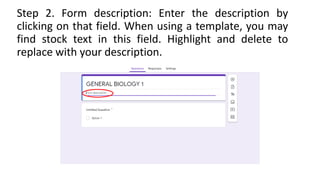
1. The document provides step-by-step instructions for creating and editing a Google Form, including adding questions, response types, required fields, and more.
2. Key features of Google Forms are highlighted like pre-made templates, unlimited questions at no cost, integrated storage in Google Sheets, and sharing options via email or links.
3. Form responses can be viewed in a summary, individual, or spreadsheet view for analysis and the form can be closed, deleted, or found in Google Drive.
2. OBJECTIVES:
After 1 hour the participants will be able to:
1. Understand the advantages and disadvantages of
using google forms;
2. Create a google quiz using the google form;
3. Appreciate the paperless system in checking quizzes
and submission of students output.
3. What is google form?
Google forms is a free Google application that allows
you to quickly create and distribute a form to gather
information. Form responses are saved in a Google
spreadsheet in Google drive.
Retrieved 14 November 2021, from
https://www.uww.edu/Documents/icit/documentation/Google/ICI
T-Google%20Forms.pdf
4. What are the Advantages
and Disadvantages of using
the google form?
5. ADVANTAGES
•It is a free online tool, that allows you collect
information easily and efficiently.
•With Google forms you can create surveys in
few minutes to collect students information.
•To start using this tool, you only need a Google
account, the same one you need to access
Gmail, YouTube or Google Drive.
6. •The interface is very easy to use. Any user with an
average Internet knowledge can create forms using
this tool.
•The assistant is simple to use. The What-You-See-Is-
What-You-Get interface makes it easy to drag and
drop form elements and organize them based on
actions or events.
•At the design level it is possible to choose between a
palette of colors, as well as own images as a
background.
•Google forms stores the feedback received so we can
analyze it in detail.
7. •Google forms allows us to see how the survey will
look before sending it over to the recipients.
•We can send the form by email, integrate it into our
website or send the link via social networks or any
other means.
•With this tool, you can get unlimited questions and
answers at no cost, while other survey tools require
a payment depending on the number of questions
and recipients.
8. •The forms are integrated with Google spreadsheets
therefore we can access to a spreadsheet view of
the collected data.
•The general configuration of forms or surveys allows
you to collect the recipient’s email address and limit
the answers.
9. DISADVANTAGES
•It is necessary to have internet to be able to
use this tool.
•You can’t collect some rich metadata as
Pictures, Barcodes and Signatures.
•The design customization is very limited.
Advanced users can change the design to use
the tool with a greater number of purposes.
10. •There are certain limitations regarding the
capabilities of this tool. It accepts texts up to 500
Kb; images up to 2 Mb; and for spreadsheets the
limit is 256 cells or 40 sheets.
13. Step 2.Go to http://drive.google.com
Step 3. Enter your full email address, then click next.
Step 4. Enter your password, then click Sign in.
You will now be signed into Google Drive.
14.
15. Step 5. Select New > More > Google Forms from
the available menu. Choose either a Blank form or
From a template
22. Creating a New Form from Template or
by using a Blank form
Step 1. The Template gallery General tab offers a
number of form templates. Or, simply click on
Blank form to start from scratch.
23. Editing your form
Step 1. Name the Form. Click the “Untitled Form”
name in the top left corner of the screen, then
enter the form’s name. Hit the “Enter” key to
submit your changes. If using a template, click on
the template title to change to a unique name of
your choosing.
24.
25. Step 2. Form description: Enter the description by
clicking on that field. When using a template, you may
find stock text in this field. Highlight and delete to
replace with your description.
26. Edit Questions
Step 1. Select “Untitled question” to enter your
first question text.
Step 2.Use the dropdown to the right of the
question to select the question type.
27.
28.
29. Step 3. Select each option to enter option text.
Step 4.Hit the “Enter” key to create a new option.
Note: Click the X to the right of each option to
delete that option.
Note: Click the Add Other link to add an “Other”
option to your list.
32. Add Questions
Step 1.Use the question toolbar to the right to
add a new question, insert a new title and
description, inset a picture, insert a video, or add
a new section.
Step 2. Follow the steps above to edit the new
question.
40. More Button
The (More) button allows you to shuffle the order
of questions and go to a new section based on a
question answer.
41.
42. Form Colors/Themes
•You can change the form color or theme by
clicking the (Color Palate) button in the top right
corner of the page.
•Click the CHOOSE AN IMAGE button to select a
header image on a theme or upload your own.
43.
44. Preview Form
•Click the “Preview” button to open a new
browser tab with a final view of your form. Close
out of that tab to return to the “Edit Form” view
to make changes.
45. Advanced Form Settings
•Click the (Settings) button to customize your
form.
General Tab: Allows you to restrict users from
your form, collect email addresses of users filling
out your form, limit 1 response, etc.
46.
47.
48. • Presentation Tab: Allows you to display a progress bar, shuffle question
order, and submit another form response. You can also modify your
confirmation message once a user submits a form.
51. Send Form
•Click the Send button to view different ways to
distribute your form.
•Send Via Email: You can send your form via email
to recipients or send the form email to yourself,
then use Outlook to forward the form link to
others
52.
53. Copy Form Link:
Click the “link” icon to display the Form’s URL link.
Select the Shorten URL option to display a short
link option.
Click the Copy link in the bottom right to copy the
link.
54.
55. Social Media:
• Click any one of the social media icons to share the form link using a
social media platform.
63. •Spreadsheet View: Click the (Create Spreadsheet)
icon to create and view form responses in Google
Sheets. Select to create a new spreadsheet or add
to an existing spreadsheet. Once a spreadsheet is
created, click the again to open the spreadsheet.
64.
65. •Note: If you wish to be notified of any new form
submissions, select Tools > Notification Rules from the
Google Sheet menu. Select your notification
•preference, then click Save to save your changes. Note:
Do not modify the sheetsheet data until after you have
collected all responses. Modifying the form could
result in incorrect data placement.
66.
67. Close Form
•You can close the form for submission by
selecting the Responses tab, then clicking the
Accepting Responses toggle. You can modify the
message respondents will see if they try to
access your form while it is closed. Click the
toggle again to reopen your form.
68.
69. View Form and Form Responses is Google Drive
•To edit your form or view your form response
spreadsheet, go to Google Drive then select your
form. Use the search box at the top of the page
to find your form if the form was saved in a
folder.
70.
71. Delete Form
•To delete your form completely, locate your form
in Google drive, right click on the form name,
then select Delete. You may also delete the form
responses by following the same steps.
•Note: Use the search box at the top of the page
to locate your form if you cannot find it on your
main Google drive page.