
Recommended
More Related Content
What's hot
What's hot (18)
Viewers also liked
Viewers also liked (18)
Similar to Evidence of Editing
Similar to Evidence of Editing (20)
More from Mathewb98
More from Mathewb98 (18)
Recently uploaded
Recently uploaded (20)
Evidence of Editing
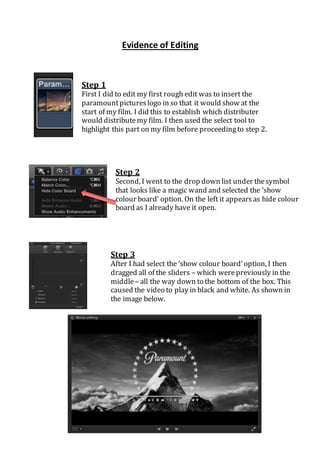
- 1. Evidence of Editing Step 1 First I did to edit my first rough edit was to insert the paramount pictures logo in so that it would show at the start of my film. I did this to establish which distributer would distribute my film. I then used the select tool to highlight this part on my film before proceeding to step 2. Step 2 Second, I went to the drop down list under the symbol that looks like a magic wand and selected the ‘show colour board’ option. On the left it appears as hide colour board as I already have it open. Step 3 After I had select the ‘show colour board’ option, I then dragged all of the sliders – which were previously in the middle – all the way down to the bottom of the box. This caused the video to play in black and white. As shown in the image below.
- 2. Step 4 Next, I re-highlighted the paramount pictures logo and right-clicked it. This gave me this new options menu that you can see on the left. I then pressed the ‘show video animation’ option before continuing to step 5. Step 5 The bar on the far left was then shown over where my paramount pictures logo was in the editing timeline. This showed a wide variety of options that I could use for editing my film, but the only option that I was interested in was the bottom option, as shown on the left. I then moved the two white scroll icons to a similar percentage as shown on the left. This made my image fade in and out to follow the conventions of a real movie.