Camera controls and settings guide
•Download as PPTX, PDF•
0 likes•367 views

Brief notes on what some of the functions/buttons are on the Sony PMW-EX3 camera. For uni purposes.

Recommended
More Related Content
What's hot
What's hot (19)
Similar to Camera controls and settings guide
Similar to Camera controls and settings guide (20)
More from Hannah Charles Media AS
More from Hannah Charles Media AS (14)
Recently uploaded
Recently uploaded (20)
Camera controls and settings guide
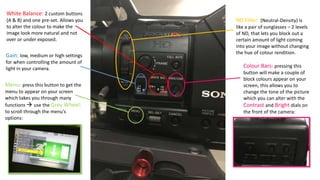
- 1. Gain: low, medium or high settings for when controlling the amount of light in your camera. White Balance: 2 custom buttons (A & B) and one pre-set. Allows you to alter the colour to make the image look more natural and not over or under exposed. Menu: press this button to get the menu to appear on your screen which takes you through many functions use the Grey Wheel: to scroll through the menu’s options: ND Filter: (Neutral-Density) is like a pair of sunglasses – 2 levels of ND, that lets you block out a certain amount of light coming into your image without changing the hue of colour rendition. Colour Bars: pressing this button will make a couple of block colours appear on your screen, this allows you to change the tone of the picture which you can alter with the Contrast and Bright dials on the front of the camera:
- 2. Audio: These buttons allow you to be in control of the sound. The top two are for channel 1 and the bottom two are for channel 2. You can either have your audio on automatic or manual and either interior or exterior, depending on where you are shooting. Levels: The audio levels are behind a clear lid to ensure there’s no altering of them once they’ve been put into place. You can adjust the levels of sound from each channels, ranging from 0 to 10. Memory Card Slot: There are two slots so you can record lots of footage. When the card is inside correctly, the light will flash green so you know it’s working. EX3’s use SxS cards which are very expensive, and so there are adapters that allow SD cards to be placed into the slot: Don’t forget to format your card every time you put it in the camera so make sure all wanted media on there is saved to a computer!
- 3. Focus: The furthest ring on the camera allows you to focus on your subject. You either zoom into something, focus the image and zoom out to ensure your picture is clear, or for artistic shots, you can go from blurry to focus easily and cleanly. Zoom: The middle ring lets you zoom in and out of whatever you are filming. There is a small stick on the ring that is helpful for when using the zoom. Iris: The thinnest and closest ring is the iris, which allows you to alter the brightness of your image. Manual/Auto: There are switches between the rings that enables you to either be on auto (the camera’s settings) or manual (your settings) which is what you should be using so you can choose how you want your footage to look.
- 4. Lens Info: Assign 1 button, is a depth-of-field indicator that you press once to turn on, and again for it to be turned off. Brightness Display: Assign 2 button, is a brightness-display indicator which will show on the menu screen so you can see how bright your image is. Histogram: Assign 3 button, is a histogram indicator, which appears on your screen and shows you a moving graph that lets you know how luminous your image is. It’s a good tool to check light levels:
- 5. Peaking: allows you to quickly focus on the subject you want and also to change what you are wanting to focus on, e.g. focusing on something in the foreground, then switching to something in the background. When using this dial, you need to also use the zoom ring on the camera. Contrast and Brightness: These dials are used when you want to alter the brightness of the image, and when you’re on the Colour Bars. Zebra: This button once pressed shows a zebra striped pattern on your viewfinder so you can see when you are close to overexposure. Mirror Image: This switch enables you to flip the image in your viewfinder, so if you have the camera facing you and you want to see what’s in the screen, you can.
- 6. White Balance: This button lets you can make your image more natural. Simply put a piece of white paper in front of the lens, focus on it and press white balance and it should give you a more natural image. Shutter: the door opens for an instant and the film is exposed to the incoming light. The shutter "opens" and "closes" once for each frame of video. The main effect of higher shutter speeds is that individual frames appear sharper, due to the minimisation of motion blur. This occurs when the subject moves within the frame while the shutter is open. The less time the shutter is open (i.e. the faster the shutter speed), the less movement will take place.