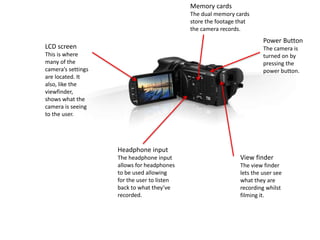
1. View finder
The view finder
lets the user see
what they are
recording whilst
filming it.
Headphone input
The headphone input
allows for headphones
to be used allowing
for the user to listen
back to what they’ve
recorded.
LCD screen
This is where
many of the
camera’s settings
are located. It
also, like the
viewfinder,
shows what the
camera is seeing
to the user.
Memory cards
The dual memory cards
store the footage that
the camera records.
Power Button
The camera is
turned on by
pressing the
power button.
2. Manual
Setting the camera
to manual allows
the user to control
different functions
themselves and
change them to suit
different situations.
Focus
The focus can be
adjusted using
the dial at the
front of the
camera.
3. Record buttons
Pressing either of these
will start a recording.
This allows for more
freedom with
movement.
Audio inputs
This is where audio
equipment can be added
onto the camera to better
record audio.
4. Digital Zoom
This lets the user
zoom in and out of
what ever they
want to. The two
different zooms
allow for more
stable control in
different
situations.
5. White balance
Changing the white balance sets the camera
to capture the correct light in different
environments. It’s important in ensuring
the colours are correct.
Exposure
Exposure is the amount of
light that the camera is
exposed to. This can make
the footage either too dark
or too light depending if the
exposure isn’t done
correctly.