More Related Content
Similar to Configure workflows using Workflow Manager
Similar to Configure workflows using Workflow Manager (20)
Configure workflows using Workflow Manager
- 1. Using the Workflow Manager 1
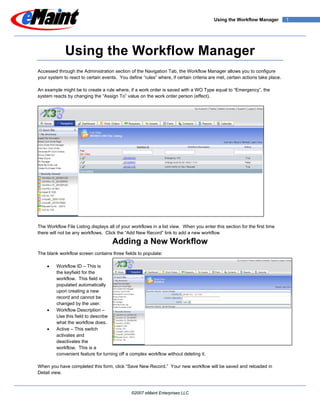
Using the Workflow Manager
Accessed through the Administration section of the Navigation Tab, the Workflow Manager allows you to configure
your system to react to certain events. You define “rules” where, if certain criteria are met, certain actions take place.
An example might be to create a rule where, if a work order is saved with a WO Type equal to “Emergency”, the
system reacts by changing the “Assign To” value on the work order person (effect).
The Workflow File Listing displays all of your workflows in a list view. When you enter this section for the first time
there will not be any workflows. Click the “Add New Record” link to add a new workflow
Adding a New Workflow
The blank workflow screen contains three fields to populate:
• Workflow ID – This is
the keyfield for the
workflow. This field is
populated automatically
upon creating a new
record and cannot be
changed by the user.
• Workflow Description –
Use this field to describe
what the workflow does.
• Active – This switch
activates and
deactivates the
workflow. This is a
convenient feature for turning off a complex workflow without deleting it.
When you have completed this form, click “Save New Record.” Your new workflow will be saved and reloaded in
Detail view.
©2007 eMaint Enterprises LLC
- 2. Using the Workflow Manager 2
Configuring a Workflow
After you create a workflow, configure it by entering the detail view of the workflow and clicking the “Configure” link.
You will be presented with the X3 Workflow Manager (see Figure 1). Begin configuring your workflow by choosing a
rule in the Choose a rule drop-down box. Your choices are:
• After Work Order Save
• After Labor Charge
• After Parts Save
• After Asset
• After PM Save
• After Contacts Save
• After PM Part Save
• After Asset Part Save Figure 1
• After Meter Save
• After Tasks Save
• After WO Procedure Save
• After Work Request Save
Note: As we enhance the Workflow Manager, options may be added or removed. The options listed here may be
different than those displayed in your X3 account.
Your choice will open the rest of the Workflow Configuration page (see
Figure 2). The upper portion contains the options for Conditions and
Actions and a button that switches between the two. The lower portion
with the gray background will display your choices as you make them
and will allow you to configure them.
©2007 eMaint Enterprises LLC
- 3. Using the Workflow Manager 3
Next is to configure the Conditions. These conditions need to be in place for the system to perform the Action. Your
options are: Figure 2
• with field equal to value – Place a check in this box to select a
field that appears on the form and a value that will be present.
• with custom condition – Place a check in this box to create
your own filter and value.
When you make your choice it will appear in the lower portion of the
page (see Figure 3). Next, click the Action button to display the
available Actions. These options are: Figure 3
• replace field with value – When the condition is met, the
system will replace the field you choose with the value you
set.
• Execute UDF : function – This option is a support tool. If the
workflow requires custom actions, the eMaint support
department will place a value here.
Choose the Action the system will make when the Condition is met.
Figure 4
The Action will be added to the lower portion of the page, directly below
your chosen Conditions (see Figure 4).
You are now able to configure the Conditions and Actions. Click the
links to open a new window that contains the configuration options.
When you complete the form, the link will be replaced with your choice
(see Figure 5).
When you have set all the options in the lower portion of the Workflow
Manager, the Save Workflow button will become available. Click the
button to save your new workflow. Figure 5
Editing a Workflow
Changing a workflow is similar to adding a workflow. Locate your workflow in the List view and click it to access the
Detail view. If you are only changing the title of the workflow, click the Edit link to enter edit mode and make your
changes, then click the Save Changes link.
If you are changing the workflow rules itself, enter the Detail view as described above, then click the Configure link.
The Workflow Manager will open with the configured rules displayed for you.
You can make adjustments to the behavior of the workflow by clicking the links and reconfiguring them. You can also
change the Conditions and Actions by placing and removing the check marks in the checkboxes then clicking the
links to configure the new options.
Alternatively, you can completely alter the workflow by using the ‘Choose a rule’ drop-down list to select a new rule.
The lower portion of the page that contains the configurations of the workflow will be cleared out for the new workflow
configuration.
When you are finished, click the Save Workflow button to record the changes or click the Go Back link at the top right
of the screen to return without saving.
©2007 eMaint Enterprises LLC
- 4. Using the Workflow Manager 4
Deleting a Workflow
Locate the workflow in the List view and click the Workflow ID or the magnifying glass to enter the Detail View. Click
the Delete link on the form. The workflow will be marked for deletion and unavailable in the list views. See the
Remove Deleted Records section on page 18 to permanently remove the workflow from the system.
Note: Remember, you have the option to disable a workflow from operating. Use this instead of deleting to save
yourself the time of re-entering workflows.
Last updated: November 26, 2007
©2007 eMaint Enterprises LLC