2. TOPICS TO BE COVERED
1.INTRODUCTION.
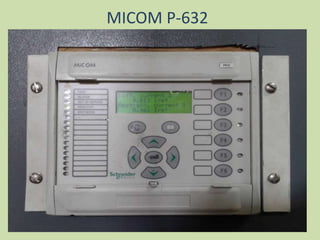
2.RELAY SPECIFICATION.
3.PROTECTIONS AVAILABLE IN MICOM P-632.
4.INPUT PARAMETERS REQUIRED FOR
CONFIGURATION.
5.STEPS TO CONFIGURE MICOM P-632.
6.PROTECTION SCHEME FOR 16 MVA MUUL
X-MER AT MRSS.
3. INTRODUCTION
The MiCOM P63x series differential protection devices are
intended for the fast and selective short circuit protection of
transformers, motors, generators and other installations with
two, three or four windings, respectively.
• P630C: Two-end/winding schemes (two 3 pole CT inputs)
• P631: Two-end/winding schemes (two 3 pole CT inputs)
• P632: Two-end/winding schemes (two 4 pole CT inputs, one VT input)
• P633: Three-end/winding schemes (three 4 pole CT inputs, one VT input)
• P634: Four-end/winding schemes (three 4 pole CT inputs, one 3 pole CT input, one
VT input)
4. RELAY SPECIFICATION
1.AUXILLARY VOLTAGE RANGE : 60 -250 VOLTS
AC OR DC.
2.CT SECONDARY INPUT (In) : 1/5 AMP(EITHER
OF ONE AVAILABLE NOT BOTH AT A TIME)
3.VT SECONDARY INPUT (Vn) : 50-130 VOLTS.
4.SYSTEM FREQUENCY (Fn) : 50/60 HZ.
5.MOUNTING : Surface/flush.
9. INPUT PARAMETERS REQUIRED
FOLLOWING PARAMETERS OF THE PROTECTED EQUIPMENT ARE REQUIRED
1. S ref : Nominal MVA rating of transformer.
2. I nom : Nominal CT ratio( both primary and secondary)
3. V nom : Nominal PT ratio.(both primary and secondary)
4. Vector Group : Vector group of the transformer
5. Phase Sequence : Phase sequence of the system
(a-b-c or a-c-b)
a-b-c : R Y B with 120 deg phase angle difference.
a-c-b : R Y B with (– 120 deg phase angle difference).
10. CALCULATION OF MATCHING FACTOR,REFERENCE CURRENT
AMPLITUDE MATCHING.jpg
AMPLITUDE MATCHING 1.jpg
EX: MRSS 16 MVA MUUL X-MER
SLD.jpg
OLD DIFF SCHEME (1).jpg
NOW THE ADVANTAGE WITH MICOM -P 632 IS THAT NO MORE NEED OF
ICT(INTERPOSING CURRENT TRANSFORMERS) FOR AMPLITUDE AND PHASE
MATCHING.
CAL.jpg
11. STEPS TO CONFIGURE MICOM P632
For configuring Micom P632, following
configurations are done:-
1.Date & Time.
2.System specifications (CT, PT & Power system
specifications).
3.Selecting parameter subset(GROUP)
4.Protection to be taken in line.
5.O/P Relay configuration for each fault & Logic.
6.LED configuration for Fault Identification.
7.Fault Recording.
8.Display Parameters.
NOTE: end A-primary side, end B-secondary side
1- refers to protection related to end A,2- refers to related to end B . ex: DTOC 1,REF 2 etc.
12. 3 BASIC SUB MENUS OF
MICOM P 632-
1.PARAMETER PARAMETERS.jpg
2.OPERATION OPERATION.jpg
3.EVENTS EVENTS.jpg
13. SETTING DATE AND TIME
Date & Time:-
For setting Date & Time, the procedure is:-
OperationCyclic MeasurementMeasured Operating data Main
Date
Time of Date
DATE.jpg
TIME.jpg
CHANGING DATE.jpg
14. SETTING SYSTEM SPECIFICATIONS
For setting system details, first we have to take Micom P632 in OFFLINE MODE (OUT OF
SERVICE). This is done by:-
ParameterFunction ParameterGlobalMain Device on Line
PRESS ENTER KEY AND THEN ENTER THE PASSWORD
THE PASSWORD IS -
THEN PRESS ENTER KEY. NOW THE RELAY COMES INTO EDIT
MODE AS WE CAN SEE THE RED COLOUR EDIT MODE LED
GLOWING.
NOW PRESS THE DOWN ARROW KEY-Device
on line NO(= OFF) appears on the screen.
Now when you press enter device becomes off line(red color
led disappears and yellow color out of service led glows)
ON LINE.jpg
ON LINE PWD.jpg
EDIT MODE.jpg
OUT OF SERVICE.jpg
15. Then for entering System Settings:-
ParameterFunction ParameterGlobalMain Nominal
Frequency (fnom) and so on.
System details which can be entered in this section are Nominal Frequency,
Phase sequence, CT Primary current (end A), CT primary current (end B), CT
Secondary Current (end A), CT Secondary current (end B), Neutral CT Primary
current(end A), Neutral CT Primary current(end B), Neutral CT secondary
current(end A), Neutral CT secondary
current(end B),PT primary voltage, PT secondary voltage.
FREQ.jpg
END A CT PRIMARY.jpg
END B CT PRIMARY .jpg
(The procedure for taking Micom in ONLINE Mode is the same as
that of the OFFLINE Mode.)
16. SELECTING PARAMETER SUBSET
Parameter subset selection is done as follows:
ParameterFunction GlobalPSS
PSS.jpg
CHANGE PSS.jpg
Within this we can select the parameter subset we want to make active(out
of the four parameter subset 1,2,3,4)
17. CREATING PROTECTION BLOCK
STEP-1 Take Micom in OFFLINE mode. Out of Service LED should
be glowing. Then in the “Configuration Parameters” of the
Parameter section, select the protection which is to be created.
ParameterConfiguration Parameter
Diff
REF 1
REF 2
DTOC 1
IDMT 1 & SO ON…
The protection to be taken is selected here by “WITH” and not to
be taken is discarded by “WITHOUT”.
18. Ex. For selecting Differential Protection:-
ParameterConfiguration Parameter DIFF
Function group DIFF “WITH”
“WITH” or “WITHOUT” can be selected by first entering password & then making
selection by pressing either or
REF WITHOUT.jpg
DIFF WITH ..jpg
STEP-2 The protections which are selected in the above section are
now also available in “General Function” of “Function Parameter”.
Here system details related for the respective Protections are
provided. For example:-
19. Parameter Function Parameter General Function
DIFF General Enable User “YES”
Reference Power Sref (to be entered)
Reference Current Iref,a ( Internally Calculated)
Reference Current Iref,b ( Internally Calculated)
Matching Factor, Kam,a (internally calculated)
Matching Factor, Kam,b (internally calculated)
Measured value Rel. Id (internally calculated)
Measured value Rel. IR(internally calculated)
REF_2 DIFF SET 1.jpg DIFF SET 2.jpg DIFF SET 3.jpg DIFF SET 4.jpg
DIFF SET 5.jpg DIFF SET 6.jpg DIFF SET 7.jpg
DTOC1
… And so on if other protections are enabled.
20. STEP 3 Settings of the protection taken in line. The settings are
done in ‘Parameter Subset 1’. Parameter subset 1 is also enabled in
this section.
Settings are entered in:-
Parameter Function Parameter PSS1Main
DIFF Enable PS1 Yes DIFF PS1 .jpg
Vector Group End a, bDIFF PS 1 2.jpg
Idiff> DIFF PS1 3.jpg
Idiff>> DIFF PS1 4.jpg
Idiff>>> DIFF PS1 5.jpg
Idiff>(CTS) DIFF PS1 6.jpg
m1 DIFF SET 7.jpg
m2 DIFF PS1 8.jpg
and so on...
Settings to be
done
accordingly
21. IDMT 1
REF 2
REF 1
.
.
.
AND SO ON…
Settings to be done
accordingly
22. OUTPUT RELAY CONFIGURATION
There are 8 output relays in Micom P632. The number of output
relays may differ from one model number to other.
The output relays are configured As follows –
First ,take Micom in OFF Line mode.Now,
ParameterConfiguration ParameterOutput
Fct. Assigm. K901 ( Enter, Put Password &
Select the tripping from the various options
Fct. Assigm. K902
Fct. Assigm. K903
K 901.jpg K 902.jpg K 903 WITHOUT.jpg
Fct. Assigm. K904
Fct. Assigm. K905
Fct. Assigm. K906
Fct. Assigm. K907
23. LED CONFIGURATION
LED indicators are provided for signal displays. 5 LED indicators
are permanently assigned to Signals which are- Trip, Alarm, Out
of service, Healthy & Edit Mode.
The remaining 12 LED indicators are available for free
assignment by the user. A separate adhesive label is provided for
user defined labelling of these LED indicators according to the
chosen configuration.
Each led can be selected for two indication colours RED and
GREEN.
The configuration of LEDs are done as follows.
24. ParameterConfiguration Parameter LED
Fct. Assigm. H5 red ( Enter, Put Password & Select from the various options).
Fct. Assigm. H5 green
Fct. Assigm. H6 red
Fct. Assigm. H6 green
.
.
.
.
And so on (LED H1 to H4 are pre-assigned.) LED H1.jpg LED H2.jpg
LED H 3.jpg LED H 4.jpg
LED H4 RED.jpg
25. NOTE:- Changes to the settings can be prepared and
confirmed by the means of ENTER Key. In the event
of erroneous entries, exit from the EDIT mode or
OFFLINE Mode with rejection of entries is possible
at any times by means of CLEAR key. When relay is
not in OFFLINE mode, pressing CLEAR Key has the
effect of restoring the indicators. Pressing the READ
key provides direct access to a preselected point in
the menu.
Editor's Notes
Fct. Assigm. K901 ( Enter, Put Password &
Select the tripping from the various options).