2. Firstly on the 2nd of December 2013, I selected a font to use for my masthead, I used the font ‘Capture it’ here as it is a
big, bold and eroded font style. This suits my music genre of rock music, and indie-rock music as them genres are
quite naughty and destructive so to have a slightly damaged font it suits the style. I did this in size 90pt. I also added a
small white stroke to the outside of the masthead. I did this to make the masthead stand out and look bold in
comparison with all the other fonts.
I then added the issue number and cover date just below the masthead. I did this in the same font but
in size 8pt.
Then after doing my photography I completed the next step on the 5th of
December. I also then added my main image which would be used as a
background. The main image would then need editing. I did this by
changing the output levels and input levels to make the dark colours in
the image darker and bright images brighter.
I did this part of on the 11th December.I then added the banner, skyline and fonts
for them both. Also a white line separating part of the banner. I did this using the
rectangle tool and colouring it black. To make sure the skyline and banner were
the exact same size I copy and pasted the blank rectangle.
3. I then made my puffs. I did this by using the elipse tool to make a black circle and a bright green circle, I placed the green circle behind it
but bigger so it would give it a green outline. I then added effects to make it look more appropriate to the rock music genre of being a bit
hard-core and battered. I was to do this by adding a drop shadow effect to make it look a bit darker and then I added stroke to make the
outside brighter.
4. This step was completed constructed on the 16th December. I added my cover
lines and main cover line. I did the cover lines either side of the main image with
three either side and I set the font on the left to be written left and the font on the
right to be written to the right. I made the coverlines in the ‘birth of a hero’ font at
size 23pt. I added effects to the coverlines. On the right hand side I added a thin
white stroke, I added it white on a black font because the image is brighter on that
side of the page and it makes it retain visibility. On the coverlines on the left I
added a black stroke to a white font, I did this because of the darkness on that
side of the page but I still wanted the stroke effect. I also added a stroke to the
main coverline font. I added a thin white stroke to the main coverline. I used the
font ‘Planecrash’ at size 55pt.
This last step was done on the lesson of the 20th of December. I added a
website and a barcode to the bottom of the page. I did this by importing a
standard barcode off the internet and using the re-occuring font birth of a
hero for the website name. I put these two in the bottom right of my
page but just above the banner.
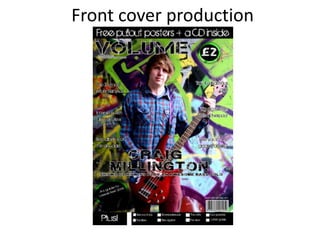
5. After all this, my final product was completed and looks as it does below.