1. This is my final design for digipack for my unsigned artist's upcoming release.
I constructed the front cover using Photoshop CS3. I started with my photo of Lewis.
The original photograph of Lewis was not the correct size or format of a typical
digipack cover, as it was rectangle not square. First of all I changed the canvas size to
make it a square shape. I was now left with the rectangle picture and a blank area that
made up the square shape. I addressed this problem by using the clone tool to make
the picture bigger but still have the same scene. Using the clone tool I dragged the
photograph out to the right. This made the size and format of my digipack cover
correct. You can see the transformation of the format and size of the digipack in the
two photos below.
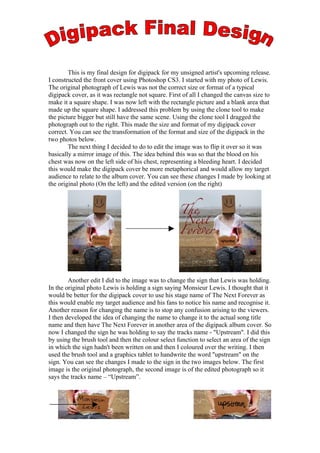
The next thing I decided to do to edit the image was to flip it over so it was
basically a mirror image of this. The idea behind this was so that the blood on his
chest was now on the left side of his chest, representing a bleeding heart. I decided
this would make the digipack cover be more metaphorical and would allow my target
audience to relate to the album cover. You can see these changes I made by looking at
the original photo (On the left) and the edited version (on the right)
Another edit I did to the image was to change the sign that Lewis was holding.
In the original photo Lewis is holding a sign saying Monsieur Lewis. I thought that it
would be better for the digipack cover to use his stage name of The Next Forever as
this would enable my target audience and his fans to notice his name and recognise it.
Another reason for changing the name is to stop any confusion arising to the viewers.
I then developed the idea of changing the name to change it to the actual song title
name and then have The Next Forever in another area of the digipack album cover. So
now I changed the sign he was holding to say the tracks name - "Upstream". I did this
by using the brush tool and then the colour select function to select an area of the sign
in which the sign hadn't been written on and then I coloured over the writing. I then
used the brush tool and a graphics tablet to handwrite the word "upstream" on the
sign. You can see the changes I made to the sign in the two images below. The first
image is the original photograph, the second image is of the edited photograph so it
says the tracks name – “Upstream”.
2. Next I had to create an album title. This process involved going onto
“www.dafont.com” and from there I downloaded a font that I thought would be ideal
for the album cover. I then installed the font onto the iMac and then opened it on
Photoshop. I used the text tool to write the text. I then positioned at the top left area of
the digipack as I thought this would be an appropriate position.
I then decided to change the colour of the text. When it came to selecting a
colour for the title, I decided red would be an appropriate colour for the album cover.
This is because red connotes thoughts of romance and this is what the songs theme is
about, so I thought red would be appropriate. I then decided to use the colour of the
fake blood from Lewis' heart in the image. To do this I extracted the colour from the
heart using the pipette tool. Then I selected the font and changed the colour. I thought
it would be a good idea to link up some of the text to make it flow more. I did this
using the graphics tablet and the brush tool. I drew lines to link up some of the letters
such as the letter "x" in the word "Next" and the letter "v" in the word "Forever". I
thought this looked nice and made the title more interesting looking and visually
appealing. You can see the letters I joined up using the graphics tablet in the image
below.
Next I create the back cover of the digipack. Again I used Photoshop CS3 and
imported the picture into the program. This photo was already the correct size for a
digipack so I did not need to edit the size of the canvas.
First of all I changed the colour and brightness of the picture. I went on the tab
“Image” and then “Adjustments” and then selected “Colour balance”. From there I
increased the levels of yellow. Then I selected the “Image” tab and then
“Adjustments”, “Brightness/Contrast”. I increased both the brightness and the contrast
to a suitable level. The purpose of doing this was to match the colour scheme and
brightness to that of the front cover image. I thought this was important so it makes it
more professional, as the original image was dark and greyer than the front cover so
would not flow very well. You can see the changes I made to the brightness, contrast
and colour in the transformation below.
3. Next I used the brush tool to paint the sky the same colour as it was in the
front cover image. I decided to do this to increase the level of continuity and make the
digipack flow better as a whole product, as apposed to two individual images. Again I
used the pipette tool to select the colour of the sky in the front cover image and then
used this colour and the brush tool to paint the sky the same colour.
From studying existing media products, particular those digipacks of the same
genre such as releases by Jack Johnson, City and Colour, Jason Mraz and more. I took
note of recurring aspects of their digipacks. I found that common features of these
digipacks were to have the track listings on the back cover. Hence, I decided to
include the track listing on the back of my digipack cover to tap into this convention
of existing media products, and to make my product look professional. I used the text
tool to write the track names. I decided to use the same font as I had done on the front
of the cover to write “Upstream”. I came to this decision because I thought using the
same font could act as a recurring theme that the audience could relate to and
associate the artist with this font. Again I extracted the colour from the Lewis’ bloody
t-shirt using the pipette tool. Then I selected the font and changed the colour.
As my chosen artist was an unsigned artist I thought it would be a good idea to
include some information about him on there. Hence I included his website that ran
along the bottom of the back cover. I used the text tool to compose the text and then
used the same font as I had done to write “The Next Forever” on the front cover and
the track listing on the back cover. I extracted the colour from sky using the pipette
tool. Then I selected the font and changed the colour to match that of the sky. I
decided to use the same colour as I thought have many different colours on thee
digipack would look messy and not very professional.
Finally I decided to add a barcode to the bottom left of the digipack. I decided
to do this because from carrying out research of existing digipacks, there are barcodes
on the back cover. I thought by including one on my digipack it would help to make it
look more professional.
Here is my final digipack design.