Processing & Properties of Floor and Wall Tiles.pptx
Manual electrical 1styr 09-25
1. ELECTRICAL, ELECTRONICS & COMPUTER SHOP
NATIONAL INSTITUTE OF TECHNOLOGY
ROURKELA-769008
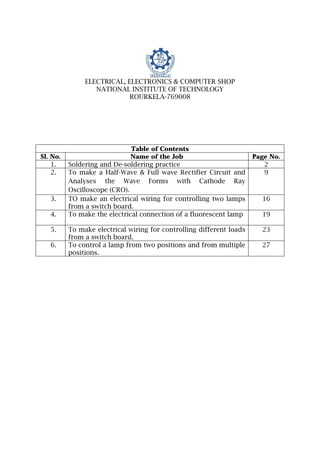
Table of Contents
Sl. No. Name of the Job Page No.
1. Soldering and De-soldering practice 2
2. To make a Half-Wave & Full wave Rectifier Circuit and
Analyses the Wave Forms with Cathode Ray
Oscilloscope (CRO).
9
3. TO make an electrical wiring for controlling two lamps
from a switch board.
16
4. To make the electrical connection of a fluorescent lamp 19
5. To make electrical wiring for controlling different loads
from a switch board.
23
6. To control a lamp from two positions and from multiple
positions.
27
2. Electrical, Electronics and Computer Shop Page 2
ELECTRICAL, ELECTRONICS & COMPUTER SHOP
NATIONAL INSTITUTE OF TECHNOLOGY
ROURKELA-769008
JOB-1
AIM: Soldering and De-soldering practice
Tools and Equipment Required:
Sl. No. Name of the Tools Size Quantity
1. Insulated wire stripper 130 mm 1 nos.
2. Soldering Iron stand small 1 nos.
3. Soldering Iron 25 Watt, 230 V 1 nos.
4. De-soldering pump 180 mm 1 nos.
5. Neon Tester (0-500)V 1 nos.
Materials Required:
Sl. No. Name of the Materials Rating/Size Quantity
1. Vero Board (100×150×1.6) mm 1 nos.
2. Soldering flux ISI mark As per requirement
3. Soldering wires Diameter (0.5-5) mm As per requirement
4. Connecting wires Single core, diameter
(0.5-5) mm, copper/
Aluminum
As per requirement
How to Practice Good Soldering Method?
Soldering is done in electronics constructions to join the components with
the tracks of the PCB. The working performance of the circuit depends on the
accuracy and perfection in the soldering. Actually it is an art to make a good
circuit. Soldering requires skill and practicing the good soldering methods
will help you to make a good working circuit. Here explains the methods of
good soldering. Soldering requires Soldering Iron, Soldering Lead and Flux
along with a PCB and component layout diagram.Figure 1 shows the standard
soldering stand which is used to keep the soldering iron after use.
3. Electrical, Electronics and Computer Shop Page 3
Figure 1. Soldering Stand
Selection of Good Soldering Iron:
Selection of the Soldering Iron (Figure 2) is very important. Soldering Iron is
the electric device that heat up the solder lead and makes the joint. Many
types of soldering irons are available, so select one with 15-25 watts. If the
wattage of the Iron is too high, it may destroy the heat sensitive components
or causes detachment of PCB tracks. Choose the Iron with a 3 pin cord. Earth
connection is important to remove the stray current that accumulates in the
iron tip. This is very important while soldering static sensitive components
like CMOS ICs and MOSFETs.
Figure 2. Soldering Iron
4. Electrical, Electronics and Computer Shop Page 4
Use the Better Soldering Wire:
Solder lead joins the component leads with the PCB contacts firmly. The
quality of the solder lead should be good enough to, make the soldering
process perfect. Rosin core solder is a good choice shown in Figure 3. Do not
use the Acid core solder used to solder electrical contacts and plumbing
metal joints since the acid content will corrode the copper tracks of the PCB.
Good solder contains 60% Tin and 40% Lead. Solder with 0.75 to 1mm
diameter is good. Some makes of solder contains a core of flux inside.
Figure 3. Soldering Wire
Use Little Soldering Flux
Soldering flux is usually applied to the solder joints before soldering. The
flux reduces the melting point of the lead so that the solder lead will melt
easily and spread uniformly on the solder joint which is shown in Figure 4.
Liquid type flux is better since it will not leave dirt after soldering. Fumes
from the flux is toxic so do the soldering work in a well ventilated place and
use an exhaust fan in the room.
Figure 4. Soldering Flux
5. Electrical, Electronics and Computer Shop Page 5
A well maintained Tip can make the soldering easy
Dry Joint Colder Joint Good Solder Joint
Figure 5. Typical good soldering
Good soldering requires clean soldering iron tip. If the soldering Iron is a
newly purchased one, first apply a layer of lead before starting the soldering.
This is called Tinning which will helps to transfer heat easily. After
prolonged use, the tip will become dirty which will make the soldering
process difficult. So before starting the soldering, clean the tip using a File
or Sand paper and make it glowing. After cleaning, wipe the tip with moist
cotton or sponge. Since the soldering process is intermittent, keep the
soldering iron tip on a heat sink. An old porcelain fuse carrier can be used
for this or purchase one soldering iron stand with heat sink. Figure 5 shows
the example of good soldering on PCB. The front view of the vero board is
shown in Figure 7 which is used for soldering purpose in the Electrical ,
Electronics and Computer shop at NIT Rourkela.
Figure 7. Vero Board
6. Electrical, Electronics and Computer Shop Page 6
Top Tips in Soldering Process:
The following tips will help you to practice good soldering methods:
1. First clean the PCB joints well using a blade or knife to remove dirt
and corroded materials. If the joint is dirty, the solder joints will be
loose.
2. Clean the leads of components before placing on the PCB.
3. The leads will project out from the copper track side of PCB. Place
resistors slightly projecting from the surface of PCB to dissipate heat.
4. First solder resistors, then capacitors, diodes etc and finally
transistors and ICs.
5. Apply very little flux in the solder joints and make the soldering. The
soldering lead and the iron tip should be at an angle of 45 degree so as
the make the solder flow easily.
6. Do not keep the soldering iron tip more than 3 seconds on the
soldering joint when soldering CMOS components.
7. After soldering, check the solder joints carefully. Use a hand lens if
needed. The joints should be conical, uniform and shiny.
8. If the solder joint is Dry, that will considerably affects the working of
circuit. So double check all the joints and re-solder if necessary.
9. Cold solder is the term used to describe the solder joints without firm
connection. The cold solder will appear as a ball over the solder joint.
So if it appears remove the excess solder with the hot iron tip.
10. Trim the excess leads of the components with a Trimmer.
11. If static sensitive components are used, touch the soldering iron tip to
a metal object before soldering to remove the static charge
accumulated at the tip.
12. Wires should be soldered firmly to prevent loose contact. Before
soldering the wires, clean the bare wire with a blade to remove rust or
dirt. Apply some solder to the wire tip and make the soldering.
13. After completing the soldering, double check the joints for any
shorting of leads. This is essential for the transistors and ICs.
14. Clean the solder side of PCB using Spirit or PCB cleaning solution.
15. After connecting the power supply, just touch on the components. If
heat develops, disconnect the power supply immediately and check for
any shorting.
16. If AC is used in the PCB, do not touch any points when connected to
mains.
17. As a safety measure, wear a rubble foot wear during soldering. It is
better to use a plastic sheet on the floor so that the foot will rest on
the insulated sheet while soldering.
7. Electrical, Electronics and Computer Shop Page 7
Desoldering
In electronics, de-soldering is the removal of solder and components from
a circuit board for troubleshooting, repair, replacement, and salvage.
Specialized tools, materials, and techniques have been devised to aid in the
de-soldering process.There are several effective methods for removing
solder from a PCB hole. Excess solder filling a hole happens quite often.
Usually, the clog is residual solder that occurs when an existing electronic
component is de-soldered and removed. The de-soldering pump used to
remove the excess solder from the PCB which is shown in Figure. 8.
Figure 8.De-soldering pump
To remove excess solder from a hole:
1. The printed circuit board is held in a vise or PCB holder
2. The tip of the de-soldering bulb is placed behind the hole and the
pump is squeezed
3. The tip of a heated soldering iron is pressed against the hole to melt
the solder
4. Keeping the pump against the hole, the pump is released (unsqueezed)
either with the soldering iron in place or just as the iron is being
withdrawn. It is found that both techniques helpful depending on the
size of the hole and amount of remaining solder. In either case, the
molten solder is drawn into the de-soldering pump.
8. Electrical, Electronics and Computer Shop Page 8
How to De-solder
Step 1: Equipment
De-soldering requires two main things: a soldering iron and a device to
remove solder. Soldering irons are the heat source used to melt solder. Irons
of the 15W to 25W range are good for most electronics/printed circuit board
work. Anything higher in wattage and you risk damaging either the
component or the board. Note that you should not use so-called soldering
guns. These are very high wattage and generate most of their heat by passing
an electrical current through a wire. Because of this, the wire carries a stray
voltage that could damage circuits and components. The choice of your
solder removing device is also important. There are two main ones; vacuum
pumps (solder suckers) and solder wick. They both do the same thing, so
what you use will depend on your personal opinion or experiences. I suggest
keeping both on hand though, as you may find that each works well in
different situations. Solder suckers usually look like large syringes. There is
a spring loaded plunger, and a button to release it. The plunger is pushed
down. When you want to suck up the solder, you position the nozzle over
the molten solder and hit the button. The plunger moves up, creating a
vacuum and sucking up the solder. Solder wick, on the other hand, has no
moving parts. It looks like wick used in oil lamps, except that it is made of
copper. To use it, you put the wick over the joint and heat it. One thing to
note about solder wick is that it is expensive, and because it is expendable, a
solder sucker may be a better choice if you plan to do a lot of de-soldering. I
personally prefer to use a sucker to remove most of the solder, then finish
up with the wick.
Remember that when de-soldering, the resin in the solder and the coating on
the board may releases fumes. These fumes are harmful to your eyes and
lungs. Therefore, always work in a well ventilated area. Hot solder is also
dangerous. Be sure not to let it splash around because it will burn you
almost instantly. Eye protection is also advised.
Step 2: Surface Preparation
There isn't really too much to worry about when removing solder. Just make
sure to get any grease, varnish or glue off the joint before you start heating.
If you don't, you will probably foul the tip of your soldering iron pretty
quickly.
Step 3: Apply Heat
Lay the iron tip so that it rests against both the component lead and the
board. Normally, it takes one or two seconds to heat the component up
enough to solder, but larger components and larger soldering pads on the
board can increase the time.
Step 4: Remove Solder
9. Electrical, Electronics and Computer Shop Page 9
ELECTRICAL, ELECTRONICS& COMPUTER SHOP
NATIONAL INSTITUTE OF TECHNOLOGY
ROURKELA-769008
JOB-02
Aim: To make a Half-Wave and Full Wave Rectifier Circuit and Analyses the
Wave Forms with Cathode Ray Oscilloscope (CRO).
Tools and Equipment Required:
Sl.
No.
Name of the Tools Size Quantity
1. Insulated screw Driver 150 mm 1 nos.
2. Insulated Combination plier 160 mm 1 nos.
3. Insulated wire stripper 130 mm 1 nos.
4. Soldering Iron 25 Watt, 230 V 1 nos.
5. Neon Tester (0-500)V 1 nos.
6. Cathode Ray Oscilloscope 200 MHz, 2 Ch,
100 ksa/s
As per requirement
Materials Required:
Sl. No. Name of the Materials Rating/Size Quantity
1. Vero Board (100×160×1.6) mm 1 nos.
2. Diode (1N4007) 1000V, 1 A 1 nos.
3. Resistance 1kΩ, 500 V, ¼ watt 1 nos.
4. Step-down Transformer 230/12-0-12V, 500 mA 1 nos.
5. Soldering flux ISI mark As per requirement
6. Soldering wires Diameter (0.5-5) mm As per requirement
7. Connecting wires Single core, diameter
(0.5-5) mm, copper/
Aluminum
As per requirement
10. Electrical, Electronics and Computer Shop Page 10
Schematic Diagram of Half-Wave Rectifier:
Figure9. Half-wave rectifier circuit along with input and output waveform
Theory:
A rectifier is an electrical device that converts alternating current(AC),which
periodically reverses direction,to direct current(pulsating DC), which is only
in one direction and the process is known as rectification .Whenonly one
diode is used to rectify AC(by blocking the negative or positive portion of
the wave form),the difference between the term diode and the term rectifier
is merely one of usagei.e., the term rectifier describes a diode that is being
used to convert AC to DC. Almost all low power rectifiers comprise a
number of diodes in specific arrangement for more efficiently converting AC
to DC than is possible with only one diode.
In half wave rectification, either the positive or negative half of the AC
wave is passed, while the other half is blocked which is shown in
Fig.9.Because only one half of the input waveform reaches the output, it is
very inefficient if used for power transformer. Half wave rectification can be
achieved with a single diode in a on phase supply, or with three diodes in a
three- phase supply. The output DC voltage of a half wave rectifier can be
calculated with the following Eqn
.
𝐕𝐕𝐫𝐫𝐫𝐫𝐫𝐫 =
𝐕𝐕𝐩𝐩𝐩𝐩𝐩𝐩𝐩𝐩
𝟐𝟐
, 𝐕𝐕𝐝𝐝𝐝𝐝 =
𝐕𝐕𝐩𝐩𝐩𝐩𝐩𝐩𝐩𝐩
𝛑𝛑
Procedure:
1. Connect the diode to the low voltage AC power supply as shown in
Fig.9.Note that the resistor used to limit the current.
11. Electrical, Electronics and Computer Shop Page 11
2. Connect channel-1(CH-1) of the oscilloscope to input and channel-
2(CH-2) to output/load resistance of the circuit.
3. Switch on the oscilloscope and sinusoidal supply.
4. Sketch the input wave form.
5. Measure and record Time T,peak voltage Vp
and peak voltage Vpp
of the
input supply.
6. With DC couple adjusts the time-base and Y-amplifier sensitivity.
7. Sketch the wave form and label it show the periods when the diode is
conducting and those when it is not. Time T depends upon frequency
of your power supply.
8. Measure and record Time T and peak voltage Vp
of output wave form.
9. Confirm this Vp
should be very nearly equal to the peak voltage of
alternating supply.
Observation: (Take observation from Oscilloscope)
Input:
Sl.No Time(T) 𝐕𝐕𝐩𝐩 𝐕𝐕𝐩𝐩𝐩𝐩 𝐕𝐕𝐫𝐫𝐫𝐫𝐫𝐫
Output:
Sl. No. Time(T) 𝐕𝐕𝐩𝐩 𝐕𝐕𝐩𝐩𝐩𝐩 𝐕𝐕𝐫𝐫𝐫𝐫𝐫𝐫
Calculation: (Calculate the average DC voltage of designed circuit)
Conclusion:
Precautions:
1. Do not touch the heating part of the soldering iron.
2. Always keep the soldering iron in its stand.
3. All joints should be provided with insulation grip.
Model Questions:
1. What is rectifier?
2. What is half wave rectifier? How does it work?
12. Electrical, Electronics and Computer Shop Page 12
ELECTRICAL, ELECTRONICS & COMPUTER SHOP
NATIONAL INSTITUTE OF TECHNOLOGY
ROURKELA-769008
Full-Wave Rectifier Circuit
Tools and Equipment Required:
Sl. No. Name of the Tools Size Quantity
1. Insulated screw Driver 150 mm 1 nos.
2. Insulated Combination plier 160 mm 1 nos.
3. Insulated wire stripper 130 mm 1 nos.
4. Soldering Iron 25 Watt, 230 V 1 nos.
5. Neon Tester (0-500)V 1 nos.
6. Cathode Ray Oscilloscope 200 MHz, 2 Ch, 100
ksa/s
As per requirement
Materials Required:
Sl. No. Name of the Materials Rating/Size Quantity
1. Vero Board (100×160×1.6) mm 1 nos.
2. Diode (1N4007) 50V, 1 A 2 nos.
3. Resistance 1kΩ, 50V, ¼ watt 1 nos.
4. Step-down Transformer 230/12-0-12V, 500 mA 1 nos.
5. Soldering flux ISI mark As per requirement
6. Solderingwires Diameter (0.5-5) mm As per requirement
7. Connecting wires Single core, diameter
(0.5-5) mm, copper/
Aluminum
As per requirement
13. Electrical, Electronics and Computer Shop Page 13
Schematic Diagram ofFull-Wave Rectifier:
Figure 10. Full-wave rectifier circuit along with input and output waveform
Theory:
A rectifier is an electrical device that converts alternating current(AC), which
periodically reverses direction, to direct current ( pulsating DC),which is only
in one direction and the process is known as rectification. When only one
diode is used to rectify AC(by blocking the negative or positive portion of
the wave form),the difference between the term diode and rectifier merely
one of usage, i.e. the term rectifier describes a diode that is being used to
convert AC to DC. Almost all low power rectifiers comprise a number of
diode in specific arrangement for more efficiently converting Ac to Dc than
is possible with only one diode.
A Full- wave rectifier converts the whole of the input waveform to one
of constant polarity (positive or negative) at its output. Full-wave
rectification converts both polarities of the input waveform to DC(direct
current), and is more efficient. However, in circuit with non-center tapped
transformer, four diodes are required instead of the one needed for half
wave rectification. Four diodes arranged this way are called a diode bridge or
bridge rectifier. For single phase AC, if the transformer is center-tapped,
then two diodes back- to- back( i.e. anode-to-anode or cathode-to cathode)
can form a full-wave rectifier which is shown in Fig.10. Twice as many
windings are required on the transformer secondary to obtain the same
output voltage compared to the bridge rectifier above.
14. Electrical, Electronics and Computer Shop Page 14
The average and root- mean-square output voltage of an ideal single
phase full wave rectifier can be calculated as:
𝐕𝐕𝐝𝐝𝐝𝐝 = 𝐕𝐕𝐚𝐚𝐚𝐚 =
𝟐𝟐𝐕𝐕𝐩𝐩𝐩𝐩𝐩𝐩𝐩𝐩
𝛑𝛑
, 𝐕𝐕𝐫𝐫𝐫𝐫𝐫𝐫 =
𝐕𝐕𝐩𝐩𝐩𝐩𝐩𝐩𝐩𝐩
√2
Procedure:
1. Connect the diode to the low voltage AC power supply as shown in
Fig.10. Note that the resistance used to limit the current.
2. Connect channel-1 (CH 1) of the oscilloscope to input and channel
2(CH 2) to output/load resistance of the circuit.
3. Switch on the oscilloscope and sinusoidal supply.
4. Sketch the input wave form.
5. Measure and record time T, peak voltage Vp
and peak to peak voltage
Vpp
of the input supply.
6. With the DC coupled adjust the time-base and the Y-amplifier
sensitivity.
7. Sketch the wave form and label it to show the periods when the diode
D1 & D2 is conducting and those when it is not. Time T depends upon
the frequency of your power supply.
8. Measure and record time T and peak voltage Vp
of output wave form.
9. Confirm this Vp
should be very nearly equal to the peak voltage of the
alternating supply.
Observation: (Take Observation from Oscilloscope)
Input:
Sl.No Time (T) 𝐕𝐕𝐩𝐩 𝐕𝐕𝐩𝐩𝐩𝐩 𝐕𝐕𝐫𝐫𝐫𝐫𝐫𝐫
Output:
Sl.No Time(T) Vp
Vpp
Vrms
Calculation: (Calculate the average dc voltage of designed circuit)
15. Electrical, Electronics and Computer Shop Page 15
Conclusion:
Precautions:
1. Do not touch the heating part of the soldering iron.
2. Always keep the soldering iron in its stand.
3. All joints should be provided with insulation grip.
Model Questions:
1. What is rectifier?
2. What is use of Resistor in Rectifier Circuit?
3. What is the use of a Rectifier Circuit?
4. What is full wave rectifier? How does it work?
16. Electrical, Electronics and Computer Shop Page 16
ELECTRICAL, ELECTRONICS & COMPUTER SHOP
NATIONAL INSTITUTE OF TECHNOLOGY
ROURKELA-769008
JOB-3
AIM: TO make an electrical wiring for controlling two lamps from a switch
board.
Tools and Equipment Required:
Sl. No. Name of the Tools Size Quantity
1. Insulated screw Driver 150 mm 1 nos.
2. Insulated Combination plier 160 mm 1 nos.
3. Insulated wire stripper 130 mm 1 nos.
4. Neon Tester (0-500)V 1 nos.
5. Pricker 150 mm 1 nos.
6. Hacksaw 160 mm (small) 1 nos.
Materials Required:
Sl. No. Name of the Materials Rating/Size Quantity
1. Switch Single pole, 6A, 230V 2 nos.
2. 3 – pin plug 230 V, 6 A, ISI Mark 1 nos.
3. PVC Board 150x90 mm 1 nos.
4. PVC Board 100x100 mm 2 nos.
5. Batten holder 230 V, 6 A, ISI Mark 2 nos.
6. PVC insulation tape 0.125mm x 18mm 1 nos.
7. PVC insulated copper
wire
1.1 kV, 8 pair,1 mm
sq.
As per requirement
8. PVC casing capping 16x25 mm As per requirement
9. Screws 20 mm & 12 mm 12 nos.
17. Electrical, Electronics and Computer Shop Page 17
Schematic Diagram for controlling two lamps from a switch board
220 V
P N
PVC Pipe
PVC saddle clamp
Wooden Box
Wooden Box
Wooden Box
Single pole Switch
Figure 11.Electrical wiring for controlling two lamps from a switch board.
Procedure:
1. Mark the position of switches and holders on the board.
2. Cut the holes for housing switches and holders as per marking.
3. Fix the switches and holders on the board.
4. Make the wiring of switch board as per the wiring diagram shown in
Figure 11.
5. Make sure that all the connection as per the wiring diagram and are
tight.
6. Give power supply and test the switch board.
18. Electrical, Electronics and Computer Shop Page 18
Conclusion:
Precautions:
1. Tools should be used carefully.
2. Fitting should be tightly fitted.
3. Connection should be tight.
4. All the joints should be provided with insulation grip.
Model Questions:
1. State the meaning of the term “OFF” and “ON”.
2. Write any two important precautions to be observed while fabricating
the switch board.
3. Why only ISI marked accessories are to be used in any electrical
installation?
4. State the importance of wiring diagram in connection to fabrication of
switch board.
5. How to identify the phase terminal in three pin socket with help of test
lamp?
6. State the meaning of ‘OPEN CIRCUIT’.
19. Electrical, Electronics and Computer Shop Page 19
ELECTRICAL, ELECTRONICS & COMPUTER SHOP
NATIONAL INSTITUTE OF TECHNOLOGY
ROURKELA-769008
JOB-4
Aim:To make the electrical connection of a fluorescent lamp
Tools and Equipment Required:
Sl. No. Name of the Tools Size Quantity
1. Insulated screw Driver 150 mm 1 nos.
2. Insulated Combination plier 160 mm 1 nos.
3. Insulated wire stripper 130 mm 1 nos.
4. Neon Tester (0-500)V 1 nos.
5. Pricker 200 mm 1 nos.
6. Hacksaw 160 mm (small) 1 nos.
Materials Required:
Sl. No. Name of the Materials Rating/Size Quantity
1. Tube light 20W, 230 V 1 nos.
2. Frame of tube light. 610 mm 2 nos.
3. Tumbler Switch Single pole, 6A, 230V 1 nos.
4. Ceiling rose 230 V, 6 A/(86×35) mm 1 nos.
5. 3 – pin plug 230 V, 6 A/ ISI Mark 1 nos.
6. PVC Board 150x90 mm 1 nos.
7. PVC Board 100x100 mm 1 nos.
8. PVC insulation tape 0.125x18 mm 1 nos.
9. PVC insulated copper
wire
1.1 kV, 8 pair,1 mm sq. As per requirement
10. PVC Casing capping 16x25 mm As per requirement
11. Screws 12 mm, 20 mm, 8 nos.
20. Electrical, Electronics and Computer Shop Page 20
Theory:
Fluorescentlamp is essentially a gas discharge tube. A voltage is
applied between two electrodes of tube containing gas. Once the voltage
exceeds the critical voltage, ionization voltage, gas is ionized and the ionized
gas emits radiation, partly in visible range and partly in ultraviolet or
infrared range. It is known that certain minerals absorb ultraviolet light and
re-radiate in the visible region. One of the main sources of ultraviolet
radiation is an electric discharge through mercury vapors at low pressure.
Schematic Diagram of Fluorescent Lamp:
Ballast
Fluorescent Tube
Stater
Condensator
Bimetal switch
220 V
PN
Tungsten Filament
PVC Pipe
PVC saddle clamp
Wooden Box
Wooden Box
21. Electrical, Electronics and Computer Shop Page 21
Figure12. Schematic diagram of Fluorescent lamp
A Fluorescent lamp circuit has the basic parts such as the tube, choke, and
starter which are shown in Fig.12. Due to low pressure the lamp is in the
form of a long tube, the inside of which is coated with phosphor to convert
ultraviolet light into visible light. Phosphor coating produce the required
colour, for instance. For example, cadmium tungstate-Blue, zinc silicate-
Green, Cadmium borate-Pink. The tube contains a small amount of mercury
and argon gas at low pressure of 2.5mm of Hg. When the temperature
increases, the mercury vaporizes and thus takes over the conduction of
current. At each end of the tube, the electrodes are of spiral form made of
tungsten and coated with an electron emitting material. The choke is
connected in series with the tube filament which provides a voltage impulse
for starting the lamp and acts as ballast during running.
The electrodes are open the starter is cold. When connected to supply
a full voltage is impressed on the starter. A glow discharge is set up in the
starter which warms the electrode which causes the bimetal strip is to bend
and touch the electrodes. The circuit gets closed and a current flows to the
filament, thereby causing emission of free electrons. At the same time the
voltage at starter falls to zero and the bimetal strips cool down. The starter
electrodes are open and then interrupted the circuit current. Its effect is to
induce high voltage surge of about 1000 volts in choke. This high voltage
produces an arc between lamp electrodes and the lamp lights up
immediately. Then starting switch contacts are left open. The current flow
through the circuit is now only through the tube and choke. Resistance of
the tube being less the current flow is through the high inductance choke
resulting in a poor power factor (of order of 0.5).
Typical fluorescent tube is filled with inert gas and a small amount of mercury that creates vapor.
Generating fluorescent light occurs in two stages. First, electrons emitted from cathodes create an
electrical arc through mercury vapor. Then, resultant ultraviolet radiation strikes phosphor coating
which then gives off visible light. Bi-pin bases are necessary for preheat and Rapid-Start fixture designs.
22. Electrical, Electronics and Computer Shop Page 22
Procedure:
1. Collect all the parts of the fluorescent lamp as well as toll required
for the electrical connection.
2. Connect all the parts through PVC wire and complete the circuit as
given in the Fig.12
3. Give supply voltage and test.
Conclusion:
Precautions:
1. Tools should be used carefully.
2. Fitting should be tightly fitted.
3. Connection should be tight.
Model Questions
1. What is standard diameter of tube light?
2. Which materials are used for coating the tube?
3. Which gas is used in tube light?
4. What are the standard lengths of the tube light?
5. What is the function of the starter?
6. Why we use choke in tube light?
7. How much power consumed by tube light?
8. Can you start the tube light without starter?
9. At which supply the tube light is connected?
10.Name any two type of starter?
23. Electrical, Electronics and Computer Shop Page 23
ELECTRICAL, ELECTRONICS & COMPUTER SHOP
NATIONAL INSTITUTE OF TECHNOLOGY
ROURKELA-769008
JOB-5
Aim:To make electrical wiring for controlling different loads from a switch
board.
Tools and Equipment Required:
Sl. No. Name of the Tools Size Quantity
1. Insulated screw Driver 150 mm 1 nos.
2. Insulated Combination plier 160 mm 1 nos.
3. Insulated wire stripper 130 mm 1 nos.
4. Neon Tester (0-500)V 1 nos.
5. Pricker 200 mm 1 nos.
6. Hacksaw 160 mm (small) 1 nos.
Materials Required:
Sl. No. Name of the Materials Rating/Size Quantity
1. Switch Single pole, 6A, 230V 6 nos.
2. Lamp 40W, 230V 1 nos.
3. 3 – pin plug Top 230 V, 6 A 1 nos.
4. 5 pin plug socket 230 V, 6 A 2 nos.
5. Fuse 6A, 230V 1 nos.
6. Indicator 6A, 230V 1 nos.
7. Regulator 230 V, 80 w, 5 step 1 nos.
8. PVC switch board 250x200 mm 1 nos.
9. PVC insulation tape 0.125x18 mm As per requirement
10. PVC insulated copper
wire
1.1 kV, 8 pair,1 mm sq. As per requirement
24. Electrical, Electronics and Computer Shop Page 24
Schematic Diagram of a Switch Board
S S S
S
S S
FPFP
R
IF
P
I
N
Figure 13. Electrical wiring for controlling different loads from a switch board; P: Phase, N: Nutral,
S: Single pole switch, I: Indicator, F: Fuse, G: Ground, FP: Five pin Plug, R: Regulator
25. Electrical, Electronics and Computer Shop Page 25
Figure 14. Front view and rare view of Switch board
Figure 15. Different type of Electrical Load
Procedure:
26. Electrical, Electronics and Computer Shop Page 26
1. Mark the position of switches and socket on the switch board as
shown in Fig.13.
2. Cut the holes on the switch board for housing switches and socket, as
per marking.
3. Fix the switches and socket on the switch board.
4. Make the wiring of switch board as per the wiring diagram.
5. Also, connect proper earthing connection as per wiring diagram.
6. Make sure that all the connection as per the wiring diagram and are
tight.
7. Test the switch board with different electrical load.
Conclusion:
Precautions:
1. Tools should be used carefully.
2. Fitting should be tightly fitted.
3. Connection should be tight.
4. All joints should be covered with insulation grip.
5. While making the connections plug should be disconnected from the
supply source.
Model Questions
1. How much voltage is applied in the single phase supply?
2. what is the bus bar?
3. Why we use regulator?
4. What is the maximum load on switch board?
5. What do you mean by colour of wiring?
6. What do you mean by PVC?
7. State the meaning of ‘SHORT CIRCUIT’.
27. Electrical, Electronics and Computer Shop Page 27
ELECTRICAL, ELECTRONICS & COMPUTER SHOP
NATIONAL INSTITUTE OF TECHNOLOGY
ROURKELA-769008
JOB-6
Aim:To control a lamp from two positions and from multiple positions.
Tools and Equipment Required:
Sl. No. Name of the Tools Size Quantity
1. Insulated screw Driver 150 mm 1 nos.
2. Insulated Combination plier 160 mm 1 nos.
3. Insulated wire stripper 130 mm 1 nos.
4. Neon Tester (0-500)V 1 nos.
5. Pricker 200 mm 1 nos.
6. Hacksaw 160 mm (small) 1 nos.
Materials required:
Sl. No. Name of the Materials Rating/Size Quantity
1. Two-way Switch Single pole, 6A, 230V 10 nos.
2. Lamp 40W, 230V 1 nos.
3. 3 – pin plug Top 230 V, 6 A/ ISI Mark 1 nos.
4. PVC switch board 270 mm × 220 mm 1 nos.
5. PVC insulation tape 0.125x18 mm As per requirement
6. PVC insulated copper
wire
1.1 kV, 8 pair,1 mm sq. As per requirement
Procedure:
1. Mark the position of switches and socket on the switch board as
shown in Fig.14 and Fig.15.
2. Cut the holes on the switch board for housing switches and socket, as
per marking.
3. Fix the switches on the switch board.
4. Make the wiring of switch board as per the wiring diagram.
28. Electrical, Electronics and Computer Shop Page 28
5. Make sure that all the connection as per the wiring diagram and are
tight.
6. Test the switch board with different bulb load.
7. Similarly, for control a lamp from multiple positions repeat procedure
no. (2-6) as per diagram.
Connection Diagram of a Lamp Control from Two Positions:
Off On
Figure16. Connection Diagram of a Lamp Control from Two Positions
29. Electrical, Electronics and Computer Shop Page 29
Figure17. Wiring Connection Diagram of a Lamp Control from Two Positions
30. Electrical, Electronics and Computer Shop Page 30
Connection Diagram of a Lamp Control from Multiple Positions:
P
N Bulb
P
N
Figure 18. Connection Diagram of a Lamp Control from multiple Positions
31. Electrical, Electronics and Computer Shop Page 31
Figure 19. Wiring Connection Diagram of a Lamp Control from multiple Positions
Precautions:
1. Tools should be handeled carefully.
2. Fitting should be tightly fitted.
3. Connection should be tight.
4. All joints should be covered with insulating tap.
5. While making the connections plug should be disconnected from
the supply source
Model Questions
1. How much voltage is applied in the single phase supply?
2. what is two-way switch?
3. How does a two-way switch work?
4. What is application of two-way switch connection?
5. What is the maximum load on switch board?
6. What do you mean by PVC?