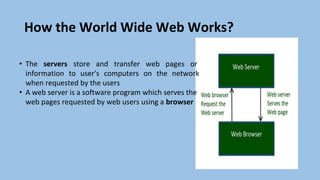
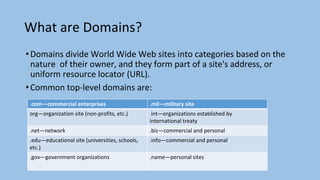
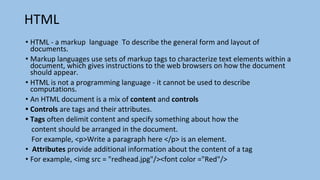
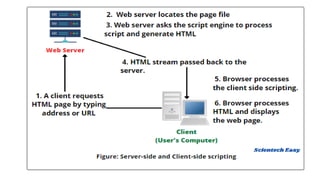
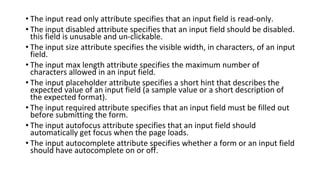
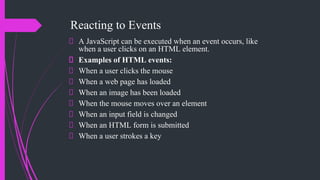
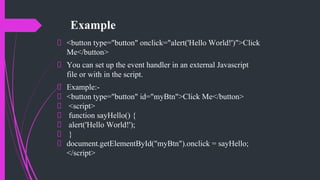
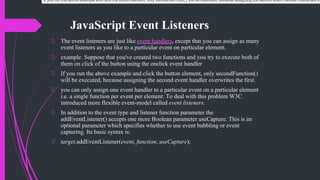
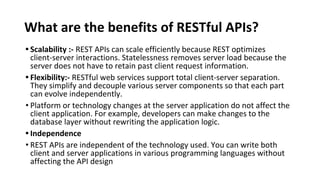
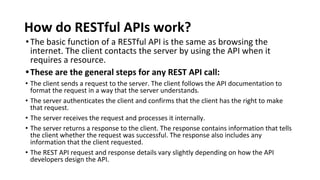
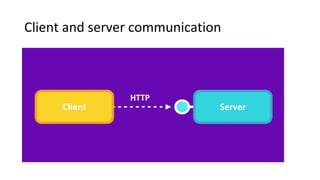
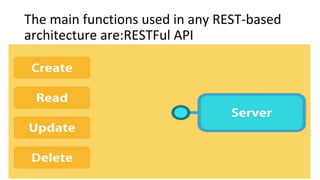
The document provides information about the World Wide Web (WWW) and its evolution. It discusses how Tim Berners-Lee invented the World Wide Web in 1989 while working at CERN to facilitate information sharing between scientists. It describes the key technologies that enabled the WWW like HTML, URLs, and HTTP. It also explains the basic functioning of the WWW including how web servers store and transfer web pages to users, and how browsers allow users to access these pages. Finally, it discusses the progression from static Web 1.0 to user-generated content on Web 2.0 to the AI-powered Web 3.0.


![RGUKT,Nuzvid
Krishna Priya
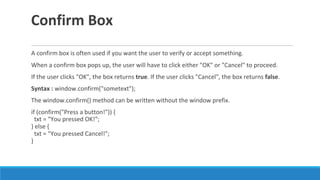
When to use JavaScript const?
• Always declare a variable with const when you know that the value
should not be changed. It does not define a constant value. It defines
a constant reference to a value.
• Use const when you declare:
• A new Array
• A new Object
• A new Function
• A new RegExp
• Example
• const cars = ["Saab", "Volvo", "BMW"];
• cars = ["Toyota", "Volvo", "Audi"]; // ERROR
Because of this you can NOT:
Reassign a constant value
Reassign a constant array
Reassign a constant object
But you CAN:
Change the elements of constant
array
Change the properties of constant
object
Example
// You can create a constant array:
const cars = ["Saab", "Volvo",
"BMW"];
// You can change an element:
cars[0] = "Toyota";
// You can add an element:](https://image.slidesharecdn.com/wttotal-230803091601-8d8422a5/85/WT_TOTAL-pdf-105-320.jpg)


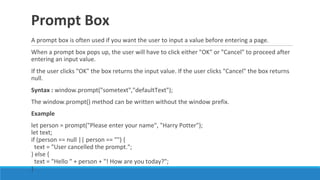
![JAVASCRIPT ARRAYS
JavaScript arrays are written with square brackets.
An array is an object that can store a collection of items.
Arrays become really useful when you need to store large
amounts of data of the same type.
Array items are separated by commas.
The following code declares (creates) an array called cars,
containing three items (car names):
Var cars = ["Saab", "Volvo", "BMW"];
const cars=[“Saab”, "Volvo", "BMW"];](https://image.slidesharecdn.com/wttotal-230803091601-8d8422a5/85/WT_TOTAL-pdf-131-320.jpg)
![ARRAYS
You can access the items in an array by referring to its index
number and the index of the first element of an array is zero.
You can also create an array using Array constructor like this:
var students = new Array("John", "Ann", "Kevin");
OR
var students = new Array();
students[0] = "John";
students[1] = "Ann"; students[2] = "Kevin";](https://image.slidesharecdn.com/wttotal-230803091601-8d8422a5/85/WT_TOTAL-pdf-132-320.jpg)
![CHANGING ELEMENTS
Array elements are accessed using their index number:
Array indexes start with 0:
[0] is the first array element
[1] is the second
[2] is the third ...
const fruits = ["Banana", "Orange", "Apple", "Mango"];
fruits[0] = "Kiwi";
fruits=[“graps”, “gova”];//not possible](https://image.slidesharecdn.com/wttotal-230803091601-8d8422a5/85/WT_TOTAL-pdf-134-320.jpg)
![DELETING ELEMENTS IN ARRAY
Since JavaScript arrays are objects, elements can be deleted
by using the JavaScript operator delete:
const fruits = ["Banana", "Orange", "Apple", "Mango"];
delete fruits[0];](https://image.slidesharecdn.com/wttotal-230803091601-8d8422a5/85/WT_TOTAL-pdf-135-320.jpg)
![MERGING (CONCATENATING) ARRAYS
The concat() method creates a new array by merging
(concatenating) existing arrays:
Example (Merging Two Arrays)
const myGirls = ["Cecilie", "Lone"];
const myBoys = ["Emil", "Tobias", "Linus"];
// Concatenate (join) myGirls and myBoys
const myChildren = myGirls.concat(myBoys);](https://image.slidesharecdn.com/wttotal-230803091601-8d8422a5/85/WT_TOTAL-pdf-136-320.jpg)
![AUTOMATIC TO STRING()
JavaScript automatically converts an array to a comma
separated string when a primitive value is expected.
This is always the case when you try to output an array.
These two examples will produce the same result:
Example
const fruits = ["Banana", "Orange", "Apple", "Mango"];
document.getElementById("demo").innerHTML =
fruits.toString();](https://image.slidesharecdn.com/wttotal-230803091601-8d8422a5/85/WT_TOTAL-pdf-137-320.jpg)

![NESTED ARRAYS
An array is useful because it stores multiple values into a
single, organized data structure.
// creates a `mixedData` array with mixed data types var
mixedData = ["abcd", 1, true, undefined, null, "all the things"];
You can even store an array in an array to create a nested
array!
// creates a `arraysInArrays` array with three arrays var
arraysInArrays = [[1, 2, 3], ["Julia", "James"], [true, false, true,
false]];](https://image.slidesharecdn.com/wttotal-230803091601-8d8422a5/85/WT_TOTAL-pdf-139-320.jpg)
![NESTED ARRAYS CONT…
Nested arrays can be particularly hard to read, so it's common
to write them on one line, using a newline after each comma:
var arraysInArrays = [ [1, 2, 3], ["Julia", "James"], [true, false,
true, false] ];
Example:-
[ [33, 91, 13, 9, 23],
[null, "", undefined, []],
[3.14, "pi", 3, 1, 4, "Yum, I like pie!"] ]
are all valid arrays. However, mixed data arrays are typically not
very useful. In most cases, you’ll want to use elements of the
same type in your arrays.](https://image.slidesharecdn.com/wttotal-230803091601-8d8422a5/85/WT_TOTAL-pdf-140-320.jpg)
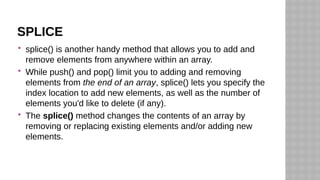
![ var donuts = ["glazed", "chocolate frosted", "Boston creme", "glazed cruller"];
donuts.splice(1, 1, "chocolate cruller", "creme de leche");
// removes "chocolate frosted" at index 1 and adds "chocolate cruller" and
"creme de leche" starting at index 1
Following is the syntax of splice() method: arrayName.splice(arg1, arg2,
item1, ....., itemX); where,
arg1 = Mandatory argument. Specifies the starting index position to
add/remove items.
You can use a negative value to specify the position from the end of the
array e.g., -1 specifies the last element.
arg2 = Optional argument. Specifies the count of elements to be removed. If
set to 0, no items will be removed.
item1, ....., itemX are the items to be added at index position arg1
splice() method returns the item(s) that were removed.](https://image.slidesharecdn.com/wttotal-230803091601-8d8422a5/85/WT_TOTAL-pdf-142-320.jpg)
![REMOVE ELEMENTS USING SPLICE
METHOD
Remove 1 element at index 3
Ex:-
let myFish = ['angel', 'clown', 'drum', 'mandarin', 'sturgeon'];
let removed = myFish.splice(3, 1);
Remove 2 elements from index 0, and insert "parrot", "anemone" and "blue“
Ex:-
splice(0, 2, 'parrot', 'anemone', 'blue‘)
Remove 1 element from index -2
Ex:- let myFish = ['angel', 'clown', 'mandarin', 'sturgeon'] ;
let removed = myFish.splice(-2, 1);
// myFish is ["angel", "clown", "sturgeon"] // removed is ["mandarin"]
Remove all elements, starting from index 2
let myFish = ['angel', 'clown', 'mandarin', 'sturgeon‘]
let removed = myFish.splice(2)](https://image.slidesharecdn.com/wttotal-230803091601-8d8422a5/85/WT_TOTAL-pdf-143-320.jpg)
![FOR EACH LOOP
Arrays have a set of special methods to help you iterate over and
perform operations on collections of data.
var donuts = ["jelly donut", "chocolate donut", "glazed donut"];
donuts.forEach(function(donut) {
donut += " hole";
donut = donut.toUpperCase();
console.log(donut); });
Prints:
JELLY DONUT HOLE
CHOCOLATE DONUT HOLE
GLAZED DONUT HOLE](https://image.slidesharecdn.com/wttotal-230803091601-8d8422a5/85/WT_TOTAL-pdf-144-320.jpg)

![ var donuts = ["jelly donut", "chocolate donut", "glazed donut"];
var improvedDonuts = donuts.map(function(donut) { donut +=
" hole"; donut = donut.toUpperCase(); return donut; }); donu](https://image.slidesharecdn.com/wttotal-230803091601-8d8422a5/85/WT_TOTAL-pdf-146-320.jpg)
![JAVASCRIPT MULTIDIMENSIONAL ARRAY
However, you can create a multidimensional array by defining
an array of elements, where each element is also another
array.
To declare an empty multidimensional array, you use the same
syntax as declaring one-dimensional array:
Ex:-let activities = [];
console.table(activities);
console.log(activities[0][1]); // 9](https://image.slidesharecdn.com/wttotal-230803091601-8d8422a5/85/WT_TOTAL-pdf-147-320.jpg)
![ADDING ELEMENTS TO THE JAVASCRIPT
MULTIDIMENSIONAL ARRAY
You can use the Array methods such as push() and splice() to
manipulate elements of a multidimensional array.
activities.push(['Study',2]);
activities.splice(1, 0, ['Programming', 2]);
console.table(activities);](https://image.slidesharecdn.com/wttotal-230803091601-8d8422a5/85/WT_TOTAL-pdf-148-320.jpg)
![ADDING ELEMENT TO THE OUTER
ARRAY AND INNER ARRAY
Ex:-
let studentsData = [['Jack', 24], ['Sara', 23],];
studentsData.push(['Peter', 24]);
Output:-
//[["Jack", 24], ["Sara", 23], ["Peter", 24]
let studentsData = [['Jack', 24], ['Sara', 23],]; studentsData[1][2]
= 'hello'; console.log(studentsData); // [["Jack", 24], ["Sara", 23,
"hello"]]](https://image.slidesharecdn.com/wttotal-230803091601-8d8422a5/85/WT_TOTAL-pdf-149-320.jpg)
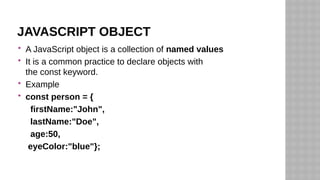

![OBJECT PROPERTIES
The named values, in JavaScript objects, are called properties.
Properties can usually be changed, added, and deleted
Objects are sometimes called associative arrays, since each property
is associated with a string value that can be used to access it.
var myCar = { “make 1”: 'Ford', model: 'Mustang', year: 1969 };
The syntax for accessing the property of an object is:
objectName.property
// person.age
or
objectName["property"]
myCar[“make 1”] = “maruthi”;
myCar['model'] = 'Mustang';
myCar['year'] = 1969;](https://image.slidesharecdn.com/wttotal-230803091601-8d8422a5/85/WT_TOTAL-pdf-153-320.jpg)
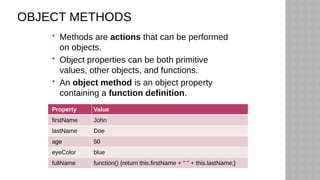
![DISPLAY JAVASCRIPT OBJECTS
Displaying a JavaScript object will output [object Object].
const person = {
name: "John",
age: 30,
city: "New York"
};
document.getElementById("demo").innerHTML = person;](https://image.slidesharecdn.com/wttotal-230803091601-8d8422a5/85/WT_TOTAL-pdf-160-320.jpg)
![DISPLAYING THE OBJECT IN A LOOP
The properties of an object can be collected in a loop:
Example
const person = {
name: "John",
age: 30,
city: "New York"
};
let txt = "";
for (let x in person) {
txt += person[x] + " ";
};
document.getElementById("demo").innerHTML = txt;](https://image.slidesharecdn.com/wttotal-230803091601-8d8422a5/85/WT_TOTAL-pdf-161-320.jpg)


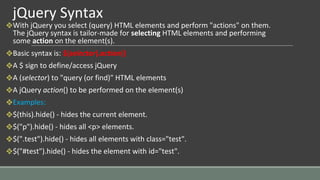

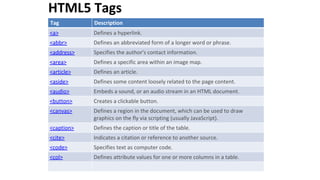
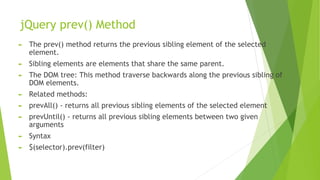
![More Examples of jQuery Selectors
Syntax Description
$("*") Selects all elements
$(this) Selects the current HTML element
$("p.intro") Selects all <p> elements with class="intro"
$("p:first") Selects the first <p> element
$("ul li:first") Selects the first <li> element of the first <ul>
$("[href]") Selects all elements with an href attribute
$("a[target='_blank']") Selects all <a> elements with a target attribute value equal to "_blank"
$("a[target!='_blank']") Selects all <a> elements with a target attribute value NOT equal to "_blank"
$(":button") Selects all <button> elements and <input> elements of type="button"
$("tr:even") Selects all even <tr> elements
$("tr:odd") Selects all odd <tr> elements](https://image.slidesharecdn.com/wttotal-230803091601-8d8422a5/85/WT_TOTAL-pdf-223-320.jpg)


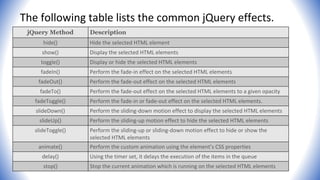
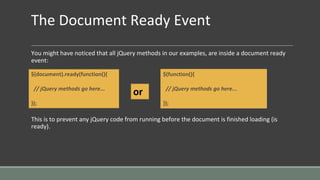
![Showing and Hiding Elements
• The commands for showing and hiding elements are pretty much what we would
expect − show() to show the elements in a wrapped set and hide() to hide them.
• Syntax
• Here is the simple syntax for show() method −
• [selector].show( speed, [callback] );
• Here is the description of all the parameters −
• speed − A string representing one of the three predefined speeds ("slow",
"normal", or "fast") or the number of milliseconds to run the animation (e.g.
1000).
• callback − This optional parameter represents a function to be executed whenever
the animation completes; executes once for each element animated against.](https://image.slidesharecdn.com/wttotal-230803091601-8d8422a5/85/WT_TOTAL-pdf-248-320.jpg)
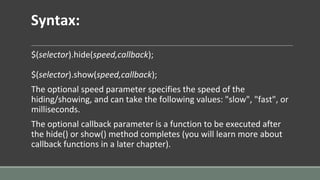
![hide() method −
•[selector].hide( speed, [callback] );
•Here is the description of all the parameters −
•speed − A string representing one of the three predefined speeds
("slow", "normal", or "fast") or the number of milliseconds to run the
animation (e.g. 1000).
•callback − This optional parameter represents a function to be
executed whenever the animation completes; executes once for each
element animated against.](https://image.slidesharecdn.com/wttotal-230803091601-8d8422a5/85/WT_TOTAL-pdf-249-320.jpg)
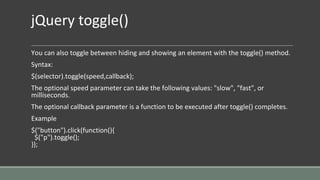
![Toggling the Elements
• jQuery provides methods to toggle the display state of elements between
revealed or hidden. If the element is initially displayed, it will be hidden; if
hidden, it will be shown.
• Syntax
• Here is the simple syntax for one of the toggle() methods −
• [selector]..toggle([speed][, callback]);
• Here is the description of all the parameters −
• speed − A string representing one of the three predefined speeds ("slow",
"normal", or "fast") or the number of milliseconds to run the animation
(e.g. 1000).
• callback − This optional parameter represents a function to be executed
whenever the animation completes; executes once for each element
animated against.](https://image.slidesharecdn.com/wttotal-230803091601-8d8422a5/85/WT_TOTAL-pdf-250-320.jpg)
![slideDown()
• The slideDown() method reveals all matched elements by adjusting their height
and firing an optional callback after completion.
• Syntax
• Here is the simple syntax to use this method −
• selector.slideDown( speed, [callback] );
• Parameters
• speed − A string representing one of the three predefined speeds ("slow",
"normal", or "fast") or the number of milliseconds to run the animation (e.g.
1000).
• callback − This is optional parameter representing a function to call once the
animation is complete.](https://image.slidesharecdn.com/wttotal-230803091601-8d8422a5/85/WT_TOTAL-pdf-251-320.jpg)
![slideToggle()
• The slideToggle() method toggles the visibility of all matched elements by
adjusting their height and firing an optional callback after completion.
• Syntax
• Here is the simple syntax to use this method −
• selector.slideToggle( speed, [callback] );
• Parameters
• speed − A string representing one of the three predefined speeds ("slow",
"normal", or "fast") or the number of milliseconds to run the animation (e.g.
1000).
• callback − This is optional parameter representing a function to call once the
animation is complete.](https://image.slidesharecdn.com/wttotal-230803091601-8d8422a5/85/WT_TOTAL-pdf-252-320.jpg)
![stop()
• The stop( [clearQueue, gotoEnd ]) method stops all the currently running
animations on all the specified elements.
• Syntax
• Here is the simple syntax to use this method −
• selector.stop( [clearQueue], [gotoEnd] ) ;
• Parameters
• clearQueue − This is optional boolean parameter. When set to true clears the
animation queue, effectively stopping all queued animations.
• gotoEnd − This is optional boolean parameter. A Boolean (true/false) that when
set to true causes the currently playing animation to immediately complete,
including resetting original styles on show and hide and calling the callback
function.](https://image.slidesharecdn.com/wttotal-230803091601-8d8422a5/85/WT_TOTAL-pdf-253-320.jpg)


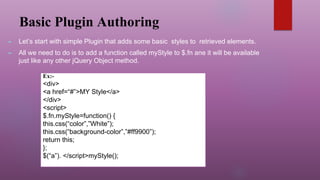

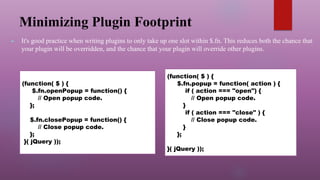
![$ Alias and Adding Scope
► $ variable is very popular among JavaScript libraries, and if you're using another library
with jQuery, you will have to make jQuery not use the $ with jQuery.noConflict().
► To over come such problem and work well with other plugins, and still use the jQuery $
alias, we need to put all of our code inside of an Immediately Invoked Function
Expression[IIFE], and then pass the function jQuery, and name the parameter $.
► And another use of such Immediately Invoked Function is to allow us to have our own
private variables.
► For example:In our plugin we want a different color green, and we want to store it in a
variable.
(function ( $ ) {
$.fn.greenify = function() {
this.css( "color", "green" );
return this;
};
}( jQuery ));
(function ( $ ) {
var shade = "#556b2f";
$.fn.greenify = function() {
this.css( "color", shade );
return this;
};}( jQuery ));](https://image.slidesharecdn.com/wttotal-230803091601-8d8422a5/85/WT_TOTAL-pdf-275-320.jpg)


![PHP $GLOBALS
• $GLOBALS is a PHP super global variable which is used to access global variables from anywhere in
the PHP script (also from within functions or methods).
• PHP stores all global variables in an array called $GLOBALS[index]. The index holds the name of the
variable.
• php
$x = 75;
$y = 25;
function addition() {
$GLOBALS['z'] = $GLOBALS['x'] + $GLOBALS['y'];
}
addition();
echo $z;
?>](https://image.slidesharecdn.com/wttotal-230803091601-8d8422a5/85/WT_TOTAL-pdf-497-320.jpg)
![PHP $_SERVER
• $_SERVER is a PHP super global variable which holds information about headers,
paths, and script locations.
• <?php
echo $_SERVER['PHP_SELF'];
echo "<br>";
echo $_SERVER['SERVER_NAME'];
echo "<br>";
echo $_SERVER['HTTP_HOST'];
echo "<br>";
echo $_SERVER['HTTP_REFERER'];
echo "<br>";
echo $_SERVER['HTTP_USER_AGENT'];
echo "<br>";
echo $_SERVER['SCRIPT_NAME'];
?>](https://image.slidesharecdn.com/wttotal-230803091601-8d8422a5/85/WT_TOTAL-pdf-498-320.jpg)
![$_REQUEST
•PHP $_REQUEST is a PHP super global variable which is used to collect
data after submitting an HTML form.
<html>
<body>
<form method="post"
action="<?php echo
$_SERVER['PHP_SELF'];?>">
Name: <input type="text"
name="fname">
<input type="submit">
</form>
<?php
if ($_SERVER["REQUEST_METHOD"] == "POST")
{
// collect value of input field
$name = $_REQUEST['fname'];
if (empty($name)) {
echo "Name is empty";
} else {
echo $name;
}
}
?>
</body>](https://image.slidesharecdn.com/wttotal-230803091601-8d8422a5/85/WT_TOTAL-pdf-500-320.jpg)
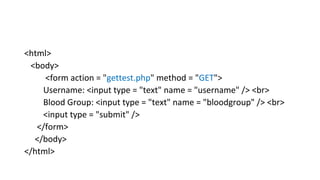
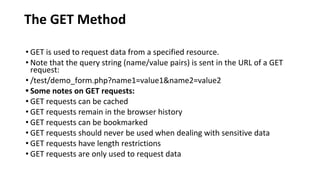
![Save this file with gettest.php
<html>
<body>
Welcome <?php echo $_GET["username"]; ?> </br>
Your blood group is: <?php echo $_GET["bloodgroup"]; ?>
</body>
</html>
When the user will click on Submit button after filling the form, the URL
sent to the server could look something like this:](https://image.slidesharecdn.com/wttotal-230803091601-8d8422a5/85/WT_TOTAL-pdf-504-320.jpg)


![PROCESSING THE UPLOADED
FILE
▪It will store the uploaded file in a "upload" folder on permanent
basis as well as implement some basic security check like file type
and file size to ensure that users upload the correct file type and
within the allowed limit.
▪Here's the complete code of our "upload-manager.php" file.(given
in google classroom of your respective class)
▪Note: The above script prevents uploading a file with the same
name as an existing file in the same folder. However, if you want
to allow this just prepend the file name with a random string or
timestamp, like $filename = time() . '_' .
$_FILES["photo"]["name"];](https://image.slidesharecdn.com/wttotal-230803091601-8d8422a5/85/WT_TOTAL-pdf-534-320.jpg)
![DISPLAY THE DETAILS OF THE
UPLOADED FILE
The PHP code in the following example will simply display the details of the uploaded file and
stores it in a temporary directory on the web server.
<?php
if($_FILES["photo"]["error"] > 0){
echo "Error: " . $_FILES["photo"]["error"] . "<br>";
} else{
echo "File Name: " . $_FILES["photo"]["name"] . "<br>";
echo "File Type: " . $_FILES["photo"]["type"] . "<br>";
echo "File Size: " . ($_FILES["photo"]["size"] / 1024) . " KB<br>";
echo "Stored in: " . $_FILES["photo"]["tmp_name"];
}
?>
Once a file has been successfully uploaded, it is automatically stored in a temporary directory on the
server. To store this file on a permanent basis, you need to move it from the temporary directory to a
permanent location using the PHP's move_uploaded_file() function.](https://image.slidesharecdn.com/wttotal-230803091601-8d8422a5/85/WT_TOTAL-pdf-535-320.jpg)


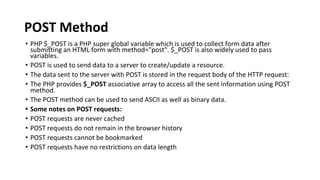
![Processing the form data
► <?php
► # Check if name and email fileds are empty
► if(empty($_POST['name']) && empty($_POST['email'])){
► # If the fields are empty, display a message to the user
► echo " <br/> Please fill in the fields";
► # Process the form data if the input fields are not empty
► }else{
► $name= $_POST['name'];
► $email= $_POST['email'];
► echo ('Your Name is: '. $name. '<br/>');
► echo ('Your Email is:' . $email. '<br/>');
► }
► ?>](https://image.slidesharecdn.com/wttotal-230803091601-8d8422a5/85/WT_TOTAL-pdf-541-320.jpg)
![To create a record in the database
► Once the form is submitted via the POST method, it is processed, and a record is
created in the table user.
<?php
// Include script to make a database connection
include("connect.php");
// Check if input fileds are empty
if(empty($_POST['name']) &&
empty($_POST['email'])){
// If the fields are empty, display a message to the user
echo "Please fill in the fields";
// Process the form data if the input fields are not empty
}
else{
$name= $_POST['name'];
$email= $_POST['email'];
echo ('Your Name is: '. $name. '<br/>');
echo ('Your Email is:' . $email. '<br/>');
# Insert into the database
$query = "INSERT INTO user(name,email) VALUES
('$name','$email')";
if (mysqli_query($conn, $query)) {
echo "New record created successfully !";
} else {
echo "Error inserting record: " . $conn->error;
}
}
?>](https://image.slidesharecdn.com/wttotal-230803091601-8d8422a5/85/WT_TOTAL-pdf-543-320.jpg)
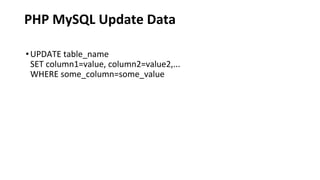
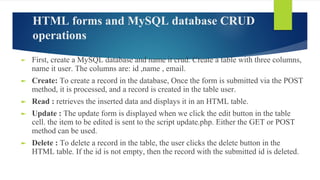
![Update
► The update form is displayed when we click the edit button in the table cell.
► The update button is a submit button for a form with hidden input fields.
► Once the edit button is clicked, the id of the item to be edited is sent to the script update.php. Either the GET
or POST method can be used.
► <td>
► <form action='update.php' method='post'>
► <input name='id' value='",$row["id"],"' hidden>
► <button type='submit' name='update' value='update'>Edit</button>
► </form>
► </td>
► In the update.php script, a form with data matching the submitted information is displayed for editing. Once
the edit is complete, the updated data is resubmitted to the script for processing.](https://image.slidesharecdn.com/wttotal-230803091601-8d8422a5/85/WT_TOTAL-pdf-544-320.jpg)
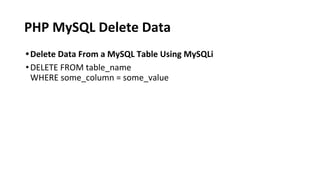
![Delete
► To delete a record in the table, the user clicks the delete button in the HTML table.
► <td>
► <form action='form-post.php' method='post'>
► <input name='id' value='",$row["id"],"' hidden>
► <button type='submit' name='delete' value='delete'>Delete</button>
► </form>
► </td>
► The submit button has a hidden id field. The data is sent to a form and processed by the PHP
script below. If the id is not empty, then the record with the submitted id is deleted.](https://image.slidesharecdn.com/wttotal-230803091601-8d8422a5/85/WT_TOTAL-pdf-545-320.jpg)
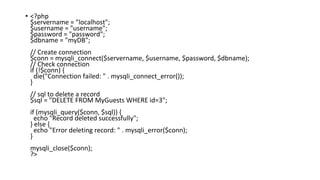
![Record with the submitted id is deleted.
► if(!empty($_POST['delete']) && !empty($_POST['id'])){
► $query3 = "DELETE FROM user WHERE id='".$_POST['id']."' ";
► if (mysqli_query($conn, $query3)) {
► echo "Record deleted successfully !";
► } else {
► // Display an error message if unable to delete the record
► echo "Error deleting record: " . $conn->error;
► }
► }](https://image.slidesharecdn.com/wttotal-230803091601-8d8422a5/85/WT_TOTAL-pdf-546-320.jpg)


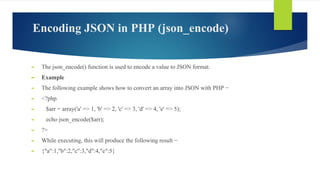

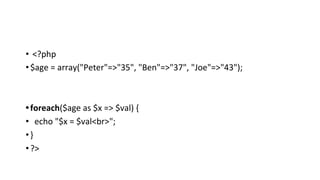
![PHP - json_decode()
► The json_decode() function is used to decode a JSON object into a PHP object or an associative array.
► The json_decode() function returns an object by default.
► The json_decode() function has a second parameter, and when set to true, JSON objects are decoded
into associative arrays.
► Example
► This example decodes JSON data into a PHP object:
► <?php
$jsonobj = '{"Peter":35,"Ben":37,"Joe":43}';
var_dump(json_decode($jsonobj));
?>
► object(stdClass)#1 (3) { ["Peter"]=> int(35) ["Ben"]=> int(37) ["Joe"]=> int(43) }](https://image.slidesharecdn.com/wttotal-230803091601-8d8422a5/85/WT_TOTAL-pdf-551-320.jpg)