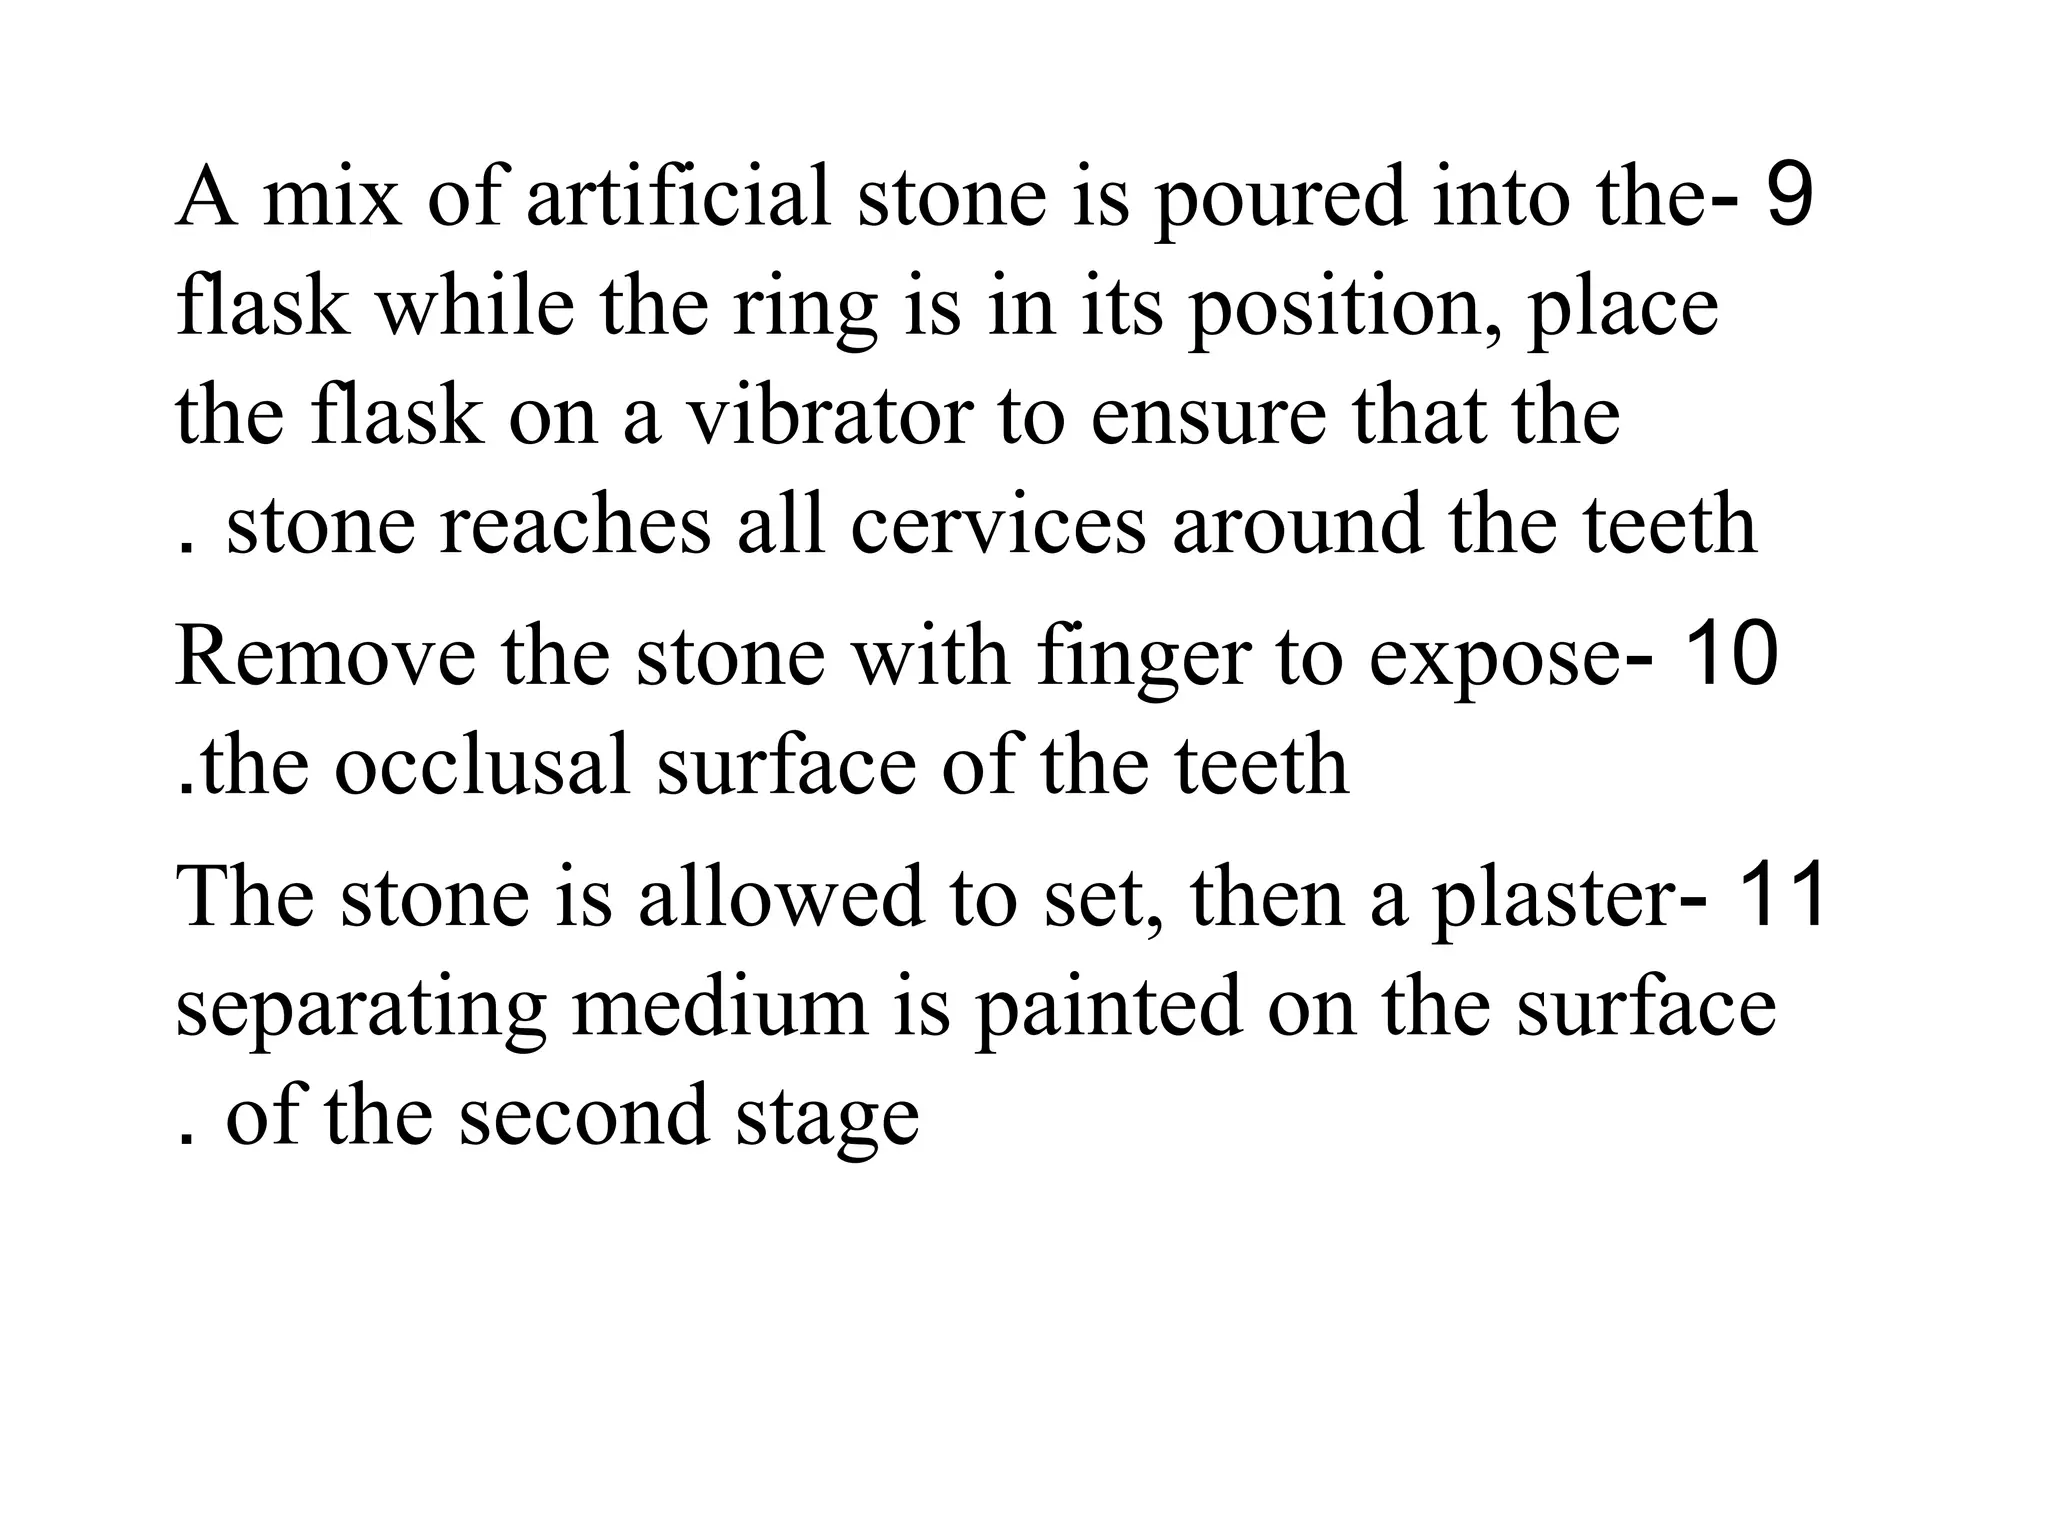
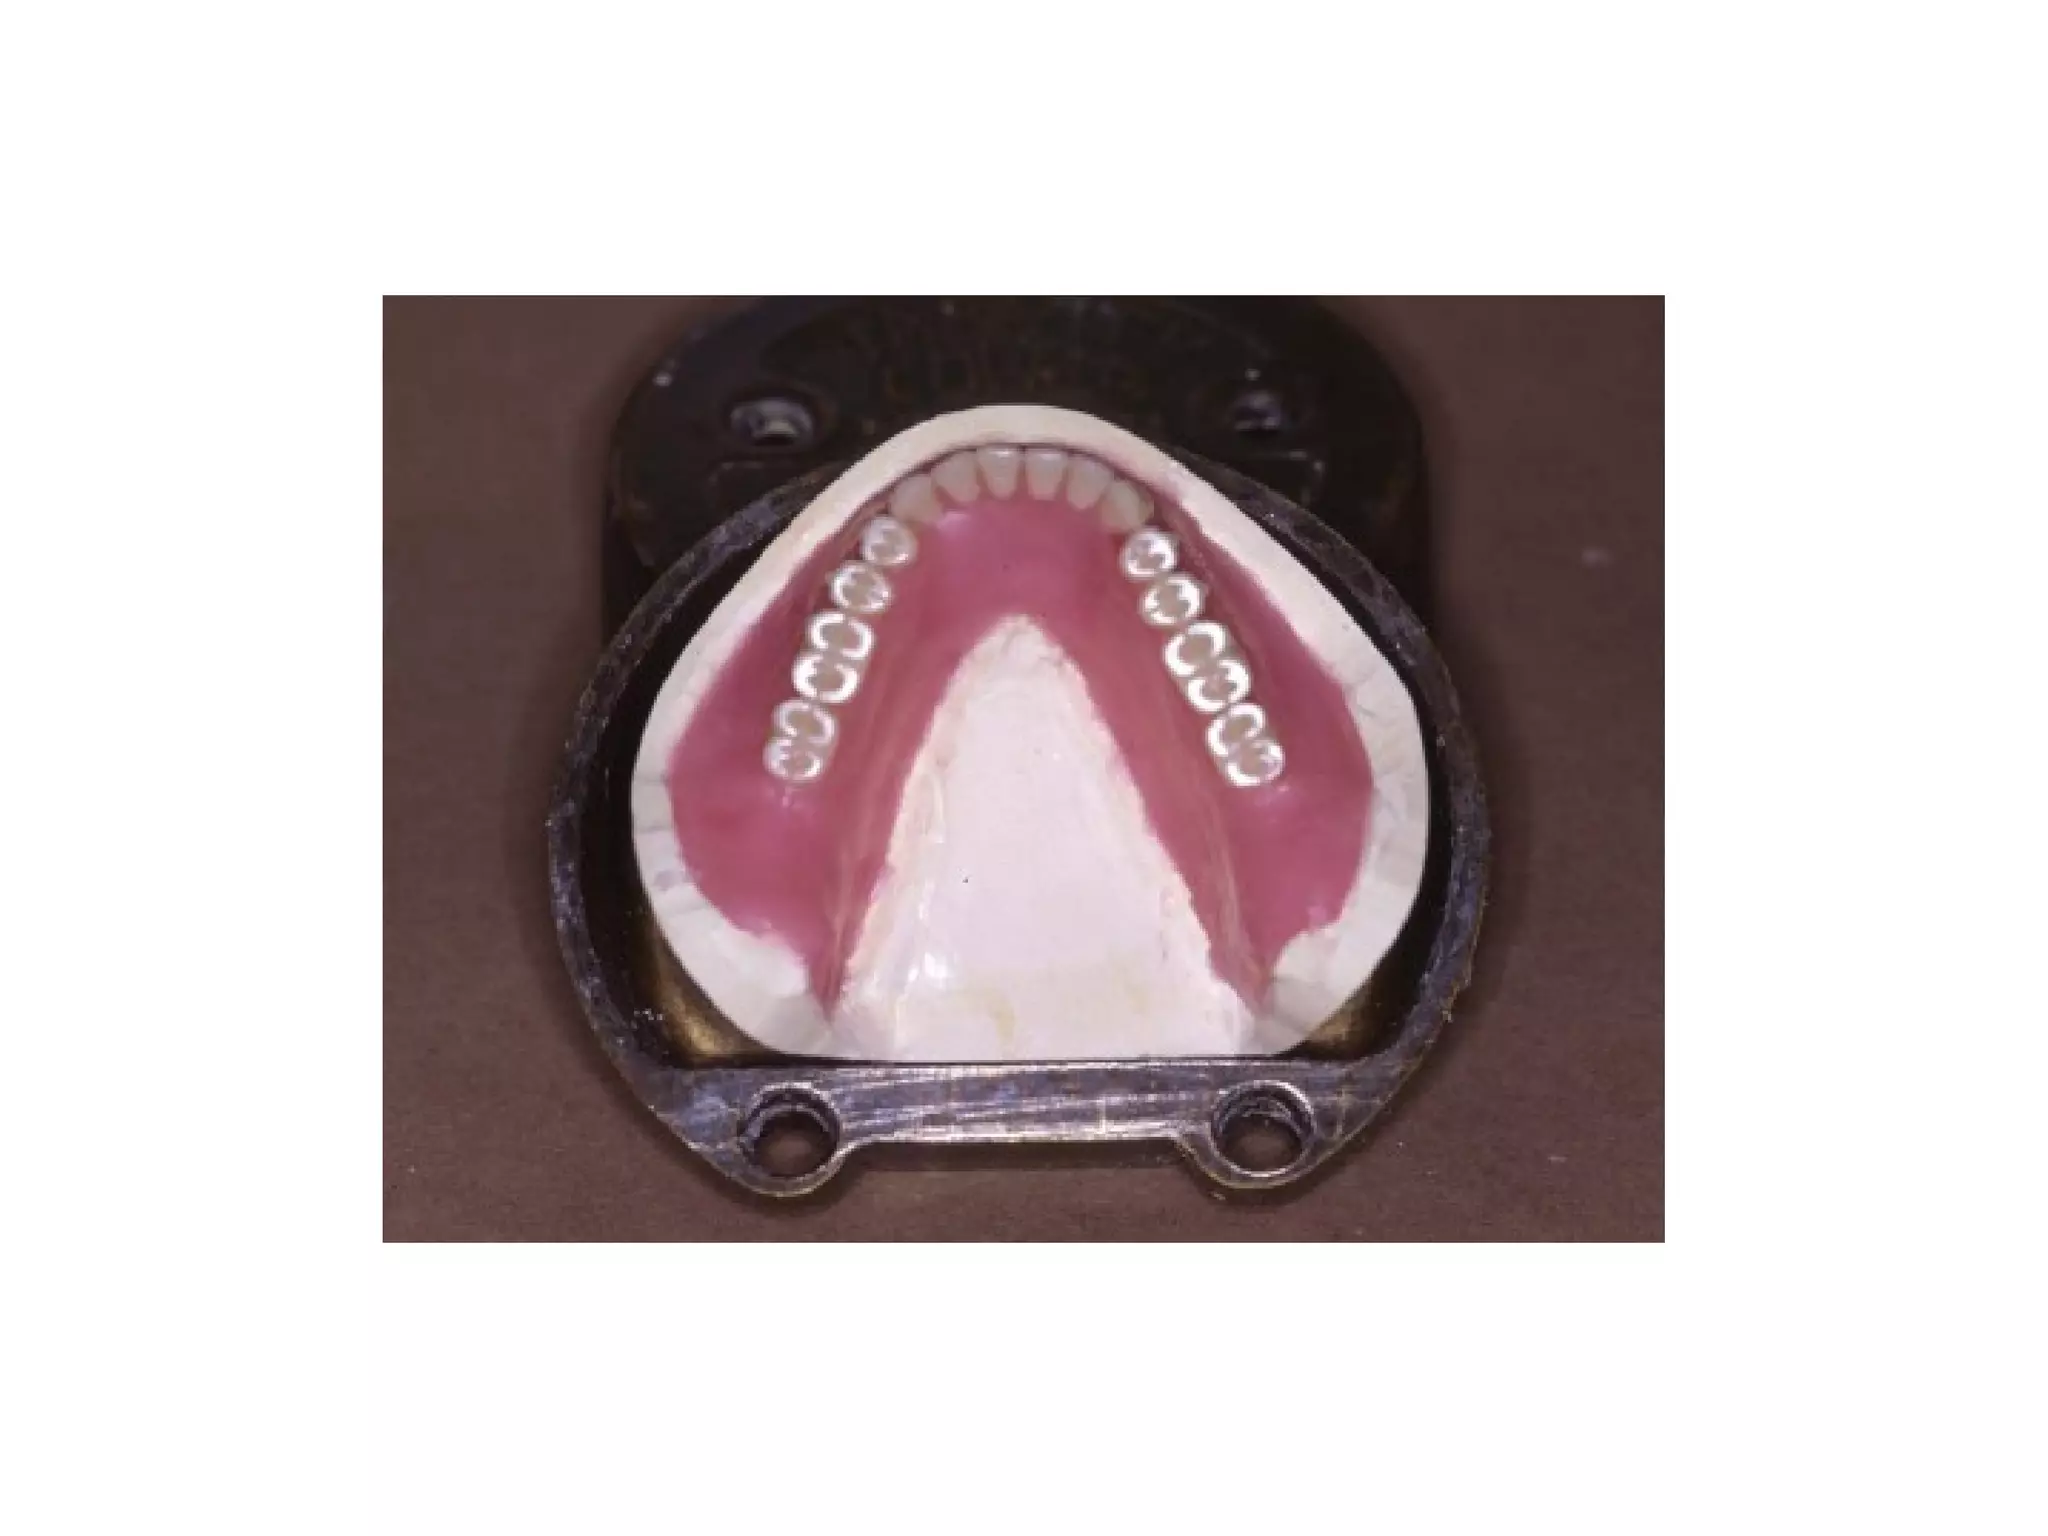
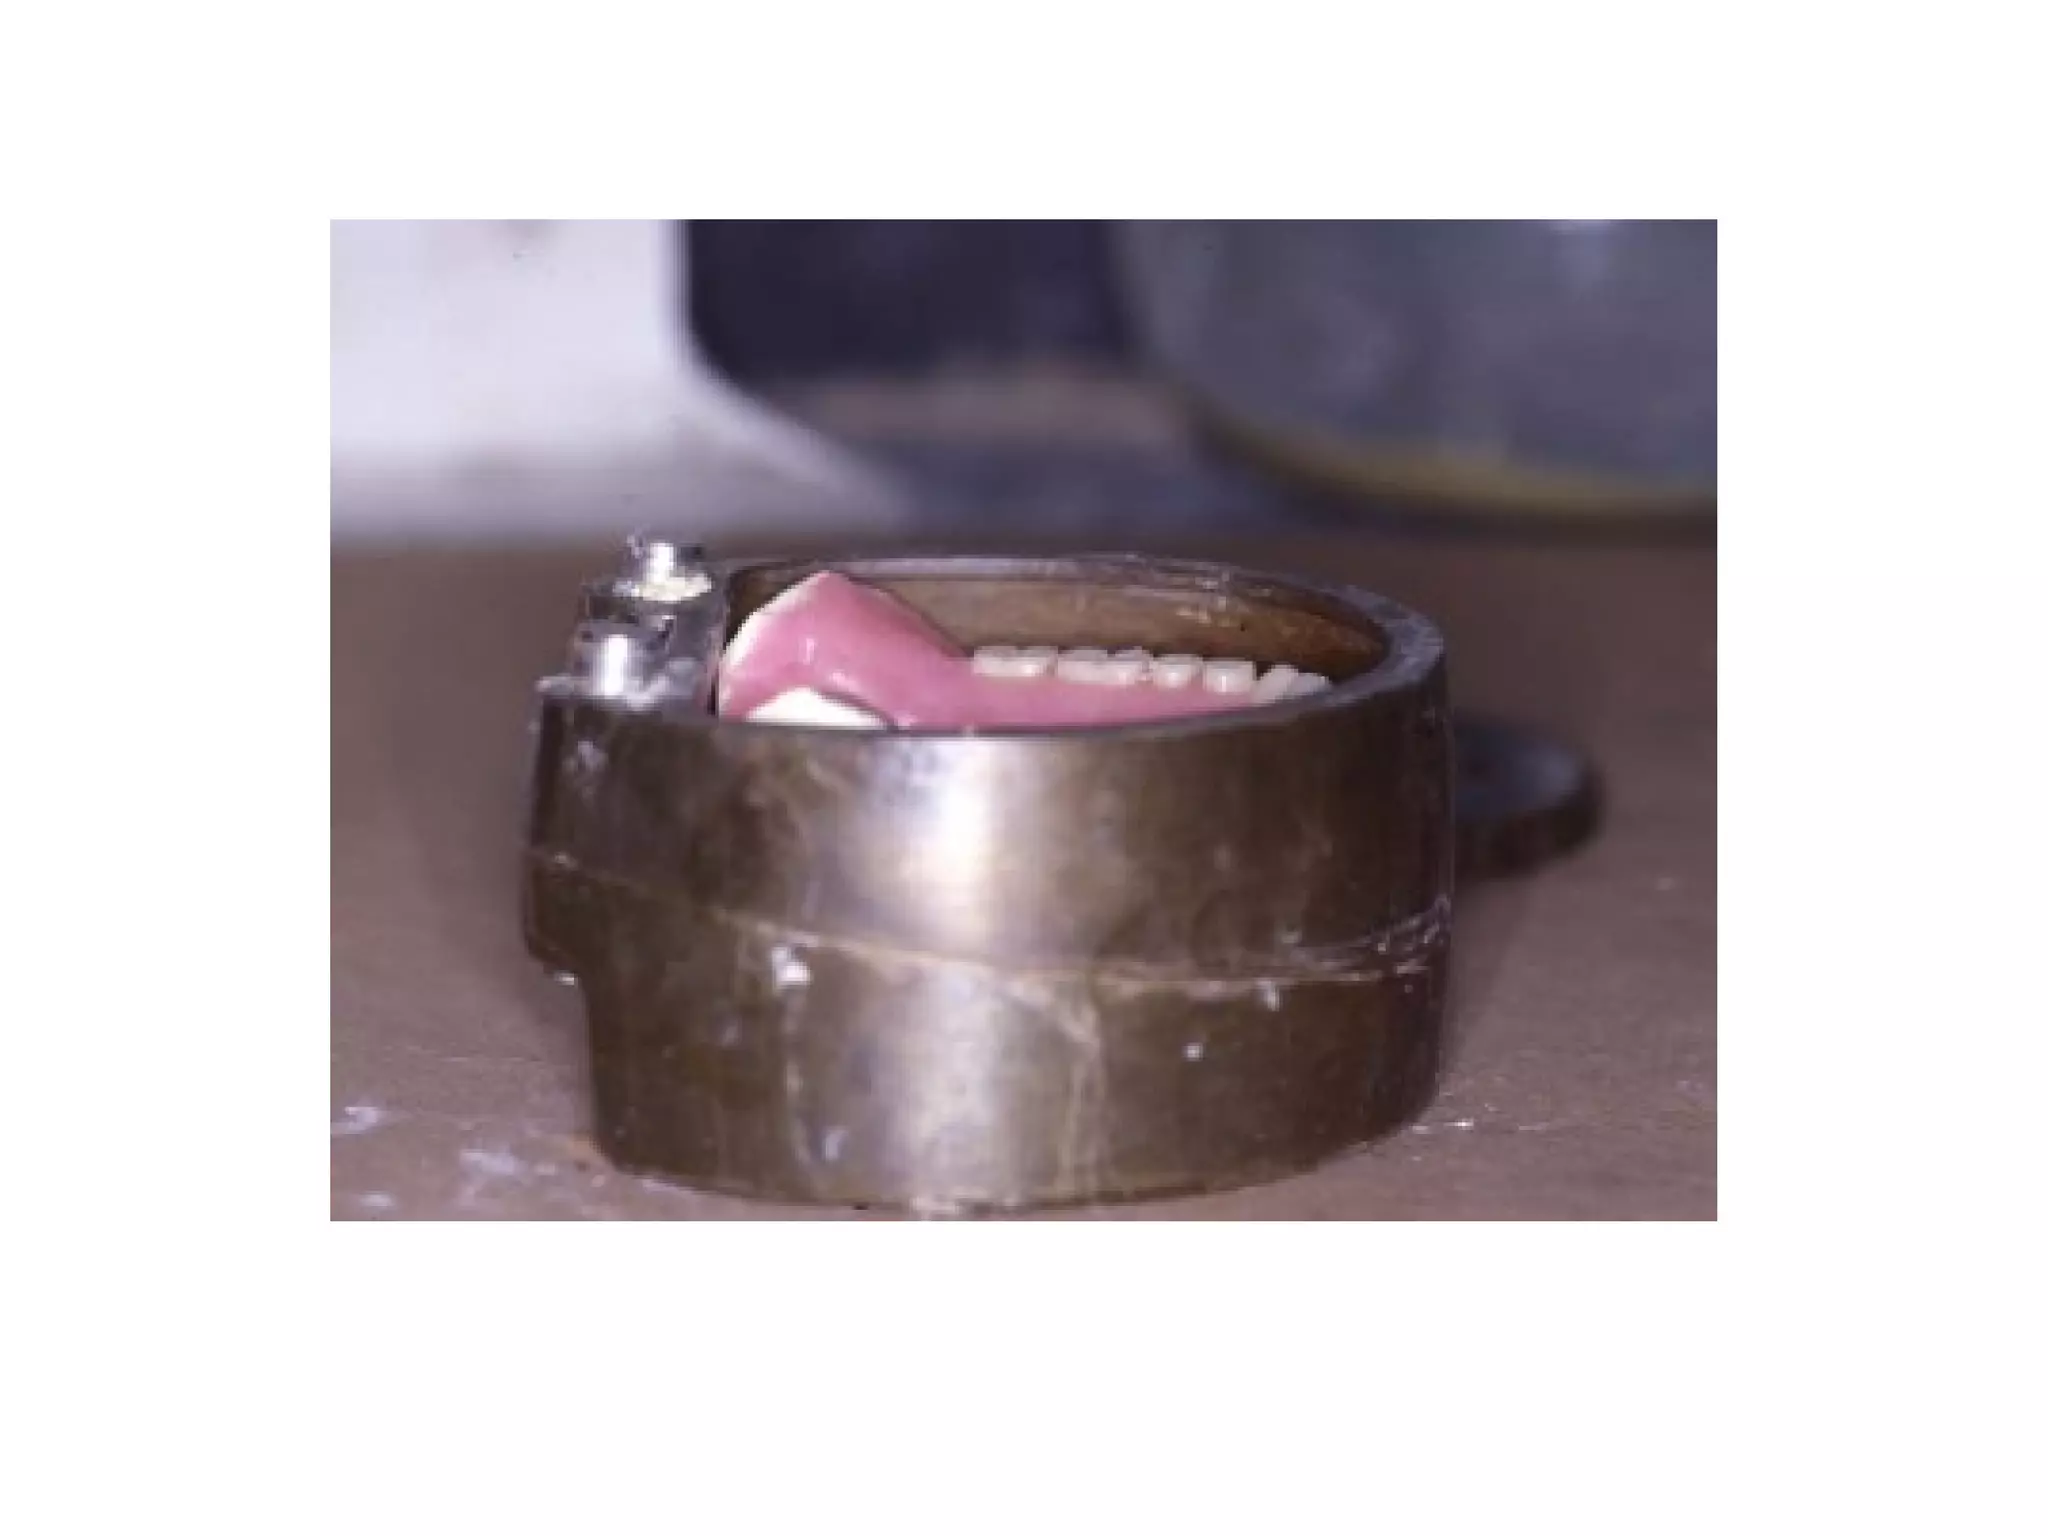
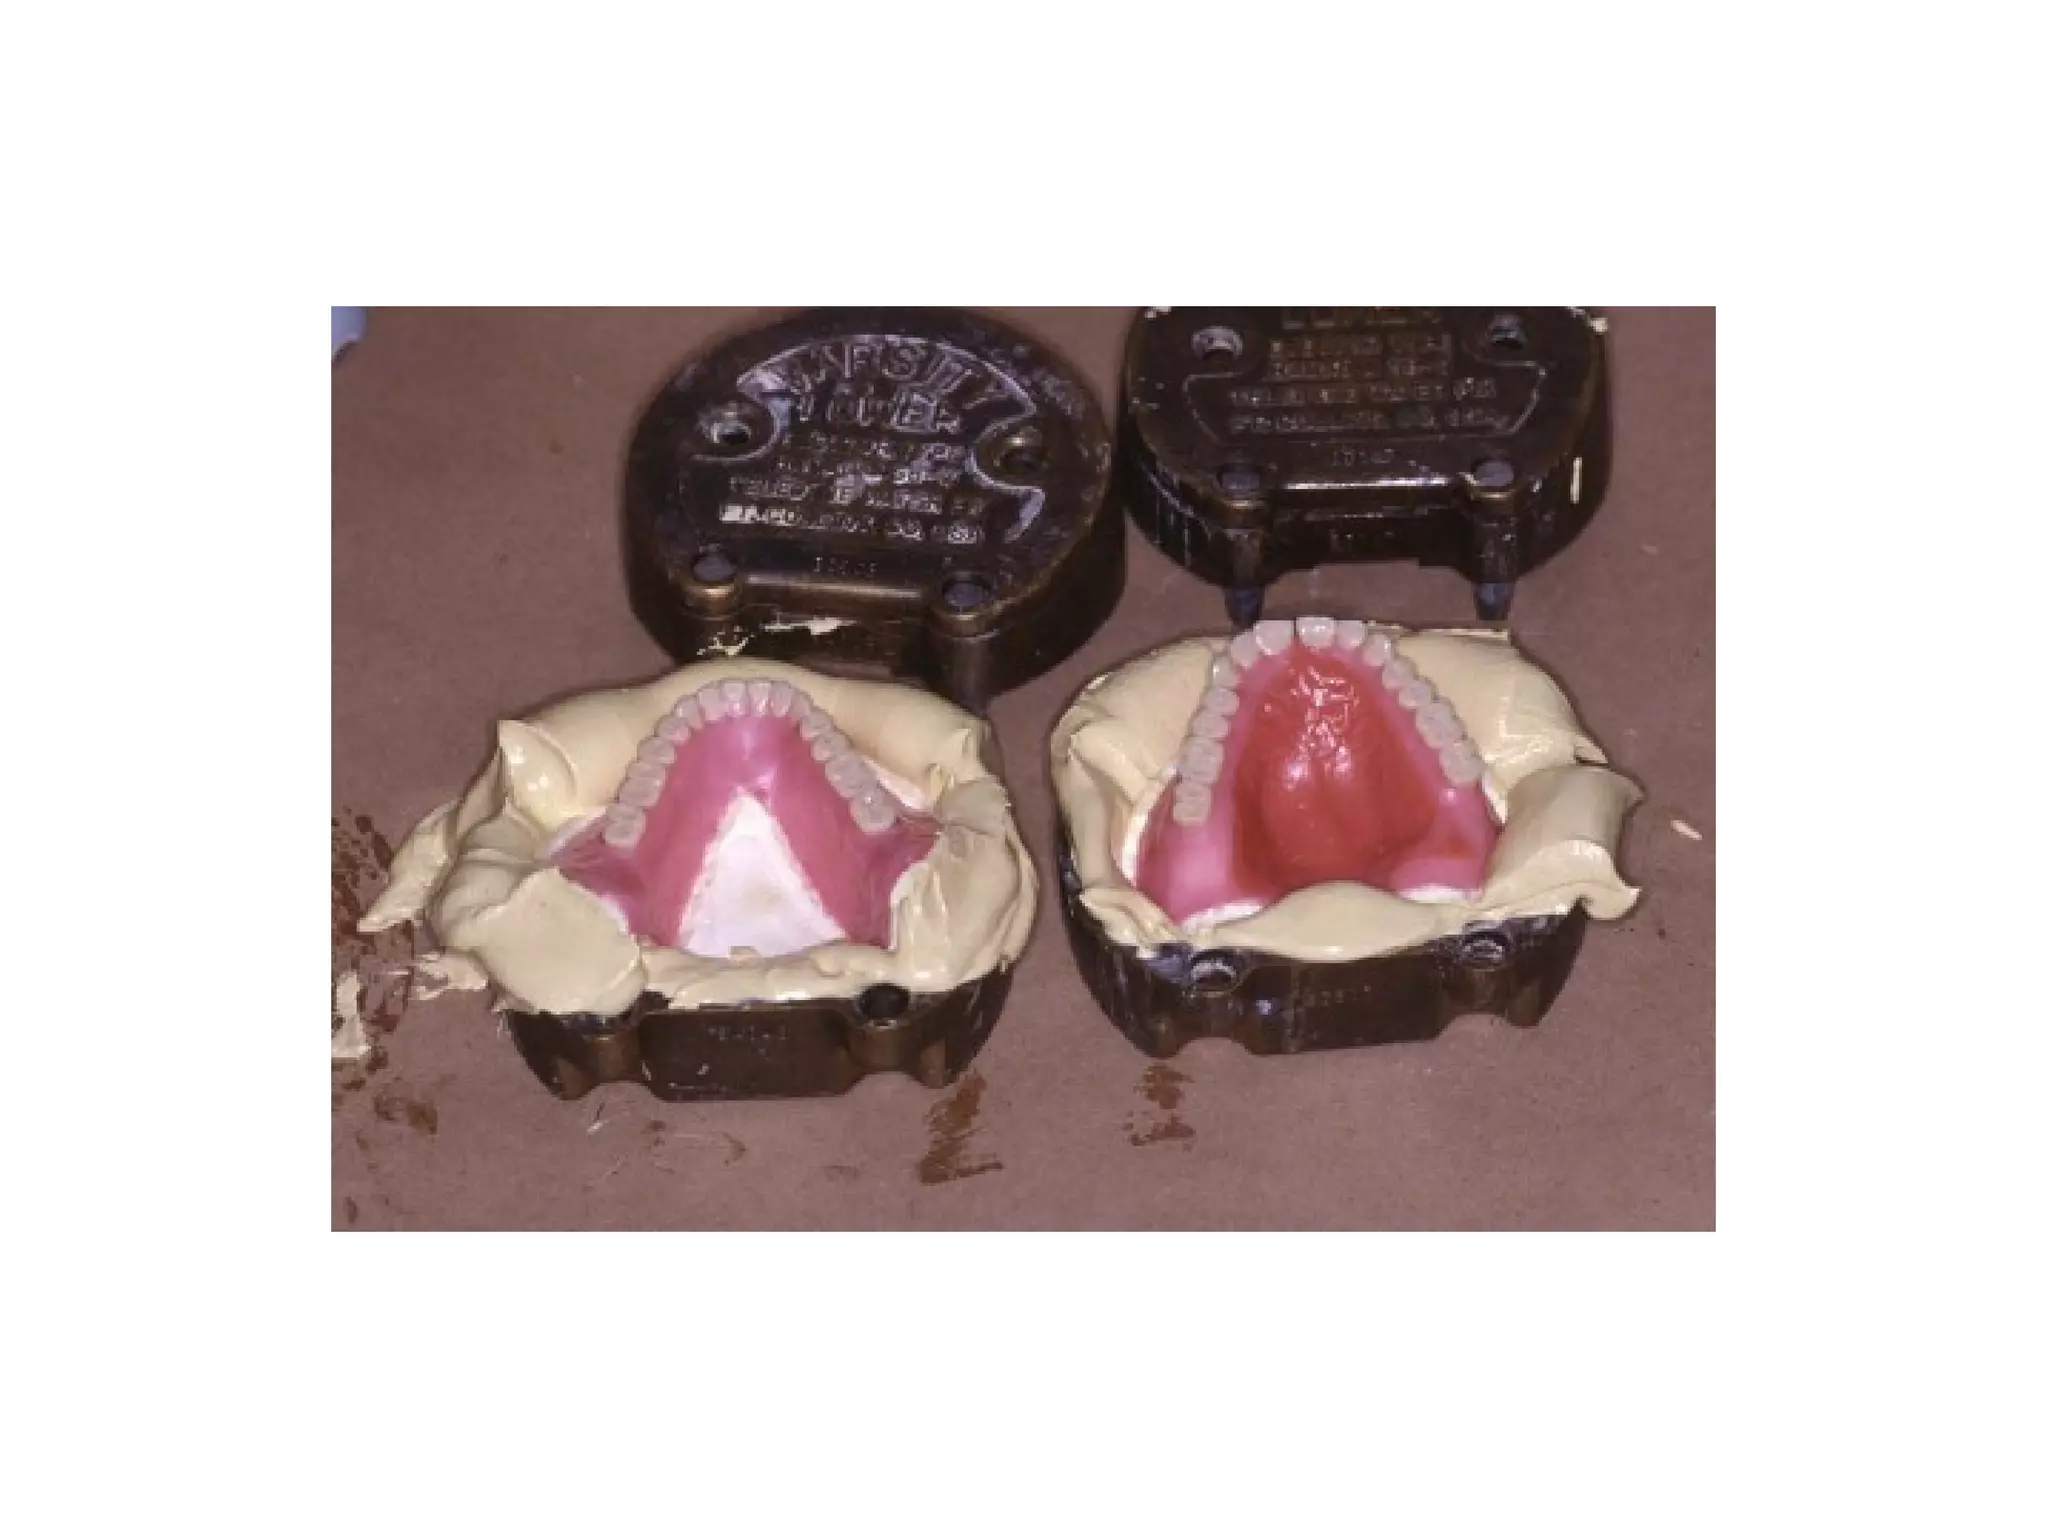
SlideShare a Scribd company logo
1 of 69
Waxing up
Dr. Waseem Bahjat Mushtaha
Specialized in prosthodontics
Waxing-up is the contouring of the trial
denture base into the desired form to
produce a denture base that reproduces the
contour of the original tissues in the
dentulous mouth in order to:
1-procedure a pleasing natural appearance
2-aid in retention and stability of the dentures
as the tongue, cheeks and lips will lie
properly against the denture base and help
in seating the dentures.
Waxing may be accomplished either by
placing a piece of soften base plate wax to
the base and gradually carving it down to
the desired form or by deposing molten wax
in the proper area to build up the desired
form so that:
1-the anterior portion of the maxillary denture
base should be shaped so that together with
the teeth, it provides a pleasing form for the
lip, and procedures a slight overall convex
effect.
2-the contour of the mandibular denture in the
anterior region is relatively straight.
3-the form of buccal flange from the premolar
backward should face downward and
outward for the upper and upward and
outward for the lower. This contour allows
the buccinator muscle to lie against the
denture and aids in its retention and stability
4-the contour of the lingual surface in the anterior
region should be straight and slope to the lingual
border. The contour of the lingual surface in the
premolar and molar region is relatively straight, as
a concave surface in this area provides space for
the tongue to catch and lift the denture
unintentionally during movement. The lingual
surface posterior to the second molar(the
retromylohyoid region) faces downward and
inward and is thinned so that it does not interfere
with normal tongue movement
5-any excess wax around the teeth is
removed. The remaining wax is carved at
the cervical line of artificial teeth to
simulate the natural appearance of the
gingival margin and gingival papillae. The
gingival papilla of the denture should be
convex both occlusogingivally and
mesiodistally, and should fill the
interproximal space below the contact point.
Carving the gingival margin should be
carried out with a knife held at an angle 45
to the cervical.
6-the region of attached gingival may be stippled to
produce a finished denture whose surface show an
a "orange-peel effect". This may be produced with
tooth brush; placed on lightly flamed wax surface
on the wax. The bristles produce many small
indentations in the wax.
7-the wax above the roots should be contoured to
simulate the root prominences present in dentulous
mouths. The root prominences should fade out
before the borders are reached. the root
prominences of canines are the most definite
prominences in the dental arch.
8-the palatal surface of the maxillary trial
denture base should be waxed to a nearly
uniform thickness of 2.5 mm. wax is
further added and carved
9-the wax at the borders is contoured as in the
impression to produce a perfect peripheral
seal.
10-finally,wax solvent is used to remove any
wax film from the surface of the teeth
otherwise, denture base material will adhere
to the teeth making finishing procedures
difficult.
Denture processing
1-Flasking
2-Wax elimination
3-Packing and curing
1-Flasking
Dental flask: is an instrument into which the
contoured, waxed-up denture base is
covered into resin, to make a denture. This
done by investing the wax denture,
eliminating the wax to form a mould into
which methyl-methacrylate resin is packed.
Component parts of the dental flask
1-the base of the flask, is in the form of a cup. It
contains a round knock-out plate. For the lower
denture, the edge of the base is higher posteriorly
to accommodate the posterior upward inclination
of the mandible.
2-The middle part of the flask is in the form of a
ring, it fits accurately into the base through pins.
3-The top parts of the flask “the lid” which fits
accurately into the ring and contains escape holes.
Flasking the denture is done in three steps. In
the first step, the cast is secured into the
base of the flask with stone. Taking care
that no undercuts exist on the surface of this
first step. In the second step, the ring of the
flask is put in place, and stone is poured up
to the occlusal surface of the teeth.
The final third step is accomplished when the
top portion of the flask is poured and the lid
is placed on the flask. The third stage is
referred to as capping
Procedure for flasking the denture
1-Seal the waxed denture base to the cast
using base plate wax.
2-Remove the waxed up denture from the
articulator.
3-Place the dentures and casts in the flask to
check the height of denture teeth in the flask
To ensure that the flask and the casts are of
compatible size.
4-The waxed up dentures placed on their
casts are soaked in water at room
temperature for about 5 minutes. Hence the
casts are thoroughly wet removing less
water from the investing stone mix.
5-Paint the casts with plaster separating
medium to facilitate deflasking, and the
inside surface of the flask is lightly coated
with vaseline.
6-Mix artificial stone and place it in the base
part of the flask. Settle the waxed denture
and the cast into the mix, and center the cast
in the flask. The posterior portion of the
cast should at the same level with the edge
of the flask, and the occlusal plane
approximately parallel to the base of the
flask.
7-Smooth the stone around the cast and block
any undercuts that would prevent separation
of the flask halves, such undercuts occur
commonly in the posterior lingual region of
mandibular dentures.
8-Place the ring of the flask in position on
the base part to ensure that no stone remains
on the rim preventing complete seating and
that teeth do not protrude above the top of
the flask. After the stone has set, paint
plaster separating medium on the first stage
stone. Take care not to place separating
medium on the waxed denture or teeth.
9-A mix of artificial stone is poured into the
flask while the ring is in its position, place
the flask on a vibrator to ensure that the
stone reaches all cervices around the teeth.
10-Remove the stone with finger to expose
the occlusal surface of the teeth.
11-The stone is allowed to set, then a plaster
separating medium is painted on the surface
of the second stage.
12-A mix of stone is poured so that the flask
is over-filled to produce the third stage
stone.
13-Place the lid on the flask firmly and tap it
gently to ensure that the flask has been
completely filled.
14-Allow the stone to set before the wax is
eliminated.
2-Wax elimination
Now, after the dentures have been flasked, the
wax must be eliminated to form a mould
into which the resin may be packed. This is
done by placing the flask in hot water
which softens the wax. The flask is then
opened and the wax. The flask is then
opened and the wax is flushed out.
Procedure for wax
1-The flask, in the holder, is placed in boiling water
for approximately 5 minutes, then removed.
2-with the blunt end of a plaster knife, separate the
flask. It is placed in the slot in the posterior
portion of the flask, which is then gently opened.
Discard the softened wax, and plastic denture
base. Then check that no denture teeth have been
dislodged on opening the flask.
3-Clean boiling water, to which detergent has
been added is flowed over the surface of the
teeth, cast, and stone to eliminate all traces
of wax.
4-With a brush, and soap or detergent
solution thoroughly scrub the mould to
reach into all mould recesses. This is
followed with a clean boiling water flush, to
remove any trace of the detergent.
5-Place the flask aside to cool.
Painting the tin-foil substitute
Tin-foil substitute or (sodium alginate) is
applied to all stone surface of the cast, and
the flasking stone after the flasks have
cooled to prevent the resin from adhering to
the stone. Pour enough tin-foil substituent
into a small container for use, never dip the
brush into the main container because it is
very easily contaminated, and its
effectiveness is destroyed.
A large brush may be used to paint the casts
and the flasking stone while a small brush is
used to carry tin foil substitute around the
teeth. A void covering the teeth otherwise, a
small void will be present around the teeth
in the complete denture. The void will stain
in the mouth and result in a black line
around the teeth.
After the stone in the flask has been painted,
place it aside and allow it to dry. Now the
mould is ready for packing the denture resin
3-packing the denture
1-proportion the monomer and polymer
following the manufacturer’s instruction.
Placed the monomer in a clean mixing jar
and then sprinkle the polymer into it to
ensure that each particle of the polymer is
wet with the monomer. The mixture is then
spatulated with a stainless steel spatula.
2-Cover the mixing jar to prevent evaporation of the
monomer, resulting in a grainy mix. Place the jar
aside until the resin reaches the proper stage
(dough) for packing.
3-Remove the resin from the jar, form it in a roll
and adapt it to the mould in the flask.
4-Place a piece of wet cellophane over the resin.
Placed the flask halves in their position and close
it. This allows the flask to be re-opened for
inspection, adding or removing resin without
adherence of the cast to the tissue surface of the
uncured resin.
5-Place the assembled flask in a bench press slowly.
This permits the flow of acrylic resin into minute
areas of the mold.
6-Open the flask and cut away excess resin
extending around the edges of the flask, so that no
resin is beyond the border of the denture.
7-Trial packing is repeated until no more excess
resin is apparent on opening the flask, all the fine
details are present on the surface of the resin
representing an exact negative replica of the cast,
and until the resin shows a dense shiny surface.
8-Repaint the cast portion of the flask with
tin-foil substitute and allow it to dry.
9-Assemble the flask and close it until metal
to metal contact between the flask rims is
achieved.
10-Place the flask in a processing clamp and
turn the hexagonal handle to close the
clamp tightly.
4-Curing the denture
Denture resins are cured by one of two methods. The
preferred method is curing the resin for 9 hours at
165F (70C). The second method requires curing
the resin at 165F for one hour followed by boiling
for half an hour. After curing, the flasks are
removed from the water and allowed to bench cool
before they are removed from the clamp. The
denture is then ready for deflasking, finishing and
polishing.
5-Deflasking
1-Remove the lid of the flask using plaster knife.
2-The flask is then placed in a flask ejector to
separate the flask from the stone enclosed denture.
3-an alternate method for removing the flask is by
using a hammer to strike the knock-out plate on
the bottom of the flask. The base part of the flask
is removed followed by the top part.
4-Place a knife blade at the junction between
the stone cap and the rest of the stone
enclosing the denture to separate the stone
cap and expose the cusp tip and incisal
edges of the denture teeth.
5-Using a saw, make three saw cut in the
investing stone, one opposite the central
incisor teeth and one at each distobuccal
corner of the flasked denture.
6-Separate the stone sections gently, then
remove stone from the palate or tongue area
using a knife. Don’t remove the dentures
from the casts, special care must be taken to
ensure that the casts are not broken.
7-use a tooth brush to clean out the index
grooves on the base of the cast, to faciliate
accurate repositioning of the casts on the
mounting stone for the correction of any
processing errors.
Common errors in the final denture
Problem:
Cured denture has porosity
Cause:
1(Flask unpacked with resin
2(Denture base heated too rapidly
Solution:
1(Fill the mould completely before curing.
2(Bench cure, followed by long curing cycle.
Problem:
Cured denture has processing errors
Cause:
1(Denture resin packed at late or rubbery
stage.
2(Flask not properly closed prior to curing
Solution:
1(Pack resin during dough stage.
2(Make certain that metal to metal contact of
flask rim is achieved.
Problem:
Stone adhering to surface of denture
Cause:
1(Failure to place tin-foil substitute on stone prior to
packing.
2(Tin-foil substitute contamination with stone
3(Wax elimination not completed during boiling
out, rendering tin-foil ineffective.
Solution:
1(Paint tin-foil properly on stone prior to packing.
2(Use fresh tin-foil poured into a small container.
3(Clean in mold surface and cast surface thoroughly
with boiling water.
Problem:
Denture has many acrylic resin nodules.
Cause:
1(Investing stone not properly spatulated.
2(Presence of air bubbles in the investing
stone.
Solution:
1(Mix stone properly.
2(Elimination air bubbles by placing the
flask on a vibrator.

More Related Content

What's hot

Rest and rest seats
Rest and rest seatsRest and rest seats
Rest and rest seatsRajvi Nahar
 
posterior palatal seal ppt
posterior palatal seal pptposterior palatal seal ppt
posterior palatal seal pptPreeti Kalia
 
Balanced occlusion aditi ghai
Balanced occlusion aditi ghaiBalanced occlusion aditi ghai
Balanced occlusion aditi ghaiAditi Ghai
 
DENTAL CERAMICS Dental Porcelain All-CERAMIC RESTORATIONS dental material
DENTAL CERAMICS Dental Porcelain All-CERAMIC RESTORATIONS dental materialDENTAL CERAMICS Dental Porcelain All-CERAMIC RESTORATIONS dental material
DENTAL CERAMICS Dental Porcelain All-CERAMIC RESTORATIONS dental materialDr-Faisal Al-Qahtani
 
SOFT TISSUE MANAGEMENT IN FPD
SOFT TISSUE MANAGEMENT IN FPDSOFT TISSUE MANAGEMENT IN FPD
SOFT TISSUE MANAGEMENT IN FPDkrishnagopan
 
Anatomical Landmarks of Mandible
Anatomical Landmarks of MandibleAnatomical Landmarks of Mandible
Anatomical Landmarks of MandibleSabnoor Aujla
 
8.working casts and dies
8.working casts and dies8.working casts and dies
8.working casts and diesLama K Banna
 
Wax patterns fabrication for fixed partial dentures
Wax patterns fabrication for fixed partial denturesWax patterns fabrication for fixed partial dentures
Wax patterns fabrication for fixed partial denturesShebin Abraham
 
Role of facial muscles in complete denture prosthesis
Role of facial muscles  in complete denture  prosthesisRole of facial muscles  in complete denture  prosthesis
Role of facial muscles in complete denture prosthesisRavi banavathu
 
OCCLUSION IN COMPLETE DENTURES
OCCLUSION IN COMPLETE DENTURESOCCLUSION IN COMPLETE DENTURES
OCCLUSION IN COMPLETE DENTURESpranav verma
 
Hollow bulb obturator / cosmetic dentistry courses
Hollow bulb obturator / cosmetic dentistry coursesHollow bulb obturator / cosmetic dentistry courses
Hollow bulb obturator / cosmetic dentistry coursesIndian dental academy
 
Heat cure acrylic
Heat cure acrylicHeat cure acrylic
Heat cure acrylicAamir Godil
 
Duplication and wax up in rpd
Duplication and wax up in rpdDuplication and wax up in rpd
Duplication and wax up in rpdNaveed AnJum
 
Pontics in Fixed Partial Dentures
Pontics in Fixed Partial DenturesPontics in Fixed Partial Dentures
Pontics in Fixed Partial DenturesKelly Norton
 
Rotary instruments in prosthodontics
Rotary instruments in prosthodonticsRotary instruments in prosthodontics
Rotary instruments in prosthodonticsDr.Pallavi Chavan
 

What's hot (20)

Rest and rest seats
Rest and rest seatsRest and rest seats
Rest and rest seats
 
posterior palatal seal ppt
posterior palatal seal pptposterior palatal seal ppt
posterior palatal seal ppt
 
Balanced occlusion aditi ghai
Balanced occlusion aditi ghaiBalanced occlusion aditi ghai
Balanced occlusion aditi ghai
 
DENTAL CERAMICS Dental Porcelain All-CERAMIC RESTORATIONS dental material
DENTAL CERAMICS Dental Porcelain All-CERAMIC RESTORATIONS dental materialDENTAL CERAMICS Dental Porcelain All-CERAMIC RESTORATIONS dental material
DENTAL CERAMICS Dental Porcelain All-CERAMIC RESTORATIONS dental material
 
Denture base materials
Denture base materialsDenture base materials
Denture base materials
 
Seminars
SeminarsSeminars
Seminars
 
SOFT TISSUE MANAGEMENT IN FPD
SOFT TISSUE MANAGEMENT IN FPDSOFT TISSUE MANAGEMENT IN FPD
SOFT TISSUE MANAGEMENT IN FPD
 
Anatomical Landmarks of Mandible
Anatomical Landmarks of MandibleAnatomical Landmarks of Mandible
Anatomical Landmarks of Mandible
 
8.working casts and dies
8.working casts and dies8.working casts and dies
8.working casts and dies
 
Impression errors presentation
Impression errors presentation Impression errors presentation
Impression errors presentation
 
Wax patterns fabrication for fixed partial dentures
Wax patterns fabrication for fixed partial denturesWax patterns fabrication for fixed partial dentures
Wax patterns fabrication for fixed partial dentures
 
Role of facial muscles in complete denture prosthesis
Role of facial muscles  in complete denture  prosthesisRole of facial muscles  in complete denture  prosthesis
Role of facial muscles in complete denture prosthesis
 
Reference points for facebow
Reference points for facebowReference points for facebow
Reference points for facebow
 
Tissue-conditioners
Tissue-conditionersTissue-conditioners
Tissue-conditioners
 
OCCLUSION IN COMPLETE DENTURES
OCCLUSION IN COMPLETE DENTURESOCCLUSION IN COMPLETE DENTURES
OCCLUSION IN COMPLETE DENTURES
 
Hollow bulb obturator / cosmetic dentistry courses
Hollow bulb obturator / cosmetic dentistry coursesHollow bulb obturator / cosmetic dentistry courses
Hollow bulb obturator / cosmetic dentistry courses
 
Heat cure acrylic
Heat cure acrylicHeat cure acrylic
Heat cure acrylic
 
Duplication and wax up in rpd
Duplication and wax up in rpdDuplication and wax up in rpd
Duplication and wax up in rpd
 
Pontics in Fixed Partial Dentures
Pontics in Fixed Partial DenturesPontics in Fixed Partial Dentures
Pontics in Fixed Partial Dentures
 
Rotary instruments in prosthodontics
Rotary instruments in prosthodonticsRotary instruments in prosthodontics
Rotary instruments in prosthodontics
 

Similar to Waxing up المحاضرة 13 + 14

“ Laminate veneer ,,
“ Laminate veneer ,, “ Laminate veneer ,,
“ Laminate veneer ,, TOC2014
 
12- Denture processing and laboratory errors
12- Denture processing and laboratory errors12- Denture processing and laboratory errors
12- Denture processing and laboratory errorsAmalKaddah1
 
12- Denture Processing and Laboratory Errors.
12- Denture Processing and Laboratory Errors.12- Denture Processing and Laboratory Errors.
12- Denture Processing and Laboratory Errors.AmalKaddah1
 
14- Denture Processing and Laboratory Errors.pptx
14- Denture Processing and Laboratory Errors.pptx14- Denture Processing and Laboratory Errors.pptx
14- Denture Processing and Laboratory Errors.pptxAmalKaddah1
 
Denture repair in complete dentures .pptx
Denture repair in complete dentures .pptxDenture repair in complete dentures .pptx
Denture repair in complete dentures .pptxbhavin16199
 
Complete denture processing & errors
Complete denture processing & errorsComplete denture processing & errors
Complete denture processing & errorsAli Alarasy
 
Repair المحاضرة 15
Repair المحاضرة 15Repair المحاضرة 15
Repair المحاضرة 15Lama K Banna
 
Final impression boxing and pouring
Final impression  boxing and pouringFinal impression  boxing and pouring
Final impression boxing and pouringBkPradeep1
 
Lab procedures ( part 1 ) / dental courses
Lab procedures  ( part 1 ) / dental coursesLab procedures  ( part 1 ) / dental courses
Lab procedures ( part 1 ) / dental coursesIndian dental academy
 
Mandibular impression procedures
Mandibular impression proceduresMandibular impression procedures
Mandibular impression proceduresAbhinav Mudaliar
 
Post damming المحاضرة 8+9
Post damming المحاضرة 8+9Post damming المحاضرة 8+9
Post damming المحاضرة 8+9Lama K Banna
 
Cavitypreparation 130320103634-phpapp01
Cavitypreparation 130320103634-phpapp01Cavitypreparation 130320103634-phpapp01
Cavitypreparation 130320103634-phpapp01vida4747
 
11 repair, reline & rebase c d
11  repair, reline & rebase c d11  repair, reline & rebase c d
11 repair, reline & rebase c dTalal Al-Dham
 

Similar to Waxing up المحاضرة 13 + 14 (20)

“ Laminate veneer ,,
“ Laminate veneer ,, “ Laminate veneer ,,
“ Laminate veneer ,,
 
123
123123
123
 
12- Denture processing and laboratory errors
12- Denture processing and laboratory errors12- Denture processing and laboratory errors
12- Denture processing and laboratory errors
 
12- Denture Processing and Laboratory Errors.
12- Denture Processing and Laboratory Errors.12- Denture Processing and Laboratory Errors.
12- Denture Processing and Laboratory Errors.
 
14- Denture Processing and Laboratory Errors.pptx
14- Denture Processing and Laboratory Errors.pptx14- Denture Processing and Laboratory Errors.pptx
14- Denture Processing and Laboratory Errors.pptx
 
Denture repair in complete dentures .pptx
Denture repair in complete dentures .pptxDenture repair in complete dentures .pptx
Denture repair in complete dentures .pptx
 
Complete denture processing & errors
Complete denture processing & errorsComplete denture processing & errors
Complete denture processing & errors
 
Repair المحاضرة 15
Repair المحاضرة 15Repair المحاضرة 15
Repair المحاضرة 15
 
Final impression boxing and pouring
Final impression  boxing and pouringFinal impression  boxing and pouring
Final impression boxing and pouring
 
Lab procedures ( part 1 ) / dental courses
Lab procedures  ( part 1 ) / dental coursesLab procedures  ( part 1 ) / dental courses
Lab procedures ( part 1 ) / dental courses
 
Copy denture
Copy dentureCopy denture
Copy denture
 
Wax pattern
Wax patternWax pattern
Wax pattern
 
Mandibular impression procedures
Mandibular impression proceduresMandibular impression procedures
Mandibular impression procedures
 
Isolation
IsolationIsolation
Isolation
 
8.boxing impressions and making casts
8.boxing impressions and making casts8.boxing impressions and making casts
8.boxing impressions and making casts
 
8.boxing impressions and making casts
8.boxing impressions and making casts8.boxing impressions and making casts
8.boxing impressions and making casts
 
Post damming المحاضرة 8+9
Post damming المحاضرة 8+9Post damming المحاضرة 8+9
Post damming المحاضرة 8+9
 
Cavitypreparation 130320103634-phpapp01
Cavitypreparation 130320103634-phpapp01Cavitypreparation 130320103634-phpapp01
Cavitypreparation 130320103634-phpapp01
 
11 repair, reline & rebase c d
11  repair, reline & rebase c d11  repair, reline & rebase c d
11 repair, reline & rebase c d
 
Cavity preparation
Cavity preparationCavity preparation
Cavity preparation
 

More from Lama K Banna

The TikTok Masterclass Deck.pdf
The TikTok Masterclass Deck.pdfThe TikTok Masterclass Deck.pdf
The TikTok Masterclass Deck.pdfLama K Banna
 
دليل كتابة المشاريع.pdf
دليل كتابة المشاريع.pdfدليل كتابة المشاريع.pdf
دليل كتابة المشاريع.pdfLama K Banna
 
Investment proposal
Investment proposalInvestment proposal
Investment proposalLama K Banna
 
Lecture 3 facial cosmetic surgery
Lecture 3 facial cosmetic surgery Lecture 3 facial cosmetic surgery
Lecture 3 facial cosmetic surgery Lama K Banna
 
lecture 1 facial cosmatic surgery
lecture 1 facial cosmatic surgery lecture 1 facial cosmatic surgery
lecture 1 facial cosmatic surgery Lama K Banna
 
Facial neuropathology Maxillofacial Surgery
Facial neuropathology Maxillofacial SurgeryFacial neuropathology Maxillofacial Surgery
Facial neuropathology Maxillofacial SurgeryLama K Banna
 
Lecture 2 Facial cosmatic surgery
Lecture 2 Facial cosmatic surgery Lecture 2 Facial cosmatic surgery
Lecture 2 Facial cosmatic surgery Lama K Banna
 
Lecture 12 general considerations in treatment of tmd
Lecture 12 general considerations in treatment of tmdLecture 12 general considerations in treatment of tmd
Lecture 12 general considerations in treatment of tmdLama K Banna
 
Lecture 10 temporomandibular joint
Lecture 10 temporomandibular jointLecture 10 temporomandibular joint
Lecture 10 temporomandibular jointLama K Banna
 
Lecture 11 temporomandibular joint Part 3
Lecture 11 temporomandibular joint Part 3Lecture 11 temporomandibular joint Part 3
Lecture 11 temporomandibular joint Part 3Lama K Banna
 
Lecture 9 TMJ anatomy examination
Lecture 9 TMJ anatomy examinationLecture 9 TMJ anatomy examination
Lecture 9 TMJ anatomy examinationLama K Banna
 
Lecture 7 correction of dentofacial deformities Part 2
Lecture 7 correction of dentofacial deformities Part 2Lecture 7 correction of dentofacial deformities Part 2
Lecture 7 correction of dentofacial deformities Part 2Lama K Banna
 
Lecture 8 management of patients with orofacial clefts
Lecture 8 management of patients with orofacial cleftsLecture 8 management of patients with orofacial clefts
Lecture 8 management of patients with orofacial cleftsLama K Banna
 
Lecture 5 Diagnosis and management of salivary gland disorders Part 2
Lecture 5 Diagnosis and management of salivary gland disorders Part 2Lecture 5 Diagnosis and management of salivary gland disorders Part 2
Lecture 5 Diagnosis and management of salivary gland disorders Part 2Lama K Banna
 
Lecture 6 correction of dentofacial deformities
Lecture 6 correction of dentofacial deformitiesLecture 6 correction of dentofacial deformities
Lecture 6 correction of dentofacial deformitiesLama K Banna
 
lecture 4 Diagnosis and management of salivary gland disorders
lecture 4 Diagnosis and management of salivary gland disorderslecture 4 Diagnosis and management of salivary gland disorders
lecture 4 Diagnosis and management of salivary gland disordersLama K Banna
 
Lecture 3 maxillofacial trauma part 3
Lecture 3 maxillofacial trauma part 3Lecture 3 maxillofacial trauma part 3
Lecture 3 maxillofacial trauma part 3Lama K Banna
 
Lecture 2 maxillofacial trauma
Lecture 2 maxillofacial traumaLecture 2 maxillofacial trauma
Lecture 2 maxillofacial traumaLama K Banna
 

More from Lama K Banna (20)

The TikTok Masterclass Deck.pdf
The TikTok Masterclass Deck.pdfThe TikTok Masterclass Deck.pdf
The TikTok Masterclass Deck.pdf
 
دليل كتابة المشاريع.pdf
دليل كتابة المشاريع.pdfدليل كتابة المشاريع.pdf
دليل كتابة المشاريع.pdf
 
Investment proposal
Investment proposalInvestment proposal
Investment proposal
 
Funding proposal
Funding proposalFunding proposal
Funding proposal
 
5 incisions
5 incisions5 incisions
5 incisions
 
Lecture 3 facial cosmetic surgery
Lecture 3 facial cosmetic surgery Lecture 3 facial cosmetic surgery
Lecture 3 facial cosmetic surgery
 
lecture 1 facial cosmatic surgery
lecture 1 facial cosmatic surgery lecture 1 facial cosmatic surgery
lecture 1 facial cosmatic surgery
 
Facial neuropathology Maxillofacial Surgery
Facial neuropathology Maxillofacial SurgeryFacial neuropathology Maxillofacial Surgery
Facial neuropathology Maxillofacial Surgery
 
Lecture 2 Facial cosmatic surgery
Lecture 2 Facial cosmatic surgery Lecture 2 Facial cosmatic surgery
Lecture 2 Facial cosmatic surgery
 
Lecture 12 general considerations in treatment of tmd
Lecture 12 general considerations in treatment of tmdLecture 12 general considerations in treatment of tmd
Lecture 12 general considerations in treatment of tmd
 
Lecture 10 temporomandibular joint
Lecture 10 temporomandibular jointLecture 10 temporomandibular joint
Lecture 10 temporomandibular joint
 
Lecture 11 temporomandibular joint Part 3
Lecture 11 temporomandibular joint Part 3Lecture 11 temporomandibular joint Part 3
Lecture 11 temporomandibular joint Part 3
 
Lecture 9 TMJ anatomy examination
Lecture 9 TMJ anatomy examinationLecture 9 TMJ anatomy examination
Lecture 9 TMJ anatomy examination
 
Lecture 7 correction of dentofacial deformities Part 2
Lecture 7 correction of dentofacial deformities Part 2Lecture 7 correction of dentofacial deformities Part 2
Lecture 7 correction of dentofacial deformities Part 2
 
Lecture 8 management of patients with orofacial clefts
Lecture 8 management of patients with orofacial cleftsLecture 8 management of patients with orofacial clefts
Lecture 8 management of patients with orofacial clefts
 
Lecture 5 Diagnosis and management of salivary gland disorders Part 2
Lecture 5 Diagnosis and management of salivary gland disorders Part 2Lecture 5 Diagnosis and management of salivary gland disorders Part 2
Lecture 5 Diagnosis and management of salivary gland disorders Part 2
 
Lecture 6 correction of dentofacial deformities
Lecture 6 correction of dentofacial deformitiesLecture 6 correction of dentofacial deformities
Lecture 6 correction of dentofacial deformities
 
lecture 4 Diagnosis and management of salivary gland disorders
lecture 4 Diagnosis and management of salivary gland disorderslecture 4 Diagnosis and management of salivary gland disorders
lecture 4 Diagnosis and management of salivary gland disorders
 
Lecture 3 maxillofacial trauma part 3
Lecture 3 maxillofacial trauma part 3Lecture 3 maxillofacial trauma part 3
Lecture 3 maxillofacial trauma part 3
 
Lecture 2 maxillofacial trauma
Lecture 2 maxillofacial traumaLecture 2 maxillofacial trauma
Lecture 2 maxillofacial trauma
 

Recently uploaded

Class 11 Legal Studies Ch-1 Concept of State .pdf
Class 11 Legal Studies Ch-1 Concept of State .pdfClass 11 Legal Studies Ch-1 Concept of State .pdf
Class 11 Legal Studies Ch-1 Concept of State .pdfakmcokerachita
 
URLs and Routing in the Odoo 17 Website App
URLs and Routing in the Odoo 17 Website AppURLs and Routing in the Odoo 17 Website App
URLs and Routing in the Odoo 17 Website AppCeline George
 
CARE OF CHILD IN INCUBATOR..........pptx
CARE OF CHILD IN INCUBATOR..........pptxCARE OF CHILD IN INCUBATOR..........pptx
CARE OF CHILD IN INCUBATOR..........pptxGaneshChakor2
 
Mastering the Unannounced Regulatory Inspection
Mastering the Unannounced Regulatory InspectionMastering the Unannounced Regulatory Inspection
Mastering the Unannounced Regulatory InspectionSafetyChain Software
 
KSHARA STURA .pptx---KSHARA KARMA THERAPY (CAUSTIC THERAPY)————IMP.OF KSHARA ...
KSHARA STURA .pptx---KSHARA KARMA THERAPY (CAUSTIC THERAPY)————IMP.OF KSHARA ...KSHARA STURA .pptx---KSHARA KARMA THERAPY (CAUSTIC THERAPY)————IMP.OF KSHARA ...
KSHARA STURA .pptx---KSHARA KARMA THERAPY (CAUSTIC THERAPY)————IMP.OF KSHARA ...M56BOOKSTORE PRODUCT/SERVICE
 
Introduction to AI in Higher Education_draft.pptx
Introduction to AI in Higher Education_draft.pptxIntroduction to AI in Higher Education_draft.pptx
Introduction to AI in Higher Education_draft.pptxpboyjonauth
 
Employee wellbeing at the workplace.pptx
Employee wellbeing at the workplace.pptxEmployee wellbeing at the workplace.pptx
Employee wellbeing at the workplace.pptxNirmalaLoungPoorunde1
 
Sanyam Choudhary Chemistry practical.pdf
Sanyam Choudhary Chemistry practical.pdfSanyam Choudhary Chemistry practical.pdf
Sanyam Choudhary Chemistry practical.pdfsanyamsingh5019
 
BASLIQ CURRENT LOOKBOOK LOOKBOOK(1) (1).pdf
BASLIQ CURRENT LOOKBOOK  LOOKBOOK(1) (1).pdfBASLIQ CURRENT LOOKBOOK  LOOKBOOK(1) (1).pdf
BASLIQ CURRENT LOOKBOOK LOOKBOOK(1) (1).pdfSoniaTolstoy
 
Paris 2024 Olympic Geographies - an activity
Paris 2024 Olympic Geographies - an activityParis 2024 Olympic Geographies - an activity
Paris 2024 Olympic Geographies - an activityGeoBlogs
 
Software Engineering Methodologies (overview)
Software Engineering Methodologies (overview)Software Engineering Methodologies (overview)
Software Engineering Methodologies (overview)eniolaolutunde
 
ECONOMIC CONTEXT - LONG FORM TV DRAMA - PPT
ECONOMIC CONTEXT - LONG FORM TV DRAMA - PPTECONOMIC CONTEXT - LONG FORM TV DRAMA - PPT
ECONOMIC CONTEXT - LONG FORM TV DRAMA - PPTiammrhaywood
 
Solving Puzzles Benefits Everyone (English).pptx
Solving Puzzles Benefits Everyone (English).pptxSolving Puzzles Benefits Everyone (English).pptx
Solving Puzzles Benefits Everyone (English).pptxOH TEIK BIN
 
“Oh GOSH! Reflecting on Hackteria's Collaborative Practices in a Global Do-It...
“Oh GOSH! Reflecting on Hackteria's Collaborative Practices in a Global Do-It...“Oh GOSH! Reflecting on Hackteria's Collaborative Practices in a Global Do-It...
“Oh GOSH! Reflecting on Hackteria's Collaborative Practices in a Global Do-It...Marc Dusseiller Dusjagr
 
Science 7 - LAND and SEA BREEZE and its Characteristics
Science 7 - LAND and SEA BREEZE and its CharacteristicsScience 7 - LAND and SEA BREEZE and its Characteristics
Science 7 - LAND and SEA BREEZE and its CharacteristicsKarinaGenton
 
How to Make a Pirate ship Primary Education.pptx
How to Make a Pirate ship Primary Education.pptxHow to Make a Pirate ship Primary Education.pptx
How to Make a Pirate ship Primary Education.pptxmanuelaromero2013
 
microwave assisted reaction. General introduction
microwave assisted reaction. General introductionmicrowave assisted reaction. General introduction
microwave assisted reaction. General introductionMaksud Ahmed
 
MENTAL STATUS EXAMINATION format.docx
MENTAL     STATUS EXAMINATION format.docxMENTAL     STATUS EXAMINATION format.docx
MENTAL STATUS EXAMINATION format.docxPoojaSen20
 

Recently uploaded (20)

Class 11 Legal Studies Ch-1 Concept of State .pdf
Class 11 Legal Studies Ch-1 Concept of State .pdfClass 11 Legal Studies Ch-1 Concept of State .pdf
Class 11 Legal Studies Ch-1 Concept of State .pdf
 
URLs and Routing in the Odoo 17 Website App
URLs and Routing in the Odoo 17 Website AppURLs and Routing in the Odoo 17 Website App
URLs and Routing in the Odoo 17 Website App
 
CARE OF CHILD IN INCUBATOR..........pptx
CARE OF CHILD IN INCUBATOR..........pptxCARE OF CHILD IN INCUBATOR..........pptx
CARE OF CHILD IN INCUBATOR..........pptx
 
Mastering the Unannounced Regulatory Inspection
Mastering the Unannounced Regulatory InspectionMastering the Unannounced Regulatory Inspection
Mastering the Unannounced Regulatory Inspection
 
KSHARA STURA .pptx---KSHARA KARMA THERAPY (CAUSTIC THERAPY)————IMP.OF KSHARA ...
KSHARA STURA .pptx---KSHARA KARMA THERAPY (CAUSTIC THERAPY)————IMP.OF KSHARA ...KSHARA STURA .pptx---KSHARA KARMA THERAPY (CAUSTIC THERAPY)————IMP.OF KSHARA ...
KSHARA STURA .pptx---KSHARA KARMA THERAPY (CAUSTIC THERAPY)————IMP.OF KSHARA ...
 
Staff of Color (SOC) Retention Efforts DDSD
Staff of Color (SOC) Retention Efforts DDSDStaff of Color (SOC) Retention Efforts DDSD
Staff of Color (SOC) Retention Efforts DDSD
 
Código Creativo y Arte de Software | Unidad 1
Código Creativo y Arte de Software | Unidad 1Código Creativo y Arte de Software | Unidad 1
Código Creativo y Arte de Software | Unidad 1
 
Introduction to AI in Higher Education_draft.pptx
Introduction to AI in Higher Education_draft.pptxIntroduction to AI in Higher Education_draft.pptx
Introduction to AI in Higher Education_draft.pptx
 
Employee wellbeing at the workplace.pptx
Employee wellbeing at the workplace.pptxEmployee wellbeing at the workplace.pptx
Employee wellbeing at the workplace.pptx
 
Sanyam Choudhary Chemistry practical.pdf
Sanyam Choudhary Chemistry practical.pdfSanyam Choudhary Chemistry practical.pdf
Sanyam Choudhary Chemistry practical.pdf
 
BASLIQ CURRENT LOOKBOOK LOOKBOOK(1) (1).pdf
BASLIQ CURRENT LOOKBOOK  LOOKBOOK(1) (1).pdfBASLIQ CURRENT LOOKBOOK  LOOKBOOK(1) (1).pdf
BASLIQ CURRENT LOOKBOOK LOOKBOOK(1) (1).pdf
 
Paris 2024 Olympic Geographies - an activity
Paris 2024 Olympic Geographies - an activityParis 2024 Olympic Geographies - an activity
Paris 2024 Olympic Geographies - an activity
 
Software Engineering Methodologies (overview)
Software Engineering Methodologies (overview)Software Engineering Methodologies (overview)
Software Engineering Methodologies (overview)
 
ECONOMIC CONTEXT - LONG FORM TV DRAMA - PPT
ECONOMIC CONTEXT - LONG FORM TV DRAMA - PPTECONOMIC CONTEXT - LONG FORM TV DRAMA - PPT
ECONOMIC CONTEXT - LONG FORM TV DRAMA - PPT
 
Solving Puzzles Benefits Everyone (English).pptx
Solving Puzzles Benefits Everyone (English).pptxSolving Puzzles Benefits Everyone (English).pptx
Solving Puzzles Benefits Everyone (English).pptx
 
“Oh GOSH! Reflecting on Hackteria's Collaborative Practices in a Global Do-It...
“Oh GOSH! Reflecting on Hackteria's Collaborative Practices in a Global Do-It...“Oh GOSH! Reflecting on Hackteria's Collaborative Practices in a Global Do-It...
“Oh GOSH! Reflecting on Hackteria's Collaborative Practices in a Global Do-It...
 
Science 7 - LAND and SEA BREEZE and its Characteristics
Science 7 - LAND and SEA BREEZE and its CharacteristicsScience 7 - LAND and SEA BREEZE and its Characteristics
Science 7 - LAND and SEA BREEZE and its Characteristics
 
How to Make a Pirate ship Primary Education.pptx
How to Make a Pirate ship Primary Education.pptxHow to Make a Pirate ship Primary Education.pptx
How to Make a Pirate ship Primary Education.pptx
 
microwave assisted reaction. General introduction
microwave assisted reaction. General introductionmicrowave assisted reaction. General introduction
microwave assisted reaction. General introduction
 
MENTAL STATUS EXAMINATION format.docx
MENTAL     STATUS EXAMINATION format.docxMENTAL     STATUS EXAMINATION format.docx
MENTAL STATUS EXAMINATION format.docx
 

Waxing up المحاضرة 13 + 14

  • 1. Waxing up Dr. Waseem Bahjat Mushtaha Specialized in prosthodontics
  • 2. Waxing-up is the contouring of the trial denture base into the desired form to produce a denture base that reproduces the contour of the original tissues in the dentulous mouth in order to: 1-procedure a pleasing natural appearance 2-aid in retention and stability of the dentures as the tongue, cheeks and lips will lie properly against the denture base and help in seating the dentures.
  • 3. Waxing may be accomplished either by placing a piece of soften base plate wax to the base and gradually carving it down to the desired form or by deposing molten wax in the proper area to build up the desired form so that: 1-the anterior portion of the maxillary denture base should be shaped so that together with the teeth, it provides a pleasing form for the lip, and procedures a slight overall convex effect.
  • 4. 2-the contour of the mandibular denture in the anterior region is relatively straight. 3-the form of buccal flange from the premolar backward should face downward and outward for the upper and upward and outward for the lower. This contour allows the buccinator muscle to lie against the denture and aids in its retention and stability
  • 5. 4-the contour of the lingual surface in the anterior region should be straight and slope to the lingual border. The contour of the lingual surface in the premolar and molar region is relatively straight, as a concave surface in this area provides space for the tongue to catch and lift the denture unintentionally during movement. The lingual surface posterior to the second molar(the retromylohyoid region) faces downward and inward and is thinned so that it does not interfere with normal tongue movement
  • 6.
  • 7. 5-any excess wax around the teeth is removed. The remaining wax is carved at the cervical line of artificial teeth to simulate the natural appearance of the gingival margin and gingival papillae. The gingival papilla of the denture should be convex both occlusogingivally and mesiodistally, and should fill the interproximal space below the contact point. Carving the gingival margin should be carried out with a knife held at an angle 45 to the cervical.
  • 8. 6-the region of attached gingival may be stippled to produce a finished denture whose surface show an a "orange-peel effect". This may be produced with tooth brush; placed on lightly flamed wax surface on the wax. The bristles produce many small indentations in the wax. 7-the wax above the roots should be contoured to simulate the root prominences present in dentulous mouths. The root prominences should fade out before the borders are reached. the root prominences of canines are the most definite prominences in the dental arch.
  • 9. 8-the palatal surface of the maxillary trial denture base should be waxed to a nearly uniform thickness of 2.5 mm. wax is further added and carved 9-the wax at the borders is contoured as in the impression to produce a perfect peripheral seal. 10-finally,wax solvent is used to remove any wax film from the surface of the teeth otherwise, denture base material will adhere to the teeth making finishing procedures difficult.
  • 11. 1-Flasking Dental flask: is an instrument into which the contoured, waxed-up denture base is covered into resin, to make a denture. This done by investing the wax denture, eliminating the wax to form a mould into which methyl-methacrylate resin is packed.
  • 12. Component parts of the dental flask 1-the base of the flask, is in the form of a cup. It contains a round knock-out plate. For the lower denture, the edge of the base is higher posteriorly to accommodate the posterior upward inclination of the mandible. 2-The middle part of the flask is in the form of a ring, it fits accurately into the base through pins. 3-The top parts of the flask “the lid” which fits accurately into the ring and contains escape holes.
  • 13.
  • 14.
  • 15. Flasking the denture is done in three steps. In the first step, the cast is secured into the base of the flask with stone. Taking care that no undercuts exist on the surface of this first step. In the second step, the ring of the flask is put in place, and stone is poured up to the occlusal surface of the teeth. The final third step is accomplished when the top portion of the flask is poured and the lid is placed on the flask. The third stage is referred to as capping
  • 16. Procedure for flasking the denture 1-Seal the waxed denture base to the cast using base plate wax. 2-Remove the waxed up denture from the articulator. 3-Place the dentures and casts in the flask to check the height of denture teeth in the flask To ensure that the flask and the casts are of compatible size.
  • 17. 4-The waxed up dentures placed on their casts are soaked in water at room temperature for about 5 minutes. Hence the casts are thoroughly wet removing less water from the investing stone mix. 5-Paint the casts with plaster separating medium to facilitate deflasking, and the inside surface of the flask is lightly coated with vaseline.
  • 18. 6-Mix artificial stone and place it in the base part of the flask. Settle the waxed denture and the cast into the mix, and center the cast in the flask. The posterior portion of the cast should at the same level with the edge of the flask, and the occlusal plane approximately parallel to the base of the flask. 7-Smooth the stone around the cast and block any undercuts that would prevent separation of the flask halves, such undercuts occur commonly in the posterior lingual region of mandibular dentures.
  • 19. 8-Place the ring of the flask in position on the base part to ensure that no stone remains on the rim preventing complete seating and that teeth do not protrude above the top of the flask. After the stone has set, paint plaster separating medium on the first stage stone. Take care not to place separating medium on the waxed denture or teeth.
  • 20. 9-A mix of artificial stone is poured into the flask while the ring is in its position, place the flask on a vibrator to ensure that the stone reaches all cervices around the teeth. 10-Remove the stone with finger to expose the occlusal surface of the teeth. 11-The stone is allowed to set, then a plaster separating medium is painted on the surface of the second stage.
  • 21. 12-A mix of stone is poured so that the flask is over-filled to produce the third stage stone. 13-Place the lid on the flask firmly and tap it gently to ensure that the flask has been completely filled. 14-Allow the stone to set before the wax is eliminated.
  • 22.
  • 23.
  • 24.
  • 25.
  • 26.
  • 27.
  • 28.
  • 29.
  • 30.
  • 31.
  • 32. 2-Wax elimination Now, after the dentures have been flasked, the wax must be eliminated to form a mould into which the resin may be packed. This is done by placing the flask in hot water which softens the wax. The flask is then opened and the wax. The flask is then opened and the wax is flushed out.
  • 33. Procedure for wax 1-The flask, in the holder, is placed in boiling water for approximately 5 minutes, then removed. 2-with the blunt end of a plaster knife, separate the flask. It is placed in the slot in the posterior portion of the flask, which is then gently opened. Discard the softened wax, and plastic denture base. Then check that no denture teeth have been dislodged on opening the flask.
  • 34. 3-Clean boiling water, to which detergent has been added is flowed over the surface of the teeth, cast, and stone to eliminate all traces of wax. 4-With a brush, and soap or detergent solution thoroughly scrub the mould to reach into all mould recesses. This is followed with a clean boiling water flush, to remove any trace of the detergent. 5-Place the flask aside to cool.
  • 35.
  • 36.
  • 37.
  • 38.
  • 39.
  • 40.
  • 41.
  • 42. Painting the tin-foil substitute Tin-foil substitute or (sodium alginate) is applied to all stone surface of the cast, and the flasking stone after the flasks have cooled to prevent the resin from adhering to the stone. Pour enough tin-foil substituent into a small container for use, never dip the brush into the main container because it is very easily contaminated, and its effectiveness is destroyed.
  • 43. A large brush may be used to paint the casts and the flasking stone while a small brush is used to carry tin foil substitute around the teeth. A void covering the teeth otherwise, a small void will be present around the teeth in the complete denture. The void will stain in the mouth and result in a black line around the teeth. After the stone in the flask has been painted, place it aside and allow it to dry. Now the mould is ready for packing the denture resin
  • 44.
  • 45. 3-packing the denture 1-proportion the monomer and polymer following the manufacturer’s instruction. Placed the monomer in a clean mixing jar and then sprinkle the polymer into it to ensure that each particle of the polymer is wet with the monomer. The mixture is then spatulated with a stainless steel spatula.
  • 46. 2-Cover the mixing jar to prevent evaporation of the monomer, resulting in a grainy mix. Place the jar aside until the resin reaches the proper stage (dough) for packing. 3-Remove the resin from the jar, form it in a roll and adapt it to the mould in the flask. 4-Place a piece of wet cellophane over the resin. Placed the flask halves in their position and close it. This allows the flask to be re-opened for inspection, adding or removing resin without adherence of the cast to the tissue surface of the uncured resin.
  • 47. 5-Place the assembled flask in a bench press slowly. This permits the flow of acrylic resin into minute areas of the mold. 6-Open the flask and cut away excess resin extending around the edges of the flask, so that no resin is beyond the border of the denture. 7-Trial packing is repeated until no more excess resin is apparent on opening the flask, all the fine details are present on the surface of the resin representing an exact negative replica of the cast, and until the resin shows a dense shiny surface.
  • 48. 8-Repaint the cast portion of the flask with tin-foil substitute and allow it to dry. 9-Assemble the flask and close it until metal to metal contact between the flask rims is achieved. 10-Place the flask in a processing clamp and turn the hexagonal handle to close the clamp tightly.
  • 49.
  • 50.
  • 51.
  • 52.
  • 53.
  • 54.
  • 55.
  • 56.
  • 57.
  • 58. 4-Curing the denture Denture resins are cured by one of two methods. The preferred method is curing the resin for 9 hours at 165F (70C). The second method requires curing the resin at 165F for one hour followed by boiling for half an hour. After curing, the flasks are removed from the water and allowed to bench cool before they are removed from the clamp. The denture is then ready for deflasking, finishing and polishing.
  • 59. 5-Deflasking 1-Remove the lid of the flask using plaster knife. 2-The flask is then placed in a flask ejector to separate the flask from the stone enclosed denture. 3-an alternate method for removing the flask is by using a hammer to strike the knock-out plate on the bottom of the flask. The base part of the flask is removed followed by the top part.
  • 60. 4-Place a knife blade at the junction between the stone cap and the rest of the stone enclosing the denture to separate the stone cap and expose the cusp tip and incisal edges of the denture teeth. 5-Using a saw, make three saw cut in the investing stone, one opposite the central incisor teeth and one at each distobuccal corner of the flasked denture.
  • 61. 6-Separate the stone sections gently, then remove stone from the palate or tongue area using a knife. Don’t remove the dentures from the casts, special care must be taken to ensure that the casts are not broken. 7-use a tooth brush to clean out the index grooves on the base of the cast, to faciliate accurate repositioning of the casts on the mounting stone for the correction of any processing errors.
  • 62.
  • 63.
  • 64.
  • 65.
  • 66. Common errors in the final denture Problem: Cured denture has porosity Cause: 1(Flask unpacked with resin 2(Denture base heated too rapidly Solution: 1(Fill the mould completely before curing. 2(Bench cure, followed by long curing cycle.
  • 67. Problem: Cured denture has processing errors Cause: 1(Denture resin packed at late or rubbery stage. 2(Flask not properly closed prior to curing Solution: 1(Pack resin during dough stage. 2(Make certain that metal to metal contact of flask rim is achieved.
  • 68. Problem: Stone adhering to surface of denture Cause: 1(Failure to place tin-foil substitute on stone prior to packing. 2(Tin-foil substitute contamination with stone 3(Wax elimination not completed during boiling out, rendering tin-foil ineffective. Solution: 1(Paint tin-foil properly on stone prior to packing. 2(Use fresh tin-foil poured into a small container. 3(Clean in mold surface and cast surface thoroughly with boiling water.
  • 69. Problem: Denture has many acrylic resin nodules. Cause: 1(Investing stone not properly spatulated. 2(Presence of air bubbles in the investing stone. Solution: 1(Mix stone properly. 2(Elimination air bubbles by placing the flask on a vibrator.