Downloaded 15 times


![Page 14 of 144 Paul Bolton 2012
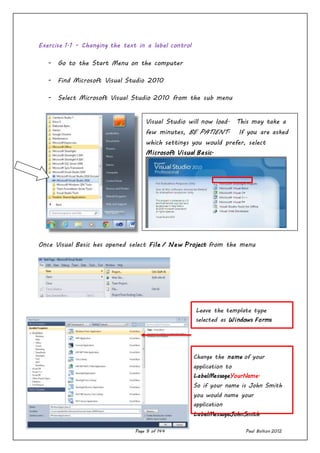
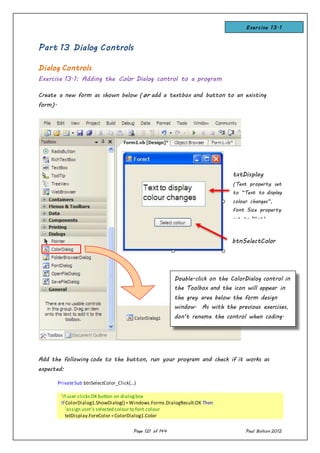
12. Return to the form either by clicking the Form1.vb [Design] Page tab or the
View Designer button in the Solution Explorer’s small toolbar (you will need to
hover the mouse over the button to see its name.
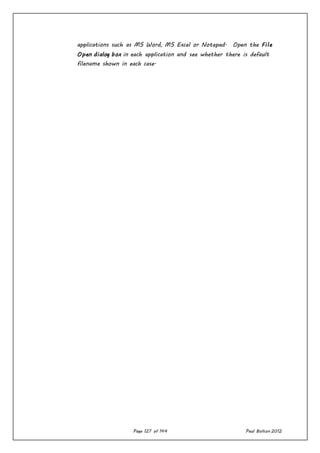
13. Double-click the Bad Message button on the form. Type in a line of code similar
to that in step 10 to display the “I do not like Visual Basic” message when the
Bad Message button is clicked.
Running the Program
14. Click the Start button on the toolbar or select Debug/Start from the menu.
Click on each of the two buttons to check that the message changes. Close the
program by clicking the red “X” in the top-right corner of the program window
(i.e. the “form” you created)
Saving the Program
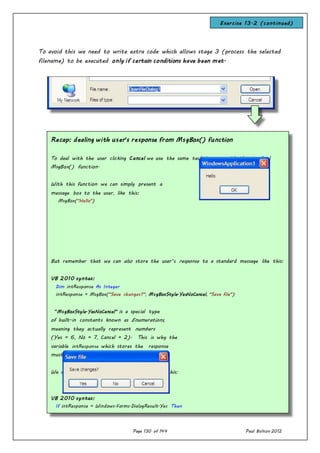
15. Click the icon on the menu. In the Save Project window you should see
LabelMessage automatically displayed as the application name. Don’t alter any of
the entries. Just click the Save button.
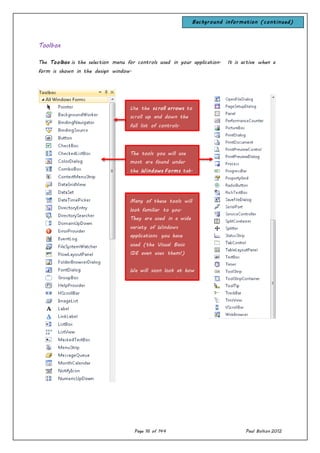
More on the VB Integrated Development Environment (IDE)
Menu Bar
Under the title bar is the Menu. This menu is dynamic, changing as you try to do different
things in Visual Basic .NET. When you start working on a project, it should look like this:
You will become familiar with each menu topic as you work through the course. Briefly, they
are:
File Use to open/close projects and files. Use to exit Visual Basic .NET
Edit Used when writing code to do the usual editing tasks of cutting, pasting, copying and
deleting text
View Provides access to most of the windows in the Integrated Development Environment
(IDE)
Project Allows adding files and objects to your application
Build Allows you to compile and run your completed application (go to Run mode)
Debug Comes in handy to help track down errors in your code (works when Visual Basic .NET
is in Break mode)
Background information](https://image.slidesharecdn.com/visualbasic2010bookletfinal-160906163939/85/Visual-basic2010bookletfinal-14-320.jpg)


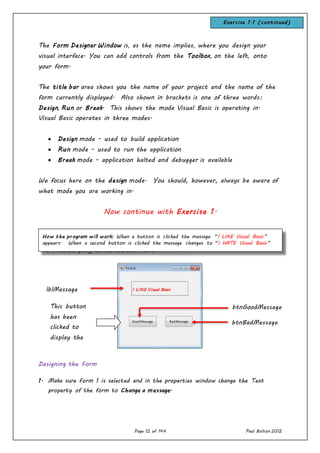
![Page 82 of 144 Paul Bolton 2012
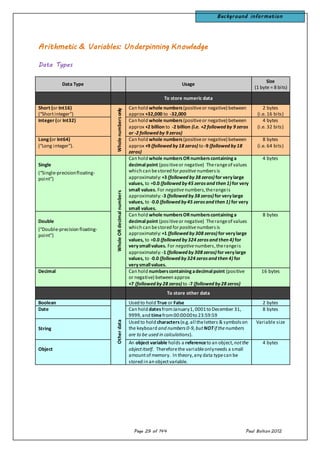
For.. Next Loops - Underpinning knowledge (continued)
Counting in steps
By default, the “For… Next” loop counts upwards in steps of 1, unless you tell it
otherwise.
So, the value of the variable “intCounter” above became: 1, then 2, then 3, then
4, then 5, as the loop was repeated 5 times.
However, you can tell it to count upwards in increments other than 1, by adding
the word “step” to the line of code. You could make the loop count up to 10
in steps of 2, for example:
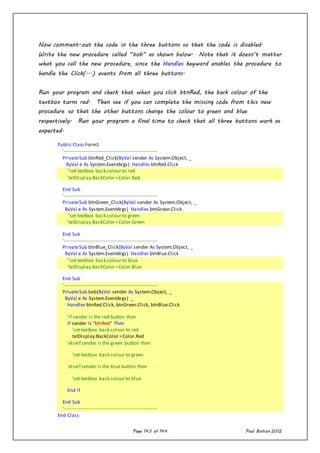
For intCounter = 1 To 10 Step 2
The result here would be that the loop is repeated 5 times. (The value of the
variable would be 1, 3, 5, 7, and 9.)
Counting backwards
There are times when you will want to count down instead of counting up. You
do this by using a negative “step” number. The example below again will run the
code 5 times.
For intCounter = 5 To 1 Step -1
In summary, the general structure of the “For… Next” loop is shown below.
(the code written in brackets [ ] is optional)
For countervariable = startnumber to endnumber [Step stepnumber]
Next [countervariable]
(3) Using variables for the start and end numbers.
Body of code
to be repeated
Background information](https://image.slidesharecdn.com/visualbasic2010bookletfinal-160906163939/85/Visual-basic2010bookletfinal-82-320.jpg)


This document provides an overview of the Visual Basic Integrated Development Environment (IDE) and walks through an introductory exercise to familiarize the reader with the basics of designing a Windows form application in Visual Basic. It introduces the three main steps to application development: designing the user interface, assigning control properties, and writing event code. The exercise demonstrates changing text in a label control using buttons. The document also provides descriptions of key IDE windows and features like the menu bar, toolbox, solution explorer, and code editor.