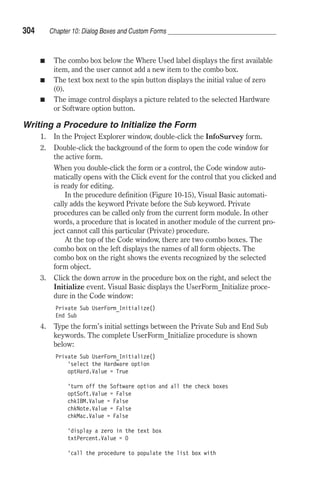
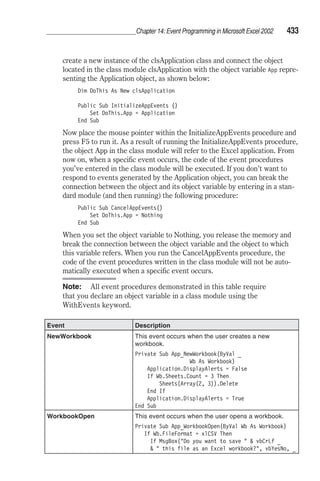
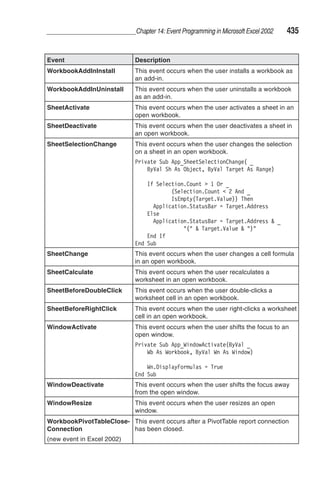
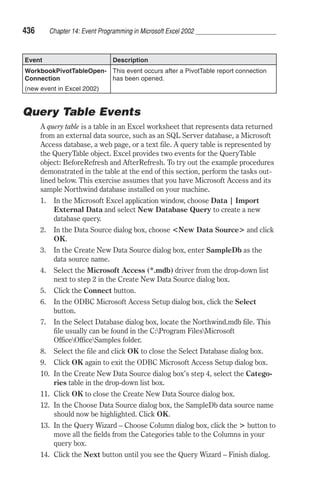
This document provides information about a book titled "Learn Microsoft Excel 2002 VBA Programming with XML and ASP" by Julitta Korol. The book is published by Wordware Publishing, Inc. and teaches how to program Excel 2002 using Visual Basic for Applications (VBA), XML, and Active Server Pages (ASP). It includes a dedication by the author to her mother and mother-in-law for supporting her during the long hours it took to write the technical book. The book contains chapters that introduce spreadsheet automation with VBA macros, teach the basics of VBA programming, and cover topics like variables, procedures, decision making, and more.


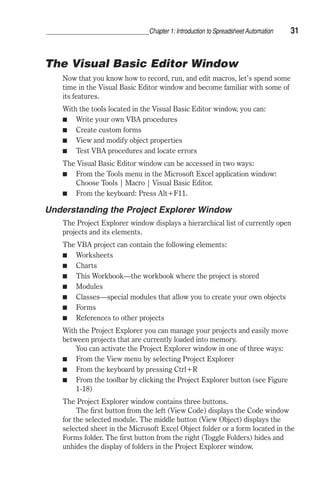

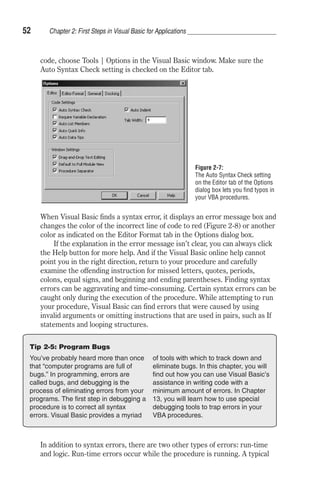
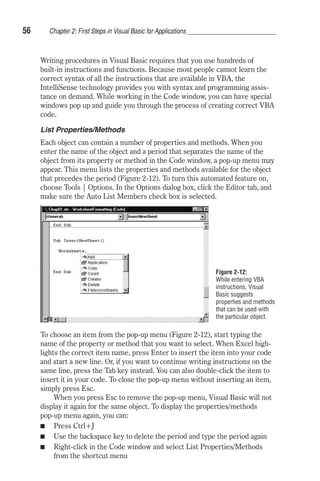
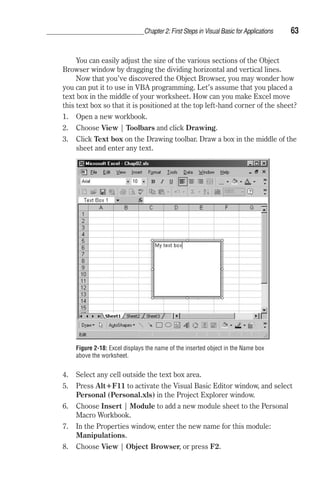
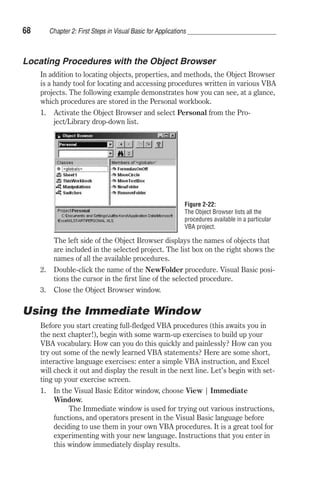
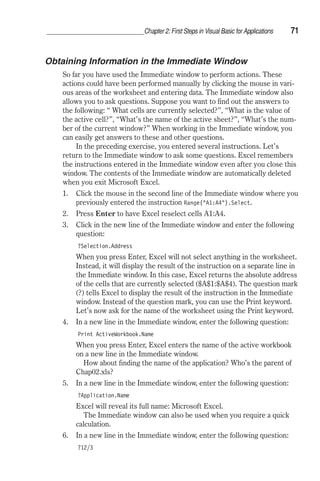
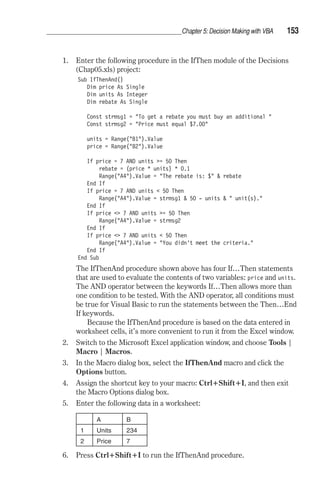
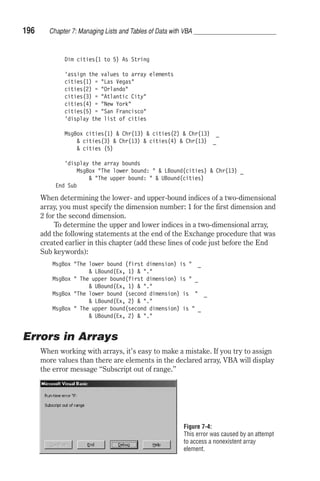
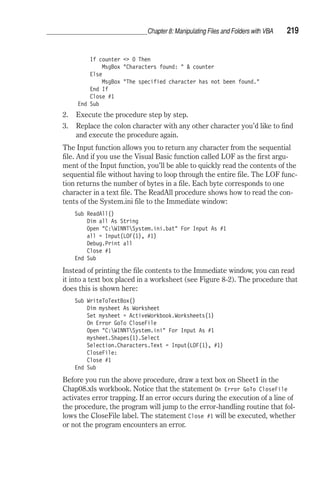
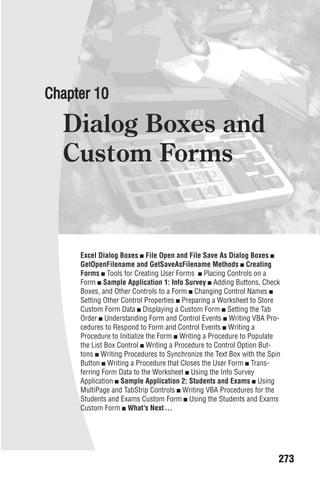
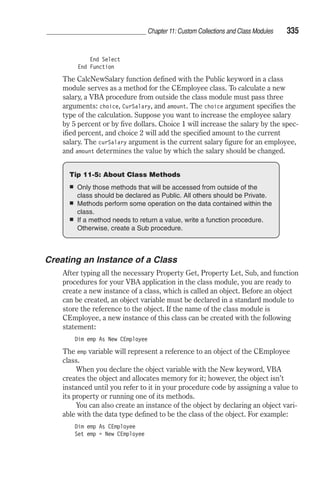
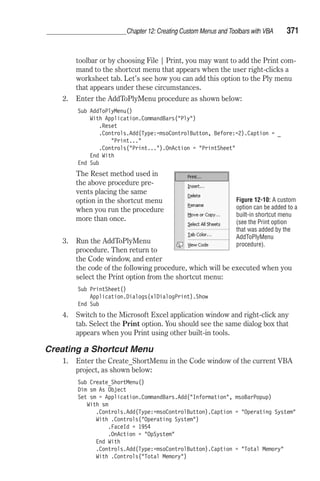
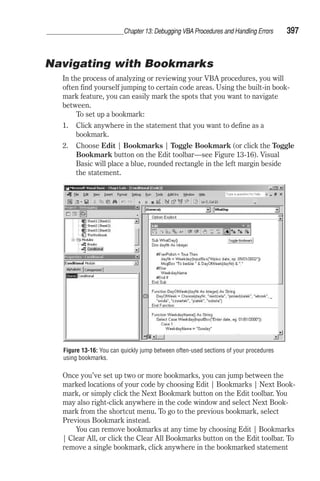
![58 Chapter 2: First Steps in Visual Basic for Applications
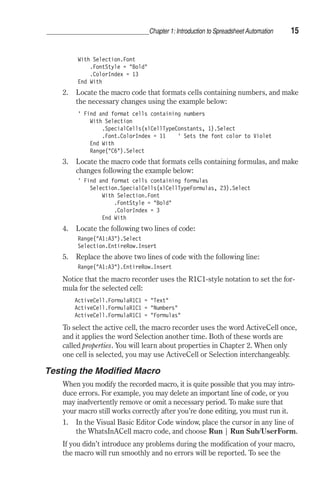
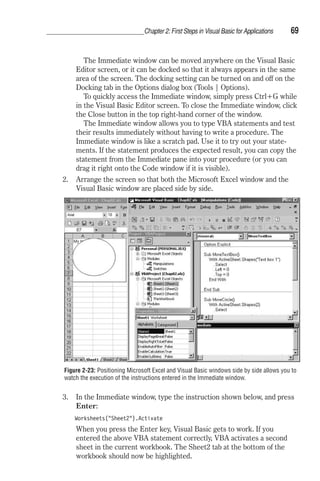
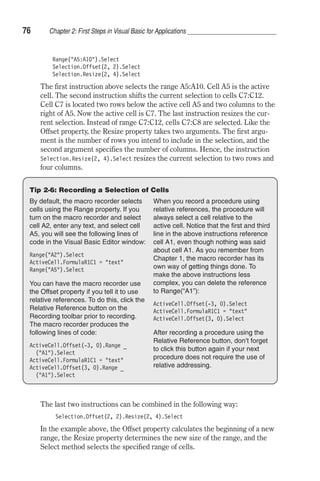
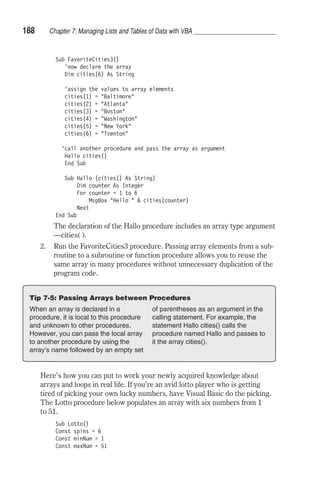
makes it easy for you to supply correct arguments to a VBA function. In
addition, it reminds you of two other things that are very important for the
function to work correctly: the order of the arguments and the required data
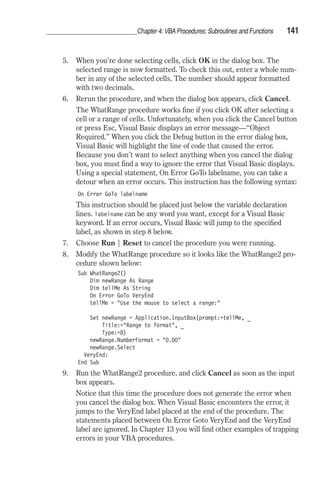
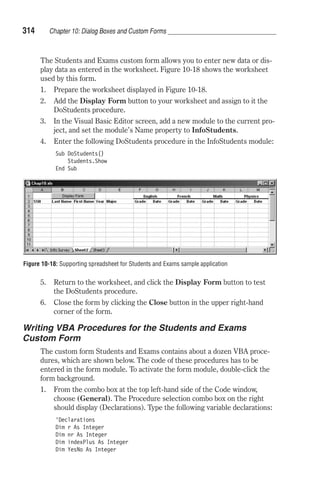
type of each argument. You will learn about data types in the next chapter.
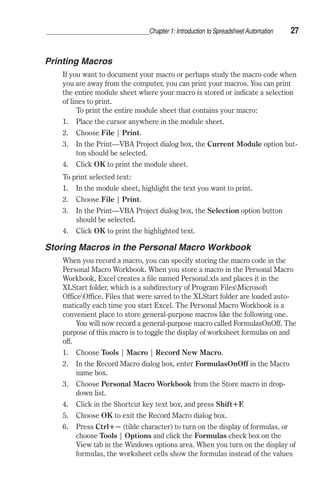
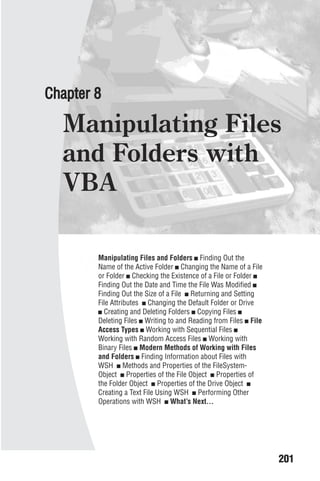
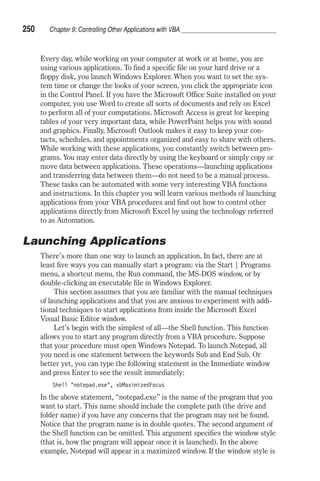
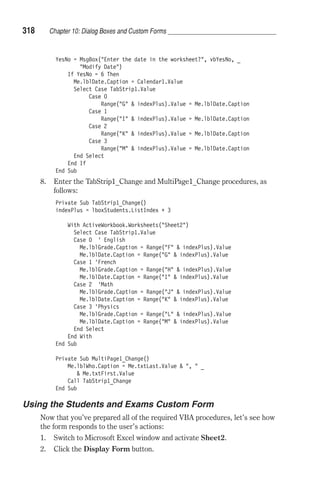
To see how this works, enter the following in the Code window:
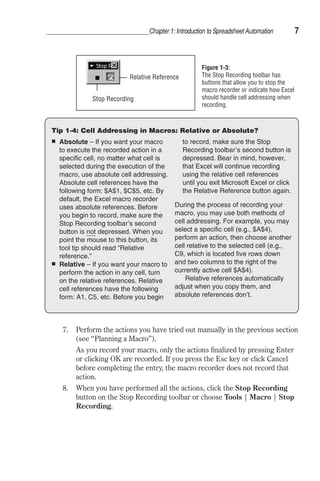
ActiveWorkbook.SaveAs(
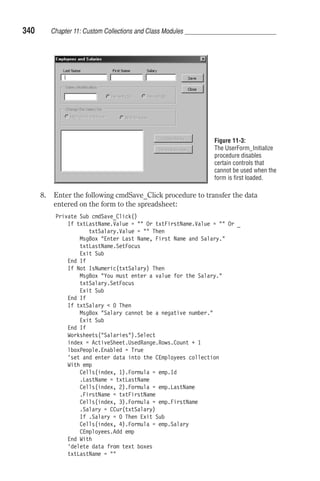
As soon as you enter the beginning parenthesis, a tip window appears just
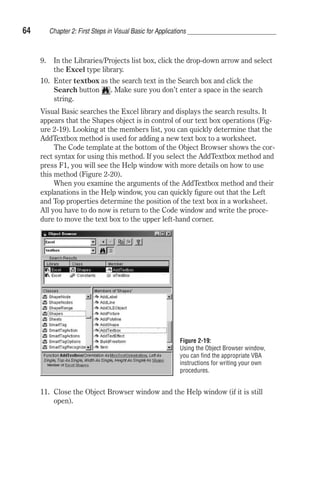
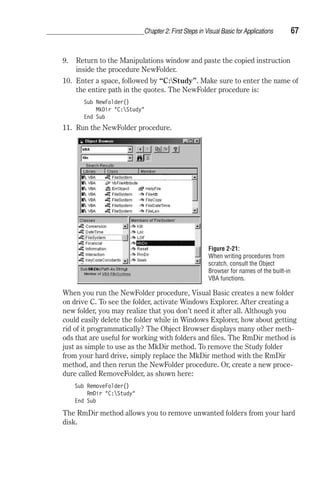
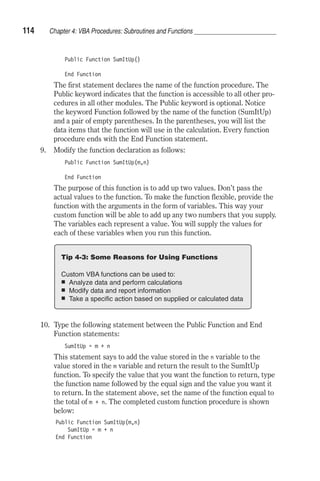
below the cursor. The current argument is displayed in bold. When you
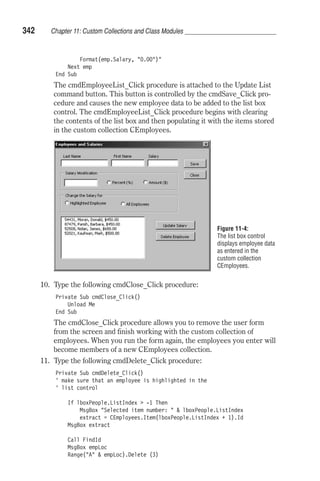
supply the first argument and enter the comma, Visual Basic displays the
next argument in bold. Optional arguments are surrounded by square
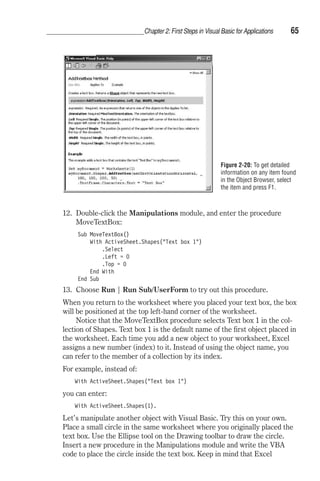
brackets [ ].
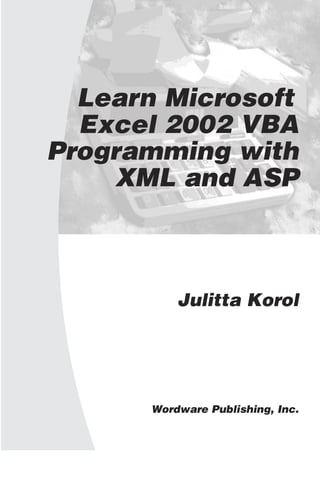
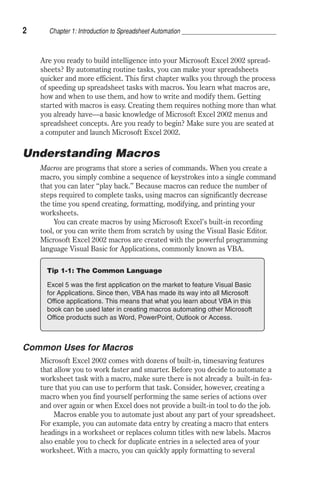
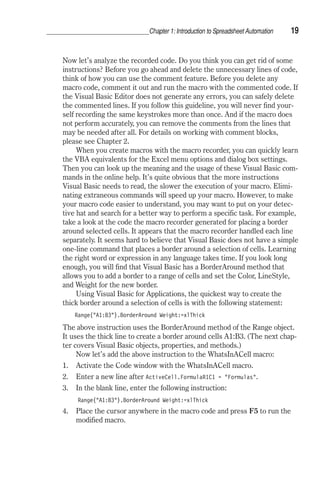
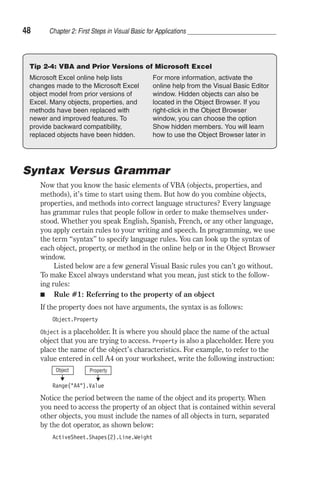
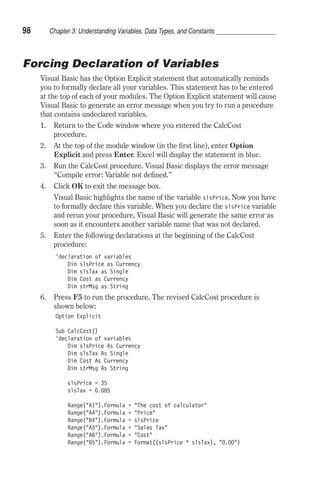
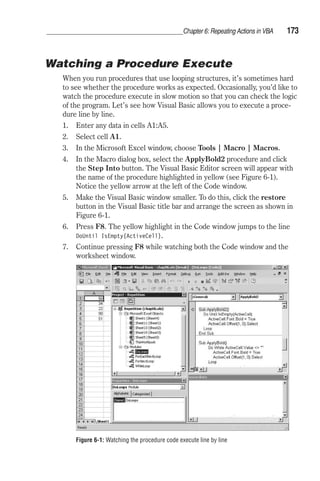
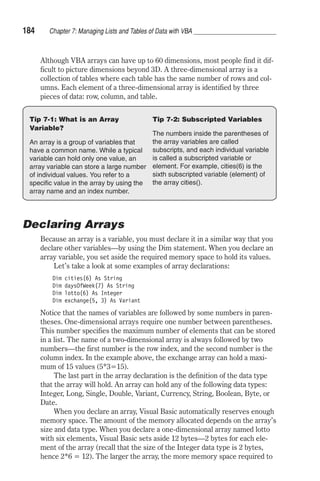
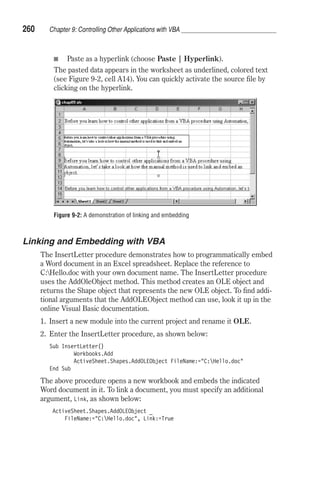
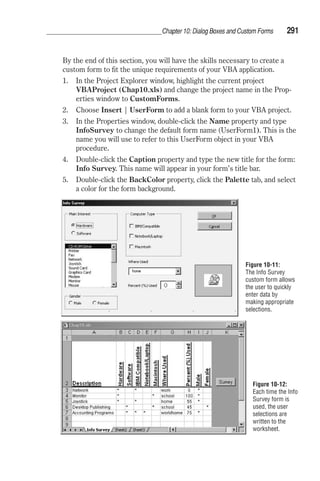
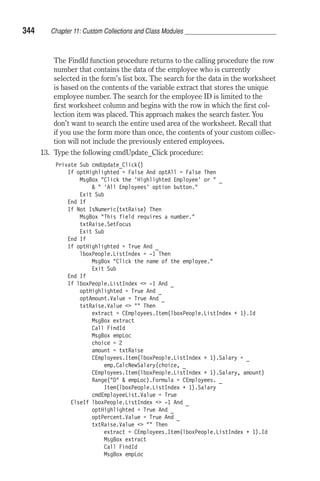
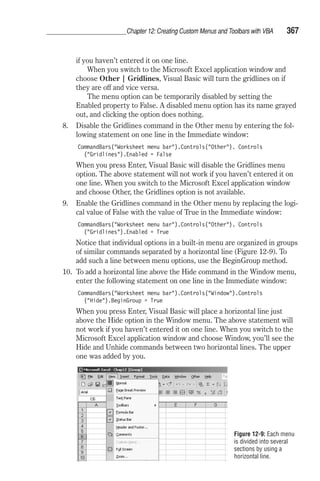
Figure 2-14: A tip window displays a list of arguments utilized by a VBA function or
instruction.
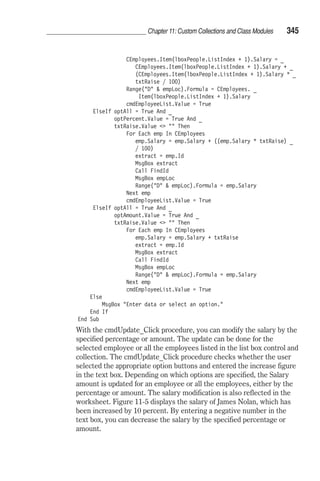
To close the Parameter Info window, press Esc. To open the tip window
using the keyboard, enter the instruction or function, follow it with the left
parenthesis, and press Ctrl+Shift+I. You can also click the Parameter Info
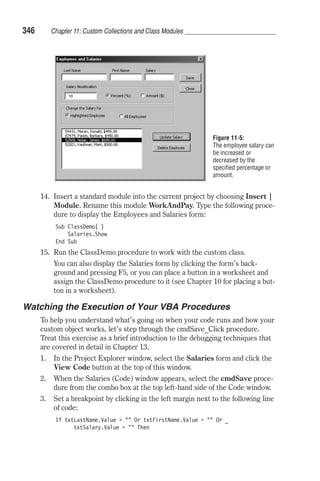
button on the Edit toolbar or choose Edit | Parameter Info.
Quick Info
When you select an instruction, function, method, procedure name, or con-stant
in the Code window and then click the Quick Info button on the
Edit toolbar (or press Ctrl+I), Visual Basic will display the syntax of the
highlighted item, as well as the value of a constant. The Quick Info feature
can be turned on or off using the Options dialog box. To use the feature,
click the Editor tab and choose the Auto Quick Info option.
Figure 2-15:
The Quick Info
feature provides a
list of function
paramenters, as
well as constant
values and VBA
statement syntax.](https://image.slidesharecdn.com/excelvbavisualbasickorol1-141026043610-conversion-gate01/85/Excel-vba-visual-basic-korol-1-75-320.jpg)

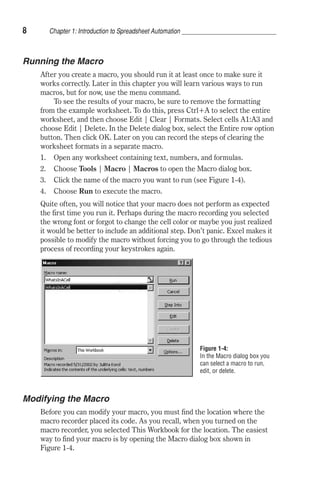
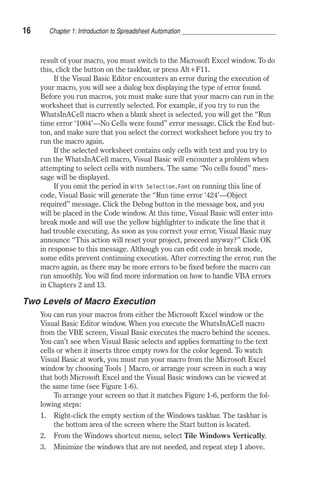
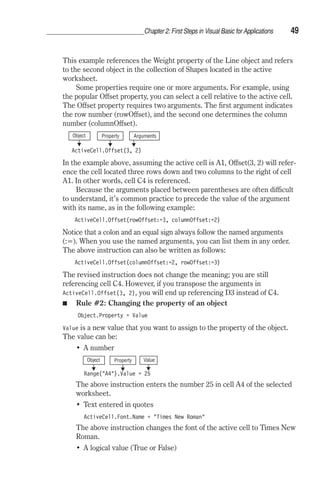
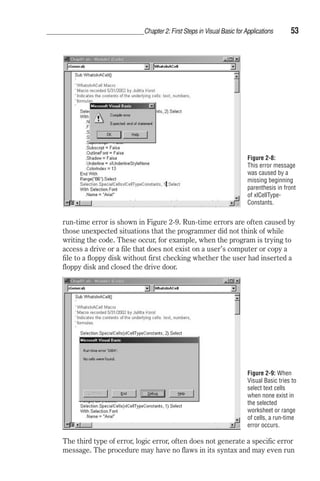
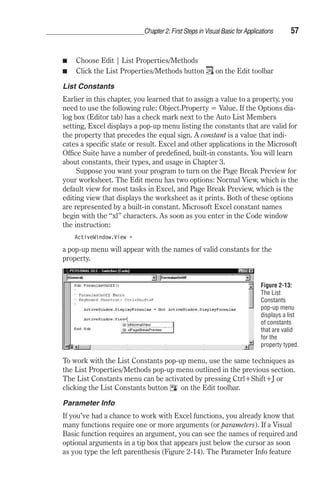
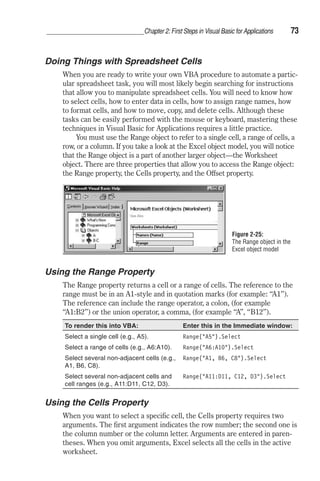
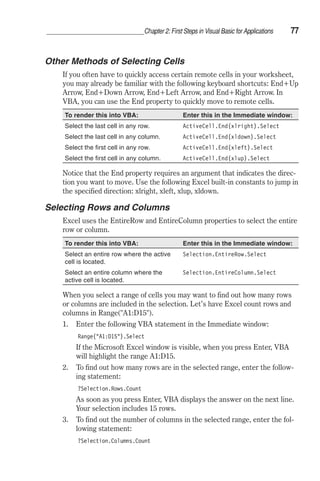
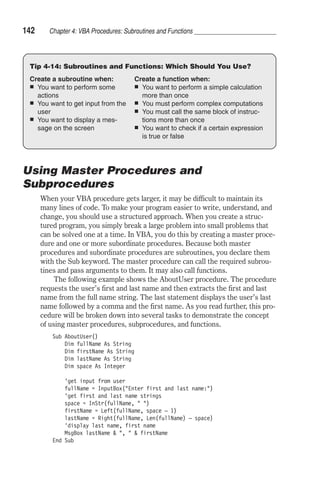
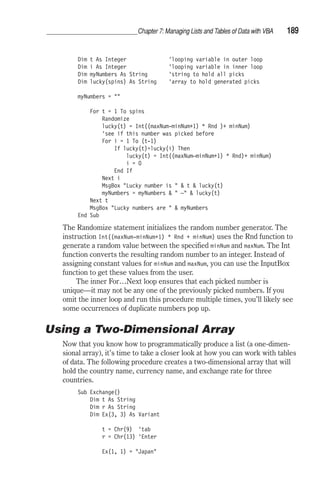
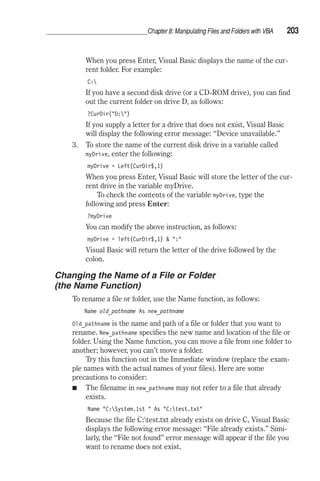
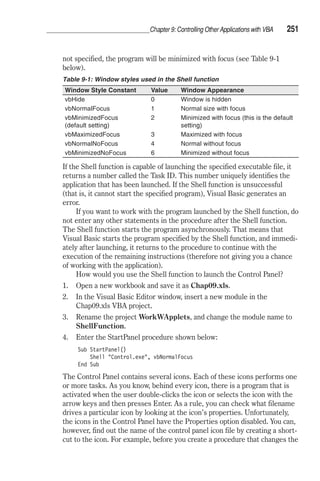
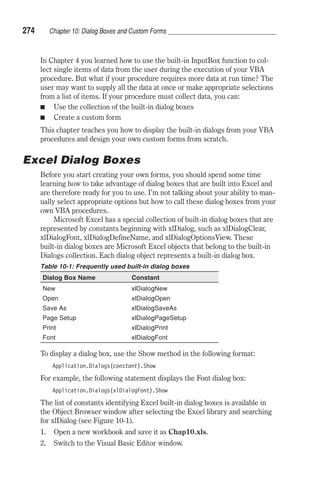
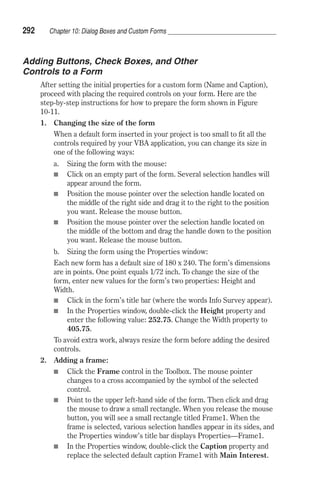
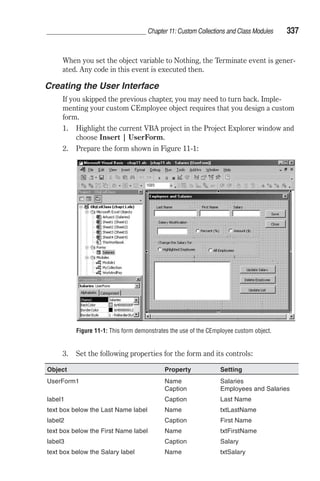
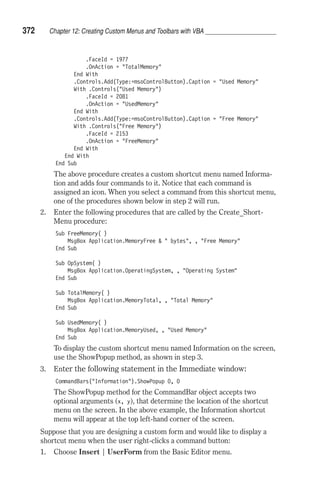
![70 Chapter 2: First Steps in Visual Basic for Applications
4. In the Immediate window, type another VBA statement and make sure
to press Enter when you’re done:
Range(A1:A4).Select
As soon as you press Enter, Visual Basic highlights the cells A1, A2,
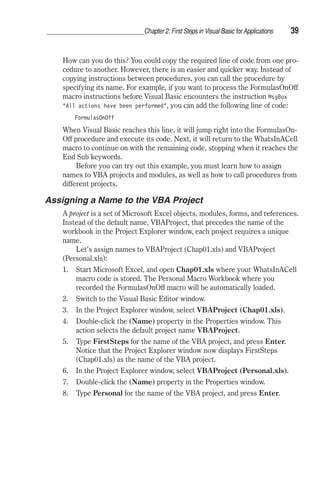
A3, and A4 in the active worksheet.
5. Enter the following instruction in the Immediate window:
[A1:A4].Value = 55
When you press Enter, Visual Basic places the number 55 in every cell
of the specified range, A1:A4. Although the above statement is an
abbreviated way of referring to the Range object, its full syntax is more
readable: Range(A1:A4).Value = 55.
6. Enter the following instruction in the Immediate window:
Selection.ClearContents
When you press Enter, VBA deletes the results of the previous state-ment
from the selected cells. Cells A1:A4 are now empty.
7. Enter the following instruction in the Immediate window:
ActiveCell.Select
When you press Enter, Visual Basic makes the cell A1 active.
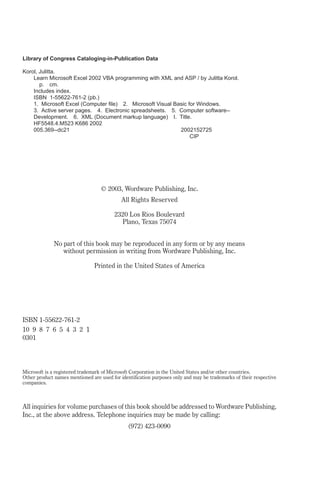
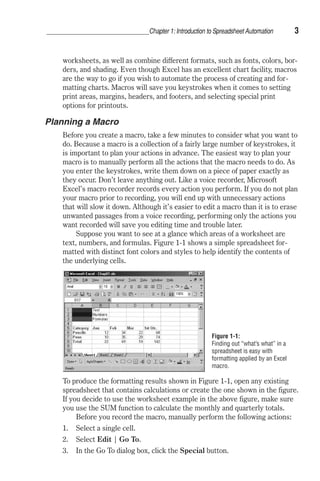
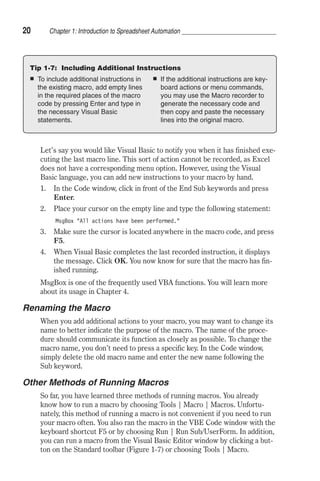
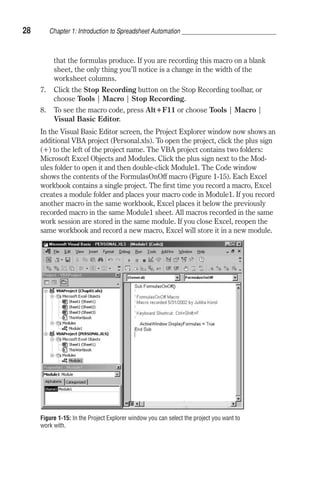
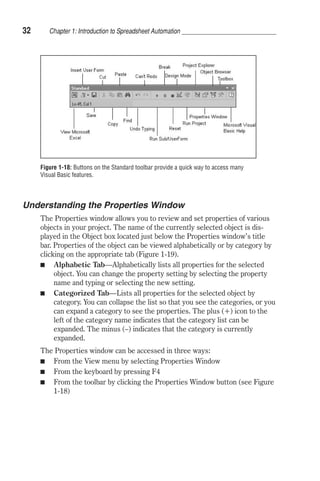
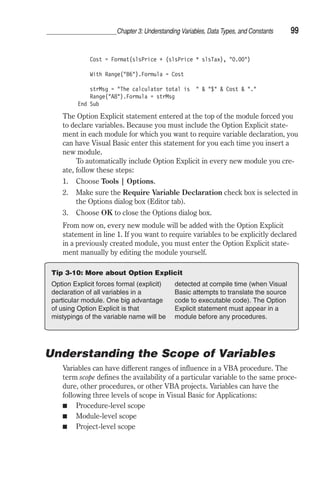
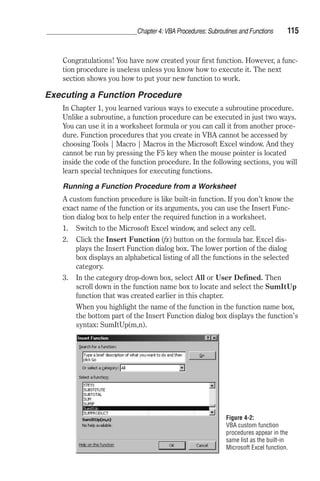
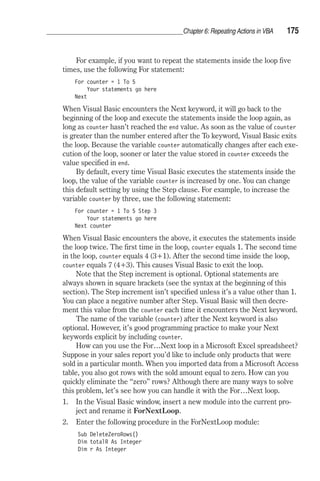
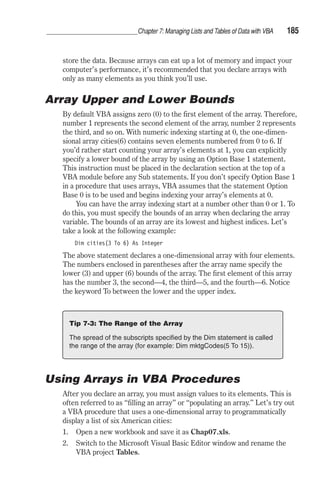
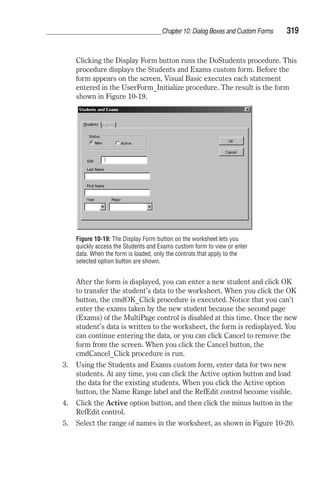
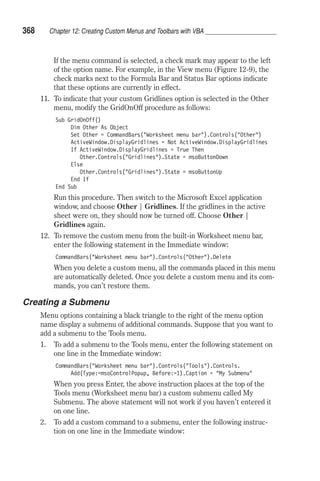
Figure 2-24 shows all the instructions entered in the Immediate window in
the above exercise. Every time you pressed the Enter key, Excel executed
the statement on the line where the cursor was located. If you want to exe-cute
the same instruction again, click anywhere in the line containing the
instruction and press Enter.
For more practice, rerun the statements shown in Figure 2-24. Start from
the instruction displayed in the second line of the Immediate window. Exe-cute
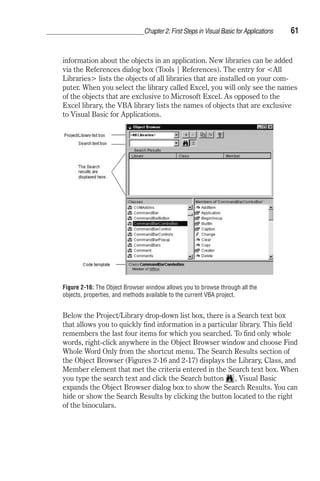
the instructions one by one by clicking in the appropriate line and
pressing the Enter key.
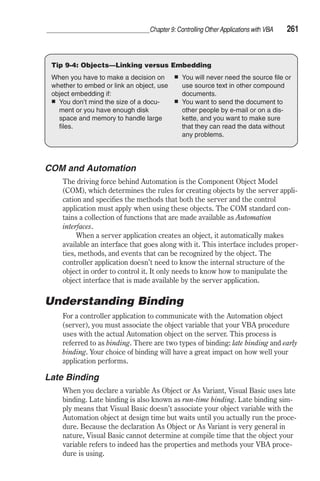
Figure 2-24:
Instructions entered in the
Immediate window are
executed as soon as you press
the Enter key.](https://image.slidesharecdn.com/excelvbavisualbasickorol1-141026043610-conversion-gate01/85/Excel-vba-visual-basic-korol-1-87-320.jpg)
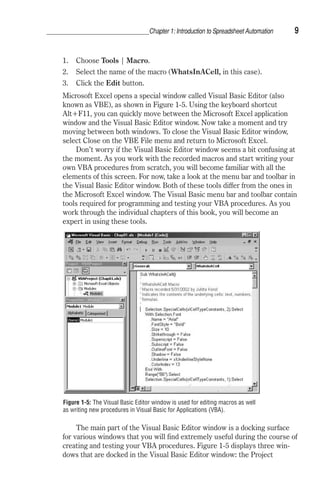
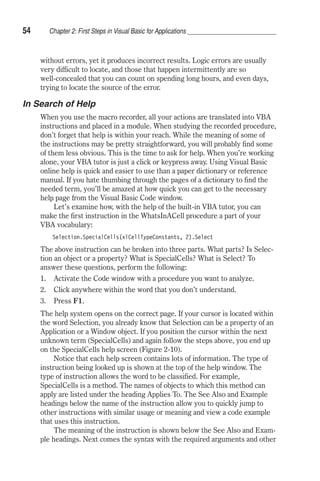
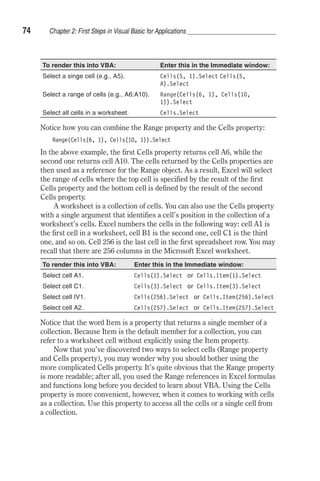
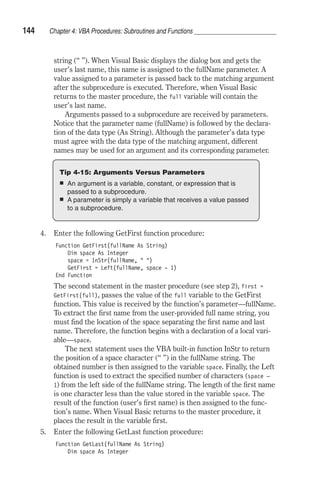
![72 Chapter 2: First Steps in Visual Basic for Applications
When you press Enter, Excel shows the result of the division on the next
line. But what if you want to know right away the result of 3+2 and 12*8?
Instead of entering these instructions on separate lines, you can enter them
on one line, as in the following example: ?3+2:?12*8.
Notice the colon separating the two blocks of instructions. When you
press the Enter key, Excel displays the results 5, 96 on separate lines in the
Immediate window.
Below are all the instructions you entered in the Immediate window
including Excel’s answers to your questions:
Worksheets(Sheet2).Activate
Range(A1:A4).Select
[A1:A4].Value = 55
Selection.ClearContents
ActiveCell.Select
?Selection.Address
$A$1:$A$4
Print ActiveWorkbook.Name
Chap02.xls
?Application.Name
Microsoft Excel
?12/3
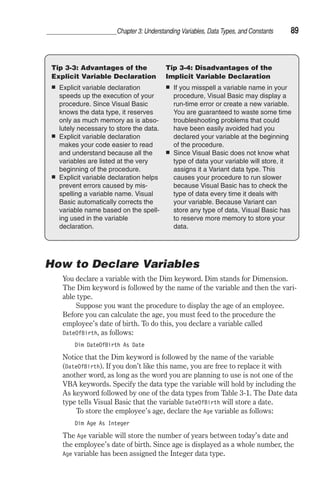
4
?3+2:?12*8
5
96
To delete the instructions from the Immediate window, highlight all the
lines and press Delete.
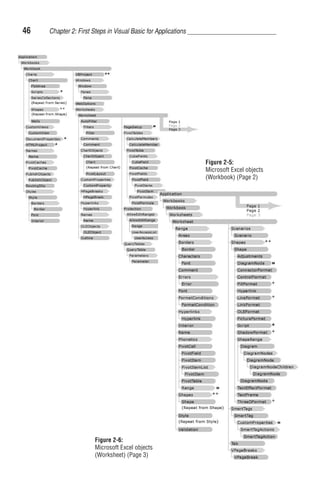
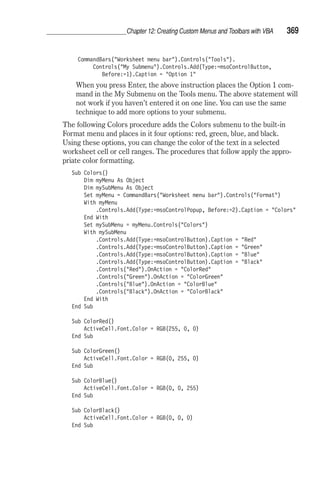
Learning about Objects
Creating custom applications in Excel requires a working knowledge of
common objects or collections of objects such as Range, Workbook (Work-books),
Worksheet (Worksheets), Window (Windows), and Application. In
preceding sections, you explored several methods of learning about Visual
Basic. Here’s a summary of when to use a specific tool:
When in doubt about objects, properties, or methods in an existing
VBA procedure, fire up the online help by pressing F1.
If you need a quick listing of properties and methods for every available
object or have trouble locating a hard-to-find procedure, go with the
Object Browser.
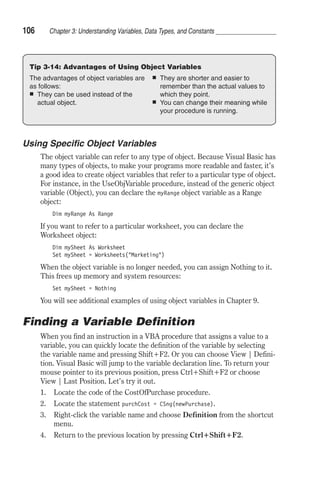
If you want to experiment with VBA and see the results of the VBA
commands immediately, activate the Immediate window.
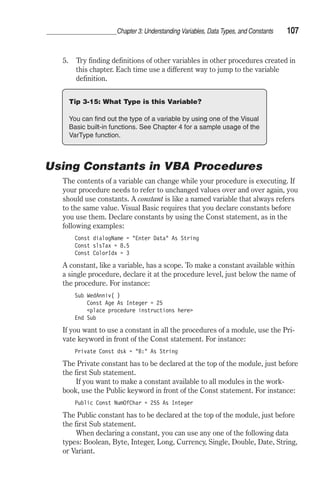
To help you better understand the VBA syntax, the remaining pages of this
chapter contain a number of VBA language drills. You will get the most out
of these drills if you take the time to work through them in the Immediate
window.](https://image.slidesharecdn.com/excelvbavisualbasickorol1-141026043610-conversion-gate01/85/Excel-vba-visual-basic-korol-1-89-320.jpg)
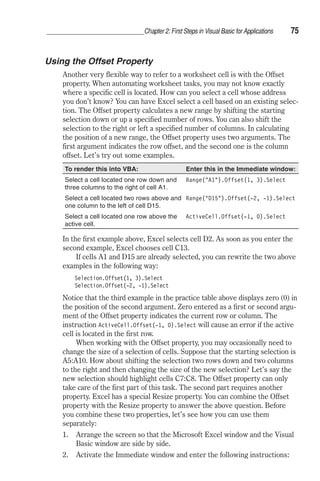
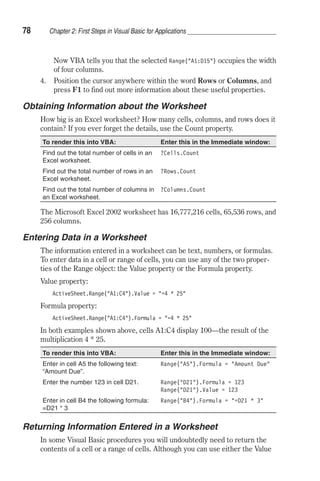

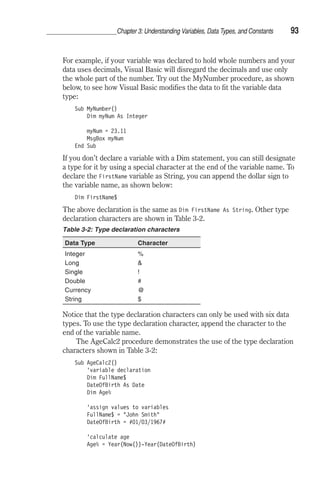
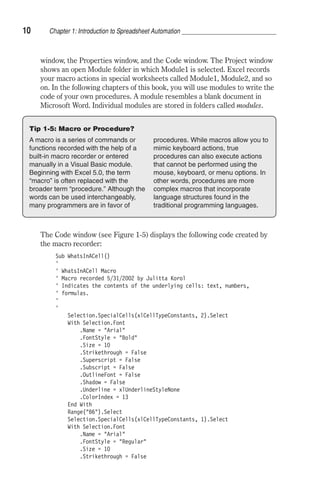
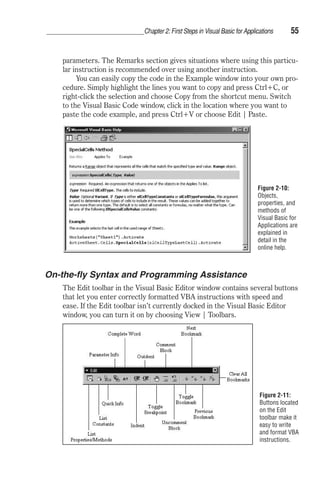
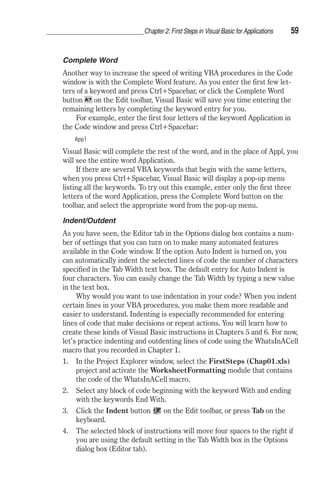
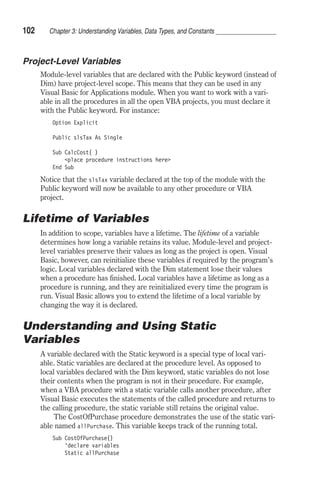
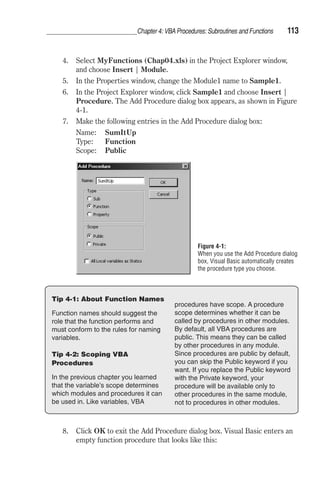
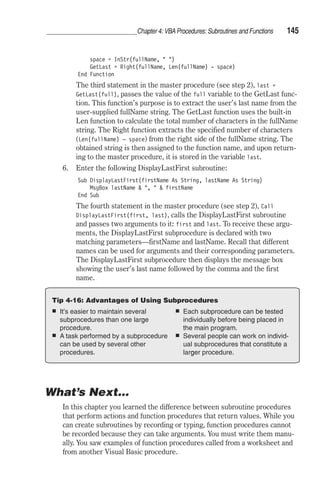
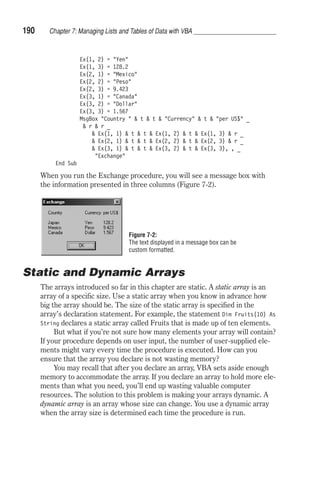
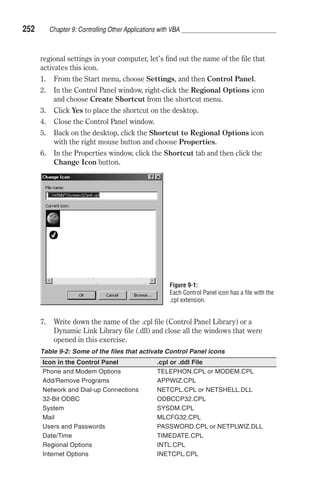
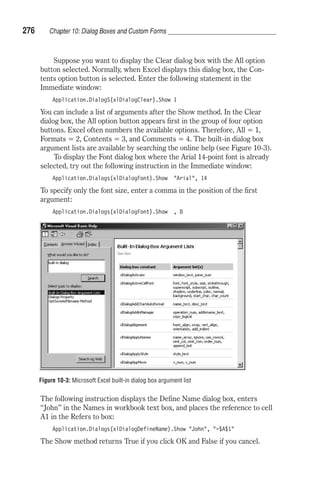
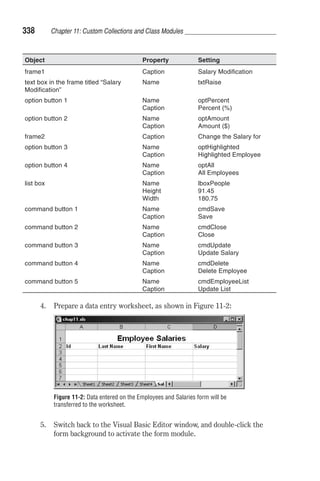
![96 Chapter 3: Understanding Variables, Data Types, and Constants
Note: When you run this procedure, Visual Basic may display
the following message: “Compile error: Variable not defined.” If
this happens, click OK to close the message box. Visual Basic will
select the slsPrice variable and highlight the name of the Sub
CalcCost procedure. The title bar displays “Microsoft Visual
Basic – Chap03.xls [break].” The Visual Basic break mode allows
you to correct the problem before you continue. Later in this
book, you will learn how to fix problems in the break mode. For
now, if you encounter the above-mentioned error, exit this mode
by choosing Run | Reset. Next, go to the top of the Code window
and delete the statement Option Explicit that appears on the first
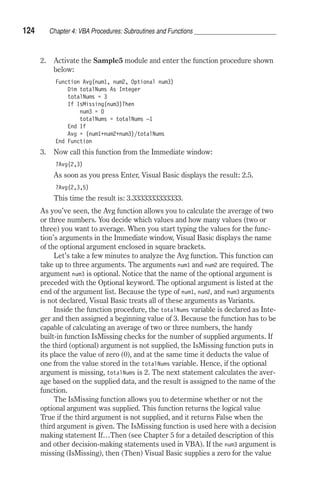
line. The Option Explicit statement means that all variables used
within this module must be formally declared. You will learn
about this statement in the next section. When the Option
Explicit statement is removed from the Code window, rerun the
procedure.
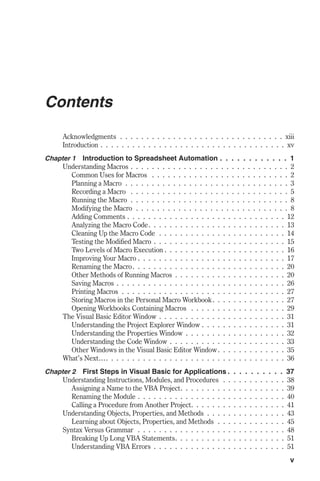
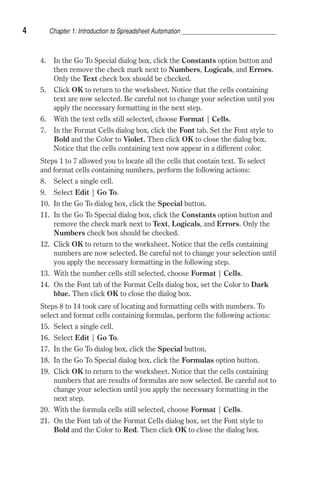
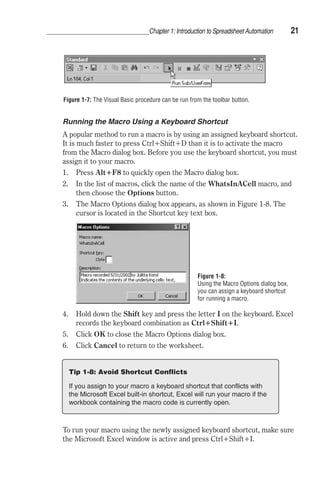
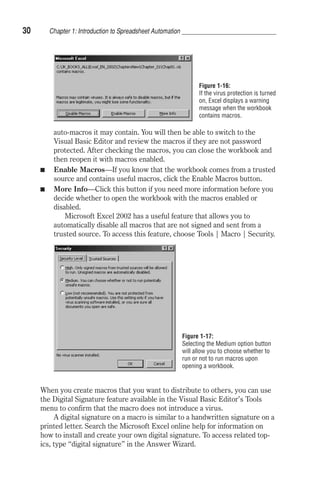
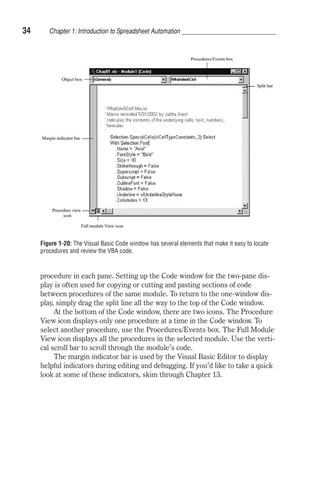
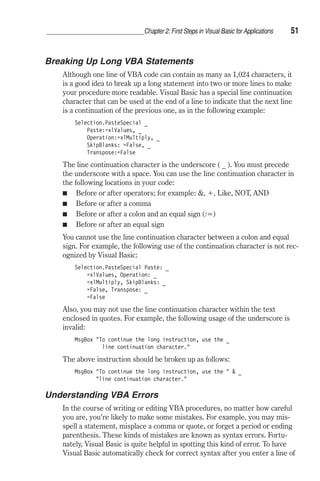
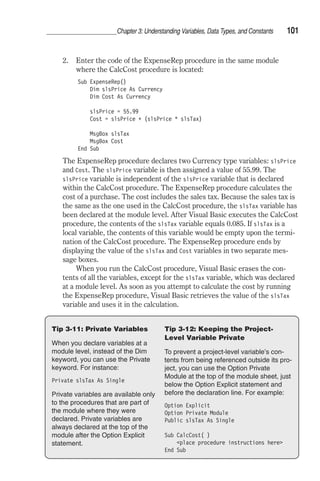
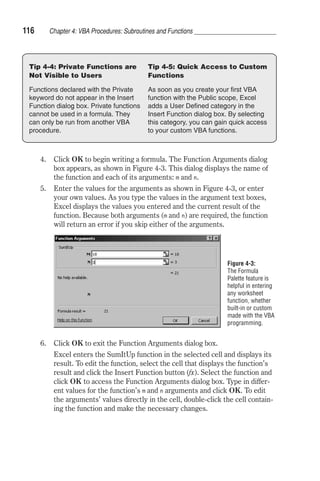
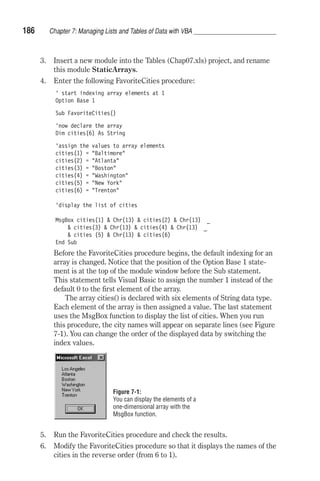
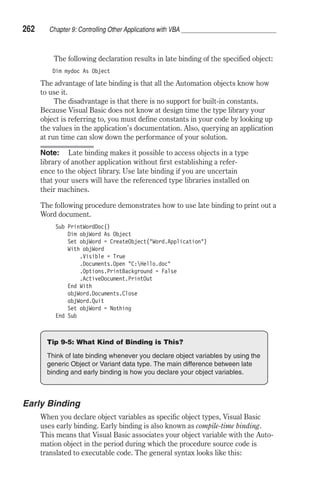
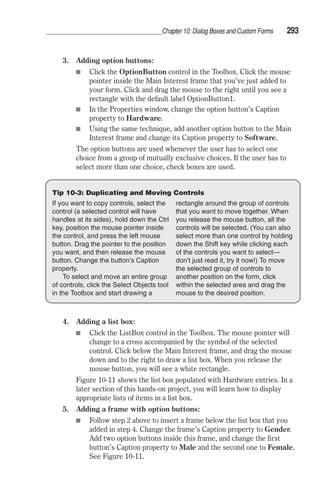
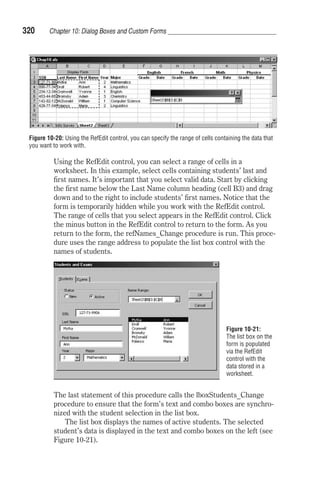
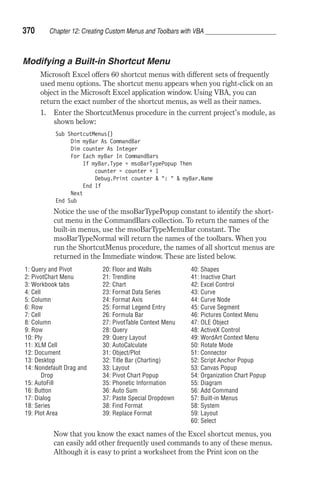
When the procedure has run, switch to Microsoft Excel. The result of the
procedure should match Figure 3-1.
Figure 3-1:
The VBA procedure can enter data and
calculate results in a worksheet.
Cell A8 displays the contents of the strMsg variable. Notice that the cost
entered in cell B6 has two decimal places, while the cost in strMsg displays
three decimals. To display the cost of a calculator with two decimal places in
cell A8, you must apply the required format not to the cell but to the Cost
variable itself.
VBA has special functions that allow you to change the format of data.
To change the format of the Cost variable, you will now use the Format func-tion.
This function has the following syntax:
Format(expression, format)
Expression is a value or variable that you want to format, and format is the
type of format you want to apply.
1. Change the calculation of the Cost variable in the CalcCost procedure:
Cost = Format(slsPrice + (slsPrice * slsTax), 0.00)](https://image.slidesharecdn.com/excelvbavisualbasickorol1-141026043610-conversion-gate01/85/Excel-vba-visual-basic-korol-1-113-320.jpg)
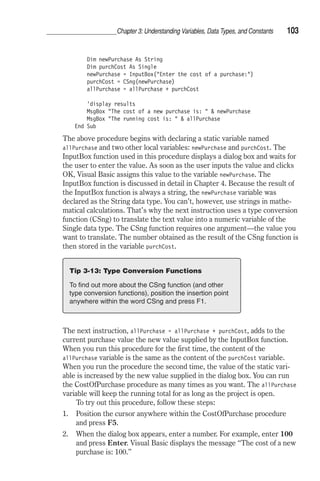


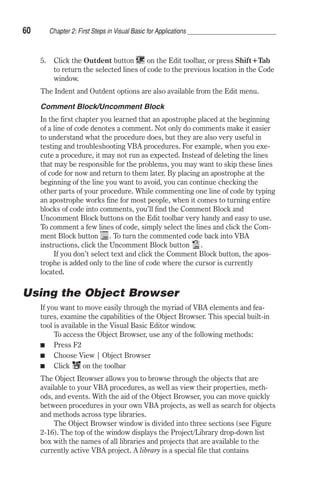
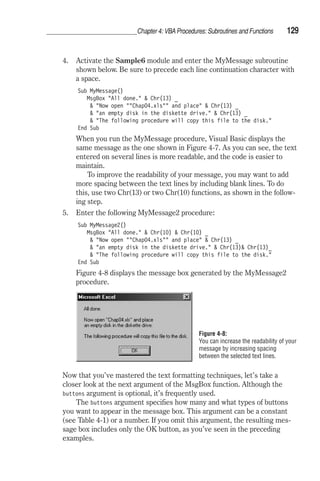
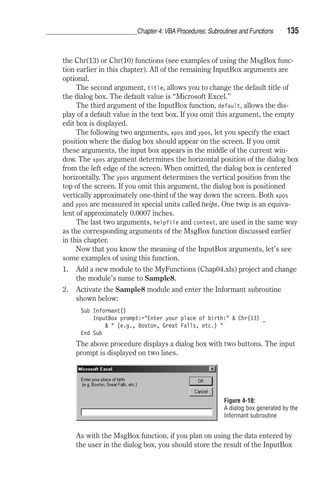
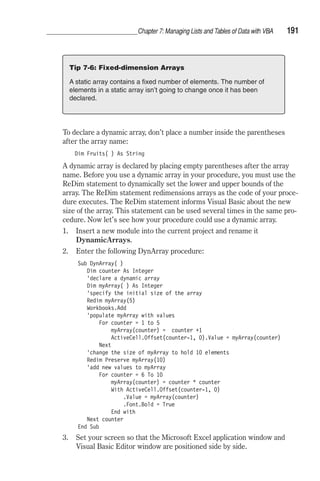
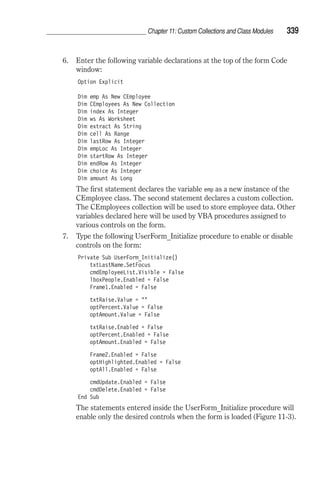
![Chapter 4: VBA Procedures: Subroutines and Functions 127
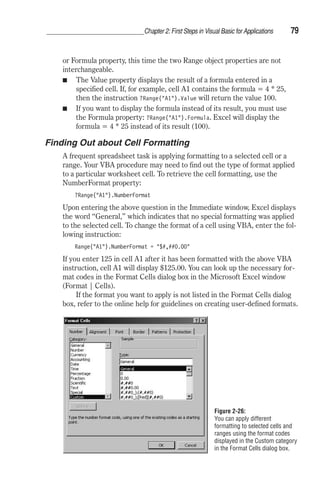
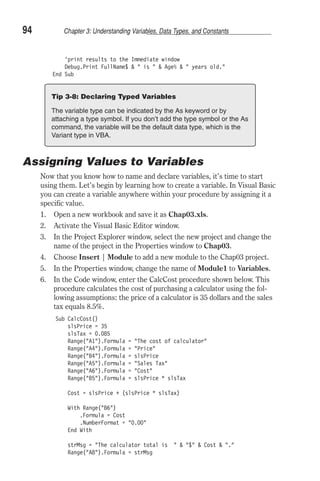
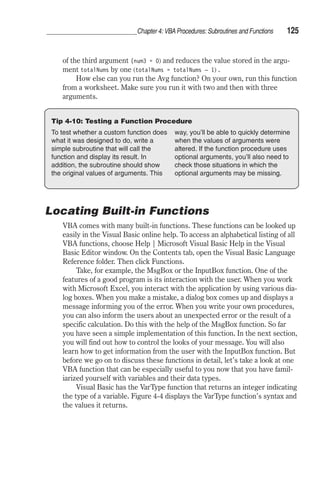
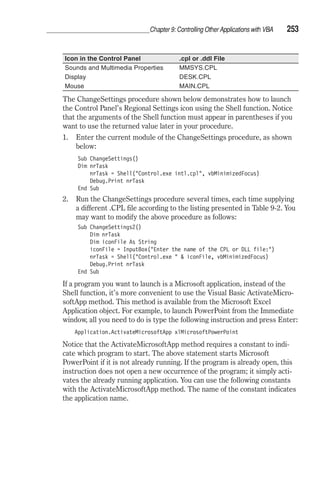
Using the MsgBox Function
The MsgBox function that you have used so far was limited to displaying a
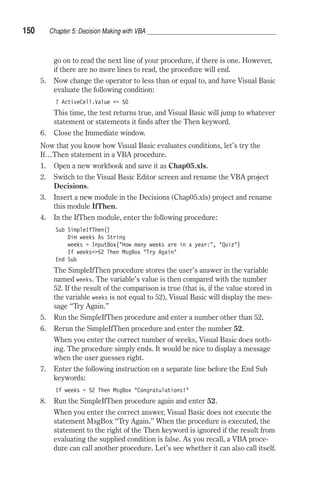
message to the user in a simple, one-button dialog box. You closed the mes-sage
box by clicking the OK button or pressing the Enter key. Create a
simple message box by following the MsgBox function name with the text
enclosed in quotation marks. In other words, to display the message “The
procedure is complete,” you should prepare the following statement:
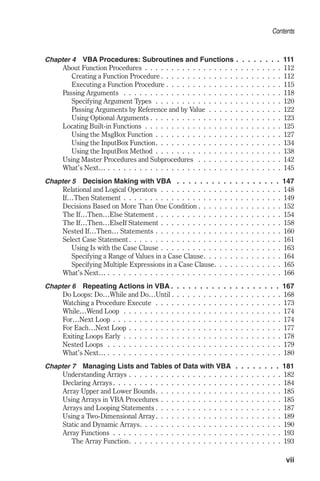
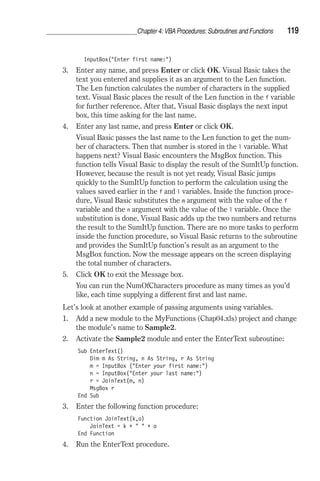
MsgBox The procedure is complete
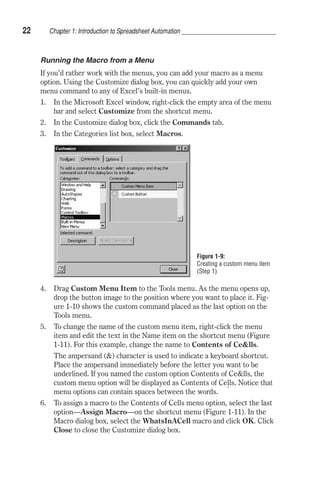
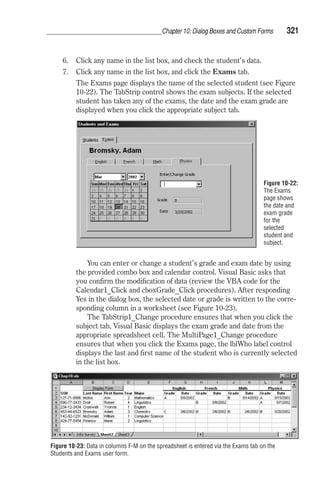
You can quickly try out the above instruction by entering it in the Immedi-ate
window. When you type this instruction and press Enter, Visual Basic
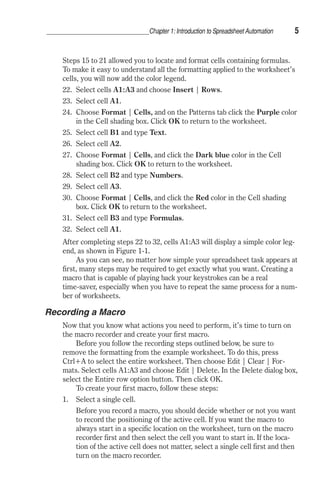
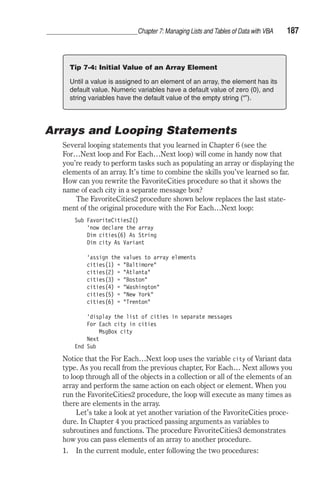
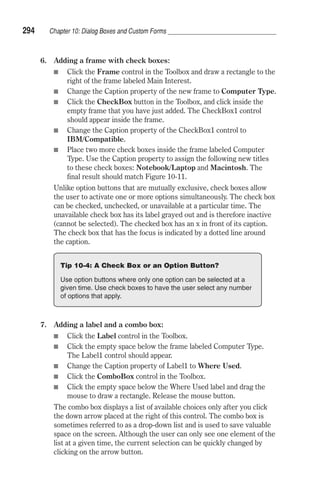
displays the message box shown in Figure 4-5.
Figure 4-5:
To display a message to the user, place the text
as the argument of the MsgBox function.
The MsgBox function allows you to use other arguments that make it possi-ble
to determine the number of buttons that should be available in the
message box or change the title of the message box from the default,
Microsoft Excel. You can also assign your own help topic. The syntax of the
MsgBox is shown below.
MsgBox (prompt [, buttons] [, title], [, helpfile, context])
Notice that while the MsgBox function has five arguments, only the first
one, prompt, is required. The arguments listed in square brackets are
optional.
When you enter a long text string for the prompt argument, Visual Basic
decides how to break the text so it fits the message box. Let’s do some
exercises in the Immediate window to learn various text formatting
techniques.
1. Enter the following instruction in the Immediate window. Make sure to
enter the entire text string on one line, and then press Enter.
MsgBox All done. Now open Chap04.xls and place an empty
disk in the diskette drive. The following procedure will copy
this file to the disk.
As soon as you press Enter, Visual Basic shows the resulting dialog
box.](https://image.slidesharecdn.com/excelvbavisualbasickorol1-141026043610-conversion-gate01/85/Excel-vba-visual-basic-korol-1-144-320.jpg)
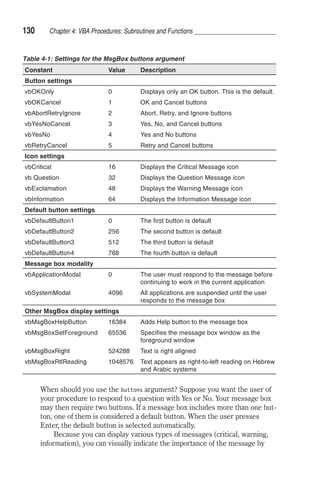

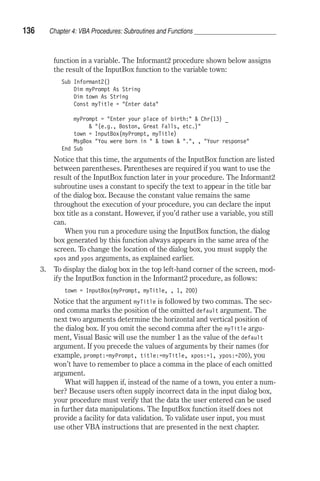
![134 Chapter 4: VBA Procedures: Subroutines and Functions
The MsgYesNo3 procedure is a revised version of MsgYesNo2. It shows
how you determine which button the user chose.
Sub MsgYesNo3()
Dim question As String
Dim myButtons As Integer
Dim myTitle As String
Dim myChoice As Integer
question = Do you want to open a new workbook?
myButtons = vbYesNo + vbQuestion + vbDefaultButton2
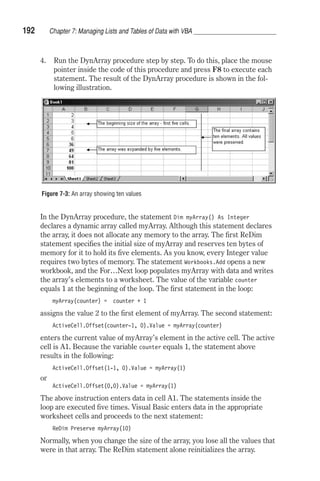
myTitle = New workbook
myChoice = MsgBox(question, myButtons, myTitle)
MsgBox myChoice
End Sub
In the above procedure, you assigned the result of the MsgBox function to
the variable myChoice. Notice that the arguments of the MsgBox function are
now listed in parentheses:
myChoice = MsgBox(question, myButtons, myTitle)
Tip 4-11: MsgBox Function — with or without Parentheses?
Use parentheses around the MsgBox
function’s argument list when you want
to use the result returned by the
function. By listing the function’s
arguments without parentheses, you
tell Visual Basic that you want to ignore
the function’s result. Most likely, you
will want to use the function’s result
when the MsgBox contains more than
one button.
When you run the MsgYesNo3 procedure, a two-button message box is dis-played.
By clicking on the Yes button, the statement MsgBox myChoice
displays the number 6. When you click the No button, the number 7 is dis-played.
In Chapter 5, you will learn how to make your procedure carry out a
task depending on a button’s selection.
Using the InputBox Function
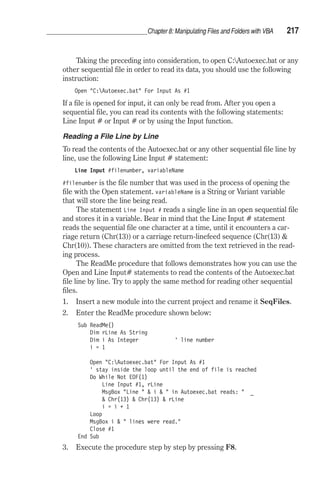
The InputBox function displays a dialog box with a message that prompts
the user to enter data. This dialog box has two buttons—OK and Cancel.
When you click OK, the InputBox function returns the information entered
in the text box. When you select Cancel, the function returns the empty
string (“ ”). The syntax of the InputBox functon is as follows:
InputBox(prompt [, title] [, default] [, xpos] [, ypos] _
[, helpfile, context])
The first argument, prompt, is the text message that you want to display in
the dialog box. Long text strings can be entered on several lines by using](https://image.slidesharecdn.com/excelvbavisualbasickorol1-141026043610-conversion-gate01/85/Excel-vba-visual-basic-korol-1-151-320.jpg)

![138 Chapter 4: VBA Procedures: Subroutines and Functions
Tip 4-12: Define a Constant
To ensure that all the title bars in a
particular VBA procedure display the
same text, assign the title text to a
constant. By following this tip, you will
save yourself time typing the title text
more than once.
Tip 4-13: Avoid the Type
Mismatch Error
If you attempt to run the AddTwoNums
procedure in previous versions of
Microsoft Excel (prior to version 2000),
you will get the Type Mismatch error
when Visual Basic tries to execute the
following line of code:
mysum = value1 + 2
To avoid the Type Mismatch error, use
the built-in CSng function to convert a
string stored in the value1 variable to a
Single type number. Write the following
statement:
mysum = CSng(value1) + 2
The next line, mySum = value1 + 2, adds 2 to the user’s input and assigns the
result of the calculation to the variable mySum. Because the value1 variable’s
data type is String, prior to using this variable’s data in the computation,
Visual Basic goes to work behind the scenes to perform the data type con-version.
Visual Basic has the brains to understand the need for conversion.
Without it, the two incompatible data types (text + number) would gener-ate
the Type Mismatch error.
The procedure ends with the MsgBox function displaying the result of
the calculation and showing the user how the total was derived.
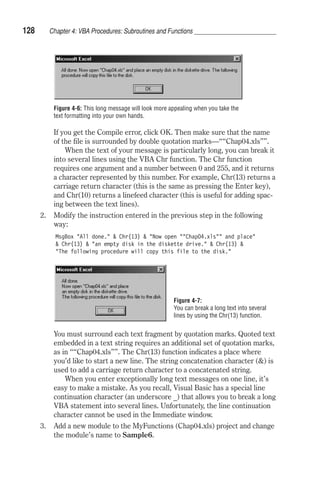
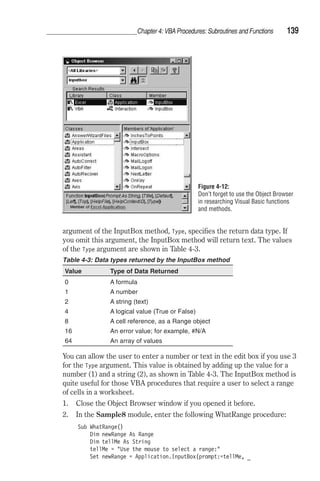
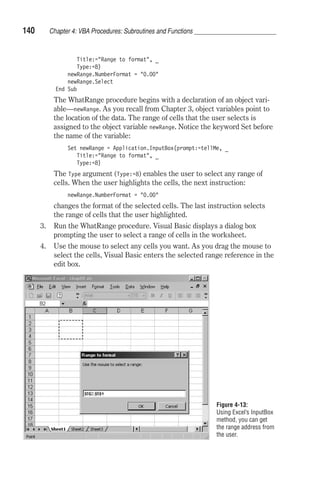
Using the InputBox Method
In addition to the InputBox function, there is the InputBox method. If you
activate the Object Browser window and type “inputbox” in the Search
box and then press Enter, Visual Basic will display two occurrences of
InputBox—one in the Excel library and the other one in the VBA library
(Figure 4-12).
The InputBox method available in the Microsoft Excel library has a
slightly different syntax than the InputBox function that was covered earlier
in this chapter. Its syntax is:
expression.InputBox(Prompt, [Title], [Default], [Left], [Top],
[HelpFile], [HelpContextID], [Type] )
All bracketed arguments are optional. The Prompt argument is the message
to be displayed in the dialog box, Title is the title for the dialog box, and
Default is a value that will appear in the text box when the dialog box is ini-tially
displayed. The Left and Top arguments specify the position of the
dialog box on the screen. The values for these arguments are entered in
points (one point equals 1/72 inch). The arguments HelpFile and
HelpContextID identify the name of the help file and specific number of the
help topic to be displayed when the user clicks the Help button. The last](https://image.slidesharecdn.com/excelvbavisualbasickorol1-141026043610-conversion-gate01/85/Excel-vba-visual-basic-korol-1-155-320.jpg)


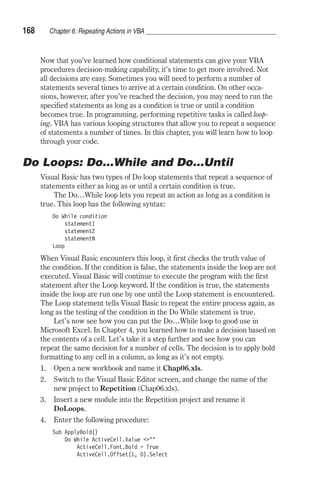

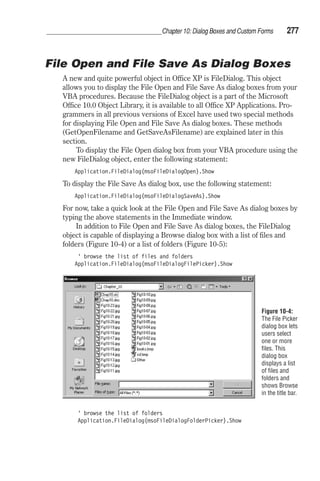
![174 Chapter 6: Repeating Actions in VBA
While…Wend Loop
The While…Wend statement is functionally equivalent to the Do…While
loop. This statement is a carryover from earlier versions of Microsoft Basic
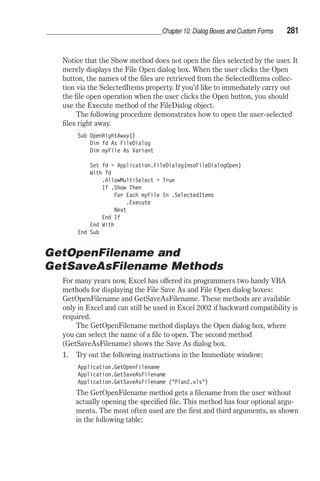
and is included in VBA for backward compatibility. The loop begins with the
keyword While and ends with the keyword Wend. Here is the syntax:
While condition
statement1
statement2
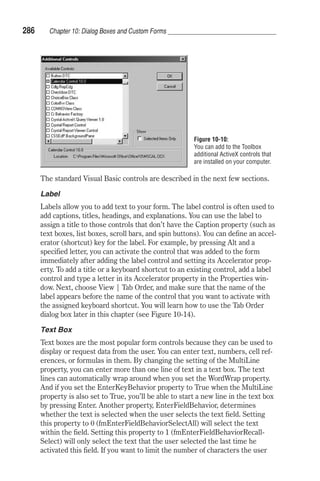
statementN
Wend
The condition is tested at the top of the loop. The statements are executed
as long as the given condition is true. Once the condition is false, Visual
Basic exits the loop. Let’s see an example of a procedure that uses the
While…Wend looping structure.
1. Insert a new module into the current project. Rename the module
WhileLoop.
2. Enter the following procedure in the WhileLoop module:
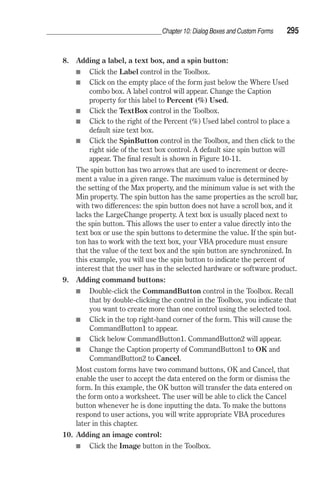
Sub ChangeRHeight()
While ActiveCell
ActiveCell.RowHeight = 28
ActiveCell.Offset(1, 0).Select
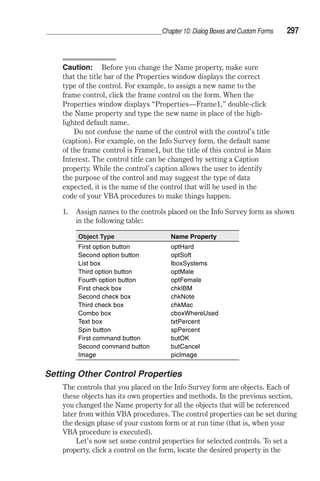
Wend
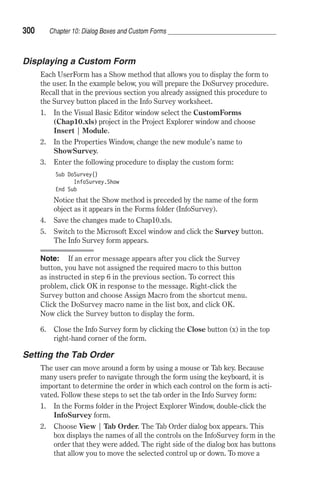
End Sub
3. Enter some data in cells B1:B4.
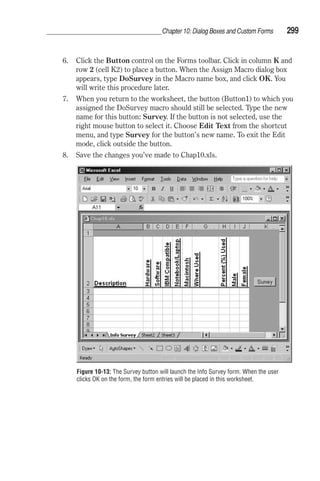
4. Select cell B1 and run the ChangeRHeight procedure.
The ChangeRHeight procedure shown above sets the row height to 28
when the active cell is not empty.
For…Next Loop
The For…Next loop is used when you know how many times you want to
repeat a group of statements. The syntax of a For…Next loop looks like
this:
For counter = start To end [Step increment]
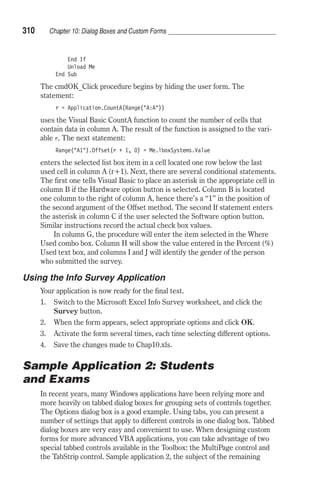
statement1
statement2
statementN
Next [counter]
The code in the brackets is optional. Counter is a numeric variable that
stores the number of iterations. Start is the number at which you want to
begin counting. End indicates how many times the loop should be executed.](https://image.slidesharecdn.com/excelvbavisualbasickorol1-141026043610-conversion-gate01/85/Excel-vba-visual-basic-korol-1-191-320.jpg)
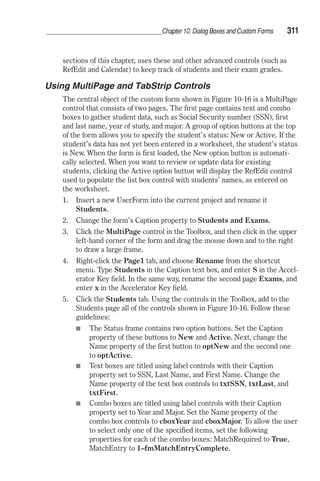
![For Each…Next Loop
Chapter 6: Repeating Actions in VBA 177
When your procedure needs to loop through all of the objects of a collection
or elements in an array (arrays are covered in Chapter 7), the For
Each…Next loop should be used. This loop does not require a counter vari-able.
Visual Basic can determine how many times the loop should execute.
Let’s take, for example, a collection of worksheets. To remove a
worksheet from a workbook, you have to first select it and then choose Edit
| Delete Sheet. To leave only one worksheet in a workbook, you have to
use the same command several times, depending on the total number of
worksheets. Because each worksheet is an object in a collection of
worksheets, you can speed up the process of deleting worksheets by using
the For Each…Next loop. This loop looks like this:
For Each element In Group
statement1
statement2
statementN
Next [element]
In the above syntax, element is a variable to which all the elements of an
array or collection will be assigned. This variable has to be of the Variant
data type for an array and an Object data type for a collection. Group is the
name of a collection or an array.
Now let’s use the For Each…Next loop to remove some worksheets.
1. Insert a new module into the current project and rename it
ForEachNextLoop.
2. Type the following procedure in the ForEachNextLoop module:
Sub RemoveSheets()
Dim mySheet As Worksheet
Application.DisplayAlerts = False
Workbooks.Add
Worksheets(Sheet2).Select
For Each mySheet In Worksheets
ActiveWindow.SelectedSheets.Delete
Next mySheet
End Sub
3. Run the RemoveSheets procedure.
Visual Basic will open a new workbook and delete all the sheets except for
Sheet1. Notice that the variable mySheet represents an object in a collection
of worksheets. Instead of declaring an object variable in a generic way as
type Object, your procedure will perform better when you declare object
variables according to their specific type. In this particular case, instead of
Dim mySheet As Object, you can use the following declaration: Dim mySheet As
Worksheet. The first instruction, Application.DisplayAlerts = False, makes
sure that Excel does not display alerts and messages while the procedure is
running. If you omit this statement, Excel will ask you to confirm the](https://image.slidesharecdn.com/excelvbavisualbasickorol1-141026043610-conversion-gate01/85/Excel-vba-visual-basic-korol-1-194-320.jpg)


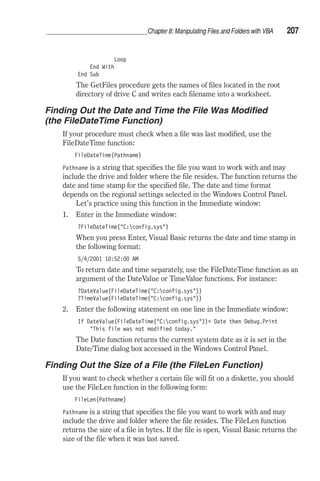
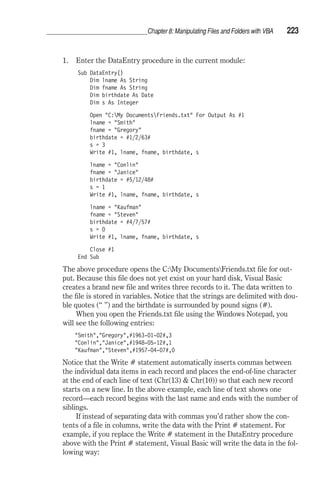
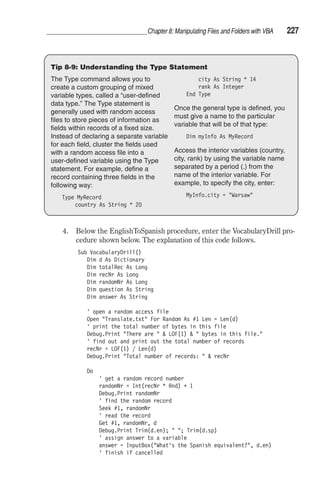
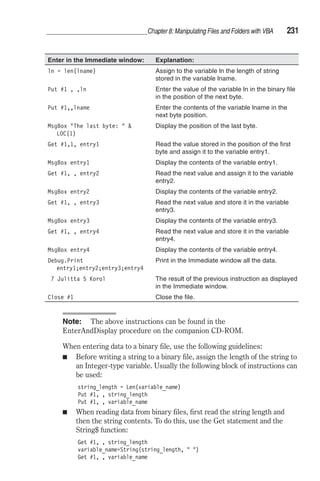
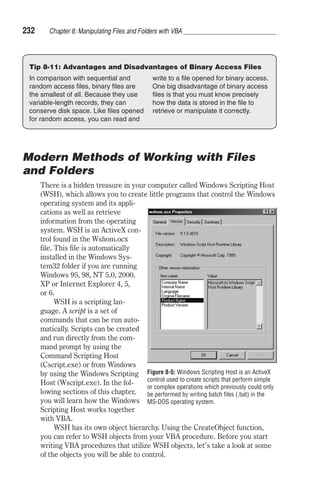
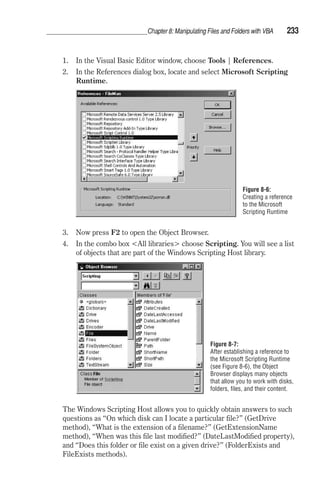
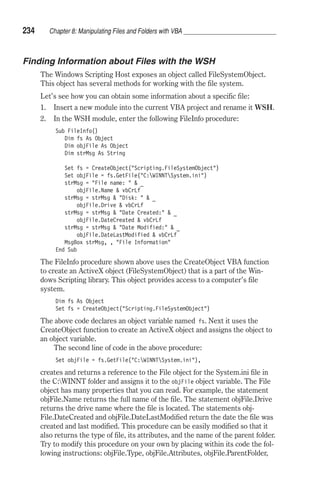
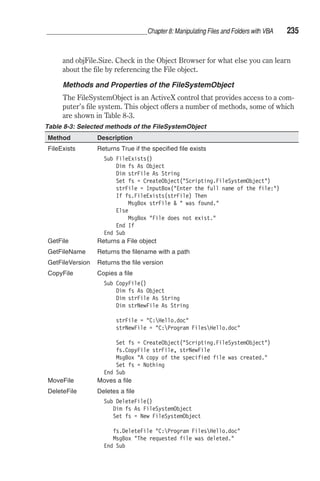
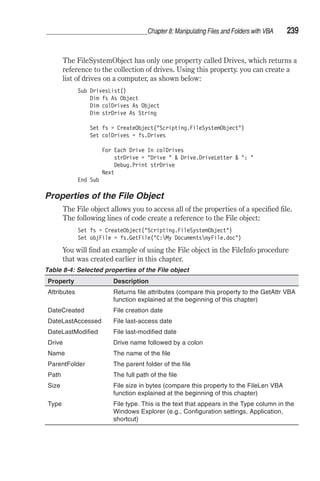
![202 Chapter 8: Manipulating Files and Folders with VBA
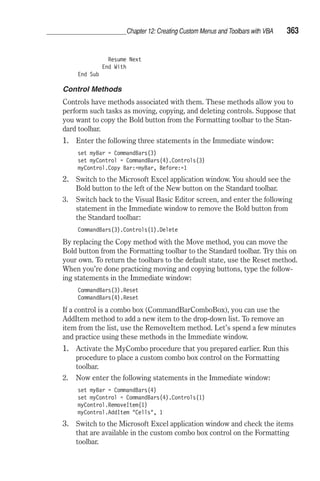
In the course of your work, you’ve surely accessed, created, renamed, cop-ied,
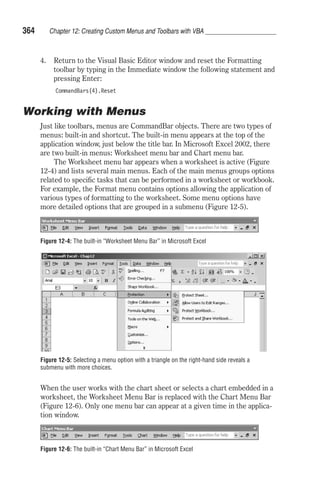
and deleted hundreds of files and folders. However, you’ve probably
never performed these tasks programmatically. So here’s your chance. This
chapter focuses on VBA functions and instructions that specifically deal
with files and folders. By using these functions, you’ll be able to:
Find out the name of the current folder (CurDir function)
Change the name of a file or folder (Name function)
Check whether a file or folder exists on a disk (Dir function)
Find out the date and time a file was last modified (FileDateTime
function)
Get the size of a file (FileLen function)
Check and change file attributes (GetAttr and SetAttr functions)
Change the default folder or drive (ChDir and ChDrive statements)
Create and delete a folder (MkDir and RmDir statements)
Copy and delete a file or folder (FileCopy and Kill statements)
In addition, this chapter gives you a working knowledge of writing to and
retrieving data from three types of files: sequential, random access, and
binary files. Instead of using the application’s interface, you will learn how
to work with files directly. At the end of this chapter, you will be introduced
to the newest method of working with files and folders by utilizing the tool
known as the Windows Scripting Host (WSH).
Manipulating Files and Folders
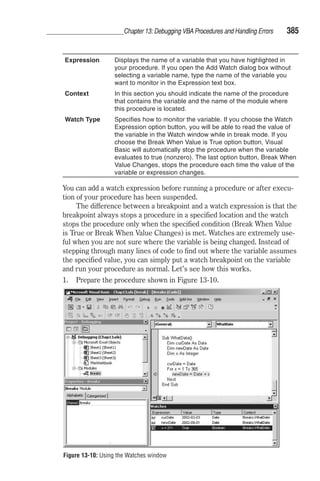
This section discusses a variety of functions for working with files and
folders.
Finding Out the Name of the Active Folder
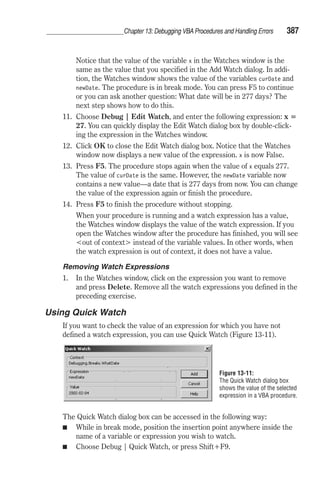
(the CurDir Function)
When you work with files, you often need to find out the name of the cur-rent
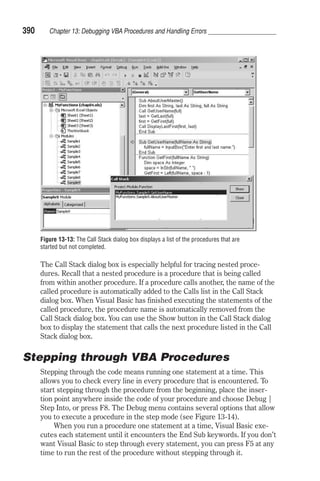
folder. You can get this information easily with the CurDir function:
CurDir([drive])
Drive is an optional argument. If you omit drive, VBA uses the current
drive.
The CurDir function returns a file path as Variant. To return the path as
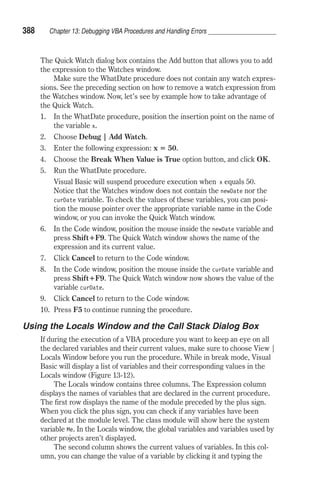
String, use CurDir$ (where $ is the type declaration character for a string).
To get some practice using these functions, let’s perform a couple of exer-cises
in the Immediate window:
1. Open a new workbook and switch to Microsoft Visual Basic Editor.
2. Activate the Immediate window and type the following:
?CurDir](https://image.slidesharecdn.com/excelvbavisualbasickorol1-141026043610-conversion-gate01/85/Excel-vba-visual-basic-korol-1-219-320.jpg)
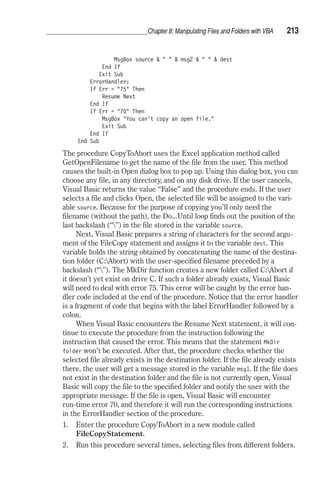
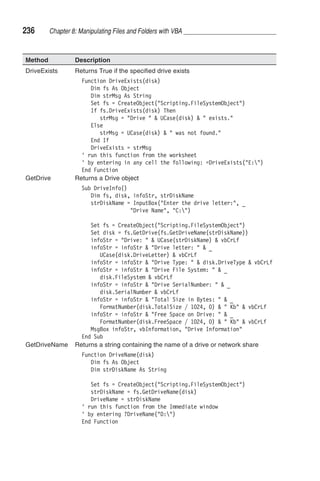
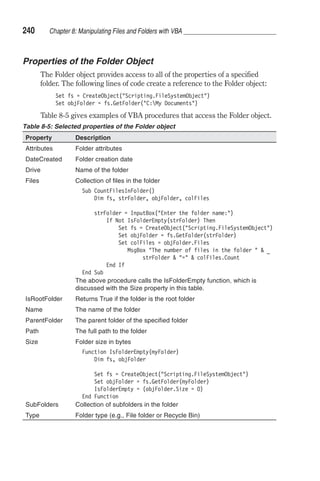
![204 Chapter 8: Manipulating Files and Folders with VBA
If new_pathname already exists, and it’s different from old_pathname, the
Name function moves the specified file to a new folder and changes its
name, if necessary.
Name C:System.1st As D:test.txt
Because the test.txt file doesn’t exist in the root directory on drive D,
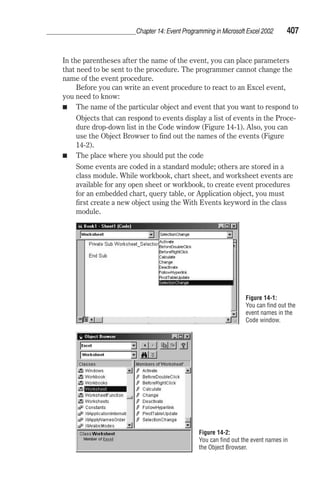
Visual Basic moves the C:System.1st file to the specified drive; how-ever,
it does not rename the file.
If new_pathname and old_pathname refer to different directories and both
supplied filenames are the same, the Name function moves the
specified file to a new location without changing the filename.
Name D:test.txt As C:DOStest.txt
The above instruction moves the test.txt file to the DOS folder on
drive C.
Tip 8-1: You Can’t Rename an Open File
You must close the file before renaming it. The name of the file
cannot contain the wildcard characters * or ?.
Checking the Existence of a File or Folder (the Dir Function)
The Dir function, which returns the name of a file or folder, has the follow-ing
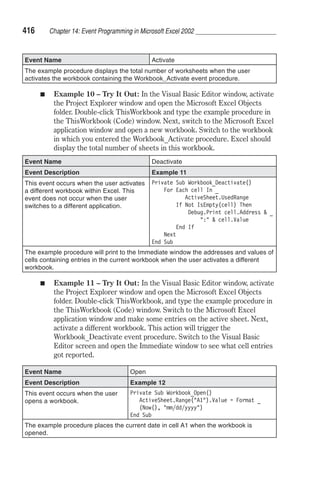
syntax:
Dir[(pathname[, attributes])]
Both arguments of the Dir function are optional. pathname is a name of a file
or folder. You can use one of the following constants or values for the
attributes argument:
Table 8-1: File attributes
Constant Value Attribute Name
vbNormal 0 Normal
vbHidden 2 Hidden
vbSystem 4 System
vbVolume 8 Volume label
vbDirectory 16 Directory or Folder
The Dir function is often used to check whether a file or folder exists on a
disk. If a file or folder does not exist, the null string (“”) is returned.
Let’s try out the Dir function in several exercises in the Immediate
window:](https://image.slidesharecdn.com/excelvbavisualbasickorol1-141026043610-conversion-gate01/85/Excel-vba-visual-basic-korol-1-221-320.jpg)

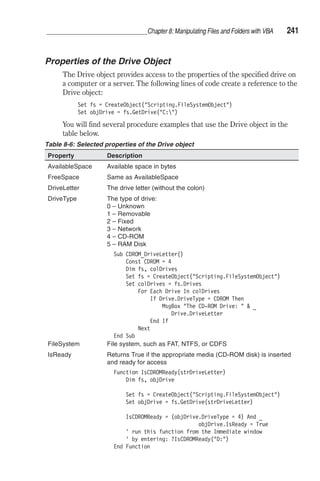
![216 Chapter 8: Manipulating Files and Folders with VBA
Tip 8-4: What is a Sequential File?
A sequential file is one in which the
records must be accessed in the order
they occur in the file. This means that
before you can access the third record,
you must first access record number 1
and then record number 2.
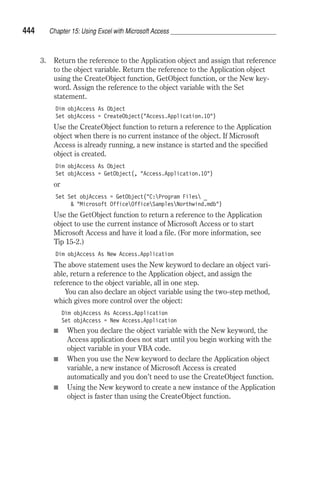
Tip 8-5: Opening Files with
the Open Statement
When you use sequential access to
open a file for input, the file must
already exist.
Reading Data Stored in Sequential Files
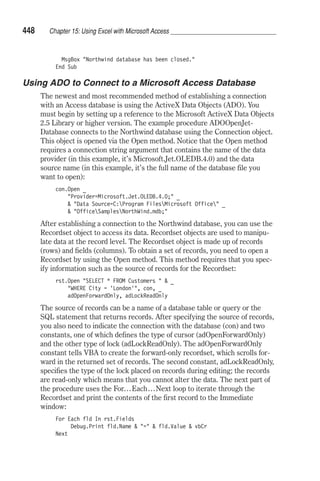
Let’s take one of the sequential files that is already present on your com-puter
and read its contents with VBA straight from the Microsoft Excel
Visual Basic Editor window. You can read the Autoexec.bat file or any other
text file that you want. To read data from a file, you must first open the file
with the Open statement. Here’s the general syntax of this statement, fol-lowed
by an explanation of each component:
Open pathname For mode [Access access][lock] As [#]filenumber
[Len=reclength]
The Open statement has three required arguments. They are: pathname,
mode, and filenumber. In the syntax shown above, these arguments are pre-ceded
by keywords that appear in bold.
Pathname is the name of the file you want to open.
Pathname may include the name of a drive and folder.
Mode is a keyword that determines how the file was opened. Sequential
files can be opened in one of the following modes: Input, Output, or
Append. Use Input to read the file, Output to write to a file by
overwriting any existing file, and Append to write to a file by appending
any existing information.
Access is a keyword that determines the file’s read and write permis-sions.
Access can be: Shared, Lock Read, Lock Write, or Lock Read
Write.
Lock determines which file operations are allowed for other processes.
For example, if a file is open in a network environment, lock deter-mines
how other people can access it. The following lock keywords can
be used: Read, Write, or Read Write.
Filenumber is a number from 1 to 511. This number is used to refer to
the file in subsequent operations. You can obtain a unique file number
by using the Visual Basic built-in FreeFile function.
The last element of the Open statement, reclength, specifies the total
number of characters in the sequential files or the size of the record for
random access files.](https://image.slidesharecdn.com/excelvbavisualbasickorol1-141026043610-conversion-gate01/85/Excel-vba-visual-basic-korol-1-233-320.jpg)
![218 Chapter 8: Manipulating Files and Folders with VBA
The ReadMe procedure opens the Autoexec.bat file in the Input mode as
file number 1 in order to read its contents. The Do…While loop tells Visual
Basic to execute the statements inside the loop until the end of the file has
been reached. The end of the file is determined by the result of the EOF
function.
The EOF function returns a logical value of true if the next character to
be read is past the end of the file. Notice that the EOF function requires one
argument—the number of the open file you want to check. This is the same
number that has been used previously by the Open statement. Use the EOF
function to ensure that Visual Basic doesn’t read past the end of the file.
The Line Input # statement stores each line’s contents in the variable
rLine. Next, a message is displayed that shows the line number and its con-tents.
Then, VBA increases the line counter by one and begins reading the
next line in the open file if the result of the EOF function is false (the end of
the file has not been reached). Visual Basic exits the Do…While loop when
the result of the EOF function is true. Before VBA ends the procedure, two
more statements are executed. A message is displayed with the total num-ber
of lines that have been read. The last statement closes the open file.
Reading Characters from Sequential Files
Suppose that your procedure needs to check how many colons appear in the
Autoexec.bat file. Instead of reading entire lines, you can use the Input
function to return the specified number of characters. Next, the If state-ment
can be used to compare the obtained character against the one you are
looking for. Before you write a procedure that does this, let’s review the
syntax of the Input function:
Input(number, [#]filenumber)
Both arguments of the Input function are required. number specifies the
number of characters you want to read, and filenumber is the same number
that the Open statement had used to open the file. The Input function
returns all the characters being read, including commas, carriage returns,
end of file markers, quotes, and leading spaces.
1. In the SeqFile module, enter the Colons procedure:
Sub Colons()
Dim counter As Integer
Dim char As String
counter = 0
Open C:Autoexec.bat For Input As #1
Do While Not EOF(1)
char = Input(1, #1)
If char = : Then
counter = counter + 1
End If
Loop](https://image.slidesharecdn.com/excelvbavisualbasickorol1-141026043610-conversion-gate01/85/Excel-vba-visual-basic-korol-1-235-320.jpg)
![222 Chapter 8: Manipulating Files and Folders with VBA
Open C:Readme.txt For Append As #1
To enter some text in a brand new file called “C:Result.txt,” open the
file in the Output mode as follows:
Open “C:Result.txt” For Output As #1
To replace the contents of an existing file C:Winners.csv with a list of
new winners, first prepare a backup copy of the original file, and then
open the original file in the Output mode:
FileCopy C:Winners.csv,C:Winners.old
Open C:Winners.csv For Output As #1
Tip 8-6: Can’t Read and Write
at the Same Time
Sequential files have to be opened
separately to perform read and write
operations. You cannot perform
these operations simultaneously.
For instance, after a file has been
opened for output and data has
been written to the file, the file
should be closed before being
opened for input.
Tip 8-7: Advantages and Disadvan-tages
of Sequential Files
Although sequential files are easy to
create and use, and don’t waste any
space, they have a number of
disadvantages. For example, you can’t
easily find one specific item in the file
without having to read through a large
portion of the file. Also, an individual item
of the file cannot be changed or deleted
easily—you must rewrite the entire file.
And as stated in Tip 8-6 sequential files
have to be opened separately for
read/write operations.
Using Write # and Print # Statements
Now that you know both methods for opening a text file with the intention
of writing to it (Append or Output), it’s time to learn the Write # and Print
# statements that will allow you to send data to the file.
When you read data from a sequential file with the Input # statement,
you usually write data to this file with the Write # statement. This state-ment
looks like the following:
Write #filenumber, [outputlist]
filenumber, which specifies the number of the file you’re working with, is
the only required argument of the Write # statement. outputlist is the text
you want to write to the file. outputlist can be a single text string or a list of
variables that contain data that you want to write. If you specify only the file
number, Visual Basic will write a single empty line to the open file.
To illustrate how the data is written to a file, let’s prepare a text file
with the first name, last name, birthdate, and number of siblings for three
people:](https://image.slidesharecdn.com/excelvbavisualbasickorol1-141026043610-conversion-gate01/85/Excel-vba-visual-basic-korol-1-239-320.jpg)
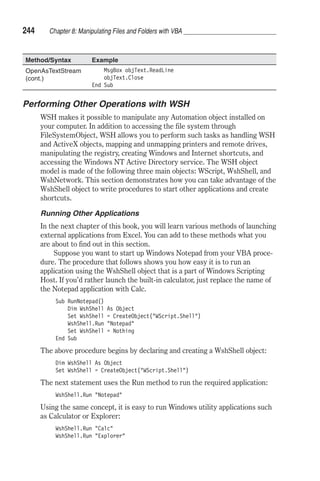
![242 Chapter 8: Manipulating Files and Folders with VBA
Property Description
Path The path of the root folder
SerialNumber Serial number of the drive
TotalSize Total drive size in bytes
Creating a Text File Using WSH
Windows Scripting Host (WSH) offers three methods for creating text files:
CreateTextFile, OpenTextFile, and OpenAsTextStream. The syntax of each
of these methods and example procedures are presented in the following
table.
Table 8-7: Various methods of creating text files
Method/Syntax Example
CreateTextFile object.CreateTextFile(filename[, overwrite[, unicode]])
Object is the name of the FileSystemObject or the Folder object.
Filename is a string expression that specifies the file to create.
Overwrite (optional) is a Boolean value that indicates whether
you can overwrite an existing file. The value is True if the file
can be overwritten and False if it can't be overwritten. If omitted,
existing files are not overwritten.
Unicode (optional) is a Boolean value that indicates whether the
file is created as a Unicode or ASCII file. The value is True if the
file is created as a Unicode file and False if it’s created as an
ASCII file. If omitted, an ASCII file is assumed.
Sub CreateFile_Method1()
Dim fs, objFile
Set fs = CreateObject(Scripting.FileSystemObject)
Set objFile = fs.CreateTextFile(C:Phones.txt, True)
objFile.WriteLine (Margaret Kubiak: 212-338-8778)
objFile.WriteBlankLines (2)
objFile.WriteLine (Robert Prochot: 202-988-2331)
objFile.Close
End Sub
The above procedure creates a text file to store the names and
phone numbers of two people. Because there is a Boolean
value of True in the position of the overwrite argument, the
C:Phones.txt file will be overwritten if it already exists in the
specified folder.
OpenTextFile object.OpenTextFile(filename[, iomode[, create[, format]]])
Object is the name of the FileSystemObject.
Filename is a string expression that identifies the file to open.
Iomode (optional) is a Boolean value that indicates whether a
new file can be created if the specified filename doesn’t exist.
The value is True if a new file is created and False if it isn’t
created. If omitted, a new file isn't created. The iomode
argument can be one of the following constants:](https://image.slidesharecdn.com/excelvbavisualbasickorol1-141026043610-conversion-gate01/85/Excel-vba-visual-basic-korol-1-259-320.jpg)
![Method/Syntax Example
OpenTextFile
(cont.)
Chapter 8: Manipulating Files and Folders with VBA 243
ForReading (1)
ForWriting (2)
ForAppending (8)
Create (optional) is a Boolean value that indicates whether a
new file can be created if the specified filename doesn’t exist.
The value is True if a new file is created and False if it isn’t
created. If omitted, a new file isn’t created.
Format (optional) is one of three Tristate values used to indicate
the format of the opened file. If omitted, the file is opened as
ASCII.
TristateTrue = Open the file as ASCII.
TristateFalse = Open the file as Unicode.
TristateUseDefault = Open the file using the system default.
Sub CreateFile_Method2()
Dim fs, objFile
Set fs = CreateObject(Scripting.FileSystemObject)
Set objFile = fs.OpenTextFile(C:Shopping.txt, _
ForWriting, True)
objFile.WriteLine (Bread)
objFile.WriteLine (Milk)
objFile.WriteLine (Strawberries)
objFile.Close
End Sub
OpenAsTextStream object.OpenAsTextStream([iomode, [format]])
Object is the name of the File object.
Iomode (optional) indicates input/output mode. It can be one of
three constants:
ForReading (1)
ForWriting (2)
ForAppending (8)
Format (optional) is one of three Tristate values used to indicate
the format of the opened file. If omitted, the file is opened as
ASCII.
TristateTrue = Open the file as ASCII.
TristateFalse = Open the file as Unicode.
TristateUseDefault = Open the file using the system default.
Sub CreateFile_Method3()
Dim fs, objFile, objText
Set fs = CreateObject(Scripting.FileSystemObject)
fs.CreateTextFile New.txt
Set objFile = fs.GetFile(New.txt)
Set objText = objFile.OpenAsTextStream(ForWriting, _
TristateUseDefault)
objText.Write Wedding Invitation
objText.Close
Set objText = objFile.OpenAsTextStream(ForReading, _
TristateUseDefault)](https://image.slidesharecdn.com/excelvbavisualbasickorol1-141026043610-conversion-gate01/85/Excel-vba-visual-basic-korol-1-260-320.jpg)

![254 Chapter 9: Controlling Other Applications with VBA
Application Name
Access
FoxPro
Mail
PowerPoint
Project
Schedule
Word
Constant
xlMicrosoftAccess
xlMicrosoftFoxPro
xlMicrosoftMail
xlMicrosoftPowerPoint
xlMicrosoftProject
xlMicrosoftSchedulePlus
xlMicrosoftWord
Moving between Applications
Because the user can work simultaneously with several applications in the
Windows environment, your VBA procedure must know how to switch
between the open programs. Suppose that in addition to Microsoft Excel,
you have two other applications open: Microsoft Word and Windows
Explorer. To activate an already open program, use the AppActivate state-ment
using the following syntax:
AppActivate title [, wait]
Only the title argument is required. This is the name of the application as
it appears in the title bar of the active application window or its task ID
number as returned by the Shell function.
Note: The application title is compared to the title string of
each running application. If there is no exact match, any applica-tion
whose title string begins with title is activated.
The second argument, wait, is optional. This is a Boolean value (True or
False) that specifies when Visual Basic activates the application. The value
of False in this position immediately activates the specified application,
even if the calling application does not have the focus. If you place True in
the position of the wait argument, the calling application waits until it has
the focus. Then it activates the specified application.
For example, to activate Microsoft Word, you should enter the following
statement:
AppActivate “Microsoft Word”
Notice that the name of the application is surrounded by double quotation
marks.
You can also use the return value of the Shell function as the argument
of the AppActivate statement:
‘ run Microsoft Word
ReturnValue = Shell(C:Microsoft OfficeOfficeWord.exe,1)
‘ activate Microsoft Word
AppActivate ReturnValue](https://image.slidesharecdn.com/excelvbavisualbasickorol1-141026043610-conversion-gate01/85/Excel-vba-visual-basic-korol-1-271-320.jpg)
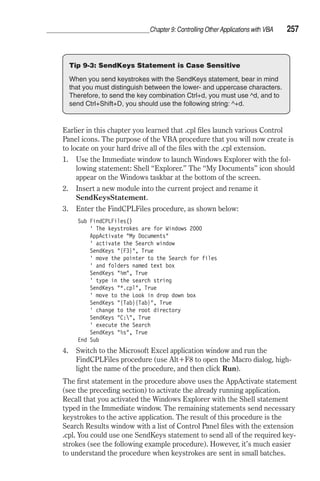
![Chapter 9: Controlling Other Applications with VBA 255
The AppActivate statement is used for moving between applications and
requires that the program is already running. This statement merely
changes the focus. The specified application becomes the active window.
The AppActivate statement will not start an application running. For an
example of using this statement, see the FindCPLFiles procedure in the
next section.
Let’s practice some of these recently introduced VBA statements:
1. Open Windows Explorer by typing in the Immediate window the follow-ing
statement:
Shell Explorer
After you press Enter, the requested application is opened. On the
Windows taskbar the icon with the My Documents folder should
appear.
2. Enter the following statement in the Immediate window:
AppActivate My Documents
After pressing Enter, the focus moves to the My Documents window.
Controlling Another Application
Now that you know how to use VBA statements to start a program and
switch between applications, let’s see how one application can communicate
with another. The simplest way for an application to get control of another
is by means of the SendKeys statement. This statement allows you to send
a series of keystrokes to the active application window. You can send a key
or a combination of keys and achieve the same result as if you worked
directly in the active application window using the keyboard. The SendKeys
statement looks as follows:
SendKeys string [, wait]
The required argument string is the key or key combination that you want
to send to the active application. For example, to send a letter “f,” use the
following instruction:
SendKeys f
To send the key combination Alt+f, use:
SendKeys %f
The percent sign (%) is the string used for the Alt key.
To send a combination of keys, such as Shift+Tab, use the following
statement:
SendKeys +{TAB}
The plus sign (+) denotes the Shift key. To send other keys and combina-tions
of keys, see the corresponding strings listed in Table 9-3.](https://image.slidesharecdn.com/excelvbavisualbasickorol1-141026043610-conversion-gate01/85/Excel-vba-visual-basic-korol-1-272-320.jpg)
![Chapter 9: Controlling Other Applications with VBA 267
(the Add method), enter text in the first paragraph (the InsertBefore
method), save the document in a disk file (the SaveAs method), and close
the Word application (the Quit method). Each statement is preceded by an
instruction that changes the message displayed in the status bar at the bot-tom
of the Microsoft Excel application window. When the Word application
is closed, the instruction:
Set wordAppl = Nothing
clears the object variable to reclaim the memory used by the object, and the
statement:
Application.StatusBar = False
restores the default “Ready” message in the status bar.
As mentioned earlier, Microsoft Word is a single-instance application.
This means that you cannot run more than one instance of Word at a time.
In short, the CreateObject function used in the WriteLetter procedure will
launch Word if it is not already running; otherwise, it will use the currently
active instance of Word.
Using the GetObject Function
If you are certain that the Automation object already exists or is already
open, consider using the GetObject function. This function looks like this:
GetObject([pathname][, class])
The GetObject function has two arguments, both of which are optional. Use
the first argument to specify the name of the file that you want to open. The
full path should be given. If you omit this argument, you have to specify the
class argument that indicates the type of object to work with. For example:
Excel.Application
Excel.Sheet
Excel.Chart
Excel.Range
Word.Application
Word.Document
PowerPoint.Application
To create an Excel object based on the Invite.xls spreadsheet and force the
object to be an Excel 5 spreadsheet, you could use the following
declaration:
‘ late binding
Dim excelObj As Object
Set excelObj = GetObject(C:Invite.xls, Excel.Sheet.5)
To set the object variable to a specific Word document, you would use:
‘early binding
Dim wordObj As Word.Application
Set wordObj = GetObject(C:Invite.doc)](https://image.slidesharecdn.com/excelvbavisualbasickorol1-141026043610-conversion-gate01/85/Excel-vba-visual-basic-korol-1-284-320.jpg)


![336 Chapter 11: Custom Collections and Class Modules
If you don’t use the New keyword with the Dim statement (as shown
above), VBA does not allocate memory for your custom object until your
procedure actually needs it.
Event Procedures in the Class Module
An event is basically an action recognized by an object. Custom classes
recognize only two events: Initialize and Terminate. These events are trig-gered
when an instance of the class is created and destroyed, respectively.
The Initialize event is generated when an object is created from a class
(see the preceding section on creating an instance of a class). In the
CEmployee class example, the Initialize event will also fire the first time
that you use the emp variable in code. Because the statements included
inside the Initialize event are the first ones to be executed for the object
before any properties are set or any methods are executed, the Initialize
event is a good place to perform initialization of the objects created from the
class.
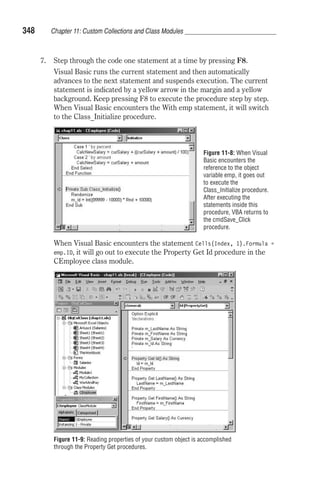
As you recall, in the CEmployee class, Id is read-only. You can use the
Initialize event to assign a unique five-digit number to the m_Id variable.
1. In the CEmployee class module, enter the following Class_Initialize
procedure:
Private Sub Class_Initialize()
Randomize
m_Id = Int((99999 - 10000) * Rnd + 10000)
End Sub
The Class_Initialize procedure initializes the CEmployee object by assign-ing
a unique five-digit number to the variable m_Id. To generate a random
integer between two given integers where ending_number = 99999 and
beginning_number = 10000, the following formula is used:
=Int((ending_number–beginning_number)*Rnd +beginning_number)
The Class_Initialize procedure also uses the Randomize statement to
reinitialize the random number generator. For more information on using
Rnd and Integer functions, as well as the Randomize statement, search the
online help.
The Terminate event occurs when all references to an object have been
released. This is a good place to perform any necessary cleanup tasks. The
Class_Terminate procedure uses the following syntax:
Private Sub Class_Terminate()
[cleanup code goes here]
End Sub
To release an object variable from an object, use the following syntax:
Set objectVariable = Nothing](https://image.slidesharecdn.com/excelvbavisualbasickorol1-141026043610-conversion-gate01/85/Excel-vba-visual-basic-korol-1-353-320.jpg)


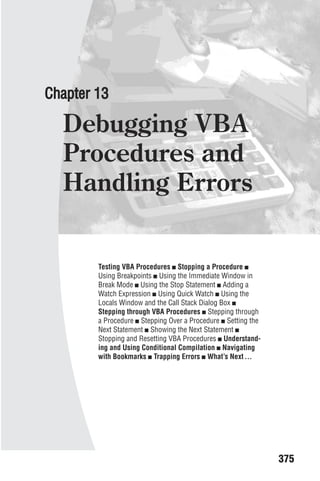
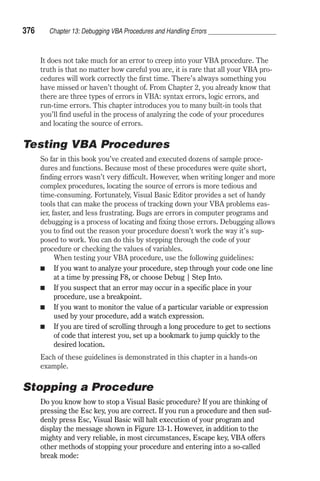
![378 Chapter 13: Debugging VBA Procedures and Handling Errors
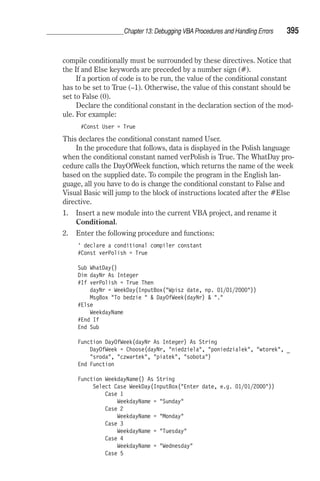
Using Breakpoints
If you know more or less where you can expect a problem in the code of
your procedure, you should suspend code execution at that location (on a
given line). Setting a breakpoint boils down to pressing F9 when the cursor
is on the desired line of code. When VBA gets to that line while running
your procedure, it will immediately display the Code window. At this point,
you can step through the code of your procedure line by line by pressing F8
or choosing Debug | Step Into.
To see how this works, let’s look at the following scenario. Assume that
during the execution of the ChangeCode procedure the following line of
code could get you in trouble:
ActiveCell.Formula = _
=VLookup(RC[1],Codes.xls!R1C1:R6C2,2)
1. Prepare the spreadsheets shown in Figures 13-2 and 13-3. Save the
data shown in Figure 13-2 as Chap13.xls. Save the data in Figure 13-3
as Codes.xls. Close the Codes.xls file.
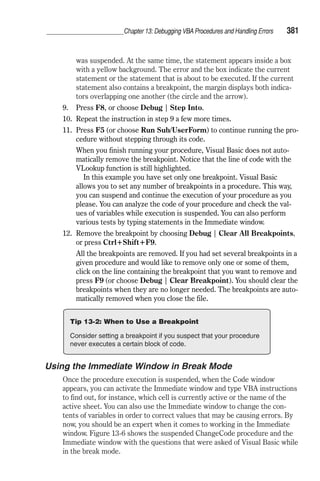
Figure 13-2: The codes entered in column D of this spreadsheet will be replaced by
the ChangeCode procedure with the codes illustrated in Figure 13-3.
Figure 13-3: The ChangeCode procedure uses this code table for lookup purposes.](https://image.slidesharecdn.com/excelvbavisualbasickorol1-141026043610-conversion-gate01/85/Excel-vba-visual-basic-korol-1-395-320.jpg)
![Chapter 13: Debugging VBA Procedures and Handling Errors 379
2. With Chap13.xls active, switch to the Visual Basic Editor window.
3. Use the Properties window to rename VBAProject (Chap13.xls) to
Debugging.
4. Insert a module into the Debugging (Chap13.xls) project, and change
its Name property to Breaks.
5. Enter the code of the ChangeCode procedure, as shown below:
Sub ChangeCode()
Workbooks.Open FileName:=C:Codes.xls
Windows(Chap13.xls).Activate
Columns(D:D).Select
Selection.Insert Shift:=xlToRight
Range(D1).Select
ActiveCell.Formula = Code
Columns(D:D).Select
Selection.SpecialCells(xlBlanks).Select
ActiveCell.Formula = =VLookup(RC[1],Codes.xls!R1C1:R6C2,2)
Selection.FillDown
With Columns(D:D)
.EntireColumn.AutoFit
.Select
End With
Selection.Copy
Selection.PasteSpecial Paste:=xlValues
Rows(1:1).Select
With Selection
.HorizontalAlignment = xlCenter
.VerticalAlignment = xlBottom
.Orientation = xlHorizontal
End With
Workbooks(Codes.xls).Close
End Sub
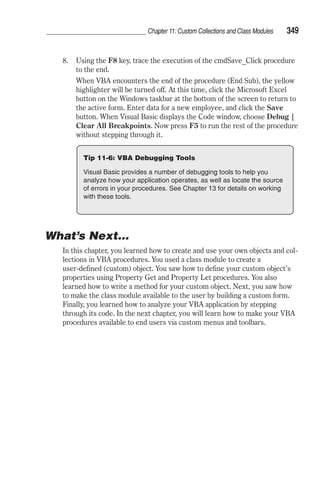
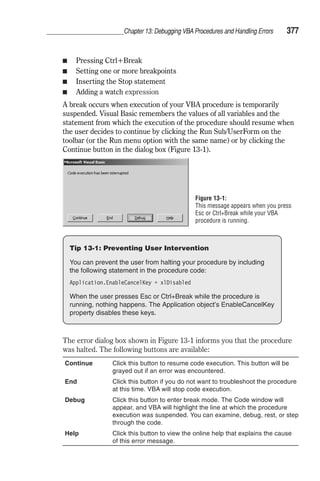
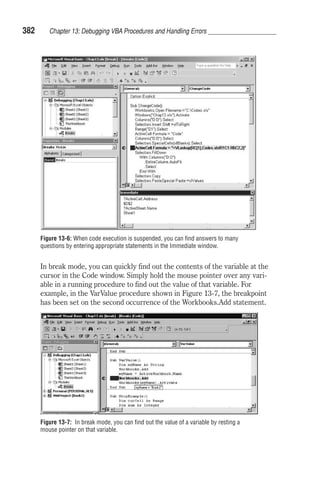
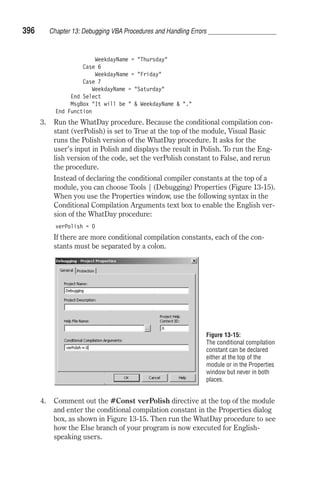
6. In the ChangeCode procedure, click anywhere on the line containing
the following statement:
ActiveCell.Formula = =VLookup(RC[1],Codes.xls!R1C1:R6C2,2)
7. Press F9 (or choose Debug | Toggle Breakpoint) to set a breakpoint
on the line where the cursor is located. Another way to set a breakpoint
is to click in the margin indicator to the left of the line on which you
want to pause the procedure. When you set the breakpoint, Visual
Basic displays a red circle in the margin. At the same time, the line that
has the breakpoint is indicated as white text on a red background (Fig-ure
13-4). The color of the breakpoint can be changed on the Editor
Format tab in the Options dialog box (Tools menu).
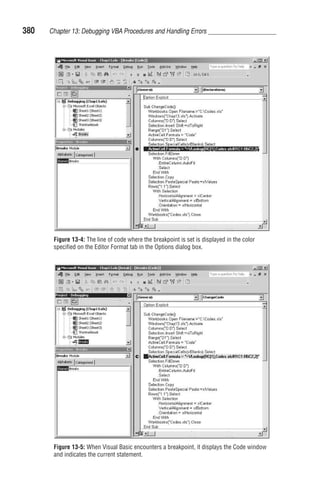
8. Run the ChangeCode procedure. When you run the procedure, Visual
Basic will execute all the statements until it encounters the breakpoint.
Once the breakpoint is reached, the code is suspended, and the screen
displays the Code window (Figure 13-5). Visual Basic displays a yellow
arrow in the margin to the left of the statement at which the procedure](https://image.slidesharecdn.com/excelvbavisualbasickorol1-141026043610-conversion-gate01/85/Excel-vba-visual-basic-korol-1-396-320.jpg)


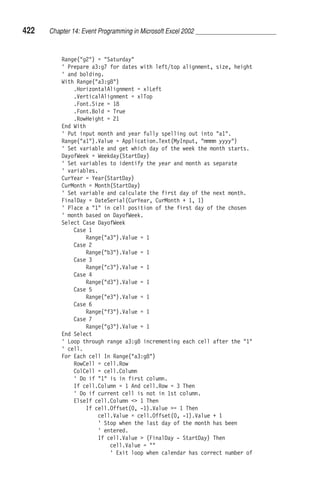
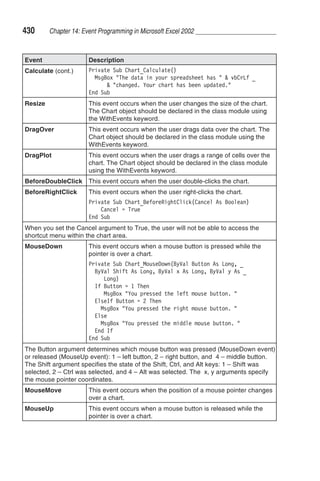
![Chapter 14: Event Programming in Microsoft Excel 2002 431
Embedded Chart Events
To capture events raised by the chart embedded in a worksheet, you must
first create a new object in the class module using the keyword WithEvents.
To see how this is done, let’s follow the steps outlined below:
1. Activate the Visual Basic Editor window.
2. In the Project Explorer, select VBAProject(ChartEvents.xls).
3. Choose Insert | Class Module.
4. In the Class Modules folder, you will see a module named Class1.
5. In the Properties window, rename Class1 to clsChart.
6. In the Code window of the class module, declare an object variable that
will represent the events generated by the Chart object:
Public WithEvents xlChart As Excel.Chart
The Public keyword will make the object variable xlChart available to all
modules in the current VBA project. Declaring an object variable using
the WithEvents keyword exposes all of the events defined for that par-ticular
object type.
After typing in the above declaration, the xlChart object variable is
added to the drop-down Object list in the upper-left corner of the Code
window, and the events associated with this object variable appear in
the Procedure drop-down list box in the upper-right corner of the Code
window.
7. Open the Object drop-down list box, and select the name of the xlChart
variable. The Code window should now show the skeleton of the
xlChart_Activate event procedure:
Private Sub xlChart_Activate()
End Sub
8. Add your VBA code to the event procedure. In this exercise, we will
add a statement to display a message box. After adding this statement,
your VBA procedure should look like the following:
Private Sub xlChart_Activate()
MsgBox You’ve activated a chart embedded in _
ActiveSheet.Name
End Sub
After typing in the event procedure, you still need to inform Visual
Basic that you are planning on using it.
9. In the Project Explorer window, double-click the object named
ThisWorkbook, and enter in the [ThisWorkbook (Code)] window the
statement to create a new instance of the class named clsChart:
Dim myChart As New clsChart
The instruction shown above declares an object variable named myChart.
This variable will refer to the xlChart object located in the class module](https://image.slidesharecdn.com/excelvbavisualbasickorol1-141026043610-conversion-gate01/85/Excel-vba-visual-basic-korol-1-448-320.jpg)
![432 Chapter 14: Event Programming in Microsoft Excel 2002
clsChart. The New keyword tells Visual Basic to create a new instance
of the specified object.
10. Enter the following procedure in the [ThisWorkbook (Code)] window to
initialize the object variable myChart:
Sub InitializeChart()
' connect the class module and its objects with the Chart object
Set myChart.xlChart = _
Worksheets(1).ChartObjects(1).Chart
End Sub
11. Run the InitializeChart procedure. After running this procedure, the
event procedures entered in the class module will be triggered in
response to a particular event.
12. Activate the Microsoft Excel application window and click the embed-ded
chart. At this time, the xlChart_Activate event procedure that you
entered in step 7 should be triggered.
13. You can now enter in the class module additional event procedures for
the embedded chart.
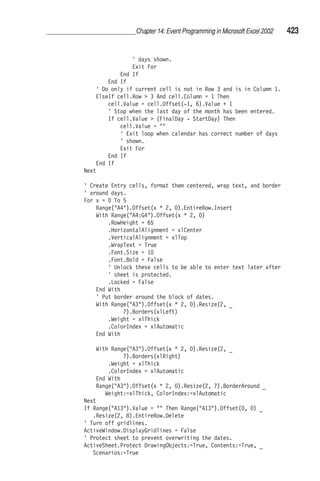
Events Recognized by the
Application Object
If you want your event procedure to execute no matter which Excel work-book
is currently active, you need to create the event procedure for the
Application object. Event procedures for the Application object have a
global scope. This means that the procedure code will be executed in
response to a certain event, as long as the Microsoft Excel application
remains open.
Events for the Application objects are listed in the following table. Sim-ilar
to an embedded chart, event procedures for the Application objects
require that you create a new object using the WithEvents keyword in the
class module. The examples of the event procedures demonstrated in the
table have to be entered in a class module. To do this, choose Insert | Class
Module in the Visual Basic Editor window. In the Properties window change
the module name to clsApplication. In the [clsApplication (Code)] window
declare an object variable to represent the Application object using the
WithEvents keyword as follows:
Public WithEvents App As Application
Below the declaration statement, enter the following event procedures, as
shown in the table: App_NewWorkbook, App_WorkbookOpen,
App_WorkbookBeforeSave, App_WorkbookBeforeClose, App_Sheet-
SelectionChange, and App_WindowActivate. After you’ve entered the code
of these procedures in the class module, insert a standard module to your
current VBA project (choose Insert | Module). In the standard module,](https://image.slidesharecdn.com/excelvbavisualbasickorol1-141026043610-conversion-gate01/85/Excel-vba-visual-basic-korol-1-449-320.jpg)
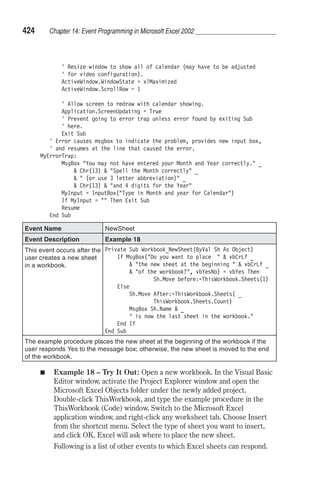
![434 Chapter 14: Event Programming in Microsoft Excel 2002
Event Description
WorkbookOpen (cont.) Original file format: _
Comma delimited file) = vbYes Then
Wb.SaveAs FileFormat:=xlWorkbookNormal
End If
End If
End Sub
WorkbookActivate This event occurs when the user shifts the focus to an
open workbook.
WorkbookDeactivate This event occurs when the user shifts the focus away
from an open workbook.
WorkbookNewSheet This event occurs when the user add a new sheet to an
open workbook.
WorkbookBeforeSave This event occurs before an open workbook is saved.
Private Sub App_WorkbookBeforeSave(ByVal _
Wb As Workbook, _
ByVal SaveAsUI As Boolean, _
Cancel As Boolean)
If Wb.Path vbNullString Then
ActiveWindow.Caption = Wb.FullName _
[Last Saved: Time ]
End If
End Sub
WorkbookBeforePrint This event occurs before an open workbook is printed.
Private Sub App_WorkbookBeforePrint(ByVal _
Wb As Workbook, Cancel As Boolean)
Wb.PrintOut Copies:=2
End Sub
WorkbookBeforeClose This event occurs before an open workbook is closed.
Private Sub App_WorkbookBeforeClose( ByVal _
Wb As Workbook, Cancel As Boolean)
Dim r As Integer
Sheets.Add
r = 1
For Each p In Wb.BuiltinDocumentProperties
On Error GoTo ErrorHandle
Cells(r, 1).Value = p.Name = _
ActiveWorkbook. _
BuiltinDocumentProperties _
.Item(p.Name).Value
r = r + 1
Next
Exit Sub
ErrorHandle:
Cells(r, 1).Value = p.Name
Resume Next
End Sub](https://image.slidesharecdn.com/excelvbavisualbasickorol1-141026043610-conversion-gate01/85/Excel-vba-visual-basic-korol-1-451-320.jpg)
![Chapter 14: Event Programming in Microsoft Excel 2002 437
15. In the wizard’s Finish dialog box, make sure the Return Data to
Microsoft Excel option button is selected and click Finish.
16. In the Import Data dialog box, the current spreadsheet cell is selected.
Click cell A1 in the current worksheet to change the cell reference, and
click OK to close the dialog box.
After completing the above steps, the data from the Category table in the
Northwind database should be placed in the active worksheet. It took quite
a number of steps to retrieve this data. In the next chapter, you will learn
how to create a query table programmatically.
To write event procedures for a QueryTable object, you must create a
class module and declare a QueryTable object by using the WithEvents
keyword.
1. Insert a class module to the current VBA project and rename it
clsQryTbl.
2. In the clsQryTbl [Code] window, type the following statement:
Public WithEvents qrytbl As QueryTable
After you’ve declared the new object (qrytbl) by using the WithEvents
keyword, it appears in the Object drop-down list in the class module.
3. In the clsQryTbl [Code] window, enter the two event procedures pre-sented
in the table on the following page: QryTbl_BeforeRefresh and
QryTbl_AfterRefresh. Before you can trigger these event procedures,
you must connect the object that you declared in the class module
(qrytbl) to the specified QueryTable object.
4. Insert a standard module into the current VBA project, and enter the
following code:
Dim sampleQry As New clsQryTbl
Public Sub Auto_Open()
' connect the class module and its objects with the Query object
Set sampleQry.qrytbl = ActiveSheet.QueryTables(1)
End Sub
The above procedure creates a new instance of the QueryTable class
(clsQryTbl) and connects this instance with the first query table on the
active worksheet. The Auto_Open procedure will run automatically
when you open the workbook, so you will not need to run this proce-dure
manually to ensure that the query events that you’ve entered are
triggered when the data is refreshed by the user or the system.
5. Run the Auto_Open procedure that you entered in step 4. After you run
this initialization procedure, the object that you declared in the class
module points to the specified QueryTable object.
6. In the worksheet where you placed the Category table from Microsoft
Access, change the name of one of the retrieved categories. Select any](https://image.slidesharecdn.com/excelvbavisualbasickorol1-141026043610-conversion-gate01/85/Excel-vba-visual-basic-korol-1-454-320.jpg)
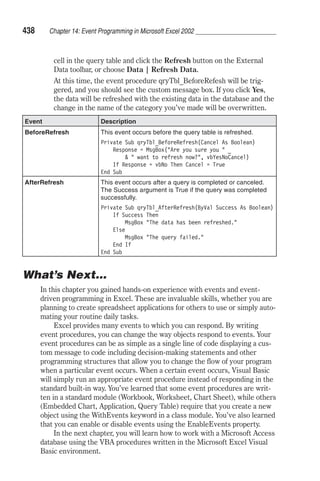


![458 Chapter 15: Using Excel with Microsoft Access
These parameters should be defined using the Parameters collection of the
Command object:
cmd.Parameters([Beginning Date]) = StartDate
cmd.Parameters([Ending Date]) = EndDate
After setting up the parameters, the query can be executed using the fol-lowing
statement:
Set rst = cmd.Execute
The set of records returned by this query is assigned to the object variable
of type Recordset and then copied to a worksheet using the CopyFrom-
Recordset method (see more information on using this method later in this
chapter).
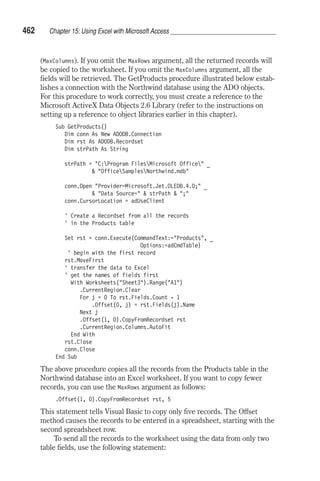
Sub RunAccessParamQuery()
' prior to running this procedure you must set up
' references to the required object libraries
Dim cat As ADOX.Catalog
Dim cmd As ADODB.Command
Dim rst As ADODB.Recordset
Dim i As Integer
Dim dbPath As String
Dim StartDate As String
Dim EndDate As String
dbPath = C:Program FilesMicrosoft Office _
OfficeSamplesNorthwind.mdb
StartDate = 7/1/96
EndDate = 7/31/96
Set cat = New ADOX.Catalog
cat.ActiveConnection = Provider=Microsoft.Jet.OLEDB.4.0; _
Data Source= dbPath
Set cmd = cat.Procedures(Employee Sales by Country).Command
cmd.Parameters([Beginning Date]) = StartDate
cmd.Parameters([Ending Date]) = EndDate
Set rst = cmd.Execute
Sheets(1).Select
For i = 0 To rst.Fields.Count - 1
Cells(1, i + 1).Value = rst.Fields(i).Name
Next
With ActiveSheet
.Range(A2).CopyFromRecordset rst
.Range(Cells(1, 1), Cells(1, rst.Fields.Count)).Font. _
Bold = True
.Range(A1).Select
End With
Selection.CurrentRegion.Columns.AutoFit
rst.Close
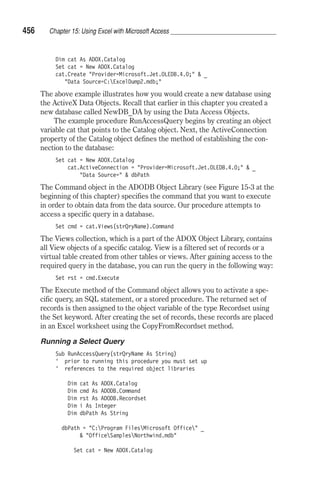
Set cmd = Nothing](https://image.slidesharecdn.com/excelvbavisualbasickorol1-141026043610-conversion-gate01/85/Excel-vba-visual-basic-korol-1-475-320.jpg)
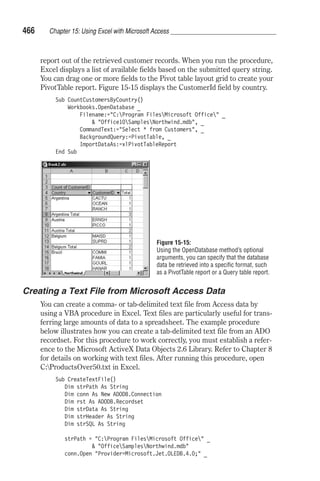
![Chapter 15: Using Excel with Microsoft Access 463
.Offset(1, 0).CopyFromRecordset rst, , 2
This statement tells Visual Basic to copy all the data from the first two col-umns.
The comma between the rst and the number 2 is a placeholder for
the omitted MaxRows argument.
Retrieving Data with the TransferSpreadsheet Method
It is possible to use the TransferSpreadsheet action to import or export data
between the current Microsoft Access database (.mdb) or Access project
(.adp) and a spreadsheet file. You can also link the data in a Microsoft Excel
spreadsheet to the current Microsoft Access database. With a linked spread-sheet,
you can view and edit the spreadsheet data with Microsoft Access
while still allowing complete access to the data from your Microsoft Excel
spreadsheet program.
The TransferSpreadsheet method carries out the TransferSpreadsheet
action in Visual Basic and has the following syntax:
DoCmd.TransferSpreadsheet [transfertype][, spreadsheettype], _
tablename, filename [, hasfieldnames][, range]
The transfertype argument can be one of the following constants: acImport
(default setting), acExport, or acLink. These constants define whether data
has to be imported, exported, or linked to the database.
The spreadsheettype argument can be one of the following constants:
0 acSpreadsheetTypeExcel3 (default setting)
6 acSpreadsheetTypeExcel4
5 acSpreadsheetTypeExcel5
5 acSpreadsheetTypeExcel7
8 acSpreadsheetTypeExcel8
8 acSpreadsheetTypeExcel9
2 acSpreadsheetTypeLotusWK1
3 acSpreadsheetTypeLotusWK3
7 acSpreadsheetTypeLotusWK4
It is not difficult to guess that the spreadsheettype argument specifies the
spreadsheet name and the version number.
The tablename argument is a string expression that specifies the name
of the Microsoft Access table you want to import spreadsheet data into,
export spreadsheet data from, or link spreadsheet data to. Instead of the
table name, you may also specify the name of the Select query whose
results you want to export to a spreadsheet.
The hasfieldnames argument is a logical value True (–1) or False (0).
True indicates that the first worksheet row contains the field names. False
denotes that the first row contains normal data. The default setting is False
(no field names in the first row).
The range argument is a string expression that specifies the range of
cells or the name of the range in the worksheet. This argument applies only](https://image.slidesharecdn.com/excelvbavisualbasickorol1-141026043610-conversion-gate01/85/Excel-vba-visual-basic-korol-1-480-320.jpg)
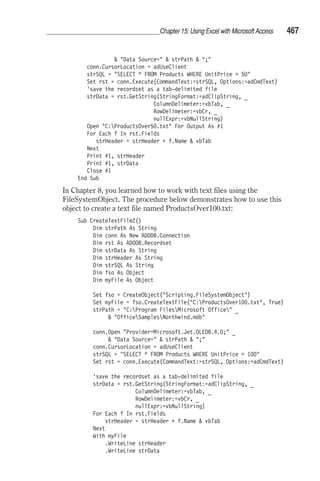
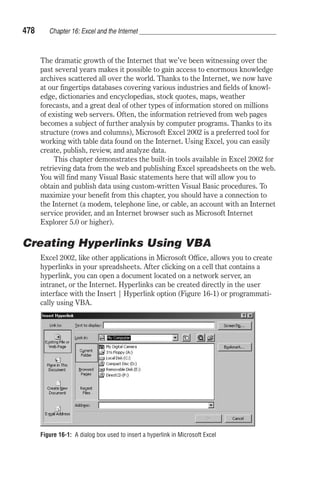
![Chapter 16: Excel and the Internet 479
In VBA, each hyperlink is represented by a Hyperlink object. To create a
hyperlink to a web page, use the Add method of the Hyperlinks collection.
This method is shown below:
Expression.Hyperlinks.Add(Anchor, Address, [SubAddress], [ScreenTip], _
[TextToDisplay])
The arguments in square brackets are optional. Expression denotes a
worksheet or range of cells where you want to place the hyperlink. Anchor is
an object to be clicked. This can be either a Range or Shape object. Address
points to a local network or a web page. SubAddress is the name of a range in
the Excel file. ScreenTip allows the display of a screen label. TextToDisplay is
a friendly name that you’d like to display in a spreadsheet cell for a specific
hyperlink.
Let’s see how this is done by creating a VBA procedure that places a
hyperlink in a worksheet cell. This hyperlink, when clicked, should take
you to the Yahoo site.
1. Open a new workbook.
2. Switch to the Visual Basic Editor screen, and insert a new module into
the current VBA project.
3. In the Code window, enter the code of the FollowMe procedure shown
below.
4. Activate the procedure created in step 3.
Sub FollowMe()
Dim myRange As Range
Set myRange = Sheets(1).Range(A1)
myRange.Hyperlinks.Add _
Anchor:=myRange, _
Address:=http://search.yahoo.com/bin/search, _
ScreenTip:=Search Yahoo, _
TextToDisplay:=Click here
End Sub
When you activate the FollowMe procedure, cell A1 in the first worksheet
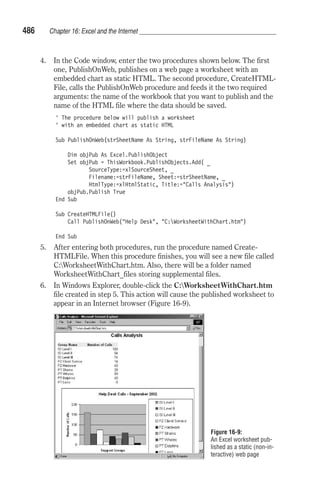
will contain a friendly hyperlink “Click here” with the screen tip “Search
Yahoo” (Figure 16-2). If you are now connected to the Internet, clicking on
this hyperlink will activate your browser and load the Yahoo search engine
(Figure 16-3).
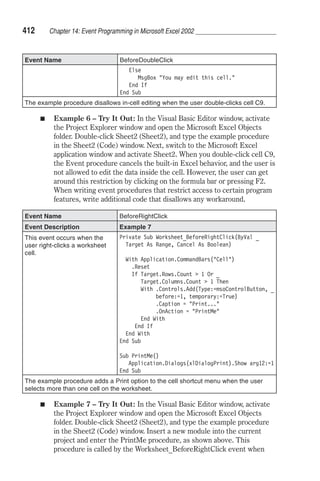
Figure 16-2:
This hyperlink was placed in a worksheet
by a VBA procedure.](https://image.slidesharecdn.com/excelvbavisualbasickorol1-141026043610-conversion-gate01/85/Excel-vba-visual-basic-korol-1-496-320.jpg)
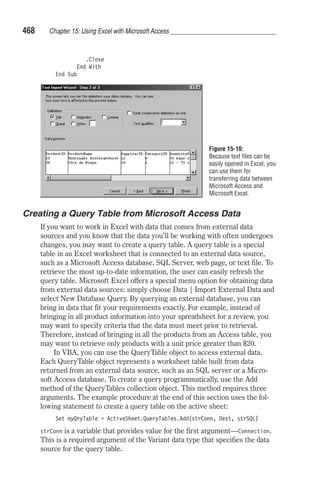
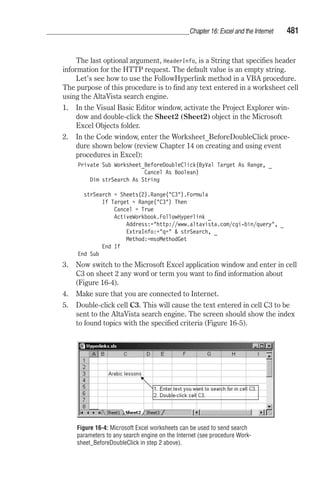
![480 Chapter 16: Excel and the Internet
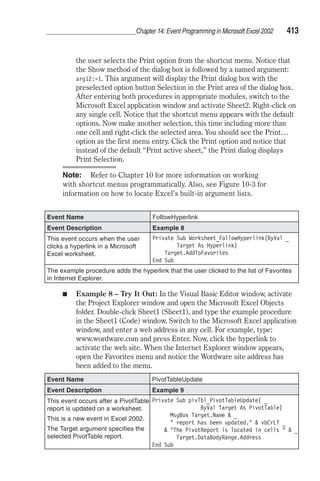
Figure 16-3: The main page of the Yahoo search engine was activated by clicking on
the hyperlink placed in a worksheet cell.
If you’d rather not place hyperlinks in a worksheet but still make it possible
for a user to reach the required Internet pages directly from the Excel
worksheet, you can use the FollowHyperlink method. This method allows
you to open the required web page without the need to place a hyperlink
object in a worksheet. The format of this method looks like this:
Expression.FollowHyperlink(Address, [SubAddress], [NewWindow], _
[AddHistory], [ExtraInfo], [Method], [HeaderInfo])
Again, the arguments in square brackets are optional. Expression returns a
Workbook object. Address is the address of the web page that you want to
activate. SubAddress is a fragment of the object to which the hyperlink
address points. This can be a range of cells in an Excel worksheet. NewWindow
indicates whether you want to display the document or page in a new win-dow.
The default setting is False. The next argument, AddHistory, is not
currently used. It is reserved for future use. ExtraInfo gives additional infor-mation
that allows jumping to the specific location in a document or on a
web page. For example, you can specify here the text for which you want to
search. Method specifies the method in which the additional information
(ExtraInfo) is attached. This can be one of the following constants:
msoMethodGet or msoMethodPost.
When you use msoMethodGet, ExtraInfo is a String that’s appended to
the URL address. When using msoMethodPost, ExtraInfo is posted as a
String or byte array.](https://image.slidesharecdn.com/excelvbavisualbasickorol1-141026043610-conversion-gate01/85/Excel-vba-visual-basic-korol-1-497-320.jpg)
![484 Chapter 16: Excel and the Internet
expression.Add(SourceType, Filename, [Sheet], [Source], [HtmlType], _
[DivID], [Title])
The arguments in square brackets are optional. Expression returns an object
that belongs to the PublishObjects collection. SourceType specifies the
source object using one of the following constants:
Constant Description
xlSourceAutoFilter An AutoFilter range
xlSourceChart A chart
xlSourcePivotTable A PivotTable report
xlSourcePrintArea A range of cells selected for printing
xlSourceQuery A query table (an external data range)
xlSourceRange A range of cells
xlSourceSheet An entire worksheet
Filename is a string specifying the location where the source object
(SourceType) was saved. This can be a URL (Unified Resource Locator) or
the path to a local or network file. Sheet is the name of the worksheet that
was saved as a web page. Source is a unique name that identifies a source
object. This argument depends on the SourceType argument. Source is a
range of cells or a name applied to a range of cells when the SourceType
argument is the xlSourceRange constant. If the argument of SourceType is a
constant, such as xlSourceChart, xlSourcePivotTable or xlSourceQuery,
Source specifies a name of a chart, PivotTable report, or query table.
HTMLType specifies whether the selected worksheet element is saved as an
interactive Microsoft Office web component or static text and images. This
can be one of the following constants:
Constant Description
xlHTMLCalc Use the Spreadsheet component.
This component makes it possible to view, analyze, and
calculate spreadsheet data directly in an Internet browser. This
component also has options that allow you to change the
formatting of fonts, cells, rows, and columns.
xlHTMLChart Use the Chart component.
This component allows you to create interactive charts in the
browser.
xlHTMLList Use the PivotTable component.
This component allows you to rearrange, filter, and summarize
information in a browser. This component is also able to
display data from a spreadsheet or a database (for instance
Microsoft Assess, SQL Server or OLAP servers).
XlHTMLStatic
(default value)
Use static (non-interactive) HTML for viewing only.
The data published in an HTML document does not change.](https://image.slidesharecdn.com/excelvbavisualbasickorol1-141026043610-conversion-gate01/85/Excel-vba-visual-basic-korol-1-501-320.jpg)
![Note: The Office Web Components allow you to use Excel
analytical options in an Internet browser.
DivID is a unique identifier used in the HTML DIV tag to identify the item
on the web page. Title is the title of the web page.
Before we can see how to use the Add method from a VBA procedure,
you also need to learn how to use the Publish method of the PublishObject.
This method will allow you to publish an element or a collection of ele-ments
in a particular document on the web page. This method is quite
simple and looks like this:
expression.Publish([Create])
Expression is an expression that returns a PublishObject object or
PublishObjects collection. The optional argument, Create, is used only with
a PublishObject. If the HTML file already exists, setting this argument to
True will overwrite the file. Setting this argument to False inserts the item
or items at the end of the file. If the file does not yet exist, a new HTML file
is created, regardless of the value of the Create argument.
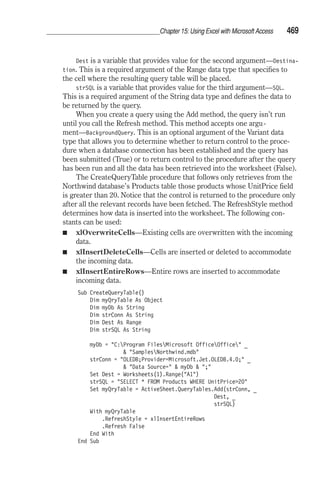
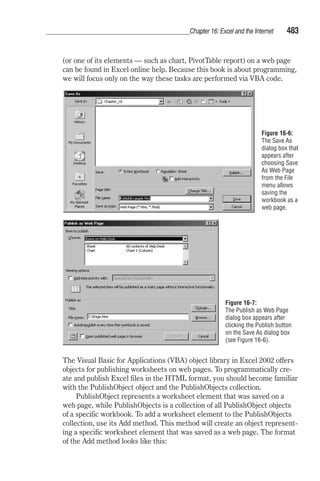
Now that you’ve been introduced to VBA objects and methods used for
creating and publishing an Excel workbook in HTML format, you can begin
programming. In the following exercises, you will create two VBA proce-dures.
The first one will create and publish an Excel worksheet with an
embedded chart as static HTML. The second procedure will demonstrate
how the same worksheet can be made available as an interactive web page.
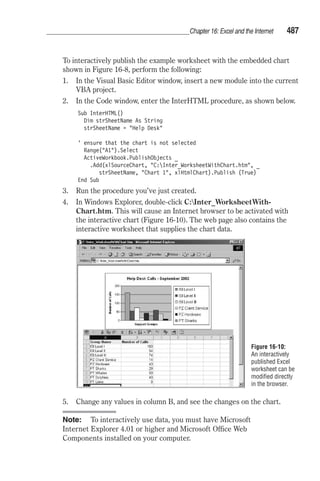
1. Create a worksheet and chart, as shown in Figure 16-8.
2. Save the workbook in a file named PublishExample.xls.
3. Activate the Visual Basic Editor window, and insert a new module into
the current VBA project.
Chapter 16: Excel and the Internet 485
Figure 16-8:
A worksheet like this one
with an embedded chart
can be placed on a web
page using the Save As
Web Page option on the
File menu or
programmatically from a
VBA procedure.](https://image.slidesharecdn.com/excelvbavisualbasickorol1-141026043610-conversion-gate01/85/Excel-vba-visual-basic-korol-1-502-320.jpg)

![490 Chapter 16: Excel and the Internet
The .iqy files contain the following parts:
Section name Description/Example
Query Type
(optional section)
Set to WEB when you use the version section:
WEB
Query Version
(optional section)
Allows you to set the version number of a web query. For
example: 1
URL
(required)
The URL of the web page where you will get your data. For
example:
http://investor.msn.com/external/excel/quotes.asp
http://www.um.lublin.pl/oswiata/sz_pdst.htm
POST Parameters
(optional section)
You can send parameters to the web server using the POST or
GET method. This section is used for sending parameters with the
POST method. These parameters need to be entered on a
separate line, as in the following example:
http://www.xe.net/cgi-bin/ucc/convert
From=USDAmount=1To=CAD
From, Amount, and To are the names of parameters, while the
values that follow the equal (=) sign are the parameter settings.
Parameters are separated from one another with the sign.
Note: When sending parameters using the GET method, the
parameters are attached to the URL address using the question
mark, as shown below:
http://uk.finance.yahoo.com/quote?symbols=met
Symbols is a parameter name, while met is a stock symbol (a
parameter value), which you want to retrieve from the specified
URL.
Creating and Running Web Queries with VBA
In the previous section you learned that a web query can be created by
using a menu option or typing special instructions in a text editor such as
Notepad. The third method of creating a web query is through VBA
statements.
To programmatically create a web query, use the Add method of the
QueryTables collection. This collection belongs to the Worksheet object and
contains all the QueryTable objects for a specific worksheet. The Add
method returns the QueryTable object that represents a new query. The
format of this method is shown below:
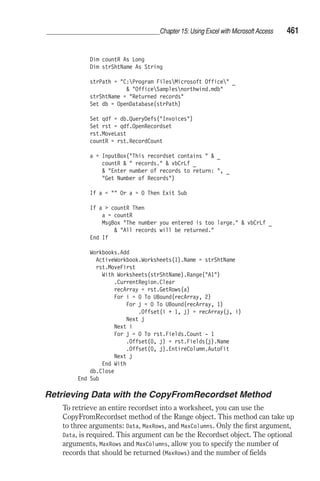
expression.Add(Connection, Destination, [Sql])
Expression is an expression that returns the QueryTable object. Connection
specifies the data source for the query table. The data source can be one of
the following:
A string containing the address of the web page in the form
“URL;url.” For example:](https://image.slidesharecdn.com/excelvbavisualbasickorol1-141026043610-conversion-gate01/85/Excel-vba-visual-basic-korol-1-507-320.jpg)
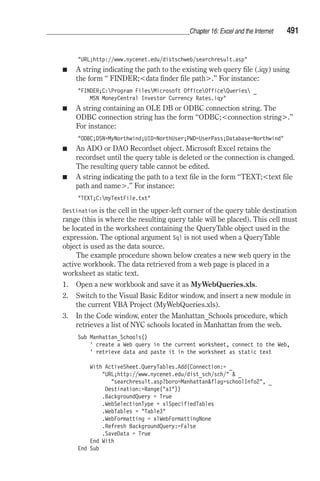
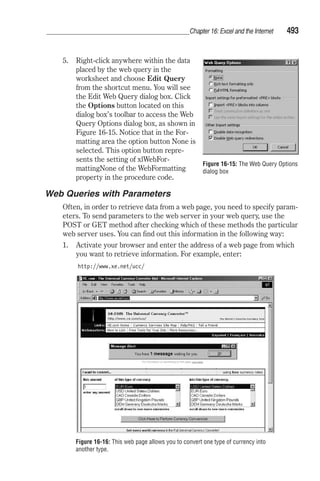
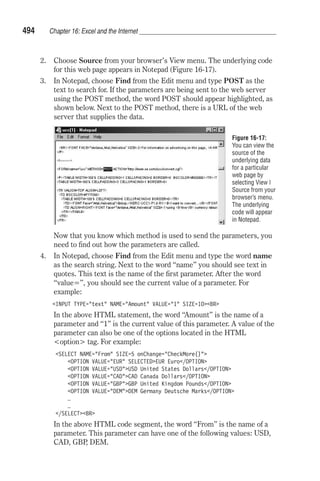
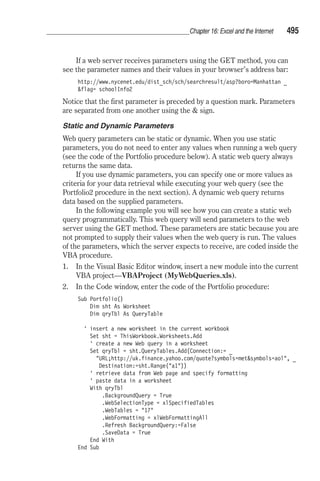
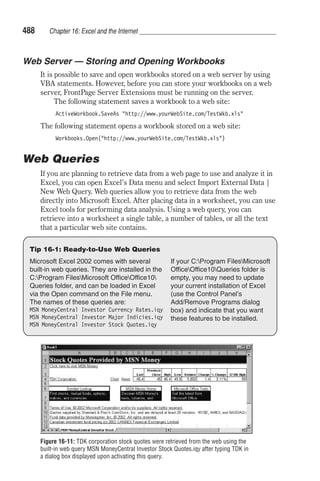
![Dynamic Web Queries
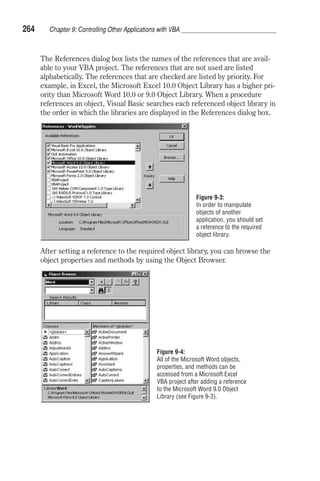
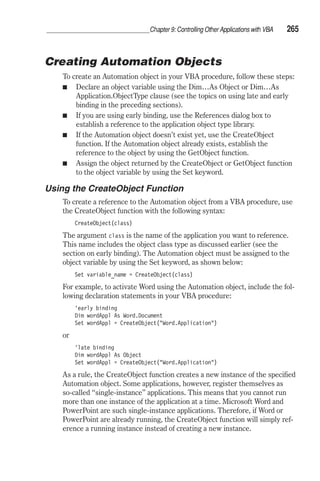
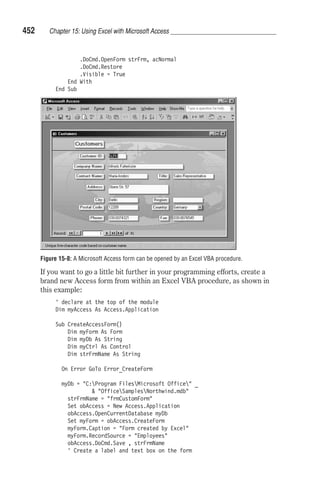
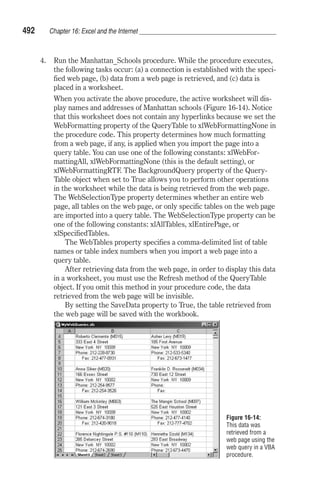
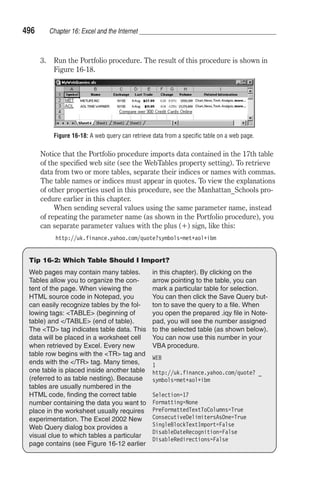
Chapter 16: Excel and the Internet 497
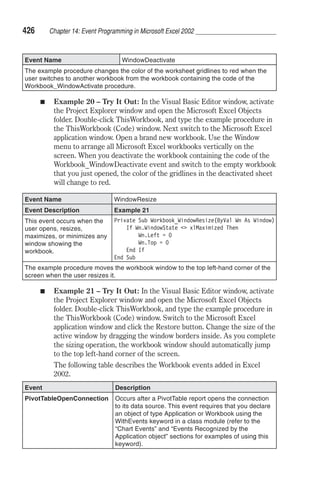
Instead of hard coding the parameter values in the code of your VBA proce-dures,
you can create a dynamic query that will prompt the user for the
parameter setting when the query is run.
The Portfolio2 procedure shown below uses the GET method for send-ing
dynamic parameters. This procedure displays a dialog box prompting
the user to enter stock symbols separated by spaces. Notice that the mes-sage
is placed within square brackets and surrounded by double quotes, like
this:
symbols=[Enter symbols separated by spaces]
When the web query is activated, a dialog box appears, as shown in Figure
16-19. Here the user may specify any stock symbols in which he or she is
interested.
Sub Portfolio2()
Dim sht As Worksheet
Dim qryTbl As QueryTable
' insert a new worksheet in the current workbook
Set sht = ThisWorkbook.Worksheets.Add
' create a new Web query in a worksheet
Set qryTbl = sht.QueryTables.Add(Connection:= _
URL;http://uk.finance.yahoo.com/quote?symbols=[Enter _
symbols separated by spaces], _
Destination:=sht.Range(a1))
' retrieve data from Web page and specify formatting
' paste data in a worksheet
With qryTbl
.BackgroundQuery = True
.WebSelectionType = xlSpecifiedTables
.WebTables = 17
.WebFormatting = xlWebFormattingAll
.Refresh BackgroundQuery:=False
.SaveData = True
End With
End Sub
Figure 16-19:
A dynamic web query requests
parameter values from the user.
The next example demonstrates a web query that uses the POST method
with dynamic parameters:](https://image.slidesharecdn.com/excelvbavisualbasickorol1-141026043610-conversion-gate01/85/Excel-vba-visual-basic-korol-1-514-320.jpg)
![498 Chapter 16: Excel and the Internet
1. In the Code window, enter the Currency_Exchange_POST procedure,
as shown below.
Sub Currency_Exchange_POST()
With ActiveSheet.QueryTables.Add(Connection:= _
URL;http://www.xe.net/cgi-bin/ucc/convert, _
Destination:=Range(D1))
.PostText = From=[Enter the currency symbol from which _
you want to convert]Amount=['Enter amount you wish _
to convert]To=[Enter the currency symbol you want to obtain]
.BackgroundQuery = True
.WebSelectionType = xlSpecifiedTables
.WebTables = 8
.WebFormatting = xlWebFormattingAll
.RefreshStyle = xlOverwriteCells
.AdjustColumnWidth = True
.Refresh BackgroundQuery:=False
.SaveData = True
End With
End Sub
2. Run the above procedure. Notice that the Currency_Exchange_POST
procedure uses the PostText property of the QueryTable object for
sending dynamic parameters to the web server. A web query can use a
combination of static and dynamic parameters, as shown in the follow-ing
code fragment:
From=[Enter the currency symbol from which _
you want to convert ]Amount=”1” To=[Enter the currency symbol _
you want to obtain””]”
Because Amount is a static parameter, the user will only be prompted
for the From and To currency symbols.
Figure 16-20: This worksheet has been generated by the
Currency_Exchange_POST procedure.
Note: Web pages undergo frequent modifications. It’s not
uncommon to find out that a web query you prepared a while ago
suddenly stops working because the web page address or parame-ters
required to process the data have changed. If you plan on](https://image.slidesharecdn.com/excelvbavisualbasickorol1-141026043610-conversion-gate01/85/Excel-vba-visual-basic-korol-1-515-320.jpg)

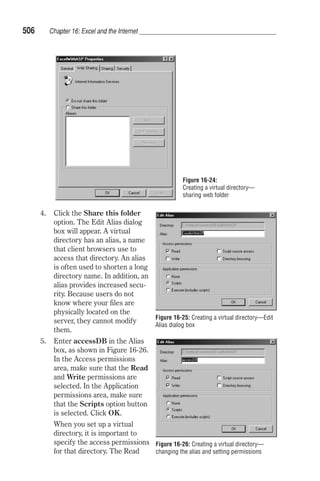
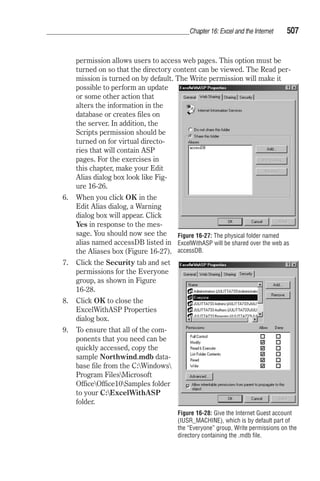

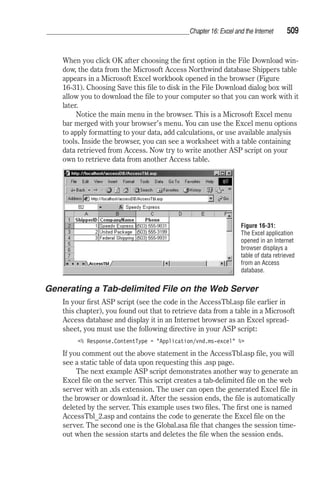
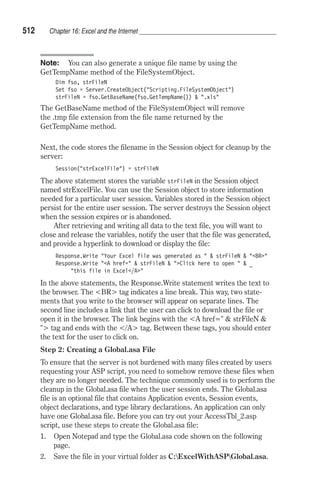
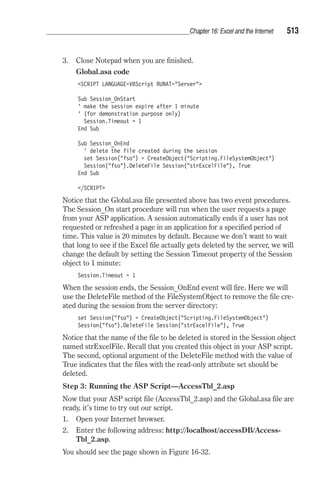
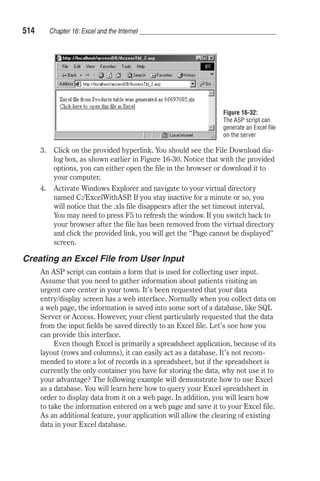
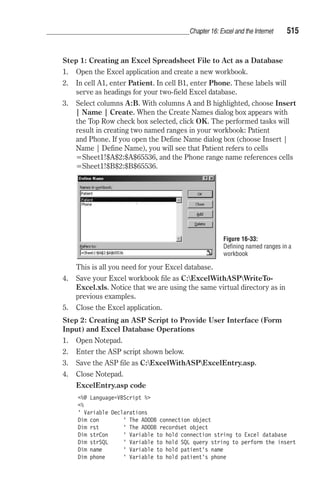
![516 Chapter 16: Excel and the Internet
Dim key ' Iterator (dummy variable) in the For Each loop
Dim GoAhead ' The flag to indicate whether we can proceed
Dim myStr ' Variable to hold the message to display in the
' right-hand side table
' ADODB Constants
'---- CursorTypeEnum Value ----
Const adOpenKeyset = 1
'---- LockTypeEnum Value ----
Const adLockPessimistic = 2
On Error Resume Next
name=Request(txtPatientName)
phone=Request(txtPhone)
For Each key In Request.Form
If Request.Form(key)= Then
If key = txtPatientName Then
Response.Write FONT Color = 'Blue'Please enter the Patient name./Font
Else
Response.Write FONT Color = 'Red'Please enter the Phone number./Font
End If
goAhead = False
Exit For
End If
GoAhead=True
Next
If goAhead = True Then
name=Replace(Request(txtPatientName),','')
If Len(name) 0 Or _
Len(phone)0 Then
Set con = Server.CreateObject(ADODB.Connection)
strCon=Provider=Microsoft.Jet.OLEDB.4.0;Data Source=
strCon=strCon server.MapPath(WriteToExcel.xls) ;
strCon=strCon Extended Properties=Excel 8.0
If Request(cmdSubmit)=Enter Data in Excel Then
strSQL = INSERT INTO [Sheet1$] (Patient, Phone)
strSQL = strSQL VALUES (' name '
strSQL = strSQL ,' Phone ')
End If
With con
.Open strCon
If Request(cmdDelete)Delete Data Then
.Execute(strSQL)
Else
set rst = Server.CreateObject(ADODB.Recordset)
rst.Open Select * from [Sheet1$] Where Patient=' name ' _
AND phone =' phone ', con, adOpenKeyset, _
adLockPessimistic
rst.fields(0).value =
rst.fields(1).value =
rst.Update](https://image.slidesharecdn.com/excelvbavisualbasickorol1-141026043610-conversion-gate01/85/Excel-vba-visual-basic-korol-1-533-320.jpg)
![rst.Close
End If
End With
If err.Number =3021 Then
Response.Write The information you entered cannot be deleted. _
BR
Response.Write Either name or phone number is incorrect. P
Else
name =
phone =
set rst = Server.CreateObject(ADODB.Recordset)
rst.Open Select * from [Sheet1$], con
Response.Write TABLE Border=1
For Each fld in rst.Fields
%
TH
% Response.Write fld.Name %
/TH
%
Next
rst.MoveFirst
Do While Not rst.EOF
%
TR
% For Each fld in rst.Fields %
TD
% Response.Write fld.Value %
/TD
% Next %
/TR
% rst.MoveNext
Loop
%
/TABLE
%
rst.Close
Set rst=Nothing
con.Close
Set con=Nothing
End If
End If
End If
%
HR
HTML
HEAD
TITLEPatient Data Entry Screen/TITLE
/HEAD
BODY
FORM Action=ExcelEntry.asp Method = POST Name=form1
P
TABLE BORDER=1 CELLPADDING=2 CELLSPACING=4
TR
Chapter 16: Excel and the Internet 517](https://image.slidesharecdn.com/excelvbavisualbasickorol1-141026043610-conversion-gate01/85/Excel-vba-visual-basic-korol-1-534-320.jpg)
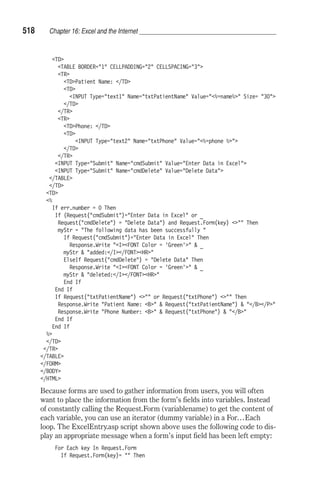
![Chapter 16: Excel and the Internet 519
If key = txtPatientName Then
Response.Write FONT Color = 'Blue'Please enter the Patient _
name./Font
Else
Response.Write FONT Color = 'Red'Please enter the Phone _
number./Font
End If
goAhead = False
Exit For
End If
GoAhead=True
Next
The above code fragment checks for any blanks in the form.
Next, if the user has filled in the two text boxes, the code uses the
Microsoft Jet database engine to access data in other database file formats,
such as Excel workbooks. Notice that to connect to a Microsoft Excel file
(WriteToExcel.xls) that serves as our database, you need to specify the
database type in the extended properties for the connection. You should use
the Excel 8.0 source database type for Microsoft Excel 8.0 and higher.
Therefore, the connection string looks like this:
strCon=Provider=Microsoft.Jet.OLEDB.4.0;Data Source=
strCon=strCon server.MapPath(WriteToExcel.xls) ;
strCon=strCon Extended Properties=Excel 8.0
Note: When you use Excel as a database, the first row is con-sidered
the header, unless you specify HDR=No in the extended
properties in your connection string.
Depending on which button the user has clicked, an SQL INSERT INTO
statement or the Recordset’s Update method are executed. When inserting
data into an Excel spreadsheet, we use the sheet name followed by a dollar
sign (Sheet1$):
If Request(cmdSubmit)=Enter Data in Excel Then
strSQL = INSERT INTO [Sheet1$] (Patient, Phone)
strSQL = strSQL VALUES (' name '
strSQL = strSQL ,' Phone ')
End If
It is also possible to reference data in a range with a defined name or a spe-cific
address. For example, if your spreadsheet contains the Patient list in
cells A1:B15, you can use the following statement to select data based on
what the user has entered in the web form’s text boxes:
rst.Open Select * from [Sheet1$A1:B15] Where Patient=' name ' _
AND phone =' phone ', con, adOpenKeyset, adLockPessimistic
Or, if you assigned the name PatientList to cells A1:B15, you can refer to
the named range as follows:](https://image.slidesharecdn.com/excelvbavisualbasickorol1-141026043610-conversion-gate01/85/Excel-vba-visual-basic-korol-1-536-320.jpg)
![520 Chapter 16: Excel and the Internet
rst.Open Select * from PatientList Where Patient=' name ' _
AND phone =' phone ', con, adOpenKeyset, adLockPessimistic
To insert data into the Excel spreadsheet, the code uses the Execute
method of the ADO connection:
If Request(cmdDelete)Delete Data Then
.Execute(strSQL)
Else
set rst = Server.CreateObject(ADODB.Recordset)
rst.Open Select * from [Sheet1$] Where Patient=' name ' _
AND phone =' phone ', con, adOpenKeyset, adLockPessimistic
rst.fields(0).value =
rst.fields(1).value =
rst.Update
rst.Close
End If
The Else clause in the code fragment above locates the data in an Excel file
based on the user’s input. Once found, the data is cleared from the spread-sheet
cells using the Recordset’s Value method, and the change is saved
with the Recordset’s Update method. Note that when using ADO from the
ASP, you are not allowed to delete entire rows in a spreadsheet. The SQL
statement DELETE FROM will not work. To get rid of the existing data in
a spreadsheet, you can only blank it out. This of course will cause empty
lines within your data range. To get rid of the empty lines, you can write
some code in the Open event for the workbook.
If the data the user wants to remove from the Excel file cannot be
located, error 3021 will occur; therefore, we display the user-friendly
message:
Response.Write The information you entered cannot be deleted. BR
Response.Write Either name or phone number is incorrect. P
Every time the user clicks any of the provided buttons, we want to keep
him posted about the data currently contained in the Excel database by
building a table on the fly:
set rst = Server.CreateObject(ADODB.Recordset)
rst.Open Select * from [Sheet1$], con
Response.Write TABLE Border=1
For Each fld in rst.Fields
%
TH
% Response.Write fld.Name %
/TH
%
Next
rst.MoveFirst
Do While Not rst.EOF
%
TR
% For Each fld in rst.Fields %](https://image.slidesharecdn.com/excelvbavisualbasickorol1-141026043610-conversion-gate01/85/Excel-vba-visual-basic-korol-1-537-320.jpg)
![524 Chapter 16: Excel and the Internet
The fifth argument (NullExpr) specifies an expression to represent NULL
values (the default is an empty string).
Now let’s see how you can use the GetString method to retrieve the
data from the Excel file created in an earlier example (or simply substitute
the file name with any Excel spreadsheet name you want to read).
1. Open Notepad.
2. Enter the ASP script shown below.
3. Save the ASP file as C:ExcelWithASPGetExcel.asp.
4. Close Notepad.
GetExcel.asp code
% @Language=VBSCRIPT %
%
dim myConn
dim myExcel
dim strCon
dim mySQL
' Create the connection object
set myConn = Server.CreateObject(ADODB.Connection)
' Specify the connection string
strCon=Provider=Microsoft.Jet.OLEDB.4.0;Data Source=
strCon=strCon server.MapPath(WriteToExcel.xls) ;
strCon=strCon Extended Properties=Excel 8.0
' Open the connection
myConn.Open strCon
' Create the Recordset
set myExcel=Server.CreateObject(ADODB.Recordset)
mySQL=Select * from [Sheet1$]
' Open the Recordset
myExcel.Open mySQL, myConn
' Show data in a table
Response.Write TABLE BORDER=1TRTD
' Get the column names
For each fld in myExcel.Fields
Response.Write fld.Name TD
Next
Response.Write /TRTRTD
' Get the actual data
Response.Write myExcel.GetString(, -1, /TRTD, _
/TD/TRTRTD, NBSPACE)
' Close the Recordset and release the object
myExcel.Close](https://image.slidesharecdn.com/excelvbavisualbasickorol1-141026043610-conversion-gate01/85/Excel-vba-visual-basic-korol-1-541-320.jpg)
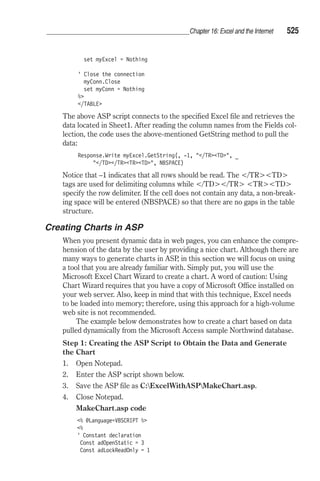
![526 Chapter 16: Excel and the Internet
Const xlColumnClustered = 51
Const xlRows = 1
Const xlLocationAsObject = 2
Const xlCategory = 1
Const xlPrimary = 1
Const xlValue = 2
Const xlHtml = 44
' Variable declaration
dim myExcel ' Object variable representing Excel Application.
dim fso ' Object variable representing the FileSystemObject.
dim filename ' String variable to hold the name of the chart file.
dim conn ' Object variable representing the Connection object.
dim rst ' Object variable representing the Recordset object.
Dim wkb ' Object variable representing the Workbook object.
Dim rng ' Object variable representing the Range object.
Dim fld ' Dummy variable for enumerating fields.
Dim rowNum ' Row counter.
Dim colNum ' Column counter.
Dim varData ' Variant to hold returned Recordset.
Set myExcel= Server.Createobject(Excel.Application)
Set fso = Server.Createobject(Scripting.FileSystemObject)
' If exists, delete the previously prepared chart
filename = c:xlsChart.htm
If fso.FileExists(filename) Then
fso.DeleteFile filename, True
End If
' Release the FileSystemObject
Set fso = Nothing
' Create a new workbook
set wkb = myExcel.Workbooks.Add
' Get data to chart from Microsoft Access database
' Create and establish connection to the database
Set conn = Server.CreateObject(ADODB.Connection)
' Open the Northwind database
conn.Open Driver={Microsoft Access Driver (*.mdb)}; _
DBQ= Server.MapPath(Northwind.mdb)
' Create recordset and retrieve values using the open connection
Set rst = Server.CreateObject(ADODB.Recordset)
' Open the Recordset with a static cursor (3) in read-only mode (1)
rst.Open SELECT CategoryName As [Product Category], _
SUM(Quantity) AS [Total Quantity Sold] _
FROM Categories _
INNER JOIN (Products INNER JOIN [Order Details] ON _
Products.ProductID = [Order Details].ProductID) ON _
Categories.CategoryID = Products.CategoryID _](https://image.slidesharecdn.com/excelvbavisualbasickorol1-141026043610-conversion-gate01/85/Excel-vba-visual-basic-korol-1-543-320.jpg)
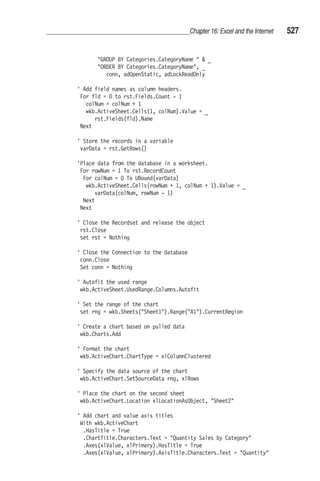
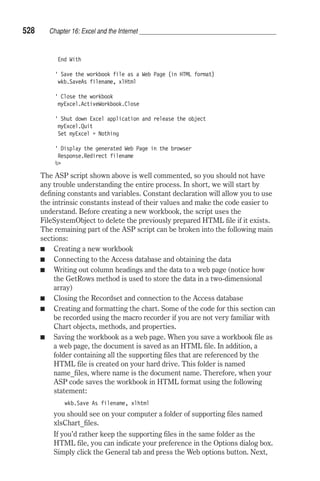
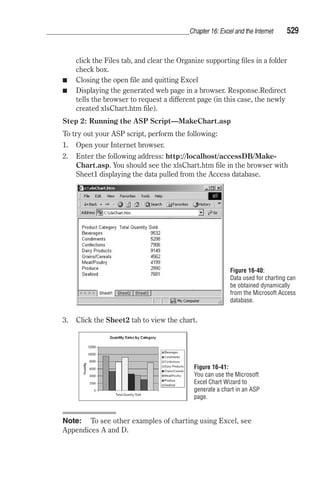
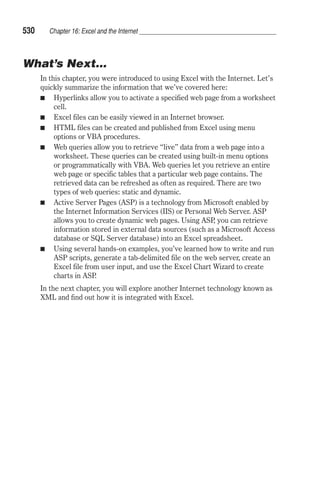

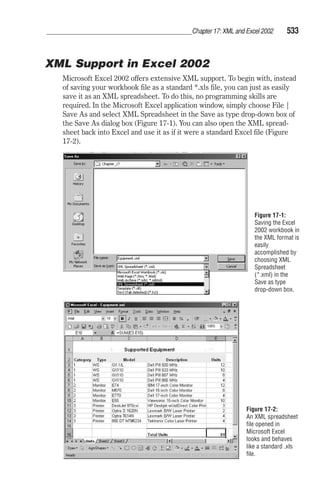
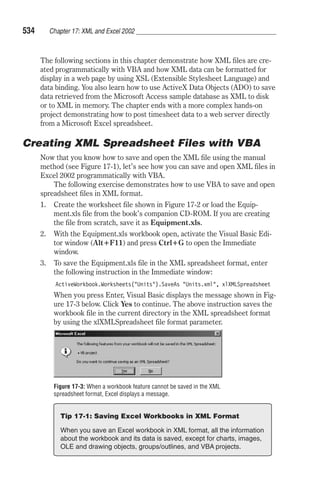
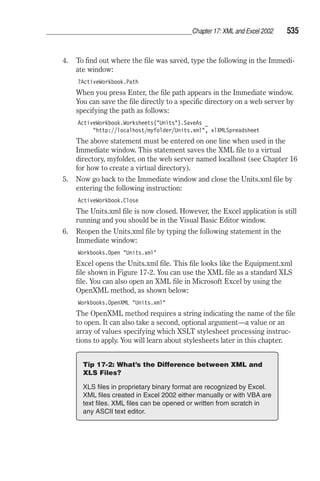
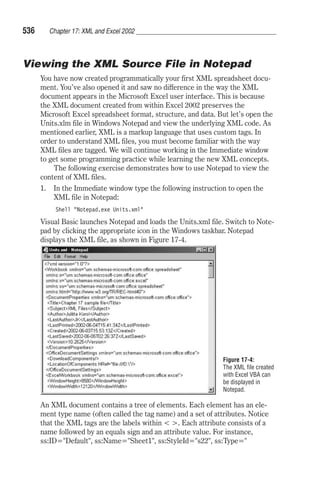
![Chapter 17: XML and Excel 2002 537
Number, ss:Size=12, and ss:Formula==SUM(R[-13]C:R[-1]C) are just
a few examples of attributes that you will find in the Units.xml source code.
The topmost element of an XML spreadsheet document is Work-book.
This is also the root tag of the spreadsheet document. Under the
root you will find other tags that represent child elements. These elements
precisely define the spreadsheet document. As you scroll down in the Note-pad
window, you will find the Styles tag that contains the style
definitions for the workbook and the Worksheet tag that defines a
worksheet within the current workbook. At least one instance of this ele-ment
is required within a valid XML spreadsheet document. Below the
Worksheet tag, you should find the Table tag that defines a table of cells
in the current worksheet with some optional attributes, such as
ss:ExpandedColumnCount or ss:ExpandedRowCount that specify the total
number of columns and rows in the table. The child element of a table is
Row. Each Row element may contain one or more Cell elements,
which in turn contain Data elements specifying the value of a cell. If
you apply more formatting to your orginal spreadsheet and resave the file in
the XML spreadsheet format, you will find other tags describing your
spreadsheet document. For example, named and/or autofilter ranges within
the worksheet will be indicated with the Names, NamedRange, and
AutoFilter tags.
Tip 17-3: The XML Spreadsheet Tag Hierarchy
The details on each XML spreadsheet element and the required
and optional attributes can be found at http://msdn.micro-soft.
com/library/default.asp?url=/library/en-us/dnexcl2k2/html/
odc_xlsmlinss.asp.
As you can see, the structure of the XML spreadsheet document is very
logical and therefore easy to follow. Tags are nested inside other tags. Each
element must have both a start tag and an end tag. Unlike HTML, XML is
less forgiving; it does not allow you to omit the end tag. The name of the
start tag must match the name in the corresponding end tag exactly. For
example, a start tag of Row must have an end tag of /Row.
The first line in the XML file is a processing instruction:
?xml version=1.0?
This instruction identifies the file as an XML file. If you remove this pro-cessing
instruction and attempt to open the XML file in Excel, the file won’t
be recognized as XML and Excel will open it as a text file. Note that the
processing instruction begins and ends with a question mark (?) and con-tains
the name of the application (in this example “xml”) to which the
instruction is directed, as well as additional information that needs to be](https://image.slidesharecdn.com/excelvbavisualbasickorol1-141026043610-conversion-gate01/85/Excel-vba-visual-basic-korol-1-554-320.jpg)
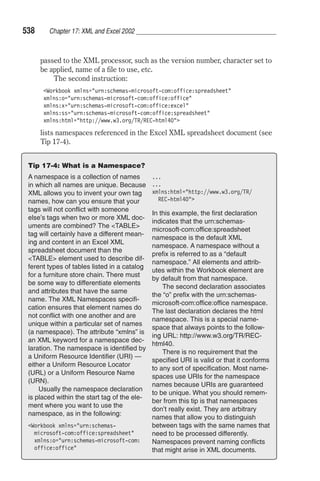
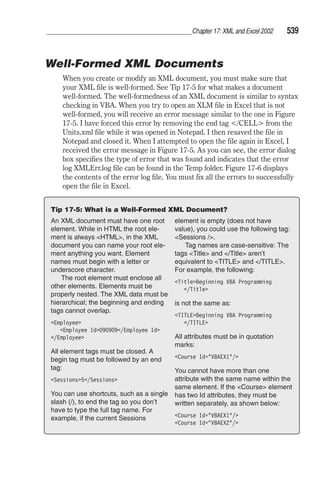
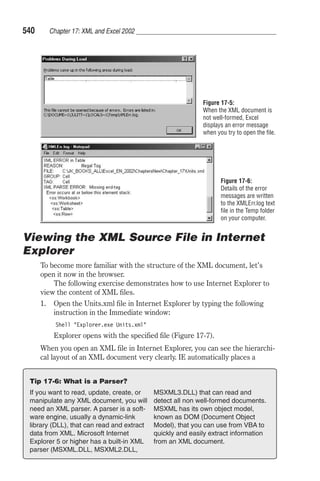
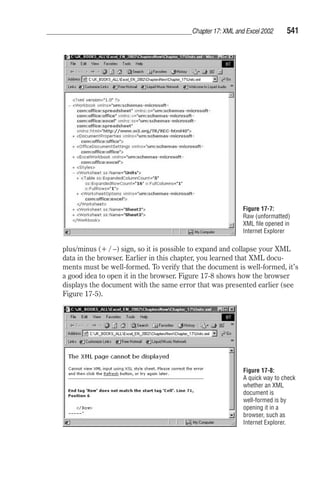
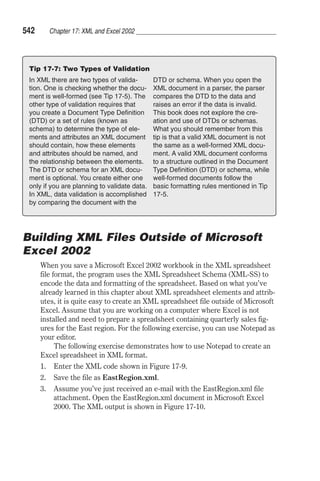
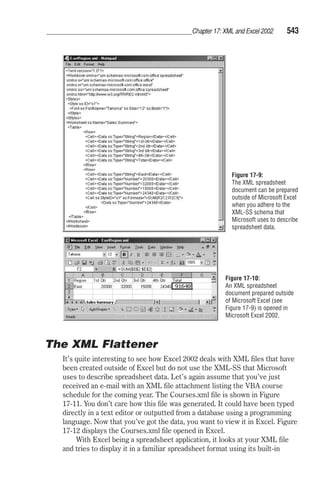
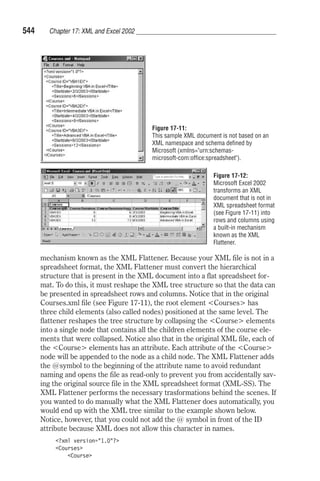

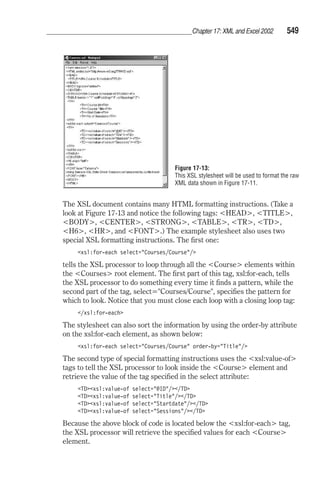
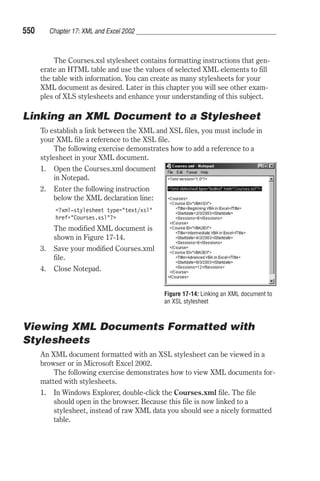
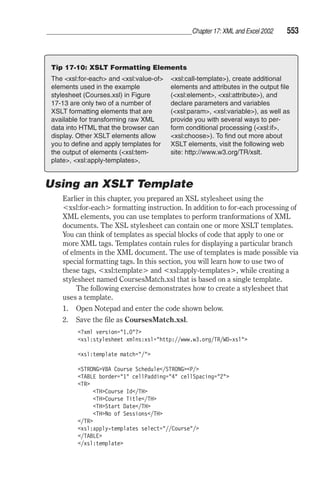
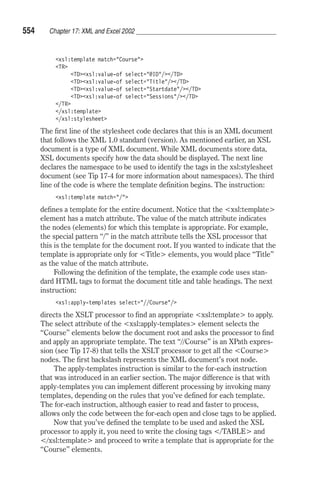
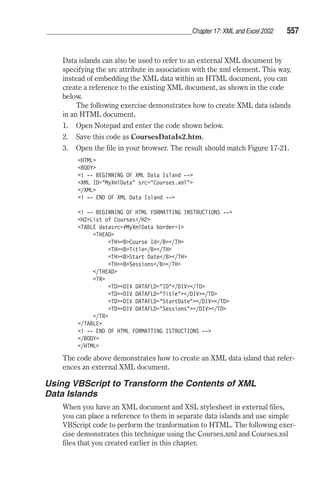

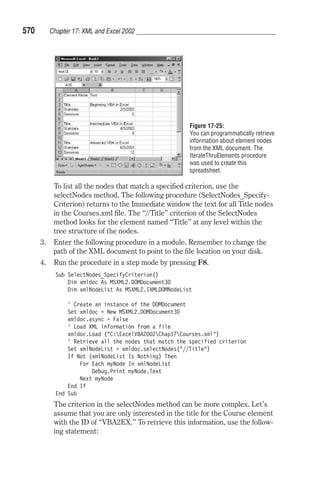
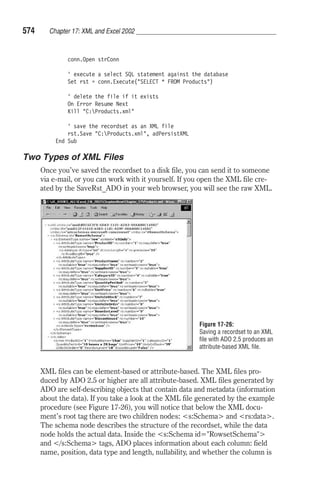

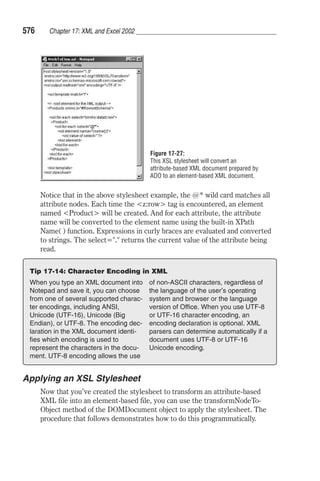
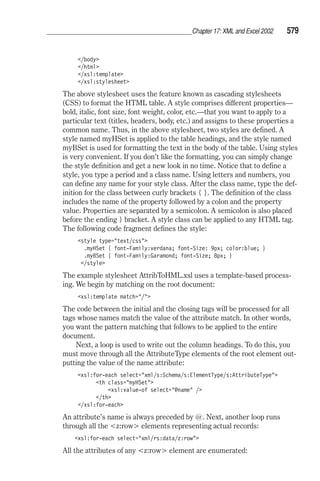
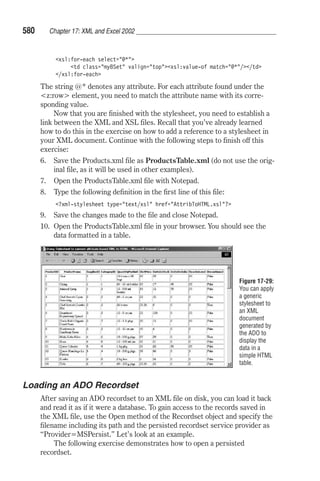
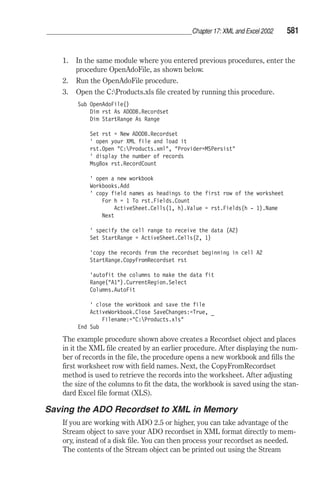
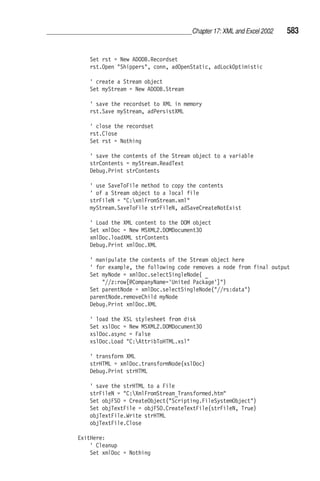
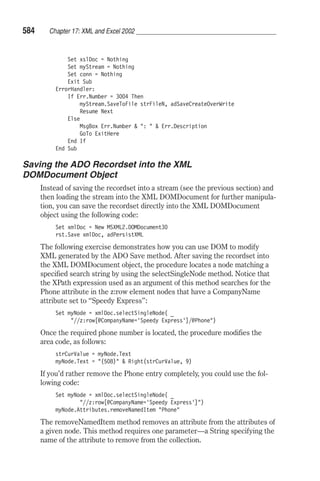
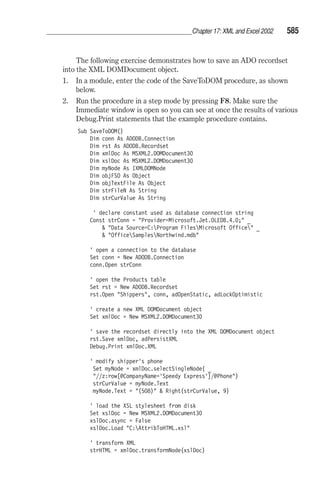
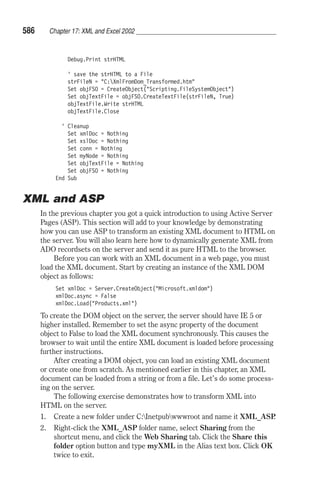
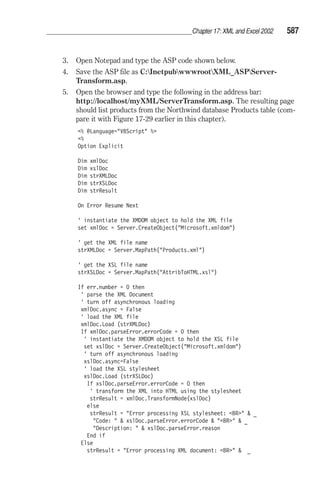
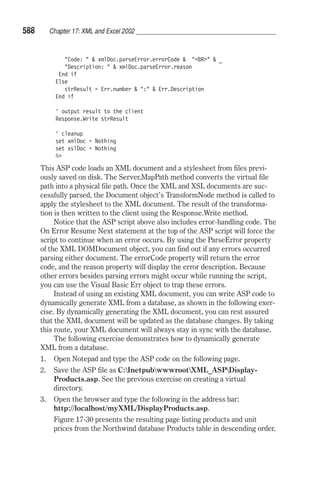
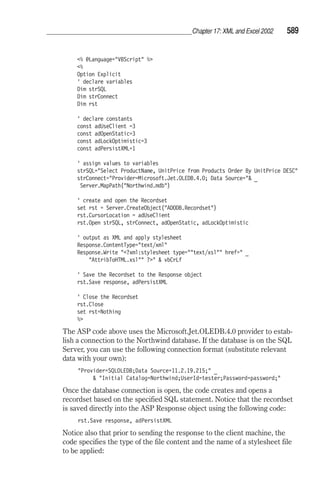
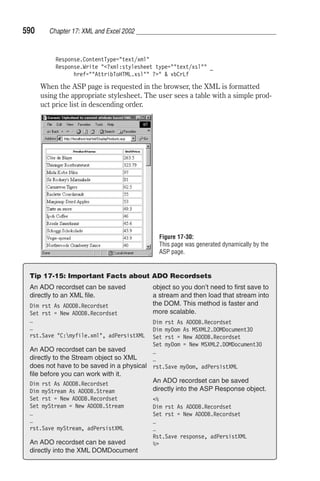
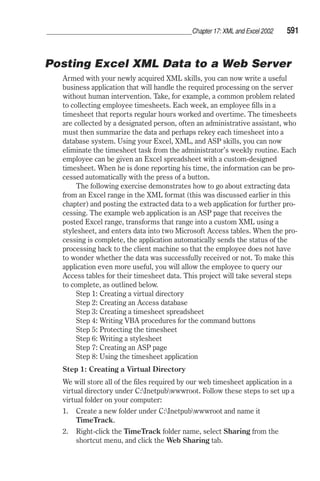
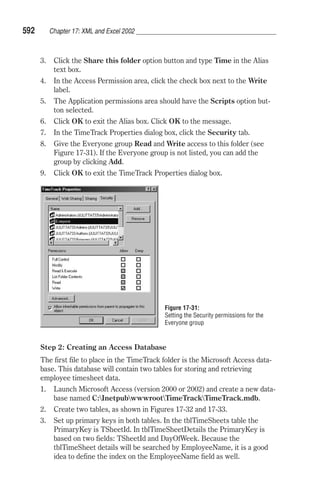

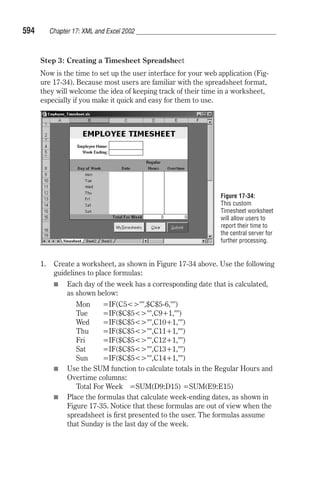
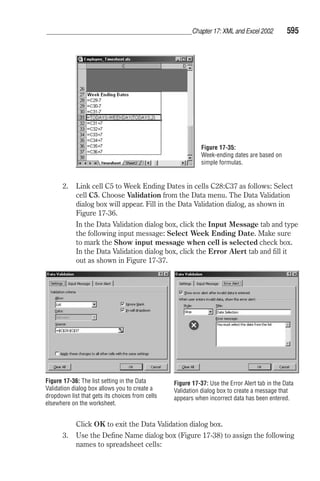
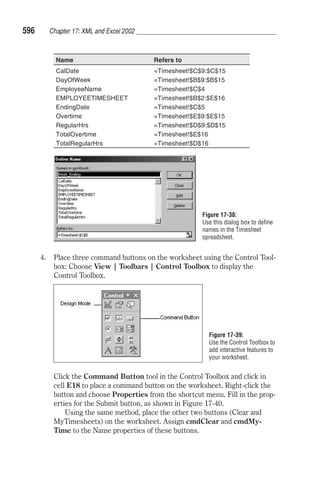
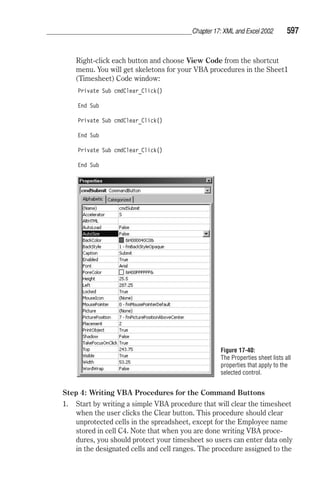
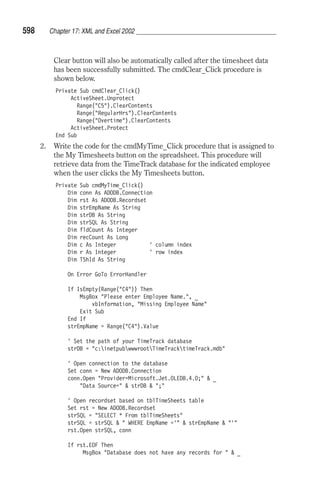
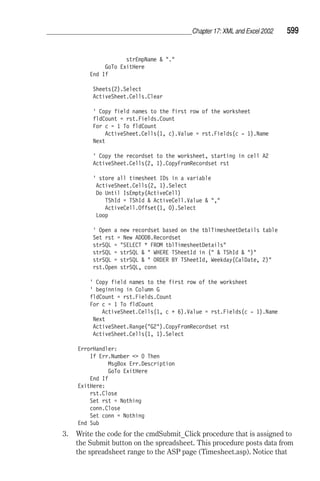
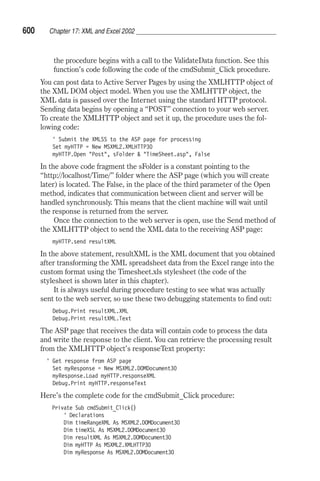
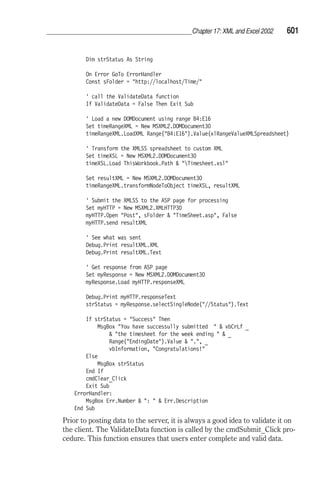
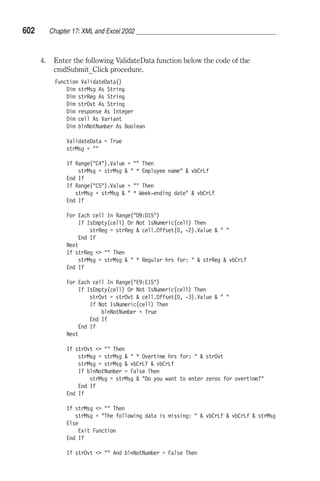
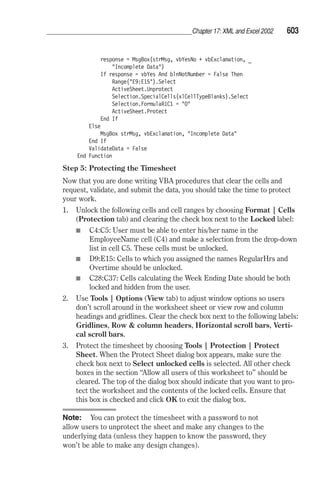
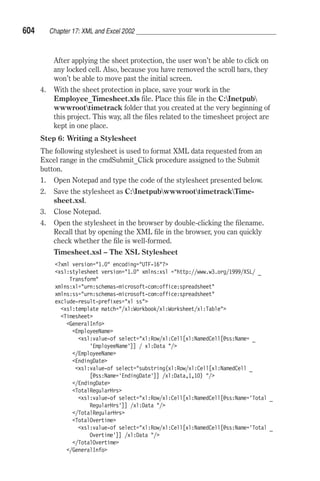
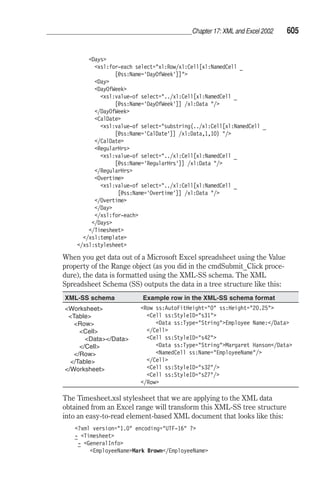
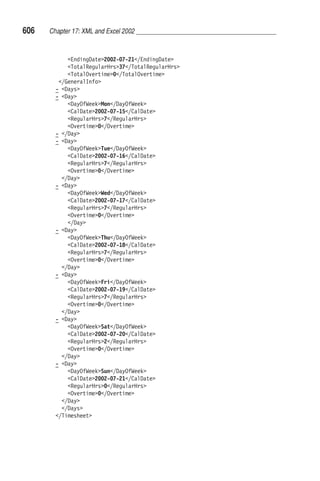
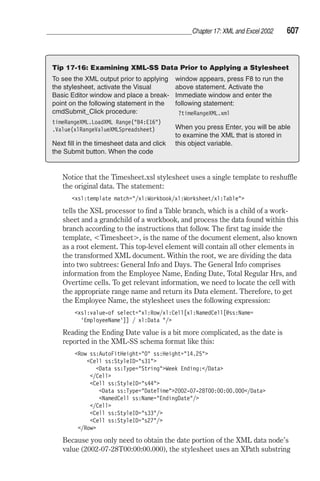
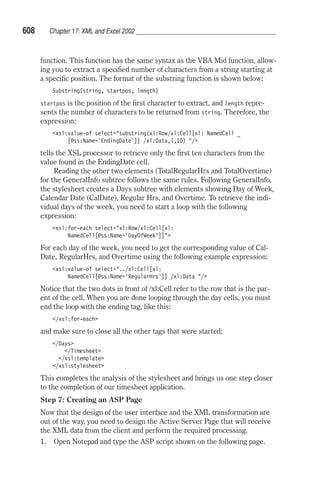
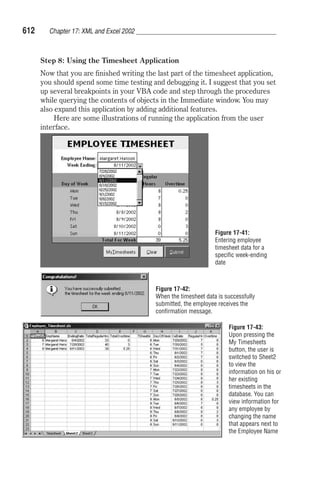
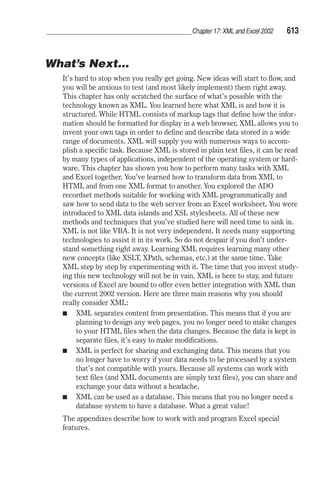

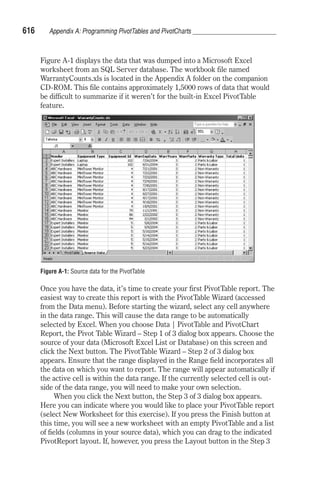
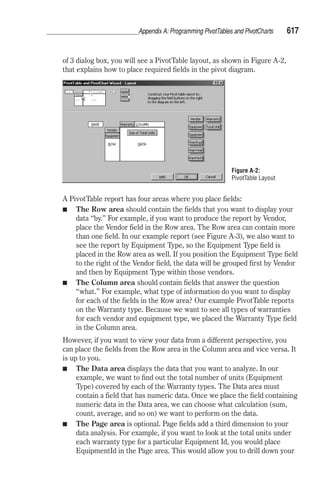
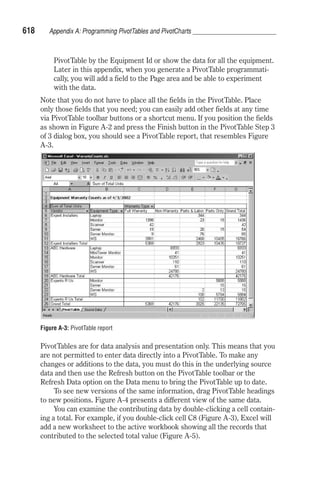
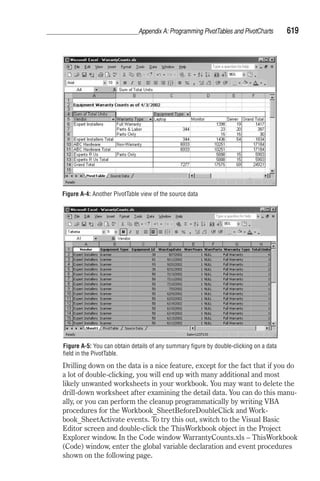
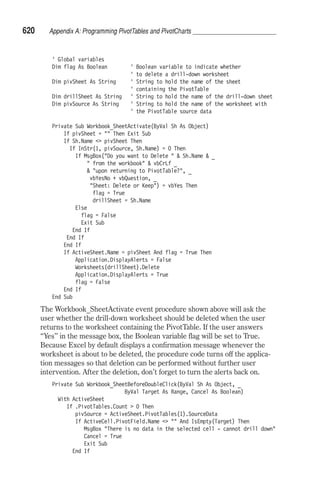
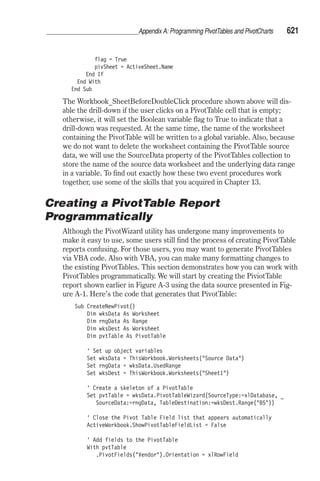
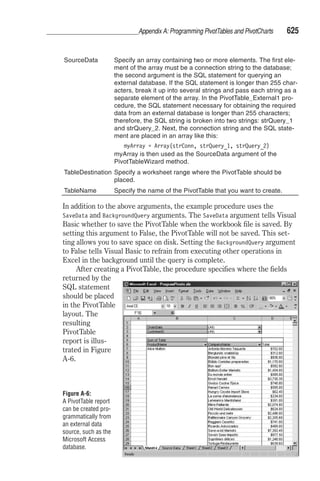
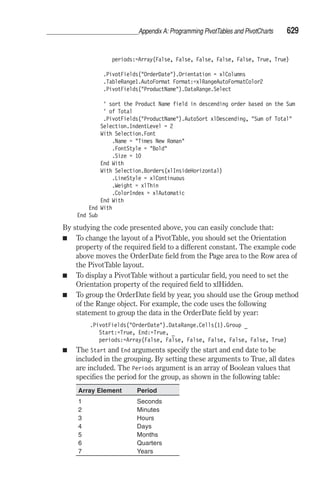
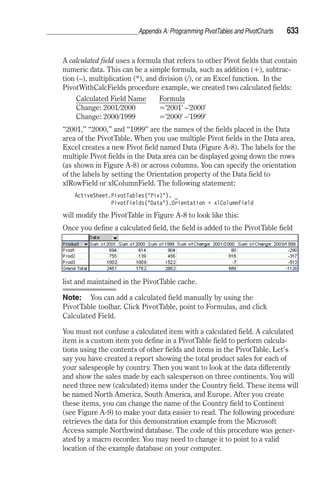
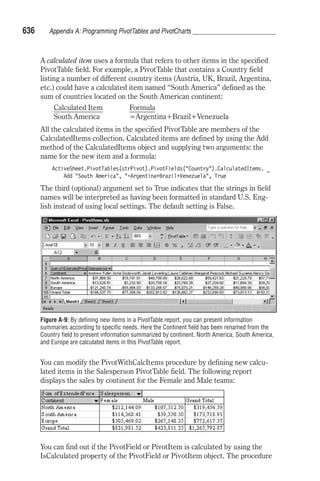
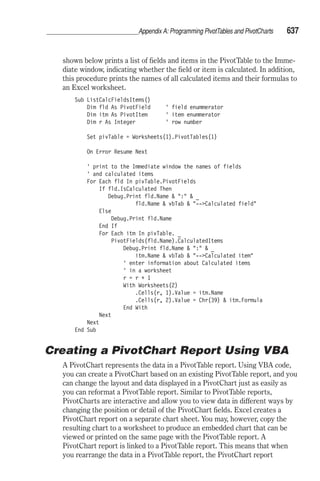
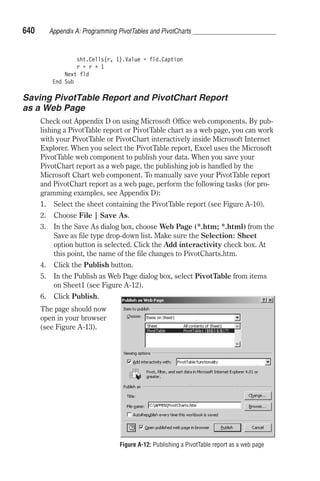
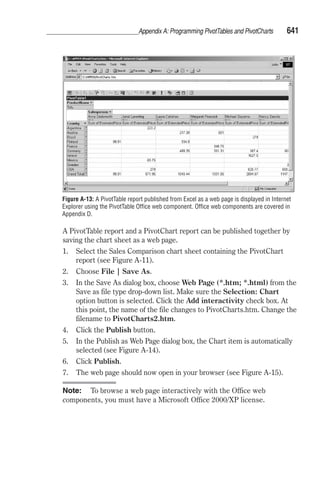
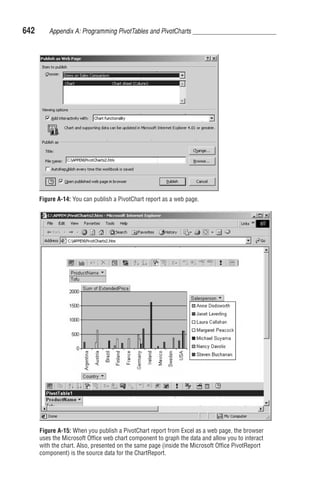
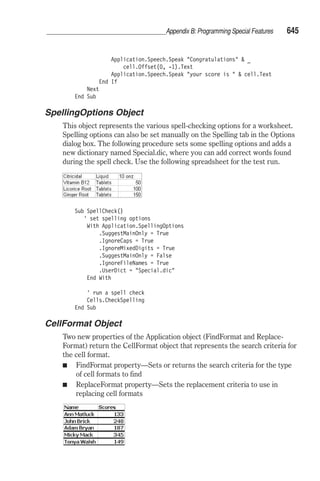
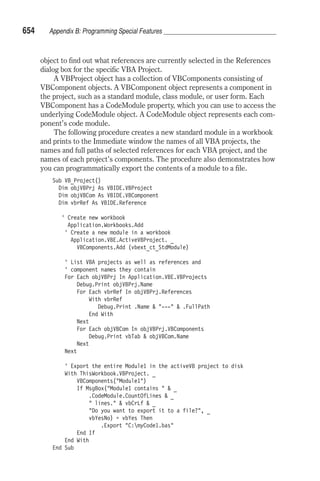
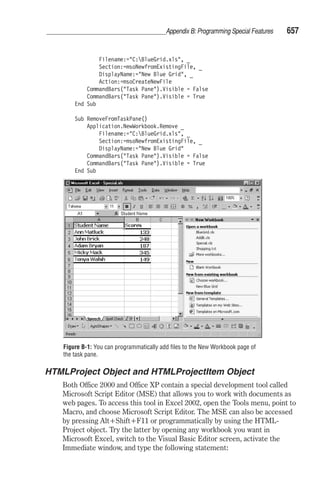
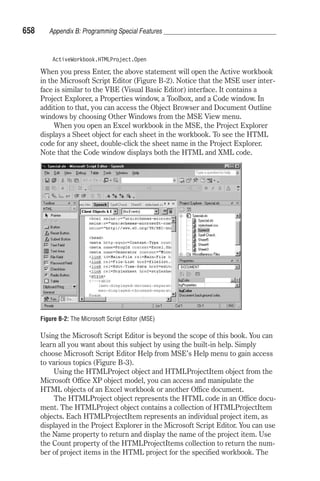

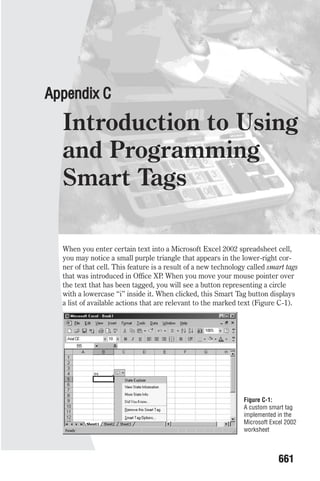
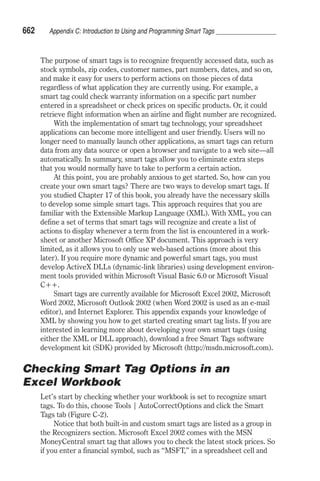
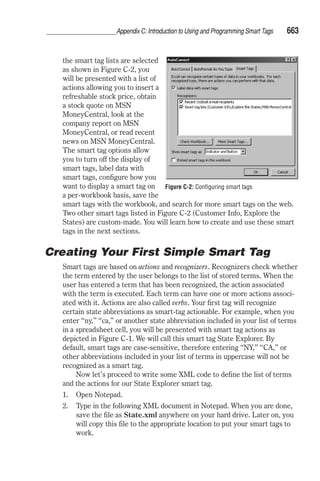
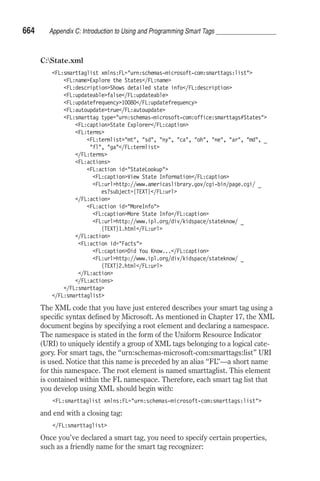
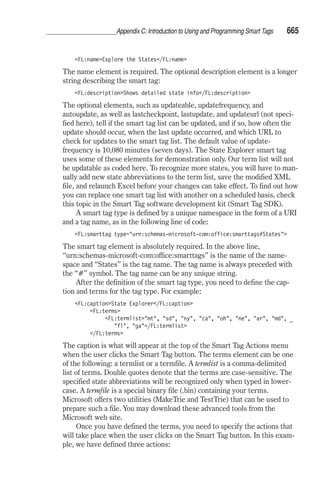
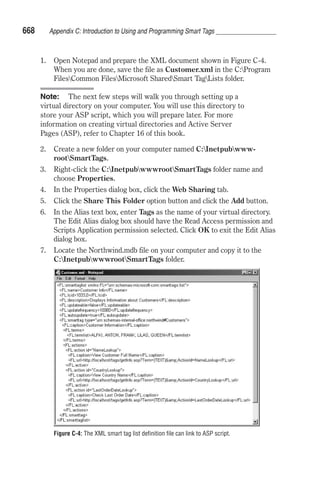
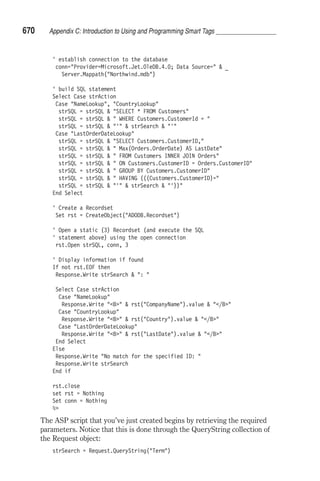
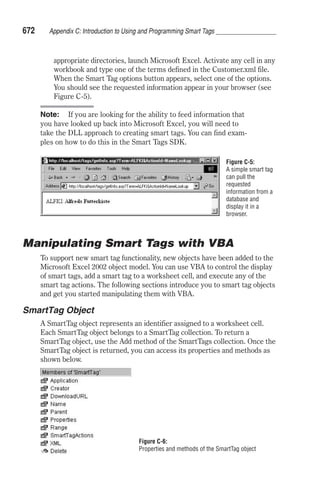
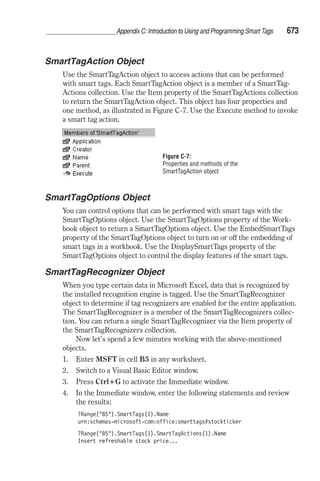
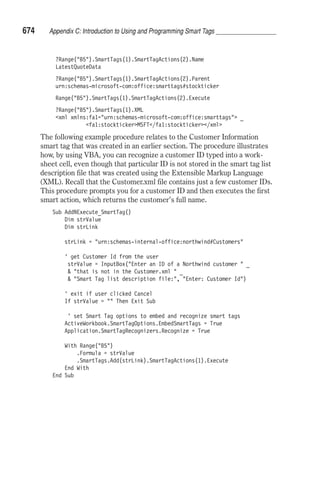
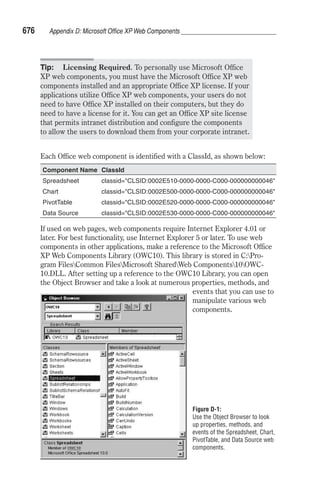
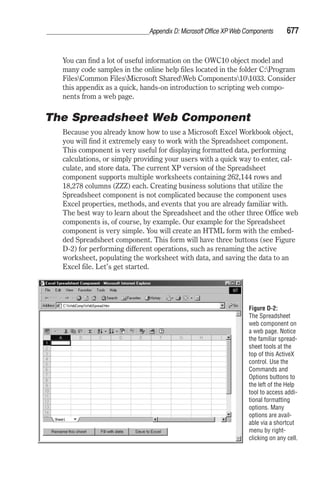
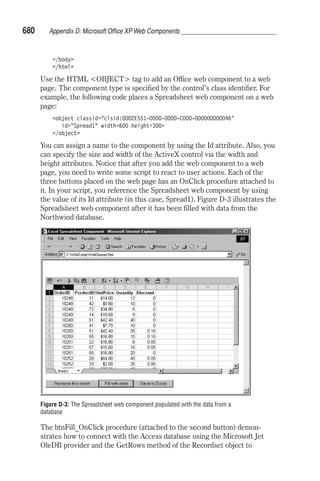
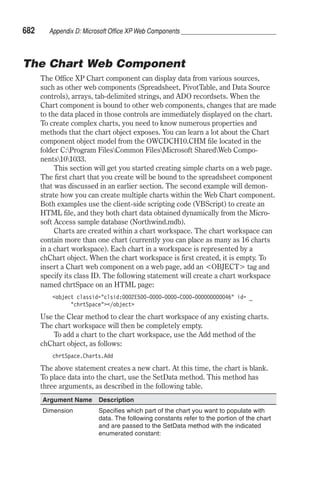
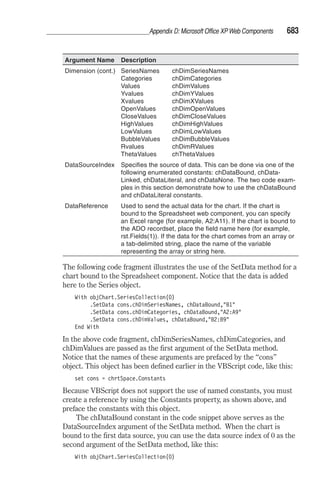
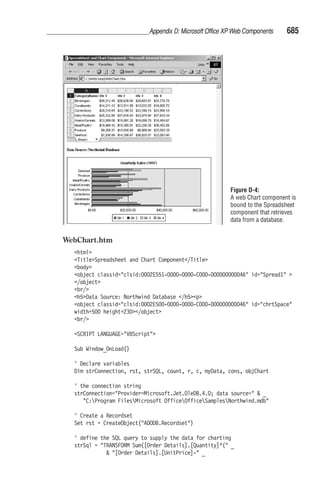
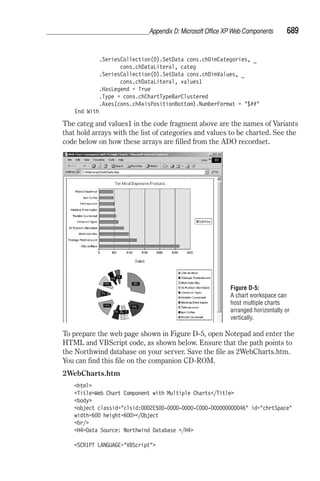
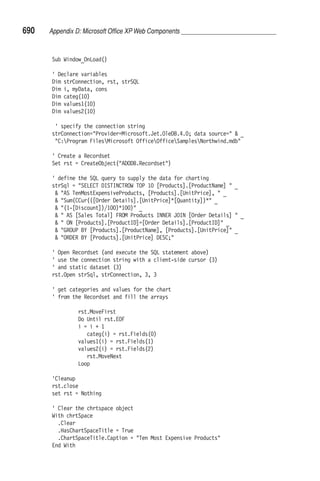
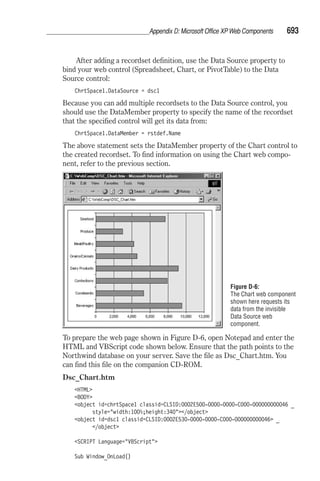
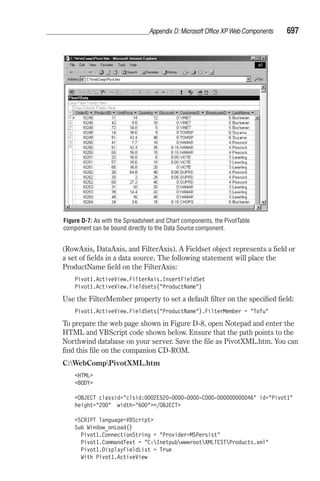
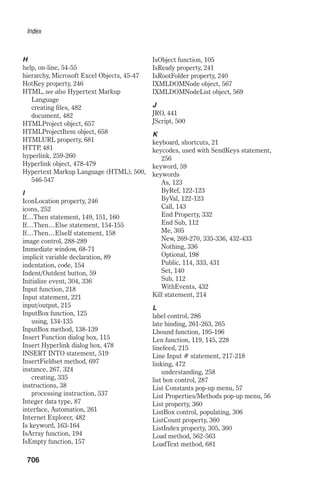
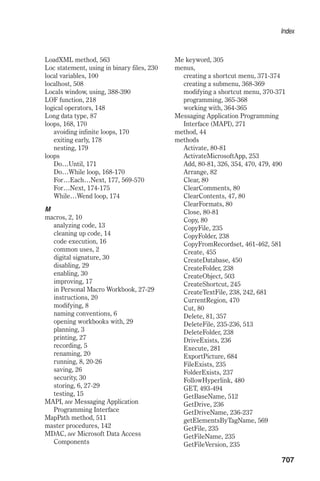
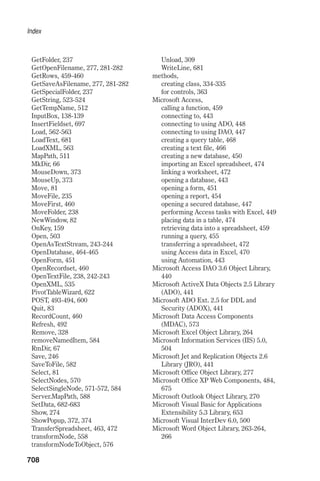
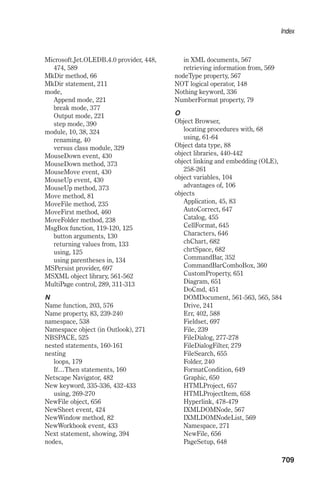
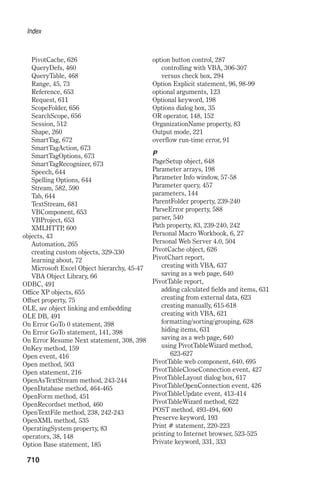

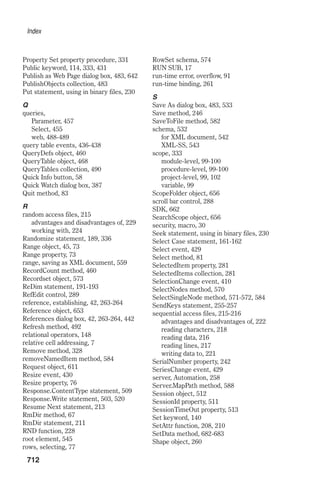
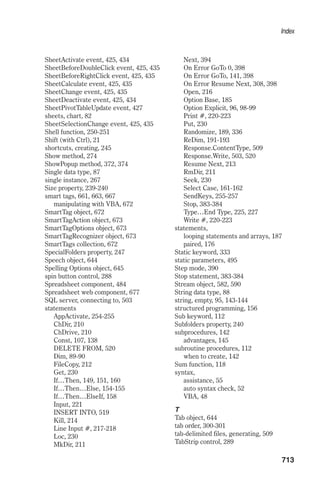
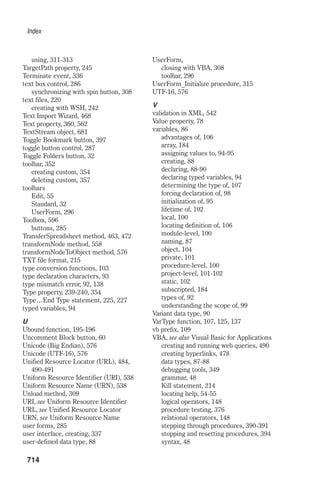


![[Codientu.org] giai bai tap xu ly tin hieu so va matlab](https://cdn.slidesharecdn.com/ss_thumbnails/codientu-170228073355-thumbnail.jpg?width=640&height=640&fit=bounds)