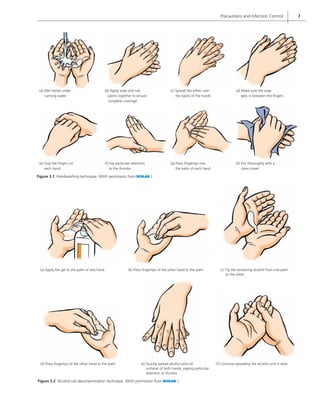
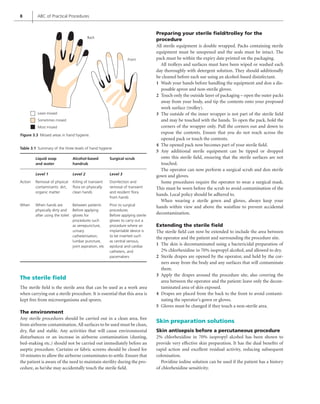
6
CHAPTER 3
Universal Precautions and
Infection Control
Anne Mutlow
Critical Care Unit, Heart of England NHS Foundation Trust, Good Hope Hospital, Birmingham, UK
ABC of Practical Procedures. Edited by T. Nutbeam and R. Daniels. © 2010
Blackwell Publishing, ISBN: 978-1-4051-8595-0.
Infection prevention and control procedures are processes or
techniques that we can use to ensure that we safeguard the patient
from infection. It is essential that these techniques are followed in
all patient contact situations.
Handwashing and decontamination
Good hand hygiene by healthcare workers has been shown to be the
single most important preventative measure to reduce the incidence
of healthcare-associated infection. It is a simple, important action
that helps prevent and control cross-infection.
Every practitioner is personally responsible for their hand
hygiene, and must actively seek to promote and safeguard the inter-
ests and wellbeing of patients.
Before handwashing, rings, watches and bracelets must be
removed (most hospitals will allow the wearing of a plain band
wedding ring only; ensure that you are aware of local policy).
There are three levels of hand hygiene.
Level 1: Socially clean
This involves the use of liquid soap and running water to remove
any visible soiling of the skin. It should be used before and after
each task and every patient contact. This is sufficient to prevent
cross-infection.
Apply one shot of liquid soap to wet hands and wash using a 6- or
•
8-point technique (see Figure 3.1).
Rinse in warm water.
•
Dry thoroughly by patting with paper towels to prevent chafing.
•
Level 2: Intermediate or disinfection
An alcohol hand rub is used to kill any surface skin organisms.
The hand rub should be available at all washbasins, in all clinical
areas and outside any isolation areas. In areas where wall-mounted
dispensers are not practical, dispensers may be attached to trolleys
or smaller dispensers may be clipped to staff uniform. Alcohol
gel can be used as an alternative to soap and water (only if hands
are physically clean), or to disinfect the hands before an aseptic
procedure.
Hands must be physically clean before application.
•
Apply alcohol hand rub to clean hands and massage using a 6- or
•
8-point technique (follow manufacturer’s recommendations for
the amount to be used) (see Figure 3.2).
Allow to dry before beginning your next task.
•
Level 3: Surgical scrub
This involves the use of a chemical disinfection and prolonged
washing to physically remove and kill surface organisms in the
deeper layers of the epidermis. This should be done before any
invasive or surgical procedure.
Apply a bactericidal, detergent, surgical scrub solution to wet
•
hands and massage in using an 8-point technique, extending the
wash to include the forearms.
Ensure the hands are positioned so as to prevent soap and water
•
running onto and contaminating the hands from unwashed areas
of the arms (high hands, low elbows technique).
Rinse in warm water.
•
Dry thoroughly by patting with sterile paper towels.
•
Don sterile gown and gloves.
•
Figure 3.3 shows areas that are commonly missed during hand
hygiene processes.
Table 3.1 shows a summary of the three techniques.
OVERVIEW
By the end of this chapter you will:
understand the importance of infection control
•
be able to describe the various levels of hand hygiene
•
understand the term ‘universal precautions’
•
be able to set up a sterile field
•
understand the various methods of achieving asepsis
•
know what to do if a needlestick or sharps injury occurs.
•
Alcohol hand gel will not kill Clostridium difficile spores –
soap and water is necessary
Precautions and Infection Control 7
Figure 3.1 Handwashing technique. (With permission from .)
(a) Wet hands under
running water
(b) Apply soap and rub
palms together to ensure
complete coverage
(c) Spread the lather over
the backs of the hands
(d) Make sure the soap
gets in between the fingers
(e) Grip the fingers on
each hand
(f) Pay particular attention
to the thumbs
(g) Press fingertips into
the palm of each hand
(h) Dry thoroughly with a
clean towel
Figure 3.2 Alcohol rub decontamination technique. (With permission from .)
(a) Apply the gel to the palm of one hand (b) Press fingertips of the other hand to the palm (c) Tip the remaining alcohol from one palm
to the other
(d) Press fingertips of the other hand to the palm (e) Quickly spread alcohol onto all
surfaces of both hands, paying particular
attention to thumbs
(f) Continue spreading the alcohol until it dries
8 ABC of Practical Procedures
The sterile field
The sterile field is the sterile area that can be used as a work area
when carrying out a sterile procedure. It is essential that this area is
kept free from microorganisms and spores.
The environment
Any sterile procedures should be carried out in a clean area, free
from airborne contamination.All surfaces to be used must be clean,
dry, flat and stable. Any activities that will cause environmental
disturbances or an increase in airborne contamination (dusting,
bed-making etc.) should not be carried out immediately before an
aseptic procedure. Curtains or fabric screens should be closed for
10 minutes to allow the airborne contaminates to settle. Ensure that
the patient is aware of the need to maintain sterility during the pro-
cedure, as he/she may accidentally touch the sterile field.
Preparing your sterile field/trolley for the
procedure
All sterile equipment is double wrapped. Packs containing sterile
equipment must be unopened and the seals must be intact. The
pack must be within the expiry date printed on the packaging.
All trolleys and surfaces must have been wiped or washed each
day thoroughly with detergent solution. They should additionally
be cleaned before each use using an alcohol-based disinfectant.
Wash your hands before handling the equipment and don a dis-
1
posable apron and non-sterile gloves.
Touch only the outside layer of packaging – open the outer packs
2
away from your body, and tip the contents onto your proposed
work surface (trolley).
The outside of the inner wrapper is not part of the sterile field
3
and may be touched with the hands. To open the pack, hold the
corners of the wrapper only. Pull the corners out and down to
expose the contents. Ensure that you do not reach across the
opened pack or touch the contents.
The opened pack now becomes part of your sterile field.
4
Any additional sterile equipment can be tipped or dropped
5
onto this sterile field, ensuring that the sterile surfaces are not
touched.
The operator can now perform a surgical scrub and don sterile
gown and gloves.
Some procedures require the operator to wear a surgical mask.
This must be worn before the scrub to avoid contamination of the
hands. Local policy should be adhered to.
When wearing a sterile gown and gloves, always keep your
hands within view and above the waistline to prevent accidental
decontamination.
Extending the sterile field
The sterile field can now be extended to include the area between
the operator and the patient and surrounding the procedure site.
The skin is decontaminated using a bactericidal preparation of
1
2% chlorhexidine in 70% isopropyl alcohol, and allowed to dry.
Sterile drapes are opened by the operator, and held by the cor-
2
ners away from the body and any surfaces that will contaminate
them.
Apply the drapes around the procedure site, also covering the
3
area between the operator and the patient: leave only the decon-
taminated area of skin exposed.
Drapes are placed from the back to the front to avoid contami-
4
nating the operator’s gown or gloves.
Gloves must be changed if they touch a non-sterile area.
5
Skin preparation solutions
Skin antisepsis before a percutaneous procedure
2% chlorhexidine in 70% isopropyl alcohol has been shown to
provide very effective skin preparation. It has the dual benefits of
rapid action and excellent residual activity, reducing subsequent
colonisation.
Povidine iodine solution can be used if the patient has a history
of chlorhexidine sensitivity.
Table 3.1 Summary of the three levels of hand hygiene.
Liquid soap
and water
Alcohol-based
handrub
Surgical scrub
Level 1 Level 2 Level 3
Action Removal of physical
contaminants: dirt,
organic matter
Killing of transient
flora on physically
clean hands
Disinfection and
removal of transient
and resident flora
from hands
When When hands are
physically dirty and
after using the toilet
Between patients
Before applying
gloves for
procedures such
as venepuncture,
urinary
catheterisation,
lumbar puncture,
joint aspiration, etc
Prior to surgical
procedures
Before applying sterile
gloves to carry out a
procedure where an
implantable device is
to be inserted such
as central venous,
epidural and cardiac
catheters, and
pacemakers
Figure 3.3 Missed areas in hand hygiene.
Back
Front
Least missed
Sometimes missed
Most missed
Precautions and Infection Control 9
Apply the skin preparation by rubbing the solution onto the skin
commencing at the insertion site and working outwards. Rub for
about 30 seconds and allow the solution to dry completely before
beginning the procedure. An alternative approach, recommended
for peripheral venous cannula insertion, is to use a ‘criss-cross’
approach in two directions to minimise the risk of missing areas.
Needlestick injury
Needlestick or sharps injuries are a daily risk for healthcare work-
ers and can lead to infection with bloodborne viruses (BBVs) such
as hepatitis or HIV. The risk of infection following a single sharps
(percutaneous) injury varies depending on the type of BBV. The
risk is approximately:
1 in 3 if the instrument is contaminated with hepatitis B
•
1 in 30 if the instrument is contaminated with hepatitis C
•
1 in 300 if the instrument is contaminated with HIV, though this
•
depends on the infectivity of the source patient.
The chances of transmission are higher with hollow-bore needles
compared to other types of sharp injury.
Prevention of needlestick and sharps injuries
There are a few simple rules to help reduce the incidence of injury.
Do not disassemble needles from syringes or other devices –
•
discard as a single unit.
Do not resheath needles. If essential, use a resheathing device.
•
Do not carry used sharps by hand or pass to another person.
•
Discard sharps immediately after use into an approved sharps
•
container (which you should take with you to the bedside).
Ensure sharps containers are of an appropriate size and available
•
at the points of use.
Ensure sharps containers are closed securely when three-quarters
•
full, and disposed of according to local policy.
Peripheral venous cannulae with a device that closes over the
needle tip after it has been withdrawn from the cannula are avail-
able, and provide a safe option.
The risk of a percutaneous injury is increased during a surgi-
cal procedure when suture needles and scalpel blades are used.
Therefore:
use blunt suture needles where possible (not suitable for skin
•
sutures)
ensure that needle holders with needle tip guards are used
•
use a disposable scalpel or ensure a blade removal device is used
•
at the end of the procedure.
When taking blood samples, avoid using a needle and syringe
if possible. A vacuum tube system reduces the risk of needlestick
injury.
Managing accidental exposure to bloodborne
viruses
Any exposure to blood or body fluids from a sharps injury, cut or
bite, or from splashing into the eyes or mouth or onto broken skin,
carries a risk of exposure to a BBV. All of these occurrences must
be reported to, and followed up by, the occupational health team. If
there is a strong suspicion of exposure to HIV, it is recommended
that antiretroviral post-exposure prophylaxis (PEP) is commenced.
Ideally this should be started within an hour of exposure and the
full course lasts 4 weeks. In situations when the treatment is delayed
but the source person proves to be HIV positive, PEP can be given
up to 2 weeks after the injury (though with reduced efficacy).
The occupational health team will assess the circumstances and
decide whether any action is necessary to reduce the risk of HIV
or hepatitis.
Figure 3.4 shows what to do in the event of a needlestick/sharps
injury.
Legal issues
The Human Tissue Act (HTA) 2004 was introduced following a
high-profile case regarding the unethical removal and retention of
organs. The act requires that virtually all organs or samples taken
from humans can only be tested or stored with the explicit consent
of the person from whom they were taken. Failure to obtain consent
can render the offender open to a fine or imprisonment. Therefore
a doctor may not test a patient for HIV or hepatitis for the benefit
of an injured healthcare worker if the patient refuses the test.
Figure 3.4 Needlestick injury protocol.
If blood or body fluids splash
into the eyes,irrigate with cold water
If blood or body fluids splash
into the mouth,do not swallow.
Rinse out several times with cold
water
In the cases of an injury
from a clean or unused instrument
or needle,no further
action is necessary
If the injury is from a used needle
or instrument,risk assessment
should be carried out with the
microbiologist,infection control
doctor or consultant for
communicable diseases.
FIRST AID
Immediately stop what you are doing
and attend to the injury
Encourage bleeding of the wound by
applying gentle pressure (do not suck the wound)
Wash well under running water
Apply a waterproof dressing as necessary
Report the incident to your occupational
health department,or emergency department
and your manager
Complete an accident form
CONSENT IS REQUIRED IF A
PATIENT’S BLOOD NEEDS
TO BE TAKEN
10 ABC of Practical Procedures
The Mental Capacity Act (MCA) 2005 came into force on
1 October 2007. This was introduced to protect patients that lack
the capacity to provide consent.
Under the MCA, all treatment decisions relating to patients over
the age of 16 years who lack the capacity to consent must be neces-
sary and made in the patient’s best interests.
Figure 3.5 Symbol used to identify equipment that cannot be cleaned or
reused.
DO NOT REUSE
Synonyms for this are:
• Single-use
• Use only once
In the event of a needlestick injury to a healthcare worker, blood
may only be taken for testing from a patient who lacks capacity or
is unconscious if it is in the best interests of the patient.
Cleaning or disposing of equipment
Most equipment used in sterile procedures is disposable.Equipment
that cannot be cleaned or reused can be identified by the symbol
seen in Figure 3.5.Please dispose of contaminated equipment safely,
and prevent injury to other healthcare workers.
Further reading
Department of Health. (2005) Saving Lives Campaign.
Department of Health. (2003) Winning ways: working together to reduce
healthcare associated infection in England.
National Institute for Health and Clinical Excellence (NICE). (2003) Infection
control. NICE clinical guideline 2. www.nice.org.uk/cg2
National Resource for Infection Control (NRIC). www.nric.org.uk.

Universal Precautions and Infection Controls

  • 1.
    6 CHAPTER 3 Universal Precautionsand Infection Control Anne Mutlow Critical Care Unit, Heart of England NHS Foundation Trust, Good Hope Hospital, Birmingham, UK ABC of Practical Procedures. Edited by T. Nutbeam and R. Daniels. © 2010 Blackwell Publishing, ISBN: 978-1-4051-8595-0. Infection prevention and control procedures are processes or techniques that we can use to ensure that we safeguard the patient from infection. It is essential that these techniques are followed in all patient contact situations. Handwashing and decontamination Good hand hygiene by healthcare workers has been shown to be the single most important preventative measure to reduce the incidence of healthcare-associated infection. It is a simple, important action that helps prevent and control cross-infection. Every practitioner is personally responsible for their hand hygiene, and must actively seek to promote and safeguard the inter- ests and wellbeing of patients. Before handwashing, rings, watches and bracelets must be removed (most hospitals will allow the wearing of a plain band wedding ring only; ensure that you are aware of local policy). There are three levels of hand hygiene. Level 1: Socially clean This involves the use of liquid soap and running water to remove any visible soiling of the skin. It should be used before and after each task and every patient contact. This is sufficient to prevent cross-infection. Apply one shot of liquid soap to wet hands and wash using a 6- or • 8-point technique (see Figure 3.1). Rinse in warm water. • Dry thoroughly by patting with paper towels to prevent chafing. • Level 2: Intermediate or disinfection An alcohol hand rub is used to kill any surface skin organisms. The hand rub should be available at all washbasins, in all clinical areas and outside any isolation areas. In areas where wall-mounted dispensers are not practical, dispensers may be attached to trolleys or smaller dispensers may be clipped to staff uniform. Alcohol gel can be used as an alternative to soap and water (only if hands are physically clean), or to disinfect the hands before an aseptic procedure. Hands must be physically clean before application. • Apply alcohol hand rub to clean hands and massage using a 6- or • 8-point technique (follow manufacturer’s recommendations for the amount to be used) (see Figure 3.2). Allow to dry before beginning your next task. • Level 3: Surgical scrub This involves the use of a chemical disinfection and prolonged washing to physically remove and kill surface organisms in the deeper layers of the epidermis. This should be done before any invasive or surgical procedure. Apply a bactericidal, detergent, surgical scrub solution to wet • hands and massage in using an 8-point technique, extending the wash to include the forearms. Ensure the hands are positioned so as to prevent soap and water • running onto and contaminating the hands from unwashed areas of the arms (high hands, low elbows technique). Rinse in warm water. • Dry thoroughly by patting with sterile paper towels. • Don sterile gown and gloves. • Figure 3.3 shows areas that are commonly missed during hand hygiene processes. Table 3.1 shows a summary of the three techniques. OVERVIEW By the end of this chapter you will: understand the importance of infection control • be able to describe the various levels of hand hygiene • understand the term ‘universal precautions’ • be able to set up a sterile field • understand the various methods of achieving asepsis • know what to do if a needlestick or sharps injury occurs. • Alcohol hand gel will not kill Clostridium difficile spores – soap and water is necessary
  • 2.
    Precautions and InfectionControl 7 Figure 3.1 Handwashing technique. (With permission from .) (a) Wet hands under running water (b) Apply soap and rub palms together to ensure complete coverage (c) Spread the lather over the backs of the hands (d) Make sure the soap gets in between the fingers (e) Grip the fingers on each hand (f) Pay particular attention to the thumbs (g) Press fingertips into the palm of each hand (h) Dry thoroughly with a clean towel Figure 3.2 Alcohol rub decontamination technique. (With permission from .) (a) Apply the gel to the palm of one hand (b) Press fingertips of the other hand to the palm (c) Tip the remaining alcohol from one palm to the other (d) Press fingertips of the other hand to the palm (e) Quickly spread alcohol onto all surfaces of both hands, paying particular attention to thumbs (f) Continue spreading the alcohol until it dries
  • 3.
    8 ABC ofPractical Procedures The sterile field The sterile field is the sterile area that can be used as a work area when carrying out a sterile procedure. It is essential that this area is kept free from microorganisms and spores. The environment Any sterile procedures should be carried out in a clean area, free from airborne contamination.All surfaces to be used must be clean, dry, flat and stable. Any activities that will cause environmental disturbances or an increase in airborne contamination (dusting, bed-making etc.) should not be carried out immediately before an aseptic procedure. Curtains or fabric screens should be closed for 10 minutes to allow the airborne contaminates to settle. Ensure that the patient is aware of the need to maintain sterility during the pro- cedure, as he/she may accidentally touch the sterile field. Preparing your sterile field/trolley for the procedure All sterile equipment is double wrapped. Packs containing sterile equipment must be unopened and the seals must be intact. The pack must be within the expiry date printed on the packaging. All trolleys and surfaces must have been wiped or washed each day thoroughly with detergent solution. They should additionally be cleaned before each use using an alcohol-based disinfectant. Wash your hands before handling the equipment and don a dis- 1 posable apron and non-sterile gloves. Touch only the outside layer of packaging – open the outer packs 2 away from your body, and tip the contents onto your proposed work surface (trolley). The outside of the inner wrapper is not part of the sterile field 3 and may be touched with the hands. To open the pack, hold the corners of the wrapper only. Pull the corners out and down to expose the contents. Ensure that you do not reach across the opened pack or touch the contents. The opened pack now becomes part of your sterile field. 4 Any additional sterile equipment can be tipped or dropped 5 onto this sterile field, ensuring that the sterile surfaces are not touched. The operator can now perform a surgical scrub and don sterile gown and gloves. Some procedures require the operator to wear a surgical mask. This must be worn before the scrub to avoid contamination of the hands. Local policy should be adhered to. When wearing a sterile gown and gloves, always keep your hands within view and above the waistline to prevent accidental decontamination. Extending the sterile field The sterile field can now be extended to include the area between the operator and the patient and surrounding the procedure site. The skin is decontaminated using a bactericidal preparation of 1 2% chlorhexidine in 70% isopropyl alcohol, and allowed to dry. Sterile drapes are opened by the operator, and held by the cor- 2 ners away from the body and any surfaces that will contaminate them. Apply the drapes around the procedure site, also covering the 3 area between the operator and the patient: leave only the decon- taminated area of skin exposed. Drapes are placed from the back to the front to avoid contami- 4 nating the operator’s gown or gloves. Gloves must be changed if they touch a non-sterile area. 5 Skin preparation solutions Skin antisepsis before a percutaneous procedure 2% chlorhexidine in 70% isopropyl alcohol has been shown to provide very effective skin preparation. It has the dual benefits of rapid action and excellent residual activity, reducing subsequent colonisation. Povidine iodine solution can be used if the patient has a history of chlorhexidine sensitivity. Table 3.1 Summary of the three levels of hand hygiene. Liquid soap and water Alcohol-based handrub Surgical scrub Level 1 Level 2 Level 3 Action Removal of physical contaminants: dirt, organic matter Killing of transient flora on physically clean hands Disinfection and removal of transient and resident flora from hands When When hands are physically dirty and after using the toilet Between patients Before applying gloves for procedures such as venepuncture, urinary catheterisation, lumbar puncture, joint aspiration, etc Prior to surgical procedures Before applying sterile gloves to carry out a procedure where an implantable device is to be inserted such as central venous, epidural and cardiac catheters, and pacemakers Figure 3.3 Missed areas in hand hygiene. Back Front Least missed Sometimes missed Most missed
  • 4.
    Precautions and InfectionControl 9 Apply the skin preparation by rubbing the solution onto the skin commencing at the insertion site and working outwards. Rub for about 30 seconds and allow the solution to dry completely before beginning the procedure. An alternative approach, recommended for peripheral venous cannula insertion, is to use a ‘criss-cross’ approach in two directions to minimise the risk of missing areas. Needlestick injury Needlestick or sharps injuries are a daily risk for healthcare work- ers and can lead to infection with bloodborne viruses (BBVs) such as hepatitis or HIV. The risk of infection following a single sharps (percutaneous) injury varies depending on the type of BBV. The risk is approximately: 1 in 3 if the instrument is contaminated with hepatitis B • 1 in 30 if the instrument is contaminated with hepatitis C • 1 in 300 if the instrument is contaminated with HIV, though this • depends on the infectivity of the source patient. The chances of transmission are higher with hollow-bore needles compared to other types of sharp injury. Prevention of needlestick and sharps injuries There are a few simple rules to help reduce the incidence of injury. Do not disassemble needles from syringes or other devices – • discard as a single unit. Do not resheath needles. If essential, use a resheathing device. • Do not carry used sharps by hand or pass to another person. • Discard sharps immediately after use into an approved sharps • container (which you should take with you to the bedside). Ensure sharps containers are of an appropriate size and available • at the points of use. Ensure sharps containers are closed securely when three-quarters • full, and disposed of according to local policy. Peripheral venous cannulae with a device that closes over the needle tip after it has been withdrawn from the cannula are avail- able, and provide a safe option. The risk of a percutaneous injury is increased during a surgi- cal procedure when suture needles and scalpel blades are used. Therefore: use blunt suture needles where possible (not suitable for skin • sutures) ensure that needle holders with needle tip guards are used • use a disposable scalpel or ensure a blade removal device is used • at the end of the procedure. When taking blood samples, avoid using a needle and syringe if possible. A vacuum tube system reduces the risk of needlestick injury. Managing accidental exposure to bloodborne viruses Any exposure to blood or body fluids from a sharps injury, cut or bite, or from splashing into the eyes or mouth or onto broken skin, carries a risk of exposure to a BBV. All of these occurrences must be reported to, and followed up by, the occupational health team. If there is a strong suspicion of exposure to HIV, it is recommended that antiretroviral post-exposure prophylaxis (PEP) is commenced. Ideally this should be started within an hour of exposure and the full course lasts 4 weeks. In situations when the treatment is delayed but the source person proves to be HIV positive, PEP can be given up to 2 weeks after the injury (though with reduced efficacy). The occupational health team will assess the circumstances and decide whether any action is necessary to reduce the risk of HIV or hepatitis. Figure 3.4 shows what to do in the event of a needlestick/sharps injury. Legal issues The Human Tissue Act (HTA) 2004 was introduced following a high-profile case regarding the unethical removal and retention of organs. The act requires that virtually all organs or samples taken from humans can only be tested or stored with the explicit consent of the person from whom they were taken. Failure to obtain consent can render the offender open to a fine or imprisonment. Therefore a doctor may not test a patient for HIV or hepatitis for the benefit of an injured healthcare worker if the patient refuses the test. Figure 3.4 Needlestick injury protocol. If blood or body fluids splash into the eyes,irrigate with cold water If blood or body fluids splash into the mouth,do not swallow. Rinse out several times with cold water In the cases of an injury from a clean or unused instrument or needle,no further action is necessary If the injury is from a used needle or instrument,risk assessment should be carried out with the microbiologist,infection control doctor or consultant for communicable diseases. FIRST AID Immediately stop what you are doing and attend to the injury Encourage bleeding of the wound by applying gentle pressure (do not suck the wound) Wash well under running water Apply a waterproof dressing as necessary Report the incident to your occupational health department,or emergency department and your manager Complete an accident form CONSENT IS REQUIRED IF A PATIENT’S BLOOD NEEDS TO BE TAKEN
  • 5.
    10 ABC ofPractical Procedures The Mental Capacity Act (MCA) 2005 came into force on 1 October 2007. This was introduced to protect patients that lack the capacity to provide consent. Under the MCA, all treatment decisions relating to patients over the age of 16 years who lack the capacity to consent must be neces- sary and made in the patient’s best interests. Figure 3.5 Symbol used to identify equipment that cannot be cleaned or reused. DO NOT REUSE Synonyms for this are: • Single-use • Use only once In the event of a needlestick injury to a healthcare worker, blood may only be taken for testing from a patient who lacks capacity or is unconscious if it is in the best interests of the patient. Cleaning or disposing of equipment Most equipment used in sterile procedures is disposable.Equipment that cannot be cleaned or reused can be identified by the symbol seen in Figure 3.5.Please dispose of contaminated equipment safely, and prevent injury to other healthcare workers. Further reading Department of Health. (2005) Saving Lives Campaign. Department of Health. (2003) Winning ways: working together to reduce healthcare associated infection in England. National Institute for Health and Clinical Excellence (NICE). (2003) Infection control. NICE clinical guideline 2. www.nice.org.uk/cg2 National Resource for Infection Control (NRIC). www.nric.org.uk.