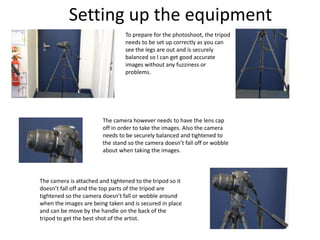
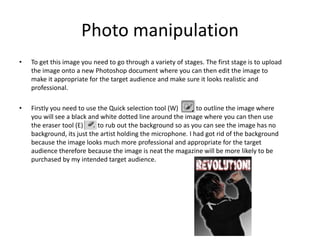
SlideShare a Scribd company logo
Setting up the equipment
To prepare for the photoshoot, the tripod
needs to be set up correctly as you can
see the legs are out and is securely
balanced so I can get good accurate
images without any fuzziness or
problems.
The camera however needs to have the lens cap
off in order to take the images. Also the camera
needs to be securely balanced and tightened to
the stand so the camera doesn’t fall off or wobble
about when taking the images.
The camera is attached and tightened to the tripod so it
doesn’t fall off and the top parts of the tripod are
tightened so the camera doesn’t fall or wobble around
when the images are being taken and is secured in place
and can be move by the handle on the back of the
tripod to get the best shot of the artist.
Where I have followed the Production
process
For the production of my magazine I referenced from the production process and had agreed on the date for the release of the first issue of Revolution!
Which was the 1st December 2014.
Pre-production
I have created a detailed plan for each story because I will then know what to talk about for the articles. I have considered the content of the story, the
types of article which will be the best fit for the story, for example interviews, features, news stories and infographics.
I needed to create a content plan and this is explained by adding content for all pages on a flat plan which I produced, including the front/back covers,
advertising spaces and tour pages and posters. This plan helps the content of a magazine issue be inserted and adapted to the readers likings by making
sure that the plan is confirmed by all members of the editorial board.
I have created a design mock-up which helps communicate layout details to your authors. The mock-ups are very simple; they provide a visual guide to help
me and the designer be able to see the layout of each story, but they aren’t necessarily the finalized designs for the double page spread or front cover.
Production
For the production I had to produce a front cover and DPS for Revolution! Based on the flat plan I had produced, therefore I needed to make the front cover
and DPS on Adobe Photoshop with all the detail from the hand drawn drafts which I produced. The other pages would then be produced on Photoshop so
the magazine looks professional and look visually appealing so that it will be in competition with my other competitors Kerrang! And NME.
However I have followed the production process by making the standfirst introduce the story, attract the readers attention and also gets the reader to carry
on reading. By having a standfirst allows me to introduce and summarise the interview in a sentence or 2 so that the reader is able to get a feel for what the
interview is about as well as making the reader want to carry on reading and understand the article and the point its putting across.
The next stage is proofreading and editing stories. For this I needed to spend time on working on the masthead name and location which it is going to be
because it is a main part of the front cover and brand identity so needs to be effective for a rock magazine. The lead should introduce the story, attract the
readers attention and also gets the reader to carry on reading. The body needed to be checked to see if it is readable and uses appropriate pull quotes to
engage the interview. The pictures needed to be appropriate and fit for purpose and the captions need to be easy to read and expressive. Therefore by
double checking my production idea, it can allow me to make some changes if they were necessary changes and improve the magazine were possible to
make it professional and a top competitor.
Post production
For the post production I have followed the production process by proof reading and get another 1 or 2 people to proof read and double check the
magazine again so that it can be the best it can be and has the appropriate images, language and content. By having more people double check the
magazine is beneficial because I could take up on any mistakes which could have been made and allowed me to go and change them. Some of the content
had to be changed as it didn’t make sense, however the changes which I needed to make and were spotted by another person were minor and could easily
be changed, so Revolution! Can be a top rock magazine with those such as Kerrang! And NME.
Test photography
For a part of test photography I
had used a deodorant can instead
of a microphone to see what type
of image would look best on the
front cover, therefore for further
parts of my development I had a
microphone to look more
professional and suitable for the
genre.
For the front cover main image their will
be 1 top artist from one of the top rock
bands in this case Black Veil Brides with
the artist looking towards the reader
straight on to convey the effects of rock
and the impact it can have on the reader.
The main headline I have chosen is
“Black Veil Brides”. The main
headline is in a bold font style with
bright contrasting colours to the
background which express emotions
and themes to what's inside.
However the headline looks bold and
catchy which conveys that the main
article/interview is going to have
truth and some happiness to it.
By having posters expressed on the
front cover on the left hand side by
the seam, conveys the fact that you
get them free within the magazine and
that they are of most popular band
members or bands. By having this on
the left suggests that more people will
buy the magazine and open the pages
to get the posters out and read
through the articles before the posters
appear.
The mast head of my magazine is going
to be in this type
of font style called Shut'em down from
www.dafont.com I am going to make the
masthead white in this font style so it
contrasts with the black from the
background as it conveys how heavy rock
is and that extreme rock will start to
cause havoc in the likes of mosh pits and
violence.
The barcode is on the right hand side
which conveys the fact that it is on the
opening page of the magazine and will
force you to take the magazine out to see
the barcode which makes you see the
front cover and images displayed.
By having puff promotions expressed
on the front cover, conveys the fact
that you have the opportunity to win
prizes in the form of Win!... Within
the magazine which causes the reader
to read through it to get to the
competition page. By having this
suggests that more people will buy
the magazine to get the chance to win
prizes and read through and take in
the articles before the competition
pages appear.
For the strapline I have chosen “Obey The Past, Present and Future of Rock!, I have followed a similar strapline to
another magazine of my sub-genre in the likes of NME. My strapline conveys the fact that rock will never get old and
in its generation it will have big all time hits. However conveys what artists and bands are in the magazine due to the
strapline saying “Past, Present and Future..” so therefore suggests that rock bands and artists are contained within the
magazine from the past, now in the present and future stars and bands.
The cover lines I have situated on the right
hand side of the page so they are away
from the main headline and stand out from
the rest of the page as they are in bright
colours and bold fonts.
Photoshop completed version of magazine
The main headline for my
article/interview I have chosen is
“The Resurrection of Rock”, the “The
and Of” are in the Vivaldi font and
the “Resurrection” in the broken
Detroit font from www.DaFont.com
The main headline is in a bold, slim
font style with contrasting colours
(White headline on black
background) which expresses the
emotions and themes to what's
imbedded within the
article/interview.
The standfirst for my double-page
spread (DPS) is going to be “For the
past two years, Black Veil Brides
have resided in the dystopian world
of the wild ones. Now, though,
they’re ready to rewrite rock’s rule
book. And all Andy Biersack needed
to do was question everything…”.
The font will be white with sky blue
highlighted key words to contrast
and create a visual appeal to the
reader forcing them to read the
standfirst and the interview. The
highlighted words convey who the
band artist is being interviewed and
the band which he is in.
The interview, I have decided to place in the bottom half of the
left page of the double page spread in a small slim, white font to
contrast to the black background, this is because it splits up the
pages nicely so all the written language is on one side of the
page and the non-verbal codes such as the image on the other
however I have an abbreviated quote being placed on the right
page as a little verbal code to convey the importance of the
interview to the artist and also gives the reader time to reflect
on the interview by looking at the image and makes the reader
want to read on.
For the main image I am going to take a picture of the artist with one
hand leaning casually on the side of a wall/fence. This will convey the
rural setting of the surround area and the type of mood the interview
will convey throughout, so by having the artist wear black clothes in a
quiet surrounding conveys isolation and that the band sticks out from
the others to cause competition.
The page number I have decided to
choose for the DPS is pages 18-19
because that’s where the main
article/interview is based in an issue
of Kerrang! Therefore by choosing
to ‘repeat’ (Steve Neale-1980) it
from that issue conveys importance
of the main article/interview and
what content should be based
before as a build up to the main
article/interview. However I have
also chosen to ‘repeat’ (Steve
Neale-1980) the brand identity
masthead name by the page
number to convey realism and gets
the reader to be able to search up
the name of the magazine on social
media.
After the interview I have put
social media links to contact the
artist or follow him on, however I
have added a link too so that you
can go online and read the full
interview online.
Photo manipulation
• To get this image you need to go through a variety of stages. The first stage is to upload
the image onto a new Photoshop document where you can then edit the image to
make it appropriate for the target audience and make sure it looks realistic and
professional.
• Firstly you need to use the Quick selection tool (W) to outline the image where
you will see a black and white dotted line around the image where you can then use
the eraser tool (E) to rub out the background so as you can see the image has no
background, its just the artist holding the microphone. I had got rid of the background
because the image looks much more professional and appropriate for the target
audience therefore because the image is neat the magazine will be more likely to be
purchased by my intended target audience.
• Once you have erased the background of the image you can add a shadow on the
image like I have done for my front cover. To do this you have to double click on
the image layer and a menu comes up as shown below were you can click on outer
glow and drag the sliders to where you want the glow and how big you want it as
well as changing its colour. I decided to add an outer glow on the image to make
the image stand out on the front cover therefore look more appropriate for a rock
magazine . By adding a white outer glow on the image allows the image to stand
out and contrast as the background is black so the image appeals more on the
front cover to the intended target audience.
Inspiration of Photo manipulation
• The inspiration which I got for the photos I chose to put on my front cover and DPS came
from other magazines which were the Kerrang! Magazines. This was my inspiration because
as I am making a magazine which is relatively similar to Kerrang! I need to make sure that I
‘repeat’ (Steve Neale 1980) the majority of the codes and conventions used so that
Revolution! Can be successful as well as be in top competition with its competitors Kerrang!
And NME.
• An example of inspiration from the Kerrang!” magazine would be the Black veil brides on the
front cover. I have chosen to ‘repeat’ (Steve Neale 1980) the idea of the main image covering
the masthead, the main headline colours for the house style with a cross of a different colour
from another Kerrang! Magazine which was red. However I have taken the idea of the front
cover of the artist screaming but for Revolution! The artist will be screaming side on into a
microphone to introduce the sub-genre of rock as well as convey to the target audience that
the magazine will be worth the read.
• The DPS for example I have chosen to ‘repeat’ (Steve Neale 1980) the idea of the artist
leaning on something with his right arm. For my version of Revolution I have put the artist in
the same position but this time instead of leaning on a wall as he will be leaning on the logo
of the Black Veil Brides for brand identity and makes the interview more expressive and
worth the read.
Proof reading the interview
A mistake which I had made in the interview
was the “And”. This was a mistake because you
don’t start the sentence with “And” so therefore
I needed to take the “And” out and start the
sentence with “All”, so it makes sense and looks
professional and appropriate rather than
unprofessional.
At the beginning of the interview just after the stand first I had been
proof reading the interview and a mistake which I had spotted was the
name “andy biersack”. This is a mistake because it is a name therefore
the letters at the start of the name needs to be in capitals to make the
article look professional and look like a lot of checking has gone into it
as well as making the interview worth the read. I had corrected this
mistake and made the name “Andy Biersack” so it looks more
appropriate and professional for the reader to read.
Step-by-step
Firstly I had to choose my background colour which is black
with a faded gradient out to the bottom right corner as this is
what I chose to ‘repeat’ (Steve Neale - 1980) from my
magazine of inspiration Kerrang! I did this back ground by
using the paint bucket tool.
Secondly I had to draw out the grid lines to where
the masthead is going to go, then I had to go on
www.dafont.com and choose my masthead font
which was Shut’em Down. I made the title white
with a red drop shadow and applied an inner and
outer glow.
1.
2.
Next I had to draw out the grid lines to where the
main image is going to go, then I had to go out and
take photos to place on the front cover. I made the
person in the image scream into a microphone to
convey the real meaning of rock. I had to use the
quick selection tool to get rid of the background
and add an outer glow to bring out the image from
the background.
Then I had to draw out the grid lines to where the
strapline is going to go, then I had to go and find a
bold font style to make the standfirst stand out I
chose the Myriad Pro font. I made the standfirst by
using the text tool and made the standfirst red
with a yellow drop shadow.
Then I had to draw out the grid lines to where the
barcode is going to go, then I had to place the
Bauer media logo, Facebook and twitter logo and
the Instagram logo onto the barcode along with a
copy of the masthead for brand identity and
originality.
3.
4.
5.
Then I had to draw out the grid lines to where the
puff promotion is going to go, then I had to draw
out the circle with the ellipse tool and change the
colour with the paint bucket tool, I then added a
red outer glow by using the eye dropper tool to
get the colour out of the masthead and repeat
that for the drop shadow/stroke. I used the text
tool to create the text and changed the colour of
the win to yellow with a red stroke too to contrast
the background with the puff promotion.
Then I had to draw out the grid lines to where the
main headline and quote from the interview is
going to go. I used the text tool and the Rosewood
Std font for the Black Veil Brides headline and the
Myriad Pro font for the quote. I changed the
colour of the Black Veil Brides to red with a yellow
drop shadow and made the quote white to
contrast the main image from the main headline
and quote.
6.
7.
Finally I had to draw out the grid lines to where
the puff promotion is going to go, then I had to
draw out the rectangle with the rectangle tool and
change the colour with the paint bucket tool to
red, I then added text using the text tool in the
SoulMission font from www.dafont.com and
changed the colour to yellow to contrast the red
with the yellow.
8.
Step-by-step (DPS)
Firstly I had to choose my background colour
which is black with a faded gradient out to
the bottom right corner as this is what I
chose to ‘repeat’ (Steve Neale - 1980) from
my magazine of inspiration Kerrang! I did this
back ground by using the paint bucket tool
and the gradient tool.
Next I had to draw out the grid lines to where the
main image is going to go, then I had to go out and
take photos to place on the DPS. I made the
person in the image lean on the wall with 1 arm
which I have chosen to ‘repeat’ (Steve Neale -
1980) from the Kerrang! DPS.
1.
2.
Then I had to draw out the grid lines to where the
main headline is going to go. I used the text tool
and the Broken Detroit font from www.dafont.com
for the “revolution” and headline and the Vivaldi
font for the “the”, “of” and “rock”. I changed the
colour of the main headline white to contrast the
headline from the background.
For the brand identity I had to mark out with the grid lines
to were the brand identity and page numbers will go. For
the brand identity I copied the mast head from my front
cover and placed it next to the page number just like my
magazine of inspiration. The page numbers I chose to
‘repeat’ (Steve Neale-1980) from an issue of Kerrang! Were
their main article/interview is on the pages of 18 and 19
and will best suit my magazine DPS also.
3.
4.
For the standfirst I chose to ‘repeat’ (Steve Neale-
1980) a similar format and colour scheme to that
of Kerrang! This is because it reflects emotions
and contrasts to the background so makes it stand
out. The font style which I have used is the Calibri
font in white writing however I chose to use the
eye dropper tool and get the same blue as that in
the standfirst of Kerrang! So that I can highlight
the band name and the artist to get them to stand
out.
For the main interview I chose to use ‘differences’
(Steve Neale-1980) so that the interview will be in
depth and over both pages of the DPS. This is
because it reflects emotions to the reader and
allows the reader to look at the image and the
content on the page whilst reading the interview.
The text I have made white so stands out from the
background and made the questions that of the
same colour as the highlighted words in the
standfirst to contrast to the background and the
answers to differentiate what the questions are
and what the answers are. However I have chosen
to ‘repeat’ (Steve Neale-1980) a quote idea from
Kerrang! And have the quote in white and the
name of the artist in the blue.
5.
6.
Shortcuts in Photoshop
Move tool - V
Rectangular marquee tool - M
Lasso tool - L
Quick selection tool - W
Crop tool - C
Eye dropper tool - I
Spot healing brush tool - J
Brush tool - B
Clone Stamp tool - S
History brush tool - Y
Eraser - E
Gradient tool - G
Blur tool - Doesn’t have a shortcut
Dodge tool - O
Pen tool - P
Text tool - T
Path selection tool - A
Rectangle tool - U
Object rotate tool - K
Camera rotate tool - N
Hand tool - H
Zoom tool - Z
Default foreground and background colours - D
Rulers - (CTRL+R)
Where I used the shortcuts
• Ruler tool – I used the ruler tool (CRTL+R) to enable me to drag loads of lines onto the canvas to allow and
show were each of my conventions were going to go on my front cover and DPS. This is done so that I can
have all the conventions inline with each other so it looks professional and also allows space for perhaps
another code/convention. I had used the ruler for all parts of my magazine especially for the main image,
main headline, masthead, barcode and the puff promotion. By having the rulers on the canvas allowed me
to split up each of these convention s and allow each of them to align with each other to look fit for
purpose and professional.
• Pen tool – I used the pen tool (P) to go around an image for example on my DPS I used the pen tool going
around the arm of the artists so the text doesn’t come in contact with the image which will make it look
unprofessional. However the pen tool was beneficial because it can allow you to draw around certain
images, conventions on the page to avoid the text clashing with any of them.
• Eye dropper tool – The eye dropper tool (I) was used significantly for my magazine front cover and DPS,
this was because I had to get the same colour from my masthead for example and manipulate that colour
onto the brand identity on the bottom of the DPS by the page numbers to make the magazine look original
and professional.
• Eraser tool – The eraser tool (E) was used on mainly the images because after I used the quick selection
tool some of the background from the image was still there so by using the eraser tool allowed me to go
around the images and remove any unwanted parts of the image, mainly the background so the image
stands out on the page and looks realistic and fit for purpose.
• Quick selection tool – The quick selection tool (W) came in handy for manipulating the images for my front
cover and DPS because it enabled me to outline the images based on these pages and got rid of the
background rather than using the eraser tool and rubbing it all out. It works as a shortcut to getting a main
part of an image therefore helped me getting the artist out of the image without the background so it
looks professional and realistic.
• Move tool – The move tool (V) was used throughout both of my pages this was because it allowed me to
click on any part of the front cover and DPS and move it to wherever I wanted/needed it which gave me
ideas to test what looks best were and moved it all around. The move tool however is a very handy tool on
Photoshop because you can drag any convention you want anywhere and see where it looks best if it
didn’t look right CRTL+Z undoes the mistake and move it again.
• Text tool – The text tool (T) was used on both of the pages for the text. This tool works by allowing you to
draw a text box were the text wants to go and then you can change what font style you want and the size
of it. This tool was used for the masthead, main headline and all text on the conventions also on the page.
• Gradient tool – The gradient tool (G) however was a useful tool to use in the production of my magazine
pages because as my magazine had to have a black to grey background the gradient tool came in handy by
allowing the black to go to grey and contrast to what I was going to have on the pages such as the images,
text, puff promotions etc.
Conclusion
• What went well?
• Through this learning outcome I have learnt how to test photography is beneficial when
producing a print based media product and able to set up simple equipment for the photos
which need to be taken for my magazine pages.
• Another part that went well was that I was able to create a simple but effective step by step
of how I went from a blank canvas in Photoshop to the completed version of the front cover
and DPS. As well as improving my skills on Photoshop by the use of the shortcuts and
learning and trying new tools to complete my pages.
• Even better if?
• This learning objective can be improved by trying to add more detail were possible therefore
will make the other learning outcomes much easier to complete.
• Finally the last improvement which I could have done was to keep asking Mr Crafts to check
my work and make sure it has been completed to a distinction standard so that I can move on
to the next learning outcome.

More Related Content

What's hot

EVALUATION // QUESTION 1
EVALUATION // QUESTION 1 EVALUATION // QUESTION 1
EVALUATION // QUESTION 1
msharrattmedia
 
Evaluation Q1 & Q2
Evaluation Q1 & Q2Evaluation Q1 & Q2
Evaluation Q1 & Q2
ella potton
 
Question1 evaluation Chris
Question1 evaluation ChrisQuestion1 evaluation Chris
Question1 evaluation Chris
ChrisAMedia
 
Magazine evaluation
Magazine evaluationMagazine evaluation
Magazine evaluation
jpriest17
 
Shannon Haines' evaluation
Shannon Haines' evaluationShannon Haines' evaluation
Shannon Haines' evaluation
mrsmwlms
 
Forms and conventions finished
Forms and conventions finishedForms and conventions finished
Forms and conventions finished
finzzyb
 
4. pre production fmp
4. pre production fmp4. pre production fmp
4. pre production fmp
AlicjaMorawska
 
1 unit 14 powerpoint
1 unit 14   powerpoint1 unit 14   powerpoint
1 unit 14 powerpoint
sonujohny
 
Evaluation
EvaluationEvaluation
Evaluation
ella potton
 
1 unit 14 powerpoint
1 unit 14   powerpoint1 unit 14   powerpoint
1 unit 14 powerpoint
sonujohny
 
house style for my magazine
house style for my magazinehouse style for my magazine
house style for my magazine
doaa elmnayneh
 
Evaluation
EvaluationEvaluation
Generic conventions
Generic conventionsGeneric conventions
Generic conventions
Kirsty Gallacher
 
Evaluation Question 5
Evaluation Question 5Evaluation Question 5
Evaluation Question 5
040807
 
Page layout
Page layout Page layout
Page layout
willydavisj
 
In what ways does your music magazine use, develop or challenge forms and con...
In what ways does your music magazine use, develop or challenge forms and con...In what ways does your music magazine use, develop or challenge forms and con...
In what ways does your music magazine use, develop or challenge forms and con...
Toddy888
 
Question 1 front cover
Question 1 front coverQuestion 1 front cover
Question 1 front cover
zoetoase
 
Evaluation2
Evaluation2Evaluation2
Evaluation2
Gugan95
 
Question1 eval
Question1 evalQuestion1 eval
Question1 eval
ChrisAMedia
 
Question1 eval
Question1 evalQuestion1 eval
Question1 eval
ChrisAMedia
 

What's hot (20)

EVALUATION // QUESTION 1
EVALUATION // QUESTION 1 EVALUATION // QUESTION 1
EVALUATION // QUESTION 1
 
Evaluation Q1 & Q2
Evaluation Q1 & Q2Evaluation Q1 & Q2
Evaluation Q1 & Q2
 
Question1 evaluation Chris
Question1 evaluation ChrisQuestion1 evaluation Chris
Question1 evaluation Chris
 
Magazine evaluation
Magazine evaluationMagazine evaluation
Magazine evaluation
 
Shannon Haines' evaluation
Shannon Haines' evaluationShannon Haines' evaluation
Shannon Haines' evaluation
 
Forms and conventions finished
Forms and conventions finishedForms and conventions finished
Forms and conventions finished
 
4. pre production fmp
4. pre production fmp4. pre production fmp
4. pre production fmp
 
1 unit 14 powerpoint
1 unit 14   powerpoint1 unit 14   powerpoint
1 unit 14 powerpoint
 
Evaluation
EvaluationEvaluation
Evaluation
 
1 unit 14 powerpoint
1 unit 14   powerpoint1 unit 14   powerpoint
1 unit 14 powerpoint
 
house style for my magazine
house style for my magazinehouse style for my magazine
house style for my magazine
 
Evaluation
EvaluationEvaluation
Evaluation
 
Generic conventions
Generic conventionsGeneric conventions
Generic conventions
 
Evaluation Question 5
Evaluation Question 5Evaluation Question 5
Evaluation Question 5
 
Page layout
Page layout Page layout
Page layout
 
In what ways does your music magazine use, develop or challenge forms and con...
In what ways does your music magazine use, develop or challenge forms and con...In what ways does your music magazine use, develop or challenge forms and con...
In what ways does your music magazine use, develop or challenge forms and con...
 
Question 1 front cover
Question 1 front coverQuestion 1 front cover
Question 1 front cover
 
Evaluation2
Evaluation2Evaluation2
Evaluation2
 
Question1 eval
Question1 evalQuestion1 eval
Question1 eval
 
Question1 eval
Question1 evalQuestion1 eval
Question1 eval
 

Viewers also liked

Resumen1
Resumen1Resumen1
Resumen1
adultosgijon
 
The Scandal of Generic Models in the Social Sciences
The Scandal of Generic Models in the Social SciencesThe Scandal of Generic Models in the Social Sciences
The Scandal of Generic Models in the Social Sciences
Bruce Edmonds
 
99 ресурсов для продвижения стартапов.Мегамозг
99 ресурсов для продвижения стартапов.Мегамозг99 ресурсов для продвижения стартапов.Мегамозг
99 ресурсов для продвижения стартапов.Мегамозг
wisedarkness
 
Automated Motion Detection from space in sea surveillance
Automated Motion Detection from space in sea surveillanceAutomated Motion Detection from space in sea surveillance
Automated Motion Detection from space in sea surveillance
Liza Charalambous
 
Proyectoenmac
ProyectoenmacProyectoenmac
Proyectoenmac
proyectoabelini
 

Viewers also liked (6)

Resumen1
Resumen1Resumen1
Resumen1
 
The Scandal of Generic Models in the Social Sciences
The Scandal of Generic Models in the Social SciencesThe Scandal of Generic Models in the Social Sciences
The Scandal of Generic Models in the Social Sciences
 
99 ресурсов для продвижения стартапов.Мегамозг
99 ресурсов для продвижения стартапов.Мегамозг99 ресурсов для продвижения стартапов.Мегамозг
99 ресурсов для продвижения стартапов.Мегамозг
 
IntroVision
IntroVisionIntroVision
IntroVision
 
Automated Motion Detection from space in sea surveillance
Automated Motion Detection from space in sea surveillanceAutomated Motion Detection from space in sea surveillance
Automated Motion Detection from space in sea surveillance
 
Proyectoenmac
ProyectoenmacProyectoenmac
Proyectoenmac
 

Similar to Unit 14 - LO3

Unit 13 - LO3
Unit 13 - LO3Unit 13 - LO3
Unit 13 - LO3
jbowers96
 
Unit 14 - LO1
Unit 14 - LO1Unit 14 - LO1
Unit 14 - LO1
zoetoulson
 
Evaluation
EvaluationEvaluation
Evaluation
Sarahwade
 
Unit 14 - LO1
Unit 14 - LO1Unit 14 - LO1
Unit 14 - LO1
jbowers96
 
Drafting
DraftingDrafting
Drafting
Amelia Ofiarska
 
Unit 13 - LO3
Unit 13 - LO3Unit 13 - LO3
Unit 13 - LO3
jbowers96
 
In what ways does your media product use, develop or challenge forms and conv...
In what ways does your media product use, develop or challenge forms and conv...In what ways does your media product use, develop or challenge forms and conv...
In what ways does your media product use, develop or challenge forms and conv...
kirstiemaccoy
 
In what ways does your media product use, develop or challenge forms and conv...
In what ways does your media product use, develop or challenge forms and conv...In what ways does your media product use, develop or challenge forms and conv...
In what ways does your media product use, develop or challenge forms and conv...
kirstiemaccoy
 
Unit 14
Unit 14Unit 14
Unit 14
SLyne98
 
Formal Evaluation
Formal EvaluationFormal Evaluation
Formal Evaluation
1bmediajoekenyon
 
Unit 14_
Unit 14_Unit 14_
Unit 14 lo1 new 20th nov
Unit 14 lo1 new 20th novUnit 14 lo1 new 20th nov
Unit 14 lo1 new 20th nov
harrymyerswest
 
Ollie long unit 14
Ollie long unit 14Ollie long unit 14
Ollie long unit 14
olong17
 
Evaluation Question 5 - How did you attract/address your audience?
Evaluation Question 5 - How did you attract/address your audience?Evaluation Question 5 - How did you attract/address your audience?
Evaluation Question 5 - How did you attract/address your audience?
EllyRewcastle
 
Evaluation
EvaluationEvaluation
Evaluation
HannahMaxwell
 
Evaluation final 3
Evaluation final 3Evaluation final 3
Evaluation final 3
HannahMaxwell
 
Actual evaluation
Actual evaluationActual evaluation
Actual evaluation
megan
 
Unit 30- LO3
Unit 30- LO3Unit 30- LO3
Unit 30- LO3
lewis269
 
EVALUATION - QUESTION I
EVALUATION - QUESTION IEVALUATION - QUESTION I
EVALUATION - QUESTION I
Magdalena Zygmunt
 
Unit 14 LO1
Unit 14 LO1Unit 14 LO1
Unit 14 LO1
jessraymond1
 

Similar to Unit 14 - LO3 (20)

Unit 13 - LO3
Unit 13 - LO3Unit 13 - LO3
Unit 13 - LO3
 
Unit 14 - LO1
Unit 14 - LO1Unit 14 - LO1
Unit 14 - LO1
 
Evaluation
EvaluationEvaluation
Evaluation
 
Unit 14 - LO1
Unit 14 - LO1Unit 14 - LO1
Unit 14 - LO1
 
Drafting
DraftingDrafting
Drafting
 
Unit 13 - LO3
Unit 13 - LO3Unit 13 - LO3
Unit 13 - LO3
 
In what ways does your media product use, develop or challenge forms and conv...
In what ways does your media product use, develop or challenge forms and conv...In what ways does your media product use, develop or challenge forms and conv...
In what ways does your media product use, develop or challenge forms and conv...
 
In what ways does your media product use, develop or challenge forms and conv...
In what ways does your media product use, develop or challenge forms and conv...In what ways does your media product use, develop or challenge forms and conv...
In what ways does your media product use, develop or challenge forms and conv...
 
Unit 14
Unit 14Unit 14
Unit 14
 
Formal Evaluation
Formal EvaluationFormal Evaluation
Formal Evaluation
 
Unit 14_
Unit 14_Unit 14_
Unit 14_
 
Unit 14 lo1 new 20th nov
Unit 14 lo1 new 20th novUnit 14 lo1 new 20th nov
Unit 14 lo1 new 20th nov
 
Ollie long unit 14
Ollie long unit 14Ollie long unit 14
Ollie long unit 14
 
Evaluation Question 5 - How did you attract/address your audience?
Evaluation Question 5 - How did you attract/address your audience?Evaluation Question 5 - How did you attract/address your audience?
Evaluation Question 5 - How did you attract/address your audience?
 
Evaluation
EvaluationEvaluation
Evaluation
 
Evaluation final 3
Evaluation final 3Evaluation final 3
Evaluation final 3
 
Actual evaluation
Actual evaluationActual evaluation
Actual evaluation
 
Unit 30- LO3
Unit 30- LO3Unit 30- LO3
Unit 30- LO3
 
EVALUATION - QUESTION I
EVALUATION - QUESTION IEVALUATION - QUESTION I
EVALUATION - QUESTION I
 
Unit 14 LO1
Unit 14 LO1Unit 14 LO1
Unit 14 LO1
 

Recently uploaded

Walmart Business+ and Spark Good for Nonprofits.pdf
Walmart Business+ and Spark Good for Nonprofits.pdfWalmart Business+ and Spark Good for Nonprofits.pdf
Walmart Business+ and Spark Good for Nonprofits.pdf
TechSoup
 
ISO/IEC 27001, ISO/IEC 42001, and GDPR: Best Practices for Implementation and...
ISO/IEC 27001, ISO/IEC 42001, and GDPR: Best Practices for Implementation and...ISO/IEC 27001, ISO/IEC 42001, and GDPR: Best Practices for Implementation and...
ISO/IEC 27001, ISO/IEC 42001, and GDPR: Best Practices for Implementation and...
PECB
 
Cognitive Development Adolescence Psychology
Cognitive Development Adolescence PsychologyCognitive Development Adolescence Psychology
Cognitive Development Adolescence Psychology
paigestewart1632
 
Natural birth techniques - Mrs.Akanksha Trivedi Rama University
Natural birth techniques - Mrs.Akanksha Trivedi Rama UniversityNatural birth techniques - Mrs.Akanksha Trivedi Rama University
Natural birth techniques - Mrs.Akanksha Trivedi Rama University
Akanksha trivedi rama nursing college kanpur.
 
বাংলাদেশ অর্থনৈতিক সমীক্ষা (Economic Review) ২০২৪ UJS App.pdf
বাংলাদেশ অর্থনৈতিক সমীক্ষা (Economic Review) ২০২৪ UJS App.pdfবাংলাদেশ অর্থনৈতিক সমীক্ষা (Economic Review) ২০২৪ UJS App.pdf
বাংলাদেশ অর্থনৈতিক সমীক্ষা (Economic Review) ২০২৪ UJS App.pdf
eBook.com.bd (প্রয়োজনীয় বাংলা বই)
 
Smart-Money for SMC traders good time and ICT
Smart-Money for SMC traders good time and ICTSmart-Money for SMC traders good time and ICT
Smart-Money for SMC traders good time and ICT
simonomuemu
 
What is Digital Literacy? A guest blog from Andy McLaughlin, University of Ab...
What is Digital Literacy? A guest blog from Andy McLaughlin, University of Ab...What is Digital Literacy? A guest blog from Andy McLaughlin, University of Ab...
What is Digital Literacy? A guest blog from Andy McLaughlin, University of Ab...
GeorgeMilliken2
 
clinical examination of hip joint (1).pdf
clinical examination of hip joint (1).pdfclinical examination of hip joint (1).pdf
clinical examination of hip joint (1).pdf
Priyankaranawat4
 
The History of Stoke Newington Street Names
The History of Stoke Newington Street NamesThe History of Stoke Newington Street Names
The History of Stoke Newington Street Names
History of Stoke Newington
 
LAND USE LAND COVER AND NDVI OF MIRZAPUR DISTRICT, UP
LAND USE LAND COVER AND NDVI OF MIRZAPUR DISTRICT, UPLAND USE LAND COVER AND NDVI OF MIRZAPUR DISTRICT, UP
LAND USE LAND COVER AND NDVI OF MIRZAPUR DISTRICT, UP
RAHUL
 
Executive Directors Chat Leveraging AI for Diversity, Equity, and Inclusion
Executive Directors Chat  Leveraging AI for Diversity, Equity, and InclusionExecutive Directors Chat  Leveraging AI for Diversity, Equity, and Inclusion
Executive Directors Chat Leveraging AI for Diversity, Equity, and Inclusion
TechSoup
 
The basics of sentences session 6pptx.pptx
The basics of sentences session 6pptx.pptxThe basics of sentences session 6pptx.pptx
The basics of sentences session 6pptx.pptx
heathfieldcps1
 
Azure Interview Questions and Answers PDF By ScholarHat
Azure Interview Questions and Answers PDF By ScholarHatAzure Interview Questions and Answers PDF By ScholarHat
Azure Interview Questions and Answers PDF By ScholarHat
Scholarhat
 
S1-Introduction-Biopesticides in ICM.pptx
S1-Introduction-Biopesticides in ICM.pptxS1-Introduction-Biopesticides in ICM.pptx
S1-Introduction-Biopesticides in ICM.pptx
tarandeep35
 
Life upper-Intermediate B2 Workbook for student
Life upper-Intermediate B2 Workbook for studentLife upper-Intermediate B2 Workbook for student
Life upper-Intermediate B2 Workbook for student
NgcHiNguyn25
 
The simplified electron and muon model, Oscillating Spacetime: The Foundation...
The simplified electron and muon model, Oscillating Spacetime: The Foundation...The simplified electron and muon model, Oscillating Spacetime: The Foundation...
The simplified electron and muon model, Oscillating Spacetime: The Foundation...
RitikBhardwaj56
 
How to Manage Your Lost Opportunities in Odoo 17 CRM
How to Manage Your Lost Opportunities in Odoo 17 CRMHow to Manage Your Lost Opportunities in Odoo 17 CRM
How to Manage Your Lost Opportunities in Odoo 17 CRM
Celine George
 
Main Java[All of the Base Concepts}.docx
Main Java[All of the Base Concepts}.docxMain Java[All of the Base Concepts}.docx
Main Java[All of the Base Concepts}.docx
adhitya5119
 
How to Build a Module in Odoo 17 Using the Scaffold Method
How to Build a Module in Odoo 17 Using the Scaffold MethodHow to Build a Module in Odoo 17 Using the Scaffold Method
How to Build a Module in Odoo 17 Using the Scaffold Method
Celine George
 
Digital Artifact 1 - 10VCD Environments Unit
Digital Artifact 1 - 10VCD Environments UnitDigital Artifact 1 - 10VCD Environments Unit
Digital Artifact 1 - 10VCD Environments Unit
chanes7
 

Recently uploaded (20)

Walmart Business+ and Spark Good for Nonprofits.pdf
Walmart Business+ and Spark Good for Nonprofits.pdfWalmart Business+ and Spark Good for Nonprofits.pdf
Walmart Business+ and Spark Good for Nonprofits.pdf
 
ISO/IEC 27001, ISO/IEC 42001, and GDPR: Best Practices for Implementation and...
ISO/IEC 27001, ISO/IEC 42001, and GDPR: Best Practices for Implementation and...ISO/IEC 27001, ISO/IEC 42001, and GDPR: Best Practices for Implementation and...
ISO/IEC 27001, ISO/IEC 42001, and GDPR: Best Practices for Implementation and...
 
Cognitive Development Adolescence Psychology
Cognitive Development Adolescence PsychologyCognitive Development Adolescence Psychology
Cognitive Development Adolescence Psychology
 
Natural birth techniques - Mrs.Akanksha Trivedi Rama University
Natural birth techniques - Mrs.Akanksha Trivedi Rama UniversityNatural birth techniques - Mrs.Akanksha Trivedi Rama University
Natural birth techniques - Mrs.Akanksha Trivedi Rama University
 
বাংলাদেশ অর্থনৈতিক সমীক্ষা (Economic Review) ২০২৪ UJS App.pdf
বাংলাদেশ অর্থনৈতিক সমীক্ষা (Economic Review) ২০২৪ UJS App.pdfবাংলাদেশ অর্থনৈতিক সমীক্ষা (Economic Review) ২০২৪ UJS App.pdf
বাংলাদেশ অর্থনৈতিক সমীক্ষা (Economic Review) ২০২৪ UJS App.pdf
 
Smart-Money for SMC traders good time and ICT
Smart-Money for SMC traders good time and ICTSmart-Money for SMC traders good time and ICT
Smart-Money for SMC traders good time and ICT
 
What is Digital Literacy? A guest blog from Andy McLaughlin, University of Ab...
What is Digital Literacy? A guest blog from Andy McLaughlin, University of Ab...What is Digital Literacy? A guest blog from Andy McLaughlin, University of Ab...
What is Digital Literacy? A guest blog from Andy McLaughlin, University of Ab...
 
clinical examination of hip joint (1).pdf
clinical examination of hip joint (1).pdfclinical examination of hip joint (1).pdf
clinical examination of hip joint (1).pdf
 
The History of Stoke Newington Street Names
The History of Stoke Newington Street NamesThe History of Stoke Newington Street Names
The History of Stoke Newington Street Names
 
LAND USE LAND COVER AND NDVI OF MIRZAPUR DISTRICT, UP
LAND USE LAND COVER AND NDVI OF MIRZAPUR DISTRICT, UPLAND USE LAND COVER AND NDVI OF MIRZAPUR DISTRICT, UP
LAND USE LAND COVER AND NDVI OF MIRZAPUR DISTRICT, UP
 
Executive Directors Chat Leveraging AI for Diversity, Equity, and Inclusion
Executive Directors Chat  Leveraging AI for Diversity, Equity, and InclusionExecutive Directors Chat  Leveraging AI for Diversity, Equity, and Inclusion
Executive Directors Chat Leveraging AI for Diversity, Equity, and Inclusion
 
The basics of sentences session 6pptx.pptx
The basics of sentences session 6pptx.pptxThe basics of sentences session 6pptx.pptx
The basics of sentences session 6pptx.pptx
 
Azure Interview Questions and Answers PDF By ScholarHat
Azure Interview Questions and Answers PDF By ScholarHatAzure Interview Questions and Answers PDF By ScholarHat
Azure Interview Questions and Answers PDF By ScholarHat
 
S1-Introduction-Biopesticides in ICM.pptx
S1-Introduction-Biopesticides in ICM.pptxS1-Introduction-Biopesticides in ICM.pptx
S1-Introduction-Biopesticides in ICM.pptx
 
Life upper-Intermediate B2 Workbook for student
Life upper-Intermediate B2 Workbook for studentLife upper-Intermediate B2 Workbook for student
Life upper-Intermediate B2 Workbook for student
 
The simplified electron and muon model, Oscillating Spacetime: The Foundation...
The simplified electron and muon model, Oscillating Spacetime: The Foundation...The simplified electron and muon model, Oscillating Spacetime: The Foundation...
The simplified electron and muon model, Oscillating Spacetime: The Foundation...
 
How to Manage Your Lost Opportunities in Odoo 17 CRM
How to Manage Your Lost Opportunities in Odoo 17 CRMHow to Manage Your Lost Opportunities in Odoo 17 CRM
How to Manage Your Lost Opportunities in Odoo 17 CRM
 
Main Java[All of the Base Concepts}.docx
Main Java[All of the Base Concepts}.docxMain Java[All of the Base Concepts}.docx
Main Java[All of the Base Concepts}.docx
 
How to Build a Module in Odoo 17 Using the Scaffold Method
How to Build a Module in Odoo 17 Using the Scaffold MethodHow to Build a Module in Odoo 17 Using the Scaffold Method
How to Build a Module in Odoo 17 Using the Scaffold Method
 
Digital Artifact 1 - 10VCD Environments Unit
Digital Artifact 1 - 10VCD Environments UnitDigital Artifact 1 - 10VCD Environments Unit
Digital Artifact 1 - 10VCD Environments Unit
 

Unit 14 - LO3

  • 1.
  • 2. Setting up the equipment To prepare for the photoshoot, the tripod needs to be set up correctly as you can see the legs are out and is securely balanced so I can get good accurate images without any fuzziness or problems. The camera however needs to have the lens cap off in order to take the images. Also the camera needs to be securely balanced and tightened to the stand so the camera doesn’t fall off or wobble about when taking the images. The camera is attached and tightened to the tripod so it doesn’t fall off and the top parts of the tripod are tightened so the camera doesn’t fall or wobble around when the images are being taken and is secured in place and can be move by the handle on the back of the tripod to get the best shot of the artist.
  • 3. Where I have followed the Production process For the production of my magazine I referenced from the production process and had agreed on the date for the release of the first issue of Revolution! Which was the 1st December 2014. Pre-production I have created a detailed plan for each story because I will then know what to talk about for the articles. I have considered the content of the story, the types of article which will be the best fit for the story, for example interviews, features, news stories and infographics. I needed to create a content plan and this is explained by adding content for all pages on a flat plan which I produced, including the front/back covers, advertising spaces and tour pages and posters. This plan helps the content of a magazine issue be inserted and adapted to the readers likings by making sure that the plan is confirmed by all members of the editorial board. I have created a design mock-up which helps communicate layout details to your authors. The mock-ups are very simple; they provide a visual guide to help me and the designer be able to see the layout of each story, but they aren’t necessarily the finalized designs for the double page spread or front cover. Production For the production I had to produce a front cover and DPS for Revolution! Based on the flat plan I had produced, therefore I needed to make the front cover and DPS on Adobe Photoshop with all the detail from the hand drawn drafts which I produced. The other pages would then be produced on Photoshop so the magazine looks professional and look visually appealing so that it will be in competition with my other competitors Kerrang! And NME. However I have followed the production process by making the standfirst introduce the story, attract the readers attention and also gets the reader to carry on reading. By having a standfirst allows me to introduce and summarise the interview in a sentence or 2 so that the reader is able to get a feel for what the interview is about as well as making the reader want to carry on reading and understand the article and the point its putting across. The next stage is proofreading and editing stories. For this I needed to spend time on working on the masthead name and location which it is going to be because it is a main part of the front cover and brand identity so needs to be effective for a rock magazine. The lead should introduce the story, attract the readers attention and also gets the reader to carry on reading. The body needed to be checked to see if it is readable and uses appropriate pull quotes to engage the interview. The pictures needed to be appropriate and fit for purpose and the captions need to be easy to read and expressive. Therefore by double checking my production idea, it can allow me to make some changes if they were necessary changes and improve the magazine were possible to make it professional and a top competitor. Post production For the post production I have followed the production process by proof reading and get another 1 or 2 people to proof read and double check the magazine again so that it can be the best it can be and has the appropriate images, language and content. By having more people double check the magazine is beneficial because I could take up on any mistakes which could have been made and allowed me to go and change them. Some of the content had to be changed as it didn’t make sense, however the changes which I needed to make and were spotted by another person were minor and could easily be changed, so Revolution! Can be a top rock magazine with those such as Kerrang! And NME.
  • 4. Test photography For a part of test photography I had used a deodorant can instead of a microphone to see what type of image would look best on the front cover, therefore for further parts of my development I had a microphone to look more professional and suitable for the genre.
  • 5. For the front cover main image their will be 1 top artist from one of the top rock bands in this case Black Veil Brides with the artist looking towards the reader straight on to convey the effects of rock and the impact it can have on the reader. The main headline I have chosen is “Black Veil Brides”. The main headline is in a bold font style with bright contrasting colours to the background which express emotions and themes to what's inside. However the headline looks bold and catchy which conveys that the main article/interview is going to have truth and some happiness to it. By having posters expressed on the front cover on the left hand side by the seam, conveys the fact that you get them free within the magazine and that they are of most popular band members or bands. By having this on the left suggests that more people will buy the magazine and open the pages to get the posters out and read through the articles before the posters appear. The mast head of my magazine is going to be in this type of font style called Shut'em down from www.dafont.com I am going to make the masthead white in this font style so it contrasts with the black from the background as it conveys how heavy rock is and that extreme rock will start to cause havoc in the likes of mosh pits and violence. The barcode is on the right hand side which conveys the fact that it is on the opening page of the magazine and will force you to take the magazine out to see the barcode which makes you see the front cover and images displayed. By having puff promotions expressed on the front cover, conveys the fact that you have the opportunity to win prizes in the form of Win!... Within the magazine which causes the reader to read through it to get to the competition page. By having this suggests that more people will buy the magazine to get the chance to win prizes and read through and take in the articles before the competition pages appear. For the strapline I have chosen “Obey The Past, Present and Future of Rock!, I have followed a similar strapline to another magazine of my sub-genre in the likes of NME. My strapline conveys the fact that rock will never get old and in its generation it will have big all time hits. However conveys what artists and bands are in the magazine due to the strapline saying “Past, Present and Future..” so therefore suggests that rock bands and artists are contained within the magazine from the past, now in the present and future stars and bands. The cover lines I have situated on the right hand side of the page so they are away from the main headline and stand out from the rest of the page as they are in bright colours and bold fonts. Photoshop completed version of magazine
  • 6. The main headline for my article/interview I have chosen is “The Resurrection of Rock”, the “The and Of” are in the Vivaldi font and the “Resurrection” in the broken Detroit font from www.DaFont.com The main headline is in a bold, slim font style with contrasting colours (White headline on black background) which expresses the emotions and themes to what's imbedded within the article/interview. The standfirst for my double-page spread (DPS) is going to be “For the past two years, Black Veil Brides have resided in the dystopian world of the wild ones. Now, though, they’re ready to rewrite rock’s rule book. And all Andy Biersack needed to do was question everything…”. The font will be white with sky blue highlighted key words to contrast and create a visual appeal to the reader forcing them to read the standfirst and the interview. The highlighted words convey who the band artist is being interviewed and the band which he is in. The interview, I have decided to place in the bottom half of the left page of the double page spread in a small slim, white font to contrast to the black background, this is because it splits up the pages nicely so all the written language is on one side of the page and the non-verbal codes such as the image on the other however I have an abbreviated quote being placed on the right page as a little verbal code to convey the importance of the interview to the artist and also gives the reader time to reflect on the interview by looking at the image and makes the reader want to read on. For the main image I am going to take a picture of the artist with one hand leaning casually on the side of a wall/fence. This will convey the rural setting of the surround area and the type of mood the interview will convey throughout, so by having the artist wear black clothes in a quiet surrounding conveys isolation and that the band sticks out from the others to cause competition. The page number I have decided to choose for the DPS is pages 18-19 because that’s where the main article/interview is based in an issue of Kerrang! Therefore by choosing to ‘repeat’ (Steve Neale-1980) it from that issue conveys importance of the main article/interview and what content should be based before as a build up to the main article/interview. However I have also chosen to ‘repeat’ (Steve Neale-1980) the brand identity masthead name by the page number to convey realism and gets the reader to be able to search up the name of the magazine on social media. After the interview I have put social media links to contact the artist or follow him on, however I have added a link too so that you can go online and read the full interview online.
  • 7. Photo manipulation • To get this image you need to go through a variety of stages. The first stage is to upload the image onto a new Photoshop document where you can then edit the image to make it appropriate for the target audience and make sure it looks realistic and professional. • Firstly you need to use the Quick selection tool (W) to outline the image where you will see a black and white dotted line around the image where you can then use the eraser tool (E) to rub out the background so as you can see the image has no background, its just the artist holding the microphone. I had got rid of the background because the image looks much more professional and appropriate for the target audience therefore because the image is neat the magazine will be more likely to be purchased by my intended target audience.
  • 8. • Once you have erased the background of the image you can add a shadow on the image like I have done for my front cover. To do this you have to double click on the image layer and a menu comes up as shown below were you can click on outer glow and drag the sliders to where you want the glow and how big you want it as well as changing its colour. I decided to add an outer glow on the image to make the image stand out on the front cover therefore look more appropriate for a rock magazine . By adding a white outer glow on the image allows the image to stand out and contrast as the background is black so the image appeals more on the front cover to the intended target audience.
  • 9. Inspiration of Photo manipulation • The inspiration which I got for the photos I chose to put on my front cover and DPS came from other magazines which were the Kerrang! Magazines. This was my inspiration because as I am making a magazine which is relatively similar to Kerrang! I need to make sure that I ‘repeat’ (Steve Neale 1980) the majority of the codes and conventions used so that Revolution! Can be successful as well as be in top competition with its competitors Kerrang! And NME. • An example of inspiration from the Kerrang!” magazine would be the Black veil brides on the front cover. I have chosen to ‘repeat’ (Steve Neale 1980) the idea of the main image covering the masthead, the main headline colours for the house style with a cross of a different colour from another Kerrang! Magazine which was red. However I have taken the idea of the front cover of the artist screaming but for Revolution! The artist will be screaming side on into a microphone to introduce the sub-genre of rock as well as convey to the target audience that the magazine will be worth the read. • The DPS for example I have chosen to ‘repeat’ (Steve Neale 1980) the idea of the artist leaning on something with his right arm. For my version of Revolution I have put the artist in the same position but this time instead of leaning on a wall as he will be leaning on the logo of the Black Veil Brides for brand identity and makes the interview more expressive and worth the read.
  • 10. Proof reading the interview A mistake which I had made in the interview was the “And”. This was a mistake because you don’t start the sentence with “And” so therefore I needed to take the “And” out and start the sentence with “All”, so it makes sense and looks professional and appropriate rather than unprofessional.
  • 11. At the beginning of the interview just after the stand first I had been proof reading the interview and a mistake which I had spotted was the name “andy biersack”. This is a mistake because it is a name therefore the letters at the start of the name needs to be in capitals to make the article look professional and look like a lot of checking has gone into it as well as making the interview worth the read. I had corrected this mistake and made the name “Andy Biersack” so it looks more appropriate and professional for the reader to read.
  • 12. Step-by-step Firstly I had to choose my background colour which is black with a faded gradient out to the bottom right corner as this is what I chose to ‘repeat’ (Steve Neale - 1980) from my magazine of inspiration Kerrang! I did this back ground by using the paint bucket tool. Secondly I had to draw out the grid lines to where the masthead is going to go, then I had to go on www.dafont.com and choose my masthead font which was Shut’em Down. I made the title white with a red drop shadow and applied an inner and outer glow. 1. 2.
  • 13. Next I had to draw out the grid lines to where the main image is going to go, then I had to go out and take photos to place on the front cover. I made the person in the image scream into a microphone to convey the real meaning of rock. I had to use the quick selection tool to get rid of the background and add an outer glow to bring out the image from the background. Then I had to draw out the grid lines to where the strapline is going to go, then I had to go and find a bold font style to make the standfirst stand out I chose the Myriad Pro font. I made the standfirst by using the text tool and made the standfirst red with a yellow drop shadow. Then I had to draw out the grid lines to where the barcode is going to go, then I had to place the Bauer media logo, Facebook and twitter logo and the Instagram logo onto the barcode along with a copy of the masthead for brand identity and originality. 3. 4. 5.
  • 14. Then I had to draw out the grid lines to where the puff promotion is going to go, then I had to draw out the circle with the ellipse tool and change the colour with the paint bucket tool, I then added a red outer glow by using the eye dropper tool to get the colour out of the masthead and repeat that for the drop shadow/stroke. I used the text tool to create the text and changed the colour of the win to yellow with a red stroke too to contrast the background with the puff promotion. Then I had to draw out the grid lines to where the main headline and quote from the interview is going to go. I used the text tool and the Rosewood Std font for the Black Veil Brides headline and the Myriad Pro font for the quote. I changed the colour of the Black Veil Brides to red with a yellow drop shadow and made the quote white to contrast the main image from the main headline and quote. 6. 7.
  • 15. Finally I had to draw out the grid lines to where the puff promotion is going to go, then I had to draw out the rectangle with the rectangle tool and change the colour with the paint bucket tool to red, I then added text using the text tool in the SoulMission font from www.dafont.com and changed the colour to yellow to contrast the red with the yellow. 8.
  • 16. Step-by-step (DPS) Firstly I had to choose my background colour which is black with a faded gradient out to the bottom right corner as this is what I chose to ‘repeat’ (Steve Neale - 1980) from my magazine of inspiration Kerrang! I did this back ground by using the paint bucket tool and the gradient tool. Next I had to draw out the grid lines to where the main image is going to go, then I had to go out and take photos to place on the DPS. I made the person in the image lean on the wall with 1 arm which I have chosen to ‘repeat’ (Steve Neale - 1980) from the Kerrang! DPS. 1. 2.
  • 17. Then I had to draw out the grid lines to where the main headline is going to go. I used the text tool and the Broken Detroit font from www.dafont.com for the “revolution” and headline and the Vivaldi font for the “the”, “of” and “rock”. I changed the colour of the main headline white to contrast the headline from the background. For the brand identity I had to mark out with the grid lines to were the brand identity and page numbers will go. For the brand identity I copied the mast head from my front cover and placed it next to the page number just like my magazine of inspiration. The page numbers I chose to ‘repeat’ (Steve Neale-1980) from an issue of Kerrang! Were their main article/interview is on the pages of 18 and 19 and will best suit my magazine DPS also. 3. 4.
  • 18. For the standfirst I chose to ‘repeat’ (Steve Neale- 1980) a similar format and colour scheme to that of Kerrang! This is because it reflects emotions and contrasts to the background so makes it stand out. The font style which I have used is the Calibri font in white writing however I chose to use the eye dropper tool and get the same blue as that in the standfirst of Kerrang! So that I can highlight the band name and the artist to get them to stand out. For the main interview I chose to use ‘differences’ (Steve Neale-1980) so that the interview will be in depth and over both pages of the DPS. This is because it reflects emotions to the reader and allows the reader to look at the image and the content on the page whilst reading the interview. The text I have made white so stands out from the background and made the questions that of the same colour as the highlighted words in the standfirst to contrast to the background and the answers to differentiate what the questions are and what the answers are. However I have chosen to ‘repeat’ (Steve Neale-1980) a quote idea from Kerrang! And have the quote in white and the name of the artist in the blue. 5. 6.
  • 19. Shortcuts in Photoshop Move tool - V Rectangular marquee tool - M Lasso tool - L Quick selection tool - W Crop tool - C Eye dropper tool - I Spot healing brush tool - J Brush tool - B Clone Stamp tool - S History brush tool - Y Eraser - E Gradient tool - G Blur tool - Doesn’t have a shortcut Dodge tool - O Pen tool - P Text tool - T Path selection tool - A Rectangle tool - U Object rotate tool - K Camera rotate tool - N Hand tool - H Zoom tool - Z Default foreground and background colours - D Rulers - (CTRL+R)
  • 20. Where I used the shortcuts • Ruler tool – I used the ruler tool (CRTL+R) to enable me to drag loads of lines onto the canvas to allow and show were each of my conventions were going to go on my front cover and DPS. This is done so that I can have all the conventions inline with each other so it looks professional and also allows space for perhaps another code/convention. I had used the ruler for all parts of my magazine especially for the main image, main headline, masthead, barcode and the puff promotion. By having the rulers on the canvas allowed me to split up each of these convention s and allow each of them to align with each other to look fit for purpose and professional. • Pen tool – I used the pen tool (P) to go around an image for example on my DPS I used the pen tool going around the arm of the artists so the text doesn’t come in contact with the image which will make it look unprofessional. However the pen tool was beneficial because it can allow you to draw around certain images, conventions on the page to avoid the text clashing with any of them. • Eye dropper tool – The eye dropper tool (I) was used significantly for my magazine front cover and DPS, this was because I had to get the same colour from my masthead for example and manipulate that colour onto the brand identity on the bottom of the DPS by the page numbers to make the magazine look original and professional. • Eraser tool – The eraser tool (E) was used on mainly the images because after I used the quick selection tool some of the background from the image was still there so by using the eraser tool allowed me to go around the images and remove any unwanted parts of the image, mainly the background so the image stands out on the page and looks realistic and fit for purpose. • Quick selection tool – The quick selection tool (W) came in handy for manipulating the images for my front cover and DPS because it enabled me to outline the images based on these pages and got rid of the background rather than using the eraser tool and rubbing it all out. It works as a shortcut to getting a main part of an image therefore helped me getting the artist out of the image without the background so it looks professional and realistic.
  • 21. • Move tool – The move tool (V) was used throughout both of my pages this was because it allowed me to click on any part of the front cover and DPS and move it to wherever I wanted/needed it which gave me ideas to test what looks best were and moved it all around. The move tool however is a very handy tool on Photoshop because you can drag any convention you want anywhere and see where it looks best if it didn’t look right CRTL+Z undoes the mistake and move it again. • Text tool – The text tool (T) was used on both of the pages for the text. This tool works by allowing you to draw a text box were the text wants to go and then you can change what font style you want and the size of it. This tool was used for the masthead, main headline and all text on the conventions also on the page. • Gradient tool – The gradient tool (G) however was a useful tool to use in the production of my magazine pages because as my magazine had to have a black to grey background the gradient tool came in handy by allowing the black to go to grey and contrast to what I was going to have on the pages such as the images, text, puff promotions etc.
  • 22. Conclusion • What went well? • Through this learning outcome I have learnt how to test photography is beneficial when producing a print based media product and able to set up simple equipment for the photos which need to be taken for my magazine pages. • Another part that went well was that I was able to create a simple but effective step by step of how I went from a blank canvas in Photoshop to the completed version of the front cover and DPS. As well as improving my skills on Photoshop by the use of the shortcuts and learning and trying new tools to complete my pages. • Even better if? • This learning objective can be improved by trying to add more detail were possible therefore will make the other learning outcomes much easier to complete. • Finally the last improvement which I could have done was to keep asking Mr Crafts to check my work and make sure it has been completed to a distinction standard so that I can move on to the next learning outcome.