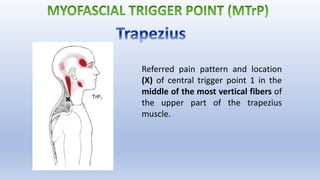
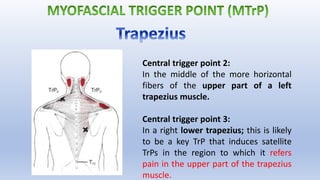
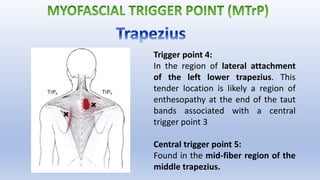
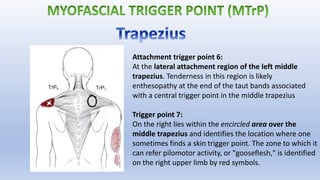
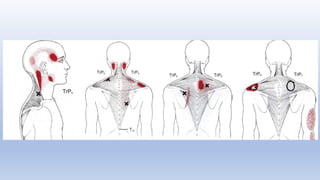
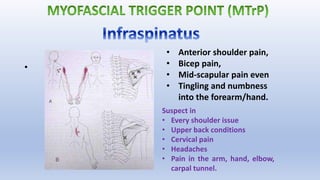
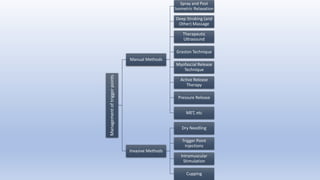
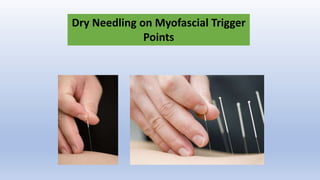
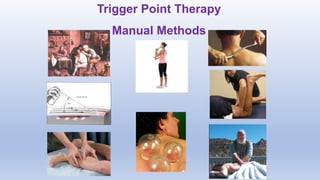
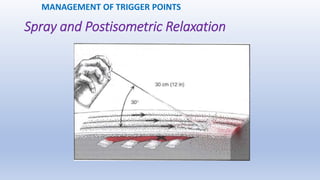
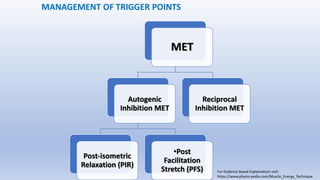
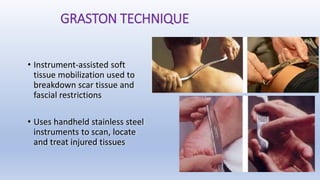
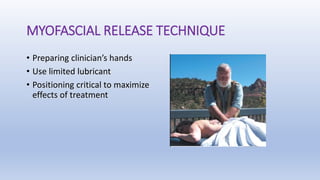
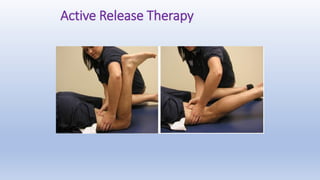
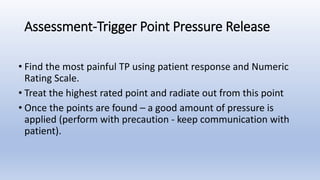
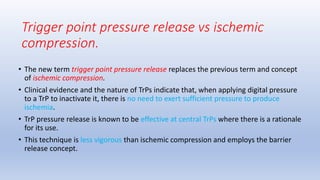
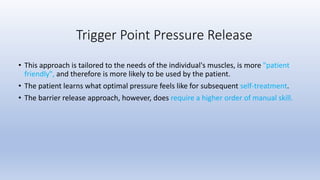
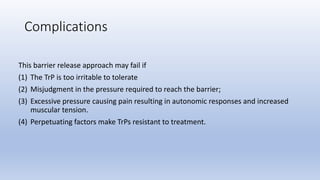
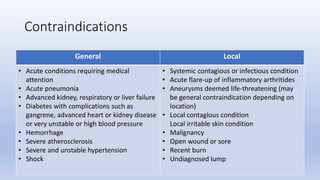
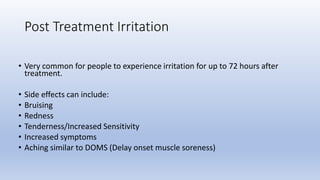
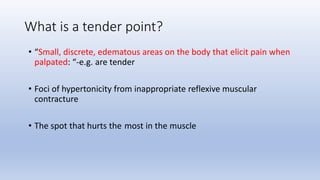
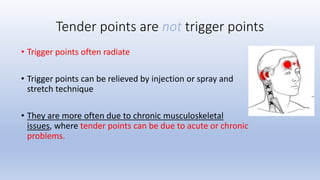
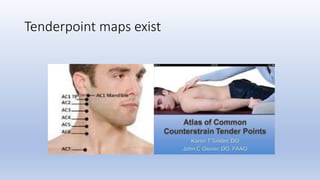
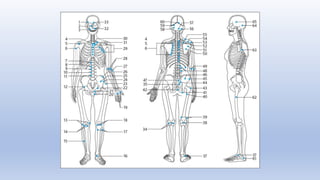
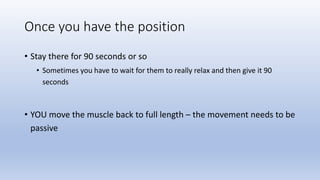
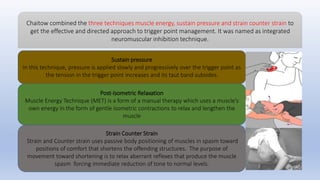
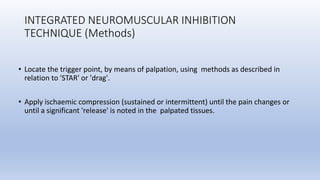
This document discusses trigger points and their management. It identifies 7 central trigger points located in different areas of the trapezius muscle that can refer pain to other areas. It then lists various manual and invasive techniques for managing trigger points, including dry needling, trigger point injections, massage, pressure release and myofascial release. Guidelines are provided for techniques like trigger point pressure release. Precautions, contraindications and potential side effects of trigger point treatment are also outlined.
4. Referred pain pattern and location
(X) of central trigger point 1 in the
middle of the most vertical fibers of
the upper part of the trapezius
muscle.
5. Central trigger point 2:
In the middle of the more horizontal
fibers of the upper part of a left
trapezius muscle.
Central trigger point 3:
In a right lower trapezius; this is likely
to be a key TrP that induces satellite
TrPs in the region to which it refers
pain in the upper part of the trapezius
muscle.
6. Trigger point 4:
In the region of lateral attachment
of the left lower trapezius. This
tender location is likely a region of
enthesopathy at the end of the taut
bands associated with a central
trigger point 3
Central trigger point 5:
Found in the mid-fiber region of the
middle trapezius.
7. Attachment trigger point 6:
At the lateral attachment region of the left middle
trapezius. Tenderness in this region is likely
enthesopathy at the end of the taut bands associated
with a central trigger point in the middle trapezius
Trigger point 7:
On the right lies within the encircled area over the
middle trapezius and identifies the location where one
sometimes finds a skin trigger point. The zone to which it
can refer pilomotor activity, or "gooseflesh," is identified
on the right upper limb by red symbols.
8.
9.
10. •
• Anterior shoulder pain,
• Bicep pain,
• Mid-scapular pain even
• Tingling and numbness
into the forearm/hand.
Suspect in
• Every shoulder issue
• Upper back conditions
• Cervical pain
• Headaches
• Pain in the arm, hand, elbow,
carpal tunnel.
11. Management
of
trigger
points
Manual Methods
Spray and Post
Isometric Relaxation
Deep Stroking (and
Other) Massage
Therapeutic
Ultrasound
Graston Technique
Myofascial Release
Technique
Active Release
Therapy
Pressure Release
MET, etc
Invasive Methods
Dry Needling
Trigger Point
Injections
Intramuscular
Stimulation
Cupping
13. TRIGGER POINT INJECTIONS
Common medications used in trigger point injections can
include local anesthetic, normal saline, and small doses of
steroid medications.
MANAGEMENT OF TRIGGER POINTS
16. Trigger Point Pressure Release
• Previous term and concept of ischemic compression
• Lengthens the muscle to the point of increasing resistance within the
comfort zone and then applies gentle, gradually increasing pressure
on the TrP until the finger encounters a definite increase in tissue
resistance (engages the barrier).
MANAGEMENT OF TRIGGER POINTS
17. Spray and Postisometric Relaxation
• In 1952, Hans Kraus described how he
discovered that spraying ethyl chloride on
the skin relieves musculoskeletal pain.
• Spray and stretch is the single most effective
noninvasive method to inactivate acute TrPs.
MANAGEMENT OF TRIGGER POINTS
19. MANAGEMENT OF TRIGGER POINTS
MET
Autogenic
Inhibition MET
Post-isometric
Relaxation (PIR)
•Post
Facilitation
Stretch (PFS)
Reciprocal
Inhibition MET
For Evidence Based Explainatioin visit:
https://www.physio-pedia.com/Muscle_Energy_Technique
20. Deep Stroking (and Other) Massage
• The technique of deep-stroking massage (which is also called
stripping massage)
MANAGEMENT OF TRIGGER POINTS
• The thumbs or a finger of both hands are
placed so they trap a taut band between
them just beyond the band's TrP. As the
digits encounter the nodularity of the TrP
that is caused by its contraction knots,
pressure is exerted to engage the restrictive
barrier. The digits progress no faster than
tissue release occurs as the nodularity
"gives" to some extent.
21. MANAGEMENT OF TRIGGER POINTS
• High Voltage Galvanic Stimulations
• Iontophoresis and Phonophorasis
• Therapeutic Ultrasound
• Transcutaneous Electrical Nerve Stimulation.
22. CUPPING
• Best if weekly for 6 -8 weeks
• Should see improvements in first 4 treatments
• Warning, will leave bruises
23. GRASTON TECHNIQUE
• Instrument-assisted soft
tissue mobilization used to
breakdown scar tissue and
fascial restrictions
• Uses handheld stainless steel
instruments to scan, locate
and treat injured tissues
24. MYOFASCIAL RELEASE TECHNIQUE
• Preparing clinician’s hands
• Use limited lubricant
• Positioning critical to maximize
effects of treatment
29. • Find the most painful TP using patient response and Numeric
Rating Scale.
• Treat the highest rated point and radiate out from this point
• Once the points are found – a good amount of pressure is
applied (perform with precaution - keep communication with
patient).
Assessment-Trigger Point Pressure Release
30. • To apply TrP pressure release, the clinician lengthens the muscle to the point of
increasing resistance within the comfort zone and then applies gentle, gradually
increasing pressure on the TrP until the finger encounters a definite increase in tissue
resistance (engages the barrier).
• At that point the patient may feel a degree of discomfort but should not experience
pain.
• This pressure is maintained (but not increased) for around 30 seconds or until the
patient’s pain has decreased to at least 3/10 NRS score or until the clinician senses
relief of tension under the palpating finger.
• The applied pressure help to break-up the adhesive fibre connections within the
trigger points and push out blood containing waste products and toxins.
Guidelines-Trigger Point Pressure Release
31. • After 30 seconds, the pressure is released allowing a rush of fresh blood containing
nutrients to circulate the trigger point.
• The palpating finger increases pressure enough to take up the tissue slack and to
encounter (engage) a new barrier (the finger "follows“ the releasing tissue).
• Clinician again maintains only light pressure until more of the muscle tension releases
("lets go") under the finger-pain should be pain eased off quicker . During this period
the clinician may change the direction of pressure to achieve better results.
• This process of TrP pressure release can be repeated for each band of taut muscle
fibers in that muscle.
Guidelines-Trigger Point Pressure Release
32. • The virtue of this technique is that it is painless and imposes no additional strain on any
attachment TrPs, and thereby avoids aggravating them.
• Re-apply pressure onto the same point until the or it isn’t felt anymore (roughly 3 times)
• Thumbs/elbows or tools can be used.
• This can vary on the severity of pain/ how deep or superficial the TP is – subjective and
variable to each patient.
• The effectiveness of this approach can often be enhanced by including supplemental
techniques.
Guidelines-Trigger Point Pressure Release
33. • Release of the TrP may be further enhanced by occasionally performing a contract-
relax maneuver alternated with reciprocal inhibition.
• The goal is to release the contraction knots in the TrP and release the tension they
cause in the muscle fibers comprising the taut band.
• These additional techniques should not cause pain either.
• In addition to simply taking up the slack in the muscle before beginning the
procedure, the entire muscle can be maintained at a slack free length throughout the
process.
Guidelines-Trigger Point Pressure Release
34. • The new term trigger point pressure release replaces the previous term and concept
of ischemic compression.
• Clinical evidence and the nature of TrPs indicate that, when applying digital pressure
to a TrP to inactivate it, there is no need to exert sufficient pressure to produce
ischemia.
• TrP pressure release is known to be effective at central TrPs where there is a rationale
for its use.
• This technique is less vigorous than ischemic compression and employs the barrier
release concept.
Trigger point pressure release vs ischemic
compression.
35. • This approach is tailored to the needs of the individual's muscles, is more "patient
friendly", and therefore is more likely to be used by the patient.
• The patient learns what optimal pressure feels like for subsequent self-treatment.
• The barrier release approach, however, does require a higher order of manual skill.
Trigger Point Pressure Release
36. This barrier release approach may fail if
(1) The TrP is too irritable to tolerate
(2) Misjudgment in the pressure required to reach the barrier;
(3) Excessive pressure causing pain resulting in autonomic responses and increased
muscular tension.
(4) Perpetuating factors make TrPs resistant to treatment.
Complications
38. General Local
• Acute conditions requiring medical
attention
• Acute pneumonia
• Advanced kidney, respiratory or liver failure
• Diabetes with complications such as
gangrene, advanced heart or kidney disease
or very unstable or high blood pressure
• Hemorrhage
• Severe atherosclerosis
• Severe and unstable hypertension
• Shock
• Systemic contagious or infectious condition
• Acute flare-up of inflammatory arthritides
• Aneurysms deemed life-threatening (may
be general contraindication depending on
location)
• Local contagious condition
Local irritable skin condition
• Malignancy
• Open wound or sore
• Recent burn
• Undiagnosed lump
Contraindications
39. • Very common for people to experience irritation for up to 72 hours after
treatment.
• Side effects can include:
• Bruising
• Redness
• Tenderness/Increased Sensitivity
• Increased symptoms
• Aching similar to DOMS (Delay onset muscle soreness)
Post Treatment Irritation
40. Causes
• The release of toxins/waste products from muscular tissue
• Neurological sensitization
• Increased blood flow and micro trauma can lead to bruising and redness
Advice
• Reassure the patient it's a normal response to be sore after soft tissue
treatment
• Recommend they drink water to keep hydrated.
Post Treatment Irritation
43. What is a tender point?
• “Small, discrete, edematous areas on the body that elicit pain when
palpated: “-e.g. are tender
• Foci of hypertonicity from inappropriate reflexive muscular
contracture
• The spot that hurts the most in the muscle
44. Tender points are not trigger points
• Trigger points often radiate
• Trigger points can be relieved by injection or spray and
stretch technique
• They are more often due to chronic musculoskeletal
issues, where tender points can be due to acute or chronic
problems.
45. Where are tender points?
• Sometimes patients can show you, but the area of pain is not always
the tender point
48. But you can find them
• Feel for spot that may be a little tense or edematous
• Get feedback from the patient
49. So what is this technique?
• Developed by Dr. Lawrence Jones.
• His definition describes “a passive positional procedure that places
the body in a position of greatest comfort, thereby relieving pain by
the reduction of the inappropriate proprioceptor activity that is
maintaining somatic dysfunction”.
50. Procedure
• Call your starting point “10”.
• Keep your finger on the point but don’t press except when
getting feedback on pain level
• Move the muscle to a position of comfort where the pressure on
the point is only at a level of 2 or 3.
51. Once you have the position
• Stay there for 90 seconds or so
• Sometimes you have to wait for them to really relax and then give it 90
seconds
• YOU move the muscle back to full length – the movement needs to be
passive
55. Sustain pressure
In this technique, pressure is applied slowly and progressively over the trigger point as
the tension in the trigger point increases and its taut band subsides.
Post-Isometric Relaxation
Muscle Energy Technique (MET) is a form of a manual therapy which uses a muscle’s
own energy in the form of gentle isometric contractions to relax and lengthen the
muscle
Strain Counter Strain
Strain and Counter strain uses passive body positioning of muscles in spasm toward
positions of comfort that shortens the offending structures. The purpose of
movement toward shortening is to relax aberrant reflexes that produce the muscle
spasm forcing immediate reduction of tone to normal levels.
Chaitow combined the three techniques muscle energy, sustain pressure and strain counter strain to
get the effective and directed approach to trigger point management. It was named as integrated
neuromuscular inhibition technique.
56. INTEGRATED NEUROMUSCULAR INHIBITION
TECHNIQUE (Methods)
• Locate the trigger point, by means of palpation, using methods as described in
relation to 'STAR' or 'drag'.
• Apply ischaemic compression (sustained or intermittent) until the pain changes or
until a significant 'release' is noted in the palpated tissues.
57. INTEGRATED NEUROMUSCULAR INHIBITION
TECHNIQUE (Methods)
• Positionally release trigger point tissues. Pressure is applied and the patient is asked to
ascribe this a value of '10', and then tissues are repositioned (fine-tuned) until the
patient reports a score of '2' or less.
• With the tissues held in this 'folded' ease position a local focused isometric contraction
of these tissues is created.
58. INTEGRATED NEUROMUSCULAR INHIBITION
TECHNIQUE (Methods)
• This is followed by a local stretch of the tissues housing the trigger point, in the
direction of the muscle fibres.
• The whole muscle is then contracted isometrically as in all MET procedures
• This is followed by a stretch of the whole muscle, as in all MET procedures for muscles.
59. INTEGRATED NEUROMUSCULAR INHIBITION
TECHNIQUE (Methods)
• Facilitation of the antagonists may then be considered, as a means of having the
patient perform home exercises to encourage inhibition of the muscle housing the
trigger point.
Editor's Notes
Central trigger point: is characteristically a very tender, circumscribed nodule-like spot in the mid-portion of a palpable taut band of skeletal muscle fibers, and it usually refers pain when compressed. This trigger point may be active or latent and can induce attachment trigger points.
Attachment Trigger Points. Arise in tendo-osseous junctions which become very tender. If not treated, degenerative processes of an adjacent joint can spring up.