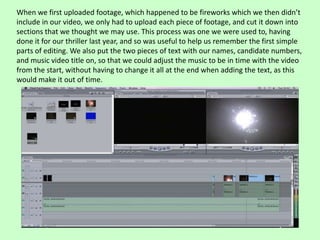
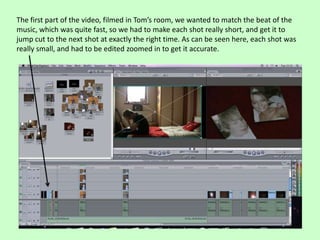
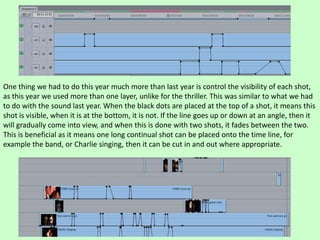
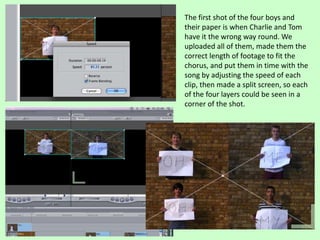
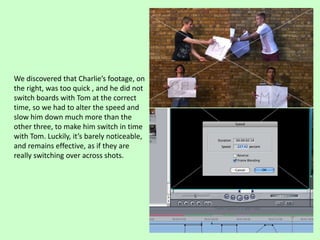
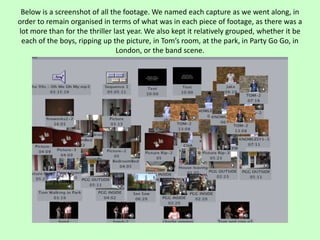
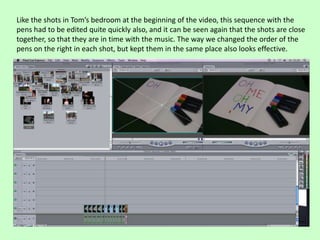
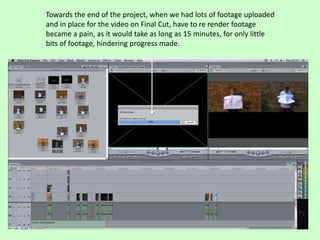
The document describes the editing process for a music video. It discusses how footage was uploaded and cut into sections, text was added to sync the video with the music, and jump cuts were used to match fast beats. Layer visibility was controlled to fade between shots. Footage was sped up or slowed down and split into corners to sync multiple shots. Regular re-rendering of added footage slowed progress toward the end.
2. When we first uploaded footage, which happened to be fireworks which we then didn’t
include in our video, we only had to upload each piece of footage, and cut it down into
sections that we thought we may use. This process was one we were used to, having
done it for our thriller last year, and so was useful to help us remember the first simple
parts of editing. We also put the two pieces of text with our names, candidate numbers,
and music video title on, so that we could adjust the music to be in time with the video
from the start, without having to change it all at the end when adding the text, as this
would make it out of time.
3. The first part of the video, filmed in Tom’s room, we wanted to match the beat of the
music, which was quite fast, so we had to make each shot really short, and get it to
jump cut to the next shot at exactly the right time. As can be seen here, each shot was
really small, and had to be edited zoomed in to get it accurate.
4. These 3 consecutive shots
have jump cuts between
them, the first of which
occurs on the lyrics “looking
outside” which is
appropriate. It’s followed by
a panning shot, and sets the
scene for the story.
5. One thing we had to do this year much more than last year is control the visibility of each shot,
as this year we used more than one layer, unlike for the thriller. This was similar to what we had
to do with the sound last year. When the black dots are placed at the top of a shot, it means this
shot is visible, when it is at the bottom, it is not. If the line goes up or down at an angle, then it
will gradually come into view, and when this is done with two shots, it fades between the two.
This is beneficial as it means one long continual shot can be placed onto the time line, for
example the band, or Charlie singing, then it can be cut in and out where appropriate.
6. The first shot of the four boys and
their paper is when Charlie and Tom
have it the wrong way round. We
uploaded all of them, made them the
correct length of footage to fit the
chorus, and put them in time with the
song by adjusting the speed of each
clip, then made a split screen, so each
of the four layers could be seen in a
corner of the shot.
7. We discovered that Charlie’s footage, on
the right, was too quick , and he did not
switch boards with Tom at the correct
time, so we had to alter the speed and
slow him down much more than the
other three, to make him switch in time
with Tom. Luckily, it’s barely noticeable,
and remains effective, as if they are
really switching over across shots.
8. Below is a screenshot of all the footage. We named each capture as we went along, in
order to remain organised in terms of what was in each piece of footage, as there was a
lot more than for the thriller last year. We also kept it relatively grouped, whether it be
each of the boys, ripping up the picture, in Tom’s room, at the park, in Party Go Go, in
London, or the band scene.
9. Like the shots in Tom’s bedroom at the beginning of the video, this sequence with the
pens had to be edited quite quickly also, and it can be seen again that the shots are close
together, so that they are in time with the music. The way we changed the order of the
pens on the right in each shot, but kept them in the same place also looks effective.
10. Towards the end of the project, when we had lots of footage uploaded
and in place for the video on Final Cut, have to re render footage
became a pain, as it would take as long as 15 minutes, for only little
bits of footage, hindering progress made.