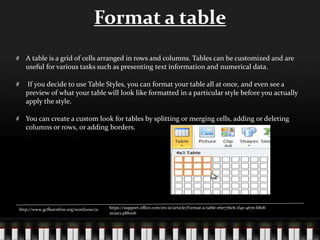
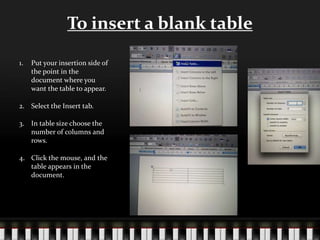
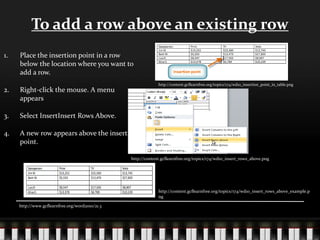
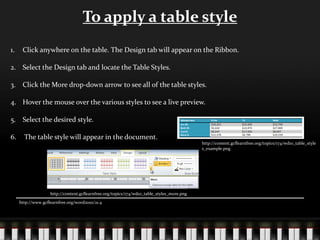
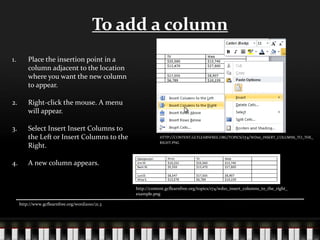
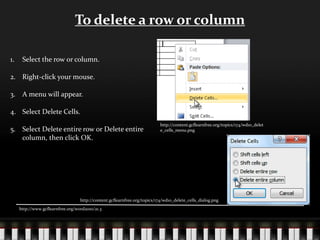
Table formatting
Format a table
A table is a grid of cells arranged in rows and columns. Tables can be customized and are
useful for various tasks such as presenting text information and numerical data.
If you decide to use Table Styles, you can format your table all at once, and even see a
preview of what your table will look like formatted in a particular style before you actually
apply the style.
You can create a custom look for tables by splitting or merging cells, adding or deleting
columns or rows, or adding borders.
http://www.gcflearnfree.org/word2010/21 https://support.office.com/en-ie/article/Format-a-table-e6e77bc6-1f4e-467e-b818-
2e2acc488006
To insert a blank table
1. Put your insertion side of
the point in the
document where you
want the table to appear.
2. Select the Insert tab.
3. In table size choose the
number of columns and
rows.
4. Click the mouse, and the
table appears in the
document.
To add a row above an existing row
1. Place the insertion point in a row
below the location where you want to
add a row.
2. Right-click the mouse. A menu
appears
3. Select InsertInsert Rows Above.
4. A new row appears above the insertion
point.
http://www.gcflearnfree.org/word2010/21.3
http://content.gcflearnfree.org/topics/174/wd10_insertion_point_in_table.png
http://content.gcflearnfree.org/topics/174/wd10_insert_rows_above.png
http://content.gcflearnfree.org/topics/174/wd10_insert_rows_above_example.p
ng
To apply a table style
1. Click anywhere on the table. The Design tab will appear on the Ribbon.
2. Select the Design tab and locate the Table Styles.
3. Click the More drop-down arrow to see all of the table styles.
4. Hover the mouse over the various styles to see a live preview.
5. Select the desired style.
6. The table style will appear in the document.
http://www.gcflearnfree.org/word2010/21.4
http://content.gcflearnfree.org/topics/174/wd10_table_styles_more.png
http://content.gcflearnfree.org/topics/174/wd10_table_style
s_example.png
To add a column
1. Place the insertion point in a
column adjacent to the location
where you want the new column
to appear.
2. Right-click the mouse. A menu
will appear.
3. Select Insert Insert Columns to
the Left or Insert Columns to the
Right.
4. A new column appears.
http://www.gcflearnfree.org/word2010/21.3
HTTP://CONTENT.GCFLEARNFREE.ORG/TOPICS/174/WD10_INSERT_COLUMNS_TO_THE_
RIGHT.PNG
http://content.gcflearnfree.org/topics/174/wd10_insert_columns_to_the_right_
example.png
To delete a row or column
1. Select the row or column.
2. Right-click your mouse.
3. A menu will appear.
4. Select Delete Cells.
5. Select Delete entire row or Delete entire
column, then click OK.
http://www.gcflearnfree.org/word2010/21.3
http://content.gcflearnfree.org/topics/174/wd10_delet
e_cells_menu.png
http://content.gcflearnfree.org/topics/174/wd10_delete_cells_dialog.png
Bibliography
http://www.gcflearnfree.org/word2010/21
https://support.office.com/en-ie/article/Format-a-table-e6e77bc6-1f4e-467e-b818-2e2acc488006
http://content.gcflearnfree.org/topics/174/wd10_insertion_point_in_table.png
http://content.gcflearnfree.org/topics/174/wd10_insert_rows_above.png
http://content.gcflearnfree.org/topics/174/wd10_insert_rows_above_example.png
http://www.gcflearnfree.org/word2010/21.4
http://content.gcflearnfree.org/topics/174/wd10_table_styles_example.png
http://content.gcflearnfree.org/topics/174/wd10_table_styles_more.png
HTTP://CONTENT.GCFLEARNFREE.ORG/TOPICS/174/WD10_INSERT_COLUMNS_TO_THE_RIGHT.PNG
http://content.gcflearnfree.org/topics/174/wd10_insert_columns_to_the_right_example.png
http://content.gcflearnfree.org/topics/174/wd10_delete_cells_menu.png
http://content.gcflearnfree.org/topics/174/wd10_delete_cells_dialog.png

Table formatting