Dedicated tools for the design and manufacture of
progressive & stamping dies
: sheet metal solutions
01
Survival and competing in a global market may depend on a single
competitive advantage or highly skilled knowledge built over many years.
Vero provide both, combining unique and dedicated applications for die
design and manufacture with a knowledgeable development team striving
to keep Vero at the leading edge of technology.
From the administration office to the shop floor,
the VISI suite of software is unique in that
it covers all aspects of the sheet metal
stamping process - from model analysis
and quoting, part unfolding and blank
development through to 3D
die design, manufacture
and multi-axis laser
trimming.
: the complete process...
making progress
02
Based on the industry standard
Parasolid kernel, flexible solid and
surface technology tools combine with
intelligent geometry healing tools to
provide the ideal platform for managing
the most complex data. The extensive
range of data translators ensures that
engineers can work with data from
almost any supplier. Very large files
can be handled with ease and users
working with complex designs will
benefit from the simplicity with which
their customer’s CAD data can be
manipulated.
Working within an integrated system,
the jump from 2D to 3D die design is
often recognised as the step to help
reduce errors, streamline the design
process and ultimately increase your
competitiveness and profitability.
Deep drawing, linear and non-linear
unfolding and flange development are
all managed with a hybrid algorithm
based on a combination of analytic and
FEM solvers. This unique technology
combination allows the user to predict
the stamping conditions and define
every step of the development process.
In-depth process studies can be
performed on multiple different
scenarios returning valuable information
to the designer such as dynamic
nesting, material wastage, material
weight and the relevant shearing forces
required at each stage.
Part complexity, part size, number of
parts and pressing speed all influence
the type of tooling required. From ‘one-
step’ press tooling through to transfer,
progressive and multi-slide tools,
Vero provide intelligent solutions with
dedicated component libraries.
For ‘one-step’ tooling, the designer
can confidently predict the forming
impact on thickness distribution
returning valuable knowledge regarding
part formability. Accurate blank
development allows the designer to
quickly provide reliable quotes.
Multi-slide tooling is an extension of
VISI progress and has been developed
to aid the design and synchronisation
of cams used during the bending
process.
Automated tool design is achieved
through a simple question and answer
process. The user is prompted for all
the relevant settings and the software
generates the complete tool assembly
including the die plates, pillars &
bushes, springs, screws and pins.
Wire EDM, laser trimming and 2D
to 5-axis toolpath construction is
performed directly on the 3D model.
Automated feature recognition for
complex holes and pocketing features
on both solid and surface geometry
allows the user to tailor the machining
strategies to follow proven company
protocols.
: sheet metal solutions
03
: knowledge driven
automating the design process using applications based
on extensive research & experience
04
: sheet metal solutions
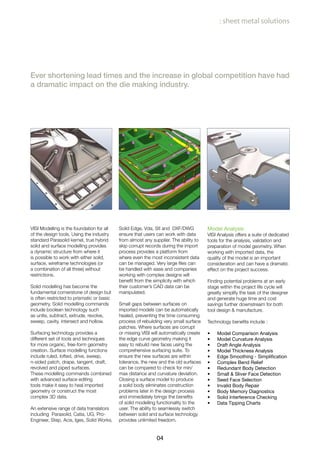
Ever shortening lead times and the increase in global competition have had
a dramatic impact on the die making industry.
VISI Modelling is the foundation for all
of the design tools. Using the industry
standard Parasolid kernel, true hybrid
solid and surface modelling provides
a dynamic structure from where it
is possible to work with either solid,
surface, wireframe technologies (or
a combination of all three) without
restrictions.
Solid modelling has become the
fundamental cornerstone of design but
is often restricted to prismatic or basic
geometry. Solid modelling commands
include boolean technology such
as unite, subtract, extrude, revolve,
sweep, cavity, intersect and hollow.
Surfacing technology provides a
different set of tools and techniques
for more organic, free-form geometry
creation. Surface modelling functions
include ruled, lofted, drive, sweep,
n-sided patch, drape, tangent, draft,
revolved and piped surfaces.
These modelling commands combined
with advanced surface editing
tools make it easy to heal imported
geometry or construct the most
complex 3D data.
An extensive range of data translators
including Parasolid, Catia, UG, Pro-
Engineer, Step, Acis, Iges, Solid Works,
Solid Edge, Vda, Stl and DXF/DWG
ensure that users can work with data
from almost any supplier. The ability to
skip corrupt records during the import
process provides a platform from
where even the most inconsistent data
can be managed. Very large files can
be handled with ease and companies
working with complex designs will
benefit from the simplicity with which
their customer’s CAD data can be
manipulated.
Small gaps between surfaces on
imported models can be automatically
healed, preventing the time consuming
process of rebuilding very small surface
patches. Where surfaces are corrupt
or missing VISI will automatically create
the edge curve geometry making it
easy to rebuild new faces using the
comprehensive surfacing suite. To
ensure the new surfaces are within
tolerance, the new and the old surfaces
can be compared to check for min/
max distance and curvature deviation.
Closing a surface model to produce
a solid body eliminates construction
problems later in the design process
and immediately brings the benefits
of solid modelling functionality to the
user. The ability to seamlessly switch
between solid and surface technology
provides unlimited freedom.
Model Analysis
VISI Analysis offers a suite of dedicated
tools for the analysis, validation and
preparation of model geometry. When
working with imported data, the
quality of the model is an important
consideration and can have a dramatic
effect on the project success.
Finding potential problems at an early
stage within the project life cycle will
greatly simplify the task of the designer
and generate huge time and cost
savings further downstream for both
tool design & manufacture.
Technology benefits include :
Model Comparison Analysis•	
Model Curvature Analysis•	
Draft Angle Analysis•	
Model Thickness Analysis•	
Edge Smoothing - Simplification•	
Complex Bend Relief•	
Redundant Body Detection•	
Small & Sliver Face Detection•	
Seed Face Selection•	
Invalid Body Repair•	
Body Memory Diagnostics•	
Solid Interference Checking•	
Data Tipping Charts•
05
: developing automation
formability analysis > process study > 3D tooling
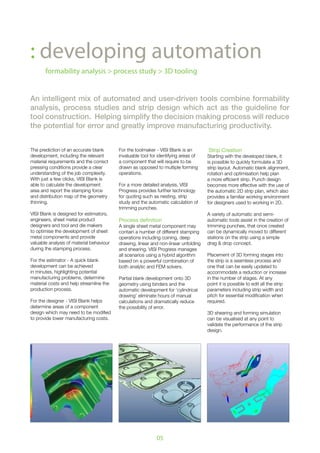
An intelligent mix of automated and user-driven tools combine formability
analysis, process studies and strip design which act as the guideline for
tool construction. Helping simplify the decision making process will reduce
the potential for error and greatly improve manufacturing productivity.
The prediction of an accurate blank
development, including the relevant
material requirements and the correct
pressing conditions provide a clear
understanding of the job complexity.
With just a few clicks, VISI Blank is
able to calculate the development
area and report the stamping force
and distribution map of the geometry
thinning.
VISI Blank is designed for estimators,
engineers, sheet metal product
designers and tool and die makers
to optimise the development of sheet
metal components and provide
valuable analysis of material behaviour
during the stamping process.
For the estimator - A quick blank
development can be achieved
in minutes, highlighting potential
manufacturing problems, determine
material costs and help streamline the
production process.
For the designer - VISI Blank helps
determine areas of a component
design which may need to be modified
to provide lower manufacturing costs.
For the toolmaker - VISI Blank is an
invaluable tool for identifying areas of
a component that will require to be
drawn as opposed to multiple forming
operations.
For a more detailed analysis, VISI
Progress provides further technology
for quoting such as nesting, strip
study and the automatic calculation of
trimming punches.
Process definition
A single sheet metal component may
contain a number of different stamping
operations including coining, deep
drawing, linear and non-linear unfolding
and shearing. VISI Progress manages
all scenarios using a hybrid algorithm
based on a powerful combination of
both analytic and FEM solvers.
Partial blank development onto 3D
geometry using binders and the
automatic development for ‘cylindrical
drawing’ eliminate hours of manual
calculations and dramatically reduce
the possibility of error.
Strip Creation
Starting with the developed blank, it
is possible to quickly formulate a 3D
strip layout. Automatic blank alignment,
rotation and optimisation help plan
a more efficient strip. Punch design
becomes more effective with the use of
the automatic 2D strip plan, which also
provides a familiar working environment
for designers used to working in 2D.
A variety of automatic and semi-
automatic tools assist in the creation of
trimming punches, that once created
can be dynamically moved to different
stations on the strip using a simple
drag & drop concept.
Placement of 3D forming stages into
the strip is a seamless process and
one that can be easily updated to
accommodate a reduction or increase
in the number of stages. At any
point it is possible to edit all the strip
parameters including strip width and
pitch for essential modification when
required.
3D shearing and forming simulation
can be visualised at any point to
validate the performance of the strip
design.
06
: sheet metal solutions
Multi-Slides
Progressive die tooling is a popular
process for producing sheet
metal parts although it is not the
only technology in this field. The
fundamental concept of ‘one tool
produces all’ is not always an
advantage and in some cases a
‘transfer tool’ process provides a better
solution. However, a combination of
these two technologies can provide the
‘best of both worlds’. Multi-Slides is an
example of this combination where the
progressive die tool remains in control
of the cutting and drawing operations,
whilst the bending cycle is performed
by special multi-slide tooling.
Starting from the unfolding steps,
every finger can be designed using a
series of quick 2D sketches. These
sketches are used to obtain the
number of movements, stroke value
and the orientation of each finger. This
information is then used as input data
to compile a computation table. On
completion of the computation table, a
kinematic simulation of the entire cycle
can be performed.
This enables the designer to check
the synchronisation level, possible
interferences among moving parts and
the optimisation level by checking the
value of the unused angular sector.
At any point during the design cycle,
it is possible to obtain the operation
diagram which is especially useful for
tool review or analysis. Geometrical
construction of each required cam is
an automatic process and the resulting
forms can be output as a 2D profile
or a 3D solid, each with their own
relevant annotation. The final cam form
is constructed from tangent arcs /
segments (no spline curves) and ready
for wire EDM or milling operations.
3D Tool Design
The tool assembly allows the designer
to quickly construct a solid based
layout of the required die set plates
along with the relevant pillar and bush
combinations. Each assembly can
be stored as a tooling template and
subsequently applied to another strip
layout, automatically adapting the tool
to the dimensions of the new strip
design.
VISI Progress supports standard
component libraries from all leading
suppliers including Misumi, Futaba,
AW Precision, Fibro, Strack, Danly,
Rabourdin, Mandelli, Sideco, Intercom,
Bordignon, Dadco, Dayton, Din, Kaller,
Lamina, Lempco, MDL, Pedrotti
Special Spring, Superior, Tipco, Uni,
Victoria and others.
Each component has a full list
of editable parameters enabling
essential adjustments to suit individual
tooling requirements and come with
manufacturing data attributes and a full
parts list itinerary.
Automatic punch extrusion ensures all
clearances are correctly designated
in each plate throughout the tool
assembly. Clearance parameters
related to each plate type can be
effectively managed by the use of
templates that can be applied to any
punch at any time. Parameter driven
construction of punch heels, support
stems and punch holders assist the
rapid design and manufacture of non
standard punch shapes.
A complete set of 2D detailed drawings
can be generated directly from the
solid tool assembly. This includes fully
editable 2D and isometric section
views, automatic plate dimensioning
and hole-type position tables.
Any change to the solid model will
result in a modification to the 2D
view along with any fully associative
dimensions.
Automatic milling and drilling cycles are
produced directly from the 3D model
using advanced feature recognition
from ‘Compass Technology’.
07
: design > manufacture
intelligent toolpath creation
VISI creates accurate and reliable toolpaths on the most complex geometry.
Intelligent toolpaths will reduce cycle times on your machine, improve
productivity and continuously produce high quality components.
08
: sheet metal solutions
: laser technology
multi-axis laser trimming
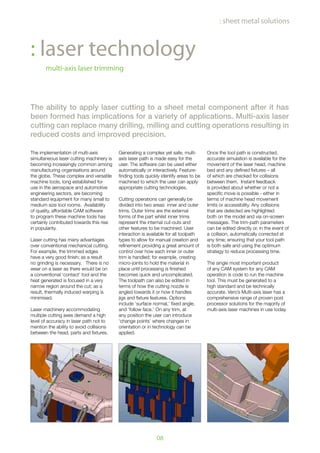
The ability to apply laser cutting to a sheet metal component after it has
been formed has implications for a variety of applications. Multi-axis laser
cutting can replace many drilling, milling and cutting operations resulting in
reduced costs and improved precision.
The implementation of multi-axis
simultaneous laser cutting machinery is
becoming increasingly common among
manufacturing organisations around
the globe. These complex and versatile
machine tools, long established for
use in the aerospace and automotive
engineering sectors, are becoming
standard equipment for many small to
medium size tool rooms. Availability
of quality, affordable CAM software
to program these machine tools has
certainly contributed towards this rise
in popularity.
Laser cutting has many advantages
over conventional mechanical cutting.
For example, the trimmed edges
have a very good finish; as a result
no grinding is necessary. There is no
wear on a laser as there would be on
a conventional ‘contact’ tool and the
heat generated is focused in a very
narrow region around the cut; as a
result, thermally induced warping is
minimised.
Laser machinery accommodating
multiple cutting axes demand a high
level of accuracy in laser path not to
mention the ability to avoid collisions
between the head, parts and fixtures.
Generating a complex yet safe, multi-
axis laser path is made easy for the
user. The software can be used either
automatically or interactively. Feature-
finding tools quickly identify areas to be
machined to which the user can apply
appropriate cutting technologies.
Cutting operations can generally be
divided into two areas: inner and outer
trims. Outer trims are the external
forms of the part whilst inner trims
represent the internal cut-outs and
other features to be machined. User
interaction is available for all toolpath
types to allow for manual creation and
refinement providing a great amount of
control over how each inner or outer
trim is handled; for example, creating
micro-joints to hold the material in
place until processing is finished
becomes quick and uncomplicated.
The toolpath can also be edited in
terms of how the cutting nozzle is
angled towards it or how it handles
jigs and fixture features. Options
include ‘surface normal,’ fixed angle,
and ‘follow face.’ On any trim, at
any position the user can introduce
‘change points’ where changes in
orientation or in technology can be
applied.
Once the tool path is constructed,
accurate simulation is available for the
movement of the laser head, machine
bed and any defined fixtures – all
of which are checked for collisions
between them. Instant feedback
is provided about whether or not a
specific move is possible - either in
terms of machine head movement
limits or accessibility. Any collisions
that are detected are highlighted
both on the model and via on-screen
messages. The trim-path parameters
can be edited directly or, in the event of
a collision, automatically corrected at
any time; ensuring that your tool path
is both safe and using the optimum
strategy to reduce processing time.
The single most important product
of any CAM system for any CAM
operation is code to run the machine
tool. This must be generated to a
high standard and be technically
accurate. Vero’s Multi-axis laser has a
comprehensive range of proven post
processor solutions for the majority of
multi-axis laser machines in use today.
09
: 2D, 3D & 5 Axis
toolpath generation directly from the 3D model
Vero have been providing world class
CAD/CAM solutions since 1988 and
VISI Machining offers all you need to
increase productivity, maximise cutting
capacity and reduce delivery times.
Remove any data conversion issues by
seamlessly transferring the geometrical
data from the tool design directly to the
cam environment.
Using VISI Machining it is possible to
machine directly from the 3D model
or from 2D construction data. A
combination of intelligent toolpath
automation, user-defined cycle
templates and powerful editing tools
ensure the operator is always in
control.
A highly graphical interface guides the
user through machining parameters,
cutting conditions and holders for
selected tooling providing a practical
and intuitive CAM solution.
Automatic feature recognition detects
complex holes and pocket features
directly from the solid model. Extraction
of diameters and depths from the
model makes it easy to enter drilling
parameters and eliminate the possibility
of MDI errors.
For every library component added to
the tool design, CAM feature data is
applied to the model ready for feature
recognition. If any inclined features are
detected, a new datum is created for
each setup and automatically filtered
against the physical machine limits.
If a non standard feature is found, it
is possible to force the system to use
a particular machining process or
existing cycle; providing an open and
configurable system for automatic plate
manufacture.
Cutter radius compensation capability
provides practical CNC code for use
on the shop floor. When the cutter
cannot machine tight internal radii,
the system will automatically create
residual stock geometry (defined by the
previous tool) and enable re-machining
with a smaller diameter tool.
The system will automatically avoid
user defined clamps and fixtures
during machining operations. Obstacle
management ensures collision
avoidance, and helps to reduce
the cycle time on the machine by
eliminating unnecessary Z retract
moves. Optimisation of the toolpath
ensures the shortest distance for tool
travel and reduces cycle times offering
maximum productivity.
Intelligent 3D toolpaths can be
created for the most complex parts
with toolpaths tailored towards high
speed machining and designed to
minimise the number of retracts,
maintain a constant tool load, minimise
any sudden direction change and
automatically smooth the CNC code.
The underlying technology makes it
easy to successfully program high
speed machine tools using VISI.
Adaptive clearance toolpaths allow the
tool to rough the part in a unique way
- by roughing out from bottom to top.
The principle behind this method is to
machine large steps using the full flute
length of the tool with a small stepover
and then machine the intermediate
levels back up the part. The tool
remains on the part as much as
possible and the toolpath automatically
switches to a trochoidal type motion
when necessary. This ensures there are
never any full width cuts guaranteeing a
constant tool load. Tool wear is spread
evenly across the cutting surfaces
and the centre of force is half-way up
the tool, reducing deflection and the
potential for vibration.
Using adaptive toolpaths, the cycle
automatically adjusts for efficient and
safe machining; improving cutting
conditions and allowing higher
machining speeds to be maintained.
The result is savings of up to 40%
in actual cutting time for roughing
operations.
10
: sheet metal solutions
High-speed finishing requires the same
fundamentals as high-speed roughing -
consistent tool loading, lighter cuts,
minimising any sudden direction
changes, optimising NC code and
reducing stress on the machine tool.
Many of the strategies can improve
the productivity of older CNC’s with
dramatically reduced air cutting time
and both roughing and finishing
toolpaths with smoothing arcs help
maintain a continuous machine tool
motion.
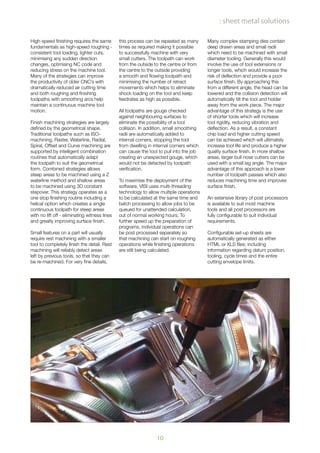
Finish machining strategies are largely
defined by the geometrical shape.
Traditional toolpaths such as ISO-
machining, Raster, Waterline, Radial,
Spiral, Offset and Curve machining are
supported by intelligent combination
routines that automatically adapt
the toolpath to suit the geometrical
form. Combined strategies allows
steep areas to be machined using a Z
waterline method and shallow areas
to be machined using 3D constant
stepover. This strategy operates as a
one stop finishing routine including a
helical option which creates a single
continuous toolpath for steep areas
with no lift off - eliminating witness lines
and greatly improving surface finish.
Small features on a part will usually
require rest machining with a smaller
tool to completely finish the detail. Rest
machining will reliably detect areas
left by previous tools, so that they can
be re-machined. For very fine details,
this process can be repeated as many
times as required making it possible
to successfully machine with very
small cutters. The toolpath can work
from the outside to the centre or from
the centre to the outside providing
a smooth and flowing toolpath and
minimising the number of retract
movements which helps to eliminate
shock loading on the tool and keep
feedrates as high as possible.
All toolpaths are gouge checked
against neighbouring surfaces to
eliminate the possibility of a tool
collision. In addition, small smoothing
radii are automatically added to
internal corners, stopping the tool
from dwelling in internal corners which
can cause the tool to pull into the job
creating an unexpected gouge, which
would not be detected by toolpath
verification.
To maximise the deployment of the
software, VISI uses multi-threading
technology to allow multiple operations
to be calculated at the same time and
batch processing to allow jobs to be
queued for unattended calculation,
out of normal working hours. To
further speed up the preparation of
programs, individual operations can
be post processed separately so
that machining can start on roughing
operations while finishing operations
are still being calculated.
Many complex stamping dies contain
deep drawn areas and small radii
which need to be machined with small
diameter tooling. Generally this would
involve the use of tool extensions or
longer tools, which would increase the
risk of deflection and provide a poor
surface finish. By approaching this
from a different angle, the head can be
lowered and the collision detection will
automatically tilt the tool and holder
away from the work piece. The major
advantage of this strategy is the use
of shorter tools which will increase
tool rigidity, reducing vibration and
deflection. As a result, a constant
chip load and higher cutting speed
can be achieved which will ultimately
increase tool life and produce a higher
quality surface finish. In more shallow
areas, larger bull nose cutters can be
used with a small lag angle. The major
advantage of this approach is a lower
number of toolpath passes which also
reduces machining time and improves
surface finish.
An extensive library of post processors
is available to suit most machine
tools and all post processors are
fully configurable to suit individual
requirements.
Configurable set-up sheets are
automatically generated as either
HTML or XLS files; including
information regarding datum position,
tooling, cycle times and the entire
cutting envelope limits.
11
: wire edm
a cut above the rest
Wire EDM technology is an integral
application for the manufacture of
stamping and progressive tools.
Trimming punches, complex apertures
and plate holes are commonly
machined using this technology.
Vero provide an intuitive environment
for the comprehensive programming
of all wire EDM machine tools -
supporting an extensive list of wire
EDM machines from leading machine
tool manufacturers; including JOB
and Script for Agie, CMD and CT
Expert for Charmilles, Brother, Fanuc,
Hitachi, Makino, Ona, Sodick, Seibu
and Mitsubishi. The advanced
postprocessors aren’t just limited to
the use of generic G and M codes;
special posts are easily configured
to suit different machine models and
configurations.
Wire EDM is extremely accurate and
enables the machine to cut internal
corners with very small corner radii
based on the wire diameter and spark
gap. It becomes easy to cut square
apertures without the need of splitting
the die or producing accurate pin holes
in a plate after heat treatment.
Strategies for all types of EDM
machining are supported including
2-axis, 2-axis with taper and full
4 axis machining with geometry
synchronisation.
Support for unmanned or overnight
machining is possible by leaving
the slugs attached while all of the
preliminary cuts are taken. Numerous
strategies are available to cut the part;
for instance, taking all of the rough cuts
before finishing, in which case all rough
cuts are taken while leaving the tags
attached, then the tags are removed,
and finally the trim cuts are taken.
Alternatively, take the rough and finish
cuts while leaving the tag in place and
then removing the tag and skimming
this area.
With apertures that decrease in size,
slug management is more complex.
Complete ‘no-core’ pocket destruction
cycles and full 3D simulation guarantee
valid slug removal. Additional support
for cam and gear profile generation
is delivered to DIN/ISO and AGMA
standards.
The completed wire path can be
simulated using rendered solid model
graphics, including fixtures and target
parts. Any collisions that are detected
are highlighted both on the model
and via on-screen messages. As
slugs become detached by cuts, the
simulation advises the programmer
that this is the case and graphically
removes the part, emulating the exact
cutting process on the machine tool.
Toolpath verification tests whether
the completed part is removable from
the component and also provides
the capability of part comparison.
By comparing the target model and
cut part, any potential rest material
or gouge issues are automatically
highlighted.
By using the complete solution from
Vero, not only will programming time
be minimised, but also the cut-path
will be far more efficient, saving further
time on the machine tool. Add in
the comprehensive simulation and
proofing tools and you have a system
that not only streamlines day-to-day
production, but also reduces costly
errors and eradicates the need for
dry-runs, giving you an important
competitive advantage.
12
: automotive stamping
SMIRT - designed explicitly for the die stamping industry
Born through encouragement from the automotive industry to provide
a software solution to address the issues of building stamping dies,
Vero’s products provide an environment in which those involved in the
design, installation and use of large scale stamping dies can manage the
development and manufacture of these incredibly complex tools.
Stamping dies are incredibly complex
assemblies, containing a large number
of parts that typically follow a traditional
workflow, particularly when you’re
dealing with dies for body in white
parts.
Each die house will generally have its
own 3D design system for the design
of stamping dies. The SMIRT products
are not meant to replace these, but
act as a mechanism through which
everyone involved in the process
(from concept to installation and
maintenance) can access that data.
SMIRT provides a common
environment, specifically tuned for
the die industry that allows users
to interact with live 3D data for
inspection, process planning, costing,
manufacture and critically, during the
development process, review.
SMIRT lets die makers, pattern
makers, machinists, foremen and other
users extract the information they need
to build a die directly from a solid
model without the need to generate
plots or drawings - a true paperless
environment.
In a traditional stamping die there are
two basic subsystems, the upper
and the lower die, as well as ancillary
assemblies and mechanisms. SMIRT
can extract this structure information
directly from the CAD assembly, then
use attribute or metadata mapping to
extract the die-specific information. All
of the SMIRT products use a common
stock list as the central repository for
all of the metadata attached to the 3D
model sets.
13
At this pre-production stage, SMIRT
makes it possible to have die data
available throughout an organisation so
that true concurrent engineering can
be made possible by people having
up-to-date information in a consistent,
usable format. Typically, at this stage
in the workflow things are fluid, but
are likely to change, so the ability to
provide ‘live’ feedback is essential.
SMIRT includes an array of mark-up
and redlining tools, which allow anyone
with the appropriate permissions to
highlight revisions. These are stored
in small, easily transportable datasets,
called display files and help make
project collaboration in a paperless
environment very effective.
When the die gets to the completion
stage, the final SMIRT dataset is
created and all those involved in the
process can inspect and review it for
completeness. Once the design is
signed off, SMIRT DieBuild, is used to
plan out a step-by-step ‘road map’
for the build process – which for these
types of dies, can be very complex.
At the same time, the finalised data
can be used by purchasing for material
ordering and on the shop floor to start
production. The major benefit is that
everyone is using a common dataset
and application, whether that’s to pull
off dimensions or volume calculations,
create a list of outsourced components
or review the die building process.
Tooling manufacture
Once the die moves toward
manufacture, SMIRT is used to create
tool paths for planar faces and hole
drilling. Automated feature recognition
makes it possible to extract complex
holes assemblies with drilling methods
automatically applied from a user
defined data base. Collision checking
(tool, tool-holder and head against the
work piece) is performed while creating
the tool path on every cutting or rapid
movement. If a collision is detected,
an alert flag is displayed and the
interference is highlighted to allow the
user make the necessary changes
A simple ‘drag & drop’ concept is used
to generate milling methods to machine
pockets, slots, hole diameters or entire
surfaces. Editing tools can be used
to set the step-down height, strategy,
define plunge milling parameters, break
and erase tool paths. The machinist
can move the cutter “free-hand” over
the surface or choose advanced
constraints to better control the milling
operation. Special constraints can
be activated to follow vertical walls,
execute planar profile milling, set the
tool path overlap and control the tool
motion direction.
If an angled face is selected, no
additional work is required as indexing
heads are managed and the correct
milling plane is automatically validated
against the machine constraints and
set accordingly.
SMIRT can be used either on a
workstation on the shop floor or even
reside on the machine controller,
helping to reduce any potential error
involved with manual data input.
Die building
All operations are completely integrated
and provide the shop floor with a
graphical outline of the complete die
build process - this allows all personnel
to build the die following a tested and
proven road map. Any variations in the
build process are quickly identified and
brought to everyone’s attention.
Once the build is complete, the
information is readily available for a
thorough review providing valuable
data to improve the building process
for subsequent builds.
Task completion check off updates
real time project information stored on
the server allowing managers to see
the current status of all work currently
running throughout the shop.
Die costing
Produce accurate ‘cost to build’
estimates for a single die or a complete
line of dies using input/output methods
that links CAD data with formulas,
standard components, castings, and
rate structures.
Simply import your part or product
data from an assortment of CAD
supported formats and immediately
perform feasibility studies by using the
tools provided. Identify and quickly
estimate 2D, 3D, & profile machining
cost estimates based upon actual
profile and machine surfaces (MFA) for
accurate and consistent quotes.
By taking a common software platform
and covering the process from design,
through manufacture, assembly and
into installation, the system offers those
within this industry real advantages.
SMIRT is highly tuned for the stamping
die industry and the benefits that could
be derived from its adoption are self
evident.
14
The VISI suite of CAD/CAM software is written and developed by Vero
Software; part of Vero Software Plc, a UK based public company launched
on the London AIM Stock Exchange in 1998
a network of over 70 partners in 40 countries
: global presence
: sheet metal solutions
Vero Software Plc comprises of ten
companies in England, Italy, the United
States, Japan, China, Canada and
France.
The company creates, owns and
distributes software for aiding the
design and manufacturing process in
specific sectors of the industry. The
specific sectors include the design
and manufacture of plastic injection
moulds, sheet metal stamping dies,
progressive dies and others.
The company firmly believes that step
gains in productivity can be made by
building as much knowledge of specific
design and machining processes
within it’s software as possible. This
philosophy of productivity through
specialisation has led to new
applications in the design of mould
tools and progressive dies.
Since 1988 Vero have been providing
innovative and specialised solutions
for the engineering industry through
a network of over seventy partners in
more than forty countries.
VISI is used by the world’s most
advanced toolmakers, as well as
leading aerospace, automotive,
packaging and medical companies to
give a clear competitive advantage in
today’s tough business environment.
Continual software development is core
to the philosophy at Vero; we have an
extensive development team striving
constantly to keep VISI at the leading
edge of software capability.
Vero works in partnership with its
customers – for the long term.
Understanding the demands of their
business and providing practical and
innovative solutions. We listen to our
customers’ requirements and build
answers into the software to meet their
expectations now and for the future.
With thousands of licenses of VISI
in use world wide, and double digit
growth year on year, Vero Software is
one of the world’s leading CAD/CAM
developers.
VISI has modules for specific
applications. Choose the ones to suit
your individual business, yet have the
room for growth. Better still, all the
modules are totally integrated and work
in just one environment with one easy
to learn interface.
Service & Support
Vero has a support network of
engineers who understand your
business through experience.
VISI is a comprehensive suite of
software in one environment with one
interface. Invite our engineers to look
at your business to see how VISI can
improve your productivity, quality and
performance.
The company now has more than
6,000 users registered for its annual
maintenance services and supplies
products to more than 40 countries
through its wholly owned subsidiaries
and competence centres.
We will guide you through the modules
and recommend the most appropriate
combination of software, training and
services that suits your needs.
Vero Software Plc
Hadley House
Bayshill Road
Cheltenham
Gloucestershire
GL50 3AW
United Kingdom
tel. +44 (0) 1242 542090
fax. +44 (0) 1242 542099
email. info@vero.co.uk
web. www.vero-software.com
Vcamtech Co., Ltd.
459 Ba Hat, Ward 8
District 10
Ho Chi Min City
Viet Nam
tel: +84 (08) 3957 2070
fax: +84 (08) 3856 3137
email: info@vcam-tech.com
web: www.vcam-tech.com

Sheet solutions 2009

  • 1.
    Dedicated tools forthe design and manufacture of progressive & stamping dies : sheet metal solutions
  • 2.
    01 Survival and competingin a global market may depend on a single competitive advantage or highly skilled knowledge built over many years. Vero provide both, combining unique and dedicated applications for die design and manufacture with a knowledgeable development team striving to keep Vero at the leading edge of technology. From the administration office to the shop floor, the VISI suite of software is unique in that it covers all aspects of the sheet metal stamping process - from model analysis and quoting, part unfolding and blank development through to 3D die design, manufacture and multi-axis laser trimming. : the complete process... making progress
  • 3.
    02 Based on theindustry standard Parasolid kernel, flexible solid and surface technology tools combine with intelligent geometry healing tools to provide the ideal platform for managing the most complex data. The extensive range of data translators ensures that engineers can work with data from almost any supplier. Very large files can be handled with ease and users working with complex designs will benefit from the simplicity with which their customer’s CAD data can be manipulated. Working within an integrated system, the jump from 2D to 3D die design is often recognised as the step to help reduce errors, streamline the design process and ultimately increase your competitiveness and profitability. Deep drawing, linear and non-linear unfolding and flange development are all managed with a hybrid algorithm based on a combination of analytic and FEM solvers. This unique technology combination allows the user to predict the stamping conditions and define every step of the development process. In-depth process studies can be performed on multiple different scenarios returning valuable information to the designer such as dynamic nesting, material wastage, material weight and the relevant shearing forces required at each stage. Part complexity, part size, number of parts and pressing speed all influence the type of tooling required. From ‘one- step’ press tooling through to transfer, progressive and multi-slide tools, Vero provide intelligent solutions with dedicated component libraries. For ‘one-step’ tooling, the designer can confidently predict the forming impact on thickness distribution returning valuable knowledge regarding part formability. Accurate blank development allows the designer to quickly provide reliable quotes. Multi-slide tooling is an extension of VISI progress and has been developed to aid the design and synchronisation of cams used during the bending process. Automated tool design is achieved through a simple question and answer process. The user is prompted for all the relevant settings and the software generates the complete tool assembly including the die plates, pillars & bushes, springs, screws and pins. Wire EDM, laser trimming and 2D to 5-axis toolpath construction is performed directly on the 3D model. Automated feature recognition for complex holes and pocketing features on both solid and surface geometry allows the user to tailor the machining strategies to follow proven company protocols. : sheet metal solutions
  • 4.
    03 : knowledge driven automatingthe design process using applications based on extensive research & experience
  • 5.
    04 : sheet metalsolutions Ever shortening lead times and the increase in global competition have had a dramatic impact on the die making industry. VISI Modelling is the foundation for all of the design tools. Using the industry standard Parasolid kernel, true hybrid solid and surface modelling provides a dynamic structure from where it is possible to work with either solid, surface, wireframe technologies (or a combination of all three) without restrictions. Solid modelling has become the fundamental cornerstone of design but is often restricted to prismatic or basic geometry. Solid modelling commands include boolean technology such as unite, subtract, extrude, revolve, sweep, cavity, intersect and hollow. Surfacing technology provides a different set of tools and techniques for more organic, free-form geometry creation. Surface modelling functions include ruled, lofted, drive, sweep, n-sided patch, drape, tangent, draft, revolved and piped surfaces. These modelling commands combined with advanced surface editing tools make it easy to heal imported geometry or construct the most complex 3D data. An extensive range of data translators including Parasolid, Catia, UG, Pro- Engineer, Step, Acis, Iges, Solid Works, Solid Edge, Vda, Stl and DXF/DWG ensure that users can work with data from almost any supplier. The ability to skip corrupt records during the import process provides a platform from where even the most inconsistent data can be managed. Very large files can be handled with ease and companies working with complex designs will benefit from the simplicity with which their customer’s CAD data can be manipulated. Small gaps between surfaces on imported models can be automatically healed, preventing the time consuming process of rebuilding very small surface patches. Where surfaces are corrupt or missing VISI will automatically create the edge curve geometry making it easy to rebuild new faces using the comprehensive surfacing suite. To ensure the new surfaces are within tolerance, the new and the old surfaces can be compared to check for min/ max distance and curvature deviation. Closing a surface model to produce a solid body eliminates construction problems later in the design process and immediately brings the benefits of solid modelling functionality to the user. The ability to seamlessly switch between solid and surface technology provides unlimited freedom. Model Analysis VISI Analysis offers a suite of dedicated tools for the analysis, validation and preparation of model geometry. When working with imported data, the quality of the model is an important consideration and can have a dramatic effect on the project success. Finding potential problems at an early stage within the project life cycle will greatly simplify the task of the designer and generate huge time and cost savings further downstream for both tool design & manufacture. Technology benefits include : Model Comparison Analysis• Model Curvature Analysis• Draft Angle Analysis• Model Thickness Analysis• Edge Smoothing - Simplification• Complex Bend Relief• Redundant Body Detection• Small & Sliver Face Detection• Seed Face Selection• Invalid Body Repair• Body Memory Diagnostics• Solid Interference Checking• Data Tipping Charts•
  • 6.
    05 : developing automation formabilityanalysis > process study > 3D tooling An intelligent mix of automated and user-driven tools combine formability analysis, process studies and strip design which act as the guideline for tool construction. Helping simplify the decision making process will reduce the potential for error and greatly improve manufacturing productivity. The prediction of an accurate blank development, including the relevant material requirements and the correct pressing conditions provide a clear understanding of the job complexity. With just a few clicks, VISI Blank is able to calculate the development area and report the stamping force and distribution map of the geometry thinning. VISI Blank is designed for estimators, engineers, sheet metal product designers and tool and die makers to optimise the development of sheet metal components and provide valuable analysis of material behaviour during the stamping process. For the estimator - A quick blank development can be achieved in minutes, highlighting potential manufacturing problems, determine material costs and help streamline the production process. For the designer - VISI Blank helps determine areas of a component design which may need to be modified to provide lower manufacturing costs. For the toolmaker - VISI Blank is an invaluable tool for identifying areas of a component that will require to be drawn as opposed to multiple forming operations. For a more detailed analysis, VISI Progress provides further technology for quoting such as nesting, strip study and the automatic calculation of trimming punches. Process definition A single sheet metal component may contain a number of different stamping operations including coining, deep drawing, linear and non-linear unfolding and shearing. VISI Progress manages all scenarios using a hybrid algorithm based on a powerful combination of both analytic and FEM solvers. Partial blank development onto 3D geometry using binders and the automatic development for ‘cylindrical drawing’ eliminate hours of manual calculations and dramatically reduce the possibility of error. Strip Creation Starting with the developed blank, it is possible to quickly formulate a 3D strip layout. Automatic blank alignment, rotation and optimisation help plan a more efficient strip. Punch design becomes more effective with the use of the automatic 2D strip plan, which also provides a familiar working environment for designers used to working in 2D. A variety of automatic and semi- automatic tools assist in the creation of trimming punches, that once created can be dynamically moved to different stations on the strip using a simple drag & drop concept. Placement of 3D forming stages into the strip is a seamless process and one that can be easily updated to accommodate a reduction or increase in the number of stages. At any point it is possible to edit all the strip parameters including strip width and pitch for essential modification when required. 3D shearing and forming simulation can be visualised at any point to validate the performance of the strip design.
  • 7.
    06 : sheet metalsolutions Multi-Slides Progressive die tooling is a popular process for producing sheet metal parts although it is not the only technology in this field. The fundamental concept of ‘one tool produces all’ is not always an advantage and in some cases a ‘transfer tool’ process provides a better solution. However, a combination of these two technologies can provide the ‘best of both worlds’. Multi-Slides is an example of this combination where the progressive die tool remains in control of the cutting and drawing operations, whilst the bending cycle is performed by special multi-slide tooling. Starting from the unfolding steps, every finger can be designed using a series of quick 2D sketches. These sketches are used to obtain the number of movements, stroke value and the orientation of each finger. This information is then used as input data to compile a computation table. On completion of the computation table, a kinematic simulation of the entire cycle can be performed. This enables the designer to check the synchronisation level, possible interferences among moving parts and the optimisation level by checking the value of the unused angular sector. At any point during the design cycle, it is possible to obtain the operation diagram which is especially useful for tool review or analysis. Geometrical construction of each required cam is an automatic process and the resulting forms can be output as a 2D profile or a 3D solid, each with their own relevant annotation. The final cam form is constructed from tangent arcs / segments (no spline curves) and ready for wire EDM or milling operations. 3D Tool Design The tool assembly allows the designer to quickly construct a solid based layout of the required die set plates along with the relevant pillar and bush combinations. Each assembly can be stored as a tooling template and subsequently applied to another strip layout, automatically adapting the tool to the dimensions of the new strip design. VISI Progress supports standard component libraries from all leading suppliers including Misumi, Futaba, AW Precision, Fibro, Strack, Danly, Rabourdin, Mandelli, Sideco, Intercom, Bordignon, Dadco, Dayton, Din, Kaller, Lamina, Lempco, MDL, Pedrotti Special Spring, Superior, Tipco, Uni, Victoria and others. Each component has a full list of editable parameters enabling essential adjustments to suit individual tooling requirements and come with manufacturing data attributes and a full parts list itinerary. Automatic punch extrusion ensures all clearances are correctly designated in each plate throughout the tool assembly. Clearance parameters related to each plate type can be effectively managed by the use of templates that can be applied to any punch at any time. Parameter driven construction of punch heels, support stems and punch holders assist the rapid design and manufacture of non standard punch shapes. A complete set of 2D detailed drawings can be generated directly from the solid tool assembly. This includes fully editable 2D and isometric section views, automatic plate dimensioning and hole-type position tables. Any change to the solid model will result in a modification to the 2D view along with any fully associative dimensions. Automatic milling and drilling cycles are produced directly from the 3D model using advanced feature recognition from ‘Compass Technology’.
  • 8.
    07 : design >manufacture intelligent toolpath creation VISI creates accurate and reliable toolpaths on the most complex geometry. Intelligent toolpaths will reduce cycle times on your machine, improve productivity and continuously produce high quality components.
  • 9.
    08 : sheet metalsolutions : laser technology multi-axis laser trimming The ability to apply laser cutting to a sheet metal component after it has been formed has implications for a variety of applications. Multi-axis laser cutting can replace many drilling, milling and cutting operations resulting in reduced costs and improved precision. The implementation of multi-axis simultaneous laser cutting machinery is becoming increasingly common among manufacturing organisations around the globe. These complex and versatile machine tools, long established for use in the aerospace and automotive engineering sectors, are becoming standard equipment for many small to medium size tool rooms. Availability of quality, affordable CAM software to program these machine tools has certainly contributed towards this rise in popularity. Laser cutting has many advantages over conventional mechanical cutting. For example, the trimmed edges have a very good finish; as a result no grinding is necessary. There is no wear on a laser as there would be on a conventional ‘contact’ tool and the heat generated is focused in a very narrow region around the cut; as a result, thermally induced warping is minimised. Laser machinery accommodating multiple cutting axes demand a high level of accuracy in laser path not to mention the ability to avoid collisions between the head, parts and fixtures. Generating a complex yet safe, multi- axis laser path is made easy for the user. The software can be used either automatically or interactively. Feature- finding tools quickly identify areas to be machined to which the user can apply appropriate cutting technologies. Cutting operations can generally be divided into two areas: inner and outer trims. Outer trims are the external forms of the part whilst inner trims represent the internal cut-outs and other features to be machined. User interaction is available for all toolpath types to allow for manual creation and refinement providing a great amount of control over how each inner or outer trim is handled; for example, creating micro-joints to hold the material in place until processing is finished becomes quick and uncomplicated. The toolpath can also be edited in terms of how the cutting nozzle is angled towards it or how it handles jigs and fixture features. Options include ‘surface normal,’ fixed angle, and ‘follow face.’ On any trim, at any position the user can introduce ‘change points’ where changes in orientation or in technology can be applied. Once the tool path is constructed, accurate simulation is available for the movement of the laser head, machine bed and any defined fixtures – all of which are checked for collisions between them. Instant feedback is provided about whether or not a specific move is possible - either in terms of machine head movement limits or accessibility. Any collisions that are detected are highlighted both on the model and via on-screen messages. The trim-path parameters can be edited directly or, in the event of a collision, automatically corrected at any time; ensuring that your tool path is both safe and using the optimum strategy to reduce processing time. The single most important product of any CAM system for any CAM operation is code to run the machine tool. This must be generated to a high standard and be technically accurate. Vero’s Multi-axis laser has a comprehensive range of proven post processor solutions for the majority of multi-axis laser machines in use today.
  • 10.
    09 : 2D, 3D& 5 Axis toolpath generation directly from the 3D model Vero have been providing world class CAD/CAM solutions since 1988 and VISI Machining offers all you need to increase productivity, maximise cutting capacity and reduce delivery times. Remove any data conversion issues by seamlessly transferring the geometrical data from the tool design directly to the cam environment. Using VISI Machining it is possible to machine directly from the 3D model or from 2D construction data. A combination of intelligent toolpath automation, user-defined cycle templates and powerful editing tools ensure the operator is always in control. A highly graphical interface guides the user through machining parameters, cutting conditions and holders for selected tooling providing a practical and intuitive CAM solution. Automatic feature recognition detects complex holes and pocket features directly from the solid model. Extraction of diameters and depths from the model makes it easy to enter drilling parameters and eliminate the possibility of MDI errors. For every library component added to the tool design, CAM feature data is applied to the model ready for feature recognition. If any inclined features are detected, a new datum is created for each setup and automatically filtered against the physical machine limits. If a non standard feature is found, it is possible to force the system to use a particular machining process or existing cycle; providing an open and configurable system for automatic plate manufacture. Cutter radius compensation capability provides practical CNC code for use on the shop floor. When the cutter cannot machine tight internal radii, the system will automatically create residual stock geometry (defined by the previous tool) and enable re-machining with a smaller diameter tool. The system will automatically avoid user defined clamps and fixtures during machining operations. Obstacle management ensures collision avoidance, and helps to reduce the cycle time on the machine by eliminating unnecessary Z retract moves. Optimisation of the toolpath ensures the shortest distance for tool travel and reduces cycle times offering maximum productivity. Intelligent 3D toolpaths can be created for the most complex parts with toolpaths tailored towards high speed machining and designed to minimise the number of retracts, maintain a constant tool load, minimise any sudden direction change and automatically smooth the CNC code. The underlying technology makes it easy to successfully program high speed machine tools using VISI. Adaptive clearance toolpaths allow the tool to rough the part in a unique way - by roughing out from bottom to top. The principle behind this method is to machine large steps using the full flute length of the tool with a small stepover and then machine the intermediate levels back up the part. The tool remains on the part as much as possible and the toolpath automatically switches to a trochoidal type motion when necessary. This ensures there are never any full width cuts guaranteeing a constant tool load. Tool wear is spread evenly across the cutting surfaces and the centre of force is half-way up the tool, reducing deflection and the potential for vibration. Using adaptive toolpaths, the cycle automatically adjusts for efficient and safe machining; improving cutting conditions and allowing higher machining speeds to be maintained. The result is savings of up to 40% in actual cutting time for roughing operations.
  • 11.
    10 : sheet metalsolutions High-speed finishing requires the same fundamentals as high-speed roughing - consistent tool loading, lighter cuts, minimising any sudden direction changes, optimising NC code and reducing stress on the machine tool. Many of the strategies can improve the productivity of older CNC’s with dramatically reduced air cutting time and both roughing and finishing toolpaths with smoothing arcs help maintain a continuous machine tool motion. Finish machining strategies are largely defined by the geometrical shape. Traditional toolpaths such as ISO- machining, Raster, Waterline, Radial, Spiral, Offset and Curve machining are supported by intelligent combination routines that automatically adapt the toolpath to suit the geometrical form. Combined strategies allows steep areas to be machined using a Z waterline method and shallow areas to be machined using 3D constant stepover. This strategy operates as a one stop finishing routine including a helical option which creates a single continuous toolpath for steep areas with no lift off - eliminating witness lines and greatly improving surface finish. Small features on a part will usually require rest machining with a smaller tool to completely finish the detail. Rest machining will reliably detect areas left by previous tools, so that they can be re-machined. For very fine details, this process can be repeated as many times as required making it possible to successfully machine with very small cutters. The toolpath can work from the outside to the centre or from the centre to the outside providing a smooth and flowing toolpath and minimising the number of retract movements which helps to eliminate shock loading on the tool and keep feedrates as high as possible. All toolpaths are gouge checked against neighbouring surfaces to eliminate the possibility of a tool collision. In addition, small smoothing radii are automatically added to internal corners, stopping the tool from dwelling in internal corners which can cause the tool to pull into the job creating an unexpected gouge, which would not be detected by toolpath verification. To maximise the deployment of the software, VISI uses multi-threading technology to allow multiple operations to be calculated at the same time and batch processing to allow jobs to be queued for unattended calculation, out of normal working hours. To further speed up the preparation of programs, individual operations can be post processed separately so that machining can start on roughing operations while finishing operations are still being calculated. Many complex stamping dies contain deep drawn areas and small radii which need to be machined with small diameter tooling. Generally this would involve the use of tool extensions or longer tools, which would increase the risk of deflection and provide a poor surface finish. By approaching this from a different angle, the head can be lowered and the collision detection will automatically tilt the tool and holder away from the work piece. The major advantage of this strategy is the use of shorter tools which will increase tool rigidity, reducing vibration and deflection. As a result, a constant chip load and higher cutting speed can be achieved which will ultimately increase tool life and produce a higher quality surface finish. In more shallow areas, larger bull nose cutters can be used with a small lag angle. The major advantage of this approach is a lower number of toolpath passes which also reduces machining time and improves surface finish. An extensive library of post processors is available to suit most machine tools and all post processors are fully configurable to suit individual requirements. Configurable set-up sheets are automatically generated as either HTML or XLS files; including information regarding datum position, tooling, cycle times and the entire cutting envelope limits.
  • 12.
    11 : wire edm acut above the rest Wire EDM technology is an integral application for the manufacture of stamping and progressive tools. Trimming punches, complex apertures and plate holes are commonly machined using this technology. Vero provide an intuitive environment for the comprehensive programming of all wire EDM machine tools - supporting an extensive list of wire EDM machines from leading machine tool manufacturers; including JOB and Script for Agie, CMD and CT Expert for Charmilles, Brother, Fanuc, Hitachi, Makino, Ona, Sodick, Seibu and Mitsubishi. The advanced postprocessors aren’t just limited to the use of generic G and M codes; special posts are easily configured to suit different machine models and configurations. Wire EDM is extremely accurate and enables the machine to cut internal corners with very small corner radii based on the wire diameter and spark gap. It becomes easy to cut square apertures without the need of splitting the die or producing accurate pin holes in a plate after heat treatment. Strategies for all types of EDM machining are supported including 2-axis, 2-axis with taper and full 4 axis machining with geometry synchronisation. Support for unmanned or overnight machining is possible by leaving the slugs attached while all of the preliminary cuts are taken. Numerous strategies are available to cut the part; for instance, taking all of the rough cuts before finishing, in which case all rough cuts are taken while leaving the tags attached, then the tags are removed, and finally the trim cuts are taken. Alternatively, take the rough and finish cuts while leaving the tag in place and then removing the tag and skimming this area. With apertures that decrease in size, slug management is more complex. Complete ‘no-core’ pocket destruction cycles and full 3D simulation guarantee valid slug removal. Additional support for cam and gear profile generation is delivered to DIN/ISO and AGMA standards. The completed wire path can be simulated using rendered solid model graphics, including fixtures and target parts. Any collisions that are detected are highlighted both on the model and via on-screen messages. As slugs become detached by cuts, the simulation advises the programmer that this is the case and graphically removes the part, emulating the exact cutting process on the machine tool. Toolpath verification tests whether the completed part is removable from the component and also provides the capability of part comparison. By comparing the target model and cut part, any potential rest material or gouge issues are automatically highlighted. By using the complete solution from Vero, not only will programming time be minimised, but also the cut-path will be far more efficient, saving further time on the machine tool. Add in the comprehensive simulation and proofing tools and you have a system that not only streamlines day-to-day production, but also reduces costly errors and eradicates the need for dry-runs, giving you an important competitive advantage.
  • 13.
    12 : automotive stamping SMIRT- designed explicitly for the die stamping industry Born through encouragement from the automotive industry to provide a software solution to address the issues of building stamping dies, Vero’s products provide an environment in which those involved in the design, installation and use of large scale stamping dies can manage the development and manufacture of these incredibly complex tools. Stamping dies are incredibly complex assemblies, containing a large number of parts that typically follow a traditional workflow, particularly when you’re dealing with dies for body in white parts. Each die house will generally have its own 3D design system for the design of stamping dies. The SMIRT products are not meant to replace these, but act as a mechanism through which everyone involved in the process (from concept to installation and maintenance) can access that data. SMIRT provides a common environment, specifically tuned for the die industry that allows users to interact with live 3D data for inspection, process planning, costing, manufacture and critically, during the development process, review. SMIRT lets die makers, pattern makers, machinists, foremen and other users extract the information they need to build a die directly from a solid model without the need to generate plots or drawings - a true paperless environment. In a traditional stamping die there are two basic subsystems, the upper and the lower die, as well as ancillary assemblies and mechanisms. SMIRT can extract this structure information directly from the CAD assembly, then use attribute or metadata mapping to extract the die-specific information. All of the SMIRT products use a common stock list as the central repository for all of the metadata attached to the 3D model sets.
  • 14.
    13 At this pre-productionstage, SMIRT makes it possible to have die data available throughout an organisation so that true concurrent engineering can be made possible by people having up-to-date information in a consistent, usable format. Typically, at this stage in the workflow things are fluid, but are likely to change, so the ability to provide ‘live’ feedback is essential. SMIRT includes an array of mark-up and redlining tools, which allow anyone with the appropriate permissions to highlight revisions. These are stored in small, easily transportable datasets, called display files and help make project collaboration in a paperless environment very effective. When the die gets to the completion stage, the final SMIRT dataset is created and all those involved in the process can inspect and review it for completeness. Once the design is signed off, SMIRT DieBuild, is used to plan out a step-by-step ‘road map’ for the build process – which for these types of dies, can be very complex. At the same time, the finalised data can be used by purchasing for material ordering and on the shop floor to start production. The major benefit is that everyone is using a common dataset and application, whether that’s to pull off dimensions or volume calculations, create a list of outsourced components or review the die building process. Tooling manufacture Once the die moves toward manufacture, SMIRT is used to create tool paths for planar faces and hole drilling. Automated feature recognition makes it possible to extract complex holes assemblies with drilling methods automatically applied from a user defined data base. Collision checking (tool, tool-holder and head against the work piece) is performed while creating the tool path on every cutting or rapid movement. If a collision is detected, an alert flag is displayed and the interference is highlighted to allow the user make the necessary changes A simple ‘drag & drop’ concept is used to generate milling methods to machine pockets, slots, hole diameters or entire surfaces. Editing tools can be used to set the step-down height, strategy, define plunge milling parameters, break and erase tool paths. The machinist can move the cutter “free-hand” over the surface or choose advanced constraints to better control the milling operation. Special constraints can be activated to follow vertical walls, execute planar profile milling, set the tool path overlap and control the tool motion direction. If an angled face is selected, no additional work is required as indexing heads are managed and the correct milling plane is automatically validated against the machine constraints and set accordingly. SMIRT can be used either on a workstation on the shop floor or even reside on the machine controller, helping to reduce any potential error involved with manual data input. Die building All operations are completely integrated and provide the shop floor with a graphical outline of the complete die build process - this allows all personnel to build the die following a tested and proven road map. Any variations in the build process are quickly identified and brought to everyone’s attention. Once the build is complete, the information is readily available for a thorough review providing valuable data to improve the building process for subsequent builds. Task completion check off updates real time project information stored on the server allowing managers to see the current status of all work currently running throughout the shop. Die costing Produce accurate ‘cost to build’ estimates for a single die or a complete line of dies using input/output methods that links CAD data with formulas, standard components, castings, and rate structures. Simply import your part or product data from an assortment of CAD supported formats and immediately perform feasibility studies by using the tools provided. Identify and quickly estimate 2D, 3D, & profile machining cost estimates based upon actual profile and machine surfaces (MFA) for accurate and consistent quotes. By taking a common software platform and covering the process from design, through manufacture, assembly and into installation, the system offers those within this industry real advantages. SMIRT is highly tuned for the stamping die industry and the benefits that could be derived from its adoption are self evident.
  • 15.
    14 The VISI suiteof CAD/CAM software is written and developed by Vero Software; part of Vero Software Plc, a UK based public company launched on the London AIM Stock Exchange in 1998 a network of over 70 partners in 40 countries : global presence : sheet metal solutions Vero Software Plc comprises of ten companies in England, Italy, the United States, Japan, China, Canada and France. The company creates, owns and distributes software for aiding the design and manufacturing process in specific sectors of the industry. The specific sectors include the design and manufacture of plastic injection moulds, sheet metal stamping dies, progressive dies and others. The company firmly believes that step gains in productivity can be made by building as much knowledge of specific design and machining processes within it’s software as possible. This philosophy of productivity through specialisation has led to new applications in the design of mould tools and progressive dies. Since 1988 Vero have been providing innovative and specialised solutions for the engineering industry through a network of over seventy partners in more than forty countries. VISI is used by the world’s most advanced toolmakers, as well as leading aerospace, automotive, packaging and medical companies to give a clear competitive advantage in today’s tough business environment. Continual software development is core to the philosophy at Vero; we have an extensive development team striving constantly to keep VISI at the leading edge of software capability. Vero works in partnership with its customers – for the long term. Understanding the demands of their business and providing practical and innovative solutions. We listen to our customers’ requirements and build answers into the software to meet their expectations now and for the future. With thousands of licenses of VISI in use world wide, and double digit growth year on year, Vero Software is one of the world’s leading CAD/CAM developers. VISI has modules for specific applications. Choose the ones to suit your individual business, yet have the room for growth. Better still, all the modules are totally integrated and work in just one environment with one easy to learn interface. Service & Support Vero has a support network of engineers who understand your business through experience. VISI is a comprehensive suite of software in one environment with one interface. Invite our engineers to look at your business to see how VISI can improve your productivity, quality and performance. The company now has more than 6,000 users registered for its annual maintenance services and supplies products to more than 40 countries through its wholly owned subsidiaries and competence centres. We will guide you through the modules and recommend the most appropriate combination of software, training and services that suits your needs.
  • 16.
    Vero Software Plc HadleyHouse Bayshill Road Cheltenham Gloucestershire GL50 3AW United Kingdom tel. +44 (0) 1242 542090 fax. +44 (0) 1242 542099 email. info@vero.co.uk web. www.vero-software.com Vcamtech Co., Ltd. 459 Ba Hat, Ward 8 District 10 Ho Chi Min City Viet Nam tel: +84 (08) 3957 2070 fax: +84 (08) 3856 3137 email: info@vcam-tech.com web: www.vcam-tech.com