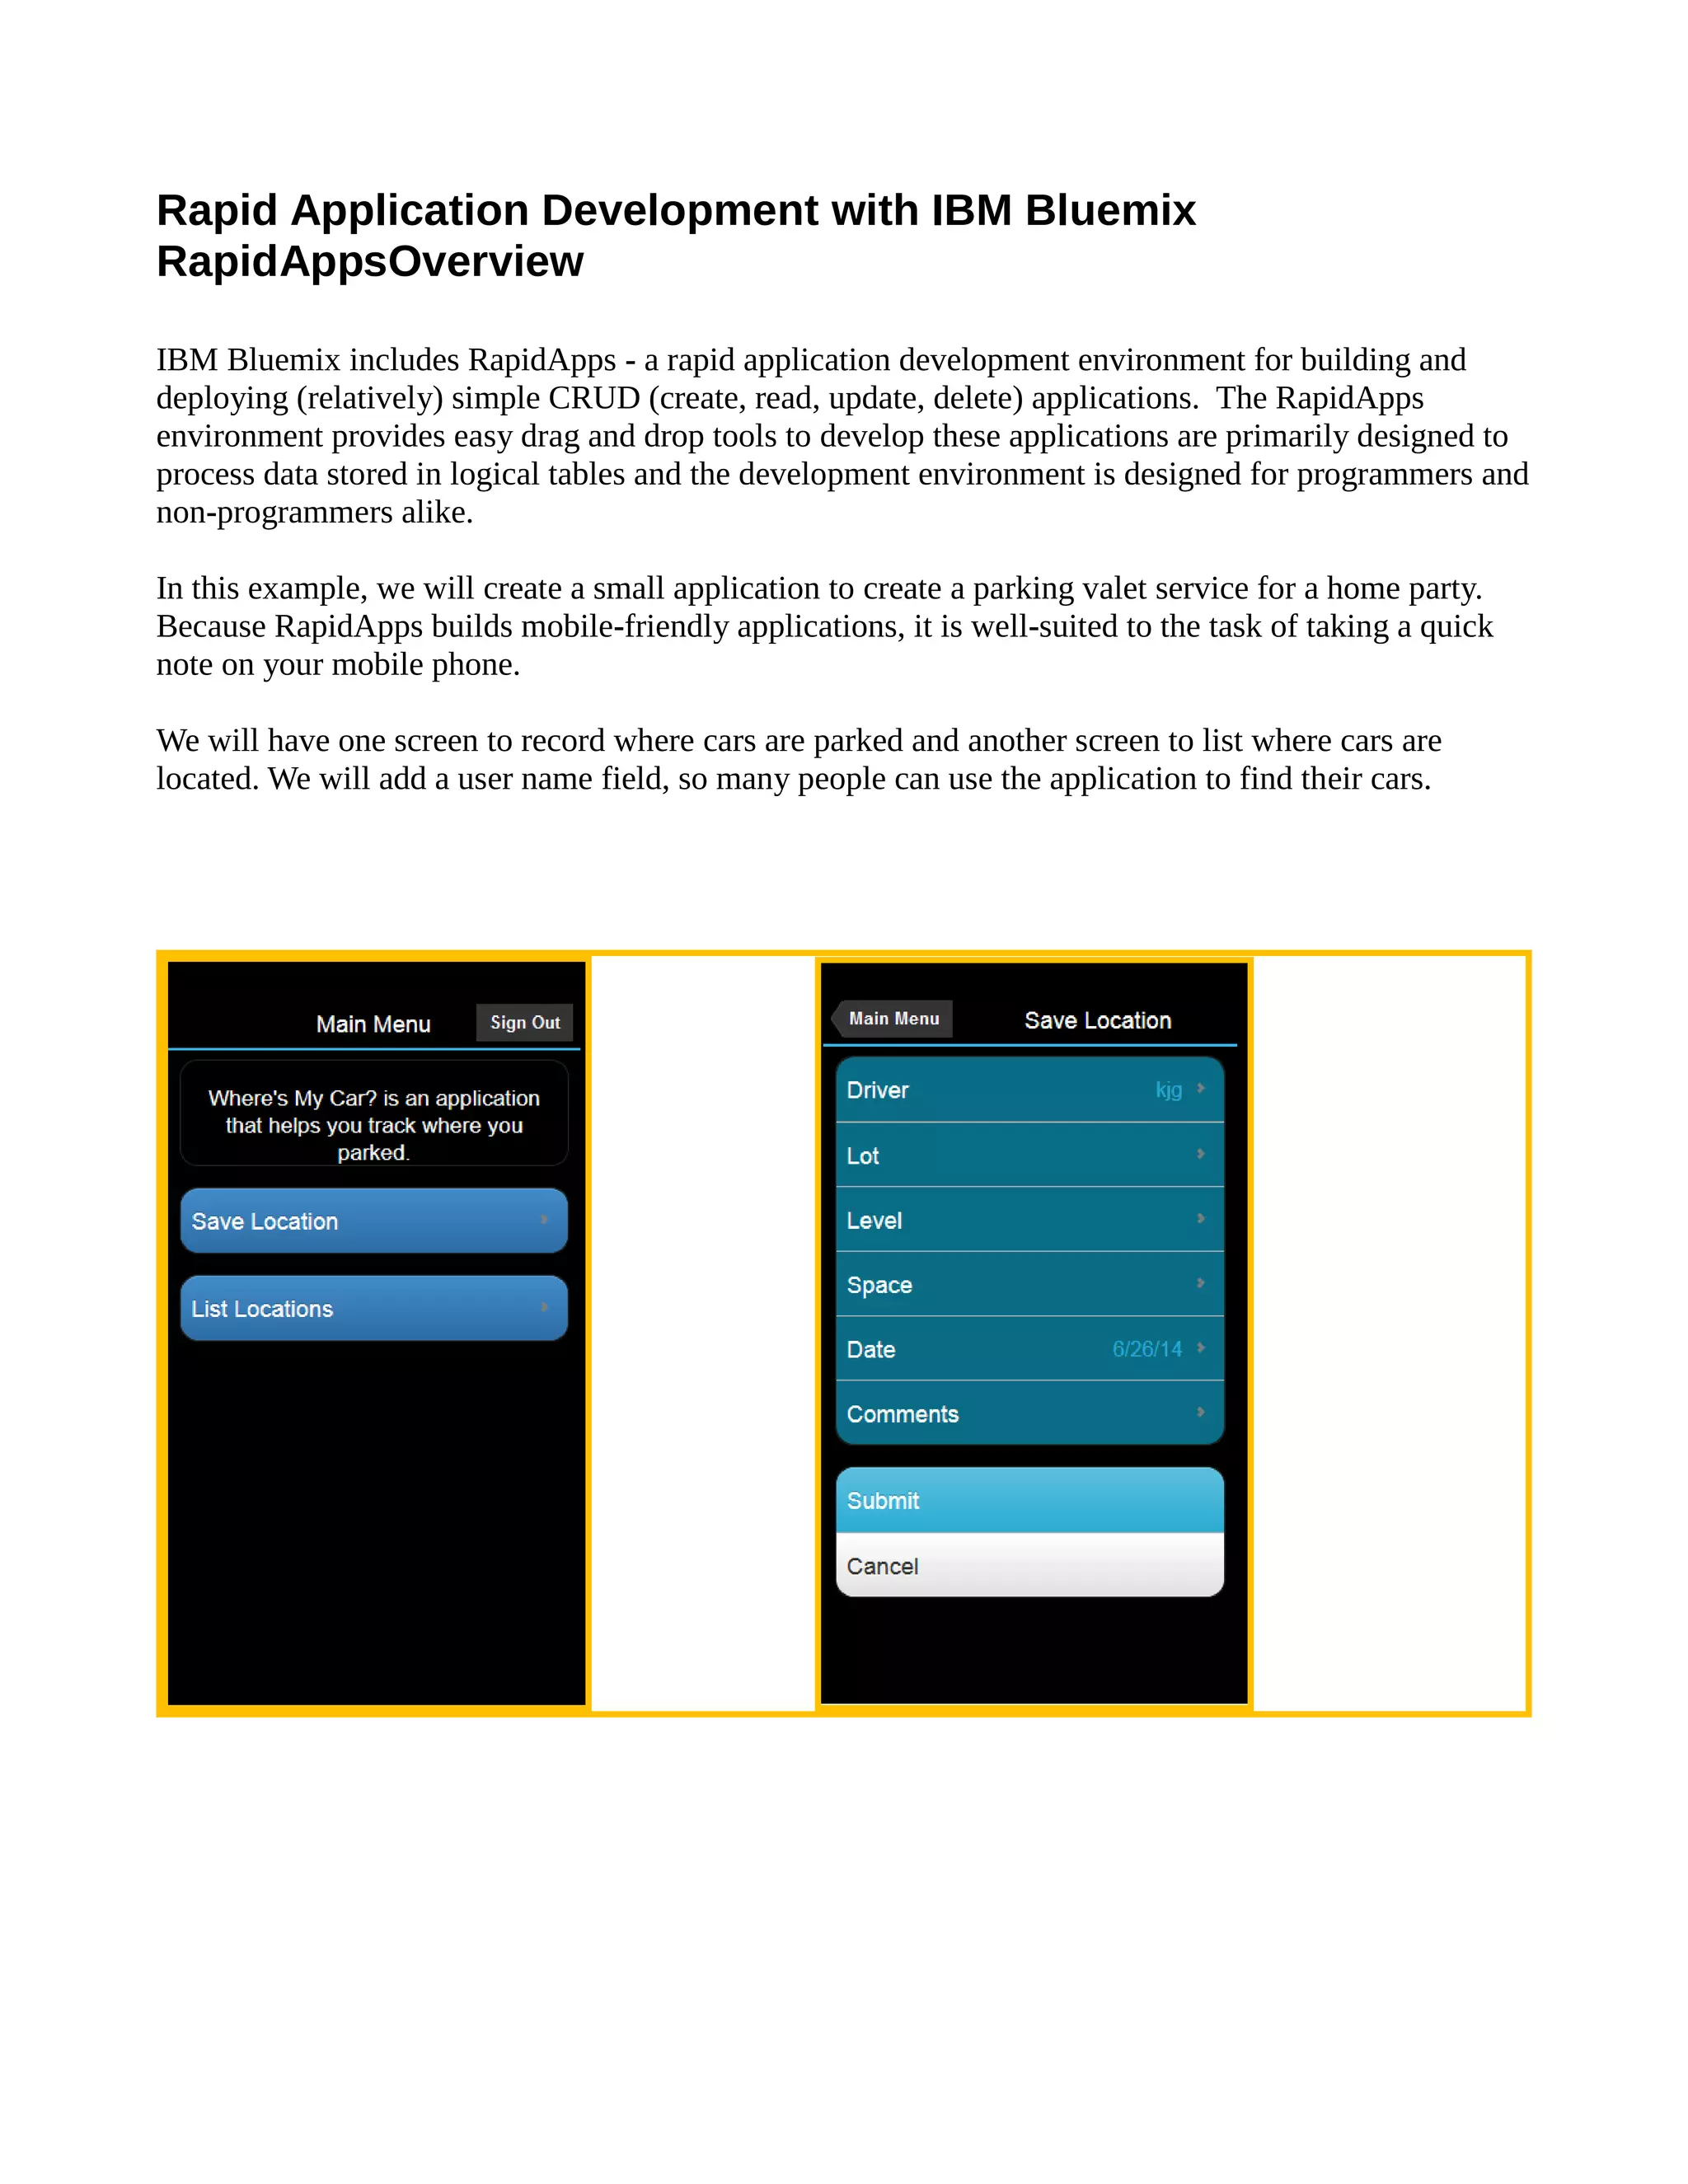
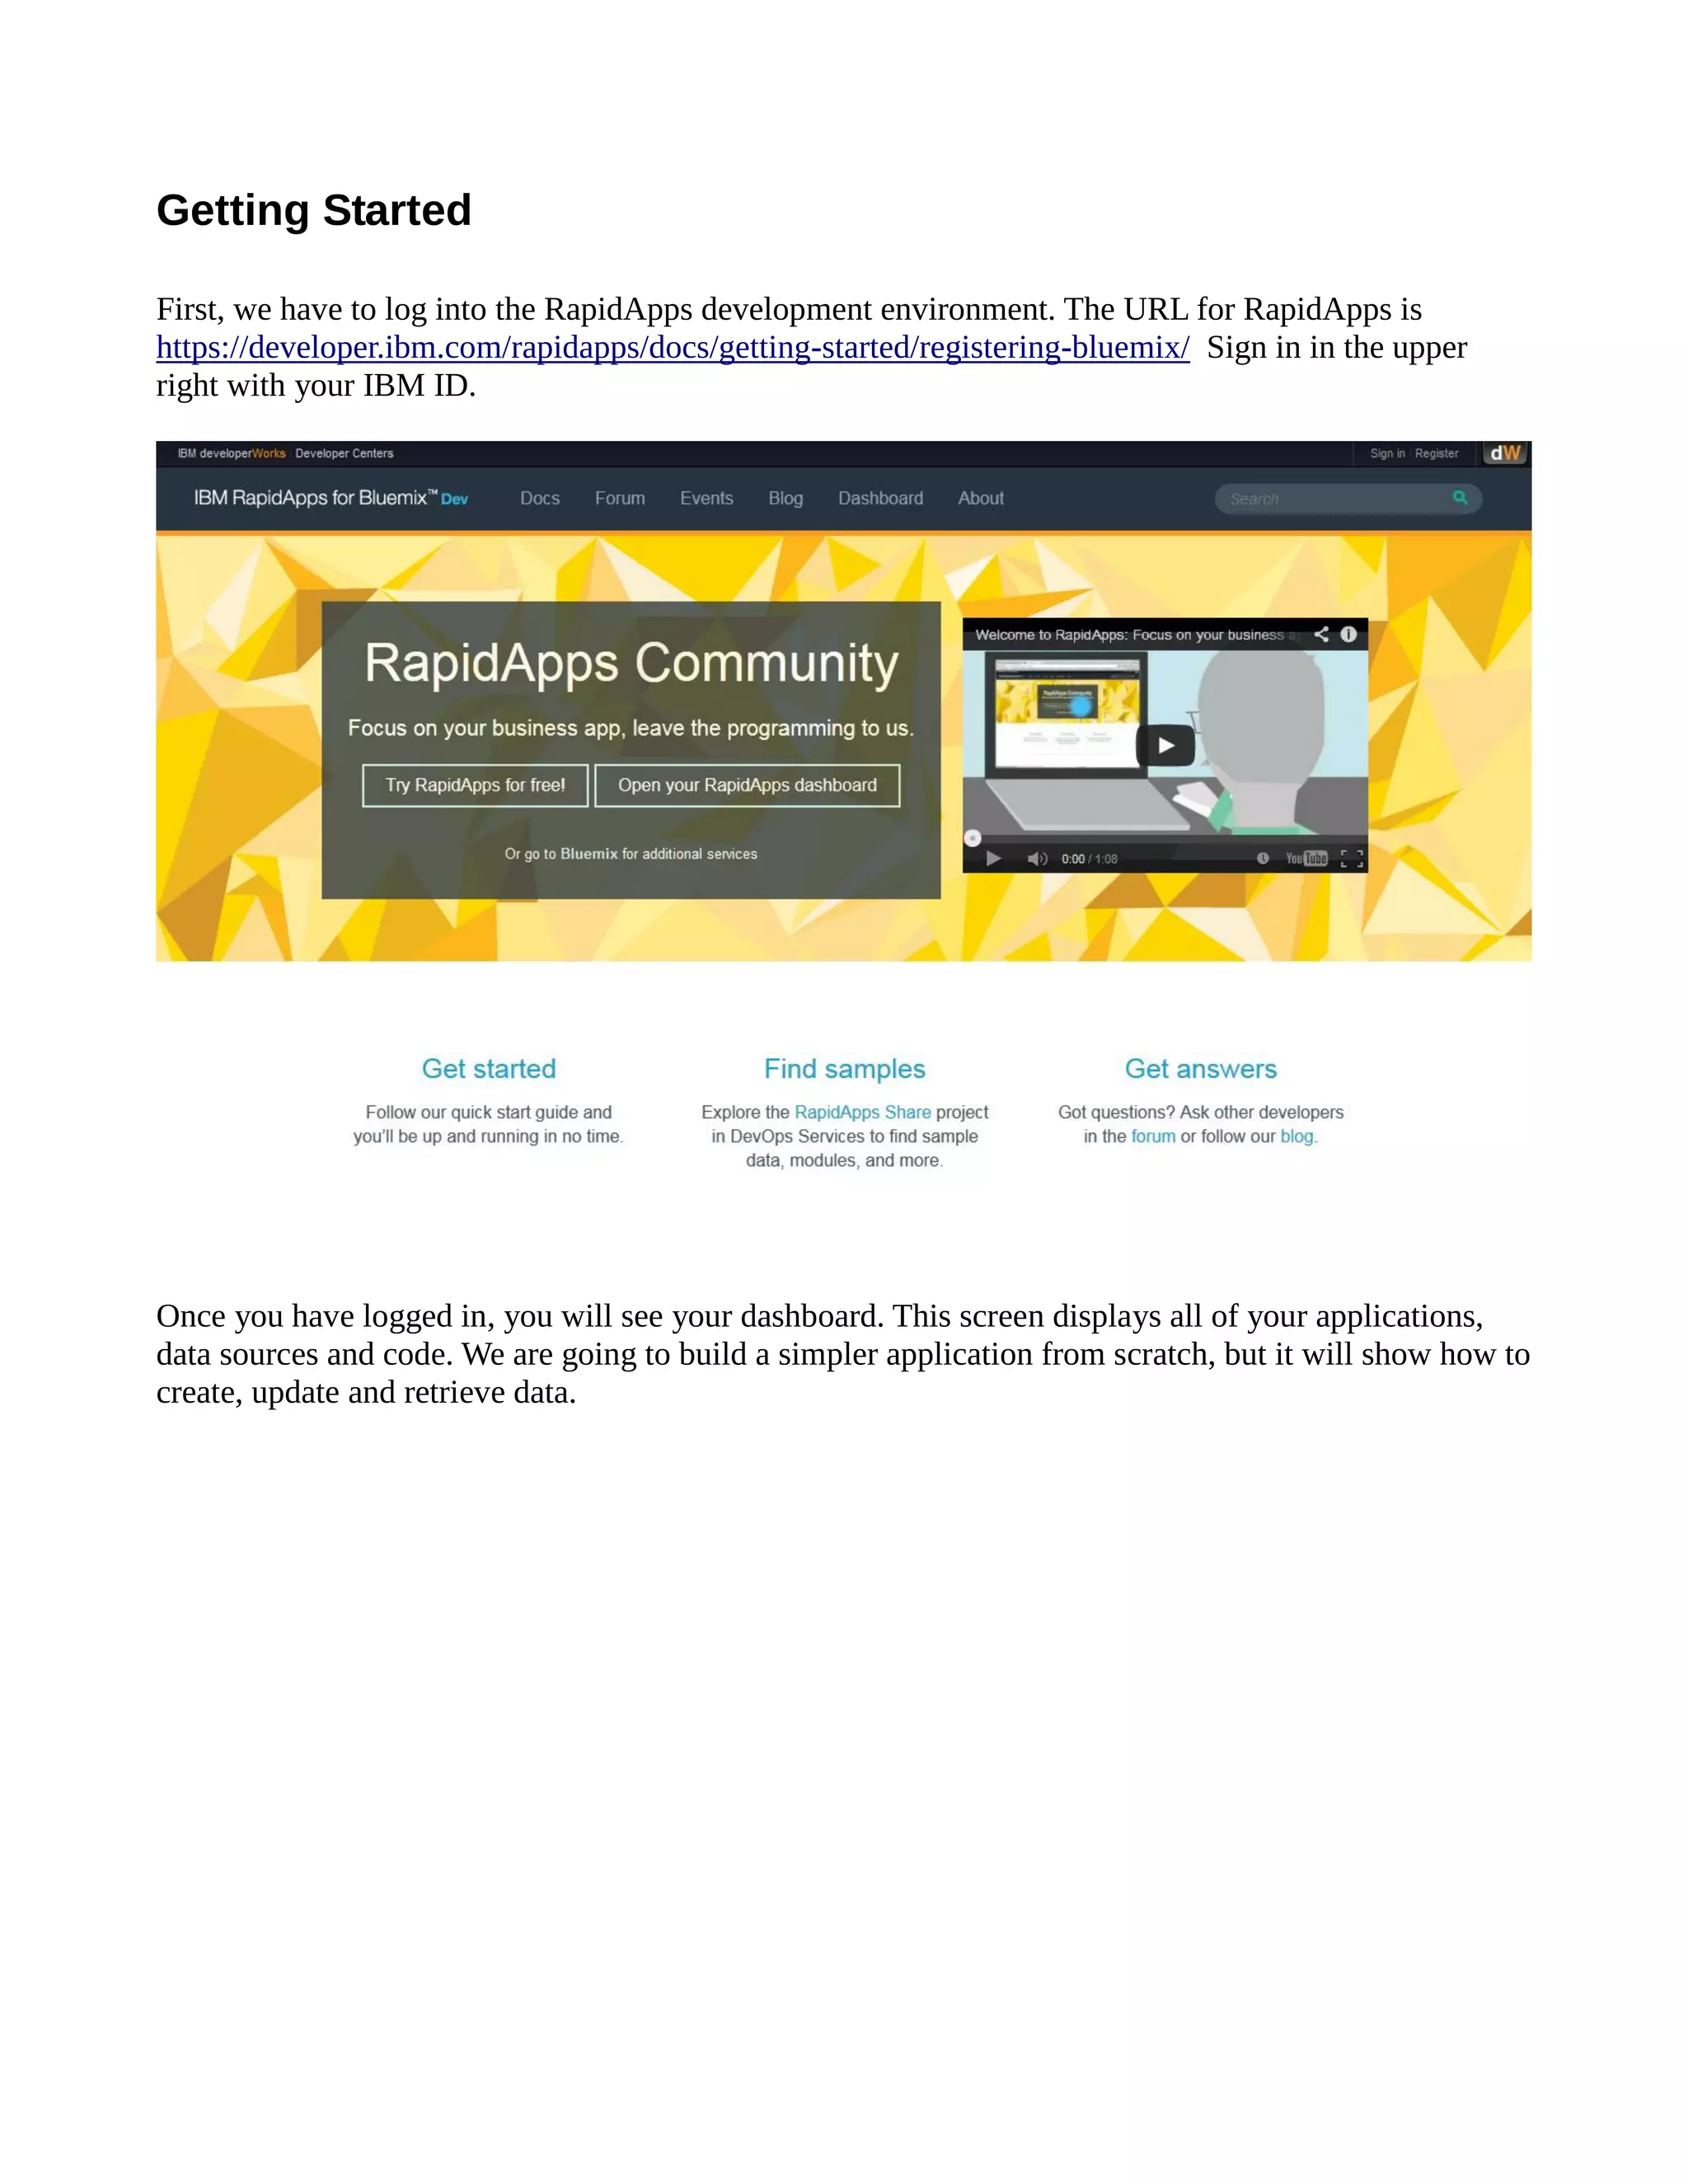
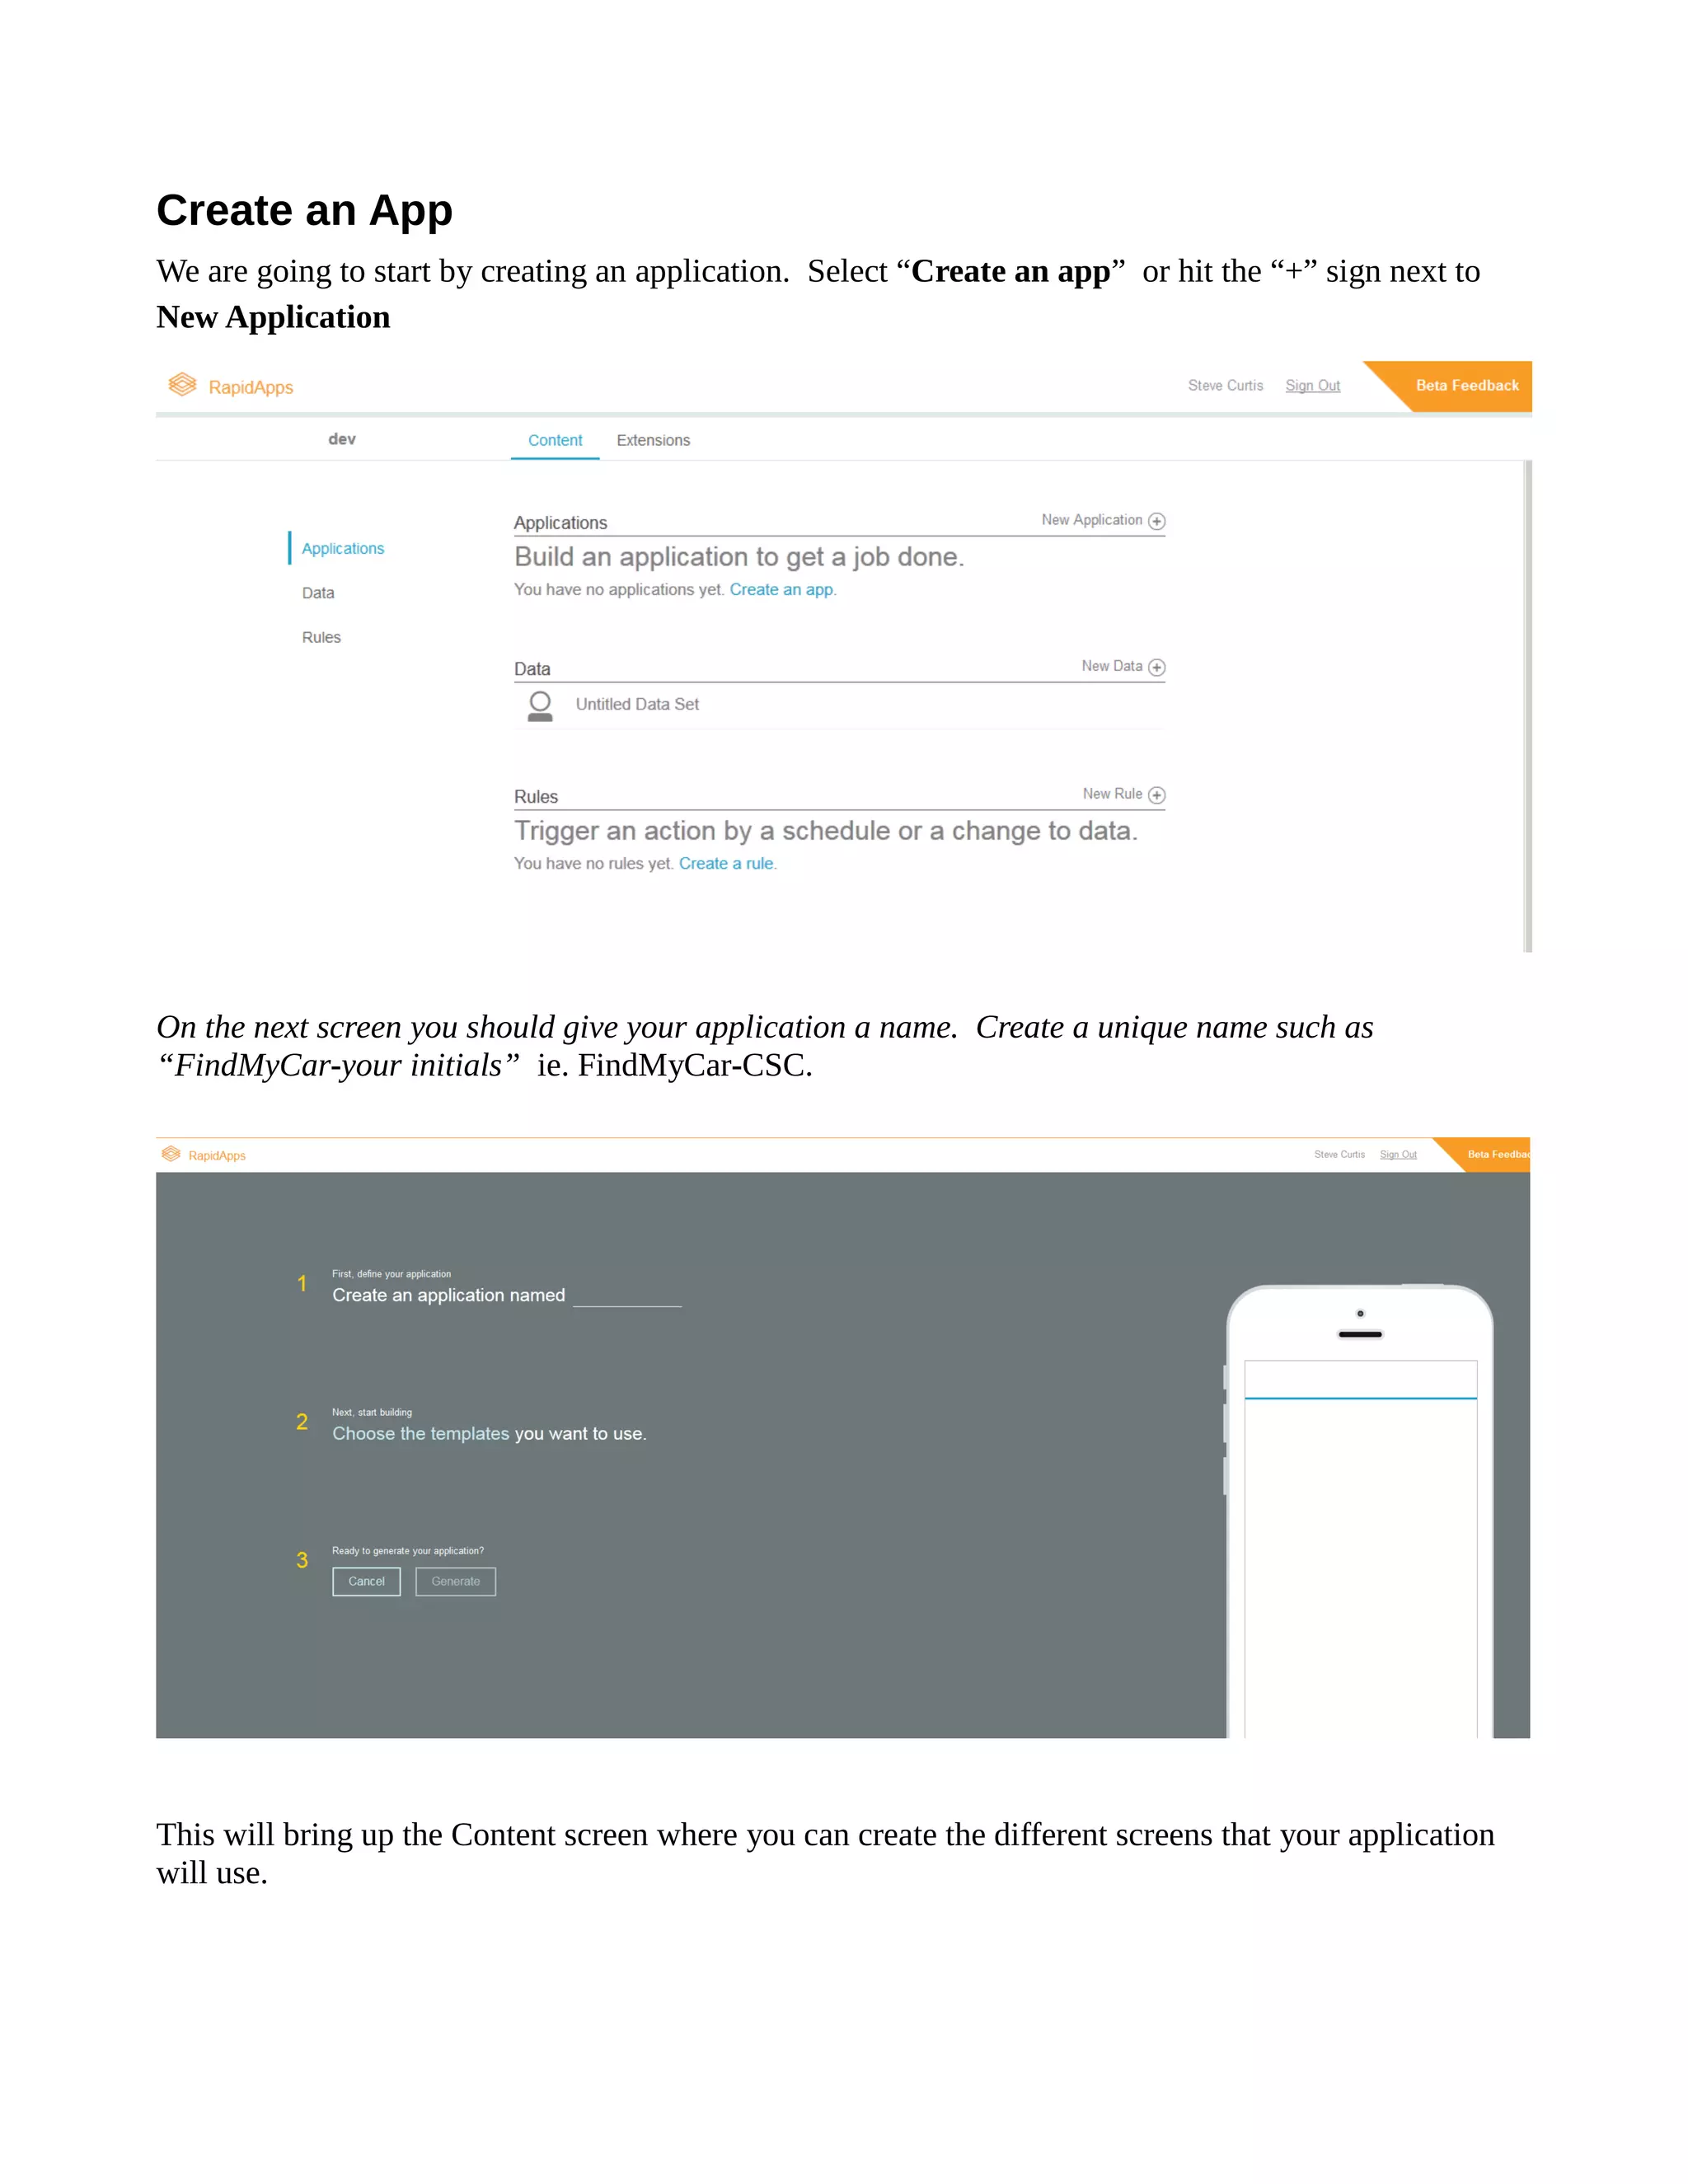
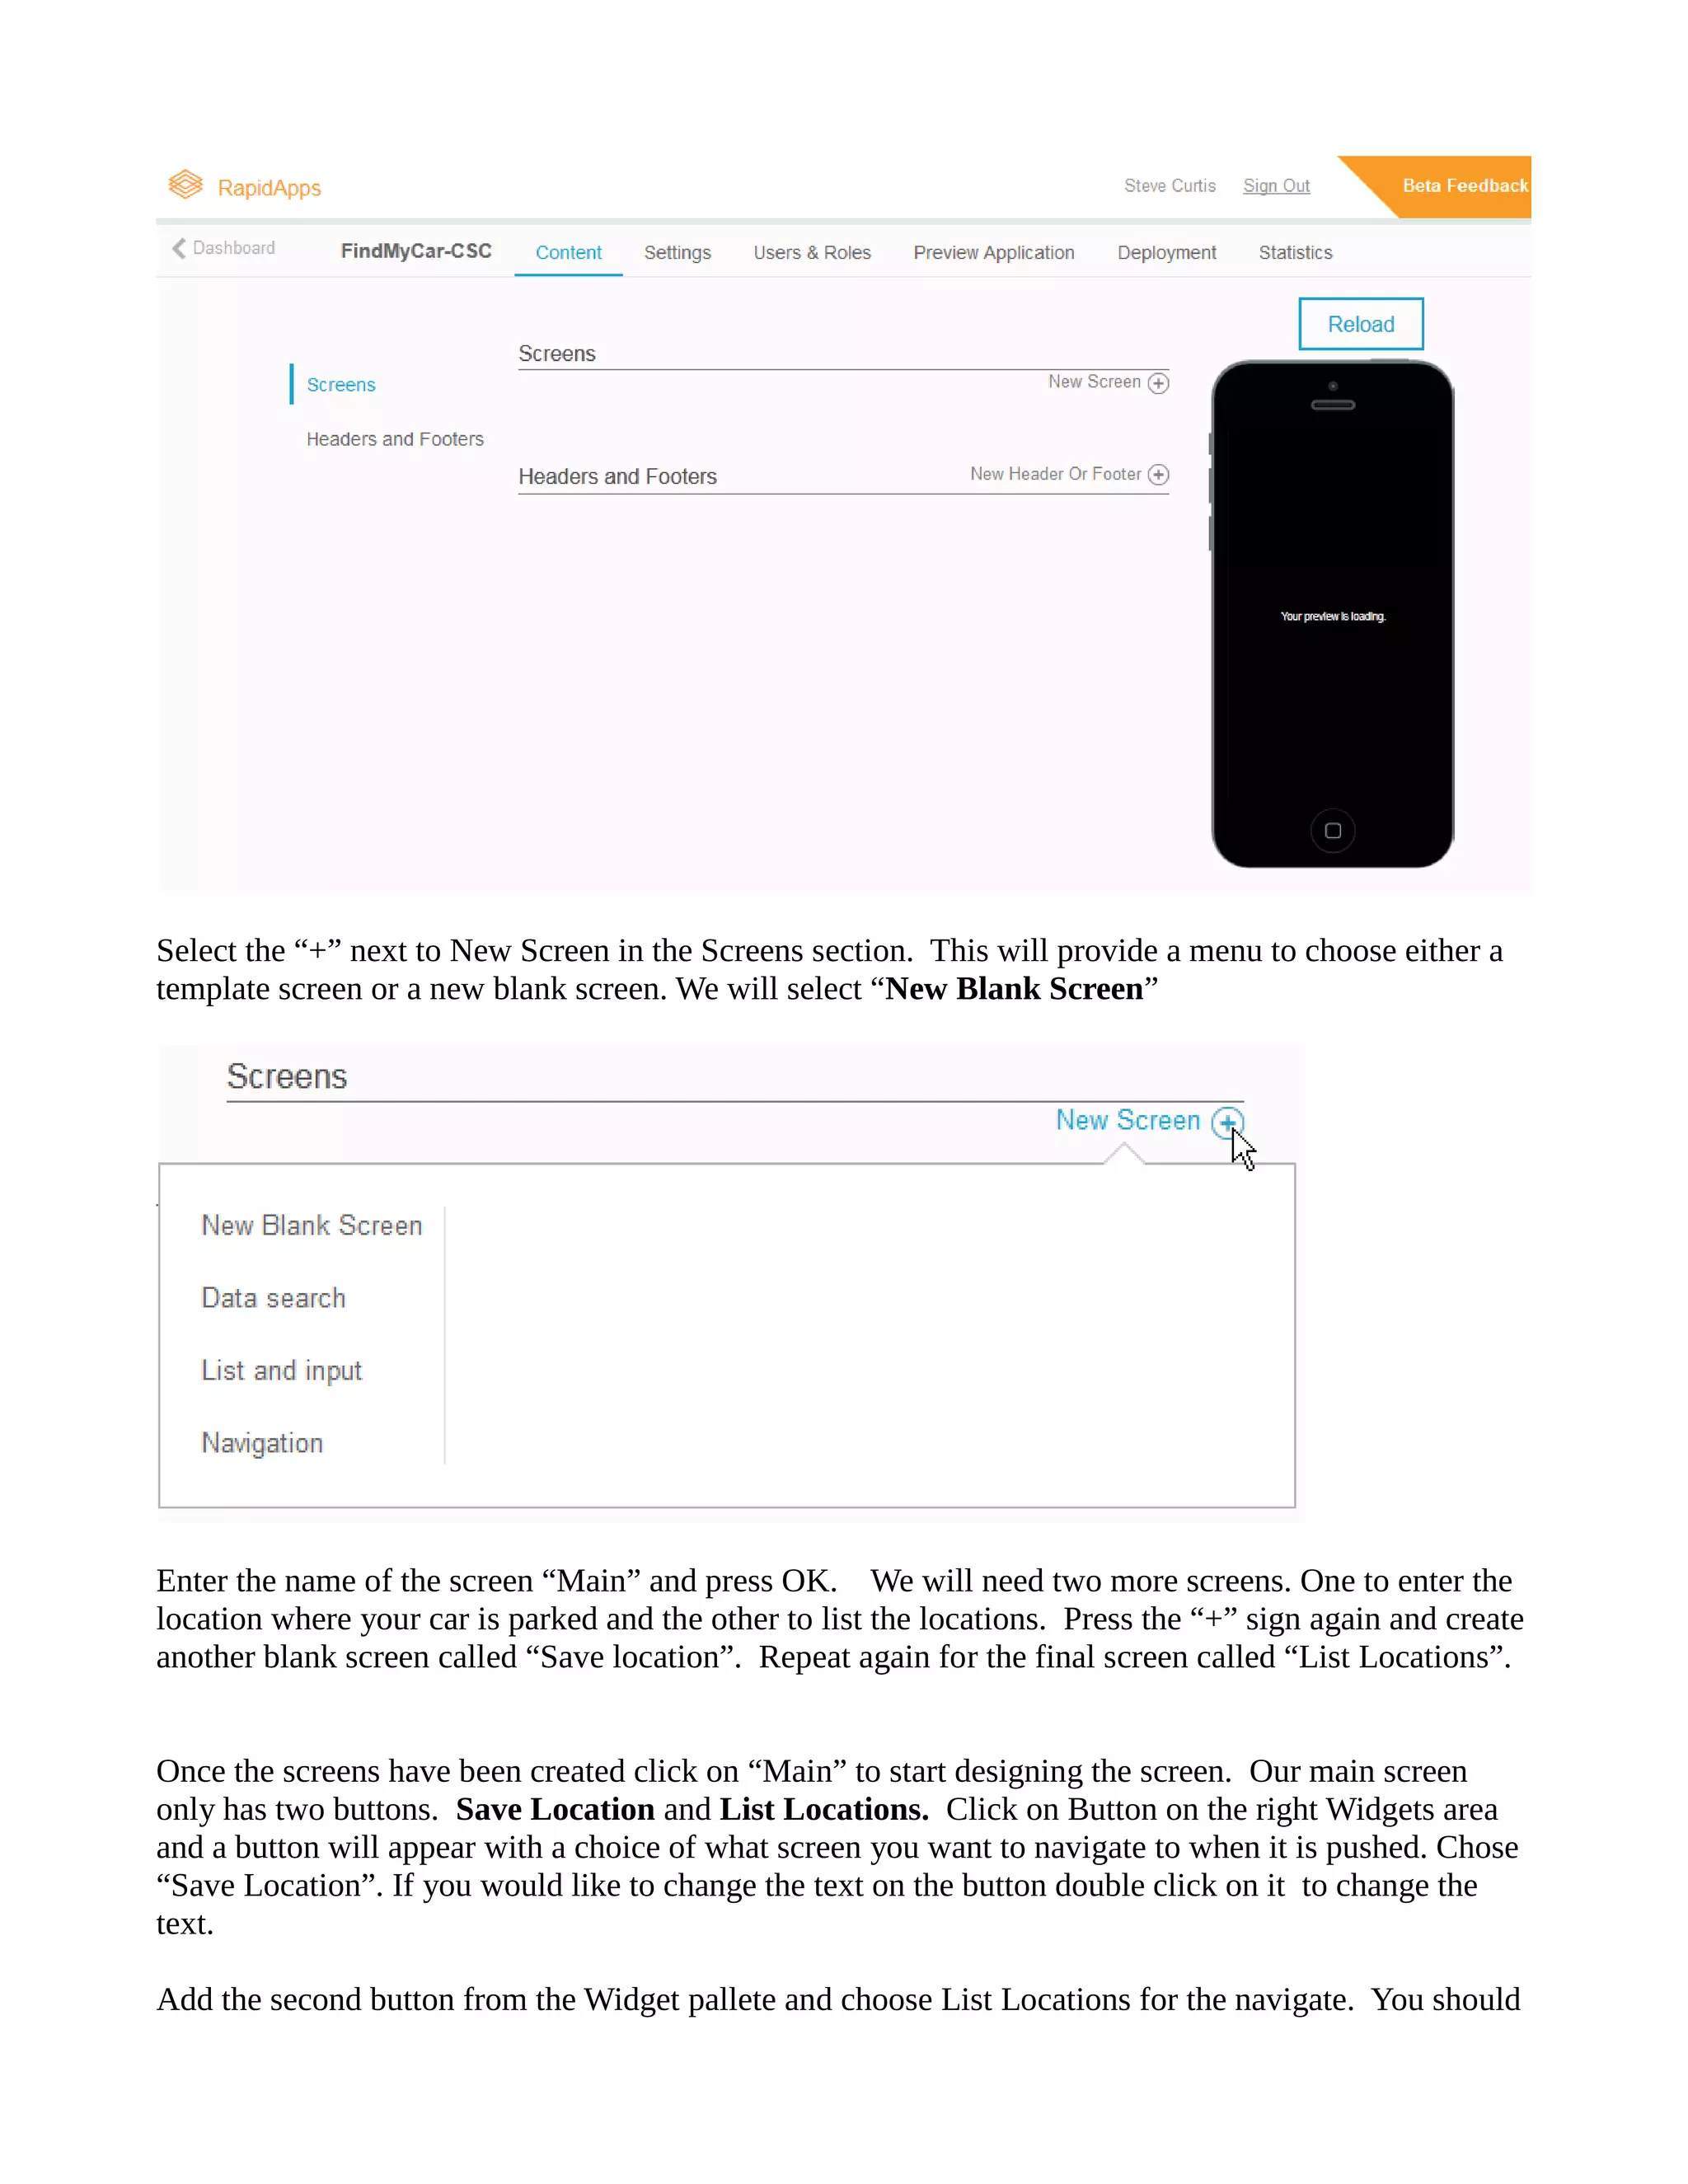
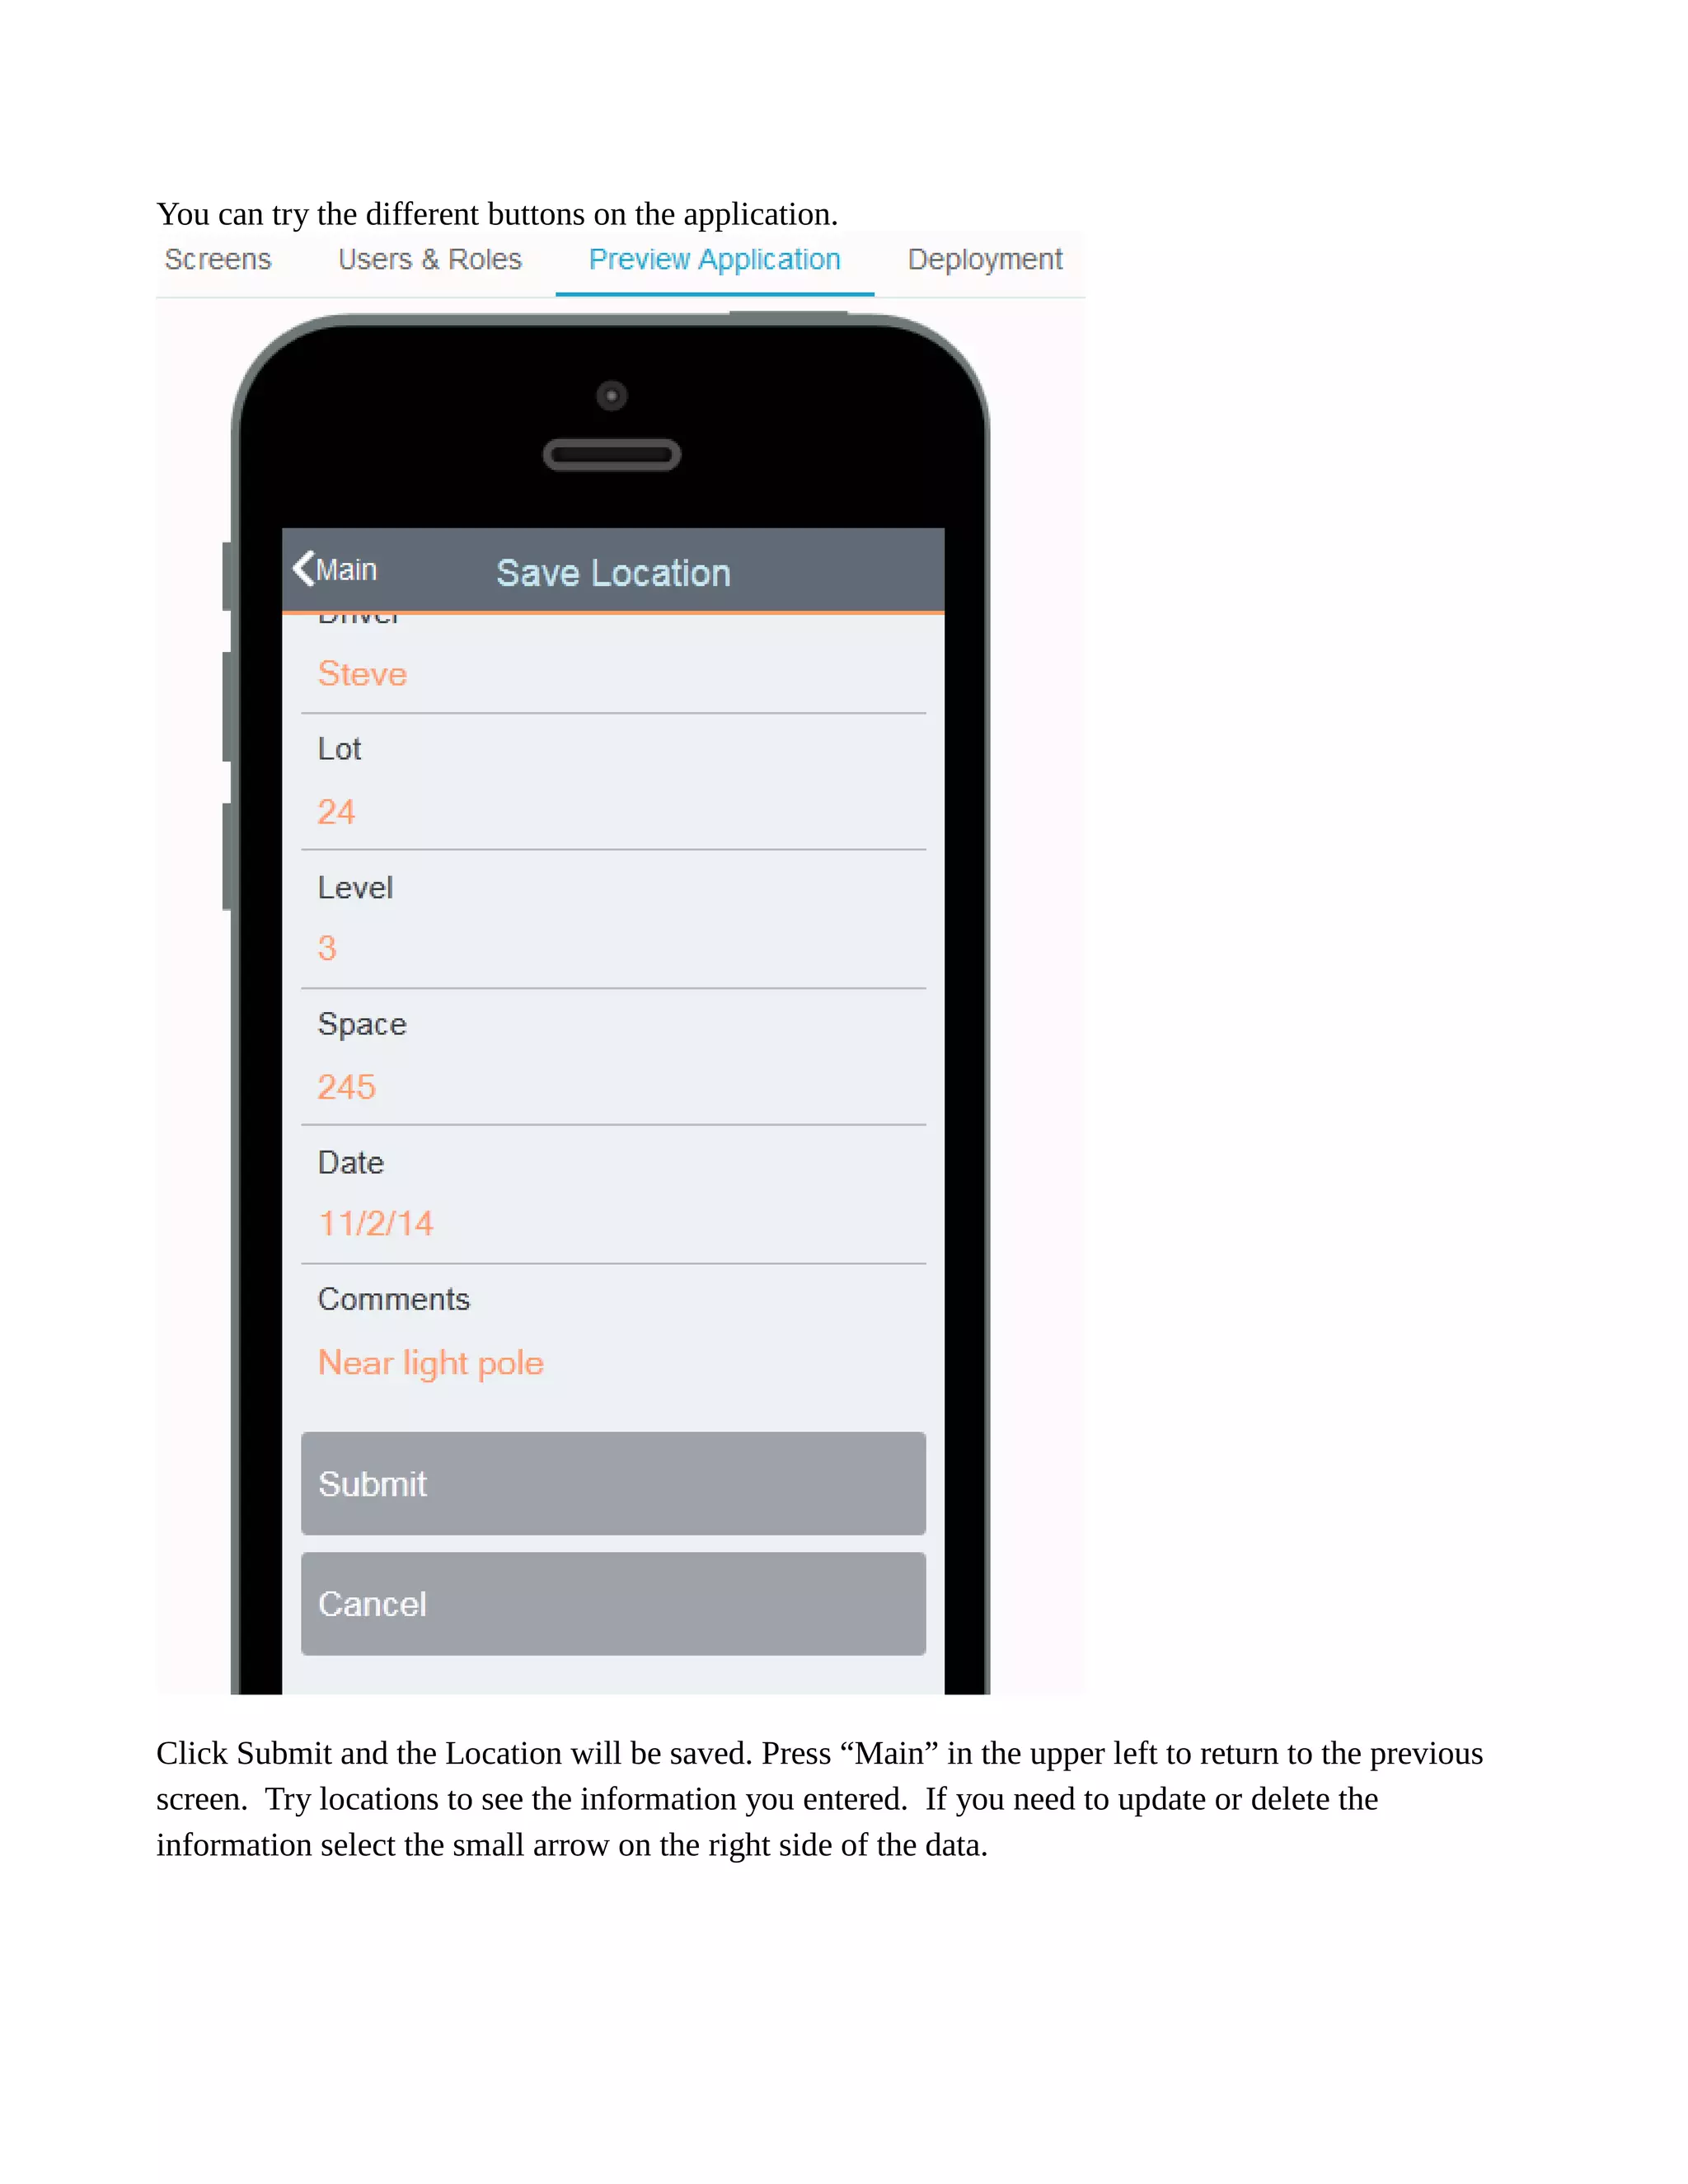
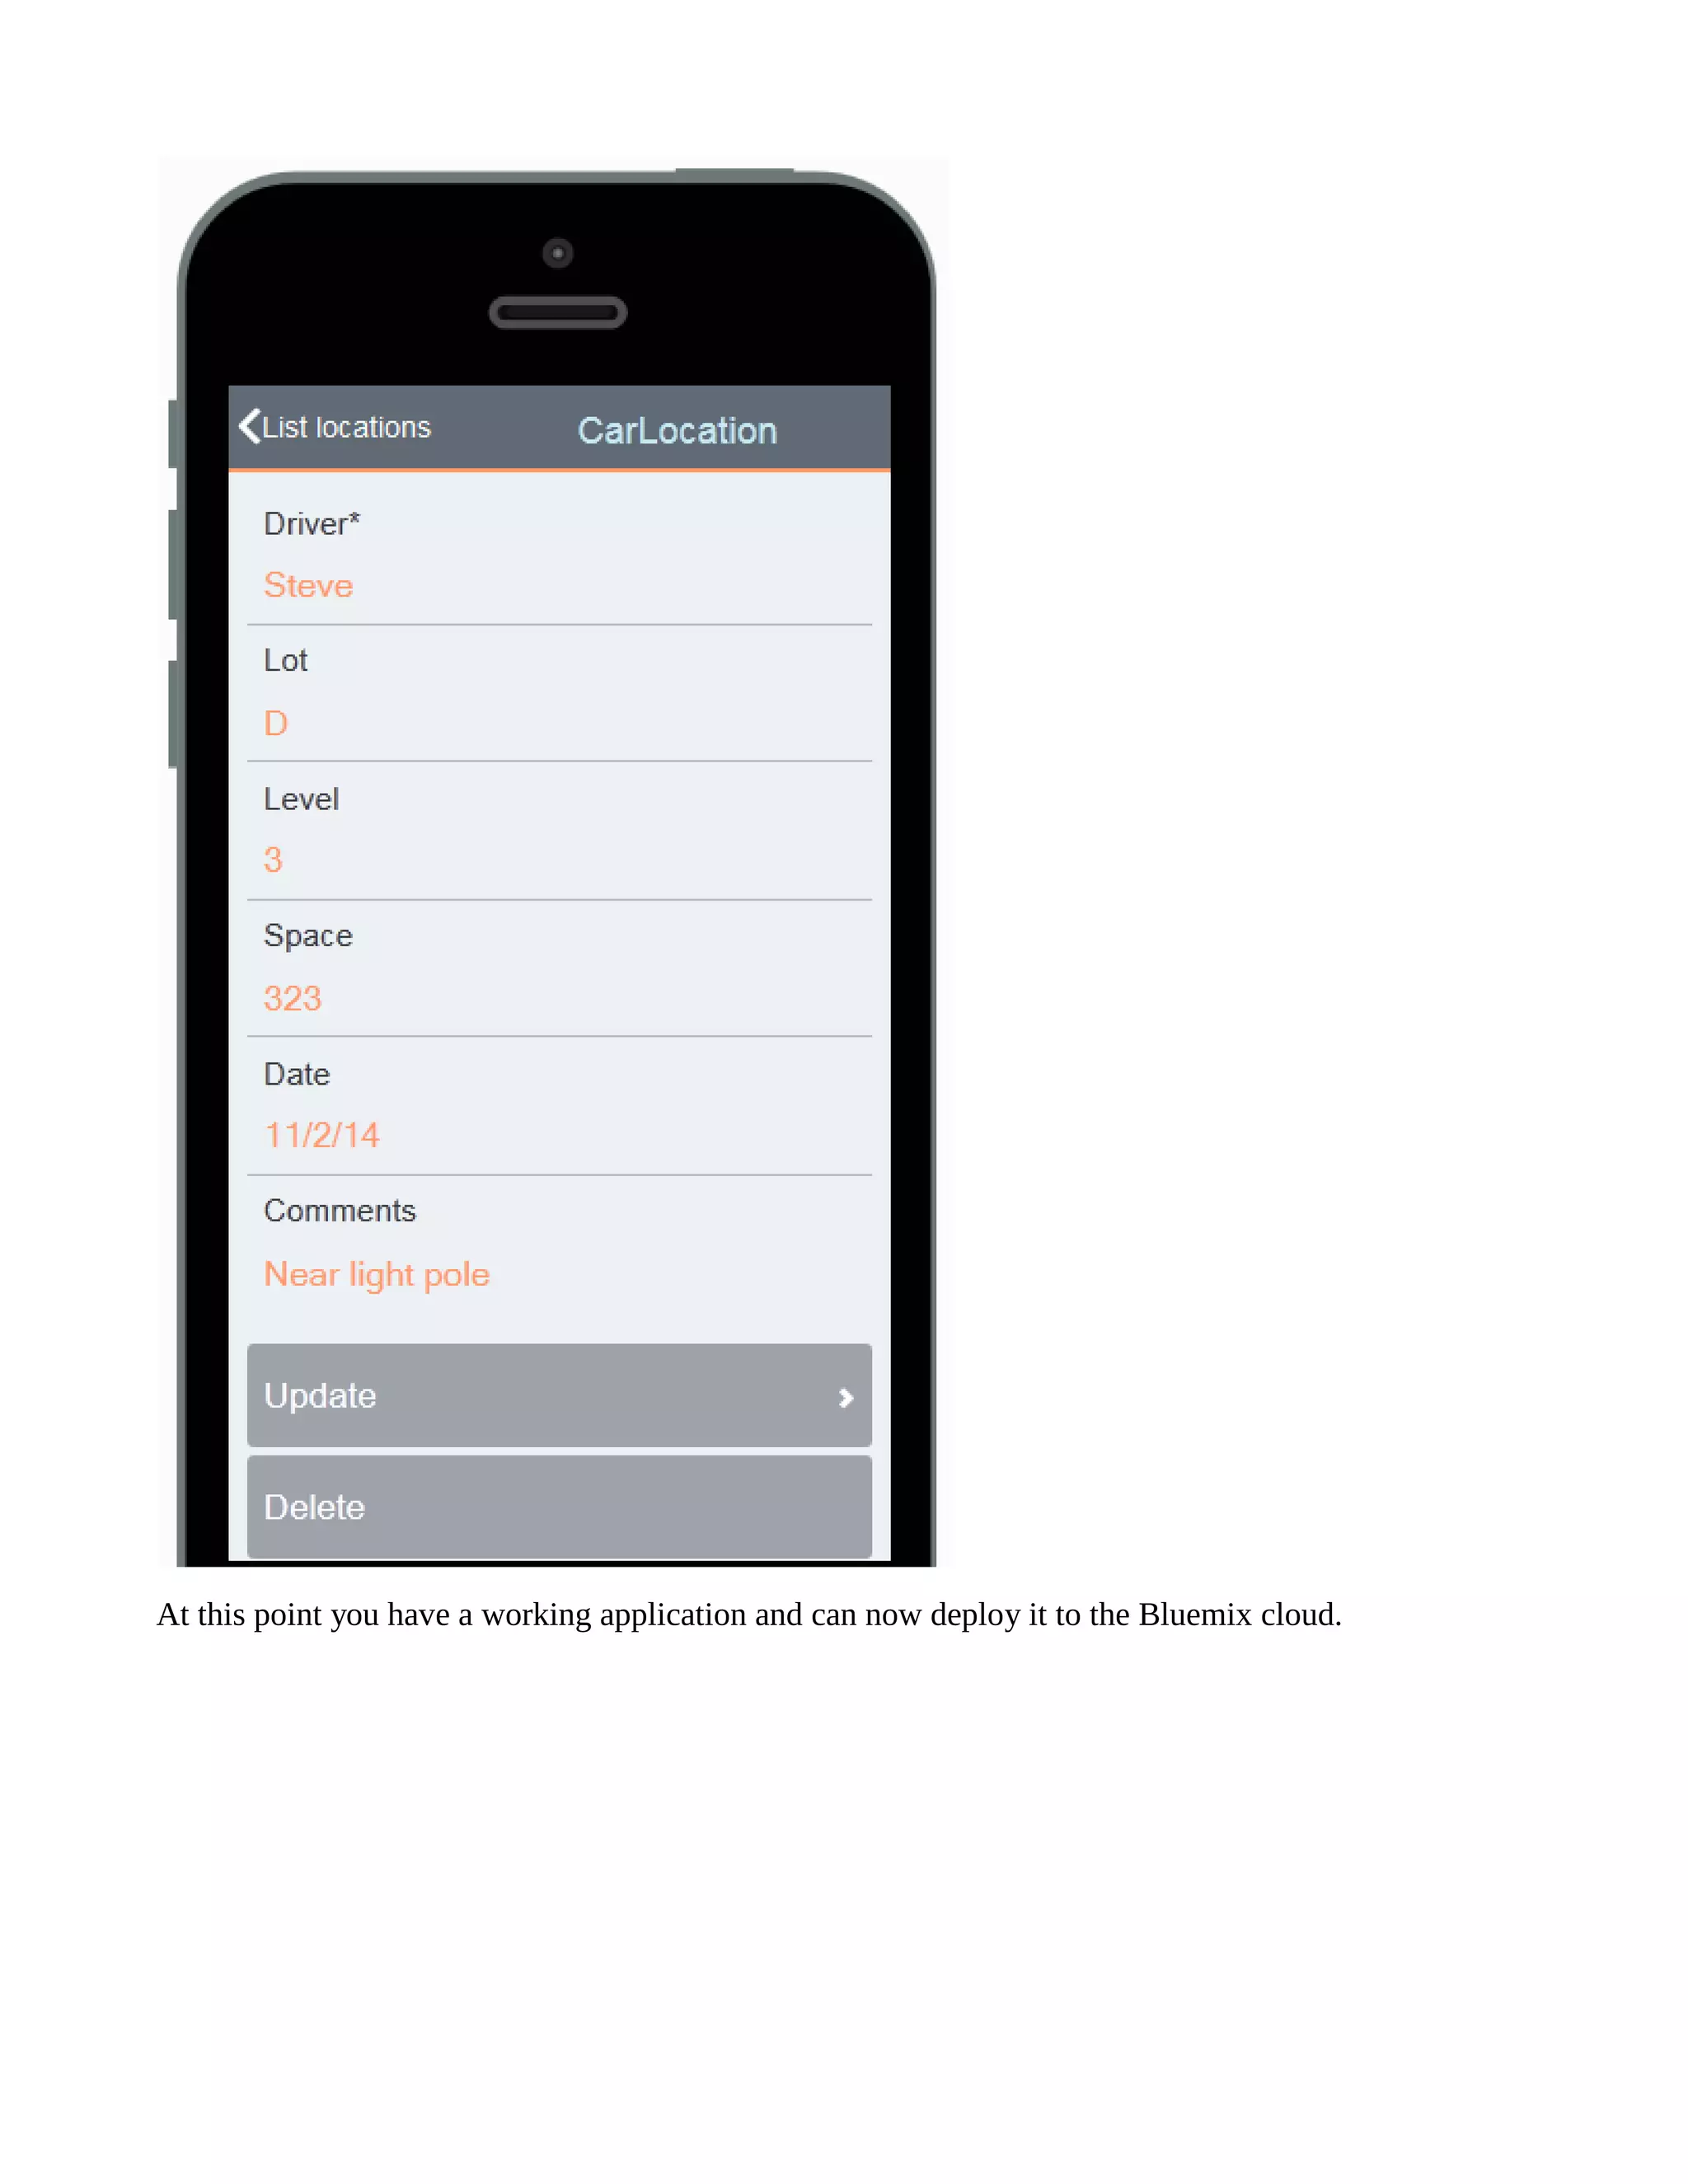
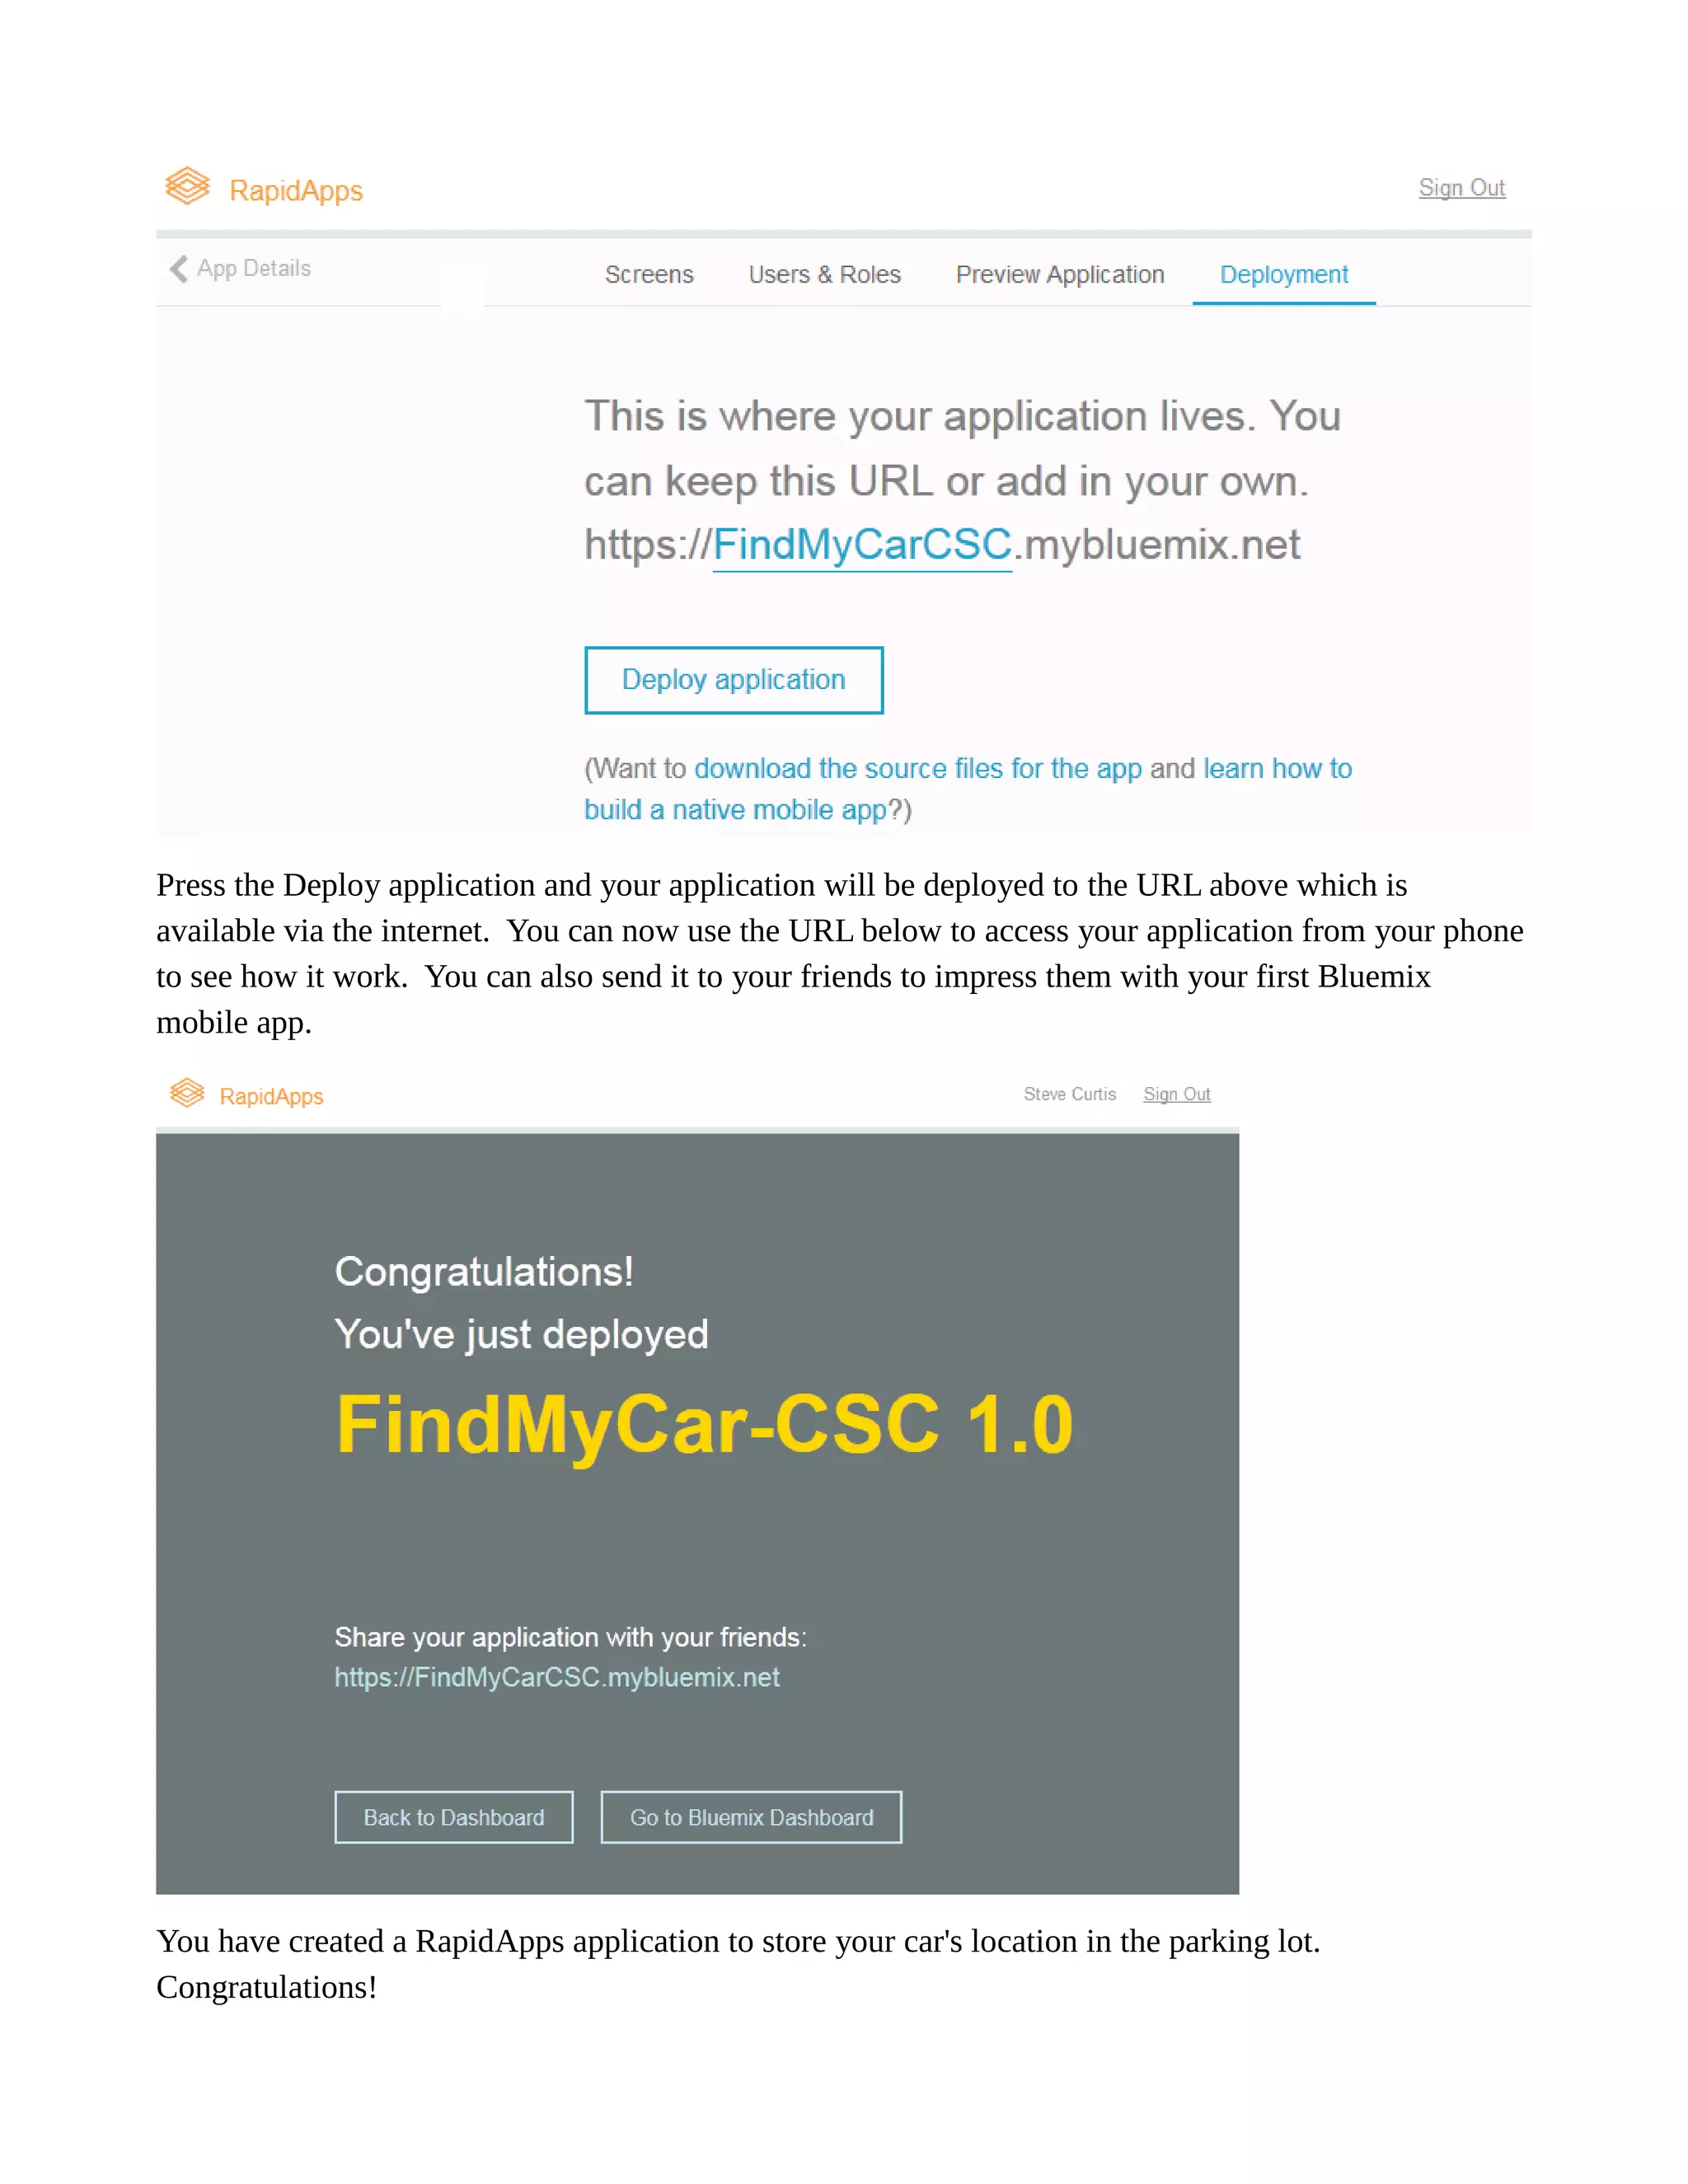
Rapid Application Development with IBM Bluemix RapidAppsOverview 
IBM Bluemix includes RapidApps - a rapid application development environment for building and deploying (relatively) simple CRUD create, read, update, delete) applications. The RapidApps environment provides easy drag and drop tools to develop these applications are primarily designed process data stored in logical tables and the development environment is designed for programmers and non-programmers alike. 
In this example, we will create a small application to create a parking valet service for home party. Because RapidApps builds mobile-friendly applications, it is well-suited to the task of taking a quick note on your mobile phone. 
We will have one screen to record where cars are parked and another screen to list where cars are located. We will add a user name field, so many people can use the application to find their cars.
Getting Started 
First, we have to log into the RapidApps development environment. The URL for is https://developer.ibm.com/rapidapps/docs/getting-started/registering-bluemix/ Sign in in the upper right with your IBM ID. 
Once you have logged in, will see your dashboard. This screen displays all of your applications, data sources and code. We are going to build a simpler application from scratch, but it will show how create, update and retrieve data.
Create an App 
We are going to start by creating an application. Select “Create an app” or hit the “+” sign next to New Application 
On the next screen you should give your application a name. Create unique name such as “FindMyCar-your initials” ie. FindMyCar-CSC. 
This will bring up the Content screen where you can create the different screens that your application will use.
Select the “+” next to New Screen in Screens section. This will provide a menu choose either template screen or a new blank screen. We will select “New Blank Screen” 
Enter the name of the screen “Main” and press OK. We will need two more screens. One to enter location where your car is parked and the other to list locations. Press “+” sign again create another blank screen called “Save location”. Repeat again for the final screen called “List Locations”. 
Once the screens have been created click on “Main” to start designing screen. Our main screen only has two buttons. Save Location and List Locations. Click on Button the right Widgets area and a button will appear with a choice of what screen you want to navigate when it is pushed. Chose “Save Location”. If you would like to change the text on button double click it text. 
Add the second button from Widget pallete and choose List Locations for the navigate. You should
also check the box to set this screen as your initial when app starts. 
have your main 
Next choose the Save Location screen on left navigation area and select Form from Widget area. You will be asked if you want to use an existing data set or create a new one. Choose Create set.
This will allow us to create the table that will hold our data Where you see Untitled Data Set, change the name to CarLocation and then select “+” 
You can now create each of the columns for data. You will name, then type (text, date, etc.) You will be creating the following fields. 
Driver 
Text - required 
Lot 
Text 
Level 
String 
Space 
String 
Date 
Date 
Notes 
String 
Click on the blue text labeled “Unittled Attribute” and set field name to Driver. It is a data
it is a required field so you will need to click on and change “Required”. Next click on the “+” again to add the subsequent fields. 
Reminder: When you get to the Date field will need change type of data “Date”. 
The last field will be Comments. Do not press the “+ sign once you have created Comments column. You are done creating the fields and can return to the screens. You will notice that your Save Location screen now has the fields along with Submit and Cancel buttons.
Now select the “List Locations” screen on left navigation. Select Table widget from right pallete. When the screen for data set comes up select the Existing Data “CarLocation” 
This will create the screen for holding data in a table with Columns on it.
Now you can preview your application. If the application does not come up right away click Reload buton.
You can try the different buttons on application. 
Click Submit and the Location will be saved. Press “Main” in upper left to return previous screen. Try locations to see the information you entered. If need update or delete the information select the small arrow on right side of data.
At this point you have a working application and can now deploy it to the Bluemix cloud.
Press the Deploy application and your will be deployed to the URL above which is available via the internet. You can now use URL below to access your application from phone to see how it work. You can also send your friends impress them with first Bluemix mobile app. 
You have created a RapidApps application to store your car's location in the parking lot. Congratulations!

Rapid applications development update12-06-14

  • 1.
    Rapid Application Developmentwith IBM Bluemix RapidAppsOverview IBM Bluemix includes RapidApps - a rapid application development environment for building and deploying (relatively) simple CRUD create, read, update, delete) applications. The RapidApps environment provides easy drag and drop tools to develop these applications are primarily designed process data stored in logical tables and the development environment is designed for programmers and non-programmers alike. In this example, we will create a small application to create a parking valet service for home party. Because RapidApps builds mobile-friendly applications, it is well-suited to the task of taking a quick note on your mobile phone. We will have one screen to record where cars are parked and another screen to list where cars are located. We will add a user name field, so many people can use the application to find their cars.
  • 2.
    Getting Started First,we have to log into the RapidApps development environment. The URL for is https://developer.ibm.com/rapidapps/docs/getting-started/registering-bluemix/ Sign in in the upper right with your IBM ID. Once you have logged in, will see your dashboard. This screen displays all of your applications, data sources and code. We are going to build a simpler application from scratch, but it will show how create, update and retrieve data.
  • 3.
    Create an App We are going to start by creating an application. Select “Create an app” or hit the “+” sign next to New Application On the next screen you should give your application a name. Create unique name such as “FindMyCar-your initials” ie. FindMyCar-CSC. This will bring up the Content screen where you can create the different screens that your application will use.
  • 4.
    Select the “+”next to New Screen in Screens section. This will provide a menu choose either template screen or a new blank screen. We will select “New Blank Screen” Enter the name of the screen “Main” and press OK. We will need two more screens. One to enter location where your car is parked and the other to list locations. Press “+” sign again create another blank screen called “Save location”. Repeat again for the final screen called “List Locations”. Once the screens have been created click on “Main” to start designing screen. Our main screen only has two buttons. Save Location and List Locations. Click on Button the right Widgets area and a button will appear with a choice of what screen you want to navigate when it is pushed. Chose “Save Location”. If you would like to change the text on button double click it text. Add the second button from Widget pallete and choose List Locations for the navigate. You should
  • 5.
    also check thebox to set this screen as your initial when app starts. have your main Next choose the Save Location screen on left navigation area and select Form from Widget area. You will be asked if you want to use an existing data set or create a new one. Choose Create set.
  • 6.
    This will allowus to create the table that will hold our data Where you see Untitled Data Set, change the name to CarLocation and then select “+” You can now create each of the columns for data. You will name, then type (text, date, etc.) You will be creating the following fields. Driver Text - required Lot Text Level String Space String Date Date Notes String Click on the blue text labeled “Unittled Attribute” and set field name to Driver. It is a data
  • 7.
    it is arequired field so you will need to click on and change “Required”. Next click on the “+” again to add the subsequent fields. Reminder: When you get to the Date field will need change type of data “Date”. The last field will be Comments. Do not press the “+ sign once you have created Comments column. You are done creating the fields and can return to the screens. You will notice that your Save Location screen now has the fields along with Submit and Cancel buttons.
  • 8.
    Now select the“List Locations” screen on left navigation. Select Table widget from right pallete. When the screen for data set comes up select the Existing Data “CarLocation” This will create the screen for holding data in a table with Columns on it.
  • 9.
    Now you canpreview your application. If the application does not come up right away click Reload buton.
  • 10.
    You can trythe different buttons on application. Click Submit and the Location will be saved. Press “Main” in upper left to return previous screen. Try locations to see the information you entered. If need update or delete the information select the small arrow on right side of data.
  • 11.
    At this pointyou have a working application and can now deploy it to the Bluemix cloud.
  • 12.
    Press the Deployapplication and your will be deployed to the URL above which is available via the internet. You can now use URL below to access your application from phone to see how it work. You can also send your friends impress them with first Bluemix mobile app. You have created a RapidApps application to store your car's location in the parking lot. Congratulations!