
Recommended
More Related Content
What's hot
What's hot (9)
Similar to Production schedule
Similar to Production schedule (20)
More from Stephen Royle
More from Stephen Royle (20)
Recently uploaded
Recently uploaded (20)
Production schedule
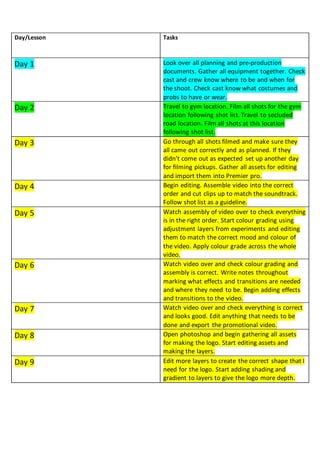
- 1. Day/Lesson Tasks Day 1 Look over all planning and pre-production documents. Gather all equipment together. Check cast and crew know where to be and when for the shoot. Check cast know what costumes and probs to have or wear. Day 2 Travel to gym location. Film all shots for the gym location following shot list. Travel to secluded road location. Film all shots at this location following shot list. Day 3 Go through all shots filmed and make sure they all came out correctly and as planned. If they didn’t come out as expected set up another day for filming pickups. Gather all assets for editing and import them into Premier pro. Day 4 Begin editing. Assemble video into the correct order and cut clips up to match the soundtrack. Follow shot list as a guideline. Day 5 Watch assembly of video over to check everything is in the right order. Start colour grading using adjustment layers from experiments and editing them to match the correct mood and colour of the video. Apply colour grade across the whole video. Day 6 Watch video over and check colour grading and assembly is correct. Write notes throughout marking what effects and transitions are needed and where they need to be. Begin adding effects and transitions to the video. Day 7 Watch video over and check everything is correct and looks good. Edit anything that needs to be done and export the promotional video. Day 8 Open photoshop and begin gathering all assets for making the logo. Start editing assets and making the layers. Day 9 Edit more layers to create the correct shape that I need for the logo. Start adding shading and gradient to layers to give the logo more depth.
- 2. Planning Shooting Postproduction & editing Day 10 Check over all the layers to make sure they are correct and look good. Start adding text to my logo and make sure everything is polished. Day 11 Finalize logo and export it as a JPEG. Begin creating social media platforms and edit some photos and videos to post. Day 12 Post more content to grow the channel. Check insights and reach to see how the platform is growing. Share social media links. Day 13 Check over all Products made and make any changes that need to be done and embed all products into my blog. Day 14 Start editing behind the scenes footage. Day 15 Start editing time lapse editing footage. Day 16 Use Loom to commentate over behind the scenes footage and time lapse editing footage during the evaluation week.