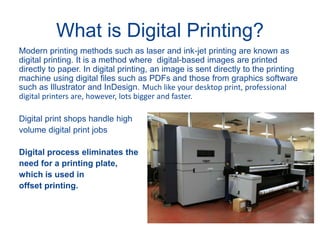
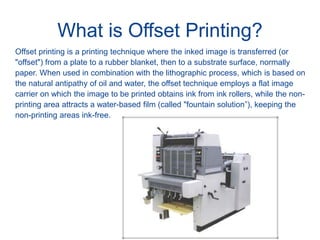
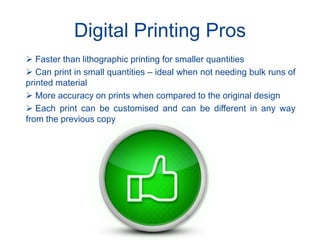
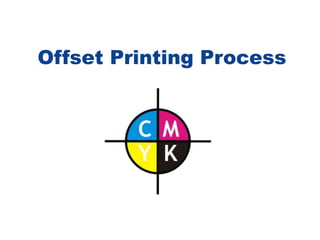
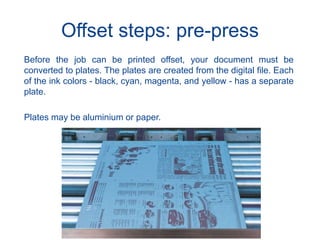
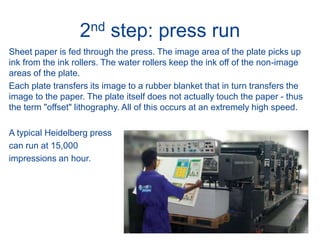
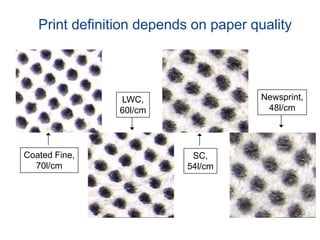
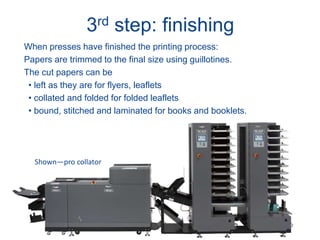
2. What is Digital Printing?
Modern printing methods such as laser and ink-jet printing are known as
digital printing. It is a method where digital-based images are printed
directly to paper. In digital printing, an image is sent directly to the printing
machine using digital files such as PDFs and those from graphics software
such as Illustrator and InDesign. Much like your desktop print, professional
digital printers are, however, lots bigger and faster.
Digital print shops handle high
volume digital print jobs
Digital process eliminates the
need for a printing plate,
which is used in
offset printing.
3. What is Offset Printing?
Offset printing is a printing technique where the inked image is transferred (or
"offset") from a plate to a rubber blanket, then to a substrate surface, normally
paper. When used in combination with the lithographic process, which is based on
the natural antipathy of oil and water, the offset technique employs a flat image
carrier on which the image to be printed obtains ink from ink rollers, while the non-
printing area attracts a water-based film (called "fountain solution”), keeping the
non-printing areas ink-free.
4. What is Web Printing?
• Web offset is a form of offset printing in which a continuous roll of paper is fed
through the printing press. Pages are separated and cut to size after they have
been printed. Web offset printing is used for high-volume publications such as
mass-market books, magazines, newspapers, catalogs and brochures.
6. Offset Printing Pros
Ability to print larger quantities cost effectively
Can print on a variety of surfaces. And use special colours where
four color process is not able to reproduce the required shade.
Can better accommodate large runs
You can include varnishes, diecuts, embossing
Has a richer look and can accommodate more paper types
7. Offset Printing Cons
The process requires more time for work to dry before finishing
Costs more than digital presses for low runs
Slower turnaround times
More expensive
8. Digital Printing Pros
Faster than lithographic printing for smaller quantities
Can print in small quantities – ideal when not needing bulk runs of
printed material
More accuracy on prints when compared to the original design
Each print can be customised and can be different in any way
from the previous copy
9. Digital Printing Cons
Although much improved over recent years, digital printing quality
is still inferior to lithographic offset printing
Can’t print large runs at lower cost
11. Offset steps: pre-press
Before the job can be printed offset, your document must be
converted to plates. The plates are created from the digital file. Each
of the ink colors - black, cyan, magenta, and yellow - has a separate
plate.
Plates may be aluminium or paper.
19. Paper Size Issues
• Print publication (book/magazine/newspaper/
newsletter)formats are based on standard flat
sheet paper size, folded, bound, or saddle-
stitched.
• Examples:
• 11 x 17 sheet double-fold (either 4 or 8 page
newsletter)
• 8 ½ x 11 magazine in signatures (groups of
8 pages)
• Decisions made about format affect cost
• Printers create in signatures of 8 pages or a
codex of 16.
So you must work in multiples of 4!
20. 2nd step: press run
Sheet paper is fed through the press. The image area of the plate picks up
ink from the ink rollers. The water rollers keep the ink off of the non-image
areas of the plate.
Each plate transfers its image to a rubber blanket that in turn transfers the
image to the paper. The plate itself does not actually touch the paper - thus
the term "offset" lithography. All of this occurs at an extremely high speed.
A typical Heidelberg press
can run at 15,000
impressions an hour.
21. Chill rolls
Specialty printers for various types of jobs introduce unique technologies
Here, chill rolls cools down a web press run and solidify the ink binder
Steel cylinders (3 - 6) with cold water are pumped through
22. Print definition depends on paper quality
Coated Fine,
70l/cm
SC,
54l/cm
LWC,
60l/cm
Newsprint,
48l/cm
24. 3rd step: finishing
When presses have finished the printing process:
Papers are trimmed to the final size using guillotines.
The cut papers can be
• left as they are for flyers, leaflets
• collated and folded for folded leaflets
• bound, stitched and laminated for books and booklets.
Shown—pro collator
26. Bindery
Booklets may be…
– perfect bound (glued)—above 100 pages
– Saddle stitched (stapled/sewn) typically less than
100 pages
27. Mechanicals
• Digital files prepared using industry-standard software, and including
all links, photographs and/or illustrations, font folders and image
folders. (Often, an InDesign, Photoshop, Illustrator file, final JPG, or a
PDF.) Also called digital prepress files.
• It is important to keep in mind that what may be an easy trial and
error process for printing at home becomes a costly transaction once
it moves outside of your control to other working professionals.
• For this reasons, further study should include not only mastery of the
specific program you have chosen to work with but also more
detailed information concerning prepress preparation and printing
technologies.
28. Bleeds, etc.
Bleed--a printing term referring to type or a visual that extends
off the edges of the page. To allow for deviations in trimming the
document after printing an element that bleeds is extended
about 1/8 inch or 1 pica beyond the trim lines (page edge). A
bleed is set up with printers marks.
30. Designing Art for a Bleed
• The important thing when working in Photoshop with a photo
that will bleed off a document page is to remember not to
crop the photo so close that losing a ½ inch all around will ruin
your image. Leave lots of active margin space and do your
cropping in InDesign.
31. Definitions
Packaging—Going into the FILE menu in InDesign, Photoshop,
and Illustrator to create a folder to store all your links, fonts, and
original images used so they can be installed on computers
where other folks are opening your file.
Rich black—A combination of colors preferred by professional
printers for greater richness and darker tone in depicting solid
black. Rich black is typically made up of 100 percent black, 60
percent cyan, 40 percent magenta, and 40 percent yellow.
Reverse type—White type. In printing, reverse type appears
white by “reversing out of” the ink to the paper—in other words,
containing no ink and thereby appearing white.
32. Definitions
“Rich Black”
In printing, there are many different types of black you can use (RGB,
Photoshop, neutral rich, registration, flat, designer, etc.) Printers refer often to
“rich black” which is not 100 percent black but includes some other colors in it
for richness (typically 100K, 60C, 40M, 40 Y).
This is an ink mixture of solid black over the other CMYK color that results in a
darker tone than black ink alone generates in the printing process. You can
choose rich black in your Adobe programs.
However, if you need small text knocked-out of a black background, make sure
that it doesn’t include these amounts of cyan, magenta and yellow. If you do,
the text will print blurred. This will happen because of ink-bleed and possible
slight misalignment of printing plates. For best results here, use white text on
a background that only has black in it.
33. Prepress Issues
PREPARING MECHANICALS FOR PRINT
• Files destined for print should be set to 300dpi. DPI stands for
Dots Per Inch.
• As designer Franz Jeitz advises: "When it comes to printing,
especially large format printing, vectors are your friend. Try
to design as much as possible in a vector based program
such as Adobe Illustrator. Not only will it reduce your file size,
but it will ensure that you get the crispest print result.”
• CMYK (Cyan-Magenta-Yellow-Black color process) is used for
print materials. Check your color modes.
• Run a pre-print check. In InDesign this is known as a “Pre-
flight” and it will bring up any issues such as RGB files being
used or fonts used that aren’t embedded.
34. Prepress Issues
PACKAGING
In InDesign, Photoshop, and Illustrator, packaging means you
create a folder to store all your links, fonts, and original images
used to be installed on computers where other folks are opening
your file. The command for creating this folder is in the
program’s FILE menu.
35. Formatting InDesign documents for press--
(Oft overlooked formatting requirements)
1. Any black and white images should be converted to grayscale.
Otherwise, cyan, magenta and yellow inks will be added when
your image when printed. Particularly important if your printer
plans to use only black ink on some pages.
2. InDesign files sent to offset press should use only JPG
photos. Gif and png files are on-screen-only file formats not
intended for print and will not print well. (Gif and pngs are 72 ppi
and images for print need to be in the 300-400 dpi range.)
36. Formatting InDesign documents for press--
3. Flatten your layers. If you fail to flatten layers before you
export to PDF your file will be huge. Your artwork should still
print okay, but it will bloat your file size and may send your
printers’ Macs into meltdown.