This Gateway Cloning instruction manual reviews:
Recombination Reactions of the GATEWAY™ Cloning System
The GATEWAY LR Cloning Reaction
The GATEWAY BP Cloning Reaction
Generating Entry Clones
Designing Entry Clones for Protein Expression
Location of Translation Start Sequences
Reading Frame
Examples of Protein Expression Constructs
Destination Vectors
GATEWAY Nomenclature
Gateway® recombination cloning technology circumvents traditional restriction enzyme based cloning limitations, enabling you to access virtually any expression system. Widely adopted in the research community with more than 1,500 references since its launch, Gateway® technology makes collaboration across research disciplines easy and convenient and enables access to a multitude of vectors from these research groups for truly multidisciplinary scientific studies.
http://bit.ly/gateway-cloning-technology-instruction-manual
DNA Cloning is the starting point for many genetic engineering approaches to Life Science Research. Using the appropriate tools is critical for the of the overall success of the research.
In Molecular Cloning, Canvax™ offers Superior Performance and the simplest PCR Cloning process thanks to pSpark® products. The Kits have a proven track record as the most efficient, powerful and easy way to obtain the best results. Nine different vectors are available for Blunt-end, TA or Universal DNA Cloning that adapts perfectly to your research to get the best results.
Additionally, Canvax™ includes in its wide portfolio the pMBL™ T-Vector for TA Cloning, CVX5α™ Chemically Competent Cells for routinary Subcloning procedures, PickMutant™ for Site-Directed Mutagenesis and many other compounds you may need.
Cloning and expression of the Nodamura virus RNA-dependent RNA polymerase
Poster presentation at Society for the Advancement of Chicanos and Native Americans in Science (SACNAS) National Conference, October 2012, Seatltle, WA
I had done a two week internship in May 2014 at a laboratory in Strand Life Sciences Pvt. Ltd. The report summarises my work and my learning during the two week period. I have also included in my report the DNA sequence of a patient that I had analysed to check for mutations.
Njiru, 2012 has described that " Lack of effective point of care diagnostic tests applicable in resource-poor endemic areas is a critical barrier to effective treatment and control of infectious diseases.” Therefore, Innovations in biotechnology that combine molecular biology, microfabrication and bioinformatics are moving nucleic acid technologies from futuristic possibilities to common laboratory techniques and modes for diagnoses. In this context, LAMP (Loop Mediated Isothermal Amplification) is a highly sensitive and specific DNA/RNA amplification method. Advantage of LAMP is isothermal reaction condition and therefore, LAMP is affordable because of no need to have expensive thermal cycler.
Foregene presentation-better life scienceMaggie Ma
This is Maggie from Foregene(www.foreivd.com), a life science company focused on molecular biology.
We're founded by experts from Yale university, and Gene company with 20+ years experience in life science industry, and with 10+ years foundation in life science reagent, including DNA/RNA isolation kit, PCR/qPCR reagent, genotyping kit, IVD kit, PCR machines, and other consumables, etc.
In 2019, we launched out the covid-19 RT-PCR kit in 3 days at the pandemic break, and ranked the 1st producer for the test kits in Southwestern China.Besides, the life science reagent is also covered in 80%+ universities in China, and the large hospital labs.
Any questions, feel free to contact me.
Regards,
Maggie | Sales
Foregene Co., Ltd
www.foreivd.com
Mob:008615281067355
2011 course on Molecular Diagnostic Automation - Part 3 - DetectionPatrick Merel
2011 course on Molecular Diagnostic Automation - Part 3 - Detection.
This is from early 2011. Prices and Specifications of instruments may have changed a lot.
Part 3 of 3
pOnebyOne™ are efficient, accurate and flexible Bicistronic Mammalian Expression Kits that contains an Expression Cassette based in 2A sequence breakthrough technology.
Its novel (patent pending) technology allows simultaneous Expression of two Proteins from the same mRNA. Cells transfected with Bicistronic vectors ensure that if one of the Proteins is present, the other one is also present.
Bicistronic Expression vectors are supported on viral elements: the IRES or 2A sequence. IRES has been widely used. It is a relative short sequence, around 600-700 bp, although this length could be a disadvantage in viral vectors where packaging capacity is limited. IRES based Expression vectors are characterized by a non-stoichiometric production of both proteins; generally there is a lower expression of the downstream gene.
Many 2A sequences from several families of viruses have been described for producing multiple polypeptides. 2A mediated cleavage is a universal phenomenon in all eukaryotic cells. With just 20 bp in length, the 2A sequence has been used succesfully to generate multiple proteins in some biological models: plants, zebrafish, transgenic mice or eukaryotic cell lines. Vectors based on 2A produce stoichiometric proportion of both proteins.
Canvax™ offers a ready-to-clone solution of your Gene of Interest, obtained by PCR, onto a wide collection of Bicistronic vectors based on 2A sequence. You can choose among different Promoters, selection Antibiotics or Reporter Genes.
pBluescript is an example of a combination between plasmids and phages (phagemids).
Phagemids represent a hybrid type of class of vectors that serve to produce single-stranded DNA.
Rapid and real-time diagnosis of Laem-Singh virus using a portable Real-Amp T...Narong Arunrut
The most prominent of growth-retarded in black tiger shrimp (Penaeus monodon) is associated with an infection of Laem-Singh virus (LSNV) that has been involved the reduction of annual production volume. To more accurately, rapidly and easily determine its effect on shrimp industries for further control disease, a portable Real-Amp Turbidimeter with real-time detection method was evaluated for LSNV detection.The device exploited the turbidity that produced by-product of magnesium pyrophosphate and displayed turbidity values in real-time on the provided software screen. The results of quantitative can be accomplished by reaction time measuring. The sensitivity of a turbidity detection was comparable to that of the nested RT-PCR, while it was 1000-time more sensitive than RT-PCR. With the use of a portable Real-Amp Turbidimeter. The application of RT-LAMP using a portable Real-Amp Turbidimeter offers a simple and rapid detection platform for LSNV detection in the field assessment. So, This 's awesome technic not only for detection of LSNV but also for many pathogen.
ATAC-seq (Assay for Transposase-Accessible Chromatin using sequencing) is a technique used in molecular biology to study chromatin accessibility. The key part of the ATAC-seq procedure is the action of the transposase Tn5 on the genomic DNA of the sample.
GridMate - End to end testing is a critical piece to ensure quality and avoid...ThomasParaiso2
End to end testing is a critical piece to ensure quality and avoid regressions. In this session, we share our journey building an E2E testing pipeline for GridMate components (LWC and Aura) using Cypress, JSForce, FakerJS…
The Art of the Pitch: WordPress Relationships and SalesLaura Byrne
Clients don’t know what they don’t know. What web solutions are right for them? How does WordPress come into the picture? How do you make sure you understand scope and timeline? What do you do if sometime changes?
All these questions and more will be explored as we talk about matching clients’ needs with what your agency offers without pulling teeth or pulling your hair out. Practical tips, and strategies for successful relationship building that leads to closing the deal.
Generative AI Deep Dive: Advancing from Proof of Concept to ProductionAggregage
Join Maher Hanafi, VP of Engineering at Betterworks, in this new session where he'll share a practical framework to transform Gen AI prototypes into impactful products! He'll delve into the complexities of data collection and management, model selection and optimization, and ensuring security, scalability, and responsible use.
In his public lecture, Christian Timmerer provides insights into the fascinating history of video streaming, starting from its humble beginnings before YouTube to the groundbreaking technologies that now dominate platforms like Netflix and ORF ON. Timmerer also presents provocative contributions of his own that have significantly influenced the industry. He concludes by looking at future challenges and invites the audience to join in a discussion.
Why You Should Replace Windows 11 with Nitrux Linux 3.5.0 for enhanced perfor...SOFTTECHHUB
The choice of an operating system plays a pivotal role in shaping our computing experience. For decades, Microsoft's Windows has dominated the market, offering a familiar and widely adopted platform for personal and professional use. However, as technological advancements continue to push the boundaries of innovation, alternative operating systems have emerged, challenging the status quo and offering users a fresh perspective on computing.
One such alternative that has garnered significant attention and acclaim is Nitrux Linux 3.5.0, a sleek, powerful, and user-friendly Linux distribution that promises to redefine the way we interact with our devices. With its focus on performance, security, and customization, Nitrux Linux presents a compelling case for those seeking to break free from the constraints of proprietary software and embrace the freedom and flexibility of open-source computing.
Observability Concepts EVERY Developer Should Know -- DeveloperWeek Europe.pdfPaige Cruz
Monitoring and observability aren’t traditionally found in software curriculums and many of us cobble this knowledge together from whatever vendor or ecosystem we were first introduced to and whatever is a part of your current company’s observability stack.
While the dev and ops silo continues to crumble….many organizations still relegate monitoring & observability as the purview of ops, infra and SRE teams. This is a mistake - achieving a highly observable system requires collaboration up and down the stack.
I, a former op, would like to extend an invitation to all application developers to join the observability party will share these foundational concepts to build on:
GDG Cloud Southlake #33: Boule & Rebala: Effective AppSec in SDLC using Deplo...James Anderson
Effective Application Security in Software Delivery lifecycle using Deployment Firewall and DBOM
The modern software delivery process (or the CI/CD process) includes many tools, distributed teams, open-source code, and cloud platforms. Constant focus on speed to release software to market, along with the traditional slow and manual security checks has caused gaps in continuous security as an important piece in the software supply chain. Today organizations feel more susceptible to external and internal cyber threats due to the vast attack surface in their applications supply chain and the lack of end-to-end governance and risk management.
The software team must secure its software delivery process to avoid vulnerability and security breaches. This needs to be achieved with existing tool chains and without extensive rework of the delivery processes. This talk will present strategies and techniques for providing visibility into the true risk of the existing vulnerabilities, preventing the introduction of security issues in the software, resolving vulnerabilities in production environments quickly, and capturing the deployment bill of materials (DBOM).
Speakers:
Bob Boule
Robert Boule is a technology enthusiast with PASSION for technology and making things work along with a knack for helping others understand how things work. He comes with around 20 years of solution engineering experience in application security, software continuous delivery, and SaaS platforms. He is known for his dynamic presentations in CI/CD and application security integrated in software delivery lifecycle.
Gopinath Rebala
Gopinath Rebala is the CTO of OpsMx, where he has overall responsibility for the machine learning and data processing architectures for Secure Software Delivery. Gopi also has a strong connection with our customers, leading design and architecture for strategic implementations. Gopi is a frequent speaker and well-known leader in continuous delivery and integrating security into software delivery.
DevOps and Testing slides at DASA ConnectKari Kakkonen
My and Rik Marselis slides at 30.5.2024 DASA Connect conference. We discuss about what is testing, then what is agile testing and finally what is Testing in DevOps. Finally we had lovely workshop with the participants trying to find out different ways to think about quality and testing in different parts of the DevOps infinity loop.
LF Energy Webinar: Electrical Grid Modelling and Simulation Through PowSyBl -...DanBrown980551
Do you want to learn how to model and simulate an electrical network from scratch in under an hour?
Then welcome to this PowSyBl workshop, hosted by Rte, the French Transmission System Operator (TSO)!
During the webinar, you will discover the PowSyBl ecosystem as well as handle and study an electrical network through an interactive Python notebook.
PowSyBl is an open source project hosted by LF Energy, which offers a comprehensive set of features for electrical grid modelling and simulation. Among other advanced features, PowSyBl provides:
- A fully editable and extendable library for grid component modelling;
- Visualization tools to display your network;
- Grid simulation tools, such as power flows, security analyses (with or without remedial actions) and sensitivity analyses;
The framework is mostly written in Java, with a Python binding so that Python developers can access PowSyBl functionalities as well.
What you will learn during the webinar:
- For beginners: discover PowSyBl's functionalities through a quick general presentation and the notebook, without needing any expert coding skills;
- For advanced developers: master the skills to efficiently apply PowSyBl functionalities to your real-world scenarios.
State of ICS and IoT Cyber Threat Landscape Report 2024 previewPrayukth K V
The IoT and OT threat landscape report has been prepared by the Threat Research Team at Sectrio using data from Sectrio, cyber threat intelligence farming facilities spread across over 85 cities around the world. In addition, Sectrio also runs AI-based advanced threat and payload engagement facilities that serve as sinks to attract and engage sophisticated threat actors, and newer malware including new variants and latent threats that are at an earlier stage of development.
The latest edition of the OT/ICS and IoT security Threat Landscape Report 2024 also covers:
State of global ICS asset and network exposure
Sectoral targets and attacks as well as the cost of ransom
Global APT activity, AI usage, actor and tactic profiles, and implications
Rise in volumes of AI-powered cyberattacks
Major cyber events in 2024
Malware and malicious payload trends
Cyberattack types and targets
Vulnerability exploit attempts on CVEs
Attacks on counties – USA
Expansion of bot farms – how, where, and why
In-depth analysis of the cyber threat landscape across North America, South America, Europe, APAC, and the Middle East
Why are attacks on smart factories rising?
Cyber risk predictions
Axis of attacks – Europe
Systemic attacks in the Middle East
Download the full report from here:
https://sectrio.com/resources/ot-threat-landscape-reports/sectrio-releases-ot-ics-and-iot-security-threat-landscape-report-2024/
SAP Sapphire 2024 - ASUG301 building better apps with SAP Fiori.pdfPeter Spielvogel
Building better applications for business users with SAP Fiori.
• What is SAP Fiori and why it matters to you
• How a better user experience drives measurable business benefits
• How to get started with SAP Fiori today
• How SAP Fiori elements accelerates application development
• How SAP Build Code includes SAP Fiori tools and other generative artificial intelligence capabilities
• How SAP Fiori paves the way for using AI in SAP apps
Threats to mobile devices are more prevalent and increasing in scope and complexity. Users of mobile devices desire to take full advantage of the features
available on those devices, but many of the features provide convenience and capability but sacrifice security. This best practices guide outlines steps the users can take to better protect personal devices and information.
Communications Mining Series - Zero to Hero - Session 1DianaGray10
This session provides introduction to UiPath Communication Mining, importance and platform overview. You will acquire a good understand of the phases in Communication Mining as we go over the platform with you. Topics covered:
• Communication Mining Overview
• Why is it important?
• How can it help today’s business and the benefits
• Phases in Communication Mining
• Demo on Platform overview
• Q/A
Pushing the limits of ePRTC: 100ns holdover for 100 daysAdtran
At WSTS 2024, Alon Stern explored the topic of parametric holdover and explained how recent research findings can be implemented in real-world PNT networks to achieve 100 nanoseconds of accuracy for up to 100 days.
A tale of scale & speed: How the US Navy is enabling software delivery from l...sonjaschweigert1
Rapid and secure feature delivery is a goal across every application team and every branch of the DoD. The Navy’s DevSecOps platform, Party Barge, has achieved:
- Reduction in onboarding time from 5 weeks to 1 day
- Improved developer experience and productivity through actionable findings and reduction of false positives
- Maintenance of superior security standards and inherent policy enforcement with Authorization to Operate (ATO)
Development teams can ship efficiently and ensure applications are cyber ready for Navy Authorizing Officials (AOs). In this webinar, Sigma Defense and Anchore will give attendees a look behind the scenes and demo secure pipeline automation and security artifacts that speed up application ATO and time to production.
We will cover:
- How to remove silos in DevSecOps
- How to build efficient development pipeline roles and component templates
- How to deliver security artifacts that matter for ATO’s (SBOMs, vulnerability reports, and policy evidence)
- How to streamline operations with automated policy checks on container images
Monitoring Java Application Security with JDK Tools and JFR Events
Precision Lenti Orf Technical Manual
1. Technical
Manual Thermo Scientific Open Biosystems
Precision LentiORF Collection
Important Safety Note
Please follow the safety guidelines for use and production of vector-based lentivirus as set by your institution’s
biosafety committee. In general, the NIH Office of Biotechnology BSL2 or BSL2+ guidelines should be followed.
Please note that Precision LentiORF vectors are not compatible with third generation packaging systems such as
ViraPower from Invitrogen. We recommend the Thermo Scientific Open Biosystems TransLenti Viral Packaging
System for use with our vectors.
**Precision LentiORFs are available in glycerol stock or viral particle format. If viral particle format is purchased,
begin work with Protocol X – Determining Relative Transduction Efficiency, page 11.
Product Description
The Precision LentiORF collection is a library of expression ready lentiviral ORFs generated using gene content
from the fully sequenced ORFeome Collaboration Collection. Its unique design expresses the ORF, the fluorescent
marker and the selection marker from one promoter, providing a visual marker for ORF expression and two
methods of transduction optimization. When used in viral format precise control of expression level can be
achieved by varying the multiplicity of infection (MOI). This collection provides a robust ORF expression tool for
gene analysis.
• Versatile vector design with convenient cloning site for the addition of fusion tags
• Efficient expression at low MOI
• Transfection or transduction options for ORF expression
• Dual marker cassette provides two ways to optimize transduction
- Nuclear localized TurboGFP for easy tracking
- Blasticidin resistance for selection
• Lentiviral transduction extends gene expression to a broad range of cell types
• Fully sequenced ORFs for increased confidence in gene expression results
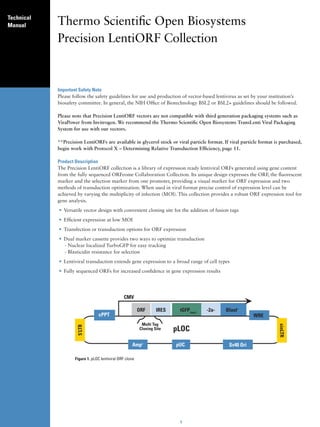
CMV
ORF IRES tGFP(nuc) -2a- Blastr
cPPT WRE
Multi Tag
Cloning Site pLOC
Ampr pUC Sv40 Ori
Figure 1. pLOC lentiviral ORF clone
1
2. Table 1. Features Of The pLOC Vector
ORF Cassette Elements
CMV Promoter RNA Polymerase II promoter
ORF Custom
MultiTag Cloning site Restriction site for purification or localization tag
TurboGFP(nuc) Marker to track ORF expression
2a-peptide signal Allows dual translation of BlastR and TurboGFP(nuc)
Blastr Mammalian selectable marker
Lentiviral Elements
SIN-LTR Increases safety - 3' Self inactivating long terminal repeat
5'LTR 5' long terminal repeat
WRE Enhances the stability and translation of transcripts
cPPT (Central Polypurine Tract) Increases translocation into the nucleus of non-dividing cells
RRE (Rev Response Element) Increases efficient packaging full-length viral genomes
Plasmid Backbone Elements
pUC ori High copy replication and maintenance in E.coli
AMPr Ampicillin bacterial selectable marker
Note: The specific sequence of the att site may vary between clones. Refer to the data file online for the specific sequence.
Figure 2. Detailed vector map of pLOC lentiviral vector.
Antibiotic Resistance
pLOC contains 2 resistance markers (Table 2).
Table 2. Antibiotic resistances conveyed by pLOC
Antibiotic Concentration Utility
Ampicillin (carbenicillin) 100 μg/ml Bacterial selection marker (outside LTRs)
Blasticidin S variable Mammalian selectable marker
Quality Control
Each ORF identity has been sequence validated following the cloning process. The att site, MultiTag cloning site
and secondary stop codons have also been sequence validated.
2
3. Protocol I - Replication
Table 3. Materials for plate replication
Item Vendor Catalog #
LB-Lennox Broth (low salt) VWR EM1.00547.0500
Peptone, granulated, 2 kg - Difco VWR 90000-368
Yeast Extract, 500 g, granulated VWR EM1.03753.0500
NaCl Sigma S-3014
Glycerol VWR EM-2200 or 80030-956
Carbenicillin Novagen 69101-3
Blasticidin S Invivogen ant-zn-5p
96-well microplates Nunc 260860
Aluminum seals Nunc 276014
Disposable replicators Genetix X5054
Disposable replicators Scinomix SCI-5010-OS
Vector Sumary
Replication From Individual Glycerol Stock
Prepare media with 8% glycerol* and the appropriate antibiotics, and inoculate from glycerol stock. For archive
replication, grow all pLOC clones at 37°C in LB-Lennox (low salt) media plus 100 μg/ml carbenicillin in order to
provide maximum stability of the clones.
Replication Of Plates
Prepare target plates by dispensing ~160 μl of LB-Lennox (low salt) media supplemented with 8% glycerol* and
appropriate antibiotic (100 μg/ml carbenicillin).
Prepare Source Plates
1. Remove foil seals while the source plates are still frozen. This minimizes cross-contamination.
2. Thaw the source plates with the lid on. Wipe any condensation underneath the lid with a paper wipe soaked in
ethanol.
Replicate
1. Gently place a disposable replicator in the thawed source plate and lightly move the replicator around inside
the well to mix the culture. Make sure to scrape the bottom of the plate of the well.
2. Gently remove the replicator from the source plate and gently place in the target plate and mix in the same
manner to transfer cells.
3. Dispose of the replicator.
4. Place the lids back on the source plates and target plates.
5. Repeat steps 1-4 until all plates have been replicated.
6. Return the source plates to the -80°C freezer.
7. Place the inoculated target plates in a 37°C incubator for 18-19 hours.
Freeze at –80°C for long term storage. Avoid long periods of storage at room temperature or higher in order to
control background recombination products.
Note: Due to the tendency of all viral vectors to recombine, we recommend keeping the incubation times as short
as possible and avoid subculturing. Return to your glycerol stock for each plasmid preparation.
*Glycerol can be omitted from the media if you are culturing for plasmid preparation. If making copies of the
constructs for long term storage at –80°C, 8% glycerol is required.
Protocol II - Plasmid Preparation
Culture Conditions For Individual Plasmid Preparations
For plasmid preparation, grow all pGIPZ clones at 37°C in LB broth (low salt) media plus 100 μg/ml
carbenicillin only.
3
4. 2X LB broth (low salt) media preparation
LB-Broth-Lennox 20 g/l
Peptone 10 g/l
Yeast Extract 5 g/l
Appropriate antibiotic(s) at recommended concentration(s)
Most plasmid mini-prep kits recommend a culture volume of 1–10 ml for good yield.
1. Upon receiving your glycerol stock(s) containing the shRNAmir of interest store at -80°C until ready to begin.
2. To prepare plasmid DNA first thaw your glycerol stock culture and pulse vortex to resuspend any E. coli that
may have settled to the bottom of the tube.
3. Take a 10 μl inoculum from the glycerol stock into 3-5 ml of 2X LB (low salt) with 100 μg/ml carbenicillin.
Return the glycerol stock(s) to -80°C.
*Note: If a larger culture volume is desired, incubate the 3-5 ml culture for 8 hours at 37˚C with shaking and
use as a starter inoculum. Dilute the starter culture 1:500-1:1000 into the larger volume.
4. Incubate at 37°C for 18-19 hours with vigorous shaking.
5. Pellet the 3-5 ml culture and begin preparation of plasmid DNA.
6. Run 3-5 μl of the plasmid DNA on a 1% agarose gel. The size of the pLOC vector containing your ORF will vary
depending on the length of the ORF. It can range from <500 nt to >4 kb.
Note: Due to the tendency of all viral vectors to recombine, we recommend keeping the incubation times as short
as possible and avoid subculturing. Return to your original glycerol stock for each plasmid preparation.
Culture Conditions For 96-Well Bio-Block Plasmid Preparation
Inoculate a 96-well bio-block containing 1 ml per well of 2X-LB (low salt) media with 100 μg/ml carbenicillin
with 1 µl of the glycerol stock culture. Incubate at 37°C with shaking (~170-200 rpm). We have observed that
incubation times between 18-19 hours produce good plasmid yield. For plasmid preparation, follow the protocols
recommended by the plasmid isolation kit manufacturer.
Note: 96-well bio-block plasmid preparation protocol in conjunction with a Qiagen Turbo kit (Catalog # 27191)
are used to purify plasmid DNA. 2 bio-blocks are combined, the optional wash step is not performed and water is
used for the elution.
Protocol III - Precision Lentiorf Plasmid Dna Analysis By Restriction Digest
The following is a sample protocol for restriction analysis of Precision LentiORF plasmid DNA using EcoRI
restriction enzyme. EcoRI cuts 15 bases upstream of attB1 site flanking the ORF at 5’ (which corresponds to 30-50
nt upstream of ORF start codon, depending on the clone configuration –see specific clone information). A second
EcoRI site is located 1348 bp downstream of attB2 site, approximately 1.37 kb downstream of the last sense codon
of the ORF. Alternatively, SpeI or PacI flanking attB1 site at the 5’ and NheI or AscI flanking attB2 at 3’ in the
vector may be used to cut out the fragment corresponding to the ORF. Use of EcoRI is preferable for smaller ORFs.
Table 4. PCR Components
Component Amount
Sterile, nuclease-free water X μl
NEBuffer EcoRI (10X) 2.0 μl
DNA sample (500 ng) in water X μl
EcoRI, 10 U/ul 0.5 μl
Final volume 20.0 μl
1. Set up EcoRI restriction reaction as follows (Table 4).
2. Mix gently by pipetting.
3. Incubate at 37°C for 1 hour to digest
4. Run cut and uncut plasmid in 1% agarose gel (Figure 3).
Protocol IV – Tagging Lentiorf With C-Terminal Tag
pLOC-ORF LentiORFs are available in “open” (the native stop codon has been removed) and “closed” (the ORF
4
5. Figure 3. Restriction analysis of 2 Precision LentiORF clones with different
sized ORFs. Lanes 1 & 10 are a 10 kb molecular weight ladder (10 kb, 7 kb, 5
kb, 4 kb, 3 kb, 2.5 kb, 2 kb, 1.5 kb, 1 kb). Lanes 2 and 4 show uncut plasmid.
Lanes 3 and 5 are EcoRI digests. The white arrow points to the 7.8 kb band
common to the back bone of all Precision LentiORF clones. The lower bands
(ORF1 producing a 2.8 kb band and ORF2 producing two bands, 2.5 kb and
1.3 kb) are specific to each ORF. ORF2 has an additional EcoRI site within it
producing two ORF specific bands noted with the asterisks.
retains its native stop codon) configurations (see clone information). Translation of the “closed” configuration
ORFs terminates at its natural stop codon immediately after last sense codon of the ORF reference sequence.
“Open” configuration of the ORFs was created to allow for C-terminal fusions of the ORFs with the tag of
interest. In these ORFs translation terminates at the stop codon in the vector immediately downstream of the attB2
site adding 11-16 amino acids to its C-terminus (see figure 4 below). If desired the stop codons in the vector can be
ORF attB2.1 site Stop condons
ATG GAC GAG CTG TAC AAG TAC CCA ACT TTC TTG TAC AAA GTG GTT GCT AGC TAA TGA
Frame of translation NheI * *
ACCGGGCGCGCC CCGCCCCTCTC
AscI
Figure 4. Example of 3’ end of ORF and flanking sequence. Highlighted gray are NheI and AscI sites flanking ORF-attB2 site at 3’. Highlighted
yellow is the attB2 site (version attB2.1) Underlined is an invariable part of the attB2 site and the adjacent vector sequence. The secondary stop
codons have asterisks beneath them.
replaced by the fusion tag at Nhe/AscI sites flanking the stop codon in the vector. Care should be taken to place the
fusion tag in the same reading frame as the Stop codon.
Table 5. Suggested concentration of Blasticidin S to use for
Protocol V - Blasticidin S Selection generation of stable cell lines expressing pLOC-ORF.
Blasticidin S Kill Curve and Blasticidin S Selection Cell Line Blasticidin S, ug/ml
pLOC-vector confers resistance to Blasticidin S in transduced HEK 293T 7-15
or transfected cells. Blasticidin S selection can be used to HeLa 5-7
eliminate non-transduced or non-transfected cells. In order HepG2 5-7
to generate stable cell lines, it is important to determine MCF7 9-12
the minimum amount of Blasticidin S required to kill non- OVCAR8 9-12
transfected or non-transduced cells. We have tested several A549 9-12
cell lines for their sensitivity to Blasticidin S (see Table 5).
These data can be used as a general guidelines. However, we recommend testing your cell line of by generating a
Blasticidin S kill curve following the protocol below.
Blasticidin S Kill Curve
1. On day 0, plate 5 x 10⁴ cells per well in a 24-well plate in enough wells to carry out your Blasticidin S
dilutions. Incubate overnight.
2. Prepare media specifically for your cells containing a range of antibiotic, for example: 0 - 20 μg/ml Blasticidin S.
3. The next day (day 1) replace the growth media with the media containing the dilutions of the antibiotic into the
appropriate wells.
4. Incubate at 37°C.
5. Approximately every 2-3 days replace with freshly prepared selective media.
6. Monitor the cells daily and observe the percentage of surviving cells. Optimum effectiveness should be reached
in 3-6 days under Blasticidin S selection.
7. The minimum antibiotic concentration to use is the lowest concentration that kills 100% of the cells in 3-6
days from the start of antibiotic selection.
5
6. Protocol VI - Transfection
The protocol below is optimized for transfection of the pLOC-ORF plasmid DNA into HEK293T cells in a 24-
well plate using serum-free media. If a different culture dish is used, adjust the number of cells, volumes and
reagent quantities in proportion to the change in surface area (Table 6).
It is preferable that transfections be carried out in medium that is serum-free and antibiotic-free. A reduction in
transfection efficiency occurs in the presence of serum, however it is possible to carry out successful transfections
with serum present (see Transfection Optimization).
Warm Express-In to ambient temperature (approximately 20 minutes at room temperature) prior to use. Always
mix well by vortex or inversion prior to use.
Table 6. Suggested amounts of DNA, medium and Express-In reagent for transfection of shRNA plasmid DNA into adherent cells.
Tissue Culture Dish Surface Area per Total Serum-Free Media Plasmid DNA (μg)* Arrest-In (μg)**
Plate or Well (cm2) Volume per Well (ml)
60 mm 20.0 2.0 4.0 21.0
35 mm 8.0 1.0 2.0 10.0
6-well 9.4 1.0 2.0 10.0
12-well 3.8 0.5 1.0 5.0
24-well 1.9 0.25 0.5 2.5
96-well 0.3 0.1 0.1 - 0.2 0.5 - 1.0
*Recommended starting amount of DNA. May need to be optimized for the highest efficiency.
**Recommended starting amount of Express-In reagent. See Transfection Optimization.
Maintain sterile working conditions with the DNA and Express-In mixtures as they will be added to the cells.
1. The day before transfection (day 0), plate the cells at a density of 5 x 10⁴ cells per well of a 24-well plate.
Full medium (i.e. with serum and antibiotics) will be used at this stage.
2. On the day of transfection, form the DNA/Express-In transfection complexes.
a. For each well to be transfected, dilute 500 ng shRNA plasmid DNA into 50 µl (total volume) of serum-free
medium in a microfuge tube.
b. For each well to be transfected, dilute 2.5 µg (2.5 µl) of Express-In into 50 µl (total volume) serum-free
medium into a separate microfuge tube.
c. Add the diluted DNA (step a) to the diluted Express-In reagent (step b), mix rapidly then incubate for
20 minutes at room temperature.
This will give a 1:5 DNA:Express-In ratio which is recommended for optimal transfection into HEK293T
cells. Your total volume will be 100 µl at this stage.
3. Aspirate the growth medium from the cells. Add an additional 150 µl of serum-free medium to each of the
tubes containing transfection complexes and mix gently. Add the 250 µl DNA/Express-In complex mixture to
the cells and incubate for 5-6 hours in a CO2 incubator at 37˚C.
Your total volume will be 250 µl at this stage (150 μl serum-free medium + 100 μl DNA:Express-In mixture).
4. Following the 5-6 hour incubation, add an equal volume of growth medium (250 µl) containing twice the
amount of normal serum to the cells (i.e. to bring the overall concentration of serum to what is typical for
your cell line). Alternatively, the transfection medium can be aspirated and replaced with the standard culture
medium (see note). Return the cells to the CO2 incubator at 37˚C.
Note – Express-In has displayed low toxicity in the cell lines tested, therefore removal of transfection reagent
is not required for many cell lines. In our experience higher transfection efficiencies have been achieved if the
transfection medium is not removed. However, if toxicity is a problem, aspirate the transfection mixture after
5-6 hours and replace with fresh growth medium. Additionally, fresh growth medium should be replenished as
required for continued cell growth.
5. After 24-72 hours of incubation, examine the cells microscopically for the TurboGFP expression.
Note: If desired, Blasticidin S selection can be applied 24 h post transfection. The working concentration of
Blasticidin S varies between cell lines. We recommend you determine the optimal concentration of Blasticidin
S required to kill your host cell line prior to selection for pLOC-ORF transfectants (see Blasticidin S kill curve
protocol). Typically, the working concentration ranges from 5-20 μg/ml. We recommend that you change
6
7. Figure 5. pLOC -ORF transfected into HEK293T cells 24 hours post transfection. a) Phase b) TurboGFP fluorescence of the
expression marker. Note the high percentage of cells successfully transfected.
Factors affecting transfection efficiency are not limited to but include purity of plasmid DNA, health of transduced cells, and
inconsistencies in number of cells plated.
selection media every 2-3 days. You should use the lowest concentration that kills 100% of the cells in 3-6
days from the start of Blasticidin S selection.
Transfection Optimization using Express-In
It is essential to optimize transfection conditions to achieve the highest transfection efficiencies and lowest toxicity
with your cells. The most important parameters for optimization are DNA to transfection reagent ratio, DNA
concentrations and cell confluency. We recommend that you initially begin with the Thermo Scientific Open
Biosystems Express-In and DNA amount indicated in Table 6 and extrapolate the number of cells needed for your
vessel size from the number of cells used in a well of a 24-well plate as listed in step 1 of the protocol for delivery
of plasmid DNA.
Cells Grown In Suspension
Transfection of cells in suspension would follow all the above principles and the protocol would largely remain
the same, except that the DNA/Open Biosystems Express-In™ mixture should be added to cells (post 20 minute
incubation for complex formation) to a total volume of 250 μl serum-free medium or to a total volume of 250 μl
of medium with serum (no antibiotics).
Protocol VII -Packaging Lentivirus
The pLOC vector is tat dependant, so you must use a packaging system that expresses the tat gene. For packaging
lentiviral constructs, we recommend the TransLenti Viral Packaging System. The TransLenti Viral Packaging
System allows creation of a replication-incompetent (Shimada, et al. 1995), HIV-1-based lentivirus which can
be used to deliver and express your gene of interest in either dividing or non-dividing mammalian cells. The
TransLenti Viral Packaging System uses a replication-incompetent lentivirus based on the translentiviral system
developed by Kappes (Kappes and Wu 2001). For protocols and information on packaging pLOC with our
TransLenti Viral GIPZ Packaging System, please see the product manual available on our website.
Protocol VIII - Titering
Viral Titering
Follow the procedure below to determine the titer of your lentiviral stock using the mammalian cell line of choice
IF YOU HAVE PRODUCED VIRAL PARTICLES YOURSELF. This protocol uses the TLA-HEK293T cell line that
is available as part of our TransLenti Viral shRNA Packaging System. You can use a standard HEK293T cell line as
an alternative.
Note: If you have generated a lentiviral stock of the expression control (e.g. pLOC Non-Silencing), we recommend
titering this stock as well.
1. The day before transduction, seed a 24-well tissue culture plate with TLA-HEK293T cells at 5 x 10⁴ cells per
well in DMEM (10% FBS, 1% pen-strep).
The following day, the well should be no more than 40-50% confluent. TLA-HEK293T (Thermo Scientific
Open Biosystems Catalog # HCL4517).
2. Make dilutions of the viral stock in a round bottom 96-well plate using serum-free media. Utilize the plate as
7
8. Five - fold dilutions
1 2 3 4 5 6 7 8 9 10 11 12
Virus stock 1 A
Virus stock 2 B
Virus stock 3 C
Virus stock 4 D
E
F
G
H
Figure 6. Five-fold serial dilutions of virus stock.
shown in Figure 6 using one row for each virus stock to be tested. Use the procedure below (starting at step
4) for dilution of the viral stocks. The goal is to produce a series of 5-fold dilutions to reach a final dilution of
390625-fold.
3. To each well add 80 μl of serum-free media.
4. Add 20 μl of thawed virus stock to each corresponding well in column 1 (5 fold dilution).
Pipette contents of well up and down 10-15 times. Discard pipette tip.
5. With new pipette tips, transfer 20 μl from each well of column 1 to the corresponding well in column 2.
Pipette 10-15 times and discard pipette tips.
6. With new pipette tips, transfer 20 μl from each well of column 2 to the corresponding well in column 3.
Pipette 10-15 times and discard pipette tip.
7. Repeat transfers of 20 μl from columns 3 through 8, pipetting up and down 10-15 times and changing pipette
tips between each dilution.
It is strongly recommended that you use a high quality multichannel pipettor when performing multiple
dilutions. Pre-incubate the dilutions of the virus stock for 5 minutes at room temperature.
8. Label 24-well plate as shown in Figure 7 using one row for each virus stock to be tested.
1 2 3 4 5 6
Virus stock 1 A
Virus stock 2 B
Virus stock 3 C
Virus stock 4 D
Figure 7. Twenty-four well tissue culture plate, seeded with TLA-HEK293T cells, used to titer the virus.
9. Remove culture media from the cells in the 24-well plate.
10. Add 225 μl of serum-free media to each well.
11. Transduce cells by adding 25 μl of diluted virus from the original 96-well plate (Figure 6) to a well on the
8
9. 24-well destination plate (Figure 7) containing the cells.
For example, transfer 25 μl from well A2 of the 96-well plate into well A1 in the 24-well plate (Table 7).
Table 7. Example of set up for dilutions
Well (Row A, B, C, or D) Volume Diluted Virus Used Dilution Factor
Originating Destination
(96-well plate) (24-well plate)
A1 25 μl 5*
A2 A1 25 μl 25
A3 A2 25 μl 125
A4 A3 25 μl 625
A5 A4 25 μl 3125
A6 A5 25 μl 15625
A7 A6 25 μl 78125
A8 25 μl 390625 *
*Please note that when expecting very high or very low titers, it would be advisable to include either well 8 or well 1 respectively.
12. Incubate transduced cultures at 37°C for 4 hours.
13. Remove transduction mix from cultures and add 1 ml of DMEM (10% FBS, 1% pen-strep).
14. Culture cells for 48 hours.
15. Count the TurboGFP expressing cells or colonies of cells (Figure 8).
Count each multi-cell colony as 1 transduced cell, as the cells will be dividing over the 48 hour culture
period. Figure 8 illustrates this principle of counting. Note: The intensity of TurboGFP may vary between
LentiORF clones. If the TurboGFP intensity in your cells is low, we recommend counting colonies at a higher
magnification.
16. Transducing units per ml (TU/ml) can be determined using the following formula:
# of TurboGFP positive colonies counted x dilution factor x 40 = #TU/ml
Example: 55 TurboGFP positive colonies counted in well A3.
(TurboGFP positive colonies) x 625 (dilution factor) x 40 =
1.38x10⁶ TU/ml
Once you have generated a lentiviral stock with a suitable titer, you
are ready to transduce the lentiviral vector into the mammalian cell
line of choice and assay for expression of your recombinant protein.
Multiplicity Of Infection (MOI)
To obtain optimal expression of your gene of interest, you will need to
transduce the lentiviral vector into your mammalian cell line of Figure 8. Example of individual colony 72 h post
choice using a suitable MOI. MOI is defined as the number of transduction. Imaged at 40x magnification.
transducing units per cell. Although this is cell line dependent, this
generally correlates with the number of integration events per cell and as
a result, level of expression.
Determining The Optimal MOI
A number of factors can influence determination of an optimal MOI including the nature of your mammalian cell
(actively- versus non-dividing), its transduction efficiency, your application of interest, and the nature of your gene
of interest. If you are transducing your lentiviral construct into the mammalian cell line of choice for the first time,
after you have titered it, we recommend using a range of MOIs (e.g. 0, 0.5, 1, 2, 5, 10, 20) to determine the MOI
required to obtain optimal expression for your particular application. If minimal expression is preferred, it should
be noted that to achieve single copy knockdown, an MOI of 0.3 is generally used, as less than 4% of your cells will
have more than one insert.
Protocol IX - Transduction
Transduction Of Target Cells
The protocol below is optimized for transduction of the lentiviral particles into TLA-HEK293T, OVCAR8 or
MCF7 cells in a 24-well plate using serum-free media. If a different culture dish is used, adjust the number of
9
10. cells, volumes and reagent quantities in proportion to the change in surface area (see Table 8). It is strongly
recommended that you optimize transduction conditions to suit your target cell line to provide for the highest
transduction efficiency possible.
It is preferable that transduction be carried out in medium that is serum-free and antibiotic-free. A reduction in
transduction efficiency occurs in the presence of serum, however it is possible to carry out successful transductions
with serum present; you will have to optimize the protocol according to your needs.
1. On day 0 plate 5 x 10⁴ cells per well in a 24-well plate. Incubate overnight.
You will be using full medium (i.e. with serum) at this stage.
2. The next day (day 1), remove the medium and add the virus to the MOI you wish to use. Set up all desired
experiments and controls in a similar fashion.
Bring the total volume of liquid up so that it just covers the cells efficiently with serum-free media (See Table
8 for guidelines). If you are using concentrated virus you are likely to use very little virus volume and a lot of
serum-free media; if you are using unconcentrated virus you will find you need much more virus volume.
Table 8. Suggested volumes of media per surface area per well of adherent cells.
Tissue Culture Dish Surface Area per Well (cm2) Suggested total serum-free medium volume per well (ml)
100 mm 56.0 5.0
60 mm 20.0 2.0
35 mm 8.0 1.0
6-well 9.4 1.0
12-well 3.8 0.5
24-well 1.9 0.25
96-well 0.3 0.1
3. Approximately 4-6 hours post-transduction, add an additional 1ml of full media (serum plus pen-strep if you
are using it) to your cells and incubate overnight.
We have experienced low toxicity with transduction in the cell lines tested, therefore removal of virus is not
required for many cell lines. In our hands higher transduction efficiencies have been achieved if the virus is not
removed after 6 hours. However, if toxicity is a problem, aspirate the mixture after 3-6 hours and replace with
fresh growth medium. Additionally, fresh growth medium should be replenished as required for continued cell
growth.
4. At 48 hours post-transduction examine the cells microscopically for the presence of reporter expression as this
will be your first indication as to the efficiency of your transduction.
Note: When visualizing TurboGFP expression, if less than 90% of all cells are green, it is recommended in
these cases to utilize Blasticidin S selection in order to increase the percentage of cells expressing your gene of
interest.
a. If adding Blasticidin S, use the appropriate concentration as determined based on the above kill curve. If
the cell density is close to or above 50% confluency, it is recommended that you split the cells at the time of
Blasticidin S addition. Incubate.
b. Approximately every 2-3 days replace with freshly prepared selective media.
c. Monitor the cells daily and observe the percentage of surviving cells. At some time point almost all of the
cells surviving selection will be harboring the gene of interest. Optimum effectiveness should be reached in
3-6 days with Blasticidin S.
Please note that the higher the MOI you have chosen the more copies of the gene of interest and Blasticidin
S resistance gene you will have per cell. When selecting on Blasticidin S, it is worth remembering that at
higher MOIs, cells containing multiple copies of the resistance gene can withstand higher Blasticidin S
concentrations than those at lower MOIs. Even at single copy the marker in pLOC lentiORFs provides
significant resistance to Blasticidin in transduced cells. Cells with very low transgene expression level may still
survive the selection even if TurboGFP is expressed at an undetectable level (see Figure 9). We recommend
using untransduced control cells to monitor the selection process. Longer selection and higher concentrations
of Blasticidin S are recommended if high level of transgene expression is desired. Adjust the concentration of
Blasticidin S to a level that will select for the population of transduced cells you wish to select for, without
going below the minimum antibiotic concentration you have established in your kill curve.
5. Once your transduction efficiency is at an acceptable level (with or without Blasticidin S selection), you can
proceed to assay cells for gene expression by quantitative/real-time PCR (QPCR), western blot or other
appropriate functional assay. The TurboRFP expression construct may be used as a control.
10
11. a
Figure 9. HEK293T cells after 4 days of selection on Blasticidin S at concentration 10ug/ml. a) untransduced control. The rounded cell
morphology compared to the transduced cells is an indication of cell death for HEK293T cells, b) and c) cells transduced with pLOC-ORF
viral particles (MOI=0.3) and placed on selection 24 hours post transduction. Imaged 5 days post transduction.
Optimal length of incubation from the start of transfection/transduction to analysis is dependent on cell type
and the gene of interest.
Protocol X – Determining Relative Transduction Efficiency
Follow the procedure below to determine the relative transduction efficiency of purchased LentiORF viral particles
(Thermo Scientific Open Biosystems Catalog # OHS5831). This protocol should be used with purchased LentiORF
RFP in viral particle format.
Prior to transducing with purchased LentiORF individual clones in viral particle format, we recommend
determining the relative transduction efficiency of your cell type. Lentiviral titers provided with purchased
LentiORF viral particles have been calculated by transducing TLAHEK293T cells. Transduction efficiencies vary
significantly by cell type. The relative transduction efficiency of your cells may be estimated by determining the
functional titer of a control virus such as LentiORF TurboRFP control viral particles (Thermo Scientific Open
Biosystems Catalog # OHS5831) in your cell type of choice.
Follow the procedure below to determine the functional titer of the LentiORF viral stock in the mammalian cell
line of your choice. The following conditions have been optimized for transduction of TLA-HEK293T cells. When
determining the relative transduction efficiency of your cell type, use the transduction conditions that have been
optimized for your cell type of choice.
1. The day before transduction, seed a 24-well tissue culture plate with your cells at 5x10⁴ cells per well in their
respective media.
The following day, the well should be no more than 40-50% confluent.
2. Make dilutions of the LentiORF control viral stock in a round bottom 96-well plate using serum-free medium.
Five - fold dilutions
1 2 3 4 5 6 7 8 9 10 11 12
Replicate 1 A
Replicate 2 B
Replicate 3 C
Replicate 4 D
E
F
G
H
Figure 10. Five-fold serial dilutions of virus stock.
11
12. Utilize the plate as shown in Figure 10 with one row for each replicate (we recommend performing at least
two replicates). Use the procedure below for dilution of the viral stock. The goal is to produce a series of
5-fold dilutions to reach a final dilution of 390625-fold.
3. Add 40 ul of serum-free media to each well in column 1. Add 80 ul of serum-free media to each well of
columns 2-8.
If desired, include 8 μg/mL polybrene in the dilution media
4. Add 10 µl of thawed control virus stock to each well in column 1 (5-fold dilution).
Pipette contents of well up and down 10-15 times. Discard pipette tip.
5. With new pipette tips, transfer 20 µl from each well of column 1 to the corresponding well in column 2.
Pipette 10-15 times and discard pipette tips.
6. With new pipette tips, transfer 20 µl from each well of column 2 to the corresponding well in column 3.
Pipette 10-15 times and discard pipette tip.
7. Repeat transfers of 20 µl from columns 3 through 8, pipetting up and down 10-15 times and changing pipette
tips between each dilution.
It is strongly recommended that you use a high quality multichannel pipettor when performing multiple
dilutions. Pre-incubate the dilutions of the virus stock for 5 minutes at room temperature.
8. Label a 24-well plate as shown in Figure 11 using one row for each replicate.
1 2 3 4 5 6
Replicate 1 A
Replicate 2 B
Replicate 3 C
Replicate 4 D
Figure 11. Twenty-four well tissue culture plate, seeded with TLA-HEK293T cells, used to titer the virus.
9. Remove culture medium from the cells in the 24-well plate.
10. Add 225 µl of serum-free medium to each well.
11. Transduce cells by adding 25 μl of diluted control LentiORF lentivirus from the original 96-well plate (Figure
10) to a well on the 24-well destination plate (Figure 11) containing the cells.
Table 9. Example of set up for dilutions
Well (Row A, B, C, or D) Volume Diluted Virus Used Dilution Factor
Originating Destination
(96-well plate) (24-well plate)
A1 25 μl 5*
A2 A1 25 μl 25
A3 A2 25 μl 125
A4 A3 25 μl 625
A5 A4 25 μl 3125
A6 A5 25 μl 15625
A7 A6 25 μl 78125
A8 25 μl 390625 *
*Please note that when expecting very high or very low transduction efficiency, it would be advisable to include either higher or lower
dilution factors.
12
13. For example, transfer 25 μl from well A2 of the 96-well plate into well A1 in the 24-well plate (Table 9).
12. Incubate transduced cultures at 37°C for 4-6 hours.
13. Add 1 ml of your medium (normal serum concentration).
14. Culture cells for 72 hours.
15. Count the TurboGFP expressing cells or colonies of cells.
Count each multi-cell colony as 1 transduced cell, as the cells will be dividing over the 72 hour culture
period. Figure 6 illustrates this principle of counting. Count the number of TurboGFP expressing colonies
in wells corresponding to at least two viral dilutions. Note: The intensity of TurboGFP may vary between
LentiORF clones. If the TurboGFP intensity in your cells is low, we recommend counting colonies at a higher
magnification.
16. Transducing units per ml (TU/ml) can be determined using the following formula:
# of TurboGFP positive colonies counted x dilution factor x 40 = # TU/mL
(Note: 25 μl of diluted virus was added to the cells. This is 1/40th of a mL)
Example: 55 TurboGFP positive colonies counted in well A3.
55 (TurboGFP positive colonies) x 625 (dilution factor) x 40 = 1.38x10⁶ TU/ml
17. The functional titer calculated for your cell line under your experimental conditions can be used to determine
the relative transduction efficiency of your cell type by using the following formula:
Functional titer of Non-silencing control virus stock in your cell line
÷ Titer of Non-silencing control shRNAmir virus stock as calculated by Thermo Scientific Open Biosystems
in TLA-HEK293T
= Relative transduction efficiency
For example, if the titer of the non-silencing control shRNAmir virus stock in TLA-HEK293T (as provided on the
product specification sheet) is 6.9x10⁶ TU/mL and the functional titer of the control shRNAmir virus stock in your
cell line is 1.38x10⁶ TU/mL, the relative transduction efficiency of your cell type is 0.2. To extrapolate the average
functional titer of the provided GIPZ viral particles, multiply the average titer of each plate as provided on the
product specification sheet by the relative transduction efficiency of your cell type. In our example, if the titer of
the GIPZ viral partilces in TLA-HEK293T cells is 2x10⁶ TU/mL and the relative transduction efficiency of your cell
type is 0.2, the extrapolated average functional titer of that plate your cell type is 4x10⁵ TU/mL.
Once the relative transduction efficiency of the GIPZ virus has been established in your cell line, use the optimized
transduction conditions determined in Protocol IX to transduce your cell line with the purchased GIPZ shRNAmir
individual clones in viral particle format. If the titer of the non-silencing control shRNAmir virus is not
satisfactory in your cell line you might consider choosing a different cell line more permissive to transduction by
lentivirus before proceeding.
Controls And Validation
Precision LentiORF Starter Kits
The use of vector-based ORF expression is a powerful and versatile tool. Successful gene silencing in vitro is
dependent on several variables including 1) The target cell line being studied 2) Transfection and transduction
efficiency 3) Abundance of the mRNA or protein of interest in the target cell line 4) Half life of the protein 5)
Robust experimental protocols. For all these reasons it is very important to run controlled experiments where the
transfection and transduction efficiencies are as high as possible and measurable.
Controls are a critical part of a gene silencing experiment. They enable accurate representation of knockdown data
and provide confidence in the specificity of the response. Changes in the mRNA or protein levels in cells treated
with negative or non-silencing controls reflect nonspecific responses in cells and can be used as a baseline against
which specific knockdown can be measured. Positive controls are useful to demonstrate that your experimental
system is functional and your shRNA construct is successfully activating the RNAi pathway.
Controls
The pLOCTM TurboRFP lentiviral expression construct has been validated as control for ORF expression
experiments. This control has been tested in transfection and transduction based experiments for TurboRFP
expression and selection on Blasticidin S. Additional cell lines to the one below have been tested and are listed in
Table 5.
13
14. Figure 12. Cells transduced with pLOC-TurboRFP control particles 72 hours post transduction (MOI=3, titered in HEK293T cells. a) Cell
line A549 b) HepG2 c) OVCAR8. TurboRFP is shown in red. The nuclear localized TurboGFP is overlaid resulting in yellow nuclei.
What Packaging Cell Line Should I Use For Making Lentivirus?
The pLOC vector is tat dependant, so you must use a packaging system that expresses the tat gene. For packaging
our lentiviral shRNAmir constructs, we recommend the TransLenti Viral Packaging System. The TransLenti Viral
shRNA Packaging System allows creation of a replication-incompetent (Shimada, et al. 1995), HIV-1-based
lentivirus which can be used to deliver and express your gene or shRNAmir of interest in either dividing or non-
dividing mammalian cells. The TransLenti Viral shRNA Packaging System uses a replication-incompetent lentivirus
based on the trans-lentiviral system developed by Kappes (Kappes and Wu 2001). For protocols and information
on packaging pLOC with our TransLenti Viral shRNA Packaging System, please see the product manual available
on our website.
Can I Use Any 2nd Generation Packaging System With The GIPZ Vector?
The pLOC vector is tat dependant, so you must use a packaging system that expresses the tat gene.
What does the number 40 refer to in the formula for the calculation of titer?
The titer units are given in transducing units (TU) per ml, so the number 40 is used to convert the 25 μl used in the
titration ("volume of diluted virus used", Table 8) to one milliliter.
How Can I Make A Stable Cell Line?
In order to generate stable cell lines, it is important to determine the minimum amount of Blasticidin S required
to kill non-transfected/transduced cells. This can be done by generating a Blasticidin S kill curve. After you have
determined the appropriate concentration of Blasticidin Sto use, you can transfect or transduce your cells with
the construct and culture with Blasticidin S in order to select for those cells that have a stable integrant. Cells not
containing a stable integrant will not be selected for.
Where do you purchase Blasticidin S?
We purchase Blasticidin S from Cellgro™ (Catalog # 61-385-RA).
How Many Transfections Are Available In Each Volume Size Of Express-In?
The number of transfections that can be performed depends on the size of the culture dish used and the volume size
of Express-In purchased. Refer to Table 10 below for the approximate number of transfections..
Table 10. Number of transfections depending on culture dish size and volume of Express-In purchased.
Tissue Culture Dish Surface Area Arrest-In 0.5 ml qty 1.0 ml qty 5.0 ml qty 10 ml qty
per Well (cm2) (1 mg/ml) (µg)* (rxns)** (rxns)** (rxns)** (rxns)**
60 mm 20.0 21.0 47-50 100 500 1000
35 mm 8.0 10.0 100 200 1000 2000
6-well 9.4 10.0 100 200 1000 2000
12-well 3.8 5.0 200 400 2000 4000
24-well 1.9 2.5 400 800 4000 8000
96-well 0.3 0.5-1.0 1000 2000 10000 20000
**Recommended starting amounts of Arrest-In reagent as defined in Table 1.
**Approximate number of transfections based on recommended starting amount of Express-In. Individual results may vary depending on
amounts of Express-In used.
1. How much time elapsed from transfection/transduction to Blasticidin S selection?
14
15. If Transfection Into Your Cell Line Is Unsuccessful, You May Need To Consider The Following List Of Factors Influencing
Successful Transfection
1. Concentration and purity of plasmid DNA and nucleic acids-determine the concentration and purity of your
DNA using 260/280 nm absorbance. Avoid cytotoxic effects by using pure preparations of nucleic acids.
2. Insufficient mixing of transfection reagent or transfection complexes.
3. Transfection in serum containing or serum free media-our studies indicate that Express-In/DNA complexes
should preferably be formed in the absence of serum. In the cell lines tested we found that the highest
transfection efficiencies can be obtained if the cells are exposed to the transfection complexes in serum free
conditions followed by the addition of medium containing twice the amount of normal serum to the complex
medium 3-6 hours post transfection (leaving the complexes on the cells). However, the serum-free transfection
medium can be replaced with normal growth medium if high toxicity is observed.
4. Presence of antibiotics in transfection medium-the presence of antibiotics can adversely affect the transfection
efficiency and lead to increased toxicity levels in some cell types. It is recommended that antibiotics be
excluded until transfection has mostly occurred (3-6 hours) and then be added together with the full medium.
5. High protein expression levels–some proteins when expressed at high levels can be cytotoxic; this effect can also
be cell line specific.
6. Cell history, density, and passage number-it is very important to use healthy cells that are regularly passaged
and in growth phase. The highest transfection efficiencies are achieved if cells are plated the day before,
however, adequate time should be given to allow the cells to recover from the passaging (generally >12 hours).
Plate cells at a consistent density to minimize experimental variation. If transfection efficiencies are low or
reduction occurs over time, thawing a new batch of cells or using cells with a lower passage number may
improve the results.
If Transduction Into Your Cell Line Is Unsuccessful, You May Need To Consider The Following List Of Factors Influencing
Successful Transduction
1. Transduction efficiency is integrally related to the quality and the quantity of the virus you have produced.
Factors to bear in mind when transducing include MOI (related to accurate titer), the presence of serum in the
media, the use of polybrene in the media, length of expose to virus, and viral toxicity to your particular cells.
2. High quality transfer vector DNA and the appropriate and efficient viral packaging are required to make high
quality virus able to transduce cells effectively. See also suggestions 3-6 for factors influencing successful
transfection (above).
3. All cell lines are not equally permissible to transduction by lentivirus. You may consider testing additional cell
lines to find one more suitable for your experiments.
If Express-In seems to be toxic to a particular cell line, try reducing the DNA:Express-In ratio.
FAQS/Troubleshooting
For answers to questions that are not addressed here, please email technical support at
openbiosystems@thermofisher.com with your question, your sales order or purchase order number and the catalog
number or clone ID of the construct or collection with which you are having trouble.
13