1. 2019 - 2024 Cisco and/or its affiliates. All rights reserved. Cisco Public Page 1 of 11 www.netacad.com
Lab 14 – Konfigurasi Keamanan Pada Switch
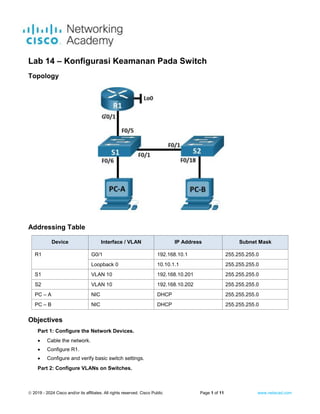
Topology
Addressing Table
Device Interface / VLAN IP Address Subnet Mask
R1 G0/1 192.168.10.1 255.255.255.0
R1
Loopback 0 10.10.1.1 255.255.255.0
S1 VLAN 10 192.168.10.201 255.255.255.0
S2 VLAN 10 192.168.10.202 255.255.255.0
PC – A NIC DHCP 255.255.255.0
PC – B NIC DHCP 255.255.255.0
Objectives
Part 1: Configure the Network Devices.
Cable the network.
Configure R1.
Configure and verify basic switch settings.
Part 2: Configure VLANs on Switches.
2. Lab 14 – Konfigurasi Keamanan Pada Switch
2019 - 2024 Cisco and/or its affiliates. All rights reserved. Cisco Public Page 2 of 11 www.netacad.com
Configure VLAN 10.
Configure the SVI for VLAN 10.
Configure VLAN 333 with the name Native on S1 and S2.
Configure VLAN 999 with the name ParkingLot on S1 and S2.
Part 3: Configure Switch Security.
Implement 802.1Q trunking.
Configure access ports.
Secure and disable unused switchports.
Document and implement port security features.
Implement DHCP snooping security.
Implement PortFast and BPDU guard.
Verify end-to-end-connectivity.
Background / Scenario
This is a comprehensive lab to review previously covered Layer 2 security features.
Note: The routers used with CCNA hands-on labs are Cisco 4221 with Cisco IOS XE Release 16.9.3
(universalk9 image). The switches used in the labs are Cisco Catalyst 2960s with Cisco IOS Release 15.0(2)
(lanbasek9 image). Other routers, switches, and Cisco IOS versions can be used. Depending on the model
and Cisco IOS version, the commands available and the output produced might vary from what is shown in
the labs. Refer to the Router Interface Summary Table at the end of the lab for the correct interface identifiers.
Note: Make sure that the switches have been erased and have no startup configurations. If you are unsure,
contact your instructor.
Required Resources
1 Router (Cisco 4221 with Cisco IOS XE Release 16.9.3 universal image or comparable)
2 Switches (Cisco 2960 with Cisco IOS Release 15.0(2) lanbasek9 image or comparable)
2 PCs (Windows with a terminal emulation program, such as Tera Term)
Console cables to configure the Cisco IOS devices via the console ports
Ethernet cables as shown in the topology
Instructions
Part 1: Configure the Network Devices.
Step 1: Cable the network.
a. Cable the network as shown in the topology.
b. Initialize the devices.
Step 2: Configure R1.
a. Load the following configuration script on R1.
Open configuration window
3. Lab 14 – Konfigurasi Keamanan Pada Switch
2019 - 2024 Cisco and/or its affiliates. All rights reserved. Cisco Public Page 3 of 11 www.netacad.com
enable
configure terminal
hostname R1
no ip domain lookup
ip dhcp excluded-address 192.168.10.1 192.168.10.9
ip dhcp excluded-address 192.168.10.201 192.168.10.202
!
ip dhcp pool Students
network 192.168.10.0 255.255.255.0
default-router 192.168.10.1
domain-name CCNA2.Lab-11.6.1
!
interface Loopback0
ip address 10.10.1.1 255.255.255.0
!
interface GigabitEthernet0/1
description Link to S1 Port 5
ip dhcp relay information trusted
ip address 192.168.10.1 255.255.255.0
no shutdown
!
line con 0
logging synchronous
exec-timeout 0 0
b. Verify the running-configuration on R1 using the following command:
R1# show ip interface brief
Interface IP-Address OK? Method Status Protocol
GigabitEthernet0/0 unassigned YES unset down down
GigabitEthernet0/1 192.168.10.1 YES manual up up
Loopback0 10.10.1.1 YES manual up up
c. Verify IP addressing and interfaces are in an up / up state (troubleshoot as necessary).
Close configuration window
Step 3: Configure and verify basic switch settings.
a. Configure the hostname for switches S1 and S2.
Open configuration window
Switch# config t
Switch(config)# hostname S1
Open configuration window
Switch# config t
Switch(config)# hostname S2
b. Prevent unwanted DNS lookups on both switches.
S1(config)# no ip domain-lookup
S2(config)# no ip domain-lookup
c. Configure interface descriptions for the ports that are in use in S1 and S2.
S1(config)# interface f0/1
4. Lab 14 – Konfigurasi Keamanan Pada Switch
2019 - 2024 Cisco and/or its affiliates. All rights reserved. Cisco Public Page 4 of 11 www.netacad.com
S1(config-if)# description Link to S2
S1(config-if)# interface f0/5
S1(config-if)# description Link to R1
S1(config-if)# interface f0/6
S1(config-if)# description Link to PC-A
S2(config)# interface f0/1
S2(config-if)# description Link to S1
S2(config-if)# interface f0/18
S2(config-if)# description Link to PC-B
d. Set the default-gateway for the Management VLAN to 192.168.10.1 on both switches.
S1(config)# ip default-gateway 192.168.10.1
S2(config)# ip default-gateway 192.168.10.1
Part 2: Configure VLANs on Switches.
Step 1: Configure VLAN 10.
Add VLAN 10 to S1 and S2 and name the VLAN Management.
S1(config)# vlan 10
S1(config-vlan)# name Management
S2(config)# vlan 10
S2(config-vlan)# name Management
Step 2: Configure the SVI for VLAN 10.
Configure the IP address according to the Addressing Table for SVI for VLAN 10 on S1 and S2. Enable the
SVI interfaces and provide a description for the interface.
S1(config)# interface vlan 10
S1(config-if)# ip address 192.168.10.201 255.255.255.0
S1(config-if)# description Management SVI
S1(config-if)# no shutdown
S2(config)# interface vlan 10
S2(config-if)# ip address 192.168.10.202 255.255.255.0
2S1(config-if)# description Management SVI
S2(config-if)# no shutdown
Step 3: Configure VLAN 333 with the name Native on S1 and S2.
S1(config)# vlan 333
S1(config-vlan)# name Native
S2(config)# vlan 333
S2(config-vlan)# name Native
5. Lab 14 – Konfigurasi Keamanan Pada Switch
2019 - 2024 Cisco and/or its affiliates. All rights reserved. Cisco Public Page 5 of 11 www.netacad.com
Step 4: Configure VLAN 999 with the name ParkingLot on S1 and S2.
S1(config-vlan)# vlan 999
S1(config-vlan)# name ParkingLot
S2(config-vlan)# vlan 999
S2(config-vlan)# name ParkingLot
Part 3: Configure Switch Security.
Step 1: Implement 802.1Q trunking.
a. On both switches, configure trunking on F0/1 to use VLAN 333 as the native VLAN.
S1(config)# interface f0/1
S1(config-if)# switchport mode trunk
S1(config-if)# switchport trunk native vlan 333
S2(config)# interface f0/1
S2(config-if)# switchport mode trunk
S2(config-if)# switchport trunk native vlan 333
b. Verify that trunking is configured on both switches.
S1# show interface trunk
Port Mode Encapsulation Status Native vlan
Fa0/1 on 802.1q trunking 333
Port Vlans allowed on trunk
Fa0/1 1-4094
Port Vlans allowed and active in management domain
Fa0/1 1,10,333,999
Port Vlans in spanning tree forwarding state and not pruned
Fa0/1 1,10,333,999
S2# show interface trunk
Port Mode Encapsulation Status Native vlan
Fa0/1 on 802.1q trunking 333
Port Vlans allowed on trunk
Fa0/1 1-4094
Port Vlans allowed and active in management domain
Fa0/1 1,10,333,999
Port Vlans in spanning tree forwarding state and not pruned
Fa0/1 1,10,333,999
6. Lab 14 – Konfigurasi Keamanan Pada Switch
2019 - 2024 Cisco and/or its affiliates. All rights reserved. Cisco Public Page 6 of 11 www.netacad.com
c. Disable DTP negotiation on F0/1 on S1 and S2.
S1(config)# interface f0/1
S1(config-if)# switchport nonegotiate
S2(config)# interface f0/1
S2(config-if)# switchport nonegotiate
d. Verify with the show interfaces command.
S1# show interfaces f0/1 switchport | include Negotiation
Negotiation of Trunking: Off
S2# show interfaces f0/1 switchport | include Negotiation
Negotiation of Trunking: Off
Step 2: Configure access ports.
a. On S1, configure F0/5 and F0/6 as access ports that are associated with VLAN 10.
S1(config)# interface range f0/5 – 6
S1(config-if)# switchport mode access
S1(config-if)# switchport access vlan 10
b. On S2, configure F0/18 as an access port that is associated with VLAN 10.
S2(config)# interface f0/18
S2(config-if)# switchport mode access
S2(config-if)# switchport access vlan 10
Step 3: Secure and disable unused switchports.
a. On S1 and S2, move the unused ports from VLAN 1 to VLAN 999 and disable the unused ports.
S1(config)# interface range f0/2-4 , f0/7-24
S1(config-if-range)# switchport mode access
S1(config-if-range)# switchport access vlan 999
S1(config-if-range)# shutdown
S2(config)# interface range f0/2-17 , f0/19-24
S2(config-if-range)# switchport mode access
S2(config-if-range)# switchport access vlan 999
S2(config-if-range)# shutdown
b. Verify that unused ports are disabled and associated with VLAN 999 by issuing the show command.
S1# show interfaces status
Port Name Status Vlan Duplex Speed Type
Fa0/1 Link to S2 connected trunk a-full a-100 10/100BaseTX
Fa0/2 disabled 999 auto auto 10/100BaseTX
Fa0/3 disabled 999 auto auto 10/100BaseTX
Fa0/4 disabled 999 auto auto 10/100BaseTX
Fa0/5 Link to R1 connected 10 a-full a-100 10/100BaseTX
Fa0/6 Link to PC-A connected 10 a-full a-100 10/100BaseTX
7. Lab 14 – Konfigurasi Keamanan Pada Switch
2019 - 2024 Cisco and/or its affiliates. All rights reserved. Cisco Public Page 7 of 11 www.netacad.com
Fa0/7 disabled 999 auto auto 10/100BaseTX
Fa0/8 disabled 999 auto auto 10/100BaseTX
Fa0/9 disabled 999 auto auto 10/100BaseTX
Fa0/10 disabled 999 auto auto 10/100BaseTX
<output omitted>
S2# show interfaces status
Port Name Status Vlan Duplex Speed Type
Fa0/1 Link to S1 connected trunk a-full a-100 10/100BaseTX
Fa0/2 disabled 999 auto auto 10/100BaseTX
Fa0/3 disabled 999 auto auto 10/100BaseTX
<output omitted>
Fa0/14 disabled 999 auto auto 10/100BaseTX
Fa0/15 disabled 999 auto auto 10/100BaseTX
Fa0/16 disabled 999 auto auto 10/100BaseTX
Fa0/17 disabled 999 auto auto 10/100BaseTX
Fa0/18 Link to PC-B connected 10 a-full a-100 10/100BaseTX
Fa0/19 disabled 999 auto auto 10/100BaseTX
Fa0/20 disabled 999 auto auto 10/100BaseTX
Fa0/21 disabled 999 auto auto 10/100BaseTX
Fa0/22 disabled 999 auto auto 10/100BaseTX
Fa0/23 disabled 999 auto auto 10/100BaseTX
Fa0/24 disabled 999 auto auto 10/100BaseTX
Gi0/1 disabled 999 auto auto 10/100/1000BaseTX
Gi0/2 disabled 999 auto auto 10/100/1000BaseTX
Step 4: Document and implement port security features.
The interfaces F0/6 on S1 and F0/18 on S2 are configured as access ports. In this step, you will also
configure port security on these two access ports.
a. On S1, issue the show port-security interface f0/6 command to display the default port security settings
for interface F0/6. Record your answers in the table below.
S1# show port-security interface f0/6
Port Security : Disabled
Port Status : Secure-down
Violation Mode : Shutdown
Aging Time : 0 mins
Aging Type : Absolute
SecureStatic Address Aging : Disabled
Maximum MAC Addresses : 1
Total MAC Addresses : 0
Configured MAC Addresses : 0
Sticky MAC Addresses : 0
Last Source Address:Vlan : 0000.0000.0000:0
Security Violation Count : 0
8. Lab 14 – Konfigurasi Keamanan Pada Switch
2019 - 2024 Cisco and/or its affiliates. All rights reserved. Cisco Public Page 8 of 11 www.netacad.com
Default Port Security Configuration
Feature Default Setting
Port Security Disabled
Maximum number of MAC addresses 1
Violation Mode Shutdown
Aging Time 0 mins
Aging Type Absolute
Secure Static Address Aging Disabled
Sticky MAC Address 0
b. On S1, enable port security on F0/6 with the following settings:
o Maximum number of MAC addresses: 3
o Violation type: restrict
o Aging time: 60 min
o Aging type: inactivity
S1(config)# interface f0/6
S1(config-if)# switchport port-security
S1(config-if)# switchport port-security maximum 3
S1(config-if)# switchport port-security violation restrict
S1(config-if)# switchport port-security aging time 60
S1(config-if)# switchport port-security aging type inactivity
c. Verify port security on S1 F0/6.
S1# show port-security interface f0/6
Port Security : Enabled
Port Status : Secure-up
Violation Mode : Restrict
Aging Time : 60 mins
Aging Type : Inactivity
SecureStatic Address Aging : Disabled
Maximum MAC Addresses : 3
Total MAC Addresses : 1
Configured MAC Addresses : 0
Sticky MAC Addresses : 0
Last Source Address:Vlan : 0022.5646.3411:10
Security Violation Count : 0
S1# show port-security address
Secure Mac Address Table
-----------------------------------------------------------------------------
Vlan Mac Address Type Ports Remaining Age
(mins)
---- ----------- ---- ----- -------------
9. Lab 14 – Konfigurasi Keamanan Pada Switch
2019 - 2024 Cisco and/or its affiliates. All rights reserved. Cisco Public Page 9 of 11 www.netacad.com
10 0022.5646.3411 SecureDynamic Fa0/6 60 (I)
-----------------------------------------------------------------------------
Total Addresses in System (excluding one mac per port) : 0
Max Addresses limit in System (excluding one mac per port) : 8192
d. Enable port security for F0/18 on S2. Configure the port to add MAC addresses learned on the port
automatically to the running configuration.
S2(config)# interface f0/18
S2(config-if)# switchport port-security
S2(config-if)# switchport port-security mac-address sticky
e. Configure the following port security settings on S2 F/18:
o Maximum number of MAC addresses: 2
o Violation type: Protect
o Aging time: 60 min
S2(config)# interface f0/18
S2(config-if)# switchport port-security aging time 60
S2(config-if)# switchport port-security maximum 2
S2(config-if)# switchport port-security violation protect
f. Verify port security on S2 F0/18.
S2# show port-security interface f0/18
Port Security : Enabled
Port Status : Secure-up
Violation Mode : Protect
Aging Time : 60 mins
Aging Type : Absolute
SecureStatic Address Aging : Disabled
Maximum MAC Addresses : 2
Total MAC Addresses : 1
Configured MAC Addresses : 0
Sticky MAC Addresses : 0
Last Source Address:Vlan : 0022.5646.3413:10
Security Violation Count : 0
S2# show port-security address
Secure Mac Address Table
-----------------------------------------------------------------------------
Vlan Mac Address Type Ports Remaining Age
(mins)
---- ----------- ---- ----- -------------
10 0022.5646.3413 SecureSticky Fa0/18 -
-----------------------------------------------------------------------------
Total Addresses in System (excluding one mac per port) : 0
Max Addresses limit in System (excluding one mac per port) : 8192
Step 5: Implement DHCP snooping security.
a. On S2, enable DHCP snooping and configure DHCP snooping on VLAN 10.
10. Lab 14 – Konfigurasi Keamanan Pada Switch
2019 - 2024 Cisco and/or its affiliates. All rights reserved. Cisco Public Page 10 of 11 www.netacad.com
S2(config)# ip dhcp snooping
S2(config)# ip dhcp snooping vlan 10
b. Configure the trunk port on S2 as a trusted port.
S2(config)# interface f0/1
S2(config-if)# ip dhcp snooping trust
c. Limit the untrusted port, F18 on S2, to five DHCP packets per second.
S2(config)# interface f0/18
S2(config-if)# ip dhcp snooping limit rate 5
d. Verify DHCP Snooping on S2.
S2# show ip dhcp snooping
Switch DHCP snooping is enabled
DHCP snooping is configured on following VLANs:
10
DHCP snooping is operational on following VLANs:
10
DHCP snooping is configured on the following L3 Interfaces:
Insertion of option 82 is enabled
circuit-id default format: vlan-mod-port
remote-id: 0cd9.96d2.3f80 (MAC)
Option 82 on untrusted port is not allowed
Verification of hwaddr field is enabled
Verification of giaddr field is enabled
DHCP snooping trust/rate is configured on the following Interfaces:
Interface Trusted Allow option Rate limit (pps)
----------------------- ------- ------------ ----------------
FastEthernet0/1 yes yes unlimited
Custom circuit-ids:
FastEthernet0/18 no no 5
Custom circuit-ids:
e. From the command prompt on PC-B, release and then renew the IP address.
C:UsersStudent> ipconfig /release
C:UsersStudent> ipconfig /renew
f. Verify the DHCP snooping binding using the show ip dhcp snooping binding command.
S2# show ip dhcp snooping binding
MacAddress IpAddress Lease(sec) Type VLAN Interface
------------------ --------------- ---------- ------------- ---- ----------------
----
00:50:56:90:D0:8E 192.168.10.11 86213 dhcp-snooping 10 FastEthernet0/18
Total number of bindings: 1
Step 6: Implement PortFast and BPDU guard.
a. Configure PortFast on all the access ports that are in use on both switches.
S1(config)# interface range f0/5 - 6
S1(config-if)# spanning-tree portfast
11. Lab 14 – Konfigurasi Keamanan Pada Switch
2019 - 2024 Cisco and/or its affiliates. All rights reserved. Cisco Public Page 11 of 11 www.netacad.com
S2(config)# interface f0/18
S2(config-if)# spanning-tree portfast
b. Enable BPDU guard on S1 and S2 VLAN 10 access ports connected to PC-A and PC-B.
S1(config)# interface f0/6
S1(config-if)# spanning-tree bpduguard enable
S2(config)# interface f0/18
S2(config-if)# spanning-tree bpduguard enable
c. Verify that BPDU guard and PortFast are enabled on the appropriate ports.
S1# show spanning-tree interface f0/6 detail
Port 8 (FastEthernet0/6) of VLAN0010 is designated forwarding
Port path cost 19, Port priority 128, Port Identifier 128.6.
<output omitted for brevity>
Number of transitions to forwarding state: 1
The port is in the portfast mode
Link type is point-to-point by default
Bpdu guard is enabled
BPDU: sent 128, received 0
Step 7: Verify end-to-end connectivity.
Verify PING connectivity between all devices in the IP Addressing Table. If the pings fail, you may need to
disable the firewall on the PC hosts.
Close configuration window
Reflection Questions
1. In reference to Port Security on S2, why is there no timer value for the remaining age in minutes when sticky
learning was configured?
2. In reference to Port Security on S2, if you load the running-config script on S2, why will PC-B on port 18 never
get an IP address via DHCP?
3. In reference to Port Security, what is the difference between the absolute aging type and inactivity aging
type?