SlideShare a Scribd company logo
1 of 44
Download to read offline
Blog of Work
Thursday 5th
February 2015
On this date, both Rhys and I decided to started to research different reference scenes for use
for our project. After our research, we decided on a room design which inspired us. The scene
we chose was an interior design from Uncharted 3. We then gave ourselves assigned tasks to
do for the day. Rhys created a blockout of the room and I created one of the scene assets for
this environment. Here are images of the reference shot and the blockout shot.
5th February 2015
Most of the models would be modelled using the box modelling technique. I originally modelled
a simple staircase with a slight chamfer on the edges. This was then added to mudbox and the
staircase was subdivided twice to add more detail. At this point, I havenā€™t decided which one will
be used in the final scene. Here are images of how it looks like currently
7th February 2015
Today I worked on updating the models in the scene. The main things I created were drafts of
the bed and the cupboard. I also created a table, carpet and updated the models of the drawers.
The lighting was also improved.
These object were modelled using boxes, cylinders and splines. To save time, I also used the
mirror modifier on objects like the doors to the cupboard. I also used instancing on duplicate
objects to save memory.
9th February 2014
Today I decided to try and create a light bake for the environment. I needed to create this
because this environment will need to be viewed on a website called sketchfab, which is where
we have to submit this work at the end. This is because the lighting that we use in 3ds max will
not carry over when its on the website, unless we bake the lighting so this is what i managed to
do. After researching into light baking tutorials i couldn't find one that will work with sketch fab. I
finally found out how to do it after looking at the sketchfab website where i found that there was
an official app available for 3ds max that helps you bake the lighting that you have got and then
publish the model. All you have to do is select the right resolution of the textures, change some
settings and then once you click the publish button it bakes all the lighting for you and then
uploads it straight to the website. This therefore allows you to see the environment on the
website, with the lighting i have created. The screenshot below shows the result I got.
I tested out the light bake early on as I didnā€™t want for there to be any problems at the end. This
is because the whole point for creating this project is so that we will get feedback on what weā€™ve
created at the end by industry professionals. If this process didnā€™t work, we might have had to
find another challenge to do.
11th February 2015
Today I have been experimenting what kind of windows we could add to this environment.
These are some basic ones I created to get us started but this will probably change as we go
on. I am also experimenting on the lighting to get a balance of light and dark areas which could
go in the scene.
When i was creating the windows i thought about possibly adding some kind of curtains to add
to the scene. These are some that I was experimenting with. I think I managed to make them
look ok as a starting point but i'm aiming to make them look more realistic in the future. I used
the cloth modifier with surface tension tools to create this basic curtain. Weā€™re aiming to improve
it in the future.
12th February 2015
Today, we were working on creating an improved model of the curtain. We spent some time
learning different ways to create these curtains mainly using the resources youtube and lynda
provides for us. There were some interesting tools using the power of the garment maker which
I thought would be useful for future projects.
In order to create this curtain, I used a box which had 100 subdivision in 2 of the axes. This
gave the model fluidity which allows it to interact better with the cloth modifier. I then
sequentially removed a face every ten faces in order to create a hole for my torusā€™s to fit into.
The cloth modifier was subdivided where needed for example in the corners and on the deleted
faces using the hierarchical subdivision surface modifier. I learn that this HSDS modifier allows
you to subdivide in certain areas which is in contrast to the turbosmooth modifier which
subdivides the whole object. I then added the cloth modifier to the box which allowed me to add
the torusā€™s as collision objects and therefore interact with the box once simulated. This is how it
looked like once it was simulated.
I found out that the bottom of the curtain didnā€™t look as nice and folded as the top part of it did. I
therefore researched some more to find a way to fix this. Animating the scaling of a box at the
bottom which is connected to the curtain as a collision object is a potential way of fixing this
problem.
12th February 2015
Today I decided to create a different type of window than i have done before, instead of creating
a 4 pane window i have decided to create an 2 pane window with a sliding door. This is firstly to
make it look more interesting and secondly so we can decide if we want to have the window
open or have it closed at the end. Having it closed would mean it will block some of the light
from coming in. Therefore, we are both trying to decide what we want to do for the lighting.
I have also been experimenting with the cloth modifier to create some curtains. My initial idea
was to make the curtains look reasonably dramatic because i thought if i added this it would
give the environment more character when looking at it. This would also make it look different
to the reference image that we have.
This was done by creating a plane and adding a cloth modifier to it., making it as dense as
possible and also by adding turbosmooth this would add more realism and finally editing the
internal parameters until it looked good. The dramatic look was created by adding the wind
space warp to the cloth forces.
We both have both been experimenting in different ways to create different kinds of curtains and
are still
deciding
what type
we are
going for.
13th February 2015
Today, I was further experimenting with trying to get a good curtain made. Over a number of
failed simulations with reasons unbeknownst to me, I didnā€™t managed to get the bottom of the
curtain to be folded in the way I wanted to. I therefore looked into alternatives of getting the
curtain looking better and found a way to pick up the curtain by animating a box diagonally and
attaching it to the curtain using the surface tool in the cloth modifier. The area where the curtain
was dragged in order to pick up the curtain didnā€™t look realistic enough so in order to make it
look better, I added a curtain tie back. Furthermore, a FFD 4*4 modifier was added in order to
give the finished curtain a better shape. Finally curtain rail holders were made using a
combination of spline modelling and box modelling. This is how it looked like after the work was
done.
13th February 2015
Later on, I proceeded to ameliorate the cupboards by adding shelves where needed and adding
a glass material to parts of the doors. Another thing I noticed was that there was a beam that
looked like a ladder on the source image. I quite liked this design and so I modelled this beam
across two of the walls in the scene. As not much texturing has been done yet, I decided to
continue improving this aspect of the image. A basic carpet texture was also added to the
carpet in order to give an idea of what it might look like.
14th February 2015
Today, I was continuing to add textures to my models. I focused on wood textures today as
there is quite a lot of wood in the scene. For the walls, I decided to change them to wood panels
rather than concrete to give the scene more of a chalet kind of look. This option of concrete vs
wood is still undecided for the walls though. In order to create these textures I was using
photoshop with a plugin called pixplant. Pixplant helps to create seamless textures for you and
therefore has saved me time. However, it doesnā€™t usually make a perfect job, especially when its
trying to replicate straight lines like what you see in between floor boards. I therefore used alpha
channels, the clone stamp tool and the ā€˜fill by content awareā€™ in order to remove the errors. In
total, I successfully created 4 textures and failed in one texture for the table as there was too
much light difference for it to be usable.
15th February 2015
My aim for today is to combine my teams work into one file so itā€™s easier for the both of us to
work out how far weā€™ve come. Iā€™m also going to continue to update my textures.
I managed to add in Rhyā€™s updated windows, bed sheets, mattress and pillows into my scene
with the textures he created. This is how the scene looked like once rendered.
I also found out that the pixplant plugin for photoshop can also make it easier for you to create
normal maps, displacement maps and specular maps. This technique was used to help me
create the textures you see below you.
16th February 2015
My aim for today is to continue adding textures to objects in the scene. Iā€™d also like to see how
the middle table would look like with a cloth draped on top of it.
Today, Iā€™ve added 4 new textures. I am fairly happy with the ladder texture and the bedpost
texture. However, Iā€™m not sure about the texture for the cupboard on the left hand side of the
image and this may need improving. Iā€™m still not sure whether the table looks better with or
without a cloth on it so I think Iā€™ll discuss this issue with my teammate.
Iā€™m still not sure whether the walls should be wood or concrete. Currently, I think there is too
much wood in the scene which leads me to prefer the concrete version.
17th February 2015
Today, I decided to model drawers for the scene. I used sketchup rather than 3ds max as I
believe to be a better modelling tool for architecture compared to 3ds max. As SketchUp works
on surface modelling rather than quad modelling, when imported, the objects tend to look a bit
messy. However, all the detail is preserved and the object still looks good.
This is a render with a simple clay material added onto the cupboard.
18th February 2015
Today, I was working on creating xref scenes in order to get my workflow to become faster as
the viewport was slowing down to the point where I wasnā€™t able to use it anymore. I therefore
created 3 separate scenes which link to the main file. The first file has all the window geometry
in it, the second file has all the bed geometry in it and the third file has the centre table, cloth
and carpet in it.
16th - 18th February
After me and my team mate concentrated on what kind of textures could possibly be used in
the final scene, i decided to go in another direction and thought i should create some basic
assets that could go into the environment. This is one to make it look and feel more like a living
place, and two it will make the whole room look more interesting and look more natural than it
was before. All of the objects were either poly modeled or spline modeled such as some of the
glass pots which i used the lathe tool to create these. Also after discussing with my teammate
about how the wall looked very bare above the bed i decided to add an book shelf that will be
placed in that position. Therefore after putting it in the right place we both agreed that it made
the room look alot better.
19th February 2015
Today, our main goal is to improve our workflow between the editing of the same file. We will be
using google drive and xrefs in order to save time.
After discussion with our tutor, these are the main elements we need to change:
ā— Make the general geometry smaller and more delicate
ā— Improve textures
ā— Refine and reduce the size of assets
ā— Create an orange tinge to the wall texture
ā— Make the lighting warmer
ā— The middle part of the cupboard should be reduced
ā— In general make the geometry more natural looking
ā— Add another layer of wood to the roof and fragment this using ray fire
Plan for things needed to be done
ā— Weā€™re thinking of creating 4 light bulbs, 2 in the back and 2 in the front
ā— We also think we should put shelves in between the windows
ā— Add more assets
The Evening of the same Day
On this evening, my teammate and I were collaborating to work out the best way for the file
transfer process. While doing this, we finally understood the power of Xrefs. Previously, only
one of us could work on the same file at a given point in time. This was because our work would
be overwritten as they both are saved to the same place. To get around this, we decided that if
we Xreffed the key parts of the scene, we would both be able to work on the same project. This
is because each xref creates a separate max file which links into the main scene.
20th February 2015
Today, I was experimenting with getting the Vray lighting working in my scene. The main reason
for choosing Vray over Mental Ray as a render engine is because the lighting tends to look
more realistic in Vray. I encountered many problems while trying to get this working and this
caused me to lose valuable time.
I also used a vray material on the curtains and changed the parameters so that the curtain looks
like itā€™s semi transparent which therefore allows more light to come into the scene.
In the end, I did manage to get a small test render made which failed at showing how I wanted
the scene to look.
20th february 2015
Today I decided to take a few of the assets of of the scene to improve them. The first one i
decided to do was the main structure of the room.
There are a couple of things i wanted to improve on this:
ā— The size of the beams was the first thing I wanted to change. After getting feedback from
our tutor, he suggested to reduce the size of the beams as they seemed to be a little too
big and chunky when comparing it to the reference image. I therefore decided to take
action and make them a lot smaller than they were before.
ā— I also decided to make the edges less sharp on the side so a chamfer was applied onto
this asset.
ā— The other comment was about the texture we had on it. The old texture seemed to have
repeated patterns so I decided to experiment into another type of texture. Having a
lighter brown texture on the structure seemed to be more fitting. Once I applied it, I found
that it suited the environment very well. I guess this was because it brought a little bit of
colour to
the image
and made
it a little
more
interesting
to look at.
The other comment that we were both given was about the bed in the scene. when
looking at it closely he said that the bed posts were very fat and chunky. And suggested
that we should shrink the size of the whole object so it looks more like the image that we
were doing. After editing, I found that it did make the bed look more natural and suited
the environment that it was placed in.
After doing this I decided to make the bed a little more messy than it was before so it
would make the environment look more like its being lived in. I also suggested that we
could change the colour of the wood of the bed too which caused me to darken it a little.
Following on with the feedback we were given from the tutor, he had a suggestion about
this table in the centre of our renders. He suggested to make the legs of this table a little
smaller and less bulky, so this is what i decided to do. I did this by selecting the edges
on each of the legs and then pulling them in with the move tool. I believed this method
was the most practical to get the result i wanted. After making the legs much smaller, I
also to carry out the same method on the top of the table.
The final change i did was to add a chamfer to all the edges that are on the table as
they were very sharp and didn't look right when placed into the environment.
I finally decided to change the look and
feel of the wood on the ceiling to make it
look less perfect than it did. If one looks
at the reference image more closely, the
wood that overlaps above has
imperfection like broken wood in
between some of the wood segments.
I therefore decided I could try and do
replicate this effect with the 3ds max plugin called ā€œrayfireā€.
ā— Firstly I selected all of the ceiling wood and put them into the rayfire plugin
ā— I then selected them to be fragmented into ā€œwood splintersā€
ā— Once this was done, I could select each fragment and then use the move or
rotate tool to get them into any angle i wanted to
ā— In my case, I wanted to make it look like the wood is fairly sharp which makes the
environment look more dramatic and lived in.
ā— I found that this made the scene look a lot more interesting then what it originally
did.
21st February 2015
Today, I decided Iā€™d model my teammateā€™s bedside table in sketchup due to it being a fast
modelling tool and then reshape it in 3ds Max so that it can conform to the style of the image.
This was then
xreffed into the main
scene and textured.
Another problem Iā€™ve recently been getting is the loss of textures while opening up the same file
on different computers. I worked out this was because it was trying to find the absolute file path
which changes depending on which computer youā€™re on. However, I found out there was a way
to get a relative file path which eliminates this problem. This was explained to me by this lynda
video tutorial: http://www.lynda.com/3ds-Max-tutorials/Asset-tracking-3ds-Max/184455/365448-
4.html
22nd February 2015
Today, I added a wood texture to the bedside table. This didnā€™t take too long to do as the texture
used was one which was previously created. Iā€™ve also modelled an updated thinner version of
the staircase with more steps which will be added to the scene.
I then created a different texture for the ladder which
was originally grey but was changed to a brown
texture using photoshop photo filters, hue/saturation
and curves.
I also edited the texture of the pillows in order to
give it more colour. This may need to be further
edited as I think there are too many pillows with the
same colour. I also briefly changed parts of the book
cover in order to make the pages look whiter.
23rd February 2015
Today, my teammate showed me how to light bake the scene. The reason why he was showing
me was because he was trying to light bake the scene the day before on his computer but his
computer crashed as there wasnā€™t enough RAM for it to handle the baking. We wanted to do a
second light bake test as we worried that as there is so much data to process, that our
computers may not be able to handle it. After getting countless errors trying to get this plugin
working, we managed to click all the right buttons for the baking process to start. However, what
we didnā€™t realise was the time it was going to take for this bake to occur and therefore, we both
lost even more time. In the end it took 12 hours to light bake and finished at 2 in the morning.
This is the link to the uploaded light bake:
https://sketchfab.com/models/0b6b99586ac5429fb10500d416849142
24th February 2015
Today, I was working on creating another curtain model as we didnā€™t think it looked good
enough and it was letting too much sunlight in. Therefore, I used the pre-simulated model of my
previous curtain and worked out a different way to create what we needed. With this attempt, I
copied the animation I created for the curtain and created holes in the bottom of the curtain in
order for the bottom part of the curtain to fold as well. After a 3 hour long simulation, I still
thought it didnā€™t look good enough so I added a wind space warp and added it to the cloth
forces. This helped the second time around as the folds I wanted got created.
I then proceed to find a better curtain texture. Once I found one, I edited its colour in photoshop
and added it to the diffuse section on the semi transparent vray material I had previously
created in 3DS Max. To save time, I added a teapot set found online on turbosquid and used it
to fill up parts of the left cupboard. The teapot set was edited to reduce the polycount. Hereā€™s
the link to the file: http://www.turbosquid.com/FullPreview/Index.cfm/ID/415417
25th February 2015
These are a few of the assets that I managed to create today. These assets helped to populate
the scene as it was looking quite bare. Some of the objects like the books and jars were made
while doing this project. Others such as the tyres, plates and bowls were from other projects as
it saves time in the modelling process.
25th - 26th February 2015
These last couple of days have been fairly frantic and busy to try and complete our scene on
time.
I created a chair during this period of time as I thought it was one of the assets missing in the
scene. This chair took a couple of hours to create and texture.
I also added wine glasses and bottles into the left cupboard which I had modelled previously.
These were then copied as instances to fill up the cupboard
DVDs were also added which I modelled and textured .These were put into the bookshelf along
with the books which were previously there. I then proceeded to add textures to the books which
were left in the bookcase. I then added Mass FX rigid body modifiers to everything in the
bookcase. The books and DVDs were then rotated so that theyā€™ll be able to fall into their natural
positions when the mass fx animation was applied. All other books in the scene also had
improved textures added to them.
I also thought it would be a good idea to work
on the right hand side cupboard. The bottom
glass were deleted and replaced with wooden
doors to add variety to the 2 separate
cupboards. I also added plates in different
orientations to the top part of the cupboard.
These plates were also textured with about 8 separate images.
25th - 26th February 2015
Over these last few days, both myself and my teammate worked really hard to get our work
done by our desired deadline which was at the end of the 26th February. We just about
managed to finish it on time and had everything finished. All that was left to do was upload it to
Sketchfab and our work would be doneā€¦ Or so we thought. The number of problems uploading
to that website have been very numerous and we both have been trying to troubleshoot the
problems and fix them.
Our first problem was that the light bake was taking too long:
ā— The light bake was taking at least day to work and was using up all of the RAM
ā— To add to this, most of the time, Windows thought that the amount of time of inactivity
meant that the program was not responding correctly and therefore Windows closed the
program each time it was rendering the UVs
ā— When we finally managed to get a test version uploaded, we found that some of the
geometry was scaled to extreme proportions
ā— I then researched why this was happening for one whole evening and worked out it was
due to scaling in object level rather than sub-object level. In order to fix this, the internet
suggested to reset the xform on the affected objects. This would reset the local scaling
percentage values to 100% while not changing the size of the object.
ā— I tried this method but for some reason the objects were changing in scale and the local
values reset themselves. I also found out that if I manually wanted to scale them, they
didnā€™t change no matter what edits I did to the geometry.
ā— The texture unwrap it did was also way too small. To fix this, one would need to have at
least textures with 5 times the resolution which would take at least 5 times as long to
render with the hope of no crashes happening in between
1st March 2015
While waiting and hoping that the next sketchfab upload will work, i was researching all different
possibilities for this 3d sketchfab upload to work. This led me to find out that there was a limit of
50MB when uploading to sketchfab. This can be increased to 200 MB if one invites 5 friends to
join sketchfab or signs up their school/university to the website. I therefore believe that this is
the reason why our textures are so low res.
On a positive note, I found there was a way to edit lighting parameters directly on the website
which allowed me to get a lot better lighting result of my previous uploads. The last successful
upload was done on the 23rd February and after editing the lighting, this is what I got
On the evening of the same day, I went to my teammates apartment to discuss the next plan of
action. While looking at the scene, Rhys had the idea of finding a DVD with no Xform errors and
attach all of the other DVDs and Books to it. This therefore finally solved the problem of Xform
as the local values managed to finally go back to 100%.
Using this information, I put on another light bake upload to Sketchfab at 3 in the morning back
at my place.
2nd March 2015
Today, I woke up to an email sent to me from the creator of Sketchfab Klaas Nienhuis!
This led me to discuss a plan of action with my teammate to see where we should go from here.
It was decided that I was to reduce the poly density of the model as well as the material
resolution in order to conform with Sketchfabā€™s upload limits. While Iā€™m doing this my teammate
was to sort out a couple of small kinks in the model and create renders of the scene including a
short video pan of our environment.
The tools Iā€™ve been using to reduce the polycount of my model include quadrify all in the
editable poly rollout, a pro optimize modifier which reduces the poly while preserving a lot of the
detail. Iā€™ve also welded a lot of the vertices on the roof as it was originally fragmented which
caused there to be a lot of unnecessary polygons. The final method Iā€™ve used is selecting edges
which arenā€™t needed and using ctrl delete to remove the edges and their respective vertices.
I also found that there were a lot of copies of identical objects. This isnā€™t how I model so I
changed all of these objects to instances and instructed my teammate to create identical objects
as instances in the future.
By the evening, I had finished reducing the polycount of every piece of geometry in the scene
down from 1,887,087 polygons to
749,873 polygons which is more
than halving the polycount.
At about 8 in the evening, I received this comment from James who suggested I manually
export the file.
Here is the FBX I uploaded:
3rd March 2015
On the 3rd March, both my
teammate and I woke up to an
email accepting our request to
upgrade to Sketchfab Pro.
This gave both of us more freedom when it came to uploading files to the website. I therefore
uploaded my OBJ file with all the materials zipped into the .7 extension format. As this file was
153MB I could now upload it to the website which I couldnā€™t do before. The result was
unexpected as some of the textures managed to work whereas most of them either werenā€™t
there or were textured with the wrong image like most of the books and the jar to the right on the
image below.
I also tried to upload another lightbake with a light density of 10 the evening before but
unfortunately overnight, the internet crashed at my living quarters which consequently crashed
my computer
On the same day, my teammate managed to add an owl texture with a bump to a frame on the
wall. A lot of problems involving malware and little RAM caused my teammates computer to
slow down nearly to a halt. This therefore meant not much could be done on his end in terms of
3D
4th March 2015
In the morning, my teammate successfully managed to produce a light bake of 5.0 of our scene
which is a huge step up from what we previously had. During the day, both my teammate and I
went to Uni with the goal of finally getting a light bake which has a high enough resolution to
display our textures. We therefore logged into 17 of the computers in our room, downloaded
google drive on all of them and narrowed down the selection to the 6 computers which had a
working version of VRay, which we could use for our light bake. The Sketchfab Exporter Plugin
was then added to these machines.
These 6 computers were rendered with different numbers of the light bake. The light bake
density calculates the resolution of the fully unwrapped image.
These light bakes were set to 8.0, 10.0, 15.0, 20.0 and 30.0 respectively.
Once this was completed, we set with the plan that I was to update the blog and my teammate
was to create some dirtier more realistic textures for some of the geometry to improve our final
renders.
Unfortunately while looking at our latest render, we noticed a final difficult problem which we
donā€™t know how to resolve. It seems that the auto-unwrap didnā€™t work very well with transparent
textures such as glass and makes it look like whatā€™s inside the image is pasted onto it. What Iā€™m
going to do to try and fix this problem is contact sketchfab again and hope for a reply which
helps our cause.
We also asked a student in the year below us to comment on our work. He liked it all except he
didnā€™t think that all textures were ā€œdirtyā€ enough to give that extra edge in photorealism. My
teammate and I then made a plan for me to update the blog and for him to fix some of the
textures.
This is the image of our most successful light bake to date:
5th March 2015
Today, I inquired about 2 of the main problems Iā€™ve been having with light baking up to
Sketchfab. This is what I wrote:
6th
March 2015
These are the replies I woke up to and what I did about it to try and fix it:
Once we both were waiting for the computers to do the light bake I decided to act on the
feedback that we were given from a student that was in the year above us. He said the image
looked very good, but to reference it more to the image we were going for he suggested that
some of the textures should be edited a little so that some of the assets look a little dirtier.
Which I thought was a good bit of feedback so that night I got to work on them. I decided to edit
most of the textures in the scene. And after I did this I found that it made a very big difference!
Below are a few objects Iā€™ve changed.
The one difference you can see is the bed cover. I thought that by having this quite dirty it would
change how you feel about the room, it would also make sense if the room was dirty then the
bed cover would obviously be the same. I created this effect by first searching online for a
grunge texture, after finding the right one to use, I then decided to take it into Photoshop and
then tile it so has the same kind of proportion as the red texture it has on it currently. After that I
added it onto the same file as the bed cover and used the layer opacity and fill settings to edit
how the texture would look like on top of the original texture. After I was happy I saved it, these
layers were not merged together this was because I may need to edit some of the layers
individual at some point. After retexturing the bed cover I thought I would change the texture of
the cupboards, the reason I did this was because it would suit the environment a lot more, plus I
thought the old texture needed to be changed so thought this would be the best time to do this. I
used the same dirty texture overlay as the bed cover, and found that it worked very well in the
end!
The main beams of the room were also retextured. This piece of geometry was commented on
quite a lot when getting feedback. So I decided to act on that too and change it a little, which I
have created a darker grunge effect on the wood texture, this I found gave the room more depth
and meaning when looking at it.
After changing the textures, I wanted to add another v-ray camera to the scene, this camera will
then do a 360 degree view around the room. I would initially do this by using the line tool and
create a circle. And then attach the camera to the circle meaning that then it can animated going
around the environment. After I got it the way I wanted it I decided to start a render to go over
the weekend, and when I got back I had a look at the results, the final images that were created
were great! But found out that the camera movement felt a little fast when going around the
room. I attempted to edit the speed of the video, in premier pro but wasnā€™t able to sort it out. So I
have decided to go into university one day and attempt the render again on the machines and
leave it for a couple of days and see what results I get. I will also be changing the frame time
before it was 100 which was too fast but if I change it to 250 this will hopefully give me a slower
result than before.
7th
March ā€“ 17th
March
During these last 10 days, we were battling with the computers to try and get a good enough
light bake to be presentable. There were a lot of challenges we had to overcome as many of the
computers we were using to help us render these light bakes werenā€™t fast enough to carry out
the operations we liked them to. My ultimate goal I set was to get it working through Jamesā€™s
solution which klaasnienhuis confirmed.
During this period, we worked out that there were only 6 computers with VRay installed at Uni.
On each one of them, we put on a light bake with different numbers for the light bake. The
lowest consisted of a light bake of 5 and a highest of 50.
These were some of the problems we encountered:
ā€¢ Unfortunately, at first we didnā€™t think that the computers were to sleep after a certain
period of inactivity. This caused a lot of our first attempts at uni to either fail or slow
down.
ā€¢ As the uni computers only had 8GB of RAM, the tendency for them to crash was very
high. To reduce the chances of these crashes, I went into the windows task manager
and set the 3dsmax.exe priority to real time. This meant that the computer couldnā€™t be
touched while it was rendering but would use all of the computing power.
ā€¢ A lot of our original light bakes at Uni were very dark. After a lot of troubleshooting, we
worked out that the irradiance map and light cache had been saved and used from a
previous iteration of the file. This meant that it wasnā€™t using the lighting we had set at this
point in time. To fix this, we set each computer to calculate new lighting values during
the light bake render.
Nearly all of the renders failed and crashed or simply didnā€™t work except for this one which was
done before I knew about the glass problem:
https://sketchfab.com/models/78b7d92e801441a5b4ce28e66dca9774
As it was taking such a long time, I decided to use my own computer to speed up the rendering
process. These were some of the problems I encountered during this battle:
ā€¢ As the internet was fairly intermittent at home, my computer kept losing its internet
connection. This was especially a problem at the start, as I had my computer rendering a
good light bake for 2-3 days and then as soon as itā€™s done, it didnā€™t want to upload.
Foolishly, at first I didnā€™t think that it saved any aspect of what it had created during this
period so I closed the scene. After it happened for the second time after waiting another
3 days, I decided to look into it a bit more. What I found was that I could upload the light
bake as an OBJ with all of the light bake textures it had created and the scene would
work. This is how it looked once I managed to get my second successful light bake
online.
I believe the render started happening before I worked out that the problem of the pre saved
irradiance map and light cache. This caused the scene to be a lot darker then what I would have
liked.
To fix this final problem, I decided that my final plan of action was to combine the best parts of
the 2 best light bakes. At first I encountered a problem of not being able to download one of the
successful scenes off of Sketchfab as the download button was greyed out. I assumed that this
was because it was processing the model before it allowed me to download it but after waiting
for 2 hours, it was still greyed out. This caused me to contact the support team about this
problem and this is what I wrote and what they came up with:
18th
March
Now I had the 2 successful light bakes I wanted to work with, I spent the whole of today picking
the best parts of these 2 scenes into a new 3ds Max file.
These are the problems I encountered during this day:
ā€¢ As each piece was merged into the scene, it made it hard to keep track on which parts
were overlapping. This was because the automatic unwrap and automatic merging of
objects into 1 editable poly didnā€™t seem to be as consistent as I had hoped. This meant
that there was quite a bit of zfighting during the merging of these 2 scenes. This was
fixed by deleting the elements I wanted to remove in sub-object mode. Below is a quick
representation of how zfighting looks like.
ā€¢ As both scenes werenā€™t perfect, I had to also edit some errors of the light bake by editing
the bitmap files in Photoshop. The image to the right shows some of the errors of the
light bake
19th
March
ā€¢ I also noticed that the front and back wall were too bright in comparison to the rest of the
scene. These images were then edited in Photoshop using gradients, editing exposure
levels and adding a bit more grunge to them
ā€¢ I hadnā€™t manage to fix the glass problem for a number of weeks so I asked the Sketchfab
support team if they had any suggestions but luckily I found out by myself shorty after
my post. After a lot of troubleshooting I worked out that Sketchfab didnā€™t recognize any
mental ray or vray textures which consequently was what my glass was. As I hadnā€™t
created any glass using the standard material editor, my teacher quickly helped me with
that. This is what I posted to Sketchfab:
By the end of today, I had finally gotten a good enough upload to be presented. This is how it
looks like and the link to the web 3d model:
https://sketchfab.com/models/ea23db2e60554fe1a8fde8edfcdcf570
Once it was uploaded, the Sketchfab Supporters also praised my work which was good to hear.
Here are those comments:
20th
March
Today, I woke up to see my model uploaded onto the Polycount Tower. It was certainly pleasing to see our end goal achieved after
all of our hard work. https://labs.sketchfab.com/tower/#model/ea23db2e60554fe1a8fde8edfcdcf570

More Related Content

What's hot

Reflective journal
Reflective journalReflective journal
Reflective journaljessicacrosland
Ā 
Reflective journal
Reflective journalReflective journal
Reflective journaljessicacrosland
Ā 
Reflective journal
Reflective journalReflective journal
Reflective journaljessicacrosland
Ā 
Reflective journal
Reflective journalReflective journal
Reflective journaljessicacrosland
Ā 
Reflective journal
Reflective journalReflective journal
Reflective journaljessicacrosland
Ā 
Reflective journal
Reflective journalReflective journal
Reflective journaljessicacrosland
Ā 
Reflective journal
Reflective journalReflective journal
Reflective journaljessicacrosland
Ā 
Experimental evaluation
Experimental evaluationExperimental evaluation
Experimental evaluationCallumknight
Ā 
Production reflection fmp y1
Production reflection fmp y1Production reflection fmp y1
Production reflection fmp y1GemmaNicholls1
Ā 
6. fmp production reflection
6. fmp production reflection6. fmp production reflection
6. fmp production reflectionBen Wincup
Ā 
Digital graphics evaluation pro forma (1)
Digital graphics evaluation pro forma (1)Digital graphics evaluation pro forma (1)
Digital graphics evaluation pro forma (1)Robert Ryan
Ā 
Digital graphics evaluation pro forma (1)
Digital graphics evaluation pro forma (1)Digital graphics evaluation pro forma (1)
Digital graphics evaluation pro forma (1)Robert Ryan
Ā 
Digital Graphics Evaluation Pro Forma
Digital Graphics Evaluation Pro FormaDigital Graphics Evaluation Pro Forma
Digital Graphics Evaluation Pro FormaJohnRae13
Ā 
Production reflection
Production reflectionProduction reflection
Production reflectionAbbie Nicholls
Ā 
Ha2 production log
Ha2 production logHa2 production log
Ha2 production logsoulsama
Ā 
Fmp production dev diary
Fmp production dev diary Fmp production dev diary
Fmp production dev diary Tommy Lister
Ā 
The Grid Reflections
The Grid ReflectionsThe Grid Reflections
The Grid ReflectionsShaniceYates
Ā 

What's hot (19)

Reflective journal
Reflective journalReflective journal
Reflective journal
Ā 
Reflective journal
Reflective journalReflective journal
Reflective journal
Ā 
Reflective journal
Reflective journalReflective journal
Reflective journal
Ā 
Reflective journal
Reflective journalReflective journal
Reflective journal
Ā 
Reflective journal
Reflective journalReflective journal
Reflective journal
Ā 
Reflective journal
Reflective journalReflective journal
Reflective journal
Ā 
Reflective journal
Reflective journalReflective journal
Reflective journal
Ā 
Experimental evaluation
Experimental evaluationExperimental evaluation
Experimental evaluation
Ā 
Production reflection fmp y1
Production reflection fmp y1Production reflection fmp y1
Production reflection fmp y1
Ā 
6. fmp production reflection
6. fmp production reflection6. fmp production reflection
6. fmp production reflection
Ā 
Digital graphics evaluation pro forma (1)
Digital graphics evaluation pro forma (1)Digital graphics evaluation pro forma (1)
Digital graphics evaluation pro forma (1)
Ā 
Digital graphics evaluation pro forma (1)
Digital graphics evaluation pro forma (1)Digital graphics evaluation pro forma (1)
Digital graphics evaluation pro forma (1)
Ā 
Digital Graphics Evaluation Pro Forma
Digital Graphics Evaluation Pro FormaDigital Graphics Evaluation Pro Forma
Digital Graphics Evaluation Pro Forma
Ā 
Production reflection
Production reflectionProduction reflection
Production reflection
Ā 
Ha2 production log
Ha2 production logHa2 production log
Ha2 production log
Ā 
Design doc
Design docDesign doc
Design doc
Ā 
Jamara royle ppw
Jamara royle ppwJamara royle ppw
Jamara royle ppw
Ā 
Fmp production dev diary
Fmp production dev diary Fmp production dev diary
Fmp production dev diary
Ā 
The Grid Reflections
The Grid ReflectionsThe Grid Reflections
The Grid Reflections
Ā 

Viewers also liked

Understanding Intellectual Property Protection
Understanding Intellectual Property ProtectionUnderstanding Intellectual Property Protection
Understanding Intellectual Property ProtectionOccidental Law Group
Ā 
Bibliotecas y derechos de autor. confrontaciĆ³n y equilibrio (b)
Bibliotecas y derechos de autor. confrontaciĆ³n y equilibrio (b)Bibliotecas y derechos de autor. confrontaciĆ³n y equilibrio (b)
Bibliotecas y derechos de autor. confrontaciĆ³n y equilibrio (b)CBUADY
Ā 
Sejarah yayasan almuthohhar baru
Sejarah yayasan almuthohhar baruSejarah yayasan almuthohhar baru
Sejarah yayasan almuthohhar barufatimatuzzahro23
Ā 
PresentaciĆ³n2
PresentaciĆ³n2PresentaciĆ³n2
PresentaciĆ³n2cobawendy
Ā 
Outdoor Digest August 2013
Outdoor Digest August 2013Outdoor Digest August 2013
Outdoor Digest August 2013Anna Kobzeva
Ā 
PresentaciĆ³n sin tĆ­tulo (1)
PresentaciĆ³n sin tĆ­tulo (1)PresentaciĆ³n sin tĆ­tulo (1)
PresentaciĆ³n sin tĆ­tulo (1)Xiomaraperezsuescun97
Ā 

Viewers also liked (12)

Understanding Intellectual Property Protection
Understanding Intellectual Property ProtectionUnderstanding Intellectual Property Protection
Understanding Intellectual Property Protection
Ā 
Phaithu
PhaithuPhaithu
Phaithu
Ā 
Bibliotecas y derechos de autor. confrontaciĆ³n y equilibrio (b)
Bibliotecas y derechos de autor. confrontaciĆ³n y equilibrio (b)Bibliotecas y derechos de autor. confrontaciĆ³n y equilibrio (b)
Bibliotecas y derechos de autor. confrontaciĆ³n y equilibrio (b)
Ā 
Sejarah yayasan almuthohhar baru
Sejarah yayasan almuthohhar baruSejarah yayasan almuthohhar baru
Sejarah yayasan almuthohhar baru
Ā 
PresentaciĆ³n2
PresentaciĆ³n2PresentaciĆ³n2
PresentaciĆ³n2
Ā 
Outdoor Digest August 2013
Outdoor Digest August 2013Outdoor Digest August 2013
Outdoor Digest August 2013
Ā 
Programa1
Programa1Programa1
Programa1
Ā 
SWC2012Projects-Steelhead Haven
SWC2012Projects-Steelhead HavenSWC2012Projects-Steelhead Haven
SWC2012Projects-Steelhead Haven
Ā 
The Smart Home Buyer Solution
The Smart Home Buyer SolutionThe Smart Home Buyer Solution
The Smart Home Buyer Solution
Ā 
PresentaciĆ³n sin tĆ­tulo (1)
PresentaciĆ³n sin tĆ­tulo (1)PresentaciĆ³n sin tĆ­tulo (1)
PresentaciĆ³n sin tĆ­tulo (1)
Ā 
Happy part4
Happy part4Happy part4
Happy part4
Ā 
Lecture 1 9 sam 100-
Lecture 1   9 sam 100-Lecture 1   9 sam 100-
Lecture 1 9 sam 100-
Ā 

Similar to Polycount Tower Desert Cabin Blog

Reflection Diary FMP.pptx
Reflection Diary FMP.pptxReflection Diary FMP.pptx
Reflection Diary FMP.pptxMatthewEvans7662
Ā 
4. Production Experiments
4. Production Experiments 4. Production Experiments
4. Production Experiments Hannah Palfreeman
Ā 
6. production reflection incomp
6. production reflection incomp6. production reflection incomp
6. production reflection incompAllison Hewitt
Ā 
6. production reflection(1)
6. production reflection(1)6. production reflection(1)
6. production reflection(1)OliviaWaller2
Ā 
production reflection magazine
production reflection magazine production reflection magazine
production reflection magazine DanMorland
Ā 
6. production reflection [comp]
6. production reflection [comp]6. production reflection [comp]
6. production reflection [comp]Allison Hewitt
Ā 
Post-Production.pptx
Post-Production.pptxPost-Production.pptx
Post-Production.pptxMeganIvy1
Ā 
production reflection megan.pptx
production reflection megan.pptxproduction reflection megan.pptx
production reflection megan.pptxMeganIvy1
Ā 
production reflection megan.pptx
production reflection megan.pptxproduction reflection megan.pptx
production reflection megan.pptxMeganIvy1
Ā 
Creating my doube page
Creating my doube pageCreating my doube page
Creating my doube pageamybruce
Ā 
Construction
ConstructionConstruction
Constructionsalaffina
Ā 
Video Game Project - 6. production reflection
Video Game Project - 6. production reflectionVideo Game Project - 6. production reflection
Video Game Project - 6. production reflectionTigs0102
Ā 
Evaluation Question 7
Evaluation Question 7Evaluation Question 7
Evaluation Question 7emilybritcliffe
Ā 
2.2 Production Experiments.pptx
2.2 Production Experiments.pptx2.2 Production Experiments.pptx
2.2 Production Experiments.pptxMatthewEvans7662
Ā 
Digital graphics evaluation
Digital graphics evaluationDigital graphics evaluation
Digital graphics evaluationcharles-stick
Ā 
Digital graphics evaluation pro forma 3
Digital graphics evaluation pro forma 3Digital graphics evaluation pro forma 3
Digital graphics evaluation pro forma 3Amelia101
Ā 
Overallevaluation
OverallevaluationOverallevaluation
OverallevaluationCallumknight
Ā 
Construction
ConstructionConstruction
Constructionsalaffina
Ā 
Production Experiments
Production ExperimentsProduction Experiments
Production ExperimentsSimran Jabbal
Ā 
Final piece - LH
Final piece - LHFinal piece - LH
Final piece - LHLiam Heeley
Ā 

Similar to Polycount Tower Desert Cabin Blog (20)

Reflection Diary FMP.pptx
Reflection Diary FMP.pptxReflection Diary FMP.pptx
Reflection Diary FMP.pptx
Ā 
4. Production Experiments
4. Production Experiments 4. Production Experiments
4. Production Experiments
Ā 
6. production reflection incomp
6. production reflection incomp6. production reflection incomp
6. production reflection incomp
Ā 
6. production reflection(1)
6. production reflection(1)6. production reflection(1)
6. production reflection(1)
Ā 
production reflection magazine
production reflection magazine production reflection magazine
production reflection magazine
Ā 
6. production reflection [comp]
6. production reflection [comp]6. production reflection [comp]
6. production reflection [comp]
Ā 
Post-Production.pptx
Post-Production.pptxPost-Production.pptx
Post-Production.pptx
Ā 
production reflection megan.pptx
production reflection megan.pptxproduction reflection megan.pptx
production reflection megan.pptx
Ā 
production reflection megan.pptx
production reflection megan.pptxproduction reflection megan.pptx
production reflection megan.pptx
Ā 
Creating my doube page
Creating my doube pageCreating my doube page
Creating my doube page
Ā 
Construction
ConstructionConstruction
Construction
Ā 
Video Game Project - 6. production reflection
Video Game Project - 6. production reflectionVideo Game Project - 6. production reflection
Video Game Project - 6. production reflection
Ā 
Evaluation Question 7
Evaluation Question 7Evaluation Question 7
Evaluation Question 7
Ā 
2.2 Production Experiments.pptx
2.2 Production Experiments.pptx2.2 Production Experiments.pptx
2.2 Production Experiments.pptx
Ā 
Digital graphics evaluation
Digital graphics evaluationDigital graphics evaluation
Digital graphics evaluation
Ā 
Digital graphics evaluation pro forma 3
Digital graphics evaluation pro forma 3Digital graphics evaluation pro forma 3
Digital graphics evaluation pro forma 3
Ā 
Overallevaluation
OverallevaluationOverallevaluation
Overallevaluation
Ā 
Construction
ConstructionConstruction
Construction
Ā 
Production Experiments
Production ExperimentsProduction Experiments
Production Experiments
Ā 
Final piece - LH
Final piece - LHFinal piece - LH
Final piece - LH
Ā 

More from Fredrik Simons

AVR London Letter of Reccomendation
AVR London Letter of ReccomendationAVR London Letter of Reccomendation
AVR London Letter of ReccomendationFredrik Simons
Ā 
Dragonfly Pre-Production Document
Dragonfly Pre-Production DocumentDragonfly Pre-Production Document
Dragonfly Pre-Production DocumentFredrik Simons
Ā 
Dragonfly Production Blog
Dragonfly Production BlogDragonfly Production Blog
Dragonfly Production BlogFredrik Simons
Ā 
Harry Potter Logo Photomanipulation
Harry Potter Logo PhotomanipulationHarry Potter Logo Photomanipulation
Harry Potter Logo PhotomanipulationFredrik Simons
Ā 
Drawing 1 Module
Drawing 1 ModuleDrawing 1 Module
Drawing 1 ModuleFredrik Simons
Ā 

More from Fredrik Simons (6)

AVR London Letter of Reccomendation
AVR London Letter of ReccomendationAVR London Letter of Reccomendation
AVR London Letter of Reccomendation
Ā 
Dragonfly Pre-Production Document
Dragonfly Pre-Production DocumentDragonfly Pre-Production Document
Dragonfly Pre-Production Document
Ā 
Dragonfly Production Blog
Dragonfly Production BlogDragonfly Production Blog
Dragonfly Production Blog
Ā 
Title Layout
Title LayoutTitle Layout
Title Layout
Ā 
Harry Potter Logo Photomanipulation
Harry Potter Logo PhotomanipulationHarry Potter Logo Photomanipulation
Harry Potter Logo Photomanipulation
Ā 
Drawing 1 Module
Drawing 1 ModuleDrawing 1 Module
Drawing 1 Module
Ā 

Recently uploaded

NO1 Famous Amil Baba In Karachi Kala Jadu In Karachi Amil baba In Karachi Add...
NO1 Famous Amil Baba In Karachi Kala Jadu In Karachi Amil baba In Karachi Add...NO1 Famous Amil Baba In Karachi Kala Jadu In Karachi Amil baba In Karachi Add...
NO1 Famous Amil Baba In Karachi Kala Jadu In Karachi Amil baba In Karachi Add...Amil baba
Ā 
Best VIP Call Girls Noida Sector 44 Call Me: 8448380779
Best VIP Call Girls Noida Sector 44 Call Me: 8448380779Best VIP Call Girls Noida Sector 44 Call Me: 8448380779
Best VIP Call Girls Noida Sector 44 Call Me: 8448380779Delhi Call girls
Ā 
The history of music videos a level presentation
The history of music videos a level presentationThe history of music videos a level presentation
The history of music videos a level presentationamedia6
Ā 
Call Girls in Kalkaji Delhi 8264348440 call girls ā¤ļø
Call Girls in Kalkaji Delhi 8264348440 call girls ā¤ļøCall Girls in Kalkaji Delhi 8264348440 call girls ā¤ļø
Call Girls in Kalkaji Delhi 8264348440 call girls ā¤ļøsoniya singh
Ā 
Best VIP Call Girls Noida Sector 47 Call Me: 8448380779
Best VIP Call Girls Noida Sector 47 Call Me: 8448380779Best VIP Call Girls Noida Sector 47 Call Me: 8448380779
Best VIP Call Girls Noida Sector 47 Call Me: 8448380779Delhi Call girls
Ā 
VIP Russian Call Girls in Saharanpur Deepika 8250192130 Independent Escort Se...
VIP Russian Call Girls in Saharanpur Deepika 8250192130 Independent Escort Se...VIP Russian Call Girls in Saharanpur Deepika 8250192130 Independent Escort Se...
VIP Russian Call Girls in Saharanpur Deepika 8250192130 Independent Escort Se...Suhani Kapoor
Ā 
DragonBall PowerPoint Template for demo.pptx
DragonBall PowerPoint Template for demo.pptxDragonBall PowerPoint Template for demo.pptx
DragonBall PowerPoint Template for demo.pptxmirandajeremy200221
Ā 
Fashion trends before and after covid.pptx
Fashion trends before and after covid.pptxFashion trends before and after covid.pptx
Fashion trends before and after covid.pptxVanshNarang19
Ā 
VIP Call Girls Service Bhagyanagar Hyderabad Call +91-8250192130
VIP Call Girls Service Bhagyanagar Hyderabad Call +91-8250192130VIP Call Girls Service Bhagyanagar Hyderabad Call +91-8250192130
VIP Call Girls Service Bhagyanagar Hyderabad Call +91-8250192130Suhani Kapoor
Ā 
Cheap Rate Call girls Malviya Nagar 9205541914 shot 1500 night
Cheap Rate Call girls Malviya Nagar 9205541914 shot 1500 nightCheap Rate Call girls Malviya Nagar 9205541914 shot 1500 night
Cheap Rate Call girls Malviya Nagar 9205541914 shot 1500 nightDelhi Call girls
Ā 
Cheap Rate āž„8448380779 ā–»Call Girls In Iffco Chowk Gurgaon
Cheap Rate āž„8448380779 ā–»Call Girls In Iffco Chowk GurgaonCheap Rate āž„8448380779 ā–»Call Girls In Iffco Chowk Gurgaon
Cheap Rate āž„8448380779 ā–»Call Girls In Iffco Chowk GurgaonDelhi Call girls
Ā 
VIP Russian Call Girls in Gorakhpur Deepika 8250192130 Independent Escort Ser...
VIP Russian Call Girls in Gorakhpur Deepika 8250192130 Independent Escort Ser...VIP Russian Call Girls in Gorakhpur Deepika 8250192130 Independent Escort Ser...
VIP Russian Call Girls in Gorakhpur Deepika 8250192130 Independent Escort Ser...Suhani Kapoor
Ā 
VIP Call Girls Bhiwandi Ananya 8250192130 Independent Escort Service Bhiwandi
VIP Call Girls Bhiwandi Ananya 8250192130 Independent Escort Service BhiwandiVIP Call Girls Bhiwandi Ananya 8250192130 Independent Escort Service Bhiwandi
VIP Call Girls Bhiwandi Ananya 8250192130 Independent Escort Service BhiwandiSuhani Kapoor
Ā 
Dubai Call Girls Pro Domain O525547819 Call Girls Dubai Doux
Dubai Call Girls Pro Domain O525547819 Call Girls Dubai DouxDubai Call Girls Pro Domain O525547819 Call Girls Dubai Doux
Dubai Call Girls Pro Domain O525547819 Call Girls Dubai Douxkojalkojal131
Ā 
Abu Dhabi Call Girls O58993O4O2 Call Girls in Abu Dhabi`
Abu Dhabi Call Girls O58993O4O2 Call Girls in Abu Dhabi`Abu Dhabi Call Girls O58993O4O2 Call Girls in Abu Dhabi`
Abu Dhabi Call Girls O58993O4O2 Call Girls in Abu Dhabi`dajasot375
Ā 
CALL ON āž„8923113531 šŸ”Call Girls Aminabad Lucknow best Night Fun service
CALL ON āž„8923113531 šŸ”Call Girls Aminabad Lucknow best Night Fun serviceCALL ON āž„8923113531 šŸ”Call Girls Aminabad Lucknow best Night Fun service
CALL ON āž„8923113531 šŸ”Call Girls Aminabad Lucknow best Night Fun serviceanilsa9823
Ā 
Revit Understanding Reference Planes and Reference lines in Revit for Family ...
Revit Understanding Reference Planes and Reference lines in Revit for Family ...Revit Understanding Reference Planes and Reference lines in Revit for Family ...
Revit Understanding Reference Planes and Reference lines in Revit for Family ...Narsimha murthy
Ā 

Recently uploaded (20)

escort service sasti (*~Call Girls in Prasad Nagar Metroā¤ļø9953056974
escort service sasti (*~Call Girls in Prasad Nagar Metroā¤ļø9953056974escort service sasti (*~Call Girls in Prasad Nagar Metroā¤ļø9953056974
escort service sasti (*~Call Girls in Prasad Nagar Metroā¤ļø9953056974
Ā 
NO1 Famous Amil Baba In Karachi Kala Jadu In Karachi Amil baba In Karachi Add...
NO1 Famous Amil Baba In Karachi Kala Jadu In Karachi Amil baba In Karachi Add...NO1 Famous Amil Baba In Karachi Kala Jadu In Karachi Amil baba In Karachi Add...
NO1 Famous Amil Baba In Karachi Kala Jadu In Karachi Amil baba In Karachi Add...
Ā 
Best VIP Call Girls Noida Sector 44 Call Me: 8448380779
Best VIP Call Girls Noida Sector 44 Call Me: 8448380779Best VIP Call Girls Noida Sector 44 Call Me: 8448380779
Best VIP Call Girls Noida Sector 44 Call Me: 8448380779
Ā 
The history of music videos a level presentation
The history of music videos a level presentationThe history of music videos a level presentation
The history of music videos a level presentation
Ā 
young call girls in Pandav nagar šŸ” 9953056974 šŸ” Delhi escort Service
young call girls in Pandav nagar šŸ” 9953056974 šŸ” Delhi escort Serviceyoung call girls in Pandav nagar šŸ” 9953056974 šŸ” Delhi escort Service
young call girls in Pandav nagar šŸ” 9953056974 šŸ” Delhi escort Service
Ā 
Call Girls in Kalkaji Delhi 8264348440 call girls ā¤ļø
Call Girls in Kalkaji Delhi 8264348440 call girls ā¤ļøCall Girls in Kalkaji Delhi 8264348440 call girls ā¤ļø
Call Girls in Kalkaji Delhi 8264348440 call girls ā¤ļø
Ā 
Best VIP Call Girls Noida Sector 47 Call Me: 8448380779
Best VIP Call Girls Noida Sector 47 Call Me: 8448380779Best VIP Call Girls Noida Sector 47 Call Me: 8448380779
Best VIP Call Girls Noida Sector 47 Call Me: 8448380779
Ā 
young call girls in Vivek ViharšŸ” 9953056974 šŸ” Delhi escort Service
young call girls in Vivek ViharšŸ” 9953056974 šŸ” Delhi escort Serviceyoung call girls in Vivek ViharšŸ” 9953056974 šŸ” Delhi escort Service
young call girls in Vivek ViharšŸ” 9953056974 šŸ” Delhi escort Service
Ā 
VIP Russian Call Girls in Saharanpur Deepika 8250192130 Independent Escort Se...
VIP Russian Call Girls in Saharanpur Deepika 8250192130 Independent Escort Se...VIP Russian Call Girls in Saharanpur Deepika 8250192130 Independent Escort Se...
VIP Russian Call Girls in Saharanpur Deepika 8250192130 Independent Escort Se...
Ā 
DragonBall PowerPoint Template for demo.pptx
DragonBall PowerPoint Template for demo.pptxDragonBall PowerPoint Template for demo.pptx
DragonBall PowerPoint Template for demo.pptx
Ā 
Fashion trends before and after covid.pptx
Fashion trends before and after covid.pptxFashion trends before and after covid.pptx
Fashion trends before and after covid.pptx
Ā 
VIP Call Girls Service Bhagyanagar Hyderabad Call +91-8250192130
VIP Call Girls Service Bhagyanagar Hyderabad Call +91-8250192130VIP Call Girls Service Bhagyanagar Hyderabad Call +91-8250192130
VIP Call Girls Service Bhagyanagar Hyderabad Call +91-8250192130
Ā 
Cheap Rate Call girls Malviya Nagar 9205541914 shot 1500 night
Cheap Rate Call girls Malviya Nagar 9205541914 shot 1500 nightCheap Rate Call girls Malviya Nagar 9205541914 shot 1500 night
Cheap Rate Call girls Malviya Nagar 9205541914 shot 1500 night
Ā 
Cheap Rate āž„8448380779 ā–»Call Girls In Iffco Chowk Gurgaon
Cheap Rate āž„8448380779 ā–»Call Girls In Iffco Chowk GurgaonCheap Rate āž„8448380779 ā–»Call Girls In Iffco Chowk Gurgaon
Cheap Rate āž„8448380779 ā–»Call Girls In Iffco Chowk Gurgaon
Ā 
VIP Russian Call Girls in Gorakhpur Deepika 8250192130 Independent Escort Ser...
VIP Russian Call Girls in Gorakhpur Deepika 8250192130 Independent Escort Ser...VIP Russian Call Girls in Gorakhpur Deepika 8250192130 Independent Escort Ser...
VIP Russian Call Girls in Gorakhpur Deepika 8250192130 Independent Escort Ser...
Ā 
VIP Call Girls Bhiwandi Ananya 8250192130 Independent Escort Service Bhiwandi
VIP Call Girls Bhiwandi Ananya 8250192130 Independent Escort Service BhiwandiVIP Call Girls Bhiwandi Ananya 8250192130 Independent Escort Service Bhiwandi
VIP Call Girls Bhiwandi Ananya 8250192130 Independent Escort Service Bhiwandi
Ā 
Dubai Call Girls Pro Domain O525547819 Call Girls Dubai Doux
Dubai Call Girls Pro Domain O525547819 Call Girls Dubai DouxDubai Call Girls Pro Domain O525547819 Call Girls Dubai Doux
Dubai Call Girls Pro Domain O525547819 Call Girls Dubai Doux
Ā 
Abu Dhabi Call Girls O58993O4O2 Call Girls in Abu Dhabi`
Abu Dhabi Call Girls O58993O4O2 Call Girls in Abu Dhabi`Abu Dhabi Call Girls O58993O4O2 Call Girls in Abu Dhabi`
Abu Dhabi Call Girls O58993O4O2 Call Girls in Abu Dhabi`
Ā 
CALL ON āž„8923113531 šŸ”Call Girls Aminabad Lucknow best Night Fun service
CALL ON āž„8923113531 šŸ”Call Girls Aminabad Lucknow best Night Fun serviceCALL ON āž„8923113531 šŸ”Call Girls Aminabad Lucknow best Night Fun service
CALL ON āž„8923113531 šŸ”Call Girls Aminabad Lucknow best Night Fun service
Ā 
Revit Understanding Reference Planes and Reference lines in Revit for Family ...
Revit Understanding Reference Planes and Reference lines in Revit for Family ...Revit Understanding Reference Planes and Reference lines in Revit for Family ...
Revit Understanding Reference Planes and Reference lines in Revit for Family ...
Ā 

Polycount Tower Desert Cabin Blog

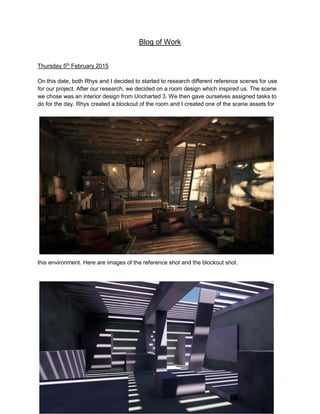
  • 1. Blog of Work Thursday 5th February 2015 On this date, both Rhys and I decided to started to research different reference scenes for use for our project. After our research, we decided on a room design which inspired us. The scene we chose was an interior design from Uncharted 3. We then gave ourselves assigned tasks to do for the day. Rhys created a blockout of the room and I created one of the scene assets for this environment. Here are images of the reference shot and the blockout shot.
  • 2. 5th February 2015 Most of the models would be modelled using the box modelling technique. I originally modelled a simple staircase with a slight chamfer on the edges. This was then added to mudbox and the staircase was subdivided twice to add more detail. At this point, I havenā€™t decided which one will be used in the final scene. Here are images of how it looks like currently
  • 3. 7th February 2015 Today I worked on updating the models in the scene. The main things I created were drafts of the bed and the cupboard. I also created a table, carpet and updated the models of the drawers. The lighting was also improved. These object were modelled using boxes, cylinders and splines. To save time, I also used the mirror modifier on objects like the doors to the cupboard. I also used instancing on duplicate objects to save memory.
  • 4. 9th February 2014 Today I decided to try and create a light bake for the environment. I needed to create this because this environment will need to be viewed on a website called sketchfab, which is where we have to submit this work at the end. This is because the lighting that we use in 3ds max will not carry over when its on the website, unless we bake the lighting so this is what i managed to do. After researching into light baking tutorials i couldn't find one that will work with sketch fab. I finally found out how to do it after looking at the sketchfab website where i found that there was an official app available for 3ds max that helps you bake the lighting that you have got and then publish the model. All you have to do is select the right resolution of the textures, change some settings and then once you click the publish button it bakes all the lighting for you and then uploads it straight to the website. This therefore allows you to see the environment on the website, with the lighting i have created. The screenshot below shows the result I got. I tested out the light bake early on as I didnā€™t want for there to be any problems at the end. This is because the whole point for creating this project is so that we will get feedback on what weā€™ve created at the end by industry professionals. If this process didnā€™t work, we might have had to find another challenge to do.
  • 5. 11th February 2015 Today I have been experimenting what kind of windows we could add to this environment. These are some basic ones I created to get us started but this will probably change as we go on. I am also experimenting on the lighting to get a balance of light and dark areas which could go in the scene. When i was creating the windows i thought about possibly adding some kind of curtains to add to the scene. These are some that I was experimenting with. I think I managed to make them look ok as a starting point but i'm aiming to make them look more realistic in the future. I used the cloth modifier with surface tension tools to create this basic curtain. Weā€™re aiming to improve it in the future.
  • 6. 12th February 2015 Today, we were working on creating an improved model of the curtain. We spent some time learning different ways to create these curtains mainly using the resources youtube and lynda provides for us. There were some interesting tools using the power of the garment maker which I thought would be useful for future projects. In order to create this curtain, I used a box which had 100 subdivision in 2 of the axes. This gave the model fluidity which allows it to interact better with the cloth modifier. I then sequentially removed a face every ten faces in order to create a hole for my torusā€™s to fit into. The cloth modifier was subdivided where needed for example in the corners and on the deleted faces using the hierarchical subdivision surface modifier. I learn that this HSDS modifier allows you to subdivide in certain areas which is in contrast to the turbosmooth modifier which subdivides the whole object. I then added the cloth modifier to the box which allowed me to add the torusā€™s as collision objects and therefore interact with the box once simulated. This is how it looked like once it was simulated. I found out that the bottom of the curtain didnā€™t look as nice and folded as the top part of it did. I therefore researched some more to find a way to fix this. Animating the scaling of a box at the bottom which is connected to the curtain as a collision object is a potential way of fixing this problem.
  • 7. 12th February 2015 Today I decided to create a different type of window than i have done before, instead of creating a 4 pane window i have decided to create an 2 pane window with a sliding door. This is firstly to make it look more interesting and secondly so we can decide if we want to have the window open or have it closed at the end. Having it closed would mean it will block some of the light from coming in. Therefore, we are both trying to decide what we want to do for the lighting. I have also been experimenting with the cloth modifier to create some curtains. My initial idea was to make the curtains look reasonably dramatic because i thought if i added this it would give the environment more character when looking at it. This would also make it look different to the reference image that we have. This was done by creating a plane and adding a cloth modifier to it., making it as dense as possible and also by adding turbosmooth this would add more realism and finally editing the internal parameters until it looked good. The dramatic look was created by adding the wind space warp to the cloth forces. We both have both been experimenting in different ways to create different kinds of curtains and are still deciding what type we are going for.
  • 8. 13th February 2015 Today, I was further experimenting with trying to get a good curtain made. Over a number of failed simulations with reasons unbeknownst to me, I didnā€™t managed to get the bottom of the curtain to be folded in the way I wanted to. I therefore looked into alternatives of getting the curtain looking better and found a way to pick up the curtain by animating a box diagonally and attaching it to the curtain using the surface tool in the cloth modifier. The area where the curtain was dragged in order to pick up the curtain didnā€™t look realistic enough so in order to make it look better, I added a curtain tie back. Furthermore, a FFD 4*4 modifier was added in order to give the finished curtain a better shape. Finally curtain rail holders were made using a combination of spline modelling and box modelling. This is how it looked like after the work was done.
  • 9. 13th February 2015 Later on, I proceeded to ameliorate the cupboards by adding shelves where needed and adding a glass material to parts of the doors. Another thing I noticed was that there was a beam that looked like a ladder on the source image. I quite liked this design and so I modelled this beam across two of the walls in the scene. As not much texturing has been done yet, I decided to continue improving this aspect of the image. A basic carpet texture was also added to the carpet in order to give an idea of what it might look like.
  • 10. 14th February 2015 Today, I was continuing to add textures to my models. I focused on wood textures today as there is quite a lot of wood in the scene. For the walls, I decided to change them to wood panels rather than concrete to give the scene more of a chalet kind of look. This option of concrete vs wood is still undecided for the walls though. In order to create these textures I was using photoshop with a plugin called pixplant. Pixplant helps to create seamless textures for you and therefore has saved me time. However, it doesnā€™t usually make a perfect job, especially when its trying to replicate straight lines like what you see in between floor boards. I therefore used alpha channels, the clone stamp tool and the ā€˜fill by content awareā€™ in order to remove the errors. In total, I successfully created 4 textures and failed in one texture for the table as there was too much light difference for it to be usable.
  • 11. 15th February 2015 My aim for today is to combine my teams work into one file so itā€™s easier for the both of us to work out how far weā€™ve come. Iā€™m also going to continue to update my textures. I managed to add in Rhyā€™s updated windows, bed sheets, mattress and pillows into my scene with the textures he created. This is how the scene looked like once rendered. I also found out that the pixplant plugin for photoshop can also make it easier for you to create normal maps, displacement maps and specular maps. This technique was used to help me create the textures you see below you.
  • 12. 16th February 2015 My aim for today is to continue adding textures to objects in the scene. Iā€™d also like to see how the middle table would look like with a cloth draped on top of it. Today, Iā€™ve added 4 new textures. I am fairly happy with the ladder texture and the bedpost texture. However, Iā€™m not sure about the texture for the cupboard on the left hand side of the image and this may need improving. Iā€™m still not sure whether the table looks better with or without a cloth on it so I think Iā€™ll discuss this issue with my teammate. Iā€™m still not sure whether the walls should be wood or concrete. Currently, I think there is too much wood in the scene which leads me to prefer the concrete version.
  • 13. 17th February 2015 Today, I decided to model drawers for the scene. I used sketchup rather than 3ds max as I believe to be a better modelling tool for architecture compared to 3ds max. As SketchUp works on surface modelling rather than quad modelling, when imported, the objects tend to look a bit messy. However, all the detail is preserved and the object still looks good. This is a render with a simple clay material added onto the cupboard. 18th February 2015 Today, I was working on creating xref scenes in order to get my workflow to become faster as the viewport was slowing down to the point where I wasnā€™t able to use it anymore. I therefore created 3 separate scenes which link to the main file. The first file has all the window geometry in it, the second file has all the bed geometry in it and the third file has the centre table, cloth and carpet in it.
  • 14. 16th - 18th February After me and my team mate concentrated on what kind of textures could possibly be used in the final scene, i decided to go in another direction and thought i should create some basic assets that could go into the environment. This is one to make it look and feel more like a living place, and two it will make the whole room look more interesting and look more natural than it was before. All of the objects were either poly modeled or spline modeled such as some of the glass pots which i used the lathe tool to create these. Also after discussing with my teammate about how the wall looked very bare above the bed i decided to add an book shelf that will be placed in that position. Therefore after putting it in the right place we both agreed that it made the room look alot better.
  • 15. 19th February 2015 Today, our main goal is to improve our workflow between the editing of the same file. We will be using google drive and xrefs in order to save time. After discussion with our tutor, these are the main elements we need to change: ā— Make the general geometry smaller and more delicate ā— Improve textures ā— Refine and reduce the size of assets ā— Create an orange tinge to the wall texture ā— Make the lighting warmer ā— The middle part of the cupboard should be reduced ā— In general make the geometry more natural looking ā— Add another layer of wood to the roof and fragment this using ray fire Plan for things needed to be done ā— Weā€™re thinking of creating 4 light bulbs, 2 in the back and 2 in the front ā— We also think we should put shelves in between the windows ā— Add more assets The Evening of the same Day On this evening, my teammate and I were collaborating to work out the best way for the file transfer process. While doing this, we finally understood the power of Xrefs. Previously, only one of us could work on the same file at a given point in time. This was because our work would be overwritten as they both are saved to the same place. To get around this, we decided that if we Xreffed the key parts of the scene, we would both be able to work on the same project. This is because each xref creates a separate max file which links into the main scene.
  • 16. 20th February 2015 Today, I was experimenting with getting the Vray lighting working in my scene. The main reason for choosing Vray over Mental Ray as a render engine is because the lighting tends to look more realistic in Vray. I encountered many problems while trying to get this working and this caused me to lose valuable time. I also used a vray material on the curtains and changed the parameters so that the curtain looks like itā€™s semi transparent which therefore allows more light to come into the scene. In the end, I did manage to get a small test render made which failed at showing how I wanted the scene to look.
  • 17. 20th february 2015 Today I decided to take a few of the assets of of the scene to improve them. The first one i decided to do was the main structure of the room. There are a couple of things i wanted to improve on this: ā— The size of the beams was the first thing I wanted to change. After getting feedback from our tutor, he suggested to reduce the size of the beams as they seemed to be a little too big and chunky when comparing it to the reference image. I therefore decided to take action and make them a lot smaller than they were before. ā— I also decided to make the edges less sharp on the side so a chamfer was applied onto this asset. ā— The other comment was about the texture we had on it. The old texture seemed to have repeated patterns so I decided to experiment into another type of texture. Having a lighter brown texture on the structure seemed to be more fitting. Once I applied it, I found that it suited the environment very well. I guess this was because it brought a little bit of colour to the image and made it a little more interesting to look at.
  • 18. The other comment that we were both given was about the bed in the scene. when looking at it closely he said that the bed posts were very fat and chunky. And suggested that we should shrink the size of the whole object so it looks more like the image that we were doing. After editing, I found that it did make the bed look more natural and suited the environment that it was placed in. After doing this I decided to make the bed a little more messy than it was before so it would make the environment look more like its being lived in. I also suggested that we could change the colour of the wood of the bed too which caused me to darken it a little. Following on with the feedback we were given from the tutor, he had a suggestion about this table in the centre of our renders. He suggested to make the legs of this table a little smaller and less bulky, so this is what i decided to do. I did this by selecting the edges on each of the legs and then pulling them in with the move tool. I believed this method was the most practical to get the result i wanted. After making the legs much smaller, I also to carry out the same method on the top of the table. The final change i did was to add a chamfer to all the edges that are on the table as they were very sharp and didn't look right when placed into the environment.
  • 19. I finally decided to change the look and feel of the wood on the ceiling to make it look less perfect than it did. If one looks at the reference image more closely, the wood that overlaps above has imperfection like broken wood in between some of the wood segments. I therefore decided I could try and do replicate this effect with the 3ds max plugin called ā€œrayfireā€. ā— Firstly I selected all of the ceiling wood and put them into the rayfire plugin ā— I then selected them to be fragmented into ā€œwood splintersā€ ā— Once this was done, I could select each fragment and then use the move or rotate tool to get them into any angle i wanted to ā— In my case, I wanted to make it look like the wood is fairly sharp which makes the environment look more dramatic and lived in. ā— I found that this made the scene look a lot more interesting then what it originally did.
  • 20. 21st February 2015 Today, I decided Iā€™d model my teammateā€™s bedside table in sketchup due to it being a fast modelling tool and then reshape it in 3ds Max so that it can conform to the style of the image. This was then xreffed into the main scene and textured. Another problem Iā€™ve recently been getting is the loss of textures while opening up the same file on different computers. I worked out this was because it was trying to find the absolute file path which changes depending on which computer youā€™re on. However, I found out there was a way to get a relative file path which eliminates this problem. This was explained to me by this lynda video tutorial: http://www.lynda.com/3ds-Max-tutorials/Asset-tracking-3ds-Max/184455/365448- 4.html
  • 21. 22nd February 2015 Today, I added a wood texture to the bedside table. This didnā€™t take too long to do as the texture used was one which was previously created. Iā€™ve also modelled an updated thinner version of the staircase with more steps which will be added to the scene. I then created a different texture for the ladder which was originally grey but was changed to a brown texture using photoshop photo filters, hue/saturation and curves. I also edited the texture of the pillows in order to give it more colour. This may need to be further edited as I think there are too many pillows with the same colour. I also briefly changed parts of the book cover in order to make the pages look whiter.
  • 22. 23rd February 2015 Today, my teammate showed me how to light bake the scene. The reason why he was showing me was because he was trying to light bake the scene the day before on his computer but his computer crashed as there wasnā€™t enough RAM for it to handle the baking. We wanted to do a second light bake test as we worried that as there is so much data to process, that our computers may not be able to handle it. After getting countless errors trying to get this plugin working, we managed to click all the right buttons for the baking process to start. However, what we didnā€™t realise was the time it was going to take for this bake to occur and therefore, we both lost even more time. In the end it took 12 hours to light bake and finished at 2 in the morning. This is the link to the uploaded light bake: https://sketchfab.com/models/0b6b99586ac5429fb10500d416849142
  • 23. 24th February 2015 Today, I was working on creating another curtain model as we didnā€™t think it looked good enough and it was letting too much sunlight in. Therefore, I used the pre-simulated model of my previous curtain and worked out a different way to create what we needed. With this attempt, I copied the animation I created for the curtain and created holes in the bottom of the curtain in order for the bottom part of the curtain to fold as well. After a 3 hour long simulation, I still thought it didnā€™t look good enough so I added a wind space warp and added it to the cloth forces. This helped the second time around as the folds I wanted got created. I then proceed to find a better curtain texture. Once I found one, I edited its colour in photoshop and added it to the diffuse section on the semi transparent vray material I had previously created in 3DS Max. To save time, I added a teapot set found online on turbosquid and used it to fill up parts of the left cupboard. The teapot set was edited to reduce the polycount. Hereā€™s the link to the file: http://www.turbosquid.com/FullPreview/Index.cfm/ID/415417
  • 24. 25th February 2015 These are a few of the assets that I managed to create today. These assets helped to populate the scene as it was looking quite bare. Some of the objects like the books and jars were made while doing this project. Others such as the tyres, plates and bowls were from other projects as it saves time in the modelling process.
  • 25. 25th - 26th February 2015 These last couple of days have been fairly frantic and busy to try and complete our scene on time. I created a chair during this period of time as I thought it was one of the assets missing in the scene. This chair took a couple of hours to create and texture. I also added wine glasses and bottles into the left cupboard which I had modelled previously. These were then copied as instances to fill up the cupboard DVDs were also added which I modelled and textured .These were put into the bookshelf along with the books which were previously there. I then proceeded to add textures to the books which were left in the bookcase. I then added Mass FX rigid body modifiers to everything in the bookcase. The books and DVDs were then rotated so that theyā€™ll be able to fall into their natural positions when the mass fx animation was applied. All other books in the scene also had improved textures added to them. I also thought it would be a good idea to work on the right hand side cupboard. The bottom glass were deleted and replaced with wooden doors to add variety to the 2 separate cupboards. I also added plates in different orientations to the top part of the cupboard. These plates were also textured with about 8 separate images.
  • 26. 25th - 26th February 2015 Over these last few days, both myself and my teammate worked really hard to get our work done by our desired deadline which was at the end of the 26th February. We just about managed to finish it on time and had everything finished. All that was left to do was upload it to Sketchfab and our work would be doneā€¦ Or so we thought. The number of problems uploading to that website have been very numerous and we both have been trying to troubleshoot the problems and fix them. Our first problem was that the light bake was taking too long: ā— The light bake was taking at least day to work and was using up all of the RAM ā— To add to this, most of the time, Windows thought that the amount of time of inactivity meant that the program was not responding correctly and therefore Windows closed the program each time it was rendering the UVs ā— When we finally managed to get a test version uploaded, we found that some of the geometry was scaled to extreme proportions ā— I then researched why this was happening for one whole evening and worked out it was due to scaling in object level rather than sub-object level. In order to fix this, the internet suggested to reset the xform on the affected objects. This would reset the local scaling percentage values to 100% while not changing the size of the object. ā— I tried this method but for some reason the objects were changing in scale and the local values reset themselves. I also found out that if I manually wanted to scale them, they didnā€™t change no matter what edits I did to the geometry. ā— The texture unwrap it did was also way too small. To fix this, one would need to have at least textures with 5 times the resolution which would take at least 5 times as long to render with the hope of no crashes happening in between
  • 27. 1st March 2015 While waiting and hoping that the next sketchfab upload will work, i was researching all different possibilities for this 3d sketchfab upload to work. This led me to find out that there was a limit of 50MB when uploading to sketchfab. This can be increased to 200 MB if one invites 5 friends to join sketchfab or signs up their school/university to the website. I therefore believe that this is the reason why our textures are so low res. On a positive note, I found there was a way to edit lighting parameters directly on the website which allowed me to get a lot better lighting result of my previous uploads. The last successful upload was done on the 23rd February and after editing the lighting, this is what I got On the evening of the same day, I went to my teammates apartment to discuss the next plan of action. While looking at the scene, Rhys had the idea of finding a DVD with no Xform errors and attach all of the other DVDs and Books to it. This therefore finally solved the problem of Xform as the local values managed to finally go back to 100%. Using this information, I put on another light bake upload to Sketchfab at 3 in the morning back at my place.
  • 28. 2nd March 2015 Today, I woke up to an email sent to me from the creator of Sketchfab Klaas Nienhuis!
  • 29. This led me to discuss a plan of action with my teammate to see where we should go from here. It was decided that I was to reduce the poly density of the model as well as the material resolution in order to conform with Sketchfabā€™s upload limits. While Iā€™m doing this my teammate was to sort out a couple of small kinks in the model and create renders of the scene including a short video pan of our environment. The tools Iā€™ve been using to reduce the polycount of my model include quadrify all in the editable poly rollout, a pro optimize modifier which reduces the poly while preserving a lot of the detail. Iā€™ve also welded a lot of the vertices on the roof as it was originally fragmented which caused there to be a lot of unnecessary polygons. The final method Iā€™ve used is selecting edges which arenā€™t needed and using ctrl delete to remove the edges and their respective vertices. I also found that there were a lot of copies of identical objects. This isnā€™t how I model so I changed all of these objects to instances and instructed my teammate to create identical objects as instances in the future. By the evening, I had finished reducing the polycount of every piece of geometry in the scene down from 1,887,087 polygons to 749,873 polygons which is more than halving the polycount.
  • 30. At about 8 in the evening, I received this comment from James who suggested I manually export the file. Here is the FBX I uploaded:
  • 31. 3rd March 2015 On the 3rd March, both my teammate and I woke up to an email accepting our request to upgrade to Sketchfab Pro. This gave both of us more freedom when it came to uploading files to the website. I therefore uploaded my OBJ file with all the materials zipped into the .7 extension format. As this file was 153MB I could now upload it to the website which I couldnā€™t do before. The result was unexpected as some of the textures managed to work whereas most of them either werenā€™t there or were textured with the wrong image like most of the books and the jar to the right on the image below. I also tried to upload another lightbake with a light density of 10 the evening before but unfortunately overnight, the internet crashed at my living quarters which consequently crashed my computer
  • 32. On the same day, my teammate managed to add an owl texture with a bump to a frame on the wall. A lot of problems involving malware and little RAM caused my teammates computer to slow down nearly to a halt. This therefore meant not much could be done on his end in terms of 3D
  • 33. 4th March 2015 In the morning, my teammate successfully managed to produce a light bake of 5.0 of our scene which is a huge step up from what we previously had. During the day, both my teammate and I went to Uni with the goal of finally getting a light bake which has a high enough resolution to display our textures. We therefore logged into 17 of the computers in our room, downloaded google drive on all of them and narrowed down the selection to the 6 computers which had a working version of VRay, which we could use for our light bake. The Sketchfab Exporter Plugin was then added to these machines. These 6 computers were rendered with different numbers of the light bake. The light bake density calculates the resolution of the fully unwrapped image. These light bakes were set to 8.0, 10.0, 15.0, 20.0 and 30.0 respectively. Once this was completed, we set with the plan that I was to update the blog and my teammate was to create some dirtier more realistic textures for some of the geometry to improve our final renders. Unfortunately while looking at our latest render, we noticed a final difficult problem which we donā€™t know how to resolve. It seems that the auto-unwrap didnā€™t work very well with transparent textures such as glass and makes it look like whatā€™s inside the image is pasted onto it. What Iā€™m going to do to try and fix this problem is contact sketchfab again and hope for a reply which helps our cause. We also asked a student in the year below us to comment on our work. He liked it all except he didnā€™t think that all textures were ā€œdirtyā€ enough to give that extra edge in photorealism. My teammate and I then made a plan for me to update the blog and for him to fix some of the textures. This is the image of our most successful light bake to date:
  • 34. 5th March 2015 Today, I inquired about 2 of the main problems Iā€™ve been having with light baking up to Sketchfab. This is what I wrote:
  • 35. 6th March 2015 These are the replies I woke up to and what I did about it to try and fix it:
  • 36. Once we both were waiting for the computers to do the light bake I decided to act on the feedback that we were given from a student that was in the year above us. He said the image looked very good, but to reference it more to the image we were going for he suggested that some of the textures should be edited a little so that some of the assets look a little dirtier. Which I thought was a good bit of feedback so that night I got to work on them. I decided to edit most of the textures in the scene. And after I did this I found that it made a very big difference! Below are a few objects Iā€™ve changed. The one difference you can see is the bed cover. I thought that by having this quite dirty it would change how you feel about the room, it would also make sense if the room was dirty then the bed cover would obviously be the same. I created this effect by first searching online for a grunge texture, after finding the right one to use, I then decided to take it into Photoshop and then tile it so has the same kind of proportion as the red texture it has on it currently. After that I added it onto the same file as the bed cover and used the layer opacity and fill settings to edit how the texture would look like on top of the original texture. After I was happy I saved it, these layers were not merged together this was because I may need to edit some of the layers individual at some point. After retexturing the bed cover I thought I would change the texture of the cupboards, the reason I did this was because it would suit the environment a lot more, plus I thought the old texture needed to be changed so thought this would be the best time to do this. I used the same dirty texture overlay as the bed cover, and found that it worked very well in the end!
  • 37. The main beams of the room were also retextured. This piece of geometry was commented on quite a lot when getting feedback. So I decided to act on that too and change it a little, which I have created a darker grunge effect on the wood texture, this I found gave the room more depth and meaning when looking at it. After changing the textures, I wanted to add another v-ray camera to the scene, this camera will then do a 360 degree view around the room. I would initially do this by using the line tool and create a circle. And then attach the camera to the circle meaning that then it can animated going around the environment. After I got it the way I wanted it I decided to start a render to go over the weekend, and when I got back I had a look at the results, the final images that were created were great! But found out that the camera movement felt a little fast when going around the room. I attempted to edit the speed of the video, in premier pro but wasnā€™t able to sort it out. So I have decided to go into university one day and attempt the render again on the machines and leave it for a couple of days and see what results I get. I will also be changing the frame time before it was 100 which was too fast but if I change it to 250 this will hopefully give me a slower result than before.
  • 38. 7th March ā€“ 17th March During these last 10 days, we were battling with the computers to try and get a good enough light bake to be presentable. There were a lot of challenges we had to overcome as many of the computers we were using to help us render these light bakes werenā€™t fast enough to carry out the operations we liked them to. My ultimate goal I set was to get it working through Jamesā€™s solution which klaasnienhuis confirmed. During this period, we worked out that there were only 6 computers with VRay installed at Uni. On each one of them, we put on a light bake with different numbers for the light bake. The lowest consisted of a light bake of 5 and a highest of 50. These were some of the problems we encountered: ā€¢ Unfortunately, at first we didnā€™t think that the computers were to sleep after a certain period of inactivity. This caused a lot of our first attempts at uni to either fail or slow down. ā€¢ As the uni computers only had 8GB of RAM, the tendency for them to crash was very high. To reduce the chances of these crashes, I went into the windows task manager and set the 3dsmax.exe priority to real time. This meant that the computer couldnā€™t be touched while it was rendering but would use all of the computing power. ā€¢ A lot of our original light bakes at Uni were very dark. After a lot of troubleshooting, we worked out that the irradiance map and light cache had been saved and used from a previous iteration of the file. This meant that it wasnā€™t using the lighting we had set at this point in time. To fix this, we set each computer to calculate new lighting values during the light bake render. Nearly all of the renders failed and crashed or simply didnā€™t work except for this one which was done before I knew about the glass problem: https://sketchfab.com/models/78b7d92e801441a5b4ce28e66dca9774
  • 39. As it was taking such a long time, I decided to use my own computer to speed up the rendering process. These were some of the problems I encountered during this battle: ā€¢ As the internet was fairly intermittent at home, my computer kept losing its internet connection. This was especially a problem at the start, as I had my computer rendering a good light bake for 2-3 days and then as soon as itā€™s done, it didnā€™t want to upload. Foolishly, at first I didnā€™t think that it saved any aspect of what it had created during this period so I closed the scene. After it happened for the second time after waiting another 3 days, I decided to look into it a bit more. What I found was that I could upload the light bake as an OBJ with all of the light bake textures it had created and the scene would work. This is how it looked once I managed to get my second successful light bake online. I believe the render started happening before I worked out that the problem of the pre saved irradiance map and light cache. This caused the scene to be a lot darker then what I would have liked.
  • 40. To fix this final problem, I decided that my final plan of action was to combine the best parts of the 2 best light bakes. At first I encountered a problem of not being able to download one of the successful scenes off of Sketchfab as the download button was greyed out. I assumed that this was because it was processing the model before it allowed me to download it but after waiting for 2 hours, it was still greyed out. This caused me to contact the support team about this problem and this is what I wrote and what they came up with:
  • 41. 18th March Now I had the 2 successful light bakes I wanted to work with, I spent the whole of today picking the best parts of these 2 scenes into a new 3ds Max file. These are the problems I encountered during this day: ā€¢ As each piece was merged into the scene, it made it hard to keep track on which parts were overlapping. This was because the automatic unwrap and automatic merging of objects into 1 editable poly didnā€™t seem to be as consistent as I had hoped. This meant that there was quite a bit of zfighting during the merging of these 2 scenes. This was fixed by deleting the elements I wanted to remove in sub-object mode. Below is a quick representation of how zfighting looks like. ā€¢ As both scenes werenā€™t perfect, I had to also edit some errors of the light bake by editing the bitmap files in Photoshop. The image to the right shows some of the errors of the light bake
  • 42. 19th March ā€¢ I also noticed that the front and back wall were too bright in comparison to the rest of the scene. These images were then edited in Photoshop using gradients, editing exposure levels and adding a bit more grunge to them ā€¢ I hadnā€™t manage to fix the glass problem for a number of weeks so I asked the Sketchfab support team if they had any suggestions but luckily I found out by myself shorty after my post. After a lot of troubleshooting I worked out that Sketchfab didnā€™t recognize any mental ray or vray textures which consequently was what my glass was. As I hadnā€™t created any glass using the standard material editor, my teacher quickly helped me with that. This is what I posted to Sketchfab:
  • 43. By the end of today, I had finally gotten a good enough upload to be presented. This is how it looks like and the link to the web 3d model: https://sketchfab.com/models/ea23db2e60554fe1a8fde8edfcdcf570 Once it was uploaded, the Sketchfab Supporters also praised my work which was good to hear. Here are those comments:
  • 44. 20th March Today, I woke up to see my model uploaded onto the Polycount Tower. It was certainly pleasing to see our end goal achieved after all of our hard work. https://labs.sketchfab.com/tower/#model/ea23db2e60554fe1a8fde8edfcdcf570