This document discusses form validation and dynamic effects using JavaScript. It begins by describing the learning objectives which are to describe how to create rollover buttons, discuss HTML form validation principles, and create dynamic presentations using timers. It then provides explanations of key concepts like APIs, libraries, frameworks, form validation, and event timers. The document goes on to demonstrate how to create rollover buttons using inline JavaScript, functions, and preloading images. It also discusses the form validation process and provides an example JavaScript function to check if a form text box is empty.
![5
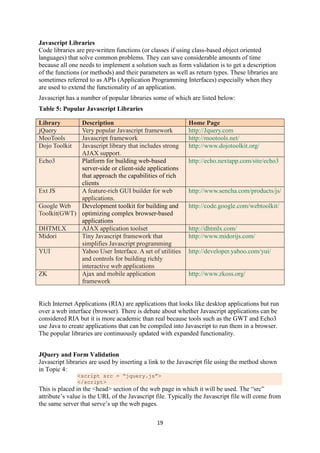
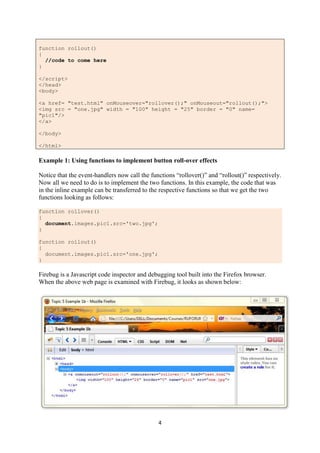
Figure 1a: Firebug view of roll-over button page
Figure 1b: Firebug view of roll-over button page (script)
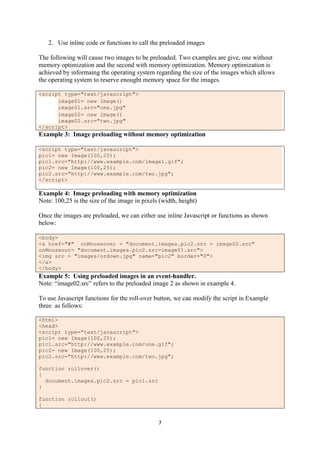
Function Re-use
To allow the two functions to be reused for other buttons in the web page, we can modify the
functions so that the image file names are not indicated in the function itself but is passed to
the function by the even-handler as shown below where the new form of the fuction is shown
on the right side:
Non-Reusable Version Reusable Version
<html>
<head>
<title> Topic 5 Example 1b </title>
<script type="text/javascript">
function rollover()
{
document.images.pic1.src='two.jpg';
}
function rollout()
{
document.images.pic1.src='one.jpg';
}
</script>
</head>
<body>
<a href= "test.html"
onMouseover="rollover();"
<html>
<head>
<title> Topic 5 Example 1b </title>
<script type="text/javascript">
function rollover(pica, bttn)
{
document.images[bttn].src=pica;
}
function rollout(picb, bttn)
{
document.images[bttn].src=picb;
}
</script>
</head>
<body>
<a href= "test.html"
onMouseover="rollover('two.jpg',](https://image.slidesharecdn.com/topic5formvalidationanddynamiceffectswithjavascript-190113155910/85/POLITEKNIK-MALAYSIA-5-320.jpg)
![6
onMouseout="rollout();">
<img src = "one.jpg" width = "100"
height = "25" border = "0" name=
"pic1"/>
</a>
</body>
</html>
'pic1');"
onMouseout="rollout('one.jpg',
'pic1');">
<img src = "one.jpg" width = "100"
height = "25" border = "0" name=
"pic1"/>
</a>
</body>
</html>
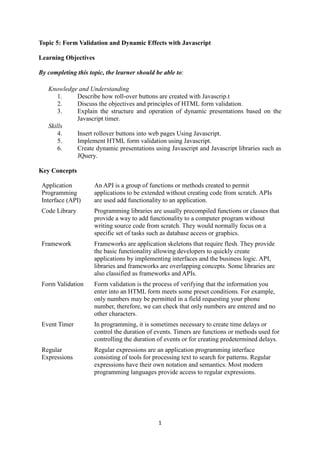
Example 2: Converting the Javascript functions to make them re-usable
Note that the functions have been modified in such a way that the name of the image file to
be used is passed on to the function by the event-handler. So is the name of the HTML
element whose src property is to be changed. When you examine the function, you notice that
it receives two parameters when it is called by the event handler. These parameters are “picb”
and “bttn”. One contains the name of the image file to be used while the second contains the
name of the HTML element to be used. The function below can now be used by other web
pages hence can be placed in an external Javascript file and used by any number of web
pages as long as each passes to it the values for “picb” and “bttn”.
function rollout(picb, bttn)
{
document.images[bttn].src=picb;
}
As discussed in Topic 4, you can use an external Javascript file by using the modified
<script> element as follows where “script-example.js” is the Javascript source file:
<script src = “script-example.js”>
</script>
Our source file in this example would be:
Table 1: Source file “script-example.js”
function rollover(pica, bttn)
{
document.images[bttn].src=pica;
}
function rollout(picb, bttn)
{
document.images[bttn].src=picb;
}
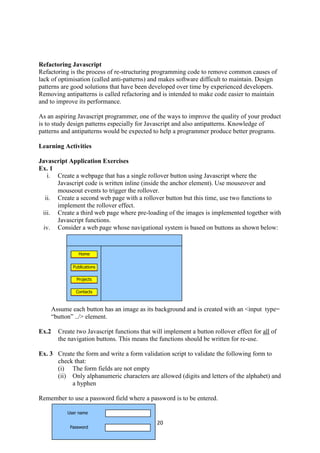
Preloading Images
When using roll-over images with a slow Internet connection, the roll-over effect may be
affected by the slow download of images because the new image to be used on a button is
downloaded when the event-handler calls the rollover() function. There is a way to force
Javascript to preload the images meaning that the images to be used in the roll-ove button are
downloaded before use. To force preloading we proceed as follows:
1. Instruct Javascript to preload the images](https://image.slidesharecdn.com/topic5formvalidationanddynamiceffectswithjavascript-190113155910/85/POLITEKNIK-MALAYSIA-6-320.jpg)

![11
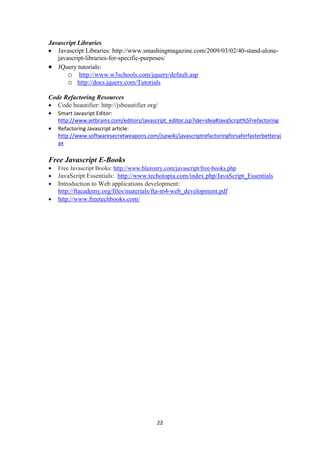
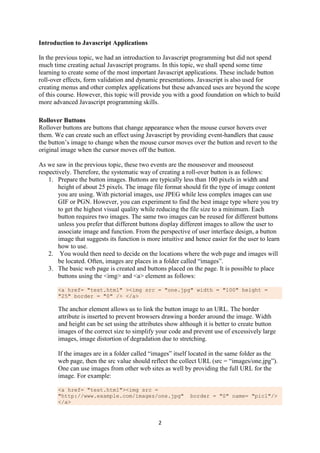
Using Regular Expressions
Regular expressions, often shortened to regex or regexp, is a way to write patterns of text that
we can use for searching or verifying that data is correctly entered. These patterns have a
specific format. The regular expressions includes a list of the characters you are looking for
and an indication of whether they can be repeated in the text you are analyzing. For example,
if you are looking for the letter “o” in this paragraph, you will first encounter it in the words
“expressions” but it also occurs 28 more times.
There are special characters called metacharacters used for construct the pattern. The pattern
can be simple words such as Javascript or more complex patterns such as /^[a-z]+$/ or /^[A-
Z0-9._%+-]+@[A-Z0-9.-]+.[A-Z]{2,4}$/
In the second example, the meaning is as follows:
1. Pattern should be searched starting at the beginning (^) and terminate at the end ($) of
the text to be searched.
2. The search pattern includes only the letters a-z of the alphabet (lower case) which
may occur once or more (+)
Therefore, the regex includes a list or range of characters to be matched called a character
class, the location of the search (at the beginning or at the end of the text to be searched and
the number of occurrences to search for. The following three tables shows the way regex are
created. Simple examples are given to help you understand the notation.
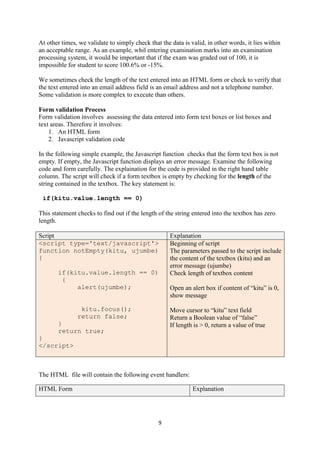
Table 2: Character Classes
Regex
Notation
Explanation Examples
[xyz] Match any one character in the list enclosed square
bracket which is called the character set. Use a
hyphen to denote range. For example. /[a-z]/ matches
any letter in the alphabet, /[0-9]/ matches any single
digit.
/[AI]CM/ matches "ACM"
and "ICM" but not
"DCM" since the leading
“D” is not in the set.
[^xyz] Match any one character not included in the character
set. The caret (^) within the square brackets indicates
that the characters to be matched are those NOT in
the list.
NOTE: The negation caret used within a character
class is different is meaning from the caret used
outside the character set to indicate that the search
should begin at the beginning of the search text.
/[^AI]CM/ matches
"DCM" but not "ACM" or
"ICM".
. (Dot). Match any character except newline or another
Unicode line terminator.
/d.t/ matches "dat", "dit",
"det" and so on.
w Match any numeral or alphabetic (alphanumeric)
character including the underscore. Equivalent to [a-
zA-Z0-9_].
/w/ matches "400" in
"400%"](https://image.slidesharecdn.com/topic5formvalidationanddynamiceffectswithjavascript-190113155910/85/POLITEKNIK-MALAYSIA-11-320.jpg)
![12
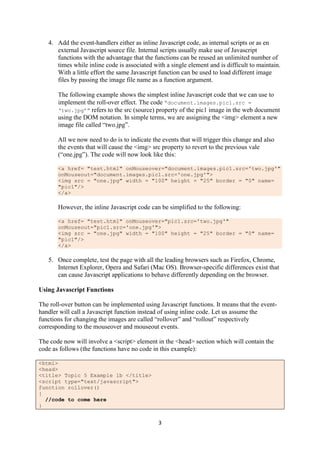
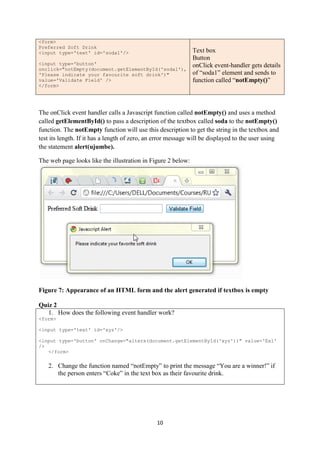
W Match any single non-word character. Equivalent to
[^a-zA-Z0-9_].
/W/ matches "%" in
"400%"
d Match any single digit. Equivalent to [0-9].
D Match any non-digit. Equivalent to [^0-9]. /D/ matches "No" in "No
342222"
s Match any single space character. Equivalent to [
trnvf].
S Match any single non-space character. Equivalent to
[^ trnvf].
Table 3: Repetition
Regex
Notation
Explanation Example
{y} Match y occurrences of a regex. /d{5}/ matches 5 digits.
{y,} Match y or more occurrences of a regex. /s{2,}/ matches at least 2 whitespace
characters.
{x,y} Matches x to y number of occurrences of a regex. /d{2,4}/ matches at least 2 but no more
than 4 digits.
? Match zero or one occurrences. Equivalent to {0,1}. /as?b/ matches "ab" or "a b".
* Match zero or more occurrences. Equivalent to {0,}. /we*/ matches "w" in "why" and "wee" in
"between", but nothing in "bad"
+ Match one or more occurrences. Equivalent to {1,}. /fe+d/ matches both "fed" and "feed"
Note that the repetition symbols affect the preceding single character or character set. Let us
examine the examples given earlier:
/^[a-z]+$/ The first caret (^) and the dollar symbol ($) mean that pattern matching should
start from the beginning of the text to be searched and end at the end.
[a-z] means that we want to search for the occurence of any charcter from a to
z. This is called the character set.
The “+” immediately after the character set means we will search for one or
more occurences of these characters.
In summary, the pattern above searches for any number of alphabetic
characters a-z (lower case).
The pattern /^[A-Z0-9._%+-]+@[A-Z0-9.-]+.[A-Z]{2,4}$/ is more complex but can be
analysed in a similar manner. It can be simplified as follows: /^[]+@[]+.[]{2,4}$/
Pattern matching will begin at the beginning and terminate at the end of the text to be
searched.
There are three character sets: [A-Z0-9._%+-], [A-Z0-9.-], and [A-Z]](https://image.slidesharecdn.com/topic5formvalidationanddynamiceffectswithjavascript-190113155910/85/POLITEKNIK-MALAYSIA-12-320.jpg)
![13
The first two can occur one or more times. The last one [A-Z] can occur 2 to 4 times.
Note that if the regular expression “engine” is set to ignore case (which is assumed in
this example), then [A-Z] also includes [a-z].
A “@” character is permitted after the first character set.
Dots (.) are permitted
The following code examples are adopted from
http://www.tizag.com/javascriptT/javascriptform.php with modifications to clarify them.
<html>
<head> </head>
<script type='text/javascript'>
function isNumeric(elem, helperMsg){
var numericExpression = /^[a-z]+$/;
if(elem.value.match(numericExpression)){
return true;
}else{
alert(helperMsg);
elem.focus();
return false;
}
}
</script>
<body>
<form>
Enter the price (KSh.): <input type='text' id='numbers'/>
<input type='button'
onclick="isNumeric(document.getElementById('numbers'), 'Enter Numbers Only
Please')"
value='Check Field' />
</form>
</body>
</html>
Example 8: Use of regular expressions in validation scripts
Note: /^[a-z]+$/; means “search for strings that have characters a to z (lower case. This is
a simple regular expression.
<html>
<head> </head>
<script type='text/javascript'>
function isNumeric(elem, helperMsg){
var numericExpression = /^[0-9a-zA-Z]+$/;
if(elem.value.match(numericExpression)){
return true;
}else{
alert(helperMsg);
elem.focus();
return false;
}
}
</script>
<body>
<form>
enter one word: <input type='text' id='numbers'/>
<input type='button'
onclick="isNumeric(document.getElementById('numbers'), 'Enter lower case
letters Only Please')"
value='Check Field' />
</form>](https://image.slidesharecdn.com/topic5formvalidationanddynamiceffectswithjavascript-190113155910/85/POLITEKNIK-MALAYSIA-13-320.jpg)
![14
</body>
</html>
Example 9: Checking for alphanumeric entries with a regular expression.
<html>
<head> </head>
<script type='text/javascript'>
function emailValidator(elem, helperMsg){
var emailExp = /^[w-.+]+@[a-zA-Z0-9.-]+.[a-zA-z0-9]{2,4}$/;
if(elem.value.match(emailExp)){
return true;
}else{
alert(helperMsg);
elem.focus();
return false;
}
}
</script>
<body>
<form>
Your Text: <input type='text' id='req1'/>
<input type='button'
onclick="emailValidator(document.getElementById('req1'), 'Please Enter a
Valid email address')"
value='Check Field' />
</form>
</body>
</html>
Example 10: Checking for an email address.
Note: There are several regular expressions people have developed to check for valid email
addresses. There is debate about which is most comprehensive. Two examples are shown in
this section. You can test each one and find out how effective they are.
<html>
<head> </head>
<script type='text/javascript'>
function formValidator()
{
// Make quick references to our fields
var firstname = document.getElementById('firstname');
var addr = document.getElementById('addr');
var postalcode = document.getElementById('postalcode');
var county = document.getElementById('county');
var username = document.getElementById('username');
var email = document.getElementById('email');
// Check each input in the order that it appears in the form!
if (isAlphabet(firstname, "Please enter only letters for your name"))
{
if (isAlphanumeric(addr, "Numbers and Letters Only for Address"))
{
if (isNumeric(postalcode, "Please enter a valid postal code"))
{
if (madeSelection(county, "Please Choose a county"))
{
if (lengthRestriction(username, 6, 8))
{
if (emailValidator(email, "Please enter a valid email address"))
{
return true;](https://image.slidesharecdn.com/topic5formvalidationanddynamiceffectswithjavascript-190113155910/85/POLITEKNIK-MALAYSIA-14-320.jpg)
![15
}
}
}
}
}
}
return false;
}
function notEmpty(elem, helperMsg)
{
if (elem.value.length == 0)
{
alert(helperMsg);
elem.focus(); // set the focus to this input
return false;
}
return true;
}
function isNumeric(elem, helperMsg)
{
var numericExpression = /^[0-9]+$/;
if (elem.value.match(numericExpression))
{
return true;
}
else
{
alert(helperMsg);
elem.focus();
return false;
}
}
function isAlphabet(elem, helperMsg)
{
var alphaExp = /^[a-zA-Z]+$/;
if (elem.value.match(alphaExp))
{
return true;
}
else
{
alert(helperMsg);
elem.focus();
return false;
}
}
function isAlphanumeric(elem, helperMsg)
{
var alphaExp = /^[0-9a-zA-Z]+$/;
if (elem.value.match(alphaExp))
{
return true;
}
else
{
alert(helperMsg);
elem.focus();
return false;
}
}](https://image.slidesharecdn.com/topic5formvalidationanddynamiceffectswithjavascript-190113155910/85/POLITEKNIK-MALAYSIA-15-320.jpg)
![16
function lengthRestriction(elem, min, max)
{
var uInput = elem.value;
if (uInput.length >= min && uInput.length <= max)
{
return true;
}
else
{
alert("Please enter between " + min + " and " + max + " characters");
elem.focus();
return false;
}
}
function madeSelection(elem, helperMsg)
{
if (elem.value == "Please Choose")
{
alert(helperMsg);
elem.focus();
return false;
}
else
{
return true;
}
}
function emailValidator(elem, helperMsg)
{
var emailExp = /^[w-.+]+@[a-zA-Z0-9.-]+.[a-zA-z0-9]{2,4}$/;
if (elem.value.match(emailExp))
{
return true;
}
else
{
alert(helperMsg);
elem.focus();
return false;
}
}
</script>
<body>
<form onsubmit='return formValidator()' >
<table width="80%">
<tr>
<td width="30%">
First Name: </td><td><input type='text' id='firstname' /></td>
</tr>
<tr>
<td width="30%">
Address: </td><td><input type='text' id='addr' /></td>
</tr>
<tr>
<td width="30%">Postal Code:</td><td> <input type='text' id='postalcode' /></td>
</tr>
<tr>
<td width="30%">
County: </td><td> <select id='county'>
<option>Please Choose</option>
<option>Nairobi</option>
<option>Nakuru</option>](https://image.slidesharecdn.com/topic5formvalidationanddynamiceffectswithjavascript-190113155910/85/POLITEKNIK-MALAYSIA-16-320.jpg)
![17
<option>Narok</option>
<option>Machakos</option>
</select></td>
</tr>
<tr>
<td>Username(6-8 characters): </td><td><input type='text' id='username' /></td>
</tr>
<tr>
<td>
Email: </td><td><input type='text' id='email' /></td>
</td>
</tr>
</table>
<input type='submit' value='Check Form' /><br />
</form>
</body>
</html>
Example 11: Full scale validation script.
Note: This script is provided for illustrative purposes only. It uses a set of functions to
validate names, addresses, postal or zip code, length of text entered and email address. The
form used is shown below:
The following code collects all the user entries and saves them in Javascript variables:
var firstname = document.getElementById('firstname');
var addr = document.getElementById('addr');
var postalcode = document.getElementById('postalcode');
var state = document.getElementById('state');
var username = document.getElementById('username');
var email = document.getElementById('email');
The functions used are as follows:
Function name Purpose Regex
isAlphabet() Checks your “First name” field; should be alphabetic /^[a-zA-Z]+$/
isAlphanumeric () Checks your “Address” field; should be
alphanumeric
/^[0-9a-zA-Z]+$/
isNumeric() Checks the “Postal Code” field; should be numeric /^[0-9]+$/
madeSelection() Checks that a county has been selected No regex used
lengthRestriction() Checks that the name is between 6 and 8 characters No regex used
emailValidator() Checks the email address /^[w-.+]+@[a-zA-Z0-
9.-]+.[a-zA-z0-9]{2,4}$/](https://image.slidesharecdn.com/topic5formvalidationanddynamiceffectswithjavascript-190113155910/85/POLITEKNIK-MALAYSIA-17-320.jpg)
![18
The following example shows the typical validation function using a regex:
Table 4: Explanation of the operation of a typical validation function using regex
Function code Explanation
function isAlphanumeric(elem,
helperMsg)
{
var alphaExp = /^[0-9a-zA-Z]+$/;
if(elem.value.match(alphaExp))
{
return true;
}else
{
alert(helperMsg);
elem.focus();
return false;
}
}
Function name and parameters. Parameters (elem,
helperMsg) are passed to the function by the event-handler.
Regular expression pattern is saved in the variable alphaExp.
The data entered in the form (elem.value) is matched with the
regex.
If it matches, return “true” else print an error message and
return false.
“elem.focus” places the cursor in the textbox where
correction is to be done.
The function is called by the event handler in the HTML element. In the case of forms,
validation scripts are called either after each field is filled (onChange) or upon submission of
the form(onSubmit). The last method is disadvantageous because the user gets feedback only
after filling in the whole form. The first method is often better because errors are indicated as
soon as they occur. Many Javascript libraries exist to help you construct effective form
validation scripts with minimal code.
Quiz 3
1. Write a regular expressions to match the following patterns:
a. Numerals (0 to 9) as well as the the “+” sign are permitted
b. The character “+” occurs not more than once a string and is only permitted at
the beginning of the string
c. The numerals 0 to 9 occur between 1 and 3 times in a string
.
2. What does each of the following symbol indicate when included in a regular
expression:
a. d
b. D
c. s
d. S
e. w
f. W
g. b
h. B
3. What do the following regular expressions mean:
a. [^XQ]
b. [^0-9]](https://image.slidesharecdn.com/topic5formvalidationanddynamiceffectswithjavascript-190113155910/85/POLITEKNIK-MALAYSIA-18-320.jpg)