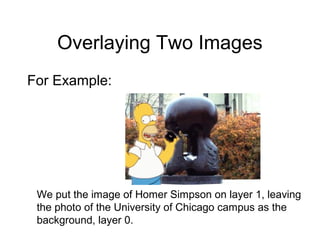
Hi im web designer ankita shinde., am 19 years old Hi im web designer ankita shinde., am 19 years old Hi im web designer ankita shinde., am 19 years old
This document provides a tutorial on basic Photoshop skills such as creating documents, working with layers, selecting colors, cutting out images, adding text effects, and more. It explains how to create a new document and select an appropriate resolution, describes common color modes like RGB and CMYK, and gives tips for saving files in different formats. The tutorial also demonstrates how to use tools like the magnetic lasso and mask to precisely select areas, overlay images by placing them on separate layers, and add effects like drop shadows to text. Resources for further learning Photoshop are provided at the end.
Photoshop layers allow images and text to be stacked and edited independently. Layers can be reordered, hidden, and have their opacity adjusted. Different blending modes determine how pixel colors mix between layers. Layer masks enable hiding portions of images underneath. Effects like shadows, glows, and overlays can be applied to layers, especially text. The tutorial recommends practicing with layers and masks to edit composite images.
This document provides an overview of key photography concepts including pixels, megapixels, resolution, color modes, histograms, and preparing images for print in Photoshop. It defines pixels and megapixels, explains how to calculate megapixels from image dimensions. It also outlines the differences between screen and print resolution, RGB and CMYK color modes, and how histograms can be used to analyze image exposure. The goal is for the learner to understand these essential digital photography and editing fundamentals.
This document provides instructions for 16 exercises to practice basic skills in Photoshop. The exercises involve using selection tools, copying and pasting images, adjusting layers, adding and editing text, and using tools like the paint bucket, clone stamp, and dodge and burn tools to manipulate images. Completing the exercises will help become familiar with Photoshop's basic functions and tools.
Adobe Photoshop | Introduction to the User InterfaceBrainPlayLLP
This document provides an overview of the interface and tools in Photoshop. It describes the main interface elements, including the menu bar, option bar, toolbar, and work area. It then explains each of the tools available in the toolbar, such as selection tools (marquee, lasso), navigation tools (move, crop), sampling tools (eyedropper), and editing tools (brush, eraser, clone stamp). The overview provides a brief description of the functionality of each tool.
This document provides an overview of Adobe Photoshop and some of its key tools. It describes Photoshop as the premier photo editing software that can be used to enhance images for webpages, presentations, and printed documents. The document then lists and describes seven categories of Photoshop tools: 1) cropping and slicing, 2) drawing, 3) painting, 4) measuring and navigating, 5) selection, 6) typing, and 7) retouching. It provides examples of tools within each category and their functions. Finally, it outlines three activities for applying basic text effects, changing an image's background, and applying a picture with text effects to a new background.
The document provides an overview of the Photoshop workspace and basic tools. It describes the five main components of the Photoshop workspace: the Application Bar, Tools Panel, Options Bar, Document Window, and Panel Dock. It also summarizes key tools like the Type Tool for adding text, the drawing tools for creating shapes and paths, and the various painting tools for editing images. Finally, it outlines the concept of layers, how to view and manipulate layers in the Layers Panel, and how layers allow for building up an image through overlapping elements.
This document provides instructions for using Photoshop to add a shadow to an image. It describes selecting the person from the original photo and placing them on their own layer. It then instructs selecting an image to use for the shadow, filling it with black, and dragging it below the person's layer. The shadow is then resized, blurred with Gaussian Blur to soften edges, and opacity lowered to reduce intensity. When completed, these steps allow adding a realistic shadow behind the person in the photo.
here is the ppt of graphics. for the begniers of gaphic sudent , to learn photoshop from begining . its very help full to all . you can contact me on mail@galiyaraa.in
The document is a presentation on Photoshop that discusses its meaning, features, system requirements, and various tools. It provides descriptions and examples of how to use many of Photoshop's selection, editing, and manipulation tools, including the marquee, lasso, crop, magic wand, move, healing brush, eraser, blur, slice, history brush, clone stamp, eyedropper, dodge, burn, and sponge tools. Requirements for running Photoshop include at least a 1GB RAM, 1GB hard disk space, and 1024x768 display.
This document provides an overview of the basics of Photoshop taught in a workshop. It discusses tools like the move tool, quick selection tool, and crop tool. It demonstrates how to clean edges when extracting an object from its background using refine mask, layer matting, and contracting selection. Methods for altering photos like adjustments, blending options, and filters are also covered. The document walks through an example of combining images and applying effects to create a composite image.
The document outlines a Photoshop workshop, beginning with an introduction to Photoshop and its uses. It then demonstrates basic Photoshop techniques like making selections, applying adjustments and filters, and using layers. The workshop walks through an example of combining two images by adding a photo of Jessica Alba to a winter night background and cleaning up the selection edges.
This document discusses color panels in Adobe Photoshop and how to properly use color in image editing. It describes the Swatches panel, which stores colors for reuse, and the Color panel, which is used to select and refine colors. It also covers extracting colors from images using the eye dropper tool, changing opacity levels, and considerations for using RGB or CMYK color modes depending on the intended use of the image.
This document provides an introduction to using Adobe Photoshop. It discusses what Photoshop is, how it can be used for publications, websites, and video/digital materials. It also covers starting Photoshop, the interface including menus and tools, understanding layers and how to work with layers, common file formats like JPEG and TIFF, creating image archives, and image resolution. The document serves as a beginner's guide for getting familiar with the Photoshop environment and basic image editing and manipulation tasks.
This document is a tutorial that teaches how to create 3D type in Photoshop CS6 Extended. It discusses choosing a font, extruding the type, texturing it, splitting the extrusion to move letters individually, adding lighting effects, and further enhancing the composition with additional textures and effects. The tutorial contains step-by-step instructions and screenshots to guide the reader through the process. It is authored by Marcus Byrne, a senior designer and retoucher with over a decade of experience working with brands.
The document provides instructions for using various tools in Photoshop CS, including the crop tool, filters, history panel, marquee tool, and other selection tools. It contains 15 sections covering topics like cropping an image, applying filters to selected areas, using the history panel to undo edits, and making selections with different selection tools like the lasso and magnetic lasso. The instructions are intended to introduce readers to Photoshop's most commonly used tools and selection methods.
The document provides an introduction to using Photoshop for beginners. It discusses organizing the Photoshop workspace by customizing menus, toolbars, and palettes. It also covers basic tasks like opening and saving files, using layers, and an overview of the toolbox and common selection tools. The summary is aimed at new Photoshop users to help them navigate the interface and perform essential functions.
Photoshop is Adobe's graphic design software used for photo editing and image creation. It uses a layer-based editing system allowing for image alteration and creation with transparency and filters. The guide explains Photoshop's main menu ribbon including File, Edit, Image, and Layer options. It also outlines important tools in the toolbar like the Marquee, Lasso, and Crop tools. Key terms are introduced like layers, which are like sheets of stacked acetate used to position and change opacity of content. Expectations of using Photoshop include fixing perspective errors, changing images, creating headers and presentations, turning photos into paintings, and restoring old photos.
Photoshop offers a range of selection tools including marquee, lasso, and magnetic selection tools. It allows selection by color using the magic wand or color range tools. The extract command can isolate foreground objects. Photoshop also provides painting and editing tools like the healing brush, clone stamp, and eraser. It includes tools for sharpening, blurring, and adjusting colors. Layers allow working on elements independently and rearranging them. The menu bar provides access to file, edit, image, and other commands to manage and modify images.
This document provides an overview of digital photography editing and summarizes the basic functions and tools available in Photoshop. It discusses how to load, open, and save images, and covers selection tools, layers, adjustments for tone and color, and basic manipulation techniques like cropping, cloning, and adding text. The goal is to demonstrate minimum post-production skills to improve photographs, including adjusting exposure, removing distractions, and making creative enhancements.
This document provides an overview of Photoshop, including its history, features, and customer market. Photoshop was created in 1988 by brothers Thomas and John Knoll and was acquired by Adobe Systems. It has since become the industry standard image editing software. Photoshop allows for powerful image editing through features like layers and masks. It also supports plugins that extend its functionality. While aimed at professionals, Adobe also offers a more casual version called Photoshop Elements for hobbyists.
DAY 2 - Starting in Photoshop (Images and Layers)Sef Cambaliza
The document provides instructions for basic image editing and layer functions in Adobe Photoshop, including how to create and open images, resize layers, save files, and work with layers. Key layer functions covered are arranging layers, duplicating layers, renaming layers, deleting layers, merging layers, adjusting layer blending and opacity, and using adjustment layers.
The document provides an overview of the Photoshop workspace and basic tools. It describes the five main components of the Photoshop workspace: the Application Bar, Tools Panel, Options Bar, Document Window, and Panel Dock. It also summarizes key tools for creating images, working with text, drawing, painting, and layers. Basic functions of tools like the Pen, Shape, Brush, Eraser, and Layer tools are outlined.
This document provides an introduction to the basics of Photoshop. It begins with a table of contents and states that the guide is designed for Photoshop starters. Section 1 defines Photoshop as an Adobe editing program used to digitally alter photos by changing colors, inserting text, and modifying resolution. Sections 2-5 describe the Photoshop toolbar and tools, how to save images as different file types like JPEG and PNG, expectations to learn photo editing and adding filters/text, and include citations for further information. The overall document serves as an introductory tutorial for beginners to understand Photoshop's basic functions and capabilities.
Photoshop is a graphics editing program used to create and modify digital images. It was created in 1988 by Thomas and John Knoll and can be used for tasks like photo retouching, image manipulation, and graphic design. Digital images are made up of tiny colored squares called pixels that combine to form the full image. Photoshop uses RGB color channels, with each channel having 256 shades, to produce over 16 million possible colors in an image. It remains the leading software for image editing and is part of the Adobe Creative Suite.
This document discusses Adobe Lightroom and optimizing workflows for photography. It compares Lightroom to Photoshop, noting that Lightroom is best for organizing, editing, and outputting large collections of images efficiently while Photoshop allows for more precise pixel-level editing. The five modules of Lightroom - Library, Develop, Slideshow, Print, and Web - are described along with typical workflows moving from importing to editing to output.
This document is a 10 page workshop on using Adobe Photoshop CS3. It provides instructions on opening and viewing files, scaling images, manipulating canvas sizes, cropping images, drawing selections, working with layers, selecting colors, combining content from multiple files, flattening layers, and saving files in different formats such as PSD, TIFF, JPEG, GIF, and PNG. The workshop also includes screenshots to demonstrate the Photoshop tools and instructions.
This document is a 10 page workshop on using Adobe Photoshop CS3. It provides instructions on opening and viewing files, scaling images, manipulating canvas sizes, cropping images, drawing selections, working with layers, selecting colors, combining content from multiple files, flattening layers, and saving files in different formats such as PSD, TIFF, JPEG, GIF, and PNG. The workshop also includes screenshots to demonstrate the Photoshop tools and interfaces discussed.
This document provides an introduction to using Adobe Photoshop CS. It explains how to open Photoshop and set up a new document, including setting the page size, resolution, color mode and background contents. It also describes the Photoshop interface including the menu bar, toolbox, options bar and various palettes. Finally, it gives an overview of some basic selection and editing tools in the toolbox.
This document provides an overview and instructions for basic tasks in Adobe Photoshop for beginners. It describes the Photoshop work area including the toolbox, palettes like layers and history, and common tools. It then gives step-by-step instructions for selecting areas, working with layers, removing blemishes and red-eye, improving exposure, adding effects like sepia tone, and using text. The document is intended as a guide for newcomers to learn fundamental Photoshop skills.
This document provides an introduction to photo editing. It discusses how photo editing can be used to enhance images or create illusions through manipulation. It then focuses on explaining the basics of using Photoshop and Microsoft Paint for photo editing. Key tools and features of each program's interface like layers, toolbars, and palettes are outlined. Basic editing techniques like cropping and copying an image selection are demonstrated. The document concludes by noting more advanced Photoshop concepts need to be learned for continued graphic design work.
This document provides an overview of basic Photoshop tools and techniques for beginners. It discusses the Photoshop workspace including the toolbox, palettes and common tools. It then explains selections, layers, masks and how to perform common image editing tasks like improving underexposed and overexposed photos, removing red eye and blemishes, removing color casts, adding sepia tones, creating photo-filled text, and applying a soft focus effect. Step-by-step instructions are provided for each technique.
This document provides an overview of the Adobe Photoshop CS6 interface and basic tools. It explains how to open and set up documents in Photoshop, including page size and resolution settings. The key areas of the interface are described, such as the menu bar, toolbox, image window, and palettes for adjusting colors, layers, and images. Common selection, alteration, and drawing tools are also introduced. The document serves as an introductory tutorial for getting started with Photoshop.
This document provides an overview of the Adobe Photoshop CS6 interface and basic tools. It explains how to open and set up a new document, including page size and orientation options. It then describes the main interface elements like the menu bar, toolbox, image window and palettes for adjusting colors, layers and more. Finally, it provides details on the selection, alteration and drawing tools available and how to use basic editing functions like cropping and resizing images.
This document provides an introduction to using Adobe Photoshop CS. It explains how to open and set up documents, navigate the interface, and use basic tools. The interface is outlined, including the menu bar, toolbox, options bar, and palettes like layers, history and navigator. Common tools like selection, alteration and drawing tools are described. Basic functions like working with layers, colors and modes are also introduced. The goal is to get users started using Photoshop for basic image editing.
This document provides an introduction to using Adobe Photoshop CS. It discusses how to get started by opening Photoshop and creating new documents. It describes the basic Photoshop interface including the menu bar, tool bar, options bar, and palettes. Common palettes like Navigator, Color, Layers, and History are explained. Basic tools for image editing are also outlined. The document serves as a starting point for learning key concepts and components of the Photoshop interface.
This document provides an introduction to using Adobe Photoshop CS. It explains how to open and set up documents, navigate the interface, and use basic tools. The interface is outlined, including the menu bar, toolbox, options bar, and palettes like layers, history and navigator. Common tools like selection, alteration and drawing tools are described. Basic functions like working with layers, colors and modes are also introduced. The goal is to get users started using Photoshop's core features for image editing.
This document provides an introduction to using Adobe Photoshop CS. It explains how to open and set up documents, navigate the interface, and use basic tools. The interface is outlined, including the menu bar, toolbox, options bar, and palettes like layers, history and color. Common tools like selection, alteration and drawing tools are described. The document also covers how to open, set up and save images.
This document provides an introduction to using Adobe Photoshop CS6. It discusses getting started with Photoshop and setting up documents. It describes the interface layout including the menu bar, toolbar, image window, and main palettes. It explains the basic selection, alteration, drawing and selection tools. It covers using color boxes and modes and provides an overview of basic image editing techniques like cropping, resizing, correcting and saving images.
This document provides an introduction to using Photoshop Elements 2. It describes the main components of the work area including the toolbox, menu bars, and palette well. It then explains how to use many of the tools in the toolbox to modify images, such as selection, creation, retouching, and miscellaneous tools. It also covers topics like color settings, file formats, quick fixes, enhancing color, changing size and resolution, and using layers and keyboard commands.
This document provides an introduction and tutorial for using Adobe Photoshop CS6. It outlines the Photoshop workspace including tools, menus, panels and describes how to open an image, adjust image size and color mode, work with layers, add additional images, crop images, add solid colors and text, and save Photoshop files in different formats for print and web. The tutorial is intended to teach basic image editing and manipulation skills in Photoshop.
Web designing involves using applications like Photoshop, Illustrator, and Flash to create graphics, images, and animations. Photoshop allows editing photos by changing colors, layers, and cropping images. Illustrator is used to create vector graphics and 3D images. Flash creates animations and videos. HTML is the basic language used to structure and present content on websites. Key HTML tags include <p> for paragraphs, <title> for the page title, and <li> for lists. Dreamweaver provides tools to help build websites using HTML tags.
Getting started with adobe photoshop 7.0 https://archicrewindia.com/2021/09/a...ArchiCrew India
This document provides an introduction to using Photoshop by summarizing its key interface elements and functions. It explains that Photoshop uses a layered workspace and defines key terms like layers, selections, resolution and color modes. It describes the main toolbar and menu options, highlighting tools for making selections, adjustments and basic image editing. Functions from the Image menu like size, mode, adjustments and cropping are demonstrated. The importance of layers for non-destructive editing is emphasized. In under 3 sentences, the document orients new Photoshop users to its interface and basic image editing capabilities.
This document provides an introduction and overview of using Photoshop for graphic editing. It discusses the basic tools in Photoshop like selection tools, cropping tools, and painting tools. It also outlines some key advantages of using Photoshop such as improving photo quality, creating new artwork, and easily editing numerous photos. The document concludes by describing the basic procedures for creating a Photoshop file, adding layers and images, adding borders and titles, and saving the file.
Living in an UBER World - June '24 Sales MeetingTom Blefko
June 2024 Lancaster County Sales Meeting for Berkshire Hathaway HomeServices Homesale Realty covering the following topics: 1. VA Suspends Buyer Agent Payment Plan (article), 2. Frequently Used Terms in title, 3. Zillow Showcase Overview, 4. QuickBuy commission promotion, 5. Documenting Cooperative Compensation, 6. NAR's Code of Ethics - Mass Media Solicitations, 7. Is it really cheaper to rent? 8. Do's and Don't's when Terminating the Agreement of Sale, 9. Living in an UBER World
Anilesh Ahuja Pioneering a Paradigm Shift in Real Estate Success.pptxneilahuja668
Anilesh Ahuja journey is a testament to the power of vision, resilience, and unwavering determination. As a visionary leader, he continues to inspire and empower others to dream big and challenge the status quo. His legacy extends far beyond the realm of real estate, leaving an indelible mark on the industry and the world at large.
Listing Turkey - Piyalepasa Istanbul CatalogListing Turkey
We are working around the clock to transform a long-time dream into reality. As a result, Piyalepasa Istanbul will be the largest privately developed urban regeneration project in Turkey.
THE NEIGHBORHOOD WE HAVE BEEN LONGING FOR IS COMING TO LIFE
The good old days of the Piyalepasa neighborhood are being brought back to life with Piyalepasa Istanbul houses, residences, offices, hotels and a pedestrianized shopping avenue.
The wide streets of this 82.000 square meter development conveniently face the main boulevard in a prime Beyoglu location. “Piyalepaşa İstanbul” stands out as the only project designed to offer a neighborhood lifestyle, complete with its grocers, bagel sellers and greengrocer. Piyalepasa Istanbul has all the values to make it an authentic neighborhood, our very own community.
A NEIGHBORHOOD FULL OF LIFE, IN THE HEART OF THE CITY!
“Piyalepaşa İstanbul” is a “mixed-use” concept containing all the elements for a vibrant social life with houses, residences, offices, hotels and high street shopping.
“Piyalepaşa İstanbul” will take the liveliness of Istanbul into its heart. The elegant sparkle of Nisantasi, the young and colorful Besiktas, the variety and multicultural heritage of Istiklal Street will all be contained within the streets of this neighborhood.
“Piyalepaşa İstanbul” bears traces of the most beautiful examples of Turkish architecture from the Seljuks to the Ottomans and from Anatolia to Rumelia. With its graded facades, wide eaves, bay windows, pools, and interior courtyard systems, it offers a new living space without disrupting the city’s silhouette and neighborhood.
“Piyalepaşa İstanbul” is the new attraction of this splendid city.
TO BE AT THE CENTER OF ISTANBUL… THIS IS REAL LUXURY!
With its proximity to D-100 highway, connecting roads and tunnels, “Piyalepaşa İstanbul” is only minutes away from Kabatas, Besiktas, the Golden Horn and Karakoy.
“Piyalepaşa İstanbul” is close to the prestigious new Istanbul Court House, a major hospital, the Perpa trade center and the city’s most lively neighborhoods. With its shuttle service to Okmeydani Metrobus station, Sishane and the Court House subway stations, “Piyalepaşa İstanbul” will provide you with the most convenient transport connections.
https://listingturkey.com/property/piyalepasa-istanbul/
36,778 sq. ft. building; Zoning: SE (Suburban Employment): The (SE) District allows numerous commercial site uses; Passenger elevator; Private and common restrooms; Fully sprinkled; Data center with a grounded floor and a specialized HVAC system; 60 KVA back-up generator; Building/pylon signage; Potential to purchase adjacent parcels; Sale Price: $4,413,360
Andhra Pradesh, known for its strategic location on the southeastern coast of India, has emerged as a key player in India’s industrial landscape. Over the decades, the state has witnessed significant growth across various sectors,
Why is Revit MEP Outsourcing considered an as good option for construction pr...MarsBIM1
Outsourcing MEP modeling services require effective collaboration and coordination amongst multiple engineering trades. The engineers and the designers often change the details of the MEP projects, but the work of Revit MEP drafting services is having the master plan and model of the complete project. To have proper coordination and installation, there is a need to execute the project effectively. Hence, the work of Revit family creation facilitates the MEP engineers.
The SVN® organization shares a portion of their new weekly listings via their SVN Live® Weekly Property Broadcast. Visit https://svn.com/svn-live/ if you would like to attend our weekly call, which we open up to the brokerage community.
Signature Global TITANIUM SPR | 3.5 & 4.5BHK High rise Apartments in Gurgaonglobalsignature2022
Signature Global TITANIUM SPR launched a high rise apartments in Gurgaon . In this project Signature Global offers 3.5 & 4.5 BHK high rise Apartment at sector 71 Gurgaon SPR Road. Signature Global Titanium SPR is IGBC Gold certified, a testament to our commitment to sustainability.
Stark Builders: Where Quality Meets Craftsmanship!shuilykhatunnil
At Stark Builders our vision is to redefine the renovation experience by combining both stunning design and high quality construction skills. We believe that by delivering both these key aspects together we are able to achieve incredible results for our clients and ensure every project reflects their vision and enhances their lifestyle.
Although we are not all related by blood we have created a team of highly professional and hardworking individuals who share the common goal of delivering beautiful and functional renovated spaces. Our tight nit team are able to work together in a way where we pour our passion into each and every project as we have a love for what we do. Building is our life.
2. Getting Started
File > New…
Select the size of the blank document that you
want to create. Pay special attention to your
choice of resolution. If you’re creating an
image for the web, 72 pixels per inch will
suffice. If you’re creating a detailed art
project, you want at least 300 pixels per inch,
but obviously the more the bettter.
3. A Few Words About Color
Computers recognized many different color
formats. Some common choices include:
1) RGB color - lists a value between 0 and 255
for each of the {Red, Green, Blue}
components of a color. (0, 0, 0), the
absence of color, is completely black. (255,
255, 255), the presence of all colors, is
completely white. Most Photoshop artists
work in RGB.
4. A Few Words About Color
2) CMYK color - lists a percentage of
each of the colors {Cyan, Maroon,
Yellow, blacK}. CMYK can best be
thought of as the “color printer cartridge
colors.” Some graphics designers
choose to convert their work (after it has
been done in RGB) to CMYK so that
they have a better sense of how it’s
going to look after it is printed.
5. A Few Words About Color
3) Grayscale - this is exactly what it
sounds like. It’s a color mode that
operates entirely in black and white.
Usually in order to convert an image to
grayscale, you will first need to flatten it.
(More about this later)
6. A Few Words About Color
4) Bitmap - Only allows for black and white dots
(pixels); I wouldn’t recommend using this in
most cases
5) Lab color - Represents color with 3
components: {Lightness, color value from red
to green, color value from blue to yellow}.
This is another non-standard color channel.
7. Don’t Forget To… Save Your File
File > Save As…
The default format for Photoshop files is aptly
named “Photoshop Format.” Keeping your
document in Photoshop format is a good idea
if you’re planning to go back and edit it later.
However, if you want to e-mail it or put it on a
website, you will want to change the format to
something more universal.
8. Popular Format Choices, Explained
1) Photoshop PDF - PDFs have gotten a bad
reputation here in the Mac Lab, mostly
because we don’t print them. However, PDF
was developed by Adobe for file-sharing
purposes, which makes it an excellent
choice for e-mailing a document to
someone else (particularly someone who
doesn’t have the same version of Adobe
Photoshop that you do).
9. Popular Format Choices, Explained
2) TIFF - Tagged Image File Format,
another format that is pretty universally
readable.
10. Web Formatting
File > Save For Web
Photoshop has a special Save For Web
feature that allows you to choose
between GIF, JPEG, PNG and WBMP
formats. It also allows you to choose
between “High,” “Medium” and “Low”
quality resolution.
11. Size Issues
Even the steadiest hands make small
mistakes with a mouse. The best way to
minimize the visibility of these mistakes
is to zoom in sufficiently far on your
project so that any mistakes that you
make are not apparent once the project
is restored to normal size.
13. Simple Photo Re-touching
Maybe we don’t like the brown spot on
LimeCat’s lime. We want to find a way
to fill in an appropriate texture and color
to match the rest of the lime. Using the
rubber stamp tool, we can do just that.
14. Using the Rubber Stamp Tool
To use the rubber stamp tool, first select
a “brush” size that looks appropriate for
the error that you’re correcting. The
rubber stamp is a cloning tool, and you
don’t want your cloning area to be too
large.
15. Using the Rubber Stamp Tool
Next, select the area that you wish to
clone by holding down the option key
while you click the mouse over that
area.
Now, “dab” the mouse in short strokes
over the area that you wanted to cover
up (ie. The brown spot on the lime)
16. Look at the Difference!
The one on the right has been re-touched. I
also removed some unwanted whiskers.
17. Cutting Out An Image
Suppose that we want to (precisely) cut
out a picture of Homer Simpson.
18. Cutting Out An Image
Using the magnetic lasso, trace
(approximately) the border of the image.
You’ll notice that this is difficult to do in
a precise manner (even if you are
viewing the image at 400% its actual
size). We will use the mask feature to
make our selection more precise.
19. Cutting Out An Image
Click on the button that looks like a grey box
with a white circle inside of it on the tool
bar.This will enable you to enter the mask
mode.
Once you are in the mask mode, you will notice
that the area that doesn’t show up in red is
the area that you have selected (the red
highlighted part is the “throwaway area”). By
using the eraser and the paintbrush tools, you
can add or subtract from this red area with
amazing precision.
20. Cutting Out An Image
Once the selected (white) area on your image is
to your liking, exit from the mask mode.
Edit > Copy will copy your image and allow you
to paste it into a new document.
Tip: In Photoshop, it is always a good idea to
paste an image onto a different layer from its
background. This will make it easier to move
your image around the canvas.
21. Overlaying Two Images
For Example:
We put the image of Homer Simpson on layer 1, leaving
the photo of the University of Chicago campus as the
background, layer 0.
22. Overlaying Two Images
New Layer
Go to the layer tool bar at the right of the screen and click on the
arrow in the upper right hand corner.
The default opacity level is set to 100%. You can always change
this later if you want your layer to allow some of the background
to show through.
Note that the “color” does not affect the color of the content of your
new layer, it just creates a tag of that color on the toolbar to help
you organize your layers or flag layers that still need work.
23. Overlaying Two Images
What was “bad” about the preceding
image?
You will notice that Homer Simpson still
doesn’t quite fit with the background.
There’s a blurry edge that goes all the
way around Homer that seems to
separate him from the University of
Chicago campus.
24. Overlaying Two Images
The image on the left looks much more natural than the image on the
right, namely because we used the rubber stamp tool to clone the
background over the white border in the “Homer” layer (layer 1).
25. Using One Layer As A Template
One useful layering trick is to take a
photograph, place it on one layer, and then
create new layers on top of it to trace different
parts of the photograph.
Once you’re finished with tracing the
photograph, you can “hide” this layer by
clicking on the eyeball icon on the Layer
toolbar.
26. Layer Template Example
I created this drawing of my cat by tracing a photograph of her. I
used over 100 layers to create it, assigning one color to each
layer.
28. Instructions
1) Create a black background
2) Write text (should automatically open in a new
layer)
3) Hide background layer so that you can see the text
4) Make a Duplicate Layer. Change the color of the
text in this layer to white.
5) Select Gaussian Blur for the Duplicate Layer from
the Filter Menu.
6) Move the Duplicate Layer beneath the Text Layer
on the layers list. Now feel free to move the
Duplicate layer in relation to the Text layer in order
to get the drop shadow effect that you want.
29. Resources for Further
Photoshop Study
Web Resources:
1) Adobe Design Center
This website is run by the makers of Photoshop.
http://www.adobe.com/designcenter/tutorials/
2) About: Graphics Software
This website has a large number of free Photoshop tutorials and tips.
http://graphicssoft.about.com/od/photoshop/Adobe_Photoshop_Resources.htm
Live Courses:
1) The Apple Store on Michigan Avenue offers two free weekly courses: Adobe Photoshop
Elements and Adobe Photoshop Pro Workshop.
For schedule, see : http://www.apple.com/retail/northmichiganavenue/
2) Adobe offers some fairly expensive professional training programs.
For more information, see: http://www.adobe.com/products/photoshop/training.html