
Recommended
More Related Content
What's hot
What's hot (18)
Viewers also liked
Similar to Photoshop process
Similar to Photoshop process (20)
Recently uploaded
Recently uploaded (20)
Photoshop process
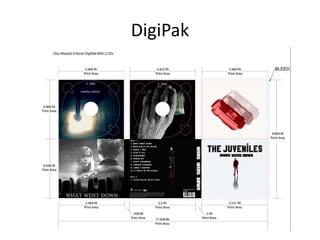
- 1. DigiPak
- 2. Front CoverThe font ‘Pricedown’ was used for the title of the album taken from dafont.com (Visit font research). The process was simple through the use of print screen after entering the album title into the preview tab I transferred hem across word by word to allow the vertical placement of them. For the main image of the front cover it was taken from the photo with the background/foreground removed from the shot to leave the single figure alone. The tool used was the ‘Quick selection tool’ that allowed me to quickly to detach the male from the rest of the photo. However the edges were slightly rough so the ‘refine edge’ tool was used to make it much smoother and higher quality in presentation of the male. A copy was then made of the layer via ‘duplicate layer’ before it was flipped vertically through transform within edit and positioned directly underneath the first image. This therefore created the reflection look of the image, the next step was to create the fade out of his body giving it more quality and professionalism. A layer mask was then created (with it being white) the gradient tool was selected before choosing the ‘Foreground to Transparent’. The final step was to then apply the gradient until the effect was how I intended it and then the opacity was lowered to 77%, which created the fade out look of the second image. In addition to this I creatively decided to apply a different colour to the image to remove any tedium set in through the image by using the ‘Hue and Saturation’ tool for the first image to create a warmer atmosphere, whilst the second image had the ‘Black and White’ tool applied to give it a darker portraying message inferring the message that there are two sides to him.
- 3. Back Cover Similarly to the front cover the back is just the same image but oppositional. The background is now white, with the two image colours being swapped over. Another difference is the song titles being placed within the corner using the simple font ‘Arial’ before thickening the text from ‘Regular’ to ‘Black’ making it stand out further. Within the corner of the cover there is the barcode to give it a realistic concept about it whilst the record label logo for ‘Warner Bros UK’ gives a more professional look. Finally the created band name ‘The Juvenile’ is seen within a website name as well to show more professional features (See ‘Band name research’).
- 4. Inside cover The inside cover was a complex process that firstly required the separation of the two images. Using the quick selection tool I was able to create two separate images that could both be edited separately. The female image was then concentrated on the most as I wanted to firstly a complex fade away affect upon her. https://www.youtube.com/watch?v=RnyEZtfteAY After trailing this out I had a change of plans during the process that I would instead create a ghost like effect upon her. Following the same video I used ‘Liquefy’ to adjust the duplicated image. This was then slowly rub out with the mist effect being created around the left side of her body. Both images were then made black and white and this was left as the inside cover. However another change of plans occurred with the bringing in of two shots seen within the music video (clouds & sea) and being mashed together with the colour of both being changed into a darker filter that brought more depth into the image. The levels and opacity were changed of all images to create the mysterious feel around it. The finally steps was adjusting the Hue & Saturation before a filter was applied to establish a artistic affect on the image.
- 5. Inside Left The image was taken form the music video, in which the camera is falling to the ground as the singer finally lets go of the past. This same feel is then carried across into the inside left. After the background was removed from the original image via the ‘Quick Selection’ tool, the image was rotated slightly before being duplicated three times. The opacity of one was lowered to 50% whilst the next was lowered around 25% to create the fade out affect of each camera from the bold front camera. The colour of each camera was then changed to red as it created connotation of this camera being filled with love and as it slowly falls that love it being drained out. The change in colour done via ‘Colour Overlay’ under layer style.
- 6. Disc 1/ Background The image was taken from the video, with the background being removed via the quick selection tool before being refined to create a smooth edge. Once this was completed the hand was then selected individual and using the black and option is was turned ‘grayscale’ creating the lifeless feel about it. The camera was left in colour allowing for the silver glow establishing the interpretation that it is the only thing that has life left in it (i.e. the memories portrayed within the music video). The next step was creating the artistic pattern seen upon the hand, this was done via the oil paint option found within ‘filter’ it automatically created the oil paint effect but I decided upon putting the ‘shine’ tab up to 100 to make it stand out further. The reasoning behind this effect was to give it more authenticity and make it much more interesting to the viewers eye rather than it just being a plain hand. The background behind the disc is the exact same image however via the magic wan tool erased the camera from the image, referencing what was seen within the video of the camera being let go. Finally to create a deeper message within the image the use of ‘hue & saturation’ was used to give colour to the lower part of the hand . The layer was duplicated within the colour added and then the eraser tool was used to make the fade affect on the hand to look as though life is coming back into the person.
- 7. Disc 2/ Background Similarly to disc 1, disc 2 continues to pattern of an artistic portrayal surrounding the image as the filter ‘Oil paint’ was used again however in a different style. The lighting effect ‘shine’ that was applied to the previous image was removed from this image. This therefore removed the unique pattern applied on the last image but instead a smooth, swirling style is inferred by the look of the image. Also the male figure was removed in the background by the use of the tool ‘Clone Stamp’ which enabled me to remove the figure whilst also making it look in sync with the rest of the image.
- 8. Magazine Advertisement The magazine advertisement for my artist was very simple in terms of applying a main image as it was taken from the digipak, being the image I felt would be the most gripping and eye catching for a viewing audience. The only miner difference with the image is the removal of the album title into the main bulk of information clearly seen below. The text that is seen below was mostly completed via the ‘Text’ tool with only the band name/album title being taken from a separate source (dafont.com). The star ratings were researched and are genuine ratings for the album itself whilst the quotes typed underneath are also taken from the article that was published with the rating. Finally using google images the images of the social media/music software logos were taken to give the advertisement a more professional look.