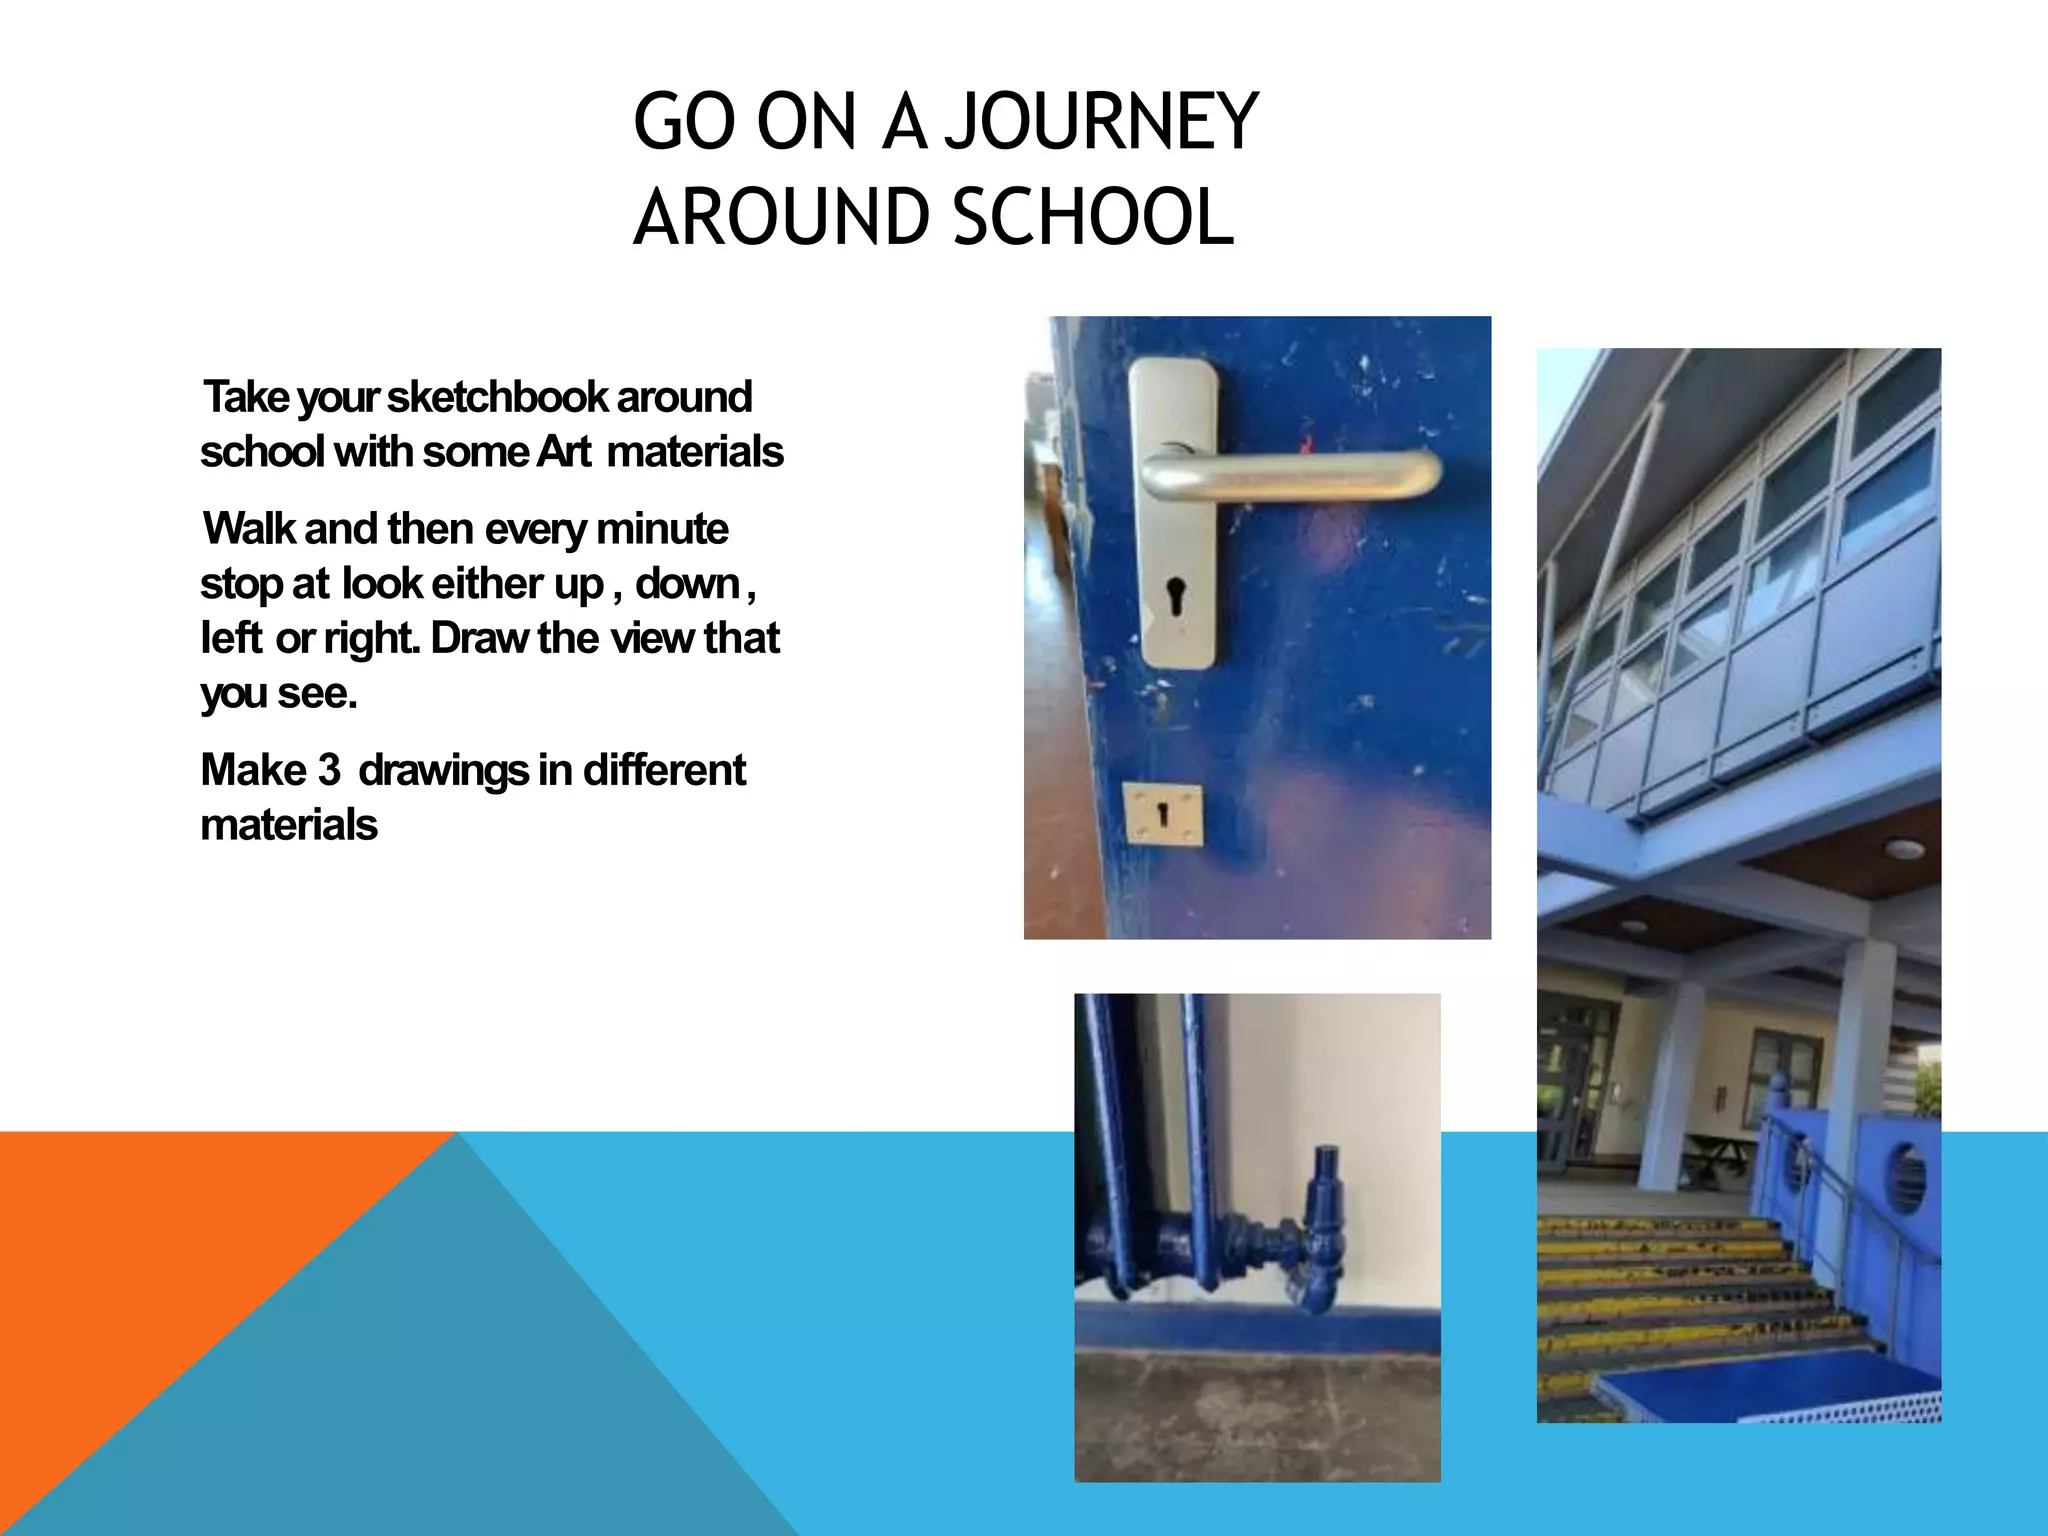
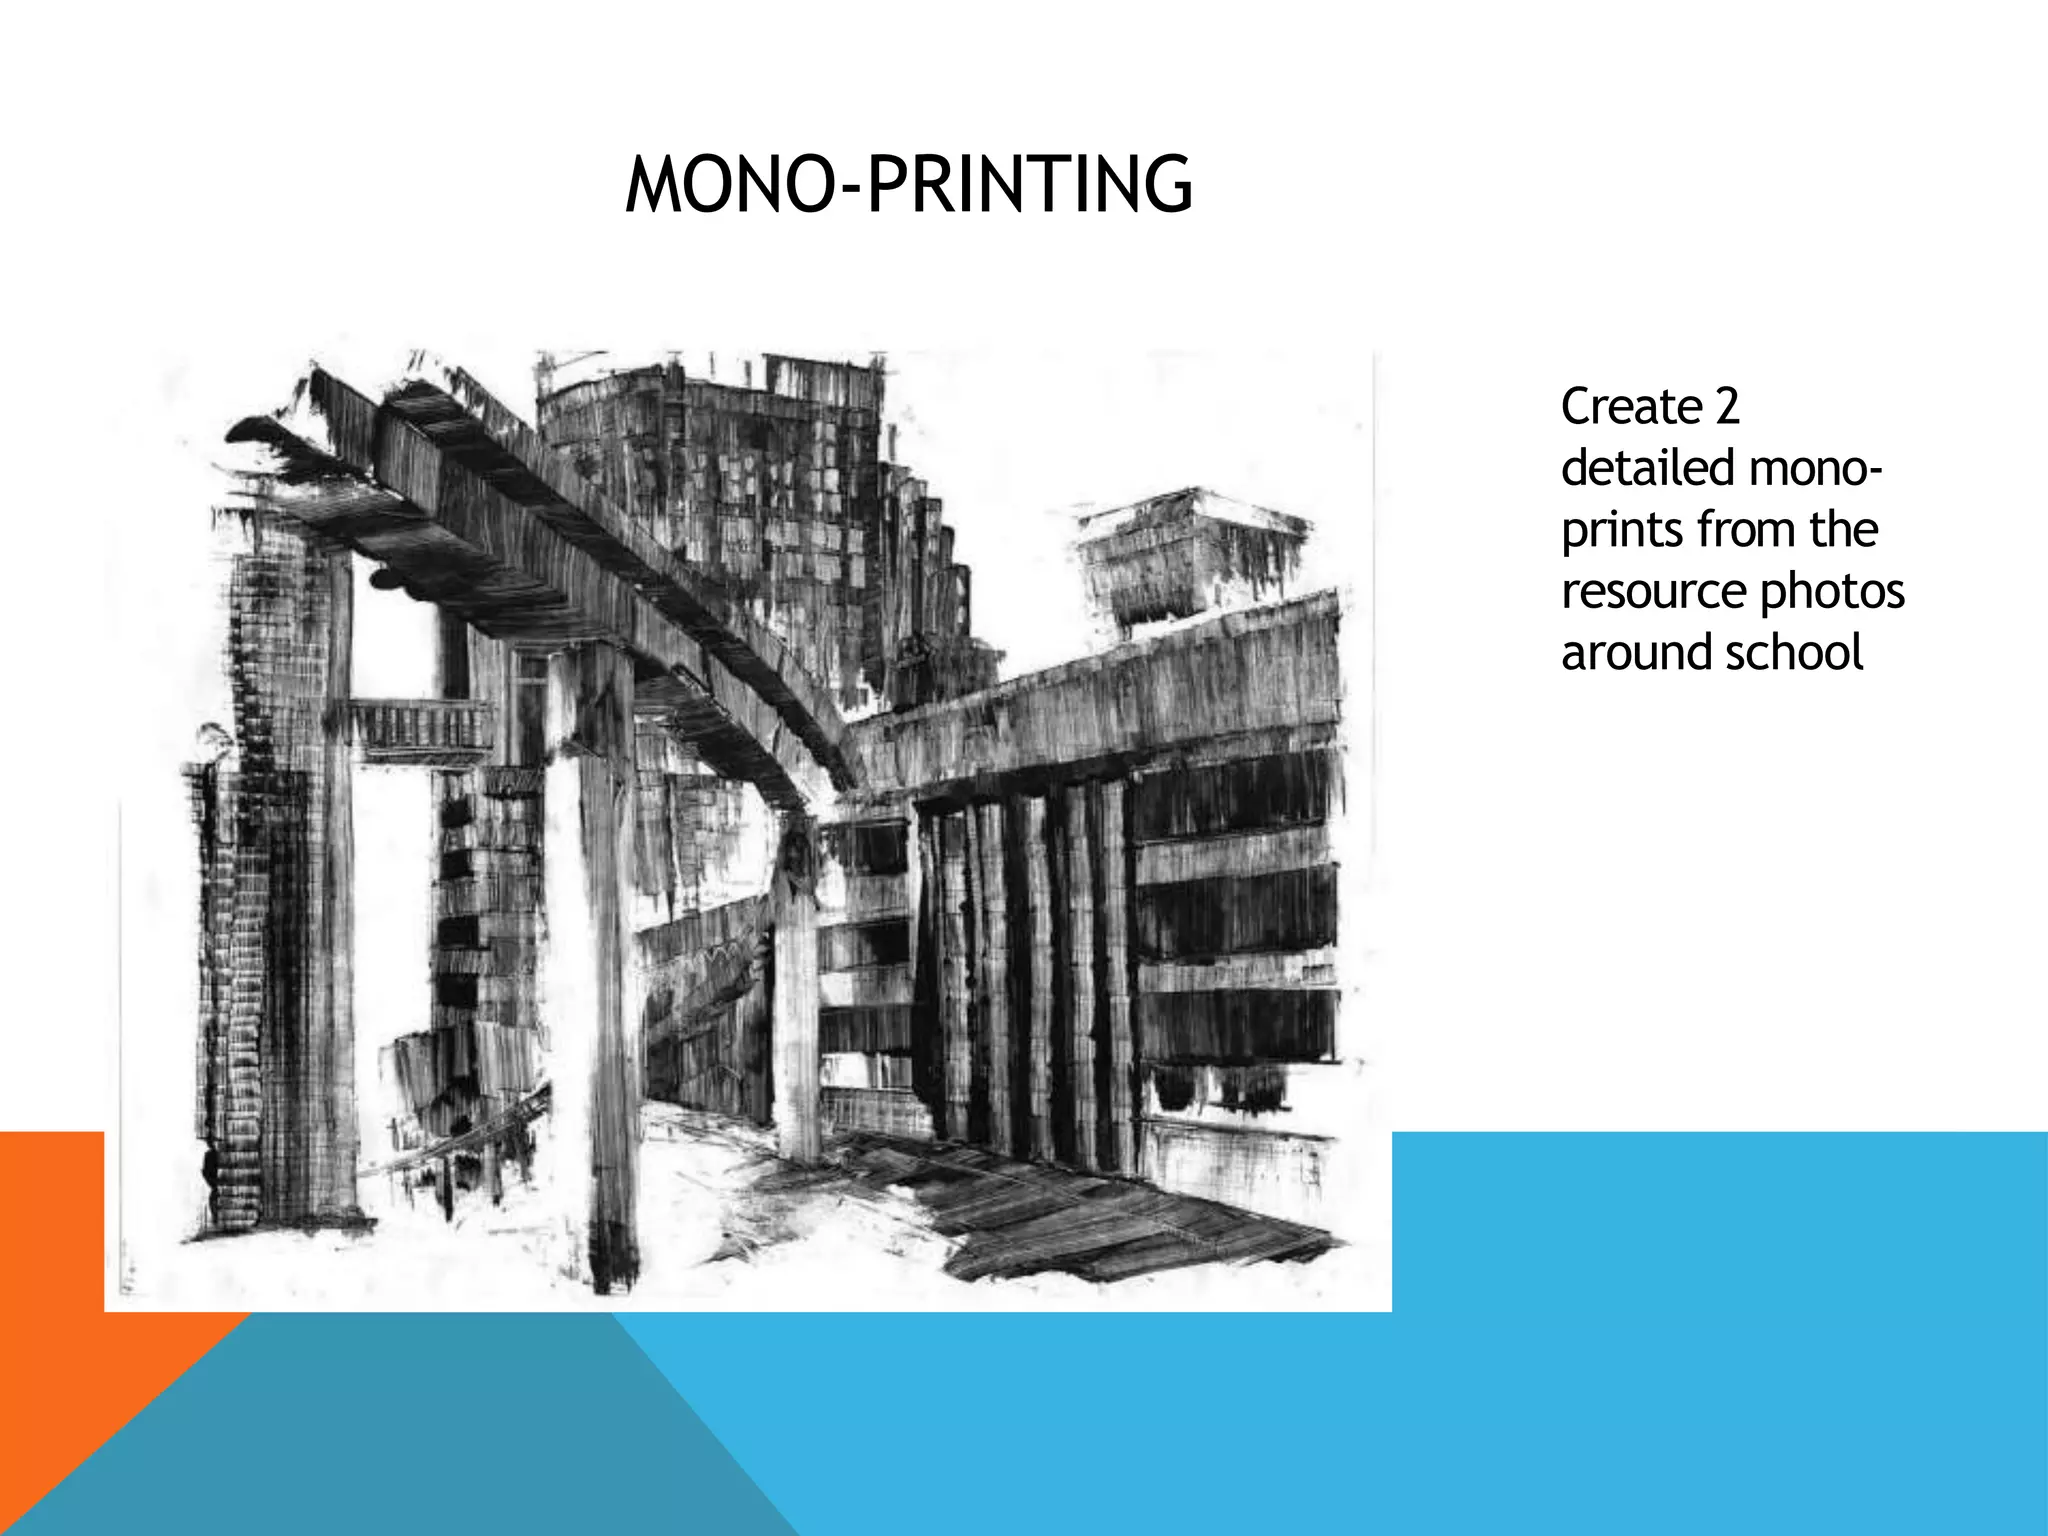
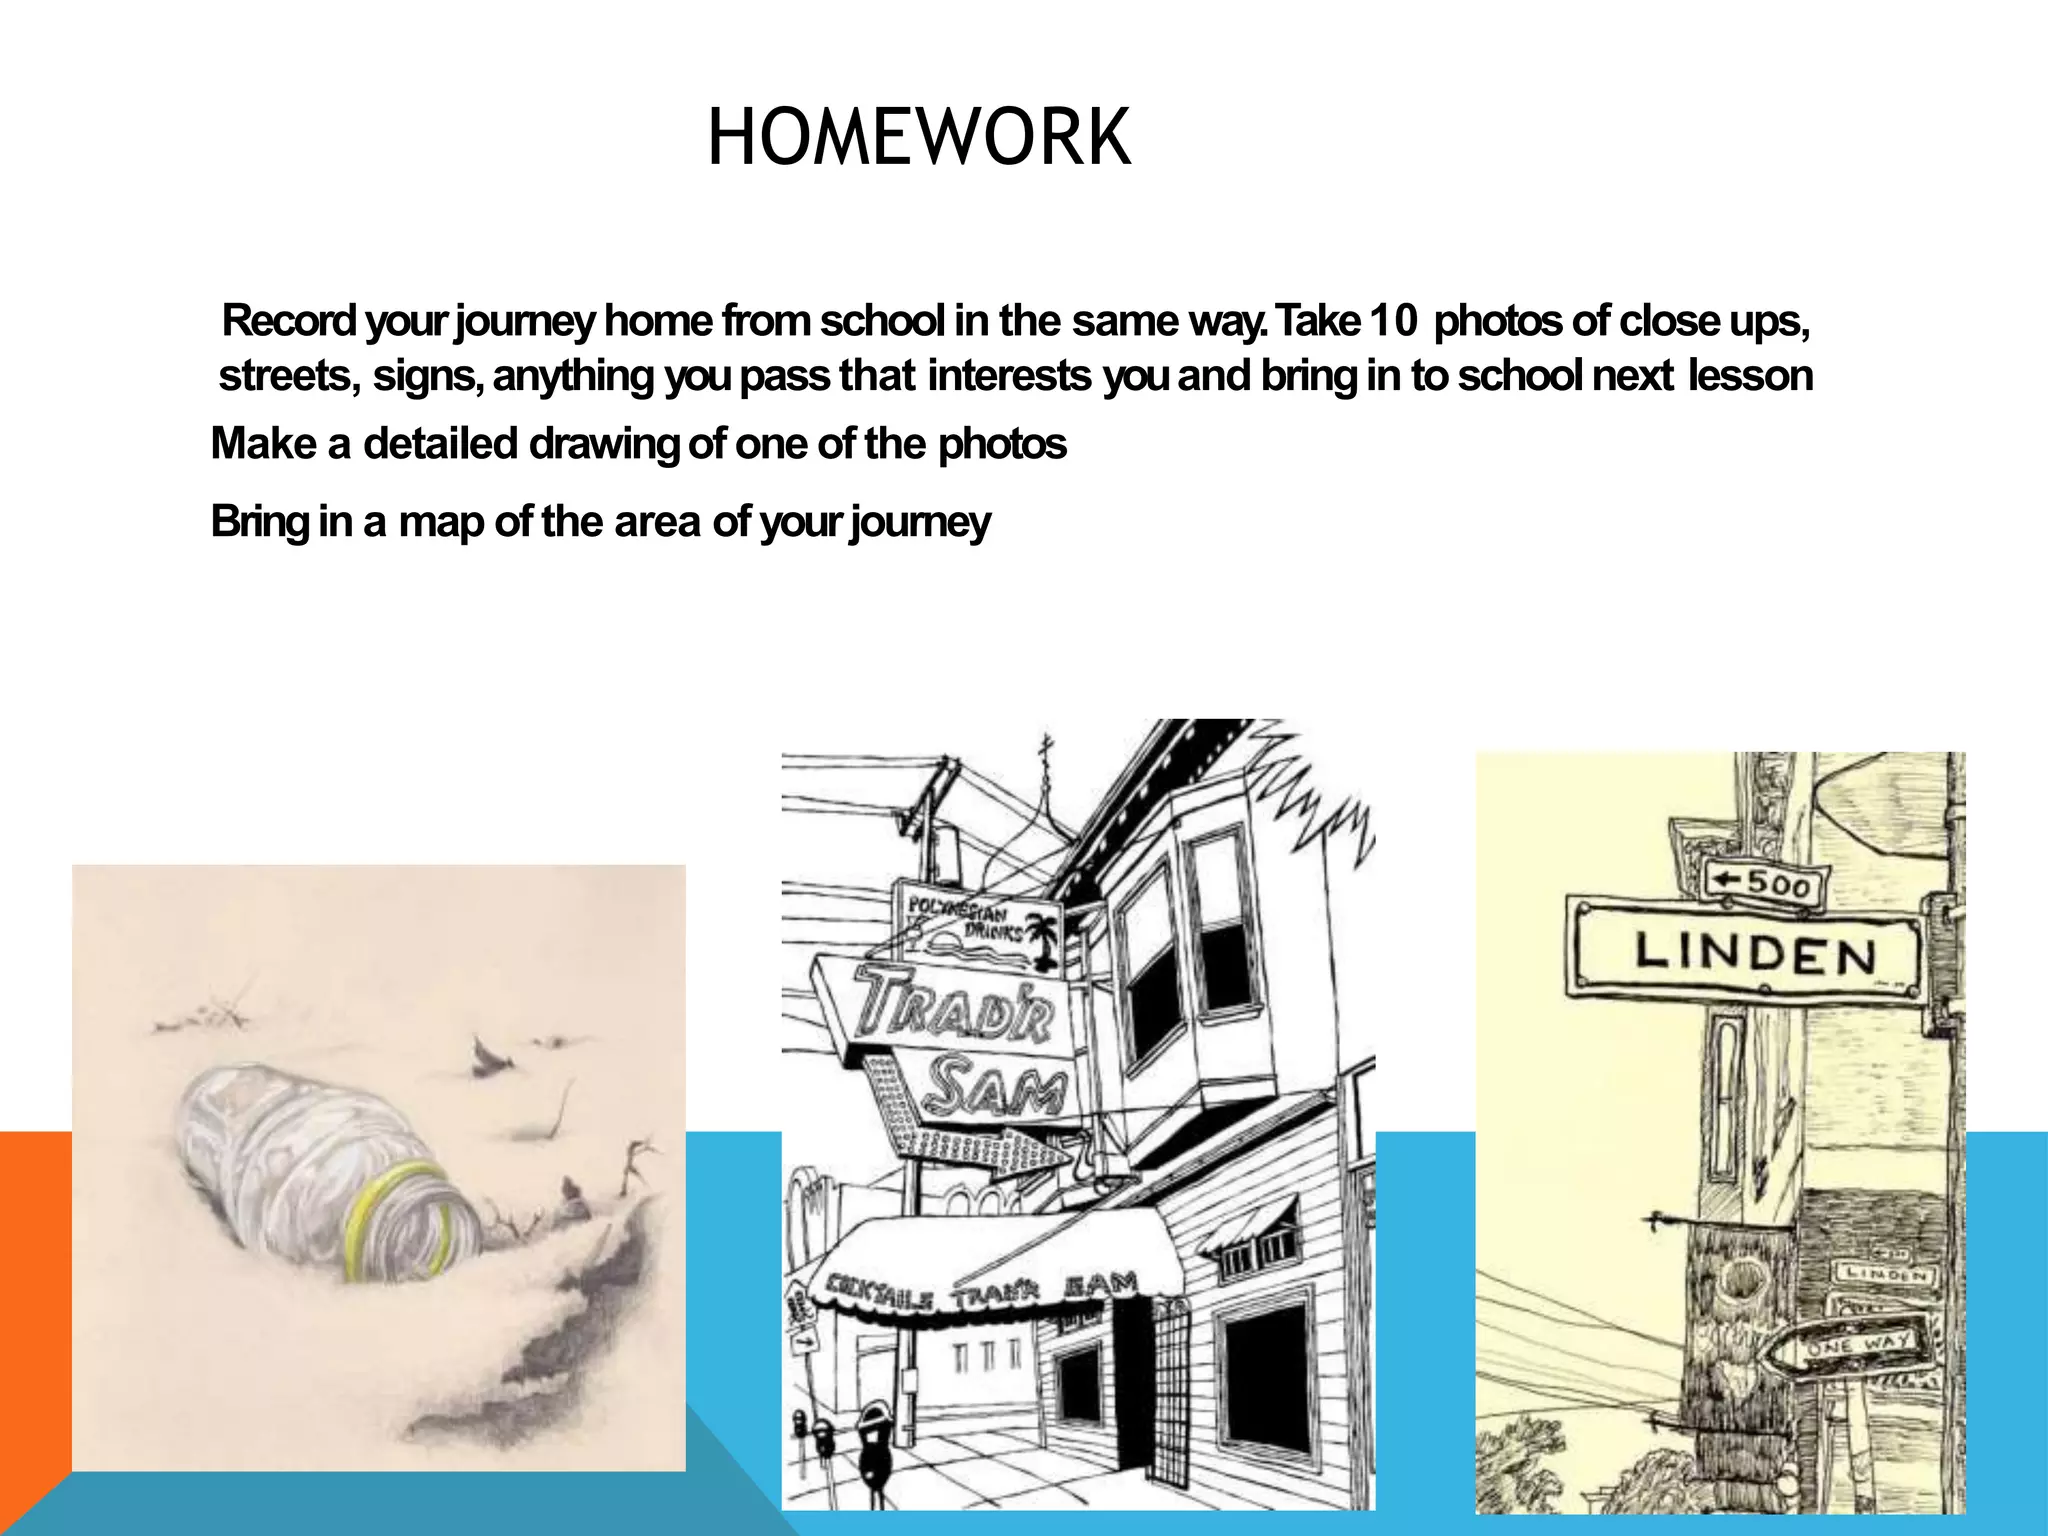
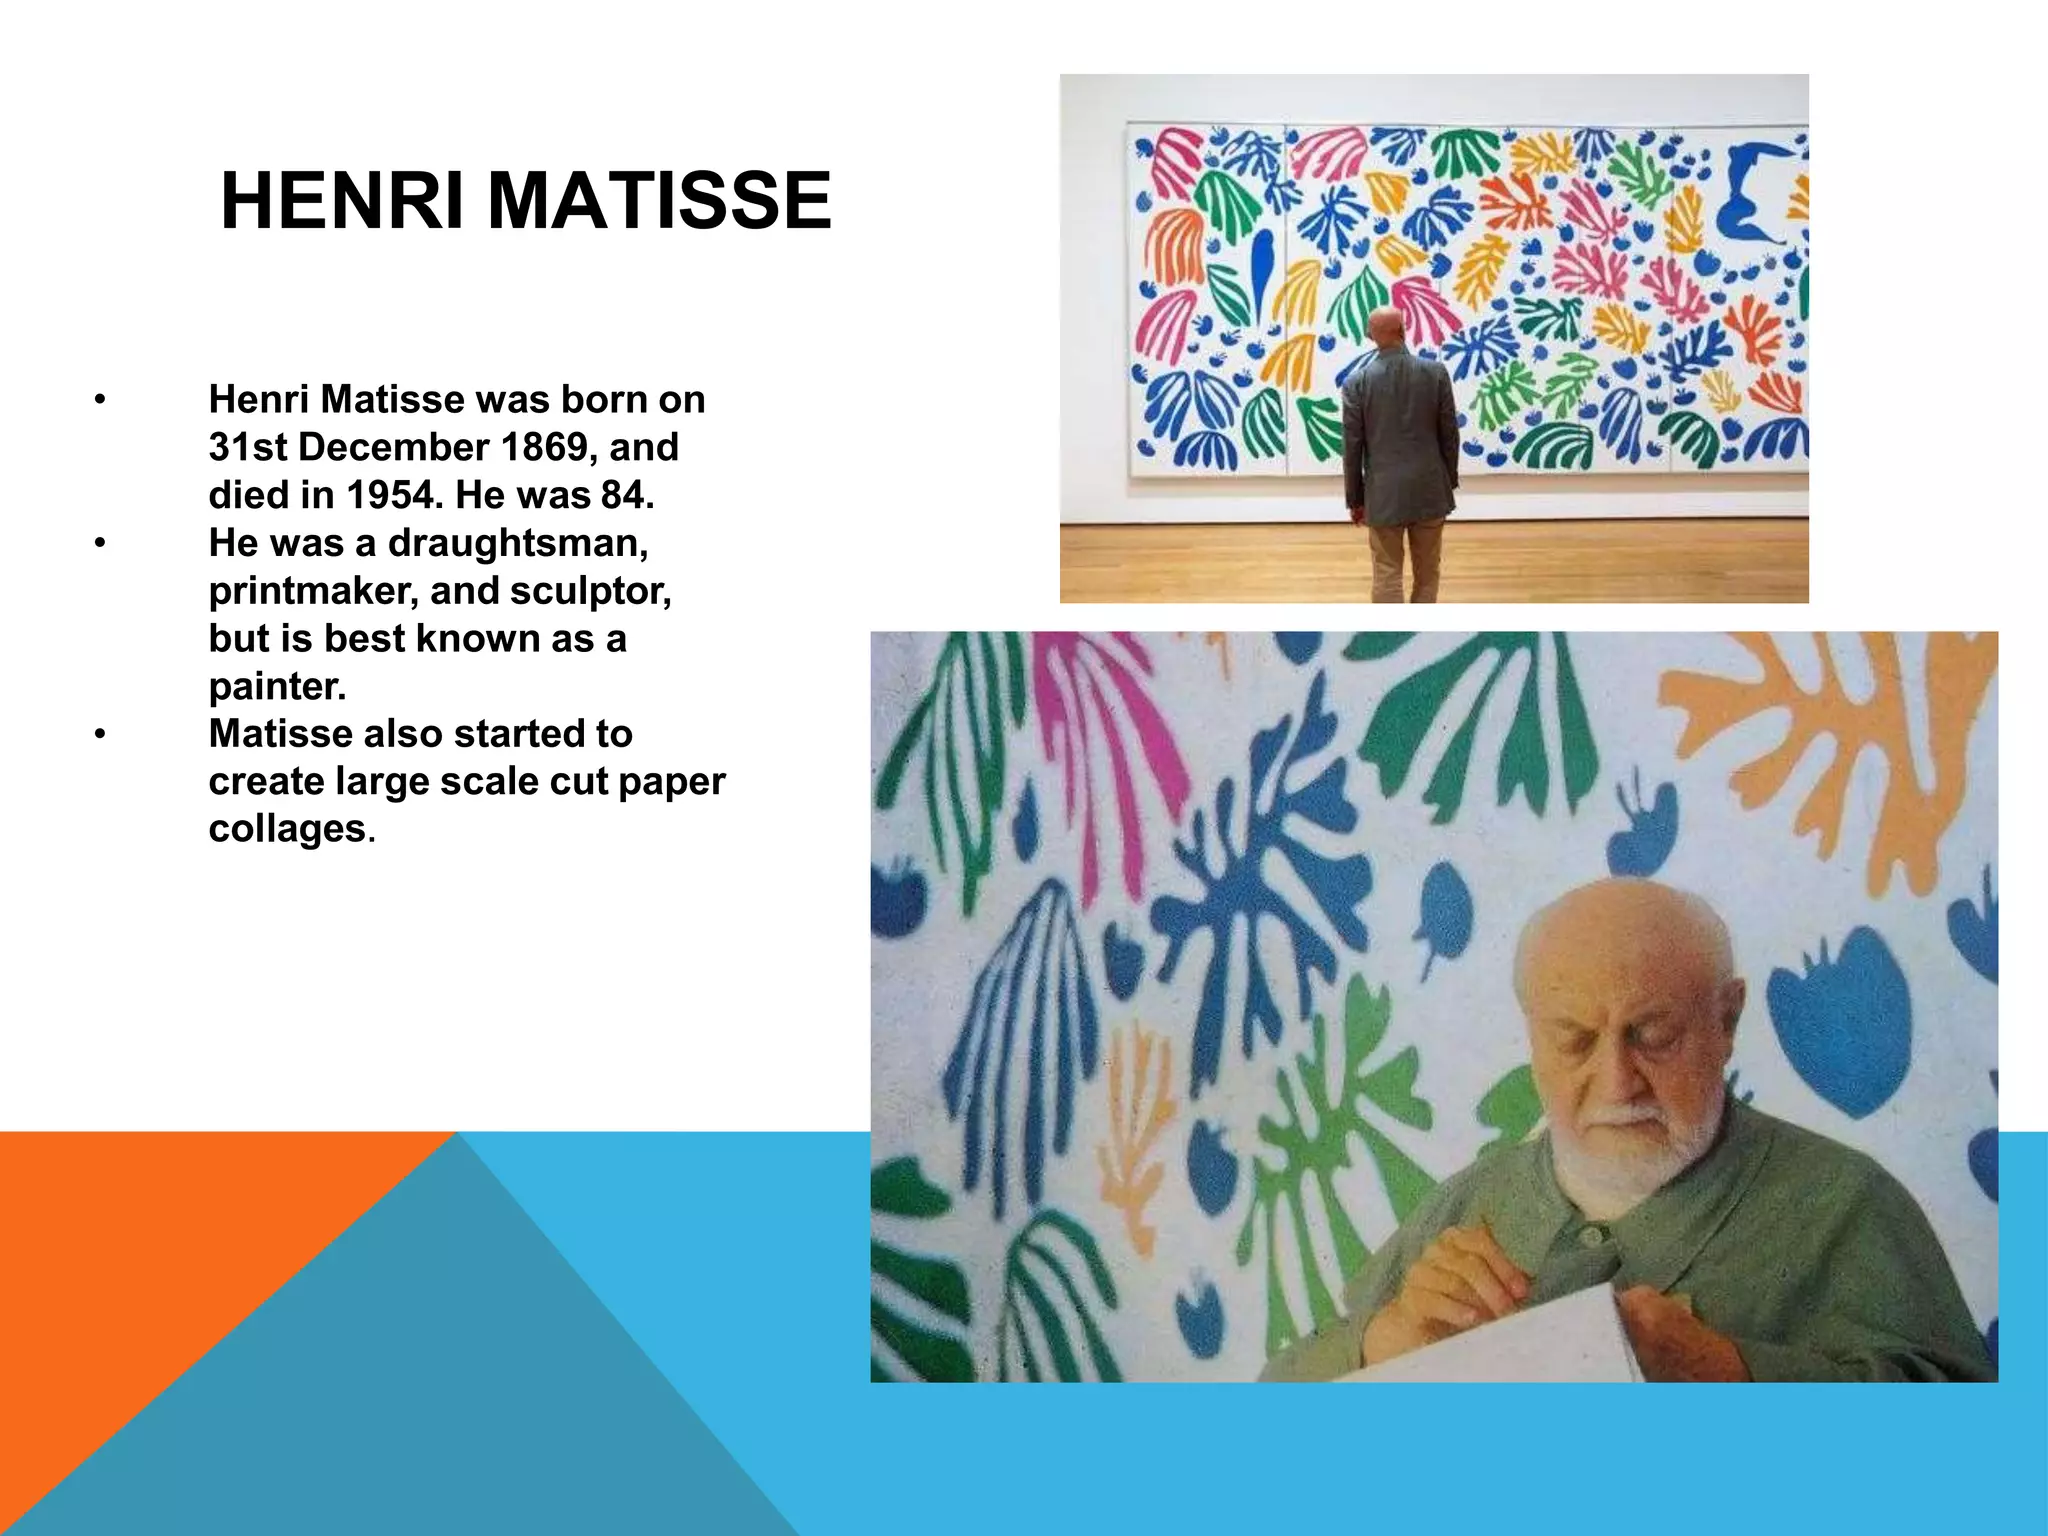
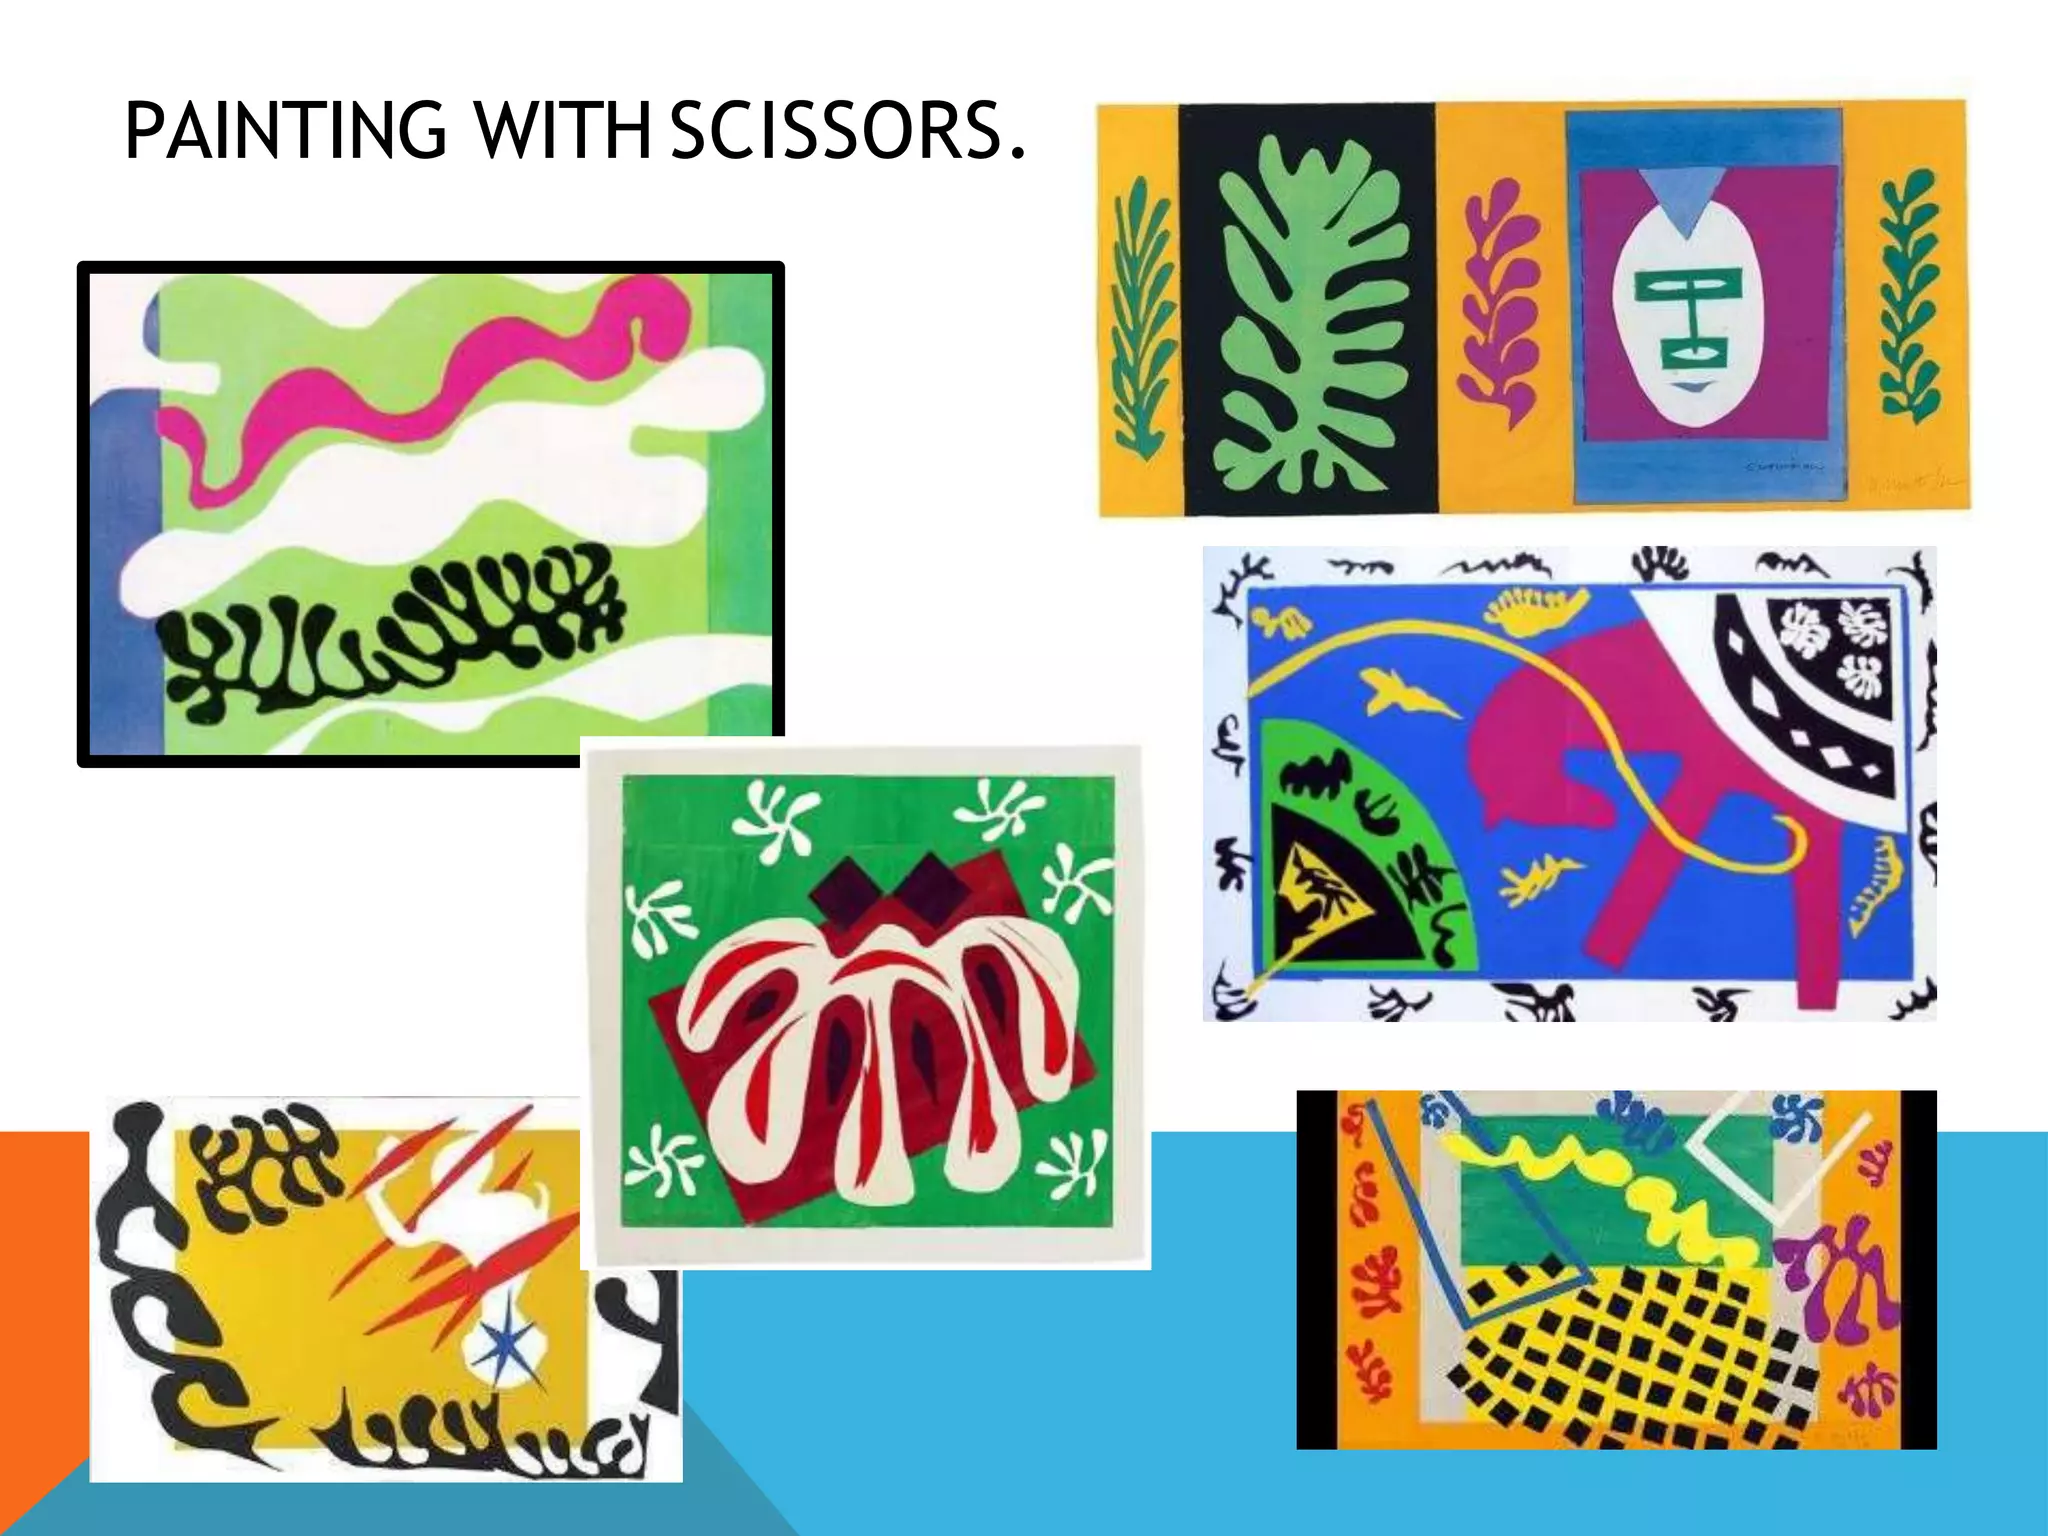
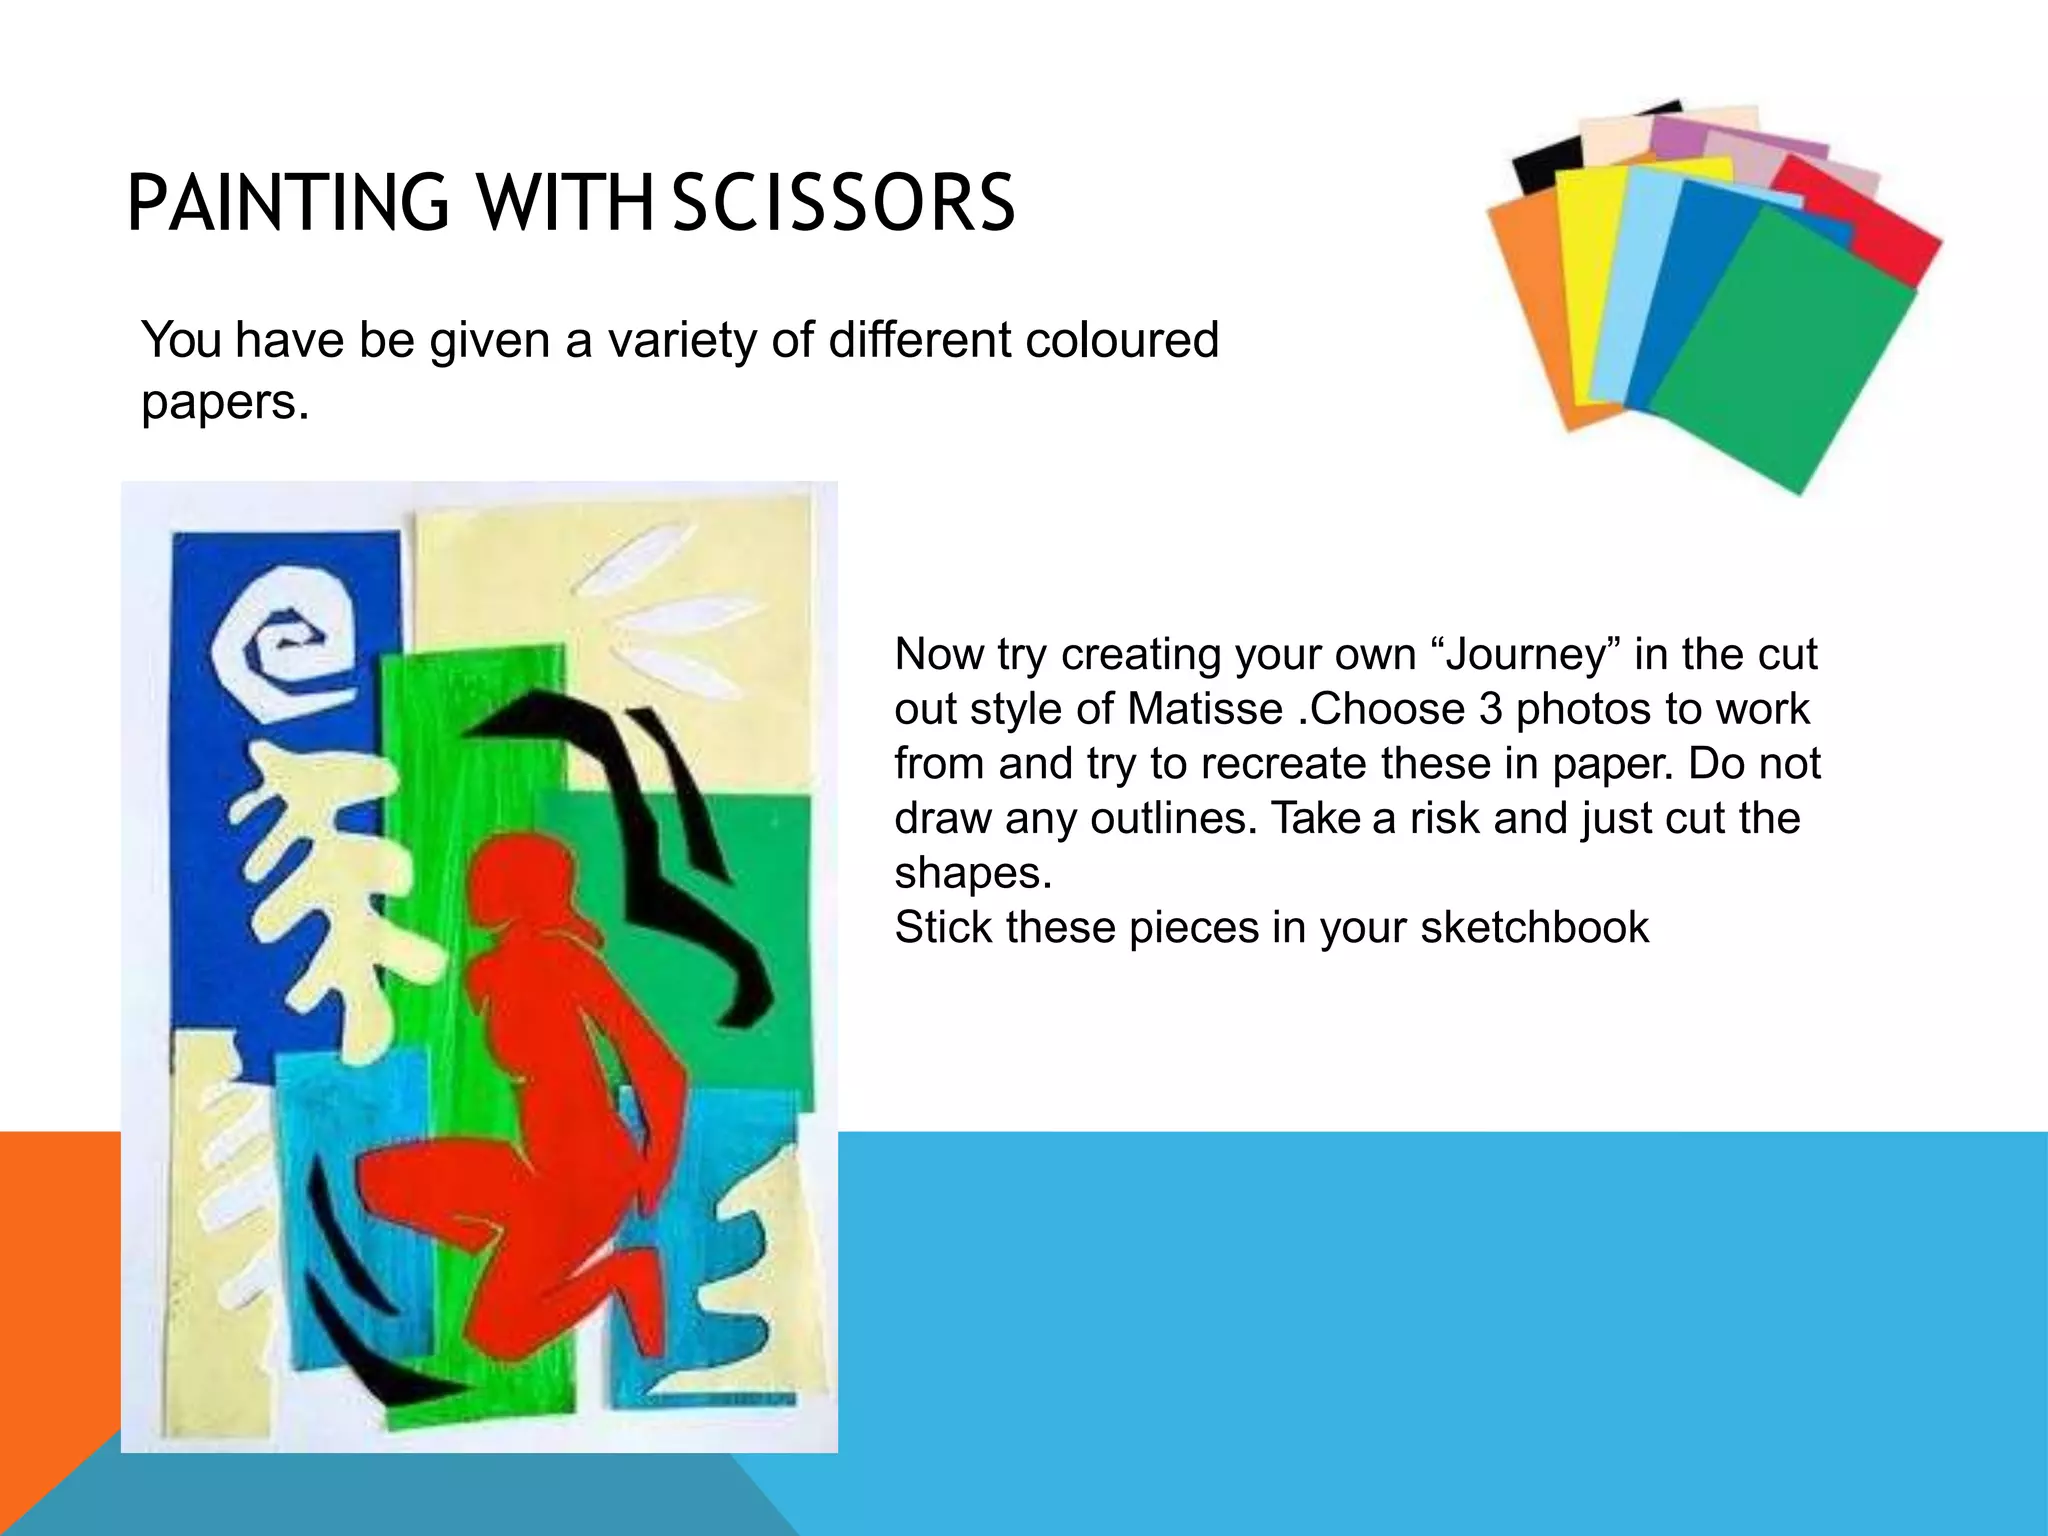
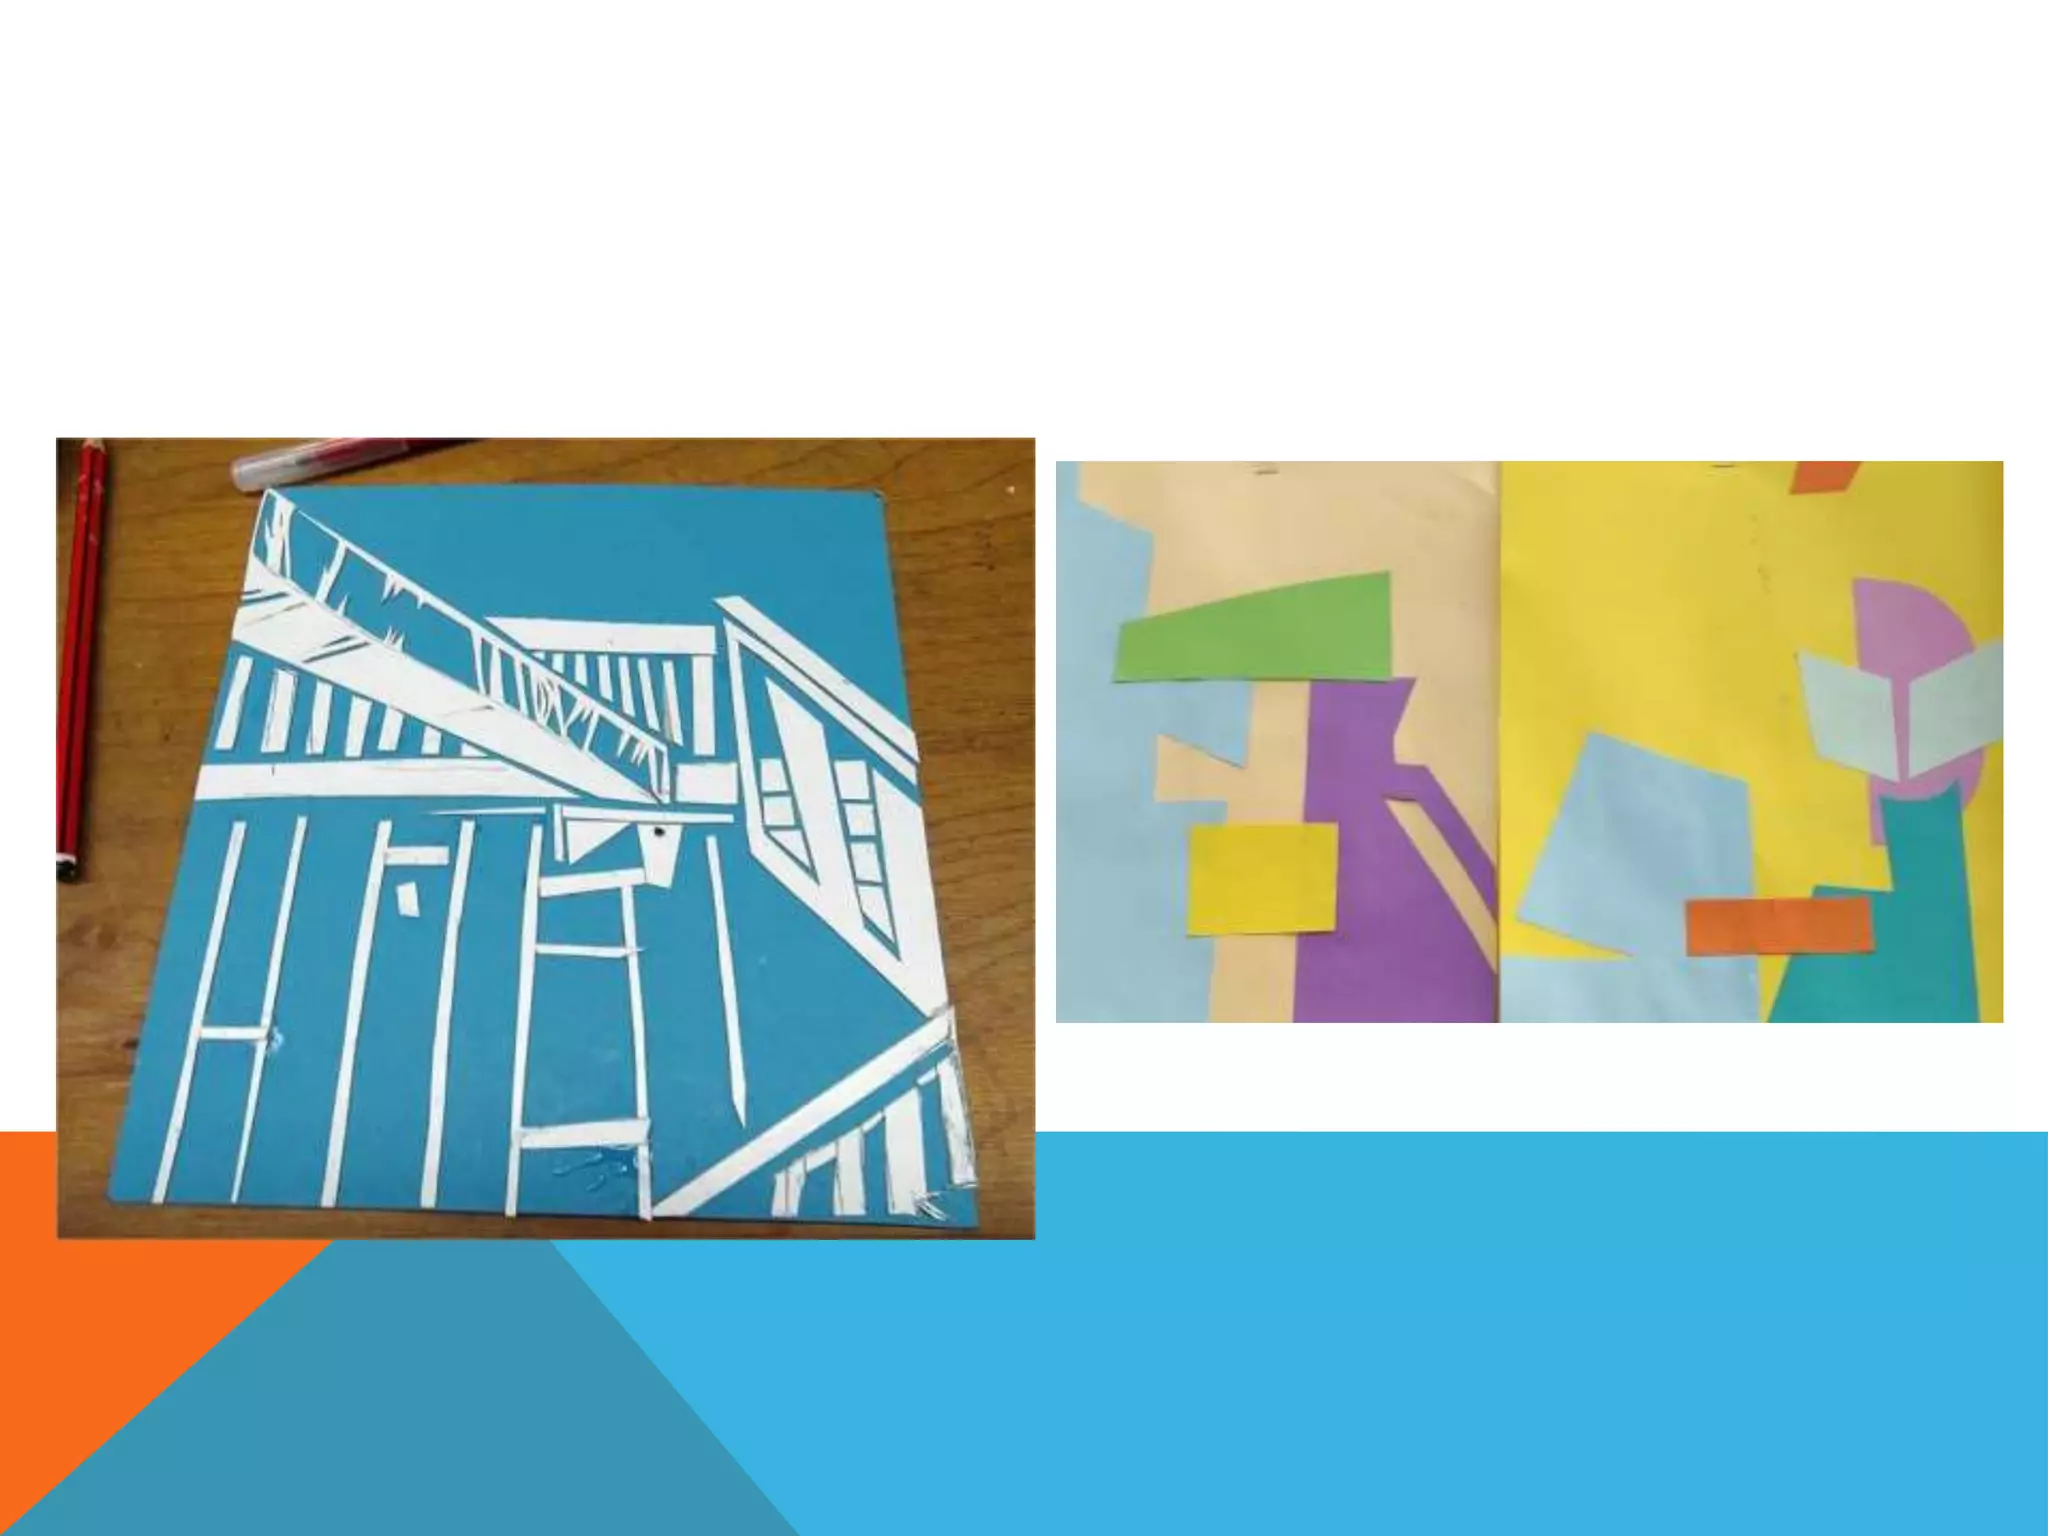
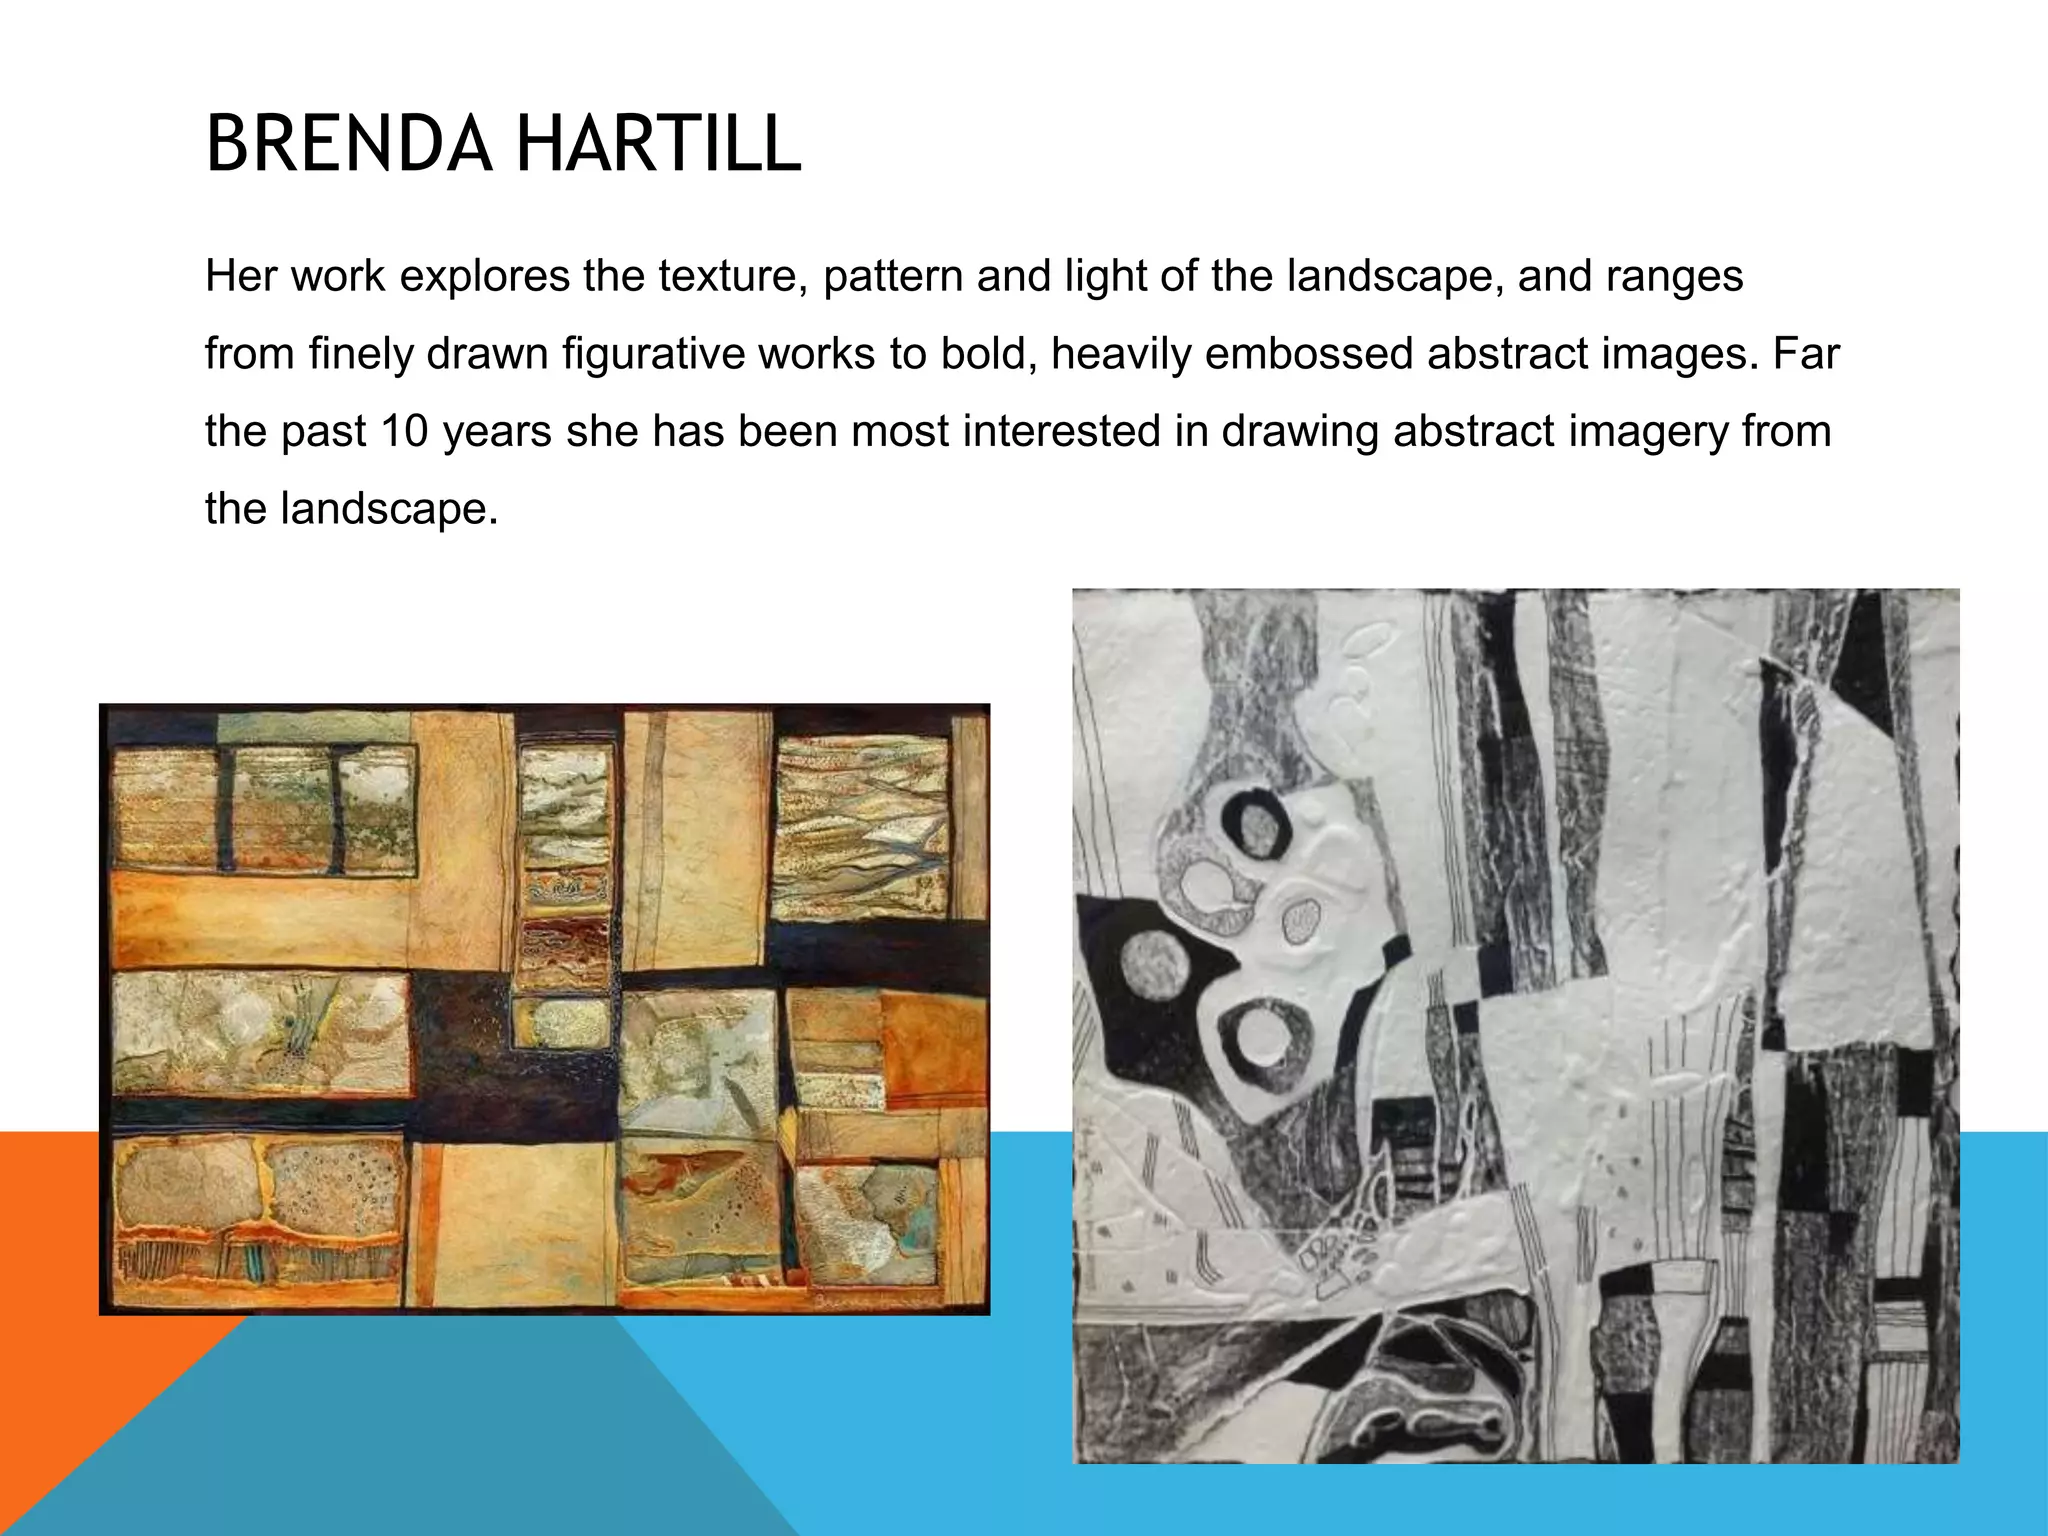
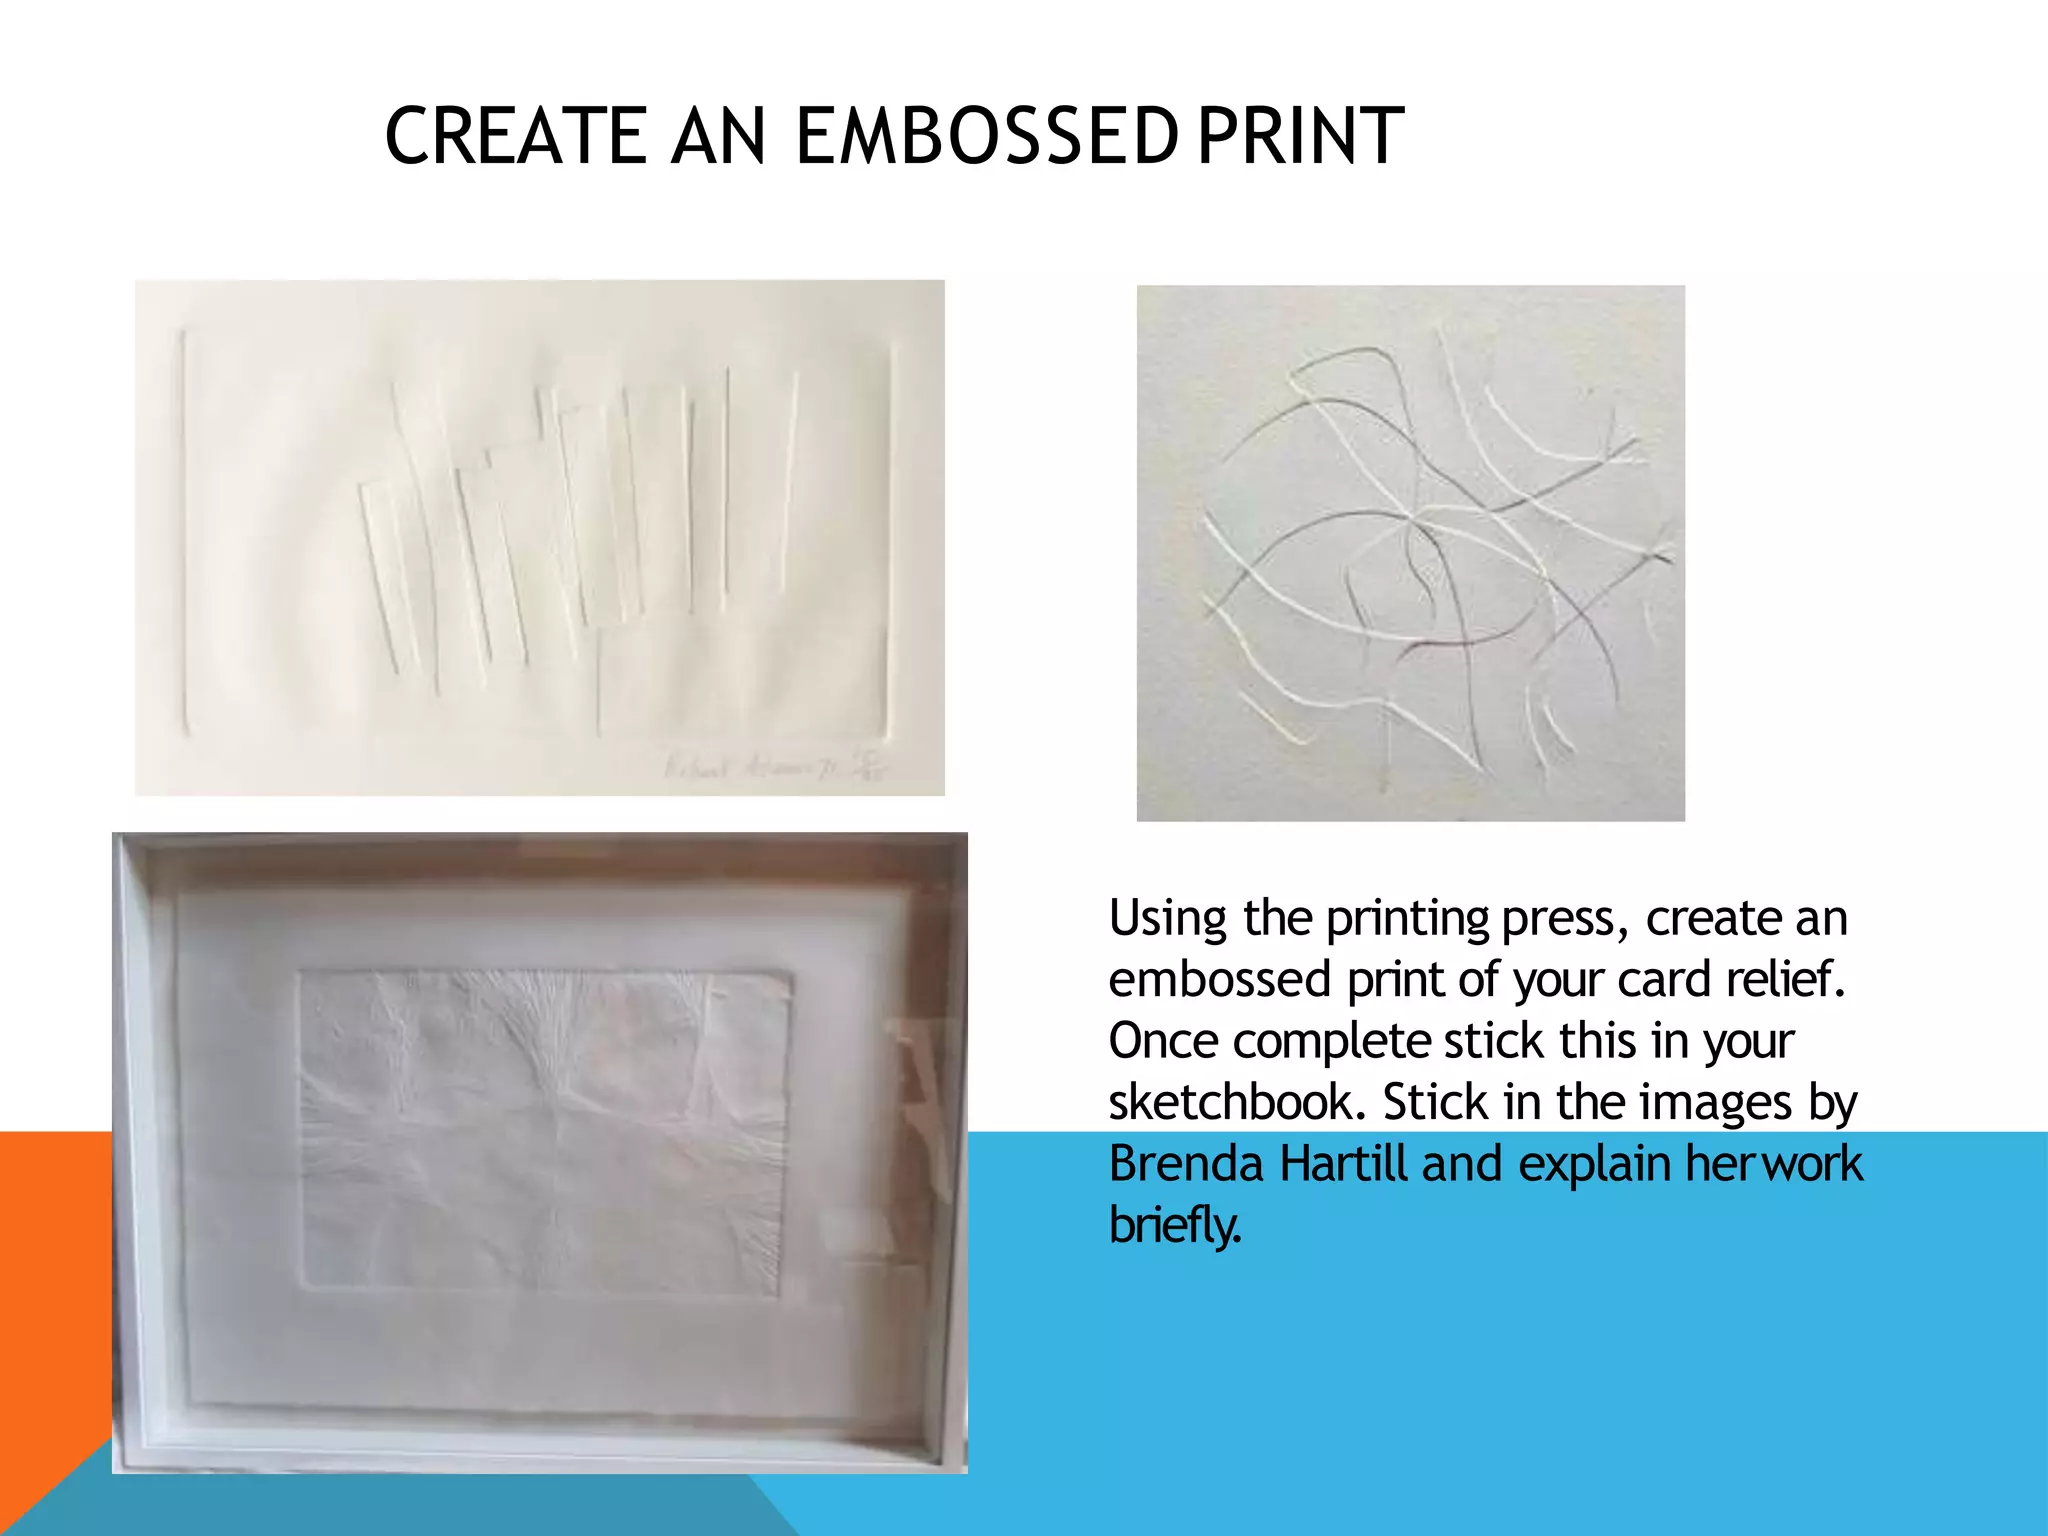
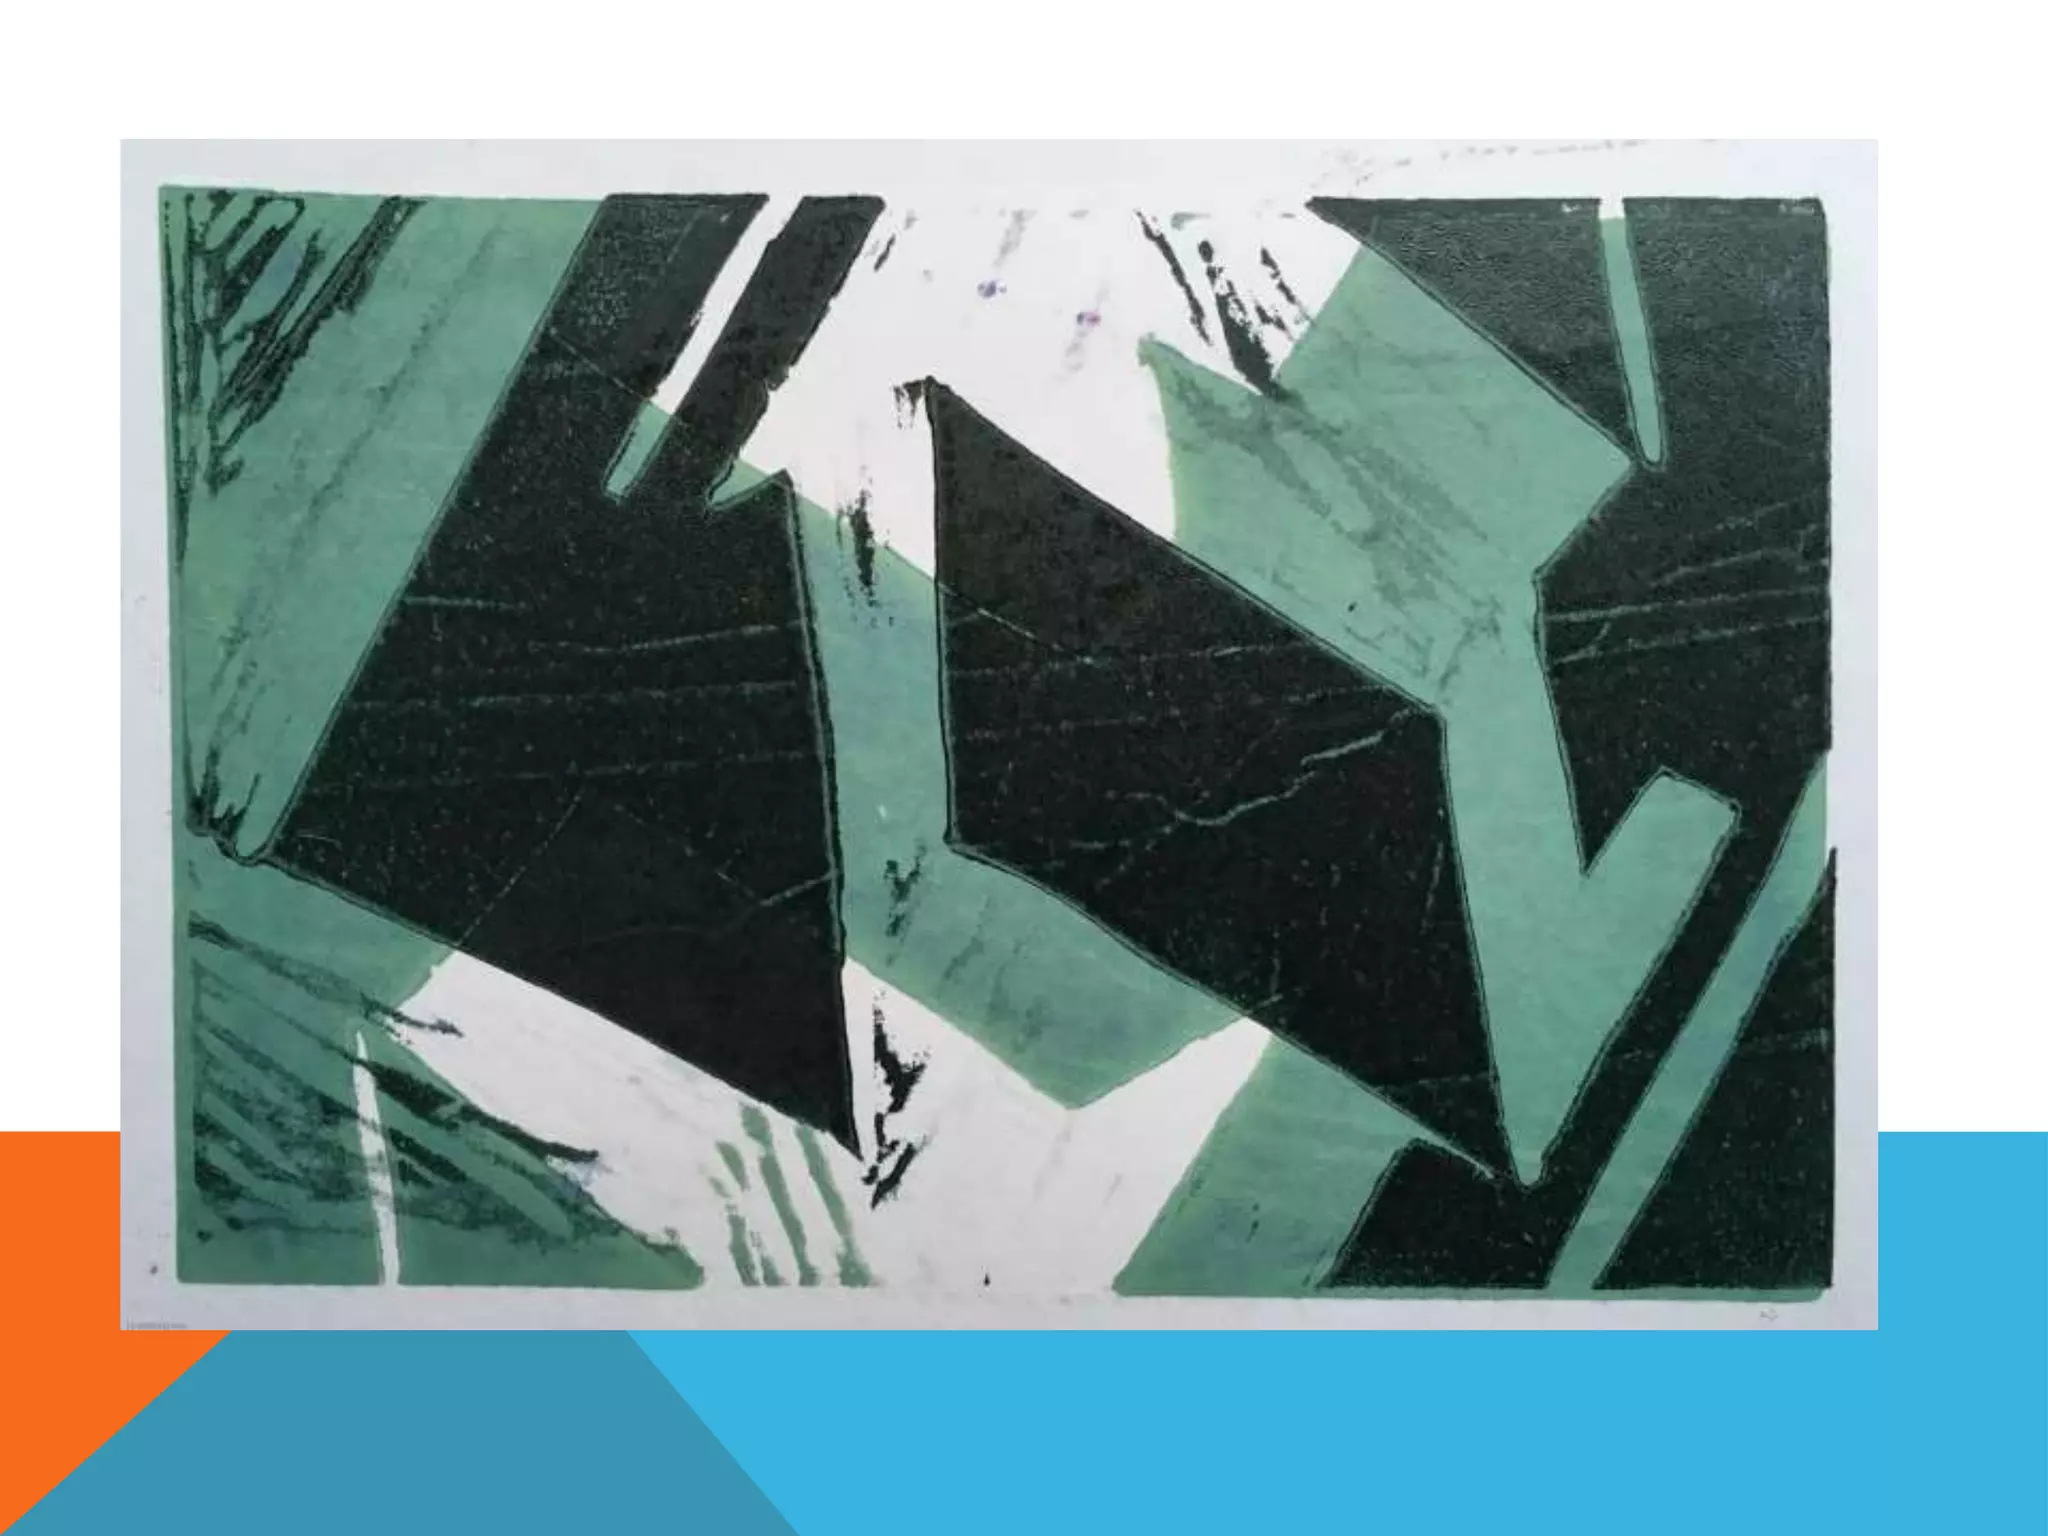
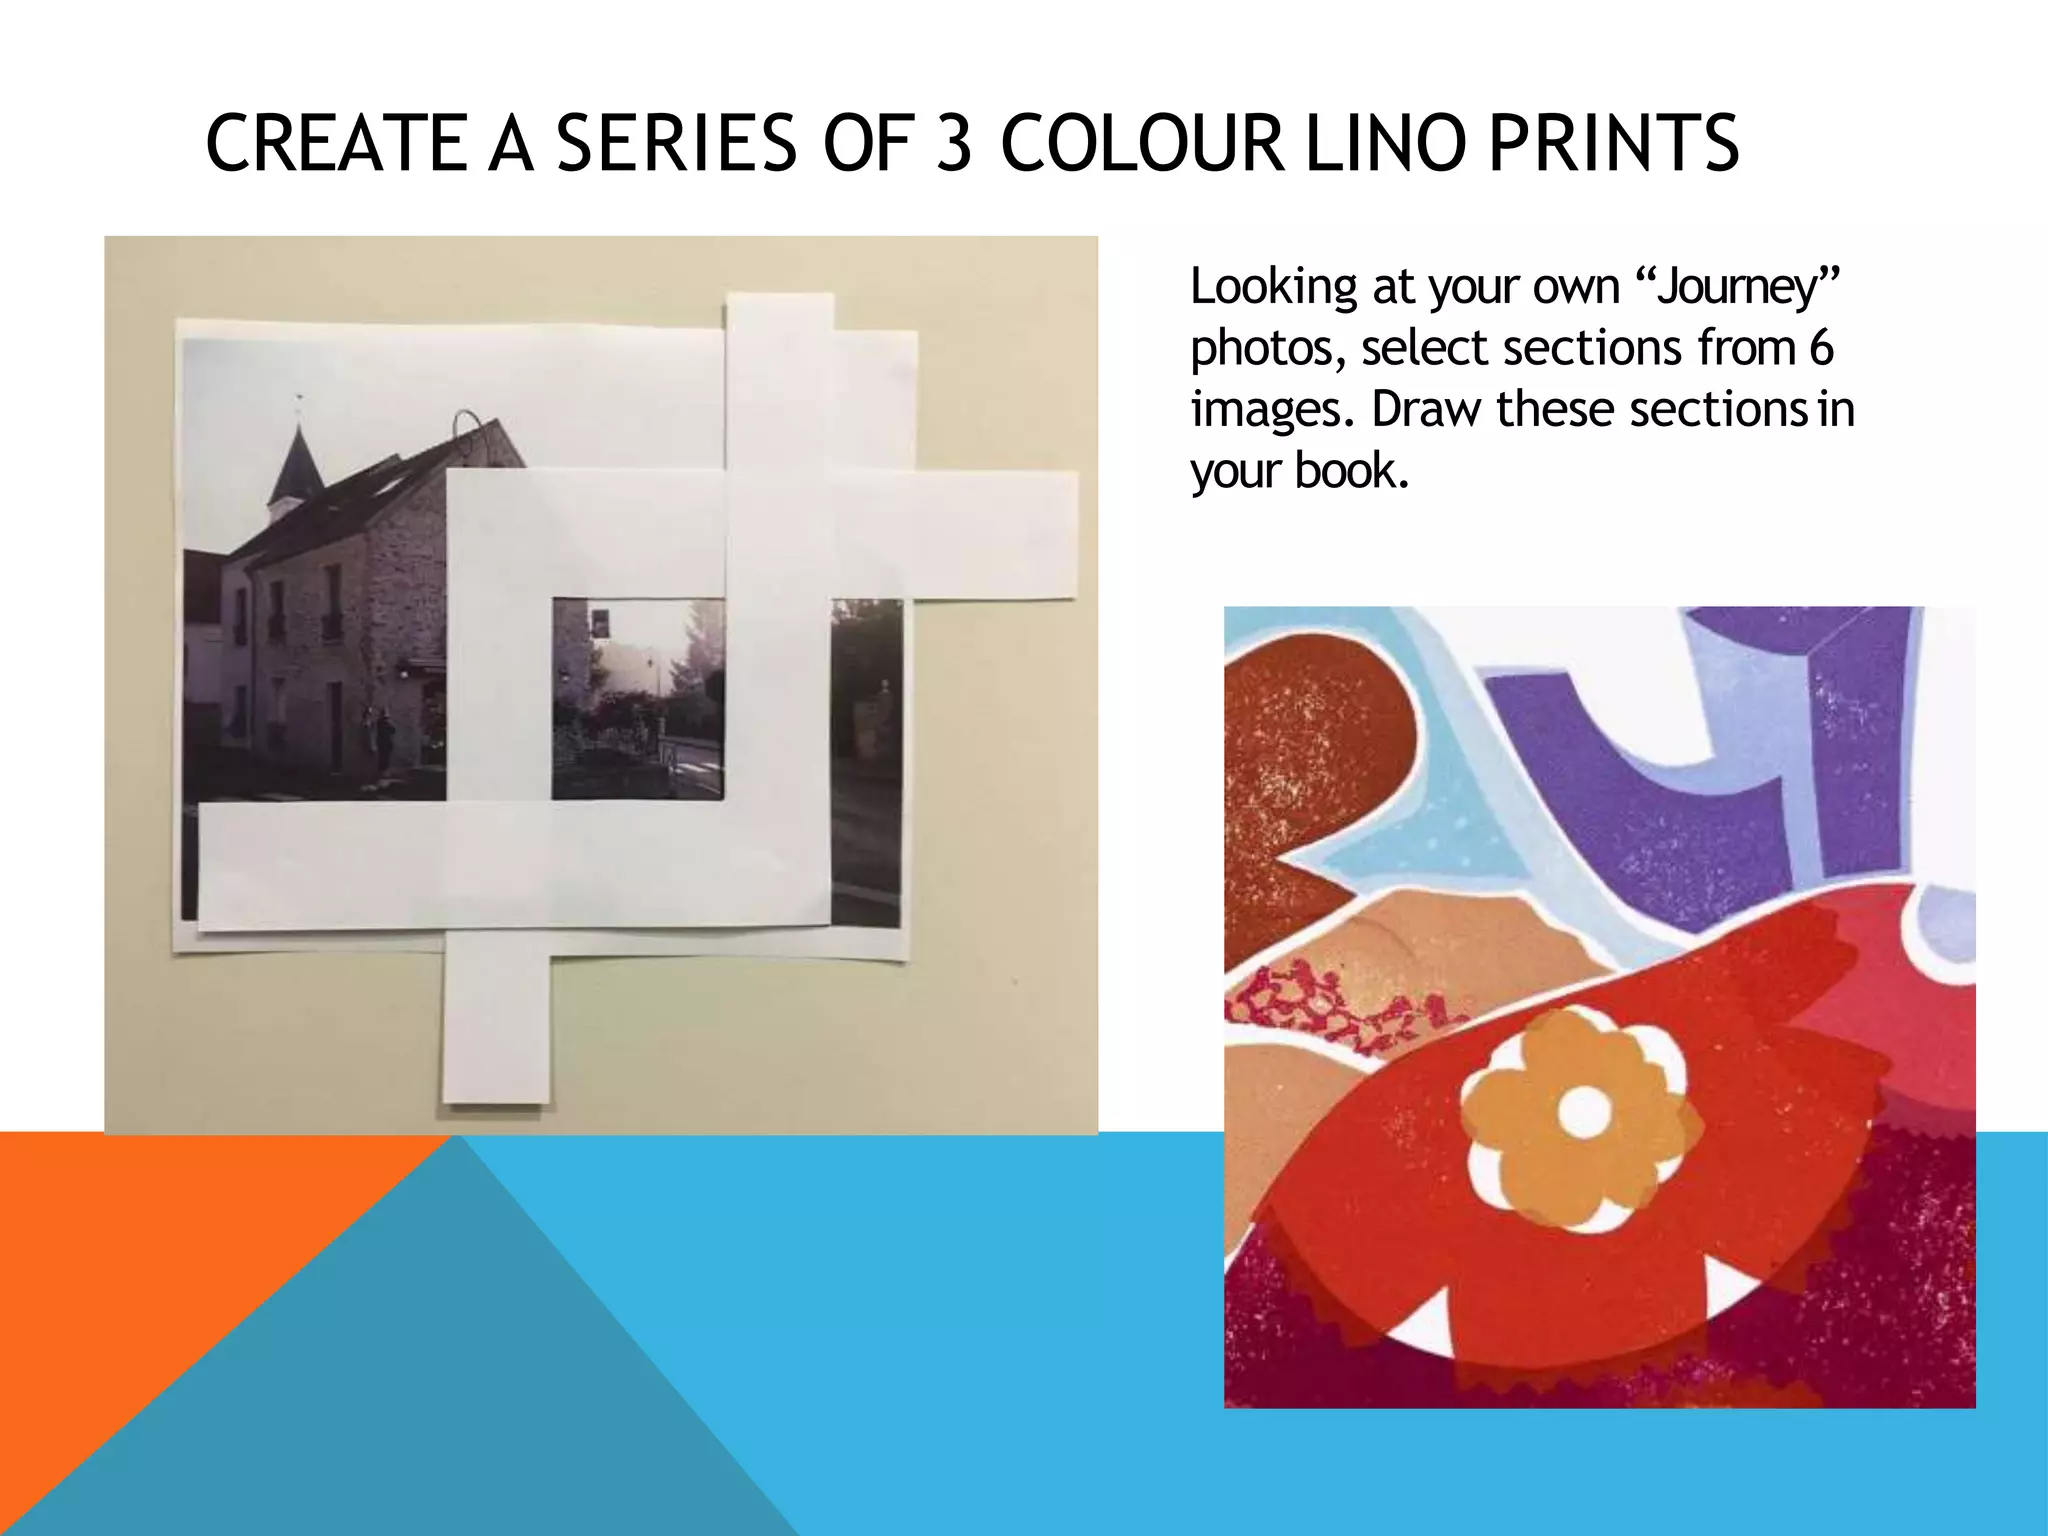
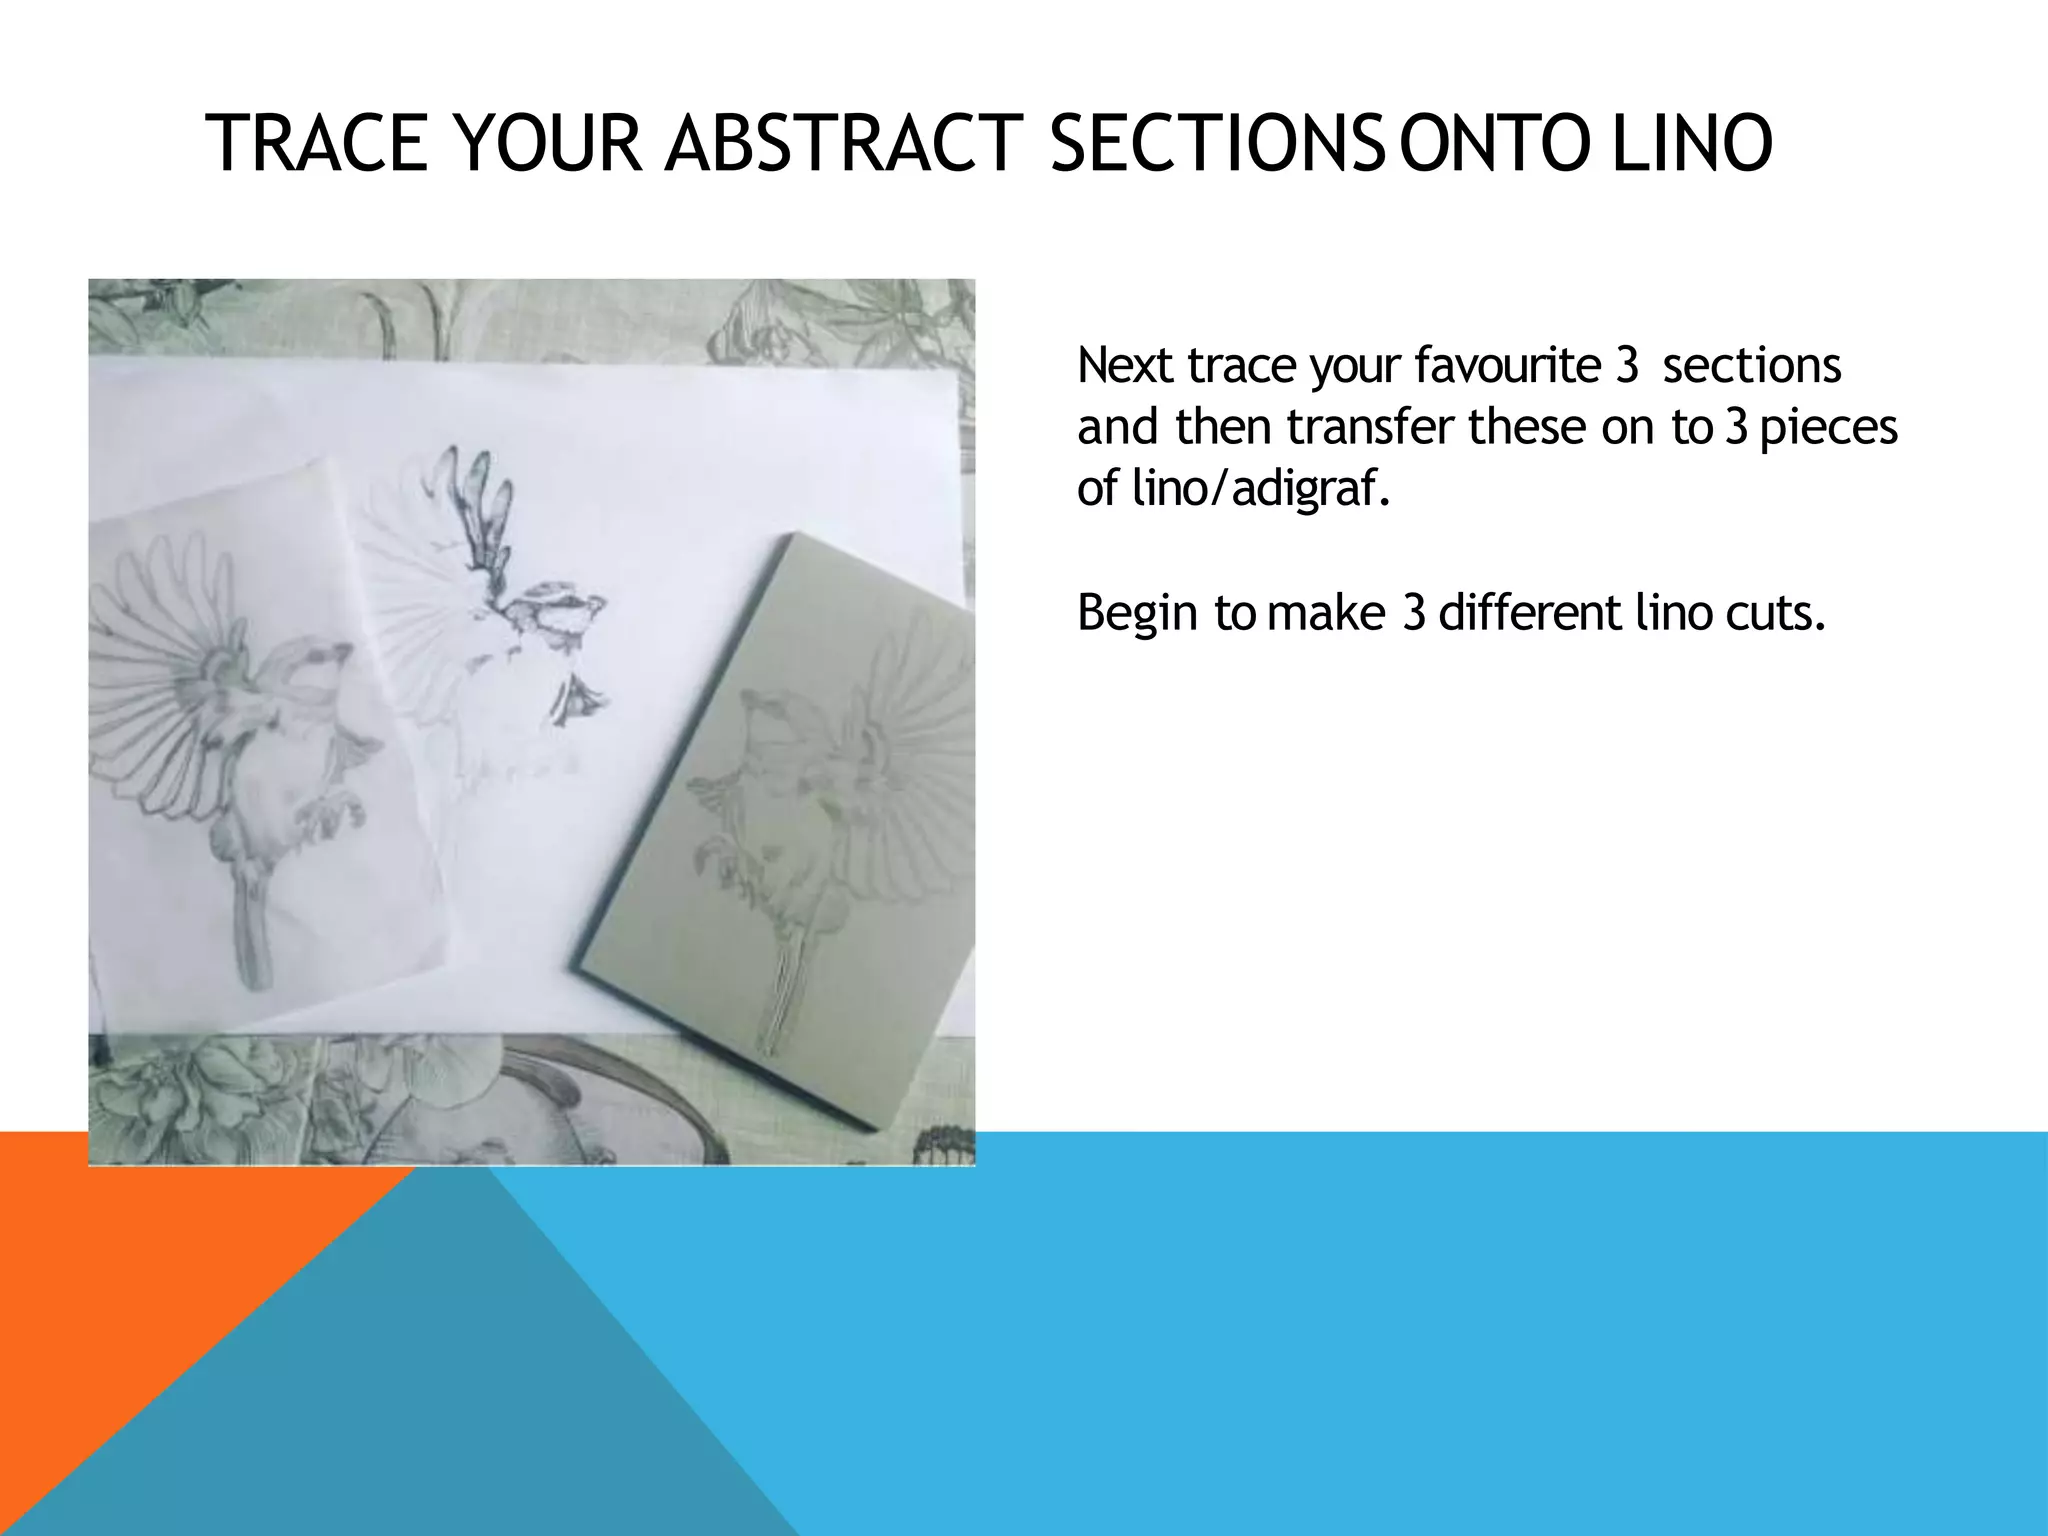
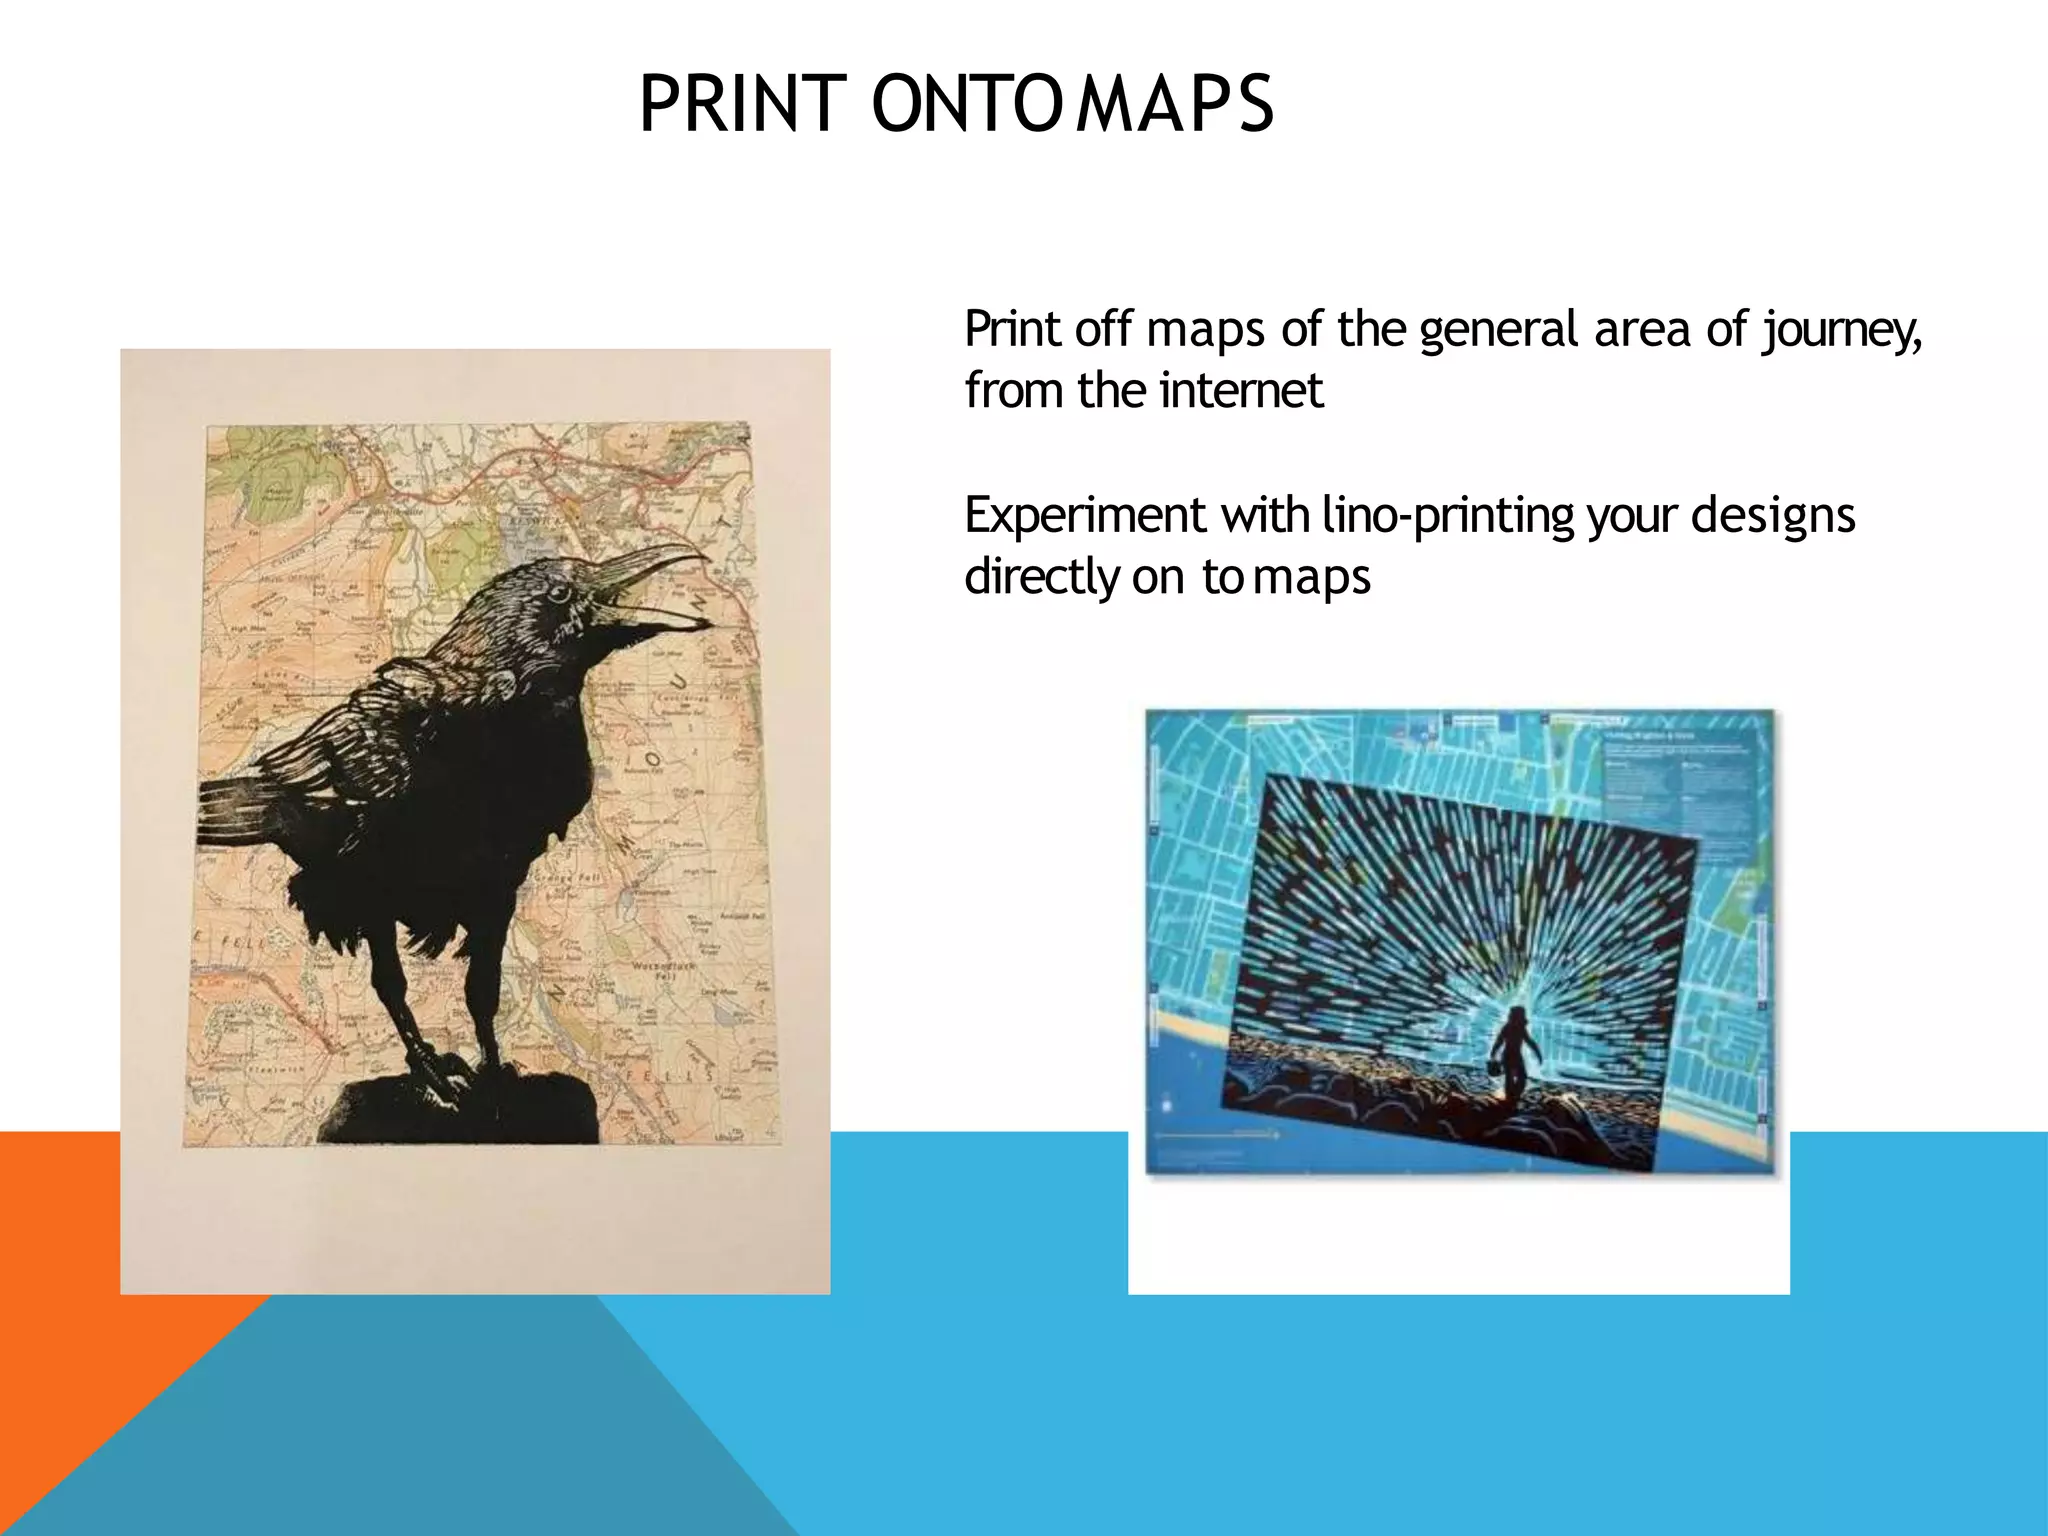
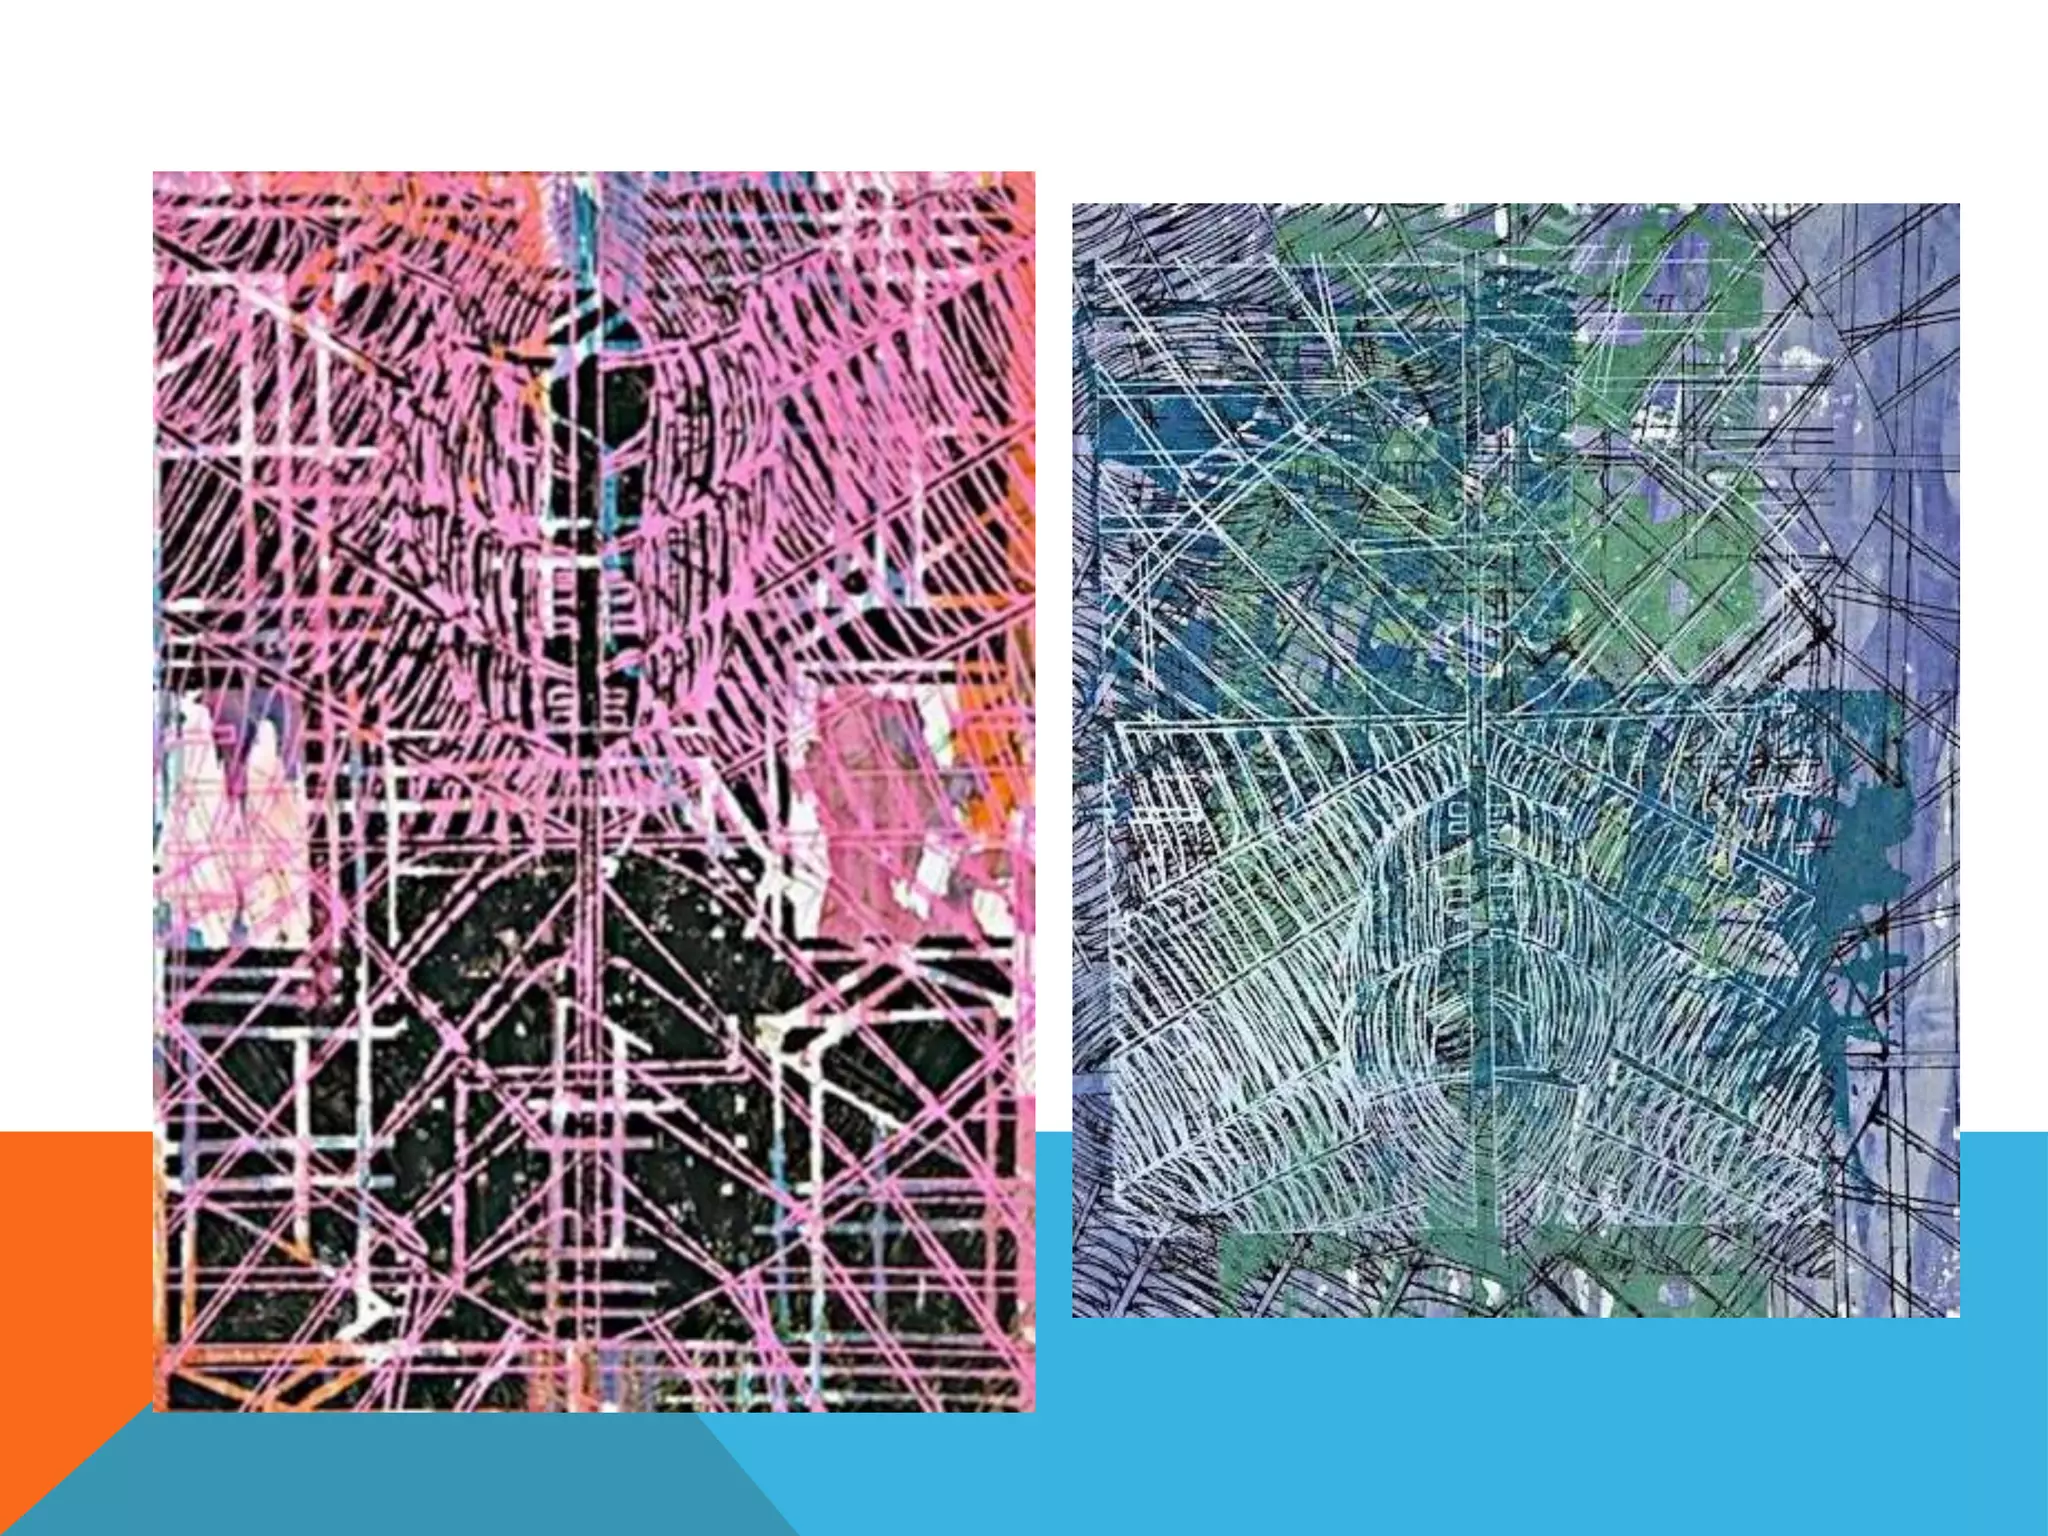
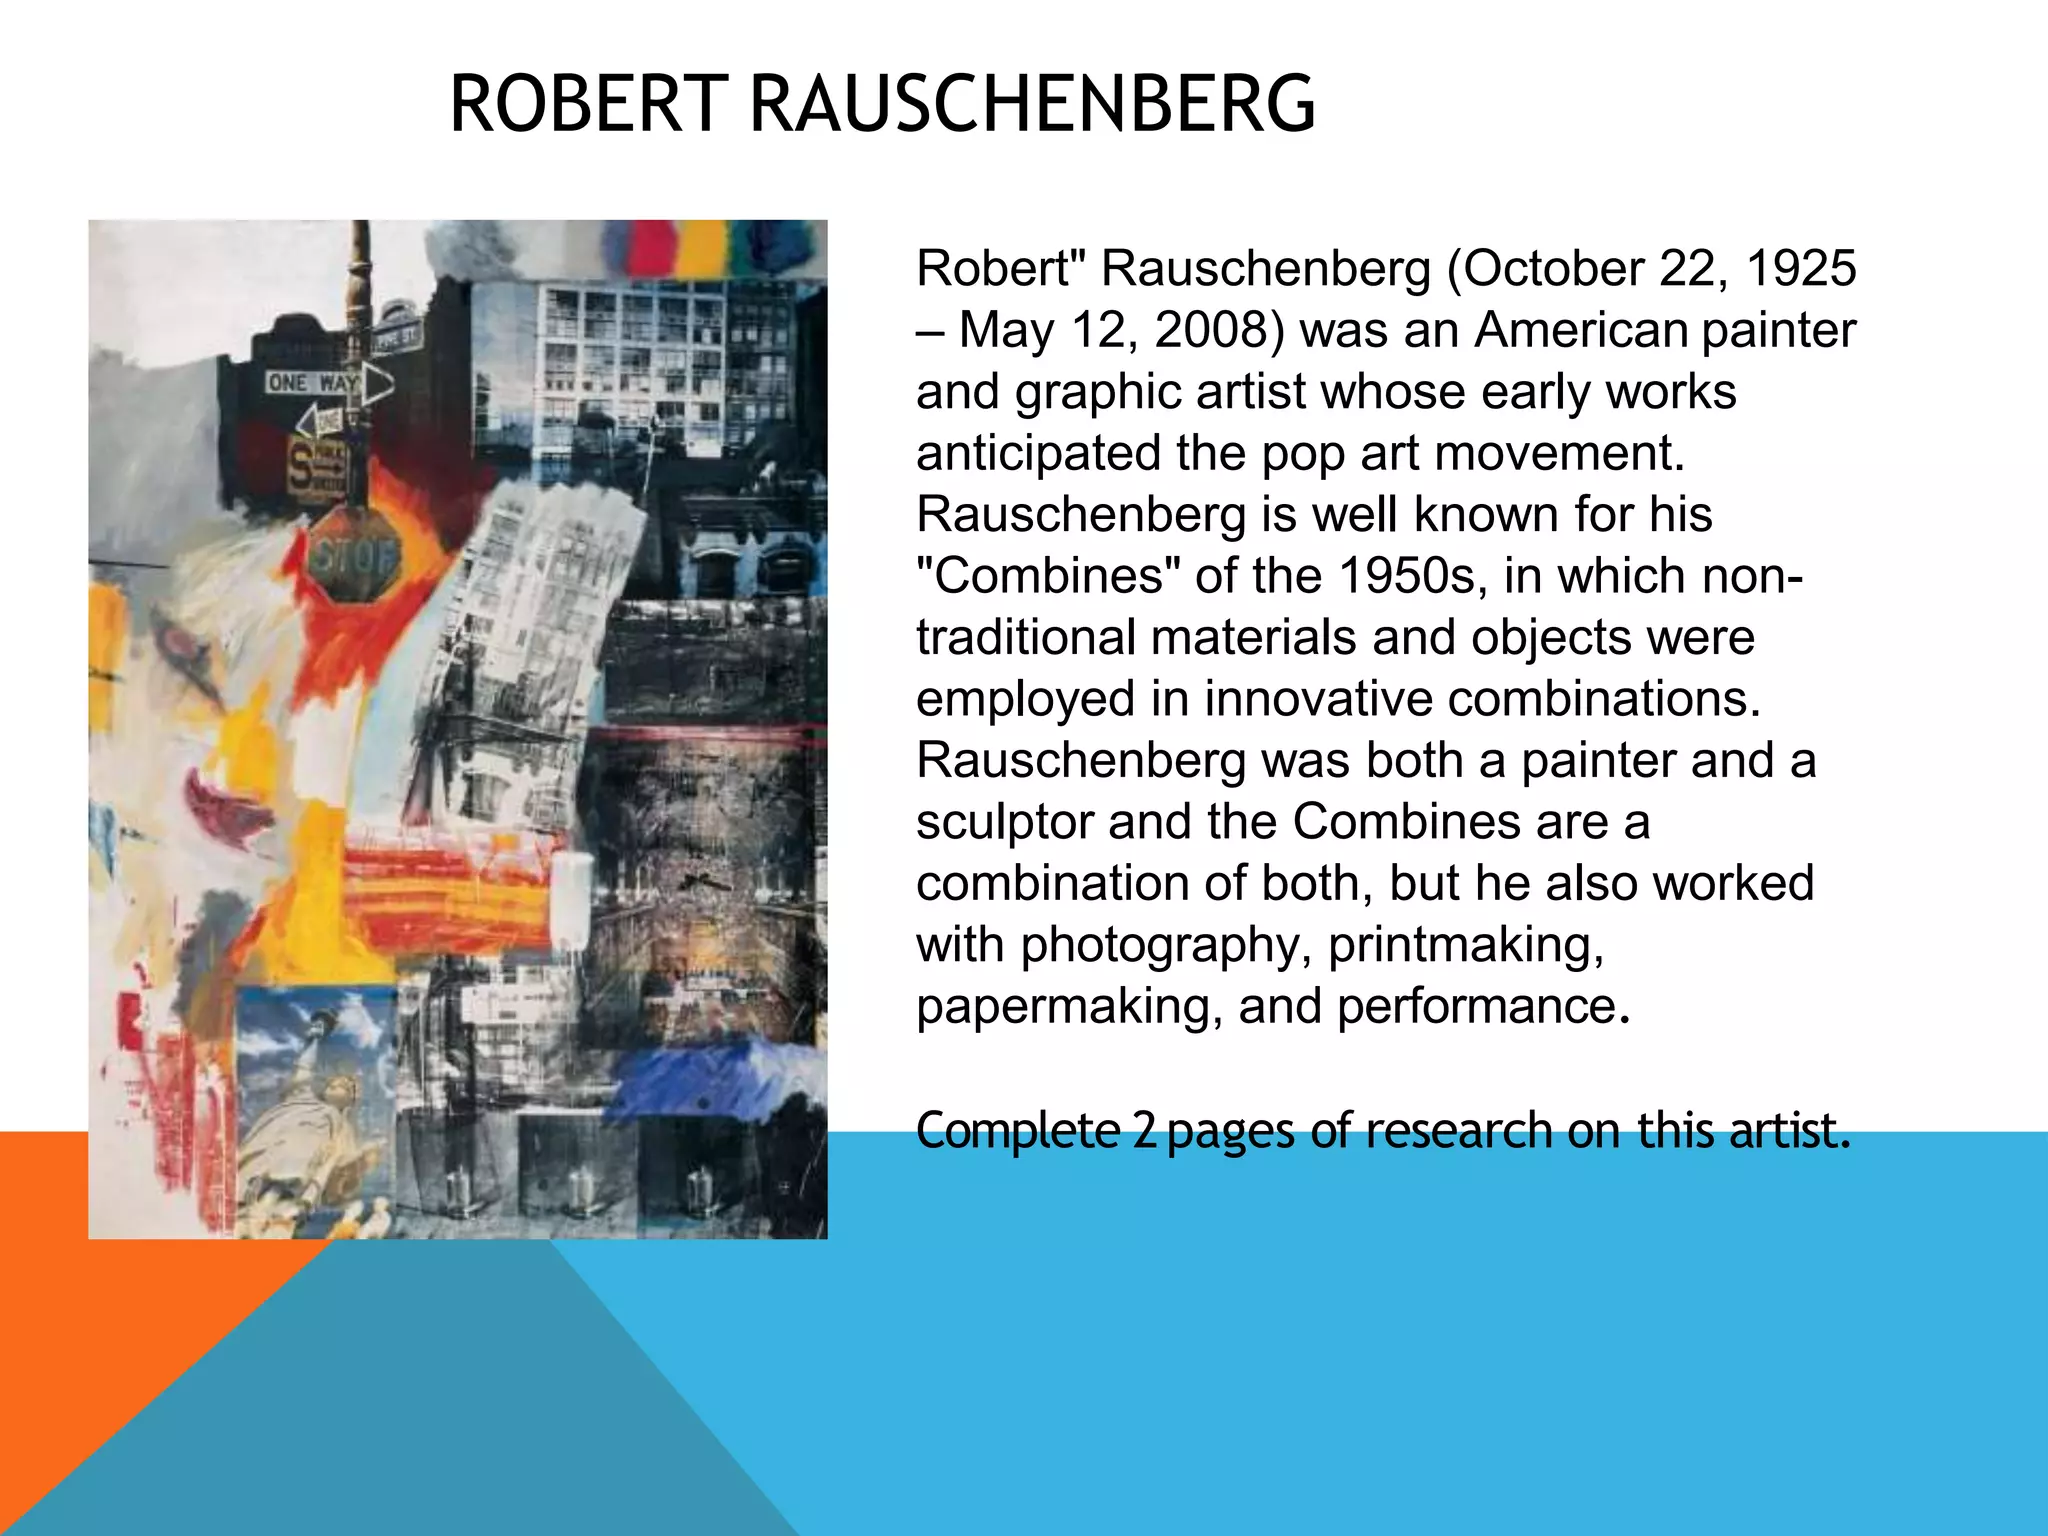
Set Project
Past, Present & Future
GO ON A JOURNEY
AROUND SCHOOL
Takeyoursketchbookaround
schoolwithsomeArt materials
Walkand then everyminute
stopat lookeither up, down,
left orright. Drawthe view that
you see.
Make 3 drawingsin different
materials
MONO-PRINTING
Create 2
detailed mono-
prints from the
resource photos
around school
HOMEWORK
Recordyourjourneyhomefromschoolin the same way.Take10 photosof closeups,
streets, signs,anything youpassthat interests youand bringin to schoolnext lesson
Make a detailed drawingof one of the photos
Bringin a map of the area of yourjourney
•
•
•
Henri Matisse was born on
31st December 1869, and
died in 1954. He was 84.
He was a draughtsman,
printmaker, and sculptor,
but is best known as a
painter.
Matisse also started to
create large scale cut paper
collages.
HENRI MATISSE
Matisse was in a wheel chair during his later years; which resulted in
him creating some of his most well known cut-out pieces. After he
could no longer stand for extended periods of time, Matisse began
creating works using a pair of scissors and paper. He used a long stick
to assemble them on his walls until he was happy with the
arrangement. He called this technique ‘painting with scissors
Complete 2 pages of research on Matisse’s cut-outs.
PAINTING WITH SCISSORS.
PAINTING WITH SCISSORS
You have be given a variety of different coloured
papers.
Now try creating your own “Journey” in the cut
out style of Matisse .Choose 3 photos to work
from and try to recreate these in paper. Do not
draw any outlines. Take a risk and just cut the
shapes.
Stick these pieces in your sketchbook
BRENDA HARTILL
Her work explores the texture, pattern and light of the landscape, and ranges
from finely drawn figurative works to bold, heavily embossed abstract images. Far
the past 10 years she has been most interested in drawing abstract imagery from
the landscape.
COLLAGRAPH PRINTING
Next take a
section of one of
your photos.
Recreate this out
of just thick card
like the image
here so that the
details and
shapes in the
image are raised
/relief.
CREATE AN EMBOSSED PRINT
Using the printing press, create an
embossed print of your card relief.
Once complete stick this in your
sketchbook. Stick in the images by
Brenda Hartill and explain herwork
briefly.
ADD MORE TO YOURPLATE https://www.youtube.com/watch?
v=SxbsSpk3wW0
Watch the clip above. Once
you have created an
embossed print, begin to add
more materials like string,
and cotton buds, and tin foil
etc to your plate to create
more texture. Once completed
make a Collagraph print in
different coloured inks. Also
experiment with printing on
different papers/colours…..
ERICH HECKEL
Erich Heckel, (born July 31, 1883, Döbeln, Germany—died January 27, 1970
German painter, printmaker, and sculptor who was one of the founding members of
Die Brücke (“The Bridge”), an influential group of German Expressionist artists. He
is best known for his paintings and bold woodcuts of nudes and landscapes. The
Brücke artists helped to revive the woodcut tradition in Germany; they prized the
medium’s ability to convey rough, spontaneous marks and bold, flat colour. Heckel
was the artist most prolific in woodcut, often creating posters and invitations for Die
Brücke exhibitions.
SINGLE-COLOUR LINO PRINTS
The easiest style of lino print is a single-colour print. You cut the design
once, and print it using one colour only. Black is usually used because of
its strong contrast to white paper.
Plan your linocut design on a sheet of paper, or on the lino itself, before
you start cutting. Remember, what you cut away will be white and what you
leave will be black. Also, the printed version will be reversed, so if you've
any lettering you must cut this out backwards.
REDUCTION LINOCUTS
Reduction linocuts are printed from one piece of lino, cutting it again for each new
colour in your design. The first cut is for any areas in the design to be left white (or
the colour of the paper), and you print it with colour 1. The second cut takes away
those areas in the design you want to be colour 1 in the final print. You then print
colour 2 on top of colour 1. (Ensure the ink is dry before printing the next colour.)
The result is a print with white and two colours.
CREATE A SERIES OF 3 COLOUR LINO PRINTS
Looking at your own “Journey”
photos, select sections from 6
images. Draw these sectionsin
your book.
TRACE YOUR ABSTRACT SECTIONSONTO LINO
Next trace your favourite 3 sections
and then transfer these on to 3 pieces
of lino/adigraf.
Begin to make 3 different lino cuts.
EXPERIMENT WITH DIFFERENTMATERIALS
Next experiment printing
each piece on to
different papers using
different colour
combinations.
Think about colour
combinations.
COLOUR THEORY
Colour Harmonies
- basic techniques for creating colour schemes
Below are shown the basic colour chords based on the colour wheel.
Complementary colour scheme
Colours that are opposite each other on the colour wheel are
considered to be complementary colours (example: red and green).
The high contrast of complementary colours creates a vibrant look
especially when used at full saturation. This colour scheme must be
managed well so it is not jarring.
Complementary colour schemes are tricky to use in large doses, but
work well when you want something to stand out.
Complementary colours are really bad for text.
PRINT ONTOMAPS
Print off maps of the general area of journey,
from the internet
Experiment with lino-printing your designs
directly on tomaps
ROBERT RAUSCHENBERG
Robert" Rauschenberg (October 22, 1925
– May 12, 2008) was an American painter
and graphic artist whose early works
anticipated the pop art movement.
Rauschenberg is well known for his
"Combines" of the 1950s, in which non-
traditional materials and objects were
employed in innovative combinations.
Rauschenberg was both a painter and a
sculptor and the Combines are a
combination of both, but he also worked
with photography, printmaking,
papermaking, and performance.
Complete 2pages of research on this artist.
CREATE COLLAGES OF YOURJOURNEY
LINO PRINT ONTO YOURCOLLAGE
FINAL PIECE
Create your final piece. Todo this
select your best 9 prints and put
them together in a grid. These
could be made up of:-
Lino prints
Reduction prints
Printing on tocollage
Textiles pieces
Mono-prints
Collagraph.
RESOURCE PHOTOS
RESOURCE IMAGES
Past, Present & Future SoW

Past, Present & Future SoW

  • 1.
  • 2.
    GO ON AJOURNEY AROUND SCHOOL Takeyoursketchbookaround schoolwithsomeArt materials Walkand then everyminute stopat lookeither up, down, left orright. Drawthe view that you see. Make 3 drawingsin different materials
  • 3.
    MONO-PRINTING Create 2 detailed mono- printsfrom the resource photos around school
  • 4.
    HOMEWORK Recordyourjourneyhomefromschoolin the sameway.Take10 photosof closeups, streets, signs,anything youpassthat interests youand bringin to schoolnext lesson Make a detailed drawingof one of the photos Bringin a map of the area of yourjourney
  • 5.
    • • • Henri Matisse wasborn on 31st December 1869, and died in 1954. He was 84. He was a draughtsman, printmaker, and sculptor, but is best known as a painter. Matisse also started to create large scale cut paper collages. HENRI MATISSE
  • 6.
    Matisse was ina wheel chair during his later years; which resulted in him creating some of his most well known cut-out pieces. After he could no longer stand for extended periods of time, Matisse began creating works using a pair of scissors and paper. He used a long stick to assemble them on his walls until he was happy with the arrangement. He called this technique ‘painting with scissors Complete 2 pages of research on Matisse’s cut-outs.
  • 7.
  • 8.
    PAINTING WITH SCISSORS Youhave be given a variety of different coloured papers. Now try creating your own “Journey” in the cut out style of Matisse .Choose 3 photos to work from and try to recreate these in paper. Do not draw any outlines. Take a risk and just cut the shapes. Stick these pieces in your sketchbook
  • 10.
    BRENDA HARTILL Her workexplores the texture, pattern and light of the landscape, and ranges from finely drawn figurative works to bold, heavily embossed abstract images. Far the past 10 years she has been most interested in drawing abstract imagery from the landscape.
  • 12.
    COLLAGRAPH PRINTING Next takea section of one of your photos. Recreate this out of just thick card like the image here so that the details and shapes in the image are raised /relief.
  • 13.
    CREATE AN EMBOSSEDPRINT Using the printing press, create an embossed print of your card relief. Once complete stick this in your sketchbook. Stick in the images by Brenda Hartill and explain herwork briefly.
  • 14.
    ADD MORE TOYOURPLATE https://www.youtube.com/watch? v=SxbsSpk3wW0 Watch the clip above. Once you have created an embossed print, begin to add more materials like string, and cotton buds, and tin foil etc to your plate to create more texture. Once completed make a Collagraph print in different coloured inks. Also experiment with printing on different papers/colours…..
  • 18.
    ERICH HECKEL Erich Heckel,(born July 31, 1883, Döbeln, Germany—died January 27, 1970 German painter, printmaker, and sculptor who was one of the founding members of Die Brücke (“The Bridge”), an influential group of German Expressionist artists. He is best known for his paintings and bold woodcuts of nudes and landscapes. The Brücke artists helped to revive the woodcut tradition in Germany; they prized the medium’s ability to convey rough, spontaneous marks and bold, flat colour. Heckel was the artist most prolific in woodcut, often creating posters and invitations for Die Brücke exhibitions.
  • 19.
    SINGLE-COLOUR LINO PRINTS Theeasiest style of lino print is a single-colour print. You cut the design once, and print it using one colour only. Black is usually used because of its strong contrast to white paper. Plan your linocut design on a sheet of paper, or on the lino itself, before you start cutting. Remember, what you cut away will be white and what you leave will be black. Also, the printed version will be reversed, so if you've any lettering you must cut this out backwards.
  • 21.
    REDUCTION LINOCUTS Reduction linocutsare printed from one piece of lino, cutting it again for each new colour in your design. The first cut is for any areas in the design to be left white (or the colour of the paper), and you print it with colour 1. The second cut takes away those areas in the design you want to be colour 1 in the final print. You then print colour 2 on top of colour 1. (Ensure the ink is dry before printing the next colour.) The result is a print with white and two colours.
  • 22.
    CREATE A SERIESOF 3 COLOUR LINO PRINTS Looking at your own “Journey” photos, select sections from 6 images. Draw these sectionsin your book.
  • 23.
    TRACE YOUR ABSTRACTSECTIONSONTO LINO Next trace your favourite 3 sections and then transfer these on to 3 pieces of lino/adigraf. Begin to make 3 different lino cuts.
  • 24.
    EXPERIMENT WITH DIFFERENTMATERIALS Nextexperiment printing each piece on to different papers using different colour combinations. Think about colour combinations.
  • 25.
    COLOUR THEORY Colour Harmonies -basic techniques for creating colour schemes Below are shown the basic colour chords based on the colour wheel. Complementary colour scheme Colours that are opposite each other on the colour wheel are considered to be complementary colours (example: red and green). The high contrast of complementary colours creates a vibrant look especially when used at full saturation. This colour scheme must be managed well so it is not jarring. Complementary colour schemes are tricky to use in large doses, but work well when you want something to stand out. Complementary colours are really bad for text.
  • 26.
    PRINT ONTOMAPS Print offmaps of the general area of journey, from the internet Experiment with lino-printing your designs directly on tomaps
  • 29.
    ROBERT RAUSCHENBERG Robert" Rauschenberg(October 22, 1925 – May 12, 2008) was an American painter and graphic artist whose early works anticipated the pop art movement. Rauschenberg is well known for his "Combines" of the 1950s, in which non- traditional materials and objects were employed in innovative combinations. Rauschenberg was both a painter and a sculptor and the Combines are a combination of both, but he also worked with photography, printmaking, papermaking, and performance. Complete 2pages of research on this artist.
  • 30.
    CREATE COLLAGES OFYOURJOURNEY
  • 31.
    LINO PRINT ONTOYOURCOLLAGE
  • 32.
    FINAL PIECE Create yourfinal piece. Todo this select your best 9 prints and put them together in a grid. These could be made up of:- Lino prints Reduction prints Printing on tocollage Textiles pieces Mono-prints Collagraph.
  • 33.
  • 34.