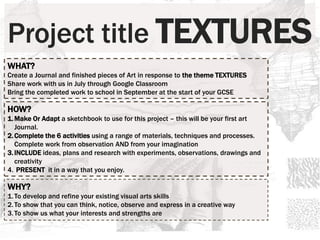
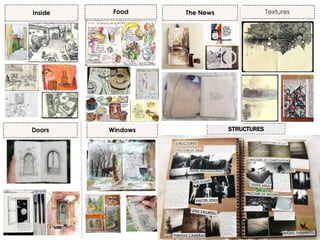
Project title TEXTURES aims to create artworks in response to the theme of TEXTURES. Students are asked to complete 6 activities exploring textures using a variety of materials and techniques. Students should document their ideas, plans, experiments and creative process in an art journal/sketchbook. The goal is to develop students' art skills, show their creative thinking and interests, and demonstrate their ability to notice and express themselves visually. Students are provided guidance on setting up their sketchbook/journal and given 6 practical tasks to explore textures through various drawing exercises using observation and imagination.
1. Project title TEXTURES
WHAT?
Create a Journal and finished pieces of Art in response to the theme TEXTURES
Share work with us in July through Google Classroom
Bring the completed work to school in September at the start of your GCSE
HOW?
1.Make Or Adapt a sketchbook to use for this project – this will be your first art
Journal.
2.Complete the 6 activities using a range of materials, techniques and processes.
Complete work from observation AND from your imagination
3.INCLUDE ideas, plans and research with experiments, observations, drawings and
creativity
4. PRESENT it in a way that you enjoy.
WHY?
1.To develop and refine your existing visual arts skills
2.To show that you can think, notice, observe and express in a creative way
3.To show us what your interests and strengths are
2.
3. SKETCHBOOK JOURNAL
ideasYou will need a sketchbook. You can purchase a
ready made sketchbook but, please, no bigger than
A5 or A4 which are a perfect size. It is also really
easy to your own. You can use whatever you have at
home and the best bit is that you can add pages
later or combine different papers when you make
it. Visit this website for videos and tips on making
one https://www.accessart.org.uk/sketchbooks-
making-your-sketchbook-your-own/
You can make personal and interesting sketchbooks
by folding long strips of paper into a concertina. You
can work on both sides and you can add interest
and texture by cutting ‘windows’ through some
pages
1 cut your
cardboard cover to
size and fold it in
half
2 choose some
interesting paper
and cut it to size
3 Fold all your
pages in half and sit
them on top of each
other
4. Assemble all your
pieces together
5 use elastic or string to
ties them together. You
can also tie around it to
hold it shut
You can re-use unloved or
found books working over
the top of the existing pages
Watch this video first
https://youtu.be/6mwu-
HHz0WE
7. Decorate your
sketchbook and start using
it
4. What do I put in my journal/portfolio?
You can include lots of
evidence including
• Photographs
• Drawings and paintings
• Collage
• Artist research
• Lettering
• Experiments with fabric
• Photographs of Models and
3d work
• Titles, ideas, plans,
thoughts
Things you make that you can stick
in like zines or mini-books
Things that you observe & look closely at OR things that you imagine or
remember
You can use titles as a good way to give context to the page and the
project tasks – make the texture and style of the titles fit the
artwork on the page but make sure it is not too dominant
Use annotation to write
notes or add further
information about the
things you have drawn
Use more than one media
or technique across pages
to make them more
interesting.
Use a range of different
size drawings on the
page, add small images
and boxes like I have
done on this page – it
makes it easier to make
sense of your work
Think about literacy when you annotate your pages. Try to use the language of Art but
also to make the appearance of your annotations pleasing. Your annotations should
support your artwork, they can go across several pages, drawing us into your creative
journey
Try using different
drawing techniques to
add interest to the page
and to show your range of
skills. You can also try out
new ones
You could include collage,
stitching, cross hatching,
continuous line, detailed
tonal studies OR
photographs etc
5. Jo Walton glues found things
to paper then adds painted
words or a tiny photographs to
show her experience of being
there.Collage is a fun process. You build up
layers of found things with glue to
create new art or to make textures
and surfaces to work onto.
.
Things I could
collage
• Receipts
• Photographs
• Bags
• Envelopes
• Fabric
• Adverts
• Newspaper
• Magazines
• Letters
• Tickets
• Wrappers
• Dried leaves
and flowers
• String
• Maps
• books
• Postcards….
What else could I try at home: I want to do something different but don’t have a lot of stuff?
Try responding to music and using things you find lying around at home –
this is using tape, paper, string pencil and heavy metal music
What is most important is having a
sense of discovery – be prepared to
explore, experiment and just try
things out
Work outside – making art on location – it changes how
you see things AND how fast you work
6.
7. See more at: http://www.studentartguide.com/articles/how-to-make-a-mindmap-creative-
ideas?utm_source=Student+Art+Guide+Newsletter&utm_campaign=0c0050ec5b-Newsletter_21&utm_medium=email&utm_term=0_23af712e7d-0c0050ec5b-
28594137#sthash.6WEod78k.dpuf
IDEA GENERATOR. When starting an Art project: It is helpful to brainstorm possible ways of beginning
or approaching your work. Do this in a creative way. Start with filling ONE page. – here are some ideas of
how you could do it
choose a creative way of presenting YOUR IDEAS that works for you.; then for each task it helps to record a specific very brief mini
idea generation
Starter activity: 90 minutes
Fill two pages in your
book with CREATIVE
IDEAS that link to the
word TEXTURES
8. Task 1: Drawing to observe, analyse, notice and represent
TEXTURE, TONE and FORM
ANNOTATEYOURWORK
On each page write the task number in a creative way
linked to the task
Make some notes at the end on what you learned and what
you are proud of.
Practical work
FIRSTChoose an OBJECT/SUBJECT that you think has
an interestingTEXTURE., something you can hold in
your hand. Pick something you find interesting enough
to study for a while and you can complete all 7 practical
tasks with
THEN – choose your art materials and get good
lighting. Position the object and draw it from a range of
angles…you will use several pages:
1. Using line and a pencil draw only the outline – try to be
really accurate and record every tiny detail
2. Zoom in on a detail close up and draw it in pencil to fill
the page creating tone and texture with your marks
3. Draw the whole thing to fill across 2 pages completely
use pen, line and crosshatching
4. Draw a new view, inside or underneath or on top. Use
only line and fill the page
5. Draw it 6 times so that all the drawings overlap onto each
another – all have to fit on one page
6. Choose a viewpoint and use strong lighting from one side
to create shadow. Use Tone and Shade to show the Form
(so height, width, depth) work large
7. Draw a study by by using found textures or papers
collaged together
Henry Moore
The artist is Henry Moore.The first 2
drawings are by him and the second
2 are student drawings. Look closely
at the drawings and notice how hard
the artist has tried to showTexture,
Tone and Form
9. Examples of
things to draw
You can use
these only if
you have
nothing with
textures to
draw at home
10.
11. Task 2: Draw Creatively to Analyse, Experiment and
Discover
ANNOTATE YOUR WORK
Research the term Mixed-Media Art and the work of Florian Nicolle.
Present your findings in your sketchbook. Use titles and art literacy - spend
around an hour on it
Make some notes at the end of this task saying what techniques you used
and what you think of them.
Practical work
FIRST Choose an OBJECT/SUBJECT that you think has an interesting
TEXTURE It could be the same object used for Task 1 or something
new, it could also be your own face.
THEN – choose your art materials: different papers and drawing
materials. Make sure that you are using some things you have not
used before
1. Experiment with creating some interesting paper backgrounds by using
things like old book pages, found materials and newspaper.
2. Make some notes on what happens when different surfaces overlap
3. Using any materials of your choice, complete one large study making sure
that proportion Is correct
4. Using any materials of your choice, complete several small studies making
sure that proportion Is correct and that you really focus on Texture
5. The more experimental you are the more you will learn
The portrait above is by Florian Nicolle; a
famous mixed media artist who has
inspired a lot of other artists. The other
examples are from Internet searches.
Look closely and notice how all the artists
have used traditional Art material in free,
creative or unusual ways. They have
created their own paper surfaces
ADDITIONAL CHALLENGE:
Try using really unusual materials to paint
or draw with
You could use tea or coffee, beetroot stain
as paint or ink. There are some examples
on the next page and this artist may inspire
you
https://www.instagram.com/bernulia/?hl=
en
12. These images use unusual
art materials that are
easily found at home.
Coffee
Avocado
Coffee grounds
Icing
Tea
Ice
Beetroot
onion
Can you tell which is
which
Have a look around and
see what you could use
13. Composition is important for all mediums – including
Textiles, Sculpture, Pottery 3d and Photography
Annotate your work
While you watch the video make some notes in your
sketchbook, write down what you think it is important to
remember. You will need this for the practical task.
At the end of the practical activity evaluate how well you
applied what you learned
Practical work
1. Watch the video all about composition It is a really
useful video for all artists to learn from. Click on the link
https://www.youtube.com/watch?v=oAPXep8wPts .
Extension: research to find other videos on composition
2. THEN add pages in your book that will remind you about
the elements of composition.
a. You could do this really creatively with brilliant
presentation taking time on each drawing
b. you could do it more simply like the example >>>
c. you could make it as a document on the computer,
print it and stick it in
d. You could do it as a collage of found images.
e. Choose a method that you will enjoy and that will
really show off your understanding
3. Knowledge& Understanding about COMPOSITION is
important to be successful in Art. You will use it for your
next task
4. Please use your own language and DO NOT copy and
paste from the internet.
Task 3: Draw for communication and
planning: COMPOSITION
14. ANNOTATE YOUR WORK
Use what you learned about composition from task
Look at the artists on the pages at the back of this
PowerPoint choose one whose work you like.
Write down what you like about their work and why;
then add what you would like to try in your own
Practical work
FIRST Choose a person to use as a model. Try to
from real life. You can use yourself in a mirror.. Your
drawing should be strong with the drawing on the
right having the most impact
NEXT – choose your art materials.. Think about what
worked well in task 1 & 2,. think about the texture,
pose and how they can get darker across the page
Practical work
1. Sketch 4 small, quick 5 minutes ideas for your
COMPOSITION; choose the best one
2. Draw it 3-6 times: each drawing should overlap
3. Begin from the left starting with light lines and
less detail,
4. As you move across to the right, each drawing
should have a little more tone and detail
5. Making sure that proportion Is correct and that
really focus on Texture.
6. Try to create this with at least 3 stages (3
overlapping studies)
Task 4: Draw for communication, planning and IMPACT: Create an overlapping
COMPOSITION like the example below
ADDITIONAL CHALLENGE:
Try to create yours with 4-6 overlapping studies… you’ll have to
think really carefully about how much detail to leave out or
add in at each stage!
Try a new version using paint
15. Task5:Draw withpaperandfoundimages,exploringline
and composition
Annotate your work
Write down the meaning of photo-collage.
Look at the work of Jesse Treece and Evaly Jerome and NigelTomm.
There are examples at the back of this powerpoint.
Write 3 things you like about their work.
At the end of the practical activity evaluate how well you applied what
you learned.Add the final pieces to your sketchbook
Practical work:
Take or find photographs of faces to use – find them in
magazines or newspapers. Change them to create new art in
2 different ways
1. FIRST Scrunch up/tear/fold the image until you have created
distortion. It can be as simple or as complex as you choose-
.e.g. if you want to use origami folds to make the folding
more thoughtful you can
2. Once you have distorted the image, draw it using pencil or
biro. If you have other materials feel free to use these with
control and skill.
3. NEXT find more faces and other images that you like. Cut
them out.
4. Use these cut pieces of paper AND glue. Arrange them into a
good composition and stick them down. Use the examples on
the left as inspiration.
Extension work
1. Try drawing a portrait and then scrumpling or folding it to
distort the lines.
2. Trey cutting up and rearranging an original or found piece of
art that has been copied 4 time like example 4
1 2
6
5
3 4
Jesse treece
16. TASK 6 option1 Draw in 3-Dimensions: Draw to plan. sculpture from Paper
Annotation
Spend 30 minutes researching Richard Sweeney's website OR
responding to the examples here in your book. Explain what you
like best about them. Evaluate the practical when you have
finished it.
If you are able to, photograph your work as you create it
Practical work
Inspired by his work and process use paper to create
sculptures that show TEXTURE through creasing,
folding and interlocking. Use paper that you find
the house, glue, tape or string only
1. Cut paper so that you have many identical sheets –
do not have to be white
2. Play with folding and creasing paper to create a shape
and texture you like
3. Repeat it several times – at least 20 times
4. Join them together to make sculptures you like.
5. Experiment with lighting to make ot look more
and make the shapes stronger
6. Draw to photograph the results, record this in your book
Richard Sweeney uses pure white, strong clean paper and he
creases it. He repeats the same shape and patterns to build into
massive sculptures. You can find out more here
https://www.richardsweeney.co.uk/works
These are my examples
inspired by his work
17. Junior Fritz Jaquet creates sculpture by recycling one single sheet
of very simple materials like paper and card into sculptures. He
folds, creases and models without any collage or cutting. He has a
skill at using the natural textures and folds You can see more of his
work here: https://juniorfritzjacquet.com/jfj/
TASK 6 option 2 Draw in 3-Dimensions: Draw to plan. sculpture from found materials
Annotation
Spend 30 minutes researching the work of Jaquet OR Giacommetti
OR responding to the examples here in your book. Explain what
you like best about them. Evaluate your practical when you have
finished it. If you are able to, photograph your work as you
create it
Practical work
Inspired by his work and process Create a figure sculpture that
shows theTEXTURE of the material you are using
1. Use materials that you find around your home. For Example:
paper, wire, sticks, loo roll inners, cardboard, string, leaves or
dried grass/stalks and things from the garden. Be safe do not
go to collect materials
2. To start EXPLORE joining methods to see what works.Try
folding, glue, knotting, bending or creasing, you could even
try not cutting:
3. When you have a method that works make a final sculptures
of figures that you like.
4. Experiment with lighting to make it look more dramatic and
make the shapes stronger
5. Draw or photograph the results, record this in your book
AfterWorldWar 2 AlbertoGiacometti created his most
famous sculptures: his extremely tall and slender figurines,
these elongated, withered representations of the human
form, look delicate but are really quite strong.They are
made of metal and are vert heavily textured.Some are tiny
and some are real human height
He even made animals
18.
19. Nigel shafran https://www.nowness.com/story/photographer-nigel-shafrans-work-
books
Photographer sketchbooks are a collection of images, notes, technical plans, process notes and ideas. Mixed in with that are often sketches of shoots,
contact sheets and proofs of final edits. We are more than happy for those of you who are photographers to do that – you do not have to paint, sculpt,
collage if you do not want to
20. Evaly Jerome
Evaly is a mixed media artist who builds
her work from the quirky oddities she
collects from photographs to dolls, she
paints, weaves, prints and uses collage.
Her sketchbooks are a wonderful
glimpse into to the creativity of her mind
– she has a sketchbook for each year
and one for each major event plus a
keen eye for collecting interesting things
21. Grayson Perry
http://mskaysartworld.weebly.com/identity---grayson-perry.html
https://www.theguardian.com/books/2016/mar/31/sketchbooks-by-grayson-
perrie-review-daft-ideas-that-later-become-art
He is the artist who is the host for Grayson Perry's Art Club on
channel 4 on Mondays but he has been around a long time –
his sketchbooks are personal and creative. He says that they
are important because ‘he is free to doodle and play as freely’
as he want. They are a collection of drawings, ideas, words and
random things he writes down. Some pages are scruffy and
some colourful, some are planning pages and some record
what he sees or is feeling. He writes down prompts or questions
to himself to guide later work.
Most of his work is 3dimensional, brightly painted clay
sculpture and pots but he also produced painting, textile work
and installations. He is a good source to remind yourself that
great art is not necessarily neat, planned and organised
22. Julianna Cole
Julianna Coles works small and in an intense way. About her practice she says Visual Journals
are an experiment in self portraiture and personal mythology that capture a moment in time
where freedom of expression is utmost and all considerations to color theory, composition, and
technique are unimportant. These layered and timeless books are rich, hauntingly beautiful,
and exquisite; the stuff of something deeper, darker, meatier, with the gouges, scrapes, and
scars of life in our own words and our own images. https://www.meandpete.com/index.html
All your expression can
be explored within the
pages of
a sketchbook; this artist
is a great example of
one way to do it
23. Jim Moir
https://vicreeves.tv/
Noel Fielding Jean Michel Basquiat
https://twitter.com/search?q=%23NoelsArt
Club&src=hashtag_click
Jim Moir (aka Jim Reeves) and
Noel Fielding are known as both
Artists and Performers. They live
very much in the public eye. Both
say they are influenced by Jean
Michel Basquiat. Their artwork is
expressive, and personal showing
influences from Surrealism, Dada
and Neo-Expressionism (look
them up). Their work is colourful,
eye-catching and energetic, an
individual viewpoint on the world
expressed with energy and fun.
They are good examples of artists
who have found a way to make
art their way without worrying
what other people think.
26. NigelTomm: http://nigeltomm.us/
Jesse Treece is a collage artist. He came
across a box of old magazine clippings one
night and decided to make a visual story out
of them which turned into his first collage.
Since that time he has been making amazing
collages from vintage materials that could be
described as striking, surreal, absurd, and
slightly disturbing. Jesse finds his inspiration
in old newspaper comic strips and si-fi films
or books. “I don’t think I have a message that
I’m trying to get across, it’s usually more
about composition, colour, gut feelings. I’m
completely fine with art not needing to have
a specific meaning,” he says.
https://featherofme.com/jesse-treece-absurdly-beautiful/ JESSETREECE
NIGEL
TOMM
27. Frida Kahlo's life was expressed through her
work. A chronological look at her artwork
provides an understanding of the events that
changed her life: her passions, motivations,
disappointments, and desires. Painting was
cathartic for her, however, writing and
keeping a diary also helped her to establish a
relationship with herself, and to find a way of
expressing her afflictions during the final 10
years of her life. She used her sketchbooks
as a way to communicate her ideas, her
creativity, her emotions and her experiences,
every day.
“I never paint dreams or nightmares. I paint my own reality.” Frida Kahlo
Frida Kahlo
28.
29.
30. When experimenting with materials and ideas you
should Insert notes to explain ideas, work inside
your journal and on other, bigger surfaces