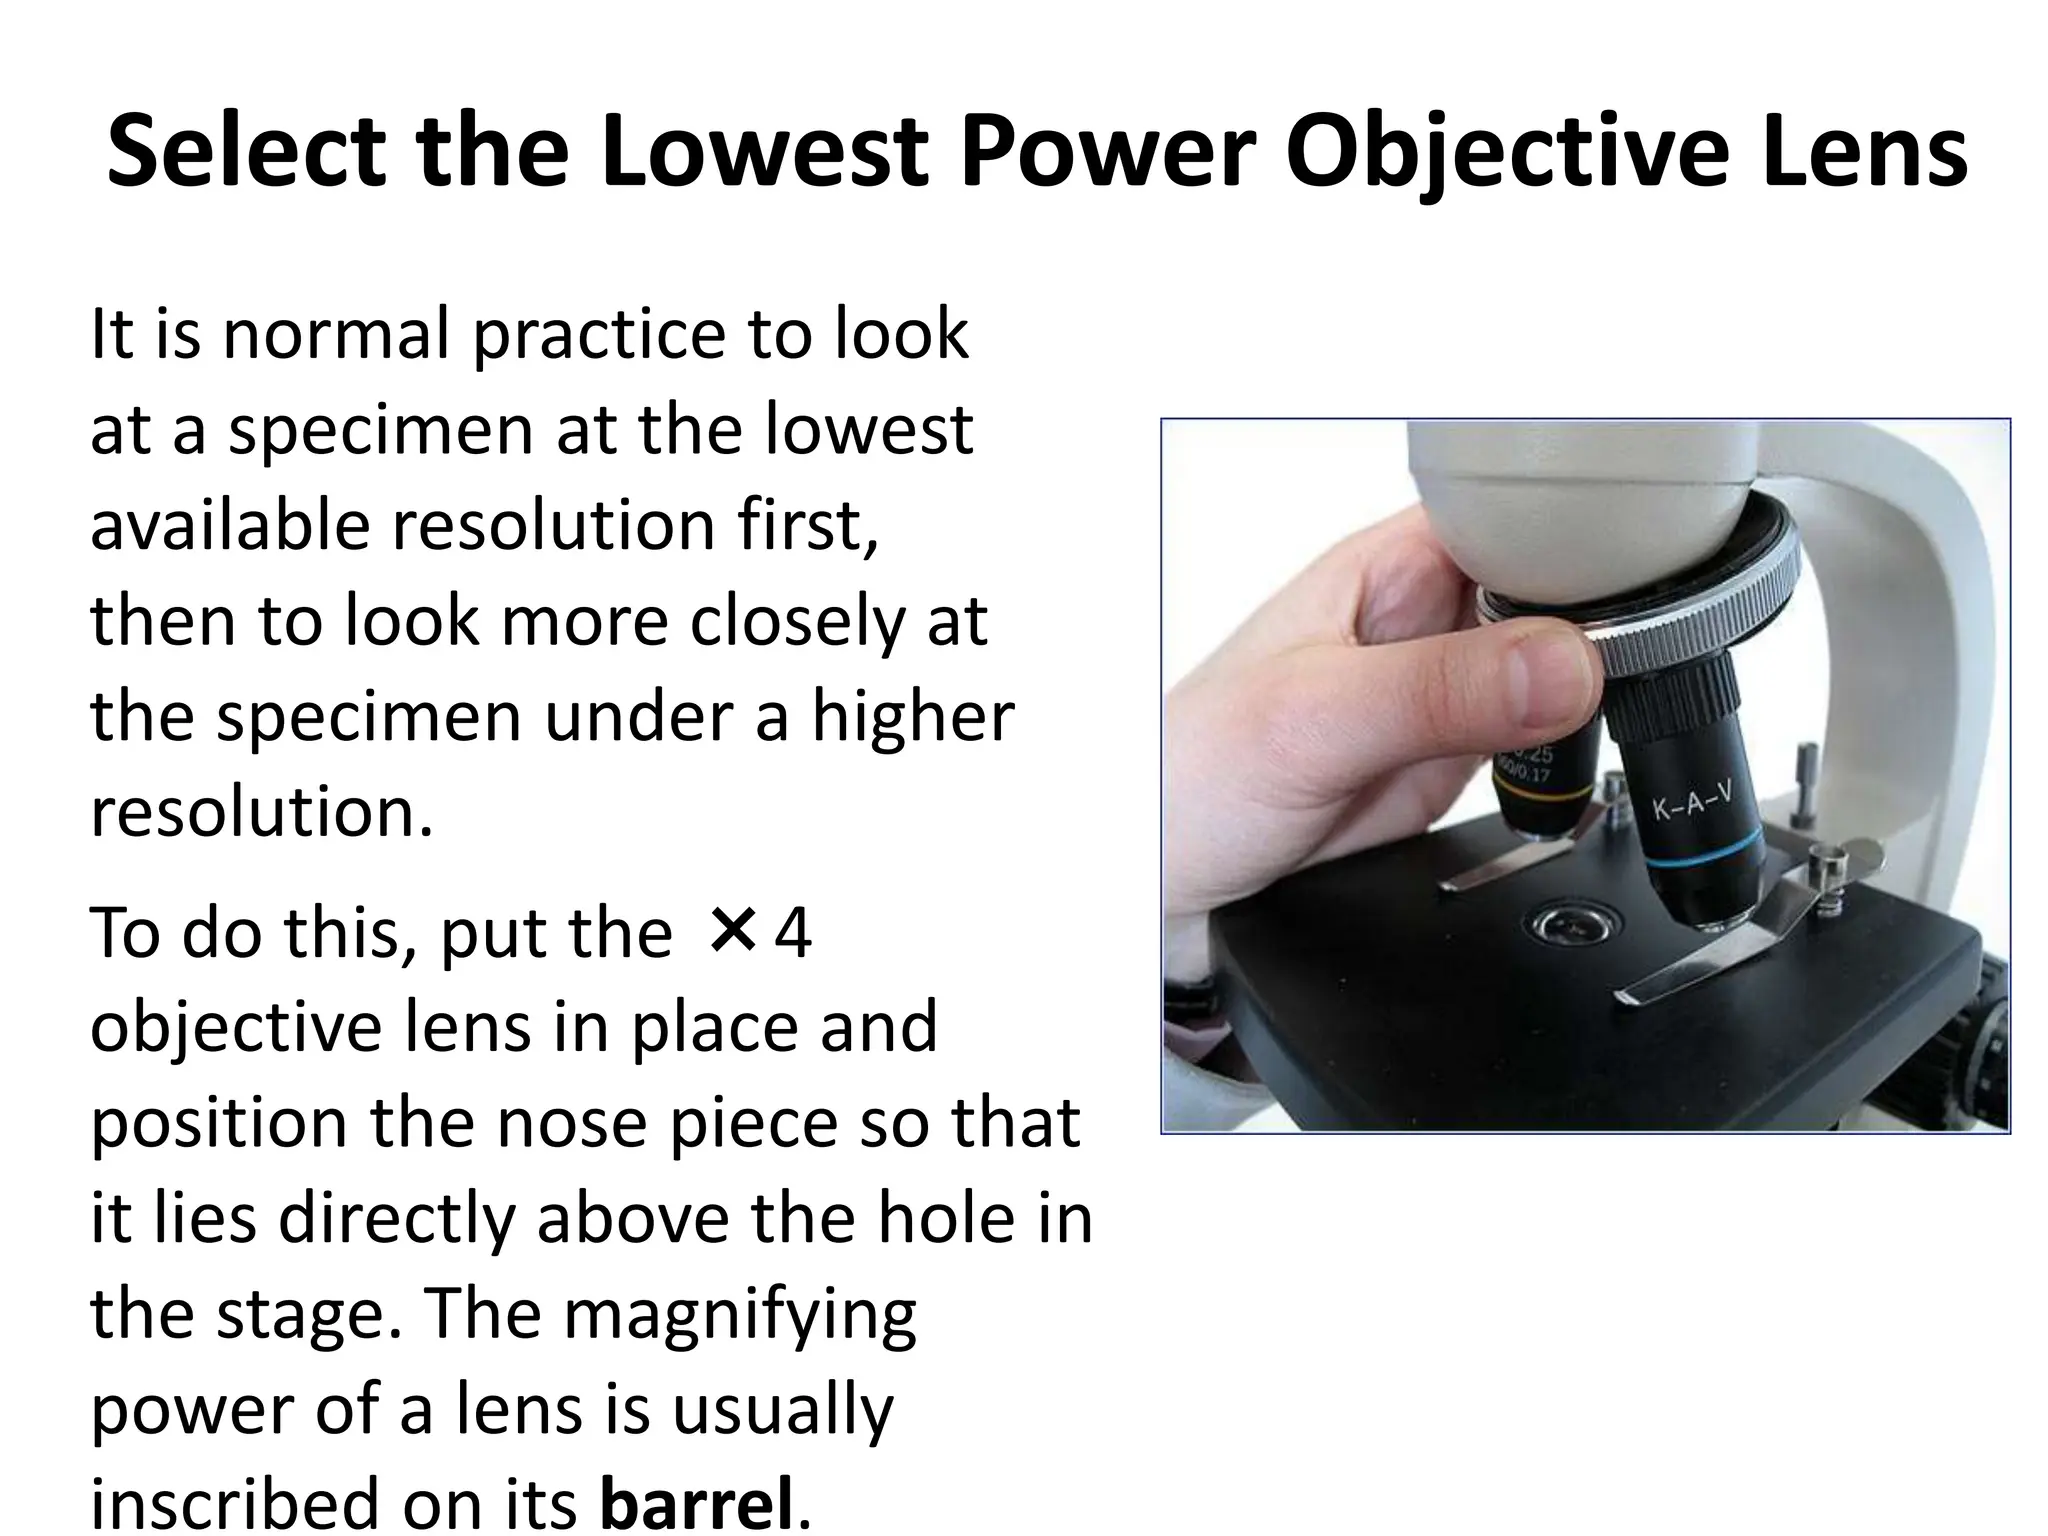
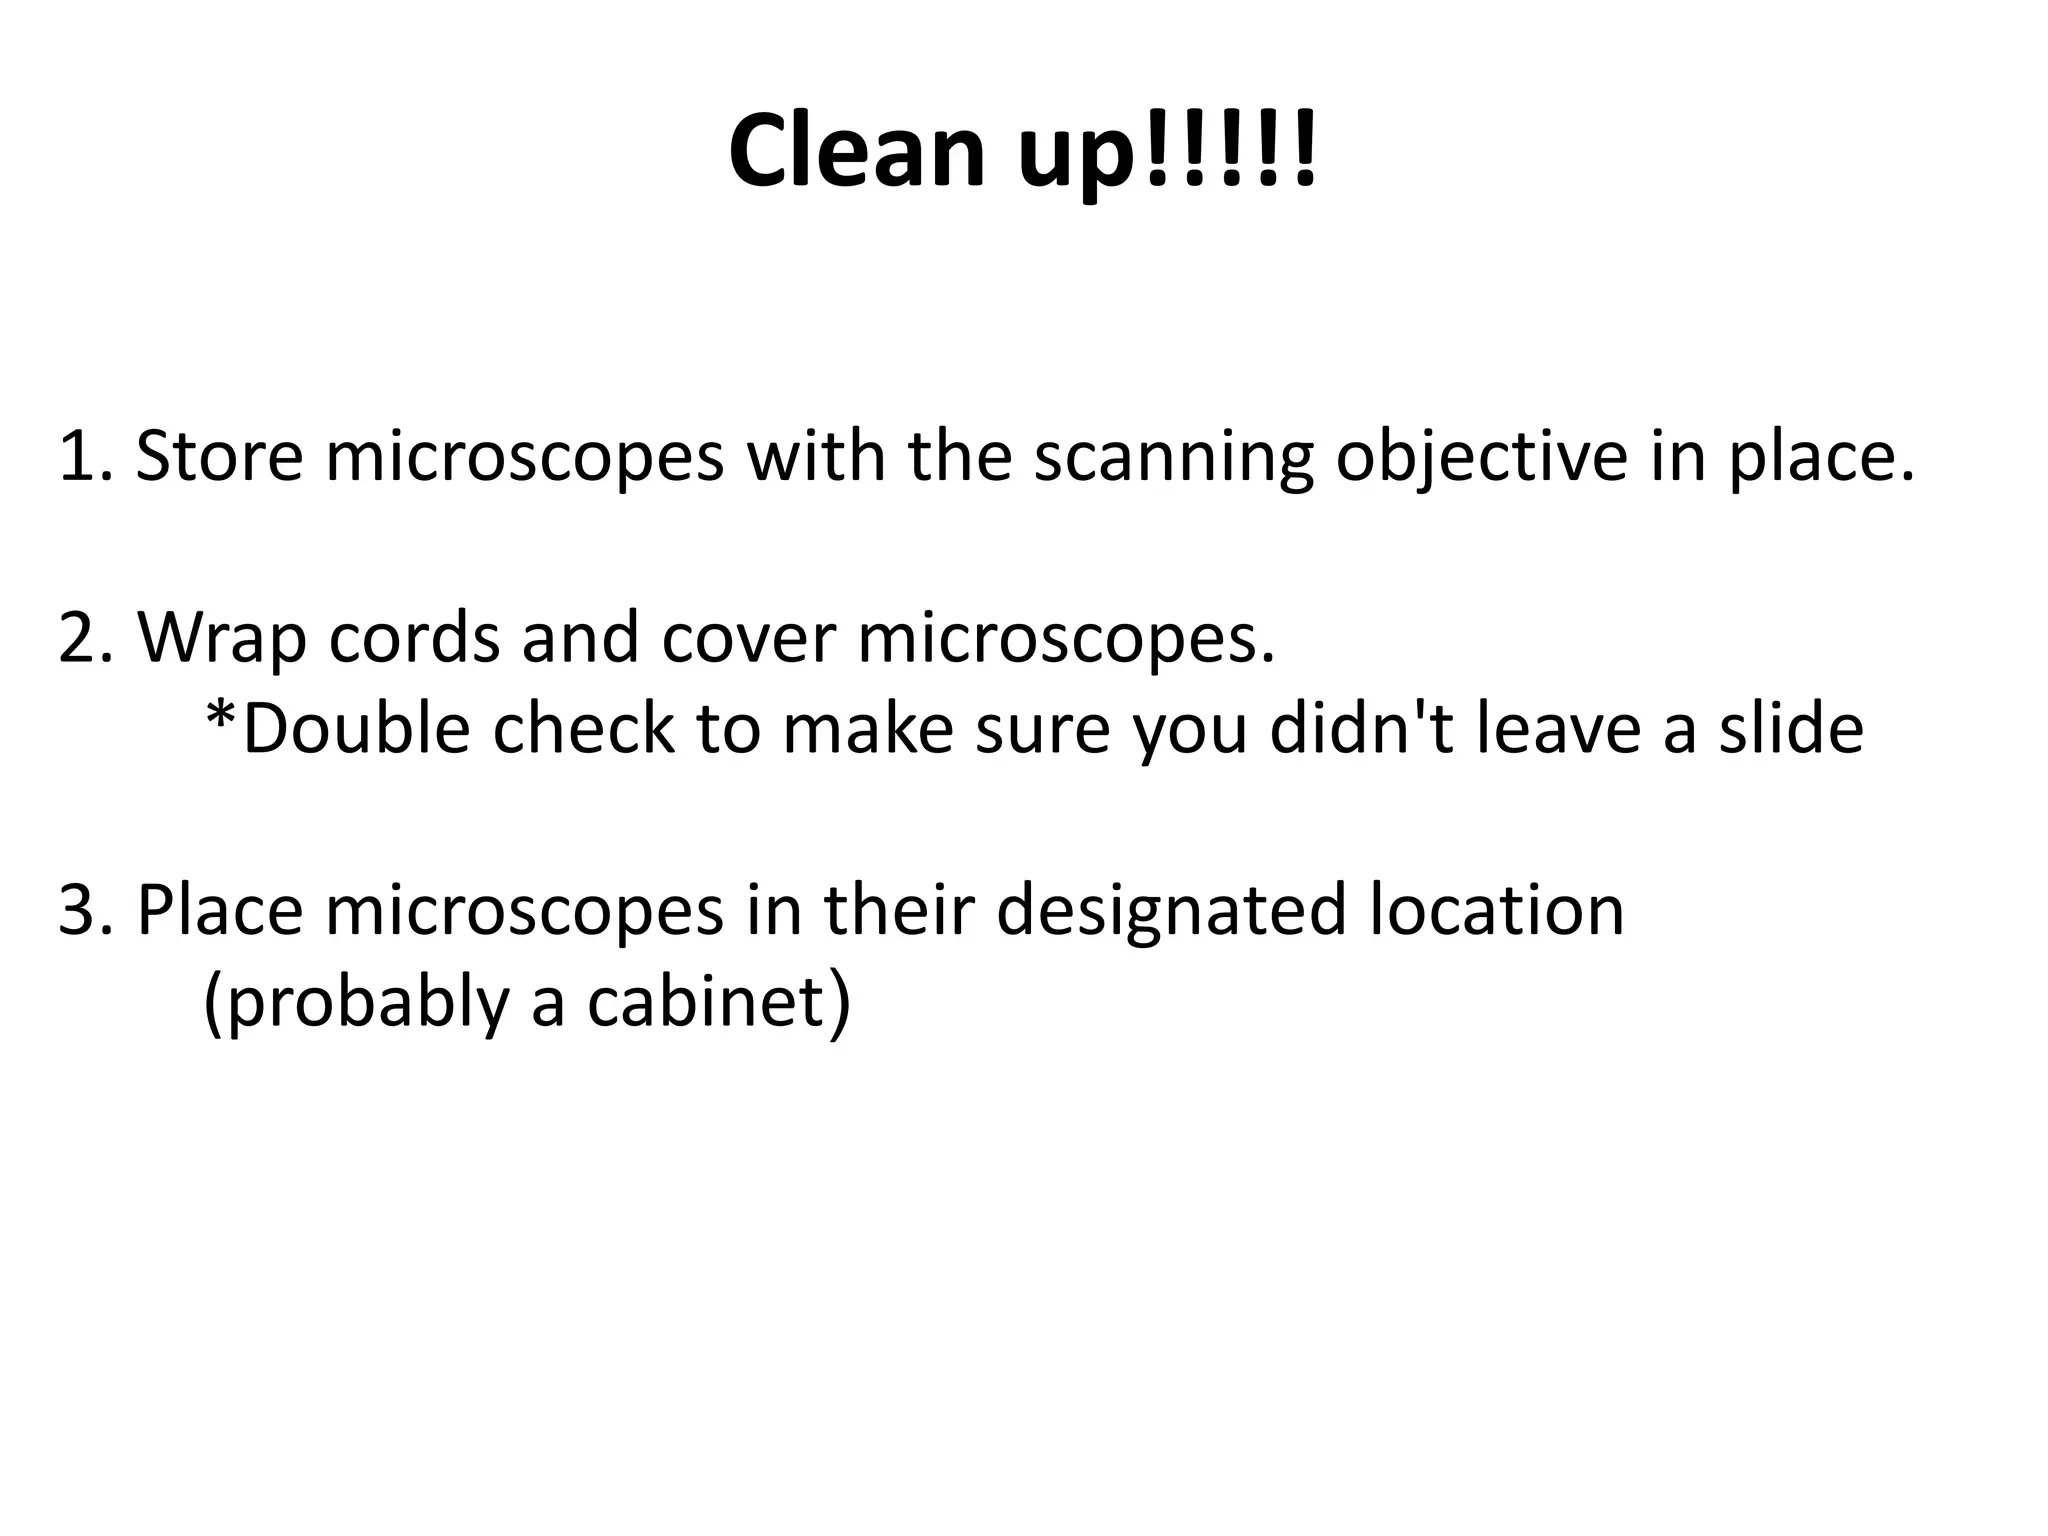
Analytical Profile of Coleus Forskohlii | Forskolin .pptx
Â
1.0 - The Light Miscroscope.ppt microscopy
1. Introduction to the Light
Microscope
History
Parts
Care
Types
Lecture 1: Dr. Prince Amoah Barnie
2. In this presentation, you will
explore the history of
microscopes.
You will learn about how the
light microscope works.
You will also learn how to
create biological drawings
from things you see under
the microscope.
Introduction to the Light
Microscope
3. Janssen – Lenses in a Tube
Around 1590, two Dutch spectacle
makers, Hans Janssen and his son
Zacharias, reputedly discovered
that nearby objects appear greatly
enlarged if they are viewed
through several lenses in a tube.
In 1609, the Italian inventor and
scientist Galileo Galilei developed
his first occhiolino or compound
microscope. This included both a
convex and a concave lens.
4. Robert Hooke – the English Microscopist
In the mid-17th century, the
English microscopist Robert
Hooke made a series of
improvements upon Galileo’s
design.
Hooke noticed that samples of
cork were made up of
microscopic box-like units. He
called them cells. We now
know that there are thousands
of different types of cells in
animals and plants.
5. Leeuwenhoek – the Father of Microbiology
The Dutch scientist, Anton van
Leeuwenhoek, developed new
methods for grinding and polishing tiny
lenses about ten years after Hooke’s
discoveries. These lenses could
magnify objects up to 270 times their
normal size.
Leeuwenhoek was the first to be able
to see and describe bacteria, yeast and
blood cells. He also saw and described
microscopic plants and animals, which
he called “animalcules”.
6. Types of Microscopes
Light Microscope - the models found in most schools, use
compound lenses to magnify objects. The lenses bend or
refract light to make the object beneath them appear
closer.
Common magnifications:
40x, 100x, 400x
7. 2. Eye piece lens
3. Objective lens nose
5. Coarse adjustment dial
6. Fine adjustment dial
9. Base
7. Stage
4. Clips
8. Diaphragm
10. Light and condenser
1. Eye piece micrometer
Parts of the Light Microscope
8. The Parts of the Light Microscope
1. Slide/Slide micrometer
2. Eye piece micrometer
3. Eye piece lens
4. Course adjustment dial
5. Fine adjustment dial
6. Objective lens nose
7. Base
9. Stage
8. Clips
10. Diaphragm
11. Power supply and switch
12. Light and condenser
9. • Always carry with 2 hands
• Only use lens paper for cleaning
• Do not force knobs
• Always store covered
The Light Microscope
Guidelines for Use:
10. Microscopes are expensive
instruments. They must be
handled with care in order
to avoid damage.
Keep the instrument in a box
or under a cover when not in
use.
Use only the supporting arm
of the microscope to lift it.
Guidelines for Using the Light Microscope
11. Guidelines for Using the Light Microscope
Always support the
microscope with one hand
underneath.
Keep the lenses clean by
wiping with lens tissue.
Never touch lenses
with fingers.
Always handle slides at
the edges.
12. Your microscope has 3 magnifications: Scanning, Low and High.
Each objective will have a written magnification. In addition to
this, the ocular lens (eyepiece) has a magnification. The total
magnification is the ocular x objective
Total Magnification
13. Total Magnification
The total magnification of an
image is equal to the
magnifying power of the eye
piece lens, multiplied by the
magnifying power of the
objective lens.
For example, if a Ă—10 objective
lens is used, assuming the eye
piece magnification is Ă—10, the
total magnification of the image
will be (Ă—10) Ă— (Ă—10) =
Ă—100.
14. Select the Lowest Power Objective Lens
To do this, put the Ă—4
objective lens in place and
position the nose piece so that
it lies directly above the hole in
the stage. The magnifying
power of a lens is usually
inscribed on its barrel.
It is normal practice to look
at a specimen at the lowest
available resolution first,
then to look more closely at
the specimen under a higher
resolution.
15. Placing the Slide on the Stage
Place the slide on the
stage, so that the specimen
is over the middle of the
hole on the stage.
Make sure that light is
shining through it and
then secure it in place
with the clips.
This will help to prevent
the slide from being
dislodged when you are
viewing it.
16. Lowering the Objective Lens
Look at the stage and the
slide from the side.
Then lower the objective
lens using the coarse
focus dial.
Lower the lens until it is
about 5 mm above the
slide.
This is to ensure that the
slide is not crushed and
damaged by the objective
lens.
17. Getting the Specimen into Focus
Looking through the microscope eye
piece, use the coarse focus dial to
move the objective lens slowly
upwards (never downward, as you
could easily crush and break the
slide). Do this until the specimen
comes into focus.
Try to keep both eyes open. This
will help to prevent eye strain
and headaches.
18. 1. Always start with the scanning objective.
Odds are, you will be able to see something
on this setting.
Use the Coarse Knob to focus and then the
fine adjustment knob until clear, image may
be small at this magnification, but you won't
be able to find it on the higher powers
without this first step.
Do not use stage clips, try moving the slide
around until you find something.
Getting the Specimen into Focus
19. 2. Once you've focused on Scanning, switch to Low Power
Use the Coarse Adjustment Knob to refocus. Then use the fine
adjustment knob to make the image crystal clear. Again, if you
haven't focused on this level, you will not be able to move to the next
level.
3. Now switch to High Power
(If you have a thick slide, or a slide without a cover, do NOT use the
high power objective). At this point, ONLY use the Fine Adjustment
Knob to focus specimens.
Recap
1. Scanning --> use coarse and fine knob
2. Low power --> use coarse and fine knob
3. High power --> use fine knob only
DO NOT SKIP
STEPS!!!!
Getting the Specimen into Focus
20. Adjusting the Diaphragm
The diaphragm can be
adjusted to let different
amounts of light through
the specimen. This is
because specimens vary in
thickness.
Finding the amount of light
that produces the best
viewing results for each
specimen is often a matter
of trial and error.
21. 1. Use pencil - you can erase and shade areas
2. All drawings should include clear and proper labels (and be large
enough to view details). Drawings should be labeled with the
specimen name and magnification.
3. Labels should be written on the outside of the circle. The circle
indicates the viewing field as seen through the eyepiece,
specimens should be drawn to scale - ie..if your specimen takes up
the whole viewing field, make sure your drawing reflects that.
Drawing of Specimens
Amoeba Amoeba
22. 1. Store microscopes with the scanning objective in place.
2. Wrap cords and cover microscopes.
*Double check to make sure you didn't leave a slide
3. Place microscopes in their designated location
(probably a cabinet)
Clean up!!!!!
23. Troubleshooting
Occasionally you may have trouble with working your microscope. Here are some
common problems and solutions.
1. Image is too dark!
Adjust the diaphragm, make sure your light is on.
2. There's a spot in my viewing field, even when I move the slide the spot stays in
the same place!
Your lens is dirty. Use lens paper, and only lens paper to carefully clean the objective
and ocular lens. The ocular lens can be removed to clean the inside. The spot is
probably a spec of dust.
3. I can't see anything under high power!
Remember the steps, if you can't focus under scanning and then low power, you
won't be able to focus anything under high power. Start at scanning and walk
through the steps again.
4. Only half of my viewing field is lit, it looks like there's a half-moon in there!
You probably don't have your objective fully clicked into place..
25. Quiz
1. When focusing a specimen, you should always start with the
___________________ objective.
2. When using the high power objective, only the
________ ___________ knob should be used.
3. The type of microscope used in most science classes is the
_________________ microscope
4. What part of the microscope can adjust the amount of light
that hits the slide? ______________________________
26. 5. You should carry the microscope by the ________ and the
__________.
6. The objectives are attached to what part of the microscope (it
can be rotated to click the lenses into place):
_______________ ________________
7. You should always store you microscope with
the ________________ objective in place.
8. A microscope has an ocular objective of 10x and a high
power objective of 50x. What is this microscope's total
magnification? ____________
27. Personal Study Guide
• Discuss the types of light microscopes and
highlight the importance of each