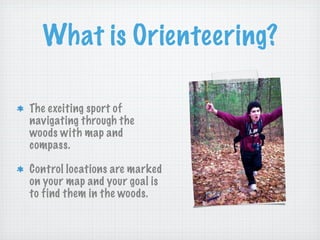
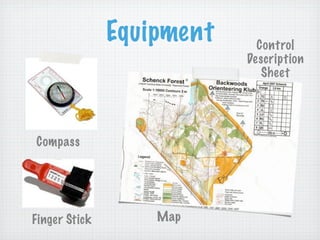
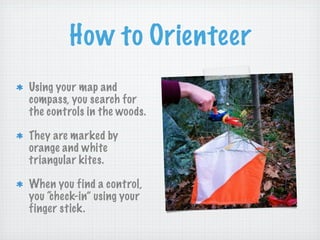
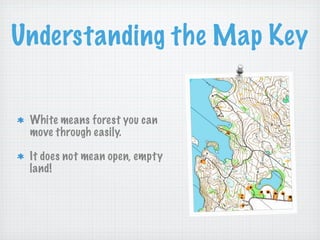
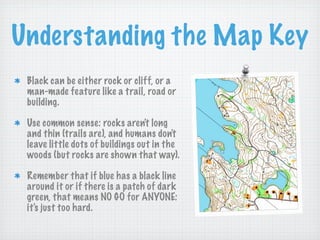
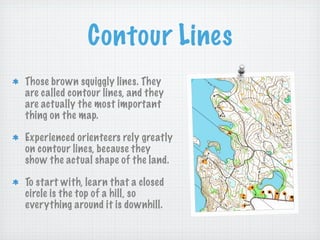
Orienteering
What is Orienteering?

The exciting sport of
navigating through the
woods with map and
compass.

Control locations are marked
on your map and your goal is
to find them in the woods.
History of Orienteering
Began in the late 19th century in Sweden.
The actual term "orientering" was first used in
1886 and meant the crossing of unknown land
with the aid of a map and a compass.
Grew from military training in land navigation
into a competitive sport for military officers, then
for civilians.
The first orienteering competition open to the
public was held in Nor way in 1897.
Equipment     Control
                           Description
                              Sheet


Compass


Finger Stick       Map
General Information
You can orienteer solo, or in
small groups.

You are competing for the
fastest time.

To ensure fairness bet ween
competitors the map is not
provided until the start, and
starts are staggered with
competitors starting at
intervals.
How to Orienteer
Using your map and
compass, you search for
the controls in the woods.

They are marked by
orange and white
triangular kites.

When you find a control,
you “check-in” using your
finger stick.
Holding Your Map
If you hold the map properly, it will show you where to go.
Hold the map with your "weak" hand (left hand if you are
right-handed, right hand if you are left-handed.)
Always keep your map parallel to the ground (horizontal)
and never up in front of your face (vertical).
Always hold the map so that the features on the map are in
the same directions around you as they are on the ground.
Keep your "weak" thumb on your present position on the
map at all times. That way you always know where you
are!
Map Key
Blue = water

Yellow = open area

Green = ground vegetation

Black = rock features or man-made
objects

White = forest you can move through
easily

Brown = contour lines, which show the
shape of the land
Understanding the Map Key


 White means forest you can
 move through easily.

 It does not mean open, empty
 land!
Understanding the Map Key
 Black can be either rock or cliff, or a
 man-made feature like a trail, road or
 building.

 Use common sense: rocks aren't long
 and thin (trails are), and humans don't
 leave little dots of buildings out in the
 woods (but rocks are shown that way).

 Remember that if blue has a black line
 around it or if there is a patch of dark
 green, that means NO GO for ANYONE:
 it's just too hard.
Contour Lines
Those brown squiggly lines. They
are called contour lines, and they
are actually the most important
thing on the map.

Experienced orienteers rely greatly
on contour lines, because they
show the actual shape of the land.

To start with, learn that a closed
circle is the top of a hill, so
everything around it is downhill.
Contour Lines

Lines close together show a steep
hillside.

Lines far apart show much
flatter land.

Also, it is helpful to remember the
little tabs on the cliff symbol on
the map always point downhill.
The Course
The orienteering course
is marked in purple or
red on a map.

A triangle is used to
indicate the start and a
double circle indicates
the finish.

Circles are used to show
the control points.
Control Description Sheet
Competitors receive a "control
description sheet" or "clue
sheet" which gives a precise
description of the feature and
the location of the kite.

Orienteering

  • 1.
  • 2.
    What is Orienteering? Theexciting sport of navigating through the woods with map and compass. Control locations are marked on your map and your goal is to find them in the woods.
  • 3.
    History of Orienteering Beganin the late 19th century in Sweden. The actual term "orientering" was first used in 1886 and meant the crossing of unknown land with the aid of a map and a compass. Grew from military training in land navigation into a competitive sport for military officers, then for civilians. The first orienteering competition open to the public was held in Nor way in 1897.
  • 4.
    Equipment Control Description Sheet Compass Finger Stick Map
  • 5.
    General Information You canorienteer solo, or in small groups. You are competing for the fastest time. To ensure fairness bet ween competitors the map is not provided until the start, and starts are staggered with competitors starting at intervals.
  • 6.
    How to Orienteer Usingyour map and compass, you search for the controls in the woods. They are marked by orange and white triangular kites. When you find a control, you “check-in” using your finger stick.
  • 7.
    Holding Your Map Ifyou hold the map properly, it will show you where to go. Hold the map with your "weak" hand (left hand if you are right-handed, right hand if you are left-handed.) Always keep your map parallel to the ground (horizontal) and never up in front of your face (vertical). Always hold the map so that the features on the map are in the same directions around you as they are on the ground. Keep your "weak" thumb on your present position on the map at all times. That way you always know where you are!
  • 8.
    Map Key Blue =water Yellow = open area Green = ground vegetation Black = rock features or man-made objects White = forest you can move through easily Brown = contour lines, which show the shape of the land
  • 9.
    Understanding the MapKey White means forest you can move through easily. It does not mean open, empty land!
  • 10.
    Understanding the MapKey Black can be either rock or cliff, or a man-made feature like a trail, road or building. Use common sense: rocks aren't long and thin (trails are), and humans don't leave little dots of buildings out in the woods (but rocks are shown that way). Remember that if blue has a black line around it or if there is a patch of dark green, that means NO GO for ANYONE: it's just too hard.
  • 11.
    Contour Lines Those brownsquiggly lines. They are called contour lines, and they are actually the most important thing on the map. Experienced orienteers rely greatly on contour lines, because they show the actual shape of the land. To start with, learn that a closed circle is the top of a hill, so everything around it is downhill.
  • 12.
    Contour Lines Lines closetogether show a steep hillside. Lines far apart show much flatter land. Also, it is helpful to remember the little tabs on the cliff symbol on the map always point downhill.
  • 13.
    The Course The orienteeringcourse is marked in purple or red on a map. A triangle is used to indicate the start and a double circle indicates the finish. Circles are used to show the control points.
  • 14.
    Control Description Sheet Competitorsreceive a "control description sheet" or "clue sheet" which gives a precise description of the feature and the location of the kite.

Editor's Notes