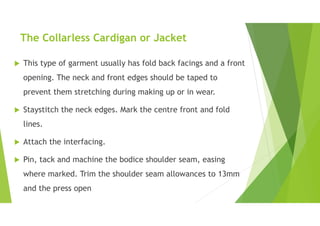
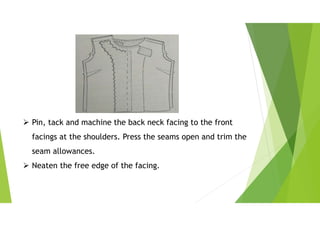
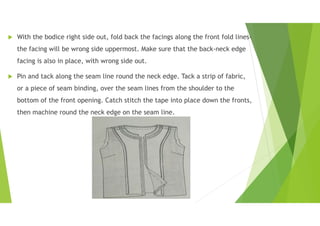
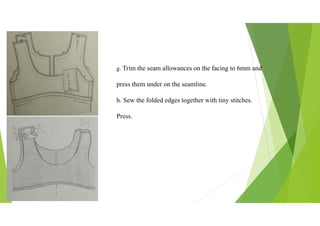
fullness in garment ( tuck dart pleats etc)Ragu Nathan
Sewing. to make full, as by gathering or pleating. to bring (the cloth) on one side of a seam to a little greater fullness than on the other by gathering or tucking very slightly.
Suji elements of design (1) the art of fashionzainabshafi4
The document discusses the elements and principles of design that are important for fashion design. It defines line, shape, space, texture, and color as the key elements. It then examines each element in depth, describing how they are used in fashion to create visual interest and guide the eye. Specific types of lines, shapes, uses of space, textures, and color properties are explained. The document suggests that an understanding of these elements and principles allows a designer to emphasize flattering features and de-emphasize less flattering ones for an appealing overall look.
Accessories: Item that enhances the aesthetic appeal or function of a garment including belt, scarves or other objects. In generally these components are sewing less. Type of Accessories
Accessories that are carried (Small pets, toy dog, cats, birds, snakes, taking parrots)
Accessories that are worn,(Necklace, Umbrella, Bag, Parts etc.)
Trims: Materials used to ornament or enhance garments. These components are attach in the garment by sewing. (Button, Zipper, Sewing thread, Lace, tape etc.)
Above definitions are fine when those are used as individual form. What happened when these terms used as “trims and accessories” in garment manufacturing industry?
Pattern making is a technical process that connects garment design to production. It involves creating paper templates for all garment components that will be cut from fabric. There are three main methods of preparing patterns: drafting, draping, and using commercial patterns. Computer software is now commonly used to assist with tasks like pattern grading and marker making to efficiently produce patterns in multiple sizes.
This session seeks to enlighten the learner on what pattern is, its improtance and and ways of obtaining them. it also help you to identify the tools and materials needed for pattern making
WHEN FINISHING THE NECKLINE EDGE OF A GARMENT, THE DESIGNER CAN CHOOSE TO ATTACH A COLLAR. THE SLIDES HIGHLIGHTS ON THE TYPES OF COLLARS AND HOW TO ATTACH THEM.
Pressing is an important finishing process in the apparel industry that uses heat, moisture, and pressure to shape fabrics and remove wrinkles. There are different types of pressing required for different garments depending on their design and material. These include no pressing for items like underwear, minimum pressing using steam for nightgowns, under pressing parts of garments before sewing, final pressing after assembly, and permanent pressing to maintain shapes after washing. Proper pressing helps increase garment aesthetics by removing creases and shaping darts and seams. A variety of pressing equipment is used including irons, steam presses, dolly presses, and tunnel finishers.
This document contains information about woven fabrics submitted by students Amit Biswas, Md. Ahasan Habib, and Tahmina Hossain Bristy to their lecturer Mr. Suja Ahmed Auporbo. It defines woven fabric as being made from two sets of warp and weft yarns interlaced at right angles. Woven fabrics are classified as having either a simple or compound structure. Simple structures use one set of parallel warp and weft yarns, while compound structures use more than one set of yarns including some for ornamental purposes. The document also describes and provides examples of various basic woven structures including plain weave, twill weave, satin weave
This document discusses different types of edge finishes used in clothing construction. It defines edge finishes as treatments given to raw edges of garments to make them look neat. Some common edge finishes mentioned include hemming, facings, bindings, and lacing. Hemming involves folding the edge twice and sewing it down. A facing involves attaching a duplicate layer of fabric to cover the raw edge. Binding uses a separate strip of fabric attached around edges. Lace can also be attached as an edge finish. Factors like the edge type and fabric are considered when choosing an edge finish.
Pattern making is the process of creating paper patterns that are then used to produce garments. It involves manipulating flat pieces of fabric or paper to conform to the three-dimensional shapes of the human body. Traditionally, pattern makers would carefully craft custom patterns for individual clients. With industrialization, standardized sizing became important for ready-to-wear clothing production. Today, computer software allows for faster, more accurate pattern design and grading for various sizes. The flat pattern method remains widely used in ready-to-wear fashion due to its speed and precision. Core tools for pattern makers include large-scale paper, rulers, pins, and measuring tapes.
This document discusses different types of seams used in garment construction. It begins by defining a seam as a method of joining two pieces of fabric together. There are several types of seams that are used for different purposes, including plain seams, double top seams, French seams, flat fell seams, welt seams, lapped seams, and piped and slot seams. Each seam type is described in terms of how it is constructed and what types of fabrics it is best suited for. Seams are an essential element of garment construction as they join fabric pieces together to create finished garments and accessories.
This document provides an introduction to different types of lace, including how they are made. It discusses needle lace, cutwork lace, bobbin lace, tape lace, knotted lace, crocheted lace, knitted lace, machine-made lace, and guipure lace. Specific laces mentioned include Brussels lace, Point de Gaze lace, Richelieu embroidery, Danish cutwork, Antwerp bobbin lace, Torchon lace, Chantilly lace, Brugge lace, tatting, Irish crochet, pineapple crochet, filet crochet, Shetland lace, and wedding ring shawls. Diagrams are provided showing examples of different lace styles.
This document discusses different types of knitting. It begins by explaining the basic process of knitting and different yarns and needles that can be used. It then describes various types of knitting machines including flat-bed and circular machines. The document focuses on classifying knitting into weft and warp knitting. It provides details on specific knitting stitches like jersey, purl, rib, and interlock. Warp knitting types like tricot, raschel, and milanese are also outlined. Finally, it briefly mentions double knit jacquard knitting machines.
This document provides information on various construction techniques for shirts and pockets for fashion design students. It discusses different types of shirt plackets like classic, French seamless, and covered plackets. It also covers yoke design and function, including midriff and partial yokes. The document defines pockets and describes applied, structural and inserted pockets. It also discusses creating variety in pocket designs. Finally, it lists five types of buttons: mother of pearl, polyester, horn, bone and wood buttons.
This document provides information on plain weave and twill weave structures. It discusses the key characteristics of plain weave, including that it is the simplest weave with a repeat size of 2 and produces a relatively strong fabric. Twill weaves are more complex and form diagonal lines. Different types of twill weaves are described, including warp face, weft face, and combination twills. The document also covers end uses for plain weave and twill weave fabrics.
Warp knitting is a method of knitting where loops are formed vertically along the length of fabric from warp yarns. There are several types of warp knitting including tricot, raschel, and milanese knits. Tricot knits use compound needles and are used for fabrics like lingerie, loungewear, and uniforms. Raschel knits use latch needles and heavier yarns, producing more textured fabrics for applications like carpets, home textiles, and outerwear. Milanese knits form diagonal patterns and are often made from filament yarns into lightweight fabrics.
This presentation discusses the four main types of fabrics: woven, knitted, non-woven, and braided. Knitted fabrics are made by interlocking loops of yarn and can be weft or warp knitted. Common knit fabrics used in clothing include jersey, pique, and rib fabrics. Non-woven fabrics are made by bonding fibers together and are used in products like diapers, wipes, and filters. Braided fabrics are made by interweaving three or more yarns in an overlapping pattern and are used for applications requiring strength and flexibility.
This presentation discusses trims and accessories used in garment manufacturing. It defines trims as items fixed to garments like buttons, zippers, and Velcro. Accessories are finishing items not integral to garments, such as neck bands and butterfly pieces. Examples of common trims and accessories are then described, including various button, zipper, and label types. Materials, uses, and applications of each item are outlined. The presentation aims to outline essential trims and accessories used in garment production and assembly.
The document discusses different types of pattern layouts used in cutting fabrics, including open layouts with no fold, lengthwise and crosswise center folds, off-center folds, and double or combination folds. Proper lay planning is important for efficient cutting room management to reduce costs, save fabric, and finish cutting on schedule. The different types of folds are used depending on the placement of patterns, width of fabric, and style of garment being cut.
There are several types of pleats that are used in clothing and upholstery to gather fabric. The main types are accordion pleats, knife pleats, box pleats, and inverted pleats. Pleats add extra room and allow fabric to move, gathering a wide piece of fabric into a narrower space. Their main purpose is functionality - pleats allow for more freedom of movement and prevent tightening and creasing, especially in areas like the hips when sitting. Pleats can be found on many different garments and accessories.
The document discusses various types of embellishment techniques used in garment construction including tucks, pleats, gathers, shirring, ruffles, plackets, fasteners, pockets, and necklines. It provides descriptions and instructions for different styles of each technique such as pin tucks, box pleats, patch pockets, v-necklines, and more. Examples and diagrams are included to illustrate the various embellishment methods.
Knitting is a method of fabric production using loops of yarn or thread. There are two main types - warp knitting where the yarn runs vertically, and weft knitting where the yarn runs horizontally. Weft knitting is used for finished garments and includes different stitches like plain, purl, rib which can be produced on flatbed or circular machines. Circular machines allow continuous production of tubular fabrics at high speeds. Common knit fabrics include jersey with wales on one side, rib with alternating wales, and interlock with a smooth surface on both sides.
There are several key steps in the development of clothing construction:
1) Humans began wearing animal skins and furs for protection, modesty, and appearance starting 100,000-500,000 years ago. Sewing was initially done by hand.
2) The invention of the sewing machine in the 1800s revolutionized garment production by enabling mass manufacturing. This led to the rise of ready-made clothing industries.
3) Proper fitting involves five factors - ease, line, grain, set, and balance. A well-fitted garment is comfortable and looks balanced from all angles.
This document lists various presser feet and accessories for a sewing machine that serve different purposes such as preventing fraying, attaching zippers, making buttonholes, hemming, quilting, attaching cords decoratively, guiding a 1/4 inch seam, and using a ruler to sew evenly spaced lines.
The document defines various terms related to patternmaking including parts of a garment like the bodice and waistline. It also covers patternmaking techniques such as draping, drafting, notches, and seam allowances. Finally, it discusses drafting a skirt from measurements including measuring the waist, hip, and half hip circumference of a dress form.
This document defines key terminology used in garment draping. It provides concise definitions for over 50 terms related to processes like cutting, pinning, slashing and marking fabric during pattern development. Some key terms defined include drape, trueing, grain, notch, dart, ease, style line, and vanishing point. The document serves as a reference for understanding the specialized language of draping garments on dress forms or models.
The document provides instructions for draping fabric on a dress form to design garments. It discusses preparing the dress form by constructing it using strips of paper molded to the body. It then explains the basic steps of draping, including aligning and anchoring the fabric, clipping excess fabric, and pinning darts. Key areas like the waist, princess seam, and shoulders are marked to transfer the design to the fabric. The overall goal is to manipulate the fabric to obtain perfect fit and harmony for the garment design.
Molds and sewing instructions for the most common baby clothes, like playsuit, dress shirts, overol, tailores moldes pants, elastic waist pants, fitting bodice patterns and hooded sweatshirt sleeveless for child, hooded sweatshirt sleeveless pattern,
The document provides information on using three-dimensional dress forms for designing and fitting clothing. It discusses how dress forms come in different sizes to represent different body types and how they allow designers to see how garments will fit and drape on the body. Adjustable forms can be tailored to fit specific individuals. The document then gives step-by-step instructions for making a custom dress form to match an individual's exact measurements and outlines the materials and methods needed.
The document provides instructions for preparing fabric and cutting patterns before sewing children's clothing. It outlines 5 key preparation steps: 1) choosing the correct pattern size, 2) washing and ironing fabric, 3) laying out the fabric flat with the printed side up, 4) placing patterns on the fabric, and 5) cutting out the pieces while standing. The document also describes assembly methods like overlocking raw edges, joining seams, and hemming. It discusses procedures for sewing specific items like pencil skirts and provides details on finishing touches and types of fasteners commonly used in children's wear.
Sewing machine is a textile machine used to stitch fabric together with thread. It provides instructions on how to sew a pencil skirt which includes: (1) Sewing the raw edges to prevent raveling; (2) Sewing and pressing darts to shape the waist; (3) Inserting a zipper on the back; (4) Interfacing the waistband for structure and shape; (5) Attaching the waistband to the skirt; (6) Adding a kick pleat for mobility; (7) Hemming the skirt; and (8) Attaching a hook and eye to secure the waistband. The document provides step-by-step guidance on sewing a basic pencil skirt.
The document provides instructions for altering the BurdaStyle JJ blouse pattern to create a short-sleeved blouse with a pleated front bib. It describes how to cut and prepare the pattern pieces, including pleating the front bib fabric. It then provides step-by-step sewing instructions to construct the blouse fronts, back, collar, sleeves, and complete the garment. Notions include fashion fabric, interfacing, and buttons.
The document provides an introduction and overview of basic hand stitches for sewing, dividing them into temporary stitches used for construction like basting, and permanent stitches like running stitch, backstitch, and slipstitch; it then describes various temporary and permanent stitch types in detail, including how to execute them and their common uses.
The document provides step-by-step instructions for draping fabric to create a basic bodice block pattern for a dress form. It describes how to prepare the front and back fabric panels, including marking grain lines and key points like the bust apex. It then details the draping process, including smoothing and pinning the fabric at the waist, shoulders, and neckline. Key areas are marked on the fabric and patterns are then traced from the draped fabric. Instructions are also given for cutting additional front and back princess panels.
This document provides step-by-step instructions for draping a basic bodice block and princess panels on a dress form. It details how to prepare the fabric by measuring and marking grain lines. It then outlines the draping process for the front bodice, back bodice, center front panel, side panels and more. Key steps include centering pattern lines on the form, clipping darts and hemlines, smoothing fabric over seams, and marking construction notches. The goal is to create a custom block that can be adjusted as needed for patternmaking.
Fashion Design student work (Dezyne E' cole College)dezyneecole
This document provides step-by-step instructions for draping a basic bodice block and princess panels on a dress form. It describes how to prepare the fabric by measuring and marking grain lines. It then details the draping process for the front bodice, back bodice, center front panel, side panels and more. Key steps include centering pattern lines on the form, clipping darts and hemlines, smoothing fabric over seams, and marking construction notches. The goal is to create a custom block that can be adjusted as needed for patternmaking.
The document discusses various topics related to advanced garment manufacturing including:
1) The three main divisions of apparel manufacturers - design, production, and sales. All divisions work together to design, produce, and sell clothing.
2) The design process and responsibilities of fashion designers which includes producing concepts, making sketches, developing patterns, overseeing production, and analyzing trends.
3) The different types of seams used in garment construction like plain seams, French seams, and decorative stitched seams. It also discusses techniques for adding fullness like darts, tucks, pleats and gathers.
4) Sequential operations in garment construction and the various classes of seams
This document is a project report submitted by Geeta Kumari, a student of fashion design, on the topic of garment technology. The report provides information on different types of seams and stitches, including definitions and examples. It discusses plain seams, lapped seams, French seams, flat felled seams, and more. It also covers topics like stitch per inch, classes of stitches, types of seams including superimposed seams, lapped seams, and bound seams. The report was submitted to fulfill requirements for Geeta Kumari's two-year diploma in fashion design.
Draping is a technique used by designers to manipulate fabric on a 3D form to achieve perfect fit and harmony between the garment design and the wearer's silhouette. There are several stages to the draping process, beginning with draping uncut fabric over a dress form to observe its characteristics without cutting. In subsequent stages, fabric is substituted, lines are taped on the form to guide draping, excess fabric is pinned around the form taking the drape's direction and fullness into account. The final stages involve truing lines, checking seam allowances, and making a sample garment to model fit.
The document provides details about fashion design courses, workshops, and drafting instructions. It includes information on workshops covering construction details of plackets and fasteners, pockets and necklines, and pre-teen tops with collars and sleeves. It also provides instructions for drafting a basic bodice block, pre-teen bodice, basic sleeve, and variations of sleeves including set in, kimono, raglan and bell sleeves. Further, it describes different types of collars like peter pan, sailor, straight, shawl and Chinese collars.
The document provides instructions for assembling a blouse using the unit method of construction. It explains that the unit method involves sewing each part of the garment (the units) separately before attaching them. The key steps are: 1) preparing the cut parts by finishing raw edges, sewing darts, etc., 2) sewing the shoulder seams, side seams, sleeves, and collar, 3) hemming the bottom, 4) making buttonholes, and 5) adding final touches. This systematic approach makes construction easier by minimizing handling of pieces and ensuring marks are accurately followed.
Pratigya Bhatnagar,B.Sc.-Fashion Technology+2 years Diploma dezyneecole
The document discusses garment finishing and its importance in determining the quality and branding of a garment. It states that garment finishing, including details like necklines, seams, and brand placement, can indicate whether a garment is branded or inexpensive. The document also provides instructions for adjusting pattern pieces to fit different shoulder shapes, including square, sloping, broad, and narrow shoulders. Additional garment finishing techniques like piping, facing, and draping are mentioned, as well as a "cut and insert" fitting technique using a contrasting fabric.
This document defines different types of seams and how they are constructed. It discusses plain seams, top stitched seams, flat fell seams, French seams, mantua maker's seams, and piped seams. For each seam type, it provides details on how to construct the seam, including placing fabric pieces together, stitching, pressing, and finishing raw edges. The document is intended to explain the working of common seam types and provide instructions for making different seams.
This document is a project report submitted by Dimpal Chouhan, a student at Dezyne E'cole College, on stitches and seam classes. The report begins with an acknowledgment and introduction. It then discusses stitches per inch, different types of seams suitable for various fabrics, and 7 classes of seams as defined by the British Standard. Each seam class has multiple seam types described in detail. The report concludes with applications and advantages/disadvantages of different stitch types. In summary, the document provides an in-depth overview of various stitches and seam constructions as part of Dimpal Chouhan's coursework at Dezyne E'cole College.
This document provides instructions for creating a continuous lap sleeve placket for blouses or shirts with long sleeves. It describes cutting a lap band that is double the length of the placket opening plus half an inch wide. The placket opening on the sleeve is reinforced and slashed. The lap band is then stitched to the placket opening, catching just a few threads at the tip. The lap band is folded and pressed to finish the placket.
This document discusses different types of sleeves and sleeve finishes. It describes set-in sleeves, raglan sleeves, and kimono sleeves. Set-in sleeves are the most common and come in high-cap and low-cap styles. Raglan sleeves have diagonal seams from underarm to neckline. Kimono sleeves are cut in one piece with the bodice. The document also covers various methods for finishing sleeve edges, including hems, facings, bindings, and different types of plackets like horizontal faced and continuous bound plackets. Sleeve design and construction are important for the quality and fit of a garment.
DART MANIPULATION ALLOWS ONE TO MOVE DART FROM ITS ORIGINAL POSITION TO A NEW POSITION IN THE SLOPER.
THIS SLIDE TEACHES STEP BY STEP WITH ILLUSTRATIONS HOW TO MOVE DARTS USING BOTH THE SLASH AND SPREAD METHOD AND PIVOT METHOD.
Darts are triangular folds in fabric that allow a garment to better fit the body's curves. In patterns, darts are triangular or diamond shapes. Darts take in fullness at the fullest part of the body and taper to nothing at the ends. The size of a dart depends on the angle at the tip, with a larger angle indicating a larger dart. When moving or adjusting darts, the length, width, and size may change but the size should remain the same. Darts are essential for fitting garments to the body's shape.
This document discusses the usage of darts in patternmaking. It defines darts as triangular folds in fabric that are tapered at one or both ends to allow a garment to conform to the body's curves. Darts are represented as triangular or diamond shapes in patterns. There are different types of darts including waist, underarm, and shoulder darts. Darts are used to control fullness and fit fabric to the body's anatomy. The size of a dart is determined by its angle, while its length and width can change if the dart is moved to a new seamline. Pivoting points and folding of darts are also discussed.
This unit seeks to enable learners to understand the importance of taking accurate body measurement and also know how to take body measurement for accurate fit in sewing and pattern drafting.
Explanation and classification of stitchesTsekpoPeace
This content is to help the student teacher to under the concept of stitches. it aims at giving at giving the overview, types and guidelines to working stitches.
This presentation includes basic of PCOS their pathology and treatment and also Ayurveda correlation of PCOS and Ayurvedic line of treatment mentioned in classics.
it describes the bony anatomy including the femoral head , acetabulum, labrum . also discusses the capsule , ligaments . muscle that act on the hip joint and the range of motion are outlined. factors affecting hip joint stability and weight transmission through the joint are summarized.
This slide is special for master students (MIBS & MIFB) in UUM. Also useful for readers who are interested in the topic of contemporary Islamic banking.
Strategies for Effective Upskilling is a presentation by Chinwendu Peace in a Your Skill Boost Masterclass organisation by the Excellence Foundation for South Sudan on 08th and 09th June 2024 from 1 PM to 3 PM on each day.
How to Manage Your Lost Opportunities in Odoo 17 CRMCeline George
Odoo 17 CRM allows us to track why we lose sales opportunities with "Lost Reasons." This helps analyze our sales process and identify areas for improvement. Here's how to configure lost reasons in Odoo 17 CRM
Introduction to AI for Nonprofits with Tapp NetworkTechSoup
Dive into the world of AI! Experts Jon Hill and Tareq Monaur will guide you through AI's role in enhancing nonprofit websites and basic marketing strategies, making it easy to understand and apply.
Physiology and chemistry of skin and pigmentation, hairs, scalp, lips and nail, Cleansing cream, Lotions, Face powders, Face packs, Lipsticks, Bath products, soaps and baby product,
Preparation and standardization of the following : Tonic, Bleaches, Dentifrices and Mouth washes & Tooth Pastes, Cosmetics for Nails.
Exploiting Artificial Intelligence for Empowering Researchers and Faculty, In...Dr. Vinod Kumar Kanvaria
Exploiting Artificial Intelligence for Empowering Researchers and Faculty,
International FDP on Fundamentals of Research in Social Sciences
at Integral University, Lucknow, 06.06.2024
By Dr. Vinod Kumar Kanvaria
A workshop hosted by the South African Journal of Science aimed at postgraduate students and early career researchers with little or no experience in writing and publishing journal articles.
ISO/IEC 27001, ISO/IEC 42001, and GDPR: Best Practices for Implementation and...PECB
Denis is a dynamic and results-driven Chief Information Officer (CIO) with a distinguished career spanning information systems analysis and technical project management. With a proven track record of spearheading the design and delivery of cutting-edge Information Management solutions, he has consistently elevated business operations, streamlined reporting functions, and maximized process efficiency.
Certified as an ISO/IEC 27001: Information Security Management Systems (ISMS) Lead Implementer, Data Protection Officer, and Cyber Risks Analyst, Denis brings a heightened focus on data security, privacy, and cyber resilience to every endeavor.
His expertise extends across a diverse spectrum of reporting, database, and web development applications, underpinned by an exceptional grasp of data storage and virtualization technologies. His proficiency in application testing, database administration, and data cleansing ensures seamless execution of complex projects.
What sets Denis apart is his comprehensive understanding of Business and Systems Analysis technologies, honed through involvement in all phases of the Software Development Lifecycle (SDLC). From meticulous requirements gathering to precise analysis, innovative design, rigorous development, thorough testing, and successful implementation, he has consistently delivered exceptional results.
Throughout his career, he has taken on multifaceted roles, from leading technical project management teams to owning solutions that drive operational excellence. His conscientious and proactive approach is unwavering, whether he is working independently or collaboratively within a team. His ability to connect with colleagues on a personal level underscores his commitment to fostering a harmonious and productive workplace environment.
Date: May 29, 2024
Tags: Information Security, ISO/IEC 27001, ISO/IEC 42001, Artificial Intelligence, GDPR
-------------------------------------------------------------------------------
Find out more about ISO training and certification services
Training: ISO/IEC 27001 Information Security Management System - EN | PECB
ISO/IEC 42001 Artificial Intelligence Management System - EN | PECB
General Data Protection Regulation (GDPR) - Training Courses - EN | PECB
Webinars: https://pecb.com/webinars
Article: https://pecb.com/article
-------------------------------------------------------------------------------
For more information about PECB:
Website: https://pecb.com/
LinkedIn: https://www.linkedin.com/company/pecb/
Facebook: https://www.facebook.com/PECBInternational/
Slideshare: http://www.slideshare.net/PECBCERTIFICATION
ISO/IEC 27001, ISO/IEC 42001, and GDPR: Best Practices for Implementation and...
NECKLINE FINISHES
1.
2. MS. PEACE AKOSUA TSEKPO
VOCATIONAL AND TECHNICAL EDUCATION
HOME ECONOMICS UNIT (CLOTHING AND TEXTILES)
3. The neckline is an important part of a garment that
must be hard-wearing therefore time and care should be
spent on it. When the garment has no collar, it is
possible to finish the neckline neatly and simply with a
facing, piping or binding, but this must be sewn very
accurately for an elegant appearance.
BASIC NECKLINE TREATMENTS
4. The neckline of garments can be finished in a number of
ways. They can be finished to be flat and smooth or they can
be finished by adding other features to form an extension on
the neckline. There exist a variety of neck treatments.
Necklines can be bound or faced. Collars are also used to
finish necklines.
5. Normally a facing pattern is shaped to fit the neckline and is
included in the pattern. If a facing pattern is not included then the
facing strip should be cut on bias. When the inside curve of a
neckline is bound, stretch the bias into a curve then press before
attaching it. All necklines should be stay-stitched before making
up, and most necklines keep their shape better if they are
interfaced.
6. Shaped facing for necklines
Here the neck edge is finished by reinforcing it with a hidden
facing. Whatever the shape of the finished neckline-square,
front ‘V’, bateau (boat- shaped) round or standing- the
method of fitting the facing is similar to the one given below.
The facing may be fitted onto the right side of the garment as
part of the design, and may be of contrasting fabric, or
stitched with contrasting thread, as a decoration.
7. General Method
1. Stay stich the neck edge by machining each piece each piece next to the seam line, just
inside the seam allowance. This prevents stretching during making up. Interface the facing.
2. Pin and tack to the bodice pieces together, matching balance markings. Try on and adjust
for fit.
3. Stitch and press the bodice pieces together on the seam line.
4. Then insert a zip if required.
8. 5. Prepare the facing by pinning the pieces together, right sides together, matching the
pattern notches.
6. Tack and machine on the seam line. Trim these seam allowance to 10mm and press
open.
7. Neaten the outer edge of the facing.
8. With the bodice right side out, pin the facing (wrong side out) to the neck edge. Check
that the pattern notches and the shoulder seams match exactly. Tack into place.
9. 9. Machine along the seam line round the neck edge, pivoting at any corners and making
straight lines or smooth curves according to the style.
10. Clip curves or corners in the seam allowance.
11. Trim away the facing seam allowance to 3mm and the bodice seam allowance to 6mm.
press the seam stitching.
10. 12. Turn to the wrong side and press the seam allowance up onto the wrong side of the facing.
13. Machine along the facing close to the neck seam, through all layers. This under stitching will prevent
the facing rolling over to the right side.
14. Fold the facing onto the wrong side of the bodice, rolling the edge so that the seamed edge falls just
inside and does not show from the right side. Tack round neck edge through all layers. Press the facing.
15. Hem the free edge of the facing to the seam allowances of the shoulder seams, not to the bodice.
11. 16. Fold the ends of the facing under and slipstitch to the zip tape, at least 3mm from the teeth.
Press. Sew a hook and eye on the facing ends above the zip.
12. The Slashed or ‘V’ shaped
Usually the pattern is marked indicating slashed opening of the garment.
The facing should be attached to the garment before slashing.
Place right sides together. Pin and tack facing to the garment. The facing should cover
the marked slash area.
Tack a short length of fabric or seam binding over the facing at the point of the ‘V’, as
reinforcement.
13. Machine the facing to the neckline edge. Continue the machining down
the front 6mm from the centre then taper the machining to a point at
the lower end of the opening. Make one stitch across the point before
starting along the second side.
Machine stitch a second time round the point, using a fine stitch.
Cut or slash between machined lines
Remove the tacking and then turn the facing to the inside part of the
garment.
Under stitch the facing and catchstitch the facing down at the seams.
Press the facing to the wrong side of the garment then tack or slip-
stitch facing invisibly to the garment.
14.
15. The Collarless Cardigan or Jacket
This type of garment usually has fold back facings and a front
opening. The neck and front edges should be taped to
prevent them stretching during making up or in wear.
Staystitch the neck edges. Mark the centre front and fold
lines.
Attach the interfacing.
Pin, tack and machine the bodice shoulder seam, easing
where marked. Trim the shoulder seam allowances to 13mm
and the press open
16. Pin, tack and machine the back neck facing to the front
facings at the shoulders. Press the seams open and trim the
seam allowances.
Neaten the free edge of the facing.
17. With the bodice right side out, fold back the facings along the front fold lines-
the facing will be wrong side uppermost. Make sure that the back-neck edge
facing is also in place, with wrong side out.
Pin and tack along the seam line round the neck edge. Tack a strip of fabric,
or a piece of seam binding, over the seam lines from the shoulder to the
bottom of the front opening. Catch stitch the tape into place down the fronts,
then machine round the neck edge on the seam line.
18. Bound, Piped or Corded Neckline
Binding of any width can be used to finish all types necklines, particularly
curved shapes where the bias binding will stretch to fit. A crossway strip can
be cut from the garment fabric, or bought bias binding in matching or
contrasting colours may be used. By filling the binding with cord, a piped or
corded edge may be produced making a firm and attractive edge.
19. 1. Unfaced Bateau (or Boat Shaped) Neckline
This very simple finish is used on loosely fitted dresses and jerkins which
have no neck fastening.
a. Staystitch the bodice neck edge just outside the seam line.
b. Stitch and press the bodice darts, then tack the bodice together for fitting.
Make any necessary alterations so that the neckline is exactly the right
size, and that it lies flat.
c. Machine, and press the shoulder and side seams.
20. d. Press under 3 mm of the seam allowance of the neckline
and shoulder seam.
e. Fold the neck edges to the wrong side along the seam line,
pressing the shoulder seam.
f. Slipstitch the edge of the hem to the bodice, picking up
one thread each time so that stitches do not show on the right
side.
g. Remove tacking. Turning right side out. Press.
21. Cowl Neckline
The soft drape of a cowl neckline is formed by setting in a yoke cut on the cross.
This yoke is usually mounted to give it body so that it drapes well. A piece of
fabric cut on the straight grain is also added so that the neck area is supported
and does not fall out of shape.
Mount the lining onto the yoke sections.
Pin, tack and machine and the mounted yoke sections at the shoulders. Press,
clip and trim the seams.
22. a. Stitch the darts in the back of the stay piece and
press them to the centre back.
b. Join the shoulder seams of the stay with bias
binding.
c. Tack the stay piece to the yoke, wrong side
together.
d. Tack and stitch the yoke to the garment, finishing
the corners carefully
23. e. Pin in the back-neck zip and blind stitch the facing to the
lining fabric. Some fabrics need a weight attaching to pull the
cowl down into soft drapes. Experiment to find the right size
and place for the weight.
24. 1. One Piece Neckline and Armhole Facing (Also called a combination Facing)
In this method one piece of facing neatens both neckline and armholes. For
garments made from thick fabrics the facing may be cut from lining fabric. The
method differs slightly according to the width of the shoulder. For shoulder wider
than 5cm
a. Prepare the neck and armhole edges by staystitching.
b. Attach interfacing if required.
25. a. Pin, tack and machine garment and facing shoulder seams
separately, press open and trim.
b. Neaten long un-notched facing edges as these will not be
stitched to the garment.
c. With right sides together pin and tack the facing to the
garment. Carefully match the balance marks on the neck
and armhole edges. Machine on the seam lines. Trim and
layer or grade the seam allowances, clipping the curves.
26. d. Tack the facing into place, press carefully and catch stitch
facing the side seams.
For shoulders narrower than 5cm;
In this method the shoulder seams are finished as the final stage,
because it would be impossible to pull the facing through the
narrow openings on the shoulders.
a. Staystitch and interface the neck and armholes as before.
b. Prepare the bodice and facing as before but do not stitch the
shoulder seams.
27. c. Make a tiny, temporary tuck in the garment at shoulders so that the facing will be
slightly smaller, and therefore hidden, later.
d. With right sides together, pin, tuck and machine facing to garment along the neck and
armhole seamlines. Trim and layer or grade, the seam allowances.
e. Remove the pins in the temporary tucks then under stitch the facing to the seam allowances, as far
along as possible.
f. Fold the facing back and stitch the bodice shoulder seams. Sew in the machine threads securely at
both ends. Press the seam line.
28. g. Trim the seam allowances on the facing to 6mm and
press them under on the seamline.
h. Sew the folded edges together with tiny stitches.
Press.
29. References:
Gavor et al. clothing and textiles for schools and colleges,
Adwinsa Publications (GH) Ltd (2014).