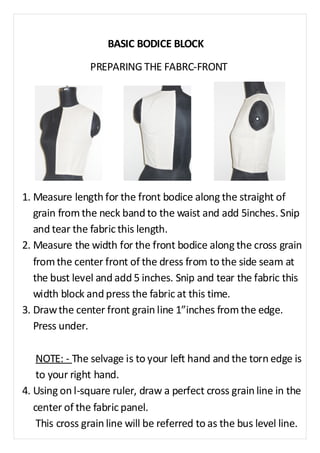
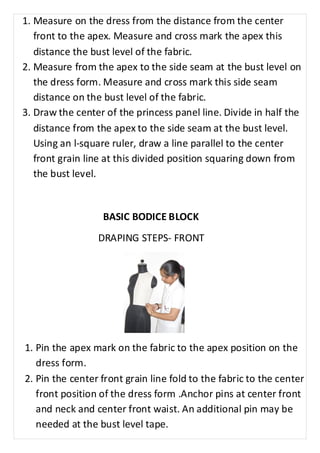
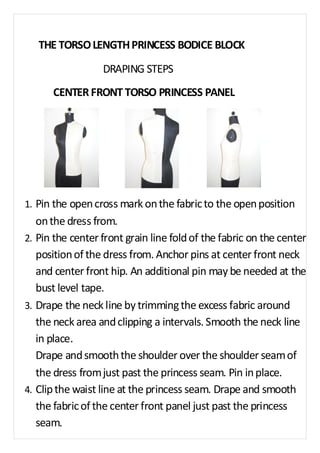
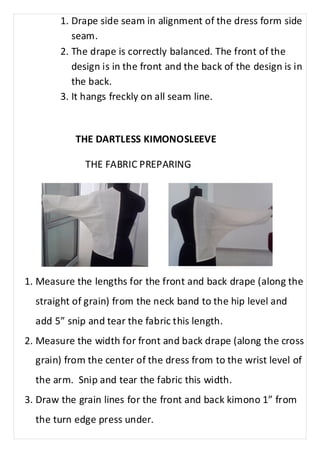
FASHION DRAPING 
TECHNIQUES 
A STEP-BY-STEP VISUAL 
GUIDE TO FASHION DESIGN 
PRESENTED BY : 
KHUSHBOO KHUNTWAL 
B. Sc. FT. 1ST YEAR DIPLOMA 
FASHION TECHNOLOGY
SUBMITTED TO 
DEZYEN E’ COLE COLLEGE TOWARDS 
PRACTICAL FULFILLMENT FOR THE AWARDS 
OF 
ADVNCE DIPLOMA IN FASHION TECHNOLOGY 
SUBMITTED BY 
KHUSHBOO KUHNTWAL 
ADVANCE DIPLOMA IN FASHION TECNOLOGY 
ADVISER 
MADHURI TANDON 
DEZYNE E’ COLE COLLEGE AJMER 2010-2011
BASIC BODICE BLOCK 
PREPARING THE FABRC-FRONT 
1. Measure length for the front bodice along the straight of 
grain from the neck band to the waist and add 5inches. Snip 
and tear the fabric this length. 
2. Measure the width for the front bodice along the cross grain 
from the center front of the dress from to the side seam at 
the bust level and add 5 inches. Snip and tear the fabric this 
width block and press the fabric at this time. 
3. Draw the center front grain line 1”inches from the edge. 
Press under. 
NOTE: - The selvage is to your left hand and the torn edge is 
to your right hand. 
4. Using on l-square ruler, draw a perfect cross grain line in the 
center of the fabric panel. 
This cross grain line will be referred to as the bus level line.
1. Measure on the dress from the distance from the center 
front to the apex. Measure and cross mark the apex this 
distance the bust level of the fabric. 
2. Measure from the apex to the side seam at the bust level on 
the dress form. Measure and cross mark this side seam 
distance on the bust level of the fabric. 
3. Draw the center of the princess panel line. Divide in half the 
distance from the apex to the side seam at the bust level. 
Using an l-square ruler, draw a line parallel to the center 
front grain line at this divided position squaring down from 
the bust level. 
BASIC BODICE BLOCK 
DRAPING STEPS- FRONT 
1. Pin the apex mark on the fabric to the apex position on the 
dress form. 
2. Pin the center front grain line fold to the fabric to the center 
front position of the dress form .Anchor pins at center front 
and neck and center front waist. An additional pin may be 
needed at the bust level tape.
1. Pin the center of the princess panel line of the fabric exactly 
in the center of the princess panel of the dress form. Anchor 
pins at the waist line and the cross grain. Align a pin the 
from cross grain. 
NOTE:- The purpose for centering the princess panel line is 
to be sure the cross grain line is perfectly aligned check that 
the length wise grain is parallel to center front and 
perpendicular to the cross grain. 
2. Clip the waist line fabric at the center of the princess panel. 
From the bottom edge up to the waist seam tape. 
3. The excess fabric between the center front waist positions 
becomes the front waist dart. Drape and pin the excess 
fabric in place on the princess seam as the front waist dart. 
Excess fabric is folded toward the center front. 
4. Smooth and drape the reminder of the waist line fabric 
across the waist tape till the fabric passes the side seam pin 
the side seam waist corner. Also drape the reminder of the 
front side seam pass the side seam and flat arm plate. Pin in 
place. 
5. Drape the neckline by trimming the excess fabric around the 
neck area and clipping at internals. Smooth the neckline in 
place. Drape and smooth the fabric over the shoulder seam 
of the dress form. Just pass the princess seam pin in place. 
6. The excess fabric that falls between the neckline and the 
shoulder/ armhole area becomes the amount of the 
shoulder dart this amount various from one bust size to 
another.
1. Fold and pin this excess fabric on the shoulder princess 
seam of the dress from. The excess fabric is folded towards 
the center front neck. 
2. Mark all key areas of the dress form to the fabric. 
1. Neck line 
Cross mark at center front neck and at neckline corner 
lightly mark reminder of neck line. 
2. Shoulder seam and shoulder dart. 
a.)Top at shoulder seam ridge. 
b.) Middle at screw level. 
c.) Cross mark bottom at side seam. 
3. Waist line and waist dart. 
4. Side seam lightly mark cross mark center front waist at 
Side Seam and both side of the dart. 
BASIC BODICE BLOCK 
PREPARING THE FABRIC- BACK 
1. Measure length for the back bodice along the straight of 
grain from the neck band to the waist and add 5 inches. 
2. Measure the width of for the back bodice along the cross 
grain from the center back seam at the under arm and add 5 
inches. 
3. Draw the center back grain line 1“from the torn edge and 
press under.
1. Cross mark the center back neck line position 3 inches below 
the top of the fabric on the center back grain line. 
2. Measure down 41/4” from the back neck line mark. Using an 
l-square ruler draw a perfect cross grain line at this position 
(This is considered the shoulder blade level). 
NOTE:-This 41/4” measurement represents one fourth of 
the distance from center back neck to waist for a size 8 or 10 
women’s figure. 
Also, measure the distance from center back to the arm 
plate at the shoulder level of the dress from. Measure and 
cross mark this back shoulder distance on the fabric at the 
shoulder blade level line. 
BASIC BODICE BLOCK 
DRAPING STEPS – BACK 
1. Pin the center front grain line fold of the fabric to the center 
back position on the dress from. 
Align the neck line position mark of the fabric to the center 
back neck position on the dress from. 
2. Pin and drape the back cross grain line of the fabric to the 
shoulder blade level on the dress from. Pin the arm plate 
cross mark ¼” away from plate (At armhole ridge). 
Distribute excess ease along shoulder blade level. 
NOTE:-This line is correctly draped in to position when the drape 
hangs freckly and evenly without any drag or pulled
down look. Also, the lower edge of the drape shoulder hangs 
parallel to the floor. 
1. Drape in the back waist line dart (7”long and 11/4”wide) 
Smooth the fabric towards the side seam till the fabric 
passes the princess seam. 
Cross mark at the princess/ Waist seam measure and cross 
mark 7” up from the waist line on the back princess seam. 
At the waist line fold the princess seam cross mark to the 
11/4” mark. Taper the dart to nothing at the 7”mark. 
2. Clip the waist line fabric at the center of the princess panel 
up to the button of the waist seam tape. Smooth the fabric 
across the waist tape till the fabric passes the side seam. Pin 
at the side seam/ waist corner. 
3. Drape the back side seam by smoothing the fabric pat the 
side seam and flat over the dress from pin in place. 
4. Drape and smooth the back neck line by carefully trimming 
the excess fabric around the neck area and clipping at 
intervals. Continue to smooth the fabric over the shoulder of 
the dress form and pin in place. 
5. Drape in the back shoulder dart (3”long and ½”wide) straight 
at the neck line. Smooth the fabric over the shoulder seam 
of the dress form to the princess seam and cross mark on 
the princess seam at the shoulder, measure towards the 
armhole ½” and cross mark. Also on the princess seam 
measure down 3” from the shoulder seam. Fold the fabric 
from the shoulder seam cross mark to the ½” cross mark. 
Taper the dart to nothing at the 3” cross mark. 
6. Mark all key area of the dress from to the fabric.
· Neck line 
Cross mark at center back neck and at neck line/ 
shoulder corner. Lightly mark remainder of neck line. 
· Shoulder seam and shoulder dart. 
· Lightly mark shoulder seam and cross mark shoulder 
dart and shoulder ridge corner. 
· Arm plate. 
a) Top at shoulder seam ridge. 
b) Middle at screw level. 
c) Bottom at the side seam cross mark. 
· Side seam – lightly mark 
· Waist line and waist dart seam waist and both side of 
the dart. 
Check the drape by spinning the front and back side seam 
and front and back shoulder seam together before 
proceeding to the next steps. 
1. Remove the fabric from the dress from and lay flat on table. 
If you are planning to true up the fabric on the paper 
complete the following steps. 
a) Draw in the straight of grain and cross grain on the 
pattern paper. Place the fabric on top of the paper. 
Notching the straight of grain and cross grain. 
b) With a trace wheel, transfer all the fabric markings on the 
paper. 
2. Draw a short go degree angle at- 
Center front neck (1/4”) 
Center front waist (1/2”) 
Center back neck (1”)
Center back waist (1”) 
1. Draw in the front darts using a straight ruler. 
Front waist darts (1” from the open through the waist dart 
cross mark) 
Front shoulder dart (1” from the open through the shoulder 
dart cross mark) 
Back waist dart (vanishing point through waist dart cross 
mark) 
Back shoulder dart (vanishing point to back waist dart 
through shoulder dart connect other shoulder dart cross 
mark. 
PRINCESS PANEL 
1. Measure the length for the front and back panel (along the 
straight of grain) from the neck band to the waist and add 5” 
snip and tear the fabric this length. 
2. Fold the fabric from selvage to selvage and snip and tear the 
fabric piece in half length wise.
Use one piece for the front panels and the other piece for 
the back panel. 
1. Measure the width for the center front panel (along the 
cross grain) from the center front of the dress from to the 
princess seam at the apex, and add 4”. 
Using one of the fabric pieces prepared in step 2, snip and 
tear the fabric this width. 
Use the remaining front piece for the side front panel. 
2. Measure the width for the center back panel from the 
center back of the dress from to the back princess seam at 
the shoulder blade level. 
And add 4”. Using the second fabric piece prepared in step 2 
snip and tear the fabric this width. 
Use the remaining back fabric piece for the side back panel. 
3. Draw the grain line for the center front panel 1” from the 
torn edge press under. 
4. Draw the cross grain line for the front panel in the center of 
the both panel. 
5. Measure the dress form from center front to the apex, 
measure and cross mark the apex this distance of the cross 
grain line. 
6. Draw the grain line for the center back panel 1” from the 
torn edge. Press under. 
Draw the grain line for the side back panel in the center of 
the fabric piece. 
7. Draw the cross grain line for both back panels 8” from the 
top of the fabric edge.
THE PRINCESS BODICEBLOCK 
DRAPING STEPS 
CENTER FRONT PANEL 
1. Pin the apex cross marks on the fabric to the apex position 
on the dress from. 
2. Pin the center front grain line fold of the fabric to the center 
position of the dress from. 
Anchor pins at center front neck and center front waist. An 
additional pin may be needed at the bust level tape. 
3. Drape the neck line trimming the excess fabric around the 
neck area and clipping at intervals. Smooth the neck line in 
place. 
4. Drape and smooth the waist line place from center front to 
just past the princess seam. Pin in place. 
5. Mark all key area of the dress from on the center front 
panel. 
· Neck line 
· Waist line 
· Princess seam and style line 
· Notches 
· Shoulder seam 
6. True up center front panel. Add seam allowance and trim all 
excess fabric place panel back on the dress from.
SIDE FRONT PRINCESS PANEL 
1. Pin the grain line of the side front panel to the center of the 
front princess panel on the dress from matching the cross 
grain of the side seam bust panel to the cross grain of the 
center front panel. 
Anchors pins on the cross grain at the bust level. Place 
another anchor pin on the straight of grain at the waist line. 
1. Clip the waist line at the center of the front princess panel 
up to the bottom of the waist line seam tape. 
Drape and smooth the waist line on place. 
2. From the grain line to the side front panel smooth the fabric 
past the side seam of the dress from do not allow the grain 
line to slip out of position. Pin the side seam in place. 
3. Drape the shoulder by carefully smoothing the excess fabric 
above the bust level up and over the dress from. 
NOTE: - The grain line will look as if it is angled toward the 
neck line. 
4. Smooth the fabric over the princess seam add pin the 
princess seam in place. 
NOTE: - The excess fabric will drape over the bust level area 
creating ease at the princess seam between the notches. 
5. Mark all key areas of the dress from on the side front panel. 
Princess seam and style line notches (match the center front 
panel notches)
Arm plate 
Shoulder seam at ridge 
Middle of plate at screw level 
Bottom of plate at side seam 
Shoulder seam 
Side seam 
Waist line 
1. Remove the side front panel from the dress from and true 
up all the lines. Add seam allowance. 
Trim excess fabric, leaving all seams allowance. Pin to front 
panel and return to check seam notches and balance. 
THE PRINCESS BODICEBLOCK 
DRAPING STEPS 
CENTER BACK PRINCESS PANNEL 
1. Pin the center back grain line fold of the fabric to the center 
back position of the dress from. 
Align and line the cross grain to the shoulder blade level of 
the dress from. 
1. Drape and smooth the back waist line from center back to 
just pass the princess seam. Pin the waist line in place. 
2. Drape and smooth the back neck line by carefully trimming 
the excess fabric around the neck area and clipping at 
intervals. 
Continue to smooth the fabric over the shoulder of the dress 
from and pin in place.
1. Mark all key areas of the dress from on the center back 
panel 
Neck line 
Waist line 
Shoulder seam 
Back princess seam and style line notches (a double notch is 
used in the back) 
2. Remove the center back panel drape from and true up all 
lines. Add seam allowance trim all excess fabric, leaving all 
seam allowance. Place this center back drape on the dress 
from. 
THE PRINCESS BODICE BLOCK 
DRAPING STEPS 
SIDE BACK PRINCESS PANEL 
1. Pin the grain line of the side back panel to the center of the 
back princess panel on the dress from matching all cross 
grain at the shoulder blade. 
2. Clip the waist line at the side back panel up to the bottom of 
the waist seam tape. Smooth and pin the waist line in place. 
3. From the grain of the side back panel. Smooth the fabric 
past the side seam of the dress from. Do not allow the grain 
line to slip out of position. Pin the side seam in place. 
4. Drape the shoulder by smoothing the excess fabric from 
above the shoulder level up and over the shoulder seam of 
the dress from.
NOTE: - The grain line will look as if it is angle toward the 
neck line (over the cross grain). 
1. From the grain line of the side back panel smooth the fabric 
past the princess seam of the dress from. Do not allow the 
grain line to slip out of position. Pin the princess seam in 
place. 
2. Mark all key areas of the dress from on the side back panel. 
Princess seam and style line notches (match to center back 
panel double notches) 
Arm plate 
Shoulder seam at ridge. 
Middle of plate at screw level. 
Bottom of plate at side seam 
Side waist 
Waist line 
3. Remove the drape from and true up all lines. Add seam 
allowance trim all excess fabric, leaving all seam allowance. 
Pin the entire garment together and place the drape on the 
dress from check for accuracy fit and hang. 
THE TORSO LENGTH PRINCESS BODICE BLOCK 
DRAPING THE FABRIC
1. Measure the length for the front and back panel (along the 
straight grain) from the neck band to the hip area and add 
5”. Snip the tear the fabric this length. 
2. Fold the fabric from salvage to salvage snip and tear the 
fabric piece in half length wise. 
Use one piece for the front panel and the other piece for the 
back panel. 
3. Measure the width for the center panel (along the cross 
grain) from front of the dress from to the princess seam at 
the open and add 5”. 
Snip and tear the fabric this width use the remaining fabric 
piece for the side front panel. 
4. Draw the grain line for the center front panel 1” from the 
torn edge. Press under. 
5. Draw the grain line for the side front panel in the center of 
the fabric piece. 
6. Draw the cross grain lines for the front and side front panel 
12” from the top edge of the fabric. 
7. Measure the dress from center front to the open. Measure 
and cross mark the apex. This distance on the center front 
panel on the cross grain line. 
8. Draw the grain line for the center back panel 1” from the 
torn edge. Press under. 
Draw the grain line for the side back panel, in the center of 
the fabric piece. 
9. Draw the cross grain line for both back panels 8". From the 
top of the fabric edge.
THE TORSO LENGTH PRINCESS BODICE BLOCK 
DRAPING STEPS 
CENTER FRONT TORSO PRINCESS PANEL 
1. Pin the open cross mark on the fabric to the open position 
on the dress from. 
2. Pin the center front grain line fold of the fabric on the center 
position of the dress from. Anchor pins at center front neck 
and center front hip. An additional pin may be needed at the 
bust level tape. 
3. Drape the neck line by trimming the excess fabric around 
the neck area and clipping a intervals. Smooth the neck line 
in place. 
Drape and smooth the shoulder over the shoulder seam of 
the dress from just past the princess seam. Pin in place. 
4. Clip the waist line at the princess seam. Drape and smooth 
the fabric of the center front panel just past the princess 
seam.
NOTE: - The fabric at the waist line will be smooth but not 
snug tight. 
1. Mark all key areas of the dress from on the center front 
panel. 
Neck line 
Princess seam and style line notches (2” above and below 
open) 
Shoulder seam 
2. True up the center front panel. Add seam allowance trim all 
excess fabric leaving. Place back on the dress from. 
THE TORSO LENGTH PINCESS BODICE BLOCK 
DRAPING STEPS 
SIDE FRONT TORSO PRINCESS PANEL 
1. Pin the grain line of the side front panel to the center of the 
front princess panel on the dress from notching the cross 
grain of the side bust panel to the cross grain at the bust 
level. Place another anchor pin on the straight of grain at the 
waist line. 
2. Clip the waist line at the side seam of the side front panel. 
From the grain line of the side front panel. Smooth the fabric 
past the side seam. 
Continue to smooth the fabric flat over the arm plate. Do 
not allow the grain line to slip out of position. Pin the side 
seam in place.
1. Drape the shoulder by carefully smoothing the excess fabric 
above the bust level up and over the shoulder of the dress 
from. 
NOTE: - The grain line will look as if it is angled toward the 
neck line above the bust level. 
2. Clip the waist line at the princess seam smooth the fabric 
over the princess seam and pin in place. 
NOTE: - The excess fabric will drape over the bust level 
area creating ease at the princess seam between the notches. 
3. Mark all key area of the dress from on the side front panel. 
a.) Princess seam and style line notches (match to center 
front panel notches). 
b.) Arm plate 
Shoulder seam at ridge. 
Middle of plate at screw level 
Bottom of plot at side seam 
c.) Shoulder seam 
d.) Side seam 
4. Remove the side front panel from the dress from and true 
up all lines. Add seam allowance. 
Trim all excess fabric, leaving all seam allowance pin to front 
panel front and place on the dress from to check seams, 
notches and balance.
THE TORSO LENGTH PRINCESS BODICE BLOCK 
DRAPING STEPS 
SIDE FRONT TORSO PRINCESS PANEL 
1. Pin the grain line of the side back panel to the center of back 
princess panel on the dress form matching all cross grain at 
the shoulder blade level. 
2. Clip the waist line at the side seam. Drape and smooth fabric 
past the side seam and flat over the dress form. Pin in place. 
3. Drape the shoulder by smoothing the excess fabric from 
above the shoulder blade level up and over the shoulder 
seam of the dress form. 
NOTE: - The grain line will look as if it is angled toward the 
neckline (above the cross grain) 
4. Clip the waist line at the princess seam of the side back 
panel. From the grain line of the side back panel. Smooth 
the fabric past the princess seam of the dress form. Do not 
allow the grain line to slip out of position. Pin the princess 
seam in place. 
5. Mark all key areas of the dress form on the side back 
Panel. 
- Princess seam and style line notches 
(Match to center back panel double notches) 
- Arm plate 
- Shoulder seam at ridge 
- Middle of plate at screw level
- Shoulder seam 
- Side seam. 
1. Remove the drape from the dress form and true up all lines. 
Add seam allowance. Trim all excess fabric leaving all seam 
allowance. 
Pin the entire garment together and place the drape on the 
dress form. Check for accuracy, fit and hang. 
THE TORSO LENGTH PRINCESS BODICE BLOCK 
DRAPINGBSTEPS 
CENTER BACK TORSO PRINCESS PANEL 
1. Pin the center back grain line fold of the fabric to the 
center back position of the dress from. 
Align and pin the cross grain to the shoulder blade level of 
the dress from. 
2. Drape and smooth the back neck line by carefully 
trimming the excess fabric around the neck area and 
clipping at intervals. 
Continue to drape and smooth the shoulder over the 
shoulder of the dress from and pin in place. 
3. Clip the waist line at the princess seam. Drape and 
smooth the fabric pat the princess seam and pin in 
place. 
Note: - The waist areas will drape smoothly. But will not be 
snug tight.
1. Mark all key area of the dress form on the center back 
panel. 
- Neck line 
- Shoulder seam 
- Back princess seam and style line notches. 
- (A double notch is used in back) 
2. Remove the center back panel drape from the dress 
form and true up all lines. Add seam allowance. Trim, 
leaving all seam allowance. Place. 
THE BASIC STRAIGHT SKIRT BLOCK 
PREPARING THE 
FRONT 
1. Preparing the dress form measure down 7” from the waist 
line on the center front of the dress form .This is the hip 
level. Place will tape (or measuring tape) parallel to the 
dress form at this hip level and remove the tape. 
2. Measure the length (along the cross grain) for the front and 
back skirt from 2” above the waist to the bottom of the 
dress form. Add 4” ship and tear the fabric this length.
1. Measure the width (along the cross grain) for the front and 
back skirt at the hip level from to the side seam. Add 3” ship 
and tear the fabric this width. 
2. Draw the center front center back grain lines on the fabric 
1” from the turn edge. Press under. 
3. Mark the center front waist position measure down 2” from 
the top of the fabric at the center front fold pencil in a waist 
line mark at the position. 
4. Using on (l-square ruler, draw perfect cross grain at the hip 
level for the front and back skirt. On the skirt front, measure 
down 7” from the waist line mark on the skirt back, measure 
down 9” on the grain line) from the top of the fabric . 
5. Determined the front side seam. Measure from center front 
to the side seam (at the hip level) and add ½” ease. Transfer 
this measurement to the fabric. Using the mark draw a side 
seams perfectly parallel to the center front grain line. 
6. Determined the back side seam. Measure from center back 
to the side seams (at the hip level) and add ½” for ease. 
Transfer this measurement to the fabric. Using this mark, 
draw a side seams perfectly parallel to the center back grain 
line.
1. Draw a second line ¾” from the side seam on both the front 
and back skirt .This line will be used to help drape in the 
waist line. 
THE BASIC STRAIGTH SKIRT BLOCK 
DRAPING STEP FRONT 
1. Pin the center front grain line fold of the fabric on the center 
front position of the dress from matching the cross grain of 
the fabric to the hip level on the dress from. 
2. Smooth and pin the cross grain to the fabric (evenly 
distributing the ease) across the dress from to the side 
seam. 
Be sure the fabric cross grain is parallel to the floor and the 
side seam match. 
Pin the cross grain and side seam (below the hip level) to the 
dress from. 
3. Carefully drape and pin the front ¾” line to the side seam/ 
waist of the dress from. 
NOTE: - When this side seam/ waist corner is draped 
correctly, a slight gap will occur automatically at the side 
seam above the hip level. 
4. Drape in two darts at the front waist line. Smooth the fabric 
from the center front to the princess seam.
Cross mark the waist line at the princess seams. Drape in the 
first dart (one half of the excess fabric) on the princess seam 
line. 
Measure over on the waist line 11/4” from the first dart. 
Place a second cross mark at this position clip the waist line 
and drape in the second dart (the remaining half of the 
excess fabric) at this second cross mark. 
THE BASIC SRAIGHT SKIRT BLOCK 
DRAPING STEP BACK 
1. Match the back side seam at the hip level to the front 
side seam at the hip level. 
NOTE: - The side seam should match and be perfectly 
parallel to each other. 
Smooth the cross grain of the fabric (evenly distributing the 
ease) across the dress form. Pin the center back grain line 
fold of the fabric to the center back seams of the dress form. 
1. Carefully drape and pin the back ¾’ line of the fabric to the 
side seam/waist corner of the dress form. 
NOTE: - When this side seam (waist corner is draped 
correctly a slight gap will occur automatically on the side 
seam above the hip level. 
2. Drape in two dart at the back waist line. Smooth the fabric 
form the center back to the princess seam.
Cross mark the waist line at the princess seams. Drape in the 
first dart (one half of the excess fabric) on the princess seam 
line. 
Measure over on the waist line 114”from the first dark. 
Place a second cross mark at this position. Clip the waist line 
and drape in the second dart (the remaining half of the 
excess fabric) at this second cross mark. 
1. Mark all key areas- 
Waist line – front and back 
Dart _ front and back 
BASIC STRAIGHT SKIRT BLOCK 
TRUENING STEPS 
1. Remove the fabric from the dress form laid this drape flat on 
a table. If you are planning to true up the fabric on to paper. 
Complete the following steps – 
A) Draw in a straight grain line and the cross grain at the hip 
level on to pieces of paper. 
B) Re measure the hip and ½” ease. Transfer this 
measurement to the paper. Draw a side seam line at this 
position parallel to the grain line. (Do this for both the 
front and back skirt) 
C) Place the fabric drape on top of the paper matching the 
straight grain and the cross grain and hip level. The side 
seam line should match automatically. 
D) With a trace wheel, transfer the waist line, darts, and side 
seam marking on to the paper.
1. Draw a short 90” angle at – 
1) Center front waist (1/2”) 
2) Center back waist (1”) 
2. Draw the front and back waist dart – 
1) Locate the center of each dart. 
2) Using a straight ruler, draw a line for the center of each 
dart parallel to the grain line and the length of the 
desired dart at vanishing point (3 ½” for the from dart 
and 5 ½” for the back dart) 
3) Using a straight ruler. Complete drawing the reminder of 
the dart. Draw the outer edges of the dart from the 
vanishing point to the waist line cross mark. 
3. Draw the side seam. Using a hip curve ruler place the 
straight part of this ruler to the side seam/waist corner and 
the side seam (as illustrated). 
4. Draw the waist line. Fold and pin in the waist dart. With the 
darts folded in place. Use the hip curve ruler and draw in the 
waist line. 
NOTE: - At this time, match and walk front and back bodies 
waist to the skirt waist. When a bodice 
Is being attached to the skirt. Waist line should be the same 
distance when all darts are folded closed. 
5. Check side seam- 
1. Pin the front of back side seam together. Matching 
cross grain at the hip level. 
Measure the side seam form the hip level to the waist line. These 
measurements should be the same if they
1. are not. Adjust the back waist line. Side seam corner to 
match the front measurement. 
NOTE: - If these measurements are more than 3/8” of 
recheck the drape for a more accurately draped side 
seam/waist corner. 
1. Draw the hemline- 
1. With the side seam still pinned together, measurement 
from the center back waist down to the desired skirt 
length. 
2. At this measurement, square a line across the skirt to the 
center front of the skirt. This line should be perfectly to 
the hip line. 
3. 
CHECK LIST 
1. A carefully checking and fitting of the finished drape 
serves as several purposes. It may show in accuracy in 
fit and any changes or correction can be made at this 
time. 
1. Front and back grain line should be straight. 
2. Front and back cross grain should be perfectly level 
to the floor. 
3. Hip level ease evenly distributed. 
4. All tarred line has the correct amount if seam allow. 
5. The overall look of the drapes is near and cleans. 
6. Dare the pinned in place to the vanishing point.
1. Drape side seam in alignment of the dress form side 
seam. 
2. The drape is correctly balanced. The front of the 
design is in the front and the back of the design is in 
the back. 
3. It hangs freckly on all seam line. 
THE DARTLESS KIMONOSLEEVE 
THE FABRIC PREPARING 
1. Measure the lengths for the front and back drape (along the 
straight of grain) from the neck band to the hip level and 
add 5” snip and tear the fabric this length. 
2. Measure the width for front and back drape (along the cross 
grain) from the center of the dress from to the wrist level of 
the arm. Snip and tear the fabric this width. 
3. Draw the grain lines for the front and back kimono 1” from 
the turn edge press under.
1. Draw two cross grain for the front and back kimono. 
1. Draw the first cross grain line 11” from the top edge of 
the fabric this indicates the bust level line. 
2. Draw the second cross grain line 14” from the first cross 
grain line; this indicates the hip level line. 
2. Draw in the back side seam at the hip level measure from 
the center back to the side seam and add ½” for ease. 
Transfer this measurement to the fabric. Using this mark 
draw a side seams perfectly parallel to the center back grain 
line. 
3. Draw in the front side seam. At the hip level measurements 
from the center front to the side seams and add ½” for ease. 
Transfer this measurement to the fabric. Using this mark 
draw a side seam. Perfectly parallel to the center front grain 
lines. 
THE DRAPING KIMONO SLEEVE 
DRAPING STEPS 
Pin the center front grain line fold of the fabric, on the center 
front position of the dress from. Be sure the cross grain is at the 
bust level. Anchor pins at center front neck
1. and center front hip. An additional pin may be needed at the 
bust level. 
2. Smooth and pin the cross grain of the fabric across the dress 
from to the side seam. Pin the side seam to side seams of 
the dress from. 
Be sure the fabric cross grain are parallel to the floor and 
side seams match. 
3. Pin the shoulder / neck area in to position by trimming the 
excess fabric, around the neck area and smoothing the 
fabric flat over the shoulder / neck area. 
4. Mark the key area of the dress from corner and the shoulder 
ridge. 
Ø Side seam 11/2” below the arm plate. 
Ø Side seam at the waist line. 
5. Remove the fabric drape from the dress from and true up 
the neck line and side seam and draft the kimono sleeve. 
Ø Raise the shoulder line ½” following this slant 
To from the sleeve seam. 
Ø Exited this line 23” from the shoulder ridge corner. 
Ø With an l-square ruler, draw a line 8” long. 
Perpendicular from the shoulder seam.
Ø With the l-square ruler again, square the under arm line 
from the wrist line back to the side seam. 
Ø Draw in the desired under arm, kimono shape to the 
waist level. 
1. Draft the back kimono drape. Place the front kimono drape 
on top of the prepared fabric for the back drape, matching 
cross grains and side seam. Also, place the center fold grain 
lines parallel, allowing the back to extend ½” over the front 
grain line, but still parallel. Pin both layers of fabric together. 
2. Transfer the front kimono shape to the back fabric piece. 
Turn the fabric over and mark the back following the pins. 
Using a French curve shape the back neck line. Does not 
scoop as low as the front neck line. 
True all seam, add seam allowances and trims excess fabric, 
leaving seam allowance. 
3. Check the fit of the kimono drape, pin the front and back 
kimono together, Return the drape to the dress from. Place 
anchor pins at the center front and center back hip level.
CHECK THE HANG OF THEIS DRAPE 
Ø HE FRONT AND BACK DRAPES ARE PLUMB (NO TWIST) 
Ø Side seam align with the dress from side seam. 
Ø Shoulder seam lay on the shoulder seam of the dress 
from. 
NOTE: - If the drape hangs incorrectly, this usually 
indicates that the shoulder and back neck area need to 
be adjusted. This may result in a slightly larger (1/2”) 
back sleeve width 
PEGGED SKIRT 
The peg skirt makes hard line news usually for evening or format 
ware this skirt is flattering and quite feminism and usually 
departs out of soft pliable fabrics.
The peg skit is easily recognized by its following fullness over the 
hip area which is formed by dropping deep folds drawn into the 
waist line. At the same time the lower edge is drown back into 
the body allowing movement with case and freedom. A 
beautifully draped peg skirt depends largely on the skill of the 
drapes. 
THE PEG SKIRT 
PREPARING THE FABRIC 
1. Measure the length (along the straight of grain) of the 
desired skirt of adds 6” ship of tear the fabric this length. 
2. Measure the width along the cross grain 32” to determine 
the width of the fabric ship of tear the fabric at this width. 
NOTE: - When the drape is completed there will be a seam 
at the center front of a seam at center back, however, there 
will be no side seam. 
3. Draw the center back grain line parallel to the grain line on 
the left side of the fabric. Press under. 
4. Mark the center back waist position. From the top edge of 
the4 fabric measure down 3” (on the center back grain line) 
draw a waist line mark.
1. On the center back grain line, measure down 7” from the 
waist line mark for the hip level. Draw a perfect cross grain. 
THE PEGED SKIRT 
DRAPING STEPS 
1. Pin the center back grain line fold of the fabric on the center 
back position of the dress form. 
2. Life of hold the top edge of the fabric, Pin the center front in 
this bias position to the dress form. 
NOTE: - This lifting process will maintain greater fullness at 
the waist level, of minimum fullness at the hem level. 
However, enough fullness at the hem level must be allowed 
for walking ease. 
If the skirt front is draped on a true bias, maximum waist 
line fullness is achieved. However if the center front is 
draped on a partial bias line, this would create less fullness 
at the waist line. 
Both methods are acceptable draping procedures. 
3. To gather the fullness at the waist line, with a piece of will 
tape. Tie the fabric at the waist line. Evenly distribute the 
gathers. 
4. Pleat the desired number of pleats at the waist line. At the 
same time, push down slightly on each pleat to help billow 
the fabric at the hip level. Also, slightly pull up the center 
front bias waist position.
NOTE: - pushing down and maintaining gathers (instead of 
pleats) will give a style variation if this very dramatic skirt. 
The number of pleats 9r darts of the amount of fullness 
desired is up to the individual designer. 
1. Pin the pleats in place of remove the will tape. Mark key 
areas. 
- Waist line 
- Pleats 
- Hemline 
2. Remove the fabric from the dress form of true up the drape. 
Add seam allowances and trim excess fabrics. 
Pin in the pleats and place drape back on the 
Dress from. Check for accuracy. Making all necessary corrections. 
THE BASIC NECKLINE COWL 
Cowls are draped on the bias, usually in lighter, finer fabrics to 
enhance a soft, harmonious look. A basic neckline cowl employee 
deep folds to create a variety of looks and woods .The deeper 
thee cowl can be used subtly or add imaginative to an otherwise 
low key garment. The drape should be done in the same quality 
of fabric as the finished garment. The basic neckline cowls / 
preparing the fabrics.
THE BASIC COWL NECKLIE /PREPARING THE FRBRIC 
PREPARING THE DRESS FORM 
Determine the desired neckline depth place a pin or the dress 
form at this neckline position. Also place a pin on each shoulder 
seam the width of the desired neckline. 
1. Measure and cut a perfect square of soft fabric wide enough 
for an entire front or entire back bodice (about 34” square) 
NOTE – The drape should be done in the same quality of fabric 
as the finished garment. 
2. Draw a true bias line diagonally across the piece of fabric. 
3. To determine the neckline and facing are turn a corner of 
the fabric deep enough to reach from one shoulder pin to 
the other shoulder pin, add 3” for ease. 
THE BASIC COWL NECKLINE / DRAPING STEPS 
1. Place the folded edge of the fabric on the dress form to 
drape the center front neckline position. Match the center
front bias line of the fabric to the center front neckline pin 
on the dress form. 
2. Drape and pin the shoulder in to position by allowing the 
neckline cowl to fall in genteelly. Be sure to keep the center 
front bias line on the center front the dress form. 
3. Lift and pleat each shoulder to form additional desired 
cowl drapes. 
NOTE: - Refer to the garment design to determine the no. 
of cowl drapes desired. 
1. Clip the waist line fabric. Pin and drape the waist line, side 
seam and armhole area. 
2. Mark key areas of the dress form on one side of the drape 
only. 
- Shoulder seam 
- Side seam 
- Waist line 
- Arm hole are and desired armhole shape. 
3. True up the front cowl drape. Add seam allowance and 
trim excess fabric. At the neckline fold, determine the 
width of the desired neckline facing. Prim excess form 
check for accuracy make all necessary correction. 
4. Refer to one of the basic back drapes to drape a back 
bodice desired. 
NOTE: – A low back neckline cannot be used because the 
drape will fall off the shoulder. Also the neckline shoulder 
area should match.
UNDER ARM / SIDE SEAM COWL 
The under arm/side seam cowl drape produces softly curved bias 
fold at the underarm seam. The fabric is placed on the true bias 
and is draped without a side seam. The under arm/side seam 
cowl is effective on a soft drape without working over done. It 
after design inspiration for soft and fluid fabric, crate a mood of 
easy elegance. 
UNDER ARM SIDE SEAM COWL / PREPARING THE 
FABRIC 
PREPARING THE DRESS FORM 
Determine the depth of the under arm cowl desired place a pin 
on the dress form at this under arm/side seam position. Also, the 
desired shoulder/ arm hole position. 
1. Measure and cut a 36” square of soft fabric this will be 
enough fabric to drape a front of back waist seam design 
forming an under arm cowl. 
NOTE: - The drape should be done in the same quality of 
fabric. As the finished garments. 
2. Draw a true bias line diagonally across the 36” piece of 
fabric. 
3. Measure up 16” from the bottom edge on the bias line. At 
this position draw a perfect cross bias line. Turn the fabric 
on this line.
1. Measure up 16” from the bottom edge on the bias line. At 
this position draw a perfect cross bias line. Turn the fabric 
on this line. 
UNDER ARM SIDE SEAM COWL /DRAPING STEPS 
1. Pin the fabric on the dress form at the under arm side seam 
pin. Position & match the bias line at the fold line to the side 
seam pin & the dress form. 
2. Drape the shoulder form the cowl by holding the fabric at 
the fold line fabric edge and swing the fabric up on to the 
shoulder’s place anchor pin’s at this shoulders position. 
NOTE: - It will be necessary to from pleats and the shoulder 
to help from clean even folds, the deeper the side seam 
cowl. 
3. Clip the fabric on the side seam from the bottom & the bias 
line, up to the waist line. Pin the bias line & the fabric to the 
side seam/waist position & the dress form. 
4. Smooth and drape the fabric past the center frontline will 
the grain of the fabric is parallel to the center from of the 
dress from.
1. Arm cowl fold line determines the width & shaped of the 
desired facing amount. Smooth and drape the fabric past 
the center back line will the cross grain of the fabric is 
parallel to the center back the dress form. 
2. Clip of pin in place the waist line for the front of back. 
NOTE: - Another pleat will probably from at the shoulder. 
3. Clip the front of back neck lines of drape in the shoulder. 
NOTE – Another pleat will probably from at the shoulder. 
4. Mark key areas 
- Front of back 
- Center front 
- Center back 
- Front of back waist line 
- Shoulder of pleats 
5. True up all lines. For truing up the shoulder, neckline, side 
seam & waist line area. Add seam allowance and bin excess 
fabric at the under

fashion

  • 1.
    FASHION DRAPING TECHNIQUES A STEP-BY-STEP VISUAL GUIDE TO FASHION DESIGN PRESENTED BY : KHUSHBOO KHUNTWAL B. Sc. FT. 1ST YEAR DIPLOMA FASHION TECHNOLOGY
  • 2.
    SUBMITTED TO DEZYENE’ COLE COLLEGE TOWARDS PRACTICAL FULFILLMENT FOR THE AWARDS OF ADVNCE DIPLOMA IN FASHION TECHNOLOGY SUBMITTED BY KHUSHBOO KUHNTWAL ADVANCE DIPLOMA IN FASHION TECNOLOGY ADVISER MADHURI TANDON DEZYNE E’ COLE COLLEGE AJMER 2010-2011
  • 3.
    BASIC BODICE BLOCK PREPARING THE FABRC-FRONT 1. Measure length for the front bodice along the straight of grain from the neck band to the waist and add 5inches. Snip and tear the fabric this length. 2. Measure the width for the front bodice along the cross grain from the center front of the dress from to the side seam at the bust level and add 5 inches. Snip and tear the fabric this width block and press the fabric at this time. 3. Draw the center front grain line 1”inches from the edge. Press under. NOTE: - The selvage is to your left hand and the torn edge is to your right hand. 4. Using on l-square ruler, draw a perfect cross grain line in the center of the fabric panel. This cross grain line will be referred to as the bus level line.
  • 4.
    1. Measure onthe dress from the distance from the center front to the apex. Measure and cross mark the apex this distance the bust level of the fabric. 2. Measure from the apex to the side seam at the bust level on the dress form. Measure and cross mark this side seam distance on the bust level of the fabric. 3. Draw the center of the princess panel line. Divide in half the distance from the apex to the side seam at the bust level. Using an l-square ruler, draw a line parallel to the center front grain line at this divided position squaring down from the bust level. BASIC BODICE BLOCK DRAPING STEPS- FRONT 1. Pin the apex mark on the fabric to the apex position on the dress form. 2. Pin the center front grain line fold to the fabric to the center front position of the dress form .Anchor pins at center front and neck and center front waist. An additional pin may be needed at the bust level tape.
  • 5.
    1. Pin thecenter of the princess panel line of the fabric exactly in the center of the princess panel of the dress form. Anchor pins at the waist line and the cross grain. Align a pin the from cross grain. NOTE:- The purpose for centering the princess panel line is to be sure the cross grain line is perfectly aligned check that the length wise grain is parallel to center front and perpendicular to the cross grain. 2. Clip the waist line fabric at the center of the princess panel. From the bottom edge up to the waist seam tape. 3. The excess fabric between the center front waist positions becomes the front waist dart. Drape and pin the excess fabric in place on the princess seam as the front waist dart. Excess fabric is folded toward the center front. 4. Smooth and drape the reminder of the waist line fabric across the waist tape till the fabric passes the side seam pin the side seam waist corner. Also drape the reminder of the front side seam pass the side seam and flat arm plate. Pin in place. 5. Drape the neckline by trimming the excess fabric around the neck area and clipping at internals. Smooth the neckline in place. Drape and smooth the fabric over the shoulder seam of the dress form. Just pass the princess seam pin in place. 6. The excess fabric that falls between the neckline and the shoulder/ armhole area becomes the amount of the shoulder dart this amount various from one bust size to another.
  • 6.
    1. Fold andpin this excess fabric on the shoulder princess seam of the dress from. The excess fabric is folded towards the center front neck. 2. Mark all key areas of the dress form to the fabric. 1. Neck line Cross mark at center front neck and at neckline corner lightly mark reminder of neck line. 2. Shoulder seam and shoulder dart. a.)Top at shoulder seam ridge. b.) Middle at screw level. c.) Cross mark bottom at side seam. 3. Waist line and waist dart. 4. Side seam lightly mark cross mark center front waist at Side Seam and both side of the dart. BASIC BODICE BLOCK PREPARING THE FABRIC- BACK 1. Measure length for the back bodice along the straight of grain from the neck band to the waist and add 5 inches. 2. Measure the width of for the back bodice along the cross grain from the center back seam at the under arm and add 5 inches. 3. Draw the center back grain line 1“from the torn edge and press under.
  • 7.
    1. Cross markthe center back neck line position 3 inches below the top of the fabric on the center back grain line. 2. Measure down 41/4” from the back neck line mark. Using an l-square ruler draw a perfect cross grain line at this position (This is considered the shoulder blade level). NOTE:-This 41/4” measurement represents one fourth of the distance from center back neck to waist for a size 8 or 10 women’s figure. Also, measure the distance from center back to the arm plate at the shoulder level of the dress from. Measure and cross mark this back shoulder distance on the fabric at the shoulder blade level line. BASIC BODICE BLOCK DRAPING STEPS – BACK 1. Pin the center front grain line fold of the fabric to the center back position on the dress from. Align the neck line position mark of the fabric to the center back neck position on the dress from. 2. Pin and drape the back cross grain line of the fabric to the shoulder blade level on the dress from. Pin the arm plate cross mark ¼” away from plate (At armhole ridge). Distribute excess ease along shoulder blade level. NOTE:-This line is correctly draped in to position when the drape hangs freckly and evenly without any drag or pulled
  • 8.
    down look. Also,the lower edge of the drape shoulder hangs parallel to the floor. 1. Drape in the back waist line dart (7”long and 11/4”wide) Smooth the fabric towards the side seam till the fabric passes the princess seam. Cross mark at the princess/ Waist seam measure and cross mark 7” up from the waist line on the back princess seam. At the waist line fold the princess seam cross mark to the 11/4” mark. Taper the dart to nothing at the 7”mark. 2. Clip the waist line fabric at the center of the princess panel up to the button of the waist seam tape. Smooth the fabric across the waist tape till the fabric passes the side seam. Pin at the side seam/ waist corner. 3. Drape the back side seam by smoothing the fabric pat the side seam and flat over the dress from pin in place. 4. Drape and smooth the back neck line by carefully trimming the excess fabric around the neck area and clipping at intervals. Continue to smooth the fabric over the shoulder of the dress form and pin in place. 5. Drape in the back shoulder dart (3”long and ½”wide) straight at the neck line. Smooth the fabric over the shoulder seam of the dress form to the princess seam and cross mark on the princess seam at the shoulder, measure towards the armhole ½” and cross mark. Also on the princess seam measure down 3” from the shoulder seam. Fold the fabric from the shoulder seam cross mark to the ½” cross mark. Taper the dart to nothing at the 3” cross mark. 6. Mark all key area of the dress from to the fabric.
  • 9.
    · Neck line Cross mark at center back neck and at neck line/ shoulder corner. Lightly mark remainder of neck line. · Shoulder seam and shoulder dart. · Lightly mark shoulder seam and cross mark shoulder dart and shoulder ridge corner. · Arm plate. a) Top at shoulder seam ridge. b) Middle at screw level. c) Bottom at the side seam cross mark. · Side seam – lightly mark · Waist line and waist dart seam waist and both side of the dart. Check the drape by spinning the front and back side seam and front and back shoulder seam together before proceeding to the next steps. 1. Remove the fabric from the dress from and lay flat on table. If you are planning to true up the fabric on the paper complete the following steps. a) Draw in the straight of grain and cross grain on the pattern paper. Place the fabric on top of the paper. Notching the straight of grain and cross grain. b) With a trace wheel, transfer all the fabric markings on the paper. 2. Draw a short go degree angle at- Center front neck (1/4”) Center front waist (1/2”) Center back neck (1”)
  • 10.
    Center back waist(1”) 1. Draw in the front darts using a straight ruler. Front waist darts (1” from the open through the waist dart cross mark) Front shoulder dart (1” from the open through the shoulder dart cross mark) Back waist dart (vanishing point through waist dart cross mark) Back shoulder dart (vanishing point to back waist dart through shoulder dart connect other shoulder dart cross mark. PRINCESS PANEL 1. Measure the length for the front and back panel (along the straight of grain) from the neck band to the waist and add 5” snip and tear the fabric this length. 2. Fold the fabric from selvage to selvage and snip and tear the fabric piece in half length wise.
  • 11.
    Use one piecefor the front panels and the other piece for the back panel. 1. Measure the width for the center front panel (along the cross grain) from the center front of the dress from to the princess seam at the apex, and add 4”. Using one of the fabric pieces prepared in step 2, snip and tear the fabric this width. Use the remaining front piece for the side front panel. 2. Measure the width for the center back panel from the center back of the dress from to the back princess seam at the shoulder blade level. And add 4”. Using the second fabric piece prepared in step 2 snip and tear the fabric this width. Use the remaining back fabric piece for the side back panel. 3. Draw the grain line for the center front panel 1” from the torn edge press under. 4. Draw the cross grain line for the front panel in the center of the both panel. 5. Measure the dress form from center front to the apex, measure and cross mark the apex this distance of the cross grain line. 6. Draw the grain line for the center back panel 1” from the torn edge. Press under. Draw the grain line for the side back panel in the center of the fabric piece. 7. Draw the cross grain line for both back panels 8” from the top of the fabric edge.
  • 12.
    THE PRINCESS BODICEBLOCK DRAPING STEPS CENTER FRONT PANEL 1. Pin the apex cross marks on the fabric to the apex position on the dress from. 2. Pin the center front grain line fold of the fabric to the center position of the dress from. Anchor pins at center front neck and center front waist. An additional pin may be needed at the bust level tape. 3. Drape the neck line trimming the excess fabric around the neck area and clipping at intervals. Smooth the neck line in place. 4. Drape and smooth the waist line place from center front to just past the princess seam. Pin in place. 5. Mark all key area of the dress from on the center front panel. · Neck line · Waist line · Princess seam and style line · Notches · Shoulder seam 6. True up center front panel. Add seam allowance and trim all excess fabric place panel back on the dress from.
  • 13.
    SIDE FRONT PRINCESSPANEL 1. Pin the grain line of the side front panel to the center of the front princess panel on the dress from matching the cross grain of the side seam bust panel to the cross grain of the center front panel. Anchors pins on the cross grain at the bust level. Place another anchor pin on the straight of grain at the waist line. 1. Clip the waist line at the center of the front princess panel up to the bottom of the waist line seam tape. Drape and smooth the waist line on place. 2. From the grain line to the side front panel smooth the fabric past the side seam of the dress from do not allow the grain line to slip out of position. Pin the side seam in place. 3. Drape the shoulder by carefully smoothing the excess fabric above the bust level up and over the dress from. NOTE: - The grain line will look as if it is angled toward the neck line. 4. Smooth the fabric over the princess seam add pin the princess seam in place. NOTE: - The excess fabric will drape over the bust level area creating ease at the princess seam between the notches. 5. Mark all key areas of the dress from on the side front panel. Princess seam and style line notches (match the center front panel notches)
  • 14.
    Arm plate Shoulderseam at ridge Middle of plate at screw level Bottom of plate at side seam Shoulder seam Side seam Waist line 1. Remove the side front panel from the dress from and true up all the lines. Add seam allowance. Trim excess fabric, leaving all seams allowance. Pin to front panel and return to check seam notches and balance. THE PRINCESS BODICEBLOCK DRAPING STEPS CENTER BACK PRINCESS PANNEL 1. Pin the center back grain line fold of the fabric to the center back position of the dress from. Align and line the cross grain to the shoulder blade level of the dress from. 1. Drape and smooth the back waist line from center back to just pass the princess seam. Pin the waist line in place. 2. Drape and smooth the back neck line by carefully trimming the excess fabric around the neck area and clipping at intervals. Continue to smooth the fabric over the shoulder of the dress from and pin in place.
  • 15.
    1. Mark allkey areas of the dress from on the center back panel Neck line Waist line Shoulder seam Back princess seam and style line notches (a double notch is used in the back) 2. Remove the center back panel drape from and true up all lines. Add seam allowance trim all excess fabric, leaving all seam allowance. Place this center back drape on the dress from. THE PRINCESS BODICE BLOCK DRAPING STEPS SIDE BACK PRINCESS PANEL 1. Pin the grain line of the side back panel to the center of the back princess panel on the dress from matching all cross grain at the shoulder blade. 2. Clip the waist line at the side back panel up to the bottom of the waist seam tape. Smooth and pin the waist line in place. 3. From the grain of the side back panel. Smooth the fabric past the side seam of the dress from. Do not allow the grain line to slip out of position. Pin the side seam in place. 4. Drape the shoulder by smoothing the excess fabric from above the shoulder level up and over the shoulder seam of the dress from.
  • 16.
    NOTE: - Thegrain line will look as if it is angle toward the neck line (over the cross grain). 1. From the grain line of the side back panel smooth the fabric past the princess seam of the dress from. Do not allow the grain line to slip out of position. Pin the princess seam in place. 2. Mark all key areas of the dress from on the side back panel. Princess seam and style line notches (match to center back panel double notches) Arm plate Shoulder seam at ridge. Middle of plate at screw level. Bottom of plate at side seam Side waist Waist line 3. Remove the drape from and true up all lines. Add seam allowance trim all excess fabric, leaving all seam allowance. Pin the entire garment together and place the drape on the dress from check for accuracy fit and hang. THE TORSO LENGTH PRINCESS BODICE BLOCK DRAPING THE FABRIC
  • 17.
    1. Measure thelength for the front and back panel (along the straight grain) from the neck band to the hip area and add 5”. Snip the tear the fabric this length. 2. Fold the fabric from salvage to salvage snip and tear the fabric piece in half length wise. Use one piece for the front panel and the other piece for the back panel. 3. Measure the width for the center panel (along the cross grain) from front of the dress from to the princess seam at the open and add 5”. Snip and tear the fabric this width use the remaining fabric piece for the side front panel. 4. Draw the grain line for the center front panel 1” from the torn edge. Press under. 5. Draw the grain line for the side front panel in the center of the fabric piece. 6. Draw the cross grain lines for the front and side front panel 12” from the top edge of the fabric. 7. Measure the dress from center front to the open. Measure and cross mark the apex. This distance on the center front panel on the cross grain line. 8. Draw the grain line for the center back panel 1” from the torn edge. Press under. Draw the grain line for the side back panel, in the center of the fabric piece. 9. Draw the cross grain line for both back panels 8". From the top of the fabric edge.
  • 18.
    THE TORSO LENGTHPRINCESS BODICE BLOCK DRAPING STEPS CENTER FRONT TORSO PRINCESS PANEL 1. Pin the open cross mark on the fabric to the open position on the dress from. 2. Pin the center front grain line fold of the fabric on the center position of the dress from. Anchor pins at center front neck and center front hip. An additional pin may be needed at the bust level tape. 3. Drape the neck line by trimming the excess fabric around the neck area and clipping a intervals. Smooth the neck line in place. Drape and smooth the shoulder over the shoulder seam of the dress from just past the princess seam. Pin in place. 4. Clip the waist line at the princess seam. Drape and smooth the fabric of the center front panel just past the princess seam.
  • 19.
    NOTE: - Thefabric at the waist line will be smooth but not snug tight. 1. Mark all key areas of the dress from on the center front panel. Neck line Princess seam and style line notches (2” above and below open) Shoulder seam 2. True up the center front panel. Add seam allowance trim all excess fabric leaving. Place back on the dress from. THE TORSO LENGTH PINCESS BODICE BLOCK DRAPING STEPS SIDE FRONT TORSO PRINCESS PANEL 1. Pin the grain line of the side front panel to the center of the front princess panel on the dress from notching the cross grain of the side bust panel to the cross grain at the bust level. Place another anchor pin on the straight of grain at the waist line. 2. Clip the waist line at the side seam of the side front panel. From the grain line of the side front panel. Smooth the fabric past the side seam. Continue to smooth the fabric flat over the arm plate. Do not allow the grain line to slip out of position. Pin the side seam in place.
  • 20.
    1. Drape theshoulder by carefully smoothing the excess fabric above the bust level up and over the shoulder of the dress from. NOTE: - The grain line will look as if it is angled toward the neck line above the bust level. 2. Clip the waist line at the princess seam smooth the fabric over the princess seam and pin in place. NOTE: - The excess fabric will drape over the bust level area creating ease at the princess seam between the notches. 3. Mark all key area of the dress from on the side front panel. a.) Princess seam and style line notches (match to center front panel notches). b.) Arm plate Shoulder seam at ridge. Middle of plate at screw level Bottom of plot at side seam c.) Shoulder seam d.) Side seam 4. Remove the side front panel from the dress from and true up all lines. Add seam allowance. Trim all excess fabric, leaving all seam allowance pin to front panel front and place on the dress from to check seams, notches and balance.
  • 21.
    THE TORSO LENGTHPRINCESS BODICE BLOCK DRAPING STEPS SIDE FRONT TORSO PRINCESS PANEL 1. Pin the grain line of the side back panel to the center of back princess panel on the dress form matching all cross grain at the shoulder blade level. 2. Clip the waist line at the side seam. Drape and smooth fabric past the side seam and flat over the dress form. Pin in place. 3. Drape the shoulder by smoothing the excess fabric from above the shoulder blade level up and over the shoulder seam of the dress form. NOTE: - The grain line will look as if it is angled toward the neckline (above the cross grain) 4. Clip the waist line at the princess seam of the side back panel. From the grain line of the side back panel. Smooth the fabric past the princess seam of the dress form. Do not allow the grain line to slip out of position. Pin the princess seam in place. 5. Mark all key areas of the dress form on the side back Panel. - Princess seam and style line notches (Match to center back panel double notches) - Arm plate - Shoulder seam at ridge - Middle of plate at screw level
  • 22.
    - Shoulder seam - Side seam. 1. Remove the drape from the dress form and true up all lines. Add seam allowance. Trim all excess fabric leaving all seam allowance. Pin the entire garment together and place the drape on the dress form. Check for accuracy, fit and hang. THE TORSO LENGTH PRINCESS BODICE BLOCK DRAPINGBSTEPS CENTER BACK TORSO PRINCESS PANEL 1. Pin the center back grain line fold of the fabric to the center back position of the dress from. Align and pin the cross grain to the shoulder blade level of the dress from. 2. Drape and smooth the back neck line by carefully trimming the excess fabric around the neck area and clipping at intervals. Continue to drape and smooth the shoulder over the shoulder of the dress from and pin in place. 3. Clip the waist line at the princess seam. Drape and smooth the fabric pat the princess seam and pin in place. Note: - The waist areas will drape smoothly. But will not be snug tight.
  • 23.
    1. Mark allkey area of the dress form on the center back panel. - Neck line - Shoulder seam - Back princess seam and style line notches. - (A double notch is used in back) 2. Remove the center back panel drape from the dress form and true up all lines. Add seam allowance. Trim, leaving all seam allowance. Place. THE BASIC STRAIGHT SKIRT BLOCK PREPARING THE FRONT 1. Preparing the dress form measure down 7” from the waist line on the center front of the dress form .This is the hip level. Place will tape (or measuring tape) parallel to the dress form at this hip level and remove the tape. 2. Measure the length (along the cross grain) for the front and back skirt from 2” above the waist to the bottom of the dress form. Add 4” ship and tear the fabric this length.
  • 24.
    1. Measure thewidth (along the cross grain) for the front and back skirt at the hip level from to the side seam. Add 3” ship and tear the fabric this width. 2. Draw the center front center back grain lines on the fabric 1” from the turn edge. Press under. 3. Mark the center front waist position measure down 2” from the top of the fabric at the center front fold pencil in a waist line mark at the position. 4. Using on (l-square ruler, draw perfect cross grain at the hip level for the front and back skirt. On the skirt front, measure down 7” from the waist line mark on the skirt back, measure down 9” on the grain line) from the top of the fabric . 5. Determined the front side seam. Measure from center front to the side seam (at the hip level) and add ½” ease. Transfer this measurement to the fabric. Using the mark draw a side seams perfectly parallel to the center front grain line. 6. Determined the back side seam. Measure from center back to the side seams (at the hip level) and add ½” for ease. Transfer this measurement to the fabric. Using this mark, draw a side seams perfectly parallel to the center back grain line.
  • 25.
    1. Draw asecond line ¾” from the side seam on both the front and back skirt .This line will be used to help drape in the waist line. THE BASIC STRAIGTH SKIRT BLOCK DRAPING STEP FRONT 1. Pin the center front grain line fold of the fabric on the center front position of the dress from matching the cross grain of the fabric to the hip level on the dress from. 2. Smooth and pin the cross grain to the fabric (evenly distributing the ease) across the dress from to the side seam. Be sure the fabric cross grain is parallel to the floor and the side seam match. Pin the cross grain and side seam (below the hip level) to the dress from. 3. Carefully drape and pin the front ¾” line to the side seam/ waist of the dress from. NOTE: - When this side seam/ waist corner is draped correctly, a slight gap will occur automatically at the side seam above the hip level. 4. Drape in two darts at the front waist line. Smooth the fabric from the center front to the princess seam.
  • 26.
    Cross mark thewaist line at the princess seams. Drape in the first dart (one half of the excess fabric) on the princess seam line. Measure over on the waist line 11/4” from the first dart. Place a second cross mark at this position clip the waist line and drape in the second dart (the remaining half of the excess fabric) at this second cross mark. THE BASIC SRAIGHT SKIRT BLOCK DRAPING STEP BACK 1. Match the back side seam at the hip level to the front side seam at the hip level. NOTE: - The side seam should match and be perfectly parallel to each other. Smooth the cross grain of the fabric (evenly distributing the ease) across the dress form. Pin the center back grain line fold of the fabric to the center back seams of the dress form. 1. Carefully drape and pin the back ¾’ line of the fabric to the side seam/waist corner of the dress form. NOTE: - When this side seam (waist corner is draped correctly a slight gap will occur automatically on the side seam above the hip level. 2. Drape in two dart at the back waist line. Smooth the fabric form the center back to the princess seam.
  • 27.
    Cross mark thewaist line at the princess seams. Drape in the first dart (one half of the excess fabric) on the princess seam line. Measure over on the waist line 114”from the first dark. Place a second cross mark at this position. Clip the waist line and drape in the second dart (the remaining half of the excess fabric) at this second cross mark. 1. Mark all key areas- Waist line – front and back Dart _ front and back BASIC STRAIGHT SKIRT BLOCK TRUENING STEPS 1. Remove the fabric from the dress form laid this drape flat on a table. If you are planning to true up the fabric on to paper. Complete the following steps – A) Draw in a straight grain line and the cross grain at the hip level on to pieces of paper. B) Re measure the hip and ½” ease. Transfer this measurement to the paper. Draw a side seam line at this position parallel to the grain line. (Do this for both the front and back skirt) C) Place the fabric drape on top of the paper matching the straight grain and the cross grain and hip level. The side seam line should match automatically. D) With a trace wheel, transfer the waist line, darts, and side seam marking on to the paper.
  • 28.
    1. Draw ashort 90” angle at – 1) Center front waist (1/2”) 2) Center back waist (1”) 2. Draw the front and back waist dart – 1) Locate the center of each dart. 2) Using a straight ruler, draw a line for the center of each dart parallel to the grain line and the length of the desired dart at vanishing point (3 ½” for the from dart and 5 ½” for the back dart) 3) Using a straight ruler. Complete drawing the reminder of the dart. Draw the outer edges of the dart from the vanishing point to the waist line cross mark. 3. Draw the side seam. Using a hip curve ruler place the straight part of this ruler to the side seam/waist corner and the side seam (as illustrated). 4. Draw the waist line. Fold and pin in the waist dart. With the darts folded in place. Use the hip curve ruler and draw in the waist line. NOTE: - At this time, match and walk front and back bodies waist to the skirt waist. When a bodice Is being attached to the skirt. Waist line should be the same distance when all darts are folded closed. 5. Check side seam- 1. Pin the front of back side seam together. Matching cross grain at the hip level. Measure the side seam form the hip level to the waist line. These measurements should be the same if they
  • 29.
    1. are not.Adjust the back waist line. Side seam corner to match the front measurement. NOTE: - If these measurements are more than 3/8” of recheck the drape for a more accurately draped side seam/waist corner. 1. Draw the hemline- 1. With the side seam still pinned together, measurement from the center back waist down to the desired skirt length. 2. At this measurement, square a line across the skirt to the center front of the skirt. This line should be perfectly to the hip line. 3. CHECK LIST 1. A carefully checking and fitting of the finished drape serves as several purposes. It may show in accuracy in fit and any changes or correction can be made at this time. 1. Front and back grain line should be straight. 2. Front and back cross grain should be perfectly level to the floor. 3. Hip level ease evenly distributed. 4. All tarred line has the correct amount if seam allow. 5. The overall look of the drapes is near and cleans. 6. Dare the pinned in place to the vanishing point.
  • 30.
    1. Drape sideseam in alignment of the dress form side seam. 2. The drape is correctly balanced. The front of the design is in the front and the back of the design is in the back. 3. It hangs freckly on all seam line. THE DARTLESS KIMONOSLEEVE THE FABRIC PREPARING 1. Measure the lengths for the front and back drape (along the straight of grain) from the neck band to the hip level and add 5” snip and tear the fabric this length. 2. Measure the width for front and back drape (along the cross grain) from the center of the dress from to the wrist level of the arm. Snip and tear the fabric this width. 3. Draw the grain lines for the front and back kimono 1” from the turn edge press under.
  • 31.
    1. Draw twocross grain for the front and back kimono. 1. Draw the first cross grain line 11” from the top edge of the fabric this indicates the bust level line. 2. Draw the second cross grain line 14” from the first cross grain line; this indicates the hip level line. 2. Draw in the back side seam at the hip level measure from the center back to the side seam and add ½” for ease. Transfer this measurement to the fabric. Using this mark draw a side seams perfectly parallel to the center back grain line. 3. Draw in the front side seam. At the hip level measurements from the center front to the side seams and add ½” for ease. Transfer this measurement to the fabric. Using this mark draw a side seam. Perfectly parallel to the center front grain lines. THE DRAPING KIMONO SLEEVE DRAPING STEPS Pin the center front grain line fold of the fabric, on the center front position of the dress from. Be sure the cross grain is at the bust level. Anchor pins at center front neck
  • 32.
    1. and centerfront hip. An additional pin may be needed at the bust level. 2. Smooth and pin the cross grain of the fabric across the dress from to the side seam. Pin the side seam to side seams of the dress from. Be sure the fabric cross grain are parallel to the floor and side seams match. 3. Pin the shoulder / neck area in to position by trimming the excess fabric, around the neck area and smoothing the fabric flat over the shoulder / neck area. 4. Mark the key area of the dress from corner and the shoulder ridge. Ø Side seam 11/2” below the arm plate. Ø Side seam at the waist line. 5. Remove the fabric drape from the dress from and true up the neck line and side seam and draft the kimono sleeve. Ø Raise the shoulder line ½” following this slant To from the sleeve seam. Ø Exited this line 23” from the shoulder ridge corner. Ø With an l-square ruler, draw a line 8” long. Perpendicular from the shoulder seam.
  • 33.
    Ø With thel-square ruler again, square the under arm line from the wrist line back to the side seam. Ø Draw in the desired under arm, kimono shape to the waist level. 1. Draft the back kimono drape. Place the front kimono drape on top of the prepared fabric for the back drape, matching cross grains and side seam. Also, place the center fold grain lines parallel, allowing the back to extend ½” over the front grain line, but still parallel. Pin both layers of fabric together. 2. Transfer the front kimono shape to the back fabric piece. Turn the fabric over and mark the back following the pins. Using a French curve shape the back neck line. Does not scoop as low as the front neck line. True all seam, add seam allowances and trims excess fabric, leaving seam allowance. 3. Check the fit of the kimono drape, pin the front and back kimono together, Return the drape to the dress from. Place anchor pins at the center front and center back hip level.
  • 34.
    CHECK THE HANGOF THEIS DRAPE Ø HE FRONT AND BACK DRAPES ARE PLUMB (NO TWIST) Ø Side seam align with the dress from side seam. Ø Shoulder seam lay on the shoulder seam of the dress from. NOTE: - If the drape hangs incorrectly, this usually indicates that the shoulder and back neck area need to be adjusted. This may result in a slightly larger (1/2”) back sleeve width PEGGED SKIRT The peg skirt makes hard line news usually for evening or format ware this skirt is flattering and quite feminism and usually departs out of soft pliable fabrics.
  • 35.
    The peg skitis easily recognized by its following fullness over the hip area which is formed by dropping deep folds drawn into the waist line. At the same time the lower edge is drown back into the body allowing movement with case and freedom. A beautifully draped peg skirt depends largely on the skill of the drapes. THE PEG SKIRT PREPARING THE FABRIC 1. Measure the length (along the straight of grain) of the desired skirt of adds 6” ship of tear the fabric this length. 2. Measure the width along the cross grain 32” to determine the width of the fabric ship of tear the fabric at this width. NOTE: - When the drape is completed there will be a seam at the center front of a seam at center back, however, there will be no side seam. 3. Draw the center back grain line parallel to the grain line on the left side of the fabric. Press under. 4. Mark the center back waist position. From the top edge of the4 fabric measure down 3” (on the center back grain line) draw a waist line mark.
  • 36.
    1. On thecenter back grain line, measure down 7” from the waist line mark for the hip level. Draw a perfect cross grain. THE PEGED SKIRT DRAPING STEPS 1. Pin the center back grain line fold of the fabric on the center back position of the dress form. 2. Life of hold the top edge of the fabric, Pin the center front in this bias position to the dress form. NOTE: - This lifting process will maintain greater fullness at the waist level, of minimum fullness at the hem level. However, enough fullness at the hem level must be allowed for walking ease. If the skirt front is draped on a true bias, maximum waist line fullness is achieved. However if the center front is draped on a partial bias line, this would create less fullness at the waist line. Both methods are acceptable draping procedures. 3. To gather the fullness at the waist line, with a piece of will tape. Tie the fabric at the waist line. Evenly distribute the gathers. 4. Pleat the desired number of pleats at the waist line. At the same time, push down slightly on each pleat to help billow the fabric at the hip level. Also, slightly pull up the center front bias waist position.
  • 37.
    NOTE: - pushingdown and maintaining gathers (instead of pleats) will give a style variation if this very dramatic skirt. The number of pleats 9r darts of the amount of fullness desired is up to the individual designer. 1. Pin the pleats in place of remove the will tape. Mark key areas. - Waist line - Pleats - Hemline 2. Remove the fabric from the dress form of true up the drape. Add seam allowances and trim excess fabrics. Pin in the pleats and place drape back on the Dress from. Check for accuracy. Making all necessary corrections. THE BASIC NECKLINE COWL Cowls are draped on the bias, usually in lighter, finer fabrics to enhance a soft, harmonious look. A basic neckline cowl employee deep folds to create a variety of looks and woods .The deeper thee cowl can be used subtly or add imaginative to an otherwise low key garment. The drape should be done in the same quality of fabric as the finished garment. The basic neckline cowls / preparing the fabrics.
  • 38.
    THE BASIC COWLNECKLIE /PREPARING THE FRBRIC PREPARING THE DRESS FORM Determine the desired neckline depth place a pin or the dress form at this neckline position. Also place a pin on each shoulder seam the width of the desired neckline. 1. Measure and cut a perfect square of soft fabric wide enough for an entire front or entire back bodice (about 34” square) NOTE – The drape should be done in the same quality of fabric as the finished garment. 2. Draw a true bias line diagonally across the piece of fabric. 3. To determine the neckline and facing are turn a corner of the fabric deep enough to reach from one shoulder pin to the other shoulder pin, add 3” for ease. THE BASIC COWL NECKLINE / DRAPING STEPS 1. Place the folded edge of the fabric on the dress form to drape the center front neckline position. Match the center
  • 39.
    front bias lineof the fabric to the center front neckline pin on the dress form. 2. Drape and pin the shoulder in to position by allowing the neckline cowl to fall in genteelly. Be sure to keep the center front bias line on the center front the dress form. 3. Lift and pleat each shoulder to form additional desired cowl drapes. NOTE: - Refer to the garment design to determine the no. of cowl drapes desired. 1. Clip the waist line fabric. Pin and drape the waist line, side seam and armhole area. 2. Mark key areas of the dress form on one side of the drape only. - Shoulder seam - Side seam - Waist line - Arm hole are and desired armhole shape. 3. True up the front cowl drape. Add seam allowance and trim excess fabric. At the neckline fold, determine the width of the desired neckline facing. Prim excess form check for accuracy make all necessary correction. 4. Refer to one of the basic back drapes to drape a back bodice desired. NOTE: – A low back neckline cannot be used because the drape will fall off the shoulder. Also the neckline shoulder area should match.
  • 40.
    UNDER ARM /SIDE SEAM COWL The under arm/side seam cowl drape produces softly curved bias fold at the underarm seam. The fabric is placed on the true bias and is draped without a side seam. The under arm/side seam cowl is effective on a soft drape without working over done. It after design inspiration for soft and fluid fabric, crate a mood of easy elegance. UNDER ARM SIDE SEAM COWL / PREPARING THE FABRIC PREPARING THE DRESS FORM Determine the depth of the under arm cowl desired place a pin on the dress form at this under arm/side seam position. Also, the desired shoulder/ arm hole position. 1. Measure and cut a 36” square of soft fabric this will be enough fabric to drape a front of back waist seam design forming an under arm cowl. NOTE: - The drape should be done in the same quality of fabric. As the finished garments. 2. Draw a true bias line diagonally across the 36” piece of fabric. 3. Measure up 16” from the bottom edge on the bias line. At this position draw a perfect cross bias line. Turn the fabric on this line.
  • 41.
    1. Measure up16” from the bottom edge on the bias line. At this position draw a perfect cross bias line. Turn the fabric on this line. UNDER ARM SIDE SEAM COWL /DRAPING STEPS 1. Pin the fabric on the dress form at the under arm side seam pin. Position & match the bias line at the fold line to the side seam pin & the dress form. 2. Drape the shoulder form the cowl by holding the fabric at the fold line fabric edge and swing the fabric up on to the shoulder’s place anchor pin’s at this shoulders position. NOTE: - It will be necessary to from pleats and the shoulder to help from clean even folds, the deeper the side seam cowl. 3. Clip the fabric on the side seam from the bottom & the bias line, up to the waist line. Pin the bias line & the fabric to the side seam/waist position & the dress form. 4. Smooth and drape the fabric past the center frontline will the grain of the fabric is parallel to the center from of the dress from.
  • 42.
    1. Arm cowlfold line determines the width & shaped of the desired facing amount. Smooth and drape the fabric past the center back line will the cross grain of the fabric is parallel to the center back the dress form. 2. Clip of pin in place the waist line for the front of back. NOTE: - Another pleat will probably from at the shoulder. 3. Clip the front of back neck lines of drape in the shoulder. NOTE – Another pleat will probably from at the shoulder. 4. Mark key areas - Front of back - Center front - Center back - Front of back waist line - Shoulder of pleats 5. True up all lines. For truing up the shoulder, neckline, side seam & waist line area. Add seam allowance and bin excess fabric at the under