SlideShare a Scribd company logo
1 of 81
Download to read offline
Chapter 5
Notes by Mr. C.P.Divate
Android Application Components with Implementation & Examples
In this part of Android Tutorial, we will explain various Android Application Components used
in Android development. There are four basic components and some additional application
components, which we will learn in detail.
Android applications are developed using JAVA, Kotlin, and C++. Application
components are very essential for building Applications. They work as an entry point for users
or system to enter your application. There are four different types of components. Each
component has its own purpose and distinct life cycle.
Android Application Components
The basic components of an Android application are:
1. Activities
An activity is a class that is considered as an entry point for users that represents a single screen.
A messenger application might have an activity that shows a new notification, another activity
which reads messages and another which composes a new message.
Each activity is independent of one another. For example – camera application can be started in
an email application to compose an email that shares an image. The picture below depicts how
each new activity adds an item to back stack and how the current activity is destroyed and
previous activity is resumed. We will study the life cycle of activity in detail in our Android
Activity article.
To implement an activity, extend the Activity class in your subclass:
public class MainActivity extends Activity {
//code
}
2. Services
A service is a component that runs in the background, it acts as an invisible worker of our
application. It keeps updating data sources and activities. It also broadcasts intents and
performs tasks when applications are not active. An example of service is we can surf the
internet or use any other application while listening to music.
To execute services, extend the Services class in your sub-class:
public class MyService extends Services {
//code
}
Explore Android Services Tutorial and get a detailed insight into the concept
3. Content Providers
Content Provider is a component that allows applications to share data among multiple
applications. It hides the details of the database and can be used to read and write private data of
the application which is not shared. It would be a mess to access data from other applications
without content providers.
For example – you can consider looking for contact details in contact list. Or You might want
photos from the gallery which are also provided by Content Provider.
To implement this, extend ContentProvider in your subclass:
public class Provider_Name extends ContentProvider {
//code
}
4. Broadcast Receiver
Broadcast Receiver is a component that responds to broadcast messages from another application
or the same system. It can also deliver broadcasts to applications that are not running. For
example – notify the user that the battery is low. Android developers can use broadcast messages
in the application or outside the normal flow.
To implement this, extend BroadcastReceiver to your receiver:
public class Broadcast_Name extends BroadcastReceiver {
//code
}
Get a thorough understanding of Android Broadcast Receiver
Additional Components of Android Application
Some additional components of an android application:
1. Intents
It is an inter-application message passing framework for communication between android
components. It is also used for transferring data between different Activities as well as to start a
new service and display a list of contacts in ListView. Example – the camera application sends
an intent to the operating system when the user decides to share a picture.
2. Widgets
Widgets are variations of Broadcast Receivers and essential aspects of home screen
customization. They display data and allow users to perform actions on them. There are various
types of widgets:
 Information widget: These widgets display crucial information and track how the
information changes over time. Example – Clock widgets and widgets that display
weather and time information.
 Collection widget: As the name depicts, collection widgets are a collection of
information of the same type. Its use is for browsing information and opening any one
of the elements to view details. Example – music widgets, as we can skip, pause and
play music outside the music application.
 Control widget: These widgets display functionalities and by using them, the user
can trigger from home screen without opening the application. Example – pause and
play the video outside the application.
 Hybrid widget: These widgets combine features of all the other three widgets.
Example – music player widget is a control widget but it also informs the user about
which track is playing currently, which means it is a combination of control and
information thus it is termed as hybrid widget.
3. Views
View is responsible for drawing and event handling. They are rectangular elements on the
screen. Some of the views are EditText, ImageView Button, CheckBox and ImageButton.
4. Notifications
It alerts users when the application is not visible or is inactive. This alert flashes on the screen
and then disappears. Example – Notification of the new incoming message popped on the screen.
5. Fragments
A fragment is a portion of the total user interface. Users can combine more than one fragment in
a single activity and these fragments can be reused in multiple activities. A fragment generally
contains Views and ViewGroups inside them.
6. Layout XML Files
Layout is the structure for the user interface in the application. XML files provide different types
of layouts for the different type of screen, it also specifies which GUI component, an activity or
fragment holds.
7. App APK files
Apk file is the package file format that contains the program’s code, resources, and assets. The
Android operating system uses them for installing mobile applications and middleware.
8. Resources
Resources in Android is for defining Images, texts, string values. Everything is defined in the
resource file and it can be referenced within the source code. We will learn about Android
Resources, in detail in our next upcoming article on Resources.
AndroidActivityLifecyclewithCallbackMethods&Usage
Android Activity provides users with a frame to interact with & perform their actions.
Since an activity interacts with the user, it designs a window to hold UI elements. An interactive
application has many activities providing a screen & interacting with each other.
Come let’s see what we’re going to study about Android Activity in this tutorial:
 What is Activity
 Android Activity Lifecycle
 Android Activity Lifecycle Methods
 Manifest Attributes of Android Activities
What is Activity?
We know by now, that an activity is a single screen of an application that lets us see and
interact to perform an activity. Usually, an application contains many screens and each screen
extends Activity() class.
When we work on an application what we see is a UI on the screen which is an activity. Most of
the applications that we use have many activities. Among all those activities, one is
the MainActivity() & the rest are its ChildActivities(). Generally, the first page that appears on
the screen when an application opens is referred to as MainActivity(). This main activity
interacts with the child activities and lets the user access them.
Activities are stored in a stack of Activities, wherein the current activity holds the highest
position.
Before proceeding, let’s revise the Android Application Components
Android Activity Lifecycle
An activity can have four states, which are :
1.Running
2.Paused
3.Resumed
4.Stopped
The above are the four states that Android activity can achieve during its whole lifecycle.
1. Running State
An activity is in the running state if it’s shown in the foreground of the users’ screen. Activity is
in the running state when the user is interacting with it.
2. Paused State
When an activity is not in the focus but is still alive for the user, it’s in a paused state. The
activity comes in this state when some other activity comes in with a higher position in the
window.
3. Resumed State
It is when an activity goes from the paused state to the foreground that is an active state.
4. Stopped State
When an activity is no longer in the activity stack and not visible to the users.
Android Activity Methods
Android activities go through four states during their entire lifecycle. These activities have
callback methods() to describe each activity in each of the four stages. These methods need to be
overridden by the implementing subclass. In Android, we have the following 7 callback methods
that activity uses to go through the four states:
1. onCreate()
2. onStart()
3. onPause()
4. onRestart()
5. onResume()
6. onStop()
7. onDestroy()
We’ll understand these in the following:
1. onCreate()
The Android oncreate() method is called at the very start when an activity is created. An activity
is created as soon as an application is opened. This method is used in order to create an Activity.
Syntax:
@Override protected void onCreate(Bundle savedInstanceState)
{
super.onCreate(savedInstanceState);
...
}
2. onStart()
The Android onstart() method is invoked as soon as the activity becomes visible to the users.
This method is to start an activity. The activity comes on the forescreen of the users when this
method is invoked.
Syntax:
@Override protected void onStart()
{
super.onStart();
...
}
3. onPause()
The Android onPause() method is invoked when the activity doesn’t receive any user input and
goes on hold. In the pause state, the activity is partially visible to the user. This is done when the
user presses the back or home buttons. Once an activity is in the pause state, it can be followed
by either onResume() or onStopped() callback method.
Syntax:
@Override protected void onPause()
{
super.onPause();
...
}
4. onRestart()
The Android onRestart() method is invoked when activity is about to start from the stop state.
This method is to restart an activity that had been active some time back. When an activity
restarts, it starts working from where it was paused.
Syntax:
@Override protected void onRestart()
{
super.onRestart();
...
}
5. onResume()
The Android onResume() method is invoked when the user starts interacting with the user. This
callback method is followed by onPause(). Most of the functionalities of an application are
implemented using onResume().
Syntax:
@Override protected void onResume()
{
super.onResume();
...
}
6. onStop()
The Android onStop() method is invoked when the activity is no longer visible to the user. The
reason for this state is either activity is getting destroyed or another existing activity comes back
to resume state.
Syntax:
@Override protected void onStop()
{
super.onStop();
...
}
7. onDestroy()
The Android onDestroy() is the method that is called when an activity finishes and the user stops
using it. It is the final callback method received by activity, as after this it is destroyed.
Syntax:
@Override protected void onDestroy()
{
super.onDestroy();
...
}
Understand the flow of Activity through the four states using the seven methods from the
diagram:
Manifest Attributes of Android Activity
To implement activities in our application, we need to register them in the Manifest file.
For the activities to work properly, we must manage their lifecycle properly. Now let us see the
declaration of activities and their attributes in Manifest files. We’ll see the syntax as well, using
datflair_activity as an example.
1. Declare Activities
For this, the required attribute name is android:name.
To declare it in the manifest file, simply open the Manifest and type add <activity> tag
under <application> tag.
The syntax to declare Android activity:
<manifest ... >
<application ... >
<activity android:name=".Dataflair_activity" />
...content….
</application ... >
</manifest >
To declare an activity, we only need one important element that is the name of the activity. We
can add certain attributes like UI, label, etc.
2. Declare Intent filters
Intents are a very crucial part of an Android application. Intents let an activity to be launched in
other activity or applications. It also provides the advantage of making an implicit or an explicit
request.
The syntax is as follows:
<activity android:name=".Dataflair_Activity" android:icon="@drawable/app_icon">
<intent-filter>
<action android:name="android.intent.action.SEND" />
<category android:name="android.intent.category.DEFAULT" />
<data android:mimeType="text/plain" />
</intent-filter>
</activity>
3. Declare Permissions
Android activity tag can also control which applications can start activities. For permission, the
element that is used is android:permission. With this, we can put control on the activities,
where they can be launched.
The syntax is as follows:
<manifest>
<activity
android:name=".dataflair_activity"
android:permission=”com.google.socialapp.permission.SHARE_POST”
/>
<manifest/>
Example: on Activity Life Cycle: https://www.tutlane.com/tutorial/android/android-
activity-lifecycle
AndroidServiceTutorial–Lifecycle,Methods&Implementation
Ever thought of a music player, as a service? Yes, the music player is a service. Not sure
how? Well, it runs in the background while the user happily uses some other
application, isn’t it? For a better understanding, consider an online music player that
uses the internet and plays music in the background. Now, let’s understand its technical
part.
Whatare Android Services?
Android Services are the application components that run in the background. We can
understand it as a process that doesn’t need any direct user interaction. As they perform
long-running processes without user intervention, they have no User Interface. They can
be connected to other components and do inter-process communication (IPC).
Types of Android Services
When we talk about services, they can be of three types as shown in the figure below:
The working of these three services is below:
1. Foreground Services
Foreground services are those services that are visible to the users. The users can
interact with them at ease and track what’s happening. These services continue to run
even when users are using other applications.
The perfect example of this is Music Player and Downloading.
2. Background Services
These services run in the background, such that the user can’t see or access them. These
are the tasks that don’t need the user to know them.
Syncing and Storing data can be the best example.
3. Bound Services
Bound service runs as long as some other application component is bound to it. Many
components can bind to one service at a time, but once they all unbind, the service will
destroy.
To bind an application component to the service, bindService() is used.
Lifecycle of Android Services
Android services life-cycle can have two forms of services and they follow two paths that
are:
1. Started Service
2. Bounded Service
Let us see these services and their approach.
1. Started Service
A service becomes started only when an application component calls startService(). It
performs a single operation and doesn’t return any result to the caller. Once this service
starts, it runs in the background even if the component that created it destroys. This
service can be stopped only in one of the two cases:
 By using the stopService() method.
 By stopping itself using the stopSelf() method.
2. Bound Service
A service is bound only if an application component binds to it using bindService(). It
gives a client-server relation that lets the components interact with the service. The
components can send requests to services and get results.
This service runs in the background as long as another application is bound to it. Or it
can be unbound according to our requirement by using the unbindService() method.
IntentService()
There’s an additional service class that extends Service class, IntentService Class. It is a
base class for services to handle asynchronous requests. It enables running an operation
on a single background. It executes long-running programs without affecting any user’s
interface interaction. Intent services run and execute in the background and terminate
themselves as soon as they are executed completely.
Certain important features of Intent are:
 It queues up the upcoming request and executes them one by one.
 Once the queue is empty it stops itself, without the user’s intervention in its
lifecycle.
 It does proper thread management by handling the requests on a separate thread.
Methods of Android Services
The service base class defines certain callback methods to perform operations on
applications. When we talk about Android services it becomes quite obvious that these
services will do some operations and they’ll be used. The following are a few important
methods of Android services:
 onStartCommand()
 onBind()
 onCreate()
 onUnbind()
 onDestroy()
 onRebind()
Let us see these methods in detail:
1. onStartCommand()
The system calls this method whenever a component, say an activity requests ‘start’ to a
service, using startService().
Once we use this method it’s our duty to stop the service using stopService() or stopSelf().
2. onBind()
This is invoked when a component wants to bind with the service by
calling bindService(). In this, we must provide an interface for clients to communicate
with the service. For interprocess communication, we use the IBinder object.
It is a must to implement this method. If in case binding is not required, we should
return null as implementation is mandatory.
3. onUnbind()
The system invokes this when all the clients disconnect from the interface published by
the service.
4. onRebind()
The system calls this method when new clients connect to the service. The system calls it
after the onBind() method.
5. onCreate()
This is the first callback method that the system calls when a new component starts the
service. We need this method for a one-time set-up.
6. onDestroy()
This method is the final clean up call for the system. The system invokes it just before
the service destroys. It cleans up resources like threads, receivers, registered listeners,
etc.
Implementation of Android Services
Now we’ll implement services in our Android Studio with the following code. Along with
this, we’ll see the implementation of a few of the callback methods that are required for
the service implementation.
1. Now for this, we’ll create a project in our Android Studio and name it. We’re naming it
as Service. Then we’ll write the following code in our activity_main.xml:
<?xml version="1.0" encoding="utf-8"?>
<LinearLayout xmlns:android="http://schemas.android.com/apk/res/android"
android:orientation="vertical" android:layout_width="match_parent"
android:layout_height="match_parent">
<TextView
android:id="@+id/textView2"
android:layout_width="wrap_content"
android:layout_height="wrap_content"
android:layout_centerHorizontal="true"
android:layout_marginLeft="100dp"
android:text="DataFlair "
android:textColor="@color/colorPrimaryDark"
android:textSize="50dp" />
<Button
android:id="@+id/btnStart"
android:layout_width="wrap_content"
android:layout_height="wrap_content"
android:layout_marginLeft="50dp"
android:layout_marginTop="50dp"
android:onClick="startService"
android:text="Start Service" />
<Button
android:id="@+id/btnstop"
android:layout_width="wrap_content"
android:layout_height="wrap_content"
android:layout_marginLeft="50dp"
android:layout_marginTop="50dp"
android:onClick="stopService"
android:text="Stop Service" />
</LinearLayout>
2. After this, we’ll write the following code in MainActivity.java:
package com.DataFlair.DataFlair_Services;
import android.content.Intent;
import android.os.Bundle;
import android.view.View;
import androidx.appcompat.app.AppCompatActivity;
public class MainActivity extends AppCompatActivity {
@Override
protected void onCreate(Bundle savedInstanceState) {
super.onCreate(savedInstanceState);
setContentView(R.layout.activity_main);
}
public void startService(View view) {
startService(new Intent(this, DataFlairService.class));
}
public void stopService(View view) {
stopService(new Intent(this, DataFlairService.class));
}
}
3. Now open the Manifest.xml file. Following code is to be written in the Manifest file:
<?xml version="1.0" encoding="utf-8"?>
<manifest xmlns:android="http://schemas.android.com/apk/res/android"
package="com.DataFlair.DataFlair_Services">
<application
android:allowBackup="true"
android:icon="@mipmap/ic_launcher"
android:label="@string/app_name"
android:roundIcon="@mipmap/ic_launcher_round"
android:supportsRtl="true"
android:theme="@style/AppTheme">
<activity android:name="com.DataFlair.DataFlair_Services.MainActivity">
<intent-filter>
<action android:name="android.intent.action.MAIN" /&gt;
<category android:name="android.intent.category.LAUNCHER" />
</intent-filter>
</activity>
<service android:name="com.DataFlair.DataFlair_Services.DataFlairService" />
</application>
</manifest>
4. And finally, we’ll create a file, a java class, and name it. We’re naming
it DataFlairService.java. After this file is created, we’ll write the following code in it:
package com.DataFlair.DataFlair_Services;
import android.app.Service;
import android.content.Intent;
import android.media.MediaPlayer;
import android.os.IBinder;
import android.provider.Settings;
import android.widget.Toast;
public class DataFlairService extends Service {
private MediaPlayer player;
@Override
public IBinder onBind(Intent intent) {
return null;
}
@Override
public void onCreate() {
Toast.makeText(this, "Service was Created", Toast.LENGTH_LONG).show();
}
@Override
public int onStartCommand(Intent intent, int flags, int startId) {
player = MediaPlayer.create(this, Settings.System.DEFAULT_RINGTONE_URI);
player.setLooping(true);
player.start();
Toast.makeText(this, "Service Started", Toast.LENGTH_LONG).show();
return START_STICKY;
}
@Override
public void onDestroy() {
super.onDestroy();
player.stop();
Toast.makeText(this, "Service Stopped", Toast.LENGTH_LONG).show();
}
}
5. After we’ve written all the codes respectively, we’ll run our app now. The following
would be shown to us as our output:
This is our application wherein we can Start and Stop our service.
Now we’ve clicked on Start Service, therefore Service is created first.
After the service is created, it will start executing.
After that, we can stop our service whenever we like to stop them.
As we can see below, the service has stopped.
Android Fragments with Examples
In android, Fragments are the modular section of activity design and these are used to represent the
behavior of user interface (UI) in an activity. By using fragments we can create flexible UI designs that
can be adjusted based on the device screen size such as tablets, smartphones.
We can build multi-pane UI by combining multiple fragments in a single activity and we can reuse
the same fragment in multiple activities. The fragment has its own lifecycle call-backs and accepts its
own input events.
We can add or remove fragments in an activity while the activity is running. In android, the fragment
will act as a sub-activity and we can reuse it in multiple activities.
Generally in android, the fragment must be included in an activity due to that the fragment lifecycle
will always be affected by the host activity life cycle. In case if we pause an activity, all the fragments
related to an activity will also be stopped.
In android, we can insert the fragment into activity layout by using <fragment> element and by
dividing the layout of activity into fragments, we can modify the appearance of an app design at
runtime. We can also implement a fragment without having any user interface (UI).
It’s an optional to use fragments into activity but by doing this it will improve the flexibility of our
app UI and make it easier to adjust our app design based on the device size.
Following is the example of defining a multiple fragments in single activity for the tablet design to
display the details of an item which we selected in the app, but separated for mobile design.
If you observe above example for Tablet we defined an Activity A with two fragments such as one is
to show the list of items and second one is to show the details of item which we selected in first
fragment.
For Handset device, there is no enough space to show both the fragments in single activity, so
the Activity A includes first fragment to show the list of items and the Activity B which includes
another fragment to display the details of an item which is selected in Activity A.
For example, GMAIL app is designed with multiple fragments, so the design of GMAIL app will be
varied based on the size of device such as tablet or mobile device.
Table View
Mobile View
Android Fragment Life Cycle
Following is a pictorial representation of the android fragment life cycle while its activity is running.
Following are the list of methods which will perform during the lifecycle of fragment in android
applications.
Method Description
onAttach() It is called when the fragment has been associated with an activity.
onCreate() It is used to initialize the fragment.
onCreteView() It is used to create a view hierarchy associated with the fragment.
onActivityCreated() It is called when the fragment activity has been created and the fragment view hierarc
instantiated.
onStart() It is used to make the fragment visible.
onResume() It is used to make the fragment visible in an activity.
onPause() It is called when fragment is no longer visible and it indicates that the user is leaving t
fragment.
onStop() It is called to stop the fragment using the onStop() method.
onDestoryView() The view hierarchy associated with the fragment is being removed after executing t
method.
onDestroy() It is called to perform a final clean up of the fragments state.
onDetach() It is called immediately after the fragment disassociated from the activity.
Android Fragments Examples
Following is the example of creating a two fragments, two buttons and showing the respective
fragment when click on button in android application.
Create a new android application using android studio and give names as Fragments. In case if you
are not aware of creating an app in android studio check this article Android Hello World App.
Now we need to create our own custom fragment layout files (listitems_info.xml, details_info.xml)
in reslayout path to display those fragments in the main layout for that right-click on your layout
folder  Go to New  select Layout resource file and give name as listitems_info.xml.
Once we create a new file listitems_info.xml, open it and write the code like as shown below
Listitems_info.xml
<?xml version="1.0" encoding="utf-8"?>
<LinearLayout xmlns:android="http://schemas.android.com/apk/res/android"
android:orientation="vertical" android:layout_width="match_parent"
android:layout_height="match_parent">
<ListView
android:layout_width="match_parent"
android:layout_height="wrap_content"
android:id="@android:id/list" />
</LinearLayout>
Same way create another file details_info.xml, open it and write the code like as shown below
details_info.xml
<?xml version="1.0" encoding="utf-8"?>
<LinearLayout xmlns:android="http://schemas.android.com/apk/res/android"
android:orientation="vertical" android:layout_width="match_parent"
android:layout_height="match_parent"
android:background="#0079D6">
<TextView
android:layout_width="wrap_content"
android:layout_height="wrap_content"
android:textColor="#ffffff"
android:layout_marginTop="200px"
android:layout_marginLeft="200px"
android:id="@+id/Name"/>
<TextView
android:layout_width="wrap_content"
android:layout_height="wrap_content"
android:layout_marginLeft="200px"
android:textColor="#ffffff"
android:id="@+id/Location"/>
</LinearLayout>
Now we need to create our own custom fragment class files
(ListMenuFragment.java, DetailsFragment.java) in javacom.tutlane.fragmentsexample path to
bind and display data in fragments for that right-click on your application folder  Go to
New  select Java Class and give name as DetailsFragment.java.
Once we create a new file DetailsFragment.java, open it and write the code like as shown below
DetailsFragment.java
package com.tutlane.fragmentsexample;
import android.app.Fragment;
import android.os.Bundle;
import android.view.LayoutInflater;
import android.view.View;
import android.view.ViewGroup;
import android.widget.TextView;
/**
* Created by tutlane on 06-08-2017.
*/
public class DetailsFragment extends Fragment {
TextView name,location;
@Override
public View onCreateView(LayoutInflater inflater, ViewGroup container,
Bundle savedInstanceState) {
View view = inflater.inflate(R.layout.details_info, container, fal
se);
name = (TextView)view.findViewById(R.id.Name);
location = (TextView)view.findViewById(R.id.Location);
return view;
}
public void change(String uname, String ulocation){
name.setText(uname);
location.setText(ulocation);
}
}
If you observe above code we extended class with Fragment and used LayoutInflater to show the
details of fragment. We defined a function change() to change the text in textview.
Same way create another file ListMenuFragment.java, open it and write the code like as shown
below
ListMenuFragment.java
package com.tutlane.fragmentsexample;
import android.app.ListFragment;
import android.os.Bundle;
import android.view.LayoutInflater;
import android.view.View;
import android.view.ViewGroup;
import android.widget.ArrayAdapter;
import android.widget.ListView;
/**
* Created by tutlane on 06-08-2017.
*/
public class ListMenuFragment extends ListFragment {
String[] users = new String[] { "Suresh","Rohini","Trishika","Praveen"
,"Sateesh","Madhav" };
String[] location = new String[]{"Hyderabad","Guntur","Hyderabad","Ban
galore","Vizag","Nagpur"};
@Override
public View onCreateView(LayoutInflater inflater, ViewGroup container,
Bundle savedInstanceState) {
View view =inflater.inflate(R.layout.listitems_info, container, fa
lse);
ArrayAdapter<String> adapter = new ArrayAdapter<String>(getActivit
y(),
android.R.layout.simple_list_item_1, users);
setListAdapter(adapter);
return view;
}
@Override
public void onListItemClick(ListView l, View v, int position, long id)
{
DetailsFragment txt = (DetailsFragment)getFragmentManager().findFr
agmentById(R.id.fragment2);
txt.change("Name: "+ users[position],"Location : "+ location[posit
ion]);
getListView().setSelector(android.R.color.holo_blue_dark);
}
}
If you observe above code we extended our class using ListFragment and we defined two array of
strings users, location which contains names and locations. We defined onListItemClick event to
update the name and location in DetailsFragment based on the list item which we clicked.
Now we need to display our fragments horizontally side by side in main layout for that
open activity_main.xml file and write code like as shown below
activity_main.xml
<?xml version="1.0" encoding="utf-8"?>
<LinearLayout xmlns:android="http://schemas.android.com/apk/res/android"
xmlns:tools="http://schemas.android.com/tools"
android:layout_width="match_parent"
android:layout_height="match_parent"
android:orientation="horizontal"
tools:context="com.tutlane.fragmentsexample.MainActivity">
<fragment
android:layout_height="match_parent"
android:layout_width="350px"
class="com.tutlane.fragmentsexample.ListMenuFragment"
android:id="@+id/fragment"/>
<fragment
android:layout_width="match_parent"
android:layout_height="match_parent"
class="com.tutlane.fragmentsexample.DetailsFragment"
android:id="@+id/fragment2"/>
</LinearLayout>
We are not going to make any modifications for our main activity file (MainActivity.java) and
manifest file (AndroidMainfest.xml).
Output of Android Fragments Example
When we execute the above example in the android emulator we will get a result like as shown
below
This is how we can use fragments in activity to build multi-pane UI to adjust the android application
layout based on the size of a device such as tablets or smartphones, etc. based on our requirements.
Android Audio / Media Player with
Examples
In android, by using MediaPlayer class we can easily fetch, decode and play both audio and video
files with minimal setup.
The android media framework provides built-in support for playing a variety of common media
types, such as audio or video. We have multiple ways to play audio or video but the most important
component of media framework is MediaPlayer class.
Android MediaPlayer Class
In android, by using MediaPlayer class we can access audio or video files from application (raw)
resources, standalone files in file system or from a data stream arriving over a network connection
and play audio or video files with the multiple playback options such as play, pause, forward,
backward, etc.
Following is the code snippet, to play an audio that is available in our application’s local raw resource
(res/raw) directory.
MediaPlayer mPlayer = MediaPlayer.create(this, R.raw.baitikochi_chuste);
mPlayer.start();
The second parameter in create() method is the name of the song that we want to play from our
application resource directory (res/raw). In case if raw folder not exists in your application, create a
new raw folder under res directory and add a properly encoded and formatted media files in it.
In case, if we want to play an audio from a URI that is locally available in the system, we need to
write the code like as shown below.
Uri myUri = ....; // initialize Uri here
MediaPlayer mPlayer = new MediaPlayer();
mPlayer.setAudioStreamType(AudioManager.STREAM_MUSIC);
mPlayer.setDataSource(getApplicationContext(), myUri);
mPlayer.prepare();
mPlayer.start();
If we want to play an audio from a URL via HTTP streaming, we need to write the code like as shown
below.
String url = "http://........"; // your URL here
MediaPlayer mPlayer = new MediaPlayer();
mPlayer.setAudioStreamType(AudioManager.STREAM_MUSIC);
mPlayer.setDataSource(url);
mPlayer.prepare(); // might take long! (for buffering, etc)
mPlayer.start();
If you observe above code snippets, we create an instance of MediaPlayer class and added required
audio source, streaming type, audio file path, etc. to play an audio from our application.
Apart from above methods, MediaPlayer class provides a different type of methods to control audio
and video files based on requirements.
Method Description
getCurrentPosition() It is used to get the current position of the song in milliseconds.
getDuration() It is used to get the total time duration of the song in milliseconds.
isPlaying() It returns true / false to indicate whether song playing or not.
pause() It is used to pause the song playing.
setAudioStreamType() it is used to specify the audio streaming type.
setDataSource() It is used to specify the path of audio / video file to play.
setVolume() It is used to adjust media player volume either up / down.
seekTo(position) It is used to move song to particular position in milliseconds.
getTrackInfo() It returns an array of track information.
start() It is used to start playing the audio/video.
stop() It is used to stop playing the audio/video.
reset() It is used to reset the MediaPlayer object.
release() It is used to releases the resources which are associated with MediaPlayer object.
Now we will see how to implement media playing application using MediaPlayer to play a song or
audio with multiple playback options, such as play, pause, forward, backward in android application
with examples.
Android Audio Player Example
Following is the example of implementing an audio player to play a song or audio with multiple
playback options using MediaPlayer.
Create a new android application using android studio and give names as MediaPlayerExample. In
case if you are not aware of creating an app in android studio check this article Android Hello World
App.
As discussed create a new raw folder in res directory and add one music file like as shown below to
play it by using MediaPlayer class.
Now open activity_main.xml file from reslayout folder path and write the code like as shown
below.
activity_main.xml
<?xml version="1.0" encoding="utf-8"?>
<RelativeLayout xmlns:android="http://schemas.android.com/apk/res/android"
android:layout_width="match_parent"
android:layout_height="match_parent"
android:paddingLeft="10dp"
android:paddingRight="10dp">
<TextView
android:id="@+id/txtVw1"
android:layout_width="wrap_content"
android:layout_height="wrap_content"
android:text="Now Playing: "
android:layout_marginTop="30dp"
android:textAppearance="?android:attr/textAppearanceMedium" />
<TextView
android:id="@+id/txtSname"
android:layout_width="wrap_content"
android:layout_height="wrap_content"
android:layout_alignBaseline="@+id/txtVw1"
android:layout_toRightOf="@+id/txtVw1"
android:text="TextView" />
<ImageView
android:id="@+id/imgLogo"
android:layout_width="match_parent"
android:layout_height="450dp"
android:layout_below="@+id/txtVw1"
android:src="@drawable/tutlane" />
<ImageButton
android:id="@+id/btnBackward"
android:layout_width="wrap_content"
android:layout_height="wrap_content"
android:layout_alignParentBottom="true"
android:layout_marginBottom="44dp"
android:layout_marginLeft="20dp"
android:src="@android:drawable/ic_media_rew" />
<ImageButton
android:id="@+id/btnPlay"
android:layout_width="wrap_content"
android:layout_height="wrap_content"
android:layout_alignTop="@+id/btnBackward"
android:layout_marginLeft="20dp"
android:layout_toRightOf="@+id/btnBackward"
android:src="@android:drawable/ic_media_play" />
<ImageButton
android:id="@+id/btnPause"
android:layout_width="wrap_content"
android:layout_height="wrap_content"
android:layout_alignTop="@+id/btnPlay"
android:layout_marginLeft="20dp"
android:layout_toRightOf="@+id/btnPlay"
android:src="@android:drawable/ic_media_pause" />
<ImageButton
android:id="@+id/btnForward"
android:layout_width="wrap_content"
android:layout_height="wrap_content"
android:layout_alignTop="@+id/btnPause"
android:layout_marginLeft="20dp"
android:layout_toRightOf="@+id/btnPause"
android:contentDescription="@+id/imageButton3"
android:src="@android:drawable/ic_media_ff" />
<TextView
android:id="@+id/txtStartTime"
android:layout_width="wrap_content"
android:layout_height="wrap_content"
android:layout_alignTop="@+id/sBar"
android:text="0 min, 0 sec" />
<SeekBar
android:id="@+id/sBar"
android:layout_width="match_parent"
android:layout_height="wrap_content"
android:layout_above="@+id/btnBackward"
android:layout_toLeftOf="@+id/txtSongTime"
android:layout_toRightOf="@+id/txtStartTime" />
<TextView
android:id="@+id/txtSongTime"
android:layout_width="wrap_content"
android:layout_height="wrap_content"
android:layout_toRightOf="@+id/btnForward"
android:layout_alignTop="@+id/sBar"
android:text="0 min, 0 sec " />
</RelativeLayout>
Now open your main activity
file MainActivity.java from javacom.tutlane.audioplayerexample path and write the code like as
shown below.
MainActivity.java
package com.tutlane.mediaplayerexample;
import android.media.MediaPlayer;
import android.os.Handler;
import android.support.v7.app.AppCompatActivity;
import android.os.Bundle;
import android.view.View;
import android.widget.ImageButton;
import android.widget.SeekBar;
import android.widget.TextView;
import android.widget.Toast;
import java.util.concurrent.TimeUnit;
public class MainActivity extends AppCompatActivity {
private ImageButton forwardbtn, backwardbtn, pausebtn, playbtn;
private MediaPlayer mPlayer;
private TextView songName, startTime, songTime;
private SeekBar songPrgs;
private static int oTime =0, sTime =0, eTime =0, fTime = 5000, bTim
e = 5000;
private Handler hdlr = new Handler();
@Override
protected void onCreate(Bundle savedInstanceState) {
super.onCreate(savedInstanceState);
setContentView(R.layout.activity_main);
backwardbtn = (ImageButton)findViewById(R.id.btnBackward);
forwardbtn = (ImageButton)findViewById(R.id.btnForward);
playbtn = (ImageButton)findViewById(R.id.btnPlay);
pausebtn = (ImageButton)findViewById(R.id.btnPause);
songName = (TextView)findViewById(R.id.txtSname);
startTime = (TextView)findViewById(R.id.txtStartTime);
songTime = (TextView)findViewById(R.id.txtSongTime);
songName.setText("Baitikochi Chuste");
mPlayer = MediaPlayer.create(this, R.raw.baitikochi_chuste);
songPrgs = (SeekBar)findViewById(R.id.sBar);
songPrgs.setClickable(false);
pausebtn.setEnabled(false);
playbtn.setOnClickListener(new View.OnClickListener() {
@Override
public void onClick(View v) {
Toast.makeText(MainActivity.this, "Playing Audio", Toast.L
ENGTH_SHORT).show();
mPlayer.start();
eTime = mPlayer.getDuration();
sTime = mPlayer.getCurrentPosition();
if(oTime == 0){
songPrgs.setMax(eTime);
oTime =1;
}
songTime.setText(String.format("%d min, %d sec", TimeUnit.
MILLISECONDS.toMinutes(eTime),
TimeUnit.MILLISECONDS.toSeconds(eTime) - TimeUnit.
MINUTES.toSeconds(TimeUnit.MILLISECONDS. toMinutes(eTime))) );
startTime.setText(String.format("%d min, %d sec", TimeUnit
.MILLISECONDS.toMinutes(sTime),
TimeUnit.MILLISECONDS.toSeconds(sTime) - TimeUnit.
MINUTES.toSeconds(TimeUnit.MILLISECONDS. toMinutes(sTime))) );
songPrgs.setProgress(sTime);
hdlr.postDelayed(UpdateSongTime, 100);
pausebtn.setEnabled(true);
playbtn.setEnabled(false);
}
});
pausebtn.setOnClickListener(new View.OnClickListener() {
@Override
public void onClick(View v) {
mPlayer.pause();
pausebtn.setEnabled(false);
playbtn.setEnabled(true);
Toast.makeText(getApplicationContext(),"Pausing Audio", To
ast.LENGTH_SHORT).show();
}
});
forwardbtn.setOnClickListener(new View.OnClickListener() {
@Override
public void onClick(View v) {
if((sTime + fTime) <= eTime)
{
sTime = sTime + fTime;
mPlayer.seekTo(sTime);
}
else
{
Toast.makeText(getApplicationContext(), "Cannot jump f
orward 5 seconds", Toast.LENGTH_SHORT).show();
}
if(!playbtn.isEnabled()){
playbtn.setEnabled(true);
}
}
});
backwardbtn.setOnClickListener(new View.OnClickListener() {
@Override
public void onClick(View v) {
if((sTime - bTime) > 0)
{
sTime = sTime - bTime;
mPlayer.seekTo(sTime);
}
else
{
Toast.makeText(getApplicationContext(), "Cannot jump b
ackward 5 seconds", Toast.LENGTH_SHORT).show();
}
if(!playbtn.isEnabled()){
playbtn.setEnabled(true);
}
}
});
}
private Runnable UpdateSongTime = new Runnable() {
@Override
public void run() {
sTime = mPlayer.getCurrentPosition();
startTime.setText(String.format("%d min, %d sec", TimeUnit.MIL
LISECONDS.toMinutes(sTime),
TimeUnit.MILLISECONDS.toSeconds(sTime) - TimeUnit.MINU
TES.toSeconds(TimeUnit.MILLISECONDS.toMinutes(sTime))) );
songPrgs.setProgress(sTime);
hdlr.postDelayed(this, 100);
}
};
}
If you observe above code we used MeidaPlayer object properties to play, pause song and
changing the song position either forward or backward based on our requirements.
Output of Android Audio Player Example
When we run the above program in the android studio we will get the result as shown below.
If you observe above result, when we click on play button song will start play and it will show the
song duration details. If we click on pause button, the song will stop playing and use forward and
backward buttons to move song forward or backward based on your requirements.
This is how we can implement audio player app in android applications with multiple playback
options based on our requirements.
Android TextToSpeech with Examples
In android, by using TextToSpeech class we can easily convert our text into voice and it supports
different types of speaking languages. We can choose the speaking language based on our
requirements in the android application.
Generally, the android TextToSpeech instance can only be used to synthesize text once it has
completed its initialization so implement TextToSpeech.OnInitListener to notify the completion of
initialization.
During the initialization, we can set the audio pitch rate, audio speed, type of language to speak, etc.
based on our requirements.
Following is the code snippet of converting text to voice using TextToSpeech class in android
applications.
public class MainActivity extends AppCompatActivity implements TextToSpeec
h.OnInitListener {
....
TextToSpeech textToSpeech;
@Override
public void onInit(int status) {
if (status == TextToSpeech.SUCCESS) {
int result = textToSpeech.setLanguage(Locale.US);
String text = speakText.getText().toString();
textToSpeech.speak(text, TextToSpeech.QUEUE_FLUSH, null, null)
;
}
}
....
}
If you observe above code, we used TextToSpeech.OnInitListener to notify the completion of
initialization and used TextToSpeech class to convert entered text to voice.
Now we will see how to use the TextToSpeech component to convert the given text to speech
conversion in android application with examples.
Android TextToSpeech Example
Following is the example of converting the given text to voice using an
android TextToSpeech object.
Create a new android application using android studio and give names as TextSpeechExample. In
case if you are not aware of creating an app in android studio check this article Android Hello World
App.
Once we create an application, open activity_main.xml file from reslayout folder path and write
the code like as shown below.
activity_main.xml
<?xml version="1.0" encoding="utf-8"?>
<LinearLayout xmlns:android="http://schemas.android.com/apk/res/android"
android:orientation="vertical" android:layout_width="match_parent"
android:layout_height="match_parent">
<TextView
android:id="@+id/fstTxt"
android:layout_width="wrap_content"
android:layout_height="wrap_content"
android:layout_marginLeft="100dp"
android:layout_marginTop="150dp"
android:text="Enter Text to Speak"/>
<EditText
android:id="@+id/txtSpeak"
android:layout_width="wrap_content"
android:layout_height="wrap_content"
android:layout_marginLeft="100dp"
android:ems="10"/>
<Button
android:id="@+id/btnSpeech"
android:layout_width="wrap_content"
android:layout_height="wrap_content"
android:layout_marginLeft="100dp"
android:text="Speak" />
</LinearLayout>
Now open your main activity
file MainActivity.java from javacom.tutlane.textspeechexample path and write the code like as
shown below
MainActivity.java
package com.tutlane.textspeechexample;
import android.os.Build;
import android.speech.tts.TextToSpeech;
import android.support.v7.app.AppCompatActivity;
import android.os.Bundle;
import android.util.Log;
import android.view.View;
import android.widget.Button;
import android.widget.EditText;
import java.util.Locale;
public class MainActivity extends AppCompatActivity implements TextToSpeec
h.OnInitListener {
Button speakBtn;
EditText speakText;
TextToSpeech textToSpeech;
@Override
protected void onCreate(Bundle savedInstanceState) {
super.onCreate(savedInstanceState);
setContentView(R.layout.activity_main);
speakText = (EditText) findViewById(R.id.txtSpeak);
speakBtn = (Button)findViewById(R.id.btnSpeech);
textToSpeech = new TextToSpeech(this, this);
speakBtn.setOnClickListener(new View.OnClickListener() {
@Override
public void onClick(View v) {
texttoSpeak();
}
});
}
@Override
public void onInit(int status) {
if (status == TextToSpeech.SUCCESS) {
int result = textToSpeech.setLanguage(Locale.US);
if (result == TextToSpeech.LANG_MISSING_DATA || result == Text
ToSpeech.LANG_NOT_SUPPORTED) {
Log.e("error", "This Language is not supported");
} else {
texttoSpeak();
}
} else {
Log.e("error", "Failed to Initialize");
}
}
@Override
public void onDestroy() {
if (textToSpeech != null) {
textToSpeech.stop();
textToSpeech.shutdown();
}
super.onDestroy();
}
private void texttoSpeak() {
String text = speakText.getText().toString();
if ("".equals(text)) {
text = "Please enter some text to speak.";
}
if (Build.VERSION.SDK_INT >= Build.VERSION_CODES.LOLLIPOP) {
textToSpeech.speak(text, TextToSpeech.QUEUE_FLUSH, null, n
ull);
}
else {
textToSpeech.speak(text, TextToSpeech.QUEUE_FLUSH, null);
}
}
}
If you observe above code, we are converting the text to speech conversion
using TextToSpeech class.
Output of Android TextToSpeech Example
When we run the above example in the android emulator we will get a result like as shown below.
If you observe the above result, once we enter text and click on the Speak button, the entered text
converted to voice based on the language which we selected in the application.
This is how we can convert text to speech in android applications using TextToSpeech object based
on our requirements.
AsyncTask Tutorial With Example Android Studio
In Android, AsyncTask (Asynchronous Task) allows us to run the instruction in the
background and then synchronize again with our main thread. This class will override at
least one method i.e doInBackground(Params) and most often will override second
method onPostExecute(Result).
AsyncTask class is used to do background operations that will update the UI(user
interface). Mainly we used it for short operations that will not effect on our main
thread.
AsyncTask class is firstly executed using execute() method. In the first step AsyncTask is
called onPreExecute() then onPreExecute() calls doInBackground() for background
processes and then doInBackground() calls onPostExecute() method to update the UI.
Methods of AsyncTask
 onPreExecute() − Before doing background operation we should show
something on screen like progressbar or any animation to user. we can directly
comminicate background operation using on doInBackground() but for the best
practice, we should call all asyncTask methods .
 doInBackground(Params) − In this method we have to do background
operation on background thread. Operations in this method should not touch on
any mainthread activities or fragments.
 onProgressUpdate(Progress…) − While doing background operation, if you
want to update some information on UI, we can use this method.
 onPostExecute(Result) − In this method we can update ui of background
operation result.
Generic Types in Async Task
 TypeOfVarArgParams − It contains information about what type of params used
for execution.
 ProgressValue − It contains information about progress units. While doing
background operation we can update information on ui using
onProgressUpdate().
 ResultValue −It contains information about result type.
This example demonstrate about how to use asyncTask in android.
Step 1 − Create a new project in Android Studio, go to File ⇒ New Project and fill all
required details to create a new project.
Step 2 − Add the following code to res/layout/activity_main.xml.
<?xml version = "1.0" encoding = "utf-8"?>
<LinearLayout xmlns:android =
"http://schemas.android.com/apk/res/android"
xmlns:tools = "http://schemas.android.com/tools"
android:id = "@+id/rootview"
android:layout_width = "match_parent"
android:layout_height = "match_parent"
android:orientation = "vertical"
android:background = "#c1c1c1"
android:gravity = "center_horizontal"
tools:context = ".MainActivity">
<Button
android:id = "@+id/asyncTask"
android:text = "Download"
android:layout_width = "wrap_content"
android:layout_height = "wrap_content" />
<ImageView
android:id = "@+id/image"
android:layout_width = "300dp"
android:layout_height = "300dp" />
</LinearLayout>
In the above xml we have created a button, when user click on the button it going to
download image and append image to imageview.
Step 3 − Add the following code to src/MainActivity.java
package com.example.andy.myapplication;
import android.app.ProgressDialog;
import android.graphics.Bitmap;
import android.graphics.BitmapFactory;
import android.os.AsyncTask;
import android.os.Bundle;
import android.support.v7.app.AppCompatActivity;
import android.view.View;
import android.widget.Button;
import android.widget.ImageView;
import java.io.IOException;
import java.io.InputStream;
import java.net.HttpURLConnection;
import java.net.URL;
public class MainActivity extends AppCompatActivity {
URL ImageUrl = null;
InputStream is = null;
Bitmap bmImg = null;
ImageView imageView= null;
ProgressDialog p;
@Override
protected void onCreate(Bundle savedInstanceState) {
super.onCreate(savedInstanceState);
setContentView(R.layout.activity_main);
Button button=findViewById(R.id.asyncTask);
imageView=findViewById(R.id.image);
button.setOnClickListener(new View.OnClickListener() {
@Override
public void onClick(View v) {
AsyncTaskExample asyncTask=new AsyncTaskExample();
asyncTask.execute("https://www.tutorialspoint.com/image
s/tp-logo-diamond.png");
}
});
}
private class AsyncTaskExample extends AsyncTask<String, String,
Bitmap> {
@Override
protected void onPreExecute() {
super.onPreExecute();
p = new ProgressDialog(MainActivity.this);
p.setMessage("Please wait...It is downloading");
p.setIndeterminate(false);
p.setCancelable(false);
p.show();
}
@Override
protected Bitmap doInBackground(String... strings) {
try {
ImageUrl = new URL(strings[0]);
HttpURLConnection conn = (HttpURLConnection)
ImageUrl.openConnection();
conn.setDoInput(true);
conn.connect();
is = conn.getInputStream();
BitmapFactory.Options options = new
BitmapFactory.Options();
options.inPreferredConfig = Bitmap.Config.RGB_565;
bmImg = BitmapFactory.decodeStream(is, null, options);
} catch (IOException e) {
e.printStackTrace();
}
return bmImg;
}
@Override
protected void onPostExecute(Bitmap bitmap) {
super.onPostExecute(bitmap);
if(imageView!=null) {
p.hide();
imageView.setImageBitmap(bitmap);
}else {
p.show();
}
}
}
}
In the above code we are downloading image using asyncTask and appending image to
imageview.
Step 4 − Add the following code to manifest.xml
<?xml version = "1.0" encoding = "utf-8"?>
<manifest xmlns:android =
"http://schemas.android.com/apk/res/android"
package = "com.example.andy.myapplication">
<uses-permission android:name = "android.permission.INTERNET"/>
<application
android:allowBackup = "true"
android:icon = "@mipmap/ic_launcher"
android:label = "@string/app_name"
android:roundIcon = "@mipmap/ic_launcher_round"
android:supportsRtl = "true"
android:theme = "@style/AppTheme">
<activity android:name = ".MainActivity">
<intent-filter>
<action android:name = "android.intent.action.MAIN" />
<category android:name =
"android.intent.category.LAUNCHER" />
</intent-filter>
</activity>
</application>
</manifest>
In the above AndroidManifest.xml file we have added internet permission to access
internet to download image.
Let's try to run your application. I assume you have connected your actual Android
Mobile device with your computer. To run the app from android studio, open one of your
project's activity files and click Run Eclipse Run Icon icon from the toolbar. Select your
mobile device as an option and then check your mobile device which will display your
default screen.
Now click on download button it will show progress on UI and download image at
background as shown below
After downloading image, it will update on UI as shown below
Android Audio Recorder with Examples
In android, MediaRecorder class will provide a functionality to record audio or video files.
The android multimedia framework provides built-in support for capturing and encoding a variety of
common audio and video formats. We have a multiple ways to record audio or video but by
using MediaRecorder class we can easily implement audio or video recording.
In android, to record an audio we need to use device’s microphone along with MediaRecorder class.
In case, if we want to record video, we need to use device’s camera along with MediaRecorder class.
Android Set Permissions to Record Audio
To record an audio and save it in device, our app must tell the user that it will access the device’s
audio input and storage, for that we need to set multiple permissions such
as RECORD_AUDIO, STORAGE and WRITE_EXTERNAL_STORAGE in our manifest file.
Following is the code snippet of defining the permissions in android manifest file to record audio
and save it in device.
<manifest ... >
<uses-permission android:name="android.permission.RECORD_AUDIO"/>
<uses-permission android:name="android.permission.WRITE_EXTERNAL_STORAGE"/
>
<uses-permission android:name="android.permission.STORAGE"/>
...
</manifest>
The RECORD_AUDIO, WRITE_EXTERNAL_STORAGE are considered as a dangerous permissions
because it may pose a risk to the user’s privacy. Starting with Android 6.0 (API level 23) an app that
uses a dangerous permission must ask the user for approval at run time. After the user has granted
permission, the app should remember and not ask again.
Android MediaRecorder Class
In android, we can record audio or video by using MediaRecorder class in our applications. This
class will provide required API’s to record audio and video.
To use MediaRecord class to record an audio, we need to create an instance
of MediaRecorder class and set the source, output, encoding format and output file to store the
recorded audio in device. After that we need to call prepare(), start(), stop(), etc. to start the audio
recording in our application.
Following is the code snippet to use MediaRecorder to record audio in android applications.
MediaRecorder recorder = new MediaRecorder();
recorder.setAudioSource(MediaRecorder.AudioSource.MIC);
recorder.setOutputFormat(MediaRecorder.OutputFormat.THREE_GPP);
recorder.setAudioEncoder(MediaRecorder.AudioEncoder.AMR_NB);
recorder.setOutputFile(PATH_NAME);
recorder.prepare();
recorder.start(); // Recording will start
...
recorder.stop();
recorder.reset(); // You can reuse the object by going back to setAudioS
ource() step
recorder.release(); // Now the object cannot be reused
If you observe above code snippet, we create an instance of MediaRecorder class and added
required audio source, output format, encoding format, audio file saving path, etc. to record an
audio and save it in device.
Apart from above methods, MediaRecorder class provides a different type of methods to control
audio and video recording based on requirements.
Method Description
setAudioSource() It is used to specify the source of audio to be recorded.
setVideoSource() It is used to specify the source of the video to be recorded.
setOutputFormat() It is used to specify the audio / video output format.
setAudioEncoder() It is used to specify the audio encoder.
setVideoEncoder() it is used to specify the video encoder.
setOutputFile() It is used to specify the path of a recorded audio/video files to be stored.
stop() It is used to stop the recording process.
start() it is used to start the recording process.
release() It is used to releases the resources which are associated with MediaRecorder object.
Now we will see how to capture audio from device microphone, save the audio, and play it back
using MediaPlayer in android application with examples.
Android Audio Recording Example
Following is the example of recording an audio from device microphone, save the audio in device
memory and play it using MediaPlayer.
Create a new android application using android studio and give names as AudioRecorderExample.
In case if you are not aware of creating an app in android studio check this article Android Hello
World App.
Once we create an application, open activity_main.xml file from reslayout folder path and write
the code like as shown below.
activity_main.xml
<?xml version="1.0" encoding="utf-8"?>
<LinearLayout xmlns:android="http://schemas.android.com/apk/res/android"
android:orientation="vertical" android:layout_width="match_parent"
android:layout_height="match_parent">
<Button
android:id="@+id/btnRecord"
android:layout_width="wrap_content"
android:layout_height="wrap_content"
android:layout_marginLeft="100dp"
android:layout_marginTop="120dp"
android:text="Start Recording" />
<Button
android:id="@+id/btnStop"
android:layout_width="wrap_content"
android:layout_height="wrap_content"
android:layout_marginLeft="100dp"
android:text="Stop Recording" />
<Button
android:id="@+id/btnPlay"
android:layout_width="wrap_content"
android:layout_height="wrap_content"
android:layout_marginLeft="100dp"
android:text="Play Recording" />
<Button
android:id="@+id/btnStopPlay"
android:layout_width="wrap_content"
android:layout_height="wrap_content"
android:layout_marginLeft="100dp"
android:text="Stop Playing" />
</LinearLayout>
Now open your main activity
file MainActivity.java from javacom.tutlane.audiorecorderexample path and write the code like
as shown below
MainActivity.java
package com.tutlane.audiorecorderexample;
import android.content.pm.PackageManager;
import android.media.MediaPlayer;
import android.media.MediaRecorder;
import android.os.Environment;
import android.support.v4.app.ActivityCompat;
import android.support.v4.content.ContextCompat;
import android.support.v7.app.AppCompatActivity;
import android.os.Bundle;
import android.util.Log;
import android.view.View;
import android.widget.Button;
import android.widget.Toast;
import java.io.IOException;
import static android.Manifest.permission.RECORD_AUDIO;
import static android.Manifest.permission.WRITE_EXTERNAL_STORAGE;
public class MainActivity extends AppCompatActivity {
private Button startbtn, stopbtn, playbtn, stopplay;
private MediaRecorder mRecorder;
private MediaPlayer mPlayer;
private static final String LOG_TAG = "AudioRecording";
private static String mFileName = null;
public static final int REQUEST_AUDIO_PERMISSION_CODE = 1;
@Override
protected void onCreate(Bundle savedInstanceState) {
super.onCreate(savedInstanceState);
setContentView(R.layout.activity_main);
startbtn = (Button)findViewById(R.id.btnRecord);
stopbtn = (Button)findViewById(R.id.btnStop);
playbtn = (Button)findViewById(R.id.btnPlay);
stopplay = (Button)findViewById(R.id.btnStopPlay);
stopbtn.setEnabled(false);
playbtn.setEnabled(false);
stopplay.setEnabled(false);
mFileName = Environment.getExternalStorageDirectory().getAbsoluteP
ath();
mFileName += "/AudioRecording.3gp";
startbtn.setOnClickListener(new View.OnClickListener() {
@Override
public void onClick(View v) {
if(CheckPermissions()) {
stopbtn.setEnabled(true);
startbtn.setEnabled(false);
playbtn.setEnabled(false);
stopplay.setEnabled(false);
mRecorder = new MediaRecorder();
mRecorder.setAudioSource(MediaRecorder.AudioSource.MIC
);
mRecorder.setOutputFormat(MediaRecorder.OutputFormat.T
HREE_GPP);
mRecorder.setAudioEncoder(MediaRecorder.AudioEncoder.A
MR_NB);
mRecorder.setOutputFile(mFileName);
try {
mRecorder.prepare();
} catch (IOException e) {
Log.e(LOG_TAG, "prepare() failed");
}
mRecorder.start();
Toast.makeText(getApplicationContext(), "Recording Sta
rted", Toast.LENGTH_LONG).show();
}
else
{
RequestPermissions();
}
}
});
stopbtn.setOnClickListener(new View.OnClickListener() {
@Override
public void onClick(View v) {
stopbtn.setEnabled(false);
startbtn.setEnabled(true);
playbtn.setEnabled(true);
stopplay.setEnabled(true);
mRecorder.stop();
mRecorder.release();
mRecorder = null;
Toast.makeText(getApplicationContext(), "Recording Stopped
", Toast.LENGTH_LONG).show();
}
});
playbtn.setOnClickListener(new View.OnClickListener() {
@Override
public void onClick(View v) {
stopbtn.setEnabled(false);
startbtn.setEnabled(true);
playbtn.setEnabled(false);
stopplay.setEnabled(true);
mPlayer = new MediaPlayer();
try {
mPlayer.setDataSource(mFileName);
mPlayer.prepare();
mPlayer.start();
Toast.makeText(getApplicationContext(), "Recording Sta
rted Playing", Toast.LENGTH_LONG).show();
} catch (IOException e) {
Log.e(LOG_TAG, "prepare() failed");
}
}
});
stopplay.setOnClickListener(new View.OnClickListener() {
@Override
public void onClick(View v) {
mPlayer.release();
mPlayer = null;
stopbtn.setEnabled(false);
startbtn.setEnabled(true);
playbtn.setEnabled(true);
stopplay.setEnabled(false);
Toast.makeText(getApplicationContext(),"Playing Audio Stop
ped", Toast.LENGTH_SHORT).show();
}
});
}
@Override
public void onRequestPermissionsResult(int requestCode, String[] permi
ssions, int[] grantResults) {
switch (requestCode) {
case REQUEST_AUDIO_PERMISSION_CODE:
if (grantResults.length> 0) {
boolean permissionToRecord = grantResults[0] == Packag
eManager.PERMISSION_GRANTED;
boolean permissionToStore = grantResults[1] == Packag
eManager.PERMISSION_GRANTED;
if (permissionToRecord && permissionToStore) {
Toast.makeText(getApplicationContext(), "Permissio
n Granted", Toast.LENGTH_LONG).show();
} else {
Toast.makeText(getApplicationContext(),"Permission
Denied",Toast.LENGTH_LONG).show();
}
}
break;
}
}
public boolean CheckPermissions() {
int result = ContextCompat.checkSelfPermission(getApplicationConte
xt(), WRITE_EXTERNAL_STORAGE);
int result1 = ContextCompat.checkSelfPermission(getApplicationCont
ext(), RECORD_AUDIO);
return result == PackageManager.PERMISSION_GRANTED && result1 == P
ackageManager.PERMISSION_GRANTED;
}
private void RequestPermissions() {
ActivityCompat.requestPermissions(MainActivity.this, new String[]{
RECORD_AUDIO, WRITE_EXTERNAL_STORAGE}, REQUEST_AUDIO_PERMISSION_CODE);
}
}
If you observe above code, we are requesting permissions from user to record audio and store
recorded files in device using onRequestPermissionResult method and added required
functionality for audio recording and playing audio using mediaplayer based on our requirements.
As discussed, we need to set permissions in android manifest file (AndroidManifest.xml) to record
audio and stored record audio files in device. Now open android manifest file
(AndroidManifest.xml) and write the code like as shown below
AndroidManifest.xml
<?xml version="1.0" encoding="utf-8"?>
<manifest xmlns:android="http://schemas.android.com/apk/res/android"
package="com.tutlane.audiorecorderexample">
<uses-permission android:name="android.permission.RECORD_AUDIO"/>
<uses-permission android:name="android.permission.WRITE_EXTERNAL_STORA
GE"/>
<uses-permission android:name="android.permission.STORAGE"/>
<application
android:allowBackup="true"
android:icon="@mipmap/ic_launcher"
android:label="@string/app_name"
android:roundIcon="@mipmap/ic_launcher_round"
android:supportsRtl="true"
android:theme="@style/AppTheme">
<activity android:name=".MainActivity">
<intent-filter>
<action android:name="android.intent.action.MAIN" />
<category android:name="android.intent.category.LAUNCHER
" />
</intent-filter>
</activity>
</application>
</manifest>
If you observe above code, we added required audio and storage permissions in manifest file to
record and store audio files in device.
Output of Android Audio Recording Example
When we run the above program in the android studio we will get the result as shown below.
If you observe above result, when we are clicking on Start Recording button it’s asking for
permission to record audio and local storage access.
After giving all the required permissions, if we click on Start Recording button, the audio recording
will be started by using local device microphone like as shown below.
Once the audio recording finished, click on the Play Recording button to listen the audio from local
device.
This is how we can implement an audio recording in android applications based on our
requirements.
Android Camera App with Examples
In android, Camera is useful to capture the photos and videos in our applications. By using camera
API we can control the functionalities of camera based on our requirements.
The android framework provides a two ways such as android.hardware.camera2 API and
camera intent to capture the images and videos in our application.
android.hardware.camera2
It’s a primary API for controlling the device cameras. By using this we can take the pictures or videos
from our application using camera.
Intent
By using intent action types
either MediaStore.ACTION_IMAGE_CAPTURE or MediaStore.ACTION_VIDEO_CAPTURE, we can
capture the photos or videos without directly using the Camera object.
The best way is to use an Intent to invoke an existing Android camera application to take pictures or
videos in our application without writing a lot of extra code.
In android, By using startActivityForResult() method with intent action
parameter MediaStore.ACTION_IMAGE_CAPTURE, we can take the pictures from our android
applications.
Following is the code snippet to capture the pictures using intent object with action
parameter MediaStore.ACTION_IMAGE_CAPTURE in android applications.
Intent cInt = new Intent(MediaStore.ACTION_IMAGE_CAPTURE);
startActivityForResult(cInt,Image_Capture_Code);
If you observe above code snippet, we used startActivityForResult() method
with MediaStore.ACTION_IMAGE_CAPTURE intent action parameter to capture the photos. The
second parameter Image_Capture_Code is a locally defined integer that must be greater than 0.
Android Camera App Example
Following is the example of using an existing camera app in our android applications to capture the
photos on button click.
Create a new android application using android studio and give names as CameraExample. In case if
you are not aware of creating an app in android studio check this article Android Hello World App.
Once we create an application, open activity_main.xml file from reslayout folder path and write
the code like as shown below.
activity_main.xml
<?xml version="1.0" encoding="utf-8"?>
<RelativeLayout xmlns:android="http://schemas.android.com/apk/res/android"
android:layout_width="match_parent"
android:layout_height="match_parent"
android:paddingLeft="10dp"
android:paddingRight="10dp">
<Button
android:id="@+id/btnTakePicture"
android:layout_width="wrap_content"
android:layout_height="wrap_content"
android:text="Take a Photo"
android:textStyle="bold"
android:layout_centerHorizontal="true"
android:layout_alignParentBottom="true" />
<ImageView
android:layout_width="fill_parent"
android:layout_height="fill_parent"
android:id="@+id/capturedImage"
android:layout_above="@+id/btnTakePicture"/>
</RelativeLayout>
Now open your main activity file MainActivity.java from javacom.tutlane.cameraexample path
and write the code like as shown below
MainActivity.java
package com.tutlane.cameraexample;
import android.content.Intent;
import android.graphics.Bitmap;
import android.provider.MediaStore;
import android.support.v7.app.AppCompatActivity;
import android.os.Bundle;
import android.view.View;
import android.widget.Button;
import android.widget.ImageView;
import android.widget.Toast;
public class MainActivity extends AppCompatActivity {
private Button btnCapture;
private ImageView imgCapture;
private static final int Image_Capture_Code = 1;
@Override
protected void onCreate(Bundle savedInstanceState) {
super.onCreate(savedInstanceState);
setContentView(R.layout.activity_main);
btnCapture =(Button)findViewById(R.id.btnTakePicture);
imgCapture = (ImageView) findViewById(R.id.capturedImage);
btnCapture.setOnClickListener(new View.OnClickListener() {
@Override
public void onClick(View v) {
Intent cInt = new Intent(MediaStore.ACTION_IMAGE_CAPTURE);
startActivityForResult(cInt,Image_Capture_Code);
}
});
}
@Override
protected void onActivityResult(int requestCode, int resultCode, Inten
t data) {
if (requestCode == Image_Capture_Code) {
if (resultCode == RESULT_OK) {
Bitmap bp = (Bitmap) data.getExtras().get("data");
imgCapture.setImageBitmap(bp);
} else if (resultCode == RESULT_CANCELED) {
Toast.makeText(this, "Cancelled", Toast.LENGTH_LONG).show(
);
}
}
}
}
If you observe above code snippet, we used startActivityForResult() method
with MediaStore.ACTION_IMAGE_CAPTURE intent action parameter to capture the photos.
Output of Android Camera App Example
When we run the above program in the android studio we will get the result as shown below.
When we click on Take a Photo button, the camera will start and we can take the picture of
whatever we want, the captured image will be shown in defined imageview.
This is how we can use the camera in android applications to capture the photos or videos based on
our requirements.
Android Bluetooth Device Discoverable
with Examples
In android, Bluetooth is a communication network protocol, which allow a devices to connect
wirelessly to exchange the data with other Bluetooth devices.
Generally, in android applications by using Bluetooth API’s we can implement Bluetooth
functionalities, such as enable or disable Bluetooth, searching for available Bluetooth devices,
connecting with the devices and managing the data transfer between devices within the range.
In android, we can perform Bluetooth related activities by using BluetoothAdapter class in our
applications. To know more about BluetoothAdapter, check this Android Bluetooth with Examples.
Android Bluetooth Enable Discoverability
To make the device discoverable to other devices, we need to start the new activity by
calling startActivityForResult(intent, int) with the ACTION_REQUEST_DISCOVERABLE intent.
Following is the code snippet to enable the system’s discoverable mode to make sure that the device
discoverable to other devices.
Intent dIntent = new Intent(BluetoothAdapter.ACTION_REQUEST_DISCOVERABLE)
;
dIntent.putExtra(BluetoothAdapter.EXTRA_DISCOVERABLE_DURATION, 300);
startActivity(dIntent);
If you observe above code snippet, we are making sure our device discoverable to other devices
using ACTION_REQUEST_DISCOVERABLE. By default, the device becomes discoverable for 120
seconds. We can extend the device discoverable duration up to 3600 seconds (1 hour), by adding
the EXTRA_DISCOVERABLE_DURATION extra.
As we discussed in previous tutorial Android Bluetooth with Examples, we need to set Bluetooth
permissions in our android manifest file as shown below to use Bluetooth features in our android
applications.
<manifest ... >
<uses-permission android:name="android.permission.BLUETOOTH"/>
<uses-permission android:name="android.permission.BLUETOOTH_ADMIN"/>
<uses-permission android:name="android.permission.ACCESS_COARSE_LOCATION"/
>
...
</manifest>
Android Bluetooth Device Discoverable Example
Following is the example of making device discoverable to other nearby Bluetooth devices on button
click in android applications.
Create a new android application using android studio and give names
as BluetoothDiscoverableExample. In case if you are not aware of creating an app in android
studio check this article Android Hello World App.
Once we create an application, open activity_main.xml file from reslayout folder path and write
the code like as shown below.
activity_main.xml
<?xml version="1.0" encoding="utf-8"?>
<RelativeLayout xmlns:android="http://schemas.android.com/apk/res/android"
android:layout_width="match_parent"
android:layout_height="match_parent"
android:paddingLeft="10dp"
android:paddingRight="10dp">
<Button
android:id="@+id/btnOn"
android:layout_width="wrap_content"
android:layout_height="wrap_content"
android:text="Turn On" android:layout_marginLeft="50dp" android:la
yout_marginTop="200dp" />
<Button
android:id="@+id/btnDiscoverable"
android:layout_width="wrap_content"
android:layout_height="wrap_content"
android:layout_alignBottom="@+id/btnOn"
android:layout_toRightOf="@+id/btnOn"
android:text="Discoverable" />
<Button
android:id="@+id/btnOFF"
android:layout_width="wrap_content"
android:layout_height="wrap_content"
android:layout_alignBottom="@+id/btnDiscoverable"
android:layout_toRightOf="@+id/btnDiscoverable"
android:text="Turn OFF" />
</RelativeLayout>
Now open your main activity
file MainActivity.java from javacom.tutlane.bluetoothdiscoverableexample path and write the
code like as shown below
MainActivity.java
package com.tutlane.bluetoothdiscoverableexample;
import android.bluetooth.BluetoothAdapter;
import android.content.Intent;
import android.support.v7.app.AppCompatActivity;
import android.os.Bundle;
import android.view.View;
import android.widget.Button;
import android.widget.Toast;
public class MainActivity extends AppCompatActivity {
@Override
protected void onCreate(Bundle savedInstanceState) {
super.onCreate(savedInstanceState);
setContentView(R.layout.activity_main);
Button btntOn = (Button)findViewById(R.id.btnOn);
Button btntOff = (Button)findViewById(R.id.btnOFF);
Button btnDisc = (Button)findViewById(R.id.btnDiscoverable);
final BluetoothAdapter bAdapter = BluetoothAdapter.getDefaultAdapt
er();
btntOn.setOnClickListener(new View.OnClickListener() {
@Override
public void onClick(View v) {
if(bAdapter == null)
{
Toast.makeText(getApplicationContext(),"Bluetooth Not
Supported",Toast.LENGTH_SHORT).show();
}
else{
if(!bAdapter.isEnabled()){
startActivityForResult(new Intent(BluetoothAdapter
.ACTION_REQUEST_ENABLE),1);
Toast.makeText(getApplicationContext(),"Bluetooth
Turned ON",Toast.LENGTH_SHORT).show();
}
}
}
});
btntOff.setOnClickListener(new View.OnClickListener() {
@Override
public void onClick(View v) {
bAdapter.disable();
Toast.makeText(getApplicationContext(),"Bluetooth Turned O
FF", Toast.LENGTH_SHORT).show();
}
});
btnDisc.setOnClickListener(new View.OnClickListener() {
@Override
public void onClick(View v) {
if(!bAdapter.isDiscovering()){
startActivityForResult(new Intent(BluetoothAdapter.ACT
ION_REQUEST_DISCOVERABLE),1);
Toast.makeText(getApplicationContext(),"Making Device
Discoverable",Toast.LENGTH_SHORT).show();
}
}
});
}
}
If you observe above code, we are making sure our device discoverable to other devices
using ACTION_REQUEST_DISCOVERABLE.
As discussed, we need to set Bluetooth permissions in android manifest file (AndroidManifest.xml)
to access Bluetooth features in android applications. Now open android manifest file
(AndroidManifest.xml) and write the code like as shown below
AndroidManifest.xml
<?xml version="1.0" encoding="utf-8"?>
<manifest xmlns:android="http://schemas.android.com/apk/res/android"
package="com.tutlane.bluetoothdiscoverableexample">
<uses-permission android:name="android.permission.BLUETOOTH"/>
<uses-permission android:name="android.permission.BLUETOOTH_ADMIN"/>
<application
android:allowBackup="true"
android:icon="@mipmap/ic_launcher"
android:label="@string/app_name"
android:roundIcon="@mipmap/ic_launcher_round"
android:supportsRtl="true"
android:theme="@style/AppTheme">
<activity android:name=".MainActivity">
<intent-filter>
<action android:name="android.intent.action.MAIN" />
<category android:name="android.intent.category.LAUNCHER
" />
</intent-filter>
</activity>
</application>
</manifest>
If you observe above code, we added required Bluetooth permissions in manifest file to access
Bluetooth features in android applications.
Output of Android Bluetooth Device Discoverable Example
When we run the above program in android studio we will get the result as shown below.
When we click on Turn ON or Turn OFF buttons, we can make the device Bluetooth turn ON or OFF
and then click on Discoverable button, our device discoverable to other Bluetooth devices.
This is how we can make our device discoverable to other nearby Bluetooth devices in android
applications based on our requirements.
Android Animations with Examples
In android, Animations are used to change the appearance and behavior of the objects over a
particular interval of time. The animations will provide a better look and feel high-quality user
interface for our applications.
Generally, the animations are useful when we want to notify users about the changes happening in
our app, such as new content loaded or new actions available, etc.
We have a different type of animations available in android, here we will discuss the most commonly
used android animations such as zoom in / zoom out, fade in / fade out, slide up / slide
down and rotate clockwise or anti-clockwise, etc. with examples.
To create an animation effect on the objects in our android application, we need to follow the below
steps.
Create XML File to Define Animation
We need to create an XML file that defines the type of animation to perform in a new
folder anim under res directory (res  anim  animation.xml) with the required properties. In
case, anim folder not exists in res directory, create a new one.
Following is the example of creating XML files under anim folder to define slide up / down animation
properties.
The XML files will contain the code like as shown below based on the type of animation.
<?xml version="1.0" encoding="utf-8"?>
<set xmlns:android="http://schemas.android.com/apk/res/android" android:in
terpolator="@android:anim/linear_interpolator">
<scale
android:duration="500"
android:fromXScale="1.0"
android:fromYScale="0.0"
android:toXScale="1.0"
android:toYScale="1.0" />
</set>
In case if we want to use different type of animations such as fade in / out, zoom in / out, etc. we
need to create a new xml files in anim folder with required properties.
The following are some of the important animation attributes that will help us to change the
behavior of animation in our application.
Attributes Description
android:duration It is used to define the duration of the animation to complete.
android:startOffset It is used to define the waiting time before the animation starts.
android:interpolator It is used to define the rate of change in animation.
android:repeatMode It is useful when we want to repeat our animation.
android:repeatCount It is used to define the number of times the animation repeats. In case if we set infinite, t
animation will repeat infinite times.
android:fillAfter It is used to define whether to apply animation transformation after the animation comple
or not.
Android Load and Start the Animation
In android, we can perform animations by using AnimationUtils component methods such
as loadAnimation(). Following is the code snippet of loading and starting an animation
using loadAnimation() and startAnimation() methods.
ImageView img = (ImageView)findViewById(R.id.imgvw);
Animation aniSlide = AnimationUtils.loadAnimation(getApplicationContext(),
R.anim.slide_up);
img.startAnimation(aniSlide);
If you observe above code snippet, we are adding an animation to the image
using loadAnimation() method. The second parameter in loadAnimation() method is the name of
our animation xml file.
Here we used another method startAnimation() to apply the defined animation
to imageview object.
Different Types of Android Animations
In android, we have different types of animations such as Fade In / Fade Out, Zoom In / Zoom
Out, Slide Up / Slide Down, Rotate in Clockwise or Anti-Clockwise, etc.
Now we will see how to create each animation with required properties in the android application.
Android Fade In / Out Animation
To use Fade In or Fade Out animations in our android applications, we need to define a new XML file
with <alpha> tag like as shown below.
For Fade In animation, we need to increase the alpha value from 0 to 1 like as shown below.
<?xml version="1.0" encoding="utf-8"?>
<set xmlns:android="http://schemas.android.com/apk/res/android" android:in
terpolator="@android:anim/linear_interpolator">
<alpha
android:duration="2000"
android:fromAlpha="0.1"
android:toAlpha="1.0">
</alpha>
</set>
For Fade Out animation, we need to decrease the alpha value from 1 to 0 like as shown below.
<?xml version="1.0" encoding="utf-8"?>
<set xmlns:android="http://schemas.android.com/apk/res/android"
android:interpolator="@android:anim/linear_interpolator">
<alpha
android:duration="2000"
android:fromAlpha="1.0"
android:toAlpha="0.1" >
</alpha>
</set>
To know more about Fade In and Fade Out animations check this, Android Fade In / Out Animations
with Examples.
Android Slide Up / Down Animation
To use Slide Up or Slide Down animations in our android applications, we need to define a new XML
file with <scale> tag like as shown below.
For Slide Up animation, we need to set android:fromYScale="1.0" and android:toYScale="0.0" like as
shown below.
<?xml version="1.0" encoding="utf-8"?>
<set xmlns:android="http://schemas.android.com/apk/res/android" android:in
terpolator="@android:anim/linear_interpolator">
<scale
android:duration="500"
android:fromXScale="1.0"
android:fromYScale="1.0"
android:toXScale="1.0"
android:toYScale="0.0" />
</set>
For Slide Down animation, we need to
set android:fromYScale="0.0" and android:toYScale="1.0" like as shown below.
<?xml version="1.0" encoding="utf-8"?>
<set xmlns:android="http://schemas.android.com/apk/res/android" android:in
terpolator="@android:anim/linear_interpolator">
<scale
android:duration="500"
android:fromXScale="1.0"
android:fromYScale="0.0"
android:toXScale="1.0"
android:toYScale="1.0" />
</set>
To know more about Slide Up and Slide Down animations check this, Android Slide Up / Down
Animations with Examples.
Android Zoom In / Out Animation
To use Zoom In or Zoom Out animations in our android applications, we need to define a new XML
file with <scale> tag like as shown below.
For Zoom In animation, we need to set android:pivotX="50%" and android:pivotY="50%" to perform
the zoom from the centre of the element. Also, we need to use fromXScale, fromYScale attributes to
define the scaling of an object and we need keep these values lesser than toXScale, toYScale like as
shown below.
<?xml version="1.0" encoding="utf-8"?>
<set xmlns:android="http://schemas.android.com/apk/res/android">
<scale
xmlns:android="http://schemas.android.com/apk/res/android"
android:duration="1000"
android:fromXScale="2"
android:fromYScale="2"
android:pivotX="50%"
android:pivotY="50%"
android:toXScale="4"
android:toYScale="4" >
</scale>
</set>
In android, Zoom Out animation is same as Zoom In animation
but fromXScale, fromYScale attribute values must be greater than toXScale, toYScale like as shown
below.
<?xml version="1.0" encoding="utf-8"?>
<set xmlns:android="http://schemas.android.com/apk/res/android">
<scale
android:duration="2500"
android:fromXScale="1.0"
android:fromYScale="1.0"
android:pivotX="50%"
android:pivotY="50%"
android:toXScale=".2"
android:toYScale=".2" />
</set>
To know more about Zoom In and Zoom Out animations check this, Android Zoom In / Out
Animations with Examples.
Android Rotate Clockwise / Anti Clockwise Animation
To use Rotate animation in our android applications, we need to define a new XML file
with <rotate> tag like as shown below.
To Rotate animation in Clockwise, we need to
set android:fromDegrees and android:toDegrees property values and these will define a rotation
angles like as shown below.
<?xml version="1.0" encoding="utf-8"?>
<set xmlns:android="http://schemas.android.com/apk/res/android" android:in
terpolator="@android:anim/cycle_interpolator">
<rotate android:fromDegrees="0"
android:toDegrees="360"
android:pivotX="50%"
android:pivotY="50%"
android:duration="5000" />
</set>
To Rotate animation in Anti Clockwise, we need to
set android:fromDegrees and android:toDegrees property values and these will define a rotation
angles like as shown below.
<?xml version="1.0" encoding="utf-8"?>
<set xmlns:android="http://schemas.android.com/apk/res/android" android:in
terpolator="@android:anim/cycle_interpolator">
<rotate android:fromDegrees="360"
android:toDegrees="0"
android:pivotX="50%"
android:pivotY="50%"
android:duration="5000" />
</set>
To know more about Rotate animations check this, Android Rotate Clockwise / Anti Clockwise
Animations with Examples.
This is how we can use different types of animations in android applications based on our
requirements.
Android SQLite Database with Examples
In android, we have different storage options such as shared preferences, internal storage, external
storage, SQLite storage, etc. to store and retrieve the application data based on our requirements.
In previous chapters, we learned how to use shared preferences, internal storage, external
storage and now we will see how to use the SQLite Database option to store structured data in a
private database.
SQLite is an open-source lightweight relational database management system (RDBMS) to perform
database operations, such as storing, updating, retrieving data from the database. To know more
about SQLite, check this SQLite Tutorial with Examples.
Generally, in our android applications Shared Preferences, Internal Storage and External
Storage options are useful to store and maintain a small amount of data. In case, if we want to deal
with large amounts of data, then SQLite database is the preferable option to store and maintain the
data in a structured format.
By default, Android comes with built-in SQLite Database support so we don’t need to do any
configurations.
Just like we save the files on the device’s internal storage, Android stores our database in a private
disk space that’s associated with our application and the data is secure, because by default this area
is not accessible to other applications.
The package android.database.sqlite contains all the required APIs to use an SQLite database in our
android applications.
Now we will see how to create a database and required tables in SQLite and perform CRUD (insert,
update, delete and select) operations in android applications.
Create Database and Tables using SQLite Helper
In android, by using SQLiteOpenHelper class we can easily create the required database and tables
for our application. To use SQLiteOpenHelper, we need to create a subclass that overrides
the onCreate() and onUpgrade() call-back methods.
Following is the code snippet of creating the database and tables using the SQLiteOpenHelper class
in our android application.
public class DbHandler extends SQLiteOpenHelper {
private static final int DB_VERSION = 1;
private static final String DB_NAME = "usersdb";
private static final String TABLE_Users = "userdetails";
private static final String KEY_ID = "id";
private static final String KEY_NAME = "name";
private static final String KEY_LOC = "location";
private static final String KEY_DESG = "designation";
public DbHandler(Context context){
super(context,DB_NAME, null, DB_VERSION);
}
@Override
public void onCreate(SQLiteDatabase db){
String CREATE_TABLE = "CREATE TABLE " + TABLE_Users + "("
+ KEY_ID + " INTEGER PRIMARY KEY AUTOINCREMENT," + KEY_NAM
E + " TEXT,"
+ KEY_LOC + " TEXT,"
+ KEY_DESG + " TEXT"+ ")";
db.execSQL(CREATE_TABLE);
}
@Override
public void onUpgrade(SQLiteDatabase db, int oldVersion, int newVersio
n){
// Drop older table if exist
db.execSQL("DROP TABLE IF EXISTS " + TABLE_Users);
// Create tables again
onCreate(db);
}
}
If you observe above code snippet, we are creating database “usersdb” and table “userdetails”
using SQLiteOpenHelper class by overriding onCreate and onUpgrade methods.
Method Description
onCreate() This method is called only once throughout the application after the database is created and t
table creation statements can be written in this method.
onUpgrade() This method is called whenever there is an updation in the database like modifying the tab
structure, adding constraints to the database, etc.
Now we will see how to perform CRUD (create, read, delete and update) operations in android
applications.
Insert Data into SQLite Database
In android, we can insert data into the SQLite database by
passing ContentValues to insert() method.
Following is the code snippet to insert data into the SQLite database using the insert() method in
the android application.
//Get the Data Repository in write mode
SQLiteDatabase db = this.getWritableDatabase();
//Create a new map of values, where column names are the keys
ContentValues cValues = new ContentValues();
cValues.put(KEY_NAME, name);
cValues.put(KEY_LOC, location);
cValues.put(KEY_DESG, designation);
// Insert the new row, returning the primary key value of the new row
long newRowId = db.insert(TABLE_Users,null, cValues);
If you observe above code, we are getting the data repository in write mode and adding required
values to columns and inserting into database.
Read the Data from SQLite Database
In android, we can read the data from the SQLite database using the query() method in android
applications.
Following is the code snippet to read the data from the SQLite Database using a query() method in
the android application.
//Get the Data Repository in write mode
SQLiteDatabase db = this.getWritableDatabase();
Cursor cursor = db.query(TABLE_Users, new String[]{KEY_NAME, KEY_LOC, KEY_
DESG}, KEY_ID+ "=?",new String[]{String.valueOf(userid)},null, null, null
, null);
If you observe above code, we are getting the details from required table using query() method
based on our requirements.
Update Data in SQLite Database
In android, we can update the data in the SQLite database using an update() method in android
applications.
Following is the code snippet to update the data in the SQLite database using an update() method
in the android application.
//Get the Data Repository in write mode
SQLiteDatabase db = this.getWritableDatabase();
ContentValues cVals = new ContentValues();
cVals.put(KEY_LOC, location);
cVals.put(KEY_DESG, designation);
int count = db.update(TABLE_Users, cVals, KEY_ID+" = ?",new String[]{Strin
g.valueOf(id)});
If you observe above code, we are updating the details using update() method based on our
requirements.
Delete Data from SQLite Database
In android, we can delete data from the SQLite database using the delete() method in android
applications.
Following is the code snippet to delete the data from the SQLite database using the delete() method
in the android application.
Android Application Components with Implementation & Examples

More Related Content

Similar to Android Application Components with Implementation & Examples

Android development Training Programme Day 2
Android development Training Programme Day 2Android development Training Programme Day 2
Android development Training Programme Day 2DHIRAJ PRAVIN
 
android_mod_3.useful for bca students for their last sem
android_mod_3.useful for bca students for their last semandroid_mod_3.useful for bca students for their last sem
android_mod_3.useful for bca students for their last semaswinbiju1652
 
Android application fundamentals
Android application fundamentalsAndroid application fundamentals
Android application fundamentalsJohn Smith
 
Introduction to Android Development
Introduction to Android DevelopmentIntroduction to Android Development
Introduction to Android DevelopmentAly Abdelkareem
 
Android development-tutorial
Android development-tutorialAndroid development-tutorial
Android development-tutorialnirajsimulanis
 
Kotlin for Android App Development Presentation
Kotlin for Android App Development PresentationKotlin for Android App Development Presentation
Kotlin for Android App Development PresentationKnoldus Inc.
 
Android terminologies
Android terminologiesAndroid terminologies
Android terminologiesjerry vasoya
 
Mobile Application Development -Lecture 09 & 10.pdf
Mobile Application Development -Lecture 09 & 10.pdfMobile Application Development -Lecture 09 & 10.pdf
Mobile Application Development -Lecture 09 & 10.pdfAbdullahMunir32
 
Android application development
Android application developmentAndroid application development
Android application developmentMd. Mujahid Islam
 
Android application-component
Android application-componentAndroid application-component
Android application-componentLy Haza
 
Hello android world
Hello android worldHello android world
Hello android worldeleksdev
 
Android application model
Android application modelAndroid application model
Android application modelmagicshui
 

Similar to Android Application Components with Implementation & Examples (20)

Android development Training Programme Day 2
Android development Training Programme Day 2Android development Training Programme Day 2
Android development Training Programme Day 2
 
android_mod_3.useful for bca students for their last sem
android_mod_3.useful for bca students for their last semandroid_mod_3.useful for bca students for their last sem
android_mod_3.useful for bca students for their last sem
 
Android Basic- CMC
Android Basic- CMCAndroid Basic- CMC
Android Basic- CMC
 
Android application fundamentals
Android application fundamentalsAndroid application fundamentals
Android application fundamentals
 
ANDROID
ANDROIDANDROID
ANDROID
 
Android Development Basics
Android Development BasicsAndroid Development Basics
Android Development Basics
 
Introduction to Android Development
Introduction to Android DevelopmentIntroduction to Android Development
Introduction to Android Development
 
Android development-tutorial
Android development-tutorialAndroid development-tutorial
Android development-tutorial
 
Kotlin for Android App Development Presentation
Kotlin for Android App Development PresentationKotlin for Android App Development Presentation
Kotlin for Android App Development Presentation
 
Activity
ActivityActivity
Activity
 
Activity
ActivityActivity
Activity
 
Activity
ActivityActivity
Activity
 
Activity
ActivityActivity
Activity
 
Android terminologies
Android terminologiesAndroid terminologies
Android terminologies
 
Mobile Application Development -Lecture 09 & 10.pdf
Mobile Application Development -Lecture 09 & 10.pdfMobile Application Development -Lecture 09 & 10.pdf
Mobile Application Development -Lecture 09 & 10.pdf
 
Android session 2
Android session 2Android session 2
Android session 2
 
Android application development
Android application developmentAndroid application development
Android application development
 
Android application-component
Android application-componentAndroid application-component
Android application-component
 
Hello android world
Hello android worldHello android world
Hello android world
 
Android application model
Android application modelAndroid application model
Android application model
 

More from ChandrakantDivate1

Study of Computer Hardware System using Block Diagram
Study of Computer Hardware System using Block DiagramStudy of Computer Hardware System using Block Diagram
Study of Computer Hardware System using Block DiagramChandrakantDivate1
 
Computer System Output Devices Peripherals
Computer System Output  Devices PeripheralsComputer System Output  Devices Peripherals
Computer System Output Devices PeripheralsChandrakantDivate1
 
Computer system Input Devices Peripherals
Computer system Input  Devices PeripheralsComputer system Input  Devices Peripherals
Computer system Input Devices PeripheralsChandrakantDivate1
 
Computer system Input and Output Devices
Computer system Input and Output DevicesComputer system Input and Output Devices
Computer system Input and Output DevicesChandrakantDivate1
 
Introduction to COMPUTER’S MEMORY RAM and ROM
Introduction to COMPUTER’S MEMORY RAM and ROMIntroduction to COMPUTER’S MEMORY RAM and ROM
Introduction to COMPUTER’S MEMORY RAM and ROMChandrakantDivate1
 
Introduction to Computer Hardware Systems
Introduction to Computer Hardware SystemsIntroduction to Computer Hardware Systems
Introduction to Computer Hardware SystemsChandrakantDivate1
 
Fundamentals of Internet of Things (IoT) Part-2
Fundamentals of Internet of Things (IoT) Part-2Fundamentals of Internet of Things (IoT) Part-2
Fundamentals of Internet of Things (IoT) Part-2ChandrakantDivate1
 
Fundamentals of Internet of Things (IoT)
Fundamentals of Internet of Things (IoT)Fundamentals of Internet of Things (IoT)
Fundamentals of Internet of Things (IoT)ChandrakantDivate1
 
Introduction to Artificial Intelligence ( AI)
Introduction to Artificial Intelligence ( AI)Introduction to Artificial Intelligence ( AI)
Introduction to Artificial Intelligence ( AI)ChandrakantDivate1
 
Fundamentals of functions in C program.pptx
Fundamentals of functions in C program.pptxFundamentals of functions in C program.pptx
Fundamentals of functions in C program.pptxChandrakantDivate1
 
Fundamentals of Structure in C Programming
Fundamentals of Structure in C ProgrammingFundamentals of Structure in C Programming
Fundamentals of Structure in C ProgrammingChandrakantDivate1
 
INPUT AND OUTPUT STATEMENTS IN PROGRAMMING IN C
INPUT AND OUTPUT STATEMENTS IN PROGRAMMING IN CINPUT AND OUTPUT STATEMENTS IN PROGRAMMING IN C
INPUT AND OUTPUT STATEMENTS IN PROGRAMMING IN CChandrakantDivate1
 
Programming in C - Fundamental Study of Strings
Programming in C - Fundamental Study of  StringsProgramming in C - Fundamental Study of  Strings
Programming in C - Fundamental Study of StringsChandrakantDivate1
 
Basics of Control Statement in C Languages
Basics of Control Statement in C LanguagesBasics of Control Statement in C Languages
Basics of Control Statement in C LanguagesChandrakantDivate1
 
Features and Fundamentals of C Language for Beginners
Features and Fundamentals of C Language for BeginnersFeatures and Fundamentals of C Language for Beginners
Features and Fundamentals of C Language for BeginnersChandrakantDivate1
 
Basics of Programming Algorithms and Flowchart
Basics of Programming Algorithms and FlowchartBasics of Programming Algorithms and Flowchart
Basics of Programming Algorithms and FlowchartChandrakantDivate1
 
Computer Graphics Introduction To Curves
Computer Graphics Introduction To CurvesComputer Graphics Introduction To Curves
Computer Graphics Introduction To CurvesChandrakantDivate1
 
Computer Graphics Three-Dimensional Geometric Transformations
Computer Graphics Three-Dimensional Geometric TransformationsComputer Graphics Three-Dimensional Geometric Transformations
Computer Graphics Three-Dimensional Geometric TransformationsChandrakantDivate1
 
Computer Graphics - Windowing and Clipping
Computer Graphics - Windowing and ClippingComputer Graphics - Windowing and Clipping
Computer Graphics - Windowing and ClippingChandrakantDivate1
 
Overview of Transformation in Computer Graphics
Overview of Transformation in Computer GraphicsOverview of Transformation in Computer Graphics
Overview of Transformation in Computer GraphicsChandrakantDivate1
 

More from ChandrakantDivate1 (20)

Study of Computer Hardware System using Block Diagram
Study of Computer Hardware System using Block DiagramStudy of Computer Hardware System using Block Diagram
Study of Computer Hardware System using Block Diagram
 
Computer System Output Devices Peripherals
Computer System Output  Devices PeripheralsComputer System Output  Devices Peripherals
Computer System Output Devices Peripherals
 
Computer system Input Devices Peripherals
Computer system Input  Devices PeripheralsComputer system Input  Devices Peripherals
Computer system Input Devices Peripherals
 
Computer system Input and Output Devices
Computer system Input and Output DevicesComputer system Input and Output Devices
Computer system Input and Output Devices
 
Introduction to COMPUTER’S MEMORY RAM and ROM
Introduction to COMPUTER’S MEMORY RAM and ROMIntroduction to COMPUTER’S MEMORY RAM and ROM
Introduction to COMPUTER’S MEMORY RAM and ROM
 
Introduction to Computer Hardware Systems
Introduction to Computer Hardware SystemsIntroduction to Computer Hardware Systems
Introduction to Computer Hardware Systems
 
Fundamentals of Internet of Things (IoT) Part-2
Fundamentals of Internet of Things (IoT) Part-2Fundamentals of Internet of Things (IoT) Part-2
Fundamentals of Internet of Things (IoT) Part-2
 
Fundamentals of Internet of Things (IoT)
Fundamentals of Internet of Things (IoT)Fundamentals of Internet of Things (IoT)
Fundamentals of Internet of Things (IoT)
 
Introduction to Artificial Intelligence ( AI)
Introduction to Artificial Intelligence ( AI)Introduction to Artificial Intelligence ( AI)
Introduction to Artificial Intelligence ( AI)
 
Fundamentals of functions in C program.pptx
Fundamentals of functions in C program.pptxFundamentals of functions in C program.pptx
Fundamentals of functions in C program.pptx
 
Fundamentals of Structure in C Programming
Fundamentals of Structure in C ProgrammingFundamentals of Structure in C Programming
Fundamentals of Structure in C Programming
 
INPUT AND OUTPUT STATEMENTS IN PROGRAMMING IN C
INPUT AND OUTPUT STATEMENTS IN PROGRAMMING IN CINPUT AND OUTPUT STATEMENTS IN PROGRAMMING IN C
INPUT AND OUTPUT STATEMENTS IN PROGRAMMING IN C
 
Programming in C - Fundamental Study of Strings
Programming in C - Fundamental Study of  StringsProgramming in C - Fundamental Study of  Strings
Programming in C - Fundamental Study of Strings
 
Basics of Control Statement in C Languages
Basics of Control Statement in C LanguagesBasics of Control Statement in C Languages
Basics of Control Statement in C Languages
 
Features and Fundamentals of C Language for Beginners
Features and Fundamentals of C Language for BeginnersFeatures and Fundamentals of C Language for Beginners
Features and Fundamentals of C Language for Beginners
 
Basics of Programming Algorithms and Flowchart
Basics of Programming Algorithms and FlowchartBasics of Programming Algorithms and Flowchart
Basics of Programming Algorithms and Flowchart
 
Computer Graphics Introduction To Curves
Computer Graphics Introduction To CurvesComputer Graphics Introduction To Curves
Computer Graphics Introduction To Curves
 
Computer Graphics Three-Dimensional Geometric Transformations
Computer Graphics Three-Dimensional Geometric TransformationsComputer Graphics Three-Dimensional Geometric Transformations
Computer Graphics Three-Dimensional Geometric Transformations
 
Computer Graphics - Windowing and Clipping
Computer Graphics - Windowing and ClippingComputer Graphics - Windowing and Clipping
Computer Graphics - Windowing and Clipping
 
Overview of Transformation in Computer Graphics
Overview of Transformation in Computer GraphicsOverview of Transformation in Computer Graphics
Overview of Transformation in Computer Graphics
 

Android Application Components with Implementation & Examples

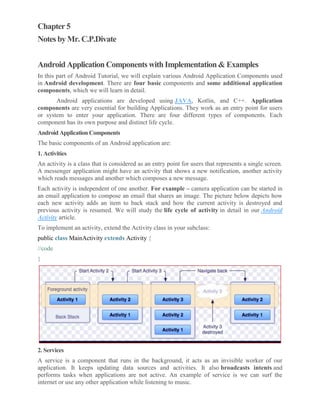
  • 1. Chapter 5 Notes by Mr. C.P.Divate Android Application Components with Implementation & Examples In this part of Android Tutorial, we will explain various Android Application Components used in Android development. There are four basic components and some additional application components, which we will learn in detail. Android applications are developed using JAVA, Kotlin, and C++. Application components are very essential for building Applications. They work as an entry point for users or system to enter your application. There are four different types of components. Each component has its own purpose and distinct life cycle. Android Application Components The basic components of an Android application are: 1. Activities An activity is a class that is considered as an entry point for users that represents a single screen. A messenger application might have an activity that shows a new notification, another activity which reads messages and another which composes a new message. Each activity is independent of one another. For example – camera application can be started in an email application to compose an email that shares an image. The picture below depicts how each new activity adds an item to back stack and how the current activity is destroyed and previous activity is resumed. We will study the life cycle of activity in detail in our Android Activity article. To implement an activity, extend the Activity class in your subclass: public class MainActivity extends Activity { //code } 2. Services A service is a component that runs in the background, it acts as an invisible worker of our application. It keeps updating data sources and activities. It also broadcasts intents and performs tasks when applications are not active. An example of service is we can surf the internet or use any other application while listening to music.
  • 2. To execute services, extend the Services class in your sub-class: public class MyService extends Services { //code } Explore Android Services Tutorial and get a detailed insight into the concept 3. Content Providers Content Provider is a component that allows applications to share data among multiple applications. It hides the details of the database and can be used to read and write private data of the application which is not shared. It would be a mess to access data from other applications without content providers. For example – you can consider looking for contact details in contact list. Or You might want photos from the gallery which are also provided by Content Provider. To implement this, extend ContentProvider in your subclass: public class Provider_Name extends ContentProvider { //code } 4. Broadcast Receiver Broadcast Receiver is a component that responds to broadcast messages from another application or the same system. It can also deliver broadcasts to applications that are not running. For example – notify the user that the battery is low. Android developers can use broadcast messages in the application or outside the normal flow. To implement this, extend BroadcastReceiver to your receiver: public class Broadcast_Name extends BroadcastReceiver { //code } Get a thorough understanding of Android Broadcast Receiver Additional Components of Android Application Some additional components of an android application: 1. Intents It is an inter-application message passing framework for communication between android components. It is also used for transferring data between different Activities as well as to start a new service and display a list of contacts in ListView. Example – the camera application sends an intent to the operating system when the user decides to share a picture. 2. Widgets Widgets are variations of Broadcast Receivers and essential aspects of home screen customization. They display data and allow users to perform actions on them. There are various types of widgets:
  • 3.  Information widget: These widgets display crucial information and track how the information changes over time. Example – Clock widgets and widgets that display weather and time information.  Collection widget: As the name depicts, collection widgets are a collection of information of the same type. Its use is for browsing information and opening any one of the elements to view details. Example – music widgets, as we can skip, pause and play music outside the music application.  Control widget: These widgets display functionalities and by using them, the user can trigger from home screen without opening the application. Example – pause and play the video outside the application.  Hybrid widget: These widgets combine features of all the other three widgets. Example – music player widget is a control widget but it also informs the user about which track is playing currently, which means it is a combination of control and information thus it is termed as hybrid widget. 3. Views View is responsible for drawing and event handling. They are rectangular elements on the screen. Some of the views are EditText, ImageView Button, CheckBox and ImageButton. 4. Notifications It alerts users when the application is not visible or is inactive. This alert flashes on the screen and then disappears. Example – Notification of the new incoming message popped on the screen. 5. Fragments A fragment is a portion of the total user interface. Users can combine more than one fragment in a single activity and these fragments can be reused in multiple activities. A fragment generally contains Views and ViewGroups inside them. 6. Layout XML Files Layout is the structure for the user interface in the application. XML files provide different types of layouts for the different type of screen, it also specifies which GUI component, an activity or fragment holds. 7. App APK files Apk file is the package file format that contains the program’s code, resources, and assets. The Android operating system uses them for installing mobile applications and middleware. 8. Resources Resources in Android is for defining Images, texts, string values. Everything is defined in the resource file and it can be referenced within the source code. We will learn about Android Resources, in detail in our next upcoming article on Resources.
  • 4. AndroidActivityLifecyclewithCallbackMethods&Usage Android Activity provides users with a frame to interact with & perform their actions. Since an activity interacts with the user, it designs a window to hold UI elements. An interactive application has many activities providing a screen & interacting with each other. Come let’s see what we’re going to study about Android Activity in this tutorial:  What is Activity  Android Activity Lifecycle  Android Activity Lifecycle Methods  Manifest Attributes of Android Activities What is Activity? We know by now, that an activity is a single screen of an application that lets us see and interact to perform an activity. Usually, an application contains many screens and each screen extends Activity() class. When we work on an application what we see is a UI on the screen which is an activity. Most of the applications that we use have many activities. Among all those activities, one is the MainActivity() & the rest are its ChildActivities(). Generally, the first page that appears on the screen when an application opens is referred to as MainActivity(). This main activity interacts with the child activities and lets the user access them. Activities are stored in a stack of Activities, wherein the current activity holds the highest position. Before proceeding, let’s revise the Android Application Components Android Activity Lifecycle An activity can have four states, which are : 1.Running 2.Paused 3.Resumed 4.Stopped The above are the four states that Android activity can achieve during its whole lifecycle. 1. Running State An activity is in the running state if it’s shown in the foreground of the users’ screen. Activity is in the running state when the user is interacting with it. 2. Paused State
  • 5. When an activity is not in the focus but is still alive for the user, it’s in a paused state. The activity comes in this state when some other activity comes in with a higher position in the window. 3. Resumed State It is when an activity goes from the paused state to the foreground that is an active state. 4. Stopped State When an activity is no longer in the activity stack and not visible to the users. Android Activity Methods Android activities go through four states during their entire lifecycle. These activities have callback methods() to describe each activity in each of the four stages. These methods need to be overridden by the implementing subclass. In Android, we have the following 7 callback methods that activity uses to go through the four states: 1. onCreate() 2. onStart() 3. onPause() 4. onRestart() 5. onResume() 6. onStop() 7. onDestroy() We’ll understand these in the following: 1. onCreate() The Android oncreate() method is called at the very start when an activity is created. An activity is created as soon as an application is opened. This method is used in order to create an Activity. Syntax: @Override protected void onCreate(Bundle savedInstanceState) { super.onCreate(savedInstanceState); ... } 2. onStart() The Android onstart() method is invoked as soon as the activity becomes visible to the users. This method is to start an activity. The activity comes on the forescreen of the users when this method is invoked. Syntax: @Override protected void onStart() { super.onStart(); ... } 3. onPause() The Android onPause() method is invoked when the activity doesn’t receive any user input and goes on hold. In the pause state, the activity is partially visible to the user. This is done when the user presses the back or home buttons. Once an activity is in the pause state, it can be followed by either onResume() or onStopped() callback method. Syntax: @Override protected void onPause() { super.onPause(); ... } 4. onRestart()
  • 6. The Android onRestart() method is invoked when activity is about to start from the stop state. This method is to restart an activity that had been active some time back. When an activity restarts, it starts working from where it was paused. Syntax: @Override protected void onRestart() { super.onRestart(); ... } 5. onResume() The Android onResume() method is invoked when the user starts interacting with the user. This callback method is followed by onPause(). Most of the functionalities of an application are implemented using onResume(). Syntax: @Override protected void onResume() { super.onResume(); ... } 6. onStop() The Android onStop() method is invoked when the activity is no longer visible to the user. The reason for this state is either activity is getting destroyed or another existing activity comes back to resume state. Syntax: @Override protected void onStop() { super.onStop(); ... } 7. onDestroy() The Android onDestroy() is the method that is called when an activity finishes and the user stops using it. It is the final callback method received by activity, as after this it is destroyed. Syntax: @Override protected void onDestroy() { super.onDestroy(); ... } Understand the flow of Activity through the four states using the seven methods from the diagram:
  • 7. Manifest Attributes of Android Activity To implement activities in our application, we need to register them in the Manifest file. For the activities to work properly, we must manage their lifecycle properly. Now let us see the declaration of activities and their attributes in Manifest files. We’ll see the syntax as well, using datflair_activity as an example. 1. Declare Activities For this, the required attribute name is android:name. To declare it in the manifest file, simply open the Manifest and type add <activity> tag under <application> tag. The syntax to declare Android activity: <manifest ... > <application ... > <activity android:name=".Dataflair_activity" /> ...content…. </application ... > </manifest > To declare an activity, we only need one important element that is the name of the activity. We can add certain attributes like UI, label, etc. 2. Declare Intent filters
  • 8. Intents are a very crucial part of an Android application. Intents let an activity to be launched in other activity or applications. It also provides the advantage of making an implicit or an explicit request. The syntax is as follows: <activity android:name=".Dataflair_Activity" android:icon="@drawable/app_icon"> <intent-filter> <action android:name="android.intent.action.SEND" /> <category android:name="android.intent.category.DEFAULT" /> <data android:mimeType="text/plain" /> </intent-filter> </activity> 3. Declare Permissions Android activity tag can also control which applications can start activities. For permission, the element that is used is android:permission. With this, we can put control on the activities, where they can be launched. The syntax is as follows: <manifest> <activity android:name=".dataflair_activity" android:permission=”com.google.socialapp.permission.SHARE_POST” /> <manifest/> Example: on Activity Life Cycle: https://www.tutlane.com/tutorial/android/android- activity-lifecycle
  • 9. AndroidServiceTutorial–Lifecycle,Methods&Implementation Ever thought of a music player, as a service? Yes, the music player is a service. Not sure how? Well, it runs in the background while the user happily uses some other application, isn’t it? For a better understanding, consider an online music player that uses the internet and plays music in the background. Now, let’s understand its technical part. Whatare Android Services? Android Services are the application components that run in the background. We can understand it as a process that doesn’t need any direct user interaction. As they perform long-running processes without user intervention, they have no User Interface. They can be connected to other components and do inter-process communication (IPC). Types of Android Services When we talk about services, they can be of three types as shown in the figure below: The working of these three services is below: 1. Foreground Services Foreground services are those services that are visible to the users. The users can interact with them at ease and track what’s happening. These services continue to run even when users are using other applications. The perfect example of this is Music Player and Downloading. 2. Background Services These services run in the background, such that the user can’t see or access them. These are the tasks that don’t need the user to know them. Syncing and Storing data can be the best example. 3. Bound Services
  • 10. Bound service runs as long as some other application component is bound to it. Many components can bind to one service at a time, but once they all unbind, the service will destroy. To bind an application component to the service, bindService() is used. Lifecycle of Android Services Android services life-cycle can have two forms of services and they follow two paths that are: 1. Started Service 2. Bounded Service Let us see these services and their approach. 1. Started Service A service becomes started only when an application component calls startService(). It performs a single operation and doesn’t return any result to the caller. Once this service starts, it runs in the background even if the component that created it destroys. This service can be stopped only in one of the two cases:  By using the stopService() method.  By stopping itself using the stopSelf() method. 2. Bound Service A service is bound only if an application component binds to it using bindService(). It gives a client-server relation that lets the components interact with the service. The components can send requests to services and get results. This service runs in the background as long as another application is bound to it. Or it can be unbound according to our requirement by using the unbindService() method.
  • 11. IntentService() There’s an additional service class that extends Service class, IntentService Class. It is a base class for services to handle asynchronous requests. It enables running an operation on a single background. It executes long-running programs without affecting any user’s interface interaction. Intent services run and execute in the background and terminate themselves as soon as they are executed completely. Certain important features of Intent are:  It queues up the upcoming request and executes them one by one.  Once the queue is empty it stops itself, without the user’s intervention in its lifecycle.  It does proper thread management by handling the requests on a separate thread. Methods of Android Services The service base class defines certain callback methods to perform operations on applications. When we talk about Android services it becomes quite obvious that these
  • 12. services will do some operations and they’ll be used. The following are a few important methods of Android services:  onStartCommand()  onBind()  onCreate()  onUnbind()  onDestroy()  onRebind() Let us see these methods in detail: 1. onStartCommand() The system calls this method whenever a component, say an activity requests ‘start’ to a service, using startService(). Once we use this method it’s our duty to stop the service using stopService() or stopSelf(). 2. onBind() This is invoked when a component wants to bind with the service by calling bindService(). In this, we must provide an interface for clients to communicate with the service. For interprocess communication, we use the IBinder object. It is a must to implement this method. If in case binding is not required, we should return null as implementation is mandatory. 3. onUnbind() The system invokes this when all the clients disconnect from the interface published by the service. 4. onRebind() The system calls this method when new clients connect to the service. The system calls it after the onBind() method. 5. onCreate() This is the first callback method that the system calls when a new component starts the service. We need this method for a one-time set-up. 6. onDestroy() This method is the final clean up call for the system. The system invokes it just before the service destroys. It cleans up resources like threads, receivers, registered listeners, etc. Implementation of Android Services
  • 13. Now we’ll implement services in our Android Studio with the following code. Along with this, we’ll see the implementation of a few of the callback methods that are required for the service implementation. 1. Now for this, we’ll create a project in our Android Studio and name it. We’re naming it as Service. Then we’ll write the following code in our activity_main.xml: <?xml version="1.0" encoding="utf-8"?> <LinearLayout xmlns:android="http://schemas.android.com/apk/res/android" android:orientation="vertical" android:layout_width="match_parent" android:layout_height="match_parent"> <TextView android:id="@+id/textView2" android:layout_width="wrap_content" android:layout_height="wrap_content" android:layout_centerHorizontal="true" android:layout_marginLeft="100dp" android:text="DataFlair " android:textColor="@color/colorPrimaryDark" android:textSize="50dp" /> <Button android:id="@+id/btnStart" android:layout_width="wrap_content" android:layout_height="wrap_content" android:layout_marginLeft="50dp" android:layout_marginTop="50dp" android:onClick="startService" android:text="Start Service" /> <Button android:id="@+id/btnstop" android:layout_width="wrap_content" android:layout_height="wrap_content" android:layout_marginLeft="50dp" android:layout_marginTop="50dp" android:onClick="stopService" android:text="Stop Service" /> </LinearLayout> 2. After this, we’ll write the following code in MainActivity.java:
  • 14. package com.DataFlair.DataFlair_Services; import android.content.Intent; import android.os.Bundle; import android.view.View; import androidx.appcompat.app.AppCompatActivity; public class MainActivity extends AppCompatActivity { @Override protected void onCreate(Bundle savedInstanceState) { super.onCreate(savedInstanceState); setContentView(R.layout.activity_main); } public void startService(View view) { startService(new Intent(this, DataFlairService.class)); } public void stopService(View view) { stopService(new Intent(this, DataFlairService.class)); } } 3. Now open the Manifest.xml file. Following code is to be written in the Manifest file: <?xml version="1.0" encoding="utf-8"?> <manifest xmlns:android="http://schemas.android.com/apk/res/android" package="com.DataFlair.DataFlair_Services"> <application android:allowBackup="true" android:icon="@mipmap/ic_launcher" android:label="@string/app_name" android:roundIcon="@mipmap/ic_launcher_round" android:supportsRtl="true" android:theme="@style/AppTheme"> <activity android:name="com.DataFlair.DataFlair_Services.MainActivity"> <intent-filter> <action android:name="android.intent.action.MAIN" /&gt; <category android:name="android.intent.category.LAUNCHER" /> </intent-filter> </activity> <service android:name="com.DataFlair.DataFlair_Services.DataFlairService" /> </application>
  • 15. </manifest> 4. And finally, we’ll create a file, a java class, and name it. We’re naming it DataFlairService.java. After this file is created, we’ll write the following code in it: package com.DataFlair.DataFlair_Services; import android.app.Service; import android.content.Intent; import android.media.MediaPlayer; import android.os.IBinder; import android.provider.Settings; import android.widget.Toast; public class DataFlairService extends Service { private MediaPlayer player; @Override public IBinder onBind(Intent intent) { return null; } @Override public void onCreate() { Toast.makeText(this, "Service was Created", Toast.LENGTH_LONG).show(); } @Override public int onStartCommand(Intent intent, int flags, int startId) { player = MediaPlayer.create(this, Settings.System.DEFAULT_RINGTONE_URI); player.setLooping(true); player.start(); Toast.makeText(this, "Service Started", Toast.LENGTH_LONG).show(); return START_STICKY; } @Override public void onDestroy() { super.onDestroy(); player.stop(); Toast.makeText(this, "Service Stopped", Toast.LENGTH_LONG).show(); } } 5. After we’ve written all the codes respectively, we’ll run our app now. The following would be shown to us as our output:
  • 16. This is our application wherein we can Start and Stop our service. Now we’ve clicked on Start Service, therefore Service is created first. After the service is created, it will start executing.
  • 17. After that, we can stop our service whenever we like to stop them. As we can see below, the service has stopped.
  • 18. Android Fragments with Examples In android, Fragments are the modular section of activity design and these are used to represent the behavior of user interface (UI) in an activity. By using fragments we can create flexible UI designs that can be adjusted based on the device screen size such as tablets, smartphones. We can build multi-pane UI by combining multiple fragments in a single activity and we can reuse the same fragment in multiple activities. The fragment has its own lifecycle call-backs and accepts its own input events. We can add or remove fragments in an activity while the activity is running. In android, the fragment will act as a sub-activity and we can reuse it in multiple activities. Generally in android, the fragment must be included in an activity due to that the fragment lifecycle will always be affected by the host activity life cycle. In case if we pause an activity, all the fragments related to an activity will also be stopped. In android, we can insert the fragment into activity layout by using <fragment> element and by dividing the layout of activity into fragments, we can modify the appearance of an app design at runtime. We can also implement a fragment without having any user interface (UI). It’s an optional to use fragments into activity but by doing this it will improve the flexibility of our app UI and make it easier to adjust our app design based on the device size. Following is the example of defining a multiple fragments in single activity for the tablet design to display the details of an item which we selected in the app, but separated for mobile design. If you observe above example for Tablet we defined an Activity A with two fragments such as one is to show the list of items and second one is to show the details of item which we selected in first fragment.
  • 19. For Handset device, there is no enough space to show both the fragments in single activity, so the Activity A includes first fragment to show the list of items and the Activity B which includes another fragment to display the details of an item which is selected in Activity A. For example, GMAIL app is designed with multiple fragments, so the design of GMAIL app will be varied based on the size of device such as tablet or mobile device. Table View Mobile View
  • 20. Android Fragment Life Cycle Following is a pictorial representation of the android fragment life cycle while its activity is running.
  • 21. Following are the list of methods which will perform during the lifecycle of fragment in android applications.
  • 22. Method Description onAttach() It is called when the fragment has been associated with an activity. onCreate() It is used to initialize the fragment. onCreteView() It is used to create a view hierarchy associated with the fragment. onActivityCreated() It is called when the fragment activity has been created and the fragment view hierarc instantiated. onStart() It is used to make the fragment visible. onResume() It is used to make the fragment visible in an activity. onPause() It is called when fragment is no longer visible and it indicates that the user is leaving t fragment. onStop() It is called to stop the fragment using the onStop() method. onDestoryView() The view hierarchy associated with the fragment is being removed after executing t method. onDestroy() It is called to perform a final clean up of the fragments state. onDetach() It is called immediately after the fragment disassociated from the activity. Android Fragments Examples Following is the example of creating a two fragments, two buttons and showing the respective fragment when click on button in android application. Create a new android application using android studio and give names as Fragments. In case if you are not aware of creating an app in android studio check this article Android Hello World App. Now we need to create our own custom fragment layout files (listitems_info.xml, details_info.xml) in reslayout path to display those fragments in the main layout for that right-click on your layout folder  Go to New  select Layout resource file and give name as listitems_info.xml.
  • 23. Once we create a new file listitems_info.xml, open it and write the code like as shown below Listitems_info.xml <?xml version="1.0" encoding="utf-8"?> <LinearLayout xmlns:android="http://schemas.android.com/apk/res/android" android:orientation="vertical" android:layout_width="match_parent" android:layout_height="match_parent"> <ListView android:layout_width="match_parent" android:layout_height="wrap_content" android:id="@android:id/list" /> </LinearLayout> Same way create another file details_info.xml, open it and write the code like as shown below details_info.xml <?xml version="1.0" encoding="utf-8"?> <LinearLayout xmlns:android="http://schemas.android.com/apk/res/android" android:orientation="vertical" android:layout_width="match_parent" android:layout_height="match_parent" android:background="#0079D6"> <TextView android:layout_width="wrap_content" android:layout_height="wrap_content" android:textColor="#ffffff" android:layout_marginTop="200px" android:layout_marginLeft="200px" android:id="@+id/Name"/> <TextView android:layout_width="wrap_content" android:layout_height="wrap_content" android:layout_marginLeft="200px" android:textColor="#ffffff" android:id="@+id/Location"/> </LinearLayout> Now we need to create our own custom fragment class files (ListMenuFragment.java, DetailsFragment.java) in javacom.tutlane.fragmentsexample path to bind and display data in fragments for that right-click on your application folder  Go to New  select Java Class and give name as DetailsFragment.java. Once we create a new file DetailsFragment.java, open it and write the code like as shown below DetailsFragment.java package com.tutlane.fragmentsexample; import android.app.Fragment;
  • 24. import android.os.Bundle; import android.view.LayoutInflater; import android.view.View; import android.view.ViewGroup; import android.widget.TextView; /** * Created by tutlane on 06-08-2017. */ public class DetailsFragment extends Fragment { TextView name,location; @Override public View onCreateView(LayoutInflater inflater, ViewGroup container, Bundle savedInstanceState) { View view = inflater.inflate(R.layout.details_info, container, fal se); name = (TextView)view.findViewById(R.id.Name); location = (TextView)view.findViewById(R.id.Location); return view; } public void change(String uname, String ulocation){ name.setText(uname); location.setText(ulocation); } } If you observe above code we extended class with Fragment and used LayoutInflater to show the details of fragment. We defined a function change() to change the text in textview. Same way create another file ListMenuFragment.java, open it and write the code like as shown below ListMenuFragment.java package com.tutlane.fragmentsexample; import android.app.ListFragment; import android.os.Bundle; import android.view.LayoutInflater; import android.view.View; import android.view.ViewGroup; import android.widget.ArrayAdapter; import android.widget.ListView; /** * Created by tutlane on 06-08-2017. */ public class ListMenuFragment extends ListFragment { String[] users = new String[] { "Suresh","Rohini","Trishika","Praveen" ,"Sateesh","Madhav" }; String[] location = new String[]{"Hyderabad","Guntur","Hyderabad","Ban galore","Vizag","Nagpur"};
  • 25. @Override public View onCreateView(LayoutInflater inflater, ViewGroup container, Bundle savedInstanceState) { View view =inflater.inflate(R.layout.listitems_info, container, fa lse); ArrayAdapter<String> adapter = new ArrayAdapter<String>(getActivit y(), android.R.layout.simple_list_item_1, users); setListAdapter(adapter); return view; } @Override public void onListItemClick(ListView l, View v, int position, long id) { DetailsFragment txt = (DetailsFragment)getFragmentManager().findFr agmentById(R.id.fragment2); txt.change("Name: "+ users[position],"Location : "+ location[posit ion]); getListView().setSelector(android.R.color.holo_blue_dark); } } If you observe above code we extended our class using ListFragment and we defined two array of strings users, location which contains names and locations. We defined onListItemClick event to update the name and location in DetailsFragment based on the list item which we clicked. Now we need to display our fragments horizontally side by side in main layout for that open activity_main.xml file and write code like as shown below activity_main.xml <?xml version="1.0" encoding="utf-8"?> <LinearLayout xmlns:android="http://schemas.android.com/apk/res/android" xmlns:tools="http://schemas.android.com/tools" android:layout_width="match_parent" android:layout_height="match_parent" android:orientation="horizontal" tools:context="com.tutlane.fragmentsexample.MainActivity"> <fragment android:layout_height="match_parent" android:layout_width="350px" class="com.tutlane.fragmentsexample.ListMenuFragment" android:id="@+id/fragment"/> <fragment android:layout_width="match_parent" android:layout_height="match_parent" class="com.tutlane.fragmentsexample.DetailsFragment" android:id="@+id/fragment2"/> </LinearLayout> We are not going to make any modifications for our main activity file (MainActivity.java) and manifest file (AndroidMainfest.xml).
  • 26. Output of Android Fragments Example When we execute the above example in the android emulator we will get a result like as shown below This is how we can use fragments in activity to build multi-pane UI to adjust the android application layout based on the size of a device such as tablets or smartphones, etc. based on our requirements.
  • 27. Android Audio / Media Player with Examples In android, by using MediaPlayer class we can easily fetch, decode and play both audio and video files with minimal setup. The android media framework provides built-in support for playing a variety of common media types, such as audio or video. We have multiple ways to play audio or video but the most important component of media framework is MediaPlayer class. Android MediaPlayer Class In android, by using MediaPlayer class we can access audio or video files from application (raw) resources, standalone files in file system or from a data stream arriving over a network connection and play audio or video files with the multiple playback options such as play, pause, forward, backward, etc. Following is the code snippet, to play an audio that is available in our application’s local raw resource (res/raw) directory. MediaPlayer mPlayer = MediaPlayer.create(this, R.raw.baitikochi_chuste); mPlayer.start(); The second parameter in create() method is the name of the song that we want to play from our application resource directory (res/raw). In case if raw folder not exists in your application, create a new raw folder under res directory and add a properly encoded and formatted media files in it. In case, if we want to play an audio from a URI that is locally available in the system, we need to write the code like as shown below. Uri myUri = ....; // initialize Uri here MediaPlayer mPlayer = new MediaPlayer(); mPlayer.setAudioStreamType(AudioManager.STREAM_MUSIC); mPlayer.setDataSource(getApplicationContext(), myUri); mPlayer.prepare(); mPlayer.start(); If we want to play an audio from a URL via HTTP streaming, we need to write the code like as shown below. String url = "http://........"; // your URL here MediaPlayer mPlayer = new MediaPlayer(); mPlayer.setAudioStreamType(AudioManager.STREAM_MUSIC); mPlayer.setDataSource(url); mPlayer.prepare(); // might take long! (for buffering, etc) mPlayer.start(); If you observe above code snippets, we create an instance of MediaPlayer class and added required audio source, streaming type, audio file path, etc. to play an audio from our application.
  • 28. Apart from above methods, MediaPlayer class provides a different type of methods to control audio and video files based on requirements. Method Description getCurrentPosition() It is used to get the current position of the song in milliseconds. getDuration() It is used to get the total time duration of the song in milliseconds. isPlaying() It returns true / false to indicate whether song playing or not. pause() It is used to pause the song playing. setAudioStreamType() it is used to specify the audio streaming type. setDataSource() It is used to specify the path of audio / video file to play. setVolume() It is used to adjust media player volume either up / down. seekTo(position) It is used to move song to particular position in milliseconds. getTrackInfo() It returns an array of track information. start() It is used to start playing the audio/video. stop() It is used to stop playing the audio/video. reset() It is used to reset the MediaPlayer object. release() It is used to releases the resources which are associated with MediaPlayer object. Now we will see how to implement media playing application using MediaPlayer to play a song or audio with multiple playback options, such as play, pause, forward, backward in android application with examples. Android Audio Player Example
  • 29. Following is the example of implementing an audio player to play a song or audio with multiple playback options using MediaPlayer. Create a new android application using android studio and give names as MediaPlayerExample. In case if you are not aware of creating an app in android studio check this article Android Hello World App. As discussed create a new raw folder in res directory and add one music file like as shown below to play it by using MediaPlayer class. Now open activity_main.xml file from reslayout folder path and write the code like as shown below. activity_main.xml <?xml version="1.0" encoding="utf-8"?> <RelativeLayout xmlns:android="http://schemas.android.com/apk/res/android" android:layout_width="match_parent" android:layout_height="match_parent" android:paddingLeft="10dp" android:paddingRight="10dp"> <TextView android:id="@+id/txtVw1" android:layout_width="wrap_content" android:layout_height="wrap_content" android:text="Now Playing: " android:layout_marginTop="30dp" android:textAppearance="?android:attr/textAppearanceMedium" /> <TextView android:id="@+id/txtSname" android:layout_width="wrap_content" android:layout_height="wrap_content" android:layout_alignBaseline="@+id/txtVw1" android:layout_toRightOf="@+id/txtVw1" android:text="TextView" /> <ImageView android:id="@+id/imgLogo"
  • 30. android:layout_width="match_parent" android:layout_height="450dp" android:layout_below="@+id/txtVw1" android:src="@drawable/tutlane" /> <ImageButton android:id="@+id/btnBackward" android:layout_width="wrap_content" android:layout_height="wrap_content" android:layout_alignParentBottom="true" android:layout_marginBottom="44dp" android:layout_marginLeft="20dp" android:src="@android:drawable/ic_media_rew" /> <ImageButton android:id="@+id/btnPlay" android:layout_width="wrap_content" android:layout_height="wrap_content" android:layout_alignTop="@+id/btnBackward" android:layout_marginLeft="20dp" android:layout_toRightOf="@+id/btnBackward" android:src="@android:drawable/ic_media_play" /> <ImageButton android:id="@+id/btnPause" android:layout_width="wrap_content" android:layout_height="wrap_content" android:layout_alignTop="@+id/btnPlay" android:layout_marginLeft="20dp" android:layout_toRightOf="@+id/btnPlay" android:src="@android:drawable/ic_media_pause" /> <ImageButton android:id="@+id/btnForward" android:layout_width="wrap_content" android:layout_height="wrap_content" android:layout_alignTop="@+id/btnPause" android:layout_marginLeft="20dp" android:layout_toRightOf="@+id/btnPause" android:contentDescription="@+id/imageButton3" android:src="@android:drawable/ic_media_ff" /> <TextView android:id="@+id/txtStartTime" android:layout_width="wrap_content" android:layout_height="wrap_content" android:layout_alignTop="@+id/sBar" android:text="0 min, 0 sec" /> <SeekBar android:id="@+id/sBar" android:layout_width="match_parent" android:layout_height="wrap_content" android:layout_above="@+id/btnBackward" android:layout_toLeftOf="@+id/txtSongTime" android:layout_toRightOf="@+id/txtStartTime" /> <TextView android:id="@+id/txtSongTime" android:layout_width="wrap_content"
  • 31. android:layout_height="wrap_content" android:layout_toRightOf="@+id/btnForward" android:layout_alignTop="@+id/sBar" android:text="0 min, 0 sec " /> </RelativeLayout> Now open your main activity file MainActivity.java from javacom.tutlane.audioplayerexample path and write the code like as shown below. MainActivity.java package com.tutlane.mediaplayerexample; import android.media.MediaPlayer; import android.os.Handler; import android.support.v7.app.AppCompatActivity; import android.os.Bundle; import android.view.View; import android.widget.ImageButton; import android.widget.SeekBar; import android.widget.TextView; import android.widget.Toast; import java.util.concurrent.TimeUnit; public class MainActivity extends AppCompatActivity { private ImageButton forwardbtn, backwardbtn, pausebtn, playbtn; private MediaPlayer mPlayer; private TextView songName, startTime, songTime; private SeekBar songPrgs; private static int oTime =0, sTime =0, eTime =0, fTime = 5000, bTim e = 5000; private Handler hdlr = new Handler(); @Override protected void onCreate(Bundle savedInstanceState) { super.onCreate(savedInstanceState); setContentView(R.layout.activity_main); backwardbtn = (ImageButton)findViewById(R.id.btnBackward); forwardbtn = (ImageButton)findViewById(R.id.btnForward); playbtn = (ImageButton)findViewById(R.id.btnPlay); pausebtn = (ImageButton)findViewById(R.id.btnPause); songName = (TextView)findViewById(R.id.txtSname); startTime = (TextView)findViewById(R.id.txtStartTime); songTime = (TextView)findViewById(R.id.txtSongTime); songName.setText("Baitikochi Chuste"); mPlayer = MediaPlayer.create(this, R.raw.baitikochi_chuste); songPrgs = (SeekBar)findViewById(R.id.sBar); songPrgs.setClickable(false); pausebtn.setEnabled(false); playbtn.setOnClickListener(new View.OnClickListener() { @Override public void onClick(View v) {
  • 32. Toast.makeText(MainActivity.this, "Playing Audio", Toast.L ENGTH_SHORT).show(); mPlayer.start(); eTime = mPlayer.getDuration(); sTime = mPlayer.getCurrentPosition(); if(oTime == 0){ songPrgs.setMax(eTime); oTime =1; } songTime.setText(String.format("%d min, %d sec", TimeUnit. MILLISECONDS.toMinutes(eTime), TimeUnit.MILLISECONDS.toSeconds(eTime) - TimeUnit. MINUTES.toSeconds(TimeUnit.MILLISECONDS. toMinutes(eTime))) ); startTime.setText(String.format("%d min, %d sec", TimeUnit .MILLISECONDS.toMinutes(sTime), TimeUnit.MILLISECONDS.toSeconds(sTime) - TimeUnit. MINUTES.toSeconds(TimeUnit.MILLISECONDS. toMinutes(sTime))) ); songPrgs.setProgress(sTime); hdlr.postDelayed(UpdateSongTime, 100); pausebtn.setEnabled(true); playbtn.setEnabled(false); } }); pausebtn.setOnClickListener(new View.OnClickListener() { @Override public void onClick(View v) { mPlayer.pause(); pausebtn.setEnabled(false); playbtn.setEnabled(true); Toast.makeText(getApplicationContext(),"Pausing Audio", To ast.LENGTH_SHORT).show(); } }); forwardbtn.setOnClickListener(new View.OnClickListener() { @Override public void onClick(View v) { if((sTime + fTime) <= eTime) { sTime = sTime + fTime; mPlayer.seekTo(sTime); } else { Toast.makeText(getApplicationContext(), "Cannot jump f orward 5 seconds", Toast.LENGTH_SHORT).show(); } if(!playbtn.isEnabled()){ playbtn.setEnabled(true); } } }); backwardbtn.setOnClickListener(new View.OnClickListener() { @Override
  • 33. public void onClick(View v) { if((sTime - bTime) > 0) { sTime = sTime - bTime; mPlayer.seekTo(sTime); } else { Toast.makeText(getApplicationContext(), "Cannot jump b ackward 5 seconds", Toast.LENGTH_SHORT).show(); } if(!playbtn.isEnabled()){ playbtn.setEnabled(true); } } }); } private Runnable UpdateSongTime = new Runnable() { @Override public void run() { sTime = mPlayer.getCurrentPosition(); startTime.setText(String.format("%d min, %d sec", TimeUnit.MIL LISECONDS.toMinutes(sTime), TimeUnit.MILLISECONDS.toSeconds(sTime) - TimeUnit.MINU TES.toSeconds(TimeUnit.MILLISECONDS.toMinutes(sTime))) ); songPrgs.setProgress(sTime); hdlr.postDelayed(this, 100); } }; } If you observe above code we used MeidaPlayer object properties to play, pause song and changing the song position either forward or backward based on our requirements. Output of Android Audio Player Example When we run the above program in the android studio we will get the result as shown below.
  • 34. If you observe above result, when we click on play button song will start play and it will show the song duration details. If we click on pause button, the song will stop playing and use forward and backward buttons to move song forward or backward based on your requirements. This is how we can implement audio player app in android applications with multiple playback options based on our requirements.
  • 35. Android TextToSpeech with Examples In android, by using TextToSpeech class we can easily convert our text into voice and it supports different types of speaking languages. We can choose the speaking language based on our requirements in the android application. Generally, the android TextToSpeech instance can only be used to synthesize text once it has completed its initialization so implement TextToSpeech.OnInitListener to notify the completion of initialization. During the initialization, we can set the audio pitch rate, audio speed, type of language to speak, etc. based on our requirements. Following is the code snippet of converting text to voice using TextToSpeech class in android applications. public class MainActivity extends AppCompatActivity implements TextToSpeec h.OnInitListener { .... TextToSpeech textToSpeech; @Override public void onInit(int status) { if (status == TextToSpeech.SUCCESS) { int result = textToSpeech.setLanguage(Locale.US); String text = speakText.getText().toString(); textToSpeech.speak(text, TextToSpeech.QUEUE_FLUSH, null, null) ; } } .... } If you observe above code, we used TextToSpeech.OnInitListener to notify the completion of initialization and used TextToSpeech class to convert entered text to voice. Now we will see how to use the TextToSpeech component to convert the given text to speech conversion in android application with examples. Android TextToSpeech Example Following is the example of converting the given text to voice using an android TextToSpeech object. Create a new android application using android studio and give names as TextSpeechExample. In case if you are not aware of creating an app in android studio check this article Android Hello World App. Once we create an application, open activity_main.xml file from reslayout folder path and write the code like as shown below.
  • 36. activity_main.xml <?xml version="1.0" encoding="utf-8"?> <LinearLayout xmlns:android="http://schemas.android.com/apk/res/android" android:orientation="vertical" android:layout_width="match_parent" android:layout_height="match_parent"> <TextView android:id="@+id/fstTxt" android:layout_width="wrap_content" android:layout_height="wrap_content" android:layout_marginLeft="100dp" android:layout_marginTop="150dp" android:text="Enter Text to Speak"/> <EditText android:id="@+id/txtSpeak" android:layout_width="wrap_content" android:layout_height="wrap_content" android:layout_marginLeft="100dp" android:ems="10"/> <Button android:id="@+id/btnSpeech" android:layout_width="wrap_content" android:layout_height="wrap_content" android:layout_marginLeft="100dp" android:text="Speak" /> </LinearLayout> Now open your main activity file MainActivity.java from javacom.tutlane.textspeechexample path and write the code like as shown below MainActivity.java package com.tutlane.textspeechexample; import android.os.Build; import android.speech.tts.TextToSpeech; import android.support.v7.app.AppCompatActivity; import android.os.Bundle; import android.util.Log; import android.view.View; import android.widget.Button; import android.widget.EditText; import java.util.Locale; public class MainActivity extends AppCompatActivity implements TextToSpeec h.OnInitListener { Button speakBtn; EditText speakText; TextToSpeech textToSpeech; @Override protected void onCreate(Bundle savedInstanceState) {
  • 37. super.onCreate(savedInstanceState); setContentView(R.layout.activity_main); speakText = (EditText) findViewById(R.id.txtSpeak); speakBtn = (Button)findViewById(R.id.btnSpeech); textToSpeech = new TextToSpeech(this, this); speakBtn.setOnClickListener(new View.OnClickListener() { @Override public void onClick(View v) { texttoSpeak(); } }); } @Override public void onInit(int status) { if (status == TextToSpeech.SUCCESS) { int result = textToSpeech.setLanguage(Locale.US); if (result == TextToSpeech.LANG_MISSING_DATA || result == Text ToSpeech.LANG_NOT_SUPPORTED) { Log.e("error", "This Language is not supported"); } else { texttoSpeak(); } } else { Log.e("error", "Failed to Initialize"); } } @Override public void onDestroy() { if (textToSpeech != null) { textToSpeech.stop(); textToSpeech.shutdown(); } super.onDestroy(); } private void texttoSpeak() { String text = speakText.getText().toString(); if ("".equals(text)) { text = "Please enter some text to speak."; } if (Build.VERSION.SDK_INT >= Build.VERSION_CODES.LOLLIPOP) { textToSpeech.speak(text, TextToSpeech.QUEUE_FLUSH, null, n ull); } else { textToSpeech.speak(text, TextToSpeech.QUEUE_FLUSH, null); } } } If you observe above code, we are converting the text to speech conversion using TextToSpeech class.
  • 38. Output of Android TextToSpeech Example When we run the above example in the android emulator we will get a result like as shown below. If you observe the above result, once we enter text and click on the Speak button, the entered text converted to voice based on the language which we selected in the application. This is how we can convert text to speech in android applications using TextToSpeech object based on our requirements.
  • 39. AsyncTask Tutorial With Example Android Studio In Android, AsyncTask (Asynchronous Task) allows us to run the instruction in the background and then synchronize again with our main thread. This class will override at least one method i.e doInBackground(Params) and most often will override second method onPostExecute(Result). AsyncTask class is used to do background operations that will update the UI(user interface). Mainly we used it for short operations that will not effect on our main thread. AsyncTask class is firstly executed using execute() method. In the first step AsyncTask is called onPreExecute() then onPreExecute() calls doInBackground() for background processes and then doInBackground() calls onPostExecute() method to update the UI. Methods of AsyncTask  onPreExecute() − Before doing background operation we should show something on screen like progressbar or any animation to user. we can directly comminicate background operation using on doInBackground() but for the best practice, we should call all asyncTask methods .  doInBackground(Params) − In this method we have to do background operation on background thread. Operations in this method should not touch on any mainthread activities or fragments.  onProgressUpdate(Progress…) − While doing background operation, if you want to update some information on UI, we can use this method.  onPostExecute(Result) − In this method we can update ui of background operation result.
  • 40. Generic Types in Async Task  TypeOfVarArgParams − It contains information about what type of params used for execution.  ProgressValue − It contains information about progress units. While doing background operation we can update information on ui using onProgressUpdate().  ResultValue −It contains information about result type. This example demonstrate about how to use asyncTask in android. Step 1 − Create a new project in Android Studio, go to File ⇒ New Project and fill all required details to create a new project. Step 2 − Add the following code to res/layout/activity_main.xml. <?xml version = "1.0" encoding = "utf-8"?> <LinearLayout xmlns:android = "http://schemas.android.com/apk/res/android" xmlns:tools = "http://schemas.android.com/tools" android:id = "@+id/rootview" android:layout_width = "match_parent" android:layout_height = "match_parent" android:orientation = "vertical" android:background = "#c1c1c1" android:gravity = "center_horizontal" tools:context = ".MainActivity"> <Button android:id = "@+id/asyncTask" android:text = "Download" android:layout_width = "wrap_content" android:layout_height = "wrap_content" /> <ImageView android:id = "@+id/image" android:layout_width = "300dp" android:layout_height = "300dp" /> </LinearLayout> In the above xml we have created a button, when user click on the button it going to download image and append image to imageview. Step 3 − Add the following code to src/MainActivity.java package com.example.andy.myapplication; import android.app.ProgressDialog;
  • 41. import android.graphics.Bitmap; import android.graphics.BitmapFactory; import android.os.AsyncTask; import android.os.Bundle; import android.support.v7.app.AppCompatActivity; import android.view.View; import android.widget.Button; import android.widget.ImageView; import java.io.IOException; import java.io.InputStream; import java.net.HttpURLConnection; import java.net.URL; public class MainActivity extends AppCompatActivity { URL ImageUrl = null; InputStream is = null; Bitmap bmImg = null; ImageView imageView= null; ProgressDialog p; @Override protected void onCreate(Bundle savedInstanceState) { super.onCreate(savedInstanceState); setContentView(R.layout.activity_main); Button button=findViewById(R.id.asyncTask); imageView=findViewById(R.id.image); button.setOnClickListener(new View.OnClickListener() { @Override public void onClick(View v) { AsyncTaskExample asyncTask=new AsyncTaskExample(); asyncTask.execute("https://www.tutorialspoint.com/image s/tp-logo-diamond.png"); } }); } private class AsyncTaskExample extends AsyncTask<String, String, Bitmap> { @Override protected void onPreExecute() { super.onPreExecute();
  • 42. p = new ProgressDialog(MainActivity.this); p.setMessage("Please wait...It is downloading"); p.setIndeterminate(false); p.setCancelable(false); p.show(); } @Override protected Bitmap doInBackground(String... strings) { try { ImageUrl = new URL(strings[0]); HttpURLConnection conn = (HttpURLConnection) ImageUrl.openConnection(); conn.setDoInput(true); conn.connect(); is = conn.getInputStream(); BitmapFactory.Options options = new BitmapFactory.Options(); options.inPreferredConfig = Bitmap.Config.RGB_565; bmImg = BitmapFactory.decodeStream(is, null, options); } catch (IOException e) { e.printStackTrace(); } return bmImg; } @Override protected void onPostExecute(Bitmap bitmap) { super.onPostExecute(bitmap); if(imageView!=null) { p.hide(); imageView.setImageBitmap(bitmap); }else { p.show(); } } } } In the above code we are downloading image using asyncTask and appending image to imageview.
  • 43. Step 4 − Add the following code to manifest.xml <?xml version = "1.0" encoding = "utf-8"?> <manifest xmlns:android = "http://schemas.android.com/apk/res/android" package = "com.example.andy.myapplication"> <uses-permission android:name = "android.permission.INTERNET"/> <application android:allowBackup = "true" android:icon = "@mipmap/ic_launcher" android:label = "@string/app_name" android:roundIcon = "@mipmap/ic_launcher_round" android:supportsRtl = "true" android:theme = "@style/AppTheme"> <activity android:name = ".MainActivity"> <intent-filter> <action android:name = "android.intent.action.MAIN" /> <category android:name = "android.intent.category.LAUNCHER" /> </intent-filter> </activity> </application> </manifest> In the above AndroidManifest.xml file we have added internet permission to access internet to download image. Let's try to run your application. I assume you have connected your actual Android Mobile device with your computer. To run the app from android studio, open one of your project's activity files and click Run Eclipse Run Icon icon from the toolbar. Select your mobile device as an option and then check your mobile device which will display your default screen.
  • 44. Now click on download button it will show progress on UI and download image at background as shown below
  • 45. After downloading image, it will update on UI as shown below
  • 46.
  • 47. Android Audio Recorder with Examples In android, MediaRecorder class will provide a functionality to record audio or video files. The android multimedia framework provides built-in support for capturing and encoding a variety of common audio and video formats. We have a multiple ways to record audio or video but by using MediaRecorder class we can easily implement audio or video recording. In android, to record an audio we need to use device’s microphone along with MediaRecorder class. In case, if we want to record video, we need to use device’s camera along with MediaRecorder class. Android Set Permissions to Record Audio To record an audio and save it in device, our app must tell the user that it will access the device’s audio input and storage, for that we need to set multiple permissions such as RECORD_AUDIO, STORAGE and WRITE_EXTERNAL_STORAGE in our manifest file. Following is the code snippet of defining the permissions in android manifest file to record audio and save it in device. <manifest ... > <uses-permission android:name="android.permission.RECORD_AUDIO"/> <uses-permission android:name="android.permission.WRITE_EXTERNAL_STORAGE"/ > <uses-permission android:name="android.permission.STORAGE"/> ... </manifest> The RECORD_AUDIO, WRITE_EXTERNAL_STORAGE are considered as a dangerous permissions because it may pose a risk to the user’s privacy. Starting with Android 6.0 (API level 23) an app that uses a dangerous permission must ask the user for approval at run time. After the user has granted permission, the app should remember and not ask again. Android MediaRecorder Class In android, we can record audio or video by using MediaRecorder class in our applications. This class will provide required API’s to record audio and video. To use MediaRecord class to record an audio, we need to create an instance of MediaRecorder class and set the source, output, encoding format and output file to store the recorded audio in device. After that we need to call prepare(), start(), stop(), etc. to start the audio recording in our application. Following is the code snippet to use MediaRecorder to record audio in android applications. MediaRecorder recorder = new MediaRecorder(); recorder.setAudioSource(MediaRecorder.AudioSource.MIC); recorder.setOutputFormat(MediaRecorder.OutputFormat.THREE_GPP); recorder.setAudioEncoder(MediaRecorder.AudioEncoder.AMR_NB); recorder.setOutputFile(PATH_NAME);
  • 48. recorder.prepare(); recorder.start(); // Recording will start ... recorder.stop(); recorder.reset(); // You can reuse the object by going back to setAudioS ource() step recorder.release(); // Now the object cannot be reused If you observe above code snippet, we create an instance of MediaRecorder class and added required audio source, output format, encoding format, audio file saving path, etc. to record an audio and save it in device. Apart from above methods, MediaRecorder class provides a different type of methods to control audio and video recording based on requirements. Method Description setAudioSource() It is used to specify the source of audio to be recorded. setVideoSource() It is used to specify the source of the video to be recorded. setOutputFormat() It is used to specify the audio / video output format. setAudioEncoder() It is used to specify the audio encoder. setVideoEncoder() it is used to specify the video encoder. setOutputFile() It is used to specify the path of a recorded audio/video files to be stored. stop() It is used to stop the recording process. start() it is used to start the recording process. release() It is used to releases the resources which are associated with MediaRecorder object. Now we will see how to capture audio from device microphone, save the audio, and play it back using MediaPlayer in android application with examples. Android Audio Recording Example
  • 49. Following is the example of recording an audio from device microphone, save the audio in device memory and play it using MediaPlayer. Create a new android application using android studio and give names as AudioRecorderExample. In case if you are not aware of creating an app in android studio check this article Android Hello World App. Once we create an application, open activity_main.xml file from reslayout folder path and write the code like as shown below. activity_main.xml <?xml version="1.0" encoding="utf-8"?> <LinearLayout xmlns:android="http://schemas.android.com/apk/res/android" android:orientation="vertical" android:layout_width="match_parent" android:layout_height="match_parent"> <Button android:id="@+id/btnRecord" android:layout_width="wrap_content" android:layout_height="wrap_content" android:layout_marginLeft="100dp" android:layout_marginTop="120dp" android:text="Start Recording" /> <Button android:id="@+id/btnStop" android:layout_width="wrap_content" android:layout_height="wrap_content" android:layout_marginLeft="100dp" android:text="Stop Recording" /> <Button android:id="@+id/btnPlay" android:layout_width="wrap_content" android:layout_height="wrap_content" android:layout_marginLeft="100dp" android:text="Play Recording" /> <Button android:id="@+id/btnStopPlay" android:layout_width="wrap_content" android:layout_height="wrap_content" android:layout_marginLeft="100dp" android:text="Stop Playing" /> </LinearLayout> Now open your main activity file MainActivity.java from javacom.tutlane.audiorecorderexample path and write the code like as shown below MainActivity.java package com.tutlane.audiorecorderexample; import android.content.pm.PackageManager;
  • 50. import android.media.MediaPlayer; import android.media.MediaRecorder; import android.os.Environment; import android.support.v4.app.ActivityCompat; import android.support.v4.content.ContextCompat; import android.support.v7.app.AppCompatActivity; import android.os.Bundle; import android.util.Log; import android.view.View; import android.widget.Button; import android.widget.Toast; import java.io.IOException; import static android.Manifest.permission.RECORD_AUDIO; import static android.Manifest.permission.WRITE_EXTERNAL_STORAGE; public class MainActivity extends AppCompatActivity { private Button startbtn, stopbtn, playbtn, stopplay; private MediaRecorder mRecorder; private MediaPlayer mPlayer; private static final String LOG_TAG = "AudioRecording"; private static String mFileName = null; public static final int REQUEST_AUDIO_PERMISSION_CODE = 1; @Override protected void onCreate(Bundle savedInstanceState) { super.onCreate(savedInstanceState); setContentView(R.layout.activity_main); startbtn = (Button)findViewById(R.id.btnRecord); stopbtn = (Button)findViewById(R.id.btnStop); playbtn = (Button)findViewById(R.id.btnPlay); stopplay = (Button)findViewById(R.id.btnStopPlay); stopbtn.setEnabled(false); playbtn.setEnabled(false); stopplay.setEnabled(false); mFileName = Environment.getExternalStorageDirectory().getAbsoluteP ath(); mFileName += "/AudioRecording.3gp"; startbtn.setOnClickListener(new View.OnClickListener() { @Override public void onClick(View v) { if(CheckPermissions()) { stopbtn.setEnabled(true); startbtn.setEnabled(false); playbtn.setEnabled(false); stopplay.setEnabled(false); mRecorder = new MediaRecorder(); mRecorder.setAudioSource(MediaRecorder.AudioSource.MIC ); mRecorder.setOutputFormat(MediaRecorder.OutputFormat.T HREE_GPP); mRecorder.setAudioEncoder(MediaRecorder.AudioEncoder.A MR_NB); mRecorder.setOutputFile(mFileName);
  • 51. try { mRecorder.prepare(); } catch (IOException e) { Log.e(LOG_TAG, "prepare() failed"); } mRecorder.start(); Toast.makeText(getApplicationContext(), "Recording Sta rted", Toast.LENGTH_LONG).show(); } else { RequestPermissions(); } } }); stopbtn.setOnClickListener(new View.OnClickListener() { @Override public void onClick(View v) { stopbtn.setEnabled(false); startbtn.setEnabled(true); playbtn.setEnabled(true); stopplay.setEnabled(true); mRecorder.stop(); mRecorder.release(); mRecorder = null; Toast.makeText(getApplicationContext(), "Recording Stopped ", Toast.LENGTH_LONG).show(); } }); playbtn.setOnClickListener(new View.OnClickListener() { @Override public void onClick(View v) { stopbtn.setEnabled(false); startbtn.setEnabled(true); playbtn.setEnabled(false); stopplay.setEnabled(true); mPlayer = new MediaPlayer(); try { mPlayer.setDataSource(mFileName); mPlayer.prepare(); mPlayer.start(); Toast.makeText(getApplicationContext(), "Recording Sta rted Playing", Toast.LENGTH_LONG).show(); } catch (IOException e) { Log.e(LOG_TAG, "prepare() failed"); } } }); stopplay.setOnClickListener(new View.OnClickListener() { @Override public void onClick(View v) { mPlayer.release(); mPlayer = null;
  • 52. stopbtn.setEnabled(false); startbtn.setEnabled(true); playbtn.setEnabled(true); stopplay.setEnabled(false); Toast.makeText(getApplicationContext(),"Playing Audio Stop ped", Toast.LENGTH_SHORT).show(); } }); } @Override public void onRequestPermissionsResult(int requestCode, String[] permi ssions, int[] grantResults) { switch (requestCode) { case REQUEST_AUDIO_PERMISSION_CODE: if (grantResults.length> 0) { boolean permissionToRecord = grantResults[0] == Packag eManager.PERMISSION_GRANTED; boolean permissionToStore = grantResults[1] == Packag eManager.PERMISSION_GRANTED; if (permissionToRecord && permissionToStore) { Toast.makeText(getApplicationContext(), "Permissio n Granted", Toast.LENGTH_LONG).show(); } else { Toast.makeText(getApplicationContext(),"Permission Denied",Toast.LENGTH_LONG).show(); } } break; } } public boolean CheckPermissions() { int result = ContextCompat.checkSelfPermission(getApplicationConte xt(), WRITE_EXTERNAL_STORAGE); int result1 = ContextCompat.checkSelfPermission(getApplicationCont ext(), RECORD_AUDIO); return result == PackageManager.PERMISSION_GRANTED && result1 == P ackageManager.PERMISSION_GRANTED; } private void RequestPermissions() { ActivityCompat.requestPermissions(MainActivity.this, new String[]{ RECORD_AUDIO, WRITE_EXTERNAL_STORAGE}, REQUEST_AUDIO_PERMISSION_CODE); } } If you observe above code, we are requesting permissions from user to record audio and store recorded files in device using onRequestPermissionResult method and added required functionality for audio recording and playing audio using mediaplayer based on our requirements. As discussed, we need to set permissions in android manifest file (AndroidManifest.xml) to record audio and stored record audio files in device. Now open android manifest file (AndroidManifest.xml) and write the code like as shown below
  • 53. AndroidManifest.xml <?xml version="1.0" encoding="utf-8"?> <manifest xmlns:android="http://schemas.android.com/apk/res/android" package="com.tutlane.audiorecorderexample"> <uses-permission android:name="android.permission.RECORD_AUDIO"/> <uses-permission android:name="android.permission.WRITE_EXTERNAL_STORA GE"/> <uses-permission android:name="android.permission.STORAGE"/> <application android:allowBackup="true" android:icon="@mipmap/ic_launcher" android:label="@string/app_name" android:roundIcon="@mipmap/ic_launcher_round" android:supportsRtl="true" android:theme="@style/AppTheme"> <activity android:name=".MainActivity"> <intent-filter> <action android:name="android.intent.action.MAIN" /> <category android:name="android.intent.category.LAUNCHER " /> </intent-filter> </activity> </application> </manifest> If you observe above code, we added required audio and storage permissions in manifest file to record and store audio files in device. Output of Android Audio Recording Example When we run the above program in the android studio we will get the result as shown below.
  • 54. If you observe above result, when we are clicking on Start Recording button it’s asking for permission to record audio and local storage access. After giving all the required permissions, if we click on Start Recording button, the audio recording will be started by using local device microphone like as shown below.
  • 55. Once the audio recording finished, click on the Play Recording button to listen the audio from local device. This is how we can implement an audio recording in android applications based on our requirements.
  • 56. Android Camera App with Examples In android, Camera is useful to capture the photos and videos in our applications. By using camera API we can control the functionalities of camera based on our requirements. The android framework provides a two ways such as android.hardware.camera2 API and camera intent to capture the images and videos in our application. android.hardware.camera2 It’s a primary API for controlling the device cameras. By using this we can take the pictures or videos from our application using camera. Intent By using intent action types either MediaStore.ACTION_IMAGE_CAPTURE or MediaStore.ACTION_VIDEO_CAPTURE, we can capture the photos or videos without directly using the Camera object. The best way is to use an Intent to invoke an existing Android camera application to take pictures or videos in our application without writing a lot of extra code. In android, By using startActivityForResult() method with intent action parameter MediaStore.ACTION_IMAGE_CAPTURE, we can take the pictures from our android applications. Following is the code snippet to capture the pictures using intent object with action parameter MediaStore.ACTION_IMAGE_CAPTURE in android applications. Intent cInt = new Intent(MediaStore.ACTION_IMAGE_CAPTURE); startActivityForResult(cInt,Image_Capture_Code); If you observe above code snippet, we used startActivityForResult() method with MediaStore.ACTION_IMAGE_CAPTURE intent action parameter to capture the photos. The second parameter Image_Capture_Code is a locally defined integer that must be greater than 0. Android Camera App Example Following is the example of using an existing camera app in our android applications to capture the photos on button click. Create a new android application using android studio and give names as CameraExample. In case if you are not aware of creating an app in android studio check this article Android Hello World App. Once we create an application, open activity_main.xml file from reslayout folder path and write the code like as shown below. activity_main.xml
  • 57. <?xml version="1.0" encoding="utf-8"?> <RelativeLayout xmlns:android="http://schemas.android.com/apk/res/android" android:layout_width="match_parent" android:layout_height="match_parent" android:paddingLeft="10dp" android:paddingRight="10dp"> <Button android:id="@+id/btnTakePicture" android:layout_width="wrap_content" android:layout_height="wrap_content" android:text="Take a Photo" android:textStyle="bold" android:layout_centerHorizontal="true" android:layout_alignParentBottom="true" /> <ImageView android:layout_width="fill_parent" android:layout_height="fill_parent" android:id="@+id/capturedImage" android:layout_above="@+id/btnTakePicture"/> </RelativeLayout> Now open your main activity file MainActivity.java from javacom.tutlane.cameraexample path and write the code like as shown below MainActivity.java package com.tutlane.cameraexample; import android.content.Intent; import android.graphics.Bitmap; import android.provider.MediaStore; import android.support.v7.app.AppCompatActivity; import android.os.Bundle; import android.view.View; import android.widget.Button; import android.widget.ImageView; import android.widget.Toast; public class MainActivity extends AppCompatActivity { private Button btnCapture; private ImageView imgCapture; private static final int Image_Capture_Code = 1; @Override protected void onCreate(Bundle savedInstanceState) { super.onCreate(savedInstanceState); setContentView(R.layout.activity_main); btnCapture =(Button)findViewById(R.id.btnTakePicture); imgCapture = (ImageView) findViewById(R.id.capturedImage); btnCapture.setOnClickListener(new View.OnClickListener() { @Override public void onClick(View v) { Intent cInt = new Intent(MediaStore.ACTION_IMAGE_CAPTURE); startActivityForResult(cInt,Image_Capture_Code);
  • 58. } }); } @Override protected void onActivityResult(int requestCode, int resultCode, Inten t data) { if (requestCode == Image_Capture_Code) { if (resultCode == RESULT_OK) { Bitmap bp = (Bitmap) data.getExtras().get("data"); imgCapture.setImageBitmap(bp); } else if (resultCode == RESULT_CANCELED) { Toast.makeText(this, "Cancelled", Toast.LENGTH_LONG).show( ); } } } } If you observe above code snippet, we used startActivityForResult() method with MediaStore.ACTION_IMAGE_CAPTURE intent action parameter to capture the photos. Output of Android Camera App Example When we run the above program in the android studio we will get the result as shown below.
  • 59. When we click on Take a Photo button, the camera will start and we can take the picture of whatever we want, the captured image will be shown in defined imageview. This is how we can use the camera in android applications to capture the photos or videos based on our requirements.
  • 60. Android Bluetooth Device Discoverable with Examples In android, Bluetooth is a communication network protocol, which allow a devices to connect wirelessly to exchange the data with other Bluetooth devices. Generally, in android applications by using Bluetooth API’s we can implement Bluetooth functionalities, such as enable or disable Bluetooth, searching for available Bluetooth devices, connecting with the devices and managing the data transfer between devices within the range. In android, we can perform Bluetooth related activities by using BluetoothAdapter class in our applications. To know more about BluetoothAdapter, check this Android Bluetooth with Examples. Android Bluetooth Enable Discoverability To make the device discoverable to other devices, we need to start the new activity by calling startActivityForResult(intent, int) with the ACTION_REQUEST_DISCOVERABLE intent. Following is the code snippet to enable the system’s discoverable mode to make sure that the device discoverable to other devices. Intent dIntent = new Intent(BluetoothAdapter.ACTION_REQUEST_DISCOVERABLE) ; dIntent.putExtra(BluetoothAdapter.EXTRA_DISCOVERABLE_DURATION, 300); startActivity(dIntent); If you observe above code snippet, we are making sure our device discoverable to other devices using ACTION_REQUEST_DISCOVERABLE. By default, the device becomes discoverable for 120 seconds. We can extend the device discoverable duration up to 3600 seconds (1 hour), by adding the EXTRA_DISCOVERABLE_DURATION extra. As we discussed in previous tutorial Android Bluetooth with Examples, we need to set Bluetooth permissions in our android manifest file as shown below to use Bluetooth features in our android applications. <manifest ... > <uses-permission android:name="android.permission.BLUETOOTH"/> <uses-permission android:name="android.permission.BLUETOOTH_ADMIN"/> <uses-permission android:name="android.permission.ACCESS_COARSE_LOCATION"/ > ... </manifest> Android Bluetooth Device Discoverable Example Following is the example of making device discoverable to other nearby Bluetooth devices on button click in android applications.
  • 61. Create a new android application using android studio and give names as BluetoothDiscoverableExample. In case if you are not aware of creating an app in android studio check this article Android Hello World App. Once we create an application, open activity_main.xml file from reslayout folder path and write the code like as shown below. activity_main.xml <?xml version="1.0" encoding="utf-8"?> <RelativeLayout xmlns:android="http://schemas.android.com/apk/res/android" android:layout_width="match_parent" android:layout_height="match_parent" android:paddingLeft="10dp" android:paddingRight="10dp"> <Button android:id="@+id/btnOn" android:layout_width="wrap_content" android:layout_height="wrap_content" android:text="Turn On" android:layout_marginLeft="50dp" android:la yout_marginTop="200dp" /> <Button android:id="@+id/btnDiscoverable" android:layout_width="wrap_content" android:layout_height="wrap_content" android:layout_alignBottom="@+id/btnOn" android:layout_toRightOf="@+id/btnOn" android:text="Discoverable" /> <Button android:id="@+id/btnOFF" android:layout_width="wrap_content" android:layout_height="wrap_content" android:layout_alignBottom="@+id/btnDiscoverable" android:layout_toRightOf="@+id/btnDiscoverable" android:text="Turn OFF" /> </RelativeLayout> Now open your main activity file MainActivity.java from javacom.tutlane.bluetoothdiscoverableexample path and write the code like as shown below MainActivity.java package com.tutlane.bluetoothdiscoverableexample; import android.bluetooth.BluetoothAdapter; import android.content.Intent; import android.support.v7.app.AppCompatActivity; import android.os.Bundle; import android.view.View; import android.widget.Button; import android.widget.Toast;
  • 62. public class MainActivity extends AppCompatActivity { @Override protected void onCreate(Bundle savedInstanceState) { super.onCreate(savedInstanceState); setContentView(R.layout.activity_main); Button btntOn = (Button)findViewById(R.id.btnOn); Button btntOff = (Button)findViewById(R.id.btnOFF); Button btnDisc = (Button)findViewById(R.id.btnDiscoverable); final BluetoothAdapter bAdapter = BluetoothAdapter.getDefaultAdapt er(); btntOn.setOnClickListener(new View.OnClickListener() { @Override public void onClick(View v) { if(bAdapter == null) { Toast.makeText(getApplicationContext(),"Bluetooth Not Supported",Toast.LENGTH_SHORT).show(); } else{ if(!bAdapter.isEnabled()){ startActivityForResult(new Intent(BluetoothAdapter .ACTION_REQUEST_ENABLE),1); Toast.makeText(getApplicationContext(),"Bluetooth Turned ON",Toast.LENGTH_SHORT).show(); } } } }); btntOff.setOnClickListener(new View.OnClickListener() { @Override public void onClick(View v) { bAdapter.disable(); Toast.makeText(getApplicationContext(),"Bluetooth Turned O FF", Toast.LENGTH_SHORT).show(); } }); btnDisc.setOnClickListener(new View.OnClickListener() { @Override public void onClick(View v) { if(!bAdapter.isDiscovering()){ startActivityForResult(new Intent(BluetoothAdapter.ACT ION_REQUEST_DISCOVERABLE),1); Toast.makeText(getApplicationContext(),"Making Device Discoverable",Toast.LENGTH_SHORT).show(); } } }); } } If you observe above code, we are making sure our device discoverable to other devices using ACTION_REQUEST_DISCOVERABLE.
  • 63. As discussed, we need to set Bluetooth permissions in android manifest file (AndroidManifest.xml) to access Bluetooth features in android applications. Now open android manifest file (AndroidManifest.xml) and write the code like as shown below AndroidManifest.xml <?xml version="1.0" encoding="utf-8"?> <manifest xmlns:android="http://schemas.android.com/apk/res/android" package="com.tutlane.bluetoothdiscoverableexample"> <uses-permission android:name="android.permission.BLUETOOTH"/> <uses-permission android:name="android.permission.BLUETOOTH_ADMIN"/> <application android:allowBackup="true" android:icon="@mipmap/ic_launcher" android:label="@string/app_name" android:roundIcon="@mipmap/ic_launcher_round" android:supportsRtl="true" android:theme="@style/AppTheme"> <activity android:name=".MainActivity"> <intent-filter> <action android:name="android.intent.action.MAIN" /> <category android:name="android.intent.category.LAUNCHER " /> </intent-filter> </activity> </application> </manifest> If you observe above code, we added required Bluetooth permissions in manifest file to access Bluetooth features in android applications. Output of Android Bluetooth Device Discoverable Example When we run the above program in android studio we will get the result as shown below.
  • 64. When we click on Turn ON or Turn OFF buttons, we can make the device Bluetooth turn ON or OFF and then click on Discoverable button, our device discoverable to other Bluetooth devices. This is how we can make our device discoverable to other nearby Bluetooth devices in android applications based on our requirements.
  • 65. Android Animations with Examples In android, Animations are used to change the appearance and behavior of the objects over a particular interval of time. The animations will provide a better look and feel high-quality user interface for our applications. Generally, the animations are useful when we want to notify users about the changes happening in our app, such as new content loaded or new actions available, etc. We have a different type of animations available in android, here we will discuss the most commonly used android animations such as zoom in / zoom out, fade in / fade out, slide up / slide down and rotate clockwise or anti-clockwise, etc. with examples. To create an animation effect on the objects in our android application, we need to follow the below steps. Create XML File to Define Animation We need to create an XML file that defines the type of animation to perform in a new folder anim under res directory (res  anim  animation.xml) with the required properties. In case, anim folder not exists in res directory, create a new one. Following is the example of creating XML files under anim folder to define slide up / down animation properties. The XML files will contain the code like as shown below based on the type of animation. <?xml version="1.0" encoding="utf-8"?> <set xmlns:android="http://schemas.android.com/apk/res/android" android:in terpolator="@android:anim/linear_interpolator"> <scale android:duration="500" android:fromXScale="1.0" android:fromYScale="0.0"
  • 66. android:toXScale="1.0" android:toYScale="1.0" /> </set> In case if we want to use different type of animations such as fade in / out, zoom in / out, etc. we need to create a new xml files in anim folder with required properties. The following are some of the important animation attributes that will help us to change the behavior of animation in our application. Attributes Description android:duration It is used to define the duration of the animation to complete. android:startOffset It is used to define the waiting time before the animation starts. android:interpolator It is used to define the rate of change in animation. android:repeatMode It is useful when we want to repeat our animation. android:repeatCount It is used to define the number of times the animation repeats. In case if we set infinite, t animation will repeat infinite times. android:fillAfter It is used to define whether to apply animation transformation after the animation comple or not. Android Load and Start the Animation In android, we can perform animations by using AnimationUtils component methods such as loadAnimation(). Following is the code snippet of loading and starting an animation using loadAnimation() and startAnimation() methods. ImageView img = (ImageView)findViewById(R.id.imgvw); Animation aniSlide = AnimationUtils.loadAnimation(getApplicationContext(), R.anim.slide_up); img.startAnimation(aniSlide); If you observe above code snippet, we are adding an animation to the image using loadAnimation() method. The second parameter in loadAnimation() method is the name of our animation xml file. Here we used another method startAnimation() to apply the defined animation to imageview object.
  • 67. Different Types of Android Animations In android, we have different types of animations such as Fade In / Fade Out, Zoom In / Zoom Out, Slide Up / Slide Down, Rotate in Clockwise or Anti-Clockwise, etc. Now we will see how to create each animation with required properties in the android application. Android Fade In / Out Animation To use Fade In or Fade Out animations in our android applications, we need to define a new XML file with <alpha> tag like as shown below. For Fade In animation, we need to increase the alpha value from 0 to 1 like as shown below. <?xml version="1.0" encoding="utf-8"?> <set xmlns:android="http://schemas.android.com/apk/res/android" android:in terpolator="@android:anim/linear_interpolator"> <alpha android:duration="2000" android:fromAlpha="0.1" android:toAlpha="1.0"> </alpha> </set> For Fade Out animation, we need to decrease the alpha value from 1 to 0 like as shown below. <?xml version="1.0" encoding="utf-8"?> <set xmlns:android="http://schemas.android.com/apk/res/android" android:interpolator="@android:anim/linear_interpolator"> <alpha android:duration="2000" android:fromAlpha="1.0" android:toAlpha="0.1" > </alpha> </set> To know more about Fade In and Fade Out animations check this, Android Fade In / Out Animations with Examples. Android Slide Up / Down Animation To use Slide Up or Slide Down animations in our android applications, we need to define a new XML file with <scale> tag like as shown below. For Slide Up animation, we need to set android:fromYScale="1.0" and android:toYScale="0.0" like as shown below. <?xml version="1.0" encoding="utf-8"?> <set xmlns:android="http://schemas.android.com/apk/res/android" android:in terpolator="@android:anim/linear_interpolator">
  • 68. <scale android:duration="500" android:fromXScale="1.0" android:fromYScale="1.0" android:toXScale="1.0" android:toYScale="0.0" /> </set> For Slide Down animation, we need to set android:fromYScale="0.0" and android:toYScale="1.0" like as shown below. <?xml version="1.0" encoding="utf-8"?> <set xmlns:android="http://schemas.android.com/apk/res/android" android:in terpolator="@android:anim/linear_interpolator"> <scale android:duration="500" android:fromXScale="1.0" android:fromYScale="0.0" android:toXScale="1.0" android:toYScale="1.0" /> </set> To know more about Slide Up and Slide Down animations check this, Android Slide Up / Down Animations with Examples. Android Zoom In / Out Animation To use Zoom In or Zoom Out animations in our android applications, we need to define a new XML file with <scale> tag like as shown below. For Zoom In animation, we need to set android:pivotX="50%" and android:pivotY="50%" to perform the zoom from the centre of the element. Also, we need to use fromXScale, fromYScale attributes to define the scaling of an object and we need keep these values lesser than toXScale, toYScale like as shown below. <?xml version="1.0" encoding="utf-8"?> <set xmlns:android="http://schemas.android.com/apk/res/android"> <scale xmlns:android="http://schemas.android.com/apk/res/android" android:duration="1000" android:fromXScale="2" android:fromYScale="2" android:pivotX="50%" android:pivotY="50%" android:toXScale="4" android:toYScale="4" > </scale> </set> In android, Zoom Out animation is same as Zoom In animation but fromXScale, fromYScale attribute values must be greater than toXScale, toYScale like as shown below.
  • 69. <?xml version="1.0" encoding="utf-8"?> <set xmlns:android="http://schemas.android.com/apk/res/android"> <scale android:duration="2500" android:fromXScale="1.0" android:fromYScale="1.0" android:pivotX="50%" android:pivotY="50%" android:toXScale=".2" android:toYScale=".2" /> </set> To know more about Zoom In and Zoom Out animations check this, Android Zoom In / Out Animations with Examples. Android Rotate Clockwise / Anti Clockwise Animation To use Rotate animation in our android applications, we need to define a new XML file with <rotate> tag like as shown below. To Rotate animation in Clockwise, we need to set android:fromDegrees and android:toDegrees property values and these will define a rotation angles like as shown below. <?xml version="1.0" encoding="utf-8"?> <set xmlns:android="http://schemas.android.com/apk/res/android" android:in terpolator="@android:anim/cycle_interpolator"> <rotate android:fromDegrees="0" android:toDegrees="360" android:pivotX="50%" android:pivotY="50%" android:duration="5000" /> </set> To Rotate animation in Anti Clockwise, we need to set android:fromDegrees and android:toDegrees property values and these will define a rotation angles like as shown below. <?xml version="1.0" encoding="utf-8"?> <set xmlns:android="http://schemas.android.com/apk/res/android" android:in terpolator="@android:anim/cycle_interpolator"> <rotate android:fromDegrees="360" android:toDegrees="0" android:pivotX="50%" android:pivotY="50%" android:duration="5000" /> </set> To know more about Rotate animations check this, Android Rotate Clockwise / Anti Clockwise Animations with Examples. This is how we can use different types of animations in android applications based on our requirements.
  • 70. Android SQLite Database with Examples In android, we have different storage options such as shared preferences, internal storage, external storage, SQLite storage, etc. to store and retrieve the application data based on our requirements. In previous chapters, we learned how to use shared preferences, internal storage, external storage and now we will see how to use the SQLite Database option to store structured data in a private database. SQLite is an open-source lightweight relational database management system (RDBMS) to perform database operations, such as storing, updating, retrieving data from the database. To know more about SQLite, check this SQLite Tutorial with Examples. Generally, in our android applications Shared Preferences, Internal Storage and External Storage options are useful to store and maintain a small amount of data. In case, if we want to deal with large amounts of data, then SQLite database is the preferable option to store and maintain the data in a structured format. By default, Android comes with built-in SQLite Database support so we don’t need to do any configurations. Just like we save the files on the device’s internal storage, Android stores our database in a private disk space that’s associated with our application and the data is secure, because by default this area is not accessible to other applications. The package android.database.sqlite contains all the required APIs to use an SQLite database in our android applications. Now we will see how to create a database and required tables in SQLite and perform CRUD (insert, update, delete and select) operations in android applications. Create Database and Tables using SQLite Helper In android, by using SQLiteOpenHelper class we can easily create the required database and tables for our application. To use SQLiteOpenHelper, we need to create a subclass that overrides the onCreate() and onUpgrade() call-back methods. Following is the code snippet of creating the database and tables using the SQLiteOpenHelper class in our android application. public class DbHandler extends SQLiteOpenHelper { private static final int DB_VERSION = 1; private static final String DB_NAME = "usersdb"; private static final String TABLE_Users = "userdetails"; private static final String KEY_ID = "id"; private static final String KEY_NAME = "name"; private static final String KEY_LOC = "location"; private static final String KEY_DESG = "designation"; public DbHandler(Context context){ super(context,DB_NAME, null, DB_VERSION);
  • 71. } @Override public void onCreate(SQLiteDatabase db){ String CREATE_TABLE = "CREATE TABLE " + TABLE_Users + "(" + KEY_ID + " INTEGER PRIMARY KEY AUTOINCREMENT," + KEY_NAM E + " TEXT," + KEY_LOC + " TEXT," + KEY_DESG + " TEXT"+ ")"; db.execSQL(CREATE_TABLE); } @Override public void onUpgrade(SQLiteDatabase db, int oldVersion, int newVersio n){ // Drop older table if exist db.execSQL("DROP TABLE IF EXISTS " + TABLE_Users); // Create tables again onCreate(db); } } If you observe above code snippet, we are creating database “usersdb” and table “userdetails” using SQLiteOpenHelper class by overriding onCreate and onUpgrade methods. Method Description onCreate() This method is called only once throughout the application after the database is created and t table creation statements can be written in this method. onUpgrade() This method is called whenever there is an updation in the database like modifying the tab structure, adding constraints to the database, etc. Now we will see how to perform CRUD (create, read, delete and update) operations in android applications. Insert Data into SQLite Database In android, we can insert data into the SQLite database by passing ContentValues to insert() method. Following is the code snippet to insert data into the SQLite database using the insert() method in the android application. //Get the Data Repository in write mode SQLiteDatabase db = this.getWritableDatabase(); //Create a new map of values, where column names are the keys ContentValues cValues = new ContentValues(); cValues.put(KEY_NAME, name); cValues.put(KEY_LOC, location); cValues.put(KEY_DESG, designation);
  • 72. // Insert the new row, returning the primary key value of the new row long newRowId = db.insert(TABLE_Users,null, cValues); If you observe above code, we are getting the data repository in write mode and adding required values to columns and inserting into database. Read the Data from SQLite Database In android, we can read the data from the SQLite database using the query() method in android applications. Following is the code snippet to read the data from the SQLite Database using a query() method in the android application. //Get the Data Repository in write mode SQLiteDatabase db = this.getWritableDatabase(); Cursor cursor = db.query(TABLE_Users, new String[]{KEY_NAME, KEY_LOC, KEY_ DESG}, KEY_ID+ "=?",new String[]{String.valueOf(userid)},null, null, null , null); If you observe above code, we are getting the details from required table using query() method based on our requirements. Update Data in SQLite Database In android, we can update the data in the SQLite database using an update() method in android applications. Following is the code snippet to update the data in the SQLite database using an update() method in the android application. //Get the Data Repository in write mode SQLiteDatabase db = this.getWritableDatabase(); ContentValues cVals = new ContentValues(); cVals.put(KEY_LOC, location); cVals.put(KEY_DESG, designation); int count = db.update(TABLE_Users, cVals, KEY_ID+" = ?",new String[]{Strin g.valueOf(id)}); If you observe above code, we are updating the details using update() method based on our requirements. Delete Data from SQLite Database In android, we can delete data from the SQLite database using the delete() method in android applications. Following is the code snippet to delete the data from the SQLite database using the delete() method in the android application.