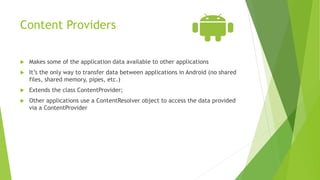
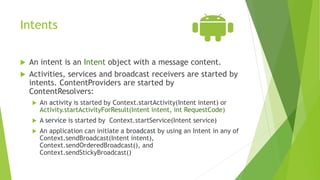
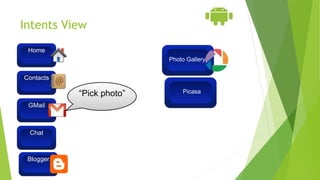
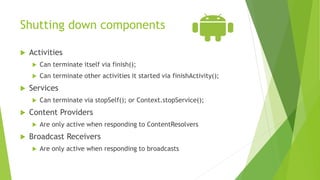
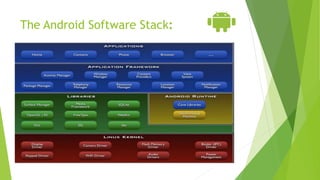
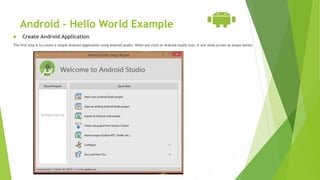
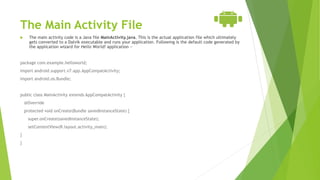
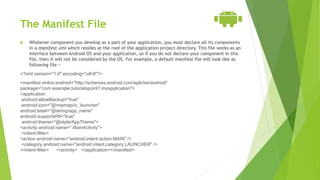
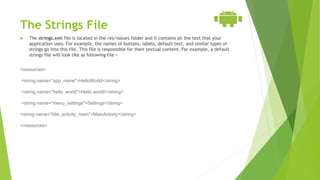
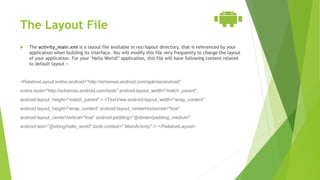
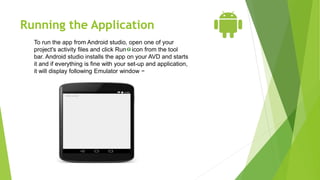
SVN Solution PVT. LTD
Presentation On
Fundamentals of Android Development
Presented by
Prajakta Dharmpurikar
Basics Of Android
Development
Prajakta Dharmpurikar
Jr.Software/Weband
Androiddeveloper
What is Android?
 Android is an open source operating system, created by Google specifically for
use on mobile devices (cell phones and tablets)
 Linux based (2.6 kernel)
 Can be programmed in C/C++ but most app development is done in Java (Java
access to C Libraries via JNI (Java Native Interface))
 Supports Bluetooth, Wi-Fi, and 3G and 4G networking
 Software Stack for Mobile Devices
 Open Source Project
 Open Handset Alliance
Android Introduction
 Concepts:
 activity,
 service,
 broadcast receiver,
 content provider,
 intent,
 AndroidManifest
Application Components
 Activities – visual user interface focused on a single thing a user can do
 Services – no visual interface – they run in the background
 Broadcast Receivers – receive and react to broadcast announcements
 Content Providers – allow data exchange between applications
Activities
 Basic component of most applications
 Most applications have several activities that start each other as needed
 Each is implemented as a subclass of the base Activity class
 Each activity has a default window to draw in (although it may prompt for
dialogs or notifications)
 The content of the window is a view or a group of views (derived from View
or ViewGroup)
 Example of views: buttons, text fields, scroll bars, menu items, check boxes,
etc.
 View(Group) made visible via Activity.setContentView() method.
Services
 Does not have a visual interface
 Runs in the background indefinitely
 Examples
 Network Downloads
 Playing Music
 TCP/UDP Server
 You can bind to a an existing service and control its operation
Broadcast Receivers
 Receive and react to broadcast announcements
 Extend the class BroadcastReceiver
 Examples of broadcasts:
 Low battery, power connected, shutdown, timezone changed, etc.
 Other applications can initiate broadcasts
Content Providers
 Makes some of the application data available to other applications
 It’s the only way to transfer data between applications in Android (no shared
files, shared memory, pipes, etc.)
 Extends the class ContentProvider;
 Other applications use a ContentResolver object to access the data provided
via a ContentProvider
Intents
 An intent is an Intent object with a message content.
 Activities, services and broadcast receivers are started by
intents. ContentProviders are started by
ContentResolvers:
 An activity is started by Context.startActivity(Intent intent) or
Activity.startActivityForResult(Intent intent, int RequestCode)
 A service is started by Context.startService(Intent service)
 An application can initiate a broadcast by using an Intent in any of
Context.sendBroadcast(Intent intent),
Context.sendOrderedBroadcast(), and
Context.sendStickyBroadcast()
Intents View
GMail
Contacts
Home
Blogger
Chat
“Pick photo”
Blogger
Photo
Gallery
Photo Gallery
Picasa
Shutting down components
 Activities
 Can terminate itself via finish();
 Can terminate other activities it started via finishActivity();
 Services
 Can terminate via stopSelf(); or Context.stopService();
 Content Providers
 Are only active when responding to ContentResolvers
 Broadcast Receivers
 Are only active when responding to broadcasts
Android Manifest
 Its main purpose in life is to declare the components to the system:
<?xml version="1.0" encoding="utf-8"?>
<manifest . . . >
<application . . . >
<activity android:name="com.example.project.FreneticActivity"
android:icon="@drawable/small_pic.png"
android:label="@string/freneticLabel"
. . . >
</activity>
. . .
</application>
</manifest>
Intent Filters
 Declare Intents handled by the current application (in the
AndroidManifest):
<?xml version="1.0" encoding="utf-8"?>
<manifest . . . >
<application . . . >
<activity android:name="com.example.project.FreneticActivity"
android:icon="@drawable/small_pic.png“
android:label="@string/freneticLabel"
. . . >
<intent-filter . . . >
<action android:name="android.intent.action.MAIN" />
<category android:name="android.intent.category.LAUNCHER" />
</intent-filter>
<intent-filter . . . >
<action android:name="com.example.project.BOUNCE" />
<data android:mimeType="image/jpeg" />
<category android:name="android.intent.category.DEFAULT" />
</intent-filter>
</activity>
. . .
</application>
</manifest>
Shows in the
Launcher and
is the main
activity to
start
Handles JPEG
images in
some way
Android development
Java Source
Generated
Class
Java
Compiler
Android
Libraries
.dex
File
Dalvik
VMResource XML
Android Manifest
The Android Software Stack:
Android versions
 Android 1.0
 Android 1.1
 Android 1.5 Cupcake
 Android 1.6 Donut
 Android 2.0 Eclair
 Android 2.2 Froyo
 Android 2.3 Gingerbread
 Android 3.0 Honeycomb
 Android 4.0 Ice Cream Sandwich
 Android 4.1 to 4.3 Jelly Bean
 Android 4.4 KitKat
 Android 5.0 Lollipop
 Android 6.0 Marshmallow
 Android 7.0 Nougat
 Android 8.0 Oreo
Android - Hello World Example
 Create Android Application
The first step is to create a simple Android Application using Android studio. When you click on Android studio icon, it will show screen as shown below;
Continue….
You can start your application development by calling
start a new android studio project. in a new installation
frame should ask Application name, package information
and location of the project.−
Continue….
After entered application name, it going to be called select the form factors your
application runs on, here need to specify Minimum SDK, in our tutorial, I have
declared as API23: Android 6.0(Mashmallow) −
Continue….
The next level of installation should contain selecting
the activity to mobile, it specifies the default layout for
Applications.
Continue….
At the final stage it going to be open development tool to write
the application code.
Anatomy of Android Application
Before you run your app, you should be aware of a few directories and files in the Android project −
The Main Activity File
 The main activity code is a Java file MainActivity.java. This is the actual application file which ultimately
gets converted to a Dalvik executable and runs your application. Following is the default code generated by
the application wizard for Hello World! application −
package com.example.helloworld;
import android.support.v7.app.AppCompatActivity;
import android.os.Bundle;
public class MainActivity extends AppCompatActivity {
@Override
protected void onCreate(Bundle savedInstanceState) {
super.onCreate(savedInstanceState);
setContentView(R.layout.activity_main);
}
}
The Manifest File
 Whatever component you develop as a part of your application, you must declare all its components
in a manifest.xml which resides at the root of the application project directory. This file works as an
interface between Android OS and your application, so if you do not declare your component in this
file, then it will not be considered by the OS. For example, a default manifest file will look like as
following file −
<?xml version="1.0" encoding="utf-8"?>
<manifest xmlns:android="http://schemas.android.com/apk/res/android"
package="com.example.tutorialspoint7.myapplication">
<application
android:allowBackup="true"
android:icon="@mipmap/ic_launcher"
android:label="@string/app_name"
android:supportsRtl="true"
android:theme="@style/AppTheme">
<activity android:name=".MainActivity">
<intent-filter>
<action android:name="android.intent.action.MAIN" />
<category android:name="android.intent.category.LAUNCHER" />
</intent-filter> </activity> </application></manifest>
The Strings File
 The strings.xml file is located in the res/values folder and it contains all the text that your
application uses. For example, the names of buttons, labels, default text, and similar types of
strings go into this file. This file is responsible for their textual content. For example, a default
strings file will look like as following file −
<resources>
<string name="app_name">HelloWorld</string>
<string name="hello_world">Hello world!</string>
<string name="menu_settings">Settings</string>
<string name="title_activity_main">MainActivity</string>
</resources>
The Layout File
 The activity_main.xml is a layout file available in res/layout directory, that is referenced by your
application when building its interface. You will modify this file very frequently to change the layout
of your application. For your "Hello World!" application, this file will have following content related
to default layout −
<RelativeLayout xmlns:android="http://schemas.android.com/apk/res/android"
xmlns:tools="http://schemas.android.com/tools" android:layout_width="match_parent"
android:layout_height="match_parent" > <TextView android:layout_width="wrap_content"
android:layout_height="wrap_content" android:layout_centerHorizontal="true"
android:layout_centerVertical="true" android:padding="@dimen/padding_medium"
android:text="@string/hello_world" tools:context=".MainActivity" /> </RelativeLayout>
Continue……
 The TextView is an Android control used to build the GUI and it have various
attributes like android:layout_width, android:layout_height etc which are
being used to set its width and height etc.. The @string refers to the
strings.xml file located in the res/values folder. Hence, @string/hello_world
refers to the hello string defined in the strings.xml file, which is "Hello
World!".
Running the ApplicationRunning the Application
To run the app from Android studio, open one of your
project's activity files and click Run icon from the tool
bar. Android studio installs the app on your AVD and starts
it and if everything is fine with your set-up and application,
it will display following Emulator window −
….

Android Development Basics

  • 1.
    SVN Solution PVT.LTD Presentation On Fundamentals of Android Development Presented by Prajakta Dharmpurikar
  • 2.
    Basics Of Android Development PrajaktaDharmpurikar Jr.Software/Weband Androiddeveloper
  • 3.
    What is Android? Android is an open source operating system, created by Google specifically for use on mobile devices (cell phones and tablets)  Linux based (2.6 kernel)  Can be programmed in C/C++ but most app development is done in Java (Java access to C Libraries via JNI (Java Native Interface))  Supports Bluetooth, Wi-Fi, and 3G and 4G networking  Software Stack for Mobile Devices  Open Source Project  Open Handset Alliance
  • 4.
    Android Introduction  Concepts: activity,  service,  broadcast receiver,  content provider,  intent,  AndroidManifest
  • 5.
    Application Components  Activities– visual user interface focused on a single thing a user can do  Services – no visual interface – they run in the background  Broadcast Receivers – receive and react to broadcast announcements  Content Providers – allow data exchange between applications
  • 6.
    Activities  Basic componentof most applications  Most applications have several activities that start each other as needed  Each is implemented as a subclass of the base Activity class  Each activity has a default window to draw in (although it may prompt for dialogs or notifications)  The content of the window is a view or a group of views (derived from View or ViewGroup)  Example of views: buttons, text fields, scroll bars, menu items, check boxes, etc.  View(Group) made visible via Activity.setContentView() method.
  • 7.
    Services  Does nothave a visual interface  Runs in the background indefinitely  Examples  Network Downloads  Playing Music  TCP/UDP Server  You can bind to a an existing service and control its operation
  • 8.
    Broadcast Receivers  Receiveand react to broadcast announcements  Extend the class BroadcastReceiver  Examples of broadcasts:  Low battery, power connected, shutdown, timezone changed, etc.  Other applications can initiate broadcasts
  • 9.
    Content Providers  Makessome of the application data available to other applications  It’s the only way to transfer data between applications in Android (no shared files, shared memory, pipes, etc.)  Extends the class ContentProvider;  Other applications use a ContentResolver object to access the data provided via a ContentProvider
  • 10.
    Intents  An intentis an Intent object with a message content.  Activities, services and broadcast receivers are started by intents. ContentProviders are started by ContentResolvers:  An activity is started by Context.startActivity(Intent intent) or Activity.startActivityForResult(Intent intent, int RequestCode)  A service is started by Context.startService(Intent service)  An application can initiate a broadcast by using an Intent in any of Context.sendBroadcast(Intent intent), Context.sendOrderedBroadcast(), and Context.sendStickyBroadcast()
  • 11.
  • 12.
    Shutting down components Activities  Can terminate itself via finish();  Can terminate other activities it started via finishActivity();  Services  Can terminate via stopSelf(); or Context.stopService();  Content Providers  Are only active when responding to ContentResolvers  Broadcast Receivers  Are only active when responding to broadcasts
  • 13.
    Android Manifest  Itsmain purpose in life is to declare the components to the system: <?xml version="1.0" encoding="utf-8"?> <manifest . . . > <application . . . > <activity android:name="com.example.project.FreneticActivity" android:icon="@drawable/small_pic.png" android:label="@string/freneticLabel" . . . > </activity> . . . </application> </manifest>
  • 14.
    Intent Filters  DeclareIntents handled by the current application (in the AndroidManifest): <?xml version="1.0" encoding="utf-8"?> <manifest . . . > <application . . . > <activity android:name="com.example.project.FreneticActivity" android:icon="@drawable/small_pic.png“ android:label="@string/freneticLabel" . . . > <intent-filter . . . > <action android:name="android.intent.action.MAIN" /> <category android:name="android.intent.category.LAUNCHER" /> </intent-filter> <intent-filter . . . > <action android:name="com.example.project.BOUNCE" /> <data android:mimeType="image/jpeg" /> <category android:name="android.intent.category.DEFAULT" /> </intent-filter> </activity> . . . </application> </manifest> Shows in the Launcher and is the main activity to start Handles JPEG images in some way
  • 15.
  • 16.
  • 17.
    Android versions  Android1.0  Android 1.1  Android 1.5 Cupcake  Android 1.6 Donut  Android 2.0 Eclair  Android 2.2 Froyo  Android 2.3 Gingerbread  Android 3.0 Honeycomb  Android 4.0 Ice Cream Sandwich  Android 4.1 to 4.3 Jelly Bean  Android 4.4 KitKat  Android 5.0 Lollipop  Android 6.0 Marshmallow  Android 7.0 Nougat  Android 8.0 Oreo
  • 18.
    Android - HelloWorld Example  Create Android Application The first step is to create a simple Android Application using Android studio. When you click on Android studio icon, it will show screen as shown below;
  • 19.
    Continue…. You can startyour application development by calling start a new android studio project. in a new installation frame should ask Application name, package information and location of the project.−
  • 20.
    Continue…. After entered applicationname, it going to be called select the form factors your application runs on, here need to specify Minimum SDK, in our tutorial, I have declared as API23: Android 6.0(Mashmallow) −
  • 21.
    Continue…. The next levelof installation should contain selecting the activity to mobile, it specifies the default layout for Applications.
  • 22.
    Continue…. At the finalstage it going to be open development tool to write the application code.
  • 23.
    Anatomy of AndroidApplication Before you run your app, you should be aware of a few directories and files in the Android project −
  • 24.
    The Main ActivityFile  The main activity code is a Java file MainActivity.java. This is the actual application file which ultimately gets converted to a Dalvik executable and runs your application. Following is the default code generated by the application wizard for Hello World! application − package com.example.helloworld; import android.support.v7.app.AppCompatActivity; import android.os.Bundle; public class MainActivity extends AppCompatActivity { @Override protected void onCreate(Bundle savedInstanceState) { super.onCreate(savedInstanceState); setContentView(R.layout.activity_main); } }
  • 25.
    The Manifest File Whatever component you develop as a part of your application, you must declare all its components in a manifest.xml which resides at the root of the application project directory. This file works as an interface between Android OS and your application, so if you do not declare your component in this file, then it will not be considered by the OS. For example, a default manifest file will look like as following file − <?xml version="1.0" encoding="utf-8"?> <manifest xmlns:android="http://schemas.android.com/apk/res/android" package="com.example.tutorialspoint7.myapplication"> <application android:allowBackup="true" android:icon="@mipmap/ic_launcher" android:label="@string/app_name" android:supportsRtl="true" android:theme="@style/AppTheme"> <activity android:name=".MainActivity"> <intent-filter> <action android:name="android.intent.action.MAIN" /> <category android:name="android.intent.category.LAUNCHER" /> </intent-filter> </activity> </application></manifest>
  • 26.
    The Strings File The strings.xml file is located in the res/values folder and it contains all the text that your application uses. For example, the names of buttons, labels, default text, and similar types of strings go into this file. This file is responsible for their textual content. For example, a default strings file will look like as following file − <resources> <string name="app_name">HelloWorld</string> <string name="hello_world">Hello world!</string> <string name="menu_settings">Settings</string> <string name="title_activity_main">MainActivity</string> </resources>
  • 27.
    The Layout File The activity_main.xml is a layout file available in res/layout directory, that is referenced by your application when building its interface. You will modify this file very frequently to change the layout of your application. For your "Hello World!" application, this file will have following content related to default layout − <RelativeLayout xmlns:android="http://schemas.android.com/apk/res/android" xmlns:tools="http://schemas.android.com/tools" android:layout_width="match_parent" android:layout_height="match_parent" > <TextView android:layout_width="wrap_content" android:layout_height="wrap_content" android:layout_centerHorizontal="true" android:layout_centerVertical="true" android:padding="@dimen/padding_medium" android:text="@string/hello_world" tools:context=".MainActivity" /> </RelativeLayout>
  • 28.
    Continue……  The TextViewis an Android control used to build the GUI and it have various attributes like android:layout_width, android:layout_height etc which are being used to set its width and height etc.. The @string refers to the strings.xml file located in the res/values folder. Hence, @string/hello_world refers to the hello string defined in the strings.xml file, which is "Hello World!".
  • 29.
    Running the ApplicationRunningthe Application To run the app from Android studio, open one of your project's activity files and click Run icon from the tool bar. Android studio installs the app on your AVD and starts it and if everything is fine with your set-up and application, it will display following Emulator window −
  • 30.