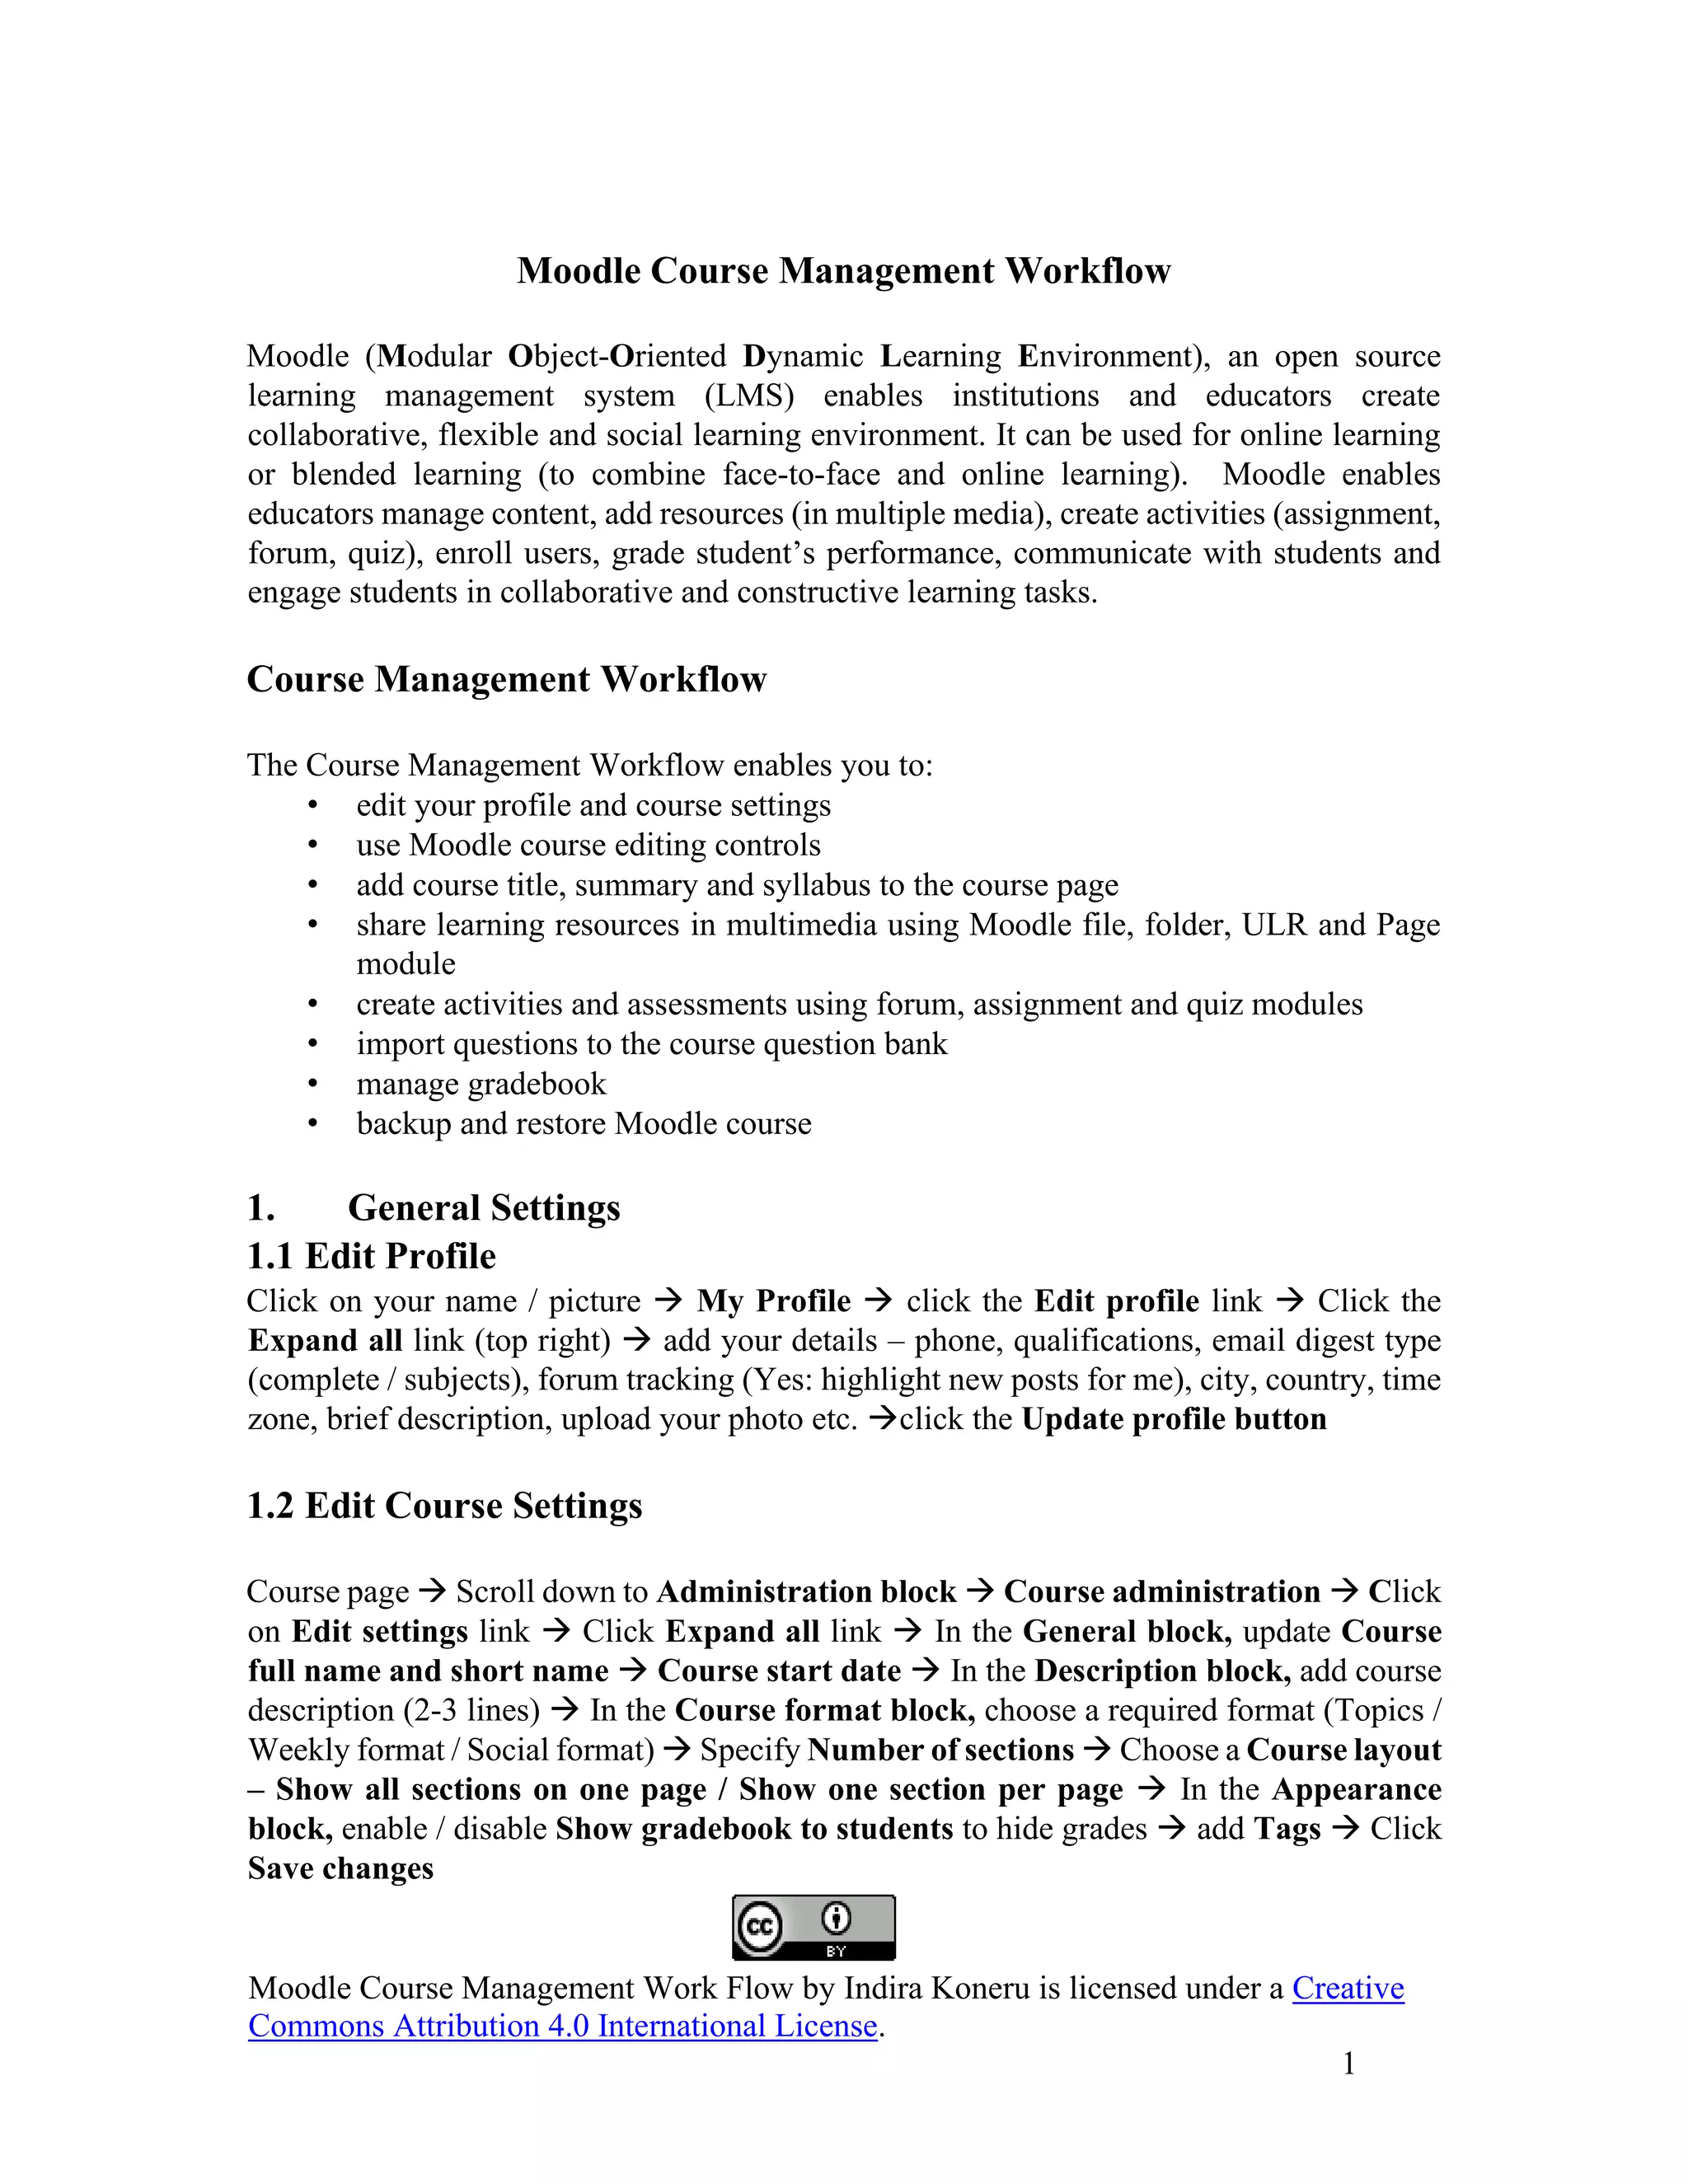
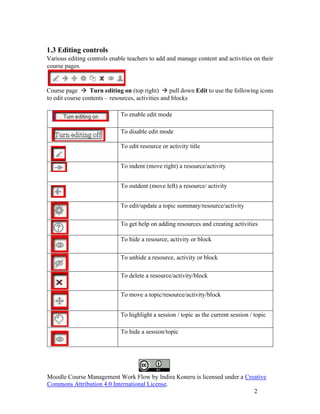
Moodle is an open-source learning management system that allows educators to create online courses. It provides tools for adding course content, creating assignments and assessments, and communicating with students. The document outlines Moodle's course management workflow, including how to edit course and user profiles, add files, folders, URLs and pages as resources, create forums, assignments and quizzes as activities, and import questions into the question bank.
How to Embed A Librarian, Library Resources & Service Components in Moodle!Dr. Indira Koneru
Exploring ways and means for embedding a librarian, library resources, instructional services and information literacy tutorials in Moodle Site and Courses.
How to Embed A Librarian, Library Resources & Service Components in Moodle!Dr. Indira Koneru
Exploring ways and means for embedding a librarian, library resources, instructional services and information literacy tutorials in Moodle Site and Courses.
Not my presentation but merely posting it publicly to embed at Moodle.org.
Link http://download.moodle.org/download.php/docs/en/presentation_1.9_en.ppt
Forum - The Heart of Moodle (iMoot presentation)Tomaz Lasic
Backbone & live slides (examples) from a presentation titled Forum -the heart of Moodle at the 2010 iMoot by Tomaz Lasic
Details & supporting docs at
http://tomazlasic.net/2010/02/forum-the-heart-of-moodle-imoot-reflection-1
E tool in yoga ,a module for teaching and learningsatyant khatyian
E tool in yoga ,a module for teaching and learning
Self-declarations-The content is exclusively meant for academic purposes for enhancing teaching and learning. Any other use for economic/commercial purpose is strictly prohibited. The users of the content shall not distribute, disseminate or share it with anyone else and its use is restricted to advancement of individual knowledge. The information provided in this e-content is authentic and best as per knowledge
Moodle est une plate-forme d'apprentissage en ligne (en anglais : Learning Management System ou LMS) sous licence libre servant à créer des communautés s'instruisant autour de contenus et d'activités pédagogiques. Le mot « Moodle » est l'abréviation de Modular Object-Oriented Dynamic Learning Environment : « Environnement orienté objet d'apprentissage dynamique modulaire »
Training presentation for senior management and faculty members teaching online.
Although customized to BellsTech, Theme structure is same across MOODLE and Microsoft 365 and can be used by educators in other institutions.
Moodle Minutes #4 - Session four of our Moodle Minutes. A series of practical demonstrations on how to apply for and use the RI Moodle Delivery Platform.
Session Topics include:
o Adding files and images to Moodle
How to Make a Field invisible in Odoo 17Celine George
It is possible to hide or invisible some fields in odoo. Commonly using “invisible” attribute in the field definition to invisible the fields. This slide will show how to make a field invisible in odoo 17.
Palestine last event orientationfvgnh .pptxRaedMohamed3
An EFL lesson about the current events in Palestine. It is intended to be for intermediate students who wish to increase their listening skills through a short lesson in power point.
The Roman Empire A Historical Colossus.pdfkaushalkr1407
The Roman Empire, a vast and enduring power, stands as one of history's most remarkable civilizations, leaving an indelible imprint on the world. It emerged from the Roman Republic, transitioning into an imperial powerhouse under the leadership of Augustus Caesar in 27 BCE. This transformation marked the beginning of an era defined by unprecedented territorial expansion, architectural marvels, and profound cultural influence.
The empire's roots lie in the city of Rome, founded, according to legend, by Romulus in 753 BCE. Over centuries, Rome evolved from a small settlement to a formidable republic, characterized by a complex political system with elected officials and checks on power. However, internal strife, class conflicts, and military ambitions paved the way for the end of the Republic. Julius Caesar’s dictatorship and subsequent assassination in 44 BCE created a power vacuum, leading to a civil war. Octavian, later Augustus, emerged victorious, heralding the Roman Empire’s birth.
Under Augustus, the empire experienced the Pax Romana, a 200-year period of relative peace and stability. Augustus reformed the military, established efficient administrative systems, and initiated grand construction projects. The empire's borders expanded, encompassing territories from Britain to Egypt and from Spain to the Euphrates. Roman legions, renowned for their discipline and engineering prowess, secured and maintained these vast territories, building roads, fortifications, and cities that facilitated control and integration.
The Roman Empire’s society was hierarchical, with a rigid class system. At the top were the patricians, wealthy elites who held significant political power. Below them were the plebeians, free citizens with limited political influence, and the vast numbers of slaves who formed the backbone of the economy. The family unit was central, governed by the paterfamilias, the male head who held absolute authority.
Culturally, the Romans were eclectic, absorbing and adapting elements from the civilizations they encountered, particularly the Greeks. Roman art, literature, and philosophy reflected this synthesis, creating a rich cultural tapestry. Latin, the Roman language, became the lingua franca of the Western world, influencing numerous modern languages.
Roman architecture and engineering achievements were monumental. They perfected the arch, vault, and dome, constructing enduring structures like the Colosseum, Pantheon, and aqueducts. These engineering marvels not only showcased Roman ingenuity but also served practical purposes, from public entertainment to water supply.
Ethnobotany and Ethnopharmacology:
Ethnobotany in herbal drug evaluation,
Impact of Ethnobotany in traditional medicine,
New development in herbals,
Bio-prospecting tools for drug discovery,
Role of Ethnopharmacology in drug evaluation,
Reverse Pharmacology.
Read| The latest issue of The Challenger is here! We are thrilled to announce that our school paper has qualified for the NATIONAL SCHOOLS PRESS CONFERENCE (NSPC) 2024. Thank you for your unwavering support and trust. Dive into the stories that made us stand out!
Students, digital devices and success - Andreas Schleicher - 27 May 2024..pptxEduSkills OECD
Andreas Schleicher presents at the OECD webinar ‘Digital devices in schools: detrimental distraction or secret to success?’ on 27 May 2024. The presentation was based on findings from PISA 2022 results and the webinar helped launch the PISA in Focus ‘Managing screen time: How to protect and equip students against distraction’ https://www.oecd-ilibrary.org/education/managing-screen-time_7c225af4-en and the OECD Education Policy Perspective ‘Students, digital devices and success’ can be found here - https://oe.cd/il/5yV
How to Create Map Views in the Odoo 17 ERPCeline George
The map views are useful for providing a geographical representation of data. They allow users to visualize and analyze the data in a more intuitive manner.
2024.06.01 Introducing a competency framework for languag learning materials ...Sandy Millin
http://sandymillin.wordpress.com/iateflwebinar2024
Published classroom materials form the basis of syllabuses, drive teacher professional development, and have a potentially huge influence on learners, teachers and education systems. All teachers also create their own materials, whether a few sentences on a blackboard, a highly-structured fully-realised online course, or anything in between. Despite this, the knowledge and skills needed to create effective language learning materials are rarely part of teacher training, and are mostly learnt by trial and error.
Knowledge and skills frameworks, generally called competency frameworks, for ELT teachers, trainers and managers have existed for a few years now. However, until I created one for my MA dissertation, there wasn’t one drawing together what we need to know and do to be able to effectively produce language learning materials.
This webinar will introduce you to my framework, highlighting the key competencies I identified from my research. It will also show how anybody involved in language teaching (any language, not just English!), teacher training, managing schools or developing language learning materials can benefit from using the framework.
This is a presentation by Dada Robert in a Your Skill Boost masterclass organised by the Excellence Foundation for South Sudan (EFSS) on Saturday, the 25th and Sunday, the 26th of May 2024.
He discussed the concept of quality improvement, emphasizing its applicability to various aspects of life, including personal, project, and program improvements. He defined quality as doing the right thing at the right time in the right way to achieve the best possible results and discussed the concept of the "gap" between what we know and what we do, and how this gap represents the areas we need to improve. He explained the scientific approach to quality improvement, which involves systematic performance analysis, testing and learning, and implementing change ideas. He also highlighted the importance of client focus and a team approach to quality improvement.
Synthetic Fiber Construction in lab .pptxPavel ( NSTU)
Synthetic fiber production is a fascinating and complex field that blends chemistry, engineering, and environmental science. By understanding these aspects, students can gain a comprehensive view of synthetic fiber production, its impact on society and the environment, and the potential for future innovations. Synthetic fibers play a crucial role in modern society, impacting various aspects of daily life, industry, and the environment. ynthetic fibers are integral to modern life, offering a range of benefits from cost-effectiveness and versatility to innovative applications and performance characteristics. While they pose environmental challenges, ongoing research and development aim to create more sustainable and eco-friendly alternatives. Understanding the importance of synthetic fibers helps in appreciating their role in the economy, industry, and daily life, while also emphasizing the need for sustainable practices and innovation.
Thesis Statement for students diagnonsed withADHD.ppt
Moodle course management workflow
1. Moodle Course Management Work Flow by Indira Koneru is licensed under a Creative
Commons Attribution 4.0 International License.
1
Moodle Course Management Workflow
Moodle (Modular Object-Oriented Dynamic Learning Environment), an open source
learning management system (LMS) enables institutions and educators create
collaborative, flexible and social learning environment. It can be used for online learning
or blended learning (to combine face-to-face and online learning). Moodle enables
educators manage content, add resources (in multiple media), create activities (assignment,
forum, quiz), enroll users, grade student’s performance, communicate with students and
engage students in collaborative and constructive learning tasks.
Course Management Workflow
The Course Management Workflow enables you to:
• edit your profile and course settings
• use Moodle course editing controls
• add course title, summary and syllabus to the course page
• share learning resources in multimedia using Moodle file, folder, ULR and Page
module
• create activities and assessments using forum, assignment and quiz modules
• import questions to the course question bank
• manage gradebook
• backup and restore Moodle course
1. General Settings
1.1 Edit Profile
Click on your name / picture → My Profile → click the Edit profile link → Click the
Expand all link (top right) → add your details – phone, qualifications, email digest type
(complete / subjects), forum tracking (Yes: highlight new posts for me), city, country, time
zone, brief description, upload your photo etc. →click the Update profile button
1.2 Edit Course Settings
Course page → Scroll down to Administration block → Course administration → Click
on Edit settings link → Click Expand all link → In the General block, update Course
full name and short name → Course start date → In the Description block, add course
description (2-3 lines) → In the Course format block, choose a required format (Topics /
Weekly format / Social format) → Specify Number of sections → Choose a Course layout
– Show all sections on one page / Show one section per page → In the Appearance
block, enable / disable Show gradebook to students to hide grades → add Tags → Click
Save changes
2. Moodle Course Management Work Flow by Indira Koneru is licensed under a Creative
Commons Attribution 4.0 International License.
2
1.3 Editing controls
Various editing controls enable teachers to add and manage content and activities on their
course pages.
Course page → Turn editing on (top right) → pull down Edit to use the following icons
to edit course contents – resources, activities and blocks
To enable edit mode
To disable edit mode
To edit resource or activity title
To indent (move right) a resource/activity
To outdent (move left) a resource/ activity
To edit/update a topic summary/resource/activity
To get help on adding resources and creating activities
To hide a resource, activity or block
To unhide a resource, activity or block
To delete a resource/activity/block
To move a topic/resource/activity/block
To highlight a session / topic as the current session / topic
To hide a session/topic
3. Moodle Course Management Work Flow by Indira Koneru is licensed under a Creative
Commons Attribution 4.0 International License.
3
To duplicate a resource/activity
1.4 Content Editing Toolbar (Atto) – While adding resources or creating
activities, use the Atto toolbar to add and edit content.
Note: Enable the Mathjax or the TeX notation filters (Administration →Site administration
→ Plugins →Filters → Manage filters) to view and use equation editor.
1.5 Adding Course Title, Summary and Course Handout / Syllabus
Course page → Turn editing on →Go to Topic 0 → Edit summary (icon) → Add course
title, summary (2-3 lines), learning objectives or learning outcomes, evaluation schema,
course readings (textbooks and reference books), image/ video → Save changes
Show more
buttons
Show fewer
buttons
4. Moodle Course Management Work Flow by Indira Koneru is licensed under a Creative
Commons Attribution 4.0 International License.
4
Add an activity or resource (activity chooser → Select File → Give a Name &
Description → Click Add to upload the file using File picker → Click on Upload a file
link (in the file picker) → Browse & choose the file → Click on Upload this file button
→ Click on Save and return to the course
1.6 Switching to Student Role
Course page → Scroll down to Administration block → expand Switch role to … →
Click on Student
2 Adding Resources
2.1 Adding a File
Course page → Turn editing on → Add an activity or resource (activity chooser) →
Select File → Click the Expand all link (top right) → File name & Description → Click
Add tab to upload the file using File picker → Click on Upload a file link (in the file
picker) → Browse & choose the file →Click on Upload this file button or drag and drop
file from your computer → Click on Save and return to the course
OR
Dag and drop a file from your desktop on to the course page
2.2 Adding a Folder
The folder module enables a teacher to display a number of related files inside a single
folder, reducing scrolling on the course page. A zipped folder may be uploaded and
unzipped for display, or an empty folder created and files uploaded into it.
Course page → Turn editing on → Add an activity or resource (activity chooser) →
Choose Folder → Add → Click the Expand all link (top right) → Give a Name &
Description → Click on Create a folder → → Name the folder → Click
on Create a folder → Click on the folder created → Drag and drop files OR Click on
Add to add files using the File picker → Click on Save and return to the
course
OR
Zip and drag and drop a folder to on to the course page → Check Unzip files and create
folder → Click the Upload button to add a folder
2.3 Adding a URL
Course page → Turn editing on → Add an activity or resource (activity chooser →
5. Moodle Course Management Work Flow by Indira Koneru is licensed under a Creative
Commons Attribution 4.0 International License.
5
Select URL → Add → Click the Expand all link (top right) → Give the Name &
Description External link (Web resource) → Copy & paste the URL → Click on Save
and return to the course
2.4 Adding a Page
A page can display text, images, sound, video, and web links.
Course page → Turn editing on → Add an activity or resource (activity chooser) →
Select Page → Add → Click the Expand all link (top right) → Add Content (Text, image,
video) → Click on Save and return to the course
To add an image, click on the Insert image icon (in Atto tool bar) → Click on
Browse repositories → Browse & choose the file → Change Author and License Type
→ Click on Upload a file (in the File picker) → Browse and choose a file → Upload this
file →Describe the image → Change Size dimensions and Alignment → Give a name to
the image (General tab) → Click on Insert → Click on Save and return to the course
To embed a video, click on the Insert Moodle Media icon (in Atto tool bar) →
Click on Browse repositories → Browse & choose the file → Change Author and
License Type → Click on Upload this file button → Insert media → Click on Save and
return to the course
OR
Click on YouTube videos (in the File picker) → Search for (sort by relevance, date
published, rating, view count) & choose a YouTube video to be embedded → Click on
Select this file button → Insert media button → Click on Save and display
3 Creating Activities
3.1 Assignment
Course page → Turn editing on → Add an activity or resource (activity chooser) →
Choose Assignment → Add → Click the Expand all link (top right) → In the General
block, give Assignment name & Description (instructions to students) → Additional
files – upload answer template, if required (Download links for the files will then be
displayed on the assignment page under the description) → Under Availability block,
Enable and specify the dates from, due date, cut-off date (If set, the assignment will not
accept submissions after this date) and time → Under Submission types, check File
submissions (for Online text, enable Word limit – this is the maximum number of words
that each student will be allowed to submit – alerts students about word limit and asks to
review and resubmit) → Specify Maximum number of uploaded files and Maximum file
submission size →Under Feedback types, choose Feedback comments (leave feedback
comments for each submission) / Feedback files (to upload files with feedback when
6. Moodle Course Management Work Flow by Indira Koneru is licensed under a Creative
Commons Attribution 4.0 International License.
6
marking the assignments) and Offline grading worksheet (to download and upload a
worksheet with student grades when marking the assignments) → Set Comment inline to
Yes comment directly on the text which a student has submitted as an online text type
assignment (using a different colour, perhaps) → Under Submission settings, enable
Require students click submit button (students will have to click a Submit button to
declare their submission as final. This allows students to keep a draft version of the
submission on the system) → enable Require students accept the submission statement
(students accept submissions are his / her original work) → Under Notifications, enable /
disable Notify graders about submissions, Notify graders about late submissions and
Notify students → Under Grade block, select Type – Point → specify Maximum points
and Grading method – Simple direct grading → Grade to pass – specify minimum (pass
grades are highlighted in green and fail grades in red) → Set Use marking workflow to
Yes to go through a series of workflow stages before being released to students – Not
marked (the marker has not yet started); In marking (the marker has started but not yet
finished); Marking completed (the marker has finished but might need to go back for
checking/corrections); In review (the marking is now with the teacher in charge for quality
checking); Ready for release (the teacher in charge is satisfied with the marking but wait
before giving students access to the marking); Released (the student can access the
grades/feedback) → Enable Use marking allocation to allocate markers to particular
students → Click on Save and return to the course
3.1.1 Grading Assignment
Course page → Click the assignment created and to be evaluated → View/grade all
submissions → Scroll down to Filter → Requires grading →Workflow filter – Not
marked → Check Quick grading → Click on the document submitted to download →
Click the Grade icon → grade, set marking workflow and provide feedback → enable
Notify students → Save changes
OR
Choose Download all submissions from Grade action dropdown → Check Quick
grading to assign grades directly in the submissions table
OR
From the Grade action dropdown, click the Download all submissions and Download
grading worksheet → Open and save the downloaded worksheet as .csv file → Add
Grades and Feedback (optional) → Click the Upload grading worksheet in the Grade
action dropdown → Check Allow updating records that have been modified more
recently in Moodle than in the spreadsheet → Upload grading worksheet → Confirm →
Continue
3.2 Creating a Forum
Course page → Turn editing on → Add an activity or resource (activity chooser) →
Select Forum → Add → Click the Expand all link (top right) → In the General block,
7. Moodle Course Management Work Flow by Indira Koneru is licensed under a Creative
Commons Attribution 4.0 International License.
7
give a Name & Description (instructions for participation) → Choose a Forum type – A
single simple discussion (A single discussion topic which everyone can reply to) / Each
person posts one discussion (Each student can post exactly one new discussion topic,
which everyone can then reply to) / Q and A forum (Students must first post their
perspectives before viewing other students’ posts) / Standard forum for general use (An
open forum where anyone can start a new discussion at any time) → In the Attachment
and word count block, specify Maximum attachment size & number of attachments
(1) and enable / disable Display word count → In the Subscription and tracking block,
set the Subscription mode to Forced (Everyone is subscribed and cannot unsubscribe)
→Set Read tracking to Forced (students can track read and unread messages in the forum
and in discussions) → In the Ratings block, choose Aggregate type (Optional) and Scale
(grade) Type – Point to rate student’s participation → Specify Maximum points &
Grade to pass (under Grade area) → Specify dates to Restrict ratings → Click on Save
and return to the course
3.3 Creating Question Bank and Quiz
3.3.1 Creating Question Bank Categories
Expand Question bank link in the Administration block → Categories → Choose the
Parent category (Default for your course) – into which the new category will be placed /
Top (means that this category is not contained in any other category) → Give a Name to
the category and category info (optional) → click on Add category → Repeat the steps for
creating the required number of categories and subcategories.
3.3.2 Importing Questions to Question Bank
Moodle enables us import questions in a variety of formats, namely, GIFT, Aiken, Moodle
XML. Aiken is the simplest format to import MCQs.
3.3.2.1 Aiken Format - Importing Multiple Choice Questions
This is a simple format for importing multiple choice questions from a text file.
• The question must be all on one line. Each answer must start with a single
uppercase letter, followed by a period ‘.’, then one character space.
• The answer line must immediately follow, starting with “ANSWER: ” (NOTE the
space after the colon) and then giving the appropriate letter.
NOTE: The answer letters (A, B, C etc.) and the word “ANSWER” must be in uppercase
as shown, otherwise the import will fail.
Open a notepad → Type your question and answers as shown below:
What is the financial goal of any firm?
8. Moodle Course Management Work Flow by Indira Koneru is licensed under a Creative
Commons Attribution 4.0 International License.
8
A. maximise the wealth
B. maximise the profits
C. maximise the sales
D. minimise expenses
ANSWER: A
Which of the following methods of issuing additional shares does not result in an increase
in the net worth of the company?
A. Right issue
B. Bonus issue
C. Public issue
D. Private placement
ANSWER: B
Save the file as a .txt file and change encoding to UTF-8 and import (upload) to Question
bank.
3.3.2.2 Importing Questions into Question Bank
Course Page → Scroll down to Question Bank in the Administration Block → Expand
and click on Import link → Click the Expand all link (top right) → In the File Format
section choose Aiken format → In the General section, choose a category (you have
created) to import questions → In the Import questions from file section, click Choose a
File / Drag and drop the file → In the File Picker, click on Upload a file →Browse and
choose the Aiken file saved as .txt → Click on Upload this file button → Click on Import
→ Click on Continue to view the questions imported
3.3.3 Creating a Quiz
Course page → Turn editing on → Add an activity or resource (activity chooser) →
Select Quiz →Add → Click the Expand all link (top right) → In the General block, give
a Name (specific to the course topic) & Description (instructions to students) – you can
also embed a video to be watched before answering quiz questions → In the Timing block,
check Enable and specify the date and time to open and close the quiz → Set Time limit
(to display countdown timer to students in the quiz navigation block) → Set When time
expires to Open attempts are submitted automatically / There is a grace period when
open attempts can be submitted, but no more questions answered (if selected, specify the
Submission grace period in seconds, minutes, hours, days) → In the Grade block, set
Grade to pass → the Attempts allowed to 1 → In the Layout block, Specify the number
of questions per page (to insert page break) or Never, all questions on one page → set
Question order as Shuffled randomly → In the Question behavior block, enable Shuffle
within questions (applies to multiple choice and matching questions) → choose Deferred
9. Moodle Course Management Work Flow by Indira Koneru is licensed under a Creative
Commons Attribution 4.0 International License.
9
feedback (students will see feedback only after submitting the quiz) / immediate feedback
→ choose preferred Review option (what information students can see when they review
a quiz attempt) - Immediately after the attempt and After the quiz is closed – The
attempt, Whether correct, Marks, Right answer → Overall feedback with grade
boundaries (optional) Click on Save and display → Click on Edit quiz to add questions
→ Add Maximum grade → Enable Shuffle to shuffle order of the questions → Save
3.3.3.1 Adding Questions to the Quiz from Question Bank
Click on the quiz created → Edit quiz → Pull down the Add link and choose from
question bank → Select the category from which you wish to add questions to the quiz →
Choose questions to be added → Click on Add selected questions to the Quiz → Change
Grade and click on Save
3.3.4 Randomizing Quiz Questions
A student gets different questions each time they attempt the quiz and different students
can get different questions. When a random question is added, it results in a
randomlychosen question from the category being inserted into the quiz. This means that
different students are likely to get a different selection of questions, and when a quiz allows
multiple attempts then each attempt is likely to contain a new selection of questions.
Adding Random Questions to a Quiz
Click on the quiz created → Edit quiz → Pull down the Add link and choose a random
question → Choose a question bank category from which you wish to pick up questions
→ Specify the number of random questions to be picked up → Click the Add random
question button view the questions added → Change the maximum grade and Save →
Edit Maximum mark for each question, if required
3.3.5 Preview Quiz
Course page → Click the quiz created → Scroll down to Administration block → Quiz
administration → Preview
3.3.6 Adding Multiple Choice Question
Click on the quiz created → Edit quiz → Pull down the Add link and choose a new
question → Choose a Question type (Multiple choice) → Click on Add → Click the
Expand all link → Type in Question name & Question text → Give General feedback
(to give students a fully worked answer and perhaps a link to more information they can
use if they did not understand the questions) → Choose One answer only / Multiple
answers allowed → Enable Shuffle the choices→ Choose preferred numbering to
choices → Write answers in the boxes Choice 1, Choice 2, Choice 3 … & Feedback in
10. Moodle Course Management Work Flow by Indira Koneru is licensed under a Creative
Commons Attribution 4.0 International License.
10
the Feedback box → Assign Grade 100% to the correct answer / 50% to two correct
answers → Click on Save changes
3.3.7 Adding True/False Question
Click on the quiz created → Edit quiz → Pull down the Add link and choose a new
question → Choose a Question type (True/False) → Click on Next → Click the Expand
all link → Type in Question name & Question text → Choose the Correct answer (True
or False) → Give Feedback for both True and False responses → Click on Save changes
3.3.8 Essay Question
Essay Question allows a response of a few sentences or paragraphs. This must then be
graded manually.
Click on the quiz created → Edit quiz → Pull down the Add link and choose a new
question (Essay)→ Click on Next → Click the Expand all link → Type in Question name
& Question text → Set Default mark → Specify the lines in Input box size (10 lines or
15 lines) → Set Allow attachments to 1→ Create a Response template by clicking on
Show editing tools (This template appears in the student’s text editor to help them write
their response) → Click on Save changes
Grading Essay Question (Manual)
Click on Quiz (created/attempted) → Click on Results in the Administration block →
Manual Grading → grade/ grade all
3.3.9 Reviewing Attempt
Click on Quiz (created/attempted) → Click on Results and Responses in the
Administration block → Click on Review attempt (below student’s name) → Make
comment or override mark → Save
4 Grade Settings
4.1 Editing Grade Letters
Course page → In the Course Administration block, click the Grades link → Click on
Letters → Edit grade letters → Check Override site defaults to edit grade letters &
percent → Click Save changes
4.2 Exporting Grades
Course page → In the Course Administration block, click the Grades link →Click on
11. Moodle Course Management Work Flow by Indira Koneru is licensed under a Creative
Commons Attribution 4.0 International License.
11
Export → Click on Excel spreadsheet → Select the Grade items to be included →
Check Include feedback (Optional) → Select Grade export display type
(letter/percentage) → Specify Grade export decimal points → Click on Download →
Save the .csv file to import with added / updated grades
4.3 Importing Grades
Add or edit grades in the saved .csv file → Navigate to the course gradebook (course
administration→ Grades) and click Import → Choose the .csv file from file picker or drag
and drop → Click Upload grades → In the Import CSV screen, scroll down to Identify
users by and choose Map from Email address and Map to Email address In the
Grade items mapping section, map the grade item(s) in which you added or updated the
grade (Any field that is labelled as ignore will not cause changes to the gradebook) → Click
Upload grades →Click Continue to view the updated gradebook.
4.5 Editing Grade
To edit a grade, click on a cell in the Grader report to enter a grade and feedback.
4.6 Student Grade Report
Click on User report → Pull down and select All users to view grade report all users →
Choose a student from the dropdown to see his/her grade report (User report displays a
student's grades and feedback, if any, as s/he sees from the Grades area)
5 Course Backup& Restore
5.1 Backing up a course
Course page → In the Course Administration block, click the Backup link → On the
Initial Settings screen, select activities, blocks, filters, badges, question bank and other
items as required → click Next → On the Schema settings screen, select/deselect
specific items to include in backup → click Next → On the Confirmation and Review
screen, scroll down to the end of the page and click the Perform Backup button → On
the Perform backup screen, click the Continue button → On the Course bakcup area
screen, click the Download link and save your course backup file (.mbz)
5.2 Restoring Course
Go to a blank course page → In the Course Administration block, click the Restore link
→ On the Import a backup file screen, choose the backup file downloaded → Click the
Restore button → On the Confirm screen, scroll down and click the Continue button
→ On the Destination screen, select an appropriate option to choose the destination –
Restore as a new course / Merge the backup course into this course / Delete the course
contents of this course and then restore → click the Continue button → On the Settings
screen, check Include activities and uncheck 'Include blocks' and 'Include filters' → click
12. Moodle Course Management Work Flow by Indira Koneru is licensed under a Creative
Commons Attribution 4.0 International License.
12
the Next button → on the Schema screen, change the course settings - Course name and
short name, if required → click Next → On the Review screen, click the Perform Restore
button → On the Process screen, click the Continue button to complete the course
restoration process