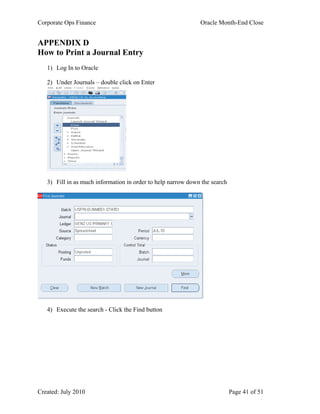
Created: July 2010 Page 1 of 51
ORACLE
Month-End Close Process
Corporate Ops Finance Oracle Month-End Close
Created: July 2010 Page 2 of 51
Table of Contents
Table of Contents _____________________________________________________________ 2
PRE-CLOSE_________________________________________________________________ 3
A) Mapping Files_________________________________________ Error! Bookmark not defined.
B) Allocation Percentages – STAT Entry ____________________________________________ 3
C) Flat Rate Facilities Allocation__________________________________________________ 10
D) Accruals ___________________________________________________________________ 13
E) Prepaid Entries _____________________________________________________________ 16
F) Miscellaneous Reclasses_______________________________________________________ 21
G) Communication ___________________________________________________________ 28
DAY 1 - CLOSE _____________________________________________________________ 28
A) Auto-Allocation _____________________________________________________________ 28
B) Verify Cost Center General Spending has Cleared ________________________________ 30
C) Communication _____________________________________________________________ 33
APPENDIX A: How to Open a Fresh Web ADI Form ______________________________ 34
APPENDIX B: How to Add an Attachment to an Unposted Journal ___________________ 36
APPENDIX C: How to Post a Journal Entry______________________________________ 39
APPENDIX D: How to Print a Journal Entry _____________________________________ 41
APPENDIX E: How to Run & Format an Account Analysis Report ___________________ 44
APPENDIX F: How to Approve a Journal Entry __________________________________ 48
APPENDIX G: How to Run a Trial Balance Report ________________________________ 49
Corporate Ops Finance Oracle Month-End Close
Created: July 2010 Page 3 of 51
PRE-CLOSE
A)Allocation Percentages – STAT Entry
a) Cost Centers Using Forecast Percentages
CC’s in Tier 1 using FCST %’s
CC’s in Tier 2 using FCST %’s
CC’s in Tier 3 using FCST %’s
NOTE: When pulling data in Essbase columns should be in the following order:
Planning
Alloc Acct Entity CC SA Proj Q3
OHPct E1000 10004120 0000 P10000990 0.00606
OHPct E1000 10004130 0000 P10000990 0.00171
1) Format allocation percentages to be 5 decimal places ONLY – click inside
cells to check. If needed turn on the following:
Tools/Options/Calculation/Click on Precision as Displayed. You will receive
a message that data will lose accuracy. Click OK. If you choose to perform
the Precision as Displayed step, make sure to turn it off after the data has
changed.
2) Verify percentages equal 1.00000 – adjust as needed
3) Copy and Paste the forecast data into the FCST % template (pink header
section) – this template has been formatted and linked via V-Lookups to
convert the forecasted account string into the Oracle account string
4) Open a “FRESH” Web ADI form (See Appendix A – Page 34)
5) Fill in the appropriate heading information
Example of how to fill in the “header” information on the Web ADI Form for %s
Balance Type Actual
Data Access Set GENZ US PRIMARY US GAAP
Ledger * List - Text GENZ US PRIMARY US GAAP
Category * List - Text US OPS
Source * List - Text Spreadsheet
Currency * List - Text STAT
Period List - Text JUL-10
Accounting Date * List - Date 7/31/2010
Batch Name Text USPRI-DUNME01-STAT01
Batch Description Text JUL-2010 Allocation Percentages
Journal Name Text USPRI-DUNME01-STAT01
Journal Description Text JUL-2010 Allocation Percentages
Reverse Journal List - Text No
Reversal Period/Date List - Text
USERID
GEN Ledger name
Corporate Ops Finance Oracle Month-End Close
Created: July 2010 Page 4 of 51
Clearing Company List - Text
NOTE: There is a Corporate Standard that needs to be followed when filling out the information
for the Batch Name and Journal Name see below:
Example: USPRI-USERID-STAT01
US – Entity 1000 and 1020
PRI – Primary ledger
USERID – User name
STAT – Type of journal entry
(Examples: STAT – %’s, REV - reversing, JL – regular journal, REC - recurring)
01 – Sequential number
6) Using the FCST % template data Copy the Oracle data (blue header section)
and Paste Values into the Web ADI form
Example of Web ADI form after the Copy & Paste step
The “flag” shown in the Upload column, all the way to the left of the Web ADI form,
indicates this is a row you want to include in the upload. You have the option to delete this
“flag” if you do not want to include specific rows in the upload. In order for the flag to reappear
if you are reusing the WEB ADI form – copy data and paste special values to bring the flags
back up.
NOTE: If you have allocations that are prepared using FCST %s and Hours %s you can use one
Web ADI Form to Upload. See notes in section “b” below on how to prepare the Hours %s.
7) Upload the Web ADI by clicking on Oracle on your Excel tool bar
Corporate Ops Finance Oracle Month-End Close
Created: July 2010 Page 5 of 51
8) Click on Upload from the dropdown list
NOTE: You will need to be logged into Oracle to perform the Upload task. If you are not logged
in – the Oracle Log In page will pop-up when you hit Upload
9) The below form will open for upload parameters
NOTE: For STAT uploads make sure to check “Upload Unbalanced Journals”
10) Once appropriate boxes are checked - Click Upload
11) A confirmation window will appear indicating the completion status of the
upload. If any errors occur, they will display in the window. Click the
“Close” Button
Corporate Ops Finance Oracle Month-End Close
Created: July 2010 Page 6 of 51
12) The Messages column all the way to the right of the Web ADI form will
automatically populate when you execute to upload the data into Oracle. If
the data in the row has no errors the Messages column will populate with a
smiley face “” to represent the data in that row is valid. If the data in the
row has an error – the Messages column will provide a description as to what
is incorrect for the given row.
13) Attach necessary backup to the entry (See Appendix B – page 36)
NOTE: ALL entries require an attachment for backup
NOTE: STAT entries do NOT require manager approval – preparer needs to hit “Approve”
14) Post the entry (See Appendix C – page 39)
15) Print the entry (See Appendix D – page 41)
b) Cost Centers Using Timesheet Hours
CC’s in Tier 3 using Timesheet Hour %’s
1) Using the Kronos Timesheet Hour Summary spreadsheet – convert the hours
into allocation percentages
NOTE: Timesheet Hour data columns should be in the following order (don’t forget Entity)
Entity CC# SA Proj Hours %
1000 4085 0000 0992 0 0.00000
1000 4085 0000 0994 0 0.00000
1000 4085 0000 0998 0 0.00000
1000 4085 0205 0005 230 0.20184
1000 4085 0205 0760 34 0.02984
1000 4085 0226 0006 358 0.31417
1000 4085 0249 0844 21 0.01843
1000 4085 0700 0011 496.5 0.43572
4085 Total 1139.5
2) Format allocation percentages to be 5 decimal places ONLY – click inside
cells to check. If needed turn on the following:
Tools/Options/Calculation/Click on Precision as Displayed. You will receive
a message that data will lose accuracy. Click OK. If you choose to perform
the Precision as Displayed step, make sure to turn it off after the data has
changed.
3) Verify percentages equal 1.00000 – adjust as needed
4) Copy and Paste the forecast data into the HOURS % template (pink header
section) – this template has been formatted and linked via V-Lookups to
convert the timesheet hour account string into the Oracle account string
5) Open a “FRESH” Web ADI form (See Appendix A – page 34)
6) Fill in the appropriate heading information (See example below)
Corporate Ops Finance Oracle Month-End Close
Created: July 2010 Page 7 of 51
Example of how to fill in the “header” information on the Web ADI Form for %s
Balance Type Actual
Data Access Set GENZ US PRIMARY US GAAP
Ledger * List - Text GENZ US PRIMARY US GAAP
Category * List - Text US OPS
Source * List - Text Spreadsheet
Currency * List - Text STAT
Period List - Text JUL-10
Accounting Date * List - Date 7/31/2010
Batch Name Text USPRI-DUNME01-STAT01
Batch Description Text JUL-2010 Allocation Percentages
Journal Name Text USPRI-DUNME01-STAT01
Journal Description Text JUL-2010 Allocation Percentages
Reverse Journal List - Text No
Reversal Period/Date List - Text
Clearing Company List - Text
NOTE: There is a Corporate Standard that needs to be followed when filling out the information
for the Batch Name and Journal Name see below:
Example: USPRI-DUNME01-STAT01
US – Entity 1000 and 1020
PRI – Primary ledger
USERID – User name
STAT – Type of journal entry
(Examples: STAT – %’s, REV - reversing, JL – regular journal, REC - recurring)
01 – Sequential number
7) Using the HOURS % template data Copy the Oracle data (blue header
section) and Paste Values into the Web ADI form
Example of Web ADI form after the Copy & Paste step
The “flag” shown in the Upload column, all the way to the left of the Web ADI form,
indicates this is a row you want to include in the upload. You have the option to delete this
“flag” if you do not want to include specific rows in the upload. In order for the flag to reappear
if you are reusing the WEB ADI form – copy data and paste special values to bring the flags
back up.
UserID
UserID
UserID
Corporate Ops Finance Oracle Month-End Close
Created: July 2010 Page 8 of 51
NOTE: If you have allocations that are prepared using FCST %s and Hours %s you can use ONE
Web ADI Form to Upload. See notes in section “a” above on how to prepare the FCST %s.
8) Upload the Web ADI by clicking on Oracle on your Excel tool bar
9) Click on Upload from the dropdown list
NOTE: You will need to be logged into Oracle to perform the Upload task. If you are not logged
in – the Oracle Log In page will pop-up when you hit Upload
10) The below form will open for Upload Parameters
Corporate Ops Finance Oracle Month-End Close
Created: July 2010 Page 9 of 51
NOTE: For STAT uploads make sure to check “Upload Unbalanced Journals”
11) Once appropriate boxes are checked - Click Upload
12) A confirmation window will appear indicating the completion status of the
upload. If any errors occur, they will display in the window. Click the
“Close” Button
13) The Messages column all the way to the right of the Web ADI form will
automatically populate when you execute to upload the data into Oracle. If
the data in the row has no errors the Messages column will populate with a
smiley face “” to represent the data in that row is valid. If the data in the
row has an error – the Messages column will provide a description as to what
is incorrect for the given row.
14) Attach necessary backup to the entry (See Appendix B – page 36)
NOTE: ALL entries require an attachment for backup
NOTE: STAT entries do NOT require manager approval – preparer needs to hit “Approve”
15) Post the entry (See Appendix C – page 39)
16) Print the entry (See Appendix D – page 41)
c) Cost Centers Using “Other” Method
CC’s in Flat Rate Allocation
NOTE: Follow the process for Timesheet %s above - substituting the “other” method of coming
up with the percentages to use for the allocation
Corporate Ops Finance Oracle Month-End Close
Created: July 2010 Page 10 of 51
NOTE: CC4080 is not part of the auto-allocation. Use the “JOURNAL” template to upload
dollar amounts for this cost center.
B)Flat Rate Facilities Allocation
Pro CC’s in Flat Rate Allocation
1) Using the JOURNAL template for a Web ADI enter the MFG Pro Account
strings into the “pink” columns on the right - this template has been formatted
and linked via V-Lookups to convert the MFG Pro account string into the
Oracle account string
2) Format the dollar column to be 2 decimal places
Enter MFG Pro Account String
Acct SA CC Proj Entity Description Jul'10
8850 0000 1258 0990 1000 Mos. Facility Alloc 259.00
8850 0000 1260 0990 1000 Mos. Facility Alloc 293.00
8850 0000 1454 0990 1000 Mos. Facility Alloc 362.00
8850 0000 1500 0990 1000 Mos. Facility Alloc 7219.00
3) Open a “FRESH” Web ADI form (See Appendix A – page 34)
4) Fill in the appropriate heading information (See example below)
Example of how to fill in the “header” information on the Web ADI Form for Amounts
Balance Type Actual
Data Access Set GENZ US PRIMARY US GAAP
Ledger * List - Text GENZ US PRIMARY US GAAP
Category * List - Text US OPS
Source * List - Text Spreadsheet
Currency * List - Text USD
Period List - Text JUL-10
Accounting Date * List - Date 7/31/2010
Batch Name Text USPRI-BARJA05-JL01
Batch Description Text JUL-2010 Facility Flat Rate Allocation
Journal Name Text USPRI-BARJA05-JL01
Journal Description Text JUL-2010 Facility Flat Rate Allocation
Reverse Journal List - Text No
Reversal Period/Date List - Text
Clearing Company List - Text
NOTE: There is a Corporate Standard that needs to be followed when filling out the information
for the Batch Name and Journal Name see below:
Example: USPRI-BARJA05-JL01
Corporate Ops Finance Oracle Month-End Close
Created: July 2010 Page 11 of 51
US – Entity 1000 and 1020
PRI – Primary ledger
USERID – User name
JL – Type of journal entry
(Examples: STAT – %’s, REV - reversing, JL – regular journal, REC - recurring)
01 – Sequential number
5) Using the JOURNAL template data Copy the Oracle data (blue header
section) and Paste Values into the Web ADI form
Example of Web ADI form after the Copy & Paste step
The “flag” shown in the Upload column, all the way to the left of the Web ADI form,
indicates this is a row you want to include in the upload. You have the option to delete this
“flag” if you do not want to include specific rows in the upload. In order for the flag to reappear
if you are reusing the WEB ADI form – copy data and paste special values to bring the flags
back up.
1) Upload the Web ADI by clicking on Oracle on your Excel tool bar
2) Click on Upload from the dropdown list
NOTE: You will need to be logged into Oracle to perform the Upload task. If you are not logged
in – the Oracle Log In page will pop-up when you hit Upload
3) The below form will open for Upload Parameters
Corporate Ops Finance Oracle Month-End Close
Created: July 2010 Page 12 of 51
4) Once appropriate boxes are checked - Click Upload
5) A confirmation window will appear indicating the completion status of the
upload. If any errors occur, they will display in the window. Click the
“Close” Button
6) The Messages column all the way to the right of the Web ADI form will
automatically populate when you execute to upload the data into Oracle. If
the data in the row has no errors the Messages column will populate with a
smiley face “” to represent the data in that row is valid. If the data in the
Corporate Ops Finance Oracle Month-End Close
Created: July 2010 Page 13 of 51
row has an error – the Messages column will provide a description as to what
is incorrect for the given row.
7) Attach necessary backup to the entry (See Appendix B – page 36)
NOTE: ALL entries require an attachment for backup
8) Once backup is attached – click on Approve. This action will send a
notification to the Approver. Once the Approver approves the entry a
notification will be sent to the Creator.
NOTE: Make sure your Oracle User Preferences are set up to receive email confirmations
NOTE: ALL journal entries REQUIRE manager approval
9) Once notification is received that the entry has been approved - Post the entry
(See Appendix C – page 39)
10) Print the entry (See Appendix D – page 41)
C)Accruals
1) The reports in MFG Pro will be used to verify if expenses have been paid
2) Using the JOURNAL template for a Web ADI enter the accruals using MFG
Pro Account strings into the “pink” columns located to the right - this
template has been formatted and linked via V-Lookups to convert the MFG
Pro account string into the Oracle account string
3) Format the dollar column to be 2 decimal places
Enter MFG Pro Account String
Acct SA CC Proj Entity Description Jul'10
8405 0000 4050 0990 1020 Accrue VTS Consultants 25000.00
4) Open a “FRESH” Web ADI form (See Appendix A – page 34)
5) Fill in the appropriate heading information (See example below)
Example of how to fill in the “header” information on the Web ADI Form for Accruals:
Balance Type Actual
Data Access Set GENZ US PRIMARY US GAAP
Ledger * List - Text GENZ US PRIMARY US GAAP
Category * List - Text Accrual
Source * List - Text Spreadsheet
Currency * List - Text USD
Period List - Text JUL-10
Accounting Date * List - Date 7/31/2010
Batch Name Text USPRI-GARDO01-REV01
Batch Description Text JUL-2010 Quality Accruals
Journal Name Text USPRI-GARDO01-REV01
Journal Description Text JUL-2010 Quality Accruals
Corporate Ops Finance Oracle Month-End Close
Created: July 2010 Page 14 of 51
Reverse Journal List - Text Yes
Reversal Period/Date List - Text AUG-10
Clearing Company List - Text
NOTE: There is a Corporate Standard that needs to be followed when filling out the information
for the Batch Name and Journal Name see below:
Example: USPRI-GARDO01-REV01
US – Entity 1000 and 1020
PRI – Primary ledger
USERID – User name
REV – Type of journal entry
(Examples: STAT – %’s, REV - reversing, JL – regular journal, REC - recurring)
01 – Sequential number
6) Using the JOURNAL template data Copy the Oracle data (blue header
section) and Paste Values into the Web ADI form
Example of Web ADI form for an Accrual after the Copy & Paste step
The “flag” shown in the Upload column, all the way to the left of the Web ADI form,
indicates this is a row you want to include in the upload. You have the option to delete this
“flag” if you do not want to include specific rows in the upload. In order for the flag to reappear
if you are reusing the WEB ADI form – copy data and paste special values to bring the flags
back up.
11) Upload the Web ADI by clicking on Oracle on your Excel tool bar
12) Click on Upload from the dropdown list
Corporate Ops Finance Oracle Month-End Close
Created: July 2010 Page 15 of 51
NOTE: You will need to be logged into Oracle to perform the Upload task. If you are not logged
in – the Oracle Log In page will pop-up when you hit Upload
13) The below form will open for Upload Parameters
14) Once appropriate boxes are checked - Click Upload
15) A confirmation window will appear indicating the completion status of the
upload. If any errors occur, they will display in the window. Click the
“Close” Button
Corporate Ops Finance Oracle Month-End Close
Created: July 2010 Page 16 of 51
16) The Messages column all the way to the right of the Web ADI form will
automatically populate when you execute to upload the data into Oracle. If
the data in the row has no errors the Messages column will populate with a
smiley face “” to represent the data in that row is valid. If the data in the
row has an error – the Messages column will provide a description as to what
is incorrect for the given row.
17) Attach necessary backup to the entry (See Appendix B – page 36)
NOTE: ALL entries require an attachment for backup
18) Once backup is attached – click on Approve. This action will send a
notification to the Approver. Once the Approver approves the entry a
notification will be sent to the Creator.
NOTE: Make sure your Oracle User Preferences are set up to receive email confirmations
NOTE: ALL Reversing entries REQUIRE manager approval
19) Once notification is received that the entry has been approved - Post the entry
(See Appendix C – page 39)
20) Print the entry (See Appendix D – page 41)
NOTE: When performing a category “Accrual” entry – you need to remember to call up the
reversing portion the following period and Post the entry (See Appendix C – page 39). This
portion of the entry does NOT require manager approval.
NOTE: This action can not be performed until the “next” accounting period has been opened by
Corporate Accounting.
D)Prepaid Entries
1) Log in to Oracle
2) Click on Journals – Define – Recurring
Corporate Ops Finance Oracle Month-End Close
Created: July 2010 Page 17 of 51
3) Enter the Batch Name, Batch Description and Journal Name
NOTE: There is a Corporate Standard that needs to be followed when filling out the information
for the Batch Name and Journal Name see below:
Example: USPRI-BARJA05-REC01
US – Entity 1000 and 1020
PRI – Primary ledger
USERID – User name
REC – Type of journal entry
(Examples: STAT – %’s, REV - reversing, JL – regular journal, REC - recurring)
01 – Sequential number
4) Enter the Effective Dates From & To (based on the terms of the service and/or
coverage that is being prepaid)
Corporate Ops Finance Oracle Month-End Close
Created: July 2010 Page 18 of 51
5) Click on Lines (both account string & amounts will be added here)
Corporate Ops Finance Oracle Month-End Close
Created: July 2010 Page 19 of 51
6) In the Line field enter “10” for the first line of the entry (for each additional line
change the line field by intervals of 10 – ex. line 2 would be “20”)
7) Enter the account string information for the first line by clicking Account
8) Click OK
9) For Step – enter “10”, leave Operator as the default “Enter”, for Amount enter the
dollar amount for this account string. (If the amount is a credit use a negative
sign)
10) Save the form
11) To add another line click on Line field and click the icon on the toolbar. The
previous line number will disappear. Once it is blank, type the next number
(remember to do increments of 10).
12) Enter the account string information for the second line by clicking Account
13) Click OK
14) For Step - enter “20”, leave Operator as the default “Enter”, for Amount enter the
dollar amount for this account string. (If the amount is a credit use a negative
sign)
15) Save the form
Note: You need to generate the recurring entry each month – once Corporate Accounting has
opened the applicable accounting period
16) Once the applicable accounting period is open – generate the recurring entry
17) Go to Journal – Generate – Recurring
Corporate Ops Finance Oracle Month-End Close
Created: July 2010 Page 20 of 51
18) Click on the box to the right of the recurring batch you want to generate (Tip: If
you only want to view your records, hit F11, type in your user id with % before
and after (%MCNMI%) then hit Ctrl+F11.
19) Enter the appropriate accounting period
20) Click on Generate to process the recurring entry
21) A note will popup with your concurrent request number – click ok
22) Close out of the generate recurring entries window
Corporate Ops Finance Oracle Month-End Close
Created: July 2010 Page 21 of 51
23) To view the status of the request – click on View then choose Requests – then
click on Find
24) Click on Refresh Data until the recurring entry appears with no errors or
warnings.
25) Attach necessary backup to the entry (See Appendix B – page 36)
NOTE: ALL entries require an attachment for backup
26) Once backup is attached – click on Approve. This action will send a notification
to the Approver. Once the Approver approves the entry a notification will be sent
to the Creator.
NOTE: Make sure your Oracle User Preferences are set up to receive email confirmations
NOTE: ALL journal entries REQUIRE manager approval
27) Once notification is received that the entry has been approved - Post the entry
(See Appendix C – page 39)
28) Print the entry (See Appendix D – page 41)
E)Miscellaneous Reclasses
1) Log in to Oracle
2) Click on Reports: Requests choose Standard
3) Choose Single Request and click OK
4) Click on the List of Values in the Name field and choose “Program-Publish FSG
Report”
Note: This FSG report does not allow you to enter a range – to retrieve a range of data you must
enter in parent values
5) Click on the List of Values in the Report field and choose “GENZ Detail TB incl
EPL” and click OK
6) Choose the current period (ex. JUL-10)
7) Click in the field for Segment Override
8) Enter the below criteria
Note: To pull US Ops CC’s only – use CC parent: AOPS and Location parent: AOPS
Corporate Ops Finance Oracle Month-End Close
Created: July 2010 Page 22 of 51
9) Click OK
10) In the Date field enter the last day of the closing month (ex. 31-JUL-2010)
11) Click OK
12) Click on Options and under Format choose EXCEL and click OK twice or you
can manually type in EXCEL in the Format field
Corporate Ops Finance Oracle Month-End Close
Created: July 2010 Page 23 of 51
13) Click Submit
Corporate Ops Finance Oracle Month-End Close
Created: July 2010 Page 24 of 51
14) For Submit Another Request – click No
15) From the toolbar – click on View then click on Requests
16) Click on Find
17) Click on Refresh Data if the Phase status does not show Completed
18) Once status has Completed – click on View Output – when prompted save the
excel file and then open the file
19) Format the file
 Delete Rows 1 - 7
 Copy & Paste the PTD & YTD data into columns R&S
 Perform a Text to Columns for column A to break out the account string
(Use Fixed Width, add & remove breaks as needed – make sure account
string fields don’t contain blank spaces, select account string columns to
be in Text Format)
 Modify names for column headers
 Delete blank columns
 Delete blank rows
20) Copy the FSG Report data into the VLOOKUPs for MISC Reclasses tab in the
MFG Pro Conversion file (This tab has been formatted to perform v-lookups for
Analyst and SA-Project combination validity)
Corporate Ops Finance Oracle Month-End Close
Created: July 2010 Page 25 of 51
21) Using the SA-PROJ LIST in the MFG Pro Conversion Templates file verify the
SA-Project combinations for your cost centers
22) Using the RC Oracle String template in the MFG Pro Conversion Templates file
enter the miscellaneous reclasses using Oracle Account strings into the “pink”
columns located to the right - this template has been formatted and linked to
convert data into the appropriate format for uploading
23) Format the dollar column to be 2 decimal places
24) Open a “FRESH” Web ADI form (See Appendix A – page 34)
25) Fill in the appropriate heading information (See example below)
Example of how to fill in the “header” information on the Web ADI Form for Reclasses
Balance Type Actual
Data Access Set GENZ US PRIMARY US GAAP
Ledger * List - Text GENZ US PRIMARY US GAAP
Category * List - Text Reclass
Source * List - Text Spreadsheet
Currency * List - Text USD
Period List - Text JUL-10
Accounting Date * List - Date 7/31/2010
Batch Name Text USPRI-BARJA05-JL02
Batch Description Text JUL-2010 Miscellaneous Reclasses
Journal Name Text USPRI-BARJA05-JL02
Journal Description Text JUL-2010 Miscellaneous Reclasses
Reverse Journal List - Text No
Reversal Period/Date List - Text
Clearing Company List - Text
NOTE: There is a Corporate Standard that needs to be followed when filling out the information
for the Batch Name and Journal Name see below:
Corporate Ops Finance Oracle Month-End Close
Created: July 2010 Page 26 of 51
Example: USPRI-BARJA05-JL02
US – Entity 1000 and 1020
PRI – Primary ledger
USERID – User name
JL – Type of journal entry
(Examples: STAT – %’s, REV - reversing, JL – regular journal, REC - recurring)
02 – Sequential number
25) Using the MISC RC Oracle template data Copy the Oracle data (blue header
section) and Paste Values into the Web ADI form
Example of Web ADI form after the Copy & Paste step
The “flag” shown in the Upload column, all the way to the left of the Web ADI form,
indicates this is a row you want to include in the upload. You have the option to delete this
“flag” if you do not want to include specific rows in the upload. In order for the flag to reappear
if you are reusing the WEB ADI form – copy data and paste special values to bring the flags
back up.
26) Upload the Web ADI by clicking on Oracle on your Excel tool bar
27) Click on Upload from the dropdown list
NOTE: You will need to be logged into Oracle to perform the Upload task. If you are not logged
in – the Oracle Log In page will pop-up when you hit Upload
28) The below form will open for Upload Parameters
Corporate Ops Finance Oracle Month-End Close
Created: July 2010 Page 27 of 51
29) Once appropriate boxes are checked - Click Upload
30) A confirmation window will appear indicating the completion status of the
upload. If any errors occur, they will display in the window. Click the
“Close” Button
31) The Messages column all the way to the right of the Web ADI form will
automatically populate when you execute to upload the data into Oracle. If
the data in the row has no errors the Messages column will populate with a
smiley face “” to represent the data in that row is valid. If the data in the
Corporate Ops Finance Oracle Month-End Close
Created: July 2010 Page 28 of 51
row has an error – the Messages column will provide a description as to what
is incorrect for the given row.
32) Attach necessary backup to the entry (See Appendix B – page 36)
NOTE: ALL entries require an attachment for backup
33) Once backup is attached – click on Approve. This action will send a
notification to the Approver. Once the Approver approves the entry a
notification will be sent to the Creator.
NOTE: Make sure your Oracle User Preferences are set up to receive email confirmations
NOTE: ALL journal entries REQUIRE manager approval
34) Once notification is received that the entry has been approved - Post the entry
(See Appendix C – page 39)
35) Print the entry (See Appendix D – page 41)
F) Communication
Once you have completed the STAT entry, Facility Flat Rate Entry , Accruals and
Miscellaneous Reclasses and these entries are all approved and posted email letting us
know you are finished with Pre-Close.
DAY 1 - CLOSE
A)Auto-Allocation
NOTE: This step will be performed by only one individual and will take place once
communication has been received that all pre-close activities are complete and have been
posted.
1) Log in to Oracle
2) Under Journals: Auto Allocation in the Navigation panel click on Workbench
Corporate Ops Finance Oracle Month-End Close
Created: July 2010 Page 29 of 51
3) Move cursor to the Allocation Set field – click F11
4) Type in US OPS ALLOCATIONS
5) Hit CTRL F11 to pull up the Mass Allocation
Corporate Ops Finance Oracle Month-End Close
Created: July 2010 Page 30 of 51
6) Submit the Allocation Set - Click on Submit
7) A Parameters Box will open – Enter the below information
Balancing Segment Value: 100000
Period: month end close date (ex. JUL-10)
Budget: leave blank
Click Submit
8) A note will pop up with your concurrent request ID number – Click OK
9) Close the AutoAllocation Workbench window
10) To view the status of the request – click on View then choose Requests – then
click on Find
11) Click on Refresh Data until all of the Tiers have run and have been posted with no
errors or warnings. You will know when this is complete when you see “Run
Mass Allocations” appear four separate times (Tier 0 – Tier 3).
12) Print the Entries (See Appendix D – page 41)
NOTE: The Auto Allocation tool DOES NOT require approval
NOTE: The Auto Allocation tool will automatically post the first batch of allocations
and once the batch is posted will proceed to run the next tier of allocations and so forth.
B)Verify Cost Center General Spending has Cleared
NOTE: This step will be performed by only one individual.
1) Log in to Oracle
2) Click on Reports: Requests choose Standard
3) Choose Single Request and click OK
Corporate Ops Finance Oracle Month-End Close
Created: July 2010 Page 31 of 51
4) Click on the List of Values in the Name field and choose “Program-Publish FSG
Report”
5) Click on the List of Values in the Report field and choose “GENZ Detail TB incl
EPL” and click OK
6) Choose the current period (ex. May-10)
7) Click in the field for Segment Override
8) Enter the below criteria and click OK
9) Enter the last day of the closing month (ex. 31-JUL-2010)
10) Click OK
11) Click on Options and under Format choose EXCEL and click OK twice or you
can manually type in EXCEL in the Format field
Corporate Ops Finance Oracle Month-End Close
Created: July 2010 Page 32 of 51
12) Click Submit
13) For Submit Another Request – click No
14) From the toolbar – click on View then click on Requests
Corporate Ops Finance Oracle Month-End Close
Created: July 2010 Page 33 of 51
15) Click on Find
16) Click on Refresh Data if the Phase status does not show Completed
17) Once status has Completed – click on View Output – when prompted save the
excel file and then open the file
18) Format the file
 Need to perform a Text to Columns for column A to break out the
account string
 Concatenate the CC and Location
 Create a pivot table showing CC-LOC and total values YTD
19) Save the Report out on the shared drive for all to view
20) Send an email to the group letting them know the “zeroed-out check” report is out
on the shared drive
C)Communication
Once the cost center general spending is cleared, Mike McNeil will send out an email
confirmation to let the group know that the allocations are complete and that we can now
start the capitalization and absorption entries.
Corporate Ops Finance Oracle Month-End Close
Created: July 2010 Page 34 of 51
APPENDIX A
How to Open a “Fresh” Web ADI Form
1) Log In to Oracle
2) Under Journals – Double Click on Open Journal Wizard
3) Under Viewer select Excel 2003 then click Next
4) Under Layout select GENZ Functional Actuals – Single then click Next
5) Under Content select None – then click Next
Corporate Ops Finance Oracle Month-End Close
Created: July 2010 Page 35 of 51
6) Click Create Document
7) Click Open and click on Enable Macros
8) Close the window that confirms document was created
9) Go to Tools – Protection – Unprotect Sheet
10) Format the file by adding in additional rows for data
11) Save the file as your Web ADI template – you won’t need to download each time
Corporate Ops Finance Oracle Month-End Close
Created: July 2010 Page 36 of 51
APPENDIX B
How to Add an Attachment to an Unposted Journal
Backup is required for all entries. Use your discretion on what to attach. Currently there are no
guidelines in place for what type and size of backup to attach.
NOTE: Be aware of confidential information when attaching backup. All users are able to view
the journal as well as the backup attached.
1) Log In to Oracle
2) Under Journals – double click on Enter
3) Fill in as much information in order to help narrow down the search
4) Execute the search - Click the Find button
Corporate Ops Finance Oracle Month-End Close
Created: July 2010 Page 37 of 51
5) To select a journal click anywhere within the line item then Click on Review Journal
6) Click on the Paperclip button in the tool bar to attach your backup
Corporate Ops Finance Oracle Month-End Close
Created: July 2010 Page 38 of 51
7) Click on the Source Tab – then fill in the appropriate fields. In this instance the backup is
an excel file. You can also have backup that is text, web page, etc.
8) An internet explorer window will pop up. Click on Browse and choose the file you wish
to attach. Double click on the file name. Then click Submit
9) You will receive a message with confirmation that the file upload completed
successfully. Close the message
10) You will receive a decision with “Has the file been uploaded successfully” – click the
Yes button
11) The file has been attached – close all windows
Corporate Ops Finance Oracle Month-End Close
Created: July 2010 Page 39 of 51
APPENDIX C
How to Post a Journal Entry
1) Log In to Oracle
2) Under Journals – double click on Enter
3) Fill in as much information in order to help narrow down the search
4) Execute the search - Click the Find button
Corporate Ops Finance Oracle Month-End Close
Created: July 2010 Page 40 of 51
5) To select a journal click anywhere within the line item then Click on Post
6) From the toolbar – click on View then click on Requests
7) Click on Find
8) Click on Refresh Data if the Phase status does not show Completed
Corporate Ops Finance Oracle Month-End Close
Created: July 2010 Page 41 of 51
APPENDIX D
How to Print a Journal Entry
1) Log In to Oracle
2) Under Journals – double click on Enter
3) Fill in as much information in order to help narrow down the search
4) Execute the search - Click the Find button
Corporate Ops Finance Oracle Month-End Close
Created: July 2010 Page 42 of 51
5) To select a journal click anywhere within the line item then Click on Review Journal
6) Click in Account Field on line 1 (the account string will be highlighted)
7) From the toolbar – click on File then click on Export
8) If the below Decision Box pops up – click on Continue to End
Corporate Ops Finance Oracle Month-End Close
Created: July 2010 Page 43 of 51
9) Save the file – the text file will look like the below:
10) Open the file in Excel choose Delimited and Tab
11) Change the Account string column to be Text and click on Finish
12) Format the file as needed & print
Corporate Ops Finance Oracle Month-End Close
Created: July 2010 Page 44 of 51
APPENDIX E
How to Run & Format an Account Analysis Report
Note: The values pulled from this report are not unique account string values – to view a total
value you need to create a pivot table of the data.
Note: This report is similar to the Account Balance Detail Report (25.15.2) in MFG Pro if you
choose criteria Order By: “line item” in the parameters of the report.
21) Log in to Oracle
22) Click on Reports: Requests – choose Standard
23) Choose Single Request and click OK
24) Click on the List of Values in the Name field and choose “Account Analysis (180
Char)” click OK
25) Fill in the parameters based on the information you need to retrieve
26) Enter the Flexfield From & To criteria based on the information you need to
retrieve (the use of parent values is allowed when entering this information)
Corporate Ops Finance Oracle Month-End Close
Created: July 2010 Page 45 of 51
27) Click OK twice and then click on Submit
28) For Submit Another Request – click No
29) From the toolbar – click on View then click on Requests
Corporate Ops Finance Oracle Month-End Close
Created: July 2010 Page 46 of 51
30) Click on Find
31) Click on Refresh Data if the Phase status does not show Completed
32) Once status has Completed – click on View Output – save the text file
33) Open the file in Excel choose Fixed Width and move line breaks where
appropriate (leave the account string as one column – can convert text to columns
once the file is opened in Excel)
34) Change the Account string column to be Text and click on Finish
35) Format the file
 Delete rows & columns
 Need to perform a Text to Columns for column A to break out the account
string (use Delimited and choose Other and enter a period); have the fields be in
text format and click Finish
 Add column headers to the account string
Ent/SA Acct CC Proj Loc Intra Other Debits (USD)
Credits
(USD)
100000 6000000 4000 10000990 1224 000000 0 6,554.37
100000 6000000 4000 10000990 1224 000000 0 3,643.12
100000 6000000 4000 10000990 1224 000000 0 2,621.75
100000 6000000 4000 10000990 2771 000000 0 259.51
100000 6000000 4000 10000990 2772 000000 0 11,379.87
Corporate Ops Finance Oracle Month-End Close
Created: July 2010 Page 47 of 51
 Create a pivot table based on criteria you are trying to view
Corporate Ops Finance Oracle Month-End Close
Created: July 2010 Page 48 of 51
APPENDIX F
How to Approve a Journal Entry
NOTE: Make sure your Oracle User Preferences are set up to receive email confirmations
1) An email confirmation will be sent to the approver when an entry has been submitted for
approval
2) Log In to Oracle
3) Click on Other - Notifications
4) Execute the search for all open notifications – click Go
5) Open the notification by clicking on the link at the bottom of the form (ex. Journal Batch
requires Approval)
6) Click the enter journals link to open the journal to review
7) To view the attachment – click the attachment button in the toolbar (paperclip)
8) Close the attachment form
9) If everything looks okay – click the Approve button. If not – click Reject
Corporate Ops Finance Oracle Month-End Close
Created: July 2010 Page 49 of 51
APPENDIX G
How to Run a Trial Balance Report
1) Log in to Oracle
2) Click on Reports: Requests choose Standard
3) Choose Single Request and click OK
4) Click on the List of Values in the Name field and choose “Program-Publish FSG
Report”
5) Click on the List of Values in the Report field and choose “GENZ Detail
Trending” and click OK
6) Choose the 1st
month of the year for period (ex. JAN-10)
7) Click in the field for Segment Override
8) Enter the below criteria and click OK (you may change parent values based on
what you are trying to pull)
Corporate Ops Finance Oracle Month-End Close
Created: July 2010 Page 50 of 51
9) Click OK
10) Click on Options and under Format choose EXCEL and click OK twice or you
can manually type in EXCEL in the Format field
11) Click Submit
12) For Submit Another Request – click No
13) From the toolbar – click on View then click on Requests
Corporate Ops Finance Oracle Month-End Close
Created: July 2010 Page 51 of 51
14) Click on Find
15) Click on Refresh Data if the Phase status does not show Completed
16) Once status has Completed – click on View Output – when prompted save the
excel file and then open the file
17) Format the file
 Need to perform a Text to Columns for column A to break out the
account string
 Perform additional formatting as needed (i.e. concatenate cc-loc; create
pivot tables, etc.)

Month end close-oracle process doc

  • 1.
    Created: July 2010Page 1 of 51 ORACLE Month-End Close Process
  • 2.
    Corporate Ops FinanceOracle Month-End Close Created: July 2010 Page 2 of 51 Table of Contents Table of Contents _____________________________________________________________ 2 PRE-CLOSE_________________________________________________________________ 3 A) Mapping Files_________________________________________ Error! Bookmark not defined. B) Allocation Percentages – STAT Entry ____________________________________________ 3 C) Flat Rate Facilities Allocation__________________________________________________ 10 D) Accruals ___________________________________________________________________ 13 E) Prepaid Entries _____________________________________________________________ 16 F) Miscellaneous Reclasses_______________________________________________________ 21 G) Communication ___________________________________________________________ 28 DAY 1 - CLOSE _____________________________________________________________ 28 A) Auto-Allocation _____________________________________________________________ 28 B) Verify Cost Center General Spending has Cleared ________________________________ 30 C) Communication _____________________________________________________________ 33 APPENDIX A: How to Open a Fresh Web ADI Form ______________________________ 34 APPENDIX B: How to Add an Attachment to an Unposted Journal ___________________ 36 APPENDIX C: How to Post a Journal Entry______________________________________ 39 APPENDIX D: How to Print a Journal Entry _____________________________________ 41 APPENDIX E: How to Run & Format an Account Analysis Report ___________________ 44 APPENDIX F: How to Approve a Journal Entry __________________________________ 48 APPENDIX G: How to Run a Trial Balance Report ________________________________ 49
  • 3.
    Corporate Ops FinanceOracle Month-End Close Created: July 2010 Page 3 of 51 PRE-CLOSE A)Allocation Percentages – STAT Entry a) Cost Centers Using Forecast Percentages CC’s in Tier 1 using FCST %’s CC’s in Tier 2 using FCST %’s CC’s in Tier 3 using FCST %’s NOTE: When pulling data in Essbase columns should be in the following order: Planning Alloc Acct Entity CC SA Proj Q3 OHPct E1000 10004120 0000 P10000990 0.00606 OHPct E1000 10004130 0000 P10000990 0.00171 1) Format allocation percentages to be 5 decimal places ONLY – click inside cells to check. If needed turn on the following: Tools/Options/Calculation/Click on Precision as Displayed. You will receive a message that data will lose accuracy. Click OK. If you choose to perform the Precision as Displayed step, make sure to turn it off after the data has changed. 2) Verify percentages equal 1.00000 – adjust as needed 3) Copy and Paste the forecast data into the FCST % template (pink header section) – this template has been formatted and linked via V-Lookups to convert the forecasted account string into the Oracle account string 4) Open a “FRESH” Web ADI form (See Appendix A – Page 34) 5) Fill in the appropriate heading information Example of how to fill in the “header” information on the Web ADI Form for %s Balance Type Actual Data Access Set GENZ US PRIMARY US GAAP Ledger * List - Text GENZ US PRIMARY US GAAP Category * List - Text US OPS Source * List - Text Spreadsheet Currency * List - Text STAT Period List - Text JUL-10 Accounting Date * List - Date 7/31/2010 Batch Name Text USPRI-DUNME01-STAT01 Batch Description Text JUL-2010 Allocation Percentages Journal Name Text USPRI-DUNME01-STAT01 Journal Description Text JUL-2010 Allocation Percentages Reverse Journal List - Text No Reversal Period/Date List - Text USERID GEN Ledger name
  • 4.
    Corporate Ops FinanceOracle Month-End Close Created: July 2010 Page 4 of 51 Clearing Company List - Text NOTE: There is a Corporate Standard that needs to be followed when filling out the information for the Batch Name and Journal Name see below: Example: USPRI-USERID-STAT01 US – Entity 1000 and 1020 PRI – Primary ledger USERID – User name STAT – Type of journal entry (Examples: STAT – %’s, REV - reversing, JL – regular journal, REC - recurring) 01 – Sequential number 6) Using the FCST % template data Copy the Oracle data (blue header section) and Paste Values into the Web ADI form Example of Web ADI form after the Copy & Paste step The “flag” shown in the Upload column, all the way to the left of the Web ADI form, indicates this is a row you want to include in the upload. You have the option to delete this “flag” if you do not want to include specific rows in the upload. In order for the flag to reappear if you are reusing the WEB ADI form – copy data and paste special values to bring the flags back up. NOTE: If you have allocations that are prepared using FCST %s and Hours %s you can use one Web ADI Form to Upload. See notes in section “b” below on how to prepare the Hours %s. 7) Upload the Web ADI by clicking on Oracle on your Excel tool bar
  • 5.
    Corporate Ops FinanceOracle Month-End Close Created: July 2010 Page 5 of 51 8) Click on Upload from the dropdown list NOTE: You will need to be logged into Oracle to perform the Upload task. If you are not logged in – the Oracle Log In page will pop-up when you hit Upload 9) The below form will open for upload parameters NOTE: For STAT uploads make sure to check “Upload Unbalanced Journals” 10) Once appropriate boxes are checked - Click Upload 11) A confirmation window will appear indicating the completion status of the upload. If any errors occur, they will display in the window. Click the “Close” Button
  • 6.
    Corporate Ops FinanceOracle Month-End Close Created: July 2010 Page 6 of 51 12) The Messages column all the way to the right of the Web ADI form will automatically populate when you execute to upload the data into Oracle. If the data in the row has no errors the Messages column will populate with a smiley face “” to represent the data in that row is valid. If the data in the row has an error – the Messages column will provide a description as to what is incorrect for the given row. 13) Attach necessary backup to the entry (See Appendix B – page 36) NOTE: ALL entries require an attachment for backup NOTE: STAT entries do NOT require manager approval – preparer needs to hit “Approve” 14) Post the entry (See Appendix C – page 39) 15) Print the entry (See Appendix D – page 41) b) Cost Centers Using Timesheet Hours CC’s in Tier 3 using Timesheet Hour %’s 1) Using the Kronos Timesheet Hour Summary spreadsheet – convert the hours into allocation percentages NOTE: Timesheet Hour data columns should be in the following order (don’t forget Entity) Entity CC# SA Proj Hours % 1000 4085 0000 0992 0 0.00000 1000 4085 0000 0994 0 0.00000 1000 4085 0000 0998 0 0.00000 1000 4085 0205 0005 230 0.20184 1000 4085 0205 0760 34 0.02984 1000 4085 0226 0006 358 0.31417 1000 4085 0249 0844 21 0.01843 1000 4085 0700 0011 496.5 0.43572 4085 Total 1139.5 2) Format allocation percentages to be 5 decimal places ONLY – click inside cells to check. If needed turn on the following: Tools/Options/Calculation/Click on Precision as Displayed. You will receive a message that data will lose accuracy. Click OK. If you choose to perform the Precision as Displayed step, make sure to turn it off after the data has changed. 3) Verify percentages equal 1.00000 – adjust as needed 4) Copy and Paste the forecast data into the HOURS % template (pink header section) – this template has been formatted and linked via V-Lookups to convert the timesheet hour account string into the Oracle account string 5) Open a “FRESH” Web ADI form (See Appendix A – page 34) 6) Fill in the appropriate heading information (See example below)
  • 7.
    Corporate Ops FinanceOracle Month-End Close Created: July 2010 Page 7 of 51 Example of how to fill in the “header” information on the Web ADI Form for %s Balance Type Actual Data Access Set GENZ US PRIMARY US GAAP Ledger * List - Text GENZ US PRIMARY US GAAP Category * List - Text US OPS Source * List - Text Spreadsheet Currency * List - Text STAT Period List - Text JUL-10 Accounting Date * List - Date 7/31/2010 Batch Name Text USPRI-DUNME01-STAT01 Batch Description Text JUL-2010 Allocation Percentages Journal Name Text USPRI-DUNME01-STAT01 Journal Description Text JUL-2010 Allocation Percentages Reverse Journal List - Text No Reversal Period/Date List - Text Clearing Company List - Text NOTE: There is a Corporate Standard that needs to be followed when filling out the information for the Batch Name and Journal Name see below: Example: USPRI-DUNME01-STAT01 US – Entity 1000 and 1020 PRI – Primary ledger USERID – User name STAT – Type of journal entry (Examples: STAT – %’s, REV - reversing, JL – regular journal, REC - recurring) 01 – Sequential number 7) Using the HOURS % template data Copy the Oracle data (blue header section) and Paste Values into the Web ADI form Example of Web ADI form after the Copy & Paste step The “flag” shown in the Upload column, all the way to the left of the Web ADI form, indicates this is a row you want to include in the upload. You have the option to delete this “flag” if you do not want to include specific rows in the upload. In order for the flag to reappear if you are reusing the WEB ADI form – copy data and paste special values to bring the flags back up. UserID UserID UserID
  • 8.
    Corporate Ops FinanceOracle Month-End Close Created: July 2010 Page 8 of 51 NOTE: If you have allocations that are prepared using FCST %s and Hours %s you can use ONE Web ADI Form to Upload. See notes in section “a” above on how to prepare the FCST %s. 8) Upload the Web ADI by clicking on Oracle on your Excel tool bar 9) Click on Upload from the dropdown list NOTE: You will need to be logged into Oracle to perform the Upload task. If you are not logged in – the Oracle Log In page will pop-up when you hit Upload 10) The below form will open for Upload Parameters
  • 9.
    Corporate Ops FinanceOracle Month-End Close Created: July 2010 Page 9 of 51 NOTE: For STAT uploads make sure to check “Upload Unbalanced Journals” 11) Once appropriate boxes are checked - Click Upload 12) A confirmation window will appear indicating the completion status of the upload. If any errors occur, they will display in the window. Click the “Close” Button 13) The Messages column all the way to the right of the Web ADI form will automatically populate when you execute to upload the data into Oracle. If the data in the row has no errors the Messages column will populate with a smiley face “” to represent the data in that row is valid. If the data in the row has an error – the Messages column will provide a description as to what is incorrect for the given row. 14) Attach necessary backup to the entry (See Appendix B – page 36) NOTE: ALL entries require an attachment for backup NOTE: STAT entries do NOT require manager approval – preparer needs to hit “Approve” 15) Post the entry (See Appendix C – page 39) 16) Print the entry (See Appendix D – page 41) c) Cost Centers Using “Other” Method CC’s in Flat Rate Allocation NOTE: Follow the process for Timesheet %s above - substituting the “other” method of coming up with the percentages to use for the allocation
  • 10.
    Corporate Ops FinanceOracle Month-End Close Created: July 2010 Page 10 of 51 NOTE: CC4080 is not part of the auto-allocation. Use the “JOURNAL” template to upload dollar amounts for this cost center. B)Flat Rate Facilities Allocation Pro CC’s in Flat Rate Allocation 1) Using the JOURNAL template for a Web ADI enter the MFG Pro Account strings into the “pink” columns on the right - this template has been formatted and linked via V-Lookups to convert the MFG Pro account string into the Oracle account string 2) Format the dollar column to be 2 decimal places Enter MFG Pro Account String Acct SA CC Proj Entity Description Jul'10 8850 0000 1258 0990 1000 Mos. Facility Alloc 259.00 8850 0000 1260 0990 1000 Mos. Facility Alloc 293.00 8850 0000 1454 0990 1000 Mos. Facility Alloc 362.00 8850 0000 1500 0990 1000 Mos. Facility Alloc 7219.00 3) Open a “FRESH” Web ADI form (See Appendix A – page 34) 4) Fill in the appropriate heading information (See example below) Example of how to fill in the “header” information on the Web ADI Form for Amounts Balance Type Actual Data Access Set GENZ US PRIMARY US GAAP Ledger * List - Text GENZ US PRIMARY US GAAP Category * List - Text US OPS Source * List - Text Spreadsheet Currency * List - Text USD Period List - Text JUL-10 Accounting Date * List - Date 7/31/2010 Batch Name Text USPRI-BARJA05-JL01 Batch Description Text JUL-2010 Facility Flat Rate Allocation Journal Name Text USPRI-BARJA05-JL01 Journal Description Text JUL-2010 Facility Flat Rate Allocation Reverse Journal List - Text No Reversal Period/Date List - Text Clearing Company List - Text NOTE: There is a Corporate Standard that needs to be followed when filling out the information for the Batch Name and Journal Name see below: Example: USPRI-BARJA05-JL01
  • 11.
    Corporate Ops FinanceOracle Month-End Close Created: July 2010 Page 11 of 51 US – Entity 1000 and 1020 PRI – Primary ledger USERID – User name JL – Type of journal entry (Examples: STAT – %’s, REV - reversing, JL – regular journal, REC - recurring) 01 – Sequential number 5) Using the JOURNAL template data Copy the Oracle data (blue header section) and Paste Values into the Web ADI form Example of Web ADI form after the Copy & Paste step The “flag” shown in the Upload column, all the way to the left of the Web ADI form, indicates this is a row you want to include in the upload. You have the option to delete this “flag” if you do not want to include specific rows in the upload. In order for the flag to reappear if you are reusing the WEB ADI form – copy data and paste special values to bring the flags back up. 1) Upload the Web ADI by clicking on Oracle on your Excel tool bar 2) Click on Upload from the dropdown list NOTE: You will need to be logged into Oracle to perform the Upload task. If you are not logged in – the Oracle Log In page will pop-up when you hit Upload 3) The below form will open for Upload Parameters
  • 12.
    Corporate Ops FinanceOracle Month-End Close Created: July 2010 Page 12 of 51 4) Once appropriate boxes are checked - Click Upload 5) A confirmation window will appear indicating the completion status of the upload. If any errors occur, they will display in the window. Click the “Close” Button 6) The Messages column all the way to the right of the Web ADI form will automatically populate when you execute to upload the data into Oracle. If the data in the row has no errors the Messages column will populate with a smiley face “” to represent the data in that row is valid. If the data in the
  • 13.
    Corporate Ops FinanceOracle Month-End Close Created: July 2010 Page 13 of 51 row has an error – the Messages column will provide a description as to what is incorrect for the given row. 7) Attach necessary backup to the entry (See Appendix B – page 36) NOTE: ALL entries require an attachment for backup 8) Once backup is attached – click on Approve. This action will send a notification to the Approver. Once the Approver approves the entry a notification will be sent to the Creator. NOTE: Make sure your Oracle User Preferences are set up to receive email confirmations NOTE: ALL journal entries REQUIRE manager approval 9) Once notification is received that the entry has been approved - Post the entry (See Appendix C – page 39) 10) Print the entry (See Appendix D – page 41) C)Accruals 1) The reports in MFG Pro will be used to verify if expenses have been paid 2) Using the JOURNAL template for a Web ADI enter the accruals using MFG Pro Account strings into the “pink” columns located to the right - this template has been formatted and linked via V-Lookups to convert the MFG Pro account string into the Oracle account string 3) Format the dollar column to be 2 decimal places Enter MFG Pro Account String Acct SA CC Proj Entity Description Jul'10 8405 0000 4050 0990 1020 Accrue VTS Consultants 25000.00 4) Open a “FRESH” Web ADI form (See Appendix A – page 34) 5) Fill in the appropriate heading information (See example below) Example of how to fill in the “header” information on the Web ADI Form for Accruals: Balance Type Actual Data Access Set GENZ US PRIMARY US GAAP Ledger * List - Text GENZ US PRIMARY US GAAP Category * List - Text Accrual Source * List - Text Spreadsheet Currency * List - Text USD Period List - Text JUL-10 Accounting Date * List - Date 7/31/2010 Batch Name Text USPRI-GARDO01-REV01 Batch Description Text JUL-2010 Quality Accruals Journal Name Text USPRI-GARDO01-REV01 Journal Description Text JUL-2010 Quality Accruals
  • 14.
    Corporate Ops FinanceOracle Month-End Close Created: July 2010 Page 14 of 51 Reverse Journal List - Text Yes Reversal Period/Date List - Text AUG-10 Clearing Company List - Text NOTE: There is a Corporate Standard that needs to be followed when filling out the information for the Batch Name and Journal Name see below: Example: USPRI-GARDO01-REV01 US – Entity 1000 and 1020 PRI – Primary ledger USERID – User name REV – Type of journal entry (Examples: STAT – %’s, REV - reversing, JL – regular journal, REC - recurring) 01 – Sequential number 6) Using the JOURNAL template data Copy the Oracle data (blue header section) and Paste Values into the Web ADI form Example of Web ADI form for an Accrual after the Copy & Paste step The “flag” shown in the Upload column, all the way to the left of the Web ADI form, indicates this is a row you want to include in the upload. You have the option to delete this “flag” if you do not want to include specific rows in the upload. In order for the flag to reappear if you are reusing the WEB ADI form – copy data and paste special values to bring the flags back up. 11) Upload the Web ADI by clicking on Oracle on your Excel tool bar 12) Click on Upload from the dropdown list
  • 15.
    Corporate Ops FinanceOracle Month-End Close Created: July 2010 Page 15 of 51 NOTE: You will need to be logged into Oracle to perform the Upload task. If you are not logged in – the Oracle Log In page will pop-up when you hit Upload 13) The below form will open for Upload Parameters 14) Once appropriate boxes are checked - Click Upload 15) A confirmation window will appear indicating the completion status of the upload. If any errors occur, they will display in the window. Click the “Close” Button
  • 16.
    Corporate Ops FinanceOracle Month-End Close Created: July 2010 Page 16 of 51 16) The Messages column all the way to the right of the Web ADI form will automatically populate when you execute to upload the data into Oracle. If the data in the row has no errors the Messages column will populate with a smiley face “” to represent the data in that row is valid. If the data in the row has an error – the Messages column will provide a description as to what is incorrect for the given row. 17) Attach necessary backup to the entry (See Appendix B – page 36) NOTE: ALL entries require an attachment for backup 18) Once backup is attached – click on Approve. This action will send a notification to the Approver. Once the Approver approves the entry a notification will be sent to the Creator. NOTE: Make sure your Oracle User Preferences are set up to receive email confirmations NOTE: ALL Reversing entries REQUIRE manager approval 19) Once notification is received that the entry has been approved - Post the entry (See Appendix C – page 39) 20) Print the entry (See Appendix D – page 41) NOTE: When performing a category “Accrual” entry – you need to remember to call up the reversing portion the following period and Post the entry (See Appendix C – page 39). This portion of the entry does NOT require manager approval. NOTE: This action can not be performed until the “next” accounting period has been opened by Corporate Accounting. D)Prepaid Entries 1) Log in to Oracle 2) Click on Journals – Define – Recurring
  • 17.
    Corporate Ops FinanceOracle Month-End Close Created: July 2010 Page 17 of 51 3) Enter the Batch Name, Batch Description and Journal Name NOTE: There is a Corporate Standard that needs to be followed when filling out the information for the Batch Name and Journal Name see below: Example: USPRI-BARJA05-REC01 US – Entity 1000 and 1020 PRI – Primary ledger USERID – User name REC – Type of journal entry (Examples: STAT – %’s, REV - reversing, JL – regular journal, REC - recurring) 01 – Sequential number 4) Enter the Effective Dates From & To (based on the terms of the service and/or coverage that is being prepaid)
  • 18.
    Corporate Ops FinanceOracle Month-End Close Created: July 2010 Page 18 of 51 5) Click on Lines (both account string & amounts will be added here)
  • 19.
    Corporate Ops FinanceOracle Month-End Close Created: July 2010 Page 19 of 51 6) In the Line field enter “10” for the first line of the entry (for each additional line change the line field by intervals of 10 – ex. line 2 would be “20”) 7) Enter the account string information for the first line by clicking Account 8) Click OK 9) For Step – enter “10”, leave Operator as the default “Enter”, for Amount enter the dollar amount for this account string. (If the amount is a credit use a negative sign) 10) Save the form 11) To add another line click on Line field and click the icon on the toolbar. The previous line number will disappear. Once it is blank, type the next number (remember to do increments of 10). 12) Enter the account string information for the second line by clicking Account 13) Click OK 14) For Step - enter “20”, leave Operator as the default “Enter”, for Amount enter the dollar amount for this account string. (If the amount is a credit use a negative sign) 15) Save the form Note: You need to generate the recurring entry each month – once Corporate Accounting has opened the applicable accounting period 16) Once the applicable accounting period is open – generate the recurring entry 17) Go to Journal – Generate – Recurring
  • 20.
    Corporate Ops FinanceOracle Month-End Close Created: July 2010 Page 20 of 51 18) Click on the box to the right of the recurring batch you want to generate (Tip: If you only want to view your records, hit F11, type in your user id with % before and after (%MCNMI%) then hit Ctrl+F11. 19) Enter the appropriate accounting period 20) Click on Generate to process the recurring entry 21) A note will popup with your concurrent request number – click ok 22) Close out of the generate recurring entries window
  • 21.
    Corporate Ops FinanceOracle Month-End Close Created: July 2010 Page 21 of 51 23) To view the status of the request – click on View then choose Requests – then click on Find 24) Click on Refresh Data until the recurring entry appears with no errors or warnings. 25) Attach necessary backup to the entry (See Appendix B – page 36) NOTE: ALL entries require an attachment for backup 26) Once backup is attached – click on Approve. This action will send a notification to the Approver. Once the Approver approves the entry a notification will be sent to the Creator. NOTE: Make sure your Oracle User Preferences are set up to receive email confirmations NOTE: ALL journal entries REQUIRE manager approval 27) Once notification is received that the entry has been approved - Post the entry (See Appendix C – page 39) 28) Print the entry (See Appendix D – page 41) E)Miscellaneous Reclasses 1) Log in to Oracle 2) Click on Reports: Requests choose Standard 3) Choose Single Request and click OK 4) Click on the List of Values in the Name field and choose “Program-Publish FSG Report” Note: This FSG report does not allow you to enter a range – to retrieve a range of data you must enter in parent values 5) Click on the List of Values in the Report field and choose “GENZ Detail TB incl EPL” and click OK 6) Choose the current period (ex. JUL-10) 7) Click in the field for Segment Override 8) Enter the below criteria Note: To pull US Ops CC’s only – use CC parent: AOPS and Location parent: AOPS
  • 22.
    Corporate Ops FinanceOracle Month-End Close Created: July 2010 Page 22 of 51 9) Click OK 10) In the Date field enter the last day of the closing month (ex. 31-JUL-2010) 11) Click OK 12) Click on Options and under Format choose EXCEL and click OK twice or you can manually type in EXCEL in the Format field
  • 23.
    Corporate Ops FinanceOracle Month-End Close Created: July 2010 Page 23 of 51 13) Click Submit
  • 24.
    Corporate Ops FinanceOracle Month-End Close Created: July 2010 Page 24 of 51 14) For Submit Another Request – click No 15) From the toolbar – click on View then click on Requests 16) Click on Find 17) Click on Refresh Data if the Phase status does not show Completed 18) Once status has Completed – click on View Output – when prompted save the excel file and then open the file 19) Format the file  Delete Rows 1 - 7  Copy & Paste the PTD & YTD data into columns R&S  Perform a Text to Columns for column A to break out the account string (Use Fixed Width, add & remove breaks as needed – make sure account string fields don’t contain blank spaces, select account string columns to be in Text Format)  Modify names for column headers  Delete blank columns  Delete blank rows 20) Copy the FSG Report data into the VLOOKUPs for MISC Reclasses tab in the MFG Pro Conversion file (This tab has been formatted to perform v-lookups for Analyst and SA-Project combination validity)
  • 25.
    Corporate Ops FinanceOracle Month-End Close Created: July 2010 Page 25 of 51 21) Using the SA-PROJ LIST in the MFG Pro Conversion Templates file verify the SA-Project combinations for your cost centers 22) Using the RC Oracle String template in the MFG Pro Conversion Templates file enter the miscellaneous reclasses using Oracle Account strings into the “pink” columns located to the right - this template has been formatted and linked to convert data into the appropriate format for uploading 23) Format the dollar column to be 2 decimal places 24) Open a “FRESH” Web ADI form (See Appendix A – page 34) 25) Fill in the appropriate heading information (See example below) Example of how to fill in the “header” information on the Web ADI Form for Reclasses Balance Type Actual Data Access Set GENZ US PRIMARY US GAAP Ledger * List - Text GENZ US PRIMARY US GAAP Category * List - Text Reclass Source * List - Text Spreadsheet Currency * List - Text USD Period List - Text JUL-10 Accounting Date * List - Date 7/31/2010 Batch Name Text USPRI-BARJA05-JL02 Batch Description Text JUL-2010 Miscellaneous Reclasses Journal Name Text USPRI-BARJA05-JL02 Journal Description Text JUL-2010 Miscellaneous Reclasses Reverse Journal List - Text No Reversal Period/Date List - Text Clearing Company List - Text NOTE: There is a Corporate Standard that needs to be followed when filling out the information for the Batch Name and Journal Name see below:
  • 26.
    Corporate Ops FinanceOracle Month-End Close Created: July 2010 Page 26 of 51 Example: USPRI-BARJA05-JL02 US – Entity 1000 and 1020 PRI – Primary ledger USERID – User name JL – Type of journal entry (Examples: STAT – %’s, REV - reversing, JL – regular journal, REC - recurring) 02 – Sequential number 25) Using the MISC RC Oracle template data Copy the Oracle data (blue header section) and Paste Values into the Web ADI form Example of Web ADI form after the Copy & Paste step The “flag” shown in the Upload column, all the way to the left of the Web ADI form, indicates this is a row you want to include in the upload. You have the option to delete this “flag” if you do not want to include specific rows in the upload. In order for the flag to reappear if you are reusing the WEB ADI form – copy data and paste special values to bring the flags back up. 26) Upload the Web ADI by clicking on Oracle on your Excel tool bar 27) Click on Upload from the dropdown list NOTE: You will need to be logged into Oracle to perform the Upload task. If you are not logged in – the Oracle Log In page will pop-up when you hit Upload 28) The below form will open for Upload Parameters
  • 27.
    Corporate Ops FinanceOracle Month-End Close Created: July 2010 Page 27 of 51 29) Once appropriate boxes are checked - Click Upload 30) A confirmation window will appear indicating the completion status of the upload. If any errors occur, they will display in the window. Click the “Close” Button 31) The Messages column all the way to the right of the Web ADI form will automatically populate when you execute to upload the data into Oracle. If the data in the row has no errors the Messages column will populate with a smiley face “” to represent the data in that row is valid. If the data in the
  • 28.
    Corporate Ops FinanceOracle Month-End Close Created: July 2010 Page 28 of 51 row has an error – the Messages column will provide a description as to what is incorrect for the given row. 32) Attach necessary backup to the entry (See Appendix B – page 36) NOTE: ALL entries require an attachment for backup 33) Once backup is attached – click on Approve. This action will send a notification to the Approver. Once the Approver approves the entry a notification will be sent to the Creator. NOTE: Make sure your Oracle User Preferences are set up to receive email confirmations NOTE: ALL journal entries REQUIRE manager approval 34) Once notification is received that the entry has been approved - Post the entry (See Appendix C – page 39) 35) Print the entry (See Appendix D – page 41) F) Communication Once you have completed the STAT entry, Facility Flat Rate Entry , Accruals and Miscellaneous Reclasses and these entries are all approved and posted email letting us know you are finished with Pre-Close. DAY 1 - CLOSE A)Auto-Allocation NOTE: This step will be performed by only one individual and will take place once communication has been received that all pre-close activities are complete and have been posted. 1) Log in to Oracle 2) Under Journals: Auto Allocation in the Navigation panel click on Workbench
  • 29.
    Corporate Ops FinanceOracle Month-End Close Created: July 2010 Page 29 of 51 3) Move cursor to the Allocation Set field – click F11 4) Type in US OPS ALLOCATIONS 5) Hit CTRL F11 to pull up the Mass Allocation
  • 30.
    Corporate Ops FinanceOracle Month-End Close Created: July 2010 Page 30 of 51 6) Submit the Allocation Set - Click on Submit 7) A Parameters Box will open – Enter the below information Balancing Segment Value: 100000 Period: month end close date (ex. JUL-10) Budget: leave blank Click Submit 8) A note will pop up with your concurrent request ID number – Click OK 9) Close the AutoAllocation Workbench window 10) To view the status of the request – click on View then choose Requests – then click on Find 11) Click on Refresh Data until all of the Tiers have run and have been posted with no errors or warnings. You will know when this is complete when you see “Run Mass Allocations” appear four separate times (Tier 0 – Tier 3). 12) Print the Entries (See Appendix D – page 41) NOTE: The Auto Allocation tool DOES NOT require approval NOTE: The Auto Allocation tool will automatically post the first batch of allocations and once the batch is posted will proceed to run the next tier of allocations and so forth. B)Verify Cost Center General Spending has Cleared NOTE: This step will be performed by only one individual. 1) Log in to Oracle 2) Click on Reports: Requests choose Standard 3) Choose Single Request and click OK
  • 31.
    Corporate Ops FinanceOracle Month-End Close Created: July 2010 Page 31 of 51 4) Click on the List of Values in the Name field and choose “Program-Publish FSG Report” 5) Click on the List of Values in the Report field and choose “GENZ Detail TB incl EPL” and click OK 6) Choose the current period (ex. May-10) 7) Click in the field for Segment Override 8) Enter the below criteria and click OK 9) Enter the last day of the closing month (ex. 31-JUL-2010) 10) Click OK 11) Click on Options and under Format choose EXCEL and click OK twice or you can manually type in EXCEL in the Format field
  • 32.
    Corporate Ops FinanceOracle Month-End Close Created: July 2010 Page 32 of 51 12) Click Submit 13) For Submit Another Request – click No 14) From the toolbar – click on View then click on Requests
  • 33.
    Corporate Ops FinanceOracle Month-End Close Created: July 2010 Page 33 of 51 15) Click on Find 16) Click on Refresh Data if the Phase status does not show Completed 17) Once status has Completed – click on View Output – when prompted save the excel file and then open the file 18) Format the file  Need to perform a Text to Columns for column A to break out the account string  Concatenate the CC and Location  Create a pivot table showing CC-LOC and total values YTD 19) Save the Report out on the shared drive for all to view 20) Send an email to the group letting them know the “zeroed-out check” report is out on the shared drive C)Communication Once the cost center general spending is cleared, Mike McNeil will send out an email confirmation to let the group know that the allocations are complete and that we can now start the capitalization and absorption entries.
  • 34.
    Corporate Ops FinanceOracle Month-End Close Created: July 2010 Page 34 of 51 APPENDIX A How to Open a “Fresh” Web ADI Form 1) Log In to Oracle 2) Under Journals – Double Click on Open Journal Wizard 3) Under Viewer select Excel 2003 then click Next 4) Under Layout select GENZ Functional Actuals – Single then click Next 5) Under Content select None – then click Next
  • 35.
    Corporate Ops FinanceOracle Month-End Close Created: July 2010 Page 35 of 51 6) Click Create Document 7) Click Open and click on Enable Macros 8) Close the window that confirms document was created 9) Go to Tools – Protection – Unprotect Sheet 10) Format the file by adding in additional rows for data 11) Save the file as your Web ADI template – you won’t need to download each time
  • 36.
    Corporate Ops FinanceOracle Month-End Close Created: July 2010 Page 36 of 51 APPENDIX B How to Add an Attachment to an Unposted Journal Backup is required for all entries. Use your discretion on what to attach. Currently there are no guidelines in place for what type and size of backup to attach. NOTE: Be aware of confidential information when attaching backup. All users are able to view the journal as well as the backup attached. 1) Log In to Oracle 2) Under Journals – double click on Enter 3) Fill in as much information in order to help narrow down the search 4) Execute the search - Click the Find button
  • 37.
    Corporate Ops FinanceOracle Month-End Close Created: July 2010 Page 37 of 51 5) To select a journal click anywhere within the line item then Click on Review Journal 6) Click on the Paperclip button in the tool bar to attach your backup
  • 38.
    Corporate Ops FinanceOracle Month-End Close Created: July 2010 Page 38 of 51 7) Click on the Source Tab – then fill in the appropriate fields. In this instance the backup is an excel file. You can also have backup that is text, web page, etc. 8) An internet explorer window will pop up. Click on Browse and choose the file you wish to attach. Double click on the file name. Then click Submit 9) You will receive a message with confirmation that the file upload completed successfully. Close the message 10) You will receive a decision with “Has the file been uploaded successfully” – click the Yes button 11) The file has been attached – close all windows
  • 39.
    Corporate Ops FinanceOracle Month-End Close Created: July 2010 Page 39 of 51 APPENDIX C How to Post a Journal Entry 1) Log In to Oracle 2) Under Journals – double click on Enter 3) Fill in as much information in order to help narrow down the search 4) Execute the search - Click the Find button
  • 40.
    Corporate Ops FinanceOracle Month-End Close Created: July 2010 Page 40 of 51 5) To select a journal click anywhere within the line item then Click on Post 6) From the toolbar – click on View then click on Requests 7) Click on Find 8) Click on Refresh Data if the Phase status does not show Completed
  • 41.
    Corporate Ops FinanceOracle Month-End Close Created: July 2010 Page 41 of 51 APPENDIX D How to Print a Journal Entry 1) Log In to Oracle 2) Under Journals – double click on Enter 3) Fill in as much information in order to help narrow down the search 4) Execute the search - Click the Find button
  • 42.
    Corporate Ops FinanceOracle Month-End Close Created: July 2010 Page 42 of 51 5) To select a journal click anywhere within the line item then Click on Review Journal 6) Click in Account Field on line 1 (the account string will be highlighted) 7) From the toolbar – click on File then click on Export 8) If the below Decision Box pops up – click on Continue to End
  • 43.
    Corporate Ops FinanceOracle Month-End Close Created: July 2010 Page 43 of 51 9) Save the file – the text file will look like the below: 10) Open the file in Excel choose Delimited and Tab 11) Change the Account string column to be Text and click on Finish 12) Format the file as needed & print
  • 44.
    Corporate Ops FinanceOracle Month-End Close Created: July 2010 Page 44 of 51 APPENDIX E How to Run & Format an Account Analysis Report Note: The values pulled from this report are not unique account string values – to view a total value you need to create a pivot table of the data. Note: This report is similar to the Account Balance Detail Report (25.15.2) in MFG Pro if you choose criteria Order By: “line item” in the parameters of the report. 21) Log in to Oracle 22) Click on Reports: Requests – choose Standard 23) Choose Single Request and click OK 24) Click on the List of Values in the Name field and choose “Account Analysis (180 Char)” click OK 25) Fill in the parameters based on the information you need to retrieve 26) Enter the Flexfield From & To criteria based on the information you need to retrieve (the use of parent values is allowed when entering this information)
  • 45.
    Corporate Ops FinanceOracle Month-End Close Created: July 2010 Page 45 of 51 27) Click OK twice and then click on Submit 28) For Submit Another Request – click No 29) From the toolbar – click on View then click on Requests
  • 46.
    Corporate Ops FinanceOracle Month-End Close Created: July 2010 Page 46 of 51 30) Click on Find 31) Click on Refresh Data if the Phase status does not show Completed 32) Once status has Completed – click on View Output – save the text file 33) Open the file in Excel choose Fixed Width and move line breaks where appropriate (leave the account string as one column – can convert text to columns once the file is opened in Excel) 34) Change the Account string column to be Text and click on Finish 35) Format the file  Delete rows & columns  Need to perform a Text to Columns for column A to break out the account string (use Delimited and choose Other and enter a period); have the fields be in text format and click Finish  Add column headers to the account string Ent/SA Acct CC Proj Loc Intra Other Debits (USD) Credits (USD) 100000 6000000 4000 10000990 1224 000000 0 6,554.37 100000 6000000 4000 10000990 1224 000000 0 3,643.12 100000 6000000 4000 10000990 1224 000000 0 2,621.75 100000 6000000 4000 10000990 2771 000000 0 259.51 100000 6000000 4000 10000990 2772 000000 0 11,379.87
  • 47.
    Corporate Ops FinanceOracle Month-End Close Created: July 2010 Page 47 of 51  Create a pivot table based on criteria you are trying to view
  • 48.
    Corporate Ops FinanceOracle Month-End Close Created: July 2010 Page 48 of 51 APPENDIX F How to Approve a Journal Entry NOTE: Make sure your Oracle User Preferences are set up to receive email confirmations 1) An email confirmation will be sent to the approver when an entry has been submitted for approval 2) Log In to Oracle 3) Click on Other - Notifications 4) Execute the search for all open notifications – click Go 5) Open the notification by clicking on the link at the bottom of the form (ex. Journal Batch requires Approval) 6) Click the enter journals link to open the journal to review 7) To view the attachment – click the attachment button in the toolbar (paperclip) 8) Close the attachment form 9) If everything looks okay – click the Approve button. If not – click Reject
  • 49.
    Corporate Ops FinanceOracle Month-End Close Created: July 2010 Page 49 of 51 APPENDIX G How to Run a Trial Balance Report 1) Log in to Oracle 2) Click on Reports: Requests choose Standard 3) Choose Single Request and click OK 4) Click on the List of Values in the Name field and choose “Program-Publish FSG Report” 5) Click on the List of Values in the Report field and choose “GENZ Detail Trending” and click OK 6) Choose the 1st month of the year for period (ex. JAN-10) 7) Click in the field for Segment Override 8) Enter the below criteria and click OK (you may change parent values based on what you are trying to pull)
  • 50.
    Corporate Ops FinanceOracle Month-End Close Created: July 2010 Page 50 of 51 9) Click OK 10) Click on Options and under Format choose EXCEL and click OK twice or you can manually type in EXCEL in the Format field 11) Click Submit 12) For Submit Another Request – click No 13) From the toolbar – click on View then click on Requests
  • 51.
    Corporate Ops FinanceOracle Month-End Close Created: July 2010 Page 51 of 51 14) Click on Find 15) Click on Refresh Data if the Phase status does not show Completed 16) Once status has Completed – click on View Output – when prompted save the excel file and then open the file 17) Format the file  Need to perform a Text to Columns for column A to break out the account string  Perform additional formatting as needed (i.e. concatenate cc-loc; create pivot tables, etc.)