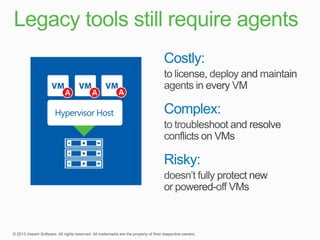
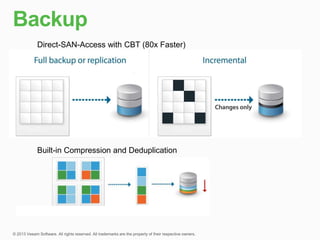
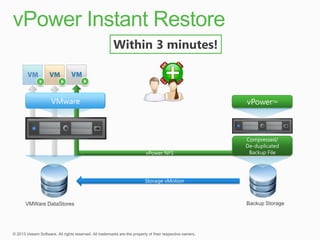
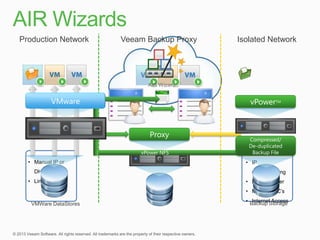
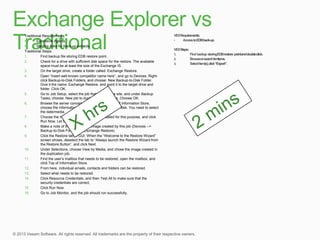
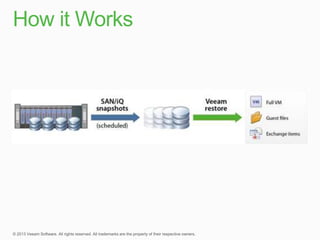
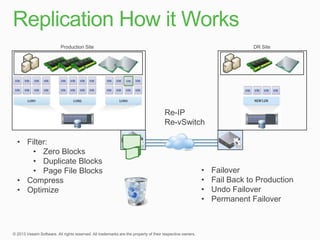
Direct-SAN-Access with CBT (80x Faster)


Built-in Compression and Deduplication
Within 3 minutes!


        VMware                             vPowerTM


                                           Compressed/
                                           De-duplicated
                         vPower NFS         Backup File


                         Storage vMotion


VMWare DataStores                          Backup Storage
Verification Job

                           VM
                           OS
                           App

                           Report


       VMware         vPowerTM


                     Compressed/
                     De-duplicated
                      Backup File


VMWare DataStores    Backup Storage
Production Network     Veeam Backup Proxy   Isolated Network


                             AIR Wizard


           VMware                              vPowerTM


                              Proxy
                                               Compressed/
                                               De-duplicated
                           vPower NFS           Backup File
  • Manual IP or                              • IP
    DHCP                                        masquerading
  • Linux Proxy                               • DHCP Server
                                              • Multiple NIC’s
                                              • Backup Storage
                                                 Internet Access
   VMWare DataStores
Traditional Requirements:
       Expensive Agents
       Staging Area for back-up extracts.
Traditional Steps:
1.        Find backup file storing EDB restore point.
2.        Check for a drive with sufficient disk space for the restore. The available
          space must be at least the size of the Exchange IS.
3.        On the target drive, create a folder called: Exchange Restore.
4.        Open “insert well-known competitor name here”, and go to Devices. Right-
          click Backup-to-Disk Folders, and choose: New Backup-to-Disk Folder.
          Give it the name: Exchange Restore, and point it to the target drive and
          folder. Click OK.
5.        Go to Job Setup, select the job that runs for the site, and under Backup
          Tasks, choose: New job to duplicate backup sets. Choose OK.
6.        Browse the server concerned, and under Microsoft Information Store,
          choose the Information Store you want to stage to disk. You need to select
          the date/media.
7.        Choose the new Backup-to-Disk folder created for this purpose, and click
          Run Now. Let the job complete.
8.        Make a note of the name of the image created by this job (Devices -->
          Backup-to-Disk Folders --> Exchange Restore).
9.        Click the Restore tab in GUI. When the “Welcome to the Restore Wizard”
          screen shows, deselect the tab to “Always launch the Restore Wizard from
          the Restore Button”, and click Next.
10.       Under Selections, choose View by Media, and chose the image created in
          the duplication job.
11.       Find the user’s mailbox that needs to be restored, open the mailbox, and
          click Top of Information Store.
12.       From here, individual emails, contacts and folders can be restored.
13.       Select what needs to be restored.
14.       Click Resource Credentials, and then Test All to make sure that the
          security credentials are correct,
15.       Click Run Now.
16.       Go to Job Monitor, and the job should run successfully.
Production Site                           DR Site


                                                      NEW LUN


                             Re-IP
                             Re-vSwitch

• Filter:
    • Zero Blocks
    • Duplicate Blocks
    • Page File Blocks                •   Failover
• Compress                            •   Fail Back to Production
• Optimize                            •   Undo Failover
                                      •   Permanent Failover
Get Veeam
in the lab!
Modern Data Protection

Modern Data Protection

  • 9.
    Direct-SAN-Access with CBT(80x Faster) Built-in Compression and Deduplication
  • 12.
    Within 3 minutes! VMware vPowerTM Compressed/ De-duplicated vPower NFS Backup File Storage vMotion VMWare DataStores Backup Storage
  • 13.
    Verification Job VM OS App Report VMware vPowerTM Compressed/ De-duplicated Backup File VMWare DataStores Backup Storage
  • 14.
    Production Network Veeam Backup Proxy Isolated Network AIR Wizard VMware vPowerTM Proxy Compressed/ De-duplicated vPower NFS Backup File • Manual IP or • IP DHCP masquerading • Linux Proxy • DHCP Server • Multiple NIC’s • Backup Storage Internet Access VMWare DataStores
  • 16.
    Traditional Requirements:  Expensive Agents  Staging Area for back-up extracts. Traditional Steps: 1. Find backup file storing EDB restore point. 2. Check for a drive with sufficient disk space for the restore. The available space must be at least the size of the Exchange IS. 3. On the target drive, create a folder called: Exchange Restore. 4. Open “insert well-known competitor name here”, and go to Devices. Right- click Backup-to-Disk Folders, and choose: New Backup-to-Disk Folder. Give it the name: Exchange Restore, and point it to the target drive and folder. Click OK. 5. Go to Job Setup, select the job that runs for the site, and under Backup Tasks, choose: New job to duplicate backup sets. Choose OK. 6. Browse the server concerned, and under Microsoft Information Store, choose the Information Store you want to stage to disk. You need to select the date/media. 7. Choose the new Backup-to-Disk folder created for this purpose, and click Run Now. Let the job complete. 8. Make a note of the name of the image created by this job (Devices --> Backup-to-Disk Folders --> Exchange Restore). 9. Click the Restore tab in GUI. When the “Welcome to the Restore Wizard” screen shows, deselect the tab to “Always launch the Restore Wizard from the Restore Button”, and click Next. 10. Under Selections, choose View by Media, and chose the image created in the duplication job. 11. Find the user’s mailbox that needs to be restored, open the mailbox, and click Top of Information Store. 12. From here, individual emails, contacts and folders can be restored. 13. Select what needs to be restored. 14. Click Resource Credentials, and then Test All to make sure that the security credentials are correct, 15. Click Run Now. 16. Go to Job Monitor, and the job should run successfully.
  • 21.
    Production Site DR Site NEW LUN Re-IP Re-vSwitch • Filter: • Zero Blocks • Duplicate Blocks • Page File Blocks • Failover • Compress • Fail Back to Production • Optimize • Undo Failover • Permanent Failover
  • 29.

Editor's Notes

  • #2 20130129 r1
  • #4 Additional source: 2008 Trends in Backup and Data Protection; April 2, 2008; Forrester Research, Inc.
  • #24 Source: Why we’re still resisting virtual backup best practices; November 8, 2010; http://itknowledgeexchange.techtarget.com/server-virtualization/why-were-still-resisting-virtual-backup-best-practices/