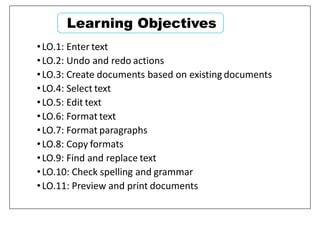
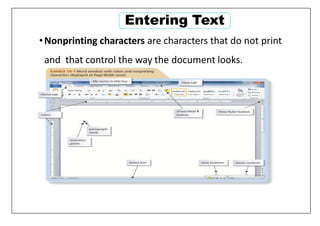
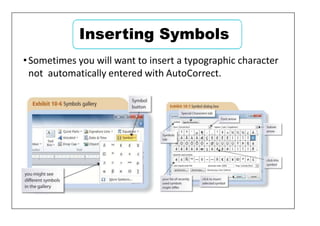
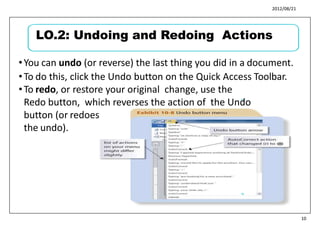
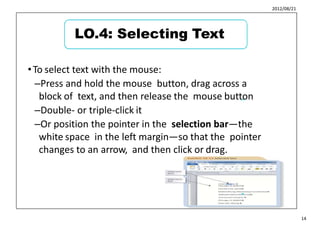
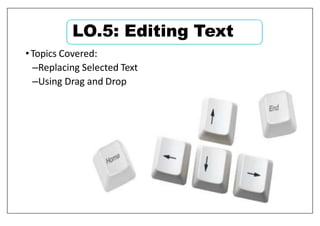
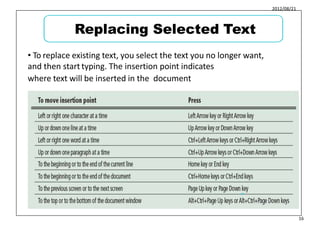
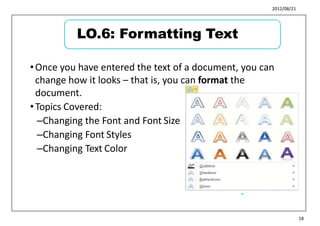
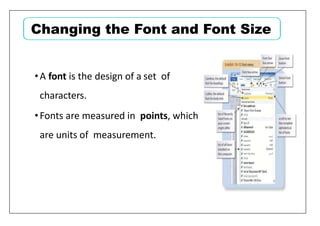
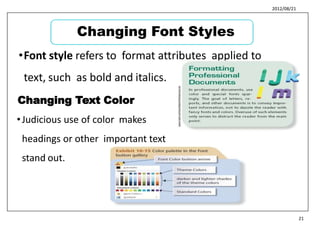
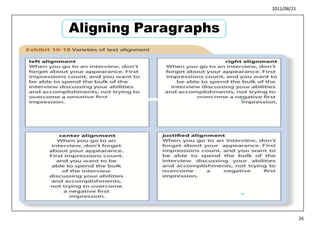
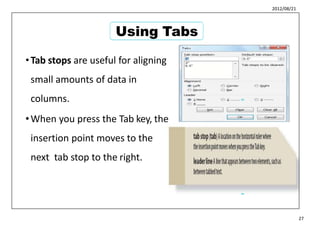
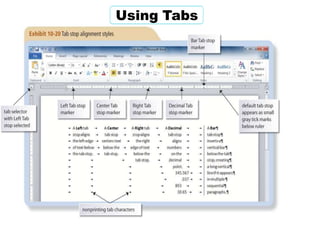
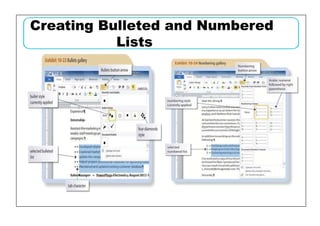
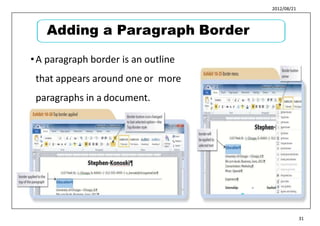
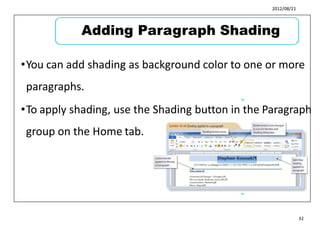
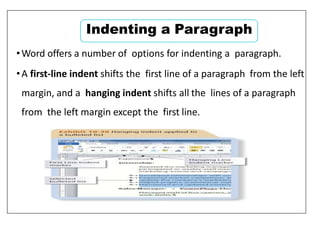
UPPER JUBBA UNIVERSITY
COMPUTER APPLICATIONS
CHAPTER FOUR
BY: ENG MOHAMED MOKTAR MOHAMED
Learning Objectives
•LO.1: Enter text
•LO.2: Undo and redo actions
•LO.3: Create documents based on existing documents
•LO.4: Select text
•LO.5: Edit text
•LO.6: Format text
•LO.7: Format paragraphs
•LO.8: Copy formats
•LO.9: Find and replace text
•LO.10: Check spelling and grammar
•LO.11: Preview and print documents
2012/08/21
•Microsoft Word 2010 is a word-processing program
used to enter, edit, and change the appearance of text.
•Topics Covered:
–Entering Text
–Inserting a Date with AutoComplete
–Correcting Errors as You Type
–Inserting Symbols
3
4
3
LO.1: Entering Text
•Nonprinting characters are characters that do not print
and that control the way the document looks.
Entering Text
2012/08/21
•To enter text in a Word document, simply start typing.
•The characters you type appear at the insertion point.
•Backspace key deletes the characters and spaces to the
left of the insertion point one at a time.
•Delete key deletes the characters and spaces to the
right of the insertion point one at a time.
•Enter key creates a new paragraph.
5
6
5
Entering Text
•When you insert dates, you can take advantage of
AutoComplete, a feature that automatically inserts
dates and other regularly used items.
Inserting a Date with AutoComplete
2012/08/21
•The AutoCorrect feature automatically corrects certain
misspelled words and typing errors.
•Printed publications usually include typographic characters,
which are special characters not included on the standard
keyboard and that appear in professionally prepared
documents.
7
8
7
Correcting Errors as You Type
2012/08/21
•It is possible to customize AutoCorrect.
–Undo the AutoCorrection
–Instruct AutoCorrect to stop making a particular
– type of correction
•Control AutoCorrect Options
9
10
8
Correcting Errors as You Type
•Sometimes you will want to insert a typographic character
not automatically entered with AutoCorrect.
Inserting Symbols
2012/08/21
•You can undo (or reverse) the last thing you did in a document.
•To do this, click the Undo button on the Quick Access Toolbar.
•To redo, or restore your original change, use the
Redo button, which reverses the action of the Undo
button (or redoes
the undo).
11
12
10
LO.2: Undoing and Redoing Actions
•Topics Covered:
–Using the Save As Command
–Using the New from Existing Command
LO.3: Creating Documents
Based on Existing Documents
2012/08/21
•When you open a document and then save
it with a new name, you create a copy of
the original document. 13
14
12
Using the Save As Command
•Another way to create a copy of a document is to use the New
from existing command.
•Unlike using the Save As command, where you open the
original document and then create a copy by saving it with a
new name, the New from existing command opens a copy of
the document as a new document.
•You can also use a template as your starting point.
–A file that contains instructions for changing the
appearance of text and graphics, and often sample content,
to guide you as your develop your own content.
–Found on New tab in Backstage view or on Office.com.
Using the New from Existing
Command
2012/08/21
15
•To select text with the mouse:
–Press and hold the mouse button, drag across a
block of text, and then release the mouse button
–Double- or triple-click it
–Or position the pointer in the selection bar—the
white space in the left margin—so that the pointer
changes to an arrow, and then click or drag.
16
14
LO.4: Selecting Text
•Topics Covered:
–Replacing Selected Text
–Using Drag and Drop
LO.5: Editing Text
2012/08/21
• To replace existing text, you select the text you no longer want,
and then start typing. The insertion point indicates
where text will be inserted in the document
19
20
16
Replacing Selected Text
•To use drag and drop to move text, select the text you want to
move, press and hold the mouse button, drag the selected text
to a new location, and then release the mouse button.
•Unlike the Cut or Copy commands, when you drag and drop,
the text you drag is not placed on the Clipboard.
Using Drag and Drop
2012/08/21
21
•Once you have entered the text of a document, you can
change how it looks – that is, you can format the
document.
•Topics Covered:
–Changing the Font and Font Size
–Changing Font Styles
–Changing Text Color
22
18
LO.6: Formatting Text
2012/08/21
•The purpose of formatting is to make the document
attractive, emphasize certain points in the document,
and make the organization and flow of the document
clear to readers.
23
24
19
LO.6: Formatting Text
•A font is the design of a set of
characters.
•Fonts are measured in points, which
are units of measurement.
Changing the Font and Font Size
2012/08/21
•Font style refers to format attributes applied to
text, such as bold and italics.
25
26
21
Changing Font Styles
Changing Text Color
•Judicious use of color makes
headings or other important text
stand out.
2012/08/21
•Topics Covered:
–Adjusting Paragraph Spacing
–Adjusting Line Spacing
–Aligning Paragraphs
–Using Tabs
–Creating Bulleted and Numbered Lists
–Adding a Paragraph Border
–Adding Paragraph Shading
–Indenting a Paragraph
27
28
22
LO.7: Formatting Paragraphs
•Paragraph spacing refers to the space that appears
directly above and below a paragraph.
Adjusting Paragraph Spacing
2012/08/21
•Line spacing is the amount of space that appears between
lines of text within a paragraph.
•Para graphs formatted with the 1.0 setting are called single
spaced.
•Paragraphs formatted with the 2.0 setting are called double
spaced and have a blank line of space between each line of
text in the paragraph.
29
30
24
Adjusting Line Spacing
•Normal paragraphs are left-aligned—they are flush with the left
margin and ragged, or uneven, along the right margin.
•Right-aligned paragraphs are aligned along the right margin and
ragged along the left margin.
•Paragraphs that are centered are positioned midway between the
left and right margins and ragged along both margins.
•Justified paragraphs are flush with both the left and right
margins.
Aligning Paragraphs
2012/08/21
Aligning Paragraphs
31
32
26
2012/08/21
•Tab stops are useful for aligning
small amounts of data in
columns.
•When you press the Tab key, the
insertion point moves to the
next tab stop to the right.
33
34
27
Using Tabs
Using Tabs
2012/08/21
•A bulleted list is a group of related paragraphs with a symbol,
such as a dot, dash, or other character, that appears to the left
of each paragraph.
•For a group of related paragraphs that have a particular order
(such as steps in a procedure), you can use numbers instead
of bullets to create a numbered list.
35
36
29
Creating Bulleted and Numbered Lists
Creating Bulleted and Numbered
Lists
2012/08/21
Adding a Paragraph Border
37
38
31
•A paragraph border is an outline
that appears around one or more
paragraphs in a document.
2012/08/21
•You can add shading as background color to one or more
paragraphs.
•To apply shading, use the Shading button in the Paragraph
group on the Home tab.
39
40
32
Adding Paragraph Shading
•Word offers a number of options for indenting a paragraph.
•A first-line indent shifts the first line of a paragraph from the left
margin, and a hanging indent shifts all the lines of a paragraph
from the left margin except the first line.
Indenting a Paragraph
2012/08/21
•Topics Covered:
–Using the Format Painter
–Using Paste Options
41
42
34
LO.8: Copying Formats
Using the Format Painter
The Format Painter is a tool that allows you to
copy formatting from one location to another,
such as from one paragraph of text to another.
2012/08/21
•When you paste text in Word, a Paste Options button
appears below the lower-right corner of the pasted text.
•You can click this button to open a menu with buttons
that control the formatting of the pasted text.
43
44
35
Using Paste Options
•Topics Covered:
–Finding Text
–Replacing Specific Text
LO.9: Finding and Replacing Text
2012/08/21
•To find specific text in a document, first open the
Navigation Pane by clicking the Find button in the Editing
group on the Home tab.
•Then, in the Search Document box in the Navigation Pane,
type the text for which you are searching.
•As you type, Word highlights every instance of the search
text in the document, and a list of text snippets containing
each instance of the search text appears in the Navigation
Pane.
45
46
37
Finding Text
2012/08/21
•You can replace specific text using the Find and Replace
dialog box, which you open by clicking the Replace
button in the Editing group on the Home tab.
•Be careful when you use the Replace All command.
47
48
38
Replacing Specific Text
•Topics Covered:
–Checking Flagged Words Individually
–Checking the Spelling in the Entire
Document
LO.10: Checking Spelling and
Grammar
2012/08/21
•You can right-click a word flagged with a colored wavy
underline to open a shortcut menu containing
suggestions for alternate spellings or a correction for a
grammatical error as well as commands for ignoring the
misspelled word or grammatical error or opening the
Spelling dialog box.
49
50
40
Checking Flagged Words Individually
•To spell-check the entire document, click the
Spelling & Grammar button in the Proofing
group on the Review tab.
Checking the Spelling in the Entire
Document
2012/08/21
•To be sure the document is ready to print, and to avoid
wasting paper and time, you should first review it on
the Print tab in Backstage view to make sure it will
appear as you want when printed.
51
l
52
42
LO.11: Previewing and Printing Documents

chapter 4 Creating a Document.pptx

  • 1.
    UPPER JUBBA UNIVERSITY COMPUTERAPPLICATIONS CHAPTER FOUR BY: ENG MOHAMED MOKTAR MOHAMED
  • 2.
    Learning Objectives •LO.1: Entertext •LO.2: Undo and redo actions •LO.3: Create documents based on existing documents •LO.4: Select text •LO.5: Edit text •LO.6: Format text •LO.7: Format paragraphs •LO.8: Copy formats •LO.9: Find and replace text •LO.10: Check spelling and grammar •LO.11: Preview and print documents
  • 3.
    2012/08/21 •Microsoft Word 2010is a word-processing program used to enter, edit, and change the appearance of text. •Topics Covered: –Entering Text –Inserting a Date with AutoComplete –Correcting Errors as You Type –Inserting Symbols 3 4 3 LO.1: Entering Text
  • 4.
    •Nonprinting characters arecharacters that do not print and that control the way the document looks. Entering Text
  • 5.
    2012/08/21 •To enter textin a Word document, simply start typing. •The characters you type appear at the insertion point. •Backspace key deletes the characters and spaces to the left of the insertion point one at a time. •Delete key deletes the characters and spaces to the right of the insertion point one at a time. •Enter key creates a new paragraph. 5 6 5 Entering Text
  • 6.
    •When you insertdates, you can take advantage of AutoComplete, a feature that automatically inserts dates and other regularly used items. Inserting a Date with AutoComplete
  • 7.
    2012/08/21 •The AutoCorrect featureautomatically corrects certain misspelled words and typing errors. •Printed publications usually include typographic characters, which are special characters not included on the standard keyboard and that appear in professionally prepared documents. 7 8 7 Correcting Errors as You Type
  • 8.
    2012/08/21 •It is possibleto customize AutoCorrect. –Undo the AutoCorrection –Instruct AutoCorrect to stop making a particular – type of correction •Control AutoCorrect Options 9 10 8 Correcting Errors as You Type
  • 9.
    •Sometimes you willwant to insert a typographic character not automatically entered with AutoCorrect. Inserting Symbols
  • 10.
    2012/08/21 •You can undo(or reverse) the last thing you did in a document. •To do this, click the Undo button on the Quick Access Toolbar. •To redo, or restore your original change, use the Redo button, which reverses the action of the Undo button (or redoes the undo). 11 12 10 LO.2: Undoing and Redoing Actions
  • 11.
    •Topics Covered: –Using theSave As Command –Using the New from Existing Command LO.3: Creating Documents Based on Existing Documents
  • 12.
    2012/08/21 •When you opena document and then save it with a new name, you create a copy of the original document. 13 14 12 Using the Save As Command
  • 13.
    •Another way tocreate a copy of a document is to use the New from existing command. •Unlike using the Save As command, where you open the original document and then create a copy by saving it with a new name, the New from existing command opens a copy of the document as a new document. •You can also use a template as your starting point. –A file that contains instructions for changing the appearance of text and graphics, and often sample content, to guide you as your develop your own content. –Found on New tab in Backstage view or on Office.com. Using the New from Existing Command
  • 14.
    2012/08/21 15 •To select textwith the mouse: –Press and hold the mouse button, drag across a block of text, and then release the mouse button –Double- or triple-click it –Or position the pointer in the selection bar—the white space in the left margin—so that the pointer changes to an arrow, and then click or drag. 16 14 LO.4: Selecting Text
  • 15.
    •Topics Covered: –Replacing SelectedText –Using Drag and Drop LO.5: Editing Text
  • 16.
    2012/08/21 • To replaceexisting text, you select the text you no longer want, and then start typing. The insertion point indicates where text will be inserted in the document 19 20 16 Replacing Selected Text
  • 17.
    •To use dragand drop to move text, select the text you want to move, press and hold the mouse button, drag the selected text to a new location, and then release the mouse button. •Unlike the Cut or Copy commands, when you drag and drop, the text you drag is not placed on the Clipboard. Using Drag and Drop
  • 18.
    2012/08/21 21 •Once you haveentered the text of a document, you can change how it looks – that is, you can format the document. •Topics Covered: –Changing the Font and Font Size –Changing Font Styles –Changing Text Color 22 18 LO.6: Formatting Text
  • 19.
    2012/08/21 •The purpose offormatting is to make the document attractive, emphasize certain points in the document, and make the organization and flow of the document clear to readers. 23 24 19 LO.6: Formatting Text
  • 20.
    •A font isthe design of a set of characters. •Fonts are measured in points, which are units of measurement. Changing the Font and Font Size
  • 21.
    2012/08/21 •Font style refersto format attributes applied to text, such as bold and italics. 25 26 21 Changing Font Styles Changing Text Color •Judicious use of color makes headings or other important text stand out.
  • 22.
    2012/08/21 •Topics Covered: –Adjusting ParagraphSpacing –Adjusting Line Spacing –Aligning Paragraphs –Using Tabs –Creating Bulleted and Numbered Lists –Adding a Paragraph Border –Adding Paragraph Shading –Indenting a Paragraph 27 28 22 LO.7: Formatting Paragraphs
  • 23.
    •Paragraph spacing refersto the space that appears directly above and below a paragraph. Adjusting Paragraph Spacing
  • 24.
    2012/08/21 •Line spacing isthe amount of space that appears between lines of text within a paragraph. •Para graphs formatted with the 1.0 setting are called single spaced. •Paragraphs formatted with the 2.0 setting are called double spaced and have a blank line of space between each line of text in the paragraph. 29 30 24 Adjusting Line Spacing
  • 25.
    •Normal paragraphs areleft-aligned—they are flush with the left margin and ragged, or uneven, along the right margin. •Right-aligned paragraphs are aligned along the right margin and ragged along the left margin. •Paragraphs that are centered are positioned midway between the left and right margins and ragged along both margins. •Justified paragraphs are flush with both the left and right margins. Aligning Paragraphs
  • 26.
  • 27.
    2012/08/21 •Tab stops areuseful for aligning small amounts of data in columns. •When you press the Tab key, the insertion point moves to the next tab stop to the right. 33 34 27 Using Tabs
  • 28.
  • 29.
    2012/08/21 •A bulleted listis a group of related paragraphs with a symbol, such as a dot, dash, or other character, that appears to the left of each paragraph. •For a group of related paragraphs that have a particular order (such as steps in a procedure), you can use numbers instead of bullets to create a numbered list. 35 36 29 Creating Bulleted and Numbered Lists
  • 30.
    Creating Bulleted andNumbered Lists
  • 31.
    2012/08/21 Adding a ParagraphBorder 37 38 31 •A paragraph border is an outline that appears around one or more paragraphs in a document.
  • 32.
    2012/08/21 •You can addshading as background color to one or more paragraphs. •To apply shading, use the Shading button in the Paragraph group on the Home tab. 39 40 32 Adding Paragraph Shading
  • 33.
    •Word offers anumber of options for indenting a paragraph. •A first-line indent shifts the first line of a paragraph from the left margin, and a hanging indent shifts all the lines of a paragraph from the left margin except the first line. Indenting a Paragraph
  • 34.
    2012/08/21 •Topics Covered: –Using theFormat Painter –Using Paste Options 41 42 34 LO.8: Copying Formats Using the Format Painter The Format Painter is a tool that allows you to copy formatting from one location to another, such as from one paragraph of text to another.
  • 35.
    2012/08/21 •When you pastetext in Word, a Paste Options button appears below the lower-right corner of the pasted text. •You can click this button to open a menu with buttons that control the formatting of the pasted text. 43 44 35 Using Paste Options
  • 36.
    •Topics Covered: –Finding Text –ReplacingSpecific Text LO.9: Finding and Replacing Text
  • 37.
    2012/08/21 •To find specifictext in a document, first open the Navigation Pane by clicking the Find button in the Editing group on the Home tab. •Then, in the Search Document box in the Navigation Pane, type the text for which you are searching. •As you type, Word highlights every instance of the search text in the document, and a list of text snippets containing each instance of the search text appears in the Navigation Pane. 45 46 37 Finding Text
  • 38.
    2012/08/21 •You can replacespecific text using the Find and Replace dialog box, which you open by clicking the Replace button in the Editing group on the Home tab. •Be careful when you use the Replace All command. 47 48 38 Replacing Specific Text
  • 39.
    •Topics Covered: –Checking FlaggedWords Individually –Checking the Spelling in the Entire Document LO.10: Checking Spelling and Grammar
  • 40.
    2012/08/21 •You can right-clicka word flagged with a colored wavy underline to open a shortcut menu containing suggestions for alternate spellings or a correction for a grammatical error as well as commands for ignoring the misspelled word or grammatical error or opening the Spelling dialog box. 49 50 40 Checking Flagged Words Individually
  • 41.
    •To spell-check theentire document, click the Spelling & Grammar button in the Proofing group on the Review tab. Checking the Spelling in the Entire Document
  • 42.
    2012/08/21 •To be surethe document is ready to print, and to avoid wasting paper and time, you should first review it on the Print tab in Backstage view to make sure it will appear as you want when printed. 51 l 52 42 LO.11: Previewing and Printing Documents