SlideShare a Scribd company logo
1 of 111
Download to read offline
Development of a conceptual
Space Smart
Kitchen Mixer
Marlene Holm
Olof Nordström
Master of Science in Industrial Design Engineering
Product Design
March 2013
Luleå University of Technology!,
Department of Business Administration, Technology and Social Science
Division of Innovation and Design
Acknowledgement
We wish to express our sincere gratitude to the people that made this project possible.
First of all, we want to thank our supervisor and professor Dennis Pettersson for believing in
our project. Our sincere thanks also goes to our examiner Åsa Wikberg Nilsson for her great
advice and assistance.
David Eriksson for all the time he spent on helping us with feedback and guidance. We are
of course extra thankful for him inviting us to work in his office at the design consultancy firm
SKAPA. We also want to thank Johan Unga for the inspiration and moral support at the
office.
We are grateful and indebted to David & SKAPA for tutoring and giving us full access to their
3D printer, 24/7, for weeks. Because of their selfless contribution, they gave us the
opportunity to make a full-scale prototype, even though the project took place in Stockholm.
A special thanks goes to Gerard Cina who supported us with great inspiration, information
and materials that otherwise would be impossible to find.
We also want to thank all the people that assisted us with information in the interviews and
user study, especially Tina & Stig Holm, Eva Forsberg, Karin & Martin Oskarsson and David
Eriksson.
For great inspiration and for believing in our project, we want to thank all our friends, in
particular Robert Bäcklund, Maria Persson, Anna Särhammar, Kamilla Prevolnik and Björn
Nygren.
We wish to express our love and gratitude to our beloved friends and families; for their
understanding & endless love, through the duration of our studies.
Marlene Holm and Olof Nordström
Stockholm, 08-03-2013
Abstract
The increased interest in cooking and culinary experiences of the urban Y-generation forms
the basis for this master thesis for the MSc program Industrial Design Engineering, Luleå
University of Technology Oktober 2012 – March 2013.
The authors, Marlene Holm and Olof Nordström, have developed a product concept based
on the former kitchen mixer Electrolux N15, that fills the gap in the product segment that is
referred to as Urban Compact Living, in which there is currently no equivalent product
offered.
The focus has been on understanding the market segment and defining the target customer
in order to conduct multiple user tests and observations to design a product with high
usability and user satisfaction.
Two stand mixers of the wall mounted model Electrolux N15, with all the attachments and
manuals, was purchased and forms the base for making the practical tests and studies.
Much of the work consists of usability analyzes in order to understand what users want,
both what they consciously seek but also implicit needs; what they do not yet know that
they want. User studies are conducted where users are observed and the product’s
usability is analyzed with the help of a CW, -Cognitive Walkthrough and a PHEA, -Predicted
Human Error Analysis test.
Electrolux's design dna is analyzed to create a product that exudes their visual brand
identity and meet the customer expectations. The idea generation is an iterative process
where creative tools such as brainstorming, exploratory sketching and clay modelling are
used to create the concept, its features and final design. To further develop and visualize,
the concept is 3D-modeled in CAD software and finally rendered into photo realistic images.
A full scale prototype is made using a 3D printer to evaluate the shape and the size.
The result is an innovative, user friendly and time saving stand mixer that inspires people
with an urban lifestyle and a compact living to a true and wholesome cooking experience.
List of Contents
1 Introduction 6
1.1 Background 6
1.1.2 Project Background 6
1.2 Aim 6
1.3 Deliverables 1
1.3.1 Sub Deliverables 1
1.4 Delimitation 1
1.5 Project Process 8
1.6 Report Layout 8
2. The Present 9
2.2 Mixer Market 9
2.3 The Company 10
2.3.1. Electrolux Group 10
2.4 The Product 10
2.4.1 Design Features 10
2.4.2 Attachments 11
2.4.3 Wall Mounting 13
3 Theory 14
3.1 Facts of Stand Mixers 14
3.1.1 Facts of Spiral Mixers 14
3.1.2 Facts of Planetary Mixers 15
3.1.3 Facts of Baking & Cooking 15
3.3 Design Theory 15
3.3.1 Principles of Design 15
3.3.2 Elements of Design 16
3.3.3 Why Design? 16
3.3.4 Timeless Design 16
3.4. Product Experience 17
3.5 Usability 17
3.6 Technologies & Material 17
3.6.1 Induction Cooking 17
3.6.2 Load Cells 17
3.6.3. Stick Free Surfaces 18
3.7 Software & Prototyping 18
3.7.1 UGS Siemens NX8 18
3.7.2. Luxion KeyShot 18
3.7.3 3D-printing 18
4. Method 19
4.1 Design Process 19
4.2 Project Planning Methods 19
4.2.1 Concept Map 19
4.2.2 GANTT-Chart 19
4.3 Data Collecting Methods 19
4.3.1 Benchmarking 19
4.3.2 Digital Survey 20
4.3.3 User Interviews 20
4.3.4 Observations 20
4.3.5 PHEA 20
4.3 Analysis Methods 20
4.1.1 S.W.O.T. Analysis 20
4.1.2 User Scenarios 20
4.1.3 Matrix of Features 21
4.1.4 HTA - Function Analysis 21
4.4 Idea Generating 21
4.4.1 Moodboards 21
4.4.2 Wordle 21
4.4.3 Brainstorming 21
4.4.4 Visualstorming 21
4.4.5 Designing For The Extremes 21
4.4.5 Exploratory Sketching 22
4.4.6 Industrial Clay Modeling 22
4.5 Evaluation Methods 22
4.5.1 Explanatory Sketching 22
4.5.2 Design Specification 22
5. Research & Analysis 23
5.1 The Company 23
5.1.1 Electrolux Brand Identity 23
5.1.2 Design Language 23
5.1.3 Design Lab 24
9
5.2 The Market 24
5.2.1 Market Segments 24
5.2.2 Competitor Analysis 25
5.3 The User 25
5.3.1 User Survey 25
5.3.2 Internet Observations 25
5.3.3 Habits 26
5.3.4 Scenarios 26
5.4 The Product 26
5.4.1 N15 Brochure 26
5.4.2 N15 Interview 27
5.4.3 Hands On Tests 27
5.4.4 Construction Analysis 27
5.4.5 SWOT Analysis 29
5.4.6 Conclusions of the Tests 29
5.4.7 HTA 30
5.4.8 CW and PHEA Test 30
5.4.9 Support Functions 31
5.5 Conclusion 31
5.5.1 Mission Statement 31
5.5.1 Target User 31
5.5.1 Feature Chart 31
6. Design Specification 37
7. Concept Development 37
7.1 Idea Generation 34
7.1.1 Moodboards 34
7.1.2 Wordle 34
7.1.3 Brainstorming 34
7.1.4 Extremes 35
7.1.5 Visualstorming 35
7.1.6 Exploratory Sketching 35
7.1.7 Clay Modeling 35
7.1.7 Conclusion 35
8. Further Development 37
8.1 Head Unit 37
8.1.1 Design & Form 37
8.1.2 Mechanics 37
8.1.3 Upper Arm 38
8.1.4 Lower Arm 39
8.1.5 Buttons And Rotary Switches 39
8.1.6 Built in scale 39
8.1.7 Induction 39
8.1.8 Timer 39
8.1.9 Effect 39
8.1.10 Cord Winder 39
8.2 Attachments 39
8.2.1 Hook & Beaters 39
8.2.2 Blender 40
8.2.3 Coffee Grinder 40
8.3 Interface Design 40
8.4 Mounting 42
8.3 Materials 41
8.1 Prototyping 42
8.1.1 CAD 42
8.1.2 Rendering 42
8.1.3 3D-Printing 42
9. The Result 43
9.1 The Product 43
9.2 Usage 45
9.3 Functions 49
9.3.1 Kneading, Whipping & Stirring 49
9.3.2 Blender 50
9.3.3 Coffe Grinder 50
9.3.4 Built in features 50
9.3.5 Cord Winder, ’Cable Cave’ 50
9.3.6 Mounting Plate - Knife Magnet 50
9.4 Design 51
9.5 Evaluatin 53
9.5.1 Prototype 53
9.5.2 CW & Error Analysis 53
10. Discussion 55
10.1 Process 55
10.2 Further Development 56
10.3 Recommendations 56
11. Outcome 57
References 57
6
1 Introduction
This report covers a master thesis in product design for the program Industrial
Design Engineering at Luleå University of Technology conducted autumn 2012
- spring 2013. The product development work has been performed by Marlene
Holm and Olof Nordström where the stand mixer N15 has been modernized and
adapted for today's market. The focus has been on understanding the market
segment and finding the target customer to design a product based on the best
possible user experience. In this first chapter we give a context for the project and
state the mission, vision and delimitation.
1.1 Background
What is it that makes us recognize a product as
better or worse than another one? Why do we
inexplicably fall in love in certain products? What
factors are involved? How can we as product
designers understand people around us so we can
give them what they really want?
The purpose for this product development project
is to deliver a concept for a wall mounted stand
mixer based on the mechanical principles of the
Electrolux N15.
1.1.1 Project Background
The idea of the thesis was born when an old
kitchen mixer was found in the kitchen of marlenes
parents' house. This model from Electrolux did not
look like any other kitchen mixer and appeared very
compact and functional. While we see an upward
trend in traditional cooking, and thus also demand
of kitchen machines, many people today are living
in compact one-person households. We saw a
need for a kitchen mixer like the one we found and
decided to find out how it would look and function if
it would be re-launched in the Electrolux range of
kitchen appliances. This thesis was conducted
without the collaboration with Electrolux.
Often, kitchen machines occupies large areas of
workspace that exist in smaller apartments. Since
they are generally heavy and large they are often
seen as "clumsy" to both store and take out. In the
smaller household, it may therefore seem
impossible to invest in a kitchen machine. Electrolux
has over the years have many products on the
market, but one of their popular products has been
discontinued, which has left a gap in this market
segment. During some years in the mid-eighties
there was a stand Mixer, the Electrolux N15, which
is a smart and compact solution for a wall-hung
kitchen machine.
What makes it unique is that it is hung on a
mounting plate screwed directly into the wall or
onto a bracket mounted under the kitchen cabinet.
It fits well both in the small student apartment as
well as in the large household and unlike today's
options, it doesn't occupy much space. With its
short setup time, it is also quick and easy to
prepare for use and with its various accessories it is
versatile and has multiple uses.
1.2 Aim
The project aim is to develop a space smart
concept of a kitchen mixer that fills the gap in the
Electrolux range that the stand mixer N15 made
when it was taken out of production. The aim is
also to explore Electrolux's customer segments and
to define the target customer for this product
concept. User-centered design methods for
analyzing the concept will be explored and carried
out to develop a concept with high user
satisfaction.
7
Furthermore, we want to understand the factors
that make users experience a product as better or
worse than another and as what it is that gives an
unexplained relationship with their products. When
we understand the emotional experiences, we can
help give users what they really want.
1.3 Deliverables
With a thorough needs analysis and a carefully
executed design process the objective for this
project is to develop a feasible concept for a wall
mounted stand mixer suitable for the Electrolux
home product range.
This concept will be founded on the Electrolux
N15’s unique advantages and it is important that
the product will meet user’s high demands on form
and function. To understand the factors that
provide as a good product experience and a true
product relationships a great emphasis is put on
understanding the human satisfaction.
1.3.1 Sub Deliverables
1. Understand the culture of baking and
cooking as well as the market of stand
mixers
2. Identify the wants and needs of the stand
mixer users
3. Analyze the Electrolux market and define
the stand mixer’s market segments
4. Analyze the Electrolux N15 and find the
strengths and weaknesses
5. Set up a list of requirements and
preferences for the Electrolux stand mixer
concept
6. Sketching and brainstorming to find
interesting solutions and design
expressions
7. Develop concepts that is realistic and
consistent with the Electrolux design.
8. Develop a chosen design concept
9. Further development of chosen concept
until every detail is worked thoroughly
10. Deliver a final concept presented as 2D
and 3D renderings with production
recommendations for further development
1.4 Delimitation
All work needed for the realization of this concept
cannot be covered in this project due to the given
limitations of time and resourses. Those are
presented in this section of delimitation.
Recommendations for further work on this project
can be found at the end of the report.
1. The project focus on the Western market
and particularly Scandinavia as the food
habits differ among regions and cultures and
the analysis is mostly taken place in Sweden.
2. The final concept should contain technology
that is available or under development and
realistic to be available within 10 years.
3. Electronic components will not be specified
4. Methods of manufacturing will not be stated
but are taken into account in the design
process
5. No estimate of costs related to the
manufacturing will be done.
6. Strength calculations are not taken into
account.
7. Packaging for the product will not be
developed.
8
1.5 Project Process
Once the problem of the project is defined with
limitations and a clear picture of the purpose and
objective, the project is divided into five phases.
Time limited phases with interim targets simplify
detailed project planning.
The plan is used as a daily tool for direct feedback
on how the project goes according to schedule. A
Gantt-schedule was made based on the mission
statement. For each task the Gantt-schedule has a
vertical time line running along a time axis. Several
tasks can run parallel to each other along the time
axis. (Johannesson, Persson & Pettersson, 2004)
This project is divided into the following six phases.
See figure 1.
1.6 Report Layout
This project follows a thesis report and contains,
besides from the introduction, the theory section
and at the methodology section a pre study, a user
study, an analysis, a concept development, further
development and that can be read for a deeper
understanding, of the product development
process. The theory section provides the reader
with information that is not considered to be
common knowledge but is essential for the
development process. The reader can take part of
the design process and the result without reading
neither the introduction, the theory or the
methodology section.
Figure 2 The report layout
Pre Study User Study Analysis Concept Development Further Development Result
Figure 1 The design process
9
2 The Present
Urban compact living, that is where we are today. More time and inspiration in the kitchen,
that is where we are heading. In today’s kitchens there is no product that alone offers the most
needed functions e.g. mixing, chopping, kneading and grinding, that is always at hand. Instead
the kitchens are cluttered with specialized appliances that steal space and are difficult to find.
The stand mixer market has not evolved since the first stand mixers came along many decades
ago. A smart kitchen machine once offered by the Electrolux may be the answer in our quest for
an emphatic and inspiring concept
2.1 Kitchen Kitchen Mixer
Market
Kitchen mixers come in a wide range of models from
different manufacturers, for both home and
professional use. The main purpose of the kitchen
mixer is to knead large dough and mix batter.
Standard equipment also includes beater for
whipping cream. For most models, there are
additional equipment to buy, such as meat grinder,
strainer and vegetable cutter. Some also have
sausage horn, pasta rolls and blender.
The Scandinavian market of kitchen stand mixers are
dominated by two models, 'KitchenAid' and
'Ankarsrum Assistent' (former Electrolux Assistent).
These two stand mixers were launched in the 1930s
respectively 1940s and have, up to this day, only
seen some minor design changes.
The KitchenAid and the Ankarsrum Assistant have
become design classics due to how well they meet
the criteria of timeless design, they have clearly stood
the test of time. (KitchenAid 2012, 1a), (Assistent
2012, 1a)
Besides the KitchenAid and the assistent, most
manufacturers of small kitchen appliances have a
kitchen mixer in their range of products.
Assistent	
  
Orginal	
  
Kenwood	
  
Kitchenaid	
   Krups	
  
OBH	
  
Nordica	
  
Bosch	
  
Figure 3 Six popular kitchen mixers
10
2.2 The Company
Since the project deals with the development of an existing
product from Electrolux, here is a brief introduction to the
Electrolux Group and their brands.
2.2.1. Electrolux Group
Electrolux is a Swedish company group which since
1919 has delivered and manufactured home
appliances to households all around the world.
Electrolux is a global leader in household appliances
and appliances for professional use, selling more than
40 million products to customers in more than 150
markets every year. They are investing heavily in
innovation and development with the goal of making
people's everyday life easier and more enjoyable.
Electrolux products include refrigerators,
dishwashers, washing machines, vacuum cleaners,
cookers and air-conditioners sold under esteemed
brands such as Electrolux, AEG, Eureka and
Frigidaire. In 2011 Electrolux had sales of SEK 102
billion and 58,000 employees. (Electrolux group,
2012)
2.2.2 Electrolux Brand
Since 2011, Electrolux's flagship brand "Electrolux"
has changed its positioning, from being a brand in the
medium segment, into offering premium household
products in the high-end segment.
“Thinking of you” is the core message and expresses
the Electrolux offering; To maintain continuous focus
on the consumer, whether it’s a question of product
development, design, production, marketing, logistics
or service. The company focuses on innovations that
are thoughtfully designed, based on extensive
consumer insight, to meet the real needs of
consumers and professionals. (Electrolux, 2012 1a)
Electrolux have the Scandinavian design values:
"freedom, intuition, authenticity, comfort and
simplicity." (Electrolux group, 2012)
2.3 The Product
Electrolux N15 is a stand mixer produced and sold in
the early 80's to the late 80's. It has a smart design
where the machine’s functional elements are folded
out when used not to take away unnecessarily
workspace when not in use.The purpose of the N15
is that the machine will always be on display to
encourage use, increase accessibility and leave more
space on the kitchen counter. With its unique design,
it is still the only one of its kind.
2.3.1 Design Features
When the kitchen machine is not in use, it is only just
over 10 centimeters deep and usually mounted 5-10
cm over the counter top so it does not occupy work
space . When in use, two arms are folded out from
the stand mixer where bowl and accessories can be
fitted. Since it's very neat, it is possible to remove it
from the bracket and store it in a cabinet or kitchen
drawer.In it’s initial state, when not in use, it has a
rectangular shape with the dimensions height; 262
mm, width; 304 mm, depth; 100 mm. See figure 6
Figure 5 Electrolux 'Thinking of you'
Figure 4 Electrolux N15
11
The machines main body is currently made of metal
and the beige front covers, buttons and controls are
made of plastic. The mixer has three power outlets for
the equipment; a high speed on the upper arm and a
low speed on both the upper and lower arm.
The 1,7 m long power cord can be winded up on the
back of the machine body.
2.3.2 Attachments
The Electrolux N15 came with accessories to handle
the most common tasks when baking. For more uses
it could be equipped with a variety of accessories to
meet most needs- See figure 7
Standard accessories:
• 1 Bowl – Container for ingredients
• 2 Beaters - for whipped cream etc. (1)
• 1 Dough hook – for kneading dough (2)
• 2 Mixing hooks – for cookie dough etc. (3)
• Protective cap for drive socket
• Plate for wall mounting
Optional extras:
• Blender (4)
• Vegetable cutter (5)
• Mincer (6)
• Feed plunger, sausage tube and
strainer unit for the mincer
• Bracket for mounting under overhead
cupboard
Figure 6 Machine body illustration
Figure 7 Electrolux N15 and its attachments
12
2.3.3 Usage & Interface
To Use Dough Hook, Beaters or Mixing Hooks
The lower arm folds out to the first position. The other
arm folds all the way up past the fixed position by
pressing and holding the release button. The bowl is
placed on the lower arm and, depending on which
one, the whisk, beater or dough hook is pushed into
their drive sockets. The upper arm folds down to its
horizontal position where it snaps and locks.
To Use the Blender
The lower arm is folded out by holding the lower arm
release button. The blender container is placed on the
socket and rotated a quarter turn clockwise until it’s
locked in position.
To Use The Mincer, Strainer Or Vegetable Cutter
Remove protective cap from drive socket and mount
the attachment onto the drive socket by pushing it in
and turning it counter clockwise until it locks.
Handling the N15
The machine is turned on by using the knob located
on the front. The speed of the machine is set
continuously by turning the knob clockwise. A full
speed / pulse mode is available if this knob is turned
counterclockwise. Then it reaches the maximum
speed immediately which stops when the knob is
released. The machine is equipped with a mechanical
safety feature that prevents the machine from starting
whenever the upper arm is not in a correct working
position.
Figure 8 N15 overview, closed
13
2.3.4 Wall Mounting
The Stand Mixer N15 is designed for mounting on the
wall. It’s hung on a mounting plate which is screwed
directly onto the wall or to brackets mounted under
the wall cabinet. The mixer can easily be removed by
lifting the machine up and then pulling it away from
the mounting plate. See figure 10
Figure 9 N15 overview, open
Figure 10 ALT.1 Mounting plate screwed to the wall, ALT. 2 Screwed onto brackets
14
3 Theory
This chapter is a literature review of knowledge and information that has been important for
the implementation of this project. A compilation of information is presented here to give the
reader some facts to understand the result obtained in this work.
3.1 Facts of Stand Mixers
To understand the product, here's a review of the
product segment of kitchen appliances.
A mixer is a kitchen appliance with the main purpose
of mixing, beating, kneading and whipping food. A
stand mixer is larger and equipped with a more
powerful motor than a regular hand mixer and is also
mounted on a stand for bearing the weight. Therefore
it’s suitable for larger quantities of food processing
and only require the user to maneuver the machine.
They often have a variety of optional extra accessories
that make them a multi functional kitchen appliance.
The names for different kitchen appliances can be
confusing. The correct terms for the appliances are
can be seen in figure 11.
Stand mixers are available in with two different
constructions; spiral and planetary.
(Acitydiscount, 2012)
3.1.1 Facts of Spiral Mixers
The spiral mixer consists of a spiral shaped agitator
that is stationary while the bowl rotates. They are
suitable for mixing dough as they do it fast and are
gentle to the dough, which does not increase its
temperature as much, which is desirable for its rise.
The spiral mixer has attachments for whipping and
beating but is not ideal for this purpose.
Stand Mixer / Kitchen Mixer! Mixer! Hand Mixer!
Blender! Food Processor!
Figure 11 Correct terms for food preparation kitchen appliances
15
Figure 12 The spiral mixer Ankarsum Assistent
3.1.2 Facts of Planetary Mixers
The planetary mixer system has a fixed bowl and a
rotating planetary head with an agitator that spins in
the counter direction. With the planetary motion it
reaches the whole bowl which is more suitable for
beating and whipping ingredients than mixing dough.
3.1.3 Facts of Baking & Cooking
Yeast
Yeast is the "heart of the dough" and has the
important task of making the bread porous, while
giving the bread flavor and aroma. It is a natural base
ingredient when baking plain bread or wheat bread.
The yeast break down the sugar to carbon dioxide
and alcohol. The carbon dioxide forms small bubbles,
which makes the dough rise and become fluffy. If the
dough liquid is too hot the ability to rise will weaken.
For the dough to rise well with fresh yeast, the
optimum temperature is 38 ° C. It should never
achieve more than about 45 ° C, since the yeast is
killed at higher temperatures. (Kronjäst, 2012)
Kneading
A good dough requires substantial kneading and it is
usually better done with the machine as it also
simplifies the work.
The dough should be worked and processed
according to the time in the recipe, to get a good
result and much volume to the bread. A stand mixer
kneads the dough fast, compared to hand-kneading,
which rises the temperature of the dough. To long
kneading time can rise the temperature to the point
where the yeast begins to die off. (Kronjäst, 2012)
3.2 Design Theory
There are a handful of universal design prinicples that applyy
to several fields, including fine arts, graphic design, industrial
design and architecture. In the following section, a generally
accepted list of the design principles are presented. The list
may differ some between books and articles but the context is
still the same.
3.2.1 Principles of Design
Unity
Brings a harmony among the elements, all part of the
design is treated as equally important. A balance
between unity and variety must exist for a design to
be exciting but not chaotic. Unity can be achieved by
using methods of proximity, similarity, continuation,
repetition andrhymes.
Balance
An equality in shape, form, value, color etc.
Repetition
Repeating a design element makes a pattern which
makes an eye-catching and interesting featureFigure 13 The planetary mixer KitchenAid
16
Proximity
Proximity creates a relationship between elements in
a way that makes them visually connected, this
minimizes clutter and increases the comprehension.
Similarity and Contrast
Contrast in color, value, size/shape and direction
make unique elements stand out in a design. (White,
2011)
Figure 14 Principles of design
3.2.2 Elements of Design
The list in this section describes the most commonly used
design elements. Applying the design principles to these design
elements are important aspects for making a good design.
Line
The mark on a surface that makes a shape, or an
outline, it can be of any thickness. Lines can be used
to describe the form and divide the product into areas
where they can be distinguished by different colors or
materials. Lines can create a sense of flow.
Form
3-dimensional object with volume and thickness.
Shape
Shape is a 2-dimensional line and can be of a
geometric or organic character but are always flat.
Value
Value is the shade of a color, how light or dark it is,
which can be used for leading the eye or emphasizing
a design.
Space
Space is the volume where the design take place.
Both negative and positive space is important when
defining a form.
Size
Size is how large or small an area is.
Texture
The quality of the surface, smooth, rough, hard, matt,
glossy
Color
Color is used to add emotion, mood or weight to a
design. Colors can be used for encoding functions
and for association with specific characteristics.
(Butler, Holden & Lidwell, 2003)
Figure 15 Elements of design
3.2.3 Why Design?
Shapes, colors, and characters are all attributes that
can give the product an identity that lets people
understand which company the product originates
from. Letting the product express the company origin
and give it a clear identity will reduce anonymity and
create trust. Design is used as a competitive tool and
can when carried out properly provide added value to
the product. (Eppinger & Ulrich, 2003) (Österlin, 2010)
Figure 16 Dieter Rams
3.2.4 Timeless Design
Dieter Rams’ 10 Principles for good design has
almost become a golden standard to what is good
design. Timeless is best described as the opposite of
a trend. According to Rams, to be a design classic,
the design should be unobtrusive and discrete to
allow for the surrounding to change as trends come
and goes. (Vitsoe, 2012)
17
3.4. Product Experience
To design a product that provides the best product
experience, the product developer always have to be
empathetic and have the user in focus continuously,
after all, it is the user the product is made for.
Empathic design is achieved through observing and
interacting with the user to better understand their
needs and appreciation.
3.5 Usability
The definition of usability according to the ISO
standard 9231-11 is;
"The extent to which a product can be used by
specified users to achieve specified goals with
effectiveness, efficiency, and satisfaction in a
specified context of use".
(International standard, 1998)
Figure 17 Illustration of usability
3.6 Technologies &
Material
3.6.1 Induction Cooking
Induction heating is a way to cook food where the
vessel is heated, as opposed to traditional cooking
where heat is transferred between electric coil or gas
to the pot.
The change in a magnetic field can create voltage, the
amount of voltage created is equal to the change in
magnetic flux divided by the change in time. The
greater the change in the magnetic field, the greater
amount of voltage and the warmer it gets. (Induction
cooking, 2013)
Figure 18 Induction heating
3.6.2 Load Cells
Load cells are used in digital scales to detect weight
changes.
The load cell contains a strain gauges which deform
when a weight is placed on the scale. The strain
gauge measures the deformation as an electrical
signal. This is possible since
the strain changes the effective
electrical resistance in the wire.
The electrical signal is amplified
and the output signal calculates
the weight applied.
Load cells are rugged and
compact with no moving parts and are available in all
sizes for both small and large loads. They measure
with high precision and can weigh both static and
dynamic loads. (Load cell, 2013)
Good design :
…..is innovative
…..makes a product useful
…..is aesthetic
…..makes a product understandable
…..is unobtrusive
…..is honest
…..is long-lasting
…..is thorough down to the last detail
…..is environmentally friendly
…..is as little design as possible
Figure 19 Illustration of load
cell
18
3.6.3. Stick Free Surfaces
Nanotechnology can be used to produce unique,
permanent and food-safe non-stick coatings. The
coating gives an easy to clean, antibacterial surface
that is resistant to temperature changes and pH-value
changes.
The nano-coating can be used on most surfaces, e.g.
stainless steel, plastic and painted aluminum.
The easy-clean nano-coating is uv-stable throughout
its lifetime. The coating cannot be removed by
abrasion since it has a permanent chemical bond with
the substrate which enables excellent abrasion
resistance. The coating also holds a high chemical
stability, it is resistant to all standard household and
industrial cleaners, except from concentrated lye.
(Nanocare, 2013)
Figure 20 Nanotechnology
3.7 Software &
Prototyping
3.7.1 UGS Siemens NX8
UGS NX8 is a CAD (computer aided design) software
which is used to create solid model designs which
can then be used as the basis for drawings,
manufacturing and simulations.
3.7.2. Luxion KeyShot
KeyShot is a 3D rendering and animation software
used for creating photo realistic images.
3.7.3 3D-printing
3D-printing is a rapid prototyping process used to
create 3D models by building up layers of plastic. The
model is formed from the molten plastic using the
data from a CAD drawing.
19
4. Method
As we see it, the design process is all about understanding the user, in order to design, build
and finally test the concept. The product development process has an iterative workflow where
the steps are repeated throughout the process, until every detail is carefully designed. This
section gives a further description of the methods used for planning, collecting data, analyzing
it, generating ideas and finally evaluating them and implement them in a final design.
Implementation and the results from the methods can be read in the following chapters.
4.1 Design Process
The design process is generally a systematic process
which is structured effectively to reach results with
high quality. The design process is specifically
customized to each projects but it’s usually an
iterative process where idea generation and evaluation
are performed alternately until the result is
satisfactory.
4.2 Project Planning
Methods
A well-planned project is essential for achieving a
good result. A concept map is first created to ensure
that all important aspects of the project will be
covered in the time plan. A time plan is then created
with a Gantt-chart.
4.2.1 Concept Map
Created with main branches, and sub branches, the
concept map clearly communicates structures in the
project, categorizes tasks and visually illustrates the
relationships among them. See figure 21
(Energy education, 2012)
4.2.2 GANTT-Chart
One of most foreseeable ways of planning and
structuring a larger time limited project is with a Gantt-
chart. The chart has a horizontal timeline on one axis
and a vertical list of tasks in chronological order on the
other axis. Every task will be presented with a bar,
where the length corresponds to the duration of the
task. (Johannesson, Persson & Pettersson, 2004)
4.3 Data Collecting
Methods
In our view, collecting data is crucial for understanding
the user, the market and the product which in turn is
key to design of successful products. Survey data is
not just statistical figures, but input that creates
understanding and insights
4.3.1 Benchmarking
Benchmarking is a process where all leading products
in the market for a specific product is mapped.
Figure 21 Concept map
20
"Competitor espionage" can provide a lot of useful
information. Interesting solutions on competitor’s
stand mixers can work either as inspiration or as a
foundation for developing a similar but better suited
for the own product.
4.3.2 Digital Survey
A survey is a structured questionnaire given to a
sample of the population where the purpose is to
identify consumer behhavior patterns and give
product feedback. Much emphasis is put on
formulating the questions in such a way that the
participants will answer truly and from their own
experiences. (Wärneryd, 1986)
4.3.3 User Interviews
User interviews are made with persons that have had
a lot of experience with the product . It can also be
professionals who have worked with the development
or retail of the product’s. Documentation with video or
audio recording is preferable. (Branston, 2009)
4.3.4 Observations
Observations are data collection through recording of
behaviors when a person is using a product. This
method provides information that cannot be reached
with only interviews. Observations can for instance
show unconscious behaviors and behaviors that the
individual might not want to discuss.
Self observations by the designer who has
understanding of product conception can also provide
userful information. Video documentation is important
to analyze the observations later on. (Malhotra, 2008)
4.3.5 PHEA
PHEA, Predictive Human Error Analysis is used to find
operational errors when using a product. PHEA can
preferably be used together with a function analysis
method as the HTA method, see section 4.1.4. Before
the PHEA is performed on the test persons it is
important to first define the task steps (by using HTA
for example) and secondly identify possible
wrongdoings in each step.
The test person is asked to perform each operation
and the whole test is documented with a video
camera. The errors are identified by taking notes that
answer the following four specific questions;
(Bohgard, 2008)
4.4 Analysis Methods
4.4.1 S.W.O.T. Analysis
The company, or in this case, the product is evaluated
as it is at the moment based on the four guiding
principles; the good internal; strength, the bad
internal; weakness, the good external; opportunity,
the bad external; threat. The properties are presented
in a matrix. (Armstrong & Kotler, 2010)
Figure 22 Illustration of S.W.O.T. analysis
4.4.2 User Scenarios
Scenarios for the typical user can be pictured to get
inputs to the design process and help the designer to
understand how the product can be improved to
better fit the users. (Branston, 2009)
1. Will the user try to achieve the right result?
2. Will the user notice that there is a possible
path to the right result?
3. Will the user associate the right action with
the right result?
4. If the right action is performed, will the user
notice that this action brought her closer to
the completion of the task?
21
4.4.3 Feature chart
A matrix where the product’s future characteristics are
featured with emotional to rational features on the x-
axis and new to old features on the y-axis that is
wanted or needed for the new product.
4.4.4 HTA - Function Analysis
Hierarchical function analysis is a method to break
down a certain operation to see every step that user
need to perform to complete the task.
The operation is divided into a series of steps and
every step is divided into hierarchically ordered
substeps. When designing a product, it is useful to
look at the number of substeps in the design process
in order to eliminate unnecessary substeps.
(Bohgard, 2008)
4.4 Idea Generating
4.4.1 Moodboards
A moodboard is a collection of images on a board
that together convey a certain mood where the
purpose is to inspire the designer or to communicate
a desired direction for a project with a client.
Moodboards can be made digitally or by hand.
See figure 23
Figure 23 Example moodboard
4.4.2 Wordle
Wordle is a creative way of using words by generating
a word cloud. The more the word is repeated within a
certain text, the bigger and more prominent the word
gets in the cloud. In this project, Wordles will be used
to show how often users refer to certain features and
characteristics. (Wordle, 2012)
Figure 24 Example wordle
4.4.3 Brainstorming
Brainstorming is a verbal session that works as a
catalyst for new ideas. This idea generating method
can be used when the participants already have direct
or indirect experiences related to the topic. Usually the
ideas are already there, they just need a trigger to be
released. An idea can, for example, be a solution to a
problem or a direction for in which way the project is
heading. A creative session of this kind should be
intense and fun without giving any idea too much
attention. (Branston, 2009)
4.4.4 Visualstorming
Visualstorming is a visual version of brainstorming
where doodling, small thumbnail
sketches inspire and triggers the
participants in the idea generating
session. Both oral and visual inputs are
usually combined In this creative method, which often
leads to even more triggers. Since these early ideas
will be indicators for the project direction, it’s
important not to close any doors, but to let all ideas
through. (Branston, 2009)
4.4.5 Designing For The Extremes
When using personas in design processes it’s
common that the characters created are representing
the typical user or customer. By designing for the
average user you often exclude the extremes. Of
course, keeping focus on the common mass is the
obvious way to go at general, but by looking at the
extremes as well, a lot of new input could result in an
even better product for all users. (Hustwit, 2009)
D. Formosa (Objectified, 2009) describes that "what
we really need to do to design is to look at the
extremes - the weakest, with arthritis, the athlete, the
strongest, the fastest - because if we understand
what the extremes are, the middle will take care of
itself".
Doodle v. Scribble
absent-minded
22
4.4.6 Exploratory Sketching
Exploratory, or investigatory sketching is a method
where quick sketching is used to generate ideas and
to explore solutions. The sketches are usually only for
the designer or for the designer team. As for
brainstorming, the aim is to generate as many ideas
as possible. The sketches can be made with whatever
pens or markers the designer is comfortable with,
although, adding colors can add emotional
characteristics to a sketch. (Sjölén, 2005)
4.4.7 Industrial Clay Modeling
Designing shapes and details in two dimension, eg.
on a paper, can be challenging but with clay it’s
possible to explore them in three dimensions. The clay
is called industrial plasticine and is based on wax and
does neither dry out or shrink. (Staedtler, 2012)
4.5 Evaluation Methods
4.5.1 Explanatory Sketching
Focus on explaining the function, structure and form
rather than sketches made for persuading and selling.
Explanatory sketches are very useful throughout the
whole project, as design solutions have to be
explained in a fast and fairly accurate way all the time.
(Sjölén, 2005)
4.5.2 Design Specification
The specification of requirements describes the
requirements and wishes the product must meet. It is
important that the requirements are written as
requirements and not as solutions to the product.
Some important and frequent headlines in the
specifications used in product development are: (Beitz
& Pahl, 1995)
• Geometry
• Design
• Materials
• Market
• Ergonomics
• Maintenance
23
5. Research & Analysis
This chapters covers all the information gathered about the market & the competitors, the
company; Electrolux, the machine; N15 and the stand mixer users. The information is gained
through benchmarking, interviews, surveys , self observations and function analyzes. This
information is analyzed in order to get all the understanding needed to create a user centered
design.
5.1 The Company
To obtain a clear picture of AB Electrolux, a study is
made with a focus on products, values and vision.
Product analysis includes products from past, present
and future and is carried out on websites, through
publications and through hands-on experiences at
Electrolux Home in Stockholm.
5.1.1 Electrolux Brand Identity
Electrolux want to be perceived as the ”Thoughtful
Design Innovator”.
Their four brand values to support and achieve their
brand identity goal are;
1. EMPATHY
–We have compassion for the experiences, thoughts and
feelings of others
2. INSIGHTFUL
–We are creating meaningful consumer value.
3. PROGRESSIVE
– We are challenge conventions to deliver industry
shaping concepts.
4. INGENIOUS
– We create clever solutions and original experiences.
(Dani, 2011)
5.1.2 Design Language
Electrolux offer, apart from domestic appliances;
major and small appliances, products for professional
use. The design languages differs between the
divisions and therefore we have focused to study the
visual brand identity of the small domestic appliances
since that is where our product belongs. (Electrolux
Group, 2012 )
The Electrolux design "DNA"; what distinguishes their
small appliances products, was analyzed by exploring
their product range in Electrolux Home stores and
online. A list of Electrolux design cues was made.
Figure 25 'Thoughtful Design Innovator'
24
The flow line
Flow lines are lines that describe the form and divides
the product into segments where they can be
distinguished by different colors or materials. It
creates a sense of flow.
Colors
Products in the segment of small appliances usually
come in a color series. The customer can choose the
color according to taste. The product can be adapted
to color in the home and kitchen and matched with
other products.
Materials & Textures
Products often have combinations of materials with
different texture. For example; Hard and smooth
plastic and metal with a silk feeling, shiny glass and
brushed metal.
Characteristic shapes
Electrolux uses soft shapes, but always combined
with strict lines, to give products the minimalist
expression that is the essence of Scandinavian
design. They often use a characteristic flow line that
can be seen just above ”ergorapido”, between the
transparent and the metallic surface, in figure 26.
Holes
Another characteristic detail is the round that creates
a pattern. They are often used, for instance, on
vacuum cleaners.
Text & symbols
The logo always have a central position on the
product and if there’s a product name it’s often
printed with its own personal typeface.
5.1.3 Design Lab
Electrolux has since 2003, annually arranged a design
competition open for design students called Design
Lab; ”Calling for inventions unseen and unheard of.”
Every year the students creativity kicks off with the
announcement of the theme. The theme of the design
lab 2013 is inspired urban living which confirms that
our focus on the urban generation of the thesis is well
timed. (Electrolux Designlab, 2013)
Figure 27 Designlab 2013: 'Inspired Urban Living'
5.2 The Market
To understand the market segment of stand mixers, a
research study of its history, uses and performance
has been made, reading tests,
Machines for both industrial and domestic use have
been analyzed in order to understand how they are
used and to find possible differences in machine
constructions and features.
5.2.1 Market Segments
Kitchen mixers come in a variety of types from
different manufacturers where price and performance
are varied. In general these variables are linked
together and the customer gets more, the more they
pay. Stand mixers for domestic purposes are
available from 2000 SEK up to 10 000 SEK, where
the more expensive variants are often more
substantial and powerful, and with more accessories.
See a compilation of kitchen mixers in appendix XII.
In general, kitchen mixers has not changed
significantly since they came on the market. Sturdy
materials and solid design are still important
characteristics. However, many people buy kitchen
mixers as an interior detail and therefore it is not
unusual that the design is more important than
function for some customers.
5.2.2 Electrolux’s Kitchen Mixers
Electrolux today offers kitchen mixers in two market
segments, the assistent and the Grand Cuisine mixer.
The Assistent Original from 1940, now manufactured
by Ankarsrum, is a spiral mixer in the price range of
Figure 26 Electrolux Ergorapido
25
4000-6000 SEK, depending on the number of
included accessories. Today, the Assistent is a
popular classic, with its solid construction, the
powerful motor and the largest bowl on the market.
The Grand Cuisine is a planetary mixer that has not
yet reached the market. It belongs in the upper
premium segment and will be sold in a package
together with other kitchen appliances.
Electrolux also has a series of mixers for the
professional kitchen where the largest is floor-
mounted and can handle a big dough and are used
by restaurants and patisseries. (Elextrolux group,
2012)
5.2.3 Competitor Analysis
To know the competing brand and their products,
internet research and field observations in consumer
electronics stores were made. The result of the
market analysis showed the same models as them
represented in the test in appendix XII.
There is nothing similar to the N15 on the market for
kitchen mixers. All of the competitors, except for the
Assistent original and some Bosch machines, use the
planetary mixer system and all of them, except for a
Bosch machine is built on the same principle as the
KitchenAid, launched in the 1930's.
Test of the Electrolux Assistent Original
Experimental testing of the Assistent Original is made
to get an understanding of how the largest of all
consumer kitchen mixers handle the dough and for
inspiration and another point of view. A great feature it
has is a spatula attached to the inside the bowl,
scraping down the dough toward the bottom. This
creates a good flow in the dough, folds it and keeps
the sides of the bowl clean.
5.3 The User
User studies consists of all sorts of observations that
bring understanding to how people think and how
they interact with the product. In this project the user
study chapter covers everything from observations on
internet forums to video recorded tests. These
observations will reveal the user’s dreams, but also
their sources of irritation. The N15's design flaws and
possible solutions are identified with hands on tests
carried out by the authors, with the help of the two
purchased N15’s.
5.3.1 User Survey
The user survey is conducted to ask about deeper
values, values that matter when choosing brand on
their kitchen mixer. All participants in the survey owns
one and have experience using it. All the adjectives
describing the wants and needs of a stand mixer
found among the survey answers are collected and
are presented in a wordle where the size represents
how common the word was, see 29 and appendix
IX.
A recurring behavior was that almost everyone put
away their stand mixer when not in use and that they
would use it more often if they had been spared the
moment of taking out and putting away the heavy,
and bulky appliance. The participants also had many
creative ideas and feature requests for their kitchen
mixers.
5.3.2 Internet Observations
Listening to what users say when they are not aware
of it will give greater understanding of user needs, but
also reveal design flaws. This information was
gathered from internet forums and facilitates to
develop a user-centered product. (Branston, 2009)
Complaints and confusions;
• The dough is climbing on the dough hook,
KitchenAid.
• Too small bowl, KitchenAid.
• Hard to learn, the Assistent.
• Weak motor, KitchenAid.
• The dough is mostly tossed around in the
bowl and is not getting kneaded, applies to
many models with the planetary mixer
system.
• Difficult to pour in the bowl because of lack
of space, KitchenAid.
Figure 28 test of the Electrolux Assistent Original
26
Praises and wishes
• Aesthetic & decorative
• Pleasurable to cook & bake
• Last for generations
• Priceworthy
5.3.3 Habits
In our opinion, what distinguishes the user of this
concept is that they want a practical and versatile
product. They are not ready to compromise but want
a compact and neat unobtrusive product and a
strong, sturdy and recognizable design icon at the
same time.
The kitchen and the art of cooking is highly
associated with daily luxury and has a significant
impact on how we experience quality of life.
Without doubt, making quick and simple meals is as
essential for today's users as the advanced and time-
consuming cooking is. Quick meals are important for
individuals everyday life in order to cope with an
active lifestyle.
Advanced cooking have never been more popular,
especially with the growing interest in traditional
cooking like baking sourdough bread, making
sausage and pastries like macarons.
5.3.4 Scenarios
In order to reach an understanding of customer
requirements, we believe it is important to understand
the situation, which is the origin and not only see that
the requirement as they are
Scenarios can be used to design a
product to fit the user's lifestyle by
finding lifestyle values that are
deemed important. In this case,
most stand mixers are designed the same and
generally not suitable for a compact kitchen or an
urban lifestyle.
The target customer for this stand mixer concept is
typically from the urban, y-generation with a compact
kitchen. When the target segment is known, possible
user scenarios can be predicted.
Some possible scenarios
5.4 The Product
There are almost no information to find about the N15
but luckily we came in contact with the Electrolux
enthusiast Gerard Cina from Switzerland, with a
passion for house hold appliances, who shared a lot
of valuable knowledge about the product.
5.4.1 N15 Brochure
We received N15 product brochures and user guides
from Gerard Cina. These documents gave us some
information about the N15, how it was marketed and
also Electrolux own selling points. Most importantly,
the brochure confirmed that it was beeing marketed
as a very simple and space-friendly mixer that is
always at hand and is also able to process small
quantities.
1. Grinding fair trade coffee beans for two
2. Blending a raw food smoothie for two
persons
3. Blending a protein shake with ice cubes
for one person to drink on the way to the
gym.
4. Shredding cabbage for a pizza sallad
5. Kneading a pizza dough for six persons
6. Grinding almond flour for macarons
7. Whipping egg whites for macarons
Scenarios n.
A postulated sequenece
of possible events.
Figure 29 Wordle based on the user survey
27
5.4.2 N15 Interview
Gerard Cina, gave us his personal opinions about the
N15 and the market of kitchen mixers. This kind of
information, that is hard to find elsewhere, was very
useful for the project.
• The N15 was sold between 1981 and 1989.
• The N15 was developed to meet the need for
compact kitchen appliances.
• The N15 was still popular long after it was
taken out of production.
• Customers prefer the classic design before
the highly conceptual design lab design.
• There is a trend for re-launching classic
design appliances with strict design look. The
Swiss brand Turmix is an example.
• He supposes people loved the N15 due to
the fact that ”it was easy to use, always at
hand, compact and ideal for small
quantities”.
5.4.3 Hands On Tests
It’s crucial to make practical hands-on-tests and user
observations with the product. Two copies of the
Electrolux N15 is purchased with all its original
accessories and instructions before the analysis
phase. See figure 31
User testing are done with of all the features and
accessories of N15. The tests are filmed,
documented and compiled in a hierarchical functional
analysis.
5.4.4 Construction Analysis
One of the two purchased machines is opened to
understand the construction of the machine. See
figure 30
Things that we noted about the construction is;
• Although it’s a compact machine, there is still
a lot of space within the housing.
• The motor is probably out of date and can be
replaced with a smaller motor with the
equivalent effect or replaced with a stronger
in the same size.
• The circuit board is very large and most likely
out of outdated.
• It’s possible to change the position of the
release button for the whisks and still use the
same mechanical solution.
• The housing, where all the mechanics is
mounted, is made out of die casted iron. The
front casing is made out of durable acrylic.
• All the mechanics seem to be of high quality
materials and is in perfect condition.
Figure 30 Construction analysis of the N15
28
Figure 31 1: Prepared for baking. 2: Yeast mixed with water 3: Attaching the dough hook. 4: The mixer kneads the dough 5: Front view.
6: Testing its limits. 7: Dough hook with a climb stop. 8: Kneading completed.
29
5.4.5 S.W.O.T. Analysis
Every strength, weakness, opportunity and threat that
is important in the development of this concept is
added into a S.W.O.T. chart, see figure 32.
5.4.6 Conclusions of the Tests
Built in scale
A lot of recipies contains measurements of
ingredients in weight instead of volume. This makes
weighing ingredients an extra step in the baking
process that requires a scale and a bowl as additional
equipment.
A way of cutting steps in the cooking process is to
allow for weighing the ingredients in the bowl. By
adding the feature of a built in scale to the mixer the
user does not need that extra equipment and the
baking process gets more convenient and time
effective.
Bowl
From observations on internet forums it was found
that many of the users prefer a larger bowl. Many
bread makers were concerned with Kitchenaid’s
small 4.8 liter bowl and preferred the Assistent’s
larger 7 liter bowl.
”If you want an aesthetically pleasing machine, you can invest in it. If you
like to bake properly then you should have something else.. KitchenAid’s
bowl is too small, that’s what I think” - (Ekorrmamman, 2010)
”I use the kitchenaid and almost always bake bread instead of buying
sourdough, plain dough, bun dough, cookie crumbs. Have never experienced
any problems with it. It’s possible that the bowl is too small.” (Brevett,
2011)
Figure 32 S.W.O.T analysis of the N15
30
Since this is a concept for an accessible kitchen
machine used daily for both big and small tasks it
needs to have a compact and neat design. Hence,
it’s reasonable to have a bowl size that is small
enough to inspire people to use the machine, even for
small quantities
The bowl is decided to hold as
much dough liquids as possible but
without being bulky. The maximum
size of the whole unit with bowl
inclued must not exceed the
external dimensions of the N15.
Heat induction
In the quest to minimize the numbers of steps in the
cooking process, it's a huge advantage to offer the
ability to heat the ingredients directly in the bowl. The
only existing known technique for this is induction
since this is the only technique that only heats the
cooking vessel.
5.4.7 HTA
The Hiearchical task analysis is make for the dough
kneading process with the dough hook. When
analyzing the HTA, several tasks that makes the
preparations complicated and lengthy were found.
Most time consuming are the steps that involve
preparing ingredients with the help of other kitchen
appliances. Based on our tests, some of those are;
• Measuring flour etc, measuring cups needs
to be taken out, used and washed after use.
• Measuring butter needs a scale that needs to
be taken out, reset and stored again
• Melting butter needs a pot, and a stove to
melt it on, the pot then needs to be washed
and stored.
• Keeping track of the time needs a timer
See figure 34. The full size HTA chart can be
found in Appendix XV.
5.4.8 CW and PHEA Test
Four test persons with no experience of this product
conducts the usability test. The operations they have
to perform are;
1. Prepare the machine for kneading dough
2. Prepare the machine for blending
3. Prepare the machine for whipping egg whites
4. Prepare the machine for mincing meat
5. Prepare the machine for shredding cabbage
Users want to learn by exploring, rather than by
reading a manual. The Cognitive Walkthrough
evaluates how well the products meet the usability
expectations, in other words, how easy the mixer is to
learn.
When analyzing the test persons actions and errors it
is extra important to see if mistakes are made by
several persons and especially notice if the mistakes
are repeated, even if they already realized that it was
wrong since last time they performed the action.
The Cognitive Walkthrough and PHEA charts with all
gathered information can be found in appendix XVI.
Dough Liquid n. The quantity
of liquid in a bread recipet is a
common way of measuring the
bowls capacity.
Figure 33 Performing CW and PHEA with test persons
Figure 34 HTA chart, mix dough
31
5.4.9 Support Functions
After having structured the HTA of the machine it’s
important to also identify the support functions as
they also contribute to a large part of the product's
user experience. The following list is our identified
support functions.
- Be mounted on the wall
- Receive electricity
- Set time or count down
- Give feedback to user
- Decorate the surrounding
- Allow to be stored
- Be easily cleaned
- Save time for the user
- Facilitate to make it cooking easier
- Always be accessible
- Protect the user
- Inspire user
- Withstand wear
5.6 Conclusion
In the following section, the mission statement, the
target user, and the design specification list, will be
presented along with a feature chart of the user's
most wanted qualities and functions.
5.6.1 Mission statement
A 'mission statement' was created to concretize the
project assignment in one sentence
"An innovative, user friendly and time saving kitchen
appliance that inspires people with an urban lifestyle
and a compact living to a true cooking experience."
5.6.2 Target User
The typical user is a small urban household from the
y-generation. They are busy, constantly connected,
have many interests and are in to in quick, healthy
meals on the go - as well as the latest gourmet
trends. The target user often lives in apartments and
wish they had more storage but most of all they want
to be instantly inspired and have their utilities ready at
their fingertips at all times. They are very sensitive to
design trends, particularly in the kitchen.
5.6.3 N15 Feature Chart
All information from hands on tests and user
observations are compiled in a chart of the most
wanted and needed features, from rational to abstract
and from new to exsisting, see figure 36
Figure 35 Y-generation
32
Figure 36 Feature Chart
33
6 Design Specification
As the focus in this project is solely to develop a concept, a design specification for features and
characteristics is used instead of a technical list of requirements. The needs and demands in
this design specification have mainly come from market analysis, functional analysis, self
observations, user tests, interviews and the survey. This specification is formulated from a user
perspective, incuding user experience and usability.
1. Technical Aspects
The same mechanical principle as the N15 with the
same power outlets and
rotation system
A more powerful motor than the N15 (300W) to
handle the tasks with ease
2. Functionality
Allow handling of the same tasks as the N15; Beating,
mixing, kneading, grinding meat, blending, cutting
vegetables, stuffing sausage, strain fruit
Allow grinding of coffee beans
Allow heating of ingredients such as butter and yeast
for a more efficient and precise cooking and baking
Allow weighing of ingredients for a more efficient and
precise cooking and baking
Allow timer setting of the machine's running time
Volume gradation in bowl and blender
Allow mounting of a spatula against the inside the
bowl
3. Design Demands (dimensions etc.)
The dept of the machine should not exceed the dept
of the N15, 13,5cm
Allow mounting to wall
Allow easy cleaning of the machine and its
attachments
Lubricating agents must not come into contact with
food
4. Expression
Be perceived as robust and powerful
Perceived as consistently amazing and always at
hand
Express honesty
Express durability; Last a lifetime
Fit into the Electrolux product range
5. Material
Allow machine washing of the accessories
Easy to clean
6. Market
Designed for the western market and particularly
Scandinavia as the food habits differ among regions
and cultures.
7. Customization
Allow personal customization by offering the product
in a selection of colors
Offer various attachments to personalize areas of use
according to need
8. Interaction
Immobilizes when the arms are not in working
position
Be intuitive and easy to handle
Automatic shut-off if overloaded not to damage motor
and components
Allow easy adding of ingredients in bowl while running
34
7. Concept
Development
When all analyzes are completed and the user’s need and wants are fully understood it is time
to concretize this knowledge down to solid concepts solutions. The unit as well as every
attachment is going through a thorough idea generation process to make a concept that perfectly
fits the user and is amazing in every aspect.
7.1 Idea Generation
All the creative methods in an iterative process are
very valuable in this extensive developing process,
considering all the human factors, user perceptions,
technical aspects and how many parts it is applied to.
7.1.1 Moodboards
In addition to all the self-composed moodboards,
Electrolux own moodboards, used for understanding
both emotional and rational versions of people,
products and places are used, see figure 37.
7.1.2 Wordle
Each one of the words used in the wordle represent
important qualities that are asked for by the users.
The words were collected from the user survey and
the size represents how common the word was
Stylish is not surprisingly the most important and
demanded quality of them all. Furthermore, it is
concluded from the wordle that it’s supposed to be
close at hands, every day, for many years to come
and always be powerful and yet simple, see figure 38.
Figure 38 Wordle
7.1.3 Brainstorming
Throughout the data collecting and analysis stage
many problems and flaws related to the N15 or the
product segment itself are revealed.
Whenever a problem is identified, a variety of
solutions immediately emerges. Many solutions to
fundamental problems were found and documented
already in the early stages. These are brought back
for iteration with the help of the brainstorming
method.
Figure 37 Electrolux moodboard
35
7.1.4 Extremes
Different extremes are taken into consideration
throughout the whole process. When designing, the
designer asks questions like; would this work well for
a person with one hand, big hands or impaired
vision? Other questions are ; would this work for a
first time user? and would this work for a person who
is not used to new technology? By asking those
questions, when visualstorming, sketching and
modeling, the design will be more user centered and
many more people than the "extremes" will be
benefited. (Objectified, 2009)
7.1.5 Visualstorming
With the help of visual inputs from moodboards and
pinterest the first ideas of form and function are
discussed, sketched and defined.
Figure 39 Being creative at the SKAPA office
7.1.6 Exploratory Sketching
Sketching is in this concept development the fastest
way to communicate ideas and a great tool to build
on each others ideas to explore all the possibilities in
the concept. Sketching is also used after the main
design is determined since there are still detailed work
before the concept is complete. Explorative sketching
on top of the main design is used to test various
solutions until every detail is perfect.
Figure 40 Exploratory sketching of a mixer and its attachments
7.1.7 Clay Modeling
Clay is used for evaluating the design and form ideas
in three dimensions. They are modeled in 1/4 scale
and are primarily used for adding and adjusting details
and are thereafter used for re-evaluation.
Figure 41 Clay models in the early design phase
36
7.1.8 Conclusion of Concept
development
The most important thing that emerged during the
development process was that if this product
should be an invaluable tool in the kitchen for the
identified target group must make it more
convenient by removing any demanding or tedious
step in the kitchen. In addition, it must be adapted
to the lifestyle of the target users.
These are some of the of the ideas for the concepts
that were developed in the concept phase.
» The machine has be able to be moved and
stored easily; many designs of the head unit
got a sleek designs to be compact instead of
bulky. When mounting and unmounting the
machine, it had to be fast and done without
any tools. It was also decided that the machine
should be hung on the brackets on the wall.
» To save space in the compact living kitchen,
making the products usable for more than one
function was key. There will just be one bowl,
with a spatula, the bowl will work with smaller
batches as well. The pitcher will be designed to
double as a glass jar and be stylish enough to
put on a table and serve drinks from.
» Since many other appliances are used while
using a kitchen mixer it was decided to build in
some of the most frequently used functions to
cut the need for other kitchen appliances. This
saves time, dishes, and space in the cabinets.
Timer, heat induction and scale will be build in
features in the new kitchen mixer concept.
» The space inside the machine had to be
utilized. The empty space behind the rotary
switch allows storage for the cable and plug. A
cord winder makes it extra functional. It will be
placed in the right rear corner.
» Three distinct concepts for the head unit's form
and expression were created; the organic, the
design lab, and the minimalist, see appendix
XIX. The miminalist was the most suitable and
was chosen to be further development and
concretized.
Figure 42 A collection of explorative and explanatory sketches created during the creative phase
37
8.Further
Development
Further development means detailing and fine tuning of the concept and includes interface
design and other technical solutions. Digital built-in scale and timer are new features that
minimizes the time for preparing and dish washing and adds extra value for the customer.
8.1 Head Unit
8.1.1 Design & Form
The shaping of the head unit is important when
designing to fulfill the users expectations of usability. It
was a big challenge since there are many aspects to
take into account. Many features and functions
should work together in harmony packed in the
Scandinavian heritage of the Electrolux design
language. Since all the part solutions and built in
features was determined it was just down to nail the
final design of the head unit. There were different
concept designs developed throughout the process.
Figure 43 Concept Designs
By evaluating our concept designs and develop them
during an iterative sketching process, we could finally
decide in which direction in design that was the most
suitable to reflect the Electrolux brand identity, meet
the user expectations and carry on the legacy of the
N15.
Figure 44 The chosen design for the head unit
The design chosen has a
minimalistlistic appearance with
a low scare factor.
8.1.2 Mechanics
The mechanical principle of the drive will be the same
as for the N15, see figure 29. The electric motor is
thought to be reduced in size while the effect is
increased due to the assumed development and
modernization of electrical motors.
Low scare factor n. The
concept's visual expression is easy
to grasp, and does not follow
temporary trends.
38
The power comes from an electric motor with two
shafts and is the large rectangle in figure 42. The
upper shaft operates the drive sockets in the upper
arm through a worm gear. The worm
gear drives a system of four gears.The
first gear drives the bevel gear that
transfers momentum and makes the
bowl rotates. The second gear drives the
socket for the dough hook and the mincer. The third
and fourth gear drives the whisks and beaters. See
figure 42.
Figure 45 The drivetrain, the colored areas are drive sockets
The lower shaft operates the drive socket in the lower
arm through a drive belt connected between the shaft
and the drive socket.
The bevel gear that transfers momentum and makes
the bowl rotate will be in the same
polymer to prevent noise and wear
which would occur between two metal
surfaces if it was made of metal.
8.1.3 Upper Arm
Buttons
According to our tests and studies, the biggest
usability problem for the N15, is by far the placement
of the release button for the upper arm. No matter
how long experience the user has with the product,
the release button for the whisks are mistaken for
releasing the upper arm. Everything indicates that the
button on the arm should instead interact with the
arm.
Furthermore the placement require both hands to
press the release button and lift the arm. The button
will therefore be repositioned to the front and at the
end of the upper arm, at the same place as the
release button for the mixer hooks and the beaters
used to be.
The button to release the mixer hooks or the beaters
is relocated to the left side of the arm in level with the
socket it's operating.
Positions
When pressing the button to fold the arm up there's
no need to press the lift button to pass the horizontal
position since there are no horizontal position on the
way up. After the selected tool has been attached the
arm will stop in its horizontal working position on the
way down.
Socket
Design should prevent user errors. When mounting
attachments on the front socket, it’s easy to do it
wrong since the socket is symmetrically shaped. This
means the attachment can be pushed in and turned
into place at three different angles. Incorrect fitting is
avoided by adjusting the Y-shaped socket so that it is
not symmetrical. This way the user instantly knows in
which way the attachment should be mounted since
there are only one way to do it.
Figure 46 The old front socket the new asymmetric "Y"-socket.
8.1.4 Lower Arm
Button
The button will be more visible compared to the
existing machines by moving it towards the user
instead of towards the back of the machine. It will
have a contrasting color to the machine body which
makes it easy to notice.
Positions
The fixed positions are currently not intuitive. The arm
has three positions, of which two are fixed, in
extended and in half extended positions.
Problems:
Since the arm is fixed in the half extended position,
it’s hard for the user to tell that there is a third position
where the arm is fully extended. In addition to this,
there is no apparent reason for the fully extended
position to be offered as an alternative since it gives
no advantage over the half extended position.
Solution:
There will be two positions, one closed and not fixed
and one 65° extended, fixed position.
Bevel Gear n. Conical
shaped gear for angled
transmission
Worm Gear n. Long gear
in shape of a screw for
angled transmission
39
8.1.5 Buttons And Rotary Switches
When designing the buttons and rotary switches,
emphasis is put on making them easy to distinguish.
All buttons, except the rotary switch and the mode
button on the front, will have another surface texture
and color than the surrounding surfaces. This to
make them more visible and tactile for a better user
experience.
Furthermore, the rotary switch (1) and the mode
button (2) on the front have the same surface and
color as the machine body but is raised from the
surface with a blended edge to enhance their
appearance as main buttons and also for a tactile
design.
To turn on the machine the rotary switch (1) is pushed
so it pops out, about 2 cm from the body. This makes
the rotary switch grippable.
The rotary switch will have a ring around it that is lit up
when the machine is turned on. The light is white
when the machine is switched on. The color of the
light depends on the mode chosen.
The rotay switch will be heavy but easy to turn thanks
to bearings in the switch for easy and smooth control.
The switch will have fixed positions to provide
feedback.
8.1.6 Built in scale
With the help of a built-in scale in the socket on the
lower arm, the user can measure the ingredients
directly in the bowl or the blender jar. Load cells are
mounted between the chassi and the drive socket
unit in the lower arm to measure the weight change.
The user can thereby measure ingredients directly as
it goes into the bowl and at anytime reset the scale
for a new measurement.
8.1.7 Induction
The possibility to heat the bowl with induction, opens
new possibilities to be effective and creative in the
kitchen. A copper coil is wound around the base of
the drive socket in the lower arm.
The induced current from the
magnetic field rapidly heats the
bowl to the desired temperature
which is regulated by a thermostat through
temperature sensors. See figure 47.
Figure 47. Intersection of the lower arm's drive socket
8.1.8 Timer
The timer starts to count up whenever the mixer is
started. It instantly helps the user to keep track of the
time elapsed.
It the user want to set the mixer for a specific time,
the timer counts down from the set time and stops
the machine when time has passed.
8.1.9 Effect
Since a strong motor is one of the most important
requirements for the users, even if this is a smaller
stand mixer, the 300 W motor is upgraded to a more
powerful motor.
8.1.10 Cord Winder
The empty space in the lower right corner of the unit
perfectly fits a cord winder. The plug is situated on
the back corner to be reachable when the machine is
mounted but is still somewhat hidden. The cable
retracts when the button next to it is pushed, just as
the cord function in most vacuum cleaners.
8.2 Attachments
This concept is compatible with all the attachments
and optional extras that were available for the N15
but we've chosen to only develop and visualize the
standard attachments, the blender jug and our new
attachment, the coffee grinder.
8.2.1 Hooks & Beaters
Mixing hooks
The mixing hooks are increased in size and also gets
a whole new look. The silhouette is more refined and
they are strengthened with extra material that is
shaped as the Electrolux logo, see figure 48.
Thermostat n. Regulates the
power to maintain correct
temperature.
40
Figure 48 Function model of the mixing hooks
Dough hook
The dough hook has a new spiral shape to knead the
dough even better. It is made of stainless steel with a
plastic cap to prevent dough, if climbing, from
entering the drive socket.
Beaters
The beaters gets a more slimmed and elegant
silhouette, they will also be longer due to the larger
bowl. The whisk will have flat loops instead of thin
round wires.
Stick Free Coating
Attachments such as the hook, whisks and beaters
are coated with a non stick surface with the help of
nano material. The coating will avoid the dough
climbing up the attachments. The nano material is
antibacterial and will also be added to the cord as it
prevents the spread of germs.
8.2.2 Bowl
The bowl is decided to have the same function and
drive as before but will be more versatile.
Bowl Size
The volume of the existing bowl is 4 liters. By cutting
the depth of the unit and thickness of the upper and
lower arm the bowl size can be increased to 5 liters.
The concept is extremeley compact and still holds
more dough than the KitchenAid.
Induction
The bowl will be made in stainless steel with a core of
aluminum in the bottom and a bit further up on the
sides. The aluminum is a good heat conducter that is
used to spread the heat evenly in the material. The
bowl will be heated in the bottom and normal
tempered on the upper half.
Rubber coated foot
The foot will have a rubber coating for a tight fitting on
the rotating plate.
8.2.3 Blender
A one liter blender jug is designed to double as a
glass pitcher, sleek enough to be put on the table. It
has a round base that transforms into a triangular top
9.2.4 Coffee Grinder
The coffee grinder can grind both coffee beans and
flour. It's attached on the front drive socket, as the
mincer. The grind level is adjusted by turning the front
wheel.
The funnel is transparent to let the user keep track of
the beans as it grinds. It has legs to allow the user to
remove and store the grinder upright.
8.3 Interface Design
The mixer startup and its functions are controlled with
the interface on the front consisting of two buttons
and a backlit display; (1), (2) & (3).
(1) - Power switch and speed control, (2) - Mode
selector invisible display, (3) - It Shows information
about mixer time, countdown timer, scale and
induction heater. A transparent surface on the body
makes the display invisible when it's not lighted.
Figure 49 Great results when testing a spatula for N15
41
Figure 49 On/Off & Wheel, 2: Mode button, 3: "Invisible" display
Turn On The Mixer
To turn the mixer on, button (1) is pushed.
The ring lights up and the button pops out and turns
into a turning wheel
Use the Mixer
The speed of the machine is set continuously by
turning the wheel clockwise. The full speed mode is
available if the wheel is turned counterclockwise and
held in its position. It then reaches the maximum
speed immediately and stops when the knob is
released.
The machine is equipped with a safety feature that will
not allow starting as long as the upper arm is not fully
recessed or or in its extended, horizontal position.
When the mixer is started a timer automatically
activates in the display showing actual mixing time.
Use the Scale
The scale mode is selected by pushing button one
time (2). The scale is tared by default and can be
reset at any time by pushing and holding button (2)
for two seconds. The weight is shown in the display
regardless of which mode the mode button is in.
Use the Timer
The timer automatically starts to count the running
time when any of the functions are started. The timer
is always displayed regardless of which mode the
mode button is in.
1. To set the timer, push the mode button (2)
two times to select time mode. The display
will show 00:00.
2. Turn the rotary switch (1) until the display
shows the right time. When the rotary switch
is turned slowly it’s changed by one second
at a time. When it’s is turned fast, the time is
changed by one minute at a time.
3. Press two times on the mode button to start
timer.
Use the Induction Heater
1. The induction heating is selected by pushing
the mode button (2) three times.
2. The temperature is shown on the display and
is selected by turning the rotary switch (1)
until desired temperature is shown.
3. When the wheel is turned fast, the
temperature is changed by ten degrees at a
time and when turned slowly it’s changed by
one degree at a time.
4. To confirm the selected temperature and turn
on the heater hold the mode button (2) for
two seconds.
The display for the induction changes to red to
visualize that the heater is on and to make the user
aware of that the bowl is warm.
The current temperature is shown on the display
regardless of which mode the machine is in.
8.3 Mounting
It’s incredibly important that the solution for the wall
mounting surpasses anything previously known, since
it’s so such a central aspect of this concept.
The current N15 has a large mounting plate that is the
same size as the machine and screwed to the wall or
on brackets. The unsightly plate is still fixed on the
wall and fully visible when the machine is lifted off the
wall.
The four aims for the idea generation for the wall
mounting were;
1. Be as discreet and neat as possible
2. Be stylish
3. Should leave as few defects on the kitchen
interior as possible in case the mounting is
removed
4. If the machine is temporarily removed, the
mounting device should offer the possibility to be
used for another purpose.
Two main ideas that emerges during the
brainstorming processes were flat knobs and knife
magnets. The vibration absorber that is currently on
the mounting plate will either way be moved to the
machine’s back.
The idea to merge the idea of an ultra slim, mounting
knob and a round, magnetic plate as mounting device
came at the second brainstorming session.
42
To fix the machine on the the wall, the user simply
slide the machine over the knob. The machine has a
roughing on the back that is half open and half
shaped by the knob. The vibration absorbing rubber
strips will be inside the cut out and between the wall
and the knob.
The knob is flat and 100 mm in diameter at a distance
of 15 mm from the wall.
8.4 Materials
The main body is die casted
aluminum to be sturdy and durable enough to hold
the motor and gears. The covering fronts are made in
acrylic. This concept has high strength polymer gears
and driving parts to maintaining the same high quality
as before and offer users the features they request;
solid, sturdy, durable, robust and strong, as can be
found in wordle figure 38 .
8.5 Prototyping
8.5.1 CAD
The chosen concepts are modeled using UGS NX 8.
Realizing concepts in this environment is a good way
to fine tune and concretize ideas.
8.5.2 Rendering
Rendering the CAD-model is by far the greatest tool
for evaluating at this later part of the developing
process, mainly because it’s a fast way of getting a
very realistic three dimensional
preview, in generally any
material and color thinkable.
8.5.3 3D-Printing
When the design is evaluated and approved the CAD-
files can be used for printing the parts in a 3D-printer.
The printer used is a 3DTouchTM
triple head.
Before the files can be imported into the 3D-printer,
the parts have to be prepared by dividing them into
printer friendly sections.
Figure 50 3D-printing the lower arm socket
UGS NX 8. Software for computer
aided design (CAD). NX can build
3D models with solid and surface
modelling.
Keyshot 3. Software for real time
rendering photo realistic images of
3D-models made in a CAD
software.
43
9 The Result
In this chapter the final results of the product concept named spacemixer is presented. The
concept and it’s features are visualized and the functions are explained with a step-by-step
guide. The thoughts behind the spacemixer’s design and form details are also given. Finally,
the result is evaluated.
9.1 The Product
The kitchen mixer spacemixer is a concept based on the principles of the Electrolux N15. It has been developed
to meet the needs and requirements of compact living users in the segment of generation Y.
Figure 51 The final concept; spacemixer
44
Figure 52 All angles of spacemixer
Figure 53 The product in use, viewed from below.
45
9.2 Usage
Some of the most important features of the
spacemixer are explained and in figure 54 and 55.
Figure 54 The features on the front explained
Figure 55 The features on the back explained
46
Figure 56 Handling the spacemixer, Step 1 - 5
1.Lift the machine and slide it onto the wall mounted
plate. Vibration absorbers inside the slot makes sure
the machine is firmly secured.
2. Pull out the plug from the cord storage and plug it
in the power outlet.
3. Fold out the lower arm by pulling it toward you.
4. Fold up upper arm by pressing the button on the
arm and lifting it up.
5. Attach any attachments of your choice in the
upper arm, in this case the whisks.
48
Figure 57 Handling the spacemixer, Step 6 - 9
6. Attach any attachment of your choice on the lower
arm, in this case the bowl.
7. Press and pop out the rotary switch to turn on the
machine.
8. Lower the arm, until it locks in place.
9. Turn the rotary switch to start the machine and
adjust the speed. Switch between the modes; scale,
induction heater and timer with the mode button
49
9.3 Functions
9.3.1 Knead, Whip & Stir
Figure 58 The spiral and spatula are ready for kneading dough.
Just like on professional spiral mixers that are made
primarily for kneading dough, the spacemixer
concept has a spiral and a spatula. The spiral
attachment for mixing the ingredients and the
spatula for folding the dough and preventing the
dough from sticking to the sides. This combination of
attachments makes the spacemixer very efficient for
kneading dough.
The smartmixer works the same way when mixing a
cookie batter or whipping eggs but instead of the
spiral, the mixing hooks or whisks are used to mix
and whip the batter.
Figure 59 Whisks for whipping
Figure 60 Hooks for mixing batter
Figure 61 The spriral and spatula attached to the machine
50
9.3.2 Blender
The compact, 1 liter glassblender is intended to be
used as both a blender and a jug. The triangular jug
is made out of solid resistant glass and the lid is
made out of soft plastic with an extra smaller lid on
for adding ingredients while blending. The knives are
removable which makes it easier to clean. When the
knives are removed it’s a safe and stylish jug. The
blender is used by attaching it to the high speed
drive socket on the lower arm. It’s fastened with a
quarter turn clockwise.
Figure 62 Top of the blender and lid.
Figure 63 The blender on the machine
9.3.3 Coffe Grinder
The new attachment is mounted on the front in the
same way as the mincer and snaps with a quarter
turn counterclockwise. It is sturdy, in polished metal
and has three support legs to stand upright when
not in use.
Figure 64 The grinder standing on a table
Figure 65 The grinder mounted on the front socket
9.3.4 Built in features
The new time-saving and precision-enhancing
features will make the work in the kitchen more
efficient and more fun with new opportunities to
create culinary delicacies. The backlit display gives
the user feedback on features that, in a simple way,
allows high precision in the kitchen. See figure 57
9.3.5 Cord Winder, ’Cable Cave’
With the touch of a button the cord goes into the
machine as on a vacuum cleaner which makes it
easy to store without a loose cable lying around. It is
also possible to keep it neat on the counter since
only the cord length needed has to be pulled out.
See figure 55
9.3.6 Mounting Plate
The mounting plate has multiple uses and can serve
as a magnetic knife rack if the machine is not
mounted. It has a rubber absorber which eliminate
the risk that any vibrations is transplanted into the
wall.
51
Figure 66 Exploded view of the mounting plate.
Figure 67 The mounting plate as a knife magnet
9.4 Design
The design is inspired from the characteristic form
elements often found in Electrolux products. The
body has a matte surface, either black or white, that
adds a solid feel to the machine. The brushed metal
flow line continues in a never-ending loop all around
the body that catches the eye and gives the sober
look a sense of motion. In contrast there are color
glimpses, around the front button and in the cable
cave at the back. When the two arms unfolds more
color are added since the insides of the both arms
has the same colored surfaces of smooth and silky
metal. The characteristic Electrolux flow line is
embedding the release button on the front of the
upper arm. The round ventilation holes on the side
and under the lower arm forms a pattern that is a
typical design feature found on Electrolux products
Electrolux Flow Line
The characteristic flow line seen on many Electrolux
products is found on the smacemixer as well.
Figure 68 Contrasts are found between materials.
Figure 69 A never ending flow line around the machine body.
52
Figure 70 Holes underneath the lower arm to ventilate hot air.
Material’s Surface
The machine housing is divided into two parts, the
front cover and the back cover. The back is made
out of die casted steel, it has to be sturdy and
resistant since the motor and other components are
attached to it and. The front cover is made out of
durable plastic. The front and back cover are made
out of different materials but will both have the same
matte and silky finish.
High Contrasts
There are a lot of contrast when surfaces meet, in
both materials and colors. The shiny aluminum flow
line that sweeps around the main body, is in large
contrast to the soft and smooth housing in metal and
plastic. The machine’s inner metal sufaces comes in
various bursting colors that makes the spacemixer
feel vibrant and alive when opened, yet tidy and
unobtrusive when closed. See figure 72
Holes
The SpaceMixer has patterns of holes to ventilate
the hot air from the motor and from the drive belt in
the lower arm. The drive belt can be seen in figure
70 and 71. The holes forms a pattern, a design
feature that can be found on many vacuum cleaners
from electrolux.
Figure 71 Holes to ventilate the hot air from the motor. The holes makes a
pattern on the spacemixer's left side..
Figure 72 Color collection
53
Figure 73 Electrolux logo on the front left side. Note the tag with the spacemixer logo on the left side.
Raised buttons
As we see it, a small but
typical Electrolux design
element is a round button that
is somewhat raised from the
surface, with an edge blend.
This is a typical place for a
meeting of two contrasting
materials, like a button in
rubber and a ring in metal or
led light.
9.5 Evaluation
This is a short recap of the development process
and and an evaluation of the final product concept to
see how it meets the demands and needs that were
set up in the beginning.
9.5.1 Prototype
A 3D printed full scale prototype was made for
evaluating the actual size and form. If only using CAD
and computer rendered pictures of the product, it
can be hard to make an accurate estimation of how
the size and form are perceived. Since the objective
was to get a slimmer shape of the main unit, we
were pleased when we saw the size of the 3D
printed model because it felt neat and compact.
Neat and compact were also two of the design
requirements set out in the beginning of the work.¨
9.5.2 CW & Error Analysis
When using the cognitive walkthrough and error
analysis with the test persons, it was possible to
identify errors in the original design of the product,
including errors in; placement of buttons, deadlocks,
feedback from the arms positions and settings.
The space mixer concept is tested against the most
common handling errors found in the tests.
Figure 75 The 3D-printed model made it easy to evaluate the size.
Positioning of Buttons
Opening the upper arm is the hardest task to both
understand and to learn. All test persons
experienced problem with this task. After using the
machine for many times, it’s still hard to open the
arm using the right release button. The main reason
Figure 74 Raised buttons
54
is that the release button is illogical located on the
right side, far away from where you are to lift the
arm. The users instead use the button placed on the
arm, where it feels natural to push and lift the arm at
the same time.
For the lower arm, the release button will be moved
closer to the front.
Figure 76 The position of the button on N15
Figure 77 The upper arm's release button on the smartmixer
Deadlocks
The N15’s lower arm have two deadlock positions.
First, when in use (¾ open) and fully extended. The
release button has to be pressed to move the arm
from one position to another, this causes a lot of
confusion.
When the test persons found the release button and
pressed it until it was fully extended, they missed the
middle position.
For the smartmixer, the fully extended position is
removed, since it’s never a need for it. There will only
be one fixed arm position; ¾ open. To open the arm,
it’s just pulled out and to close it, the release button
is pressed and pushed in.
The N15’s deadlocks for the upper arm also
confused the test persons. When opening the upper
arm, the arm will be locked in position when it
reaches a horizontal position. The test persons never
got any feedback that it was possible to raise the
arm higher. This has to be done in order to place the
bowl on the lower arm.
The new smartmixer concept will have the release
button on the front of the upper arm which has to be
pressed to lift the arm. On the way up, the arm will
be raised the whole way without any deadlock
positions. When the arm is lowered, it will be locked
in the horizontal position. By pressing the release
button, the arm can then be folded down completely
Asymetric Socket
The front drive socket for the N15 is symmetric.
Most test persons positioned the grinder wrong and
turned it the wrong way when locking it.
By making the socket asymetric on the smartmixer,
there is only one way to fit the grinder.
Figure 78 The old front socket the new asymmetric "Y"-socket.
55
10. Discussion
In this section we discuss the project’s process, project outcome and results, there after we also
give recommendations for this project if it would be developed further and also list some of the
most relevant ideas for a potential further development.
10.1 Process
The idea and initiation for this project is entirely our
own which has definitely motivated and inspiring us
throughout this project.
During a few weeks before the project start up we
tried to establish contact with Electrolux but without
success. This project was carried out with no support
function from the company Electrolux, neither in terms
of supervision, feedback or help with information
about or the N15 product or company philosophies.
Despite this, the project has run fairly smooth.
We, the authors, have worked very closely together
through the whole process and it was mostly when
writing the report and working with the CAD-files that
some tasks were divided between us.
We faced some tasked that proved to be extra time
consuming, the first was to accept a final design and
secondly a lot of trouble shooting with the 3D-printer.
Pretty early, it was decided to make an extensive user
centered analysis and to focus on usability. We are
very happy about this decision because it gave more
dimensions to this project and we also feel that we
learned many new things from it.
Figure 79 Formulating the design process in a project map
56
10.2 Further Development
In this section we have listed areas and specific
points that need some further development to make
this concept realizable.
» Define Materials
» Calculate motor to get enough effect and
define motor model
» Soundtest the unit with the new motor
» Define absorbent design and materials
» Testing and evaluation of the whisks and
dough hook to get best performance
» Usability testing on this concept
» Test if users are comfortable handling the
machine with only one rotary switch and one
mode button.
» Test if users recognize the symbols
10.3 Recommendations
All ideas that are not covered in this report due to
time limitations or that they are outside the framework
are given a short presentation along with other
recommendations in this section.
» Develop a table stand that can be used as an
alternative to wall mounting. We recommend
a L-shaped stand made out of a single piece
of material, preferrbly aluminum that have
enough rigidity to stand steady on the
counter top.
» We recommend a moror effect on more than
400 W but less than 800 W.
» Mounting the stand mixer with brackets,
screwed underneath the wall cabinet which
leaves the wall free from holes, which can be
valuable if the wall is tiled.
» A special storage solution for all attachments
that makes it easy to store and easy to
access. The storage can be in the bowl to
save space or in a drawer.
» A wider range of accessories, e.g.a pasta
rolls or ice cream bowl can be developed and
sold as extra accessories.
» In addition to the blender, a single serve
model would be perfect for users making a
morning smoothie or protein shake to go.
57
11. Outcome
The result of this project should only be considered to be an inspirational concept based on
the principles of the N15 stand mixer. The concept needs further development, testing and
evaluating before it can be manufactured.
We are confident that this concept meets the objectives set for this project. We also believe
that our investigation has been extensive enough to correctly answer our formulation of
questions for this thesis.
Primarily we can conclude that this is very much a product that would have major successes
if it will would be re-launched on the market by Electrolux or any other kitchen appliance
company. Many people we talked to are impressed when they learn about the product's
versatility and benefits and they question more than often why this is not available in the
stores today. Furthermore, the concept succeeds in meeting most of the sought qualities and
features in both the design specification and the Feature Chart of wishes in figure 36.
When it comes to the level of innovation; making a high tech and futuristic product can be
tempting, not least when it's a conceptual project. While the goal from the very begining was
to make a timeless and everlasting design classic for the selective y-generation, it never got
interesting to add the latest technology to this concept, instead we used available technology.
The result is a simple but yet solid product; it will still be as useful in 40 years as it is today and
will certainly outlast all electronic devices that are come and go every other year.
Nevertheless, this concept is full of new features and we are proud of it because we believe
that it may have positive impact on people's lives if ever produced.
Figure 80 The spacemixer with a coffee grinder in a compact kitchen
Development of a Conceptual Space Smart Kitchen Mixer

More Related Content

What's hot

Historical prespective of the mice industri
Historical prespective of the mice industriHistorical prespective of the mice industri
Historical prespective of the mice industritellstptrisakti
 
Food and Beverage Sector - Tourism
Food and Beverage Sector - TourismFood and Beverage Sector - Tourism
Food and Beverage Sector - TourismCris dela Peña
 
M.I.C.E. Destinations In Philippines
M.I.C.E. Destinations In PhilippinesM.I.C.E. Destinations In Philippines
M.I.C.E. Destinations In Philippinesshroff.travel
 
Tourism Investment Opportunities in Northern Uganda
Tourism Investment Opportunities in Northern UgandaTourism Investment Opportunities in Northern Uganda
Tourism Investment Opportunities in Northern UgandaTom Loughran
 
CULTURE AND HERITAGE TOURISM
CULTURE AND HERITAGE TOURISMCULTURE AND HERITAGE TOURISM
CULTURE AND HERITAGE TOURISMERICK MAINA
 
Supply and demand of tourism industry
Supply and demand of tourism industrySupply and demand of tourism industry
Supply and demand of tourism industryShireenAhmed6
 
Case study on community based ecotourism activities in donsol, sorsogon seein...
Case study on community based ecotourism activities in donsol, sorsogon seein...Case study on community based ecotourism activities in donsol, sorsogon seein...
Case study on community based ecotourism activities in donsol, sorsogon seein...Vinson Serrano
 
Tourism planning and development (Introduction)
Tourism planning and development (Introduction)Tourism planning and development (Introduction)
Tourism planning and development (Introduction)Mike Joseph
 
Sustainable Tourism Development
Sustainable Tourism DevelopmentSustainable Tourism Development
Sustainable Tourism DevelopmentCris dela Peña
 
International tourism organizations
International tourism organizationsInternational tourism organizations
International tourism organizationssalonibansal21
 
Tourism Planning
Tourism PlanningTourism Planning
Tourism PlanningJi Pernites
 

What's hot (20)

Region 6 Basic Geography
Region 6 Basic GeographyRegion 6 Basic Geography
Region 6 Basic Geography
 
Historical prespective of the mice industri
Historical prespective of the mice industriHistorical prespective of the mice industri
Historical prespective of the mice industri
 
Mice Tourism
Mice TourismMice Tourism
Mice Tourism
 
Palawan, Philippines
Palawan, PhilippinesPalawan, Philippines
Palawan, Philippines
 
Food and Beverage Sector - Tourism
Food and Beverage Sector - TourismFood and Beverage Sector - Tourism
Food and Beverage Sector - Tourism
 
Heritage Tourism
Heritage TourismHeritage Tourism
Heritage Tourism
 
M.I.C.E. Destinations In Philippines
M.I.C.E. Destinations In PhilippinesM.I.C.E. Destinations In Philippines
M.I.C.E. Destinations In Philippines
 
Tourism Investment Opportunities in Northern Uganda
Tourism Investment Opportunities in Northern UgandaTourism Investment Opportunities in Northern Uganda
Tourism Investment Opportunities in Northern Uganda
 
CONVENTION MANAGEMENT
CONVENTION MANAGEMENTCONVENTION MANAGEMENT
CONVENTION MANAGEMENT
 
CULTURE AND HERITAGE TOURISM
CULTURE AND HERITAGE TOURISMCULTURE AND HERITAGE TOURISM
CULTURE AND HERITAGE TOURISM
 
Gastronomy tourism
Gastronomy tourismGastronomy tourism
Gastronomy tourism
 
Supply and demand of tourism industry
Supply and demand of tourism industrySupply and demand of tourism industry
Supply and demand of tourism industry
 
Case study on community based ecotourism activities in donsol, sorsogon seein...
Case study on community based ecotourism activities in donsol, sorsogon seein...Case study on community based ecotourism activities in donsol, sorsogon seein...
Case study on community based ecotourism activities in donsol, sorsogon seein...
 
Tourism planning and development (Introduction)
Tourism planning and development (Introduction)Tourism planning and development (Introduction)
Tourism planning and development (Introduction)
 
Sustainable Tourism Development
Sustainable Tourism DevelopmentSustainable Tourism Development
Sustainable Tourism Development
 
Region 6-Western Visayas
Region 6-Western VisayasRegion 6-Western Visayas
Region 6-Western Visayas
 
International tourism organizations
International tourism organizationsInternational tourism organizations
International tourism organizations
 
Tourism Planning
Tourism PlanningTourism Planning
Tourism Planning
 
MICE MANAGEMENT
MICE MANAGEMENTMICE MANAGEMENT
MICE MANAGEMENT
 
The History of Tourism
The History of TourismThe History of Tourism
The History of Tourism
 

Viewers also liked

Extending the knowledge level of cognitive architectures with Conceptual Spac...
Extending the knowledge level of cognitive architectures with Conceptual Spac...Extending the knowledge level of cognitive architectures with Conceptual Spac...
Extending the knowledge level of cognitive architectures with Conceptual Spac...Antonio Lieto
 
Frames, scripts, scenarios, models, spaces and other animals: Bridging concep...
Frames, scripts, scenarios, models, spaces and other animals: Bridging concep...Frames, scripts, scenarios, models, spaces and other animals: Bridging concep...
Frames, scripts, scenarios, models, spaces and other animals: Bridging concep...Dominik Lukes
 
Formal Concept Analysis
Formal Concept AnalysisFormal Concept Analysis
Formal Concept AnalysisSSA KPI
 
(In)Formal Concept Analysis
(In)Formal Concept Analysis(In)Formal Concept Analysis
(In)Formal Concept Analysiskim.mens
 
A Computational Framework for Concept Representation in Cognitive Systems and...
A Computational Framework for Concept Representation in Cognitive Systems and...A Computational Framework for Concept Representation in Cognitive Systems and...
A Computational Framework for Concept Representation in Cognitive Systems and...Antonio Lieto
 
Conceptual Spaces for Cognitive Architectures: A Lingua Franca for Different ...
Conceptual Spaces for Cognitive Architectures: A Lingua Franca for Different ...Conceptual Spaces for Cognitive Architectures: A Lingua Franca for Different ...
Conceptual Spaces for Cognitive Architectures: A Lingua Franca for Different ...Antonio Lieto
 
Formal Concept Analysis
Formal Concept AnalysisFormal Concept Analysis
Formal Concept AnalysisTzar Umang
 
Lecture 21 - Image Categorization - Computer Vision Spring2015
Lecture 21 - Image Categorization -  Computer Vision Spring2015Lecture 21 - Image Categorization -  Computer Vision Spring2015
Lecture 21 - Image Categorization - Computer Vision Spring2015Jia-Bin Huang
 

Viewers also liked (9)

Extending the knowledge level of cognitive architectures with Conceptual Spac...
Extending the knowledge level of cognitive architectures with Conceptual Spac...Extending the knowledge level of cognitive architectures with Conceptual Spac...
Extending the knowledge level of cognitive architectures with Conceptual Spac...
 
Frames, scripts, scenarios, models, spaces and other animals: Bridging concep...
Frames, scripts, scenarios, models, spaces and other animals: Bridging concep...Frames, scripts, scenarios, models, spaces and other animals: Bridging concep...
Frames, scripts, scenarios, models, spaces and other animals: Bridging concep...
 
Formal Concept Analysis
Formal Concept AnalysisFormal Concept Analysis
Formal Concept Analysis
 
(In)Formal Concept Analysis
(In)Formal Concept Analysis(In)Formal Concept Analysis
(In)Formal Concept Analysis
 
A Computational Framework for Concept Representation in Cognitive Systems and...
A Computational Framework for Concept Representation in Cognitive Systems and...A Computational Framework for Concept Representation in Cognitive Systems and...
A Computational Framework for Concept Representation in Cognitive Systems and...
 
Conceptual Spaces for Cognitive Architectures: A Lingua Franca for Different ...
Conceptual Spaces for Cognitive Architectures: A Lingua Franca for Different ...Conceptual Spaces for Cognitive Architectures: A Lingua Franca for Different ...
Conceptual Spaces for Cognitive Architectures: A Lingua Franca for Different ...
 
Formal Concept Analysis
Formal Concept AnalysisFormal Concept Analysis
Formal Concept Analysis
 
Concept Analysis Presentation
Concept Analysis PresentationConcept Analysis Presentation
Concept Analysis Presentation
 
Lecture 21 - Image Categorization - Computer Vision Spring2015
Lecture 21 - Image Categorization -  Computer Vision Spring2015Lecture 21 - Image Categorization -  Computer Vision Spring2015
Lecture 21 - Image Categorization - Computer Vision Spring2015
 

Similar to Development of a Conceptual Space Smart Kitchen Mixer

Individual Design Report_Rostrum
Individual Design Report_RostrumIndividual Design Report_Rostrum
Individual Design Report_RostrumMax Lee
 
Awesome research skills training for undergraduate students
Awesome research skills training for undergraduate studentsAwesome research skills training for undergraduate students
Awesome research skills training for undergraduate studentsrachelsaffer
 
Alec_Pollard_Folio
Alec_Pollard_FolioAlec_Pollard_Folio
Alec_Pollard_FolioAlec Pollard
 
Sharma suneet portfolio
Sharma suneet portfolioSharma suneet portfolio
Sharma suneet portfolioSuneet Sharma
 
EBC 2015 presentation titles and detailed description
EBC 2015 presentation titles and detailed descriptionEBC 2015 presentation titles and detailed description
EBC 2015 presentation titles and detailed descriptionDiana Turner
 
Build Better Products | Jeremy Bell
Build Better Products | Jeremy BellBuild Better Products | Jeremy Bell
Build Better Products | Jeremy BellProduct Tank Toronto
 
Industrail Design Portfolio 2020 Ryan Merrix
Industrail Design Portfolio 2020 Ryan MerrixIndustrail Design Portfolio 2020 Ryan Merrix
Industrail Design Portfolio 2020 Ryan MerrixRyanMerrix
 
Mouldflo - Anjum Parwaiz - Plastic Engineering Day 2021
Mouldflo - Anjum Parwaiz - Plastic Engineering Day 2021Mouldflo - Anjum Parwaiz - Plastic Engineering Day 2021
Mouldflo - Anjum Parwaiz - Plastic Engineering Day 2021Plastindustrien
 
Brugerinvolvering og elektronisk skitsering af nye produkter af Morten Wagner...
Brugerinvolvering og elektronisk skitsering af nye produkter af Morten Wagner...Brugerinvolvering og elektronisk skitsering af nye produkter af Morten Wagner...
Brugerinvolvering og elektronisk skitsering af nye produkter af Morten Wagner...InfinIT - Innovationsnetværket for it
 
Design for services_lecture
Design for services_lectureDesign for services_lecture
Design for services_lectureAngelica Fontana
 
Portfolio Simon - Small
Portfolio Simon - SmallPortfolio Simon - Small
Portfolio Simon - Smallsimondejong
 
Templates for Consumer Use in Designing Customised Products
Templates for Consumer Use in Designing Customised ProductsTemplates for Consumer Use in Designing Customised Products
Templates for Consumer Use in Designing Customised ProductsYudhi Ariadi
 

Similar to Development of a Conceptual Space Smart Kitchen Mixer (20)

Individual Design Report_Rostrum
Individual Design Report_RostrumIndividual Design Report_Rostrum
Individual Design Report_Rostrum
 
R&D as a service
R&D as a serviceR&D as a service
R&D as a service
 
Awesome research skills training for undergraduate students
Awesome research skills training for undergraduate studentsAwesome research skills training for undergraduate students
Awesome research skills training for undergraduate students
 
Alec_Pollard_Folio
Alec_Pollard_FolioAlec_Pollard_Folio
Alec_Pollard_Folio
 
SPLC 2018 Booklet
SPLC 2018 BookletSPLC 2018 Booklet
SPLC 2018 Booklet
 
I4MS join webinar_c2t_digitbrain_
I4MS join webinar_c2t_digitbrain_I4MS join webinar_c2t_digitbrain_
I4MS join webinar_c2t_digitbrain_
 
Sharma suneet portfolio
Sharma suneet portfolioSharma suneet portfolio
Sharma suneet portfolio
 
EBC 2015 presentation titles and detailed description
EBC 2015 presentation titles and detailed descriptionEBC 2015 presentation titles and detailed description
EBC 2015 presentation titles and detailed description
 
Portfolio of wok
Portfolio of wokPortfolio of wok
Portfolio of wok
 
DfUbook_methods-tools
DfUbook_methods-toolsDfUbook_methods-tools
DfUbook_methods-tools
 
Build Better Products | Jeremy Bell
Build Better Products | Jeremy BellBuild Better Products | Jeremy Bell
Build Better Products | Jeremy Bell
 
Melissa Verastegui 2015
Melissa Verastegui 2015Melissa Verastegui 2015
Melissa Verastegui 2015
 
Industrail Design Portfolio 2020 Ryan Merrix
Industrail Design Portfolio 2020 Ryan MerrixIndustrail Design Portfolio 2020 Ryan Merrix
Industrail Design Portfolio 2020 Ryan Merrix
 
Mouldflo - Anjum Parwaiz - Plastic Engineering Day 2021
Mouldflo - Anjum Parwaiz - Plastic Engineering Day 2021Mouldflo - Anjum Parwaiz - Plastic Engineering Day 2021
Mouldflo - Anjum Parwaiz - Plastic Engineering Day 2021
 
Brugerinvolvering og elektronisk skitsering af nye produkter af Morten Wagner...
Brugerinvolvering og elektronisk skitsering af nye produkter af Morten Wagner...Brugerinvolvering og elektronisk skitsering af nye produkter af Morten Wagner...
Brugerinvolvering og elektronisk skitsering af nye produkter af Morten Wagner...
 
Design for services_lecture
Design for services_lectureDesign for services_lecture
Design for services_lecture
 
Portfolio Simon - Small
Portfolio Simon - SmallPortfolio Simon - Small
Portfolio Simon - Small
 
Every service as a catwalk
Every service as a catwalkEvery service as a catwalk
Every service as a catwalk
 
Templates for Consumer Use in Designing Customised Products
Templates for Consumer Use in Designing Customised ProductsTemplates for Consumer Use in Designing Customised Products
Templates for Consumer Use in Designing Customised Products
 
Formato SENA Ingles
Formato SENA InglesFormato SENA Ingles
Formato SENA Ingles
 

Recently uploaded

Cheap Rate ➥8448380779 ▻Call Girls In Iffco Chowk Gurgaon
Cheap Rate ➥8448380779 ▻Call Girls In Iffco Chowk GurgaonCheap Rate ➥8448380779 ▻Call Girls In Iffco Chowk Gurgaon
Cheap Rate ➥8448380779 ▻Call Girls In Iffco Chowk GurgaonDelhi Call girls
 
VIP Call Girls Service Mehdipatnam Hyderabad Call +91-8250192130
VIP Call Girls Service Mehdipatnam Hyderabad Call +91-8250192130VIP Call Girls Service Mehdipatnam Hyderabad Call +91-8250192130
VIP Call Girls Service Mehdipatnam Hyderabad Call +91-8250192130Suhani Kapoor
 
Cheap Rate Call girls Kalkaji 9205541914 shot 1500 night
Cheap Rate Call girls Kalkaji 9205541914 shot 1500 nightCheap Rate Call girls Kalkaji 9205541914 shot 1500 night
Cheap Rate Call girls Kalkaji 9205541914 shot 1500 nightDelhi Call girls
 
Bus tracking.pptx ,,,,,,,,,,,,,,,,,,,,,,,,,,
Bus tracking.pptx ,,,,,,,,,,,,,,,,,,,,,,,,,,Bus tracking.pptx ,,,,,,,,,,,,,,,,,,,,,,,,,,
Bus tracking.pptx ,,,,,,,,,,,,,,,,,,,,,,,,,,bhuyansuprit
 
VIP Russian Call Girls in Gorakhpur Deepika 8250192130 Independent Escort Ser...
VIP Russian Call Girls in Gorakhpur Deepika 8250192130 Independent Escort Ser...VIP Russian Call Girls in Gorakhpur Deepika 8250192130 Independent Escort Ser...
VIP Russian Call Girls in Gorakhpur Deepika 8250192130 Independent Escort Ser...Suhani Kapoor
 
PORTAFOLIO 2024_ ANASTASIYA KUDINOVA
PORTAFOLIO   2024_  ANASTASIYA  KUDINOVAPORTAFOLIO   2024_  ANASTASIYA  KUDINOVA
PORTAFOLIO 2024_ ANASTASIYA KUDINOVAAnastasiya Kudinova
 
VIP Call Girls Service Kukatpally Hyderabad Call +91-8250192130
VIP Call Girls Service Kukatpally Hyderabad Call +91-8250192130VIP Call Girls Service Kukatpally Hyderabad Call +91-8250192130
VIP Call Girls Service Kukatpally Hyderabad Call +91-8250192130Suhani Kapoor
 
Abu Dhabi Call Girls O58993O4O2 Call Girls in Abu Dhabi`
Abu Dhabi Call Girls O58993O4O2 Call Girls in Abu Dhabi`Abu Dhabi Call Girls O58993O4O2 Call Girls in Abu Dhabi`
Abu Dhabi Call Girls O58993O4O2 Call Girls in Abu Dhabi`dajasot375
 
Revit Understanding Reference Planes and Reference lines in Revit for Family ...
Revit Understanding Reference Planes and Reference lines in Revit for Family ...Revit Understanding Reference Planes and Reference lines in Revit for Family ...
Revit Understanding Reference Planes and Reference lines in Revit for Family ...Narsimha murthy
 
VIP Call Girls Service Bhagyanagar Hyderabad Call +91-8250192130
VIP Call Girls Service Bhagyanagar Hyderabad Call +91-8250192130VIP Call Girls Service Bhagyanagar Hyderabad Call +91-8250192130
VIP Call Girls Service Bhagyanagar Hyderabad Call +91-8250192130Suhani Kapoor
 
3D Printing And Designing Final Report.pdf
3D Printing And Designing Final Report.pdf3D Printing And Designing Final Report.pdf
3D Printing And Designing Final Report.pdfSwaraliBorhade
 
The history of music videos a level presentation
The history of music videos a level presentationThe history of music videos a level presentation
The history of music videos a level presentationamedia6
 
NO1 Famous Amil Baba In Karachi Kala Jadu In Karachi Amil baba In Karachi Add...
NO1 Famous Amil Baba In Karachi Kala Jadu In Karachi Amil baba In Karachi Add...NO1 Famous Amil Baba In Karachi Kala Jadu In Karachi Amil baba In Karachi Add...
NO1 Famous Amil Baba In Karachi Kala Jadu In Karachi Amil baba In Karachi Add...Amil baba
 
VVIP Pune Call Girls Hadapsar (7001035870) Pune Escorts Nearby with Complete ...
VVIP Pune Call Girls Hadapsar (7001035870) Pune Escorts Nearby with Complete ...VVIP Pune Call Girls Hadapsar (7001035870) Pune Escorts Nearby with Complete ...
VVIP Pune Call Girls Hadapsar (7001035870) Pune Escorts Nearby with Complete ...Call Girls in Nagpur High Profile
 
Captivating Charm: Exploring Marseille's Hillside Villas with Our 3D Architec...
Captivating Charm: Exploring Marseille's Hillside Villas with Our 3D Architec...Captivating Charm: Exploring Marseille's Hillside Villas with Our 3D Architec...
Captivating Charm: Exploring Marseille's Hillside Villas with Our 3D Architec...Yantram Animation Studio Corporation
 
NATA 2024 SYLLABUS, full syllabus explained in detail
NATA 2024 SYLLABUS, full syllabus explained in detailNATA 2024 SYLLABUS, full syllabus explained in detail
NATA 2024 SYLLABUS, full syllabus explained in detailDesigntroIntroducing
 
Design Portfolio - 2024 - William Vickery
Design Portfolio - 2024 - William VickeryDesign Portfolio - 2024 - William Vickery
Design Portfolio - 2024 - William VickeryWilliamVickery6
 
SD_The MATATAG Curriculum Training Design.pptx
SD_The MATATAG Curriculum Training Design.pptxSD_The MATATAG Curriculum Training Design.pptx
SD_The MATATAG Curriculum Training Design.pptxjanettecruzeiro1
 
Dubai Call Girls Pro Domain O525547819 Call Girls Dubai Doux
Dubai Call Girls Pro Domain O525547819 Call Girls Dubai DouxDubai Call Girls Pro Domain O525547819 Call Girls Dubai Doux
Dubai Call Girls Pro Domain O525547819 Call Girls Dubai Douxkojalkojal131
 

Recently uploaded (20)

Cheap Rate ➥8448380779 ▻Call Girls In Iffco Chowk Gurgaon
Cheap Rate ➥8448380779 ▻Call Girls In Iffco Chowk GurgaonCheap Rate ➥8448380779 ▻Call Girls In Iffco Chowk Gurgaon
Cheap Rate ➥8448380779 ▻Call Girls In Iffco Chowk Gurgaon
 
VIP Call Girls Service Mehdipatnam Hyderabad Call +91-8250192130
VIP Call Girls Service Mehdipatnam Hyderabad Call +91-8250192130VIP Call Girls Service Mehdipatnam Hyderabad Call +91-8250192130
VIP Call Girls Service Mehdipatnam Hyderabad Call +91-8250192130
 
Cheap Rate Call girls Kalkaji 9205541914 shot 1500 night
Cheap Rate Call girls Kalkaji 9205541914 shot 1500 nightCheap Rate Call girls Kalkaji 9205541914 shot 1500 night
Cheap Rate Call girls Kalkaji 9205541914 shot 1500 night
 
Bus tracking.pptx ,,,,,,,,,,,,,,,,,,,,,,,,,,
Bus tracking.pptx ,,,,,,,,,,,,,,,,,,,,,,,,,,Bus tracking.pptx ,,,,,,,,,,,,,,,,,,,,,,,,,,
Bus tracking.pptx ,,,,,,,,,,,,,,,,,,,,,,,,,,
 
VIP Russian Call Girls in Gorakhpur Deepika 8250192130 Independent Escort Ser...
VIP Russian Call Girls in Gorakhpur Deepika 8250192130 Independent Escort Ser...VIP Russian Call Girls in Gorakhpur Deepika 8250192130 Independent Escort Ser...
VIP Russian Call Girls in Gorakhpur Deepika 8250192130 Independent Escort Ser...
 
PORTAFOLIO 2024_ ANASTASIYA KUDINOVA
PORTAFOLIO   2024_  ANASTASIYA  KUDINOVAPORTAFOLIO   2024_  ANASTASIYA  KUDINOVA
PORTAFOLIO 2024_ ANASTASIYA KUDINOVA
 
VIP Call Girls Service Kukatpally Hyderabad Call +91-8250192130
VIP Call Girls Service Kukatpally Hyderabad Call +91-8250192130VIP Call Girls Service Kukatpally Hyderabad Call +91-8250192130
VIP Call Girls Service Kukatpally Hyderabad Call +91-8250192130
 
Abu Dhabi Call Girls O58993O4O2 Call Girls in Abu Dhabi`
Abu Dhabi Call Girls O58993O4O2 Call Girls in Abu Dhabi`Abu Dhabi Call Girls O58993O4O2 Call Girls in Abu Dhabi`
Abu Dhabi Call Girls O58993O4O2 Call Girls in Abu Dhabi`
 
Revit Understanding Reference Planes and Reference lines in Revit for Family ...
Revit Understanding Reference Planes and Reference lines in Revit for Family ...Revit Understanding Reference Planes and Reference lines in Revit for Family ...
Revit Understanding Reference Planes and Reference lines in Revit for Family ...
 
Call Girls Service Mukherjee Nagar @9999965857 Delhi 🫦 No Advance VVIP 🍎 SER...
Call Girls Service Mukherjee Nagar @9999965857 Delhi 🫦 No Advance  VVIP 🍎 SER...Call Girls Service Mukherjee Nagar @9999965857 Delhi 🫦 No Advance  VVIP 🍎 SER...
Call Girls Service Mukherjee Nagar @9999965857 Delhi 🫦 No Advance VVIP 🍎 SER...
 
VIP Call Girls Service Bhagyanagar Hyderabad Call +91-8250192130
VIP Call Girls Service Bhagyanagar Hyderabad Call +91-8250192130VIP Call Girls Service Bhagyanagar Hyderabad Call +91-8250192130
VIP Call Girls Service Bhagyanagar Hyderabad Call +91-8250192130
 
3D Printing And Designing Final Report.pdf
3D Printing And Designing Final Report.pdf3D Printing And Designing Final Report.pdf
3D Printing And Designing Final Report.pdf
 
The history of music videos a level presentation
The history of music videos a level presentationThe history of music videos a level presentation
The history of music videos a level presentation
 
NO1 Famous Amil Baba In Karachi Kala Jadu In Karachi Amil baba In Karachi Add...
NO1 Famous Amil Baba In Karachi Kala Jadu In Karachi Amil baba In Karachi Add...NO1 Famous Amil Baba In Karachi Kala Jadu In Karachi Amil baba In Karachi Add...
NO1 Famous Amil Baba In Karachi Kala Jadu In Karachi Amil baba In Karachi Add...
 
VVIP Pune Call Girls Hadapsar (7001035870) Pune Escorts Nearby with Complete ...
VVIP Pune Call Girls Hadapsar (7001035870) Pune Escorts Nearby with Complete ...VVIP Pune Call Girls Hadapsar (7001035870) Pune Escorts Nearby with Complete ...
VVIP Pune Call Girls Hadapsar (7001035870) Pune Escorts Nearby with Complete ...
 
Captivating Charm: Exploring Marseille's Hillside Villas with Our 3D Architec...
Captivating Charm: Exploring Marseille's Hillside Villas with Our 3D Architec...Captivating Charm: Exploring Marseille's Hillside Villas with Our 3D Architec...
Captivating Charm: Exploring Marseille's Hillside Villas with Our 3D Architec...
 
NATA 2024 SYLLABUS, full syllabus explained in detail
NATA 2024 SYLLABUS, full syllabus explained in detailNATA 2024 SYLLABUS, full syllabus explained in detail
NATA 2024 SYLLABUS, full syllabus explained in detail
 
Design Portfolio - 2024 - William Vickery
Design Portfolio - 2024 - William VickeryDesign Portfolio - 2024 - William Vickery
Design Portfolio - 2024 - William Vickery
 
SD_The MATATAG Curriculum Training Design.pptx
SD_The MATATAG Curriculum Training Design.pptxSD_The MATATAG Curriculum Training Design.pptx
SD_The MATATAG Curriculum Training Design.pptx
 
Dubai Call Girls Pro Domain O525547819 Call Girls Dubai Doux
Dubai Call Girls Pro Domain O525547819 Call Girls Dubai DouxDubai Call Girls Pro Domain O525547819 Call Girls Dubai Doux
Dubai Call Girls Pro Domain O525547819 Call Girls Dubai Doux
 

Development of a Conceptual Space Smart Kitchen Mixer

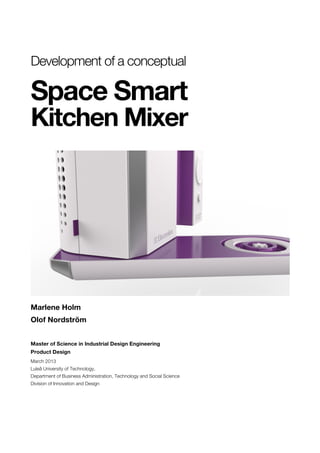
  • 1. Development of a conceptual Space Smart Kitchen Mixer Marlene Holm Olof Nordström Master of Science in Industrial Design Engineering Product Design March 2013 Luleå University of Technology!, Department of Business Administration, Technology and Social Science Division of Innovation and Design
  • 2. Acknowledgement We wish to express our sincere gratitude to the people that made this project possible. First of all, we want to thank our supervisor and professor Dennis Pettersson for believing in our project. Our sincere thanks also goes to our examiner Åsa Wikberg Nilsson for her great advice and assistance. David Eriksson for all the time he spent on helping us with feedback and guidance. We are of course extra thankful for him inviting us to work in his office at the design consultancy firm SKAPA. We also want to thank Johan Unga for the inspiration and moral support at the office. We are grateful and indebted to David & SKAPA for tutoring and giving us full access to their 3D printer, 24/7, for weeks. Because of their selfless contribution, they gave us the opportunity to make a full-scale prototype, even though the project took place in Stockholm. A special thanks goes to Gerard Cina who supported us with great inspiration, information and materials that otherwise would be impossible to find. We also want to thank all the people that assisted us with information in the interviews and user study, especially Tina & Stig Holm, Eva Forsberg, Karin & Martin Oskarsson and David Eriksson. For great inspiration and for believing in our project, we want to thank all our friends, in particular Robert Bäcklund, Maria Persson, Anna Särhammar, Kamilla Prevolnik and Björn Nygren. We wish to express our love and gratitude to our beloved friends and families; for their understanding & endless love, through the duration of our studies. Marlene Holm and Olof Nordström Stockholm, 08-03-2013
  • 3. Abstract The increased interest in cooking and culinary experiences of the urban Y-generation forms the basis for this master thesis for the MSc program Industrial Design Engineering, Luleå University of Technology Oktober 2012 – March 2013. The authors, Marlene Holm and Olof Nordström, have developed a product concept based on the former kitchen mixer Electrolux N15, that fills the gap in the product segment that is referred to as Urban Compact Living, in which there is currently no equivalent product offered. The focus has been on understanding the market segment and defining the target customer in order to conduct multiple user tests and observations to design a product with high usability and user satisfaction. Two stand mixers of the wall mounted model Electrolux N15, with all the attachments and manuals, was purchased and forms the base for making the practical tests and studies. Much of the work consists of usability analyzes in order to understand what users want, both what they consciously seek but also implicit needs; what they do not yet know that they want. User studies are conducted where users are observed and the product’s usability is analyzed with the help of a CW, -Cognitive Walkthrough and a PHEA, -Predicted Human Error Analysis test. Electrolux's design dna is analyzed to create a product that exudes their visual brand identity and meet the customer expectations. The idea generation is an iterative process where creative tools such as brainstorming, exploratory sketching and clay modelling are used to create the concept, its features and final design. To further develop and visualize, the concept is 3D-modeled in CAD software and finally rendered into photo realistic images. A full scale prototype is made using a 3D printer to evaluate the shape and the size. The result is an innovative, user friendly and time saving stand mixer that inspires people with an urban lifestyle and a compact living to a true and wholesome cooking experience.
  • 4. List of Contents 1 Introduction 6 1.1 Background 6 1.1.2 Project Background 6 1.2 Aim 6 1.3 Deliverables 1 1.3.1 Sub Deliverables 1 1.4 Delimitation 1 1.5 Project Process 8 1.6 Report Layout 8 2. The Present 9 2.2 Mixer Market 9 2.3 The Company 10 2.3.1. Electrolux Group 10 2.4 The Product 10 2.4.1 Design Features 10 2.4.2 Attachments 11 2.4.3 Wall Mounting 13 3 Theory 14 3.1 Facts of Stand Mixers 14 3.1.1 Facts of Spiral Mixers 14 3.1.2 Facts of Planetary Mixers 15 3.1.3 Facts of Baking & Cooking 15 3.3 Design Theory 15 3.3.1 Principles of Design 15 3.3.2 Elements of Design 16 3.3.3 Why Design? 16 3.3.4 Timeless Design 16 3.4. Product Experience 17 3.5 Usability 17 3.6 Technologies & Material 17 3.6.1 Induction Cooking 17 3.6.2 Load Cells 17 3.6.3. Stick Free Surfaces 18 3.7 Software & Prototyping 18 3.7.1 UGS Siemens NX8 18 3.7.2. Luxion KeyShot 18 3.7.3 3D-printing 18 4. Method 19 4.1 Design Process 19 4.2 Project Planning Methods 19 4.2.1 Concept Map 19 4.2.2 GANTT-Chart 19 4.3 Data Collecting Methods 19 4.3.1 Benchmarking 19 4.3.2 Digital Survey 20 4.3.3 User Interviews 20 4.3.4 Observations 20 4.3.5 PHEA 20 4.3 Analysis Methods 20 4.1.1 S.W.O.T. Analysis 20 4.1.2 User Scenarios 20 4.1.3 Matrix of Features 21 4.1.4 HTA - Function Analysis 21 4.4 Idea Generating 21 4.4.1 Moodboards 21 4.4.2 Wordle 21 4.4.3 Brainstorming 21 4.4.4 Visualstorming 21 4.4.5 Designing For The Extremes 21 4.4.5 Exploratory Sketching 22 4.4.6 Industrial Clay Modeling 22 4.5 Evaluation Methods 22 4.5.1 Explanatory Sketching 22 4.5.2 Design Specification 22 5. Research & Analysis 23 5.1 The Company 23 5.1.1 Electrolux Brand Identity 23 5.1.2 Design Language 23 5.1.3 Design Lab 24
  • 5. 9 5.2 The Market 24 5.2.1 Market Segments 24 5.2.2 Competitor Analysis 25 5.3 The User 25 5.3.1 User Survey 25 5.3.2 Internet Observations 25 5.3.3 Habits 26 5.3.4 Scenarios 26 5.4 The Product 26 5.4.1 N15 Brochure 26 5.4.2 N15 Interview 27 5.4.3 Hands On Tests 27 5.4.4 Construction Analysis 27 5.4.5 SWOT Analysis 29 5.4.6 Conclusions of the Tests 29 5.4.7 HTA 30 5.4.8 CW and PHEA Test 30 5.4.9 Support Functions 31 5.5 Conclusion 31 5.5.1 Mission Statement 31 5.5.1 Target User 31 5.5.1 Feature Chart 31 6. Design Specification 37 7. Concept Development 37 7.1 Idea Generation 34 7.1.1 Moodboards 34 7.1.2 Wordle 34 7.1.3 Brainstorming 34 7.1.4 Extremes 35 7.1.5 Visualstorming 35 7.1.6 Exploratory Sketching 35 7.1.7 Clay Modeling 35 7.1.7 Conclusion 35 8. Further Development 37 8.1 Head Unit 37 8.1.1 Design & Form 37 8.1.2 Mechanics 37 8.1.3 Upper Arm 38 8.1.4 Lower Arm 39 8.1.5 Buttons And Rotary Switches 39 8.1.6 Built in scale 39 8.1.7 Induction 39 8.1.8 Timer 39 8.1.9 Effect 39 8.1.10 Cord Winder 39 8.2 Attachments 39 8.2.1 Hook & Beaters 39 8.2.2 Blender 40 8.2.3 Coffee Grinder 40 8.3 Interface Design 40 8.4 Mounting 42 8.3 Materials 41 8.1 Prototyping 42 8.1.1 CAD 42 8.1.2 Rendering 42 8.1.3 3D-Printing 42 9. The Result 43 9.1 The Product 43 9.2 Usage 45 9.3 Functions 49 9.3.1 Kneading, Whipping & Stirring 49 9.3.2 Blender 50 9.3.3 Coffe Grinder 50 9.3.4 Built in features 50 9.3.5 Cord Winder, ’Cable Cave’ 50 9.3.6 Mounting Plate - Knife Magnet 50 9.4 Design 51 9.5 Evaluatin 53 9.5.1 Prototype 53 9.5.2 CW & Error Analysis 53 10. Discussion 55 10.1 Process 55 10.2 Further Development 56 10.3 Recommendations 56 11. Outcome 57 References 57
  • 6. 6 1 Introduction This report covers a master thesis in product design for the program Industrial Design Engineering at Luleå University of Technology conducted autumn 2012 - spring 2013. The product development work has been performed by Marlene Holm and Olof Nordström where the stand mixer N15 has been modernized and adapted for today's market. The focus has been on understanding the market segment and finding the target customer to design a product based on the best possible user experience. In this first chapter we give a context for the project and state the mission, vision and delimitation. 1.1 Background What is it that makes us recognize a product as better or worse than another one? Why do we inexplicably fall in love in certain products? What factors are involved? How can we as product designers understand people around us so we can give them what they really want? The purpose for this product development project is to deliver a concept for a wall mounted stand mixer based on the mechanical principles of the Electrolux N15. 1.1.1 Project Background The idea of the thesis was born when an old kitchen mixer was found in the kitchen of marlenes parents' house. This model from Electrolux did not look like any other kitchen mixer and appeared very compact and functional. While we see an upward trend in traditional cooking, and thus also demand of kitchen machines, many people today are living in compact one-person households. We saw a need for a kitchen mixer like the one we found and decided to find out how it would look and function if it would be re-launched in the Electrolux range of kitchen appliances. This thesis was conducted without the collaboration with Electrolux. Often, kitchen machines occupies large areas of workspace that exist in smaller apartments. Since they are generally heavy and large they are often seen as "clumsy" to both store and take out. In the smaller household, it may therefore seem impossible to invest in a kitchen machine. Electrolux has over the years have many products on the market, but one of their popular products has been discontinued, which has left a gap in this market segment. During some years in the mid-eighties there was a stand Mixer, the Electrolux N15, which is a smart and compact solution for a wall-hung kitchen machine. What makes it unique is that it is hung on a mounting plate screwed directly into the wall or onto a bracket mounted under the kitchen cabinet. It fits well both in the small student apartment as well as in the large household and unlike today's options, it doesn't occupy much space. With its short setup time, it is also quick and easy to prepare for use and with its various accessories it is versatile and has multiple uses. 1.2 Aim The project aim is to develop a space smart concept of a kitchen mixer that fills the gap in the Electrolux range that the stand mixer N15 made when it was taken out of production. The aim is also to explore Electrolux's customer segments and to define the target customer for this product concept. User-centered design methods for analyzing the concept will be explored and carried out to develop a concept with high user satisfaction.
  • 7. 7 Furthermore, we want to understand the factors that make users experience a product as better or worse than another and as what it is that gives an unexplained relationship with their products. When we understand the emotional experiences, we can help give users what they really want. 1.3 Deliverables With a thorough needs analysis and a carefully executed design process the objective for this project is to develop a feasible concept for a wall mounted stand mixer suitable for the Electrolux home product range. This concept will be founded on the Electrolux N15’s unique advantages and it is important that the product will meet user’s high demands on form and function. To understand the factors that provide as a good product experience and a true product relationships a great emphasis is put on understanding the human satisfaction. 1.3.1 Sub Deliverables 1. Understand the culture of baking and cooking as well as the market of stand mixers 2. Identify the wants and needs of the stand mixer users 3. Analyze the Electrolux market and define the stand mixer’s market segments 4. Analyze the Electrolux N15 and find the strengths and weaknesses 5. Set up a list of requirements and preferences for the Electrolux stand mixer concept 6. Sketching and brainstorming to find interesting solutions and design expressions 7. Develop concepts that is realistic and consistent with the Electrolux design. 8. Develop a chosen design concept 9. Further development of chosen concept until every detail is worked thoroughly 10. Deliver a final concept presented as 2D and 3D renderings with production recommendations for further development 1.4 Delimitation All work needed for the realization of this concept cannot be covered in this project due to the given limitations of time and resourses. Those are presented in this section of delimitation. Recommendations for further work on this project can be found at the end of the report. 1. The project focus on the Western market and particularly Scandinavia as the food habits differ among regions and cultures and the analysis is mostly taken place in Sweden. 2. The final concept should contain technology that is available or under development and realistic to be available within 10 years. 3. Electronic components will not be specified 4. Methods of manufacturing will not be stated but are taken into account in the design process 5. No estimate of costs related to the manufacturing will be done. 6. Strength calculations are not taken into account. 7. Packaging for the product will not be developed.
  • 8. 8 1.5 Project Process Once the problem of the project is defined with limitations and a clear picture of the purpose and objective, the project is divided into five phases. Time limited phases with interim targets simplify detailed project planning. The plan is used as a daily tool for direct feedback on how the project goes according to schedule. A Gantt-schedule was made based on the mission statement. For each task the Gantt-schedule has a vertical time line running along a time axis. Several tasks can run parallel to each other along the time axis. (Johannesson, Persson & Pettersson, 2004) This project is divided into the following six phases. See figure 1. 1.6 Report Layout This project follows a thesis report and contains, besides from the introduction, the theory section and at the methodology section a pre study, a user study, an analysis, a concept development, further development and that can be read for a deeper understanding, of the product development process. The theory section provides the reader with information that is not considered to be common knowledge but is essential for the development process. The reader can take part of the design process and the result without reading neither the introduction, the theory or the methodology section. Figure 2 The report layout Pre Study User Study Analysis Concept Development Further Development Result Figure 1 The design process
  • 9. 9 2 The Present Urban compact living, that is where we are today. More time and inspiration in the kitchen, that is where we are heading. In today’s kitchens there is no product that alone offers the most needed functions e.g. mixing, chopping, kneading and grinding, that is always at hand. Instead the kitchens are cluttered with specialized appliances that steal space and are difficult to find. The stand mixer market has not evolved since the first stand mixers came along many decades ago. A smart kitchen machine once offered by the Electrolux may be the answer in our quest for an emphatic and inspiring concept 2.1 Kitchen Kitchen Mixer Market Kitchen mixers come in a wide range of models from different manufacturers, for both home and professional use. The main purpose of the kitchen mixer is to knead large dough and mix batter. Standard equipment also includes beater for whipping cream. For most models, there are additional equipment to buy, such as meat grinder, strainer and vegetable cutter. Some also have sausage horn, pasta rolls and blender. The Scandinavian market of kitchen stand mixers are dominated by two models, 'KitchenAid' and 'Ankarsrum Assistent' (former Electrolux Assistent). These two stand mixers were launched in the 1930s respectively 1940s and have, up to this day, only seen some minor design changes. The KitchenAid and the Ankarsrum Assistant have become design classics due to how well they meet the criteria of timeless design, they have clearly stood the test of time. (KitchenAid 2012, 1a), (Assistent 2012, 1a) Besides the KitchenAid and the assistent, most manufacturers of small kitchen appliances have a kitchen mixer in their range of products. Assistent   Orginal   Kenwood   Kitchenaid   Krups   OBH   Nordica   Bosch   Figure 3 Six popular kitchen mixers
  • 10. 10 2.2 The Company Since the project deals with the development of an existing product from Electrolux, here is a brief introduction to the Electrolux Group and their brands. 2.2.1. Electrolux Group Electrolux is a Swedish company group which since 1919 has delivered and manufactured home appliances to households all around the world. Electrolux is a global leader in household appliances and appliances for professional use, selling more than 40 million products to customers in more than 150 markets every year. They are investing heavily in innovation and development with the goal of making people's everyday life easier and more enjoyable. Electrolux products include refrigerators, dishwashers, washing machines, vacuum cleaners, cookers and air-conditioners sold under esteemed brands such as Electrolux, AEG, Eureka and Frigidaire. In 2011 Electrolux had sales of SEK 102 billion and 58,000 employees. (Electrolux group, 2012) 2.2.2 Electrolux Brand Since 2011, Electrolux's flagship brand "Electrolux" has changed its positioning, from being a brand in the medium segment, into offering premium household products in the high-end segment. “Thinking of you” is the core message and expresses the Electrolux offering; To maintain continuous focus on the consumer, whether it’s a question of product development, design, production, marketing, logistics or service. The company focuses on innovations that are thoughtfully designed, based on extensive consumer insight, to meet the real needs of consumers and professionals. (Electrolux, 2012 1a) Electrolux have the Scandinavian design values: "freedom, intuition, authenticity, comfort and simplicity." (Electrolux group, 2012) 2.3 The Product Electrolux N15 is a stand mixer produced and sold in the early 80's to the late 80's. It has a smart design where the machine’s functional elements are folded out when used not to take away unnecessarily workspace when not in use.The purpose of the N15 is that the machine will always be on display to encourage use, increase accessibility and leave more space on the kitchen counter. With its unique design, it is still the only one of its kind. 2.3.1 Design Features When the kitchen machine is not in use, it is only just over 10 centimeters deep and usually mounted 5-10 cm over the counter top so it does not occupy work space . When in use, two arms are folded out from the stand mixer where bowl and accessories can be fitted. Since it's very neat, it is possible to remove it from the bracket and store it in a cabinet or kitchen drawer.In it’s initial state, when not in use, it has a rectangular shape with the dimensions height; 262 mm, width; 304 mm, depth; 100 mm. See figure 6 Figure 5 Electrolux 'Thinking of you' Figure 4 Electrolux N15
  • 11. 11 The machines main body is currently made of metal and the beige front covers, buttons and controls are made of plastic. The mixer has three power outlets for the equipment; a high speed on the upper arm and a low speed on both the upper and lower arm. The 1,7 m long power cord can be winded up on the back of the machine body. 2.3.2 Attachments The Electrolux N15 came with accessories to handle the most common tasks when baking. For more uses it could be equipped with a variety of accessories to meet most needs- See figure 7 Standard accessories: • 1 Bowl – Container for ingredients • 2 Beaters - for whipped cream etc. (1) • 1 Dough hook – for kneading dough (2) • 2 Mixing hooks – for cookie dough etc. (3) • Protective cap for drive socket • Plate for wall mounting Optional extras: • Blender (4) • Vegetable cutter (5) • Mincer (6) • Feed plunger, sausage tube and strainer unit for the mincer • Bracket for mounting under overhead cupboard Figure 6 Machine body illustration Figure 7 Electrolux N15 and its attachments
  • 12. 12 2.3.3 Usage & Interface To Use Dough Hook, Beaters or Mixing Hooks The lower arm folds out to the first position. The other arm folds all the way up past the fixed position by pressing and holding the release button. The bowl is placed on the lower arm and, depending on which one, the whisk, beater or dough hook is pushed into their drive sockets. The upper arm folds down to its horizontal position where it snaps and locks. To Use the Blender The lower arm is folded out by holding the lower arm release button. The blender container is placed on the socket and rotated a quarter turn clockwise until it’s locked in position. To Use The Mincer, Strainer Or Vegetable Cutter Remove protective cap from drive socket and mount the attachment onto the drive socket by pushing it in and turning it counter clockwise until it locks. Handling the N15 The machine is turned on by using the knob located on the front. The speed of the machine is set continuously by turning the knob clockwise. A full speed / pulse mode is available if this knob is turned counterclockwise. Then it reaches the maximum speed immediately which stops when the knob is released. The machine is equipped with a mechanical safety feature that prevents the machine from starting whenever the upper arm is not in a correct working position. Figure 8 N15 overview, closed
  • 13. 13 2.3.4 Wall Mounting The Stand Mixer N15 is designed for mounting on the wall. It’s hung on a mounting plate which is screwed directly onto the wall or to brackets mounted under the wall cabinet. The mixer can easily be removed by lifting the machine up and then pulling it away from the mounting plate. See figure 10 Figure 9 N15 overview, open Figure 10 ALT.1 Mounting plate screwed to the wall, ALT. 2 Screwed onto brackets
  • 14. 14 3 Theory This chapter is a literature review of knowledge and information that has been important for the implementation of this project. A compilation of information is presented here to give the reader some facts to understand the result obtained in this work. 3.1 Facts of Stand Mixers To understand the product, here's a review of the product segment of kitchen appliances. A mixer is a kitchen appliance with the main purpose of mixing, beating, kneading and whipping food. A stand mixer is larger and equipped with a more powerful motor than a regular hand mixer and is also mounted on a stand for bearing the weight. Therefore it’s suitable for larger quantities of food processing and only require the user to maneuver the machine. They often have a variety of optional extra accessories that make them a multi functional kitchen appliance. The names for different kitchen appliances can be confusing. The correct terms for the appliances are can be seen in figure 11. Stand mixers are available in with two different constructions; spiral and planetary. (Acitydiscount, 2012) 3.1.1 Facts of Spiral Mixers The spiral mixer consists of a spiral shaped agitator that is stationary while the bowl rotates. They are suitable for mixing dough as they do it fast and are gentle to the dough, which does not increase its temperature as much, which is desirable for its rise. The spiral mixer has attachments for whipping and beating but is not ideal for this purpose. Stand Mixer / Kitchen Mixer! Mixer! Hand Mixer! Blender! Food Processor! Figure 11 Correct terms for food preparation kitchen appliances
  • 15. 15 Figure 12 The spiral mixer Ankarsum Assistent 3.1.2 Facts of Planetary Mixers The planetary mixer system has a fixed bowl and a rotating planetary head with an agitator that spins in the counter direction. With the planetary motion it reaches the whole bowl which is more suitable for beating and whipping ingredients than mixing dough. 3.1.3 Facts of Baking & Cooking Yeast Yeast is the "heart of the dough" and has the important task of making the bread porous, while giving the bread flavor and aroma. It is a natural base ingredient when baking plain bread or wheat bread. The yeast break down the sugar to carbon dioxide and alcohol. The carbon dioxide forms small bubbles, which makes the dough rise and become fluffy. If the dough liquid is too hot the ability to rise will weaken. For the dough to rise well with fresh yeast, the optimum temperature is 38 ° C. It should never achieve more than about 45 ° C, since the yeast is killed at higher temperatures. (Kronjäst, 2012) Kneading A good dough requires substantial kneading and it is usually better done with the machine as it also simplifies the work. The dough should be worked and processed according to the time in the recipe, to get a good result and much volume to the bread. A stand mixer kneads the dough fast, compared to hand-kneading, which rises the temperature of the dough. To long kneading time can rise the temperature to the point where the yeast begins to die off. (Kronjäst, 2012) 3.2 Design Theory There are a handful of universal design prinicples that applyy to several fields, including fine arts, graphic design, industrial design and architecture. In the following section, a generally accepted list of the design principles are presented. The list may differ some between books and articles but the context is still the same. 3.2.1 Principles of Design Unity Brings a harmony among the elements, all part of the design is treated as equally important. A balance between unity and variety must exist for a design to be exciting but not chaotic. Unity can be achieved by using methods of proximity, similarity, continuation, repetition andrhymes. Balance An equality in shape, form, value, color etc. Repetition Repeating a design element makes a pattern which makes an eye-catching and interesting featureFigure 13 The planetary mixer KitchenAid
  • 16. 16 Proximity Proximity creates a relationship between elements in a way that makes them visually connected, this minimizes clutter and increases the comprehension. Similarity and Contrast Contrast in color, value, size/shape and direction make unique elements stand out in a design. (White, 2011) Figure 14 Principles of design 3.2.2 Elements of Design The list in this section describes the most commonly used design elements. Applying the design principles to these design elements are important aspects for making a good design. Line The mark on a surface that makes a shape, or an outline, it can be of any thickness. Lines can be used to describe the form and divide the product into areas where they can be distinguished by different colors or materials. Lines can create a sense of flow. Form 3-dimensional object with volume and thickness. Shape Shape is a 2-dimensional line and can be of a geometric or organic character but are always flat. Value Value is the shade of a color, how light or dark it is, which can be used for leading the eye or emphasizing a design. Space Space is the volume where the design take place. Both negative and positive space is important when defining a form. Size Size is how large or small an area is. Texture The quality of the surface, smooth, rough, hard, matt, glossy Color Color is used to add emotion, mood or weight to a design. Colors can be used for encoding functions and for association with specific characteristics. (Butler, Holden & Lidwell, 2003) Figure 15 Elements of design 3.2.3 Why Design? Shapes, colors, and characters are all attributes that can give the product an identity that lets people understand which company the product originates from. Letting the product express the company origin and give it a clear identity will reduce anonymity and create trust. Design is used as a competitive tool and can when carried out properly provide added value to the product. (Eppinger & Ulrich, 2003) (Österlin, 2010) Figure 16 Dieter Rams 3.2.4 Timeless Design Dieter Rams’ 10 Principles for good design has almost become a golden standard to what is good design. Timeless is best described as the opposite of a trend. According to Rams, to be a design classic, the design should be unobtrusive and discrete to allow for the surrounding to change as trends come and goes. (Vitsoe, 2012)
  • 17. 17 3.4. Product Experience To design a product that provides the best product experience, the product developer always have to be empathetic and have the user in focus continuously, after all, it is the user the product is made for. Empathic design is achieved through observing and interacting with the user to better understand their needs and appreciation. 3.5 Usability The definition of usability according to the ISO standard 9231-11 is; "The extent to which a product can be used by specified users to achieve specified goals with effectiveness, efficiency, and satisfaction in a specified context of use". (International standard, 1998) Figure 17 Illustration of usability 3.6 Technologies & Material 3.6.1 Induction Cooking Induction heating is a way to cook food where the vessel is heated, as opposed to traditional cooking where heat is transferred between electric coil or gas to the pot. The change in a magnetic field can create voltage, the amount of voltage created is equal to the change in magnetic flux divided by the change in time. The greater the change in the magnetic field, the greater amount of voltage and the warmer it gets. (Induction cooking, 2013) Figure 18 Induction heating 3.6.2 Load Cells Load cells are used in digital scales to detect weight changes. The load cell contains a strain gauges which deform when a weight is placed on the scale. The strain gauge measures the deformation as an electrical signal. This is possible since the strain changes the effective electrical resistance in the wire. The electrical signal is amplified and the output signal calculates the weight applied. Load cells are rugged and compact with no moving parts and are available in all sizes for both small and large loads. They measure with high precision and can weigh both static and dynamic loads. (Load cell, 2013) Good design : …..is innovative …..makes a product useful …..is aesthetic …..makes a product understandable …..is unobtrusive …..is honest …..is long-lasting …..is thorough down to the last detail …..is environmentally friendly …..is as little design as possible Figure 19 Illustration of load cell
  • 18. 18 3.6.3. Stick Free Surfaces Nanotechnology can be used to produce unique, permanent and food-safe non-stick coatings. The coating gives an easy to clean, antibacterial surface that is resistant to temperature changes and pH-value changes. The nano-coating can be used on most surfaces, e.g. stainless steel, plastic and painted aluminum. The easy-clean nano-coating is uv-stable throughout its lifetime. The coating cannot be removed by abrasion since it has a permanent chemical bond with the substrate which enables excellent abrasion resistance. The coating also holds a high chemical stability, it is resistant to all standard household and industrial cleaners, except from concentrated lye. (Nanocare, 2013) Figure 20 Nanotechnology 3.7 Software & Prototyping 3.7.1 UGS Siemens NX8 UGS NX8 is a CAD (computer aided design) software which is used to create solid model designs which can then be used as the basis for drawings, manufacturing and simulations. 3.7.2. Luxion KeyShot KeyShot is a 3D rendering and animation software used for creating photo realistic images. 3.7.3 3D-printing 3D-printing is a rapid prototyping process used to create 3D models by building up layers of plastic. The model is formed from the molten plastic using the data from a CAD drawing.
  • 19. 19 4. Method As we see it, the design process is all about understanding the user, in order to design, build and finally test the concept. The product development process has an iterative workflow where the steps are repeated throughout the process, until every detail is carefully designed. This section gives a further description of the methods used for planning, collecting data, analyzing it, generating ideas and finally evaluating them and implement them in a final design. Implementation and the results from the methods can be read in the following chapters. 4.1 Design Process The design process is generally a systematic process which is structured effectively to reach results with high quality. The design process is specifically customized to each projects but it’s usually an iterative process where idea generation and evaluation are performed alternately until the result is satisfactory. 4.2 Project Planning Methods A well-planned project is essential for achieving a good result. A concept map is first created to ensure that all important aspects of the project will be covered in the time plan. A time plan is then created with a Gantt-chart. 4.2.1 Concept Map Created with main branches, and sub branches, the concept map clearly communicates structures in the project, categorizes tasks and visually illustrates the relationships among them. See figure 21 (Energy education, 2012) 4.2.2 GANTT-Chart One of most foreseeable ways of planning and structuring a larger time limited project is with a Gantt- chart. The chart has a horizontal timeline on one axis and a vertical list of tasks in chronological order on the other axis. Every task will be presented with a bar, where the length corresponds to the duration of the task. (Johannesson, Persson & Pettersson, 2004) 4.3 Data Collecting Methods In our view, collecting data is crucial for understanding the user, the market and the product which in turn is key to design of successful products. Survey data is not just statistical figures, but input that creates understanding and insights 4.3.1 Benchmarking Benchmarking is a process where all leading products in the market for a specific product is mapped. Figure 21 Concept map
  • 20. 20 "Competitor espionage" can provide a lot of useful information. Interesting solutions on competitor’s stand mixers can work either as inspiration or as a foundation for developing a similar but better suited for the own product. 4.3.2 Digital Survey A survey is a structured questionnaire given to a sample of the population where the purpose is to identify consumer behhavior patterns and give product feedback. Much emphasis is put on formulating the questions in such a way that the participants will answer truly and from their own experiences. (Wärneryd, 1986) 4.3.3 User Interviews User interviews are made with persons that have had a lot of experience with the product . It can also be professionals who have worked with the development or retail of the product’s. Documentation with video or audio recording is preferable. (Branston, 2009) 4.3.4 Observations Observations are data collection through recording of behaviors when a person is using a product. This method provides information that cannot be reached with only interviews. Observations can for instance show unconscious behaviors and behaviors that the individual might not want to discuss. Self observations by the designer who has understanding of product conception can also provide userful information. Video documentation is important to analyze the observations later on. (Malhotra, 2008) 4.3.5 PHEA PHEA, Predictive Human Error Analysis is used to find operational errors when using a product. PHEA can preferably be used together with a function analysis method as the HTA method, see section 4.1.4. Before the PHEA is performed on the test persons it is important to first define the task steps (by using HTA for example) and secondly identify possible wrongdoings in each step. The test person is asked to perform each operation and the whole test is documented with a video camera. The errors are identified by taking notes that answer the following four specific questions; (Bohgard, 2008) 4.4 Analysis Methods 4.4.1 S.W.O.T. Analysis The company, or in this case, the product is evaluated as it is at the moment based on the four guiding principles; the good internal; strength, the bad internal; weakness, the good external; opportunity, the bad external; threat. The properties are presented in a matrix. (Armstrong & Kotler, 2010) Figure 22 Illustration of S.W.O.T. analysis 4.4.2 User Scenarios Scenarios for the typical user can be pictured to get inputs to the design process and help the designer to understand how the product can be improved to better fit the users. (Branston, 2009) 1. Will the user try to achieve the right result? 2. Will the user notice that there is a possible path to the right result? 3. Will the user associate the right action with the right result? 4. If the right action is performed, will the user notice that this action brought her closer to the completion of the task?
  • 21. 21 4.4.3 Feature chart A matrix where the product’s future characteristics are featured with emotional to rational features on the x- axis and new to old features on the y-axis that is wanted or needed for the new product. 4.4.4 HTA - Function Analysis Hierarchical function analysis is a method to break down a certain operation to see every step that user need to perform to complete the task. The operation is divided into a series of steps and every step is divided into hierarchically ordered substeps. When designing a product, it is useful to look at the number of substeps in the design process in order to eliminate unnecessary substeps. (Bohgard, 2008) 4.4 Idea Generating 4.4.1 Moodboards A moodboard is a collection of images on a board that together convey a certain mood where the purpose is to inspire the designer or to communicate a desired direction for a project with a client. Moodboards can be made digitally or by hand. See figure 23 Figure 23 Example moodboard 4.4.2 Wordle Wordle is a creative way of using words by generating a word cloud. The more the word is repeated within a certain text, the bigger and more prominent the word gets in the cloud. In this project, Wordles will be used to show how often users refer to certain features and characteristics. (Wordle, 2012) Figure 24 Example wordle 4.4.3 Brainstorming Brainstorming is a verbal session that works as a catalyst for new ideas. This idea generating method can be used when the participants already have direct or indirect experiences related to the topic. Usually the ideas are already there, they just need a trigger to be released. An idea can, for example, be a solution to a problem or a direction for in which way the project is heading. A creative session of this kind should be intense and fun without giving any idea too much attention. (Branston, 2009) 4.4.4 Visualstorming Visualstorming is a visual version of brainstorming where doodling, small thumbnail sketches inspire and triggers the participants in the idea generating session. Both oral and visual inputs are usually combined In this creative method, which often leads to even more triggers. Since these early ideas will be indicators for the project direction, it’s important not to close any doors, but to let all ideas through. (Branston, 2009) 4.4.5 Designing For The Extremes When using personas in design processes it’s common that the characters created are representing the typical user or customer. By designing for the average user you often exclude the extremes. Of course, keeping focus on the common mass is the obvious way to go at general, but by looking at the extremes as well, a lot of new input could result in an even better product for all users. (Hustwit, 2009) D. Formosa (Objectified, 2009) describes that "what we really need to do to design is to look at the extremes - the weakest, with arthritis, the athlete, the strongest, the fastest - because if we understand what the extremes are, the middle will take care of itself". Doodle v. Scribble absent-minded
  • 22. 22 4.4.6 Exploratory Sketching Exploratory, or investigatory sketching is a method where quick sketching is used to generate ideas and to explore solutions. The sketches are usually only for the designer or for the designer team. As for brainstorming, the aim is to generate as many ideas as possible. The sketches can be made with whatever pens or markers the designer is comfortable with, although, adding colors can add emotional characteristics to a sketch. (Sjölén, 2005) 4.4.7 Industrial Clay Modeling Designing shapes and details in two dimension, eg. on a paper, can be challenging but with clay it’s possible to explore them in three dimensions. The clay is called industrial plasticine and is based on wax and does neither dry out or shrink. (Staedtler, 2012) 4.5 Evaluation Methods 4.5.1 Explanatory Sketching Focus on explaining the function, structure and form rather than sketches made for persuading and selling. Explanatory sketches are very useful throughout the whole project, as design solutions have to be explained in a fast and fairly accurate way all the time. (Sjölén, 2005) 4.5.2 Design Specification The specification of requirements describes the requirements and wishes the product must meet. It is important that the requirements are written as requirements and not as solutions to the product. Some important and frequent headlines in the specifications used in product development are: (Beitz & Pahl, 1995) • Geometry • Design • Materials • Market • Ergonomics • Maintenance
  • 23. 23 5. Research & Analysis This chapters covers all the information gathered about the market & the competitors, the company; Electrolux, the machine; N15 and the stand mixer users. The information is gained through benchmarking, interviews, surveys , self observations and function analyzes. This information is analyzed in order to get all the understanding needed to create a user centered design. 5.1 The Company To obtain a clear picture of AB Electrolux, a study is made with a focus on products, values and vision. Product analysis includes products from past, present and future and is carried out on websites, through publications and through hands-on experiences at Electrolux Home in Stockholm. 5.1.1 Electrolux Brand Identity Electrolux want to be perceived as the ”Thoughtful Design Innovator”. Their four brand values to support and achieve their brand identity goal are; 1. EMPATHY –We have compassion for the experiences, thoughts and feelings of others 2. INSIGHTFUL –We are creating meaningful consumer value. 3. PROGRESSIVE – We are challenge conventions to deliver industry shaping concepts. 4. INGENIOUS – We create clever solutions and original experiences. (Dani, 2011) 5.1.2 Design Language Electrolux offer, apart from domestic appliances; major and small appliances, products for professional use. The design languages differs between the divisions and therefore we have focused to study the visual brand identity of the small domestic appliances since that is where our product belongs. (Electrolux Group, 2012 ) The Electrolux design "DNA"; what distinguishes their small appliances products, was analyzed by exploring their product range in Electrolux Home stores and online. A list of Electrolux design cues was made. Figure 25 'Thoughtful Design Innovator'
  • 24. 24 The flow line Flow lines are lines that describe the form and divides the product into segments where they can be distinguished by different colors or materials. It creates a sense of flow. Colors Products in the segment of small appliances usually come in a color series. The customer can choose the color according to taste. The product can be adapted to color in the home and kitchen and matched with other products. Materials & Textures Products often have combinations of materials with different texture. For example; Hard and smooth plastic and metal with a silk feeling, shiny glass and brushed metal. Characteristic shapes Electrolux uses soft shapes, but always combined with strict lines, to give products the minimalist expression that is the essence of Scandinavian design. They often use a characteristic flow line that can be seen just above ”ergorapido”, between the transparent and the metallic surface, in figure 26. Holes Another characteristic detail is the round that creates a pattern. They are often used, for instance, on vacuum cleaners. Text & symbols The logo always have a central position on the product and if there’s a product name it’s often printed with its own personal typeface. 5.1.3 Design Lab Electrolux has since 2003, annually arranged a design competition open for design students called Design Lab; ”Calling for inventions unseen and unheard of.” Every year the students creativity kicks off with the announcement of the theme. The theme of the design lab 2013 is inspired urban living which confirms that our focus on the urban generation of the thesis is well timed. (Electrolux Designlab, 2013) Figure 27 Designlab 2013: 'Inspired Urban Living' 5.2 The Market To understand the market segment of stand mixers, a research study of its history, uses and performance has been made, reading tests, Machines for both industrial and domestic use have been analyzed in order to understand how they are used and to find possible differences in machine constructions and features. 5.2.1 Market Segments Kitchen mixers come in a variety of types from different manufacturers where price and performance are varied. In general these variables are linked together and the customer gets more, the more they pay. Stand mixers for domestic purposes are available from 2000 SEK up to 10 000 SEK, where the more expensive variants are often more substantial and powerful, and with more accessories. See a compilation of kitchen mixers in appendix XII. In general, kitchen mixers has not changed significantly since they came on the market. Sturdy materials and solid design are still important characteristics. However, many people buy kitchen mixers as an interior detail and therefore it is not unusual that the design is more important than function for some customers. 5.2.2 Electrolux’s Kitchen Mixers Electrolux today offers kitchen mixers in two market segments, the assistent and the Grand Cuisine mixer. The Assistent Original from 1940, now manufactured by Ankarsrum, is a spiral mixer in the price range of Figure 26 Electrolux Ergorapido
  • 25. 25 4000-6000 SEK, depending on the number of included accessories. Today, the Assistent is a popular classic, with its solid construction, the powerful motor and the largest bowl on the market. The Grand Cuisine is a planetary mixer that has not yet reached the market. It belongs in the upper premium segment and will be sold in a package together with other kitchen appliances. Electrolux also has a series of mixers for the professional kitchen where the largest is floor- mounted and can handle a big dough and are used by restaurants and patisseries. (Elextrolux group, 2012) 5.2.3 Competitor Analysis To know the competing brand and their products, internet research and field observations in consumer electronics stores were made. The result of the market analysis showed the same models as them represented in the test in appendix XII. There is nothing similar to the N15 on the market for kitchen mixers. All of the competitors, except for the Assistent original and some Bosch machines, use the planetary mixer system and all of them, except for a Bosch machine is built on the same principle as the KitchenAid, launched in the 1930's. Test of the Electrolux Assistent Original Experimental testing of the Assistent Original is made to get an understanding of how the largest of all consumer kitchen mixers handle the dough and for inspiration and another point of view. A great feature it has is a spatula attached to the inside the bowl, scraping down the dough toward the bottom. This creates a good flow in the dough, folds it and keeps the sides of the bowl clean. 5.3 The User User studies consists of all sorts of observations that bring understanding to how people think and how they interact with the product. In this project the user study chapter covers everything from observations on internet forums to video recorded tests. These observations will reveal the user’s dreams, but also their sources of irritation. The N15's design flaws and possible solutions are identified with hands on tests carried out by the authors, with the help of the two purchased N15’s. 5.3.1 User Survey The user survey is conducted to ask about deeper values, values that matter when choosing brand on their kitchen mixer. All participants in the survey owns one and have experience using it. All the adjectives describing the wants and needs of a stand mixer found among the survey answers are collected and are presented in a wordle where the size represents how common the word was, see 29 and appendix IX. A recurring behavior was that almost everyone put away their stand mixer when not in use and that they would use it more often if they had been spared the moment of taking out and putting away the heavy, and bulky appliance. The participants also had many creative ideas and feature requests for their kitchen mixers. 5.3.2 Internet Observations Listening to what users say when they are not aware of it will give greater understanding of user needs, but also reveal design flaws. This information was gathered from internet forums and facilitates to develop a user-centered product. (Branston, 2009) Complaints and confusions; • The dough is climbing on the dough hook, KitchenAid. • Too small bowl, KitchenAid. • Hard to learn, the Assistent. • Weak motor, KitchenAid. • The dough is mostly tossed around in the bowl and is not getting kneaded, applies to many models with the planetary mixer system. • Difficult to pour in the bowl because of lack of space, KitchenAid. Figure 28 test of the Electrolux Assistent Original
  • 26. 26 Praises and wishes • Aesthetic & decorative • Pleasurable to cook & bake • Last for generations • Priceworthy 5.3.3 Habits In our opinion, what distinguishes the user of this concept is that they want a practical and versatile product. They are not ready to compromise but want a compact and neat unobtrusive product and a strong, sturdy and recognizable design icon at the same time. The kitchen and the art of cooking is highly associated with daily luxury and has a significant impact on how we experience quality of life. Without doubt, making quick and simple meals is as essential for today's users as the advanced and time- consuming cooking is. Quick meals are important for individuals everyday life in order to cope with an active lifestyle. Advanced cooking have never been more popular, especially with the growing interest in traditional cooking like baking sourdough bread, making sausage and pastries like macarons. 5.3.4 Scenarios In order to reach an understanding of customer requirements, we believe it is important to understand the situation, which is the origin and not only see that the requirement as they are Scenarios can be used to design a product to fit the user's lifestyle by finding lifestyle values that are deemed important. In this case, most stand mixers are designed the same and generally not suitable for a compact kitchen or an urban lifestyle. The target customer for this stand mixer concept is typically from the urban, y-generation with a compact kitchen. When the target segment is known, possible user scenarios can be predicted. Some possible scenarios 5.4 The Product There are almost no information to find about the N15 but luckily we came in contact with the Electrolux enthusiast Gerard Cina from Switzerland, with a passion for house hold appliances, who shared a lot of valuable knowledge about the product. 5.4.1 N15 Brochure We received N15 product brochures and user guides from Gerard Cina. These documents gave us some information about the N15, how it was marketed and also Electrolux own selling points. Most importantly, the brochure confirmed that it was beeing marketed as a very simple and space-friendly mixer that is always at hand and is also able to process small quantities. 1. Grinding fair trade coffee beans for two 2. Blending a raw food smoothie for two persons 3. Blending a protein shake with ice cubes for one person to drink on the way to the gym. 4. Shredding cabbage for a pizza sallad 5. Kneading a pizza dough for six persons 6. Grinding almond flour for macarons 7. Whipping egg whites for macarons Scenarios n. A postulated sequenece of possible events. Figure 29 Wordle based on the user survey
  • 27. 27 5.4.2 N15 Interview Gerard Cina, gave us his personal opinions about the N15 and the market of kitchen mixers. This kind of information, that is hard to find elsewhere, was very useful for the project. • The N15 was sold between 1981 and 1989. • The N15 was developed to meet the need for compact kitchen appliances. • The N15 was still popular long after it was taken out of production. • Customers prefer the classic design before the highly conceptual design lab design. • There is a trend for re-launching classic design appliances with strict design look. The Swiss brand Turmix is an example. • He supposes people loved the N15 due to the fact that ”it was easy to use, always at hand, compact and ideal for small quantities”. 5.4.3 Hands On Tests It’s crucial to make practical hands-on-tests and user observations with the product. Two copies of the Electrolux N15 is purchased with all its original accessories and instructions before the analysis phase. See figure 31 User testing are done with of all the features and accessories of N15. The tests are filmed, documented and compiled in a hierarchical functional analysis. 5.4.4 Construction Analysis One of the two purchased machines is opened to understand the construction of the machine. See figure 30 Things that we noted about the construction is; • Although it’s a compact machine, there is still a lot of space within the housing. • The motor is probably out of date and can be replaced with a smaller motor with the equivalent effect or replaced with a stronger in the same size. • The circuit board is very large and most likely out of outdated. • It’s possible to change the position of the release button for the whisks and still use the same mechanical solution. • The housing, where all the mechanics is mounted, is made out of die casted iron. The front casing is made out of durable acrylic. • All the mechanics seem to be of high quality materials and is in perfect condition. Figure 30 Construction analysis of the N15
  • 28. 28 Figure 31 1: Prepared for baking. 2: Yeast mixed with water 3: Attaching the dough hook. 4: The mixer kneads the dough 5: Front view. 6: Testing its limits. 7: Dough hook with a climb stop. 8: Kneading completed.
  • 29. 29 5.4.5 S.W.O.T. Analysis Every strength, weakness, opportunity and threat that is important in the development of this concept is added into a S.W.O.T. chart, see figure 32. 5.4.6 Conclusions of the Tests Built in scale A lot of recipies contains measurements of ingredients in weight instead of volume. This makes weighing ingredients an extra step in the baking process that requires a scale and a bowl as additional equipment. A way of cutting steps in the cooking process is to allow for weighing the ingredients in the bowl. By adding the feature of a built in scale to the mixer the user does not need that extra equipment and the baking process gets more convenient and time effective. Bowl From observations on internet forums it was found that many of the users prefer a larger bowl. Many bread makers were concerned with Kitchenaid’s small 4.8 liter bowl and preferred the Assistent’s larger 7 liter bowl. ”If you want an aesthetically pleasing machine, you can invest in it. If you like to bake properly then you should have something else.. KitchenAid’s bowl is too small, that’s what I think” - (Ekorrmamman, 2010) ”I use the kitchenaid and almost always bake bread instead of buying sourdough, plain dough, bun dough, cookie crumbs. Have never experienced any problems with it. It’s possible that the bowl is too small.” (Brevett, 2011) Figure 32 S.W.O.T analysis of the N15
  • 30. 30 Since this is a concept for an accessible kitchen machine used daily for both big and small tasks it needs to have a compact and neat design. Hence, it’s reasonable to have a bowl size that is small enough to inspire people to use the machine, even for small quantities The bowl is decided to hold as much dough liquids as possible but without being bulky. The maximum size of the whole unit with bowl inclued must not exceed the external dimensions of the N15. Heat induction In the quest to minimize the numbers of steps in the cooking process, it's a huge advantage to offer the ability to heat the ingredients directly in the bowl. The only existing known technique for this is induction since this is the only technique that only heats the cooking vessel. 5.4.7 HTA The Hiearchical task analysis is make for the dough kneading process with the dough hook. When analyzing the HTA, several tasks that makes the preparations complicated and lengthy were found. Most time consuming are the steps that involve preparing ingredients with the help of other kitchen appliances. Based on our tests, some of those are; • Measuring flour etc, measuring cups needs to be taken out, used and washed after use. • Measuring butter needs a scale that needs to be taken out, reset and stored again • Melting butter needs a pot, and a stove to melt it on, the pot then needs to be washed and stored. • Keeping track of the time needs a timer See figure 34. The full size HTA chart can be found in Appendix XV. 5.4.8 CW and PHEA Test Four test persons with no experience of this product conducts the usability test. The operations they have to perform are; 1. Prepare the machine for kneading dough 2. Prepare the machine for blending 3. Prepare the machine for whipping egg whites 4. Prepare the machine for mincing meat 5. Prepare the machine for shredding cabbage Users want to learn by exploring, rather than by reading a manual. The Cognitive Walkthrough evaluates how well the products meet the usability expectations, in other words, how easy the mixer is to learn. When analyzing the test persons actions and errors it is extra important to see if mistakes are made by several persons and especially notice if the mistakes are repeated, even if they already realized that it was wrong since last time they performed the action. The Cognitive Walkthrough and PHEA charts with all gathered information can be found in appendix XVI. Dough Liquid n. The quantity of liquid in a bread recipet is a common way of measuring the bowls capacity. Figure 33 Performing CW and PHEA with test persons Figure 34 HTA chart, mix dough
  • 31. 31 5.4.9 Support Functions After having structured the HTA of the machine it’s important to also identify the support functions as they also contribute to a large part of the product's user experience. The following list is our identified support functions. - Be mounted on the wall - Receive electricity - Set time or count down - Give feedback to user - Decorate the surrounding - Allow to be stored - Be easily cleaned - Save time for the user - Facilitate to make it cooking easier - Always be accessible - Protect the user - Inspire user - Withstand wear 5.6 Conclusion In the following section, the mission statement, the target user, and the design specification list, will be presented along with a feature chart of the user's most wanted qualities and functions. 5.6.1 Mission statement A 'mission statement' was created to concretize the project assignment in one sentence "An innovative, user friendly and time saving kitchen appliance that inspires people with an urban lifestyle and a compact living to a true cooking experience." 5.6.2 Target User The typical user is a small urban household from the y-generation. They are busy, constantly connected, have many interests and are in to in quick, healthy meals on the go - as well as the latest gourmet trends. The target user often lives in apartments and wish they had more storage but most of all they want to be instantly inspired and have their utilities ready at their fingertips at all times. They are very sensitive to design trends, particularly in the kitchen. 5.6.3 N15 Feature Chart All information from hands on tests and user observations are compiled in a chart of the most wanted and needed features, from rational to abstract and from new to exsisting, see figure 36 Figure 35 Y-generation
  • 33. 33 6 Design Specification As the focus in this project is solely to develop a concept, a design specification for features and characteristics is used instead of a technical list of requirements. The needs and demands in this design specification have mainly come from market analysis, functional analysis, self observations, user tests, interviews and the survey. This specification is formulated from a user perspective, incuding user experience and usability. 1. Technical Aspects The same mechanical principle as the N15 with the same power outlets and rotation system A more powerful motor than the N15 (300W) to handle the tasks with ease 2. Functionality Allow handling of the same tasks as the N15; Beating, mixing, kneading, grinding meat, blending, cutting vegetables, stuffing sausage, strain fruit Allow grinding of coffee beans Allow heating of ingredients such as butter and yeast for a more efficient and precise cooking and baking Allow weighing of ingredients for a more efficient and precise cooking and baking Allow timer setting of the machine's running time Volume gradation in bowl and blender Allow mounting of a spatula against the inside the bowl 3. Design Demands (dimensions etc.) The dept of the machine should not exceed the dept of the N15, 13,5cm Allow mounting to wall Allow easy cleaning of the machine and its attachments Lubricating agents must not come into contact with food 4. Expression Be perceived as robust and powerful Perceived as consistently amazing and always at hand Express honesty Express durability; Last a lifetime Fit into the Electrolux product range 5. Material Allow machine washing of the accessories Easy to clean 6. Market Designed for the western market and particularly Scandinavia as the food habits differ among regions and cultures. 7. Customization Allow personal customization by offering the product in a selection of colors Offer various attachments to personalize areas of use according to need 8. Interaction Immobilizes when the arms are not in working position Be intuitive and easy to handle Automatic shut-off if overloaded not to damage motor and components Allow easy adding of ingredients in bowl while running
  • 34. 34 7. Concept Development When all analyzes are completed and the user’s need and wants are fully understood it is time to concretize this knowledge down to solid concepts solutions. The unit as well as every attachment is going through a thorough idea generation process to make a concept that perfectly fits the user and is amazing in every aspect. 7.1 Idea Generation All the creative methods in an iterative process are very valuable in this extensive developing process, considering all the human factors, user perceptions, technical aspects and how many parts it is applied to. 7.1.1 Moodboards In addition to all the self-composed moodboards, Electrolux own moodboards, used for understanding both emotional and rational versions of people, products and places are used, see figure 37. 7.1.2 Wordle Each one of the words used in the wordle represent important qualities that are asked for by the users. The words were collected from the user survey and the size represents how common the word was Stylish is not surprisingly the most important and demanded quality of them all. Furthermore, it is concluded from the wordle that it’s supposed to be close at hands, every day, for many years to come and always be powerful and yet simple, see figure 38. Figure 38 Wordle 7.1.3 Brainstorming Throughout the data collecting and analysis stage many problems and flaws related to the N15 or the product segment itself are revealed. Whenever a problem is identified, a variety of solutions immediately emerges. Many solutions to fundamental problems were found and documented already in the early stages. These are brought back for iteration with the help of the brainstorming method. Figure 37 Electrolux moodboard
  • 35. 35 7.1.4 Extremes Different extremes are taken into consideration throughout the whole process. When designing, the designer asks questions like; would this work well for a person with one hand, big hands or impaired vision? Other questions are ; would this work for a first time user? and would this work for a person who is not used to new technology? By asking those questions, when visualstorming, sketching and modeling, the design will be more user centered and many more people than the "extremes" will be benefited. (Objectified, 2009) 7.1.5 Visualstorming With the help of visual inputs from moodboards and pinterest the first ideas of form and function are discussed, sketched and defined. Figure 39 Being creative at the SKAPA office 7.1.6 Exploratory Sketching Sketching is in this concept development the fastest way to communicate ideas and a great tool to build on each others ideas to explore all the possibilities in the concept. Sketching is also used after the main design is determined since there are still detailed work before the concept is complete. Explorative sketching on top of the main design is used to test various solutions until every detail is perfect. Figure 40 Exploratory sketching of a mixer and its attachments 7.1.7 Clay Modeling Clay is used for evaluating the design and form ideas in three dimensions. They are modeled in 1/4 scale and are primarily used for adding and adjusting details and are thereafter used for re-evaluation. Figure 41 Clay models in the early design phase
  • 36. 36 7.1.8 Conclusion of Concept development The most important thing that emerged during the development process was that if this product should be an invaluable tool in the kitchen for the identified target group must make it more convenient by removing any demanding or tedious step in the kitchen. In addition, it must be adapted to the lifestyle of the target users. These are some of the of the ideas for the concepts that were developed in the concept phase. » The machine has be able to be moved and stored easily; many designs of the head unit got a sleek designs to be compact instead of bulky. When mounting and unmounting the machine, it had to be fast and done without any tools. It was also decided that the machine should be hung on the brackets on the wall. » To save space in the compact living kitchen, making the products usable for more than one function was key. There will just be one bowl, with a spatula, the bowl will work with smaller batches as well. The pitcher will be designed to double as a glass jar and be stylish enough to put on a table and serve drinks from. » Since many other appliances are used while using a kitchen mixer it was decided to build in some of the most frequently used functions to cut the need for other kitchen appliances. This saves time, dishes, and space in the cabinets. Timer, heat induction and scale will be build in features in the new kitchen mixer concept. » The space inside the machine had to be utilized. The empty space behind the rotary switch allows storage for the cable and plug. A cord winder makes it extra functional. It will be placed in the right rear corner. » Three distinct concepts for the head unit's form and expression were created; the organic, the design lab, and the minimalist, see appendix XIX. The miminalist was the most suitable and was chosen to be further development and concretized. Figure 42 A collection of explorative and explanatory sketches created during the creative phase
  • 37. 37 8.Further Development Further development means detailing and fine tuning of the concept and includes interface design and other technical solutions. Digital built-in scale and timer are new features that minimizes the time for preparing and dish washing and adds extra value for the customer. 8.1 Head Unit 8.1.1 Design & Form The shaping of the head unit is important when designing to fulfill the users expectations of usability. It was a big challenge since there are many aspects to take into account. Many features and functions should work together in harmony packed in the Scandinavian heritage of the Electrolux design language. Since all the part solutions and built in features was determined it was just down to nail the final design of the head unit. There were different concept designs developed throughout the process. Figure 43 Concept Designs By evaluating our concept designs and develop them during an iterative sketching process, we could finally decide in which direction in design that was the most suitable to reflect the Electrolux brand identity, meet the user expectations and carry on the legacy of the N15. Figure 44 The chosen design for the head unit The design chosen has a minimalistlistic appearance with a low scare factor. 8.1.2 Mechanics The mechanical principle of the drive will be the same as for the N15, see figure 29. The electric motor is thought to be reduced in size while the effect is increased due to the assumed development and modernization of electrical motors. Low scare factor n. The concept's visual expression is easy to grasp, and does not follow temporary trends.
  • 38. 38 The power comes from an electric motor with two shafts and is the large rectangle in figure 42. The upper shaft operates the drive sockets in the upper arm through a worm gear. The worm gear drives a system of four gears.The first gear drives the bevel gear that transfers momentum and makes the bowl rotates. The second gear drives the socket for the dough hook and the mincer. The third and fourth gear drives the whisks and beaters. See figure 42. Figure 45 The drivetrain, the colored areas are drive sockets The lower shaft operates the drive socket in the lower arm through a drive belt connected between the shaft and the drive socket. The bevel gear that transfers momentum and makes the bowl rotate will be in the same polymer to prevent noise and wear which would occur between two metal surfaces if it was made of metal. 8.1.3 Upper Arm Buttons According to our tests and studies, the biggest usability problem for the N15, is by far the placement of the release button for the upper arm. No matter how long experience the user has with the product, the release button for the whisks are mistaken for releasing the upper arm. Everything indicates that the button on the arm should instead interact with the arm. Furthermore the placement require both hands to press the release button and lift the arm. The button will therefore be repositioned to the front and at the end of the upper arm, at the same place as the release button for the mixer hooks and the beaters used to be. The button to release the mixer hooks or the beaters is relocated to the left side of the arm in level with the socket it's operating. Positions When pressing the button to fold the arm up there's no need to press the lift button to pass the horizontal position since there are no horizontal position on the way up. After the selected tool has been attached the arm will stop in its horizontal working position on the way down. Socket Design should prevent user errors. When mounting attachments on the front socket, it’s easy to do it wrong since the socket is symmetrically shaped. This means the attachment can be pushed in and turned into place at three different angles. Incorrect fitting is avoided by adjusting the Y-shaped socket so that it is not symmetrical. This way the user instantly knows in which way the attachment should be mounted since there are only one way to do it. Figure 46 The old front socket the new asymmetric "Y"-socket. 8.1.4 Lower Arm Button The button will be more visible compared to the existing machines by moving it towards the user instead of towards the back of the machine. It will have a contrasting color to the machine body which makes it easy to notice. Positions The fixed positions are currently not intuitive. The arm has three positions, of which two are fixed, in extended and in half extended positions. Problems: Since the arm is fixed in the half extended position, it’s hard for the user to tell that there is a third position where the arm is fully extended. In addition to this, there is no apparent reason for the fully extended position to be offered as an alternative since it gives no advantage over the half extended position. Solution: There will be two positions, one closed and not fixed and one 65° extended, fixed position. Bevel Gear n. Conical shaped gear for angled transmission Worm Gear n. Long gear in shape of a screw for angled transmission
  • 39. 39 8.1.5 Buttons And Rotary Switches When designing the buttons and rotary switches, emphasis is put on making them easy to distinguish. All buttons, except the rotary switch and the mode button on the front, will have another surface texture and color than the surrounding surfaces. This to make them more visible and tactile for a better user experience. Furthermore, the rotary switch (1) and the mode button (2) on the front have the same surface and color as the machine body but is raised from the surface with a blended edge to enhance their appearance as main buttons and also for a tactile design. To turn on the machine the rotary switch (1) is pushed so it pops out, about 2 cm from the body. This makes the rotary switch grippable. The rotary switch will have a ring around it that is lit up when the machine is turned on. The light is white when the machine is switched on. The color of the light depends on the mode chosen. The rotay switch will be heavy but easy to turn thanks to bearings in the switch for easy and smooth control. The switch will have fixed positions to provide feedback. 8.1.6 Built in scale With the help of a built-in scale in the socket on the lower arm, the user can measure the ingredients directly in the bowl or the blender jar. Load cells are mounted between the chassi and the drive socket unit in the lower arm to measure the weight change. The user can thereby measure ingredients directly as it goes into the bowl and at anytime reset the scale for a new measurement. 8.1.7 Induction The possibility to heat the bowl with induction, opens new possibilities to be effective and creative in the kitchen. A copper coil is wound around the base of the drive socket in the lower arm. The induced current from the magnetic field rapidly heats the bowl to the desired temperature which is regulated by a thermostat through temperature sensors. See figure 47. Figure 47. Intersection of the lower arm's drive socket 8.1.8 Timer The timer starts to count up whenever the mixer is started. It instantly helps the user to keep track of the time elapsed. It the user want to set the mixer for a specific time, the timer counts down from the set time and stops the machine when time has passed. 8.1.9 Effect Since a strong motor is one of the most important requirements for the users, even if this is a smaller stand mixer, the 300 W motor is upgraded to a more powerful motor. 8.1.10 Cord Winder The empty space in the lower right corner of the unit perfectly fits a cord winder. The plug is situated on the back corner to be reachable when the machine is mounted but is still somewhat hidden. The cable retracts when the button next to it is pushed, just as the cord function in most vacuum cleaners. 8.2 Attachments This concept is compatible with all the attachments and optional extras that were available for the N15 but we've chosen to only develop and visualize the standard attachments, the blender jug and our new attachment, the coffee grinder. 8.2.1 Hooks & Beaters Mixing hooks The mixing hooks are increased in size and also gets a whole new look. The silhouette is more refined and they are strengthened with extra material that is shaped as the Electrolux logo, see figure 48. Thermostat n. Regulates the power to maintain correct temperature.
  • 40. 40 Figure 48 Function model of the mixing hooks Dough hook The dough hook has a new spiral shape to knead the dough even better. It is made of stainless steel with a plastic cap to prevent dough, if climbing, from entering the drive socket. Beaters The beaters gets a more slimmed and elegant silhouette, they will also be longer due to the larger bowl. The whisk will have flat loops instead of thin round wires. Stick Free Coating Attachments such as the hook, whisks and beaters are coated with a non stick surface with the help of nano material. The coating will avoid the dough climbing up the attachments. The nano material is antibacterial and will also be added to the cord as it prevents the spread of germs. 8.2.2 Bowl The bowl is decided to have the same function and drive as before but will be more versatile. Bowl Size The volume of the existing bowl is 4 liters. By cutting the depth of the unit and thickness of the upper and lower arm the bowl size can be increased to 5 liters. The concept is extremeley compact and still holds more dough than the KitchenAid. Induction The bowl will be made in stainless steel with a core of aluminum in the bottom and a bit further up on the sides. The aluminum is a good heat conducter that is used to spread the heat evenly in the material. The bowl will be heated in the bottom and normal tempered on the upper half. Rubber coated foot The foot will have a rubber coating for a tight fitting on the rotating plate. 8.2.3 Blender A one liter blender jug is designed to double as a glass pitcher, sleek enough to be put on the table. It has a round base that transforms into a triangular top 9.2.4 Coffee Grinder The coffee grinder can grind both coffee beans and flour. It's attached on the front drive socket, as the mincer. The grind level is adjusted by turning the front wheel. The funnel is transparent to let the user keep track of the beans as it grinds. It has legs to allow the user to remove and store the grinder upright. 8.3 Interface Design The mixer startup and its functions are controlled with the interface on the front consisting of two buttons and a backlit display; (1), (2) & (3). (1) - Power switch and speed control, (2) - Mode selector invisible display, (3) - It Shows information about mixer time, countdown timer, scale and induction heater. A transparent surface on the body makes the display invisible when it's not lighted. Figure 49 Great results when testing a spatula for N15
  • 41. 41 Figure 49 On/Off & Wheel, 2: Mode button, 3: "Invisible" display Turn On The Mixer To turn the mixer on, button (1) is pushed. The ring lights up and the button pops out and turns into a turning wheel Use the Mixer The speed of the machine is set continuously by turning the wheel clockwise. The full speed mode is available if the wheel is turned counterclockwise and held in its position. It then reaches the maximum speed immediately and stops when the knob is released. The machine is equipped with a safety feature that will not allow starting as long as the upper arm is not fully recessed or or in its extended, horizontal position. When the mixer is started a timer automatically activates in the display showing actual mixing time. Use the Scale The scale mode is selected by pushing button one time (2). The scale is tared by default and can be reset at any time by pushing and holding button (2) for two seconds. The weight is shown in the display regardless of which mode the mode button is in. Use the Timer The timer automatically starts to count the running time when any of the functions are started. The timer is always displayed regardless of which mode the mode button is in. 1. To set the timer, push the mode button (2) two times to select time mode. The display will show 00:00. 2. Turn the rotary switch (1) until the display shows the right time. When the rotary switch is turned slowly it’s changed by one second at a time. When it’s is turned fast, the time is changed by one minute at a time. 3. Press two times on the mode button to start timer. Use the Induction Heater 1. The induction heating is selected by pushing the mode button (2) three times. 2. The temperature is shown on the display and is selected by turning the rotary switch (1) until desired temperature is shown. 3. When the wheel is turned fast, the temperature is changed by ten degrees at a time and when turned slowly it’s changed by one degree at a time. 4. To confirm the selected temperature and turn on the heater hold the mode button (2) for two seconds. The display for the induction changes to red to visualize that the heater is on and to make the user aware of that the bowl is warm. The current temperature is shown on the display regardless of which mode the machine is in. 8.3 Mounting It’s incredibly important that the solution for the wall mounting surpasses anything previously known, since it’s so such a central aspect of this concept. The current N15 has a large mounting plate that is the same size as the machine and screwed to the wall or on brackets. The unsightly plate is still fixed on the wall and fully visible when the machine is lifted off the wall. The four aims for the idea generation for the wall mounting were; 1. Be as discreet and neat as possible 2. Be stylish 3. Should leave as few defects on the kitchen interior as possible in case the mounting is removed 4. If the machine is temporarily removed, the mounting device should offer the possibility to be used for another purpose. Two main ideas that emerges during the brainstorming processes were flat knobs and knife magnets. The vibration absorber that is currently on the mounting plate will either way be moved to the machine’s back. The idea to merge the idea of an ultra slim, mounting knob and a round, magnetic plate as mounting device came at the second brainstorming session.
  • 42. 42 To fix the machine on the the wall, the user simply slide the machine over the knob. The machine has a roughing on the back that is half open and half shaped by the knob. The vibration absorbing rubber strips will be inside the cut out and between the wall and the knob. The knob is flat and 100 mm in diameter at a distance of 15 mm from the wall. 8.4 Materials The main body is die casted aluminum to be sturdy and durable enough to hold the motor and gears. The covering fronts are made in acrylic. This concept has high strength polymer gears and driving parts to maintaining the same high quality as before and offer users the features they request; solid, sturdy, durable, robust and strong, as can be found in wordle figure 38 . 8.5 Prototyping 8.5.1 CAD The chosen concepts are modeled using UGS NX 8. Realizing concepts in this environment is a good way to fine tune and concretize ideas. 8.5.2 Rendering Rendering the CAD-model is by far the greatest tool for evaluating at this later part of the developing process, mainly because it’s a fast way of getting a very realistic three dimensional preview, in generally any material and color thinkable. 8.5.3 3D-Printing When the design is evaluated and approved the CAD- files can be used for printing the parts in a 3D-printer. The printer used is a 3DTouchTM triple head. Before the files can be imported into the 3D-printer, the parts have to be prepared by dividing them into printer friendly sections. Figure 50 3D-printing the lower arm socket UGS NX 8. Software for computer aided design (CAD). NX can build 3D models with solid and surface modelling. Keyshot 3. Software for real time rendering photo realistic images of 3D-models made in a CAD software.
  • 43. 43 9 The Result In this chapter the final results of the product concept named spacemixer is presented. The concept and it’s features are visualized and the functions are explained with a step-by-step guide. The thoughts behind the spacemixer’s design and form details are also given. Finally, the result is evaluated. 9.1 The Product The kitchen mixer spacemixer is a concept based on the principles of the Electrolux N15. It has been developed to meet the needs and requirements of compact living users in the segment of generation Y. Figure 51 The final concept; spacemixer
  • 44. 44 Figure 52 All angles of spacemixer Figure 53 The product in use, viewed from below.
  • 45. 45 9.2 Usage Some of the most important features of the spacemixer are explained and in figure 54 and 55. Figure 54 The features on the front explained Figure 55 The features on the back explained
  • 46. 46 Figure 56 Handling the spacemixer, Step 1 - 5 1.Lift the machine and slide it onto the wall mounted plate. Vibration absorbers inside the slot makes sure the machine is firmly secured. 2. Pull out the plug from the cord storage and plug it in the power outlet. 3. Fold out the lower arm by pulling it toward you. 4. Fold up upper arm by pressing the button on the arm and lifting it up. 5. Attach any attachments of your choice in the upper arm, in this case the whisks.
  • 47. 48 Figure 57 Handling the spacemixer, Step 6 - 9 6. Attach any attachment of your choice on the lower arm, in this case the bowl. 7. Press and pop out the rotary switch to turn on the machine. 8. Lower the arm, until it locks in place. 9. Turn the rotary switch to start the machine and adjust the speed. Switch between the modes; scale, induction heater and timer with the mode button
  • 48. 49 9.3 Functions 9.3.1 Knead, Whip & Stir Figure 58 The spiral and spatula are ready for kneading dough. Just like on professional spiral mixers that are made primarily for kneading dough, the spacemixer concept has a spiral and a spatula. The spiral attachment for mixing the ingredients and the spatula for folding the dough and preventing the dough from sticking to the sides. This combination of attachments makes the spacemixer very efficient for kneading dough. The smartmixer works the same way when mixing a cookie batter or whipping eggs but instead of the spiral, the mixing hooks or whisks are used to mix and whip the batter. Figure 59 Whisks for whipping Figure 60 Hooks for mixing batter Figure 61 The spriral and spatula attached to the machine
  • 49. 50 9.3.2 Blender The compact, 1 liter glassblender is intended to be used as both a blender and a jug. The triangular jug is made out of solid resistant glass and the lid is made out of soft plastic with an extra smaller lid on for adding ingredients while blending. The knives are removable which makes it easier to clean. When the knives are removed it’s a safe and stylish jug. The blender is used by attaching it to the high speed drive socket on the lower arm. It’s fastened with a quarter turn clockwise. Figure 62 Top of the blender and lid. Figure 63 The blender on the machine 9.3.3 Coffe Grinder The new attachment is mounted on the front in the same way as the mincer and snaps with a quarter turn counterclockwise. It is sturdy, in polished metal and has three support legs to stand upright when not in use. Figure 64 The grinder standing on a table Figure 65 The grinder mounted on the front socket 9.3.4 Built in features The new time-saving and precision-enhancing features will make the work in the kitchen more efficient and more fun with new opportunities to create culinary delicacies. The backlit display gives the user feedback on features that, in a simple way, allows high precision in the kitchen. See figure 57 9.3.5 Cord Winder, ’Cable Cave’ With the touch of a button the cord goes into the machine as on a vacuum cleaner which makes it easy to store without a loose cable lying around. It is also possible to keep it neat on the counter since only the cord length needed has to be pulled out. See figure 55 9.3.6 Mounting Plate The mounting plate has multiple uses and can serve as a magnetic knife rack if the machine is not mounted. It has a rubber absorber which eliminate the risk that any vibrations is transplanted into the wall.
  • 50. 51 Figure 66 Exploded view of the mounting plate. Figure 67 The mounting plate as a knife magnet 9.4 Design The design is inspired from the characteristic form elements often found in Electrolux products. The body has a matte surface, either black or white, that adds a solid feel to the machine. The brushed metal flow line continues in a never-ending loop all around the body that catches the eye and gives the sober look a sense of motion. In contrast there are color glimpses, around the front button and in the cable cave at the back. When the two arms unfolds more color are added since the insides of the both arms has the same colored surfaces of smooth and silky metal. The characteristic Electrolux flow line is embedding the release button on the front of the upper arm. The round ventilation holes on the side and under the lower arm forms a pattern that is a typical design feature found on Electrolux products Electrolux Flow Line The characteristic flow line seen on many Electrolux products is found on the smacemixer as well. Figure 68 Contrasts are found between materials. Figure 69 A never ending flow line around the machine body.
  • 51. 52 Figure 70 Holes underneath the lower arm to ventilate hot air. Material’s Surface The machine housing is divided into two parts, the front cover and the back cover. The back is made out of die casted steel, it has to be sturdy and resistant since the motor and other components are attached to it and. The front cover is made out of durable plastic. The front and back cover are made out of different materials but will both have the same matte and silky finish. High Contrasts There are a lot of contrast when surfaces meet, in both materials and colors. The shiny aluminum flow line that sweeps around the main body, is in large contrast to the soft and smooth housing in metal and plastic. The machine’s inner metal sufaces comes in various bursting colors that makes the spacemixer feel vibrant and alive when opened, yet tidy and unobtrusive when closed. See figure 72 Holes The SpaceMixer has patterns of holes to ventilate the hot air from the motor and from the drive belt in the lower arm. The drive belt can be seen in figure 70 and 71. The holes forms a pattern, a design feature that can be found on many vacuum cleaners from electrolux. Figure 71 Holes to ventilate the hot air from the motor. The holes makes a pattern on the spacemixer's left side.. Figure 72 Color collection
  • 52. 53 Figure 73 Electrolux logo on the front left side. Note the tag with the spacemixer logo on the left side. Raised buttons As we see it, a small but typical Electrolux design element is a round button that is somewhat raised from the surface, with an edge blend. This is a typical place for a meeting of two contrasting materials, like a button in rubber and a ring in metal or led light. 9.5 Evaluation This is a short recap of the development process and and an evaluation of the final product concept to see how it meets the demands and needs that were set up in the beginning. 9.5.1 Prototype A 3D printed full scale prototype was made for evaluating the actual size and form. If only using CAD and computer rendered pictures of the product, it can be hard to make an accurate estimation of how the size and form are perceived. Since the objective was to get a slimmer shape of the main unit, we were pleased when we saw the size of the 3D printed model because it felt neat and compact. Neat and compact were also two of the design requirements set out in the beginning of the work.¨ 9.5.2 CW & Error Analysis When using the cognitive walkthrough and error analysis with the test persons, it was possible to identify errors in the original design of the product, including errors in; placement of buttons, deadlocks, feedback from the arms positions and settings. The space mixer concept is tested against the most common handling errors found in the tests. Figure 75 The 3D-printed model made it easy to evaluate the size. Positioning of Buttons Opening the upper arm is the hardest task to both understand and to learn. All test persons experienced problem with this task. After using the machine for many times, it’s still hard to open the arm using the right release button. The main reason Figure 74 Raised buttons
  • 53. 54 is that the release button is illogical located on the right side, far away from where you are to lift the arm. The users instead use the button placed on the arm, where it feels natural to push and lift the arm at the same time. For the lower arm, the release button will be moved closer to the front. Figure 76 The position of the button on N15 Figure 77 The upper arm's release button on the smartmixer Deadlocks The N15’s lower arm have two deadlock positions. First, when in use (¾ open) and fully extended. The release button has to be pressed to move the arm from one position to another, this causes a lot of confusion. When the test persons found the release button and pressed it until it was fully extended, they missed the middle position. For the smartmixer, the fully extended position is removed, since it’s never a need for it. There will only be one fixed arm position; ¾ open. To open the arm, it’s just pulled out and to close it, the release button is pressed and pushed in. The N15’s deadlocks for the upper arm also confused the test persons. When opening the upper arm, the arm will be locked in position when it reaches a horizontal position. The test persons never got any feedback that it was possible to raise the arm higher. This has to be done in order to place the bowl on the lower arm. The new smartmixer concept will have the release button on the front of the upper arm which has to be pressed to lift the arm. On the way up, the arm will be raised the whole way without any deadlock positions. When the arm is lowered, it will be locked in the horizontal position. By pressing the release button, the arm can then be folded down completely Asymetric Socket The front drive socket for the N15 is symmetric. Most test persons positioned the grinder wrong and turned it the wrong way when locking it. By making the socket asymetric on the smartmixer, there is only one way to fit the grinder. Figure 78 The old front socket the new asymmetric "Y"-socket.
  • 54. 55 10. Discussion In this section we discuss the project’s process, project outcome and results, there after we also give recommendations for this project if it would be developed further and also list some of the most relevant ideas for a potential further development. 10.1 Process The idea and initiation for this project is entirely our own which has definitely motivated and inspiring us throughout this project. During a few weeks before the project start up we tried to establish contact with Electrolux but without success. This project was carried out with no support function from the company Electrolux, neither in terms of supervision, feedback or help with information about or the N15 product or company philosophies. Despite this, the project has run fairly smooth. We, the authors, have worked very closely together through the whole process and it was mostly when writing the report and working with the CAD-files that some tasks were divided between us. We faced some tasked that proved to be extra time consuming, the first was to accept a final design and secondly a lot of trouble shooting with the 3D-printer. Pretty early, it was decided to make an extensive user centered analysis and to focus on usability. We are very happy about this decision because it gave more dimensions to this project and we also feel that we learned many new things from it. Figure 79 Formulating the design process in a project map
  • 55. 56 10.2 Further Development In this section we have listed areas and specific points that need some further development to make this concept realizable. » Define Materials » Calculate motor to get enough effect and define motor model » Soundtest the unit with the new motor » Define absorbent design and materials » Testing and evaluation of the whisks and dough hook to get best performance » Usability testing on this concept » Test if users are comfortable handling the machine with only one rotary switch and one mode button. » Test if users recognize the symbols 10.3 Recommendations All ideas that are not covered in this report due to time limitations or that they are outside the framework are given a short presentation along with other recommendations in this section. » Develop a table stand that can be used as an alternative to wall mounting. We recommend a L-shaped stand made out of a single piece of material, preferrbly aluminum that have enough rigidity to stand steady on the counter top. » We recommend a moror effect on more than 400 W but less than 800 W. » Mounting the stand mixer with brackets, screwed underneath the wall cabinet which leaves the wall free from holes, which can be valuable if the wall is tiled. » A special storage solution for all attachments that makes it easy to store and easy to access. The storage can be in the bowl to save space or in a drawer. » A wider range of accessories, e.g.a pasta rolls or ice cream bowl can be developed and sold as extra accessories. » In addition to the blender, a single serve model would be perfect for users making a morning smoothie or protein shake to go.
  • 56. 57 11. Outcome The result of this project should only be considered to be an inspirational concept based on the principles of the N15 stand mixer. The concept needs further development, testing and evaluating before it can be manufactured. We are confident that this concept meets the objectives set for this project. We also believe that our investigation has been extensive enough to correctly answer our formulation of questions for this thesis. Primarily we can conclude that this is very much a product that would have major successes if it will would be re-launched on the market by Electrolux or any other kitchen appliance company. Many people we talked to are impressed when they learn about the product's versatility and benefits and they question more than often why this is not available in the stores today. Furthermore, the concept succeeds in meeting most of the sought qualities and features in both the design specification and the Feature Chart of wishes in figure 36. When it comes to the level of innovation; making a high tech and futuristic product can be tempting, not least when it's a conceptual project. While the goal from the very begining was to make a timeless and everlasting design classic for the selective y-generation, it never got interesting to add the latest technology to this concept, instead we used available technology. The result is a simple but yet solid product; it will still be as useful in 40 years as it is today and will certainly outlast all electronic devices that are come and go every other year. Nevertheless, this concept is full of new features and we are proud of it because we believe that it may have positive impact on people's lives if ever produced. Figure 80 The spacemixer with a coffee grinder in a compact kitchen