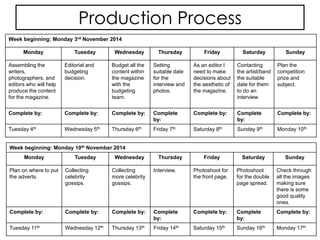
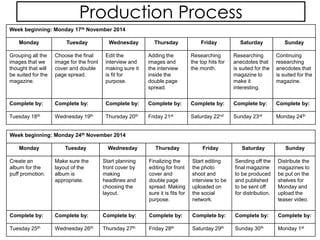
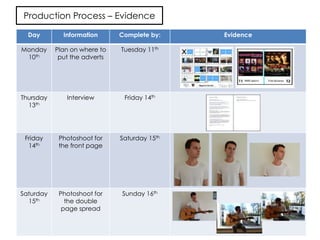
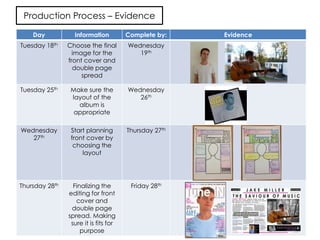
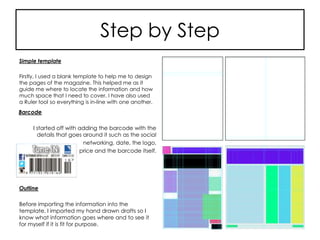
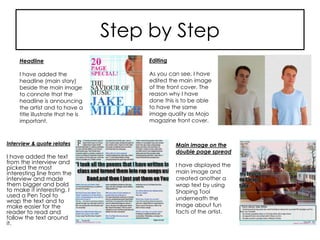
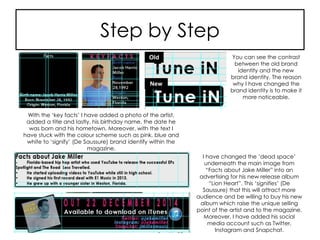
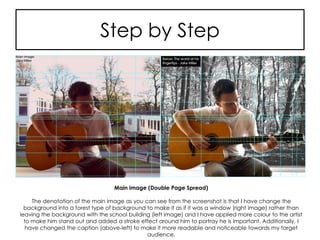
Contents Page
Slide
No.
Contents
3 Setting up Equipment
4 Pre-Production Material
5 Hand drawn Drafts (Front Cover)
6 Hand drawn Drafts (Double Page
Spread)
7 Mood Board
8 Location Recce
9 Test Photography
10 Test Photography
11 Production Process
Slide
No.
Contents
12 Production Process
13 Production Process – Evidence
14 Production Process – Evidence
15 How I will go about manipulating
these photos
16 Step by Step
17 Step by Step
18 Step by Step
19 Step by Step
20 Conclusion
Setting up Equipment
Here is my test photography. I have set
this up specifically to make it easier for
me to capture the image of the artist.
Moreover, I have used a white
background to save time with editing;
also to keep the image intact and not
edit unnecessary object within the
framing of the image.
Pre-Production Material
Hand drawn Drafts (Front Cover)
Hand drawn Drafts (Double
Page Spread)
Mood Board
Location Recce
Location
Time
Date
Why?
School field
I am going to take the pictures on
week 18th and 20th of October
because of the leaves changing
which I could use an effect into my
magazine especially in my double
page spread.
Public park
The pictures will be taken
somewhere week 21st and 25th
as there will be less people
because of work/school and the
pictures will be taken
somewhere in the morning or
midday.
School studio
I will take the pictures in the
school studio as this will give the
images a professional look. The
pictures will be taken
somewhere week 18th and 20th.
This has to be done after school
between 3-4.
Picture needed/required
Shot type
Props/Equipment
Lighting
Costume
Person/People
The shot will be a long shot to
convey the location. I will have to
use a tripod and camera. As it is set
outside the lighting will be neutral.
The costume will be casual.
The shot will be a mid-shot so the
focus will be on the artist. I will
have to use a tripod and
camera. As it is set outside the
lighting will be neutral. The
costume will be casual.
For the shots, I will be collecting
varieties of shots from long shot
to close up. I will have to use a
tripod, camera, backdrop and
studio lights. The costume will be
bold.
Permission Needed
Contact needed to be made
Evidence of this?
I will have to write or send an email
to the head teacher of the school if
it is okay if I can take pictures of the
school premises.
I would not need any permission
to take images here as this is a
public place.
I will have to send an e-mail or
write a letter to the head of
Photography department to ask
if I can use the studio.
Potential Hazards/Risks
Location specific
Why?
The editing will be hard when using
Photoshop because of the
background.
The change of weather and the
public itself as I just want the
artist/band not the public in the
background.
The risk of fire from the studio
lights.
Photos of the locations that I
will be testing
Test Photography
Here is my test photography. The reason why I have created a test photography is to have a
varieties of images that will fit for purpose into my magazine such as my Front Cover and
Double Page Spread.
Test Photography
Production Process
Week beginning: Monday 3rd November 2014
Monday Tuesday Wednesday Thursday Friday Saturday Sunday
Assembling the
writers,
photographers, and
editors who will help
produce the content
for the magazine.
Editorial and
budgeting
decision.
Budget all the
content within
the magazine
with the
budgeting
team.
Setting
suitable date
for the
interview and
photos.
As an editor I
need to make
decisions about
the aesthetic of
the magazine.
Contacting
the artist/band
the suitable
date for them
to do an
interview
Plan the
competition
prize and
subject.
Complete by: Complete by: Complete by: Complete
by:
Complete by: Complete
by:
Complete by:
Tuesday 4th Wednesday 5th Thursday 6th Friday 7th Saturday 8th Sunday 9th Monday 10th
Week beginning: Monday 10th November 2014
Monday Tuesday Wednesday Thursday Friday Saturday Sunday
Plan on where to put
the adverts.
Collecting
celebrity
gossips.
Collecting
more celebrity
gossips.
Interview. Photoshoot for
the front page.
Photoshoot
for the double
page spread.
Check through
all the images
making sure
there is some
good quality
ones.
Complete by: Complete by: Complete by: Complete
by:
Complete by: Complete
by:
Complete by:
Tuesday 11th Wednesday 12th Thursday 13th Friday 14th Saturday 15th Sunday 16th Monday 17th
Production Process
Week beginning: Monday 17th November 2014
Monday Tuesday Wednesday Thursday Friday Saturday Sunday
Grouping all the
images that we
thought that will
be suited for the
magazine.
Choose the final
image for the front
cover and double
page spread.
Edit the
interview and
making sure it
is fit for
purpose.
Adding the
images and
the interview
inside the
double page
spread.
Researching
the top hits for
the month.
Researching
anecdotes that
is suited for the
magazine to
make it
interesting.
Continuing
researching
anecdotes that
is suited for the
magazine.
Complete by: Complete by: Complete by: Complete by: Complete by: Complete by: Complete by:
Tuesday 18th Wednesday 19th Thursday 20th Friday 21st Saturday 22nd Sunday 23rd Monday 24th
Week beginning: Monday 24th November 2014
Monday Tuesday Wednesday Thursday Friday Saturday Sunday
Create an
album for the
puff promotion.
Make sure the
layout of the
album is
appropriate.
Start planning
front cover by
making
headlines and
choosing the
layout.
Finalizing the
editing for front
cover and
double page
spread. Making
sure it is fits for
purpose.
Start editing
the photo
shoot and
interview to be
uploaded on
the social
network.
Sending off the
final magazine
to be produced
and published
to be sent off
for distribution.
Distribute the
magazines to
be put on the
shelves for
Monday and
upload the
teaser video.
Complete by: Complete by: Complete by: Complete by: Complete by: Complete by: Complete by:
Tuesday 25th Wednesday 26th Thursday 27th Friday 28th Saturday 29th Sunday 30th Monday 1st
Production Process – Evidence
Day Information Complete by: Evidence
Monday
10th
Plan on where to
put the adverts
Tuesday 11th
Thursday
13th
Interview Friday 14th
Friday
14th
Photoshoot for
the front page
Saturday 15th
Saturday
15th
Photoshoot for
the double
page spread
Sunday 16th
Production Process – Evidence
Day Information Complete by: Evidence
Tuesday 18th Choose the final
image for the
front cover and
double page
spread
Wednesday
19th
Tuesday 25th Make sure the
layout of the
album is
appropriate
Wednesday
26th
Wednesday
27th
Start planning
front cover by
choosing the
layout
Thursday 27th
Thursday 28th Finalizing the
editing for front
cover and
double page
spread. Making
sure it is fits for
purpose
Friday 28th
How I will go about manipulating these photos
The way I will manipulate these photos is through Photoshop which is an
image editing software developed and manufactured by Adobe
Systems Inc. where all the tools that I need to edit my photos need;
Photoshop allows users like me to manipulate, crop, resize, and correct
colour on digital photos. The tools that they provide can go beyond the
limits of creativity. Once you start exploring, you will certainly explore
more and learn to use them for your designs. Moreover, you can even
edit some parts and change the colour or even add effects using
gradient and other tools. Each of the tools has its own job, for example,
the Crop Tool (C) crops your image to the size of a box also takes off
unnecessary background details that you do not really need. However,
any information on the outside of the box is not permanently gone, you
can still undo.
Step by Step
Simple template
Firstly, I used a blank template to help me to design
the pages of the magazine. This helped me as it
guide me where to locate the information and how
much space that I need to cover. I have also used
a Ruler tool so everything is in-line with one another.
Outline
Before importing the information into the
template, I imported my hand drawn drafts so I
know what information goes where and to see it
for myself if it is fit for purpose.
Barcode
I started off with adding the barcode with the
details that goes around it such as the social
networking, date, the logo,
price and the barcode itself.
Step by Step
Interview & quote relates
I have added the text
from the interview and
picked the most
interesting line from the
interview and made
them bigger and bold
to make it interesting. I
used a Pen Tool to
wrap the text and to
make easier for the
reader to read and
follow the text around
it.
Main image on the
double page spread
I have displayed the
main image and
created another a
wrap text by using
Shaping Tool
underneath the
image about fun
facts of the artist.
Headline
I have added the
headline (main story)
beside the main image
to connote that the
headline is announcing
the artist and to have a
title illustrate that he is
important.
Editing
As you can see, I have
edited the main image
of the front cover. The
reason why I have
done this is to be able
to have the same
image quality as Mojo
magazine front cover.
Step by Step
With the ‘key facts’ I have added a photo of the artist,
added a title and lastly, his birthday name, the date he
was born and his hometown. Moreover, with the text I
have stuck with the colour scheme such as pink, blue and
white to ‘signify’ (De Saussure) brand identify within the
magazine.
You can see the contrast
between the old brand
identity and the new
brand identity. The reason
why I have changed the
brand identity is to make it
more noticeable.
I have changed the ‘dead space’
underneath the main image from
“Facts about Jake Miller” into an
advertising for his new release album
“Lion Heart”. This ‘signifies’ (De
Saussure) that this will attract more
audience and be willing to buy his new
album which raise the unique selling
point of the artist and to the magazine.
Moreover, I have added his social
media account such as Twitter,
Instagram and Snapchat.
New
Old
Step by Step
Main image (Double Page Spread)
The denotation of the main image as you can see from the screenshot is that I have change the
background into a forest type of background to make it as if it was a window (right image) rather than
leaving the background with the school building (left image) and I have applied more colour to the artist
to make him stand out and added a stroke effect around him to portray he is important. Additionally, I
have changed the caption (above-left) to make it more readable and noticeable towards my target
audience.
Conclusion
In conclusion, LO3 is about being able to produce materials for
use in an original print media product. LO3 contains all the
production process that will help me build my magazine from
beginning to distribution through brainstorming ideas such as
what needs to contain in my magazine, what the layout is going
to be, test photography, the location of where I am going to
take pictures of the artist.

Unit 14 – Be able to produce materials for use in an original print media product (LO3)

  • 2.
    Contents Page Slide No. Contents 3 Settingup Equipment 4 Pre-Production Material 5 Hand drawn Drafts (Front Cover) 6 Hand drawn Drafts (Double Page Spread) 7 Mood Board 8 Location Recce 9 Test Photography 10 Test Photography 11 Production Process Slide No. Contents 12 Production Process 13 Production Process – Evidence 14 Production Process – Evidence 15 How I will go about manipulating these photos 16 Step by Step 17 Step by Step 18 Step by Step 19 Step by Step 20 Conclusion
  • 3.
    Setting up Equipment Hereis my test photography. I have set this up specifically to make it easier for me to capture the image of the artist. Moreover, I have used a white background to save time with editing; also to keep the image intact and not edit unnecessary object within the framing of the image.
  • 4.
  • 5.
    Hand drawn Drafts(Front Cover)
  • 6.
    Hand drawn Drafts(Double Page Spread)
  • 7.
  • 8.
    Location Recce Location Time Date Why? School field Iam going to take the pictures on week 18th and 20th of October because of the leaves changing which I could use an effect into my magazine especially in my double page spread. Public park The pictures will be taken somewhere week 21st and 25th as there will be less people because of work/school and the pictures will be taken somewhere in the morning or midday. School studio I will take the pictures in the school studio as this will give the images a professional look. The pictures will be taken somewhere week 18th and 20th. This has to be done after school between 3-4. Picture needed/required Shot type Props/Equipment Lighting Costume Person/People The shot will be a long shot to convey the location. I will have to use a tripod and camera. As it is set outside the lighting will be neutral. The costume will be casual. The shot will be a mid-shot so the focus will be on the artist. I will have to use a tripod and camera. As it is set outside the lighting will be neutral. The costume will be casual. For the shots, I will be collecting varieties of shots from long shot to close up. I will have to use a tripod, camera, backdrop and studio lights. The costume will be bold. Permission Needed Contact needed to be made Evidence of this? I will have to write or send an email to the head teacher of the school if it is okay if I can take pictures of the school premises. I would not need any permission to take images here as this is a public place. I will have to send an e-mail or write a letter to the head of Photography department to ask if I can use the studio. Potential Hazards/Risks Location specific Why? The editing will be hard when using Photoshop because of the background. The change of weather and the public itself as I just want the artist/band not the public in the background. The risk of fire from the studio lights. Photos of the locations that I will be testing
  • 9.
    Test Photography Here ismy test photography. The reason why I have created a test photography is to have a varieties of images that will fit for purpose into my magazine such as my Front Cover and Double Page Spread.
  • 10.
  • 11.
    Production Process Week beginning:Monday 3rd November 2014 Monday Tuesday Wednesday Thursday Friday Saturday Sunday Assembling the writers, photographers, and editors who will help produce the content for the magazine. Editorial and budgeting decision. Budget all the content within the magazine with the budgeting team. Setting suitable date for the interview and photos. As an editor I need to make decisions about the aesthetic of the magazine. Contacting the artist/band the suitable date for them to do an interview Plan the competition prize and subject. Complete by: Complete by: Complete by: Complete by: Complete by: Complete by: Complete by: Tuesday 4th Wednesday 5th Thursday 6th Friday 7th Saturday 8th Sunday 9th Monday 10th Week beginning: Monday 10th November 2014 Monday Tuesday Wednesday Thursday Friday Saturday Sunday Plan on where to put the adverts. Collecting celebrity gossips. Collecting more celebrity gossips. Interview. Photoshoot for the front page. Photoshoot for the double page spread. Check through all the images making sure there is some good quality ones. Complete by: Complete by: Complete by: Complete by: Complete by: Complete by: Complete by: Tuesday 11th Wednesday 12th Thursday 13th Friday 14th Saturday 15th Sunday 16th Monday 17th
  • 12.
    Production Process Week beginning:Monday 17th November 2014 Monday Tuesday Wednesday Thursday Friday Saturday Sunday Grouping all the images that we thought that will be suited for the magazine. Choose the final image for the front cover and double page spread. Edit the interview and making sure it is fit for purpose. Adding the images and the interview inside the double page spread. Researching the top hits for the month. Researching anecdotes that is suited for the magazine to make it interesting. Continuing researching anecdotes that is suited for the magazine. Complete by: Complete by: Complete by: Complete by: Complete by: Complete by: Complete by: Tuesday 18th Wednesday 19th Thursday 20th Friday 21st Saturday 22nd Sunday 23rd Monday 24th Week beginning: Monday 24th November 2014 Monday Tuesday Wednesday Thursday Friday Saturday Sunday Create an album for the puff promotion. Make sure the layout of the album is appropriate. Start planning front cover by making headlines and choosing the layout. Finalizing the editing for front cover and double page spread. Making sure it is fits for purpose. Start editing the photo shoot and interview to be uploaded on the social network. Sending off the final magazine to be produced and published to be sent off for distribution. Distribute the magazines to be put on the shelves for Monday and upload the teaser video. Complete by: Complete by: Complete by: Complete by: Complete by: Complete by: Complete by: Tuesday 25th Wednesday 26th Thursday 27th Friday 28th Saturday 29th Sunday 30th Monday 1st
  • 13.
    Production Process –Evidence Day Information Complete by: Evidence Monday 10th Plan on where to put the adverts Tuesday 11th Thursday 13th Interview Friday 14th Friday 14th Photoshoot for the front page Saturday 15th Saturday 15th Photoshoot for the double page spread Sunday 16th
  • 14.
    Production Process –Evidence Day Information Complete by: Evidence Tuesday 18th Choose the final image for the front cover and double page spread Wednesday 19th Tuesday 25th Make sure the layout of the album is appropriate Wednesday 26th Wednesday 27th Start planning front cover by choosing the layout Thursday 27th Thursday 28th Finalizing the editing for front cover and double page spread. Making sure it is fits for purpose Friday 28th
  • 15.
    How I willgo about manipulating these photos The way I will manipulate these photos is through Photoshop which is an image editing software developed and manufactured by Adobe Systems Inc. where all the tools that I need to edit my photos need; Photoshop allows users like me to manipulate, crop, resize, and correct colour on digital photos. The tools that they provide can go beyond the limits of creativity. Once you start exploring, you will certainly explore more and learn to use them for your designs. Moreover, you can even edit some parts and change the colour or even add effects using gradient and other tools. Each of the tools has its own job, for example, the Crop Tool (C) crops your image to the size of a box also takes off unnecessary background details that you do not really need. However, any information on the outside of the box is not permanently gone, you can still undo.
  • 16.
    Step by Step Simpletemplate Firstly, I used a blank template to help me to design the pages of the magazine. This helped me as it guide me where to locate the information and how much space that I need to cover. I have also used a Ruler tool so everything is in-line with one another. Outline Before importing the information into the template, I imported my hand drawn drafts so I know what information goes where and to see it for myself if it is fit for purpose. Barcode I started off with adding the barcode with the details that goes around it such as the social networking, date, the logo, price and the barcode itself.
  • 17.
    Step by Step Interview& quote relates I have added the text from the interview and picked the most interesting line from the interview and made them bigger and bold to make it interesting. I used a Pen Tool to wrap the text and to make easier for the reader to read and follow the text around it. Main image on the double page spread I have displayed the main image and created another a wrap text by using Shaping Tool underneath the image about fun facts of the artist. Headline I have added the headline (main story) beside the main image to connote that the headline is announcing the artist and to have a title illustrate that he is important. Editing As you can see, I have edited the main image of the front cover. The reason why I have done this is to be able to have the same image quality as Mojo magazine front cover.
  • 18.
    Step by Step Withthe ‘key facts’ I have added a photo of the artist, added a title and lastly, his birthday name, the date he was born and his hometown. Moreover, with the text I have stuck with the colour scheme such as pink, blue and white to ‘signify’ (De Saussure) brand identify within the magazine. You can see the contrast between the old brand identity and the new brand identity. The reason why I have changed the brand identity is to make it more noticeable. I have changed the ‘dead space’ underneath the main image from “Facts about Jake Miller” into an advertising for his new release album “Lion Heart”. This ‘signifies’ (De Saussure) that this will attract more audience and be willing to buy his new album which raise the unique selling point of the artist and to the magazine. Moreover, I have added his social media account such as Twitter, Instagram and Snapchat. New Old
  • 19.
    Step by Step Mainimage (Double Page Spread) The denotation of the main image as you can see from the screenshot is that I have change the background into a forest type of background to make it as if it was a window (right image) rather than leaving the background with the school building (left image) and I have applied more colour to the artist to make him stand out and added a stroke effect around him to portray he is important. Additionally, I have changed the caption (above-left) to make it more readable and noticeable towards my target audience.
  • 20.
    Conclusion In conclusion, LO3is about being able to produce materials for use in an original print media product. LO3 contains all the production process that will help me build my magazine from beginning to distribution through brainstorming ideas such as what needs to contain in my magazine, what the layout is going to be, test photography, the location of where I am going to take pictures of the artist.