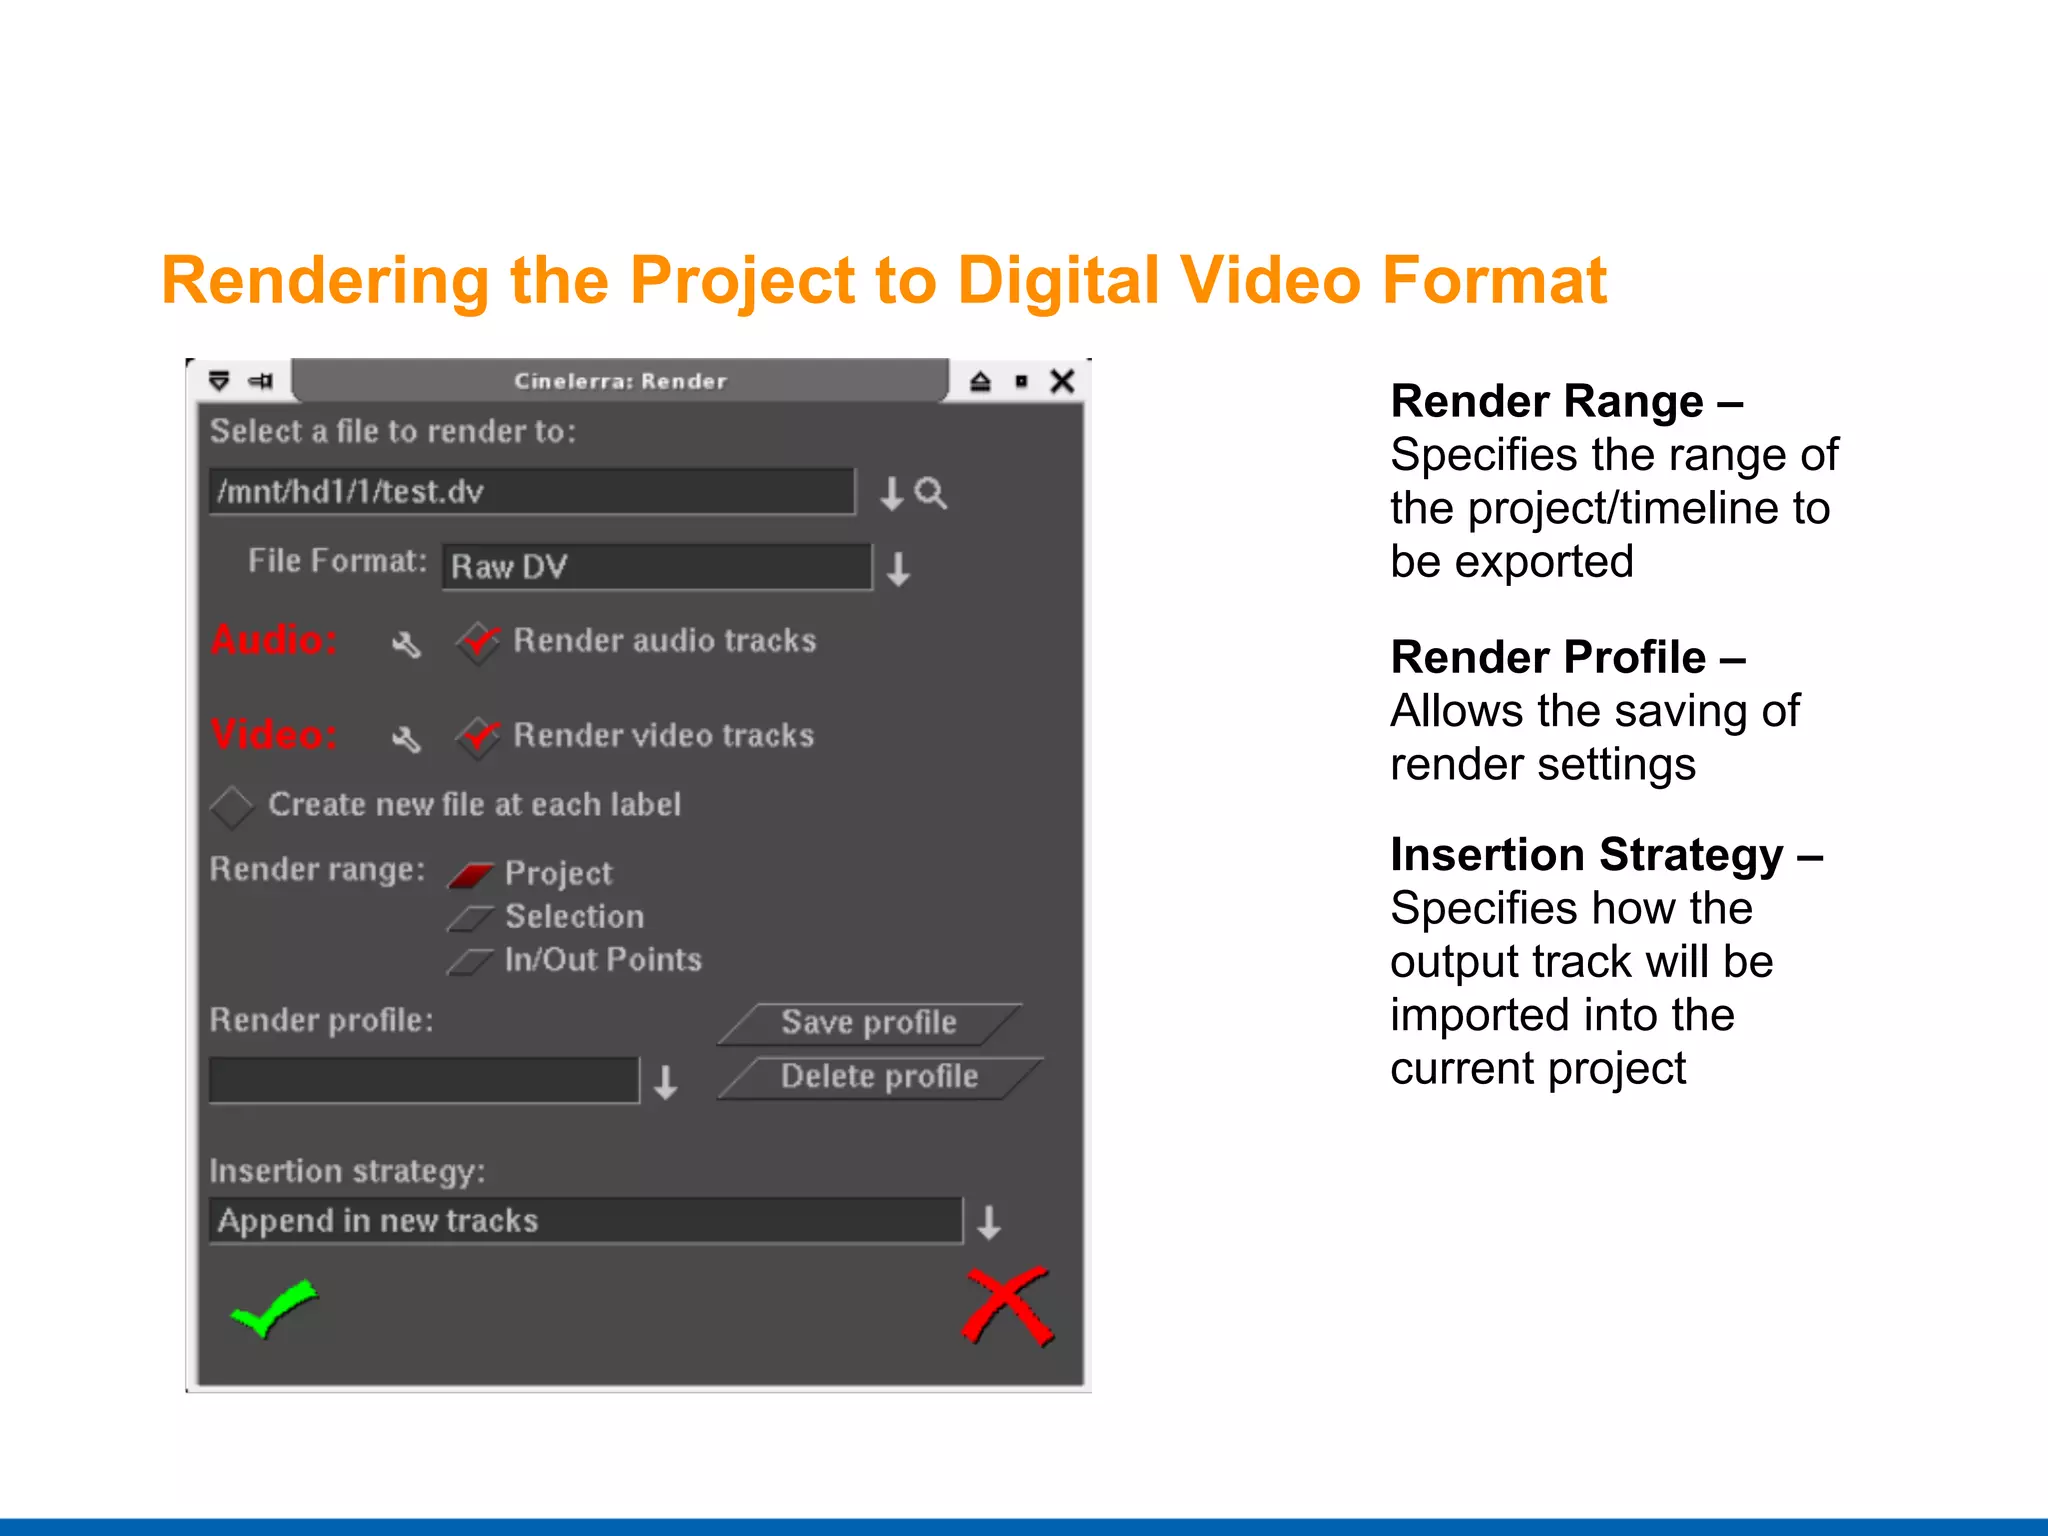
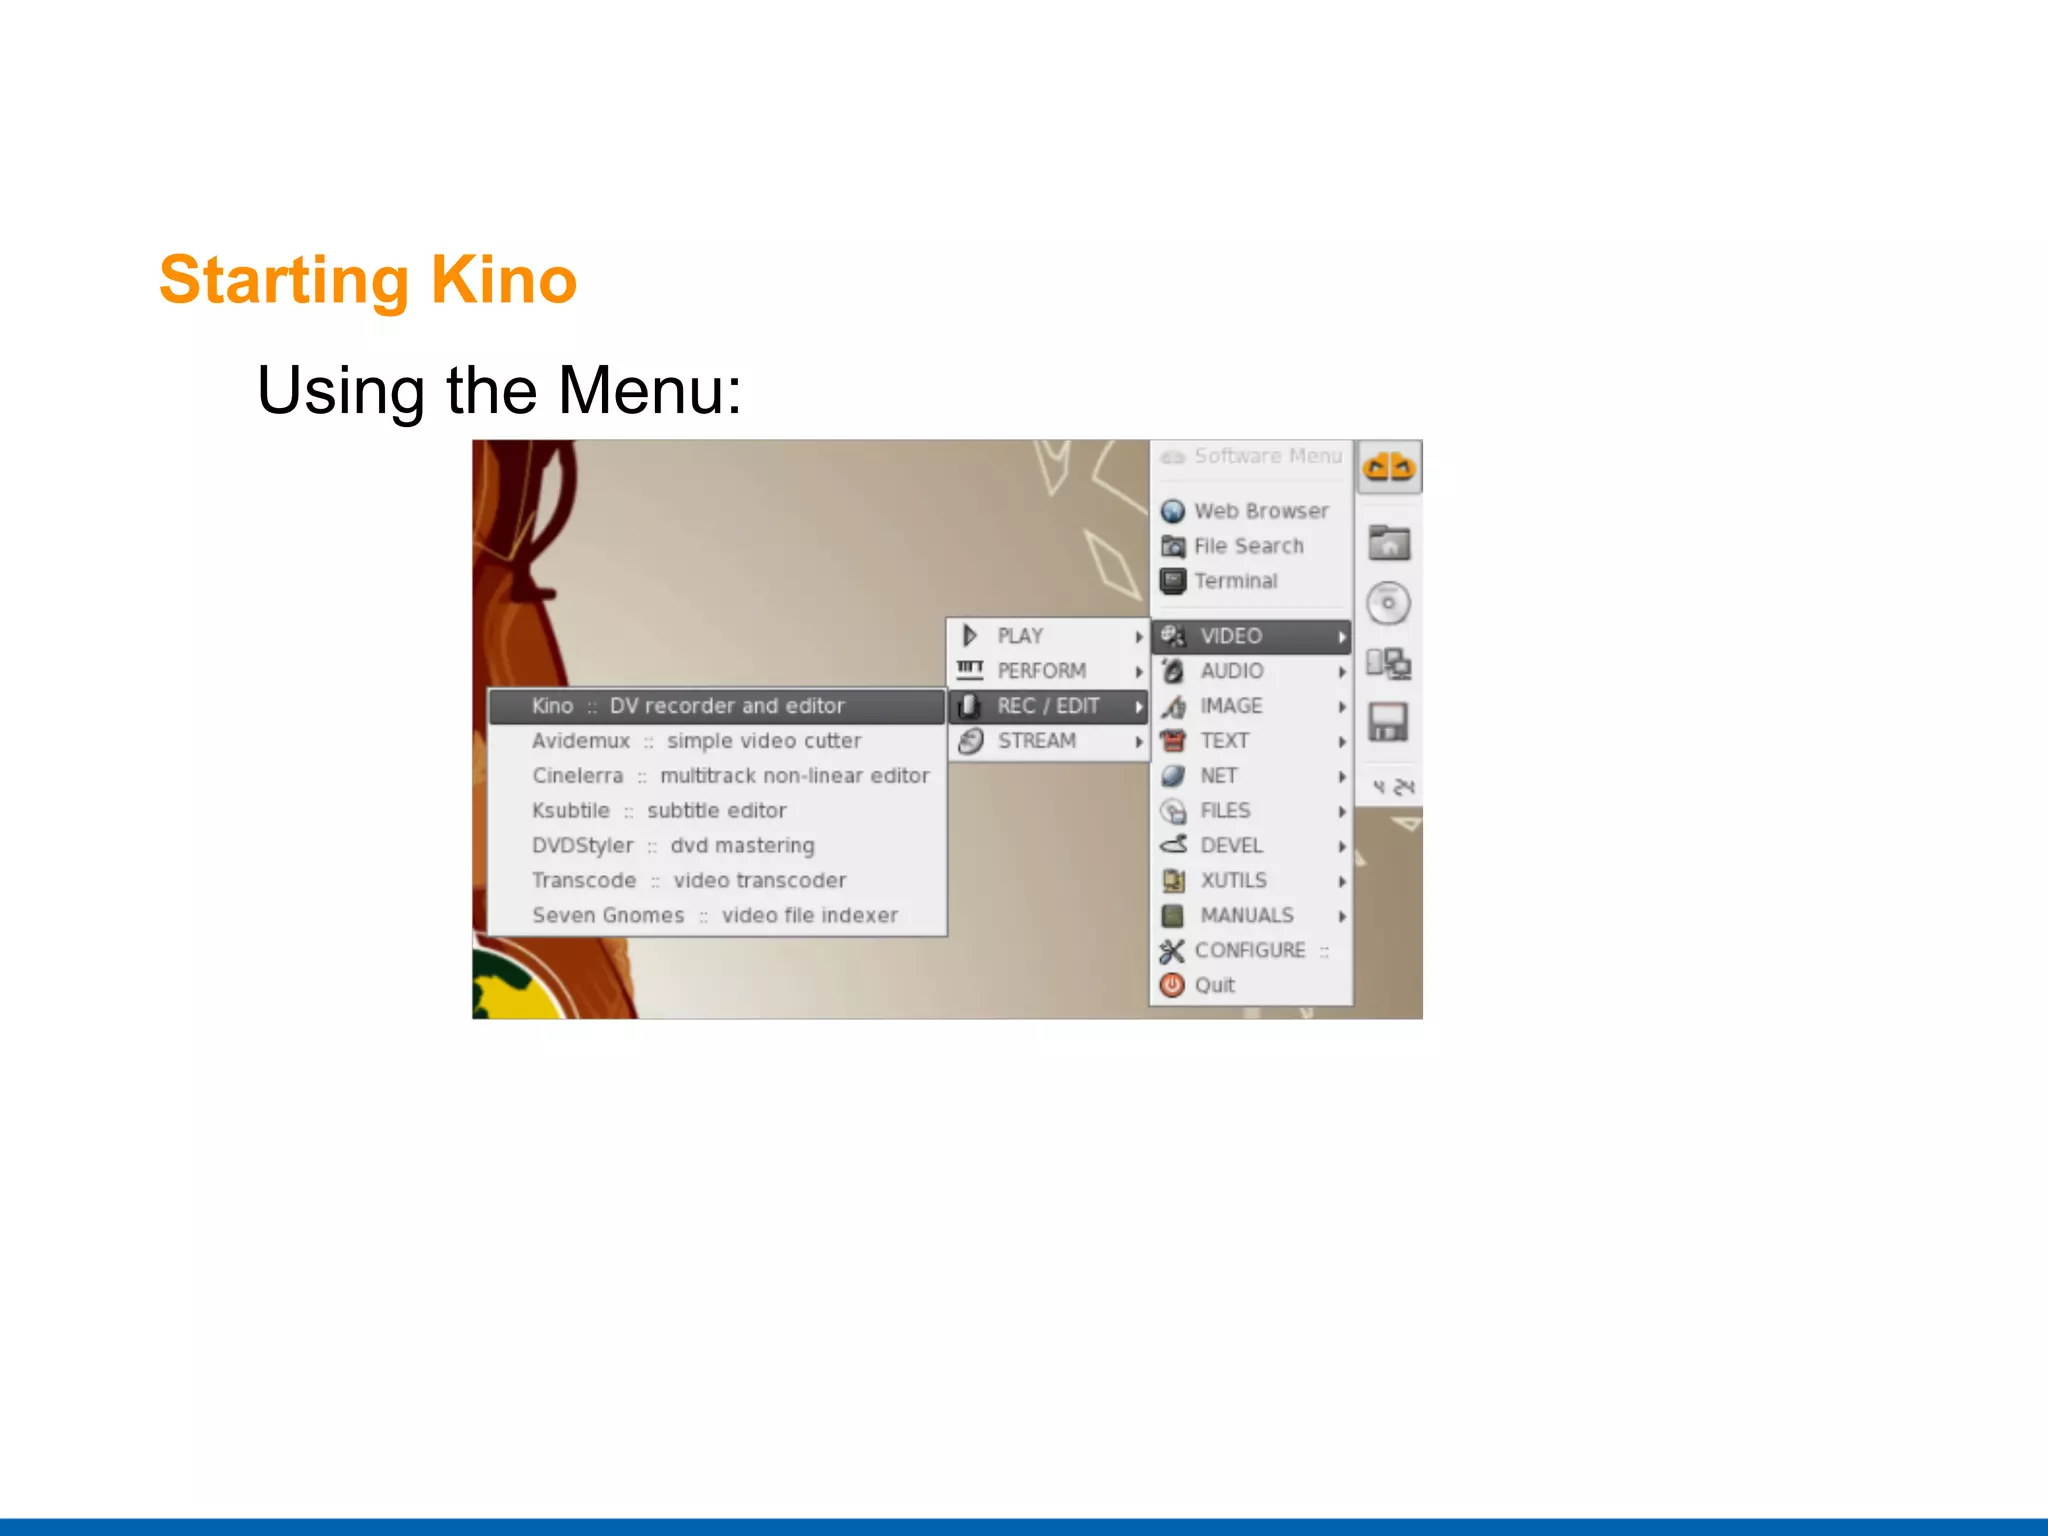
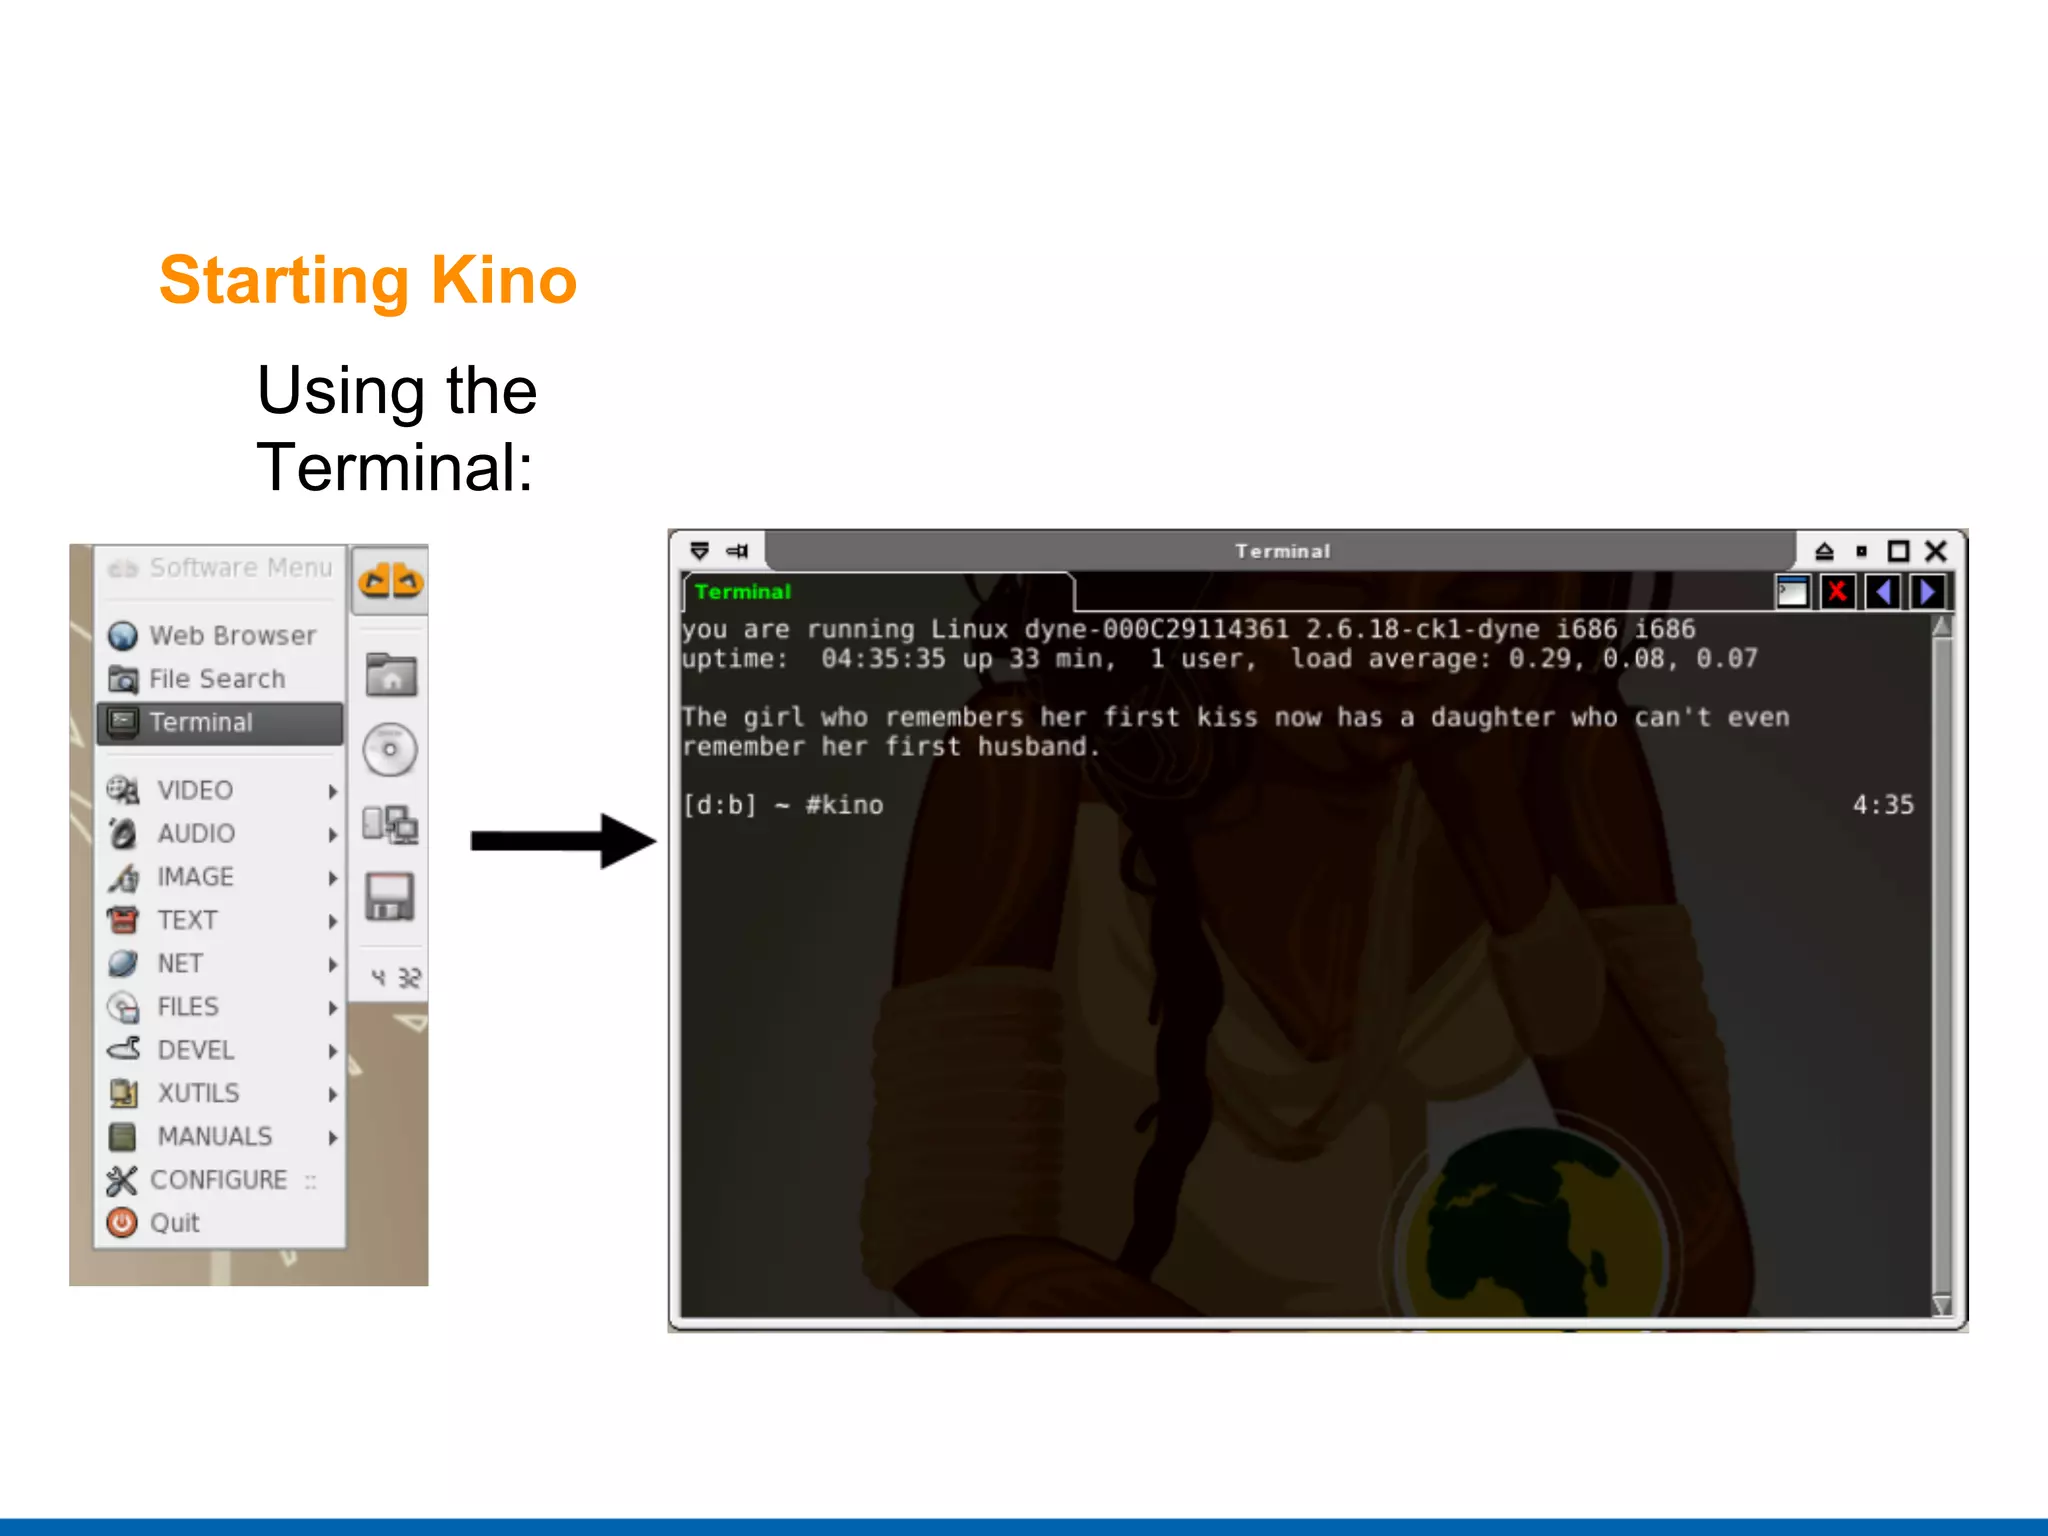
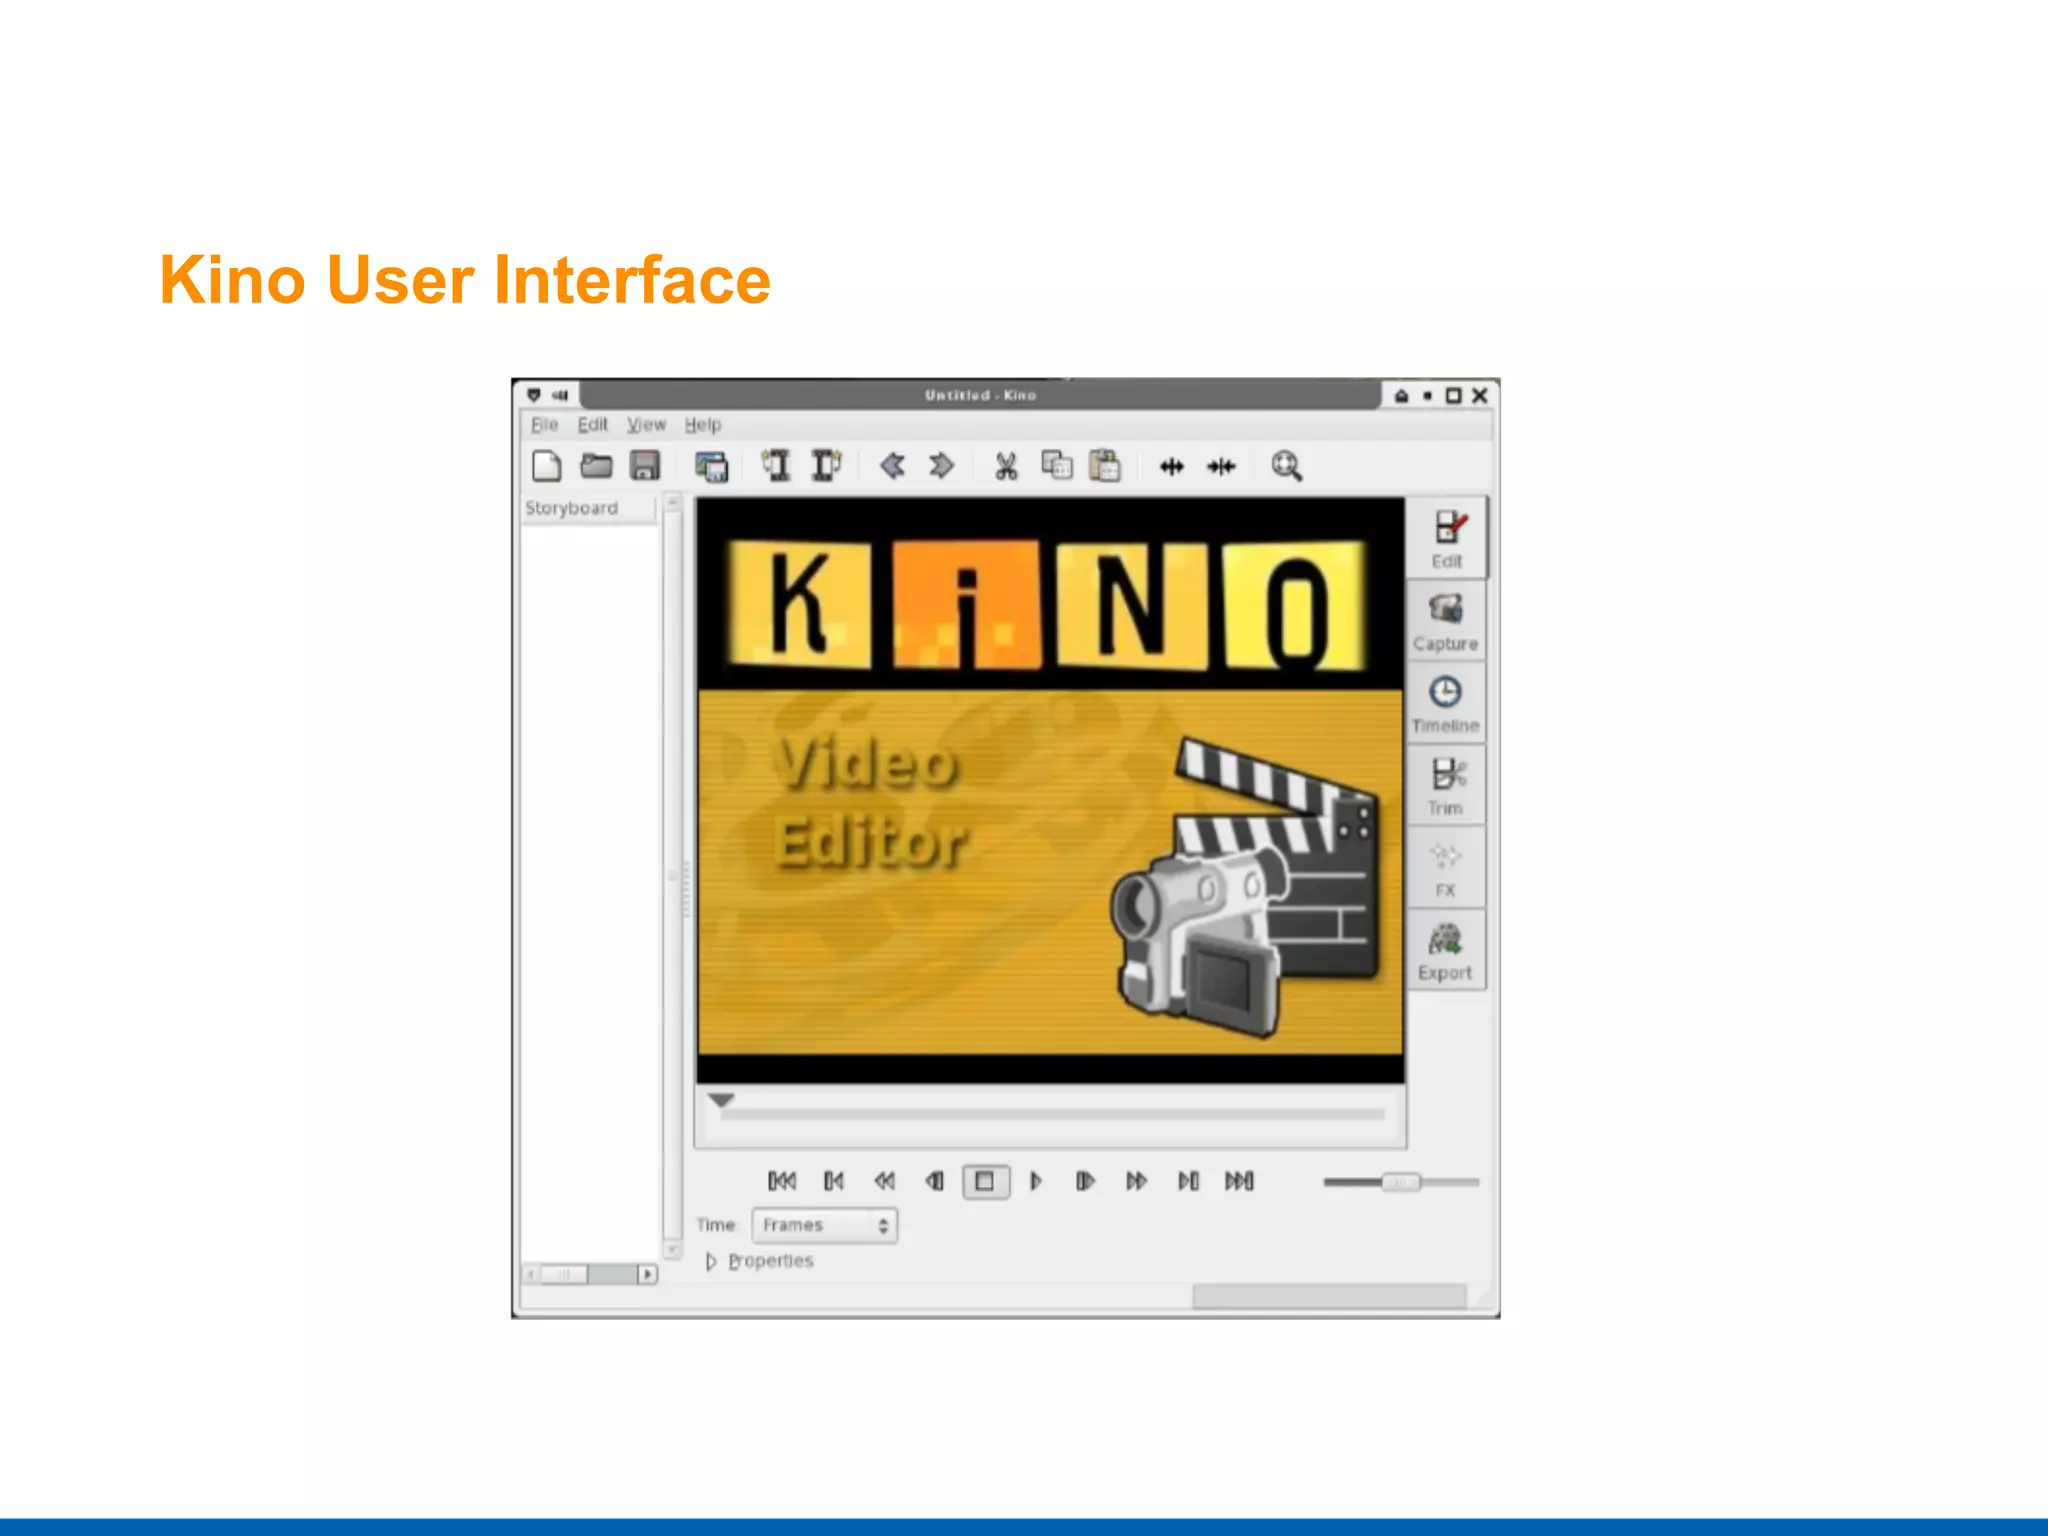
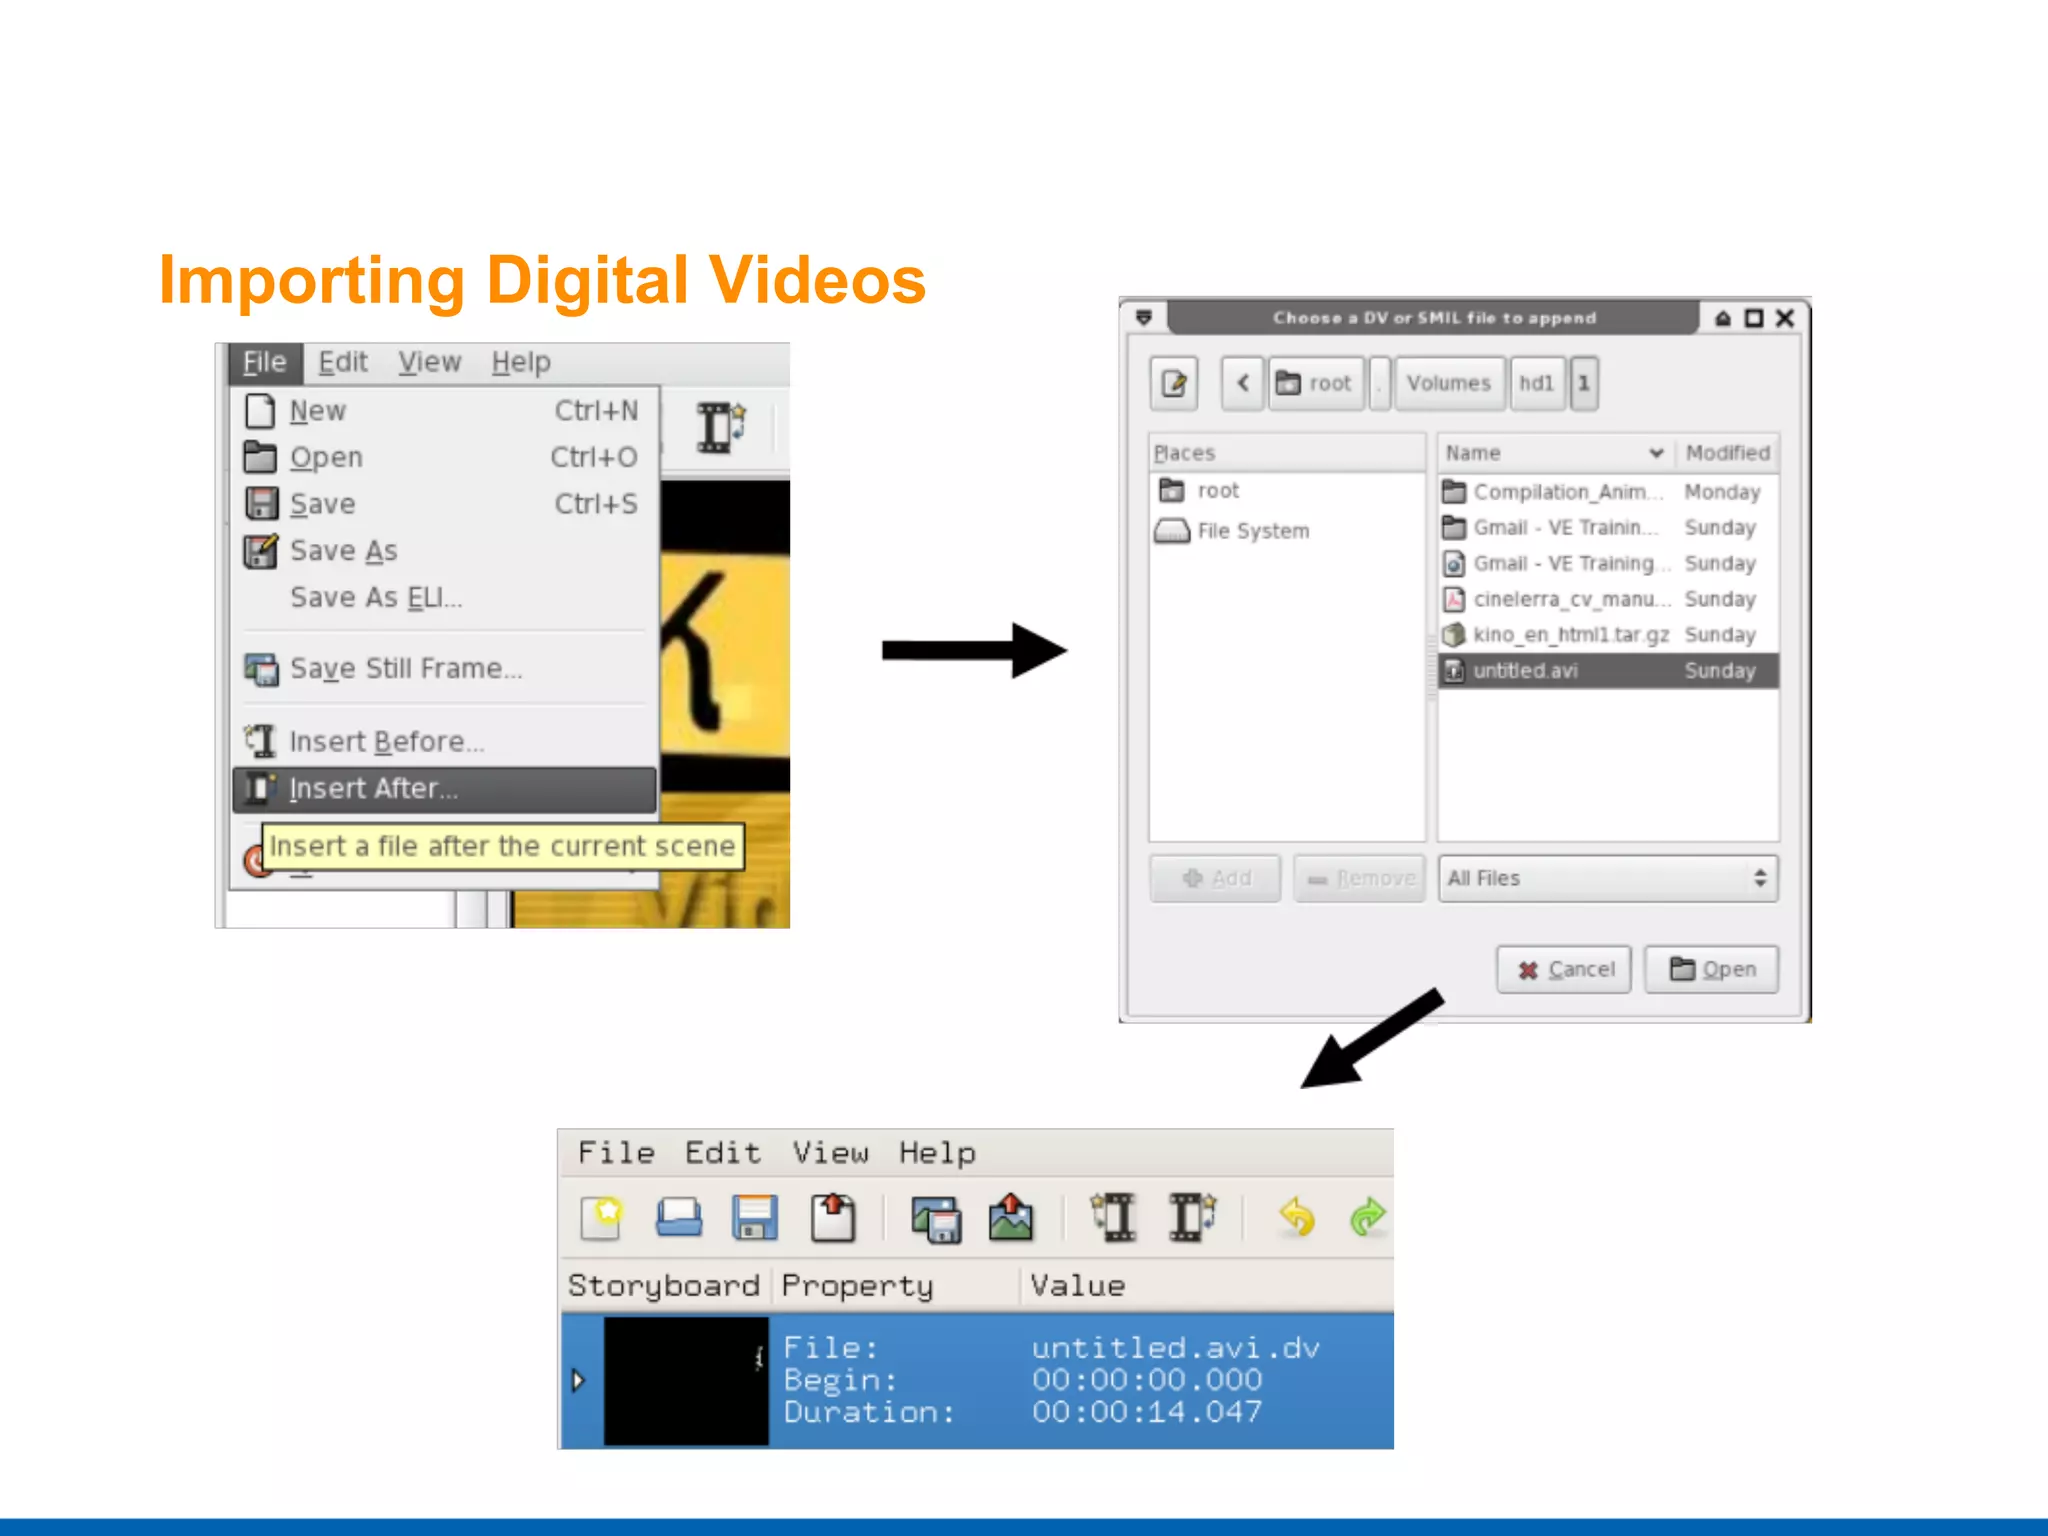
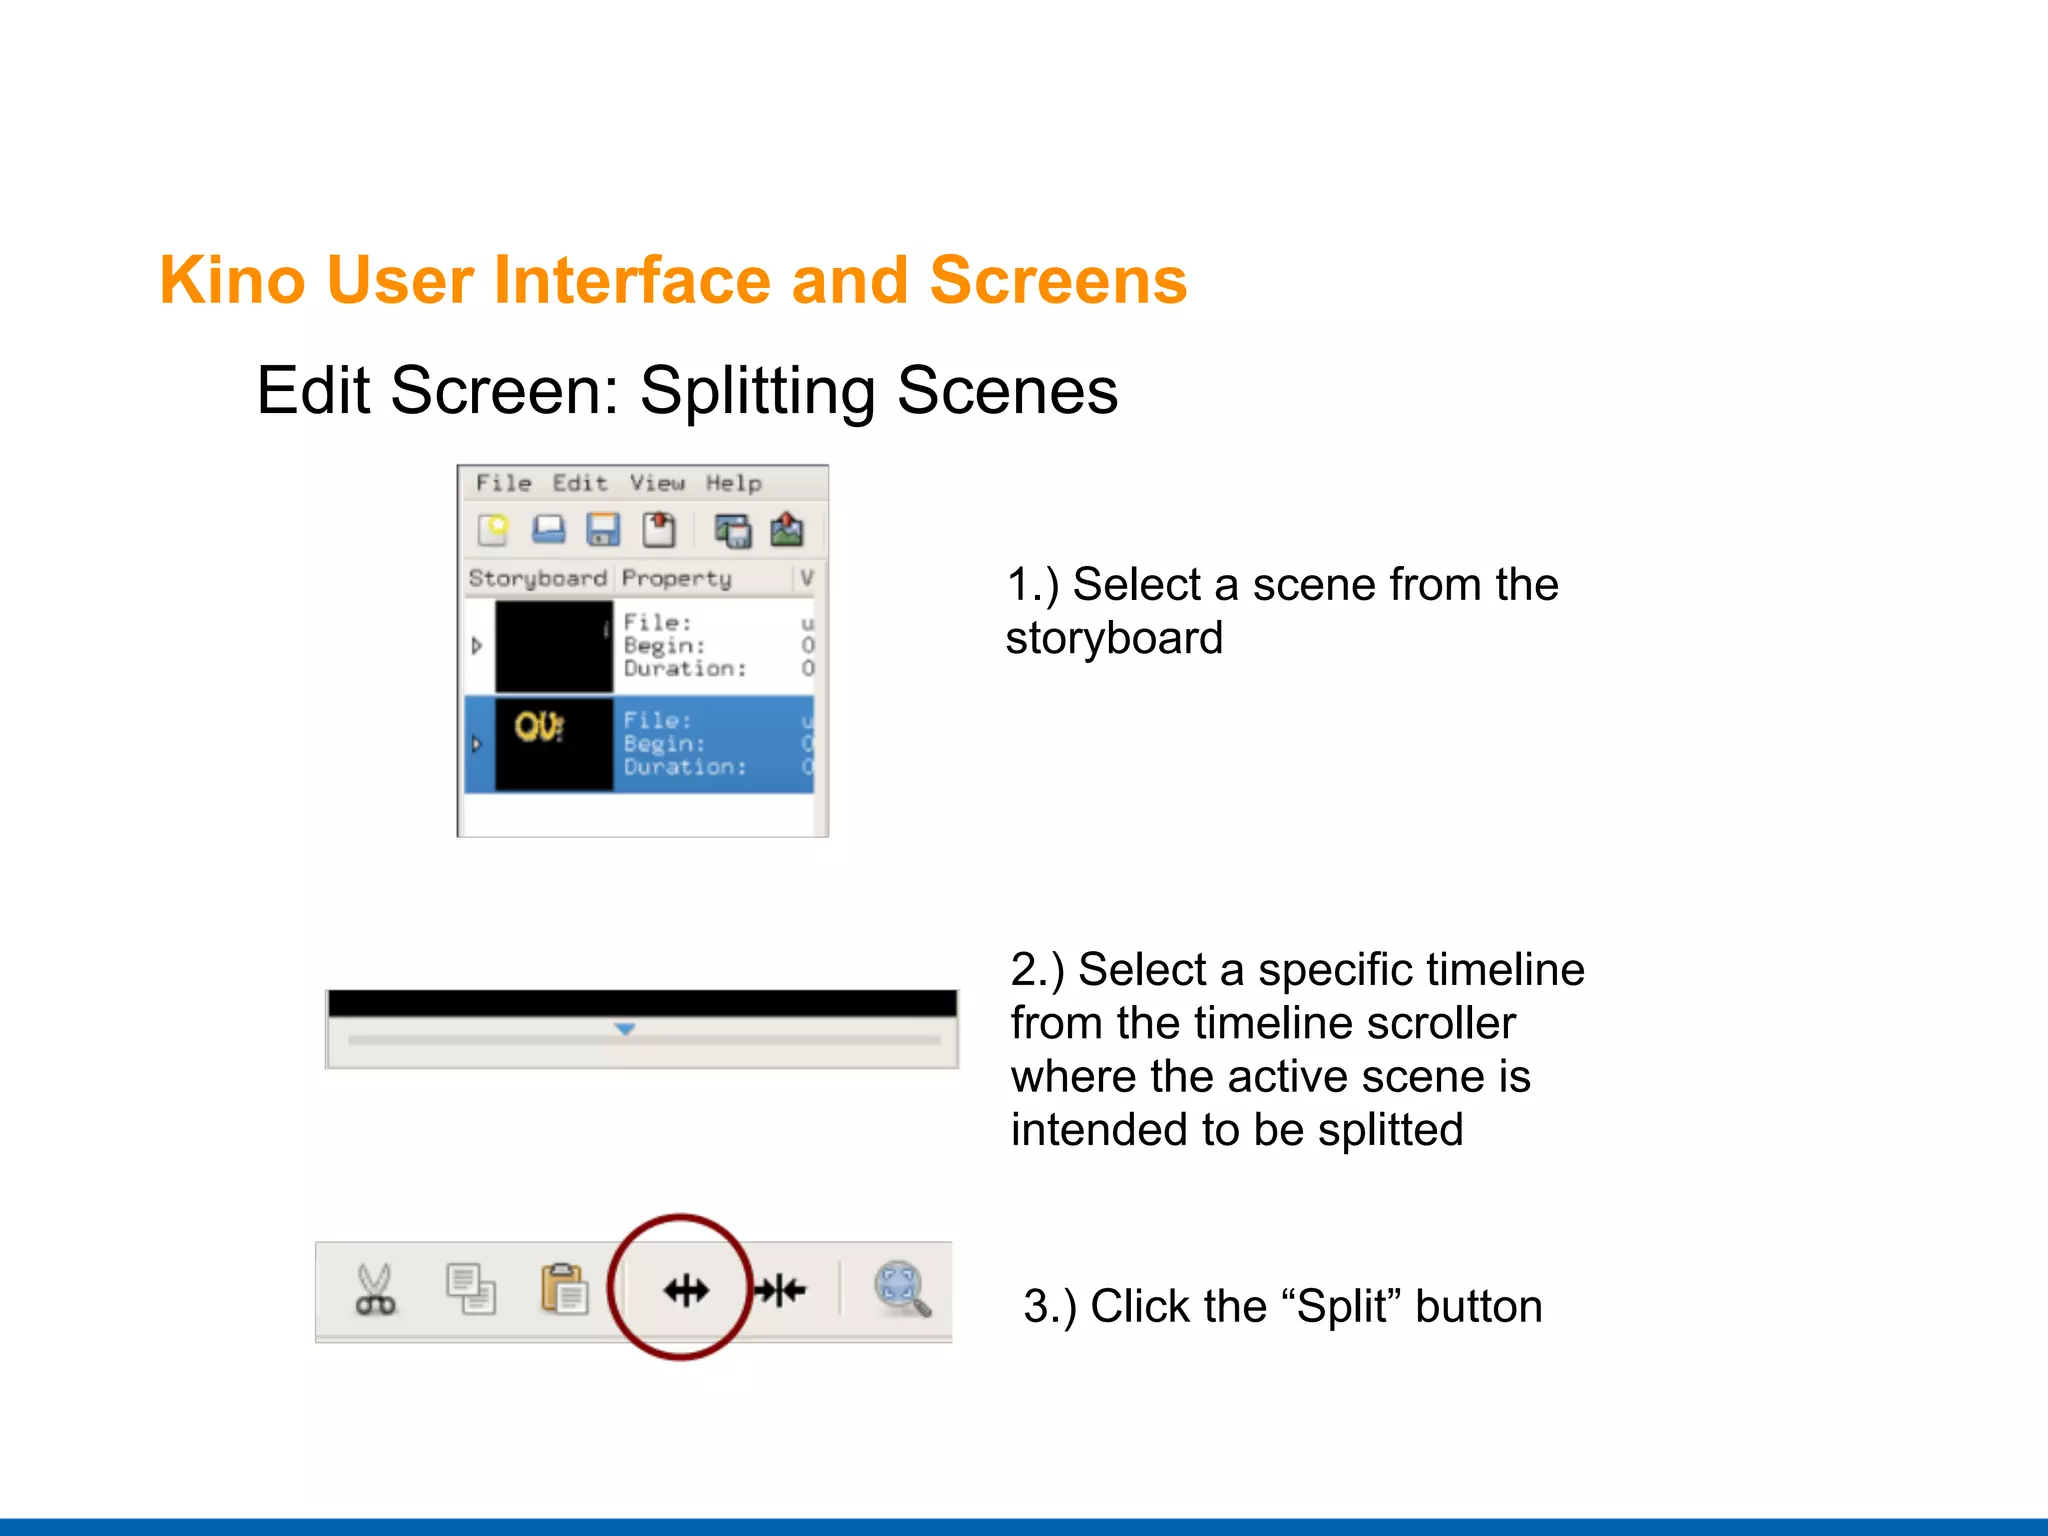
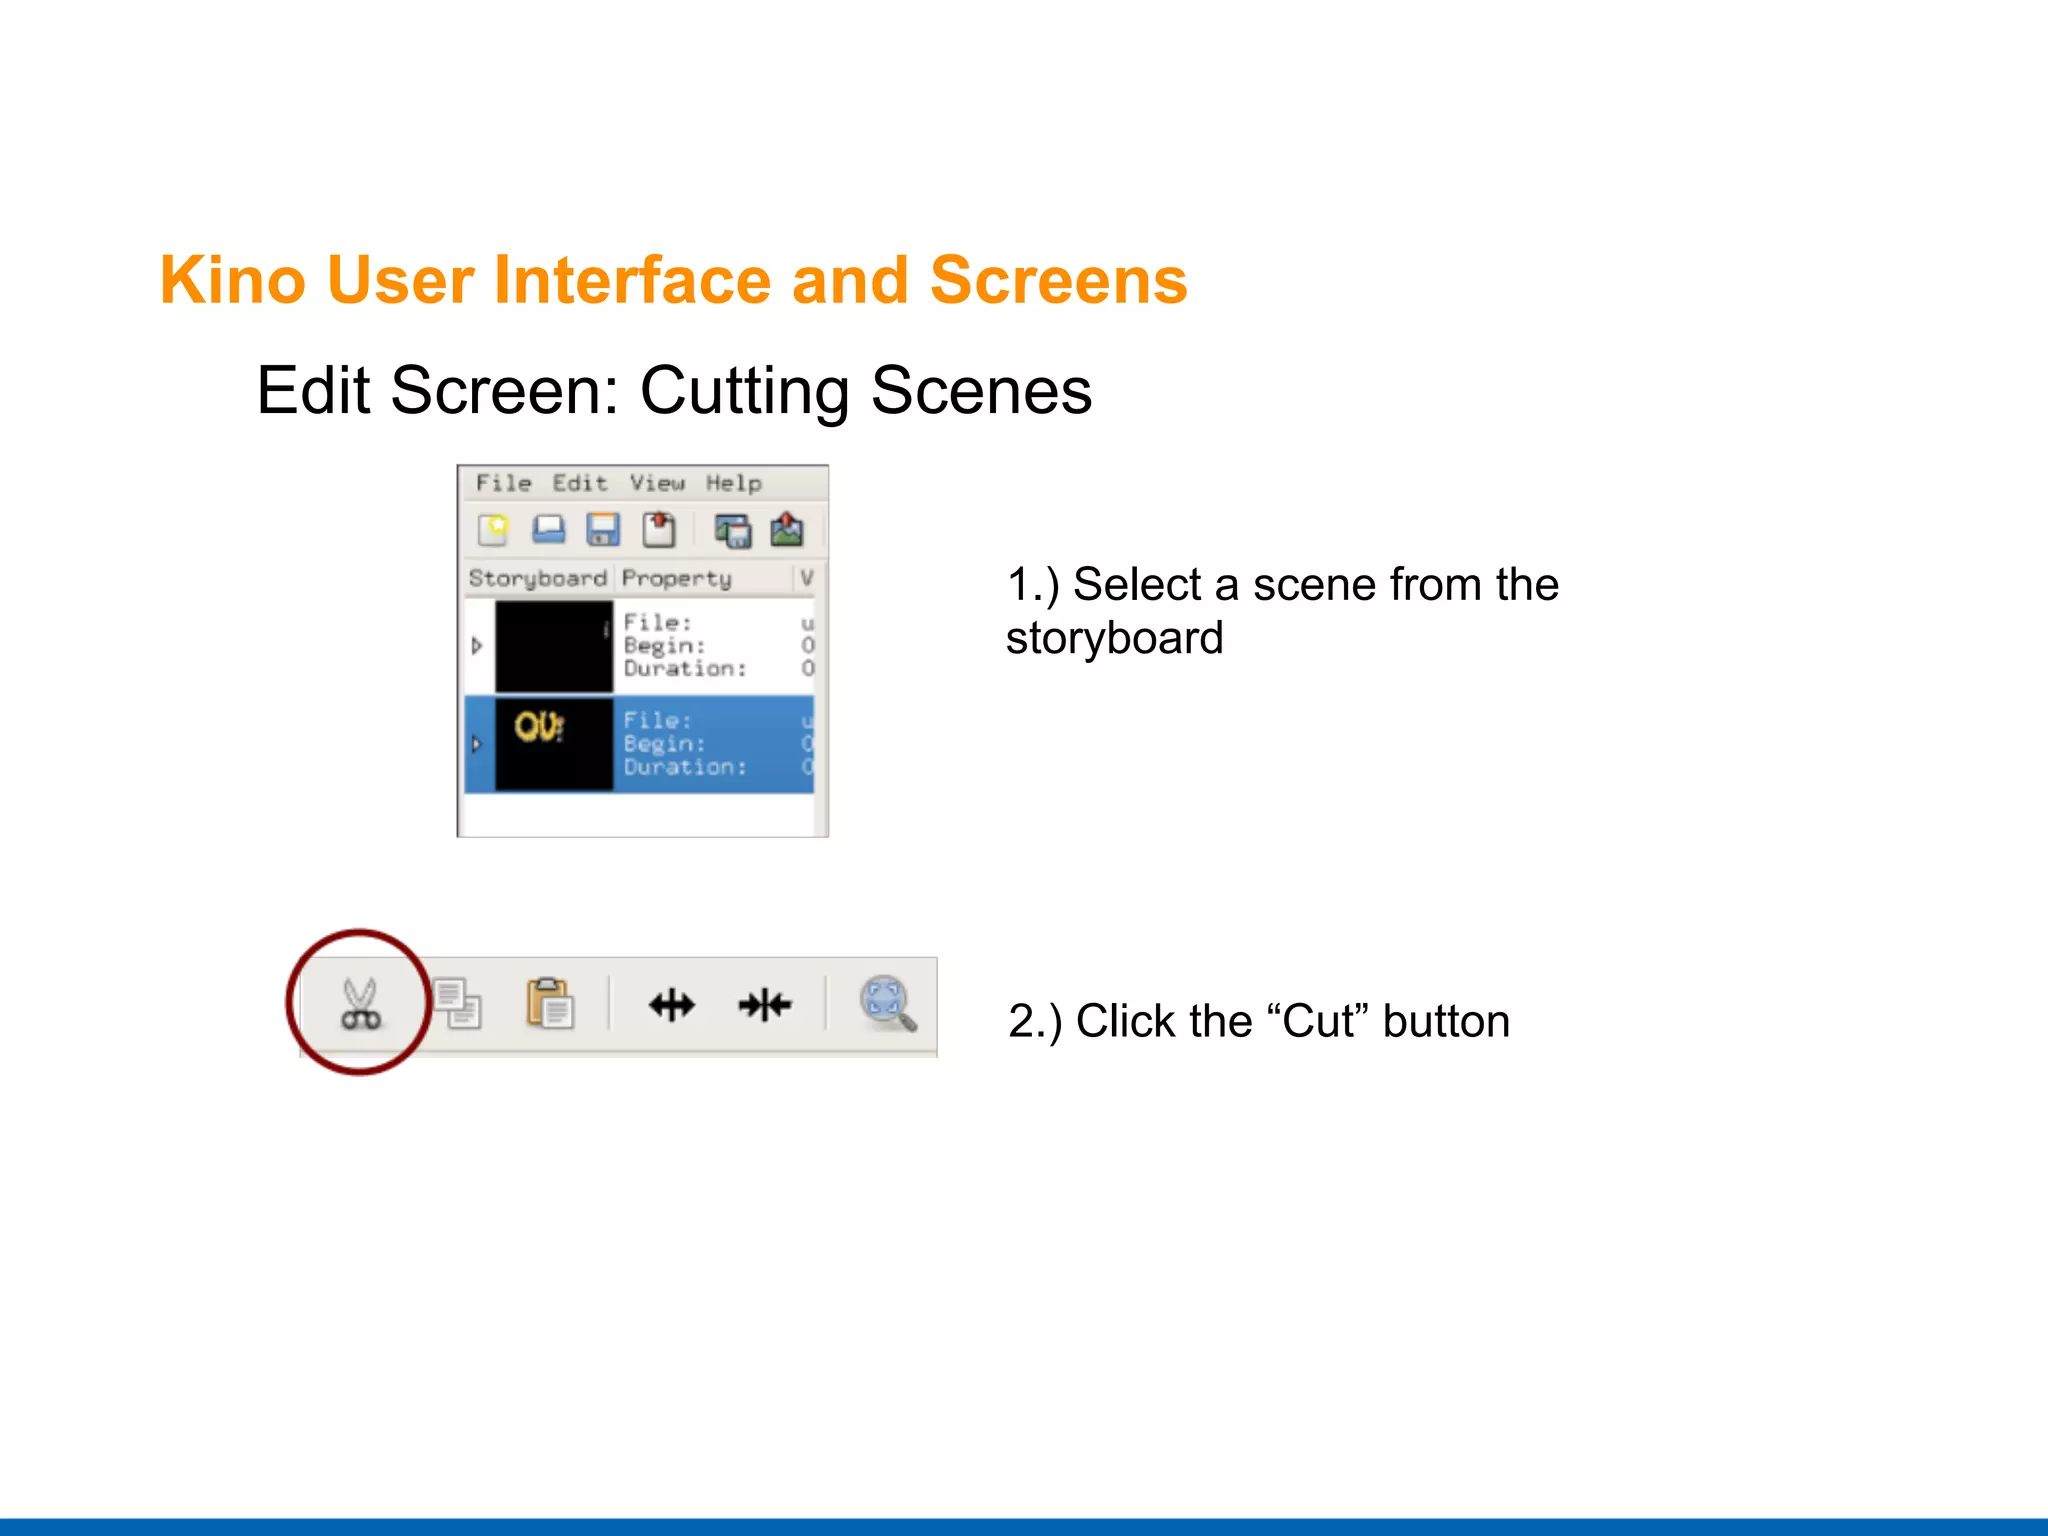
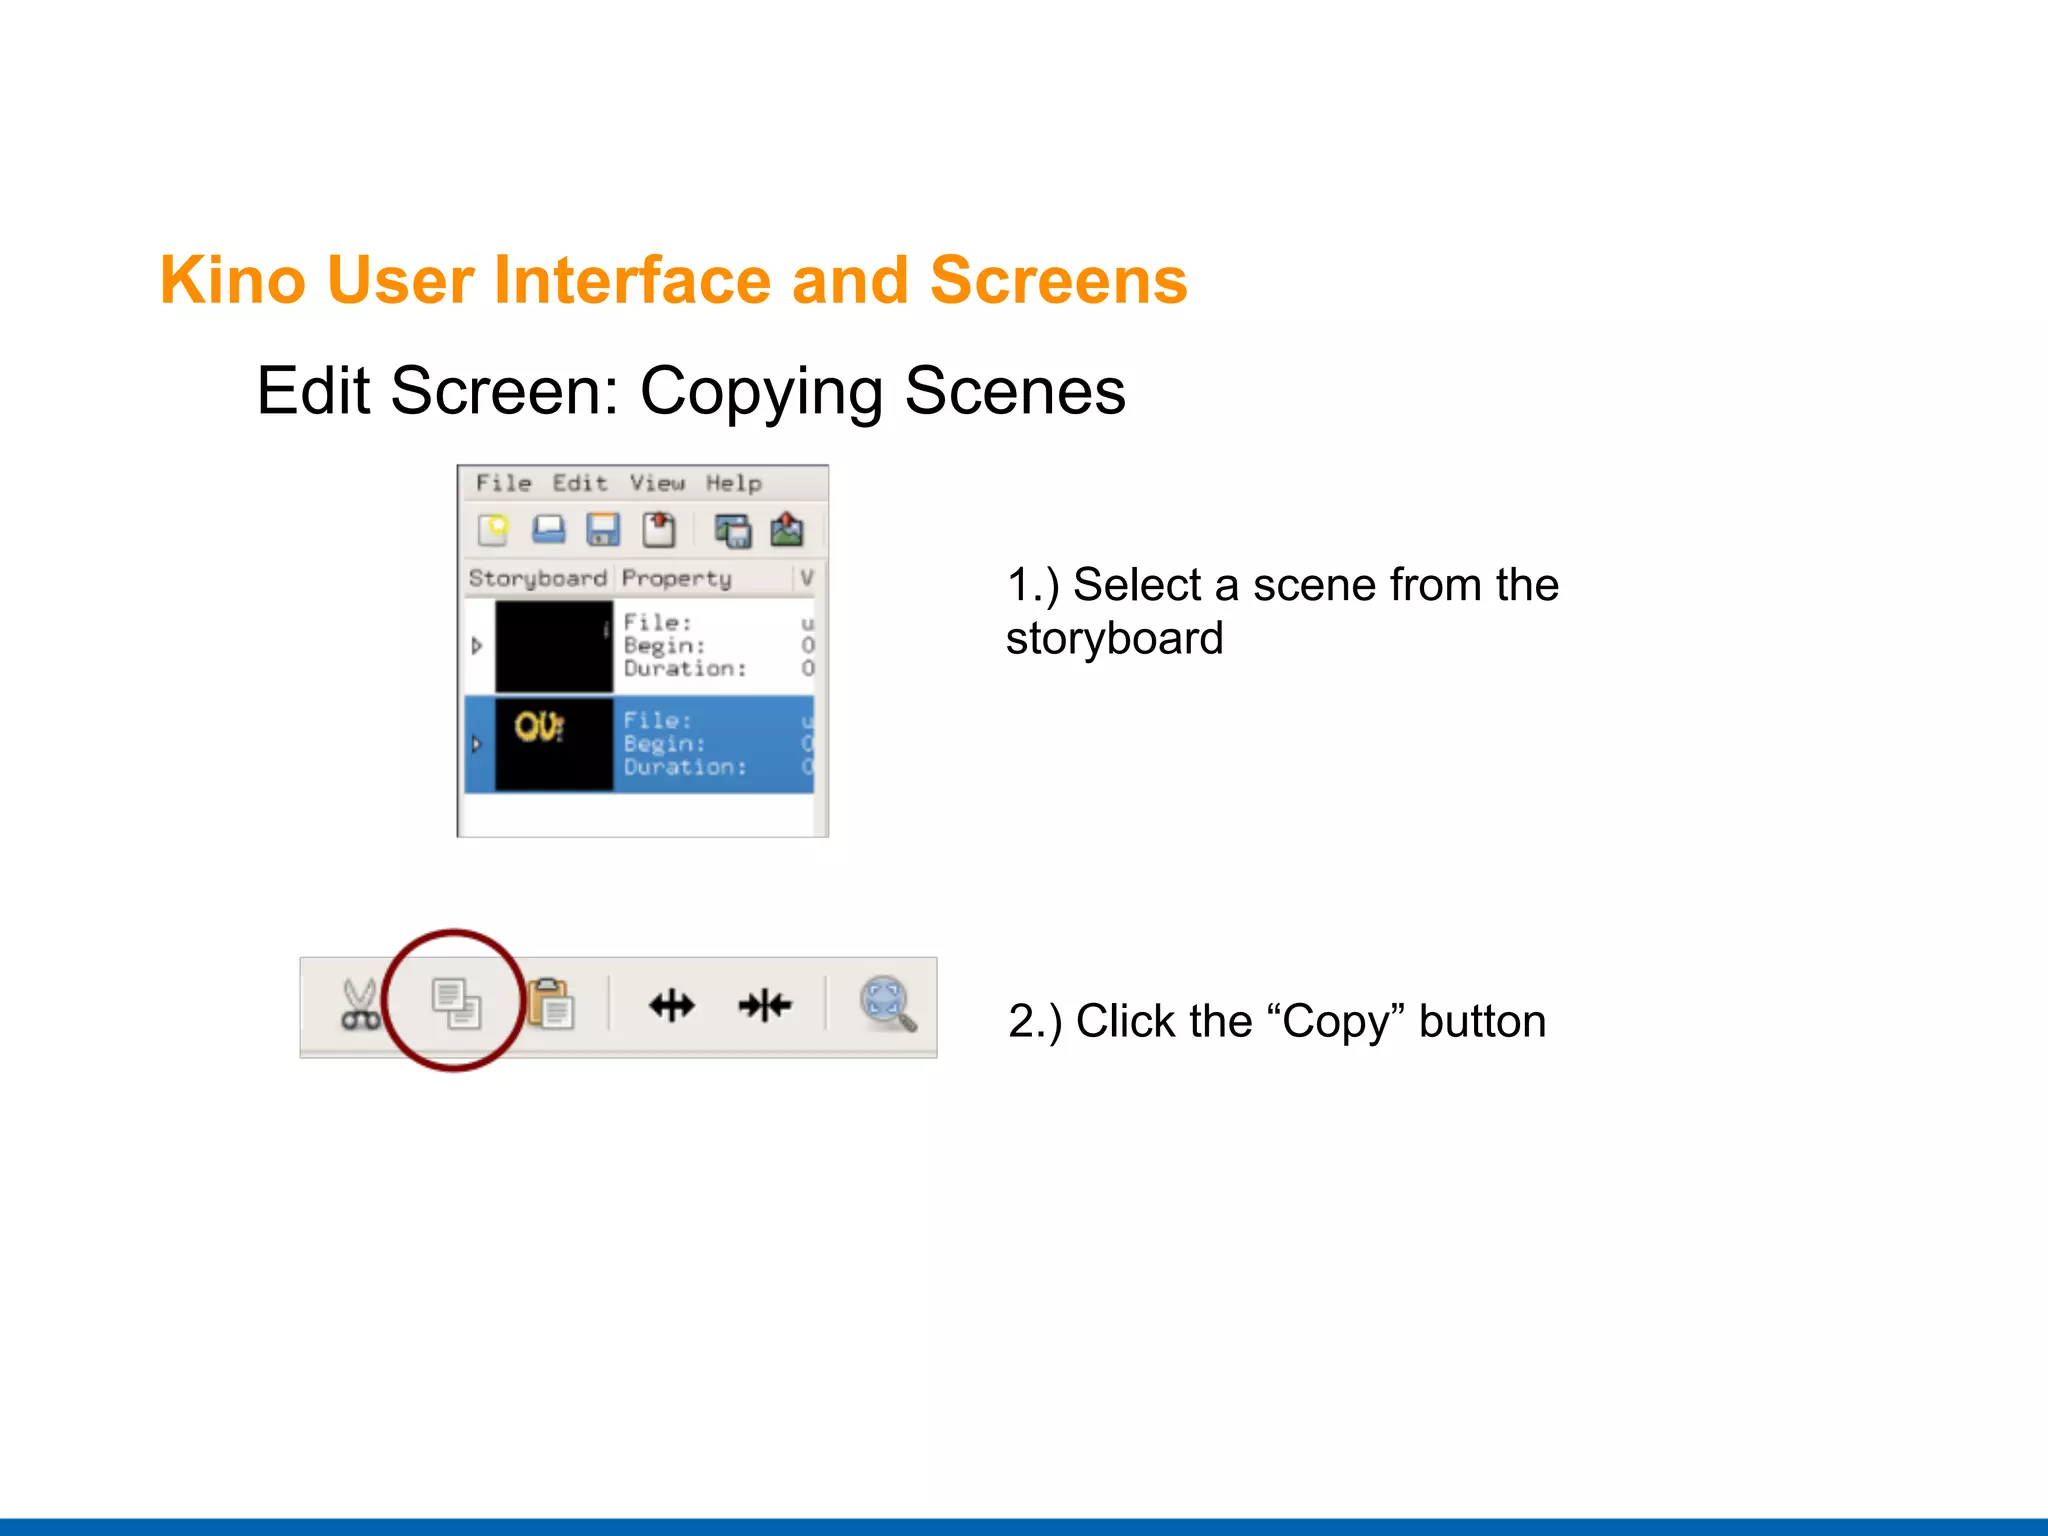
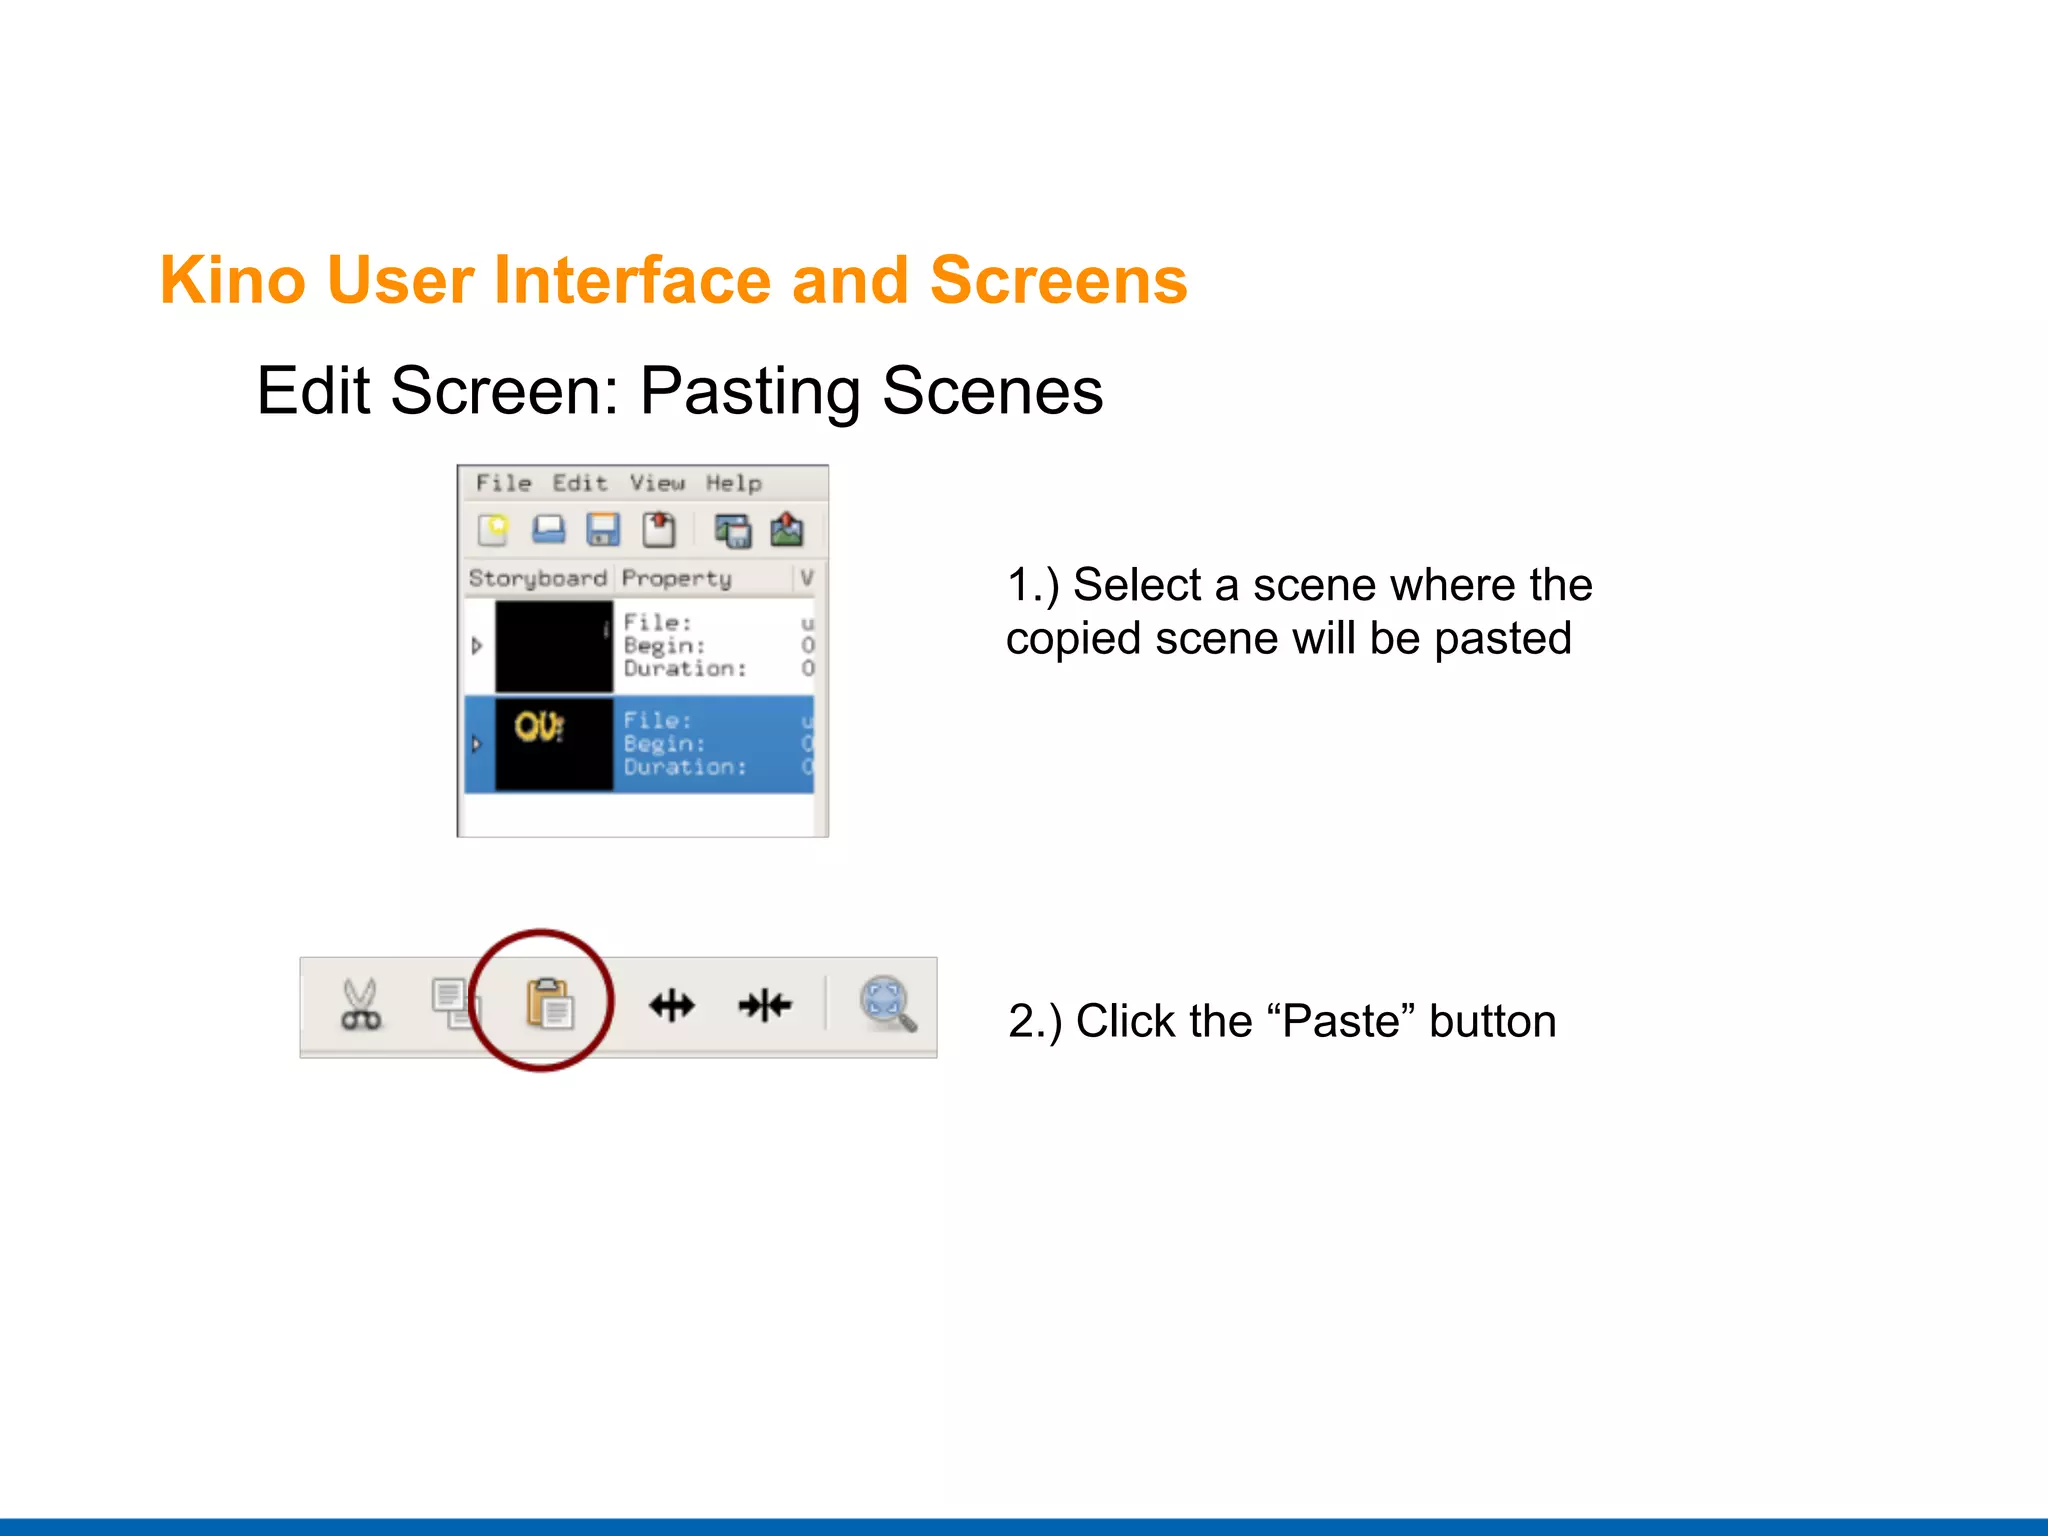
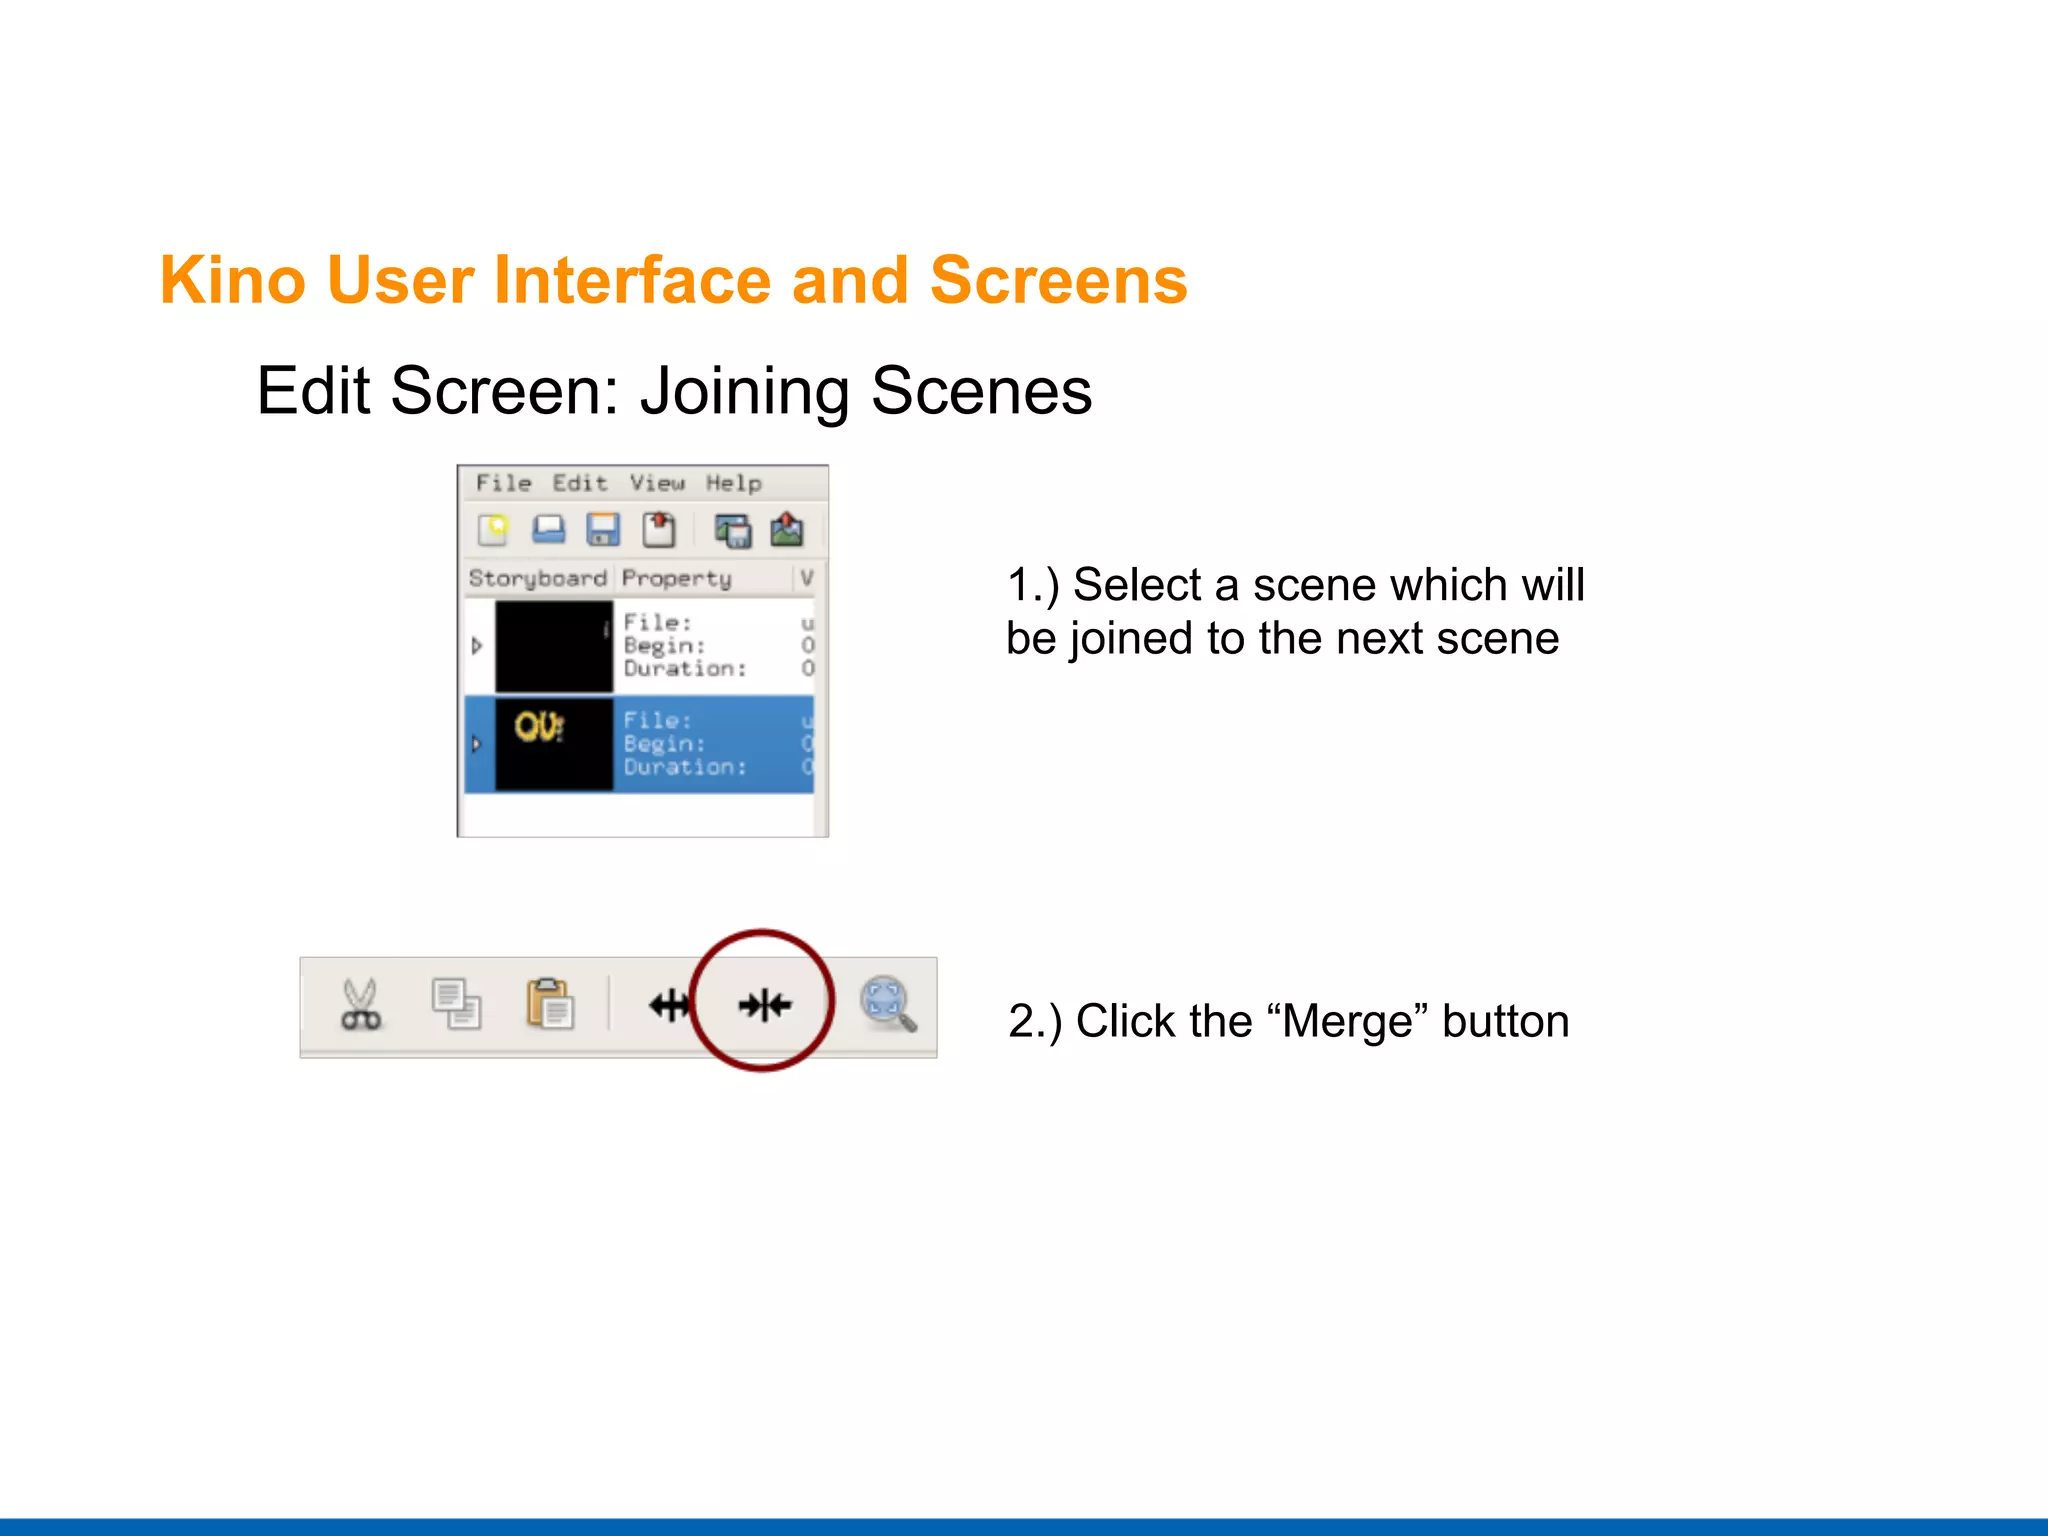
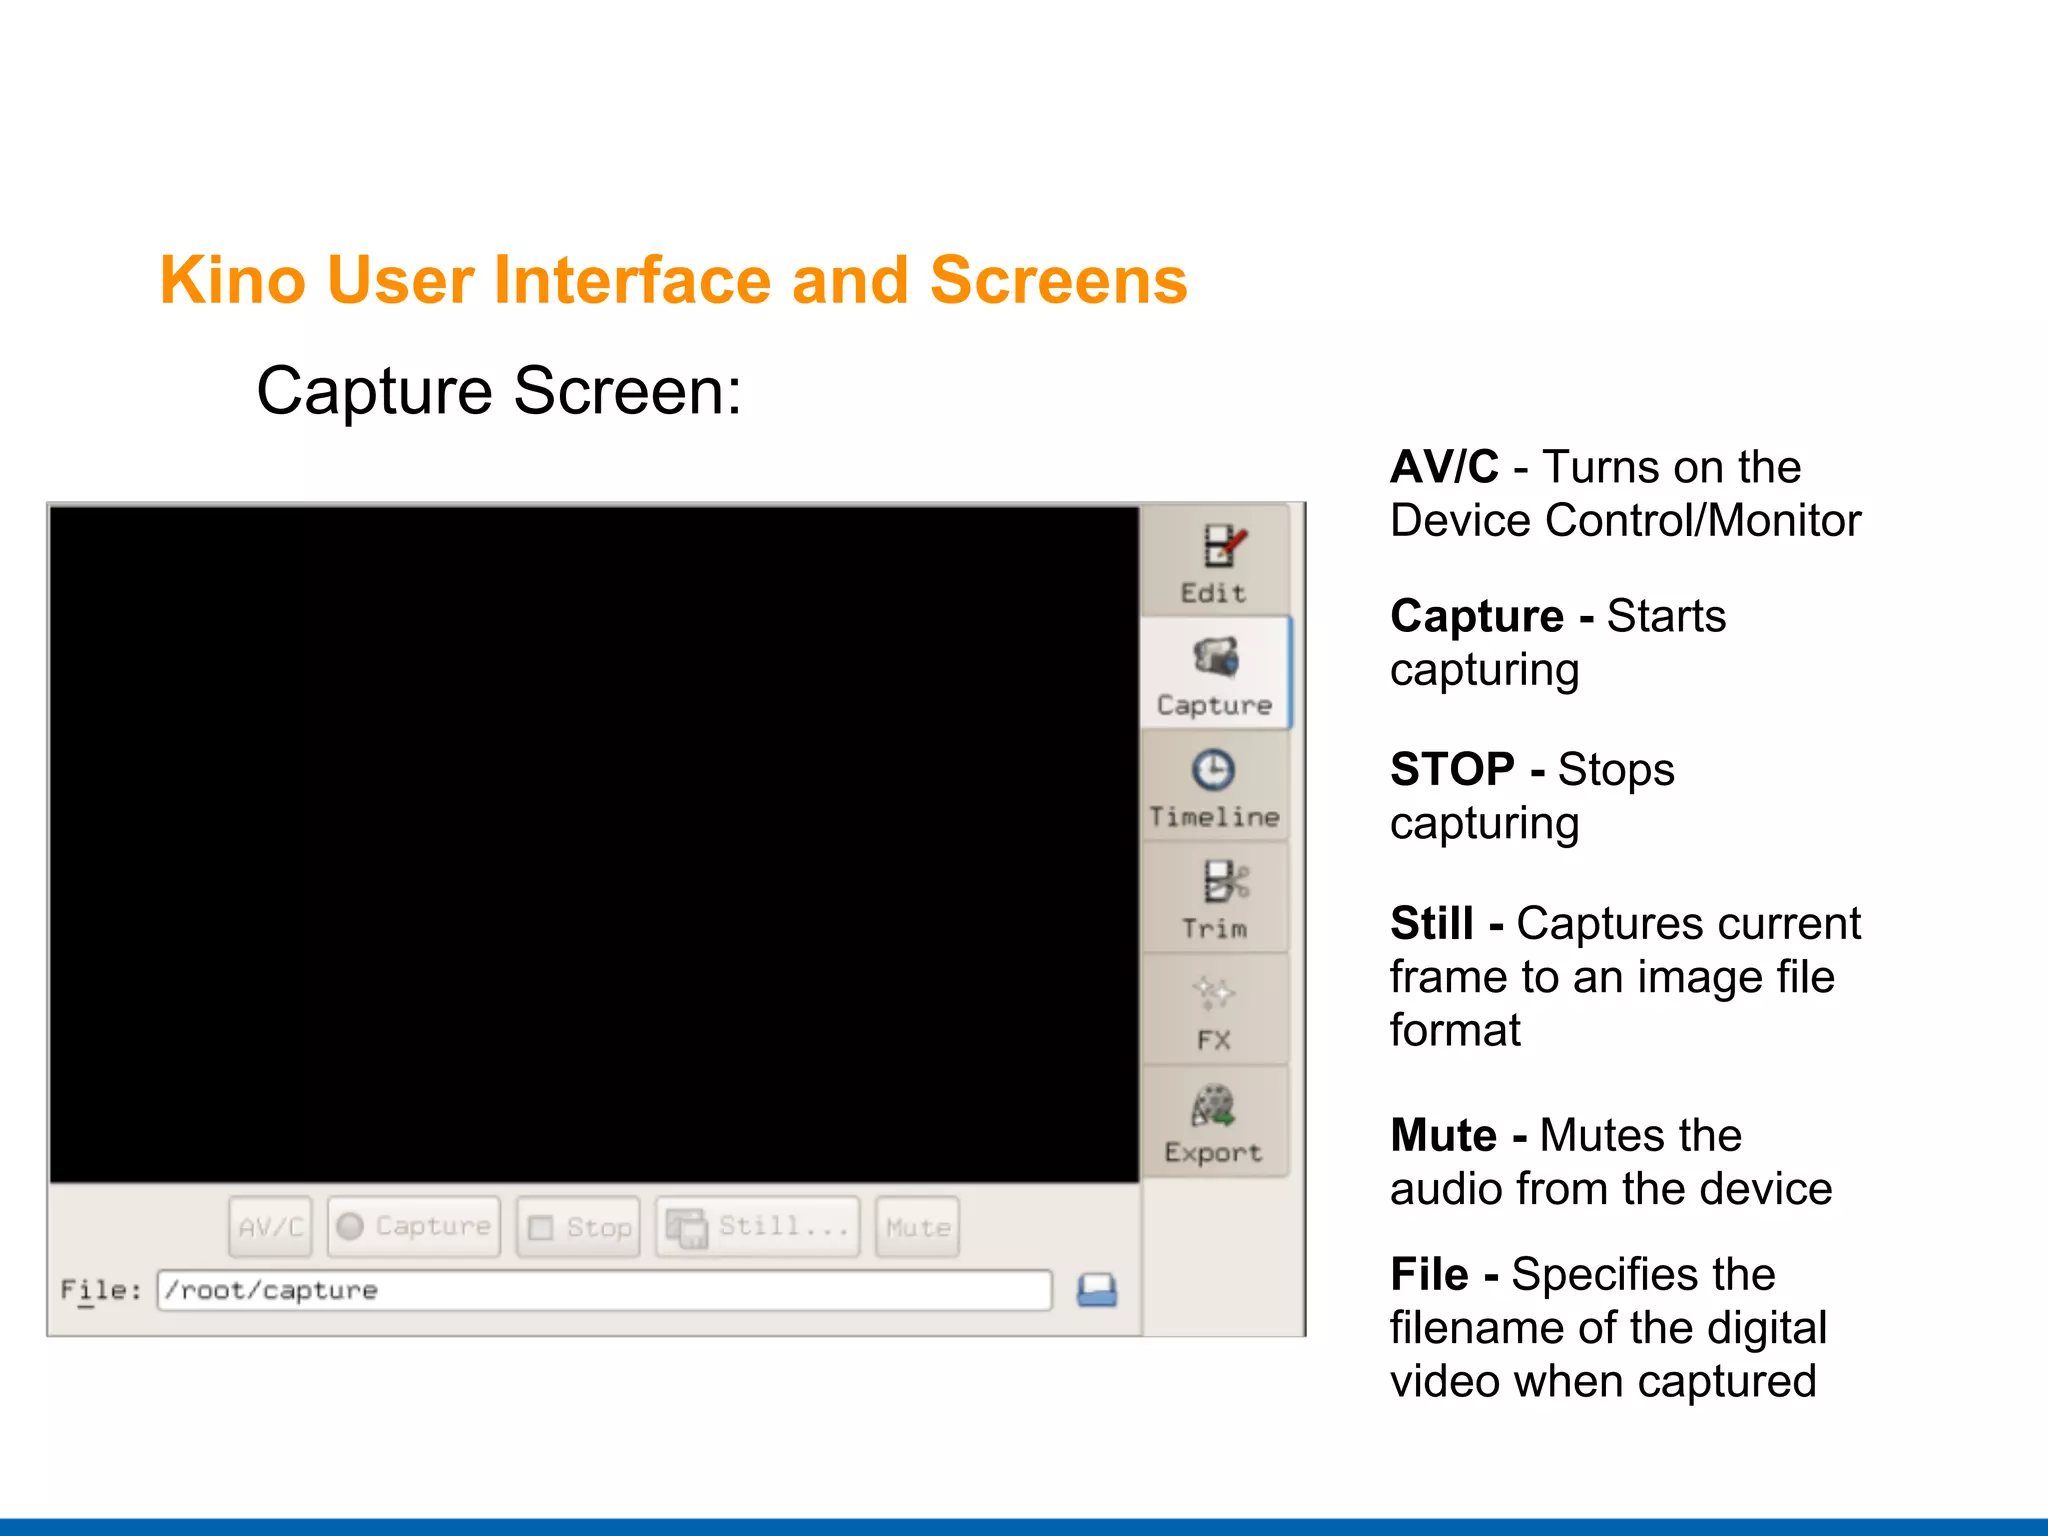
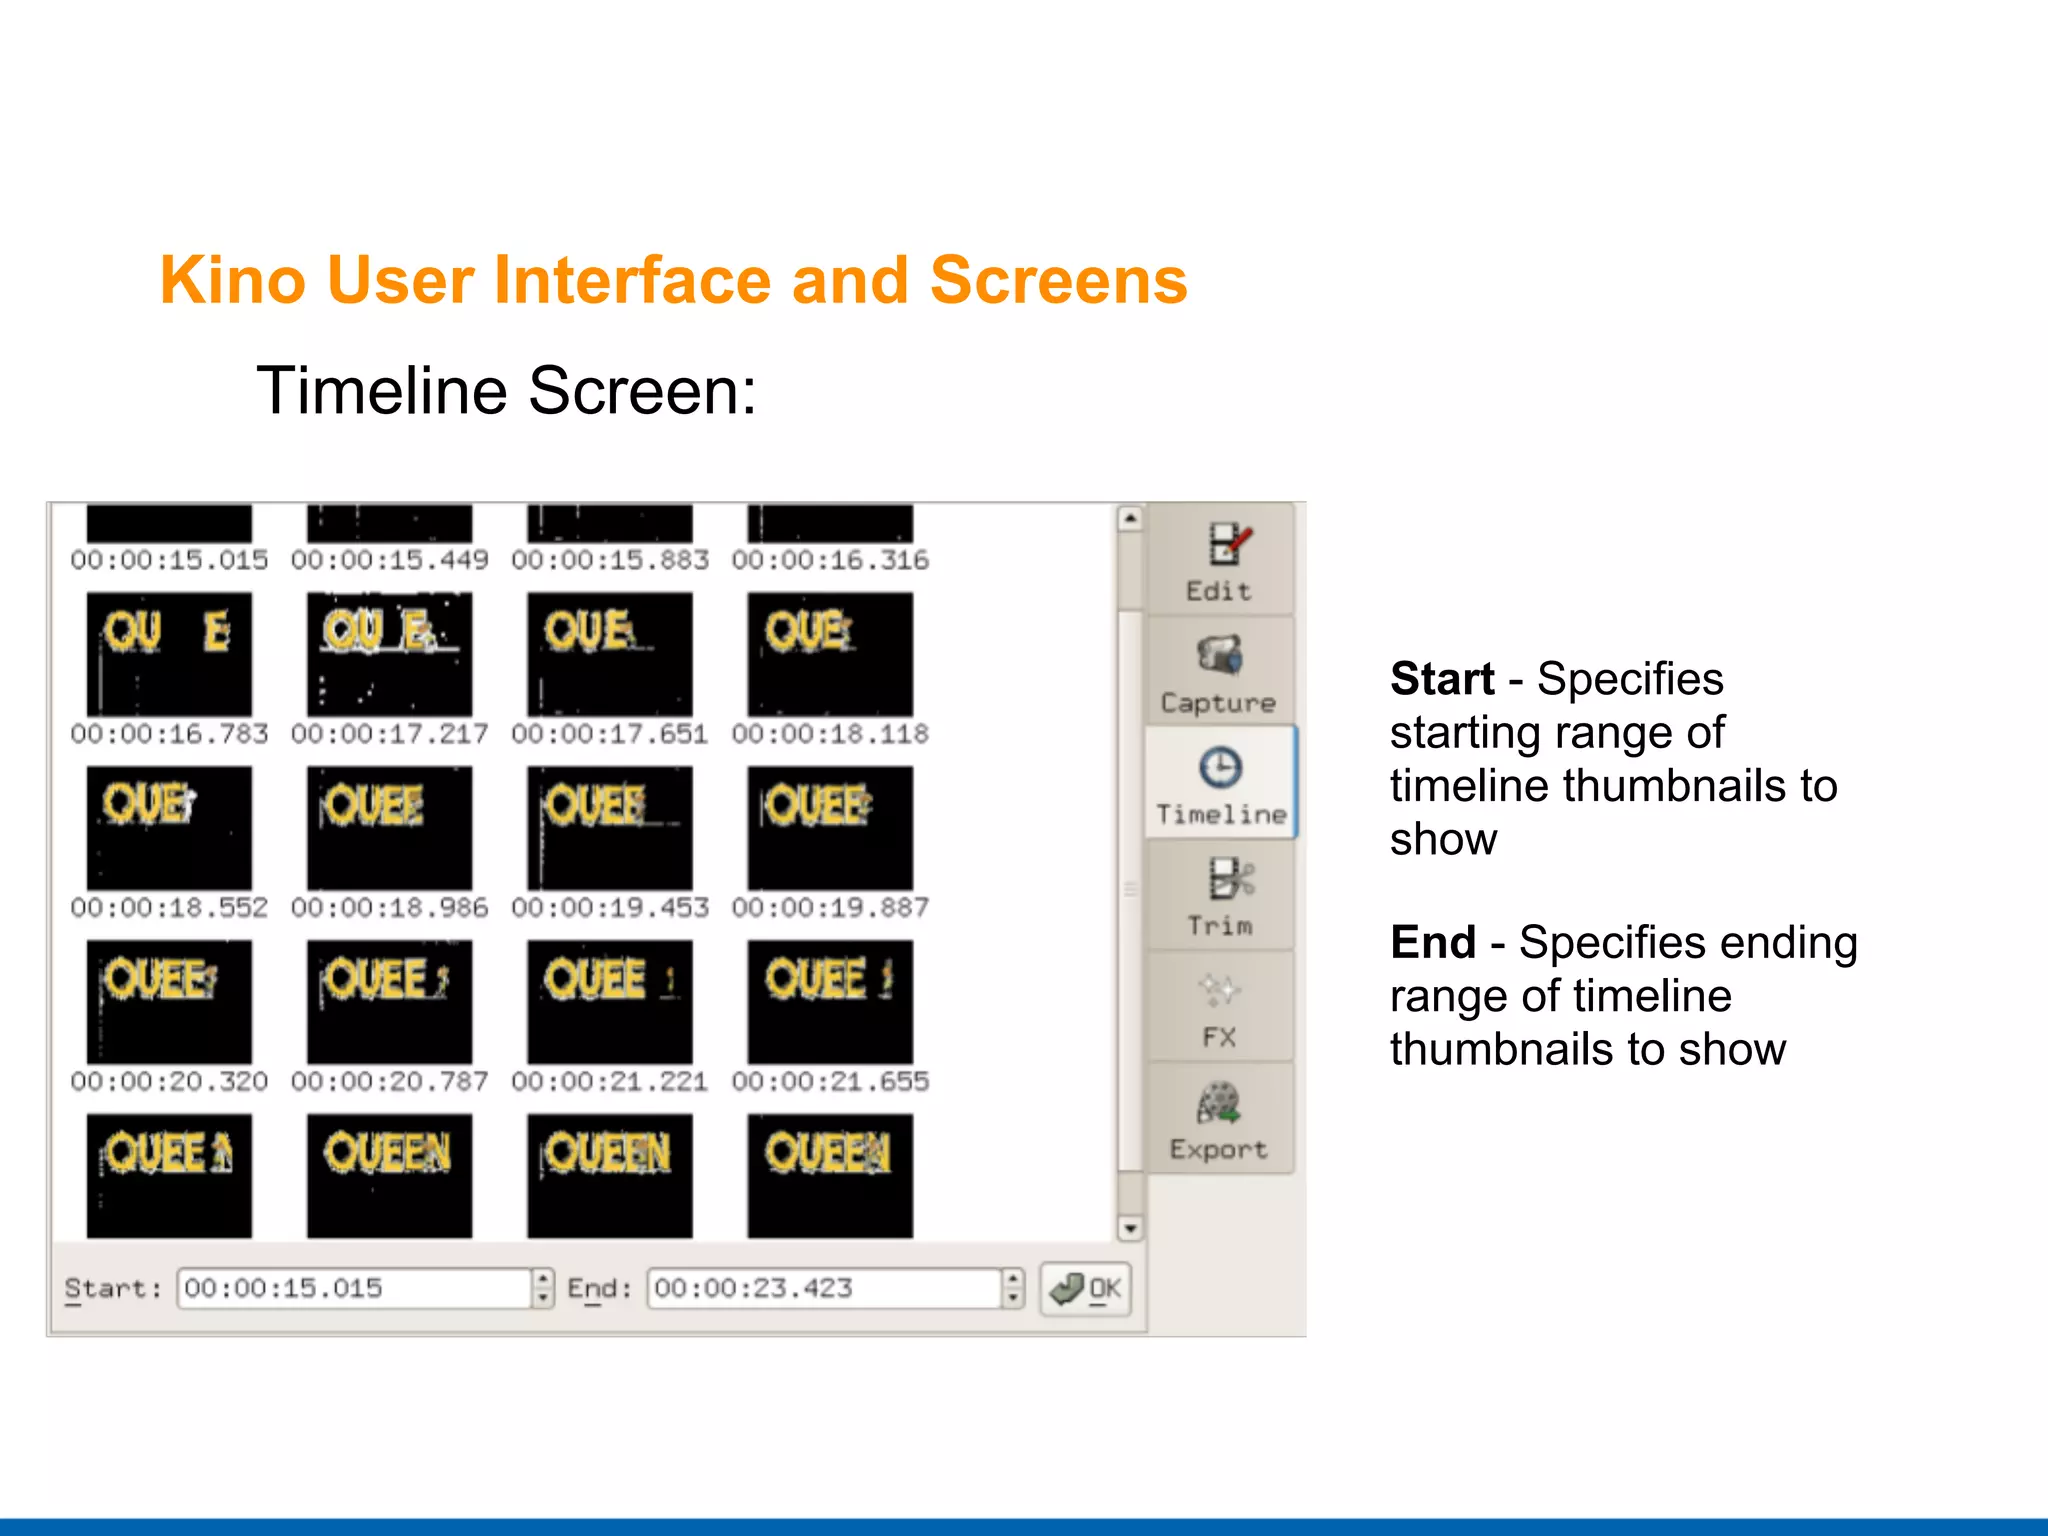
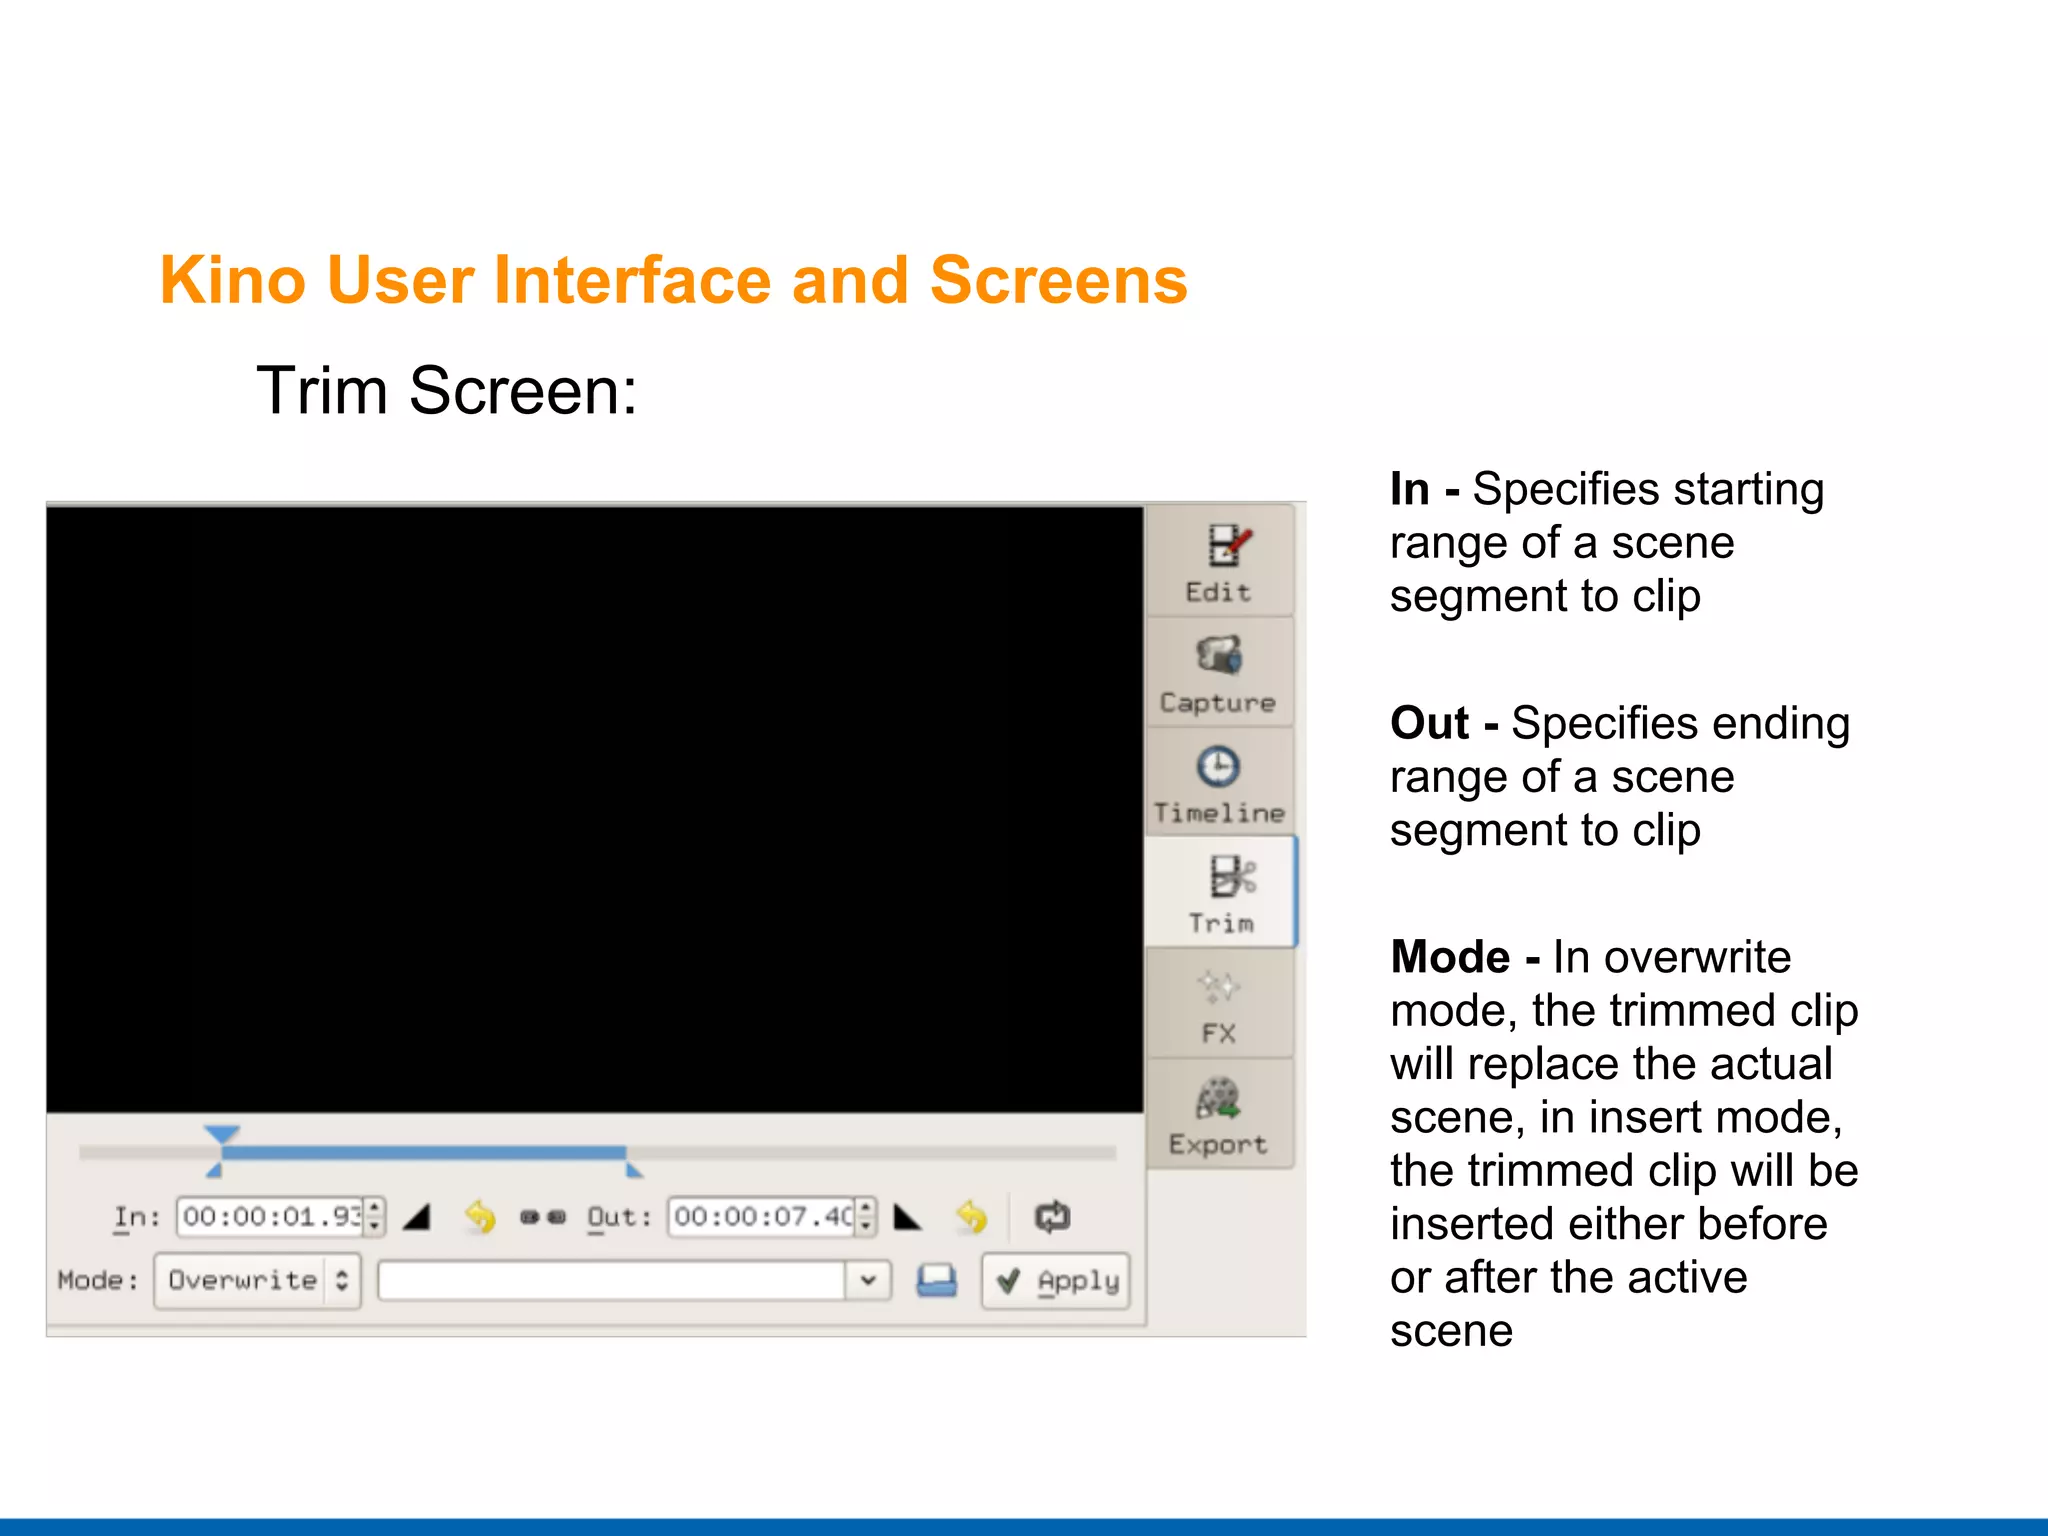
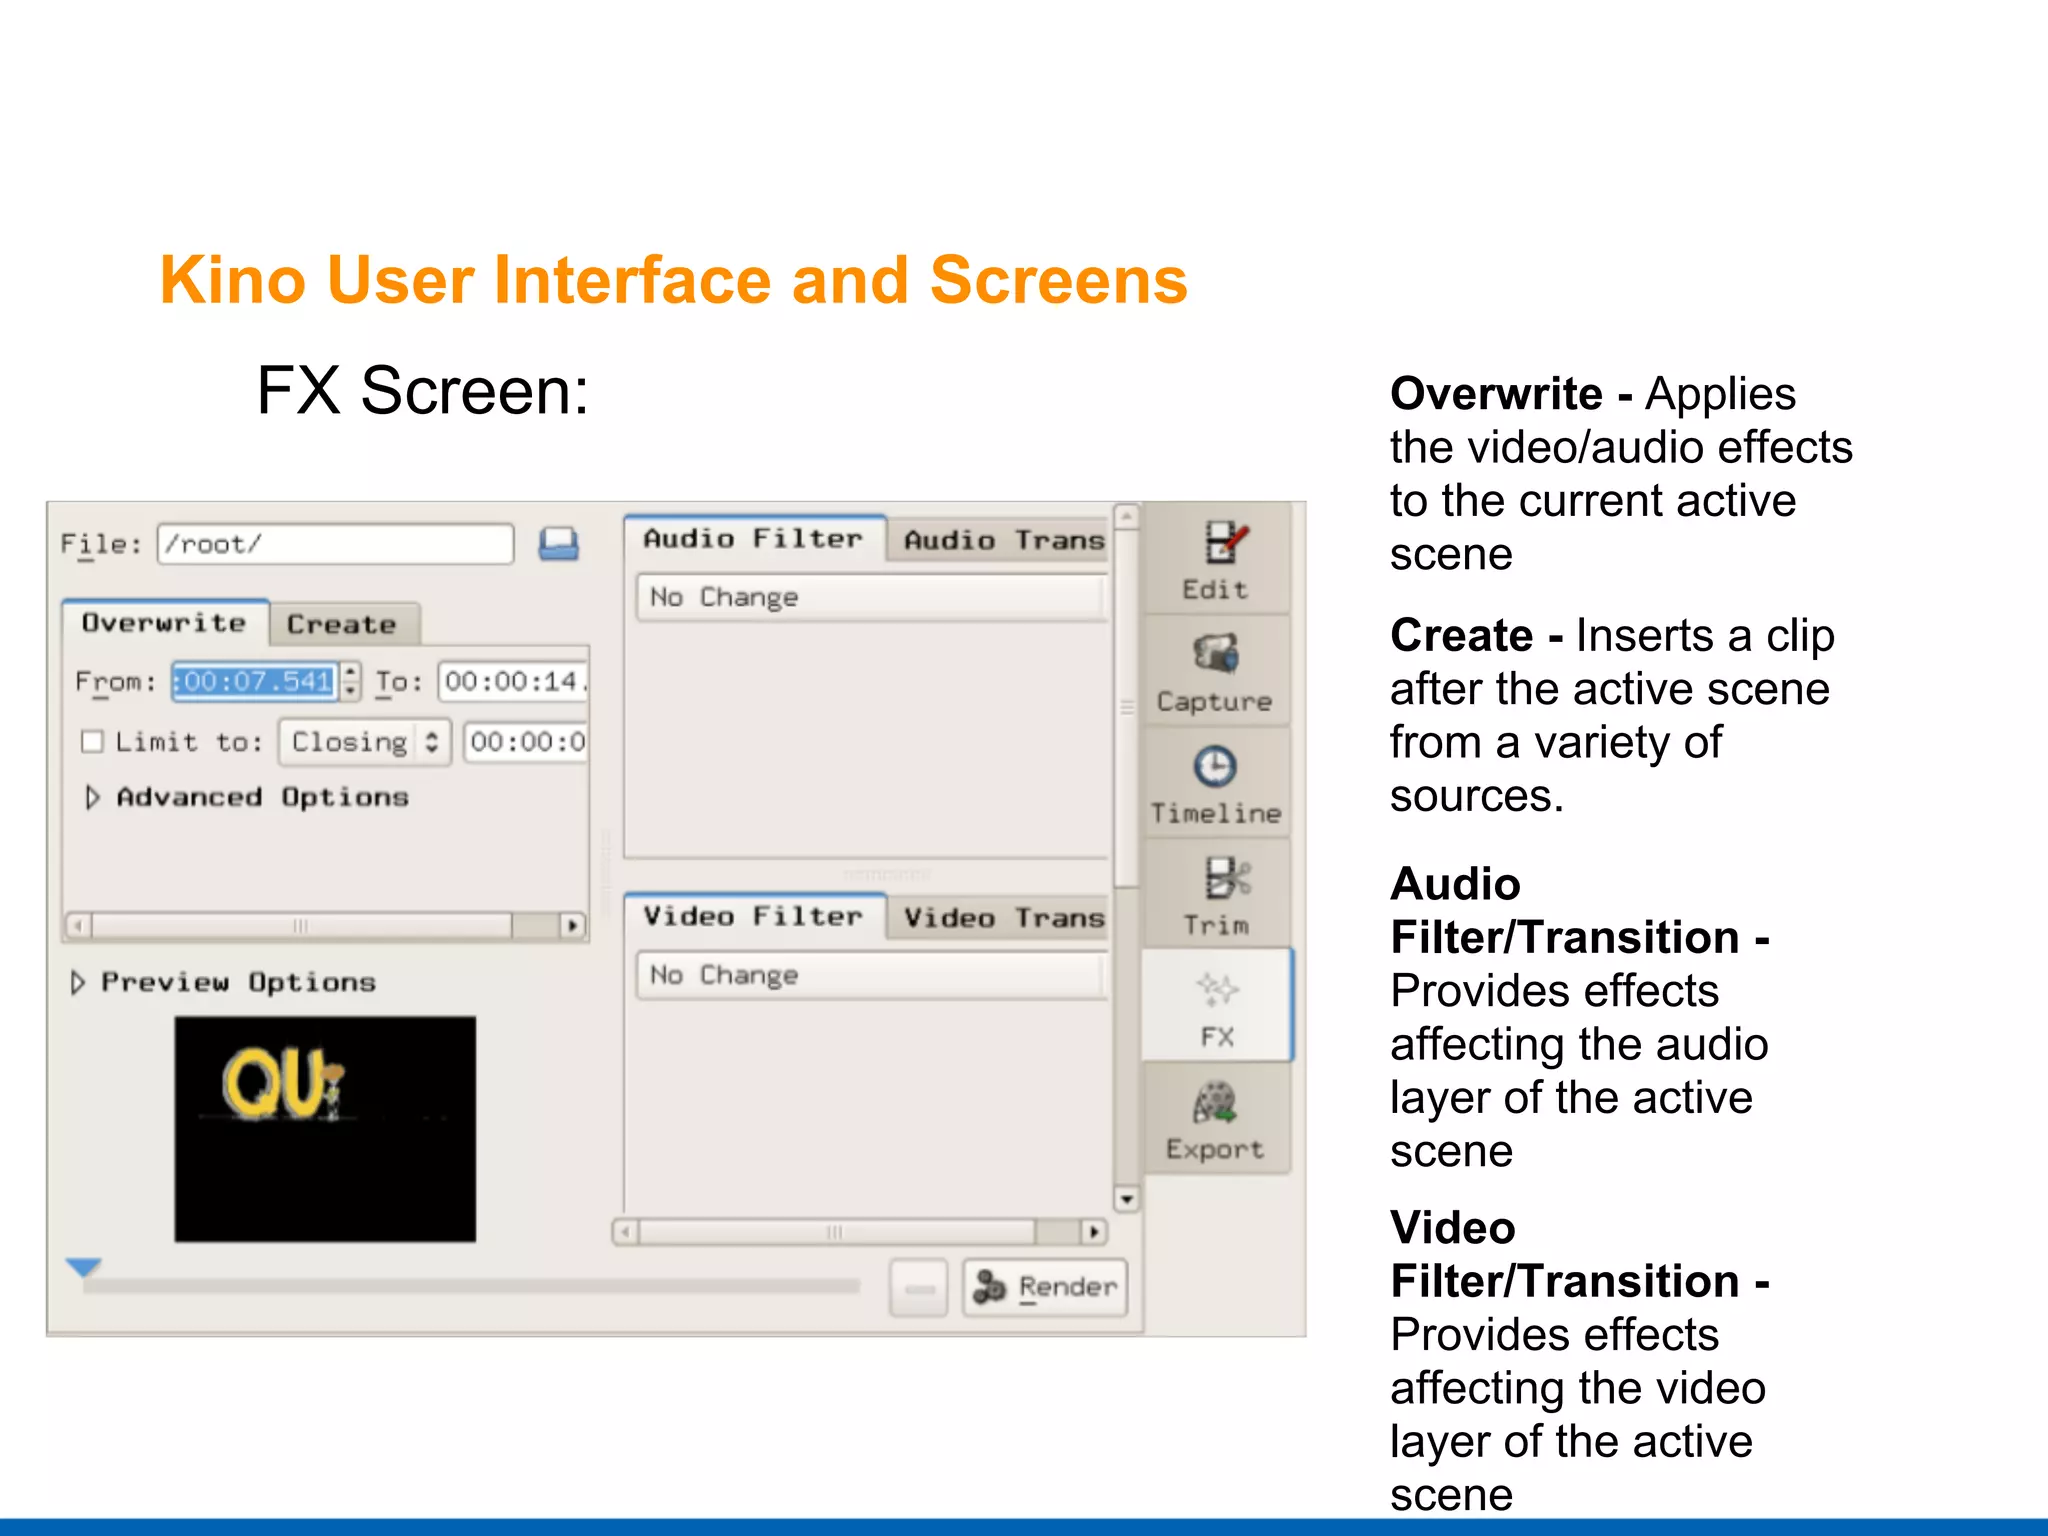
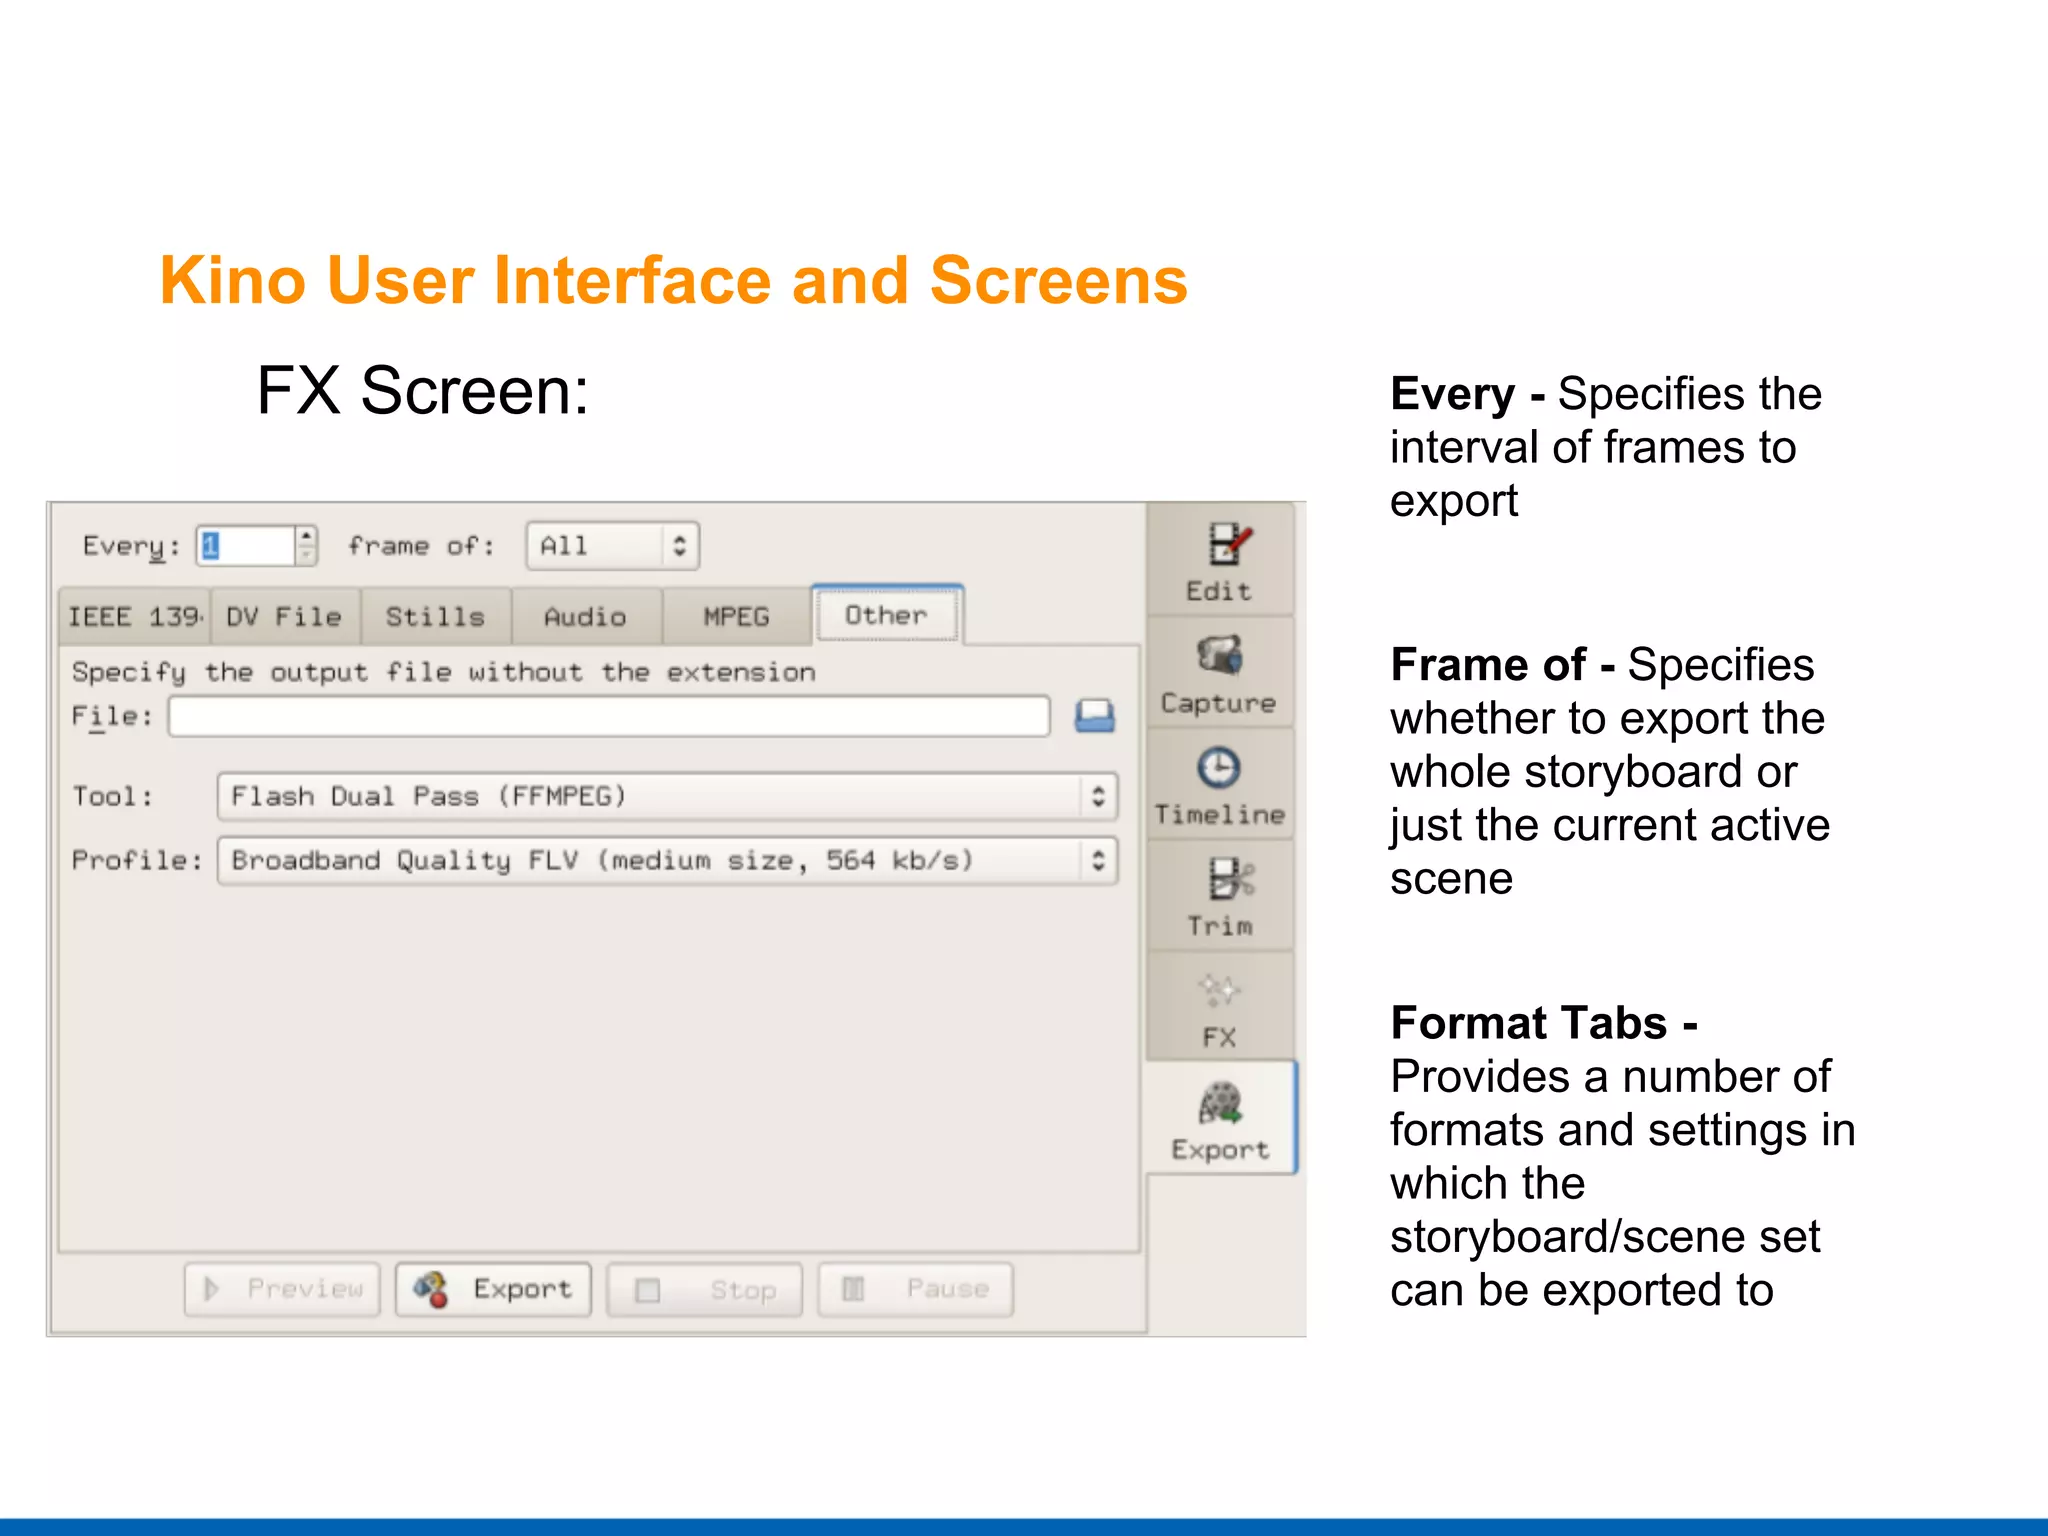
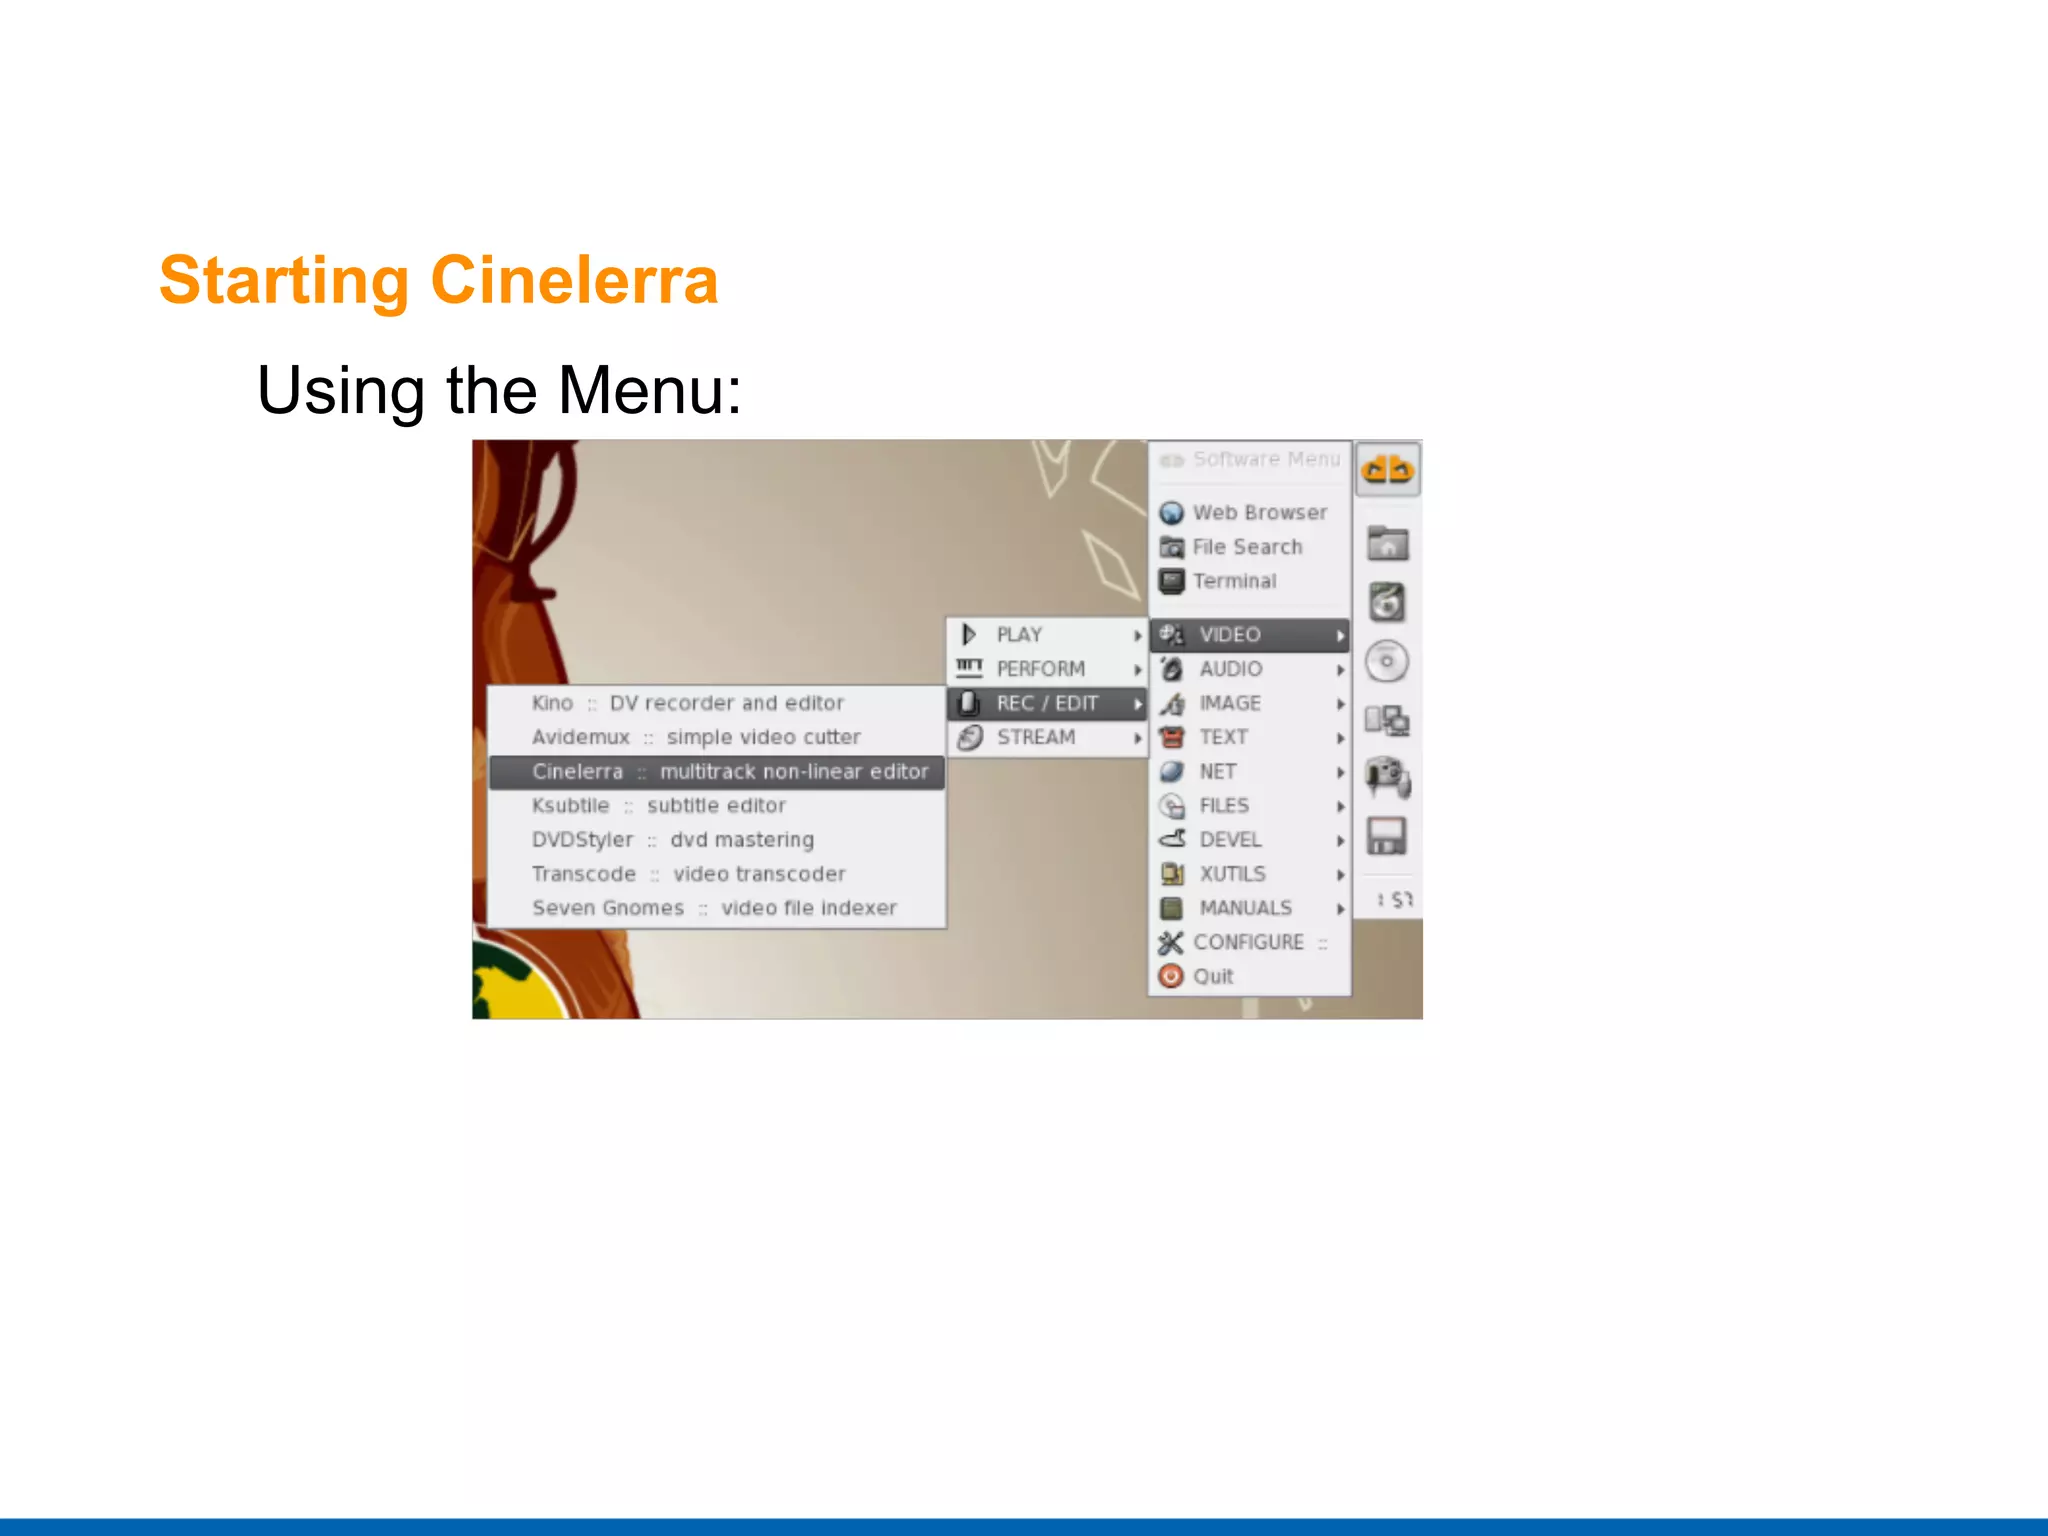
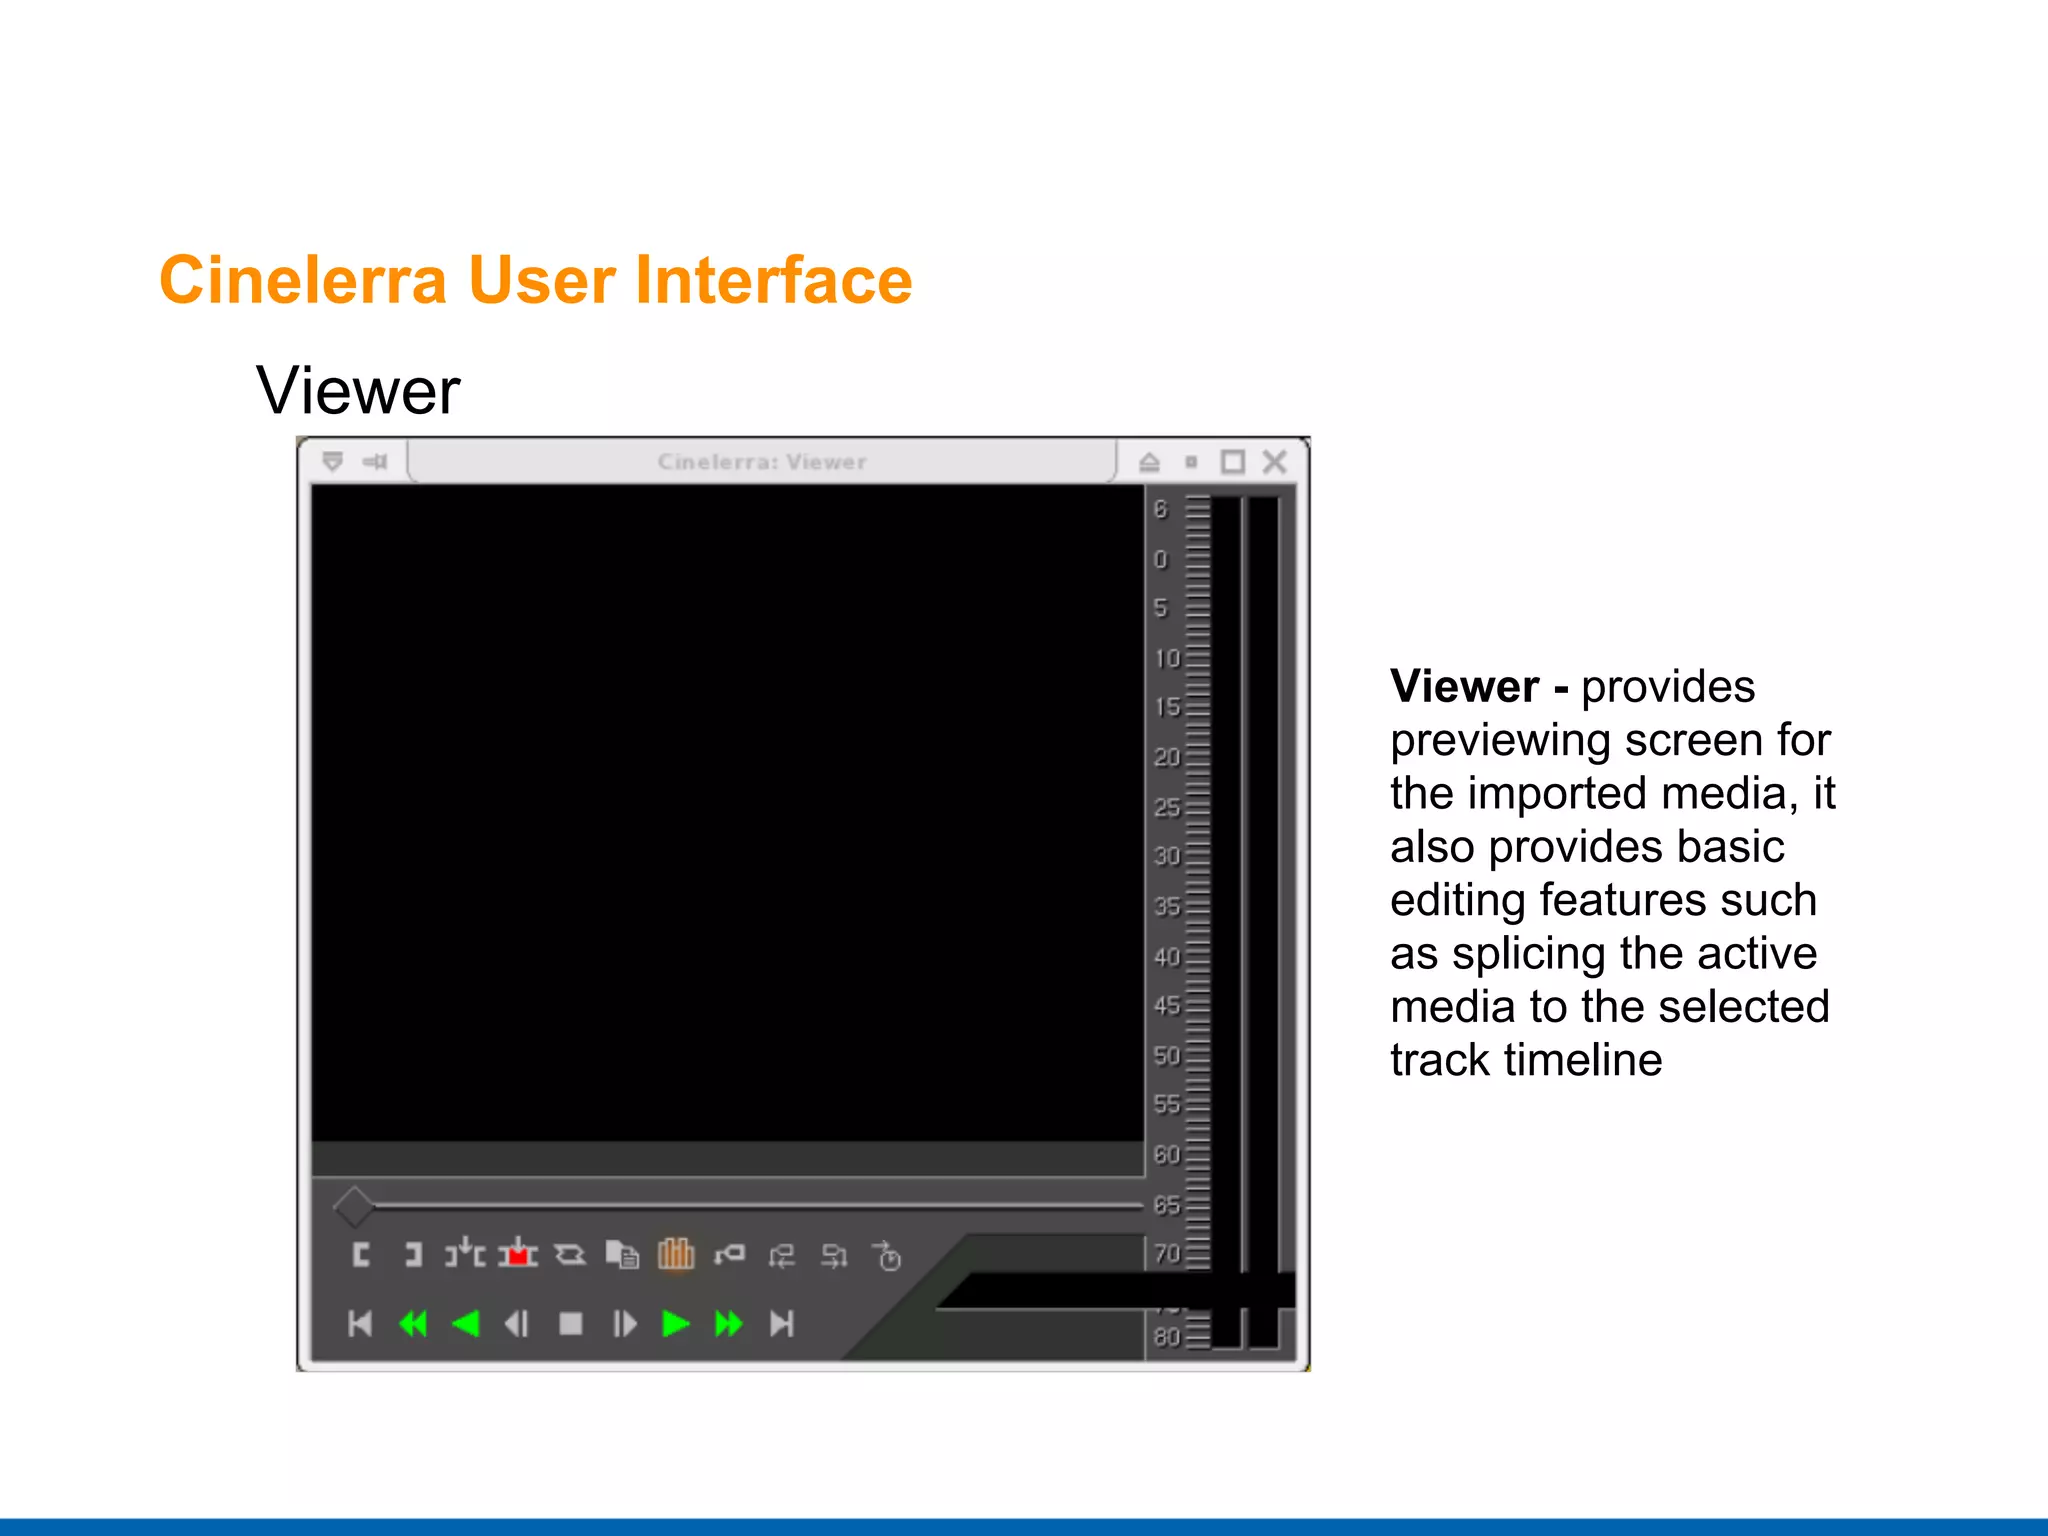
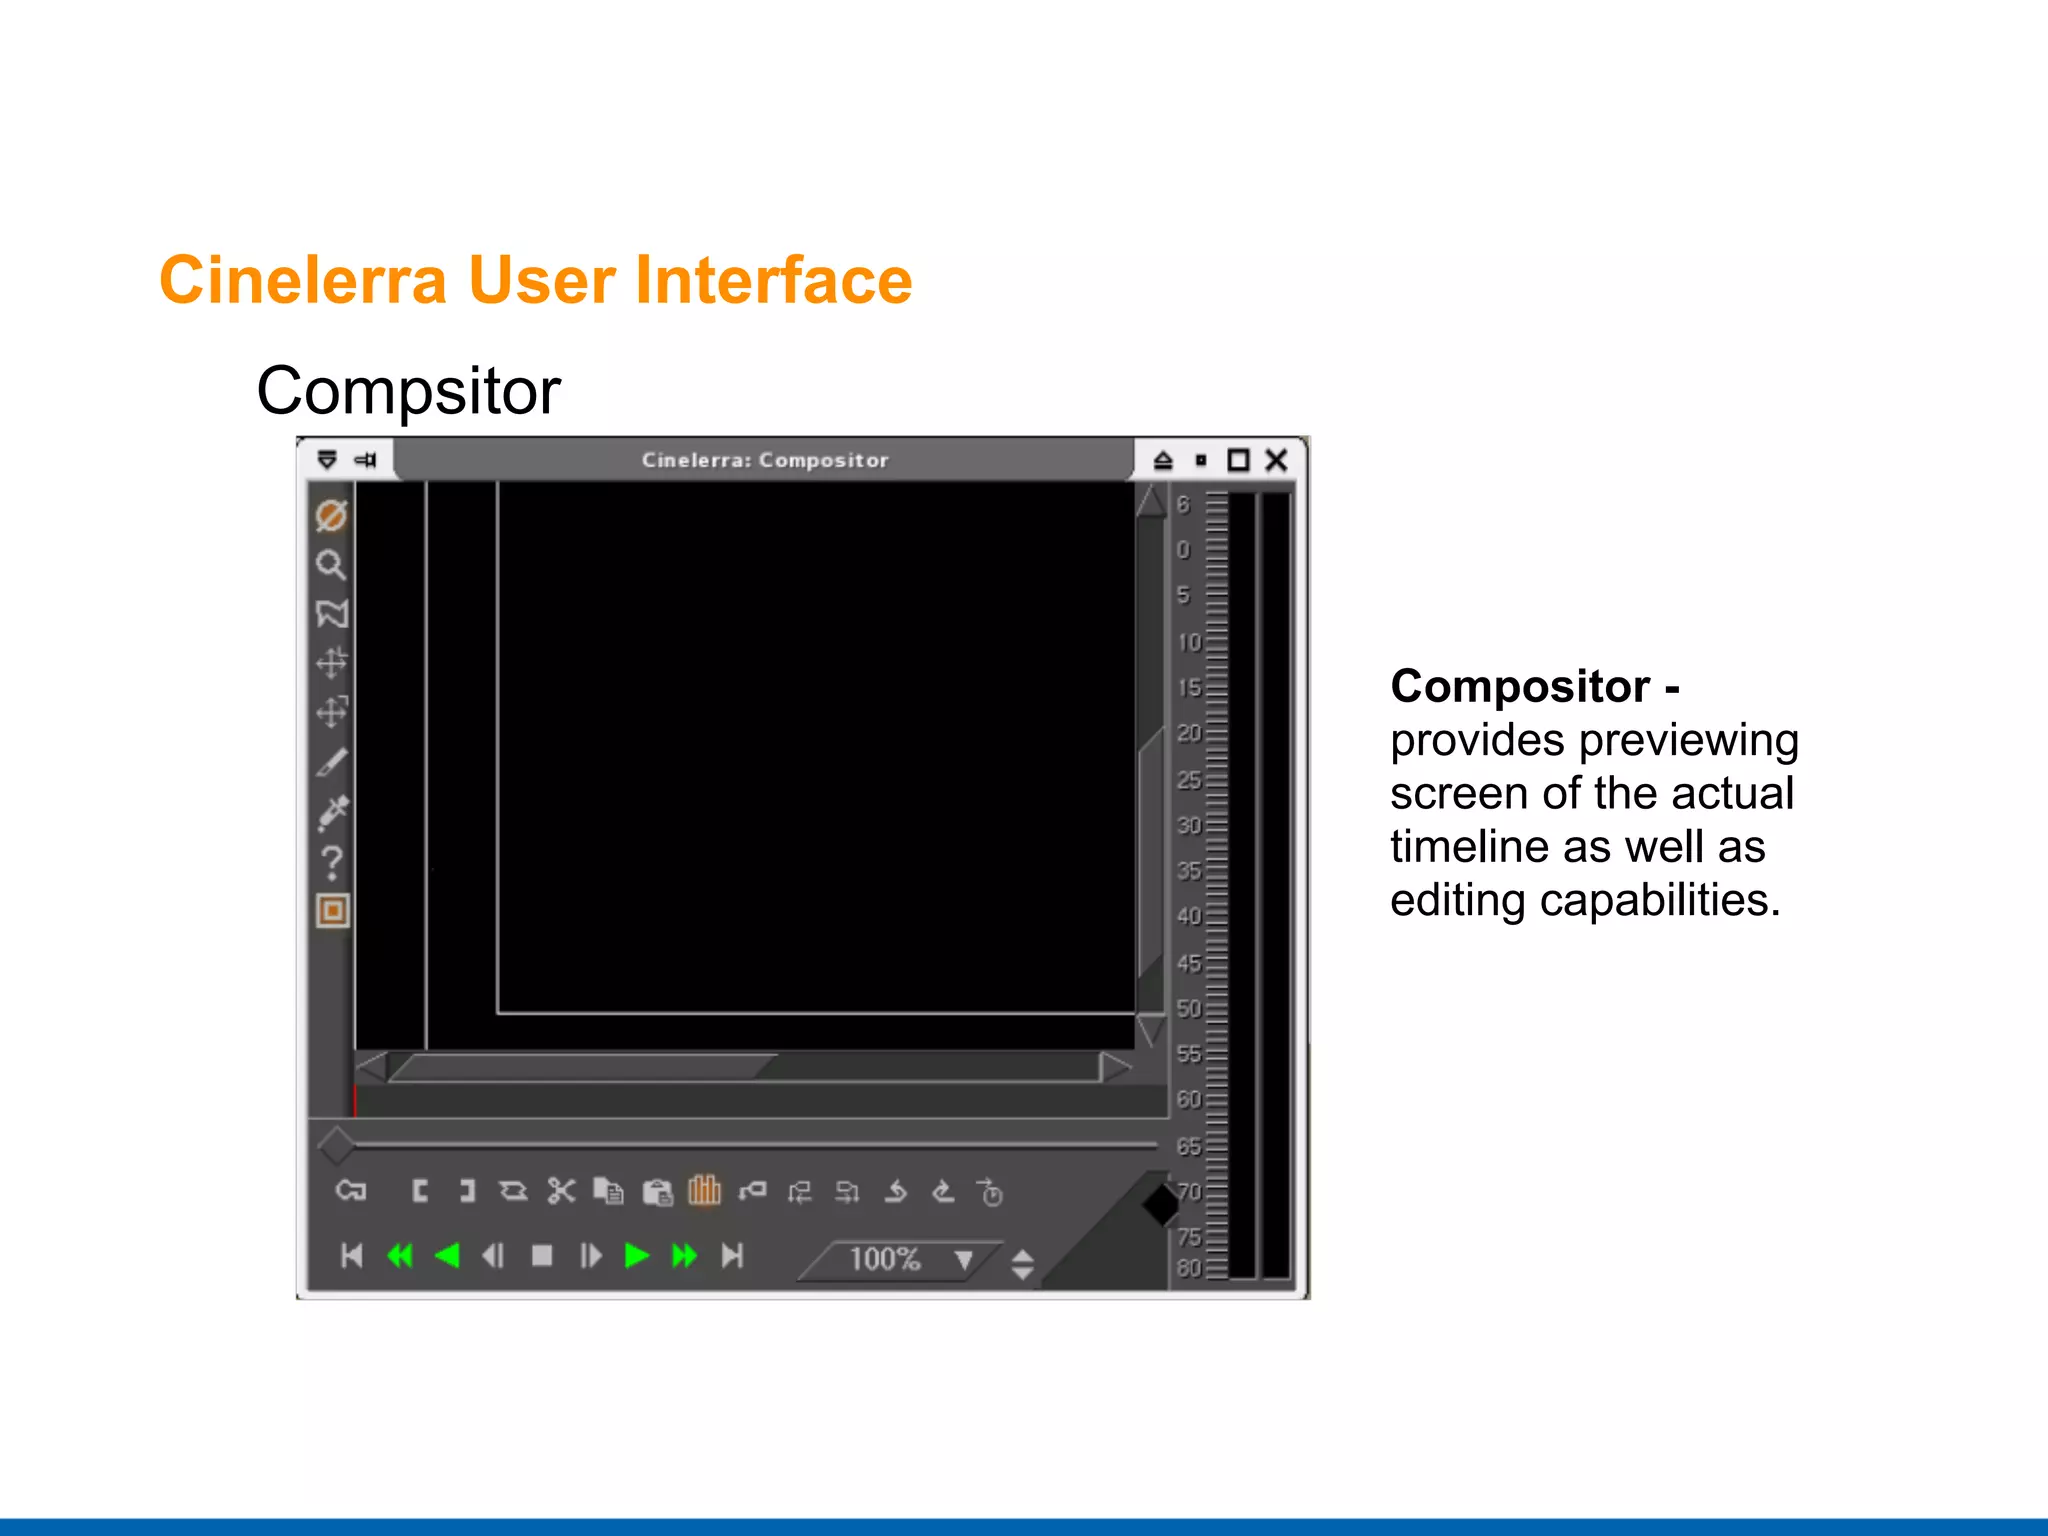
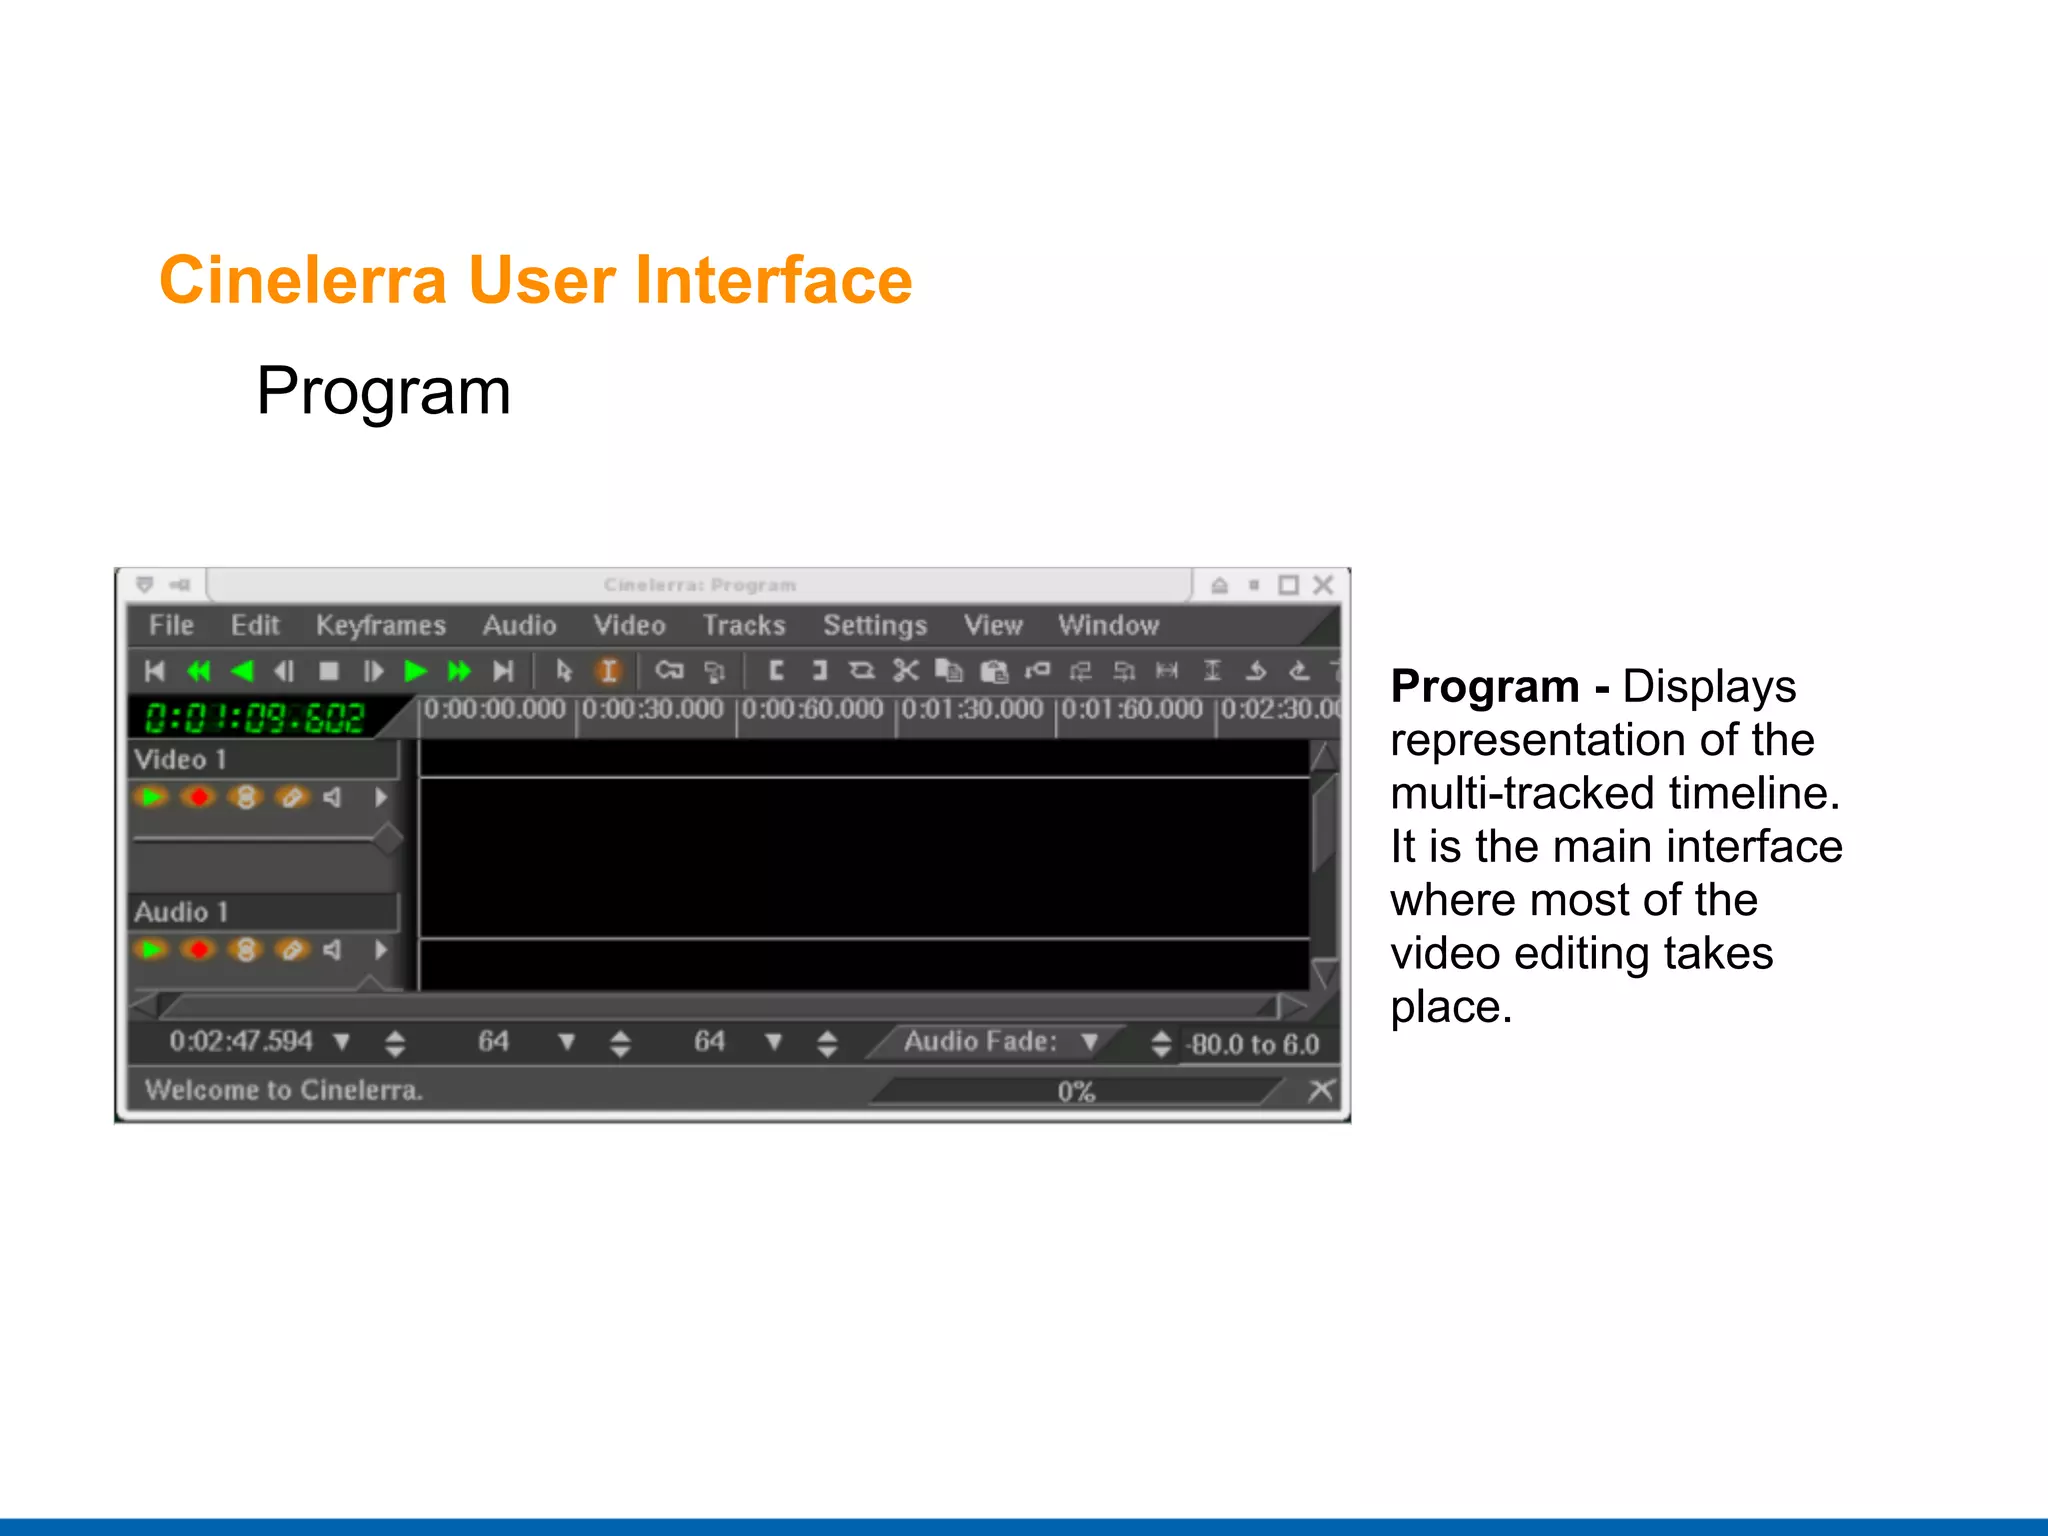
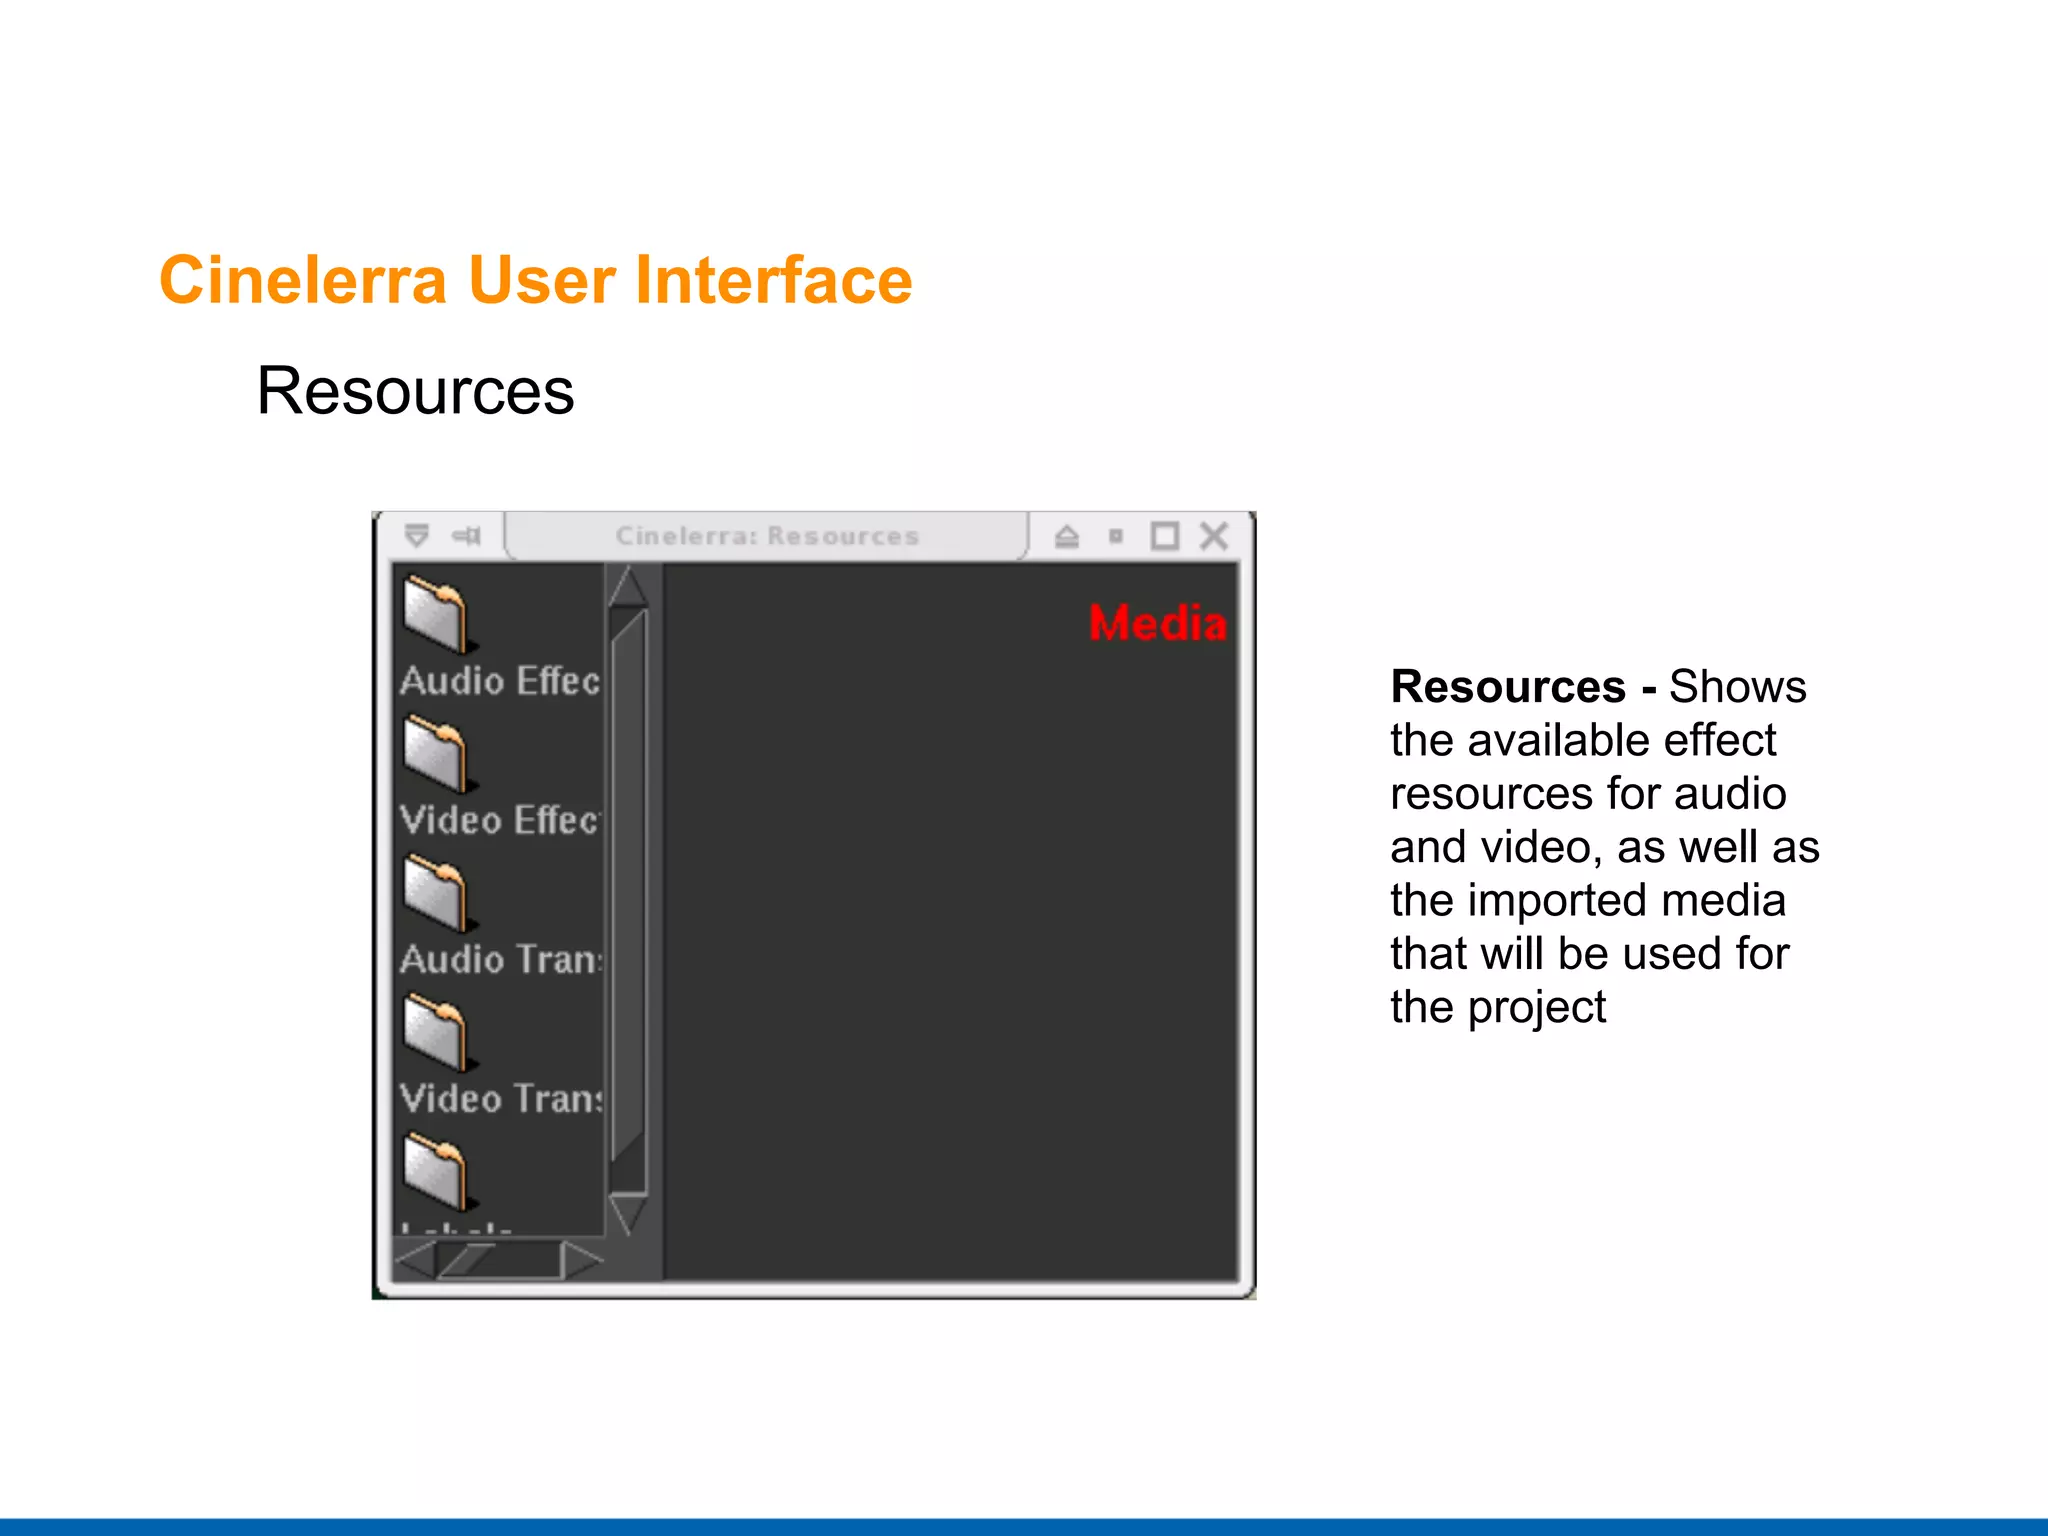
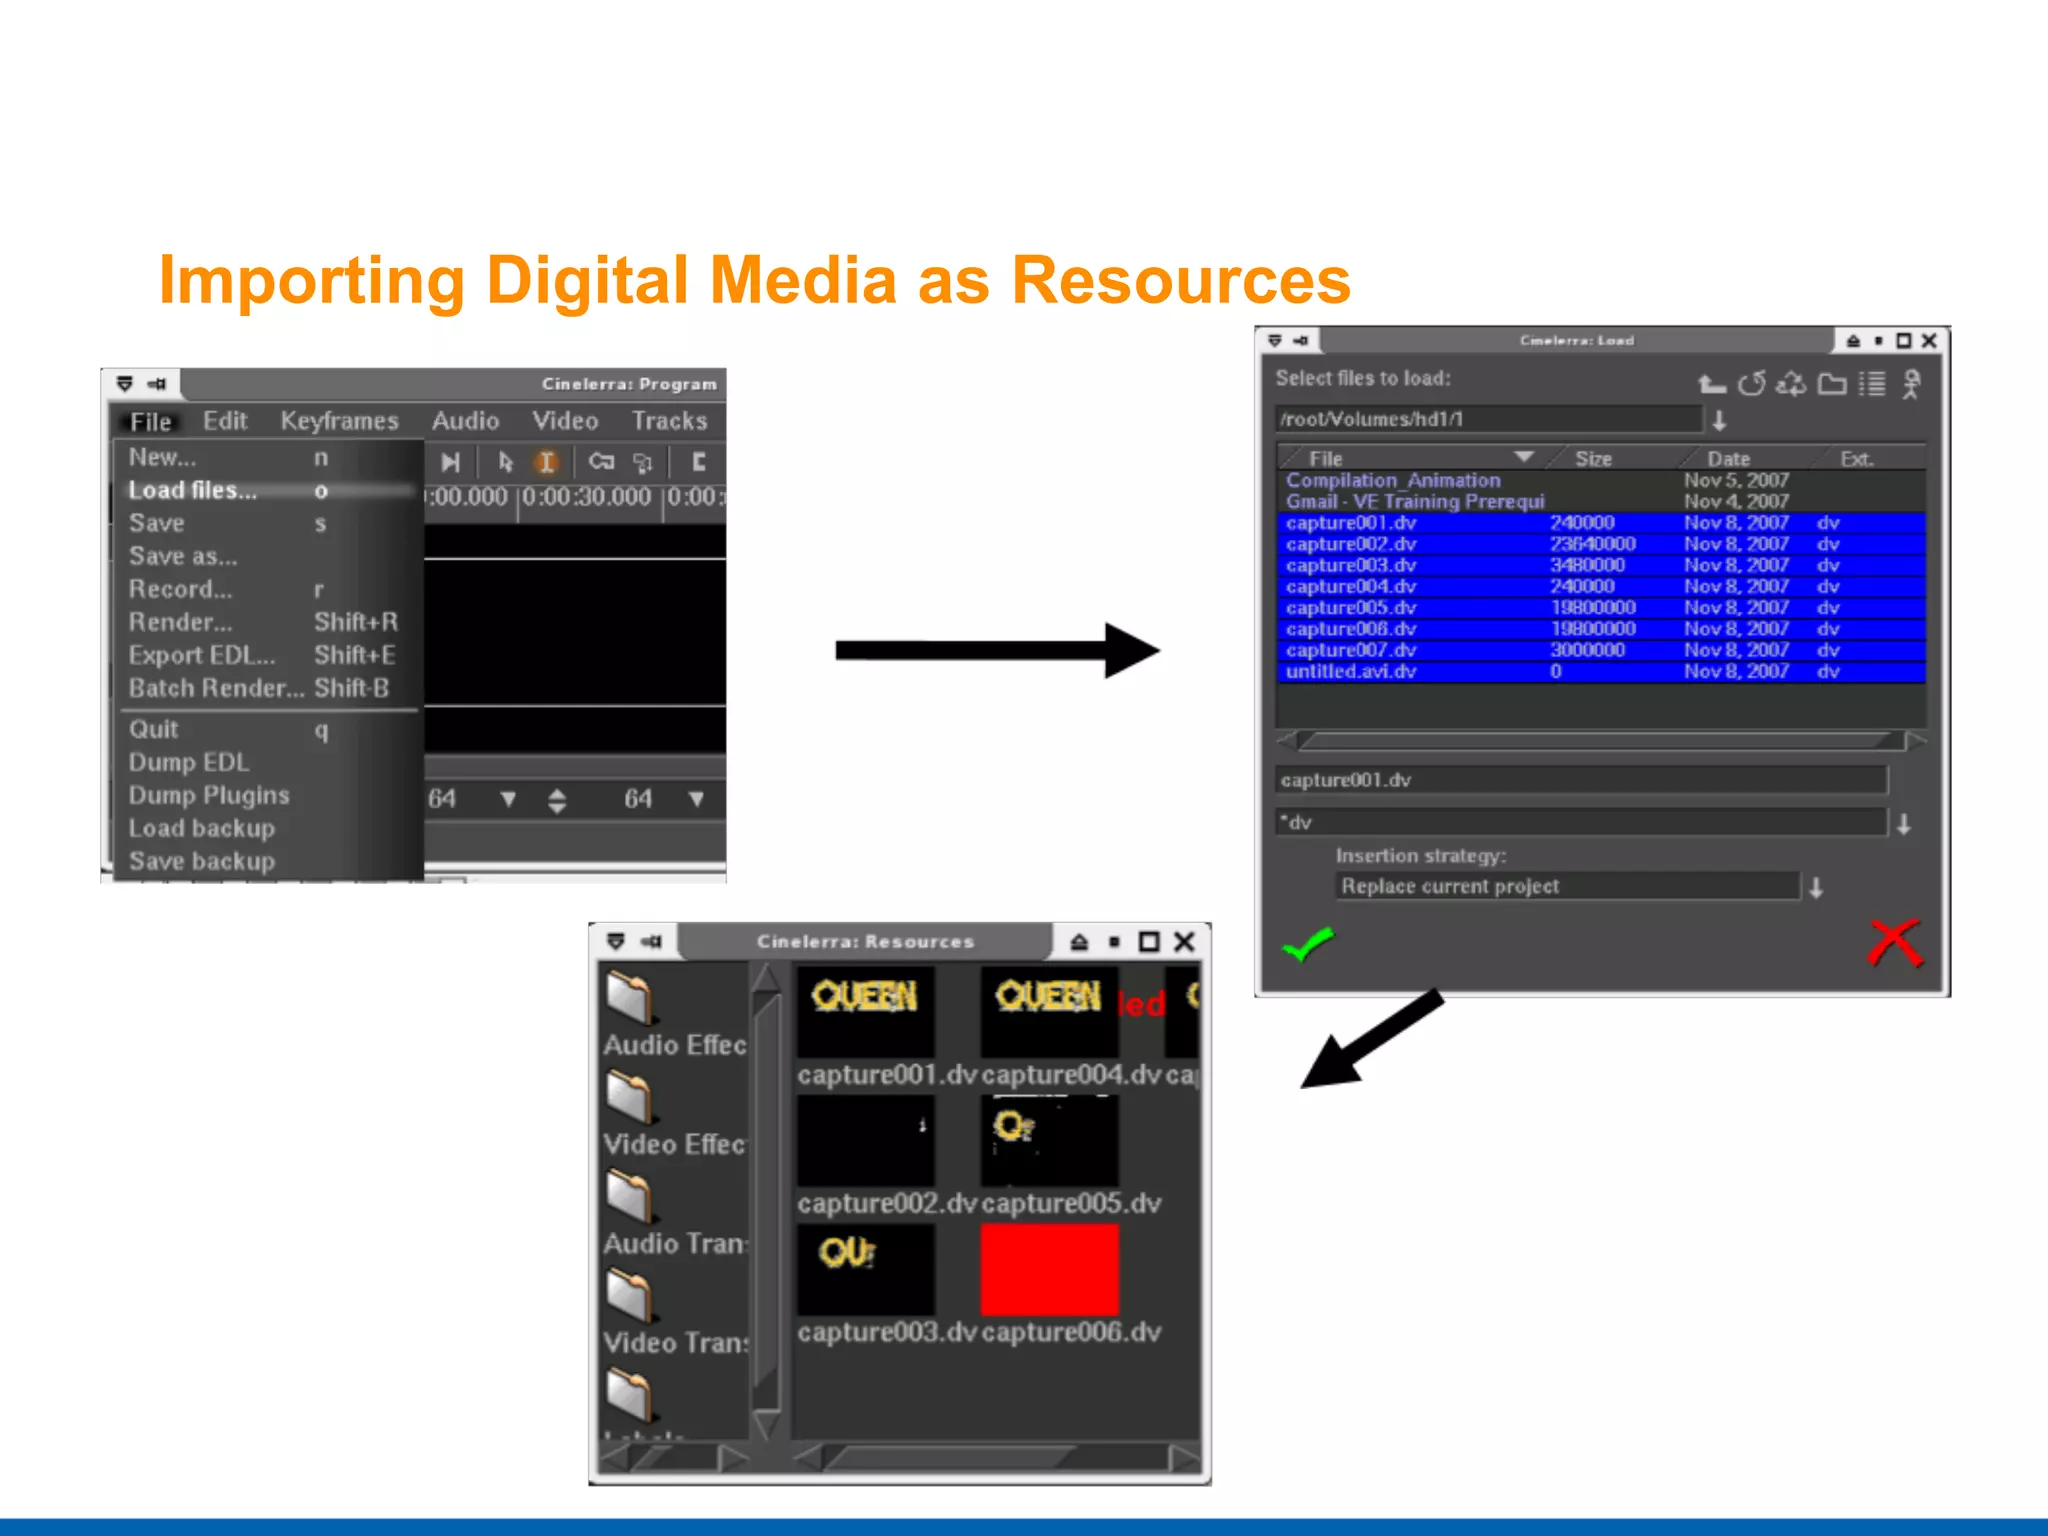
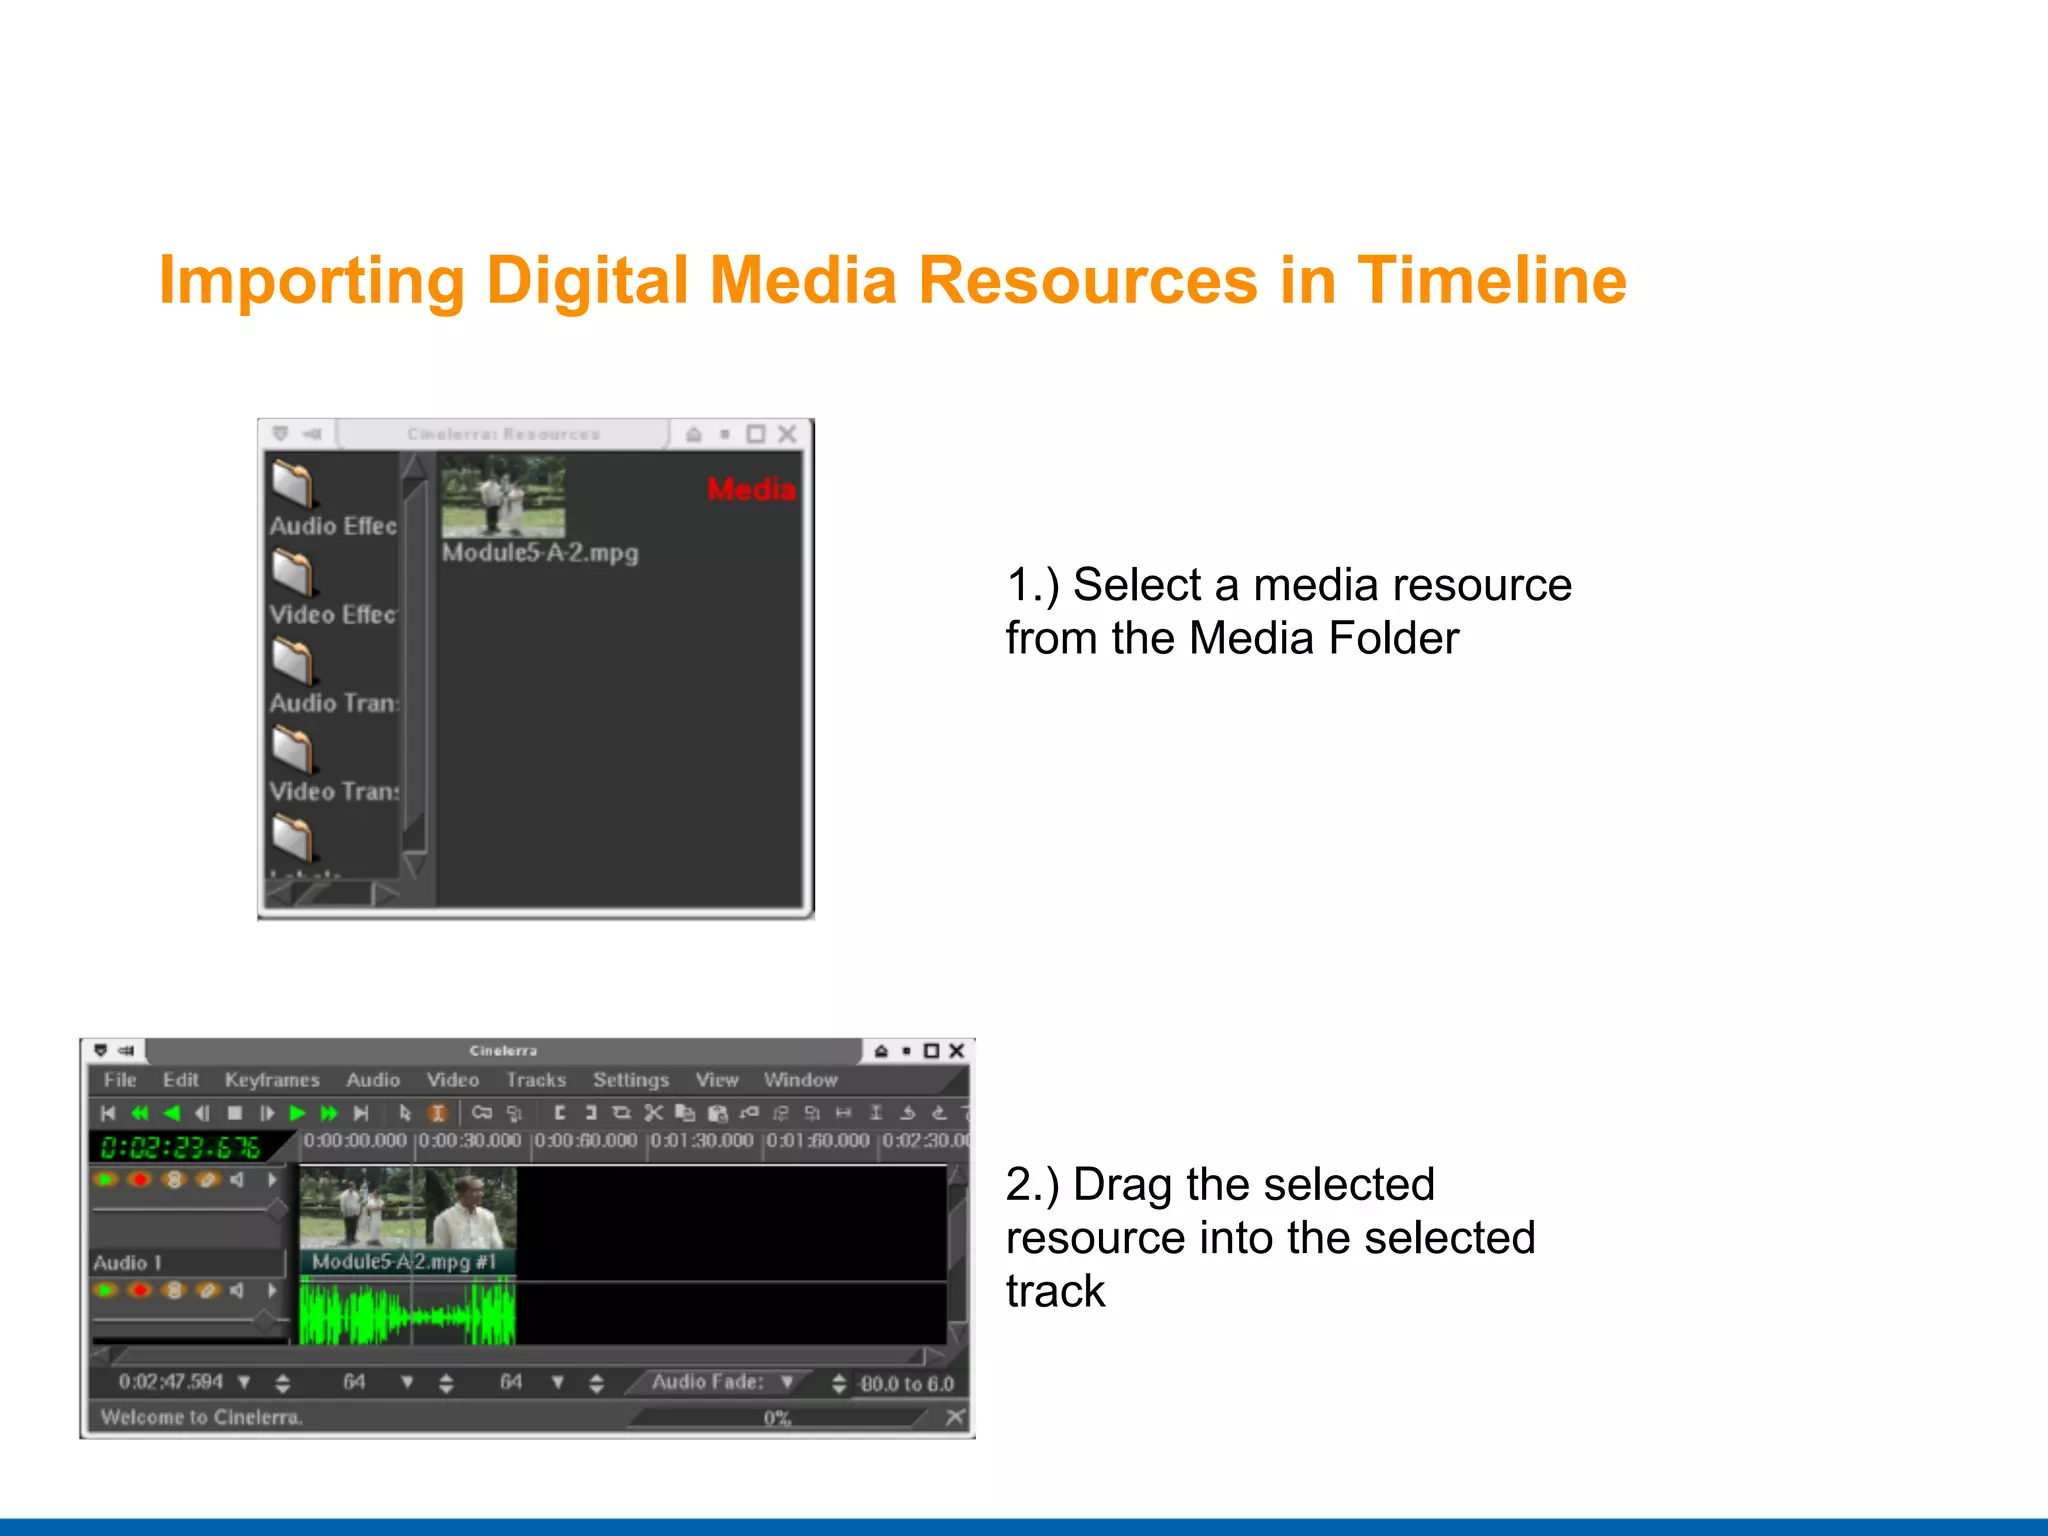
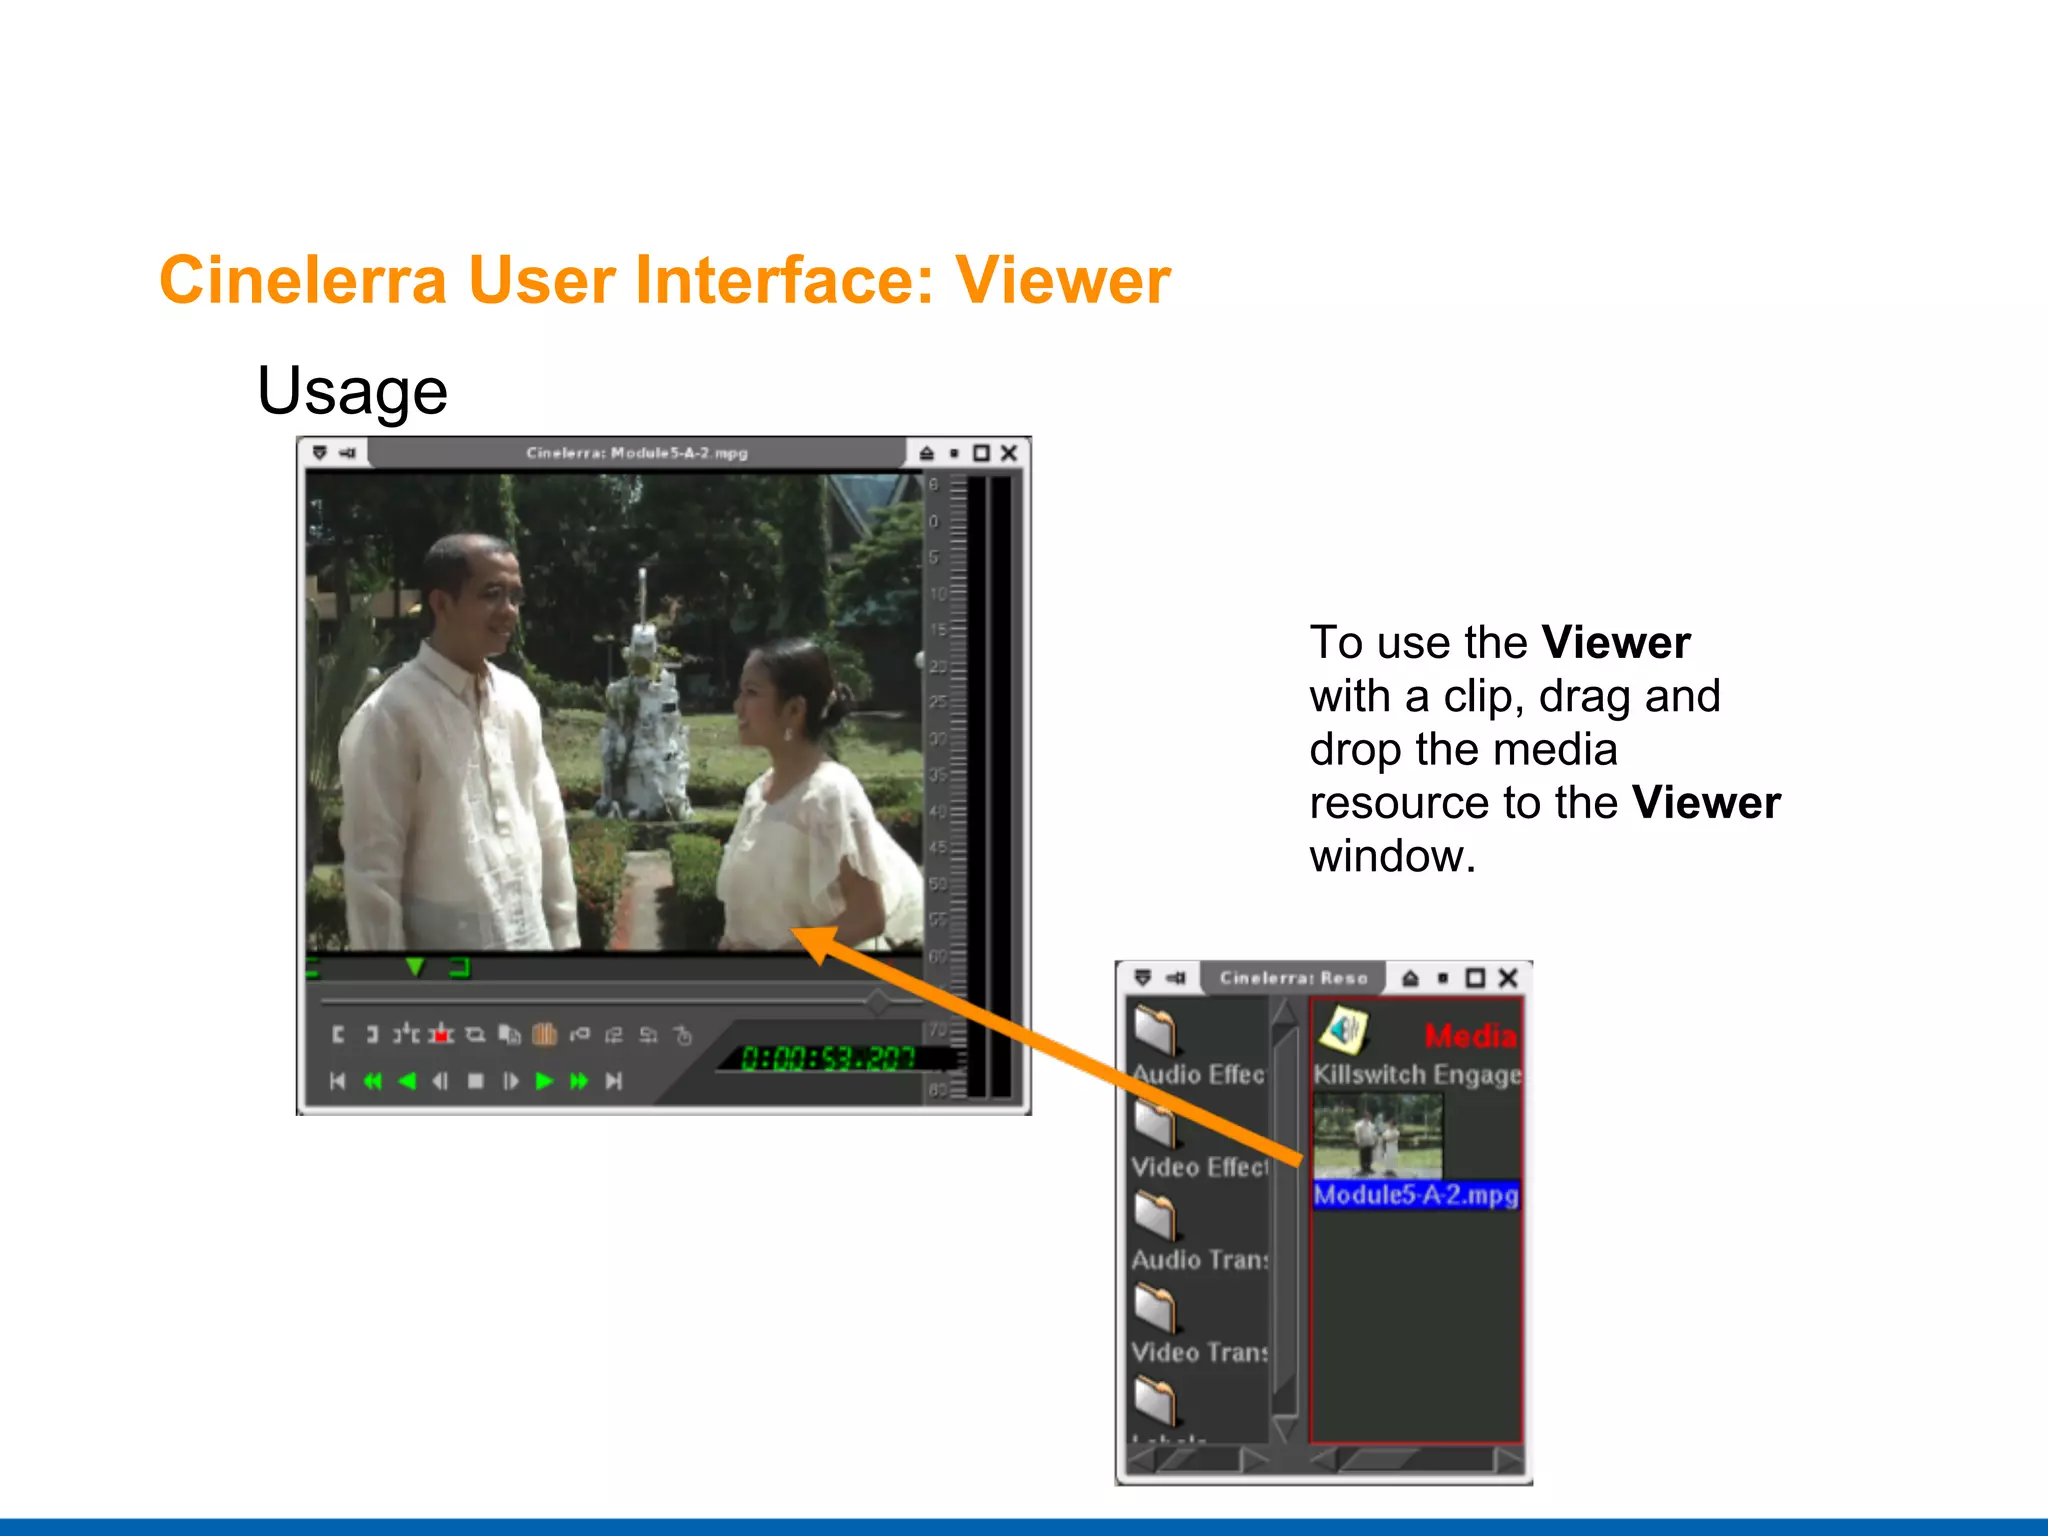
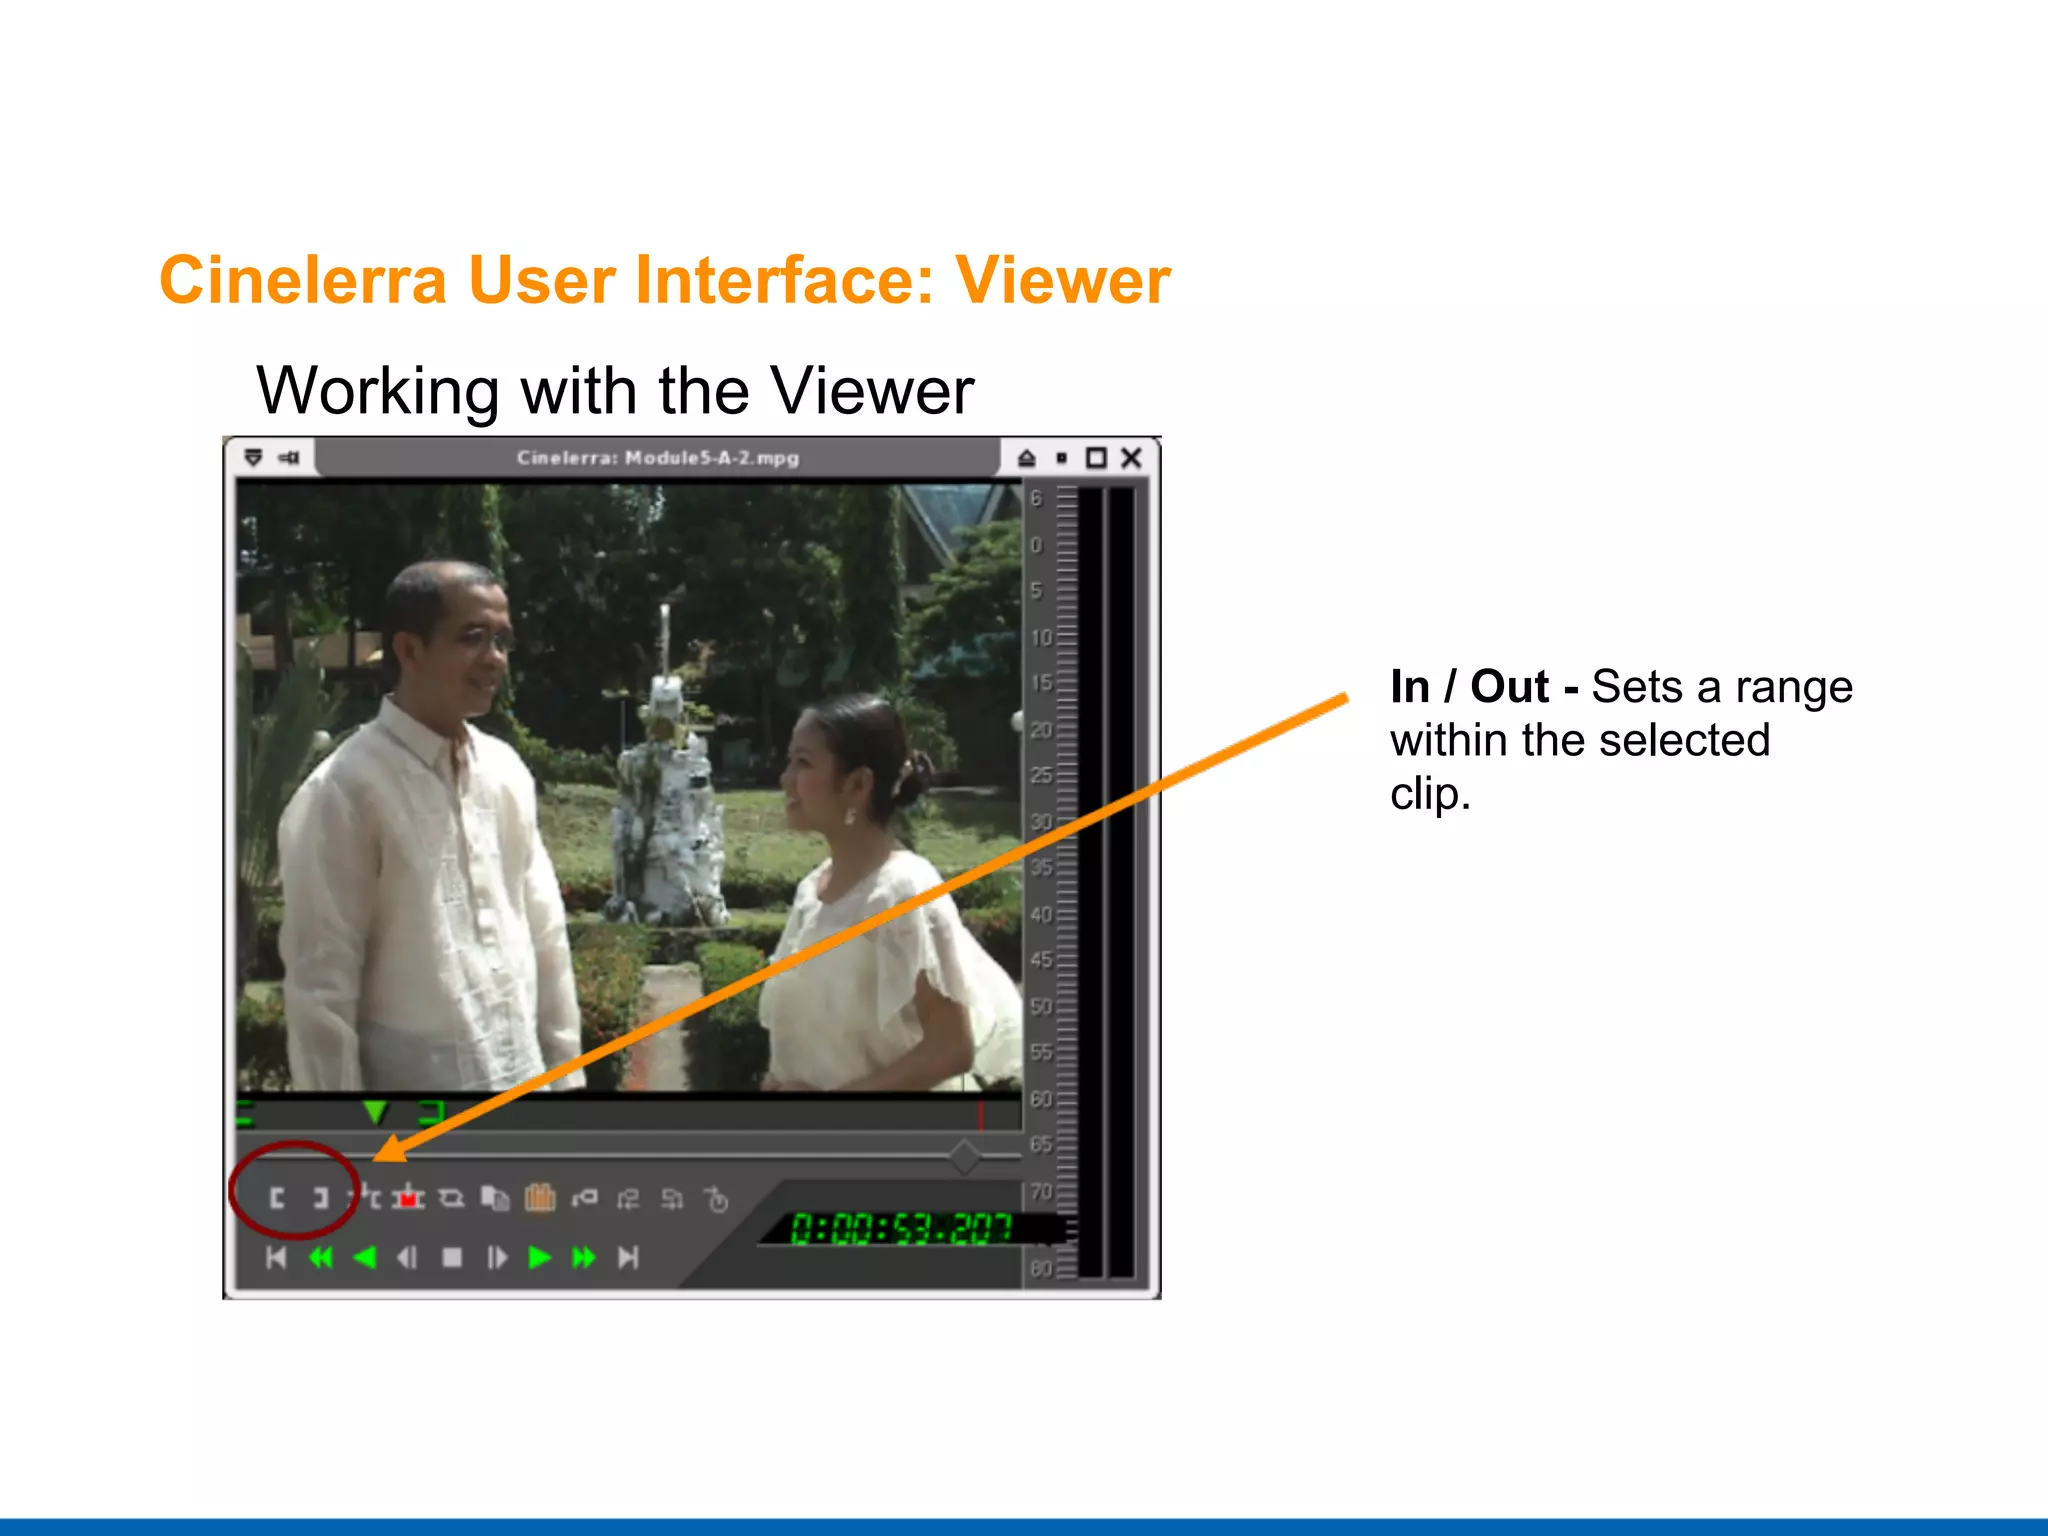
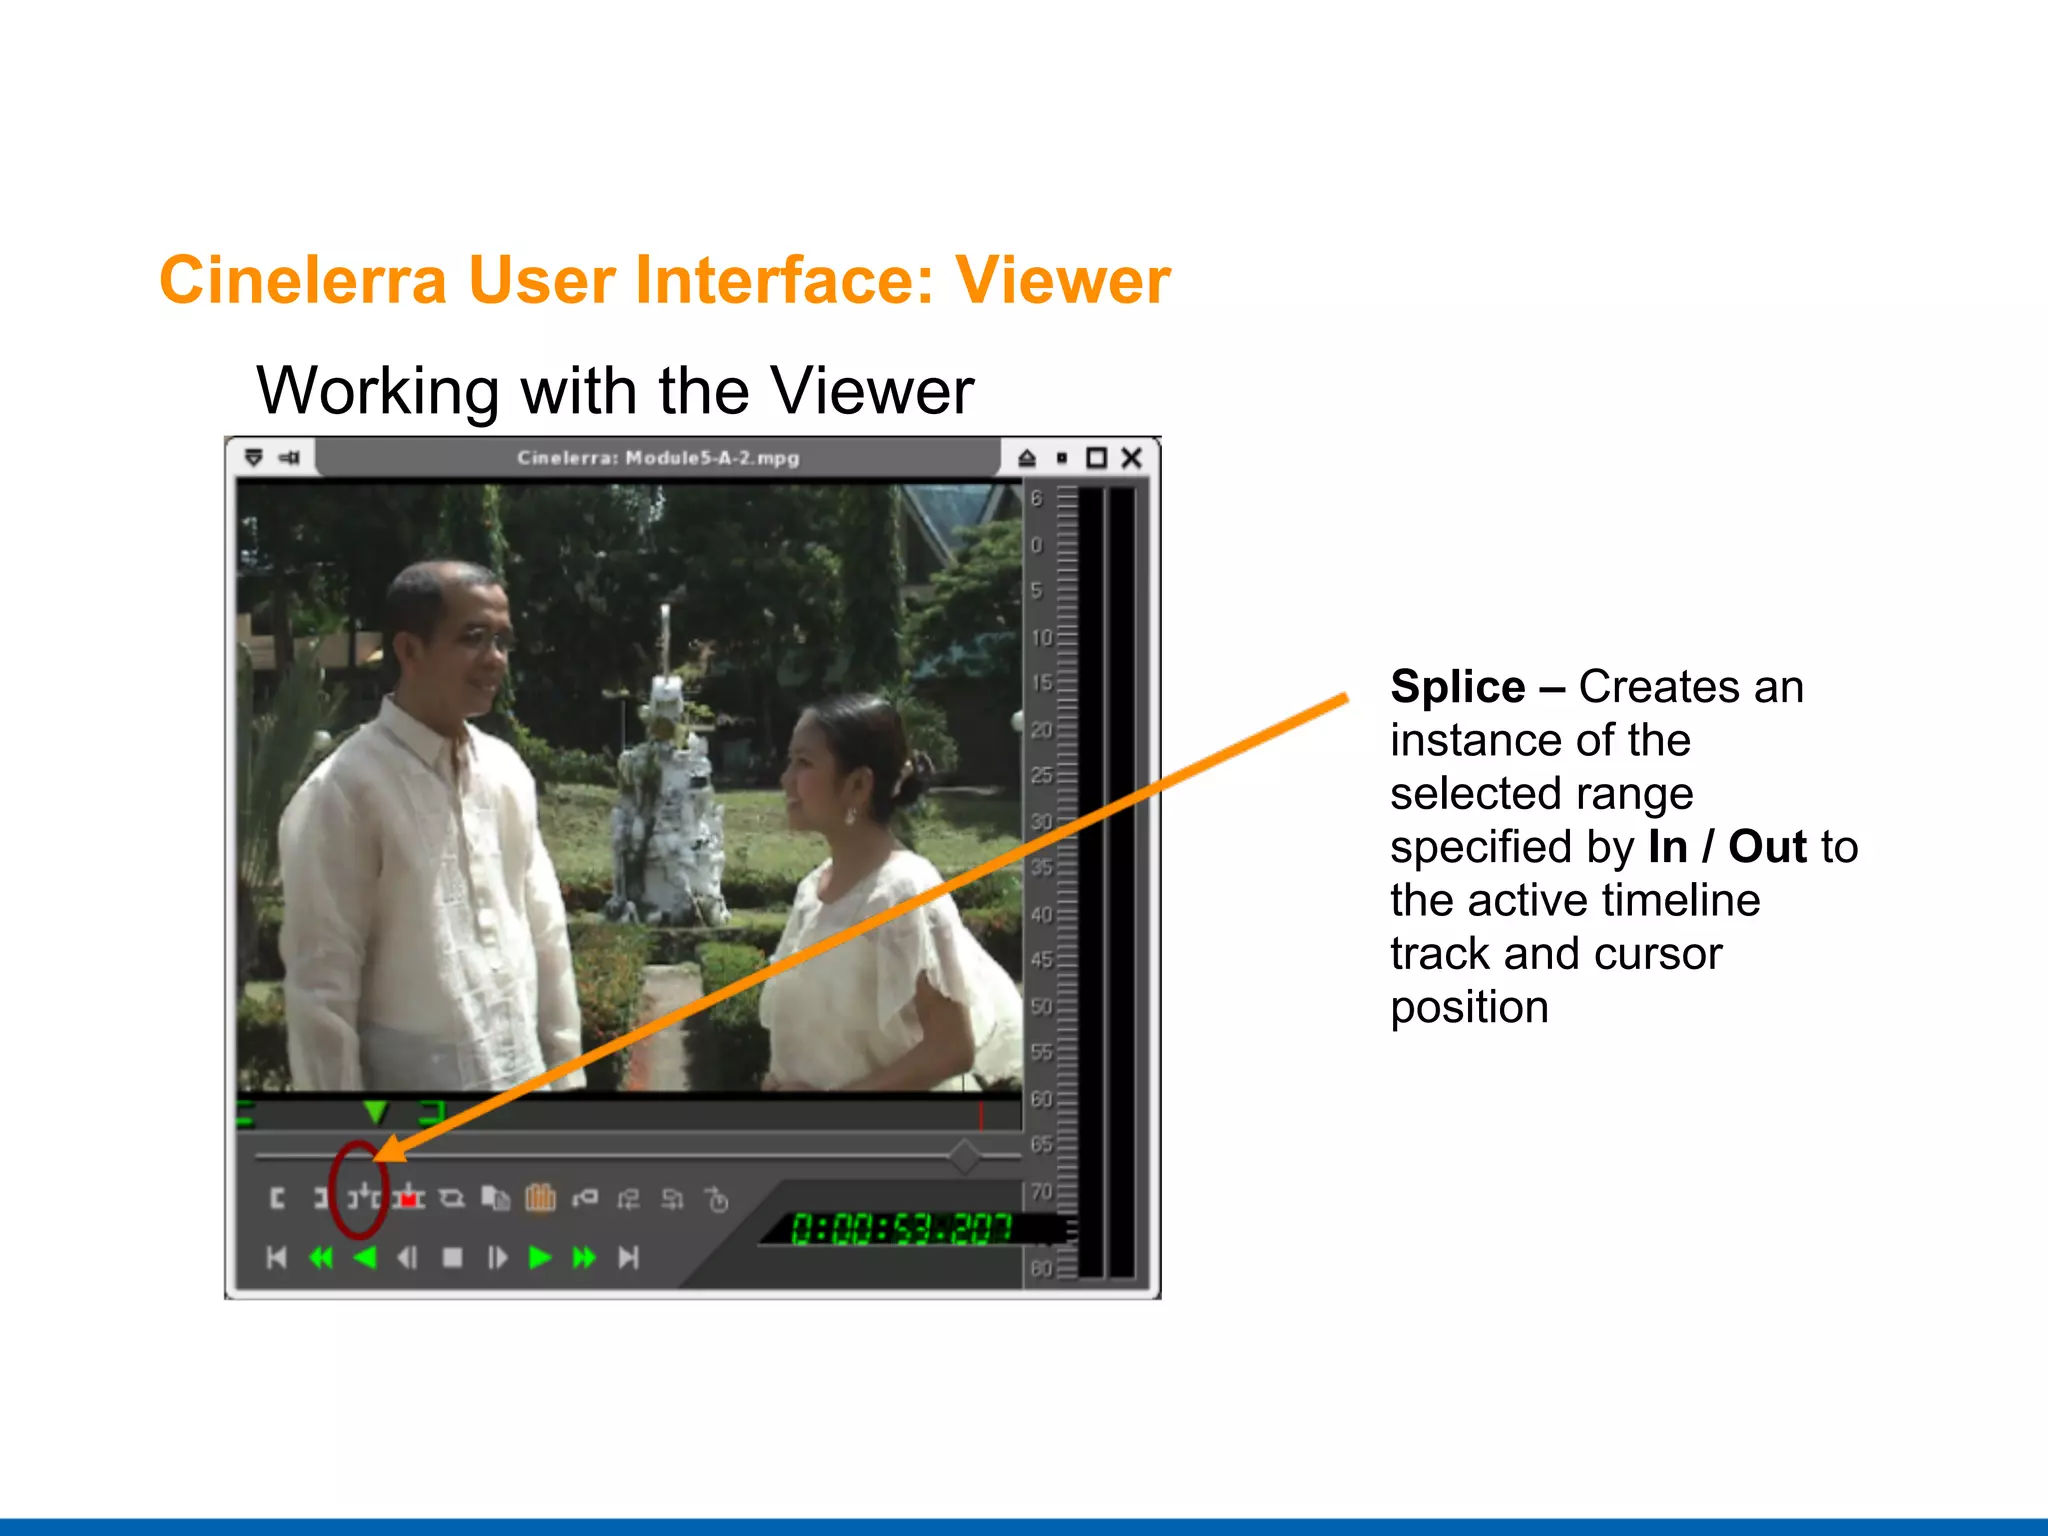
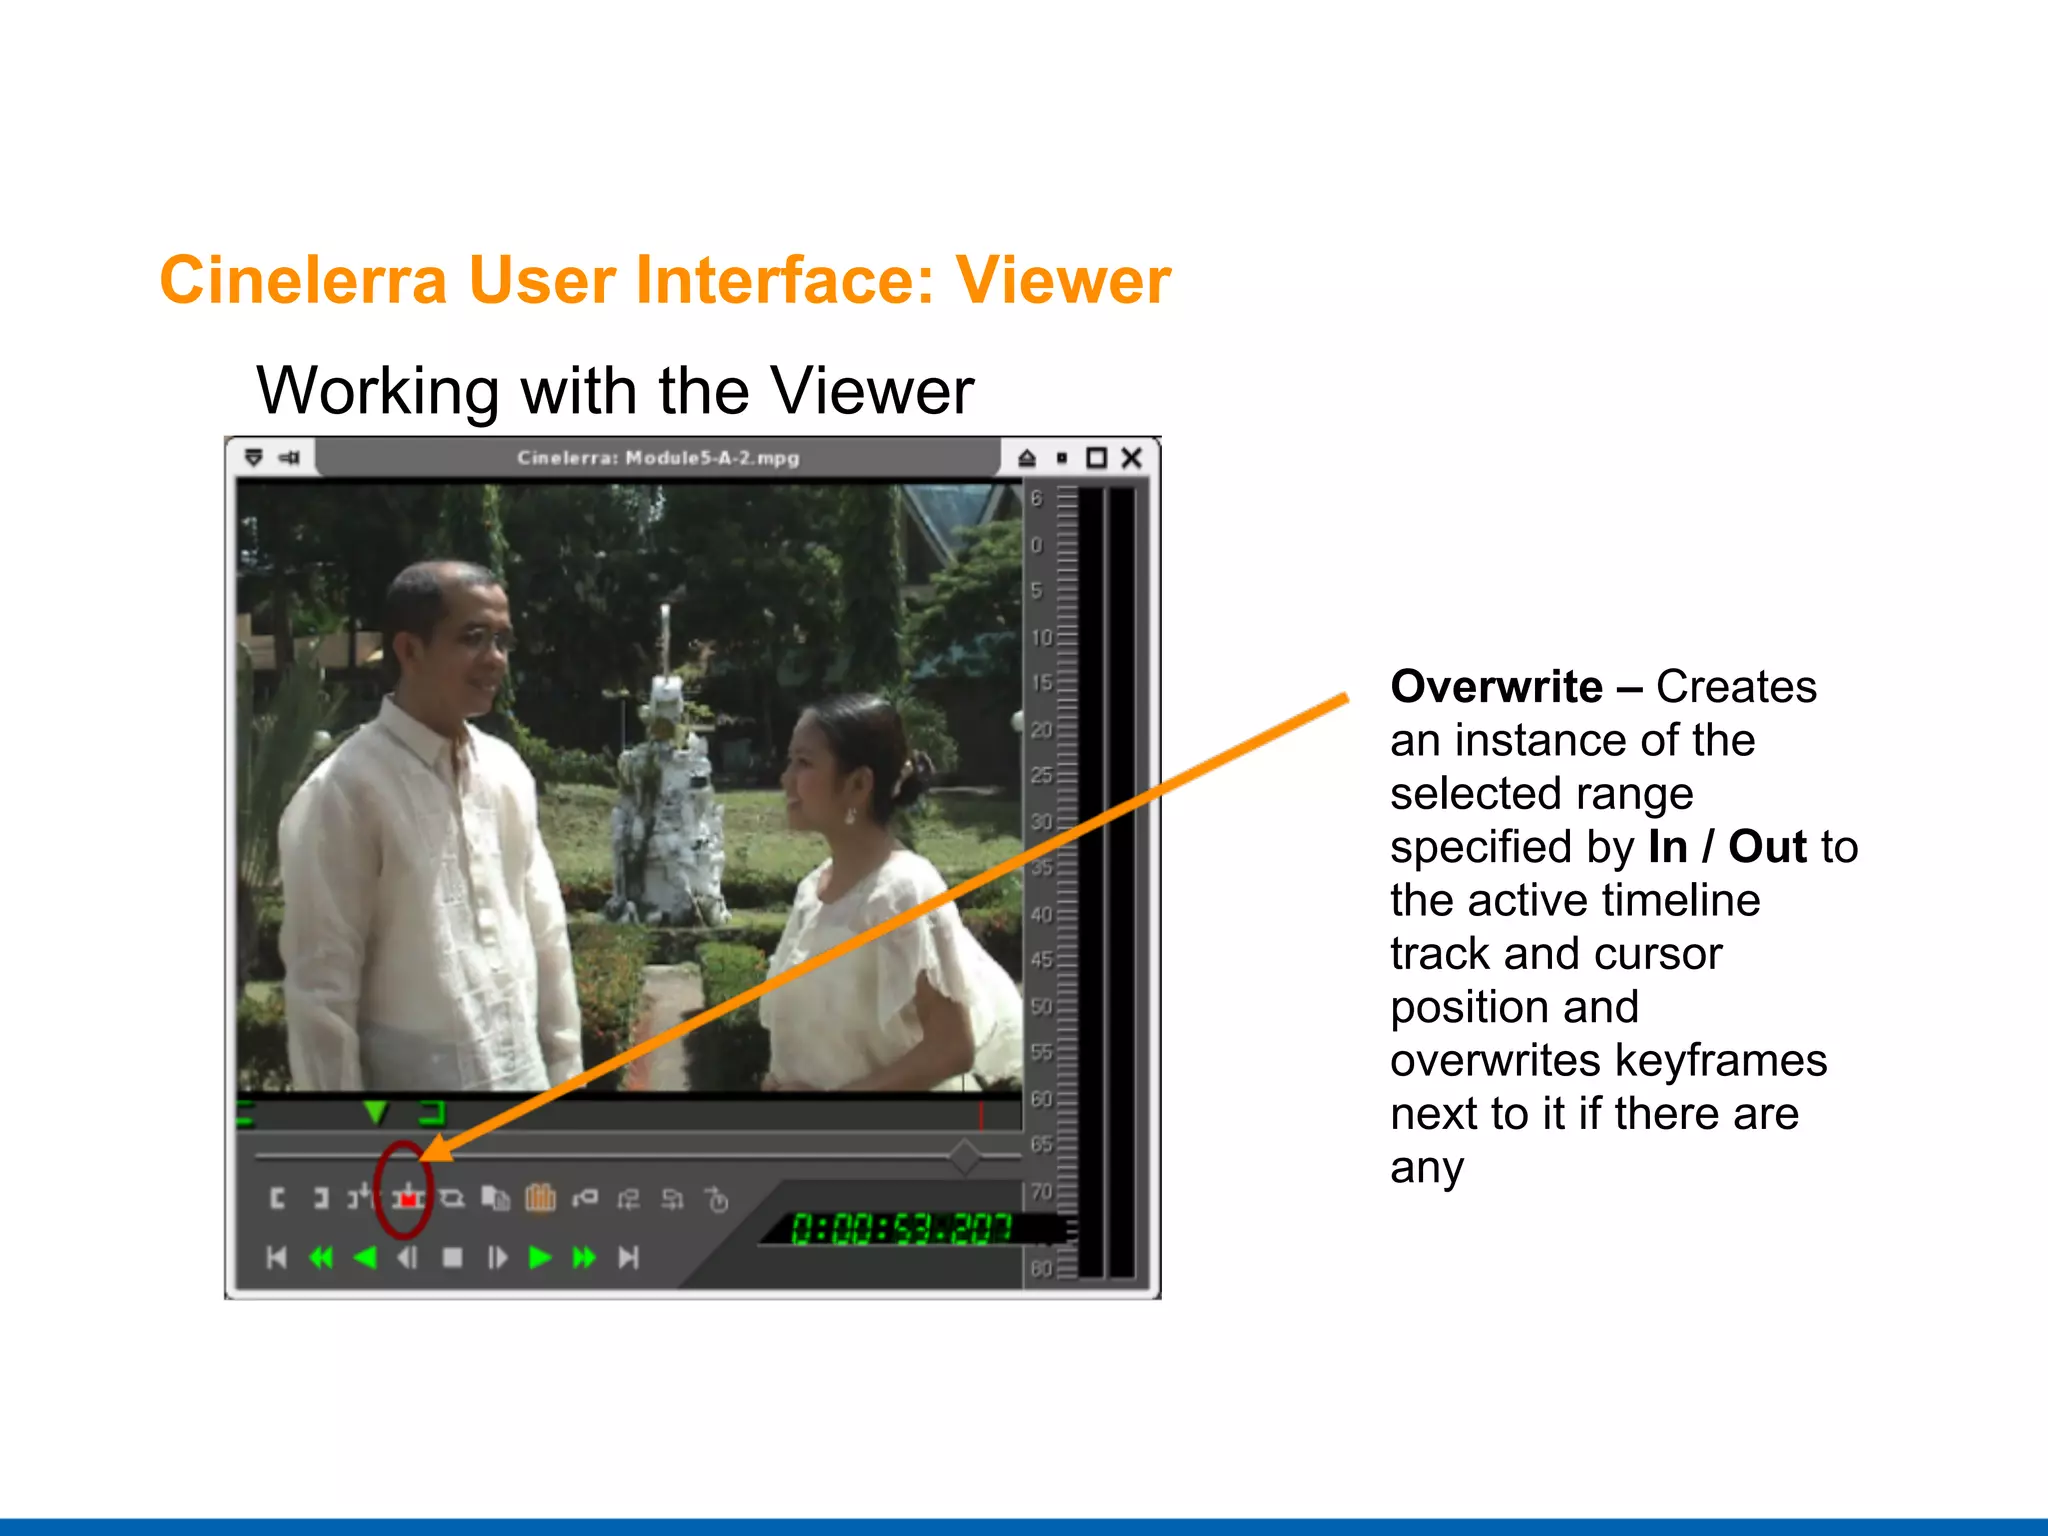
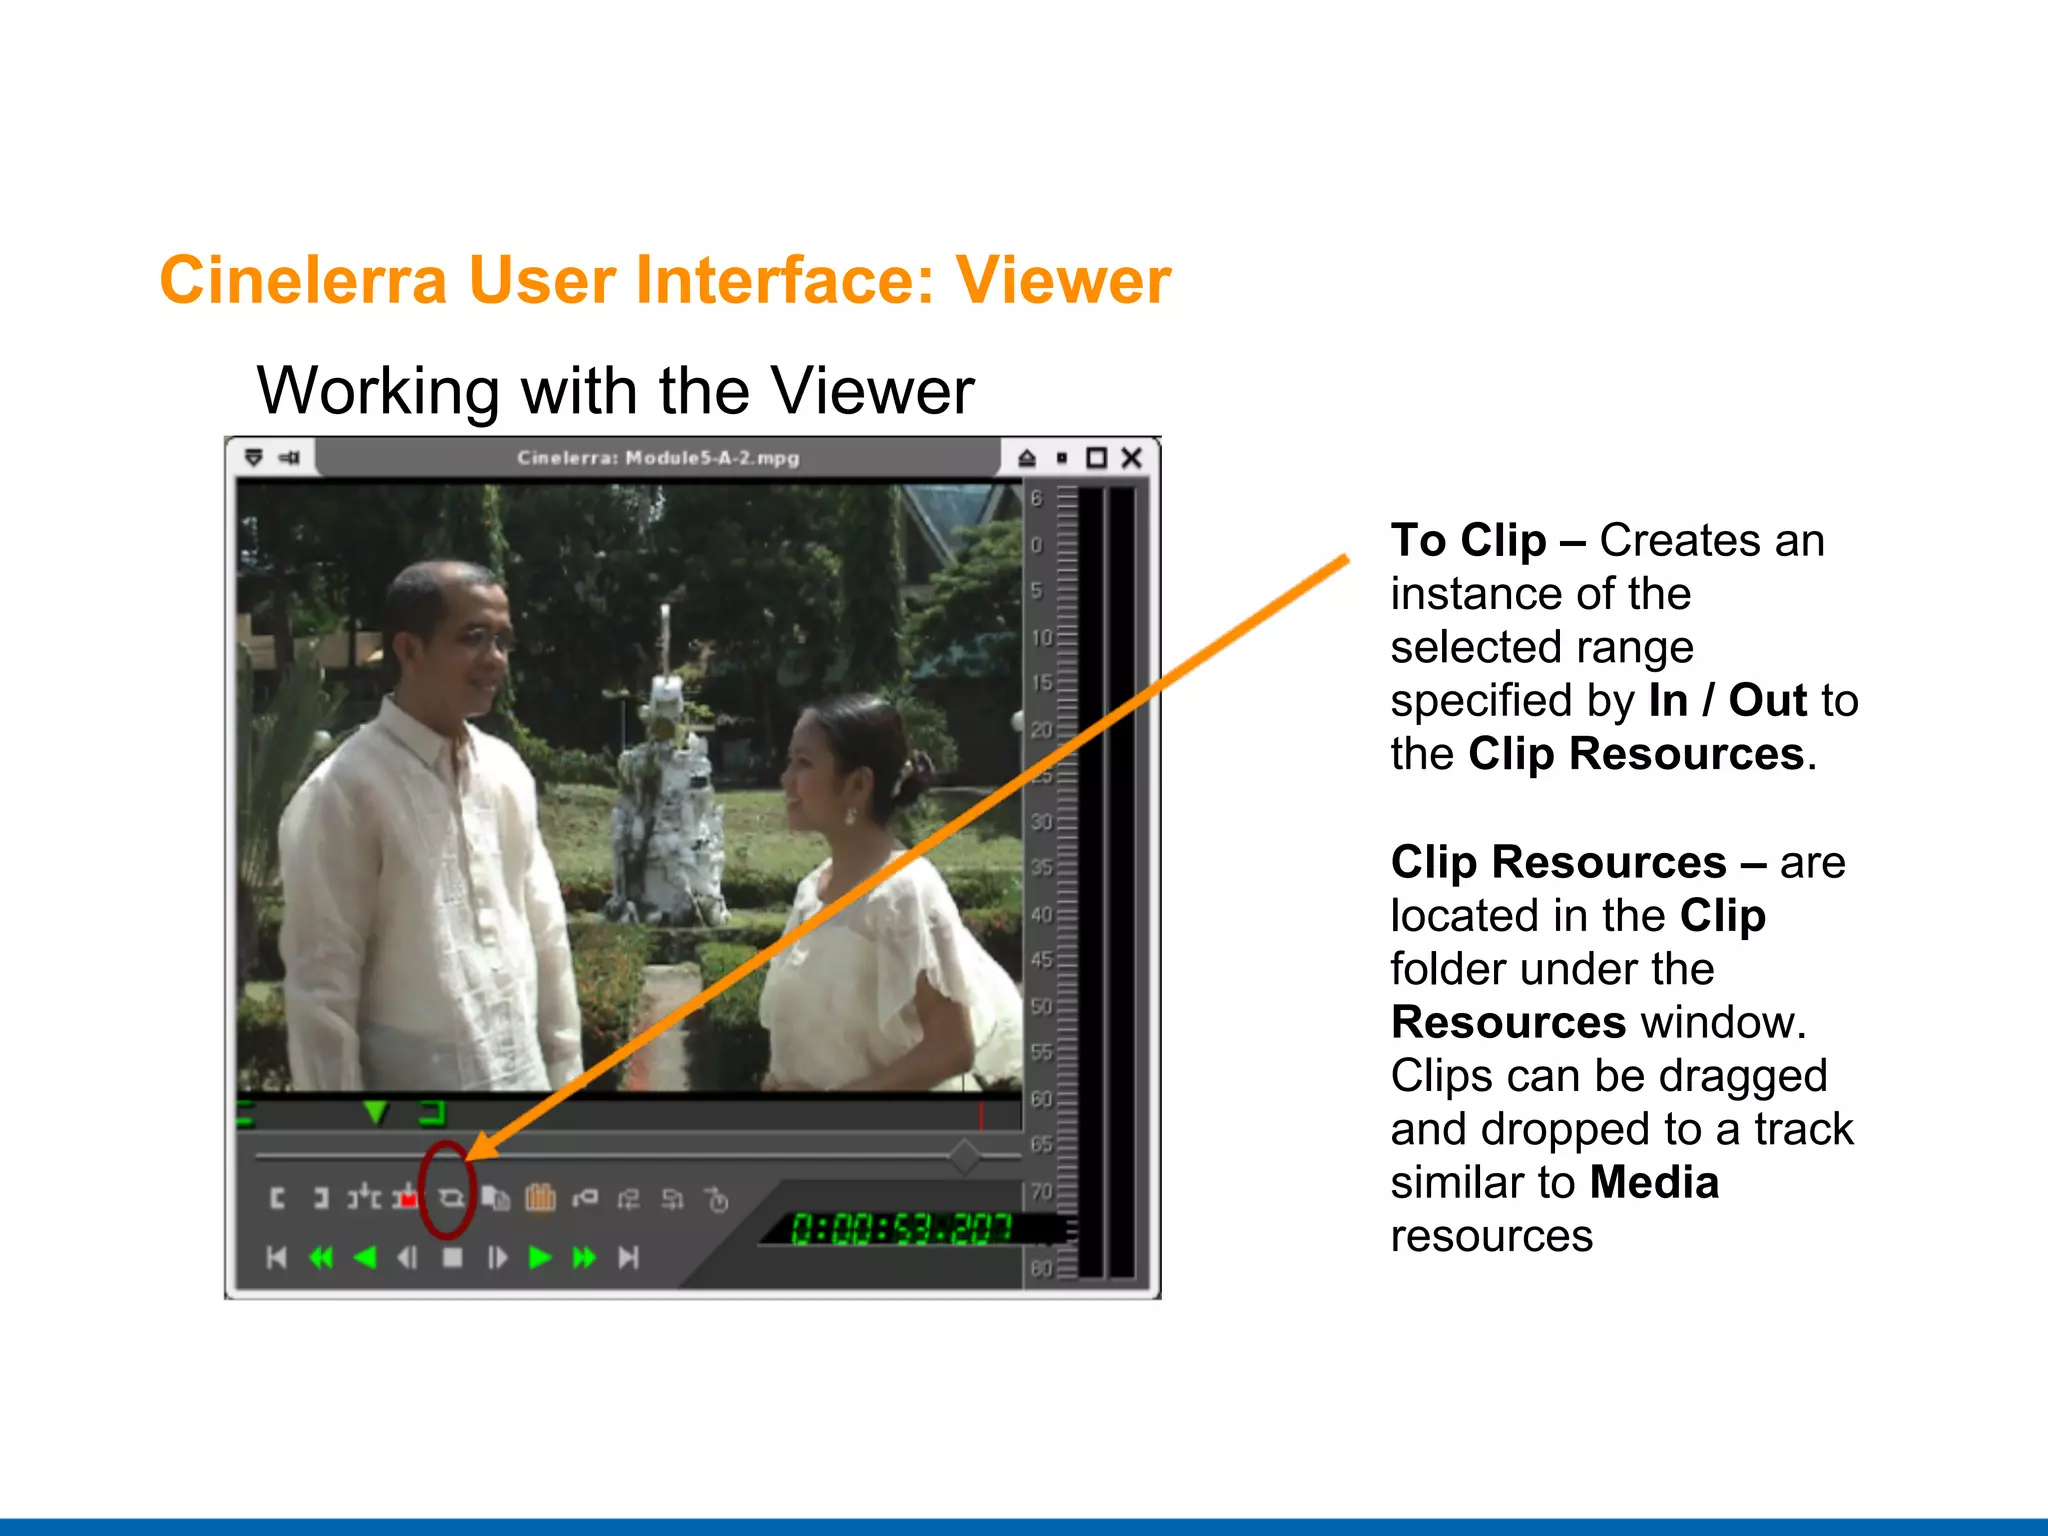
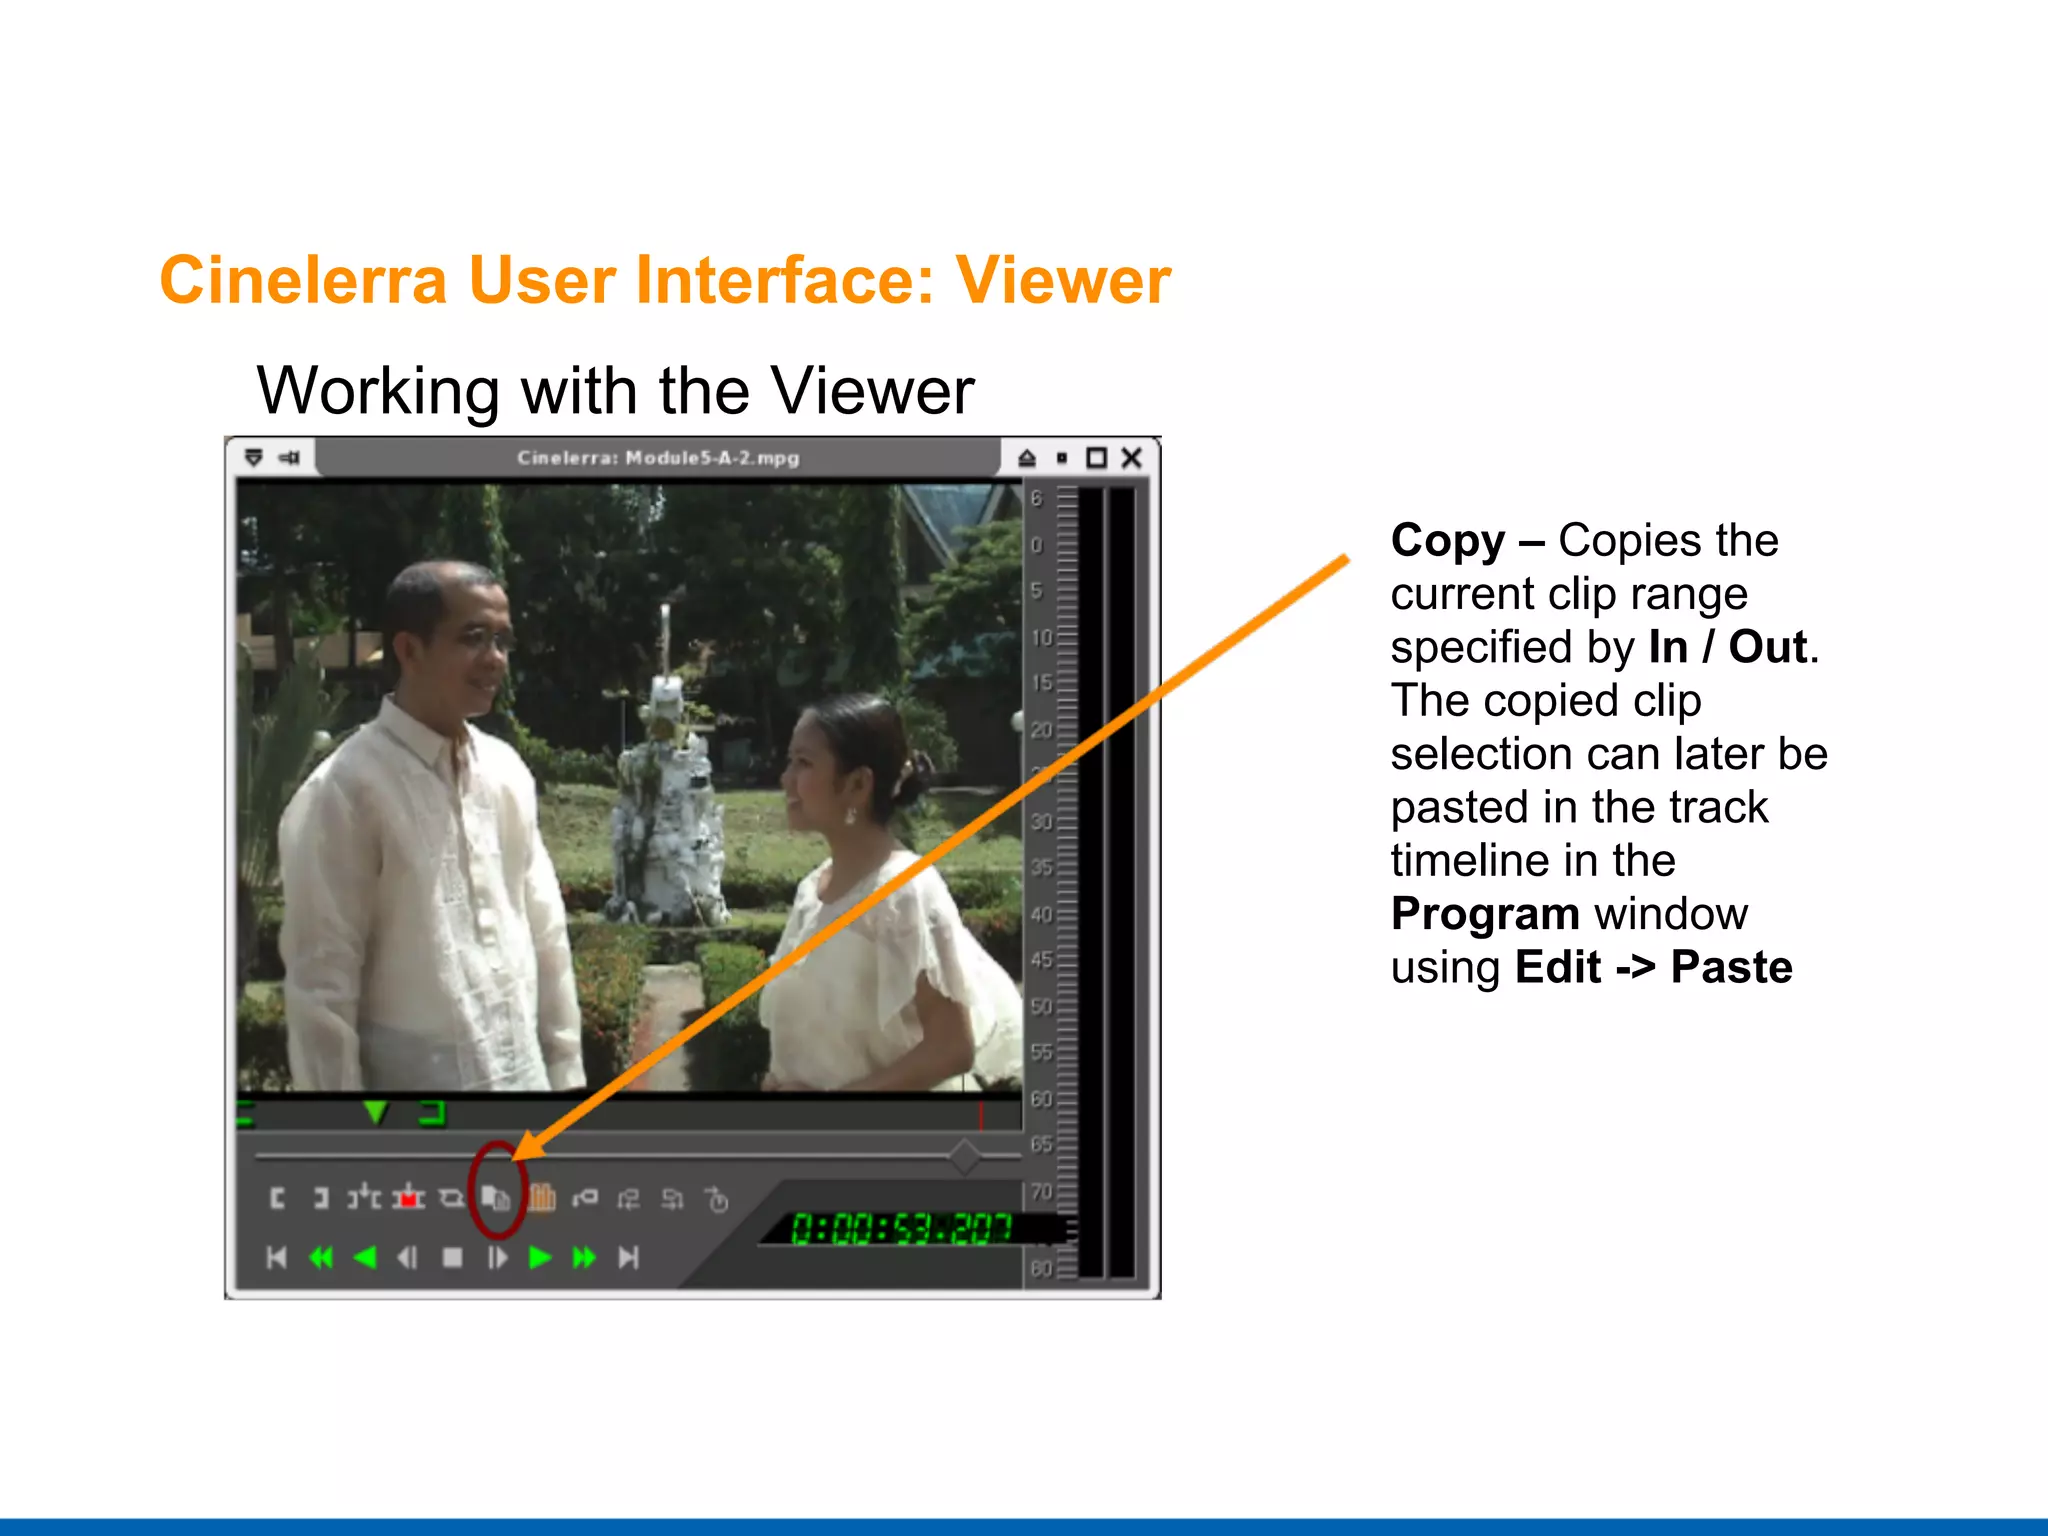
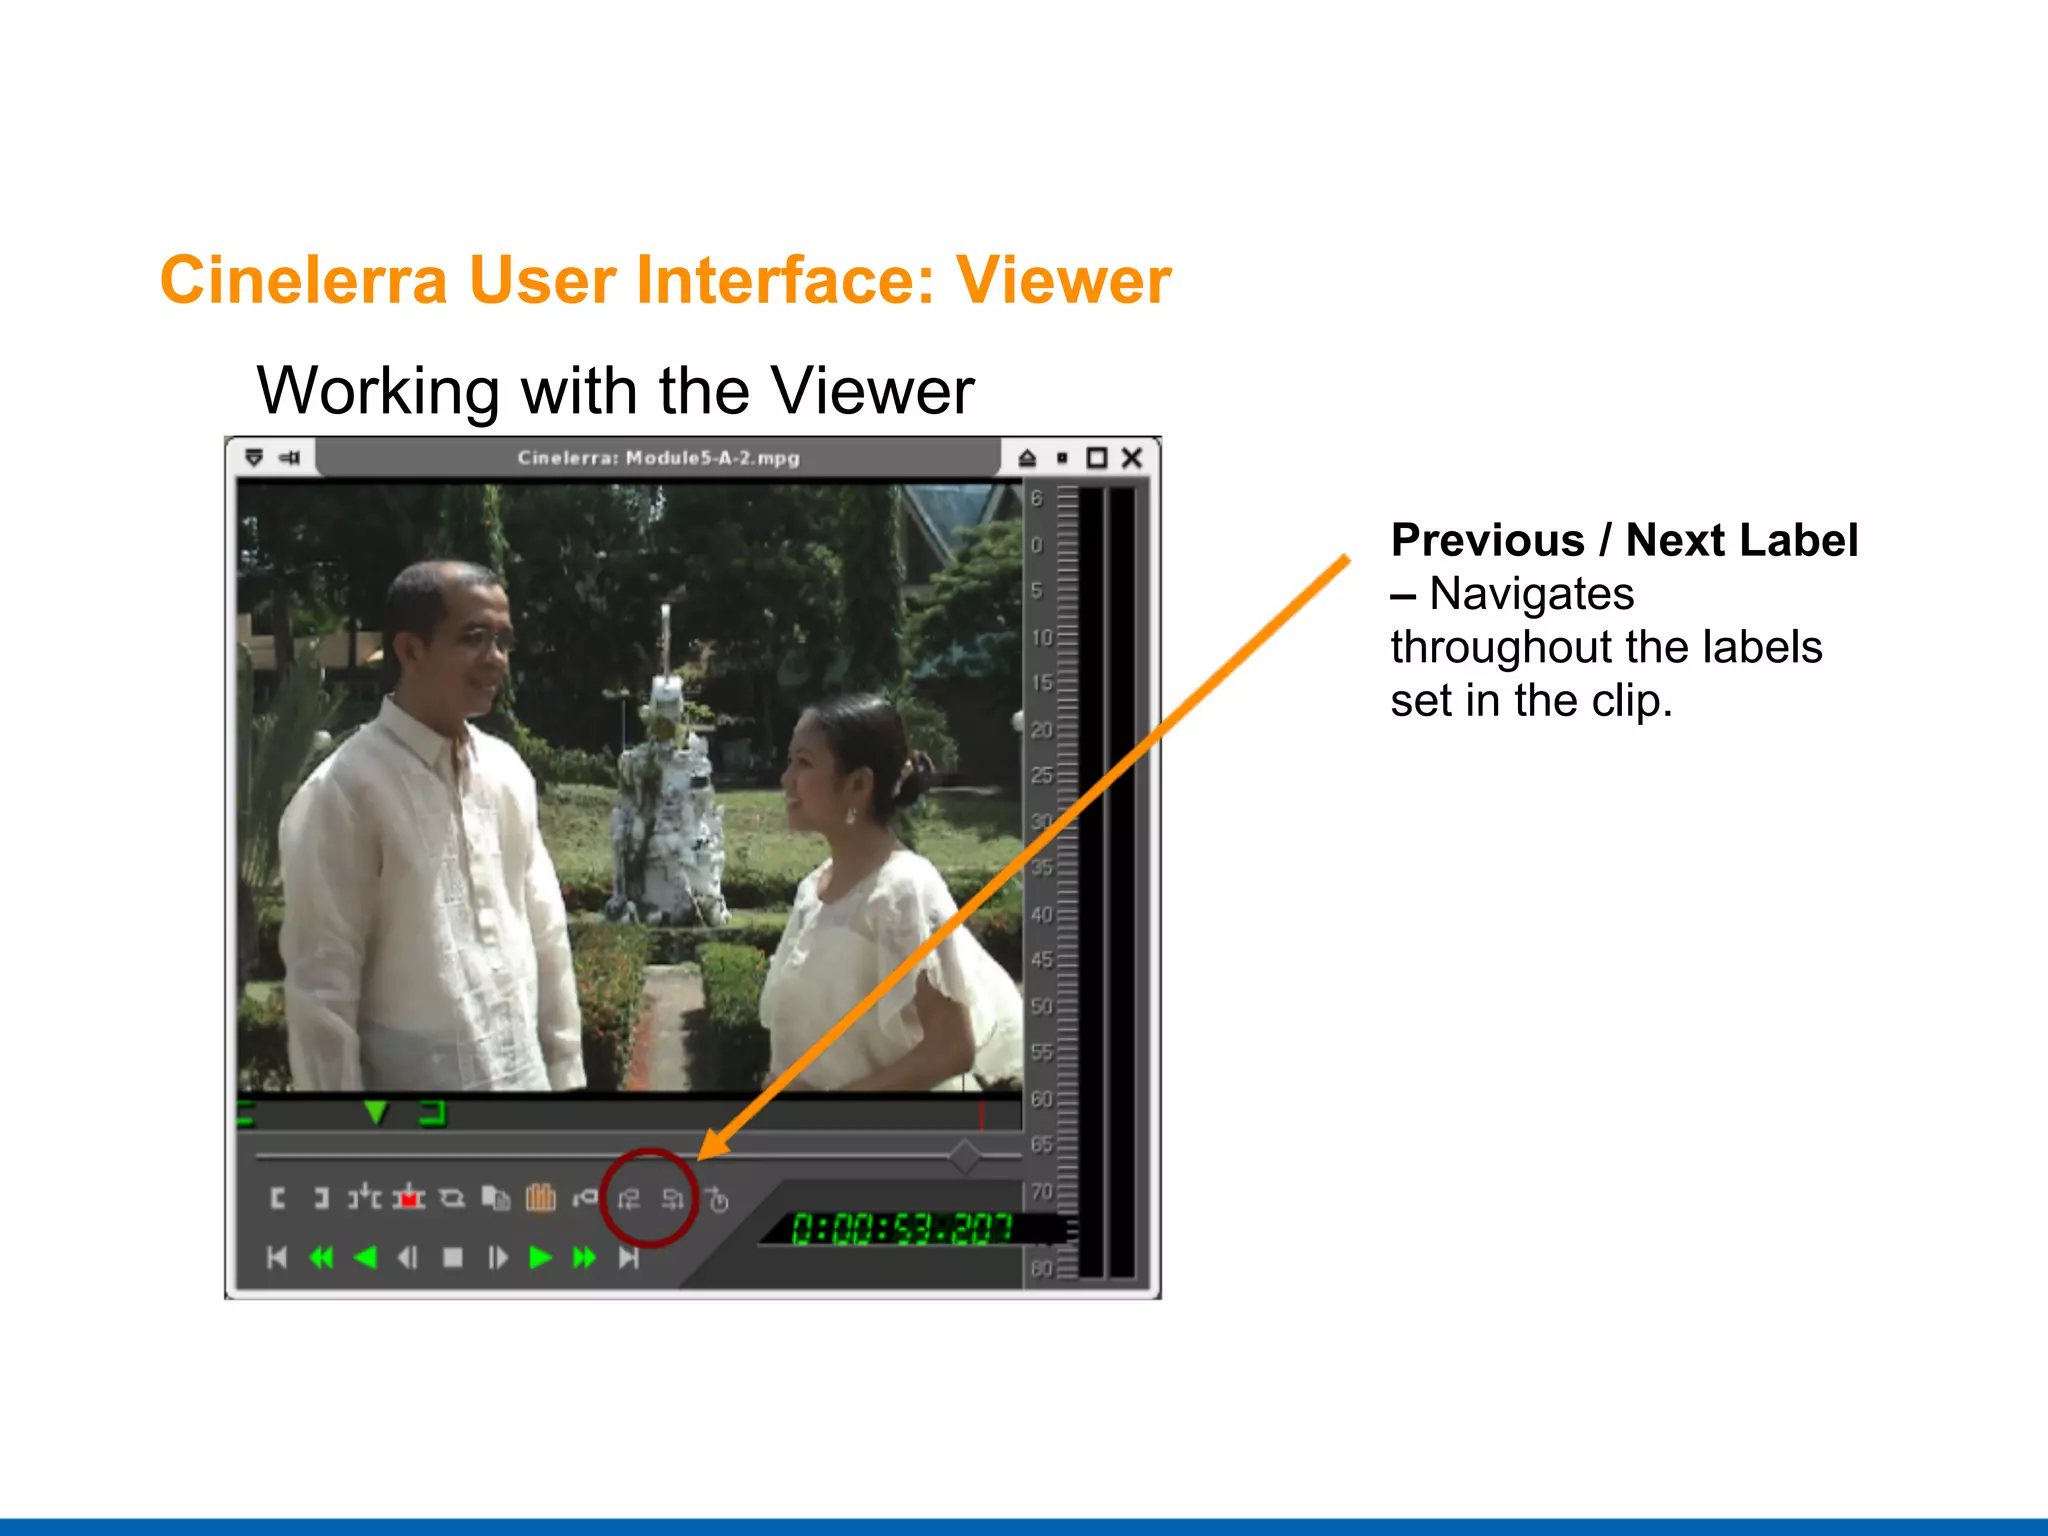
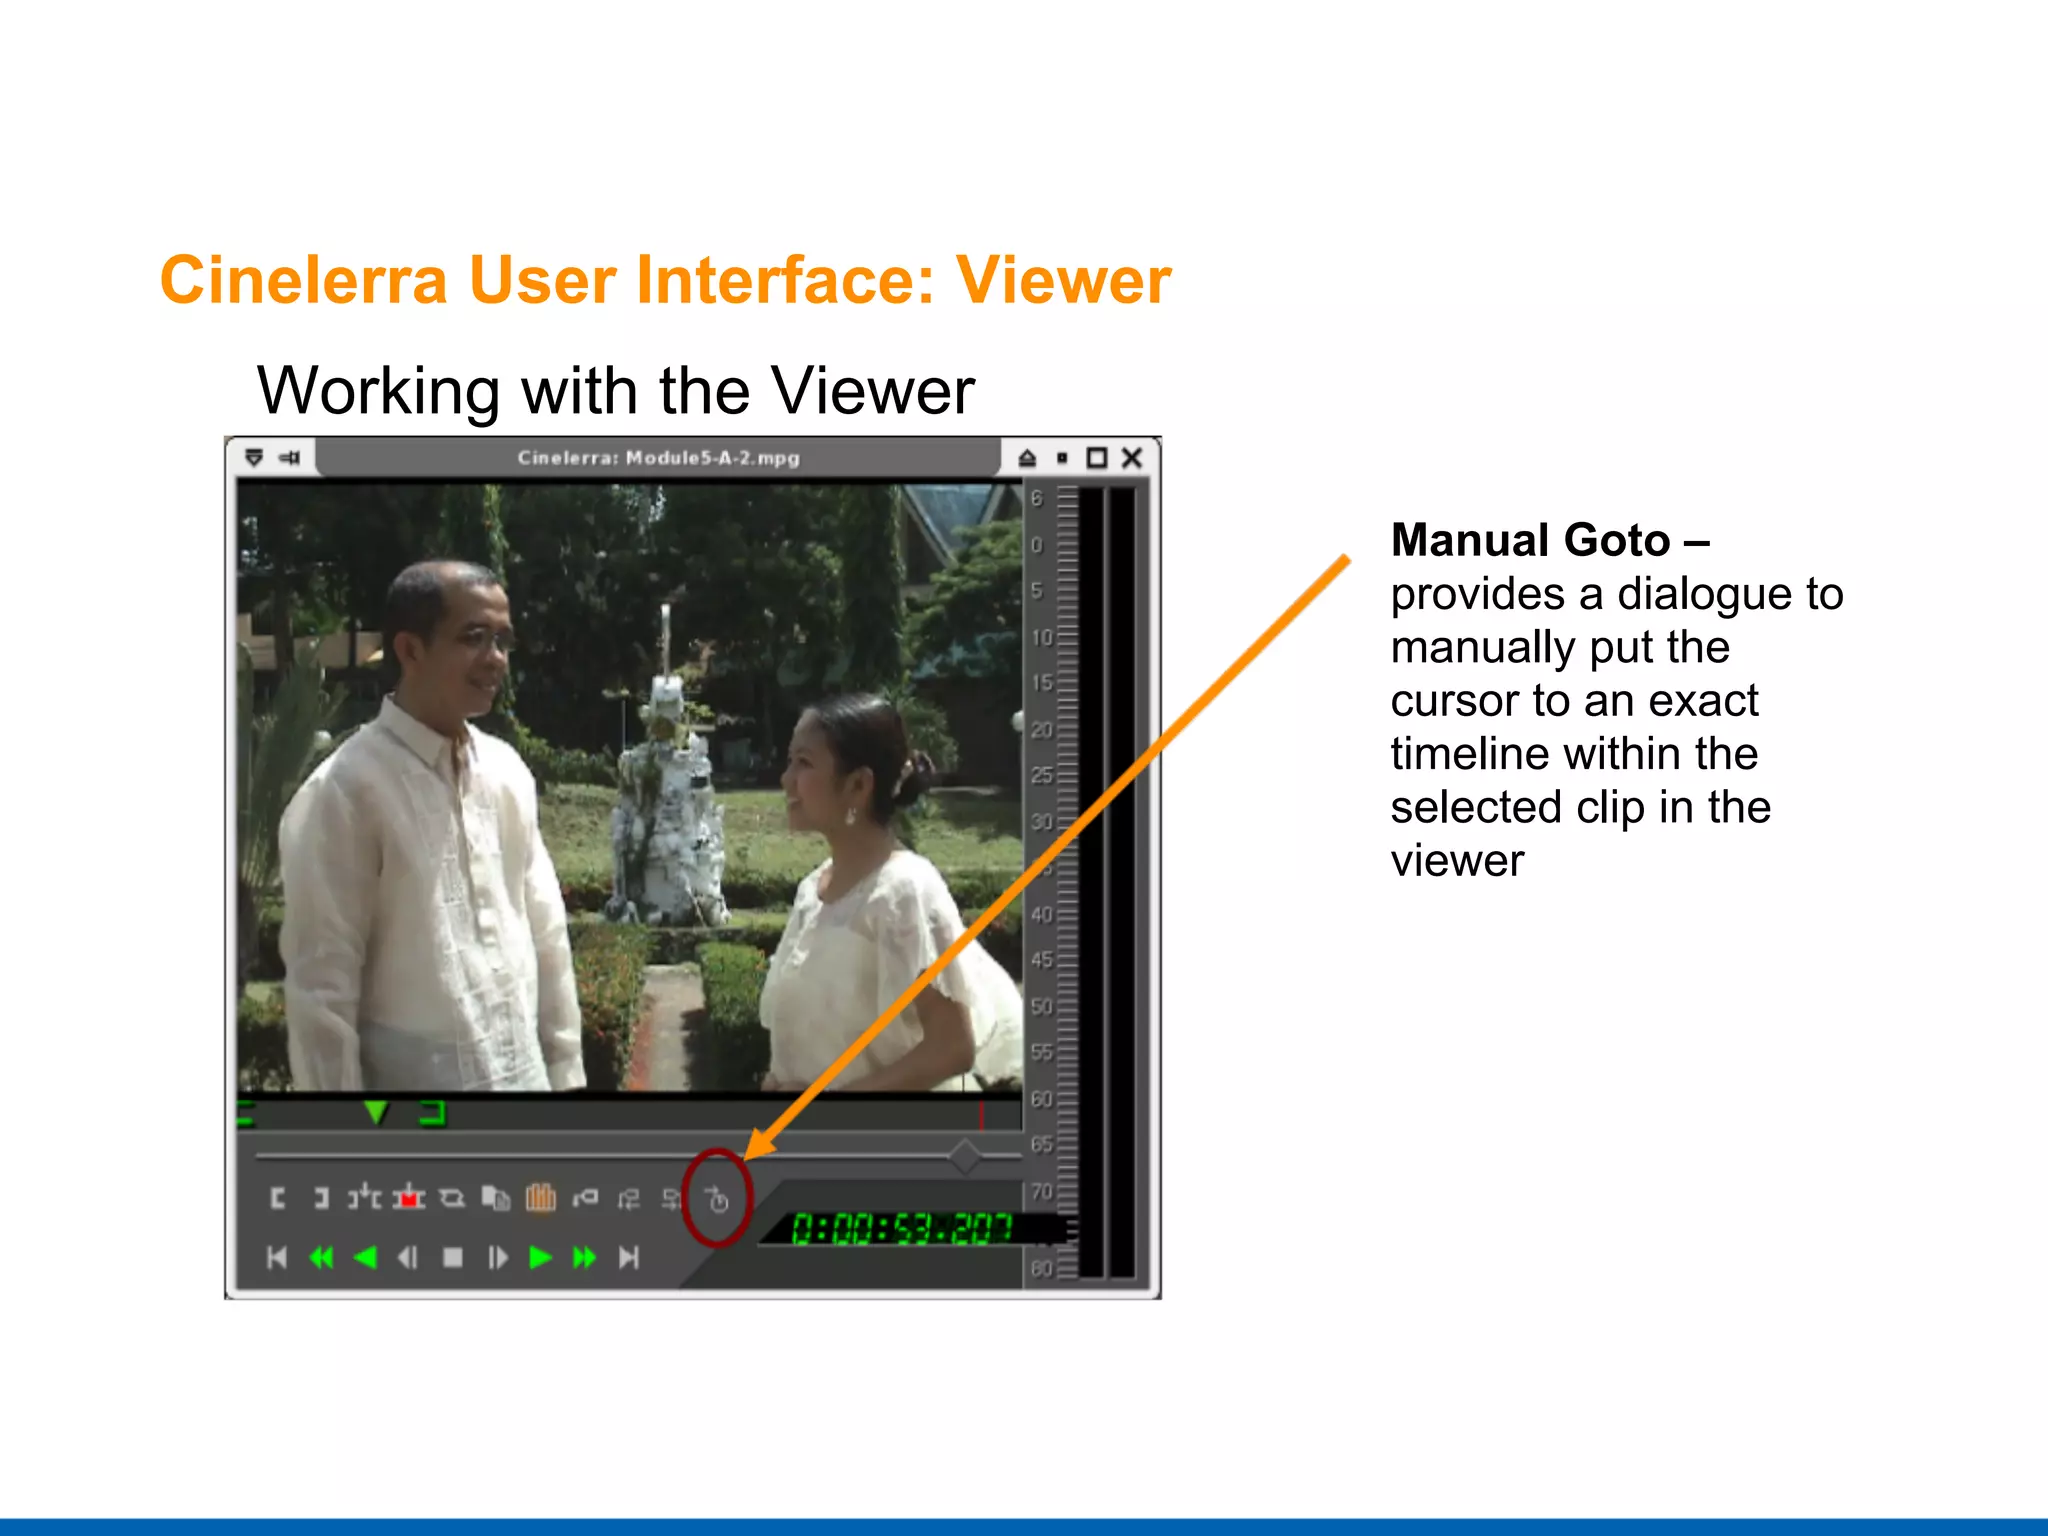
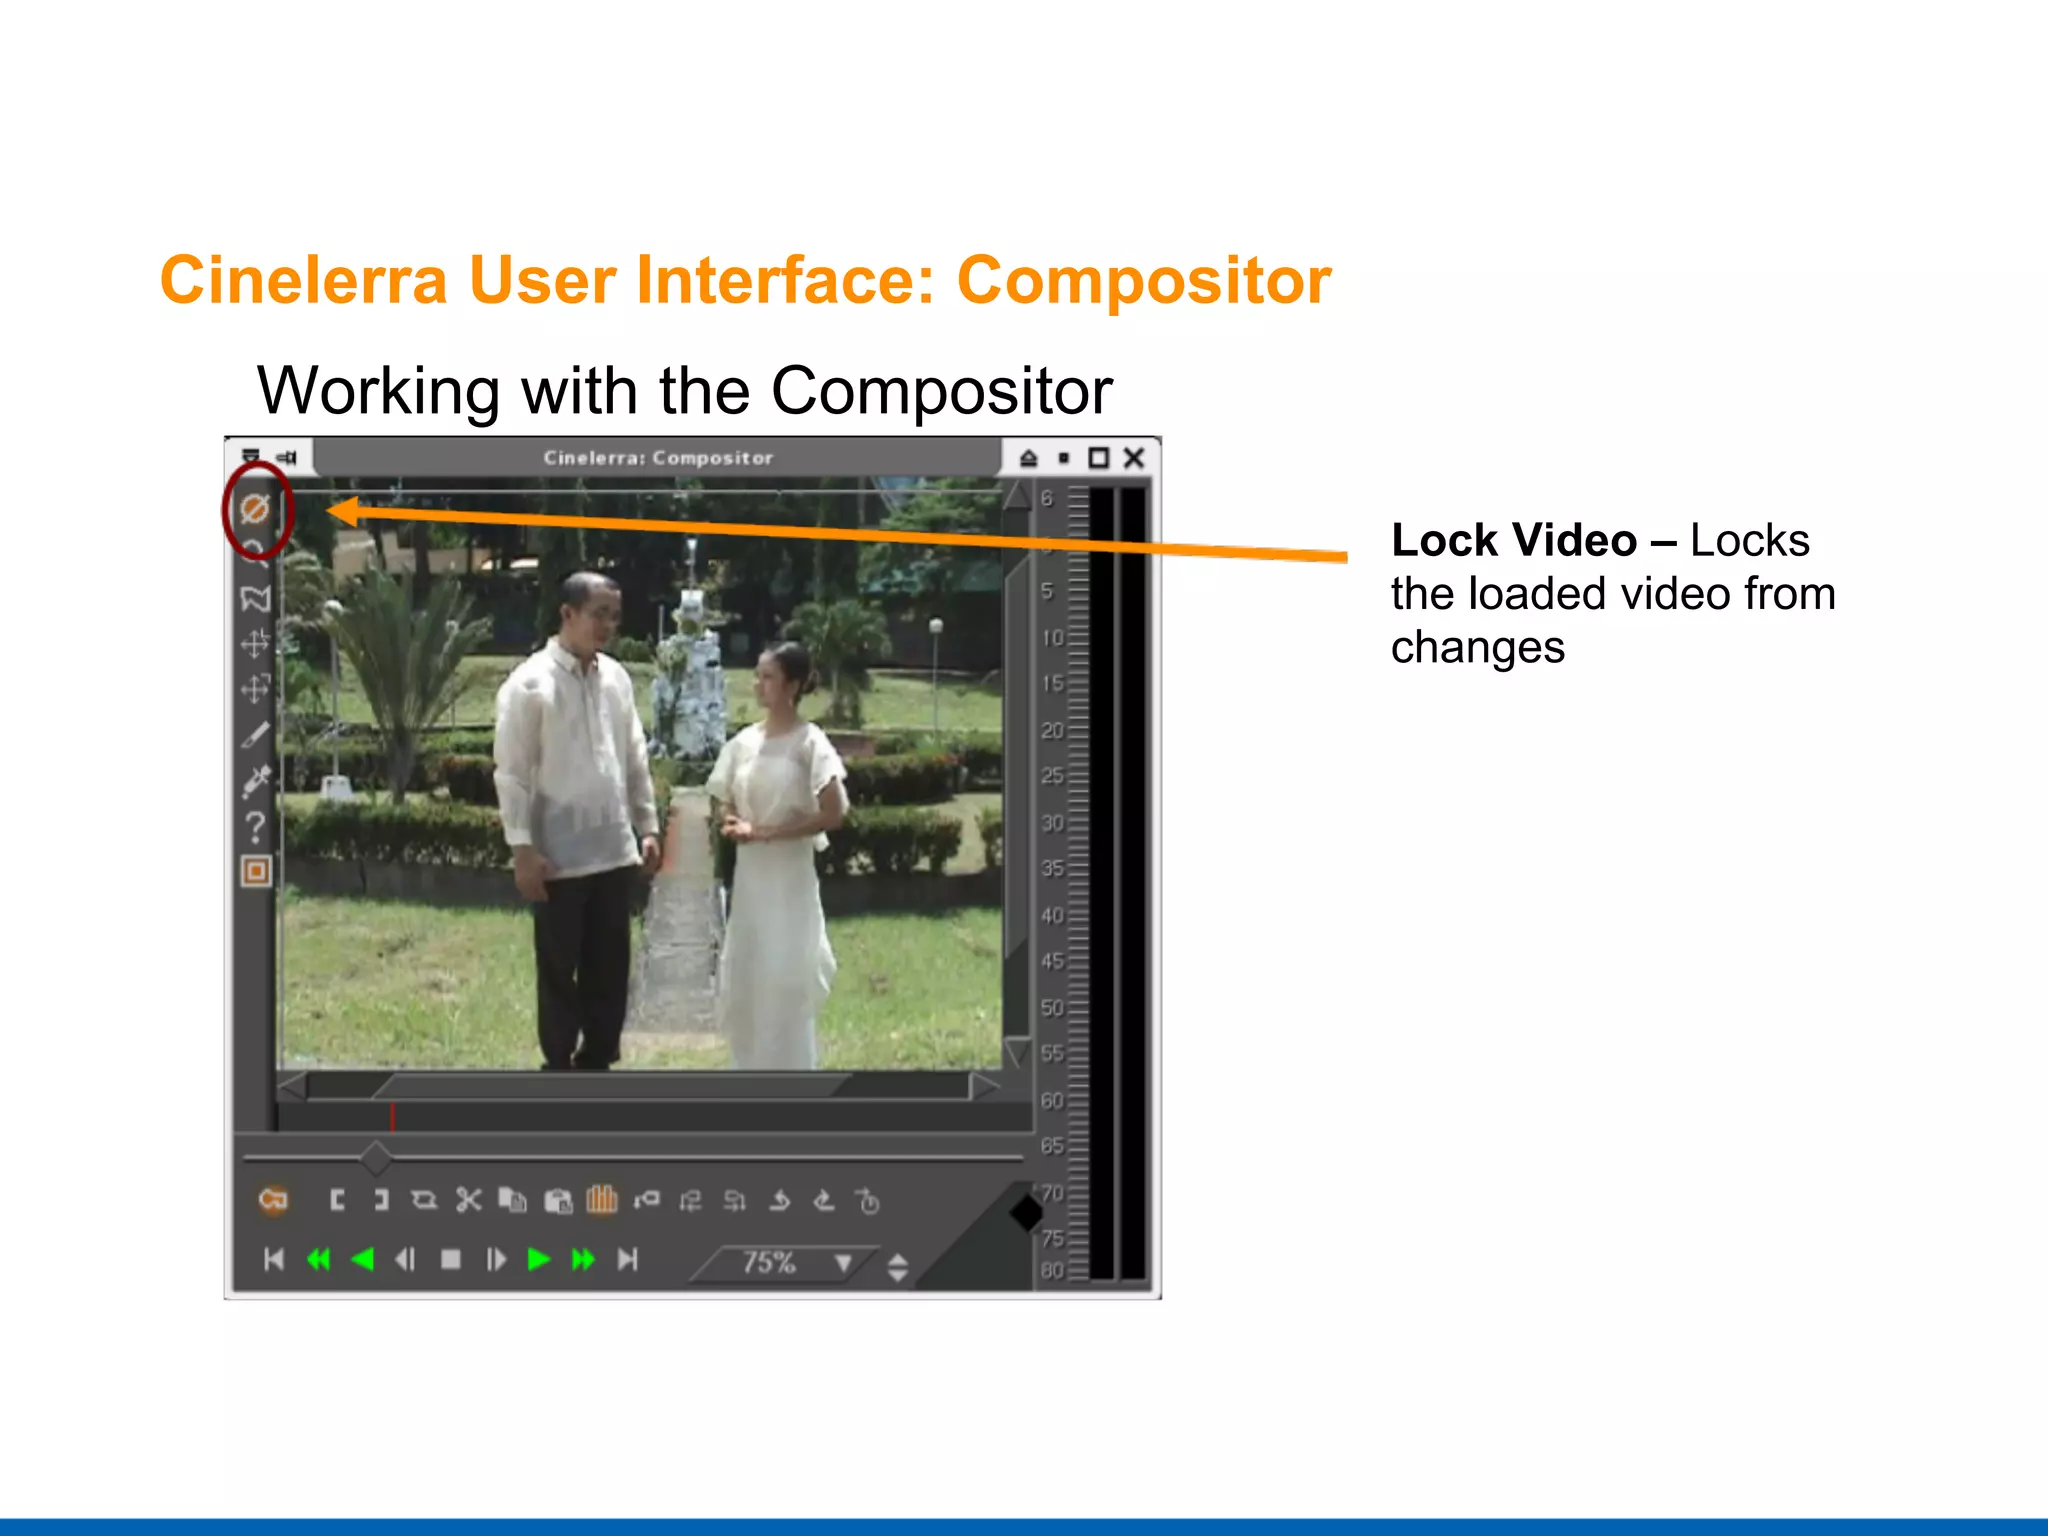
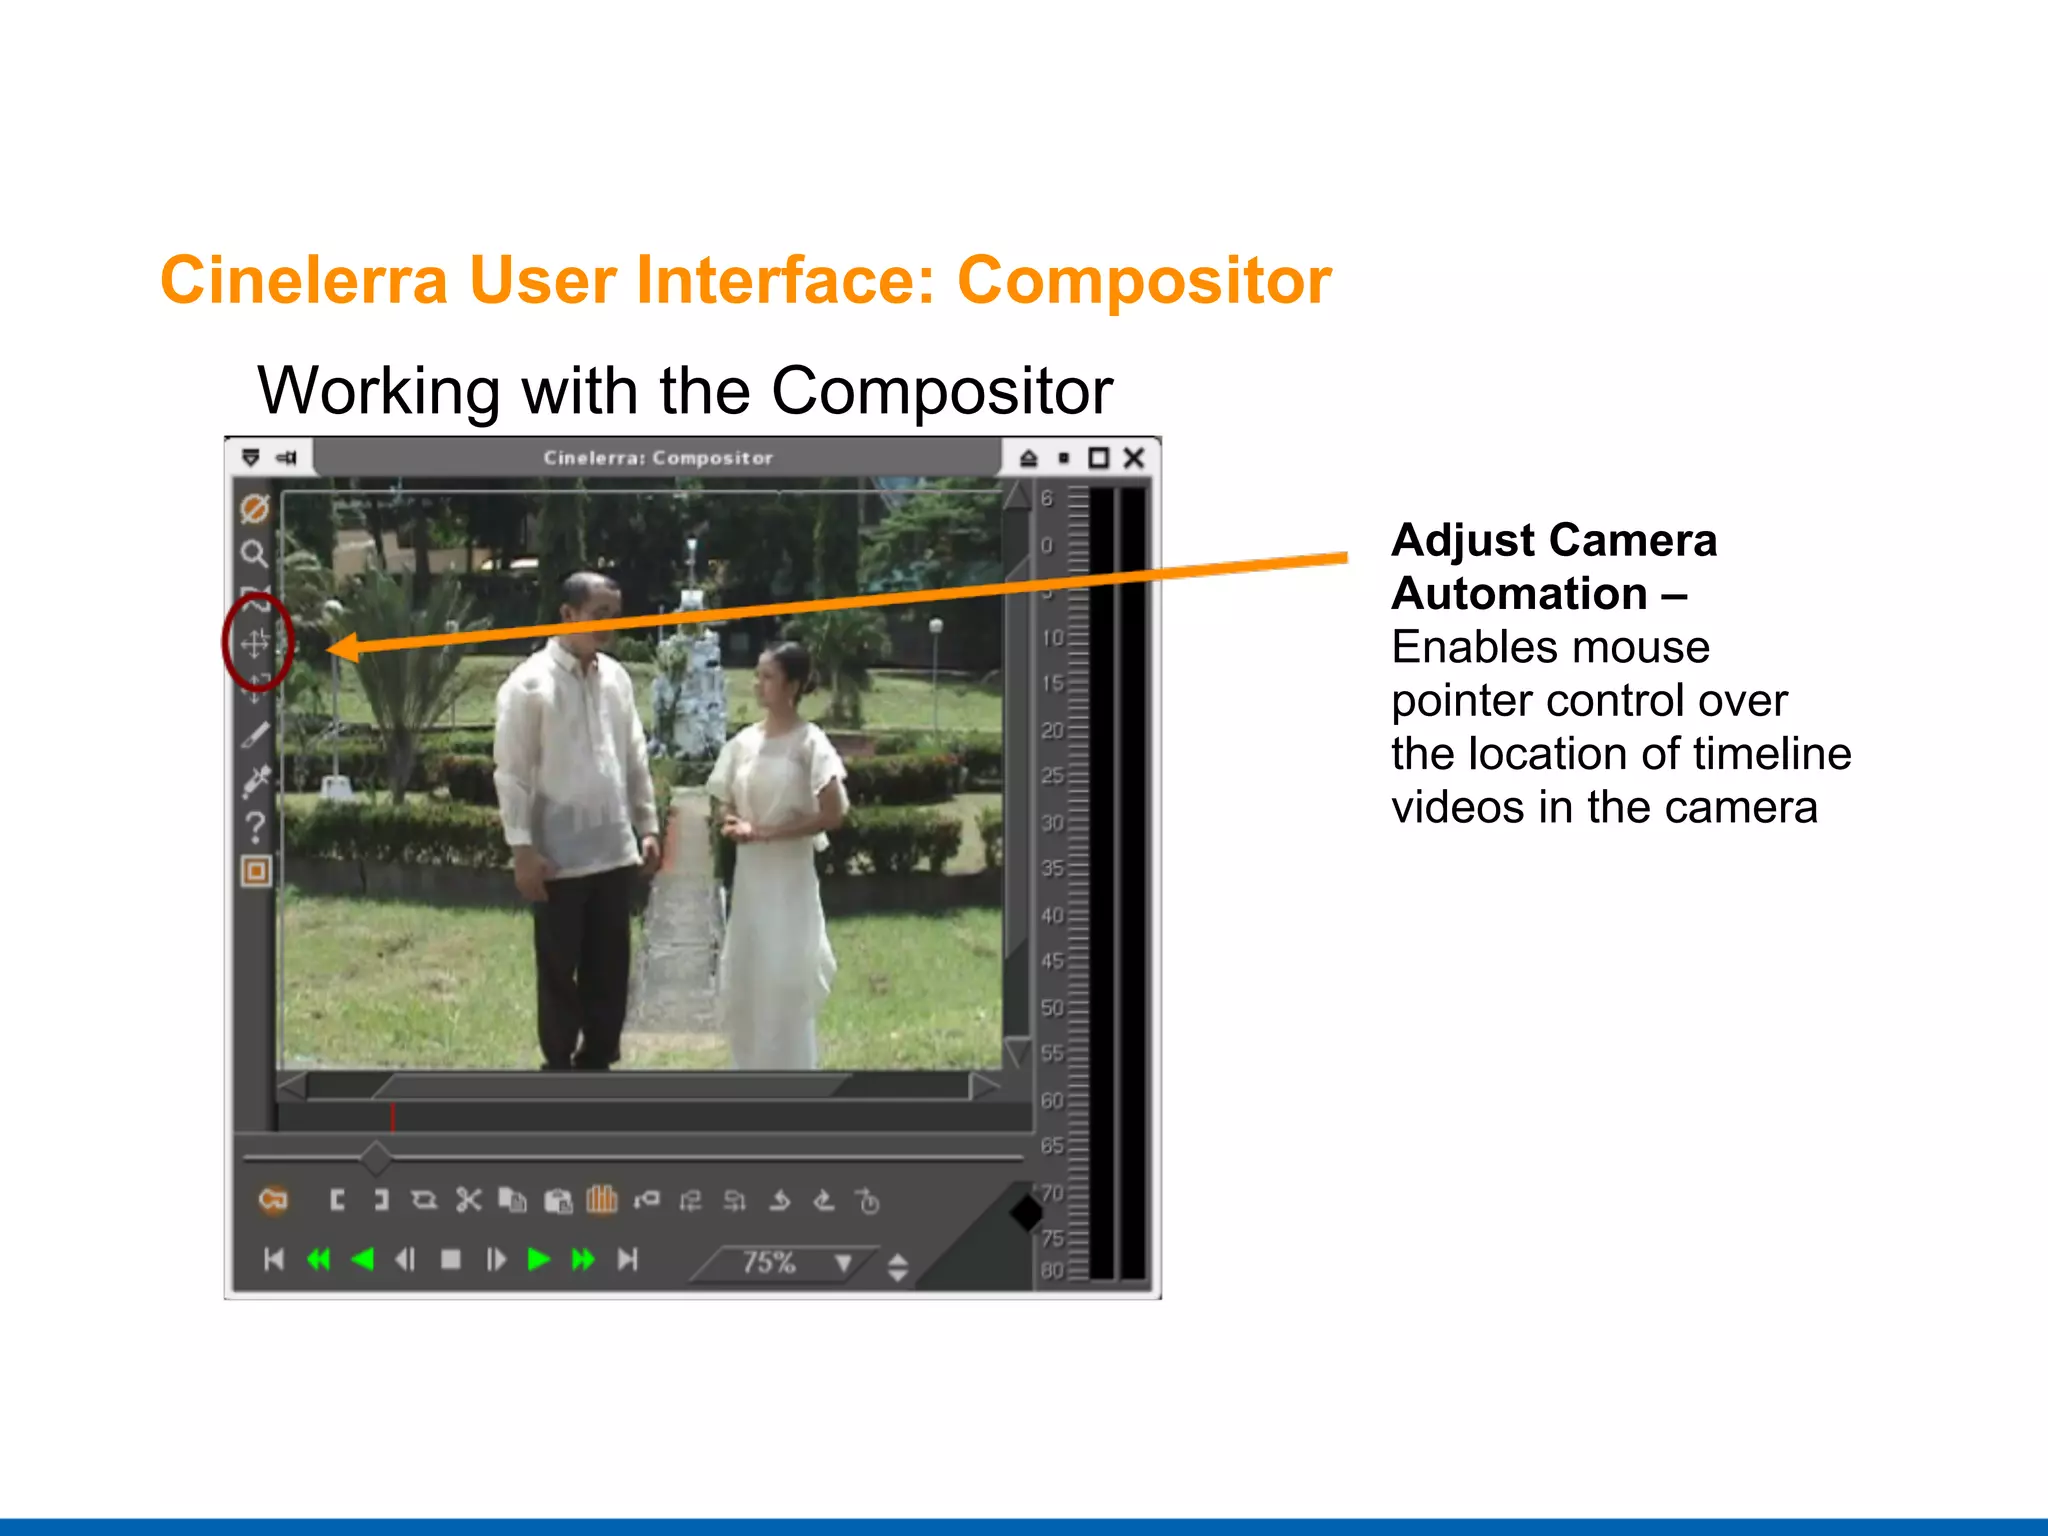
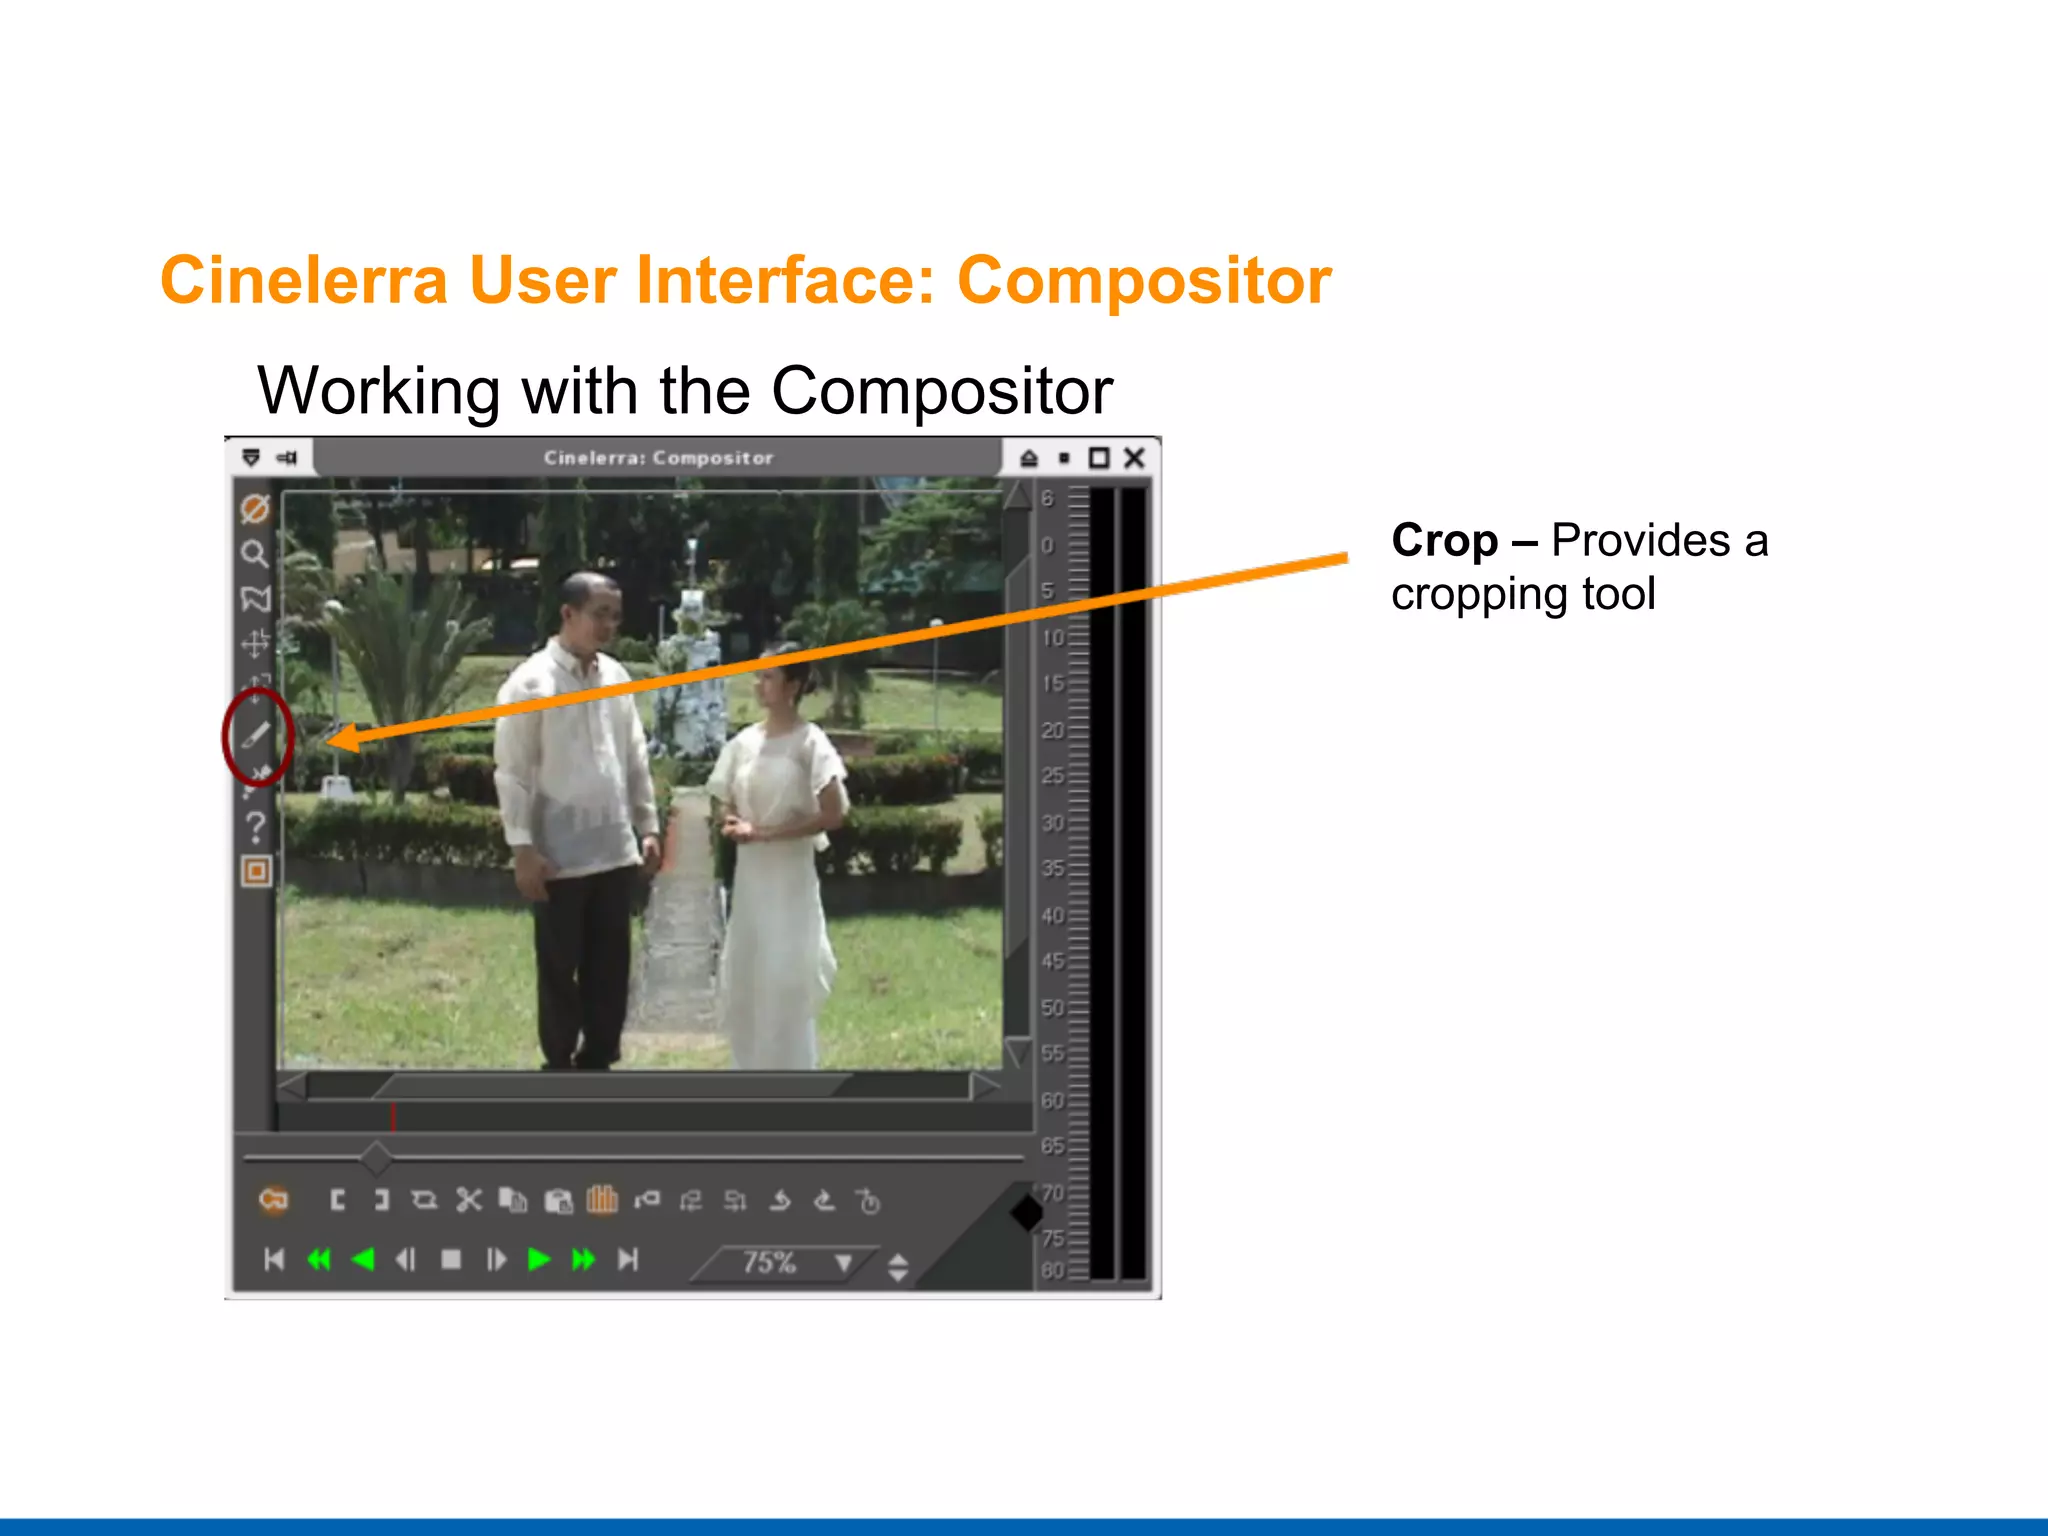
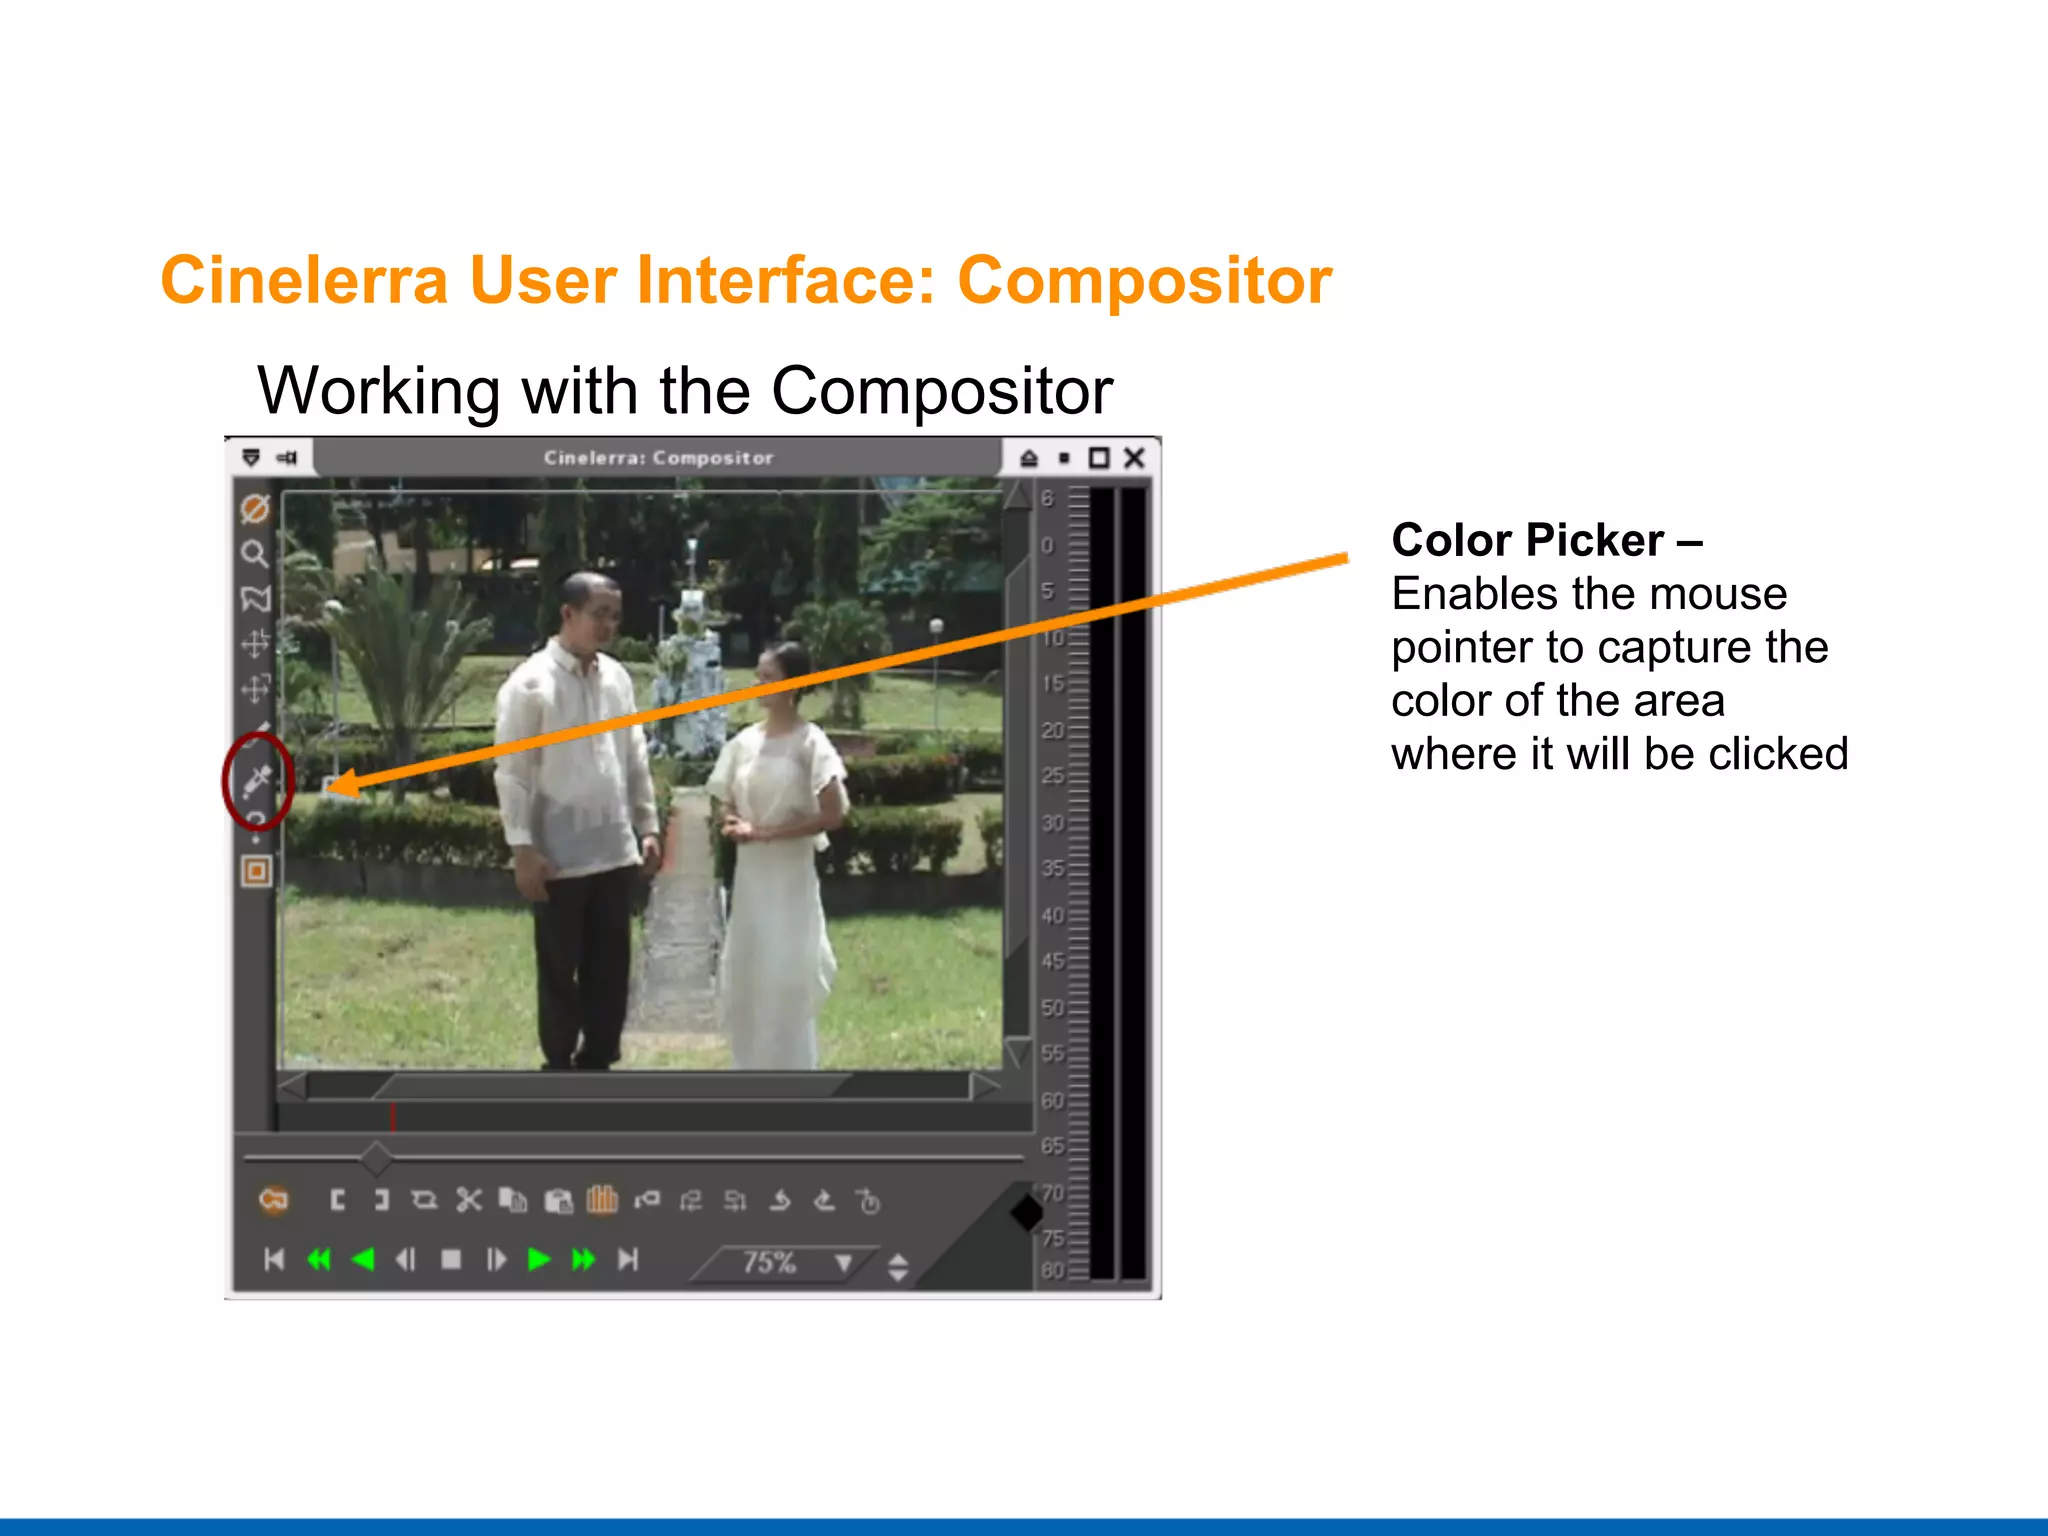
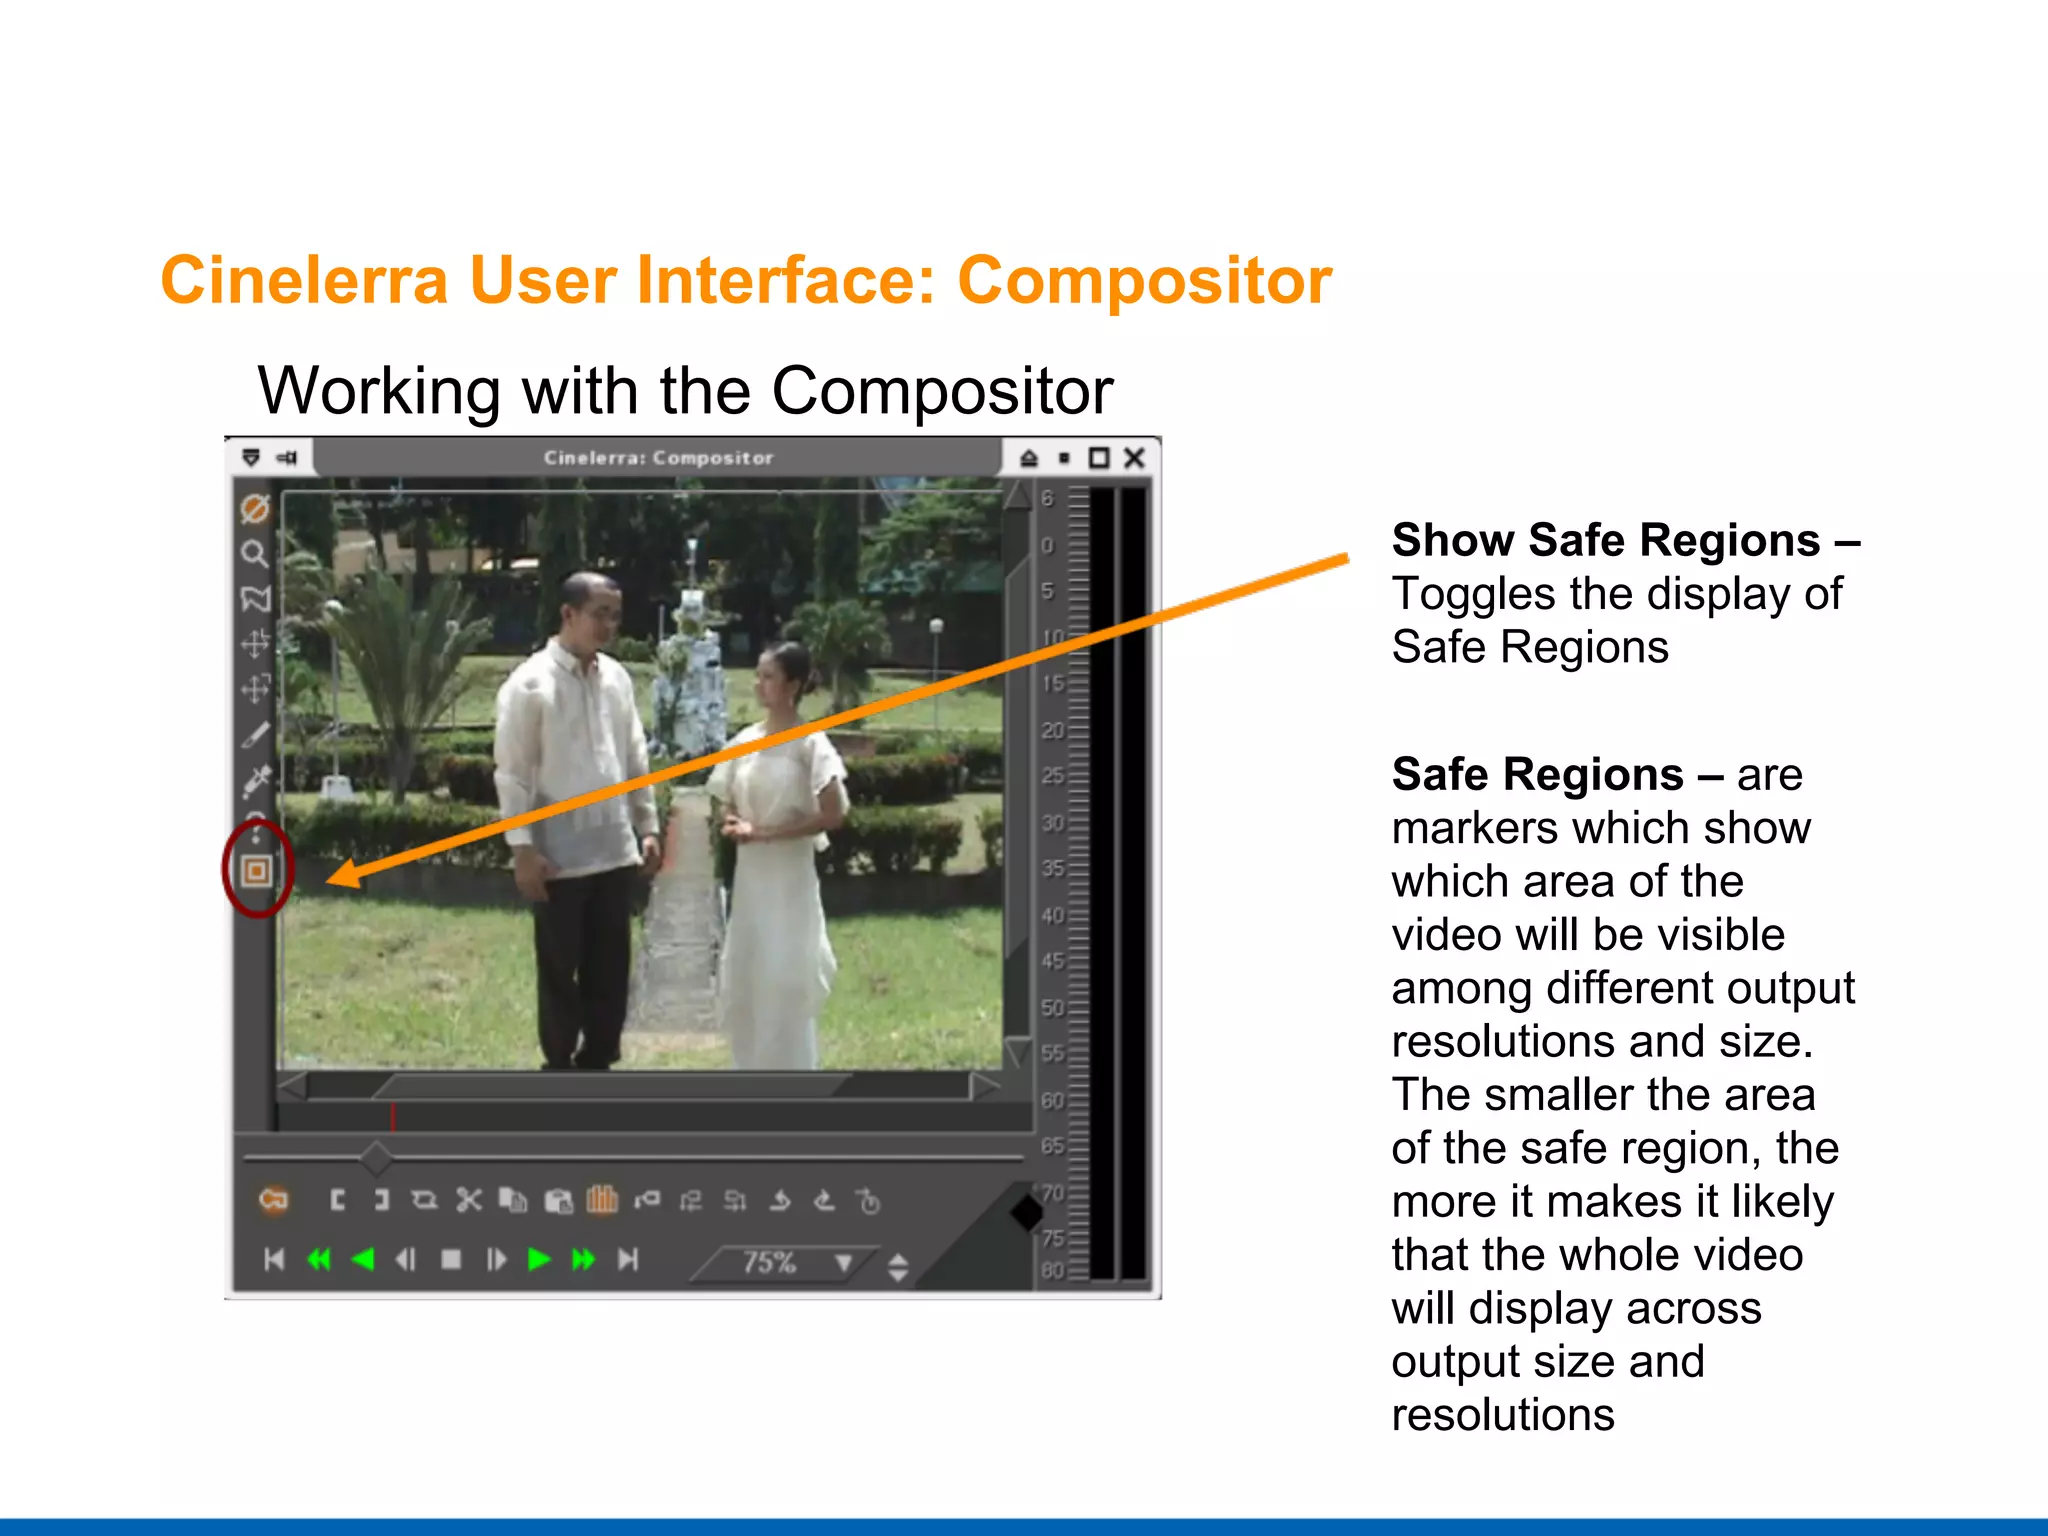
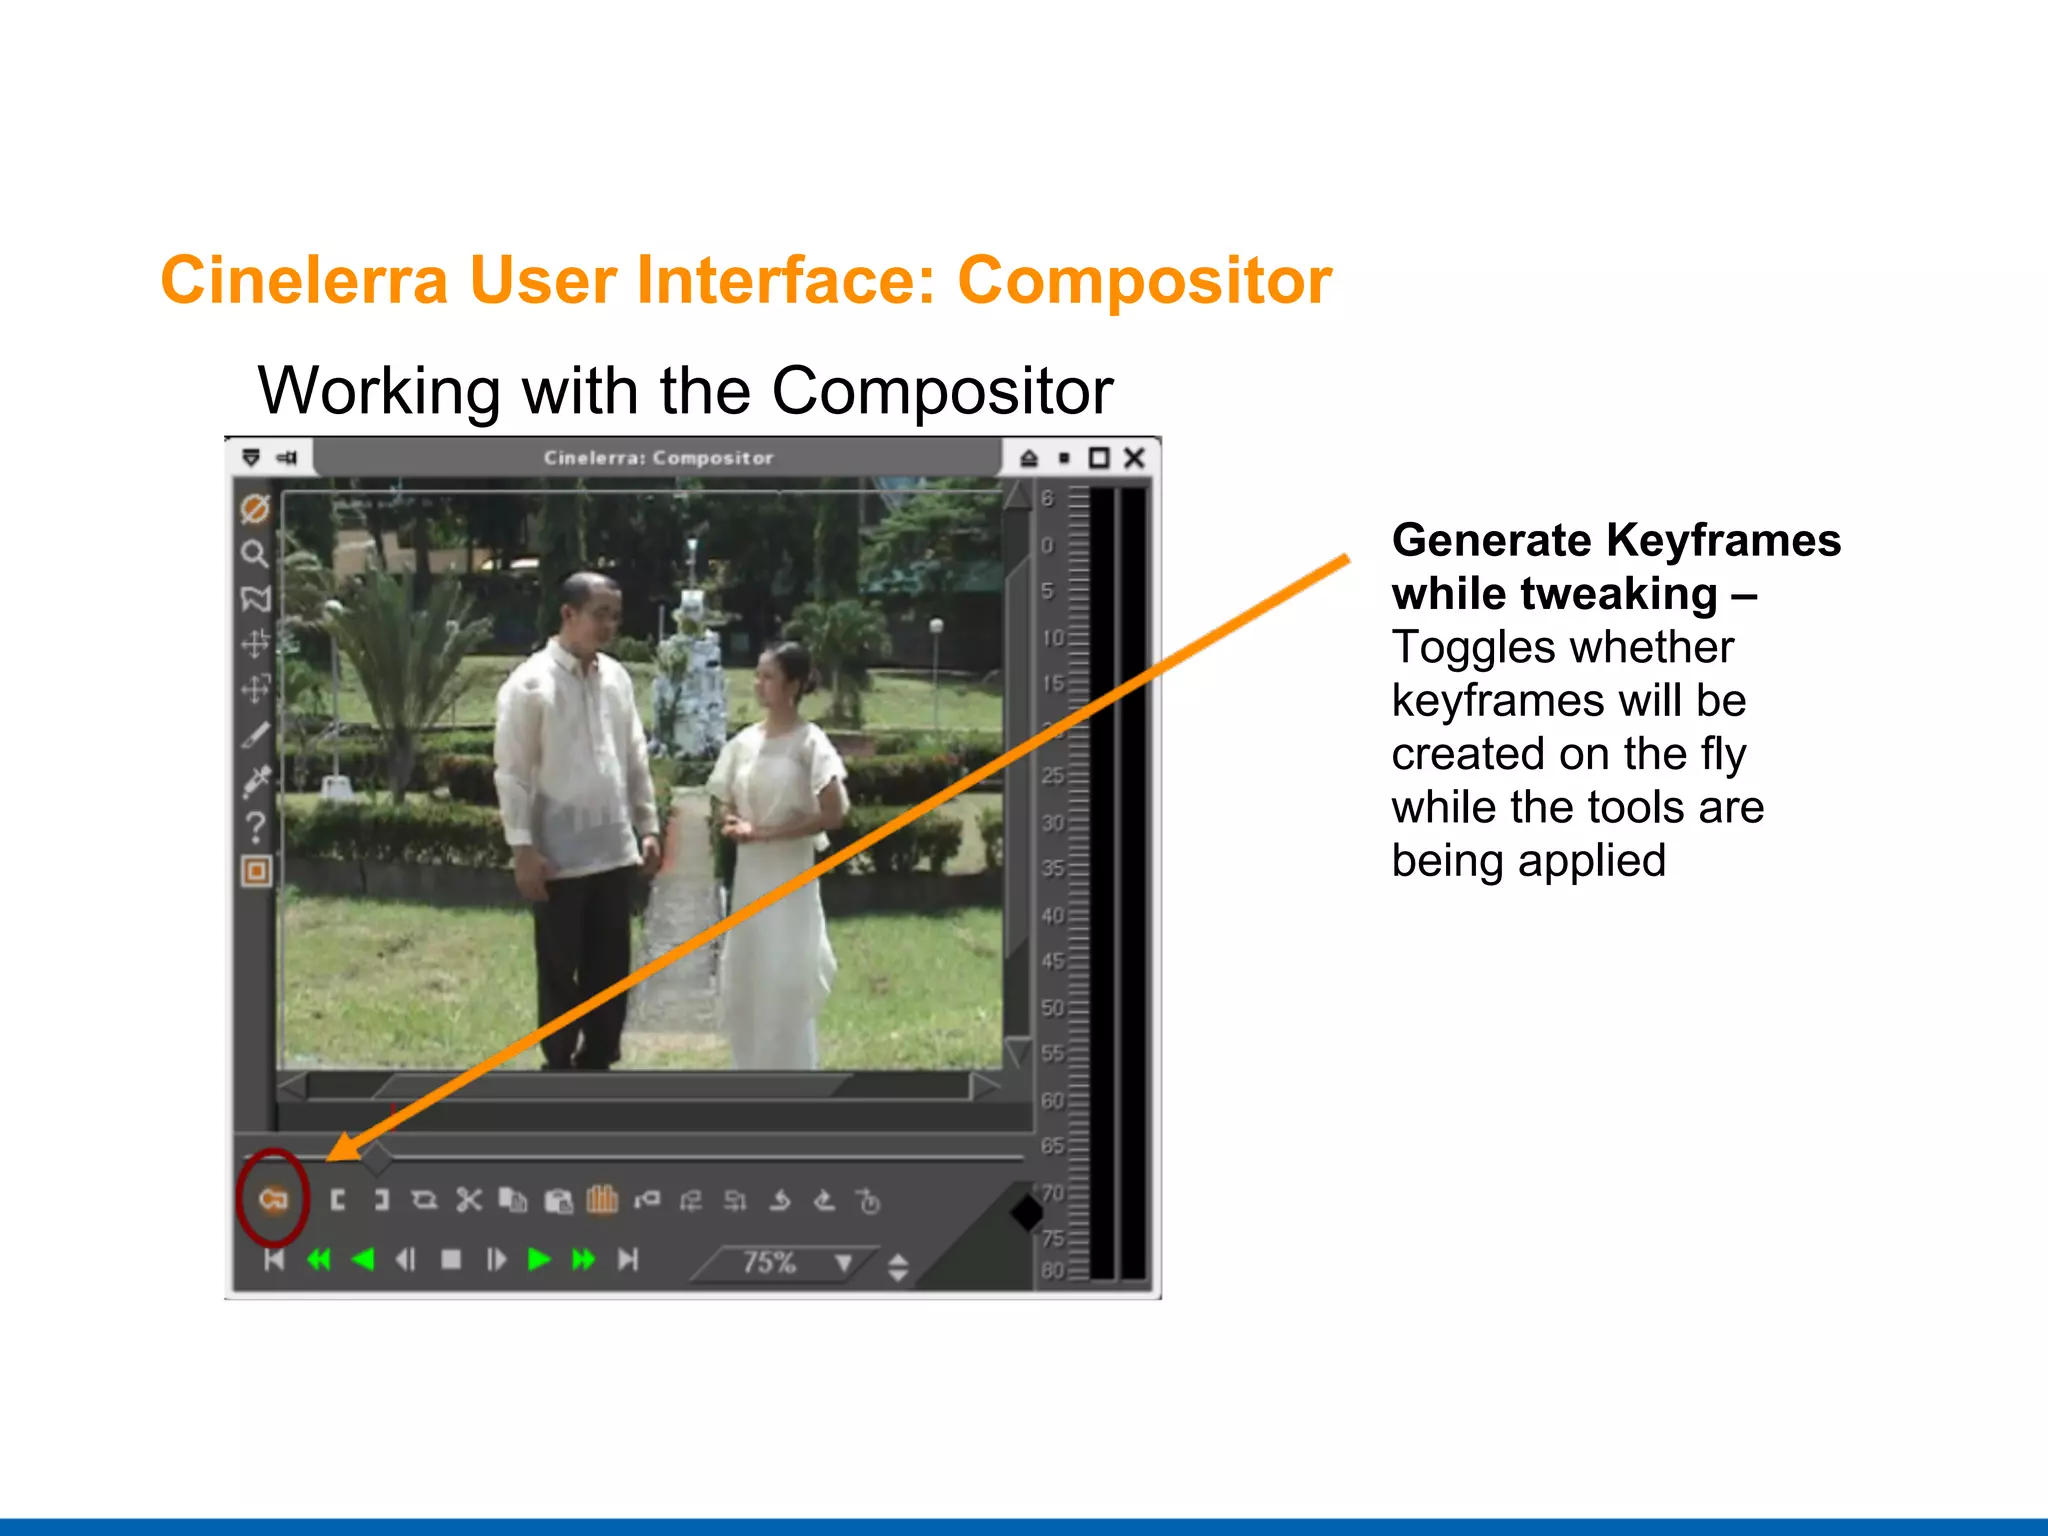
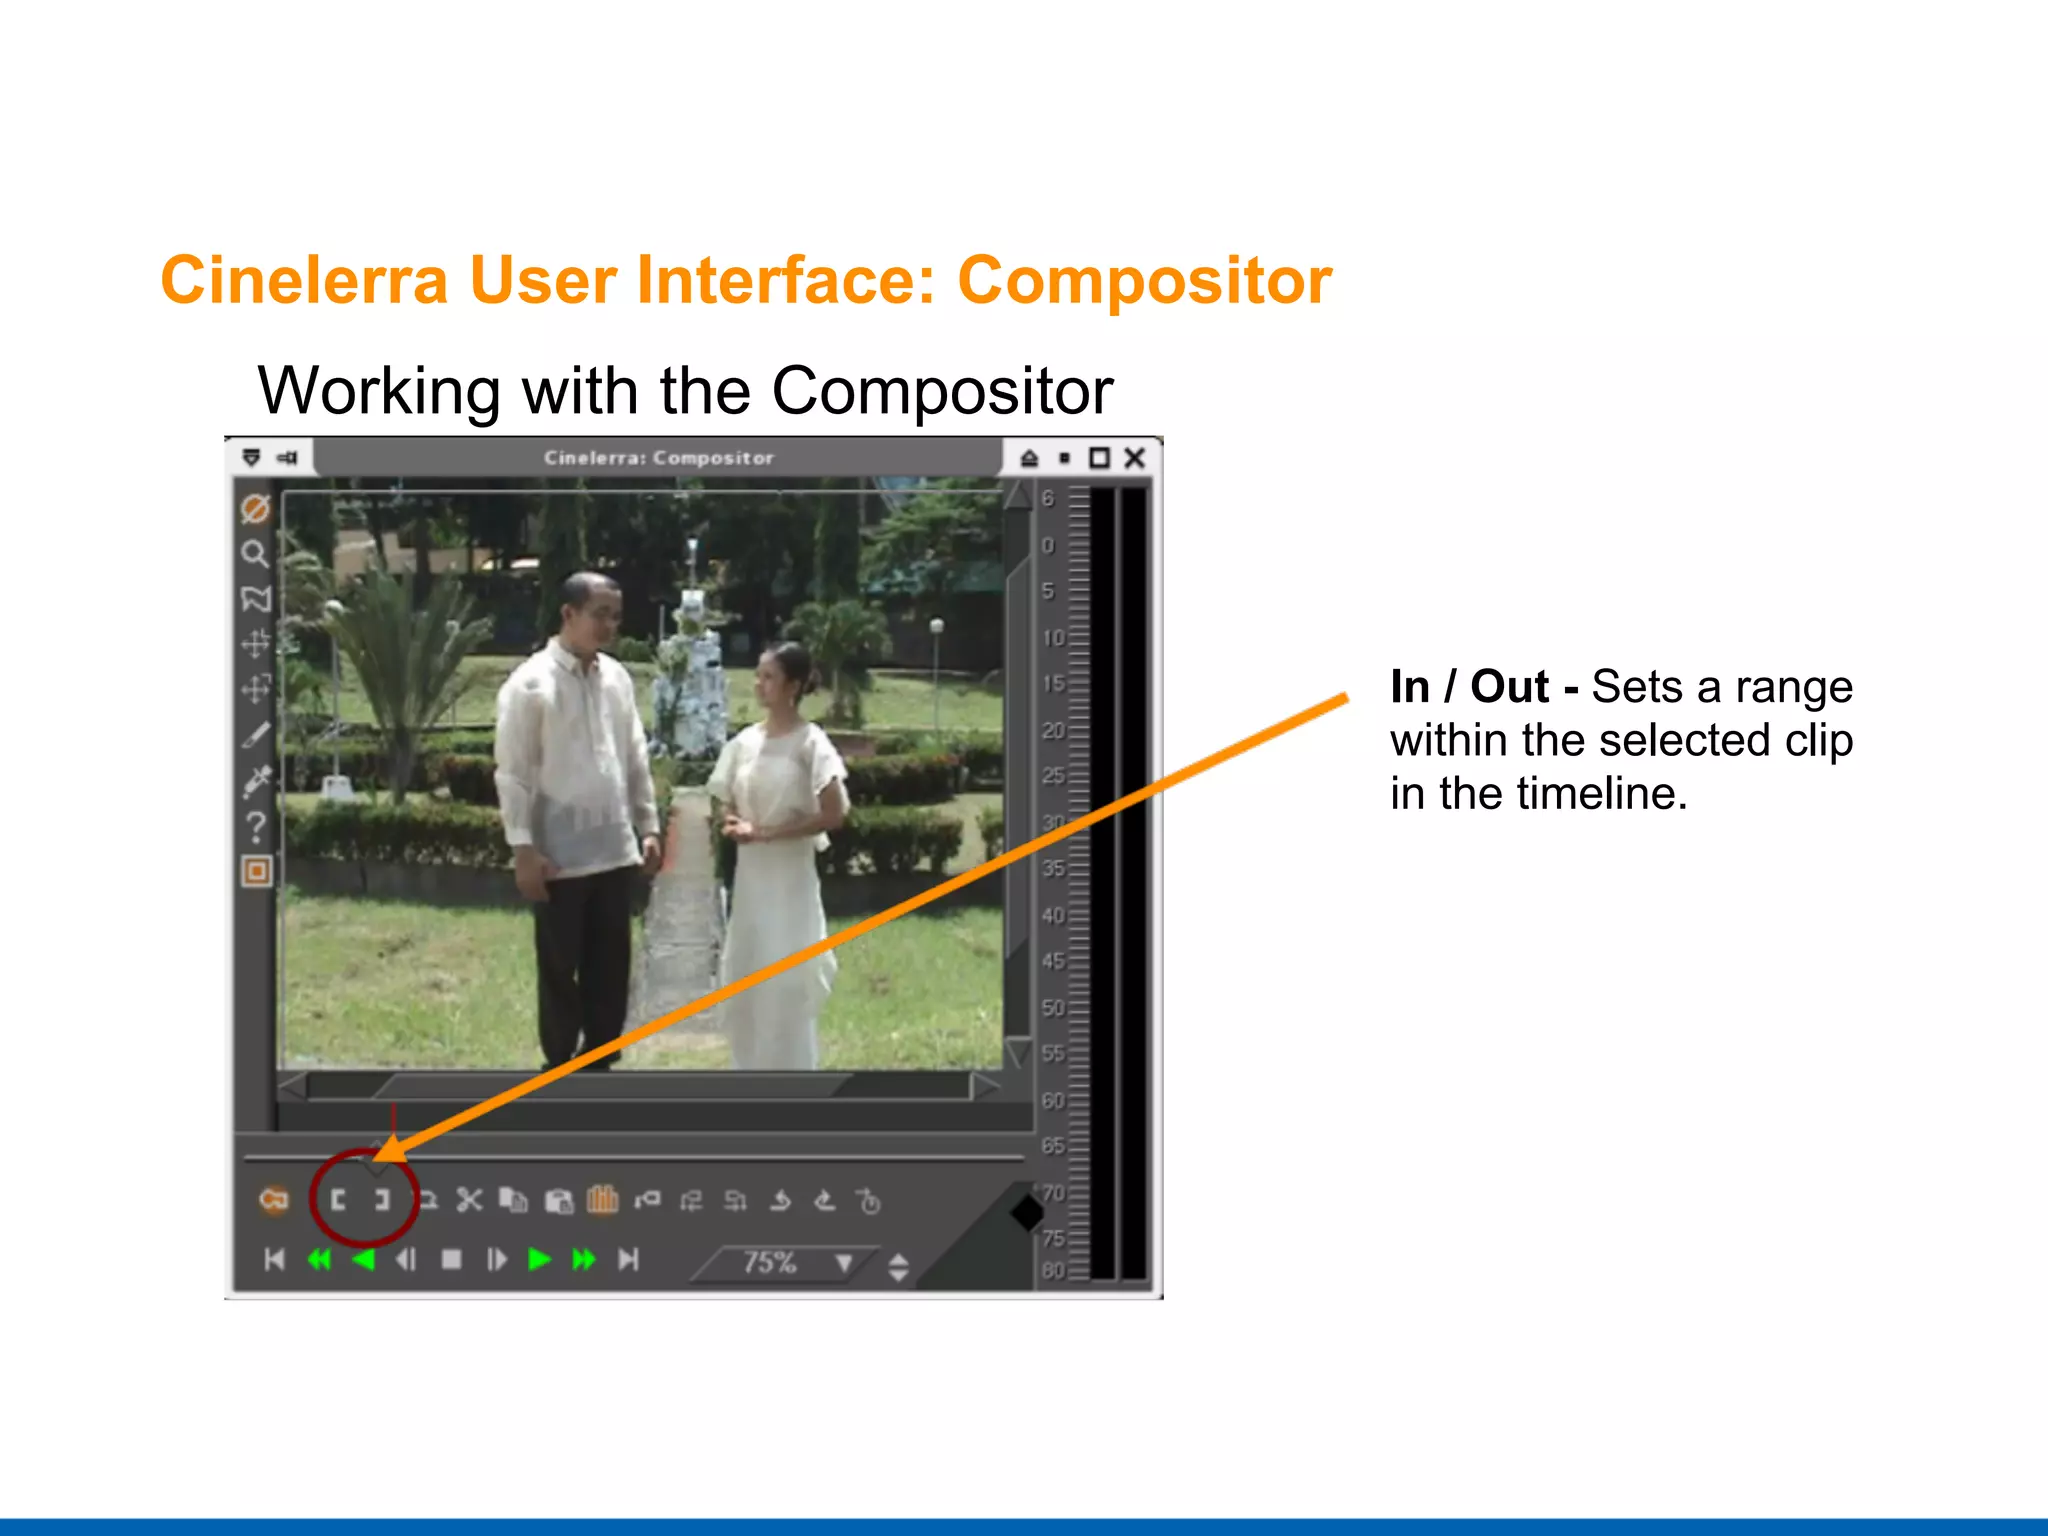
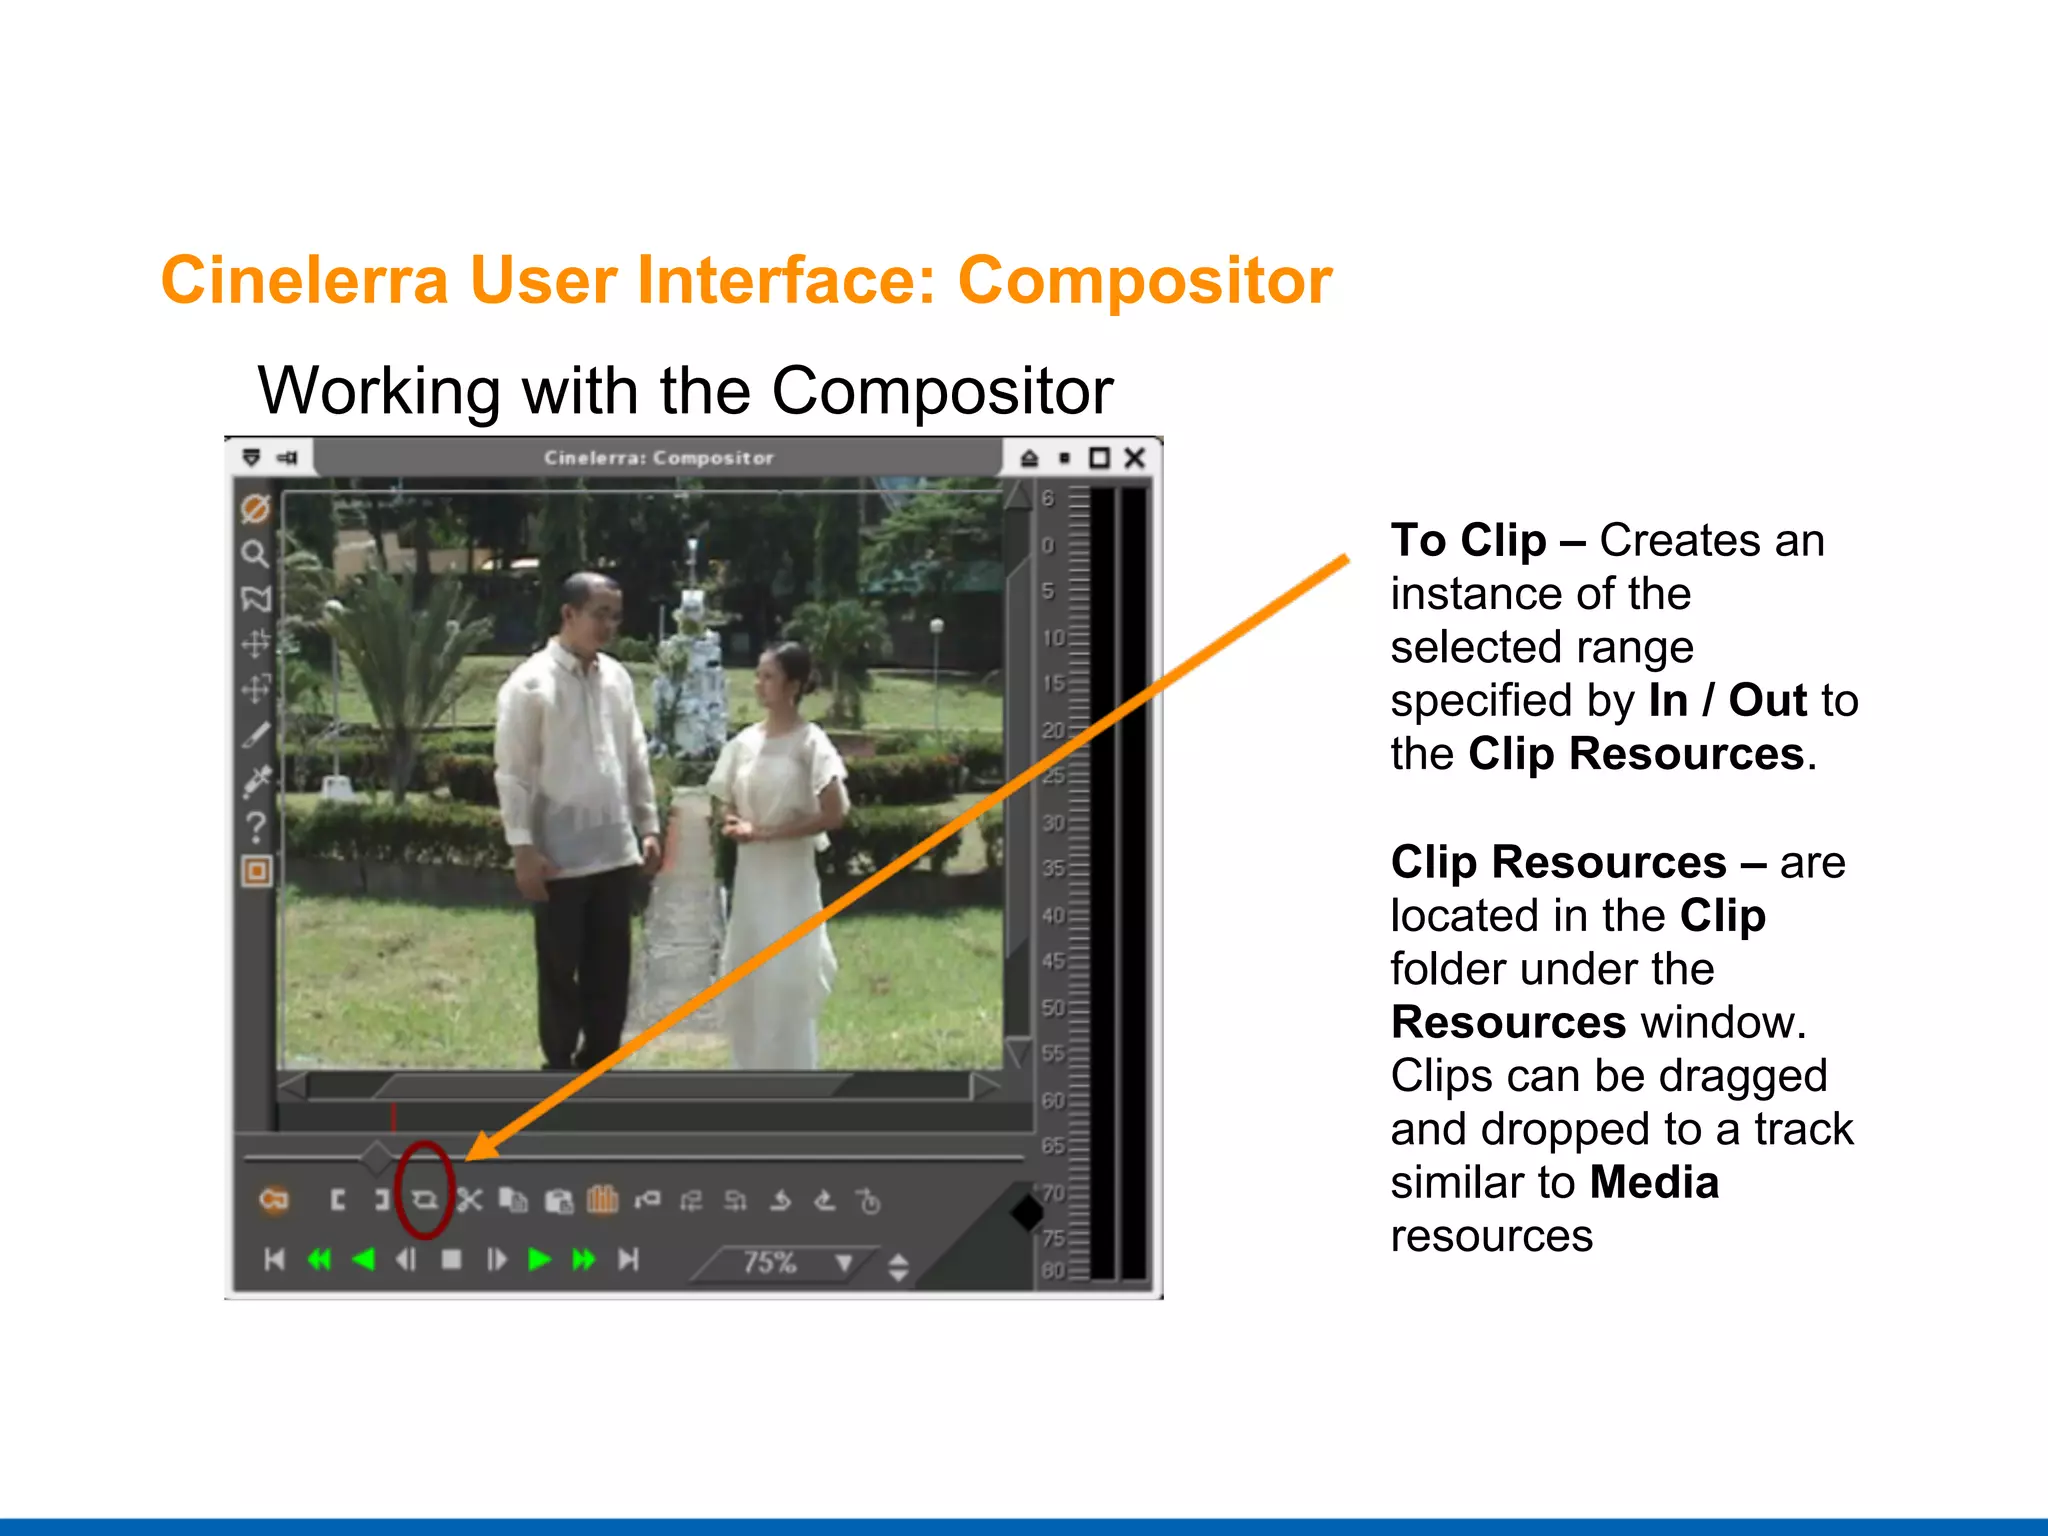
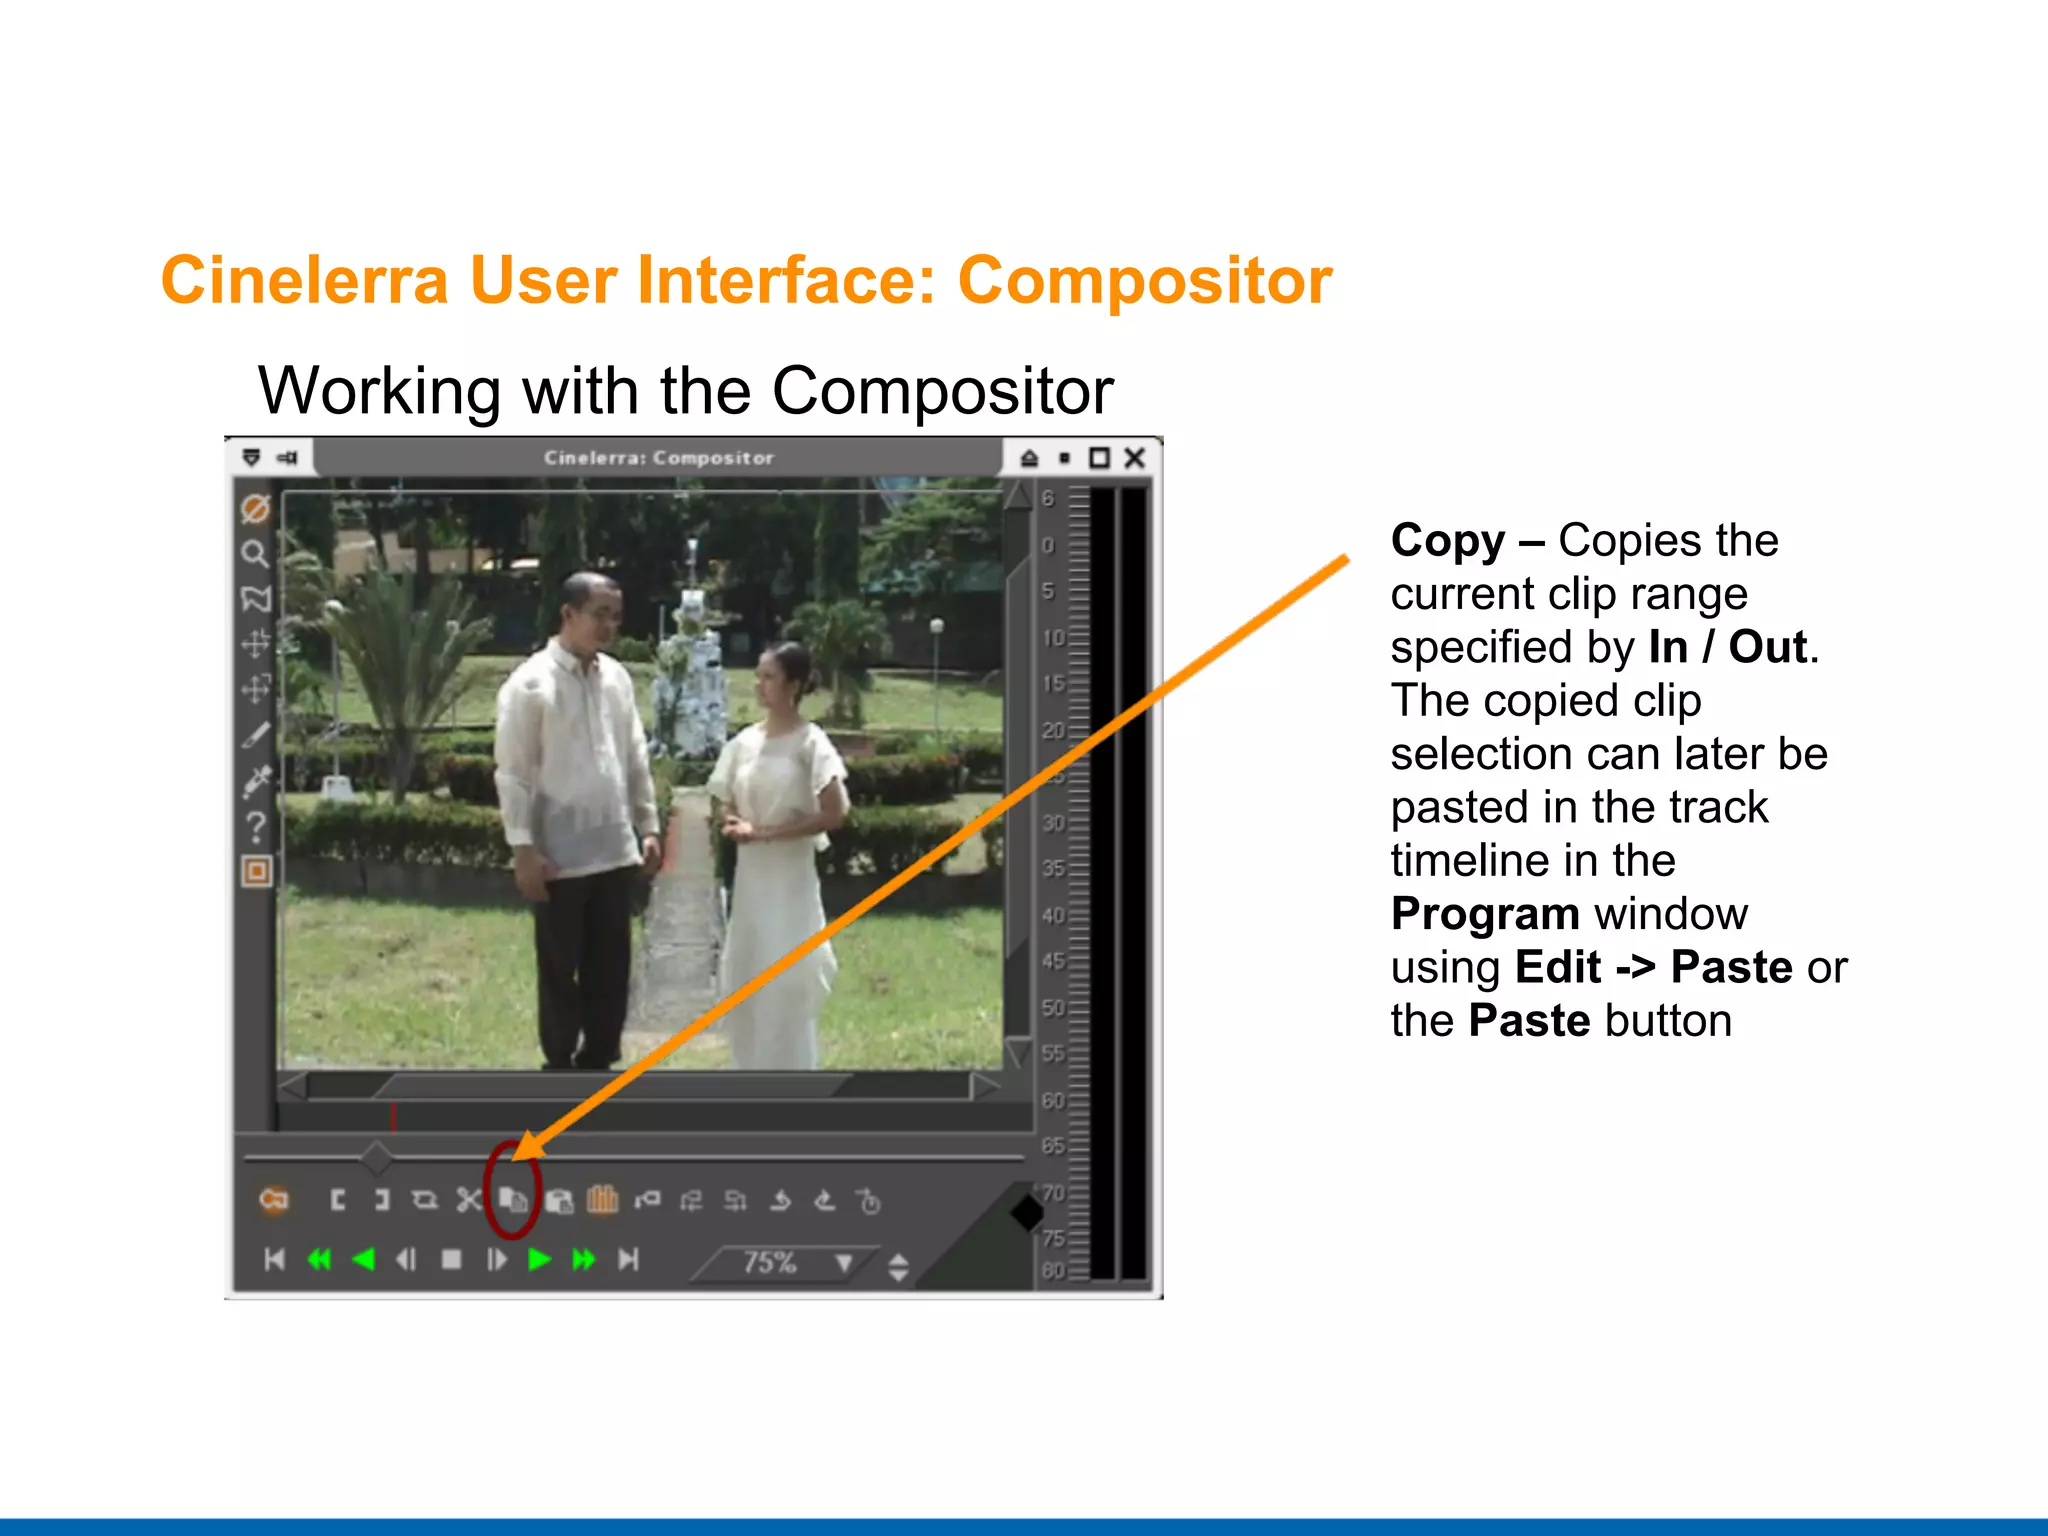
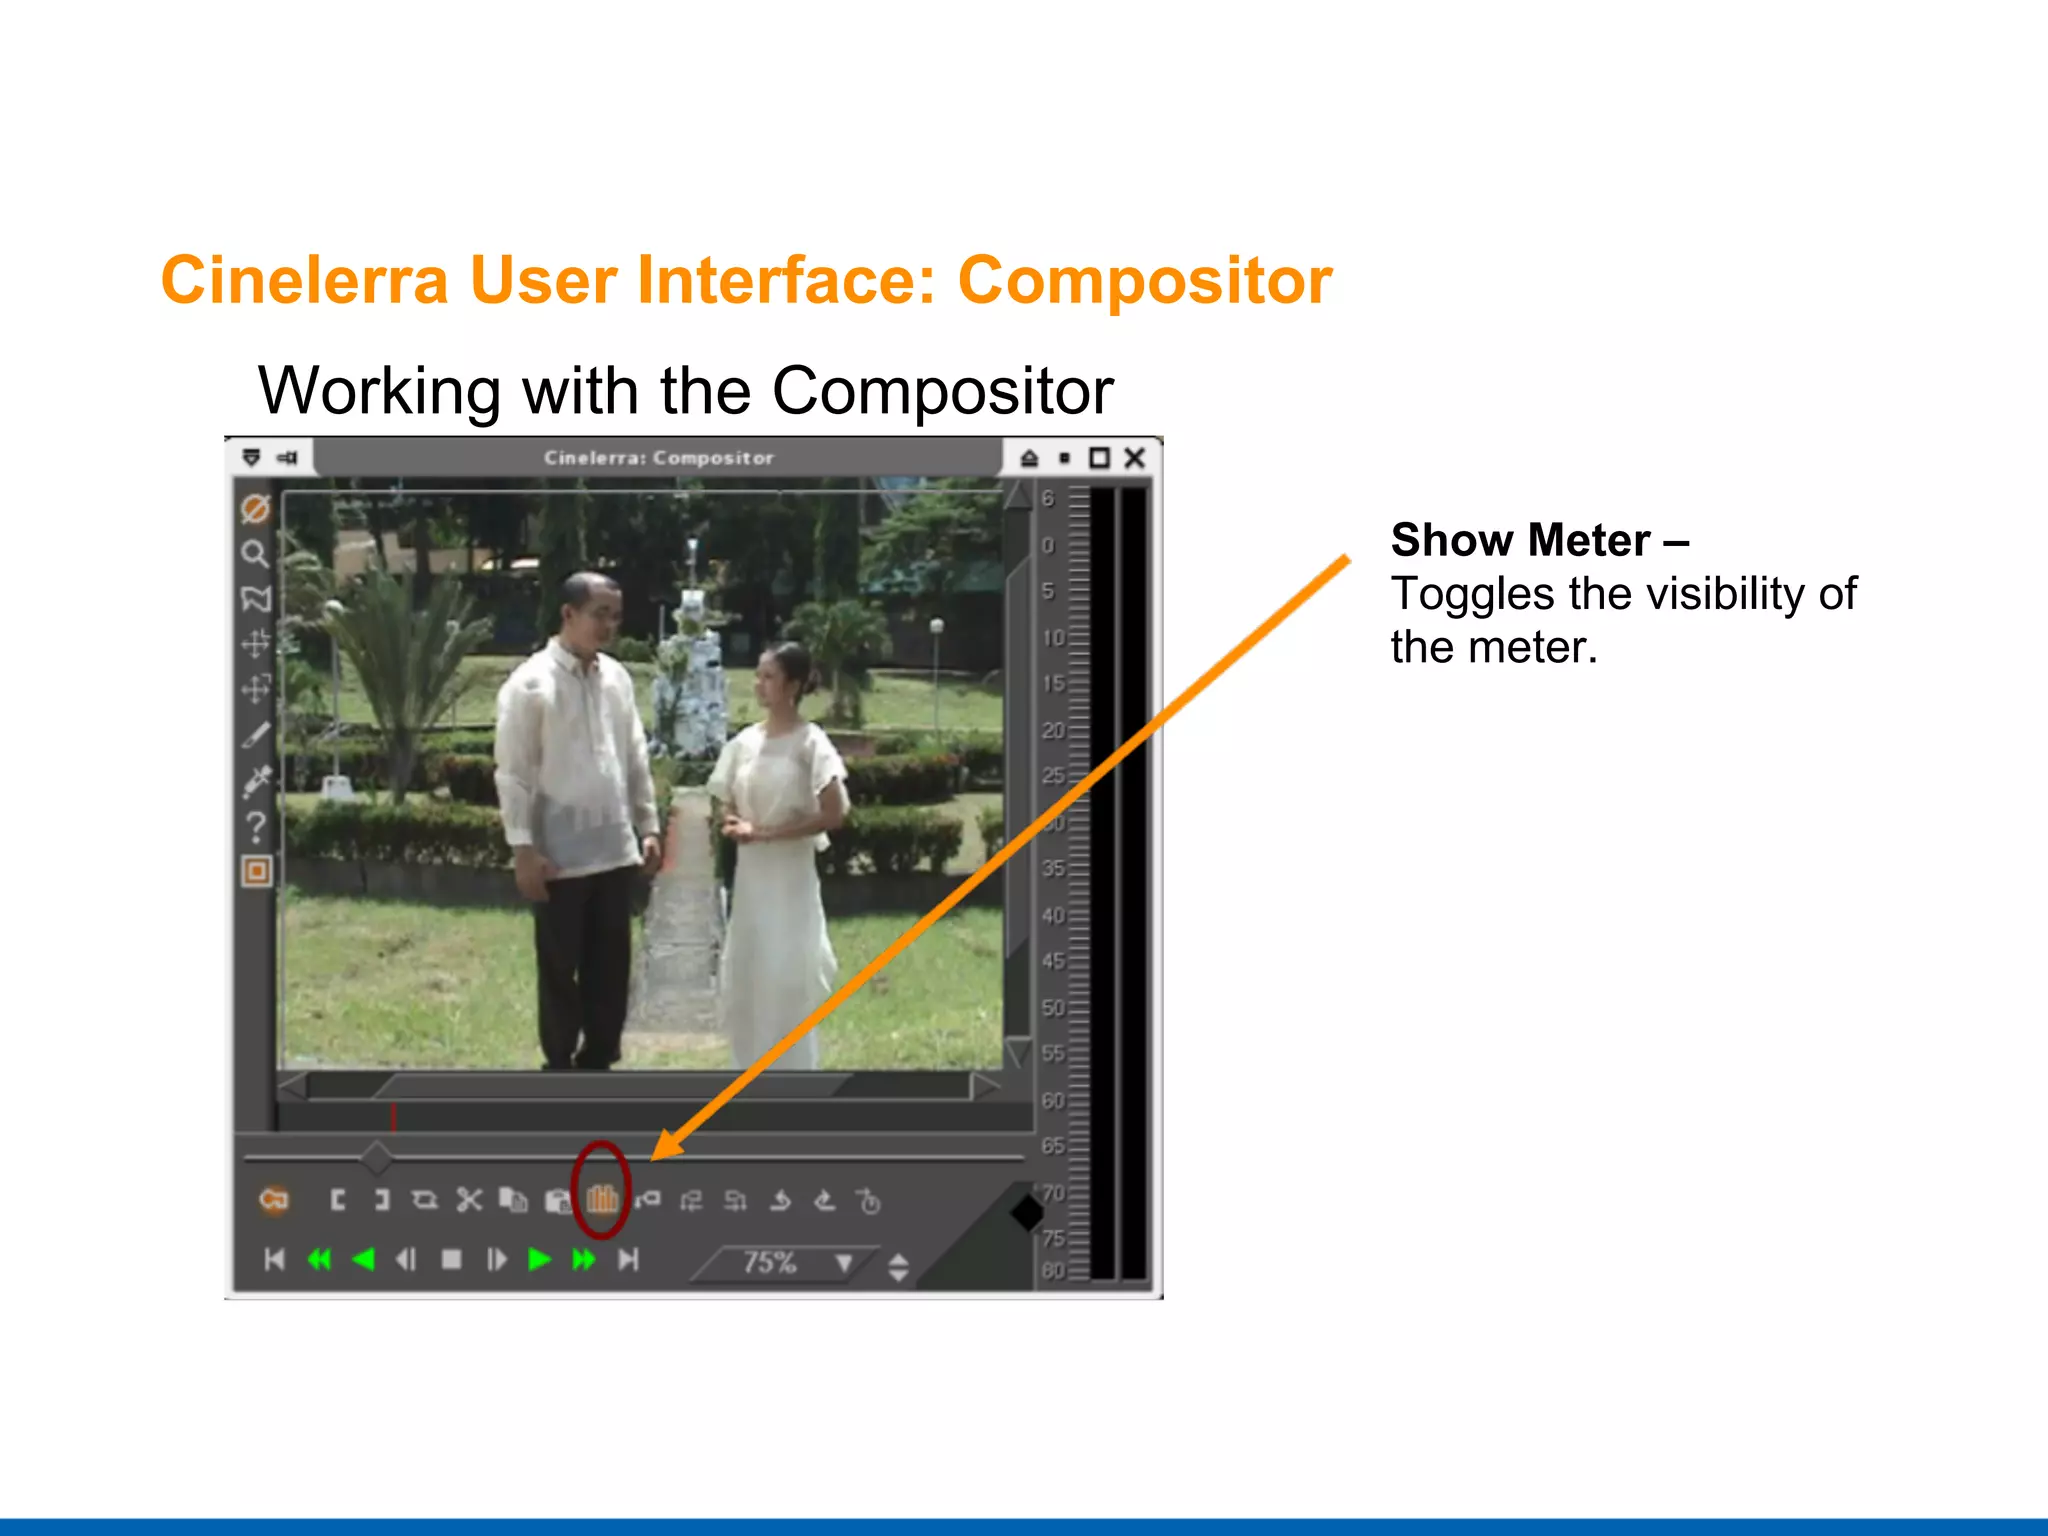
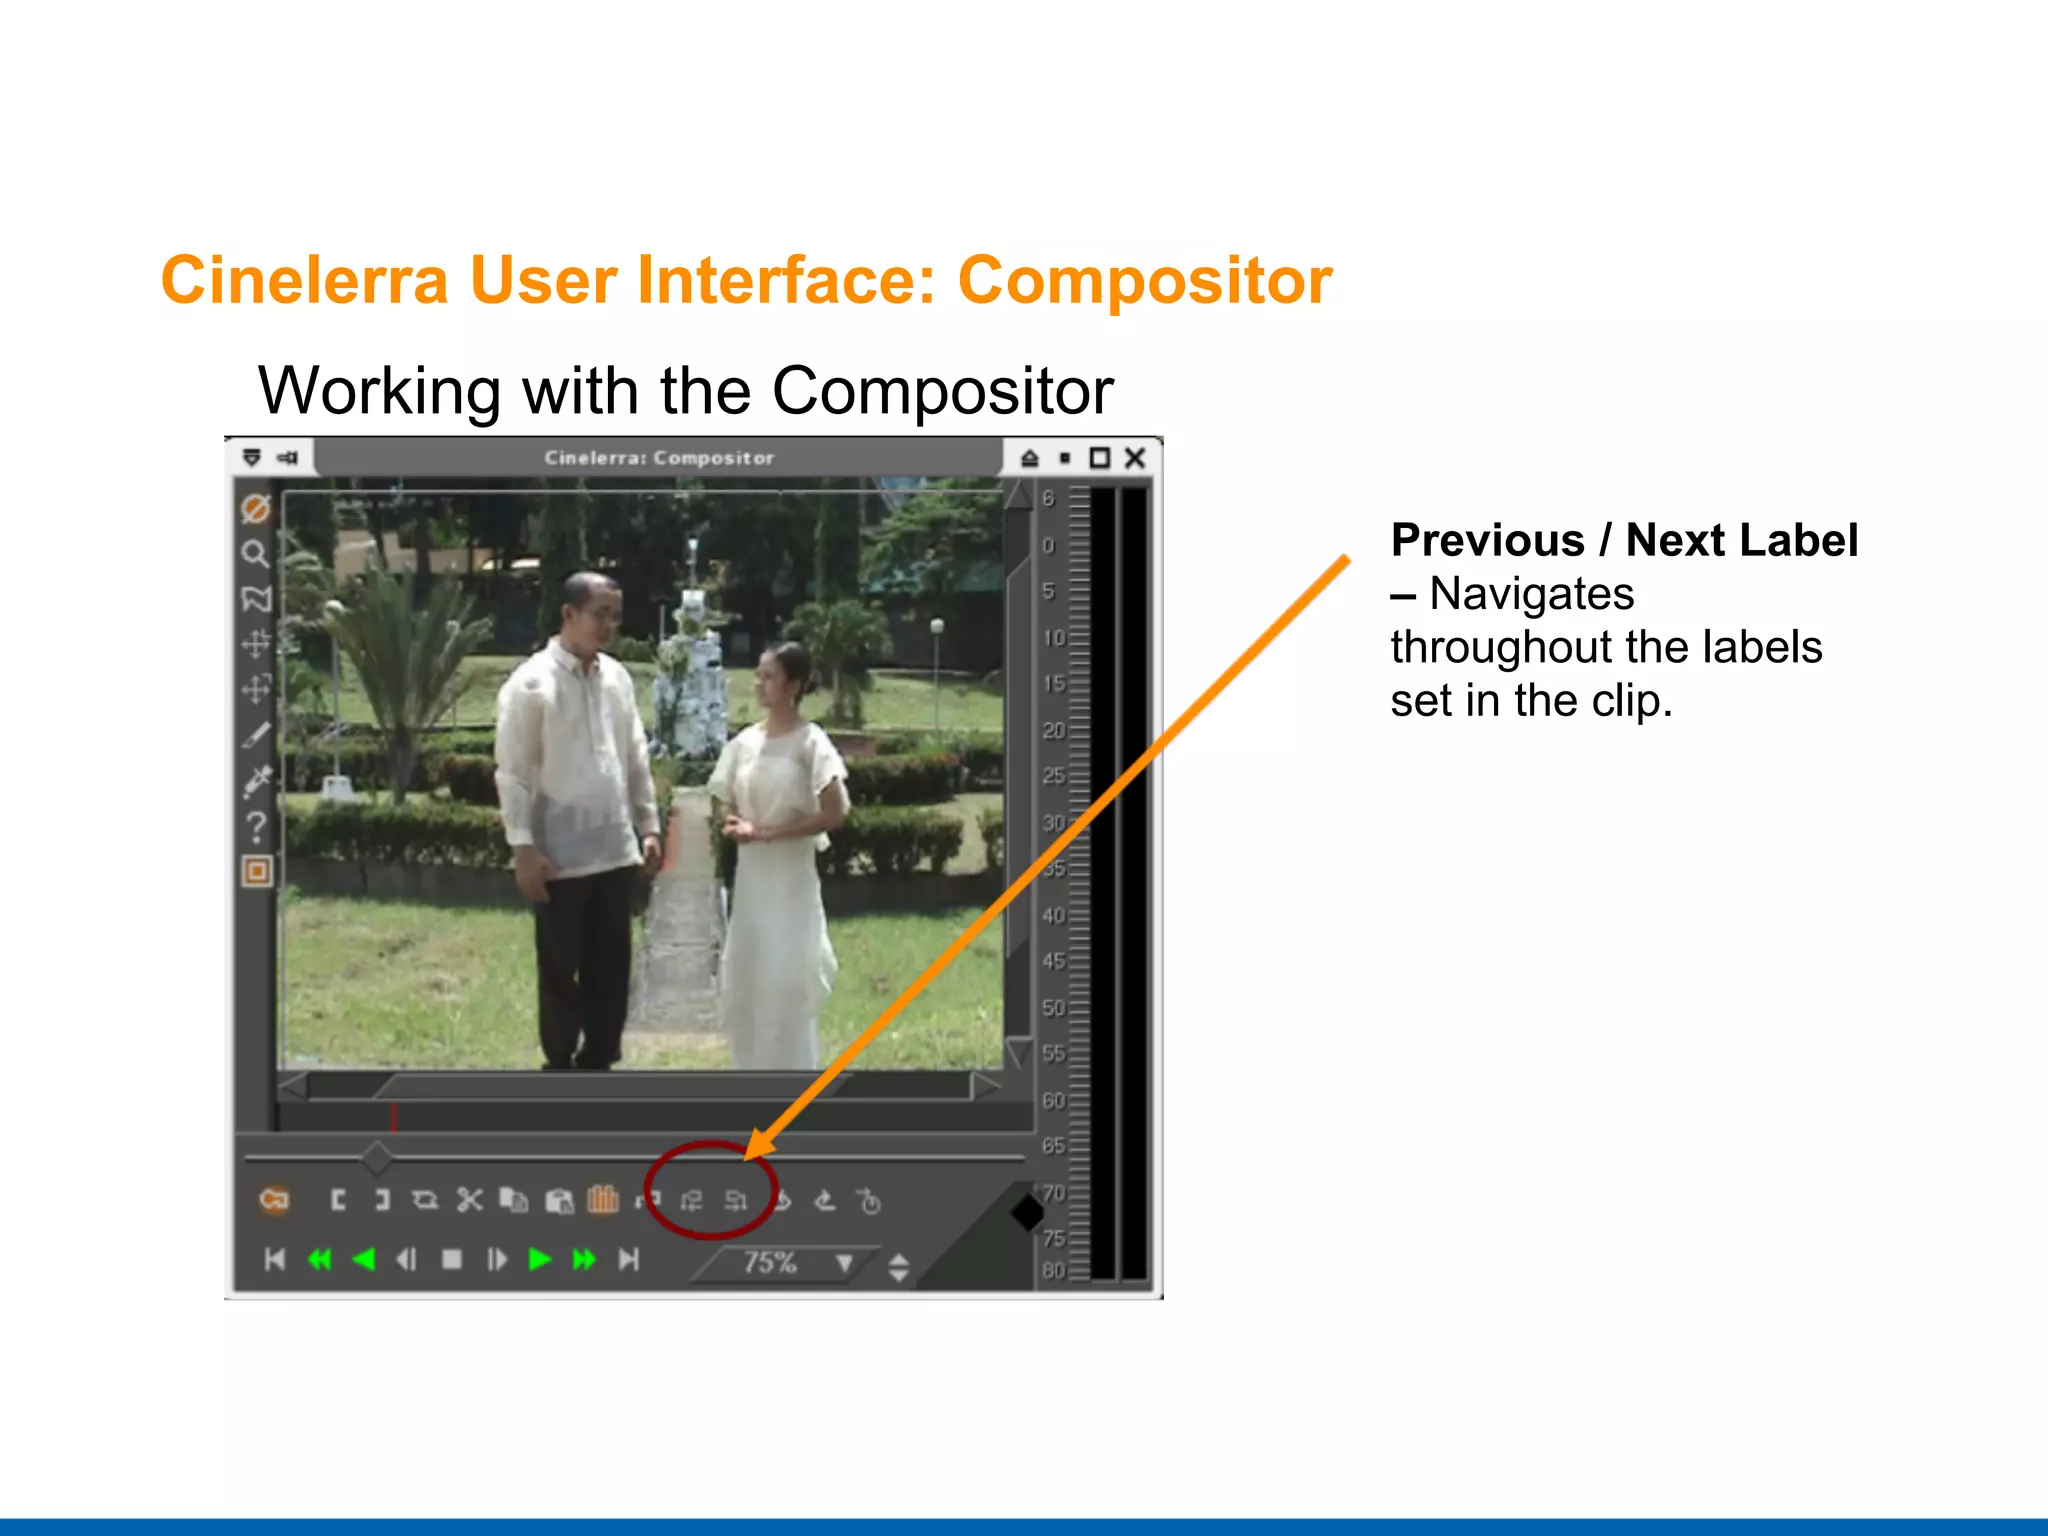
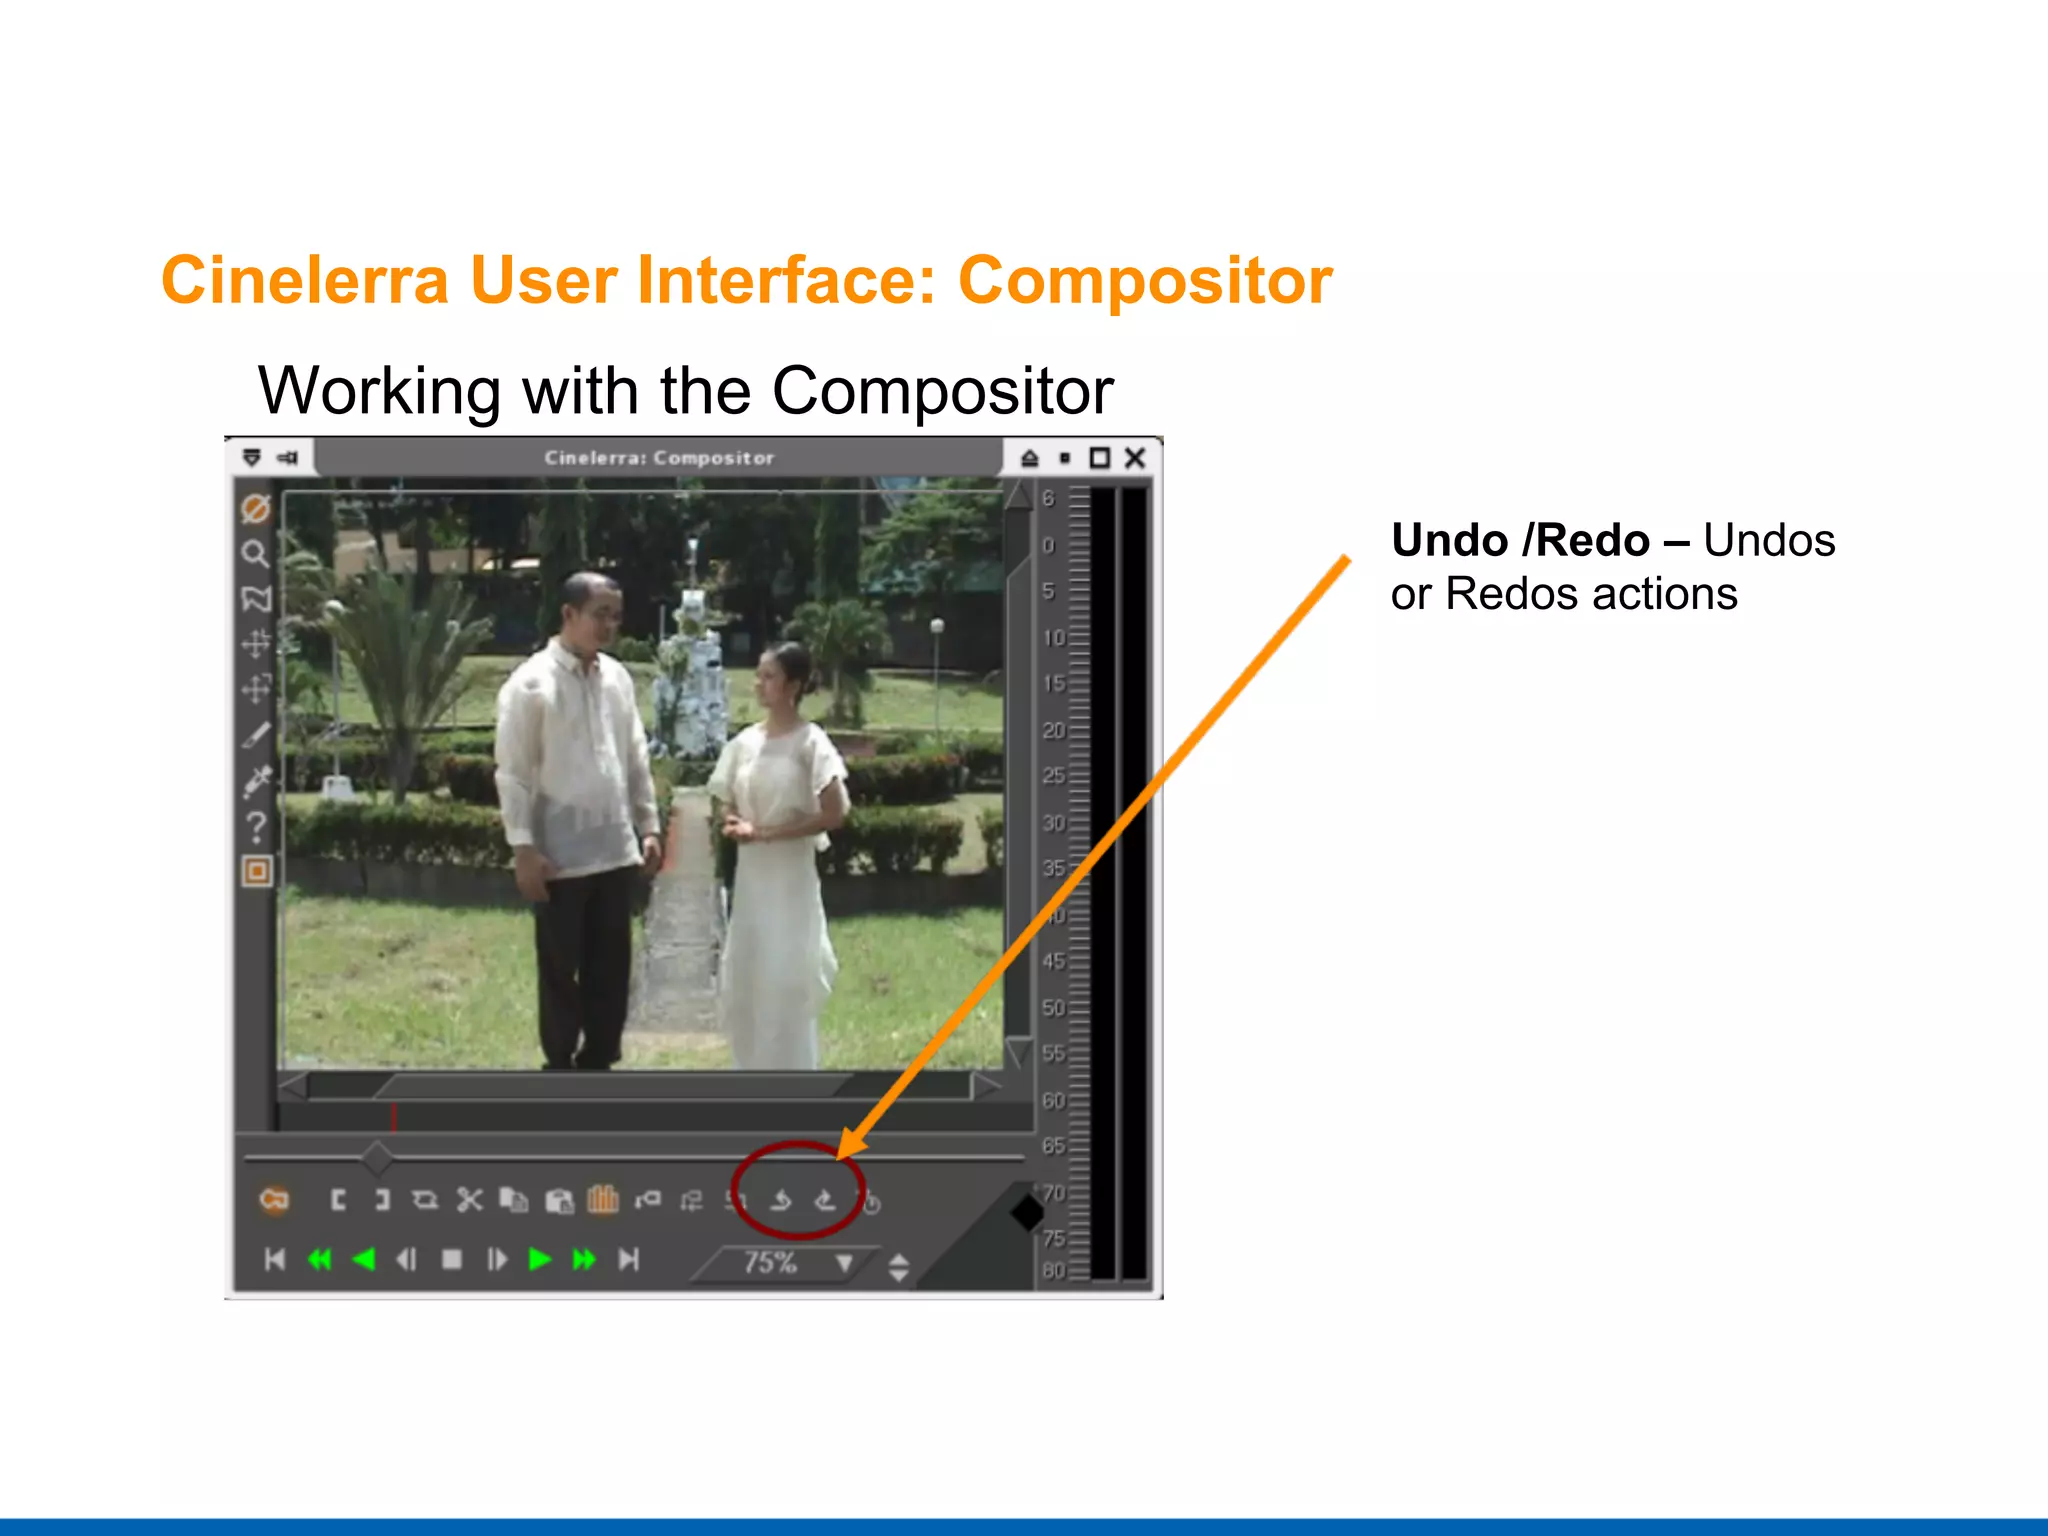
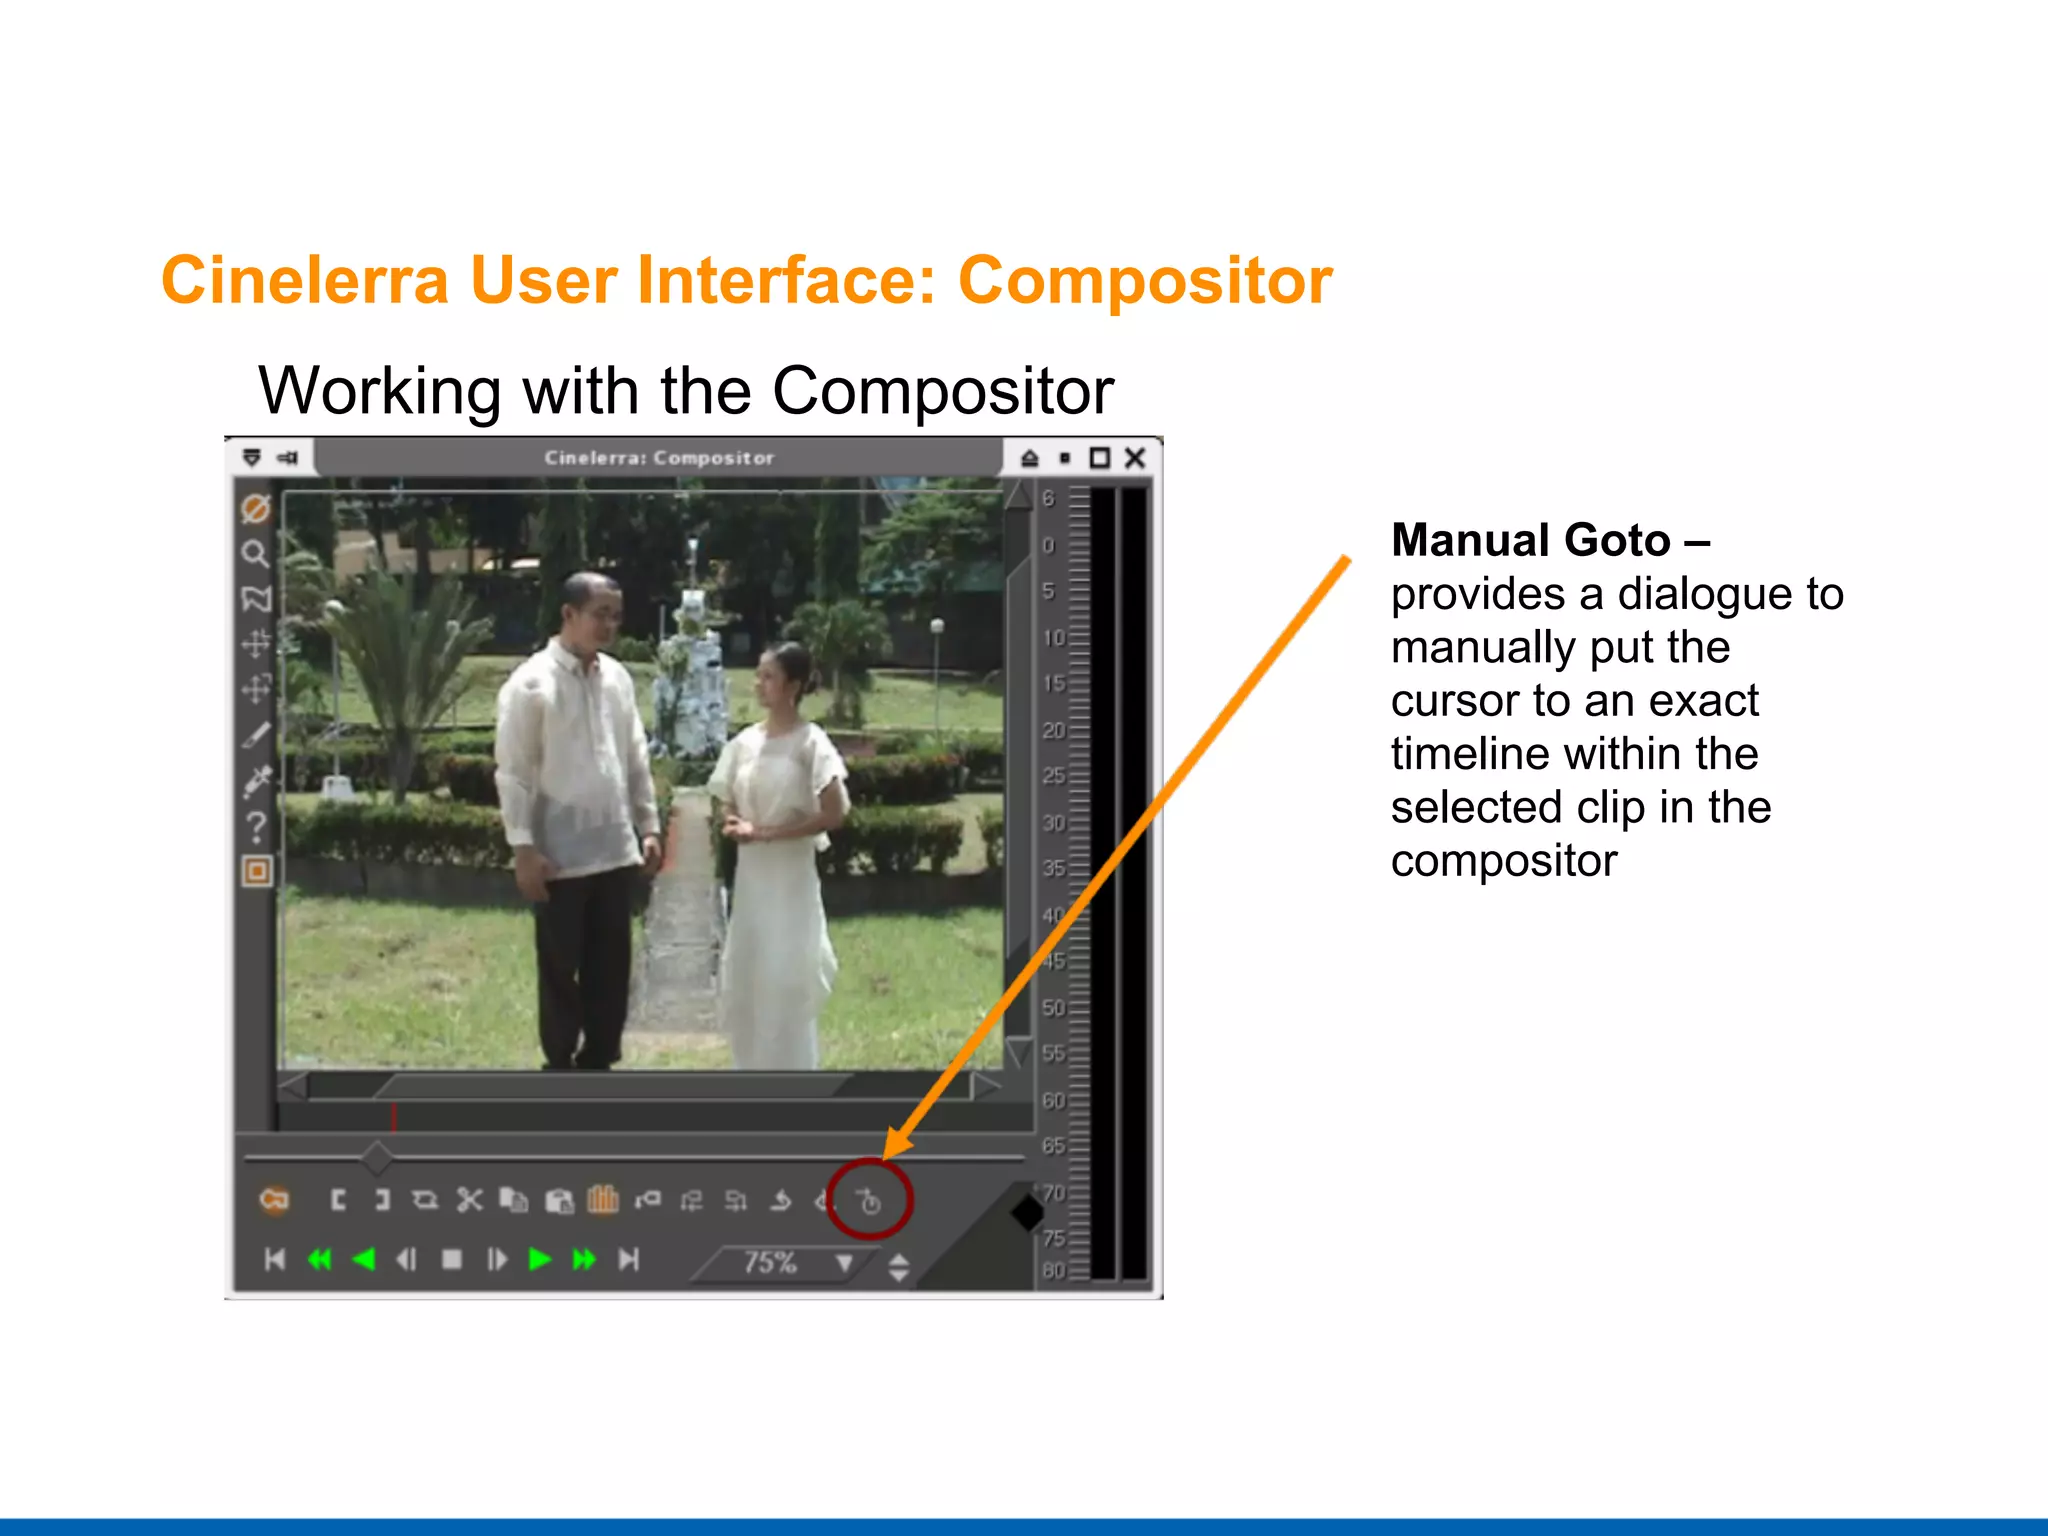
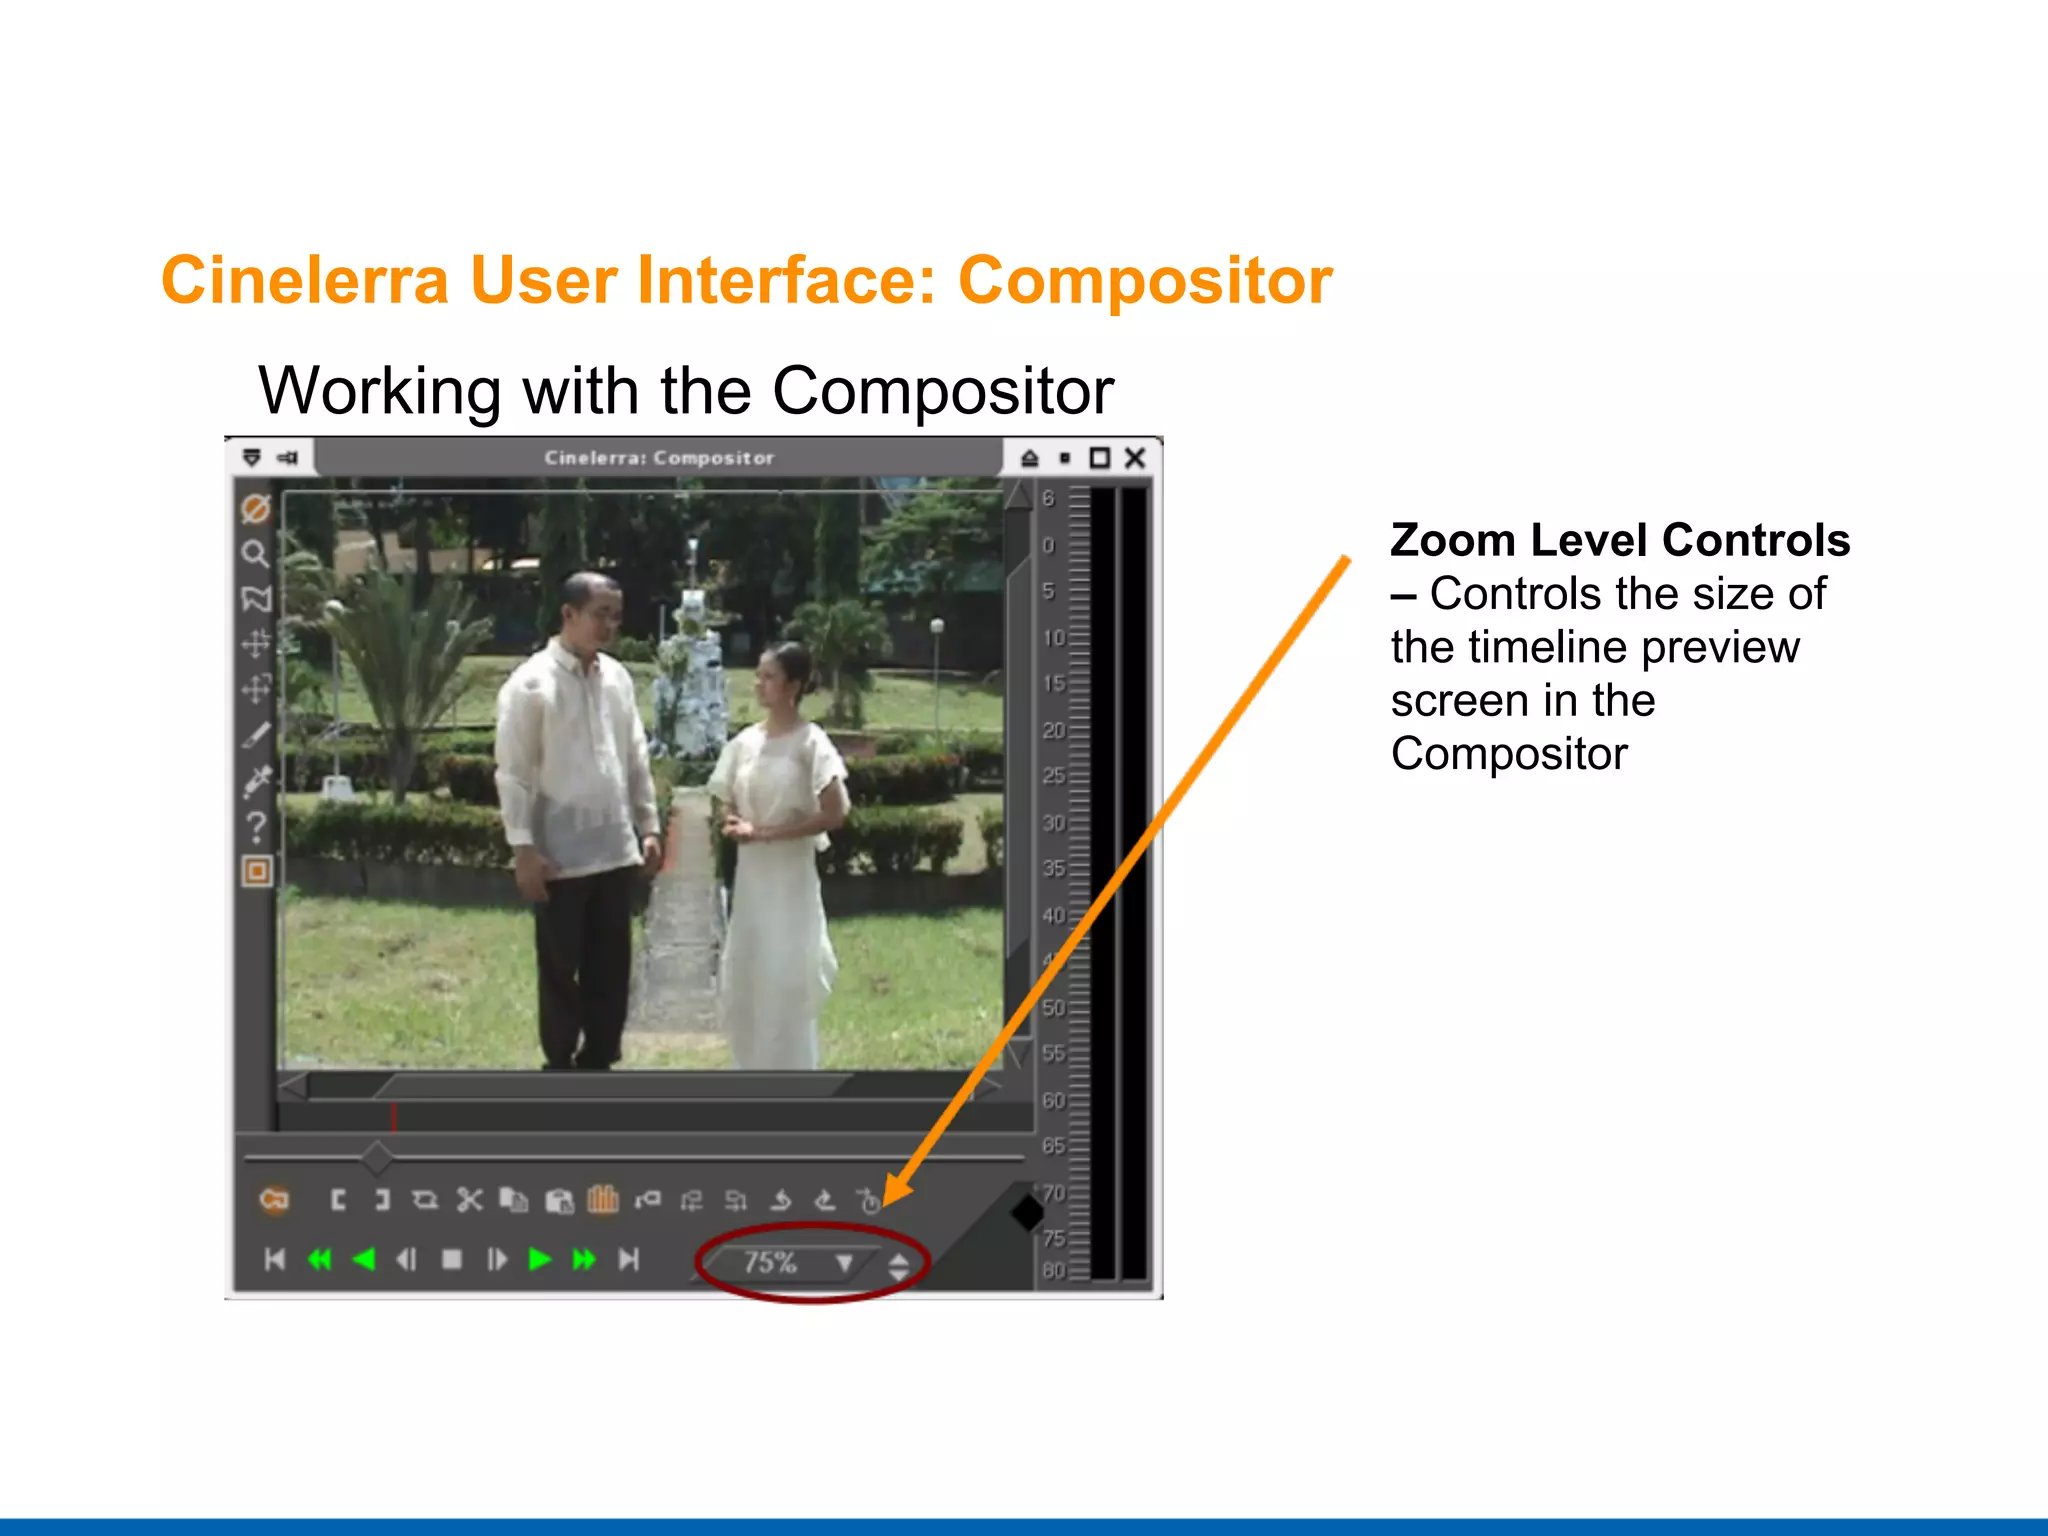
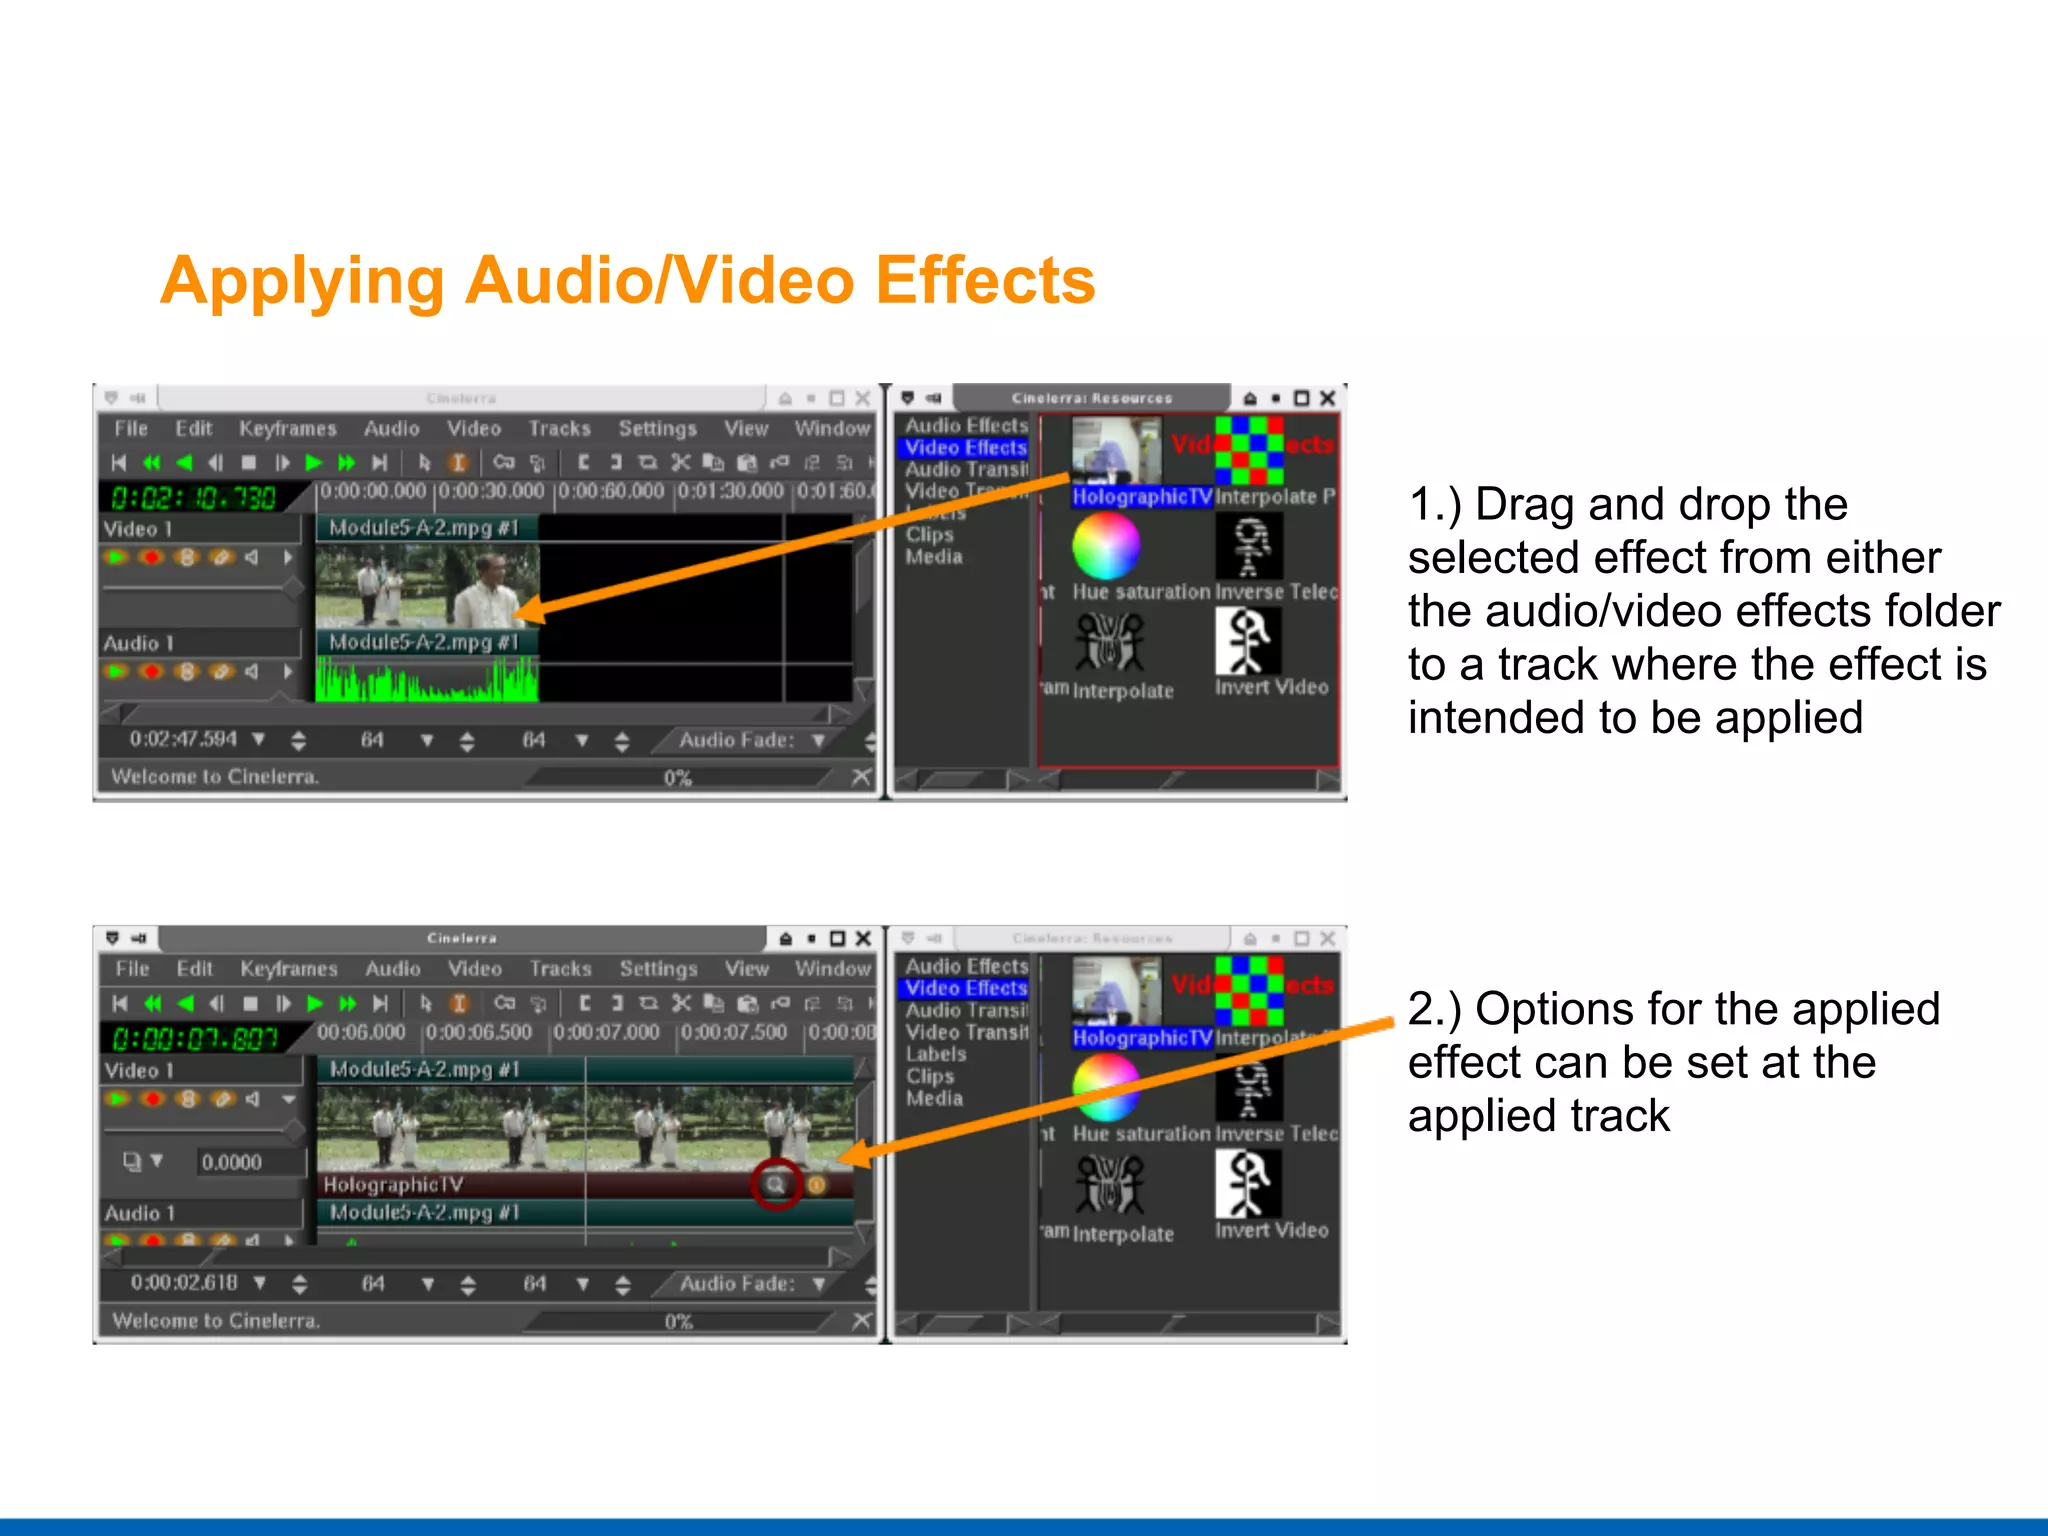
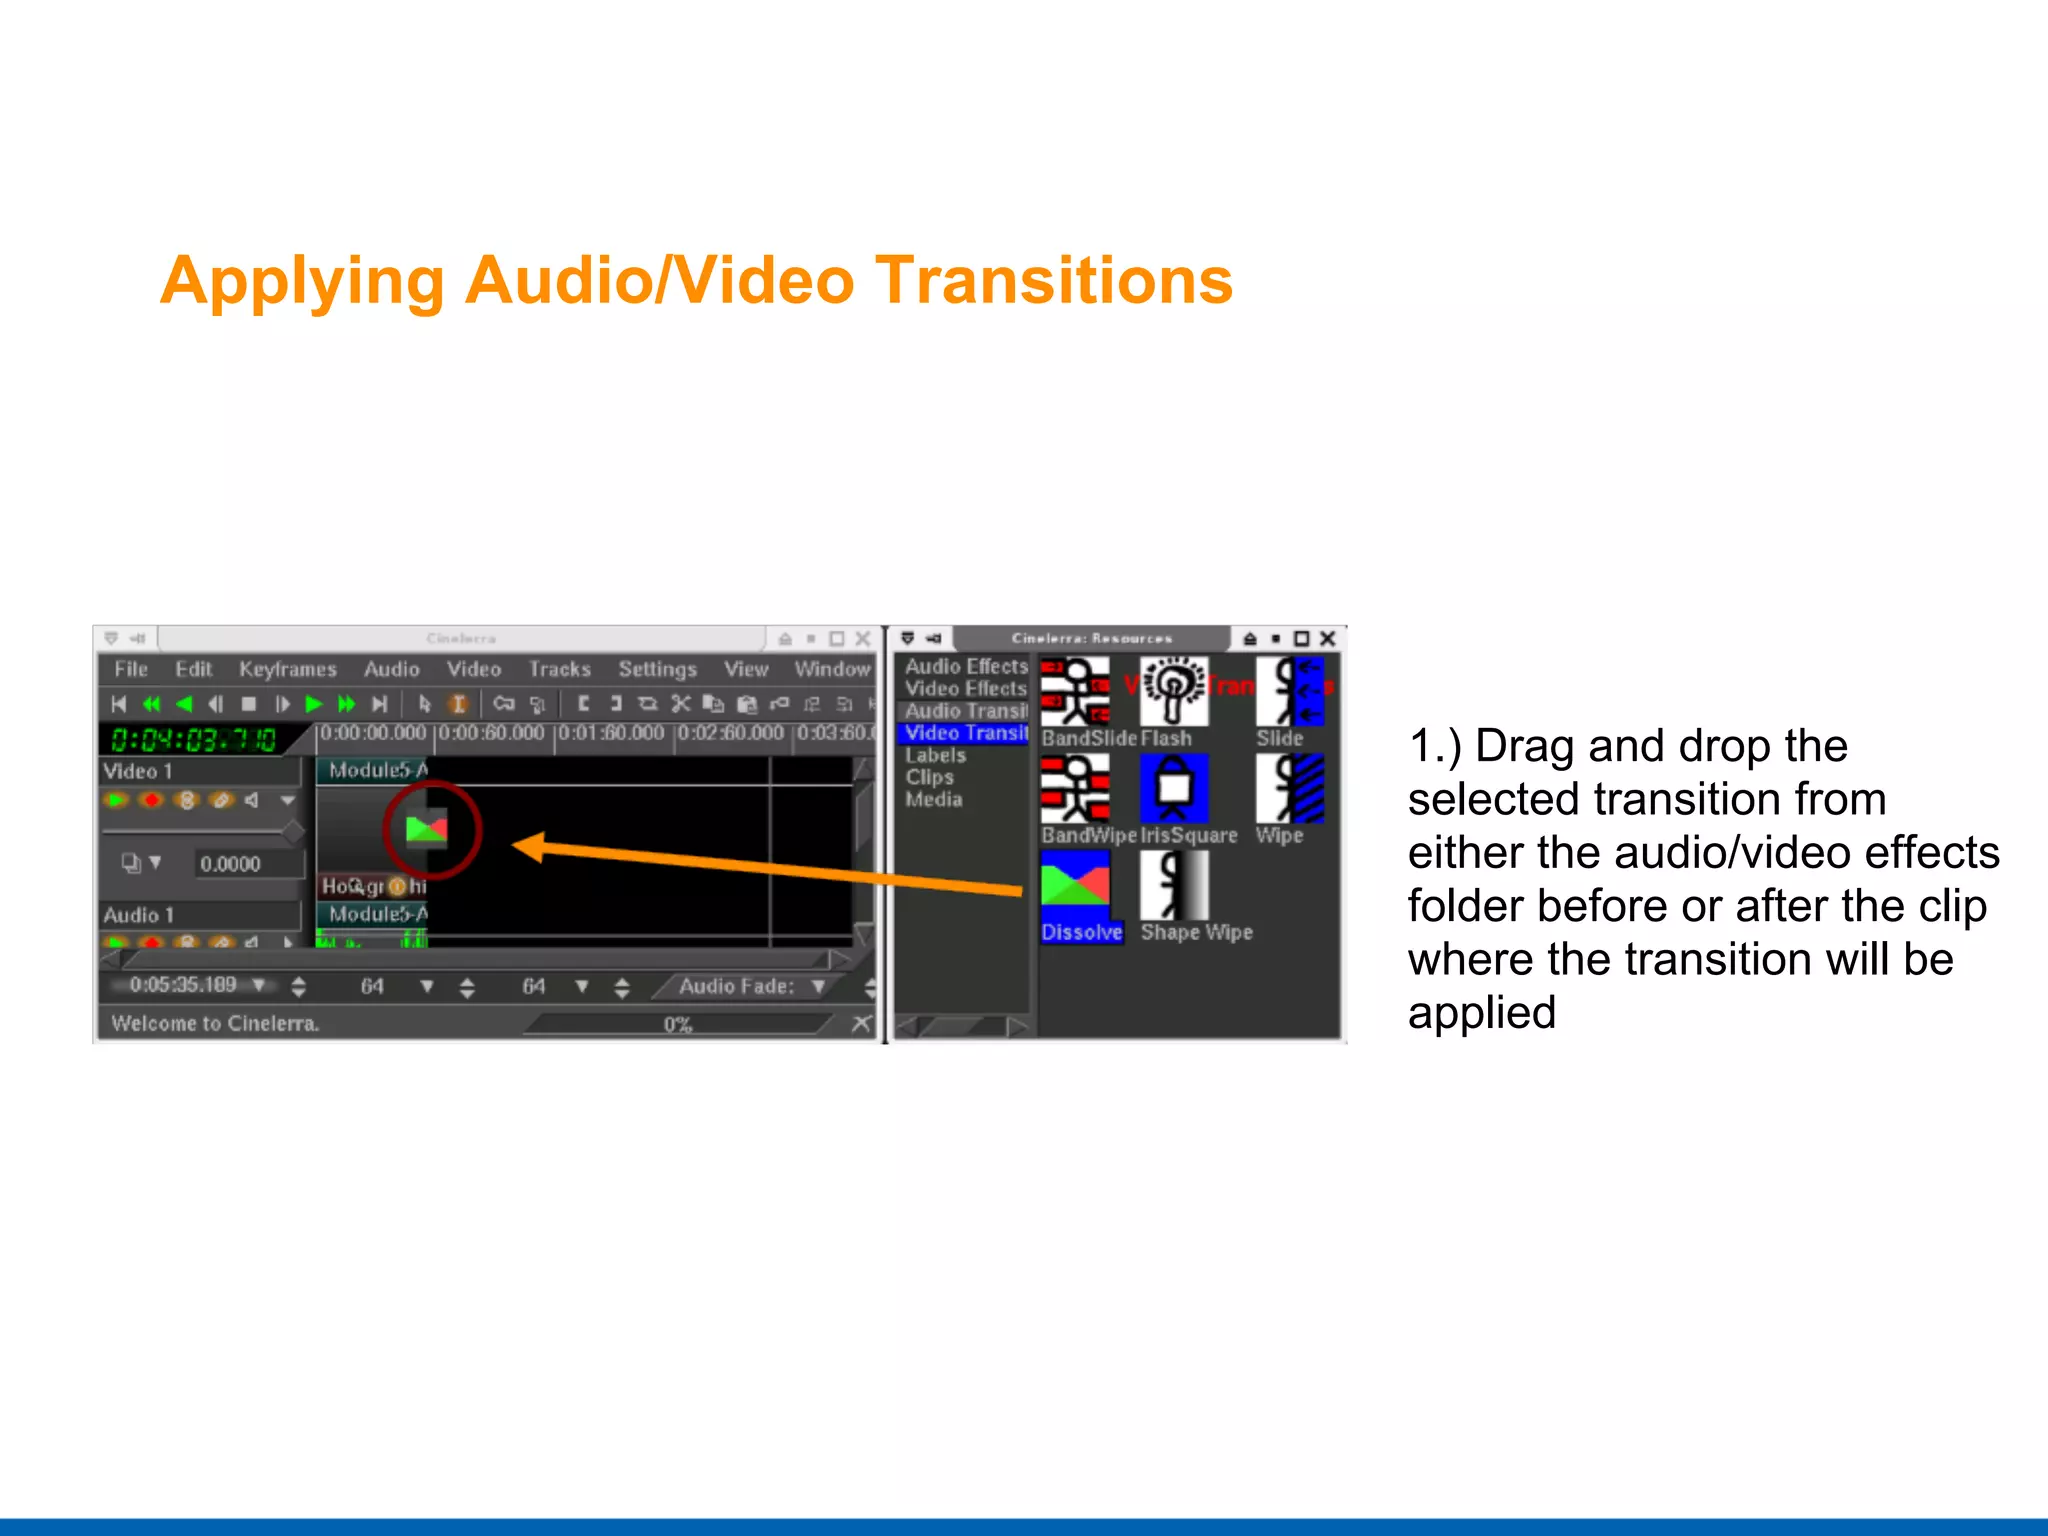
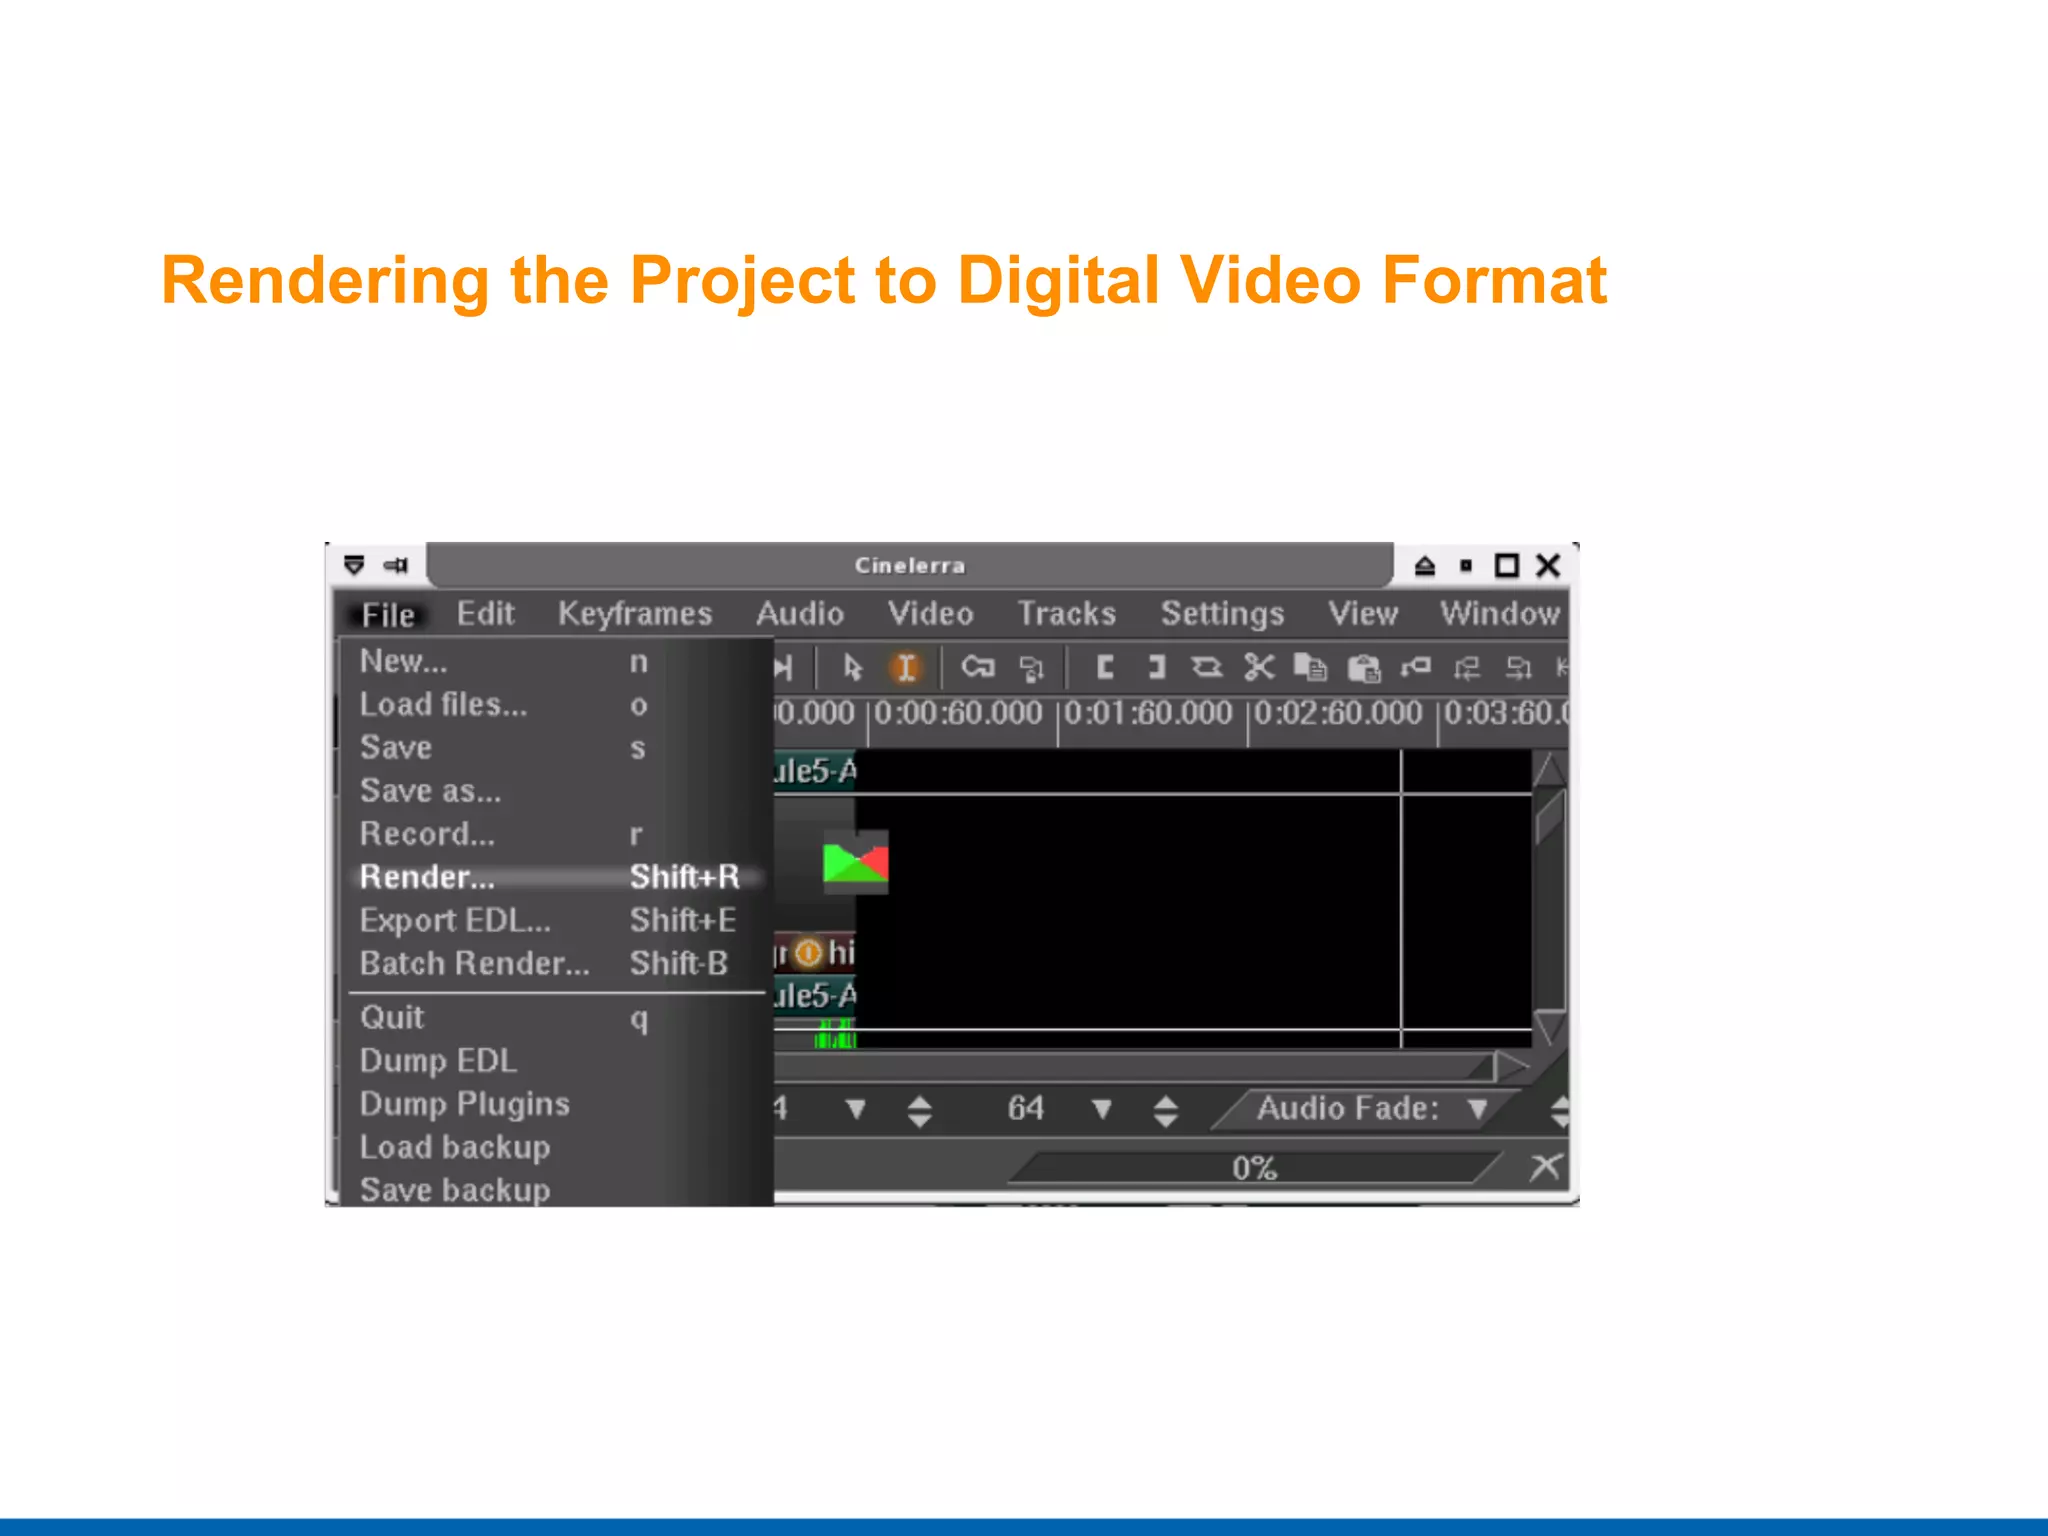
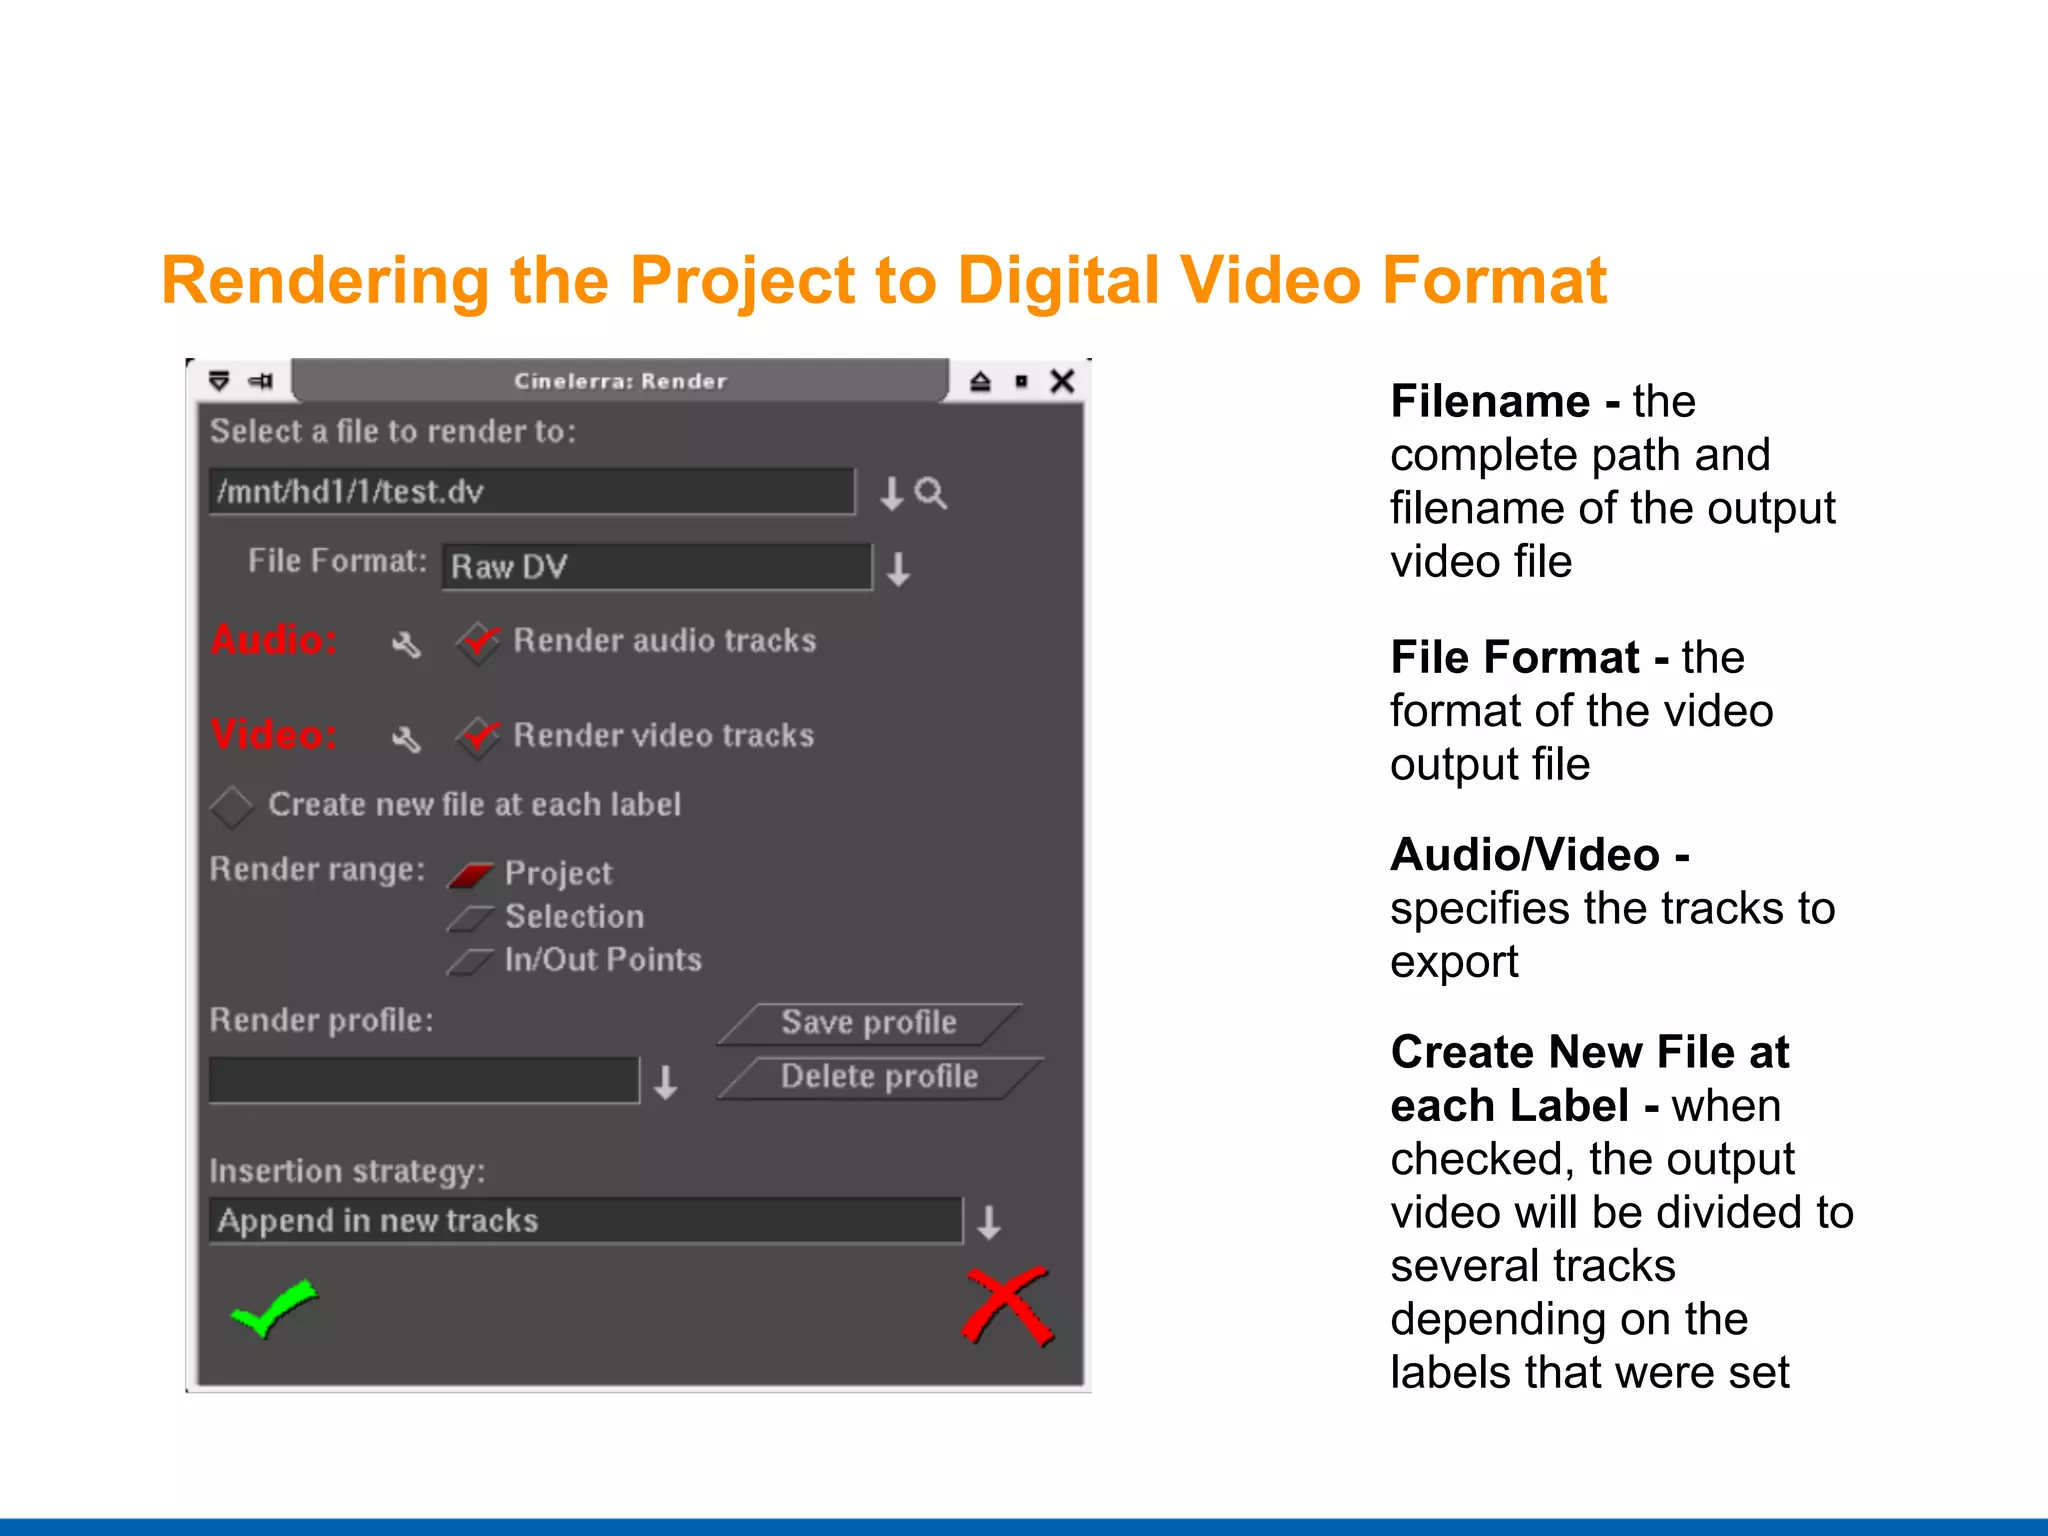
The document provides information about using the video editing software Kino and Cinelerra on Linux. It discusses the basic functions of each program, including importing video clips, splitting and trimming scenes, applying effects, and exporting finished videos. Key features of Kino include linear editing in a simple interface, while Cinelerra allows for multi-track editing and more advanced effects. Instructions are given for basic tasks like importing media, adding clips to the timeline, and using the viewer and editing screens.
Video editors are responsible for the creative editing decisions in post-production to develop films, TV programs, music videos, and commercials. They select and combine shots into sequences, add audio effects and music, and use software to improve quality and add titles, sounds, graphics, and visual effects to create the final product. Video editors work with non-linear editing software to accomplish tasks like transferring footage to computers and formatting videos for streaming online or DVDs.
www.mediacenterimac.com - Editing is part of the creative post-production process of filmmaking. Editing always a major demand in the electronic media scenario. We are the best institute in terms of video editing & photography courses.We have Industry Professionals & State –of-art set up.
The document discusses various video editing techniques and concepts. It covers topics like using editing software to add sound, titles, and transitions to animation productions. It also discusses digital versus analog media, specifying project settings like frame rate and aspect ratio, and the editing process which involves organizing clips, making cuts and joins, and adding transitions. The document provides information on tools for editing, compositing, and creating output for different formats.
Filmora is an all-in-one video editing software with a simple interface. It has both an easy mode for creating videos with themes and an advanced mode for fully customized editing. The document discusses how to import media, perform basic editing functions like trimming and splitting clips, and navigate Filmora's interface. Key points include importing video, images, and audio, recording directly in Filmora, filtering and sorting media, performing edits like rotations and crops, and joining multiple videos together.
Movie Maker is a free video editing software included with Windows that allows users to create and edit videos. It has various tools like a timeline, preview monitor, and contents pane for importing, arranging, and editing video, audio, pictures and other files. The document provides step-by-step instructions for installing Movie Maker and using its features to create a movie by importing and arranging various media types, adding effects, transitions and titles.
Windows Movie Maker is video editing software included with older versions of Windows. It allows users to import video clips, photos, and audio, arrange them on a timeline, and add titles, transitions and effects. The software supports common file formats and can export finished videos to share online or on devices.
A pretty powerful video editor application, which will not stamp a watermark or place a time limit on your clip. With FilmoraGo, making video with music and effects, FilmoraGo helps you make funny videos and relive your memories anywhere.
This document discusses how to convert .mod files to the WMV format for use in video editing software. It recommends using a mod to WMV converter program to easily convert .mod files to formats like WMV, AVI, MPEG, and RM while maintaining high quality. The program allows adjusting video effects and encoding parameters. Converting the files allows them to be imported and edited in Windows Movie Maker or other software. It provides tips that MOD is a camcorder file format, and players like MPlayer or VLC can be used to play MOD files on Windows.
This document provides information about a motion graphics project for Salford City College that features an animated caption in the corner of a video. The video shows a band performing at a festival. The animated caption scrolls the name of the band and song being performed. Technical details provided include that the caption fills a small part of the screen and uses techniques like animation, colors, and movement. Advanced techniques were not required.
Motion graphics and_compositing_video_analysis_worksheet - original - copyBethMelia
Salford City College offers a unit in Motion Graphics and Video Compositing. The document describes a title and credit sequence project. It states that at the beginning and end of the sequence, credits are displayed to list the actors and cast/crew. The techniques used include caption-based credits with white text on a dark background. The movements are simple fades for the opening, and a scrolling effect for the closing credits. No advanced techniques were used.
The document provides details about a wrestling intro video that uses various animation and visual effects techniques. It describes how the wrestler Triple H appears to have 3 wings on his back through animation on the big screen entrance. Advanced techniques like fading, blurring, spinning and changing opacity are used to enhance the intro effect. However, the video's low 240p resolution is noted as being much worse quality than HD standards like 720p. Key terms related to motion graphics, video compositing, and technical specifications are also defined.
In the free video editing software ppt, I'd like to show you the brand new smartpixel free video recording editing software features and advantages and comparisons with other video recording editing software.
User Manuel for Wondershare Video Editor Windows V. 4.8+Liza Brown
This user manual includes the following topics:
01. Introduction
02. Get Started - Download/Install/Register/Update/Uninstall
03. Create Projects
04. Import and Organize Media File
05. Basic Editing - Split/Rotate/Crop/Merge
06. Advanced Editing - Power Tools
07. Work with Audio -Add/Edit Audio File
08. Insert Transitions
09. Use Texts and Intro/Credit
10. Apply Special Effects
11. Add Overlay Clips (PIP)
12. Save and Share
a. Want this video editing tool? http://www.wondershare.com/video-editor/ to download at free.
b. Want to watch this user manual online? http://www.wondershare.com/video-editor/guide.html
c. Want to watch video tutorial? Go https://www.youtube.com/channel/UC8567DmojT8Ca3oZQlKip9w
OS: This is the complete user manual of Wondershare Video Editor (Windows Version 4.8+), which spent almost one week for me to finish all details. But there is still some new features didn't include like Split Screen, Green Screen and so on. But you can find all missing video tutorials in my YouTube Channel:
https://www.youtube.com/channel/UC8567DmojT8Ca3oZQlKip9w
and
https://www.youtube.com/user/Wondershare
The document provides instructions for using Microsoft Movie Maker, a free video editing software that comes with Windows. It explains that Movie Maker allows users to import and edit together videos, photos, and audio to create digital stories and movies. The instructions then outline the Movie Maker workspace and provide step-by-step guidance on how to add and edit various media, apply effects and transitions, add titles and credits, and save or publish finished movies.
The document reviews the top 5 Blu-ray rippers in 2016. It discusses each ripper's pros and cons, including Leawo Blu-ray Ripper, Pavtube Blu-ray Ripper, Aiseesoft Blu-ray Ripper, Open Blu-ray Ripper 2, and Xilisoft Blu-ray Ripper. It also provides a guide on how to use Leawo Blu-ray Ripper to rip Blu-ray files, including loading Blu-ray sources, setting output profiles, editing video files, and starting the conversion process.
Salford City College offers a unit in Motion Graphics and Video Compositing. The unit covers using text such as titles, credits, and captions in animations and menus. It also covers techniques like animation, visual effects, color rendering, and movement. More advanced techniques taught include blur, sharpening, distortion, rotation, and opacity. The document provides definitions for terms related to motion graphics, video formatting, and compression.
This document provides information about a title and credit sequence created for a motion graphics and video compositing course. It uses techniques like animation, visual effects, color rendering and graphics to create flashing imagery. Advanced techniques like blur, sharpening, distortion, rotation and opacity are also used. Technical details like video format, screen ratio, resolution, frame rate and compression are listed. Key terms related to motion graphics and video production are defined in a glossary.
This document defines various video and audio editing terms:
- Scrubbing is moving forward or backward through audio/video using a mouse, keyboard, or other device.
- SECAM is an analog broadcast television standard used in parts of Europe and Africa, similar to PAL but at 25 fps.
- SDI is a professional digital video connection format that transfers at 270 Mbps over coaxial cable.
- A storyboard outlines material to be shot on film/video or indicates a sequence of clips to be edited.
Movie Maker is a basic video editing program included in versions of Microsoft Windows. It allows users to import video clips, add titles and transitions, and export video files. Though simple to use, it provides benefits like free availability and easy editing of video for presentations, graduations or weddings. However, frequent crashing is a negative aspect.
This document provides information about a motion graphics video titled "Avengers blue ray dvd menu" including a brief description of what is seen in the video. It discusses the techniques used such as animation, visual effects, and color rendering since the entire clip was created using motion graphics in Adobe After Effects. Advanced techniques like blur, sharpen, distortion, and rotation are also mentioned. Technical details about the video format, screen ratio, resolution, frame rate, and compression are provided. Key terms related to motion graphics and video production are defined in a glossary.
This document provides information about a motion graphics project created by Salford City College students. [1] It describes a "Smart fun fortwo" advertisement featuring animated text that appears to wiggle. [2] Techniques used include animation, visual effects, color rendering, graphics and movement. [3] Advanced techniques like blur, sharpen, distortion, rotation and opacity were also employed.
The interactive Iron Man DVD menu displays play, subtitles, special features and scene selection options. Iron Man is animated and in bold colors to stand out against faded film clips playing behind him. Visual effects and animation are used to make Iron Man pop out from the menu. Techniques like sharpening and opacity are applied to Iron Man and the menu to make them stand out clearly. The video format is likely HD to match the high quality of the film, with a 16:9 screen ratio and resolution suitable for HD display.
The document describes an ending credits sequence from the film Sherlock Holmes. It uses text for the credits in an old font. The graphic animates between a second of film footage and transforming the scene into an old drawing in a book. This repeats throughout the credits. The animation was likely created using advanced techniques in After Effects like distortion and opacity. The footage has a dark, grainy color scheme fitting the film's style. The techniques used could be recreated using video and image editing software.
Objectives:
• Understand what is movie maker
• Understand what is the benefit of using movie maker
• Understand the interface components of Movie Maker
This document provides information about a Nickelodeon ident, including a brief description. It describes the techniques used in the ident such as animated animals moving around the screen and the Nickelodeon logo splattering on screen. Advanced techniques like blur and distortion are also used. Technical details are provided such as the video format being 720p, 16:9 ratio, and 25 frames per second. Key terms related to motion graphics and video compositing are also defined.
Basic Video Editing Training for BeginnersFawad Najam
This document provides an overview of basic video editing for beginners. It discusses (1) the goals of video editing such as removing unwanted footage and altering style/pace, (2) common video editing software options for beginners like Windows Movie Maker that are free and easy to use, and (3) the basic video editing process which includes importing media, arranging clips on the timeline, adding audio, effects and transitions.
Web Applications - Behind the Scenes + Open Source ExamplesRichard Peter Ong
The document discusses the basics of web applications including common types like content management systems, e-commerce sites, and forums. It explains the differences between web and desktop applications and covers the basic components and workflow of a web application from the browser to the server. Examples of open source web applications are provided for different types like Mambo CMS, OSCommerce, SugarCRM, and PunBB.
The document analyzes the first 10 shots of the film Mad Max. Shot 1 introduces the two main characters with Theron's name above Hardy, suggesting she has a more important role. Shot 2 establishes the main character Max in a long shot gazing over a dusty landscape near a wrecked car. Shot 3 shows Max being chased across the wasteland by warboys. Shot 4 shows a close-up of Max crawling from a wrecked car after being stomped on. Shot 5 reveals Max's face as he is shaved at the warboys' camp. Shot 6 shows tattoos being added to Max's back to dehumanize him. Shot 7 ends with Max breaking free before being branded. Shot 8 features a girl
The document discusses various video editing techniques such as continuity editing, parallel cutting, and thematic editing. Continuity editing involves arranging shots in a logical sequence to suggest progression of events or cause and effect. Parallel cutting cuts between different storylines happening simultaneously to vary pace and heighten interest. Thematic editing rapidly cuts between shots based on a central theme rather than a logical narrative. Proper use of techniques like insert shots, cutaways, and exploring motivation can enhance storytelling and believability.
The document defines key terminology related to film editing. It discusses how an editor constructs the narrative by assembling shots to tell the visual story. Some of the main editing techniques covered include cuts, dissolves, wipes, match cuts, and cross cutting. Cuts are the most basic and common transition where one shot instantly replaces the other. Dissolves gradually transition between shots, while wipes push one shot off the frame. Match cuts link shots through matching action or composition. Cross cutting alternates between scenes that may be happening simultaneously.
This document discusses various camera shots, angles, and movements used in filmmaking. It defines shots like wide shots, establishing shots, master shots, medium shots, close-ups, extreme close-ups, insert shots, reaction shots, and point-of-view shots. It explains the purpose and effect of each type of shot, such as establishing the location or emphasizing emotion. It also defines camera angles like low angles, high angles, Dutch tilts, and their effects on the audience's perspective.
This document discusses video editing software and provides tips for using it. It recommends doing the video right during filming rather than relying on editing software to fix problems. It also outlines some of the key features of video editing software, including cleaning up audio and video, cutting and adding transitions, importing and exporting files, and working with multiple tracks. Finally, it lists some basic and more advanced video editing software options that are available for under 100 euros.
This document discusses various editing techniques used to manipulate tempo, time, and meaning in films. It explores how shot length, transitions, timing, and sequencing can speed up or slow down pacing. Specific techniques like collage, shot reverse shot, and establishing shots are examined. Examples from films like The Shining, Fight Club, and Lord of the Rings are provided to illustrate editing principles in action.
This document provides instructions for using a mobile phone surveillance application on various mobile phone platforms, including Symbian, Windows Mobile, iPhone, Blackberry, and Android. It describes how to install the application, configure settings like the server address and login credentials, operate features like live video playback, PTZ control, zooming and adjusting focus/iris. It also explains how to take screenshots, switch between channels, and access a history of recorded video clips. Operations are demonstrated for both regular and full-screen viewing modes across different phone displays.
This document provides an overview of basic video concepts, including capturing, editing, and file formats. It discusses how video is a sequence of visual images measured in frames per second. Video can be captured digitally from devices like cameras or digitized from analog sources. Common video editing software allows editing video clips using a timeline, with operations like cuts, fades, and transitions. Formats are broken into containers, like MOV or MP4, and codecs for data compression like H.264 or MPEG-2.
The document describes the Live Content Producer, the AWS-G500 and AWS-G500HD. It is an all-in-one live production system that combines a video switcher, audio mixer, display and streaming encoder in a compact chassis. It provides flexible inputs including composite, S-video, HDMI and HD-SDI. It allows live switching between video and PC sources without quality degradation. Controls are integrated on the touchscreen interface for intuitive operation.
Windows Live Movie Maker allows users to create videos on their computer by importing video and audio files from devices. It has tools for editing video clips, adding transitions, effects, titles and more. The interface includes a ribbon, storyboard pane, playback controls and more. Common terms include video frames, clips, captures, and transitions. Users can add, remove and rearrange video, photos and audio, then save and close their project.
Final Cut Pro is a non-linear video editing software originally developed by Macromedia and now by Apple. It allows users to log, transfer, edit and output video files in various formats. With features like multi-track timelines and multi-camera editing, it has become popular with video hobbyists and independent filmmakers. The software consists of four main windows - the Browser to access clips, the Canvas to view the timeline, the Viewer to preview clips, and the Timeline where clips are arranged and edited.
In this report we are going to explain how a movie is virtually projected into an image, or into another video, replacing a white screen, in order to reproduce an augmented reality scenario. In the case it is projected on a video, the corners of the "screen" are tracked through each frame to update the area onto which the movie will be shown.
The document provides an overview of the Adobe Premiere workspace and its key panels. It describes the five main panels: Project, Monitor, Info, Timeline, and Tools. It explains the purpose and functions of each panel, including how to store and organize assets in the Project panel, view video in the Monitor panel, and arrange clips in the Timeline panel. It also covers the Current Time Indicator and common tools in the Tools panel used for basic video editing tasks.
This document provides instructions for using Windows Movie Maker to edit videos. It describes the key interface elements like the preview area, storyboard/timeline, and task pane. It then outlines the basic steps to edit a video, which include importing files, dragging clips to the storyboard, adding effects, transitions, titles, and audio. The document concludes by explaining how to save the finished movie in a file format like MP4 to view the completed video.
This document provides instructions on adding transition effects and overlays in Ulead VideoStudio. It discusses:
1. Transition effects that can be applied between video clips in the timeline to shift between scenes. These effects can be customized using the options panel.
2. The overlay track allows additional videos or images to be placed above video clips to enhance introductions or credits. Clips in the overlay track have automatic transparency.
3. Overlay clips can be inserted into the overlay track similar to inserting clips into the video track, and motion effects can be used to blend overlay clips with those in the video track.
This document provides an overview of basic concepts for producing video content in Adobe Premiere Pro, including:
- The objectives of understanding video editing principles in Premiere Pro, carrying out edits, packaging videos, and file sharing.
- An introduction to Premiere Pro and how it uses a timeline structure for audio/video transitions, effects, and fine-tuning videos.
- Explanations of frame rate, bit rate, storyboards, scripts and their purposes in motion picture production.
- Images and descriptions of common timeline tools in Premiere Pro like selection, track selection, ripple edit, and knife tools.
The document outlines the key phases of film production: pre-production, production, and post-production. In pre-production, tasks include screenwriting, storyboarding, casting, scheduling, and securing funding. During production, crews film on location under the direction of the director and departments like camera, lighting, and sound. In post-production, the film is edited, sound effects and music are added, and the final cut is prepared for distribution.
The document provides instructions for getting started with Camtasia Studio 4.0. It outlines the three main steps: 1) Record your video using the Camtasia Recorder to capture screen activity. 2) Edit and enhance the recording on the timeline by adding clips, adjusting timing, and adding effects. 3) Produce the final video by selecting format and settings to optimize file size. The guide provides overviews of the recording, editing, and production features in Camtasia Studio.
This document provides an overview and getting started guide for Camtasia Studio 4.0 screen recording and video editing software. It introduces the four basic steps to creating a video project: 1) recording screen activity, 2) editing and enhancing recordings, 3) producing the final video, and 4) sharing the completed video. Key concepts for each step like importing media, adding transitions, customizing production settings, and distribution options are also outlined. The guide aims to familiarize new users with the Camtasia Studio interface and walk them through the essential workflow and features.
This document provides instructions for creating a movie using Windows Movie Maker. It begins with an overview of the Movie Maker interface, including the menu bar, toolbar, movie tasks pane, collections pane, monitor, timeline, and storyboard. It then discusses how to import videos, photos, audio, and music into Movie Maker and capture video from an external device. The document also explains how to drag imported photos and videos to the storyboard or timeline to build the movie. Lastly, it describes how to move clips within the timeline or storyboard.
This document discusses various aspects of video editing, including:
- The typical editing workflow process of reviewing footage, capturing video, assembling sequences, adding effects and titles, mixing audio, and exporting.
- Key considerations for video editors like the software and hardware used, file formats, quality of imports and exports, and budget.
- An overview of the history of film editing from early linear practices to now with non-linear editing allowing for effects and separate audio/video editing.
- Techniques like continuity editing, shot reverse shot patterns, match cuts, and violations of continuity like jump cuts.
This document provides an introduction and outline for an e-learning course on video editing with Adobe Premiere. The course was created for mass communication students to teach basic video editing skills. It covers lessons on the Premiere workspace and tools, importing footage, adding titles, using keyframes and transitions, adjusting speed and opacity, applying effects and trimming clips, and exporting edited videos. The goal is to help students learn video editing and potentially pursue video editing careers.
The document outlines the key phases of film production: development, pre-production, production, post-production, and distribution. It focuses on pre-production, production, and post-production. Pre-production includes writing the screenplay, storyboarding, fundraising, casting, location scouting, and more. Production refers to filming and involves different crew roles like director, camera operators, lighting, and sound recording. Post-production encompasses editing, adding visual effects, dubbing, music, and finalizing the film for distribution.
This document provides information about techniques used in movie DVD menus, including animation, visual effects, color rendering, and graphics. It discusses how computer generated imagery (CGI) was used to create flying and stunt scenes for Spiderman in the DVD menu. Advanced techniques like blur, sharpening, distortion, rotation, and opacity changes are proposed. Technical details covered include video format, screen ratio, resolution, frame rate, and compression. Key terms like motion graphics, compositing video, and interactive menus are defined.
This document provides information about techniques used in movie DVD menus, including animation, visual effects, color rendering, and graphics. It discusses how computer generated imagery (CGI) was used to create flying and stunt scenes for Spiderman in the DVD menu. It also lists technical specifications for the video format, screen ratio, resolution, frame rate, and compression used. Key terms related to motion graphics and video compositing are defined.
This document provides information about techniques used in movie DVD menus, including animation, visual effects, color rendering, and graphics. It discusses how computer generated imagery (CGI) was used to create flying and stunt scenes for Spiderman in the DVD menu. Advanced techniques like blur, sharpening, distortion, rotation, and opacity changes are proposed. Technical details covered include video format, screen ratio, resolution, frame rate, and compression. Key terms like motion graphics, compositing video, and interactive menus are defined.
[OReilly Superstream] Occupy the Space: A grassroots guide to engineering (an...Jason Yip
The typical problem in product engineering is not bad strategy, so much as “no strategy”. This leads to confusion, lack of motivation, and incoherent action. The next time you look for a strategy and find an empty space, instead of waiting for it to be filled, I will show you how to fill it in yourself. If you’re wrong, it forces a correction. If you’re right, it helps create focus. I’ll share how I’ve approached this in the past, both what works and lessons for what didn’t work so well.
HCL Notes und Domino Lizenzkostenreduzierung in der Welt von DLAUpanagenda
Webinar Recording: https://www.panagenda.com/webinars/hcl-notes-und-domino-lizenzkostenreduzierung-in-der-welt-von-dlau/
DLAU und die Lizenzen nach dem CCB- und CCX-Modell sind für viele in der HCL-Community seit letztem Jahr ein heißes Thema. Als Notes- oder Domino-Kunde haben Sie vielleicht mit unerwartet hohen Benutzerzahlen und Lizenzgebühren zu kämpfen. Sie fragen sich vielleicht, wie diese neue Art der Lizenzierung funktioniert und welchen Nutzen sie Ihnen bringt. Vor allem wollen Sie sicherlich Ihr Budget einhalten und Kosten sparen, wo immer möglich. Das verstehen wir und wir möchten Ihnen dabei helfen!
Wir erklären Ihnen, wie Sie häufige Konfigurationsprobleme lösen können, die dazu führen können, dass mehr Benutzer gezählt werden als nötig, und wie Sie überflüssige oder ungenutzte Konten identifizieren und entfernen können, um Geld zu sparen. Es gibt auch einige Ansätze, die zu unnötigen Ausgaben führen können, z. B. wenn ein Personendokument anstelle eines Mail-Ins für geteilte Mailboxen verwendet wird. Wir zeigen Ihnen solche Fälle und deren Lösungen. Und natürlich erklären wir Ihnen das neue Lizenzmodell.
Nehmen Sie an diesem Webinar teil, bei dem HCL-Ambassador Marc Thomas und Gastredner Franz Walder Ihnen diese neue Welt näherbringen. Es vermittelt Ihnen die Tools und das Know-how, um den Überblick zu bewahren. Sie werden in der Lage sein, Ihre Kosten durch eine optimierte Domino-Konfiguration zu reduzieren und auch in Zukunft gering zu halten.
Diese Themen werden behandelt
- Reduzierung der Lizenzkosten durch Auffinden und Beheben von Fehlkonfigurationen und überflüssigen Konten
- Wie funktionieren CCB- und CCX-Lizenzen wirklich?
- Verstehen des DLAU-Tools und wie man es am besten nutzt
- Tipps für häufige Problembereiche, wie z. B. Team-Postfächer, Funktions-/Testbenutzer usw.
- Praxisbeispiele und Best Practices zum sofortigen Umsetzen
Introduction of Cybersecurity with OSS at Code Europe 2024Hiroshi SHIBATA
I develop the Ruby programming language, RubyGems, and Bundler, which are package managers for Ruby. Today, I will introduce how to enhance the security of your application using open-source software (OSS) examples from Ruby and RubyGems.
The first topic is CVE (Common Vulnerabilities and Exposures). I have published CVEs many times. But what exactly is a CVE? I'll provide a basic understanding of CVEs and explain how to detect and handle vulnerabilities in OSS.
Next, let's discuss package managers. Package managers play a critical role in the OSS ecosystem. I'll explain how to manage library dependencies in your application.
I'll share insights into how the Ruby and RubyGems core team works to keep our ecosystem safe. By the end of this talk, you'll have a better understanding of how to safeguard your code.
Driving Business Innovation: Latest Generative AI Advancements & Success StorySafe Software
Are you ready to revolutionize how you handle data? Join us for a webinar where we’ll bring you up to speed with the latest advancements in Generative AI technology and discover how leveraging FME with tools from giants like Google Gemini, Amazon, and Microsoft OpenAI can supercharge your workflow efficiency.
During the hour, we’ll take you through:
Guest Speaker Segment with Hannah Barrington: Dive into the world of dynamic real estate marketing with Hannah, the Marketing Manager at Workspace Group. Hear firsthand how their team generates engaging descriptions for thousands of office units by integrating diverse data sources—from PDF floorplans to web pages—using FME transformers, like OpenAIVisionConnector and AnthropicVisionConnector. This use case will show you how GenAI can streamline content creation for marketing across the board.
Ollama Use Case: Learn how Scenario Specialist Dmitri Bagh has utilized Ollama within FME to input data, create custom models, and enhance security protocols. This segment will include demos to illustrate the full capabilities of FME in AI-driven processes.
Custom AI Models: Discover how to leverage FME to build personalized AI models using your data. Whether it’s populating a model with local data for added security or integrating public AI tools, find out how FME facilitates a versatile and secure approach to AI.
We’ll wrap up with a live Q&A session where you can engage with our experts on your specific use cases, and learn more about optimizing your data workflows with AI.
This webinar is ideal for professionals seeking to harness the power of AI within their data management systems while ensuring high levels of customization and security. Whether you're a novice or an expert, gain actionable insights and strategies to elevate your data processes. Join us to see how FME and AI can revolutionize how you work with data!
Generating privacy-protected synthetic data using Secludy and MilvusZilliz
During this demo, the founders of Secludy will demonstrate how their system utilizes Milvus to store and manipulate embeddings for generating privacy-protected synthetic data. Their approach not only maintains the confidentiality of the original data but also enhances the utility and scalability of LLMs under privacy constraints. Attendees, including machine learning engineers, data scientists, and data managers, will witness first-hand how Secludy's integration with Milvus empowers organizations to harness the power of LLMs securely and efficiently.
Fueling AI with Great Data with Airbyte WebinarZilliz
This talk will focus on how to collect data from a variety of sources, leveraging this data for RAG and other GenAI use cases, and finally charting your course to productionalization.
Ivanti’s Patch Tuesday breakdown goes beyond patching your applications and brings you the intelligence and guidance needed to prioritize where to focus your attention first. Catch early analysis on our Ivanti blog, then join industry expert Chris Goettl for the Patch Tuesday Webinar Event. There we’ll do a deep dive into each of the bulletins and give guidance on the risks associated with the newly-identified vulnerabilities.
How information systems are built or acquired puts information, which is what they should be about, in a secondary place. Our language adapted accordingly, and we no longer talk about information systems but applications. Applications evolved in a way to break data into diverse fragments, tightly coupled with applications and expensive to integrate. The result is technical debt, which is re-paid by taking even bigger "loans", resulting in an ever-increasing technical debt. Software engineering and procurement practices work in sync with market forces to maintain this trend. This talk demonstrates how natural this situation is. The question is: can something be done to reverse the trend?
Taking AI to the Next Level in Manufacturing.pdfssuserfac0301
Read Taking AI to the Next Level in Manufacturing to gain insights on AI adoption in the manufacturing industry, such as:
1. How quickly AI is being implemented in manufacturing.
2. Which barriers stand in the way of AI adoption.
3. How data quality and governance form the backbone of AI.
4. Organizational processes and structures that may inhibit effective AI adoption.
6. Ideas and approaches to help build your organization's AI strategy.
zkStudyClub - LatticeFold: A Lattice-based Folding Scheme and its Application...Alex Pruden
Folding is a recent technique for building efficient recursive SNARKs. Several elegant folding protocols have been proposed, such as Nova, Supernova, Hypernova, Protostar, and others. However, all of them rely on an additively homomorphic commitment scheme based on discrete log, and are therefore not post-quantum secure. In this work we present LatticeFold, the first lattice-based folding protocol based on the Module SIS problem. This folding protocol naturally leads to an efficient recursive lattice-based SNARK and an efficient PCD scheme. LatticeFold supports folding low-degree relations, such as R1CS, as well as high-degree relations, such as CCS. The key challenge is to construct a secure folding protocol that works with the Ajtai commitment scheme. The difficulty, is ensuring that extracted witnesses are low norm through many rounds of folding. We present a novel technique using the sumcheck protocol to ensure that extracted witnesses are always low norm no matter how many rounds of folding are used. Our evaluation of the final proof system suggests that it is as performant as Hypernova, while providing post-quantum security.
Paper Link: https://eprint.iacr.org/2024/257
Your One-Stop Shop for Python Success: Top 10 US Python Development Providersakankshawande
Simplify your search for a reliable Python development partner! This list presents the top 10 trusted US providers offering comprehensive Python development services, ensuring your project's success from conception to completion.
HCL Notes and Domino License Cost Reduction in the World of DLAUpanagenda
Webinar Recording: https://www.panagenda.com/webinars/hcl-notes-and-domino-license-cost-reduction-in-the-world-of-dlau/
The introduction of DLAU and the CCB & CCX licensing model caused quite a stir in the HCL community. As a Notes and Domino customer, you may have faced challenges with unexpected user counts and license costs. You probably have questions on how this new licensing approach works and how to benefit from it. Most importantly, you likely have budget constraints and want to save money where possible. Don’t worry, we can help with all of this!
We’ll show you how to fix common misconfigurations that cause higher-than-expected user counts, and how to identify accounts which you can deactivate to save money. There are also frequent patterns that can cause unnecessary cost, like using a person document instead of a mail-in for shared mailboxes. We’ll provide examples and solutions for those as well. And naturally we’ll explain the new licensing model.
Join HCL Ambassador Marc Thomas in this webinar with a special guest appearance from Franz Walder. It will give you the tools and know-how to stay on top of what is going on with Domino licensing. You will be able lower your cost through an optimized configuration and keep it low going forward.
These topics will be covered
- Reducing license cost by finding and fixing misconfigurations and superfluous accounts
- How do CCB and CCX licenses really work?
- Understanding the DLAU tool and how to best utilize it
- Tips for common problem areas, like team mailboxes, functional/test users, etc
- Practical examples and best practices to implement right away
2. What is Video Editing
Video editing is the process of manipulating video clips. It is a
post production phase which is comprised by the following
activities:
Removal of clips that are not needed;
Sequencing of clips to create the flow; and
Addition of background music, video effects and other
elements to enhance the over-all look and feel of a video.
3. Software:
Kino – is a linear, non-mutli-tracked video editor for editing
in/out, trimming, splitting, sequencing and reordering scenes
and application of simple effects.
Cinelerra – is a linear, multi-tracked video editor for application
of background audio, overlaying videos/images/audio and
application of more complex effects.
9. Kino User Interface and Screens
Screen: Associated
actions/description:
- Cutting, copying, pasting, splitting and joining of scenes
- Capturing of clips from an analog source (camcorder
through firewire)
- Displays thumbnails representing a corresponding timeline
- Trimming of specific active scenes, either in overwrite or
insert modes
- Application of basic video effects and transitions
- Exporting of edited clips to various video formats
10. Kino User Interface and Screens
Edit Screen: Splitting Scenes
1.) Select a scene from the
storyboard
2.) Select a specific timeline
from the timeline scroller
where the active scene is
intended to be splitted
3.) Click the “Split” button
11. Kino User Interface and Screens
Edit Screen: Cutting Scenes
1.) Select a scene from the
storyboard
2.) Click the “Cut” button
12. Kino User Interface and Screens
Edit Screen: Copying Scenes
1.) Select a scene from the
storyboard
2.) Click the “Copy” button
13. Kino User Interface and Screens
Edit Screen: Pasting Scenes
1.) Select a scene where the
copied scene will be pasted
2.) Click the “Paste” button
14. Kino User Interface and Screens
Edit Screen: Joining Scenes
1.) Select a scene which will
be joined to the next scene
2.) Click the “Merge” button
15. Kino User Interface and Screens
Capture Screen:
AV/C - Turns on the
Device Control/Monitor
Capture - Starts
capturing
STOP - Stops
capturing
Still - Captures current
frame to an image file
format
Mute - Mutes the
audio from the device
File - Specifies the
filename of the digital
video when captured
16. Kino User Interface and Screens
Timeline Screen:
Start - Specifies
starting range of
timeline thumbnails to
show
End - Specifies ending
range of timeline
thumbnails to show
17. Kino User Interface and Screens
Trim Screen:
In - Specifies starting
range of a scene
segment to clip
Out - Specifies ending
range of a scene
segment to clip
Mode - In overwrite
mode, the trimmed clip
will replace the actual
scene, in insert mode,
the trimmed clip will be
inserted either before
or after the active
scene
18. Kino User Interface and Screens
FX Screen: Overwrite - Applies
the video/audio effects
to the current active
scene
Create - Inserts a clip
after the active scene
from a variety of
sources.
Audio
Filter/Transition -
Provides effects
affecting the audio
layer of the active
scene
Video
Filter/Transition -
Provides effects
affecting the video
layer of the active
scene
19. Kino User Interface and Screens
FX Screen: Every - Specifies the
interval of frames to
export
Frame of - Specifies
whether to export the
whole storyboard or
just the current active
scene
Format Tabs -
Provides a number of
formats and settings in
which the
storyboard/scene set
can be exported to
24. Cinelerra User Interface
Viewer
Viewer - provides
previewing screen for
the imported media, it
also provides basic
editing features such
as splicing the active
media to the selected
track timeline
25. Cinelerra User Interface
Compsitor
Compositor -
provides previewing
screen of the actual
timeline as well as
editing capabilities.
26. Cinelerra User Interface
Program
Program - Displays
representation of the
multi-tracked timeline.
It is the main interface
where most of the
video editing takes
place.
27. Cinelerra User Interface
Resources
Resources - Shows
the available effect
resources for audio
and video, as well as
the imported media
that will be used for
the project
29. Importing Digital Media Resources in Timeline
1.) Select a media resource
from the Media Folder
2.) Drag the selected
resource into the selected
track
30. Importing Digital Media Resources in Timeline
as new Tracks (Audio/Video/Image)
1.) Add a new track (Audio or
Video depending on the
resource you intend to add)
2.) Drag and drop the
Resource to the newly added
track
31. Cinelerra User Interface: Viewer
Usage
To use the Viewer
with a clip, drag and
drop the media
resource to the Viewer
window.
32. Cinelerra User Interface: Viewer
Working with the Viewer
In / Out - Sets a range
within the selected
clip.
33. Cinelerra User Interface: Viewer
Working with the Viewer
Splice – Creates an
instance of the
selected range
specified by In / Out to
the active timeline
track and cursor
position
34. Cinelerra User Interface: Viewer
Working with the Viewer
Overwrite – Creates
an instance of the
selected range
specified by In / Out to
the active timeline
track and cursor
position and
overwrites keyframes
next to it if there are
any
35. Cinelerra User Interface: Viewer
Working with the Viewer
To Clip – Creates an
instance of the
selected range
specified by In / Out to
the Clip Resources.
Clip Resources – are
located in the Clip
folder under the
Resources window.
Clips can be dragged
and dropped to a track
similar to Media
resources
36. Cinelerra User Interface: Viewer
Working with the Viewer
Copy – Copies the
current clip range
specified by In / Out.
The copied clip
selection can later be
pasted in the track
timeline in the
Program window
using Edit -> Paste
37. Cinelerra User Interface: Viewer
Working with the Viewer
Show Meter –
Toggles the visibility of
the meter.
38. Cinelerra User Interface: Viewer
Working with the Viewer
Label – Labels the
current cursor position
in the viewer
39. Cinelerra User Interface: Viewer
Working with the Viewer
Previous / Next Label
– Navigates
throughout the labels
set in the clip.
40. Cinelerra User Interface: Viewer
Working with the Viewer
Manual Goto –
provides a dialogue to
manually put the
cursor to an exact
timeline within the
selected clip in the
viewer
41. Cinelerra User Interface: Compositor
Working with the Compositor
Lock Video – Locks
the loaded video from
changes
42. Cinelerra User Interface: Compositor
Working with the Compositor
Zoom View – enables
mouse pointer zoom
view
43. Cinelerra User Interface: Compositor
Working with the Compositor
Edit Mask – Enables
editing of mask points
44. Cinelerra User Interface: Compositor
Working with the Compositor
Adjust Camera
Automation –
Enables mouse
pointer control over
the location of timeline
videos in the camera
45. Cinelerra User Interface: Compositor
Working with the Compositor
Adjust Projector
Automation –
Enables mouse
pointer control over
the projection of
videos in the timeline
47. Cinelerra User Interface: Compositor
Working with the Compositor
Color Picker –
Enables the mouse
pointer to capture the
color of the area
where it will be clicked
48. Cinelerra User Interface: Compositor
Working with the Compositor
Options / Settings –
Displays a dialogue
pertaining to the
options or settings
about the currently
active tool
49. Cinelerra User Interface: Compositor
Working with the Compositor
Show Safe Regions –
Toggles the display of
Safe Regions
Safe Regions – are
markers which show
which area of the
video will be visible
among different output
resolutions and size.
The smaller the area
of the safe region, the
more it makes it likely
that the whole video
will display across
output size and
resolutions
50. Cinelerra User Interface: Compositor
Working with the Compositor
Generate Keyframes
while tweaking –
Toggles whether
keyframes will be
created on the fly
while the tools are
being applied
51. Cinelerra User Interface: Compositor
Working with the Compositor
In / Out - Sets a range
within the selected clip
in the timeline.
52. Cinelerra User Interface: Compositor
Working with the Compositor
To Clip – Creates an
instance of the
selected range
specified by In / Out to
the Clip Resources.
Clip Resources – are
located in the Clip
folder under the
Resources window.
Clips can be dragged
and dropped to a track
similar to Media
resources
53. Cinelerra User Interface: Compositor
Working with the Compositor
Cut – Cuts the current
selection specified by
In / Out from the
timeline
54. Cinelerra User Interface: Compositor
Working with the Compositor
Copy – Copies the
current clip range
specified by In / Out.
The copied clip
selection can later be
pasted in the track
timeline in the
Program window
using Edit -> Paste or
the Paste button
55. Cinelerra User Interface: Compositor
Working with the Compositor
Paste – Pastes the
copied clip into the
current cursor position
56. Cinelerra User Interface: Compositor
Working with the Compositor
Show Meter –
Toggles the visibility of
the meter.
57. Cinelerra User Interface: Compositor
Working with the Compositor
Label – Labels the
current cursor position
in the Compositor
58. Cinelerra User Interface: Compositor
Working with the Compositor
Previous / Next Label
– Navigates
throughout the labels
set in the clip.
59. Cinelerra User Interface: Compositor
Working with the Compositor
Undo /Redo – Undos
or Redos actions
60. Cinelerra User Interface: Compositor
Working with the Compositor
Manual Goto –
provides a dialogue to
manually put the
cursor to an exact
timeline within the
selected clip in the
compositor
61. Cinelerra User Interface: Compositor
Working with the Compositor
Zoom Level Controls
– Controls the size of
the timeline preview
screen in the
Compositor
62. Applying Audio/Video Effects
1.) Drag and drop the
selected effect from either
the audio/video effects folder
to a track where the effect is
intended to be applied
2.) Options for the applied
effect can be set at the
applied track
63. Applying Audio/Video Transitions
1.) Drag and drop the
selected transition from
either the audio/video effects
folder before or after the clip
where the transition will be
applied
65. Rendering the Project to Digital Video Format
Filename - the
complete path and
filename of the output
video file
File Format - the
format of the video
output file
Audio/Video -
specifies the tracks to
export
Create New File at
each Label - when
checked, the output
video will be divided to
several tracks
depending on the
labels that were set
66. Rendering the Project to Digital Video Format
Render Range –
Specifies the range of
the project/timeline to
be exported
Render Profile –
Allows the saving of
render settings
Insertion Strategy –
Specifies how the
output track will be
imported into the
current project