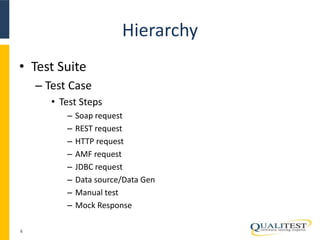
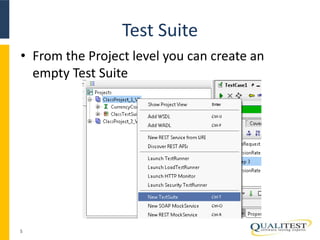
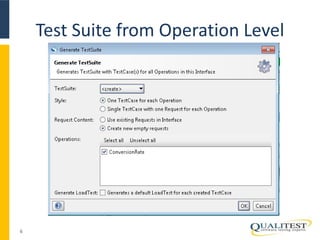
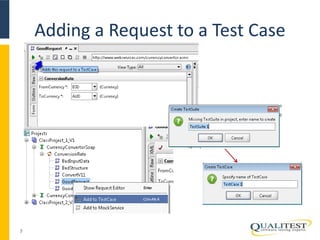
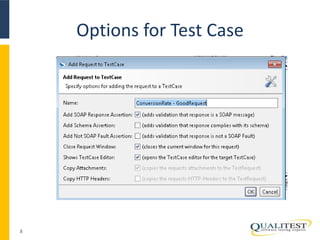
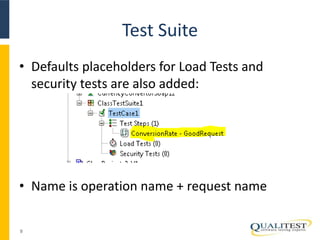
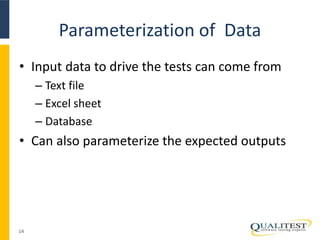
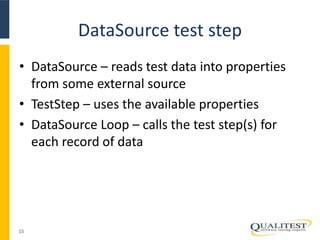
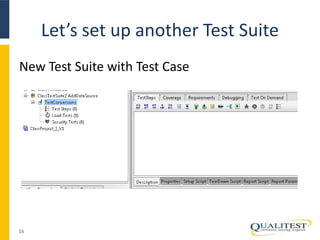
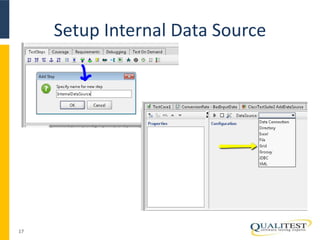
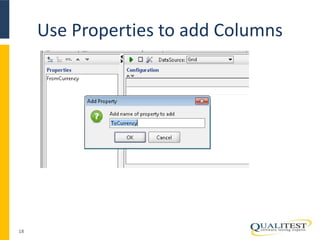
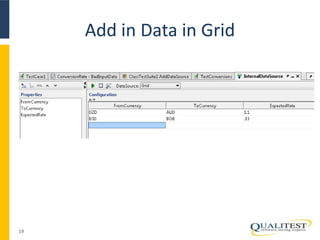
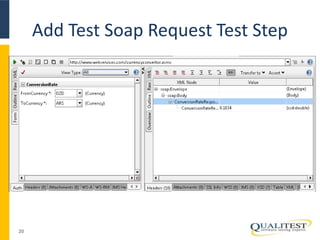
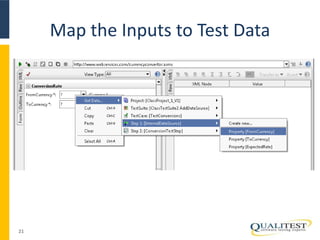
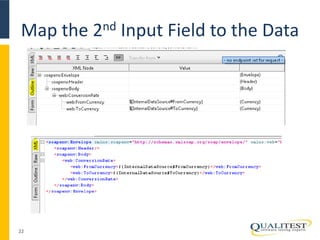
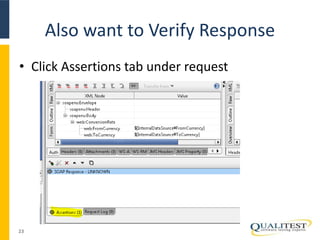
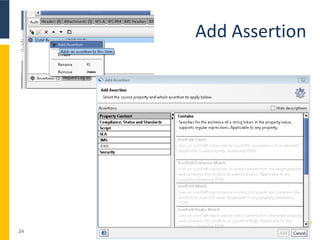
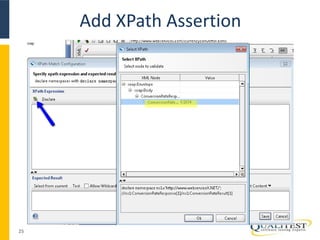
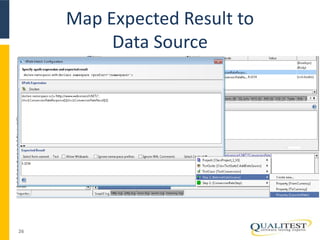
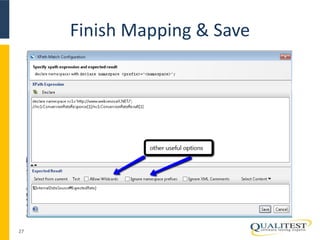
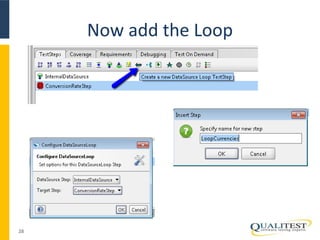
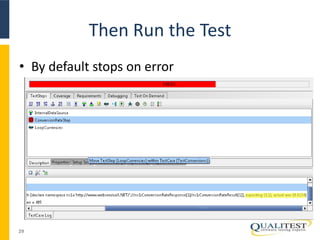
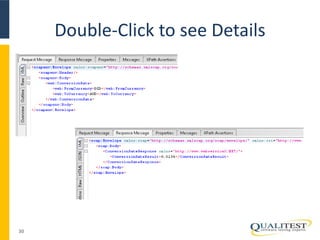
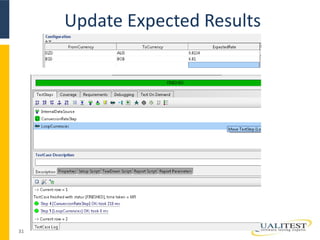
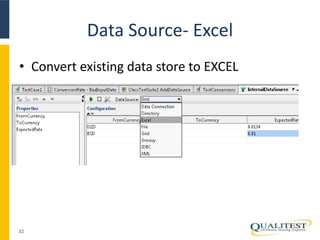
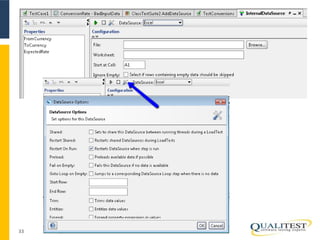
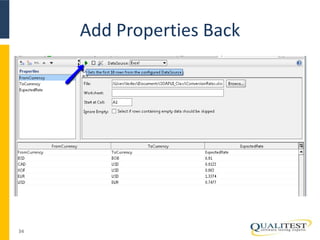
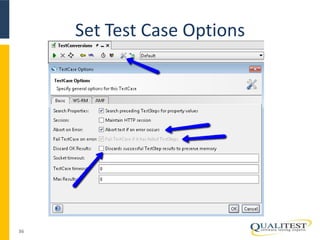
Introduction to SOAPUI 
ANY QUESTIONS?? 
1
Introduction to SOAPUI 
BUILDING TEST CASES 
2
Building Test Cases 
• Creating Test Suite, Test Cases & Test Steps 
• Unit vs. Functional Tests 
• Parameterization of Data (Text file, excel, 
Database) 
3
Hierarchy 
• Test Suite 
– Test Case 
• Test Steps 
– Soap request 
– REST request 
– HTTP request 
– AMF request 
– JDBC request 
– Data source/Data Gen 
– Manual test 
– Mock Response 
4
Test Suite 
• From the Project level you can create an 
empty Test Suite 
5
Test Suite from Operation Level 
6
Adding a Request to a Test Case 
7
Options for Test Case 
8
Test Suite 
• Defaults placeholders for Load Tests and 
security tests are also added: 
• Name is operation name + request name 
9
Test Case Window 
10
Run the Test Case 
11
Test Case Properties 
12 
Add properties such as TestCase Description
Adding New Test Steps 
• Click on type 
of request 
• Or drag and drop 
existing request 
13
Parameterization of Data 
• Input data to drive the tests can come from 
– Text file 
– Excel sheet 
– Database 
• Can also parameterize the expected outputs 
14
DataSource test step 
• DataSource – reads test data into properties 
from some external source 
• TestStep – uses the available properties 
• DataSource Loop – calls the test step(s) for 
each record of data 
15
Let’s set up another Test Suite 
New Test Suite with Test Case 
16
Setup Internal Data Source 
17
Use Properties to add Columns 
18
Add in Data in Grid 
19
Add Test Soap Request Test Step 
20
Map the Inputs to Test Data 
21
Map the 2nd Input Field to the Data 
22
Also want to Verify Response 
• Click Assertions tab under request 
23
Add Assertion 
24
Add XPath Assertion 
25
Map Expected Result to 
Data Source 
26
Finish Mapping & Save 
27
Now add the Loop 
28
Then Run the Test 
• By default stops on error 
29
Double-Click to see Details 
30
Update Expected Results 
31
Data Source- Excel 
• Convert existing data store to EXCEL 
32
33
Add Properties Back 
34
Data Mapping 
• If data source name and properties are the 
same, no need to remap 
35
Set Test Case Options 
36
PTO Patent Validation 
• Let’s take a look at 
• http://patft.uspto.gov/netahtml/PTO/index.ht 
ml 
• And the Bib WSDL 
37
38
Quick or Advanced Search 
39
Pick one & Review Data 
40
Data 
41

Soap UI - Lesson2

Editor's Notes

  • #5 At the highest level we have Test Suite; a Test Suite can have one or more test cases and each test case can have one or more test steps (which can be a mix of requests) soapUI structures functional tests into three levels; TestSuites, TestCases and TestSteps. A TestSuite is a collection of TestCases that can be used for grouping functional tests into logical units. Any number of TestSuites can be created inside a soapUI project to support massive testing scenarios. A TestCase is a collection of TestSteps that are assembled to test some specific aspect of your service(s). You can add any number of TestCases to a containing TestSuite and even modularize them to call each other for complex testing scenarios. TestSteps are the "building blocks" of functional tests in soapUI. They are added to a TestCase and used control the flow of execution and validate the functionality of the service(s) to be tested.
  • #6 Select New TestSuite from right clicking on project name
  • #7 If you right click on the operation name you can select Generate TestSuite so if you have all of the requests set up and want to combine them into one test suite, this is an easy way to do that
  • #8 You can add a request to a test case from multiple places – from the request window itself or by right-clicking on the request – then you need to enter the name of the test suite and then it will ask you for the test case name – you can use the same request to create multiple test cases.
  • #9 These are the default settings for test cases- you can always go back and make changes. We haven’t talked about assertions yet, but we will
  • #11 After creating the test suite and adding the test case, the Test Case window opens and provides additional tabs for adding more information
  • #12  The test case window reports the results after clicking on the green arrow to run the test once
  • #13 You can directly add in properties of the test case in the test case window.
  • #14 There are 2 ways to add additional test step – click on the request type or drag and drop and existing request
  • #15 There are multiple sources for the data including text file , excel sheet and any odbc accessible database – note to use obdc, you will need to install that option in soapUI
  • #16 A datasource test step is used to read in the data from an external source, the test step will then use the data and by looping through all of the lines in the data, you can execute multiple tests.
  • #17 Right click on the project and select new test suite Then right click on the test suite and select new Test Case
  • #18 Pick the Grid so that you can input the data in the internal data structure
  • #19 Click on + on upper left to add a property
  • #20 Just type in the cells the values you want
  • #21 To facilitate finding all of the elements for mapping, I usually run a valid request first
  • #22 Pick the request to add to the test step and then from the form input field, click on GetData and navigate to the internal data source that we just created
  • #23 Here are the XML and outline views after you’ve mapped the data fields
  • #24 If you want to verify the expected results and/or the response that comes back, we need to add an assertion
  • #25  To add assertion you can right click on the item or click on the + icon right above it then you have your options of what to verify
  • #26 Select the icon on the top left and then select the response field in the popup window and select OK
  • #27 Right click on select content and then navigate to the 3rd column in your internal data structure
  • #28 After you select the field and any options for the expected result, click Save - While an XPath query pointing to <myElement>Some Text</myElement> will return Some Text, a query pointing to the empty element <myElement /> will instead return <myElement />. To instead return an empty string on empty elements, surround your XPath query like this: concat( //my:XPath/query[1] ).
  • #29 The request now uses the To and From properties in the DataSource and the Assertion uses the Rate. All that is missing now is an DataSource Loop at the end of the TestCase that loops back to the Request for each row in the DataSource. Add a DataSource Loop step from the TestCase toolbar, double-click it and configure it to loop back to the Request for each row in your DataSource
  • #30 Not surprisingly you get an error from the assertion in the first run of the request. Your expected Rate was not that returned by the web-service . Double click the Failed TestStep in the TestCase log (which opens the message viewer) and select the response tab to see what was actually returned.
  • #31 Double click on the error to see the results and then navigate between the request and response message tabs
  • #32  Run again after updating the expected results – it may still fail because currency conversions can be somewhat dynamic – we will talk about handling that later
  • #33 Navigate back to the Data store for the test suite and double click to open the editor
  • #34 Can use an existing file or setup a new file for your data – the ignore empty can be a good way to control the tests if you just want to try a few before running them all – leave an empty row and then ignore the row to run the whole set the Data Source options also provide for additional ways to control the data usage
  • #35 Since the data source was changed, we lost the properties – have to add them back in to point to the excel sheet – note that in my excel sheet I have a header, so I really want to start at A2, not A1
  • #36 In general it’s a bad idea to reuse the same names for different data sources
  • #37 By default the test suite will stop running as soon as it hits an error – if it doesn’t hurt anything to continue, you can turn this off. In addition the fail testcase on error is a choice – depends on if you are counting the entire test suite as one test case or if each line in a data file is one test case. Also, SoapUI does have memory issues – so if you don’t need to preserve the results for test cases that have passed, you can also select this option.