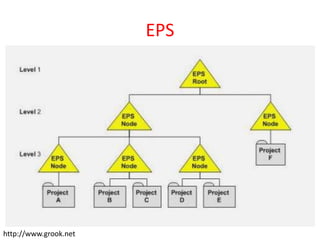
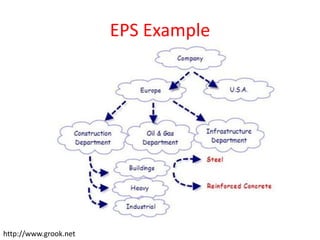
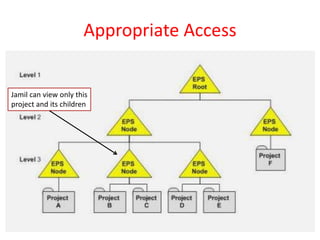
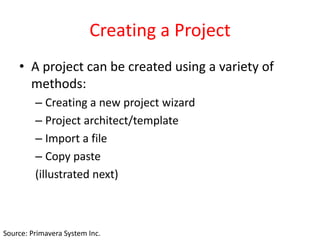
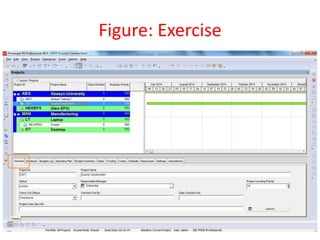
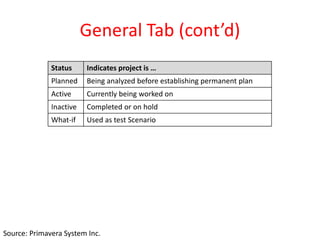
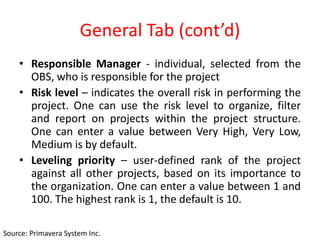
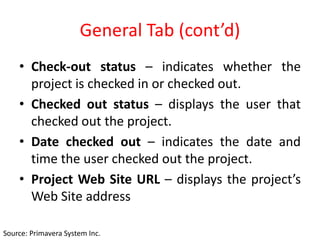
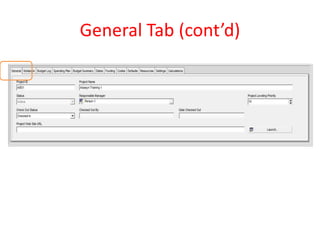
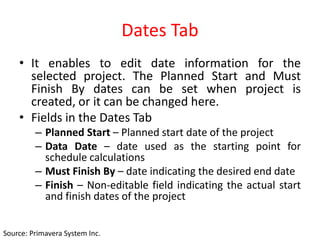
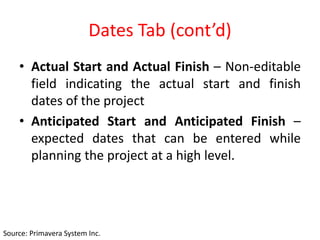
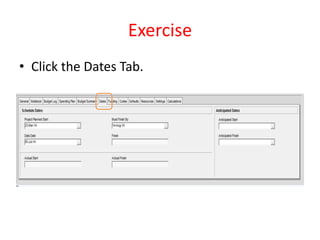
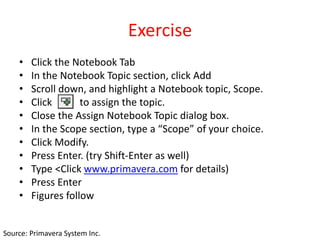
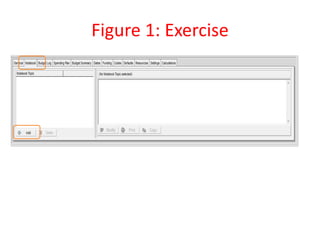
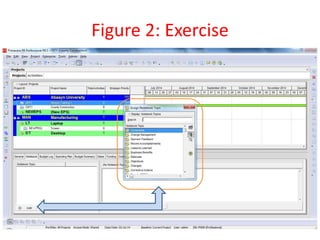
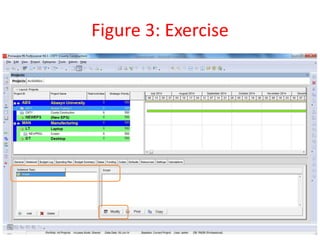
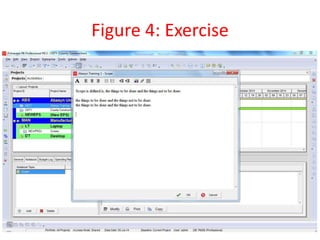
Project Planning with Primavera®
Course Contents
‐ Lesson 4 Enterprise Project Structure
‐ Lesson 5 Creating a Project
Lesson 4
Enterprise Project Structure
Objectives
• Describe the components that comprise the
EPS
• View the EPS
Source: Primavera System Inc.
Enterprise Project Structure
• EPS is a hierarchy used to organize projects.
– The EPS is made of roots and nodes
• Each root in the EPS can be subdivided into many nodes
• Nodes represent different levels within the structure
– For example, nodes can represent divisions within the company,
departments, project groups, or site locations.
– All projects must be included in a node
• Each node can contain an unlimited number of projects
• Projects always represent the lowest level of the hierarchy
• Placement of a project in a hierarchy determines the
summary level in which it is included
Source: Primavera System Inc.
EPS
http://www.grook.net
EPS Example
http://www.grook.net
Opening the EPS
• One can use EPS dialog box to define the EPS
• The three fields to enter when adding an EPS
node are
• EPS ID – identifies the selected EPS node
• EPS Name – description of the selected EPS node
• Responsible manager – use this field to select an
Organizational Breakdown Structure (OBS)
element to associate with the selected level of
the EPS.
Source: Primavera System Inc.
Exercise
• In the Enterprise menu, click Enterprise
Project Structure
• Select an EPS node, Apex
• After viewing the EPS, click Close
• Exercise Figure(s) follows
Source: Primavera System Inc.
Figure 1: Exercise
Figure 2: Exercise
Benefits of the EPS
• The EPS offers man benefits, including the ability to:
• View project priorities, scope, budget, and resources across the
entire project structure or within a specific node.
• Manage projects separately while retaining the ability to roll up and
summarize data across multiple projects
– Each node acts as a master project, rolling up all “child nodes” and
projects
– A node can be opened to view all detailed activity information from
the “member” projects
• View resource allocation across projects
• Assign security at any level of the project structure to provide users
with appropriate access to project information. For example, Jamil
can only view the Construction nodes and its children (Figure
follows).
Source: Primavera System Inc.
Appropriate Access
Jamil can view only this
project and its children
Lesson 5
Creating a Project
Objectives
• Create a project
• Navigate in the project window
• View, and modify information in the project
details
Source: Primavera System Inc.
Creating a Project
• A project can be created using a variety of
methods:
– Creating a new project wizard
– Project architect/template
– Import a file
– Copy paste
(illustrated next)
Source: Primavera System Inc.
Create a New Project wizard
• The wizard can assist you in creating the
project
• Exercise follows
Source: Primavera System Inc.
Exercise
• In the File menu, click New to launch the
Create New Project wizard
• In the Select EPS field click
• Select a node, then click to assign your
selection
• Click Next
• Figures of the exercise follow
Source: Primavera System Inc.
Figure 1: Exercise
Figure 2: Exercise
Figure 3: Exercise
Figure 4: Exercise
Figure 5: Exercise
Entering Project Name
• One has to use a Project ID/Code and a
Project name
• Project ID – type a unique ID in this field
• Project Name – type a new name in this field
(The Project Name field does not require a
unique name)
Source: Primavera System Inc.
Exercise
• Type a unique ID for the project
• Type a project name
• Click Next
• Figure Follows
Source: Primavera System Inc.
Figure: Exercise
Entering Project’s Start and End Dates
• Use the Calendar to select “Planned Start” and “Must
Finish By” dates for the project
• The “Must Finish By” field is not mandatory. It can be
assigned at any given time later in the “Dates” tab in
the “Project Details”.
• To navigate in the Calendar
• When the Calendar is launched, the current
month/year is displayed. To navigate to a different year,
click the month/year section in the Calendar, then use
arrows to scroll to the desired date.
• Click the desired date and then click “Select”.
• Exercise follows
Source: Primavera System Inc.
Exercise
• In the Planned Start field click
• Use the Calendar to specify a Planned Start
date.
• Click Select to select the date
• Click Next
Source: Primavera System Inc.
Figure 1: Exercise
Figure 2: Exercise
Entering Responsible Manager
• The Responsible Manager Selected from the OBS,
is the individual responsible for the work
• The OBS is the hierarchical arrangement an
organization’s project management structure,
either as roles or individuals. The OBS can be
configured to represent a detailed organizational
breakdown (with employee names) or a more
general framework where departments, teams,
types of responsibility are modeled in the
structure.
Source: Primavera System Inc.
Exercise
• In the Responsible Manager field, click
• Select a Responsible Manager, then click
to assign the manager.
• Click Next
• Figure(s) follow
Source: Primavera System Inc.
Figure 1: Exercise
Figure 2: Exercise
Selecting Assignment Rate Type
• Specify the Assignment Rate Type for new
resource assignment. The default rate type
determines which price/unit is set on a
resource assignment. Values in the Rate Type
drop down list reflect the rate type defined in
the Rate Types Tab in Admin Preferences.
Source: Primavera System Inc.
Exercise
• In the Rate Type drop down list, confirm
Standard
• Click Next
• Figure(s) follow
Source: Primavera System Inc.
Figure 1: Exercise
Figure 2: Exercise
Project Windows
• The project has been created and opened
• To view high level information about the project,
navigate to the Projects windows, which displays
the project within the EPS that one can access.
One can also
– Open, create, and save project layouts.
– Group projects by EPS, project codes, or other project
related items.
– Filter projects.
– Modify column data.
Source: Primavera System Inc.
Projects Windows (cont’d)
• The icon in the Projects window indicates
that the project is open.
Source: Primavera System Inc.
Projects Window (cont’d)
1
2
3
4
5
6
Details
Item Functionality
1. Tool Bar It allows you to change the look of the window
2. Layout Option Bar Option to format data, open layouts
3. Command Bar Options to add, edit, delete project data
4. Bar Area Graphical display of project progress over time
5. Project Table Displays project information in spreadsheet format
6. Vertical Split Bar Drag bar to hide/show more information in each pane
Source: Primavera System Inc.
Exercise
• In the Enterprise menu, click Projects
Source: Primavera System Inc.
Project Details
• It is located in bottom layout of Projects
windows
• It can be used to define project properties and
defaults that are applied to the selected
project.
Source: Primavera System Inc.
Exercise
• In the layout options bar, click Open
• If prompted to save, click No
• Select a Layout
• Click Open
• Select a project
• Verify that the General tab is selected.
Source: Primavera System Inc.
Figure: Exercise
General Tab
• It enables one to view or modify general
information about the selected project. Project
ID, Project Name, and Responsible Manager can
be set when you create the project, or you can
change them here. The remaining fields are set
by default.
• Fields in the General Tab
– Project ID – short, unique identifier for the Project
– Project Name – name of the project.
– Status – indicates project status based on table below
Source: Primavera System Inc.
General Tab (cont’d)
Status Indicates project is …
Planned Being analyzed before establishing permanent plan
Active Currently being worked on
Inactive Completed or on hold
What-if Used as test Scenario
Source: Primavera System Inc.
General Tab (cont’d)
• Responsible Manager - individual, selected from the
OBS, who is responsible for the project
• Risk level – indicates the overall risk in performing the
project. One can use the risk level to organize, filter
and report on projects within the project structure.
One can enter a value between Very High, Very Low,
Medium is by default.
• Leveling priority – user-defined rank of the project
against all other projects, based on its importance to
the organization. One can enter a value between 1 and
100. The highest rank is 1, the default is 10.
Source: Primavera System Inc.
General Tab (cont’d)
• Check-out status – indicates whether the
project is checked in or checked out.
• Checked out status – displays the user that
checked out the project.
• Date checked out – indicates the date and
time the user checked out the project.
• Project Web Site URL – displays the project’s
Web Site address
Source: Primavera System Inc.
General Tab (cont’d)
Dates Tab
• It enables to edit date information for the
selected project. The Planned Start and Must
Finish By dates can be set when project is
created, or it can be changed here.
• Fields in the Dates Tab
– Planned Start – Planned start date of the project
– Data Date – date used as the starting point for
schedule calculations
– Must Finish By – date indicating the desired end date
– Finish – Non-editable field indicating the actual start
and finish dates of the project
Source: Primavera System Inc.
Dates Tab (cont’d)
• Actual Start and Actual Finish – Non-editable
field indicating the actual start and finish
dates of the project
• Anticipated Start and Anticipated Finish –
expected dates that can be entered while
planning the project at a high level.
Source: Primavera System Inc.
Exercise
• Click the Dates Tab.
Notebook Tab
• It enables to write, view, or edit project notes
such as the project’s purpose, core requirements,
or other project specific details.
• Fields in the Notebook Tab are:
– Notebook Topic - list of topics assigned to the
selected node/project.
– Details – user-defined description of the selected
topic. HTML editing features, including formatting
text, inserting pictures, copying, pasting, and adding
hyperlinks.
Source: Primavera System Inc.
Exercise
• Click the Notebook Tab
• In the Notebook Topic section, click Add
• Scroll down, and highlight a Notebook topic, Scope.
• Click to assign the topic.
• Close the Assign Notebook Topic dialog box.
• In the Scope section, type a “Scope” of your choice.
• Click Modify.
• Press Enter. (try Shift-Enter as well)
• Type <Click www.primavera.com for details)
• Press Enter
• Figures follow
Source: Primavera System Inc.
Figure 1: Exercise
Figure 2: Exercise
Figure 3: Exercise
Figure 4: Exercise
Codes Tab
• It enables to assign codes value to selected
project.
• It allows to group the projects in EPS to
specific categories, such as location or
division.
– Unlimited hierarchical project codes are
supported.
– Allows for summarization of large amounts of
information across projects.
Source: Primavera System Inc.
Exercise
• Click the Codes tab
• Click Assign
• In the Project Code, Project Region, select a
project code value, E- East, and then click
to assign the selection.
• Figures follow
Source: Primavera System Inc.
Figure 1: Exercise
Figure 2: Exercise
Type Ahead and Search in Dialog Boxes
• The Search field in the Dialog boxes throughout
Primavera offers a faster alternative to scrolling
through a long list of values:
• Search – type in the Search field and then press
Enter to search for a value
• Type ahead – type in the Search field, as you
type, values that match begin with the letters you
have typed are displayed in the dialog box.
Source: Primavera System Inc.
Exercise
• In the Search field in the Assign Project Codes
dialog box, type <co>
• You will not assign the project code at this
time.
• Close the dialog box.
Source: Primavera System Inc.
Defaults Tab
• The Defaults tab is divided into two section:
– Defaults for New Activities – indicates the
settings that will be used when new activities are
added to the project. Note that changing these
settings will not affect existing activities.
– Auto-numbering Defaults – sets how new
activities will be numbered in the project.
• When the Increment Activity ID based on selected
activity field is marked, the prefix or suffix of the
selected activity is applied to the activity that is being
added.
Source: Primavera System Inc.
Exercise
• Click the Defaults Tab
• In the Activity ID Prefix field, type <BA>
• Verify an activity ID Suffix, 1000, and an
increment, 10.
Source: Primavera System Inc.
Figure: Exercise
Settings Tab
• It consists of three sections
– Summarized Data – identifies the date and the
level to which the project was last summarized.
– Project Settings – sets the character used to
separate WBS levels; identifies the month in which
the fiscal year begins, and specifies the baseline
used in earned value calculations.
– Define Critical Activities – identifies which
activities are displayed as critical, either longest
path or value of Total Float.
Source: Primavera System Inc.
Exercise
• Click the Settings Tab
Calculations Tab
• Use this tab to specify how to calculate cost and resource use when
you update activities. Two fields of note:
• Recalculate Actual Units and Cost when Duration % Complete
Changes – mark to calculate actual units and costs as Actual (units
or costs) = Budgeted (units or costs) * Duration % Complete
– Primavera performs these calculations whenever Duration % complete
is updated.
– Values you specify override the application’s calculated values. If you
clear the checkbox, the application does not estimate actuals and the
actual fields remain blank unless you specify values.
• Link Actual and Actual This Period Units and Cost – Mark this
checkbox to recalculate actual or actual this period units and costs
when one of these values is updated. This option is selected by
default.
Source: Primavera System Inc.
Exercise
• Click the Calculations Tab.
• In the Default price/unit for activities without
resource or role price/units field in the
Activities Section, type <30.00>, then press
Enter.
Source: Primavera System Inc.
Figure: Exercise

Lesson 4_5 Primavera 2.pptx..Enterprise Project Structure

  • 1.
  • 2.
    Course Contents ‐ Lesson4 Enterprise Project Structure ‐ Lesson 5 Creating a Project
  • 3.
  • 4.
    Objectives • Describe thecomponents that comprise the EPS • View the EPS Source: Primavera System Inc.
  • 5.
    Enterprise Project Structure •EPS is a hierarchy used to organize projects. – The EPS is made of roots and nodes • Each root in the EPS can be subdivided into many nodes • Nodes represent different levels within the structure – For example, nodes can represent divisions within the company, departments, project groups, or site locations. – All projects must be included in a node • Each node can contain an unlimited number of projects • Projects always represent the lowest level of the hierarchy • Placement of a project in a hierarchy determines the summary level in which it is included Source: Primavera System Inc.
  • 6.
  • 7.
  • 8.
    Opening the EPS •One can use EPS dialog box to define the EPS • The three fields to enter when adding an EPS node are • EPS ID – identifies the selected EPS node • EPS Name – description of the selected EPS node • Responsible manager – use this field to select an Organizational Breakdown Structure (OBS) element to associate with the selected level of the EPS. Source: Primavera System Inc.
  • 9.
    Exercise • In theEnterprise menu, click Enterprise Project Structure • Select an EPS node, Apex • After viewing the EPS, click Close • Exercise Figure(s) follows Source: Primavera System Inc.
  • 10.
  • 11.
  • 12.
    Benefits of theEPS • The EPS offers man benefits, including the ability to: • View project priorities, scope, budget, and resources across the entire project structure or within a specific node. • Manage projects separately while retaining the ability to roll up and summarize data across multiple projects – Each node acts as a master project, rolling up all “child nodes” and projects – A node can be opened to view all detailed activity information from the “member” projects • View resource allocation across projects • Assign security at any level of the project structure to provide users with appropriate access to project information. For example, Jamil can only view the Construction nodes and its children (Figure follows). Source: Primavera System Inc.
  • 13.
    Appropriate Access Jamil canview only this project and its children
  • 14.
  • 15.
    Objectives • Create aproject • Navigate in the project window • View, and modify information in the project details Source: Primavera System Inc.
  • 16.
    Creating a Project •A project can be created using a variety of methods: – Creating a new project wizard – Project architect/template – Import a file – Copy paste (illustrated next) Source: Primavera System Inc.
  • 17.
    Create a NewProject wizard • The wizard can assist you in creating the project • Exercise follows Source: Primavera System Inc.
  • 18.
    Exercise • In theFile menu, click New to launch the Create New Project wizard • In the Select EPS field click • Select a node, then click to assign your selection • Click Next • Figures of the exercise follow Source: Primavera System Inc.
  • 19.
  • 20.
  • 21.
  • 22.
  • 23.
  • 24.
    Entering Project Name •One has to use a Project ID/Code and a Project name • Project ID – type a unique ID in this field • Project Name – type a new name in this field (The Project Name field does not require a unique name) Source: Primavera System Inc.
  • 25.
    Exercise • Type aunique ID for the project • Type a project name • Click Next • Figure Follows Source: Primavera System Inc.
  • 26.
  • 27.
    Entering Project’s Startand End Dates • Use the Calendar to select “Planned Start” and “Must Finish By” dates for the project • The “Must Finish By” field is not mandatory. It can be assigned at any given time later in the “Dates” tab in the “Project Details”. • To navigate in the Calendar • When the Calendar is launched, the current month/year is displayed. To navigate to a different year, click the month/year section in the Calendar, then use arrows to scroll to the desired date. • Click the desired date and then click “Select”. • Exercise follows Source: Primavera System Inc.
  • 28.
    Exercise • In thePlanned Start field click • Use the Calendar to specify a Planned Start date. • Click Select to select the date • Click Next Source: Primavera System Inc.
  • 29.
  • 30.
  • 31.
    Entering Responsible Manager •The Responsible Manager Selected from the OBS, is the individual responsible for the work • The OBS is the hierarchical arrangement an organization’s project management structure, either as roles or individuals. The OBS can be configured to represent a detailed organizational breakdown (with employee names) or a more general framework where departments, teams, types of responsibility are modeled in the structure. Source: Primavera System Inc.
  • 32.
    Exercise • In theResponsible Manager field, click • Select a Responsible Manager, then click to assign the manager. • Click Next • Figure(s) follow Source: Primavera System Inc.
  • 33.
  • 34.
  • 35.
    Selecting Assignment RateType • Specify the Assignment Rate Type for new resource assignment. The default rate type determines which price/unit is set on a resource assignment. Values in the Rate Type drop down list reflect the rate type defined in the Rate Types Tab in Admin Preferences. Source: Primavera System Inc.
  • 36.
    Exercise • In theRate Type drop down list, confirm Standard • Click Next • Figure(s) follow Source: Primavera System Inc.
  • 37.
  • 38.
  • 39.
    Project Windows • Theproject has been created and opened • To view high level information about the project, navigate to the Projects windows, which displays the project within the EPS that one can access. One can also – Open, create, and save project layouts. – Group projects by EPS, project codes, or other project related items. – Filter projects. – Modify column data. Source: Primavera System Inc.
  • 40.
    Projects Windows (cont’d) •The icon in the Projects window indicates that the project is open. Source: Primavera System Inc.
  • 41.
  • 42.
  • 43.
  • 44.
    Details Item Functionality 1. ToolBar It allows you to change the look of the window 2. Layout Option Bar Option to format data, open layouts 3. Command Bar Options to add, edit, delete project data 4. Bar Area Graphical display of project progress over time 5. Project Table Displays project information in spreadsheet format 6. Vertical Split Bar Drag bar to hide/show more information in each pane Source: Primavera System Inc.
  • 45.
    Exercise • In theEnterprise menu, click Projects Source: Primavera System Inc.
  • 46.
    Project Details • Itis located in bottom layout of Projects windows • It can be used to define project properties and defaults that are applied to the selected project. Source: Primavera System Inc.
  • 47.
    Exercise • In thelayout options bar, click Open • If prompted to save, click No • Select a Layout • Click Open • Select a project • Verify that the General tab is selected. Source: Primavera System Inc.
  • 48.
  • 49.
    General Tab • Itenables one to view or modify general information about the selected project. Project ID, Project Name, and Responsible Manager can be set when you create the project, or you can change them here. The remaining fields are set by default. • Fields in the General Tab – Project ID – short, unique identifier for the Project – Project Name – name of the project. – Status – indicates project status based on table below Source: Primavera System Inc.
  • 50.
    General Tab (cont’d) StatusIndicates project is … Planned Being analyzed before establishing permanent plan Active Currently being worked on Inactive Completed or on hold What-if Used as test Scenario Source: Primavera System Inc.
  • 51.
    General Tab (cont’d) •Responsible Manager - individual, selected from the OBS, who is responsible for the project • Risk level – indicates the overall risk in performing the project. One can use the risk level to organize, filter and report on projects within the project structure. One can enter a value between Very High, Very Low, Medium is by default. • Leveling priority – user-defined rank of the project against all other projects, based on its importance to the organization. One can enter a value between 1 and 100. The highest rank is 1, the default is 10. Source: Primavera System Inc.
  • 52.
    General Tab (cont’d) •Check-out status – indicates whether the project is checked in or checked out. • Checked out status – displays the user that checked out the project. • Date checked out – indicates the date and time the user checked out the project. • Project Web Site URL – displays the project’s Web Site address Source: Primavera System Inc.
  • 53.
  • 54.
    Dates Tab • Itenables to edit date information for the selected project. The Planned Start and Must Finish By dates can be set when project is created, or it can be changed here. • Fields in the Dates Tab – Planned Start – Planned start date of the project – Data Date – date used as the starting point for schedule calculations – Must Finish By – date indicating the desired end date – Finish – Non-editable field indicating the actual start and finish dates of the project Source: Primavera System Inc.
  • 55.
    Dates Tab (cont’d) •Actual Start and Actual Finish – Non-editable field indicating the actual start and finish dates of the project • Anticipated Start and Anticipated Finish – expected dates that can be entered while planning the project at a high level. Source: Primavera System Inc.
  • 56.
  • 57.
    Notebook Tab • Itenables to write, view, or edit project notes such as the project’s purpose, core requirements, or other project specific details. • Fields in the Notebook Tab are: – Notebook Topic - list of topics assigned to the selected node/project. – Details – user-defined description of the selected topic. HTML editing features, including formatting text, inserting pictures, copying, pasting, and adding hyperlinks. Source: Primavera System Inc.
  • 58.
    Exercise • Click theNotebook Tab • In the Notebook Topic section, click Add • Scroll down, and highlight a Notebook topic, Scope. • Click to assign the topic. • Close the Assign Notebook Topic dialog box. • In the Scope section, type a “Scope” of your choice. • Click Modify. • Press Enter. (try Shift-Enter as well) • Type <Click www.primavera.com for details) • Press Enter • Figures follow Source: Primavera System Inc.
  • 59.
  • 60.
  • 61.
  • 62.
  • 63.
    Codes Tab • Itenables to assign codes value to selected project. • It allows to group the projects in EPS to specific categories, such as location or division. – Unlimited hierarchical project codes are supported. – Allows for summarization of large amounts of information across projects. Source: Primavera System Inc.
  • 64.
    Exercise • Click theCodes tab • Click Assign • In the Project Code, Project Region, select a project code value, E- East, and then click to assign the selection. • Figures follow Source: Primavera System Inc.
  • 65.
  • 66.
  • 67.
    Type Ahead andSearch in Dialog Boxes • The Search field in the Dialog boxes throughout Primavera offers a faster alternative to scrolling through a long list of values: • Search – type in the Search field and then press Enter to search for a value • Type ahead – type in the Search field, as you type, values that match begin with the letters you have typed are displayed in the dialog box. Source: Primavera System Inc.
  • 68.
    Exercise • In theSearch field in the Assign Project Codes dialog box, type <co> • You will not assign the project code at this time. • Close the dialog box. Source: Primavera System Inc.
  • 69.
    Defaults Tab • TheDefaults tab is divided into two section: – Defaults for New Activities – indicates the settings that will be used when new activities are added to the project. Note that changing these settings will not affect existing activities. – Auto-numbering Defaults – sets how new activities will be numbered in the project. • When the Increment Activity ID based on selected activity field is marked, the prefix or suffix of the selected activity is applied to the activity that is being added. Source: Primavera System Inc.
  • 70.
    Exercise • Click theDefaults Tab • In the Activity ID Prefix field, type <BA> • Verify an activity ID Suffix, 1000, and an increment, 10. Source: Primavera System Inc.
  • 71.
  • 72.
    Settings Tab • Itconsists of three sections – Summarized Data – identifies the date and the level to which the project was last summarized. – Project Settings – sets the character used to separate WBS levels; identifies the month in which the fiscal year begins, and specifies the baseline used in earned value calculations. – Define Critical Activities – identifies which activities are displayed as critical, either longest path or value of Total Float. Source: Primavera System Inc.
  • 73.
  • 74.
    Calculations Tab • Usethis tab to specify how to calculate cost and resource use when you update activities. Two fields of note: • Recalculate Actual Units and Cost when Duration % Complete Changes – mark to calculate actual units and costs as Actual (units or costs) = Budgeted (units or costs) * Duration % Complete – Primavera performs these calculations whenever Duration % complete is updated. – Values you specify override the application’s calculated values. If you clear the checkbox, the application does not estimate actuals and the actual fields remain blank unless you specify values. • Link Actual and Actual This Period Units and Cost – Mark this checkbox to recalculate actual or actual this period units and costs when one of these values is updated. This option is selected by default. Source: Primavera System Inc.
  • 75.
    Exercise • Click theCalculations Tab. • In the Default price/unit for activities without resource or role price/units field in the Activities Section, type <30.00>, then press Enter. Source: Primavera System Inc.
  • 76.