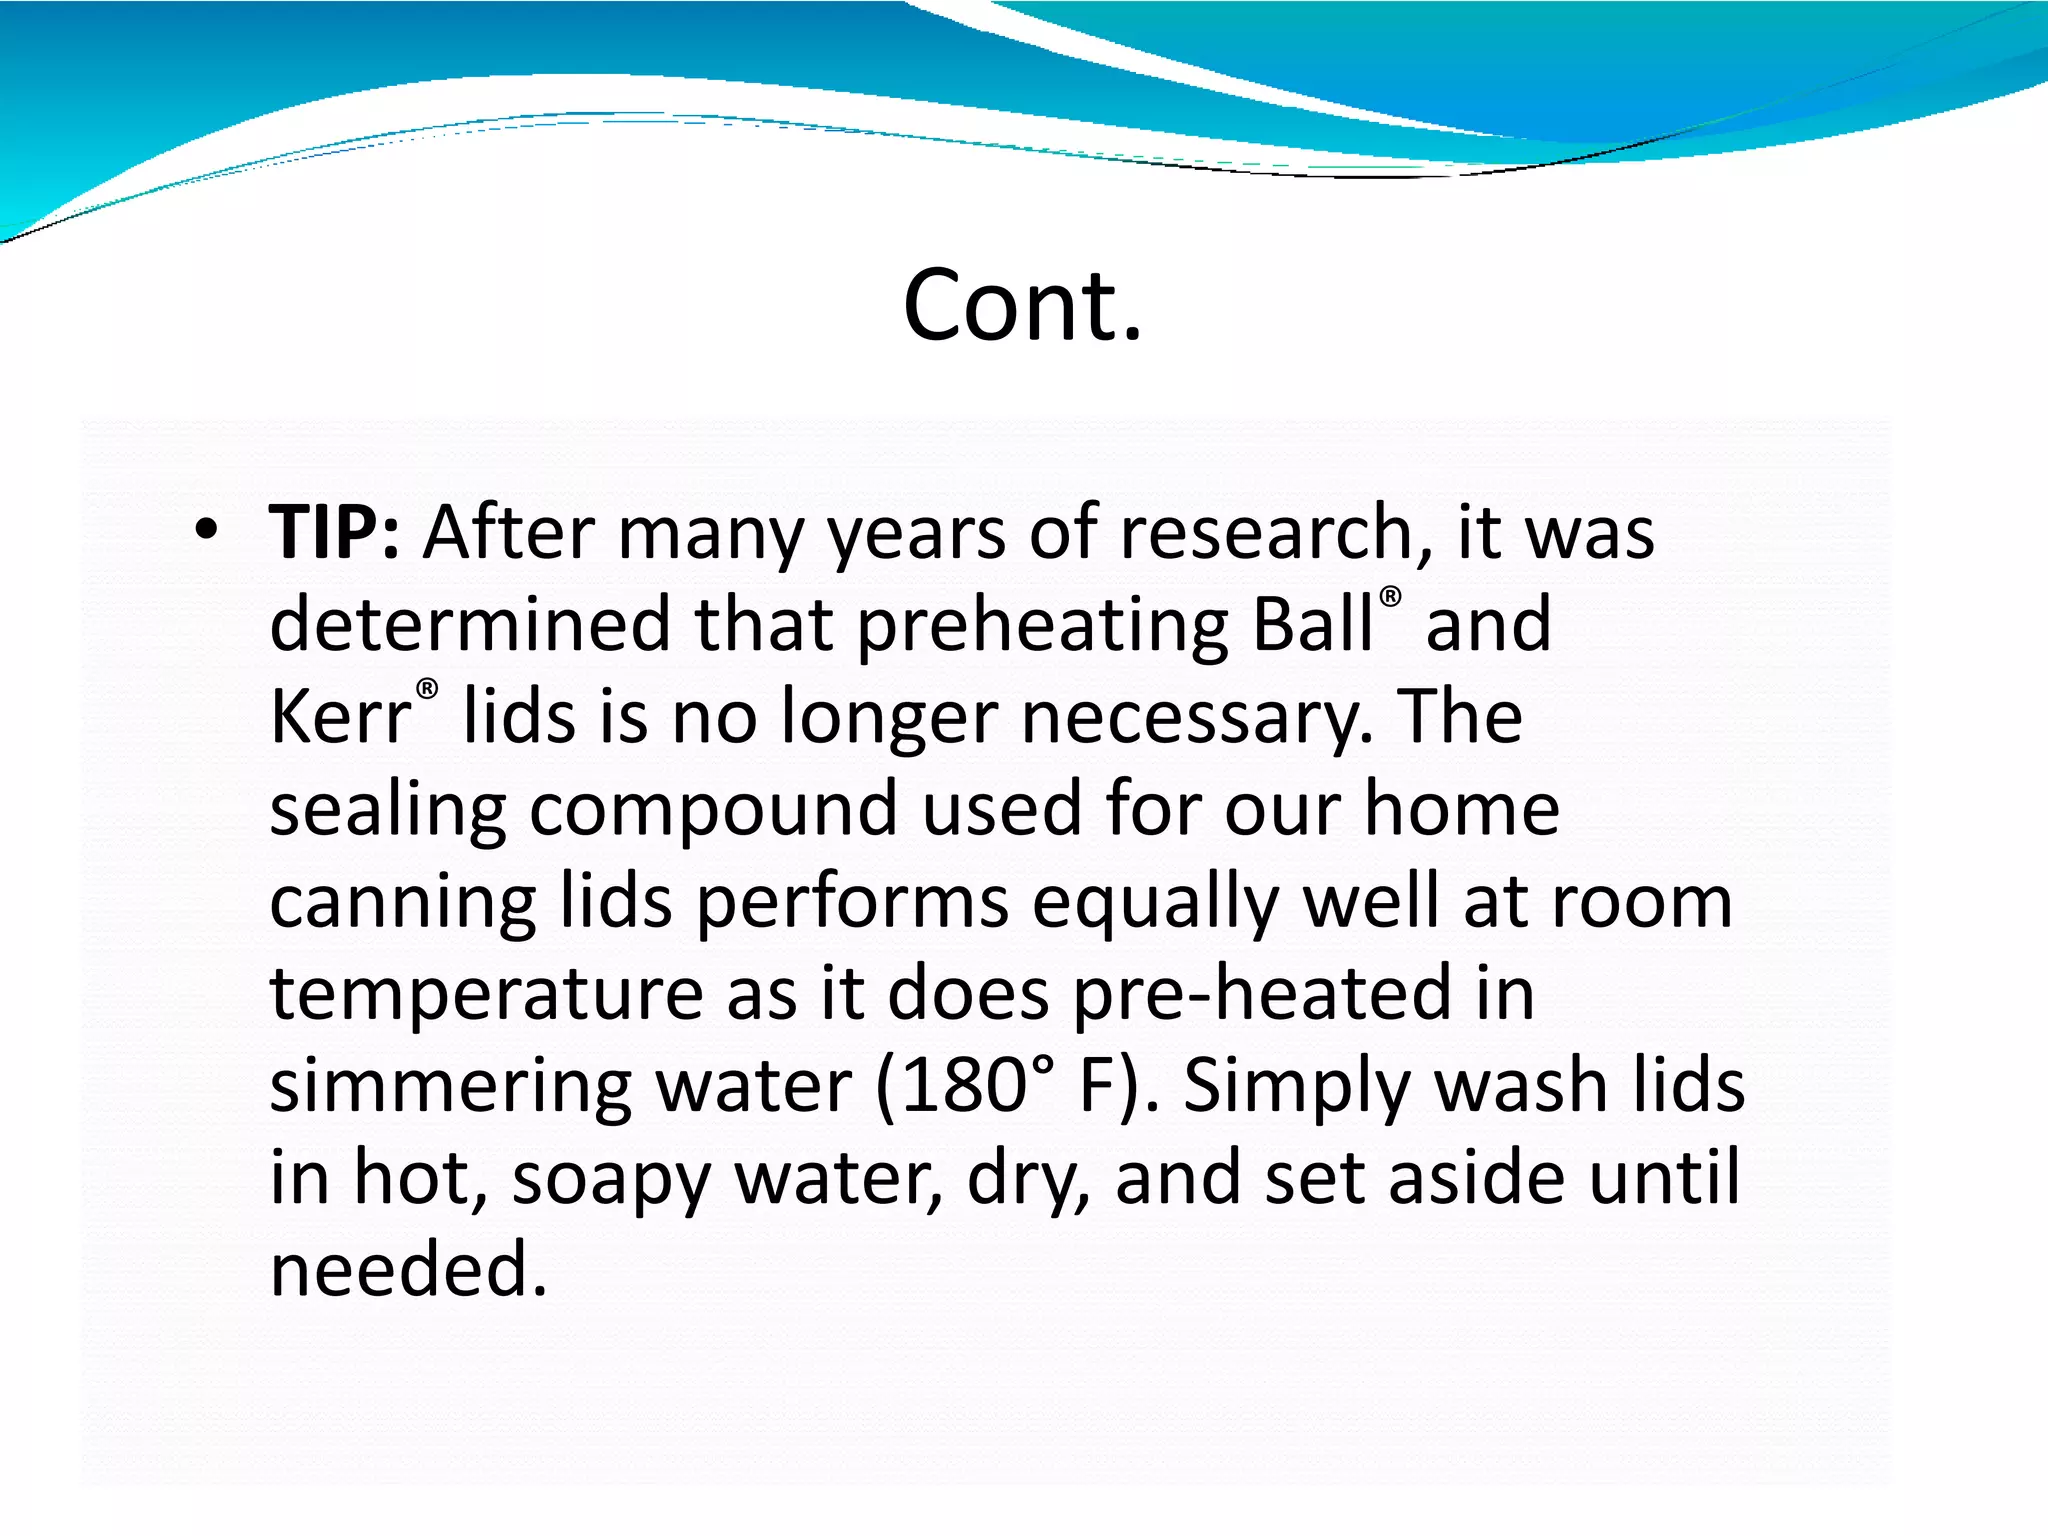
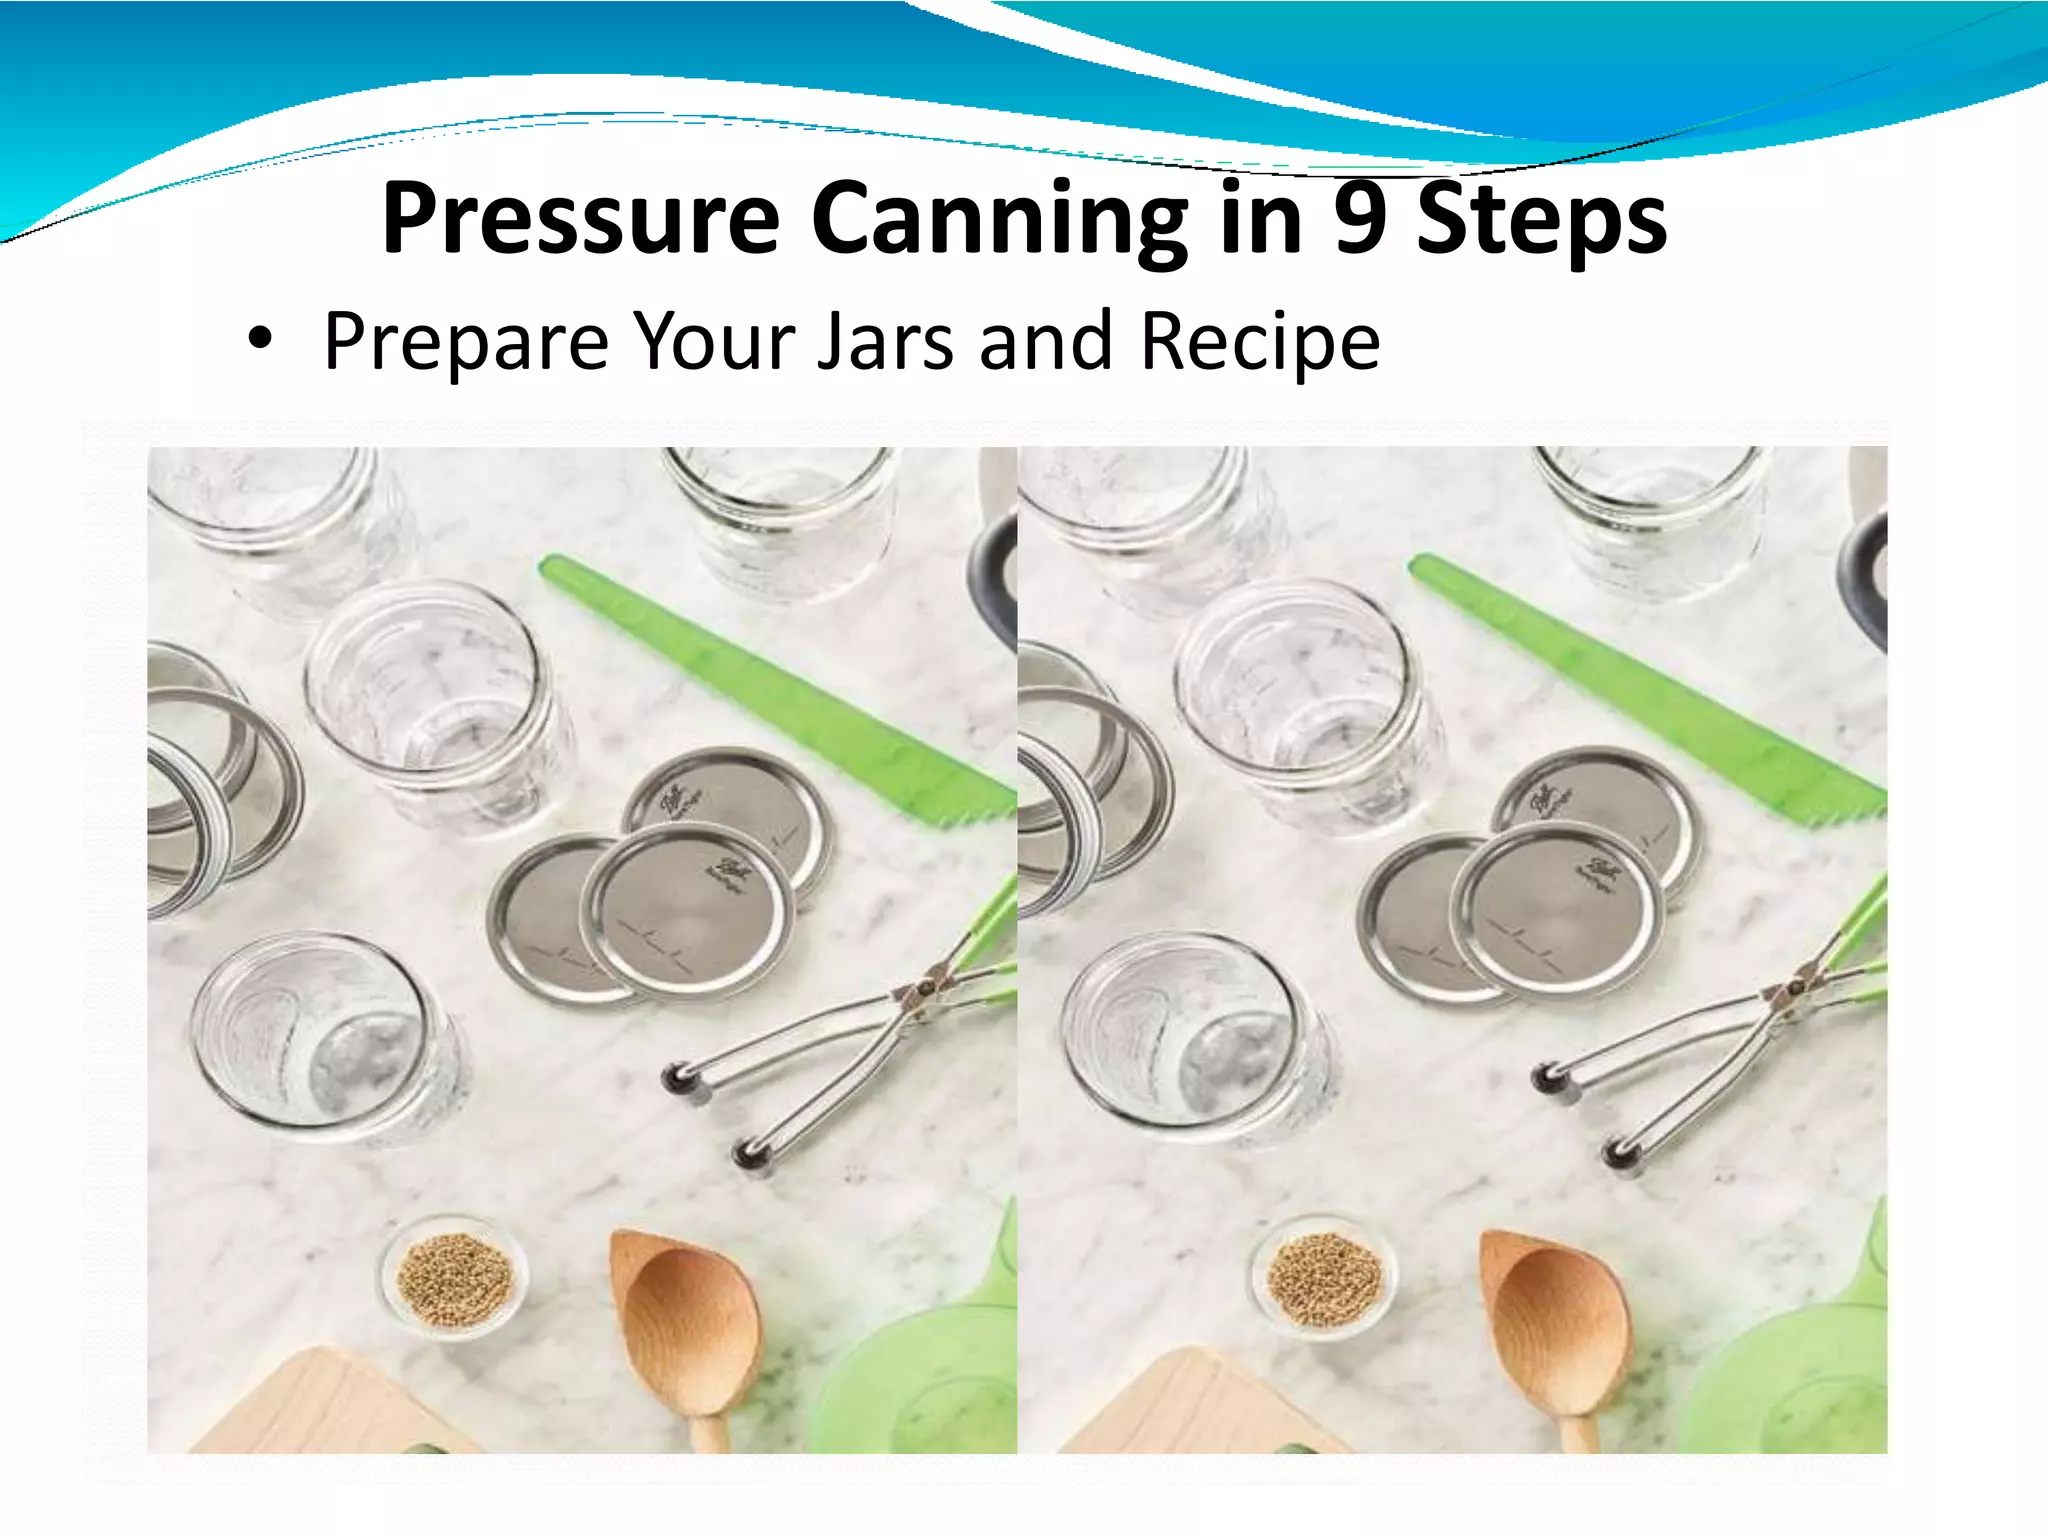
Pressure Canning
Dr. Abdirashid Ahmed Hussein
BSc IN Veterinary science department of animal husbandry in
university of Somalia (Uniso)
BSc in public health in Somvill university
Email: abwaanrashka39@gmail.com
Pressure canning
Pressure canning is the only processing
method that reaches the high
temperature (240°F) needed to safely
preserve low-acid foods.
It is the combination of time and
temperature that will destroy food-borne
bacteria and create a vacuum seal
necessary to prevent spoilage.
This process is required to preserve foods
and recipes like:
• Meats
• Poultry
• Salsas
• Vegetables
• Chili
• Seafood
Pressure Canning
High Temperatures For Low-Acid Foods
• Canning low-acid foods like meats,
poultry, seafood, and most vegetables
(except tomatoes) requires special
attention.
• These foods are such a natural part of
meal planning that preserving them
ensures an economical and well-
balanced diet throughout the year.
Cont.
• However, because these foods lack the
level of acidity needed to prevent
spoilage, low-acid foods MUST be
processed at a temperature of 240°F for
the recipe-established time. Pressure
canning is the only way to fresh
preserve at those temperature levels.
Cont.
• TIP: Recipes that combine high-acid
foods, such as tomatoes, with low-acid
foods, such as vegetables or meats, are
considered low-acid foods.
• Follow this step-by-step guide to safely
and effectively pressure can your low-
acid foods:
Prepare for Success—Gather Your
Tools of the Trade:
• Select a tested preserving recipe
• Pressure canner
• Glass preserving jars, lids, and bands (always start with new
lids)
• Common kitchen utensils, such as a wooden spoon, ladle,
and paring knife
• Quality ingredients (fresh vegetables, meat, poultry, or
seafood)
• Jar lifter
• Home canning funnel
• Bubble freer and headspace tool
• Review recipe and instructions. Follow
guidelines for preparation, jar size, preserving
method, and processing time.
• TIP: Check jars, lids, and bands for proper
functioning. Jars with nicks, cracks, uneven
rims, or sharp edges may prevent sealing or
cause jar breakage. T
• he underside of lids should not have scratches
or uneven or incomplete sealing compound as
this may prevent sealing.
• Bands should fit on jars. Wash all in hot, soapy
water and dry well.
Pressure Canning in 9 Steps
• Prepare Your Jars and Recipe
Pressure Canning in 9 Steps
• 1. Pre-heat . canning jars in hot (180°F)
water. Keeping jars hot prevents them from
breaking when filled with hot food. Leave
lids and bands at room temperature for
easy handling.
• 2. Add 2-3 inches of water to your pressure
canner. Bring to a simmer (180°F).
• 3. Prepare the desired tested low-acid
preserving recipe.
Fill Your Jars
• 4. Use a Jar Lifter to remove the pre-
heated jar. Fill jar one at a time with
prepared food using a Jar Funnel, leaving
headspace recommended in the recipe.
Remove air bubbles, if stated in the recipe,
by sliding the Bubble Remover &
Headspace Tool or rubber spatula between
the jar and food to release trapped air.
Repeat around jar 2-3 times.
Fill Your Jars
• 5. Wipe the rim and threads of the jar
using a clean, damp cloth to remove any
food residue. Center lid on the jar, allowing
the sealing compound to contact the jar
rim. Apply band and adjust until fit is
fingertip-tight. Place jar in canner. Repeat
steps 4 and 5 until all jars are filled. Ensure
that water level is 2-3 inches high (or per
recommended in manufacturer’s manual)
Process Your Jars
• 6. Lock the canner lid in place, leaving vent
pipe open. Adjust heat to medium-high.
Allow steam to escape through vent pipe
for 10 minutes or until steam forms a
constant flow to ensure there is no air
(only steam) left in the canner. Close vent
using weight or method described for your
canner. Monitor and adjust heat to achieve
the recommended pressure.
Process Your Jars
• 7. Maintain the recommended pressure for
the time indicated in tested preserving
recipe, adjusting for altitude (see altitude
chart). Turn off heat. Let canner stand
undisturbed (do not remove the weighted
gauge) until pressure returns to zero. Wait
10 minutes, remove weight and unlock the
lid, tilting away from yourself. Allow jars to
cool for an additional 10 minutes.
Set and Flex Test
• 8. Move jars from pressure canner and
set upright on a towel. This will prevent
jar breakage that can occur from
temperature differences. Leave jars
undisturbed for 12 to 24 hours. DO NOT
retighten bands as this may interfere
with the sealing process.
Set and Flex Test
• 9. Inspect lids for seals. There should be no flex
when the center is pressed. Remove the bands
and attempt to lift lids off with your fingertips.
Properly sealed lids will remain attached. If a lid
fails to seal within 24 hours, immediately
refrigerate the product. Clean canning jars and
lids, label and store in a cool, dry, dark place for
up 18 months when using SureTight
Lids according to our instructions for Food
Preservation.
Cont.
• TIP: After many years of research, it was
determined that preheating Ball® and
Kerr® lids is no longer necessary. The
sealing compound used for our home
canning lids performs equally well at room
temperature as it does pre-heated in
simmering water (180° F). Simply wash lids
in hot, soapy water, dry, and set aside until
needed.
Have you any question
End. …………

Lecture 8 food preservation by pressure canning

  • 1.
    Pressure Canning Dr. AbdirashidAhmed Hussein BSc IN Veterinary science department of animal husbandry in university of Somalia (Uniso) BSc in public health in Somvill university Email: abwaanrashka39@gmail.com
  • 2.
    Pressure canning Pressure canningis the only processing method that reaches the high temperature (240°F) needed to safely preserve low-acid foods. It is the combination of time and temperature that will destroy food-borne bacteria and create a vacuum seal necessary to prevent spoilage.
  • 3.
    This process isrequired to preserve foods and recipes like: • Meats • Poultry • Salsas • Vegetables • Chili • Seafood
  • 4.
  • 5.
    High Temperatures ForLow-Acid Foods • Canning low-acid foods like meats, poultry, seafood, and most vegetables (except tomatoes) requires special attention. • These foods are such a natural part of meal planning that preserving them ensures an economical and well- balanced diet throughout the year.
  • 6.
    Cont. • However, becausethese foods lack the level of acidity needed to prevent spoilage, low-acid foods MUST be processed at a temperature of 240°F for the recipe-established time. Pressure canning is the only way to fresh preserve at those temperature levels.
  • 7.
    Cont. • TIP: Recipesthat combine high-acid foods, such as tomatoes, with low-acid foods, such as vegetables or meats, are considered low-acid foods. • Follow this step-by-step guide to safely and effectively pressure can your low- acid foods:
  • 8.
    Prepare for Success—GatherYour Tools of the Trade: • Select a tested preserving recipe • Pressure canner • Glass preserving jars, lids, and bands (always start with new lids) • Common kitchen utensils, such as a wooden spoon, ladle, and paring knife • Quality ingredients (fresh vegetables, meat, poultry, or seafood) • Jar lifter • Home canning funnel • Bubble freer and headspace tool
  • 9.
    • Review recipeand instructions. Follow guidelines for preparation, jar size, preserving method, and processing time. • TIP: Check jars, lids, and bands for proper functioning. Jars with nicks, cracks, uneven rims, or sharp edges may prevent sealing or cause jar breakage. T • he underside of lids should not have scratches or uneven or incomplete sealing compound as this may prevent sealing. • Bands should fit on jars. Wash all in hot, soapy water and dry well.
  • 10.
    Pressure Canning in9 Steps • Prepare Your Jars and Recipe
  • 11.
    Pressure Canning in9 Steps • 1. Pre-heat . canning jars in hot (180°F) water. Keeping jars hot prevents them from breaking when filled with hot food. Leave lids and bands at room temperature for easy handling. • 2. Add 2-3 inches of water to your pressure canner. Bring to a simmer (180°F). • 3. Prepare the desired tested low-acid preserving recipe.
  • 12.
    Fill Your Jars •4. Use a Jar Lifter to remove the pre- heated jar. Fill jar one at a time with prepared food using a Jar Funnel, leaving headspace recommended in the recipe. Remove air bubbles, if stated in the recipe, by sliding the Bubble Remover & Headspace Tool or rubber spatula between the jar and food to release trapped air. Repeat around jar 2-3 times.
  • 13.
    Fill Your Jars •5. Wipe the rim and threads of the jar using a clean, damp cloth to remove any food residue. Center lid on the jar, allowing the sealing compound to contact the jar rim. Apply band and adjust until fit is fingertip-tight. Place jar in canner. Repeat steps 4 and 5 until all jars are filled. Ensure that water level is 2-3 inches high (or per recommended in manufacturer’s manual)
  • 14.
    Process Your Jars •6. Lock the canner lid in place, leaving vent pipe open. Adjust heat to medium-high. Allow steam to escape through vent pipe for 10 minutes or until steam forms a constant flow to ensure there is no air (only steam) left in the canner. Close vent using weight or method described for your canner. Monitor and adjust heat to achieve the recommended pressure.
  • 15.
    Process Your Jars •7. Maintain the recommended pressure for the time indicated in tested preserving recipe, adjusting for altitude (see altitude chart). Turn off heat. Let canner stand undisturbed (do not remove the weighted gauge) until pressure returns to zero. Wait 10 minutes, remove weight and unlock the lid, tilting away from yourself. Allow jars to cool for an additional 10 minutes.
  • 16.
    Set and FlexTest • 8. Move jars from pressure canner and set upright on a towel. This will prevent jar breakage that can occur from temperature differences. Leave jars undisturbed for 12 to 24 hours. DO NOT retighten bands as this may interfere with the sealing process.
  • 17.
    Set and FlexTest • 9. Inspect lids for seals. There should be no flex when the center is pressed. Remove the bands and attempt to lift lids off with your fingertips. Properly sealed lids will remain attached. If a lid fails to seal within 24 hours, immediately refrigerate the product. Clean canning jars and lids, label and store in a cool, dry, dark place for up 18 months when using SureTight Lids according to our instructions for Food Preservation.
  • 18.
    Cont. • TIP: Aftermany years of research, it was determined that preheating Ball® and Kerr® lids is no longer necessary. The sealing compound used for our home canning lids performs equally well at room temperature as it does pre-heated in simmering water (180° F). Simply wash lids in hot, soapy water, dry, and set aside until needed.
  • 19.
    Have you anyquestion End. …………