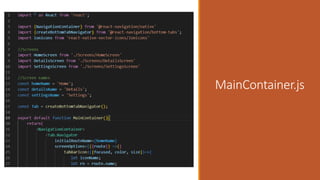
Lecture 2
Styling and
Layout in React
Native
PREPARED BY: ENG YEE WEI
Core Components
Core components are ready-to-use components available from React Native, which include
<View>, <Text>, <Image>, <ScrollView>, <Button>, and <TextInput>.
<View>
Component
The <View> component is a
generic “visible” container
without any semantic
meaning or noticeable
performance impact, best
translated as <div> from
web.
<ScrollView>
Component
The <ScrollView>
component is a generic
“visible” container with
scrolling, but it’s less
performant than <View>,
making it less suitable for
simple styling and short lines
of text.
<Image>
Component
The <Image> component is an optimized way to render images
from various sources, including remote HTTP access, local assets
imported with require, and base64 encoded strings.
<TextInput>
Component
The <TextInput> component can
capture alphanumeric input from the
user. Its behavior can be modified with
the onChangeText prop, which accepts
a function.
<TextInput>
Component
The <TextInput> component can
capture alphanumeric input from the
user. Its behavior can be modified with
the onChangeText prop, which accepts
a function.
Business-Logic
Focused
Component
Creating business-logic focused
components is done by
“composing” components into
one and connecting
functionality by passing props
and event handlers.
Props.children will render the
content that we pass as child
elements to it. The main element
here is View component and the
child element here is the component
named as <ReadMoreParagraph>
Business-Logic
Focused
Component
Creating business-logic focused
components is done by
“composing” components into
one and connecting
functionality by passing props
and event handlers.
Custom
Component
Similar to React, it’s common to
create custom components to
wrap configuration and usage
of core components.
It is recommended to set the width and
height in percentage.
Styling
Component
(StyleSheet)
StyleSheet is an abstraction that
replaces CSS by accepting CSS
styling rules using a two-
dimensional JavaScript object.
Quick
glance/reference
on the rest of
the styling
components
Navigation
Tab Navigation
This pattern uses a tab bar to allow users to
switch between screens.
Usually, these screens contain different
functionality, like a home screen and a profile
screen.
There are more variants of the tab navigator,
like Google’s Material Design (top) Tabs.
The tabs usually contain the primary
functionality of an app, like a feed and profile
screen.
Stack Navigation
Instead of using a menu or tab bar, the user has
to go from screen to screen to navigate through
all screens. When a user navigates from one
screen to another, the screen is pushed on a
stack.
The order of the stack doesn’t matter; every
transition is another screen in the stack.
However, when going back a page, the last
screen is removed from the stack and the
previous screen is displayed. These stacks
usually contain screens that are functional-
related to each other, like a list of tasks and a
task detail screen. The only UI rendered is a
header with the screen title and a back button.
Drawer Navigation
Instead of using a tab bar, it uses a pane that
can be opened by either swiping or opening a
menu button.
In this pane, there is a menu where the users
can switch between screens. Like the tab bar
pattern, these screens often contain the
primary functionality of your app.
Structure of NavigationContainer
Component
In the react-navigation library, components to be organized must be wrapped in a
NavigationContainer component since it keeps track of the navigation structure and makes sure
the navigators can operate.
createStackNavigatorFactory Method
npm install @react-navigation/native
Stack navigation
example
npm install @react-navigation/stack
Stack
navigation
example
createBottomTabNavigatorFactory
Method
In the react-navigation library, the bottom tab navigator is created by the
createBottomTabNavigator factory method.
Tab navigation
example
Practical : Do a simple tab navigation
1. In your project folder “ Hello”, create a new folder named as “Navigation” and create a
“MainContainer.js” screen.
2. Inside the “ Navigation” folder, create a new folder named as “Screens”
3. In the “Screens” folder, create 3 screens named as “DetailsScreen.js”, “HomeScreen.js”, “
SettingsScreen.js”
Navigation
MainContainer.js
HomeScreen.js
Screens
DetailsScreen.js
SettingsScreen.js
App.js
HomeScreen.js
SettingsScreen.js
DetailsScreen.js
MainContainer.js
MainContainer.js
Final Output in
iOS screen
Modify the code
of home screen
For source = {require(‘./background.jpg’)}, you need to search an image and
save the image in the folder of ‘Screen’. For using online source image,
refer the source code below.
Modify the code
of home screen
Output of
home screen
Modify the code
of home screen
(Version 2 )
Button Linking
First, create a folder at the root folder directory, named it as “styles”.
Create a new JavaScript file which named it as global.js.
Button Linking
Next, we are going to configure the ‘DetailsScreen.js’. Whenever a button
is pressed, it will redirect to another page according to the website link we
set.
Button Linking Code
Modify the code in MainContainer.js
Create another file named as
SearchScreen.js in the Screens Folder
ADD the
SearchScreen
reference
Add one more stack
of screen
In this example, we have an array of data containing objects with an id and title property.
We use this array to generate a list of search results based on the user's search query.
We create a state variable searchQuery using the useState hook to store the
user's search query. We then create a function handleSearch that updates the
searchQuery state variable as the user types.
We also create a function filterResults that filters the data array based on whether the title
property of each item in the array contains the search query. This function returns a new filtered
array.
Finally, we use the search query
and filtered data to render the
search results. We render a text
input that calls the handleSearch
function when the user types and
renders the searchQuery state
variable as its value. We also
render a list of search results by
calling the filterResults function
and mapping over the resulting
array to render each item's title.
Now, Modify
your app to
Coffee App
Expected
output
Change <text> to <image>
Modify StyleSheet
Food Selection
Screen (Codes
given in PDF)
Lecture 2 Styling and Layout in React Native.pptx

Lecture 2 Styling and Layout in React Native.pptx