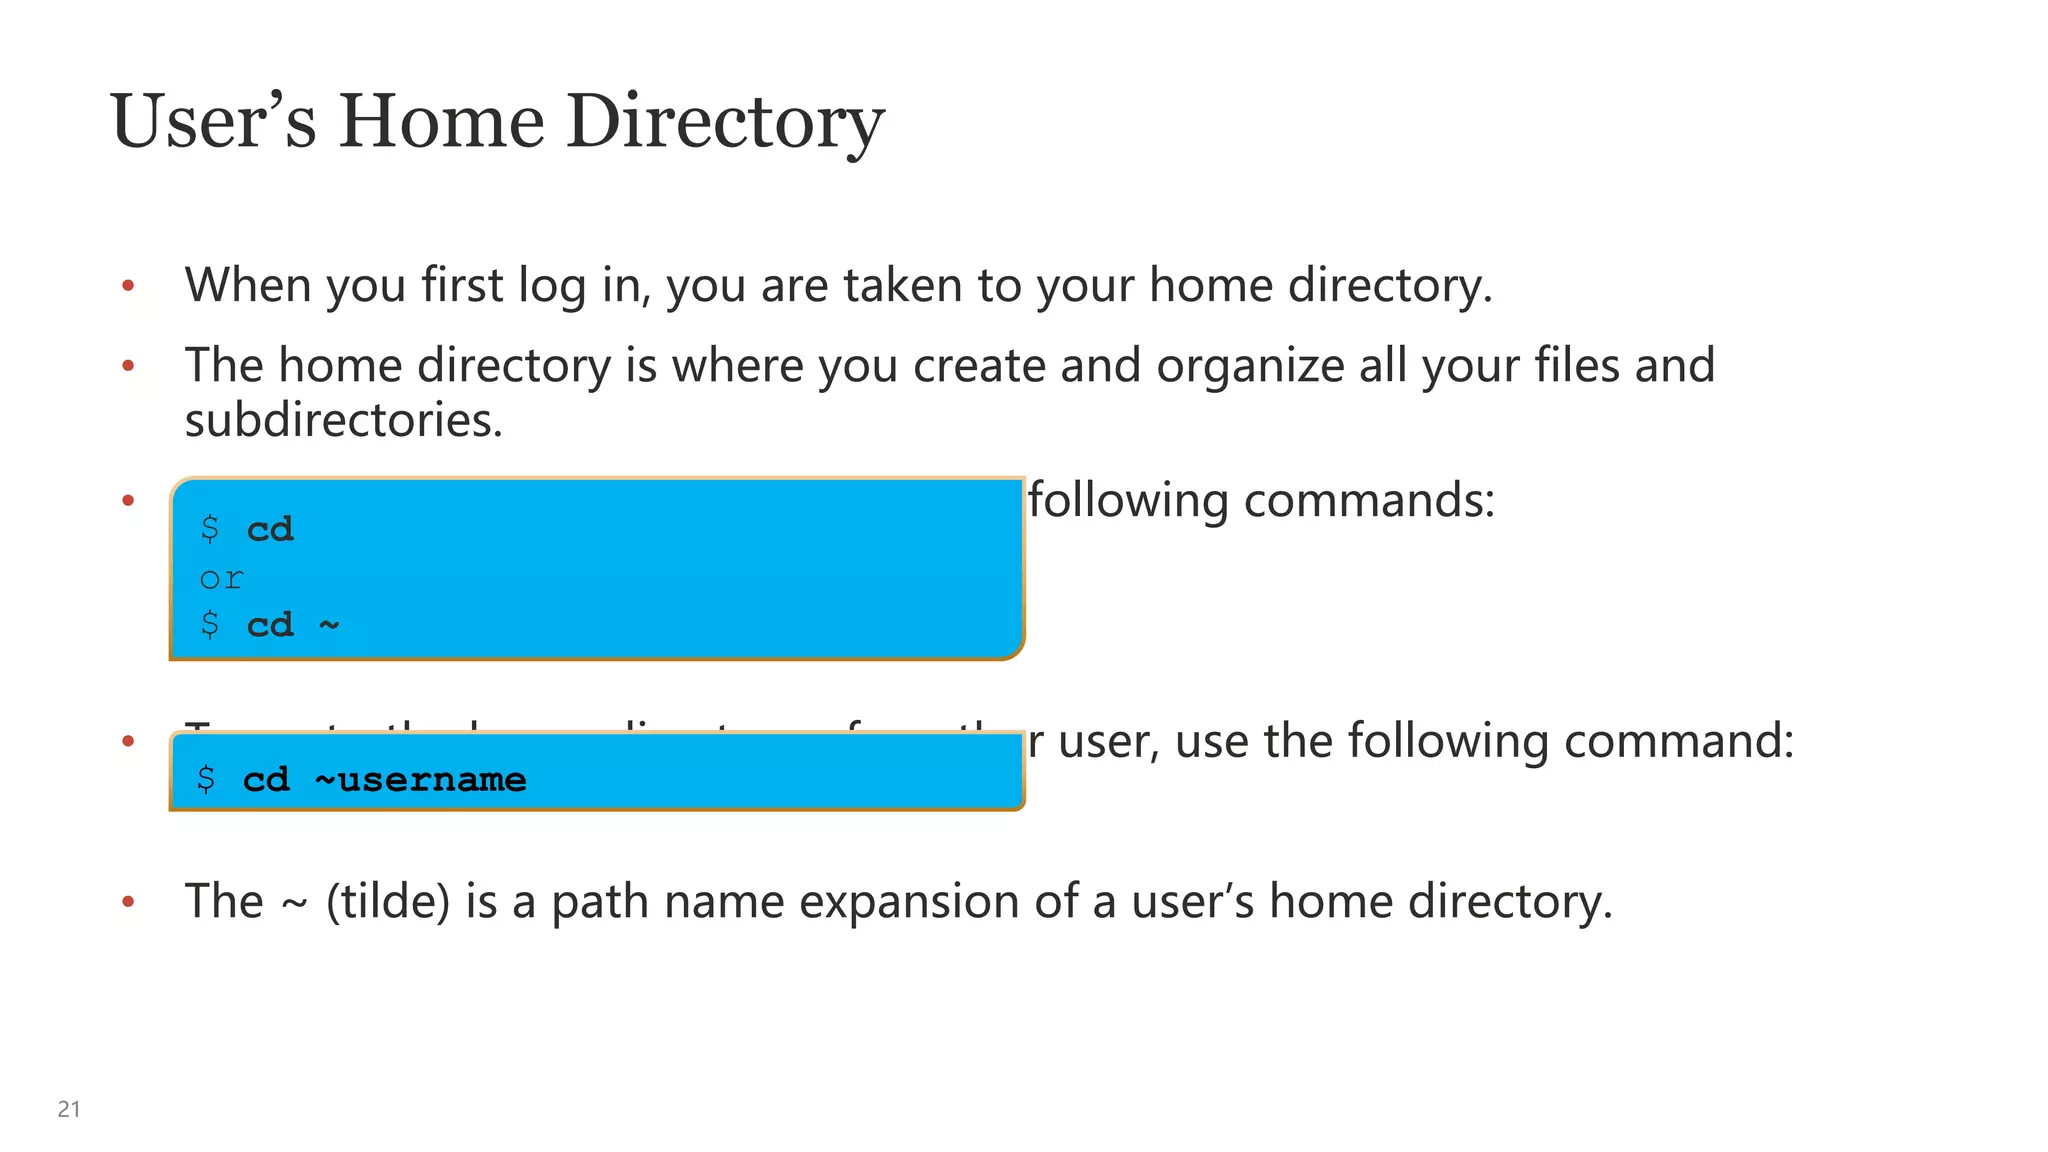
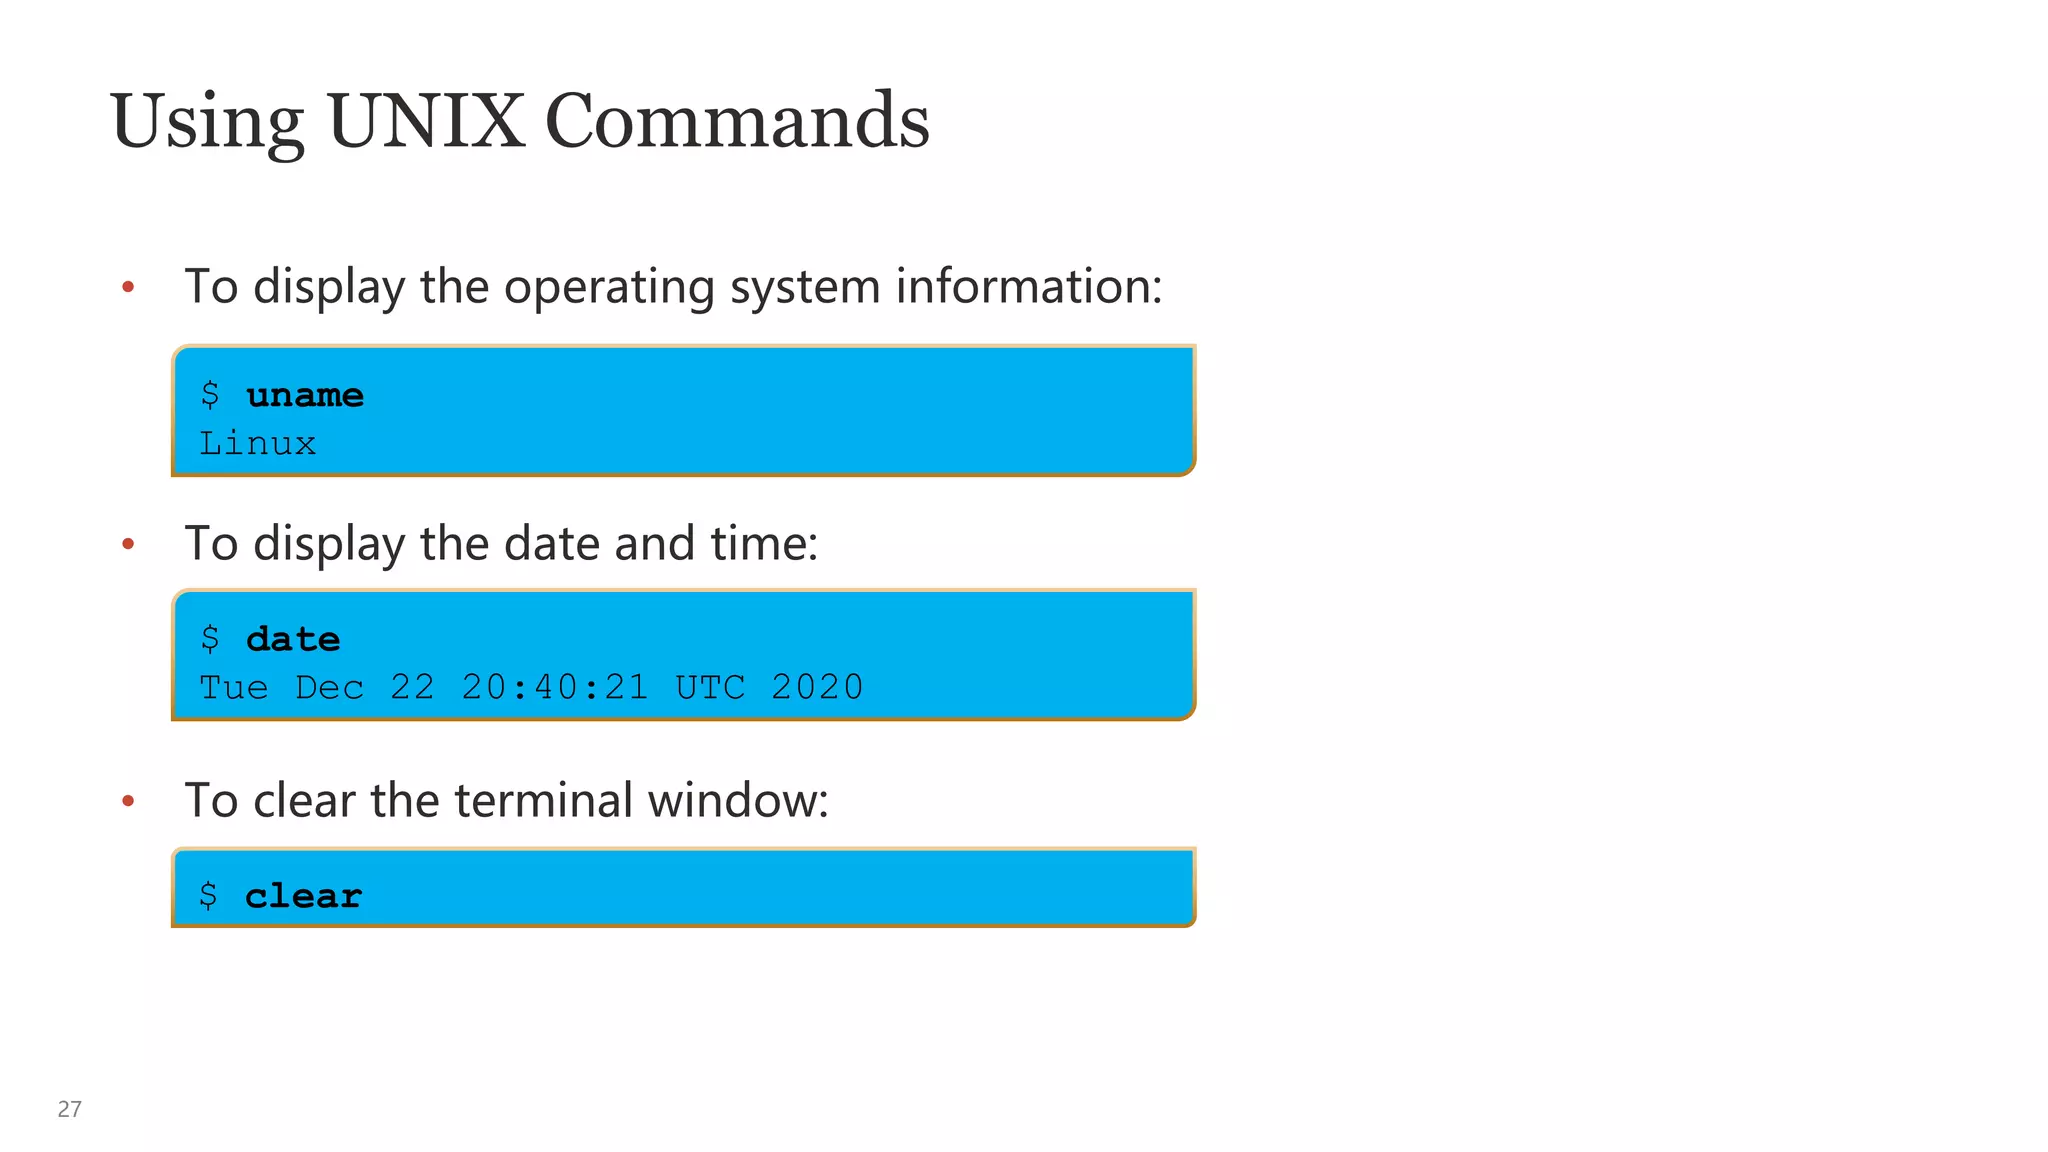
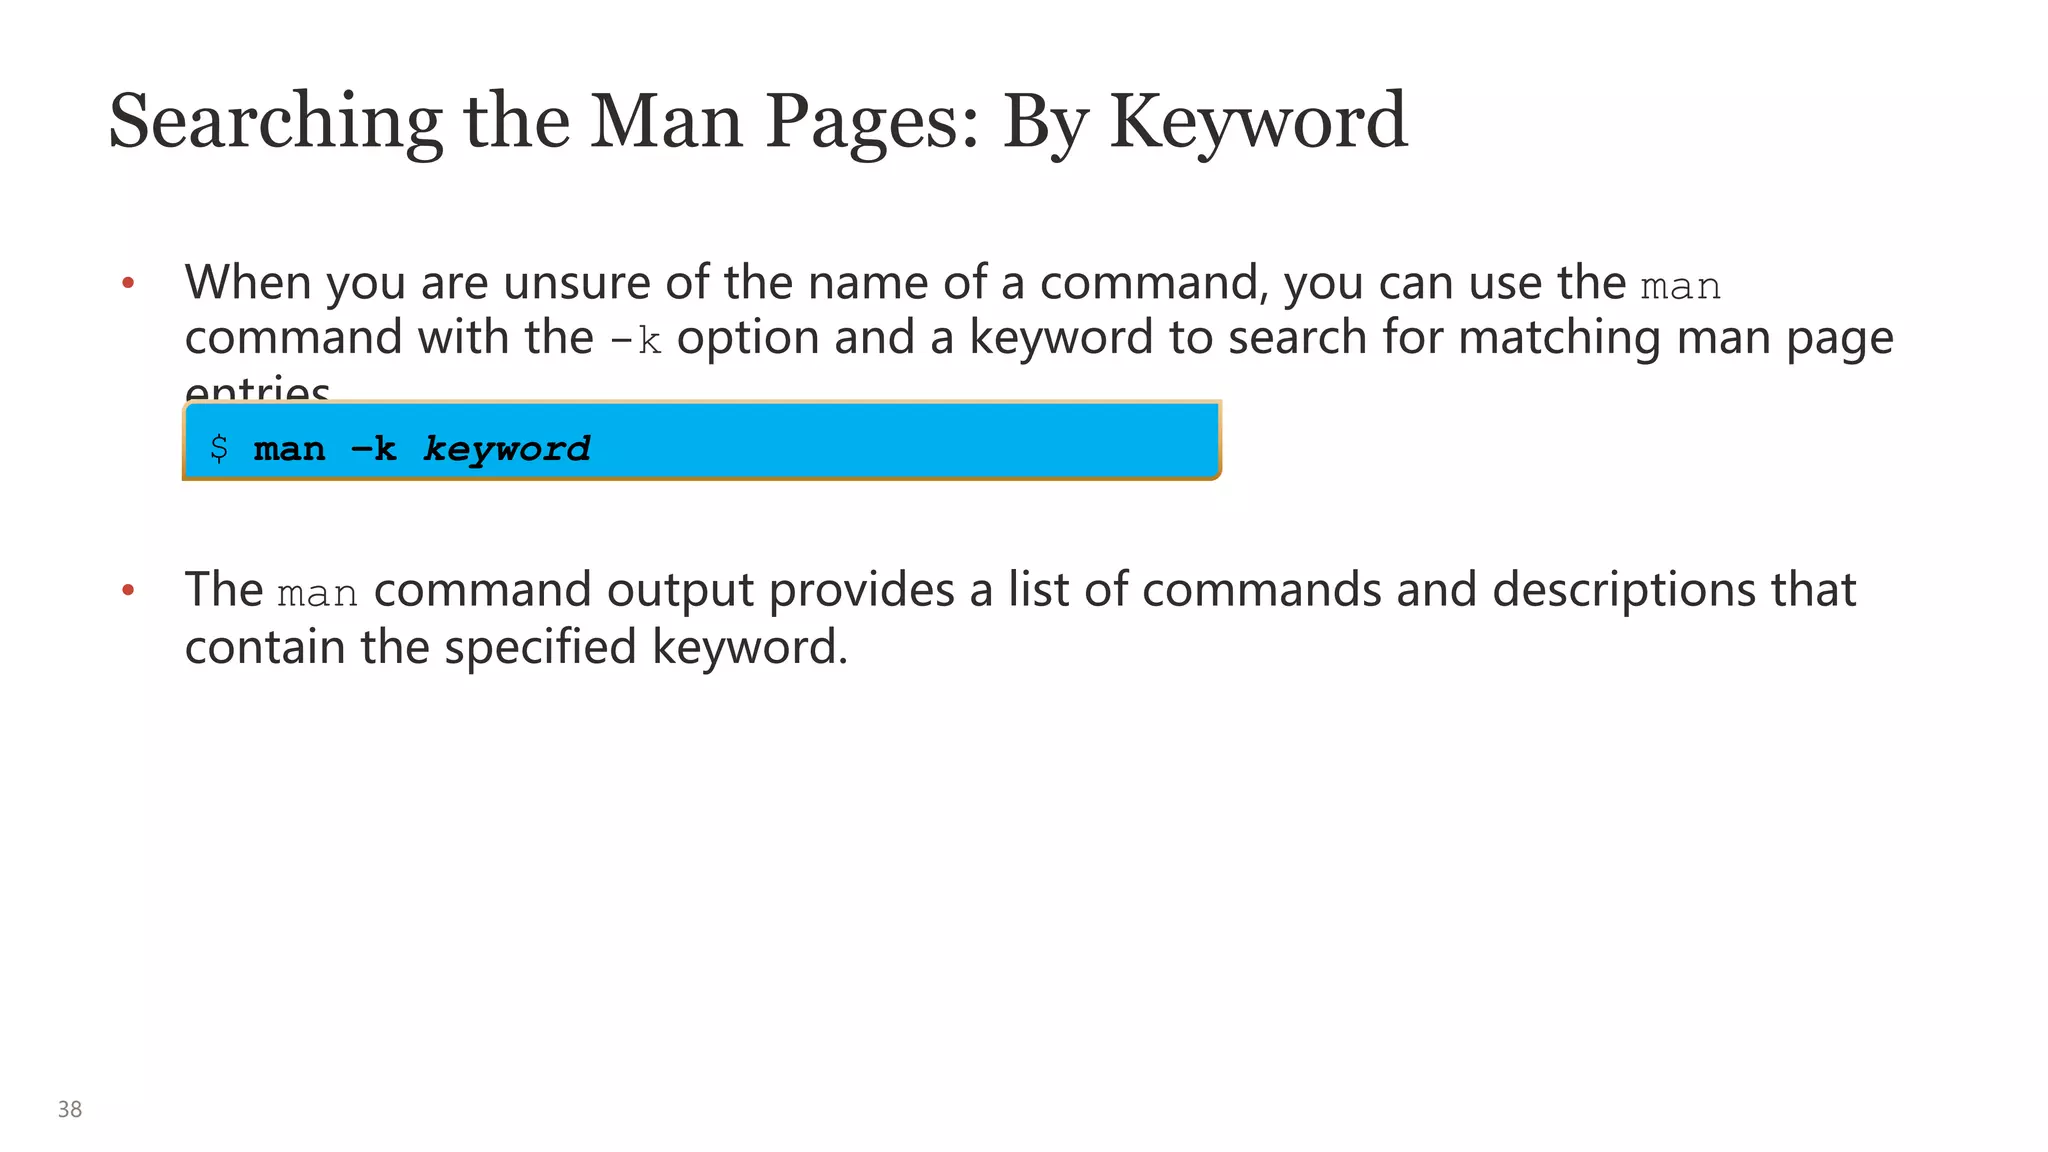
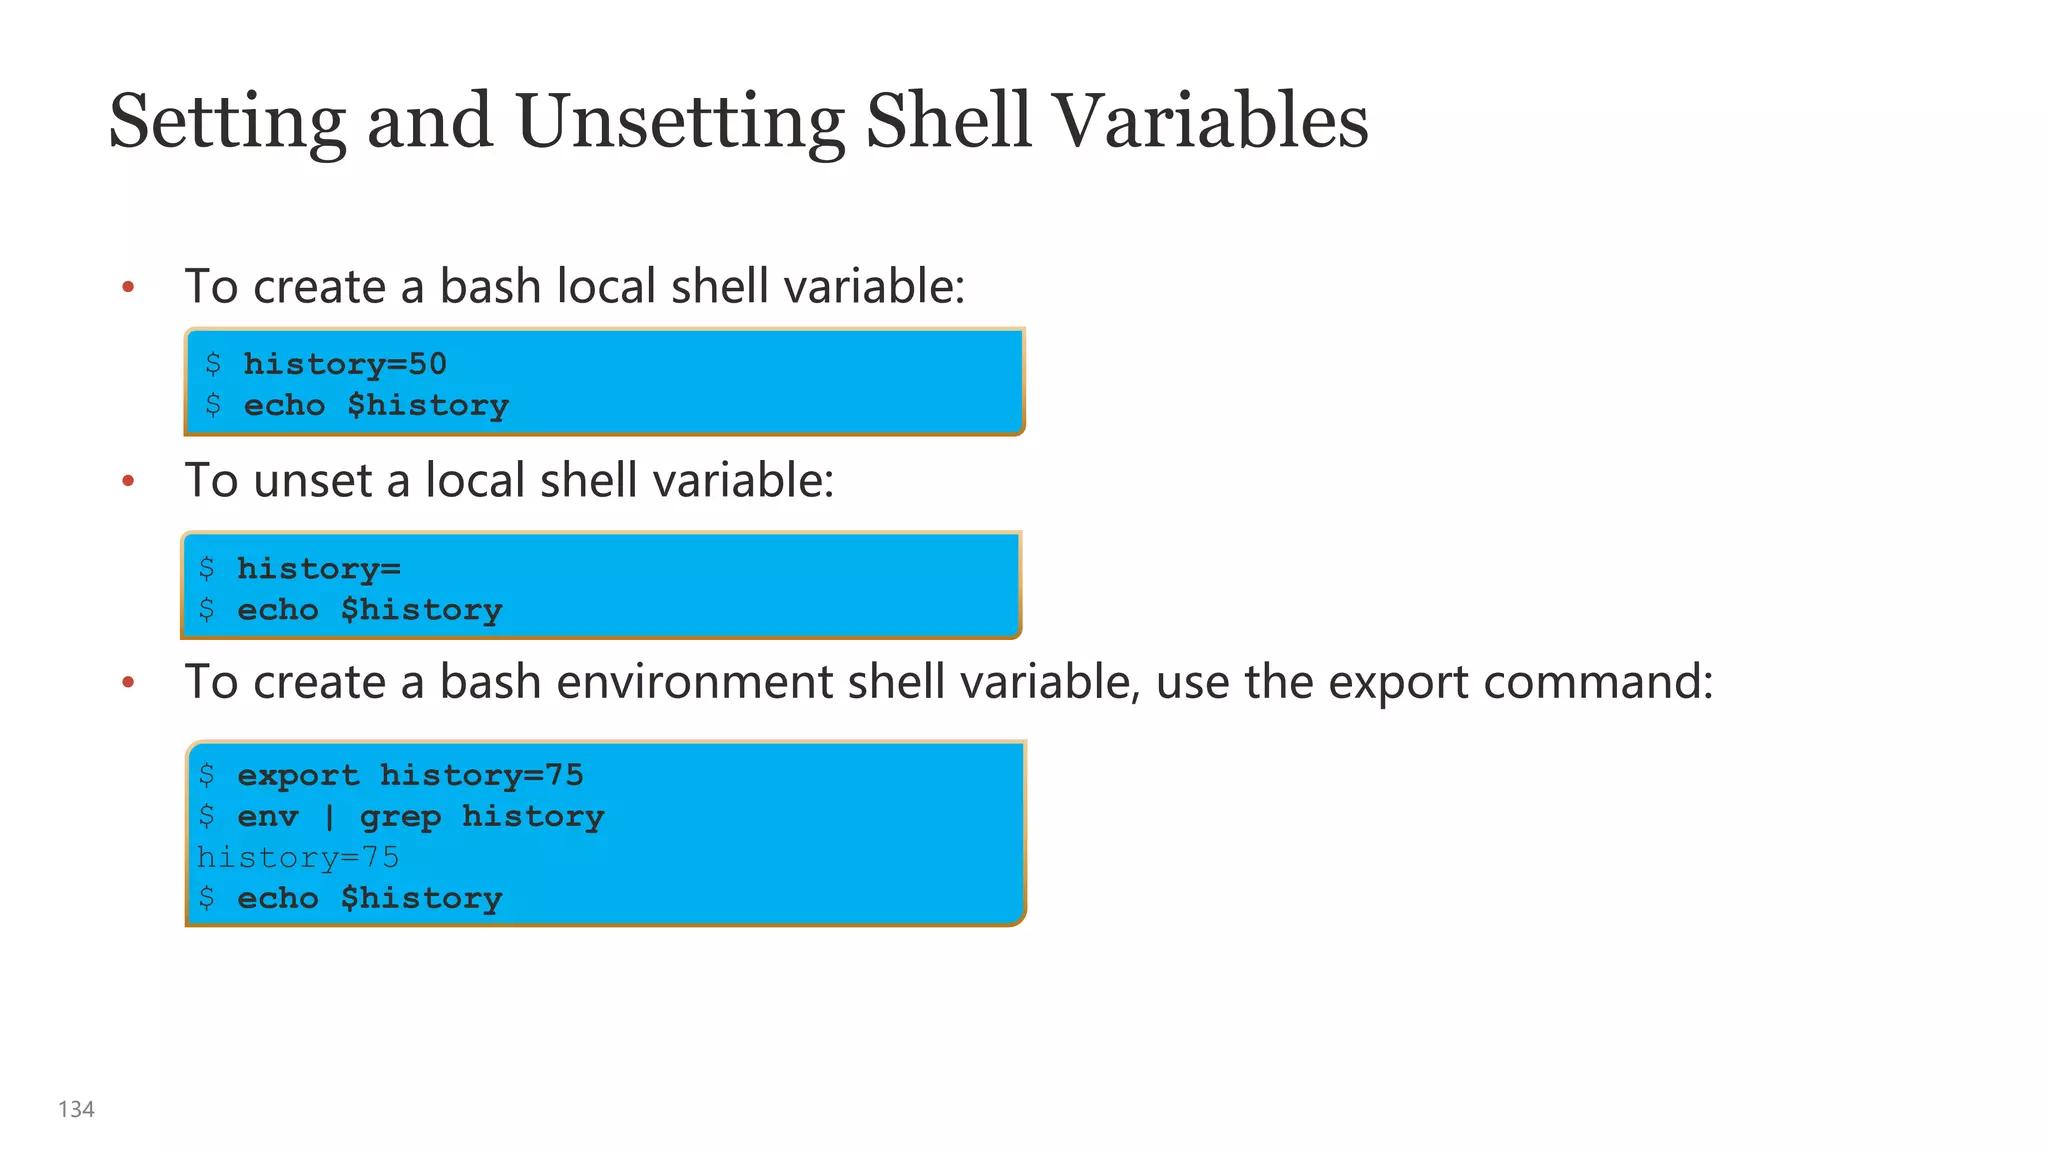
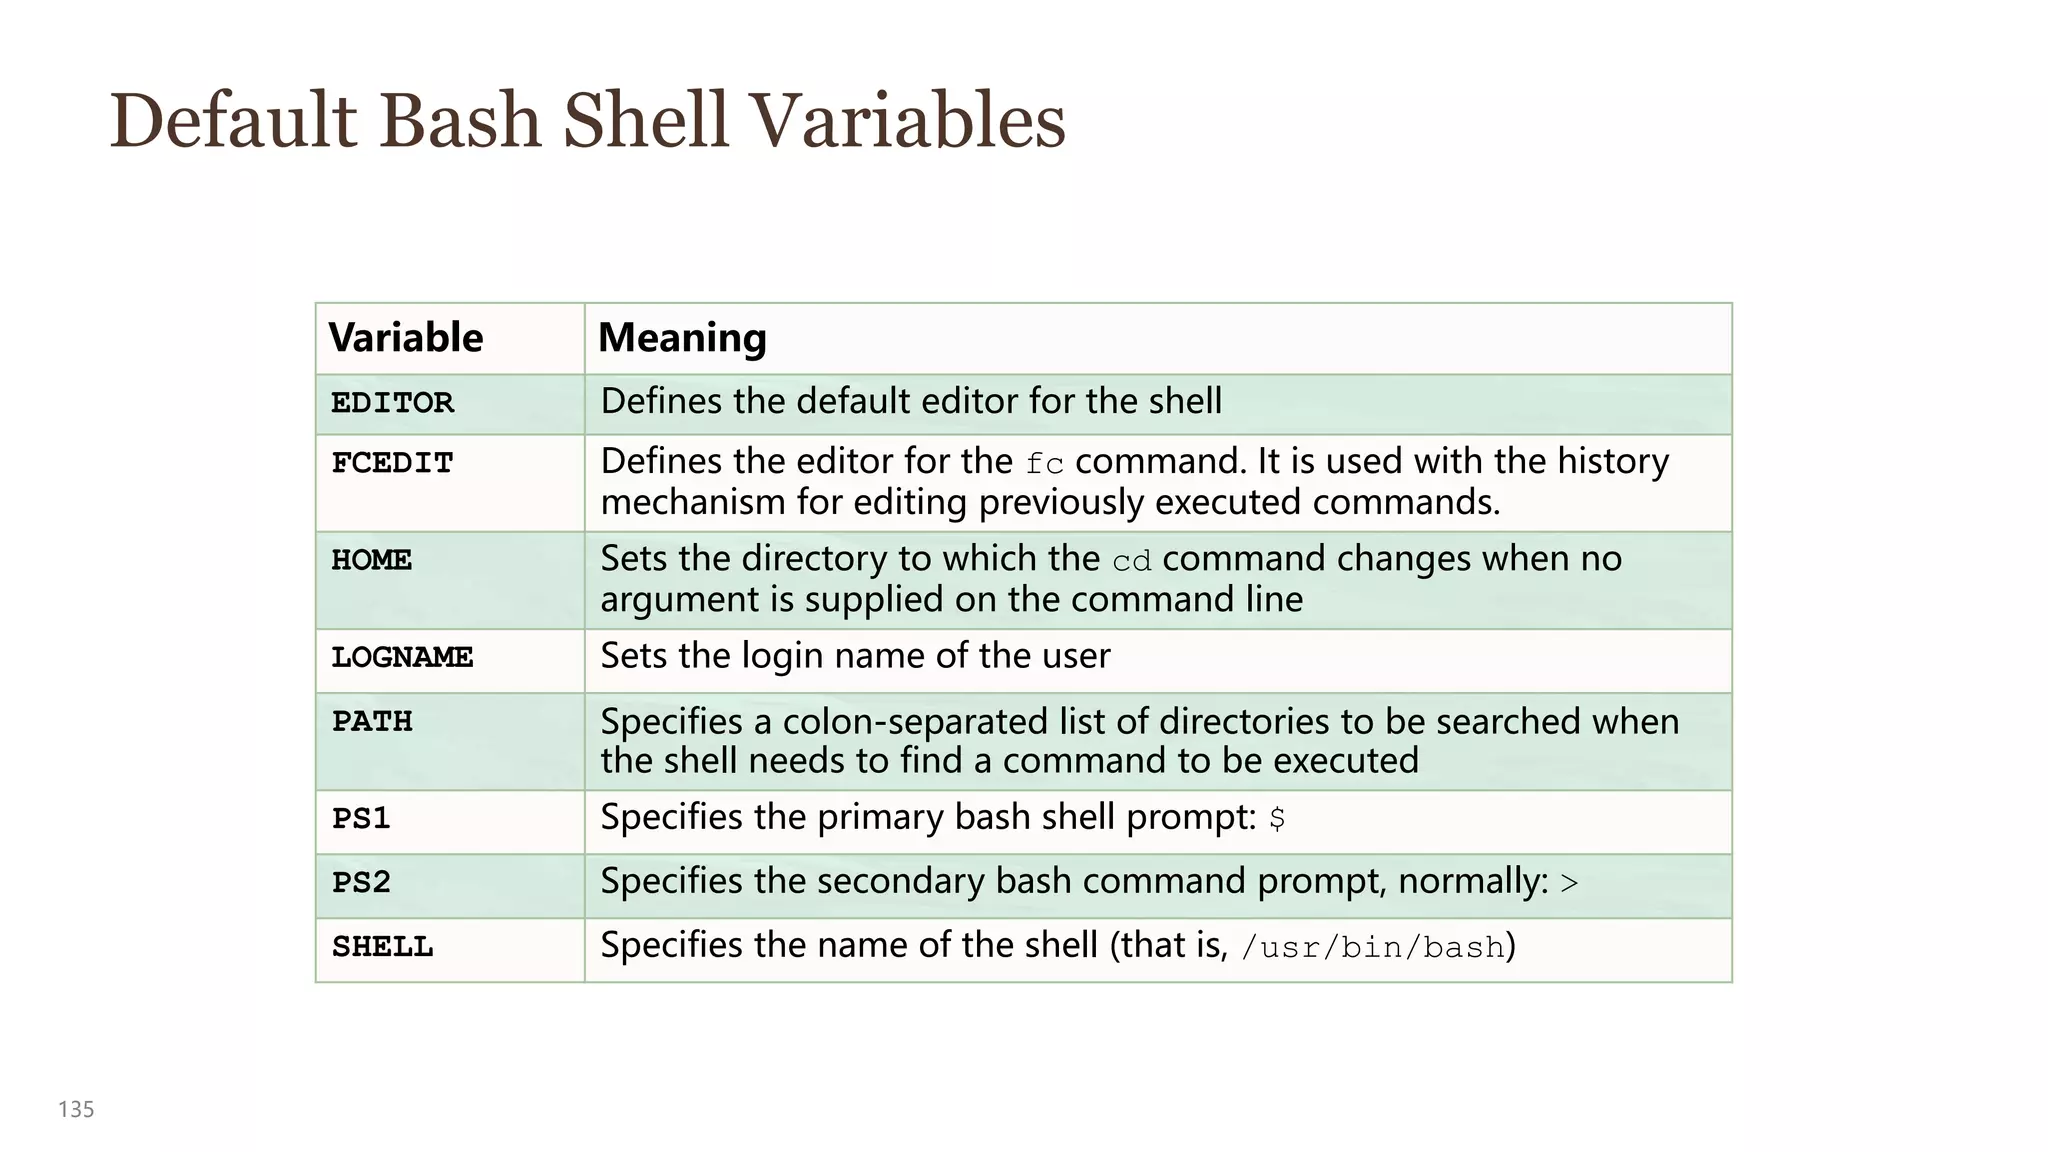
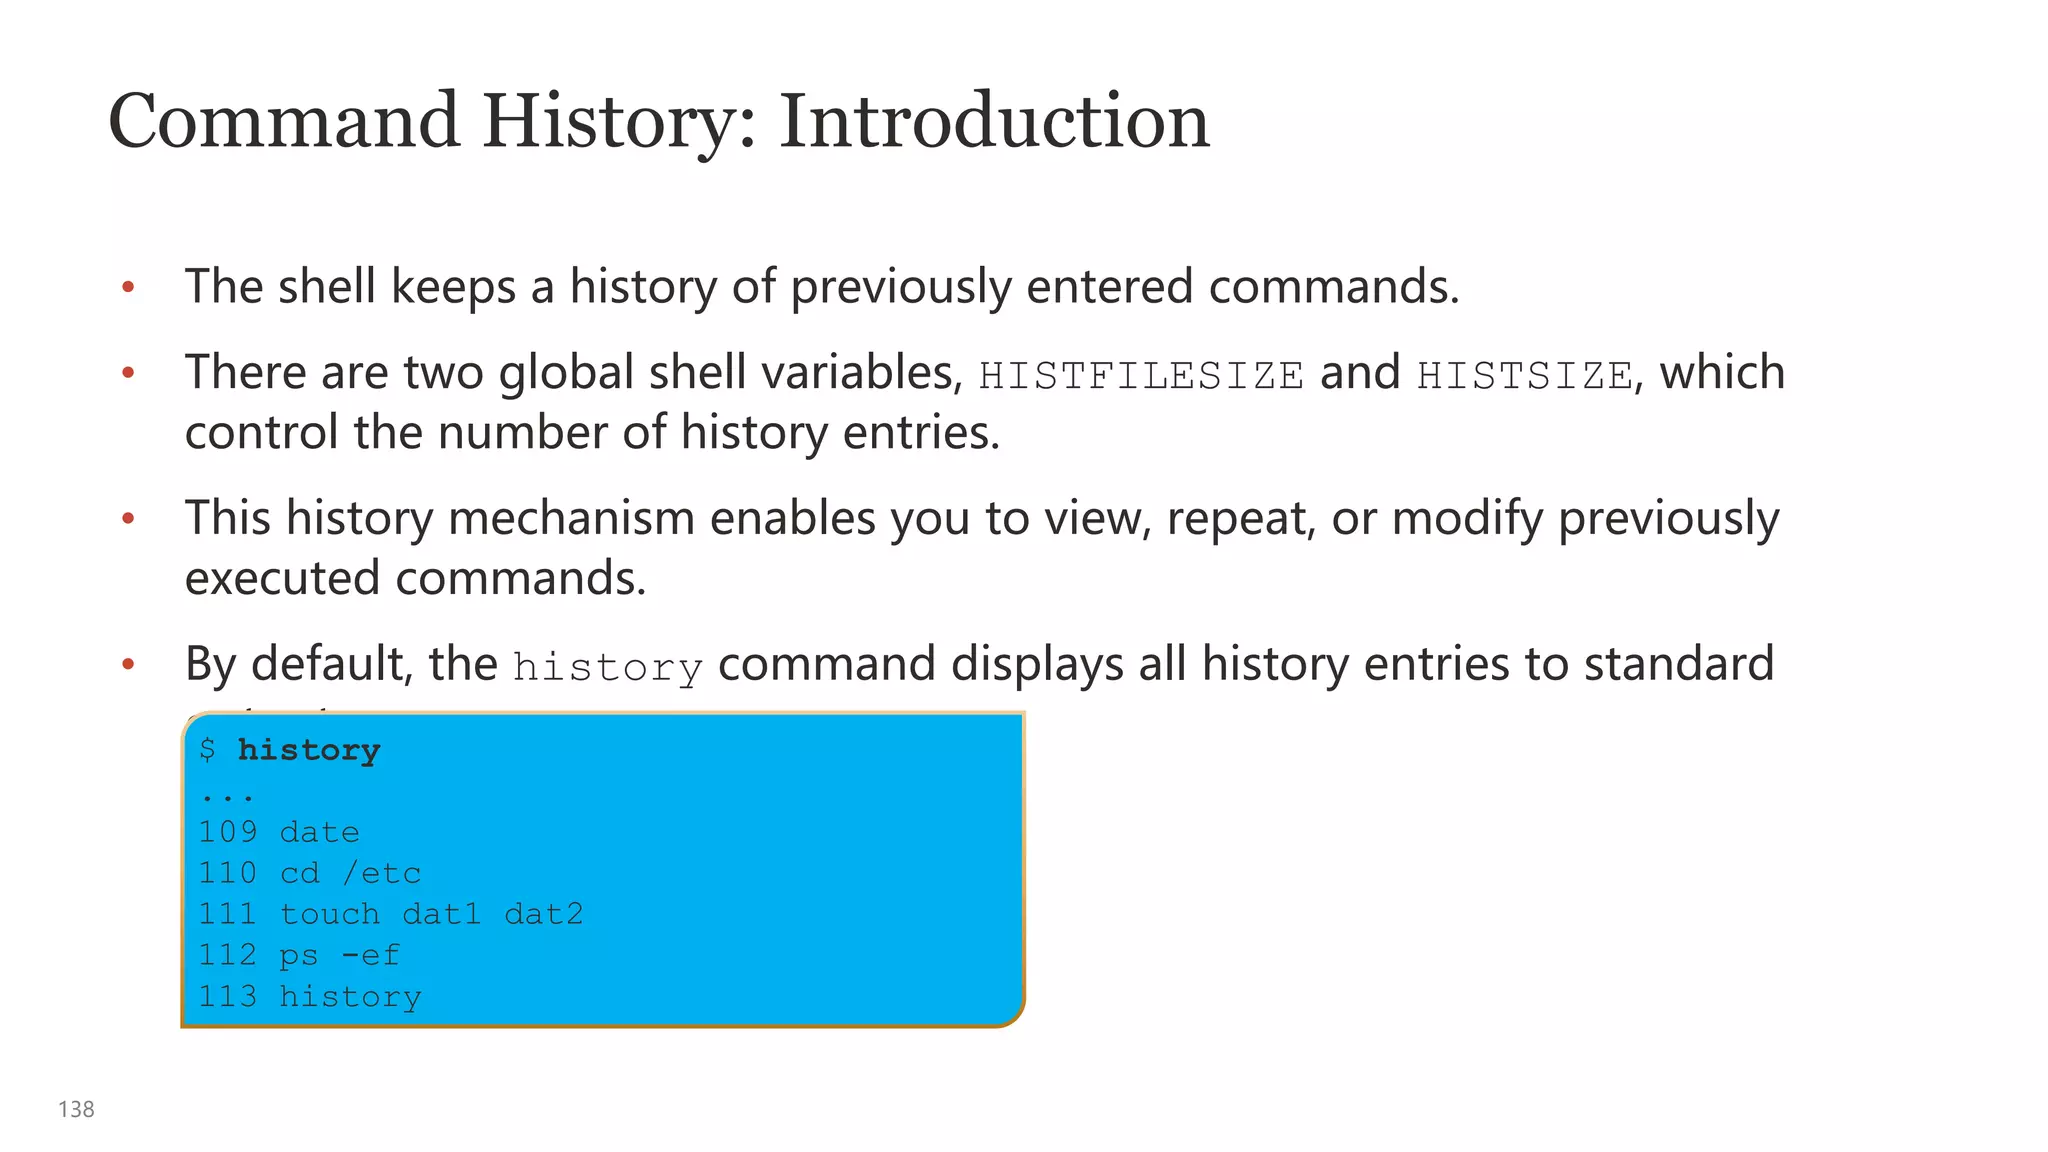
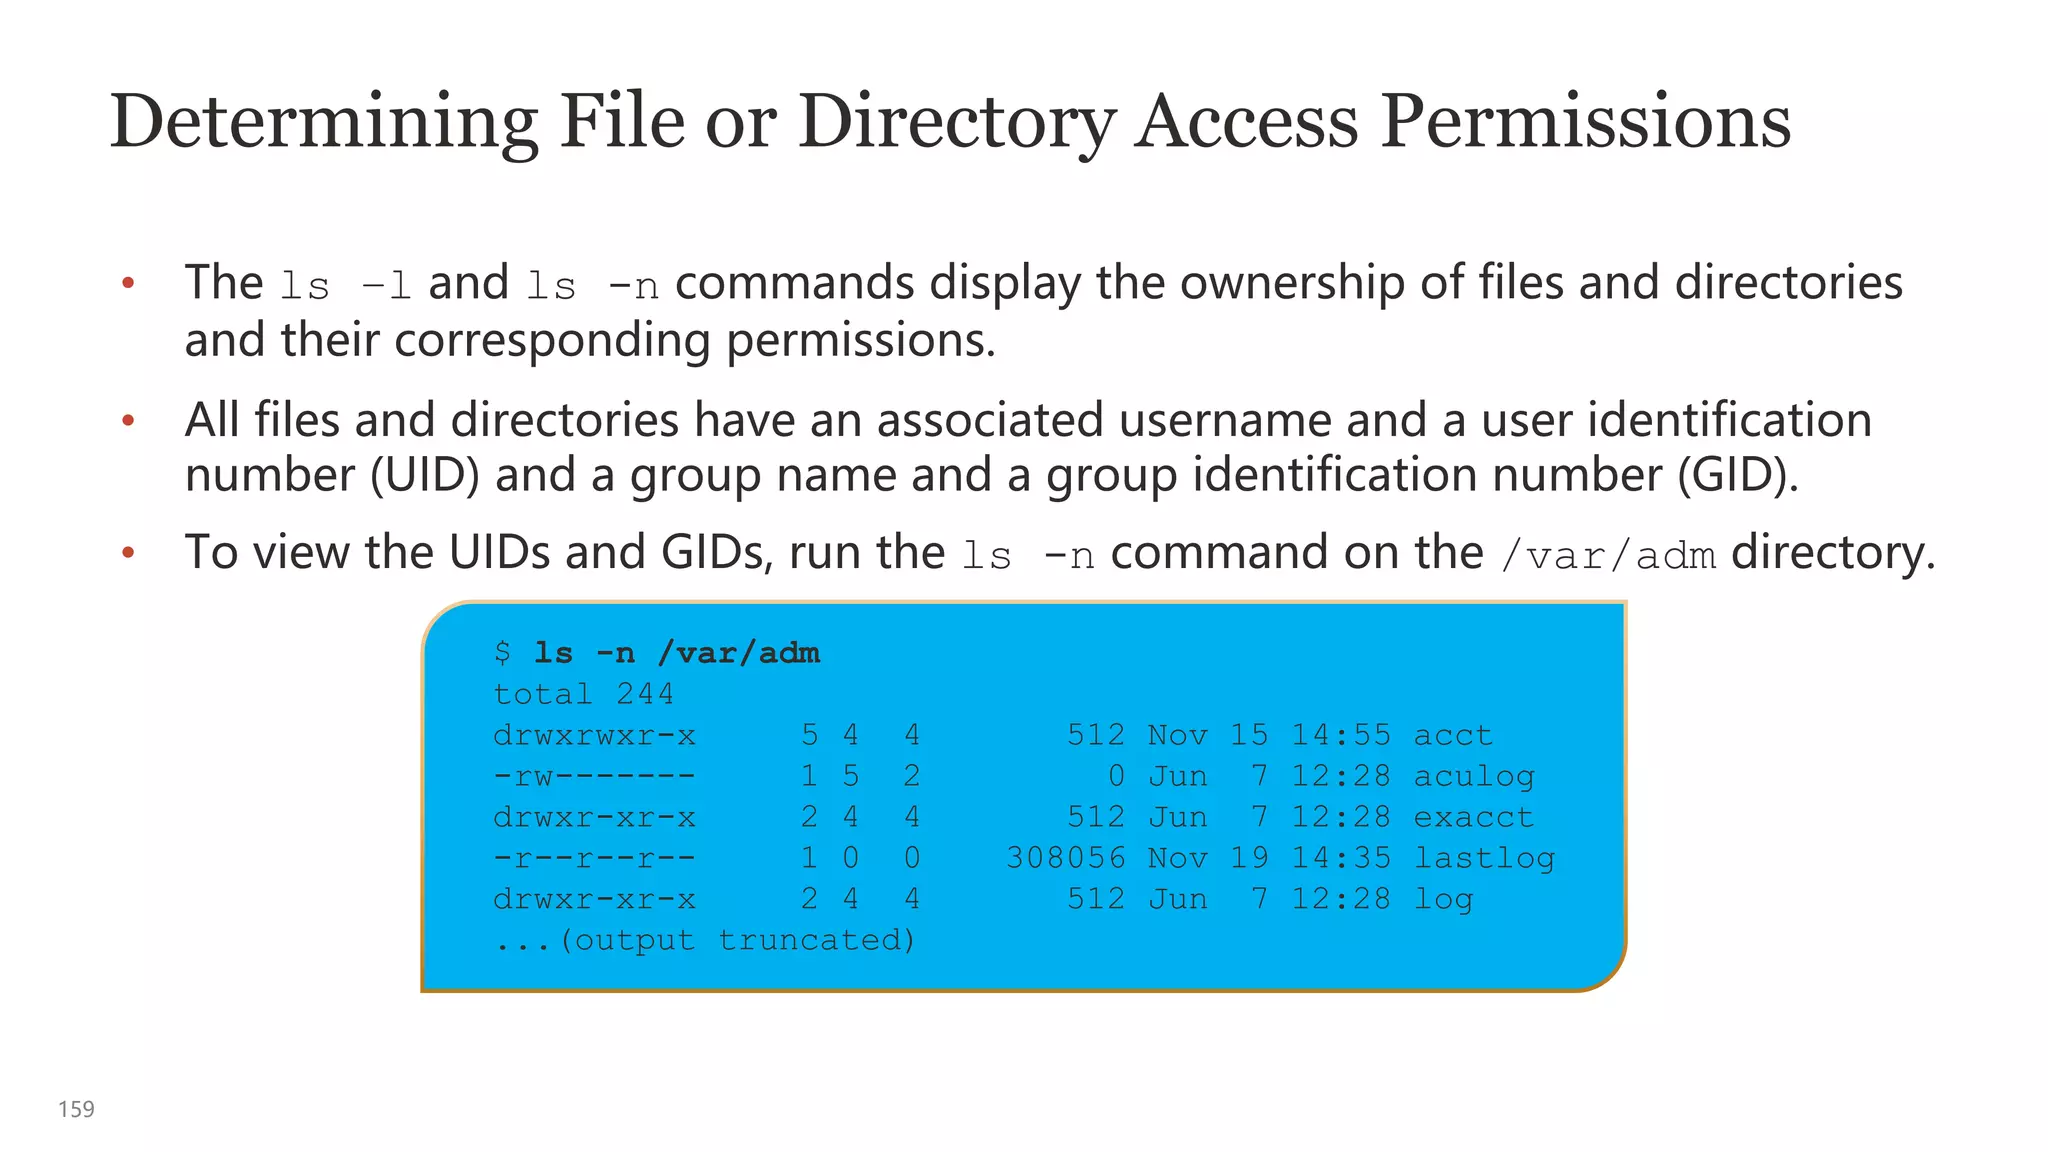
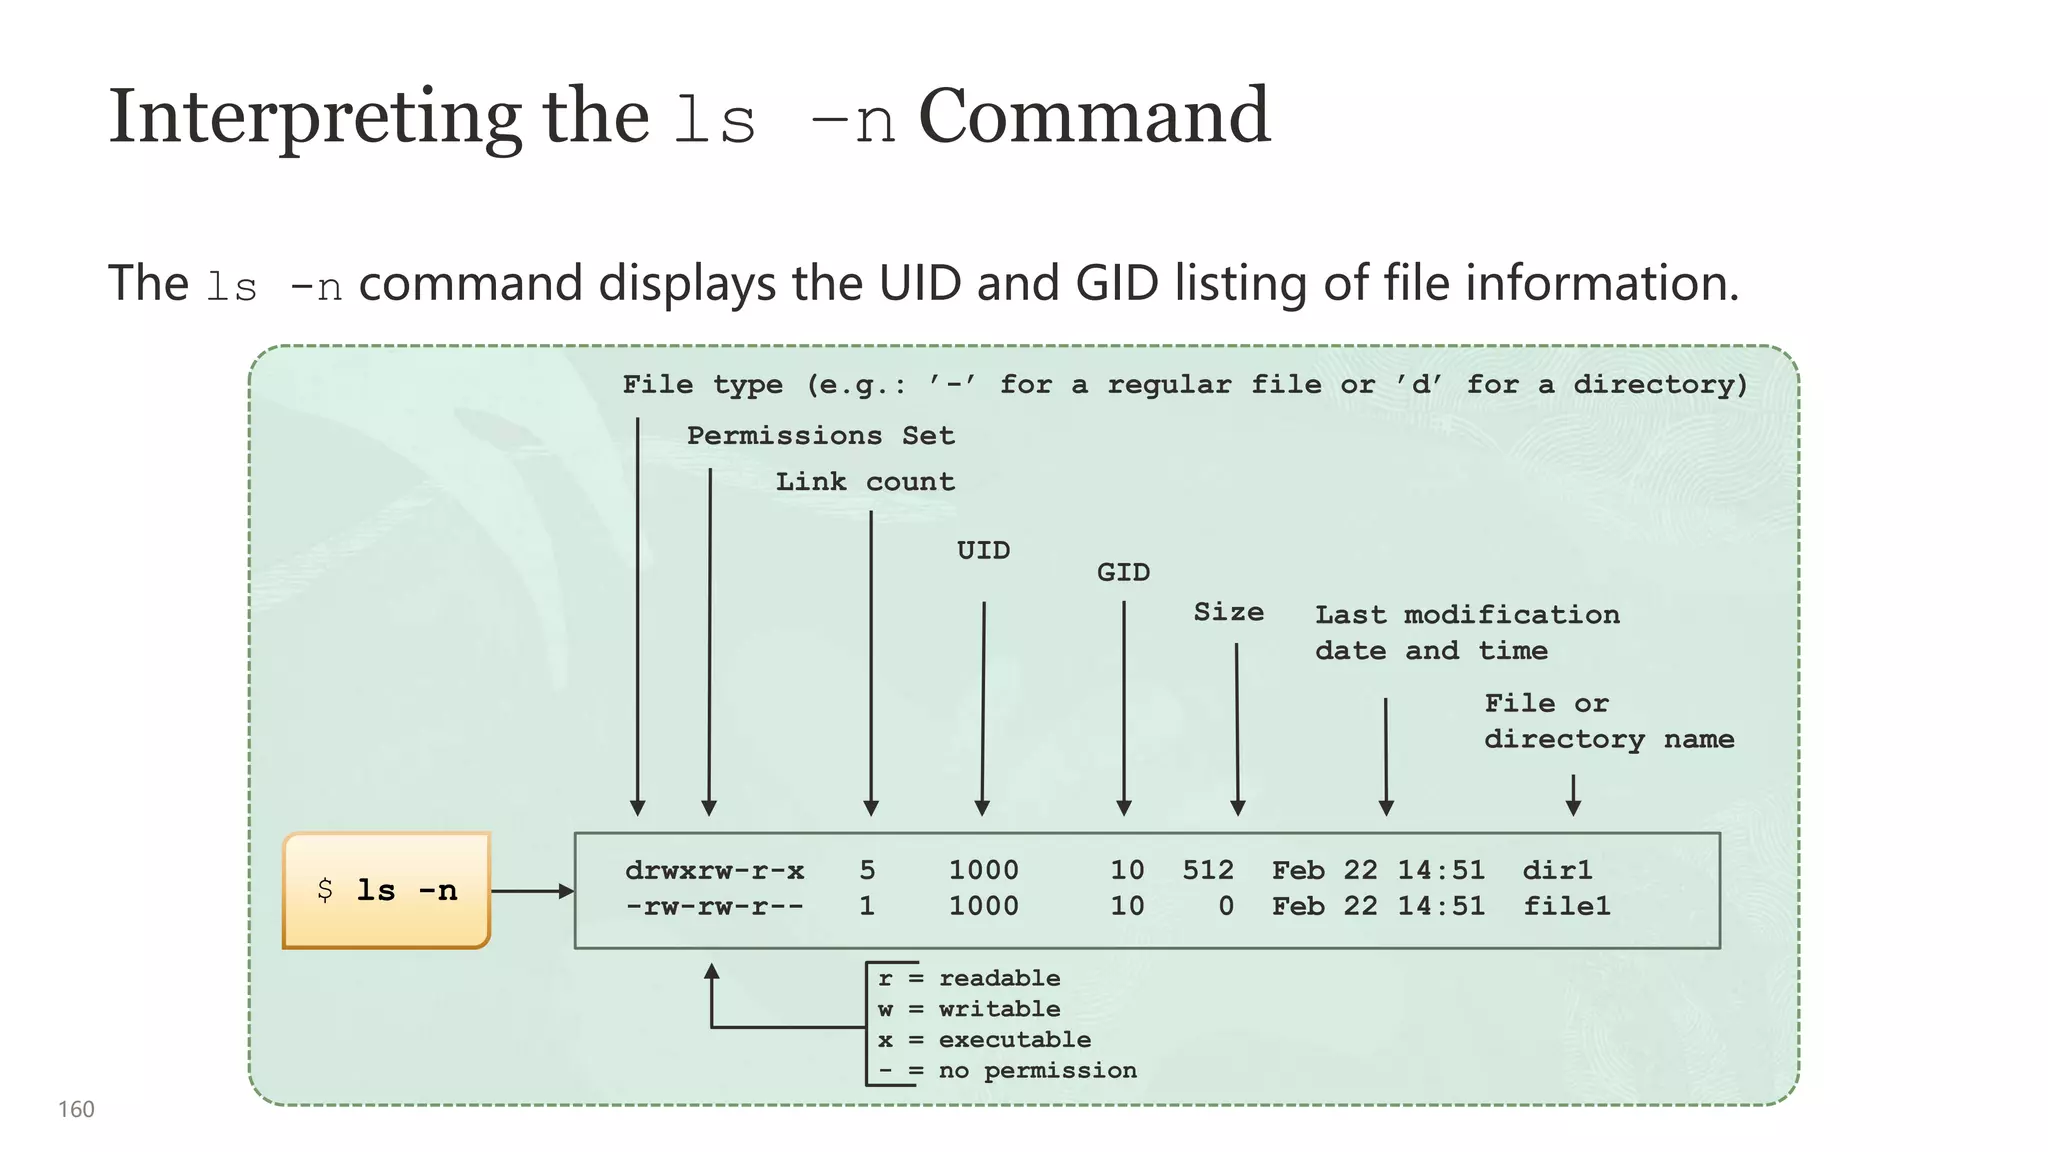
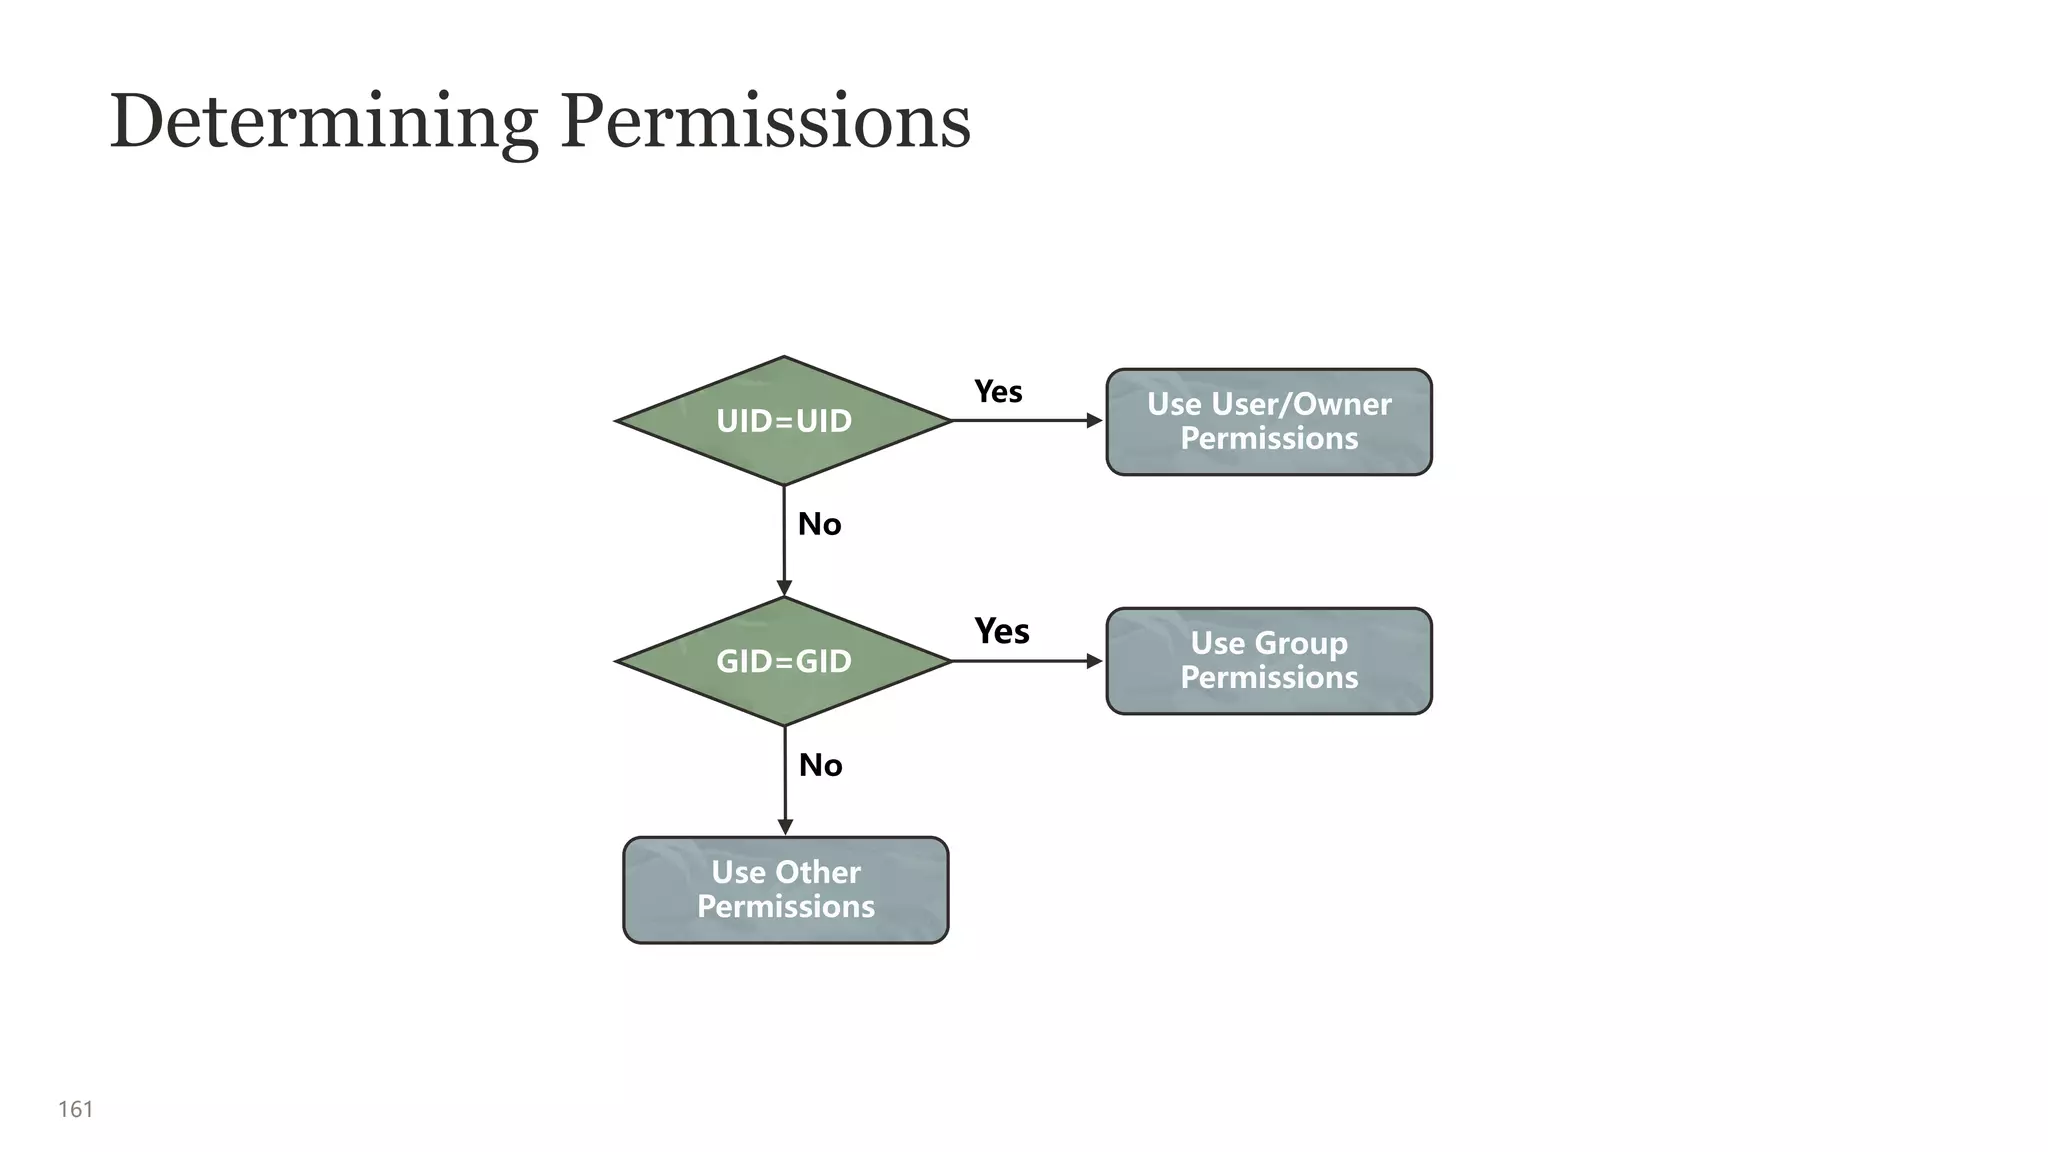
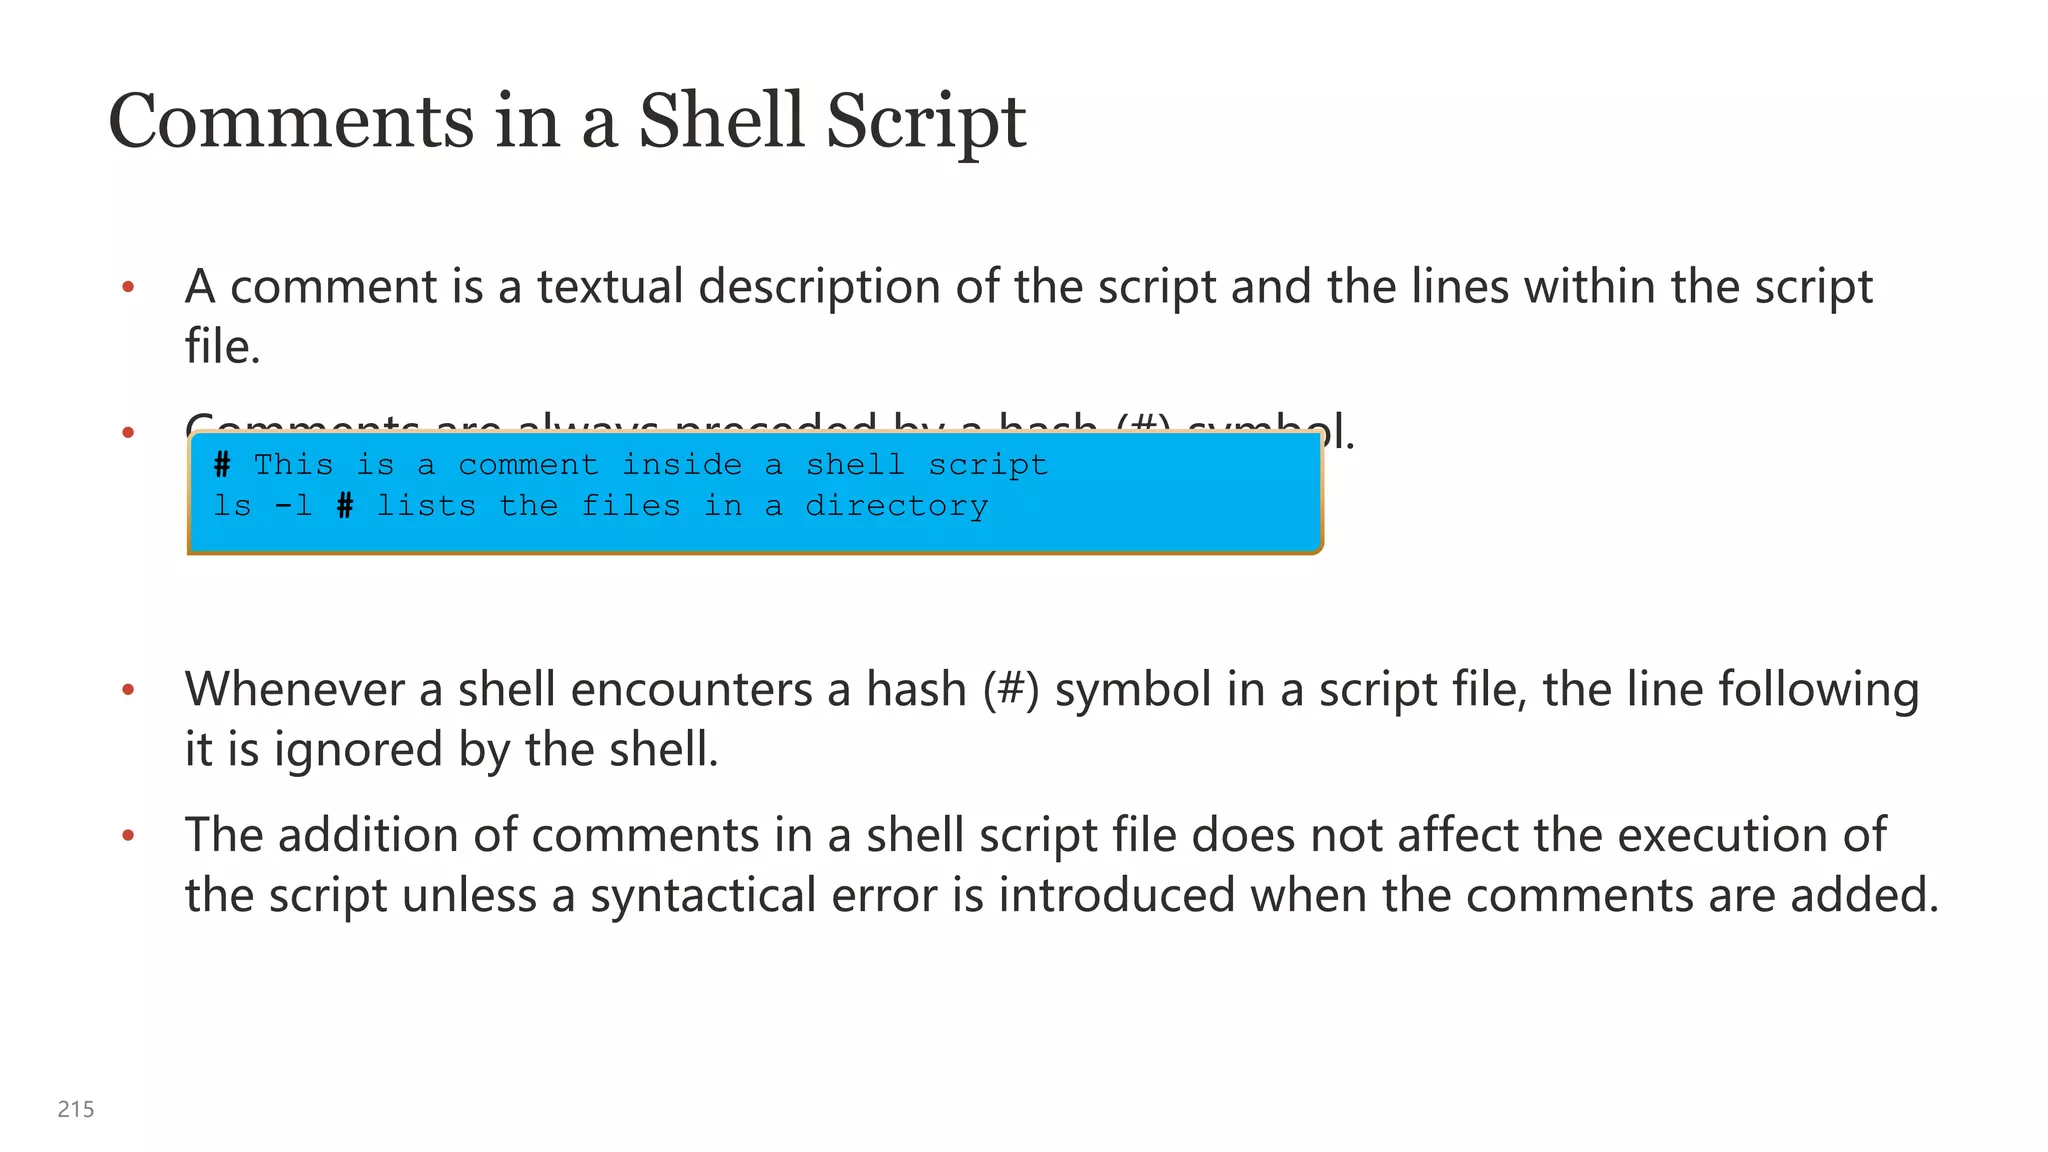
Download to read offline
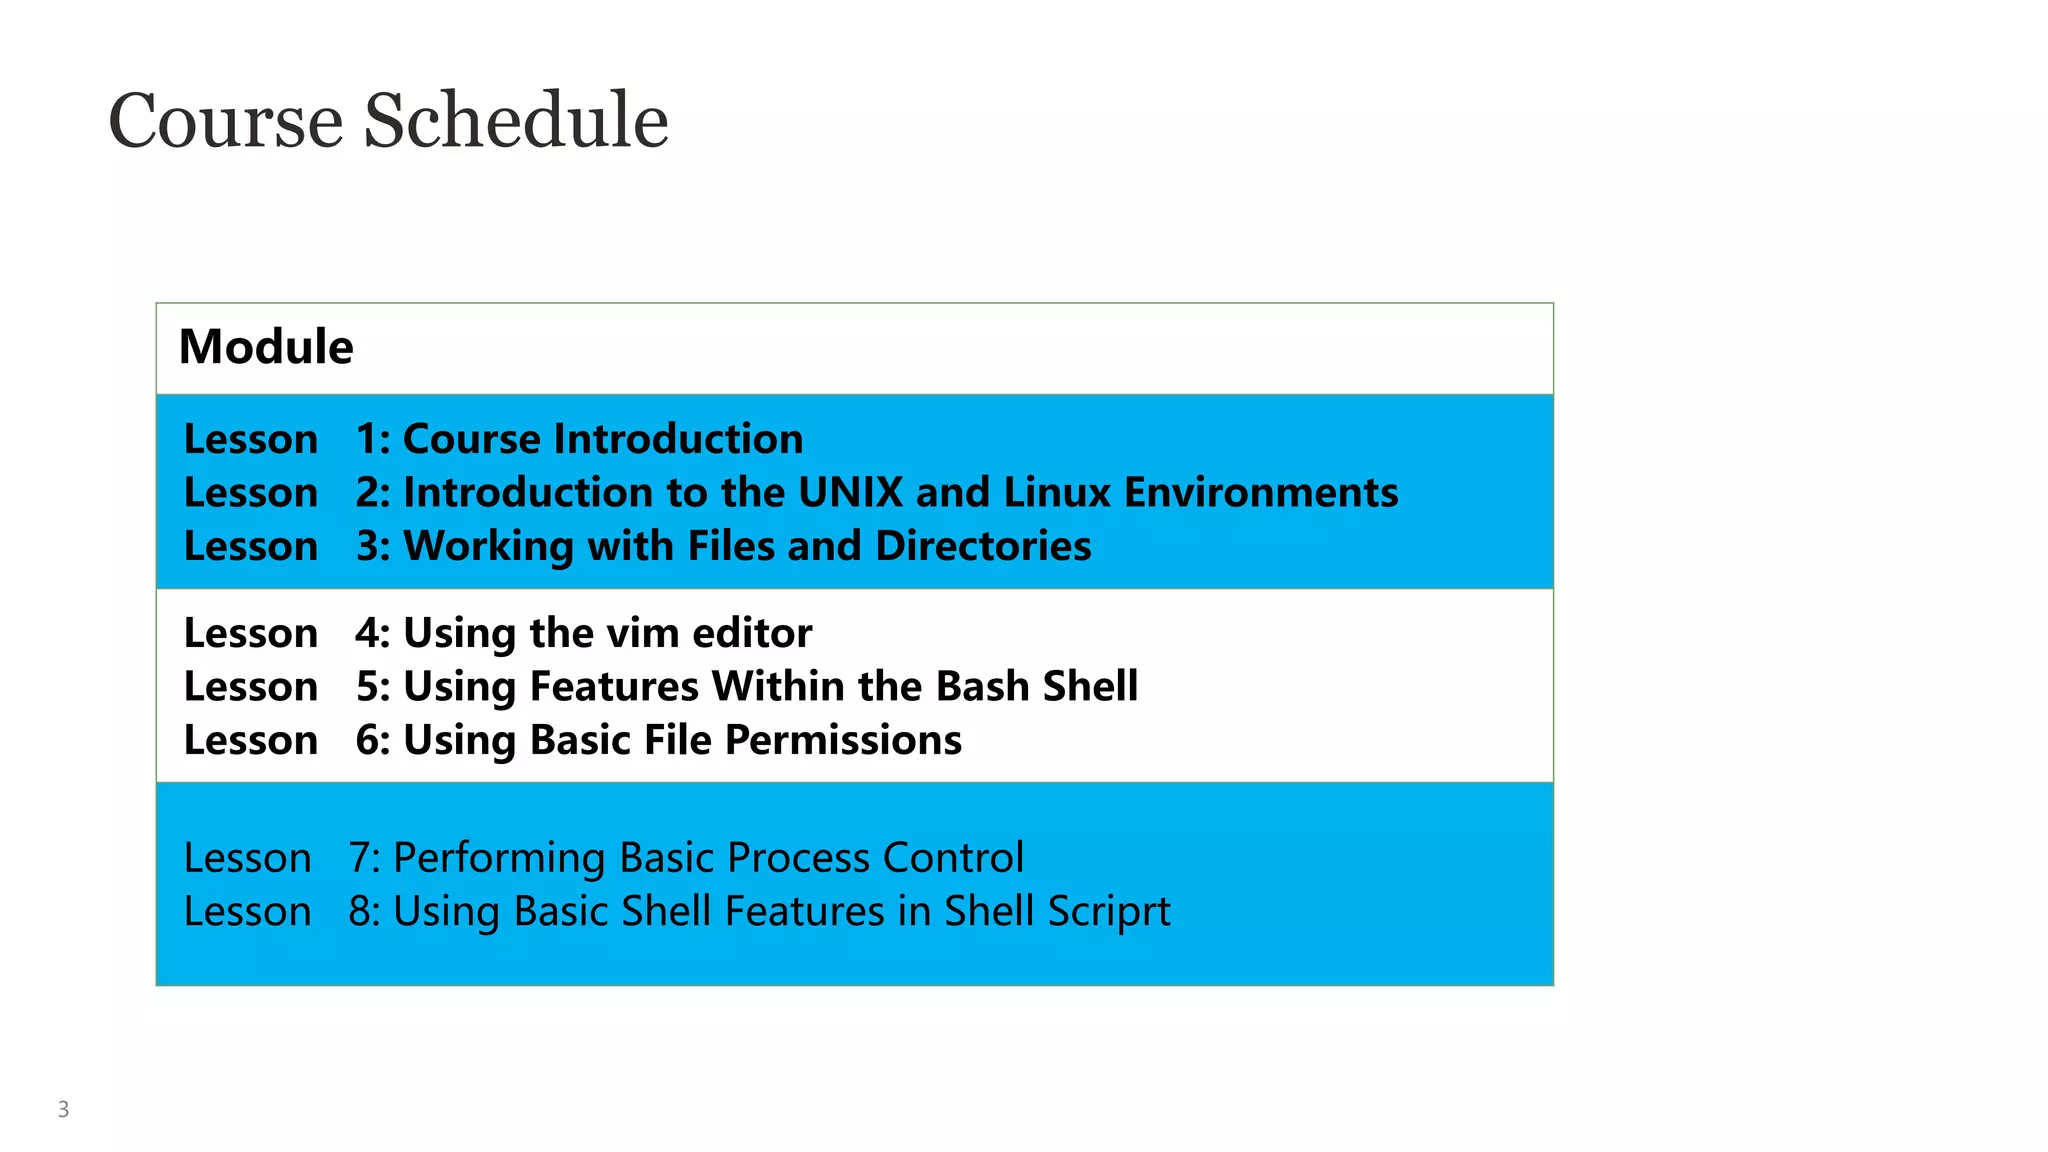


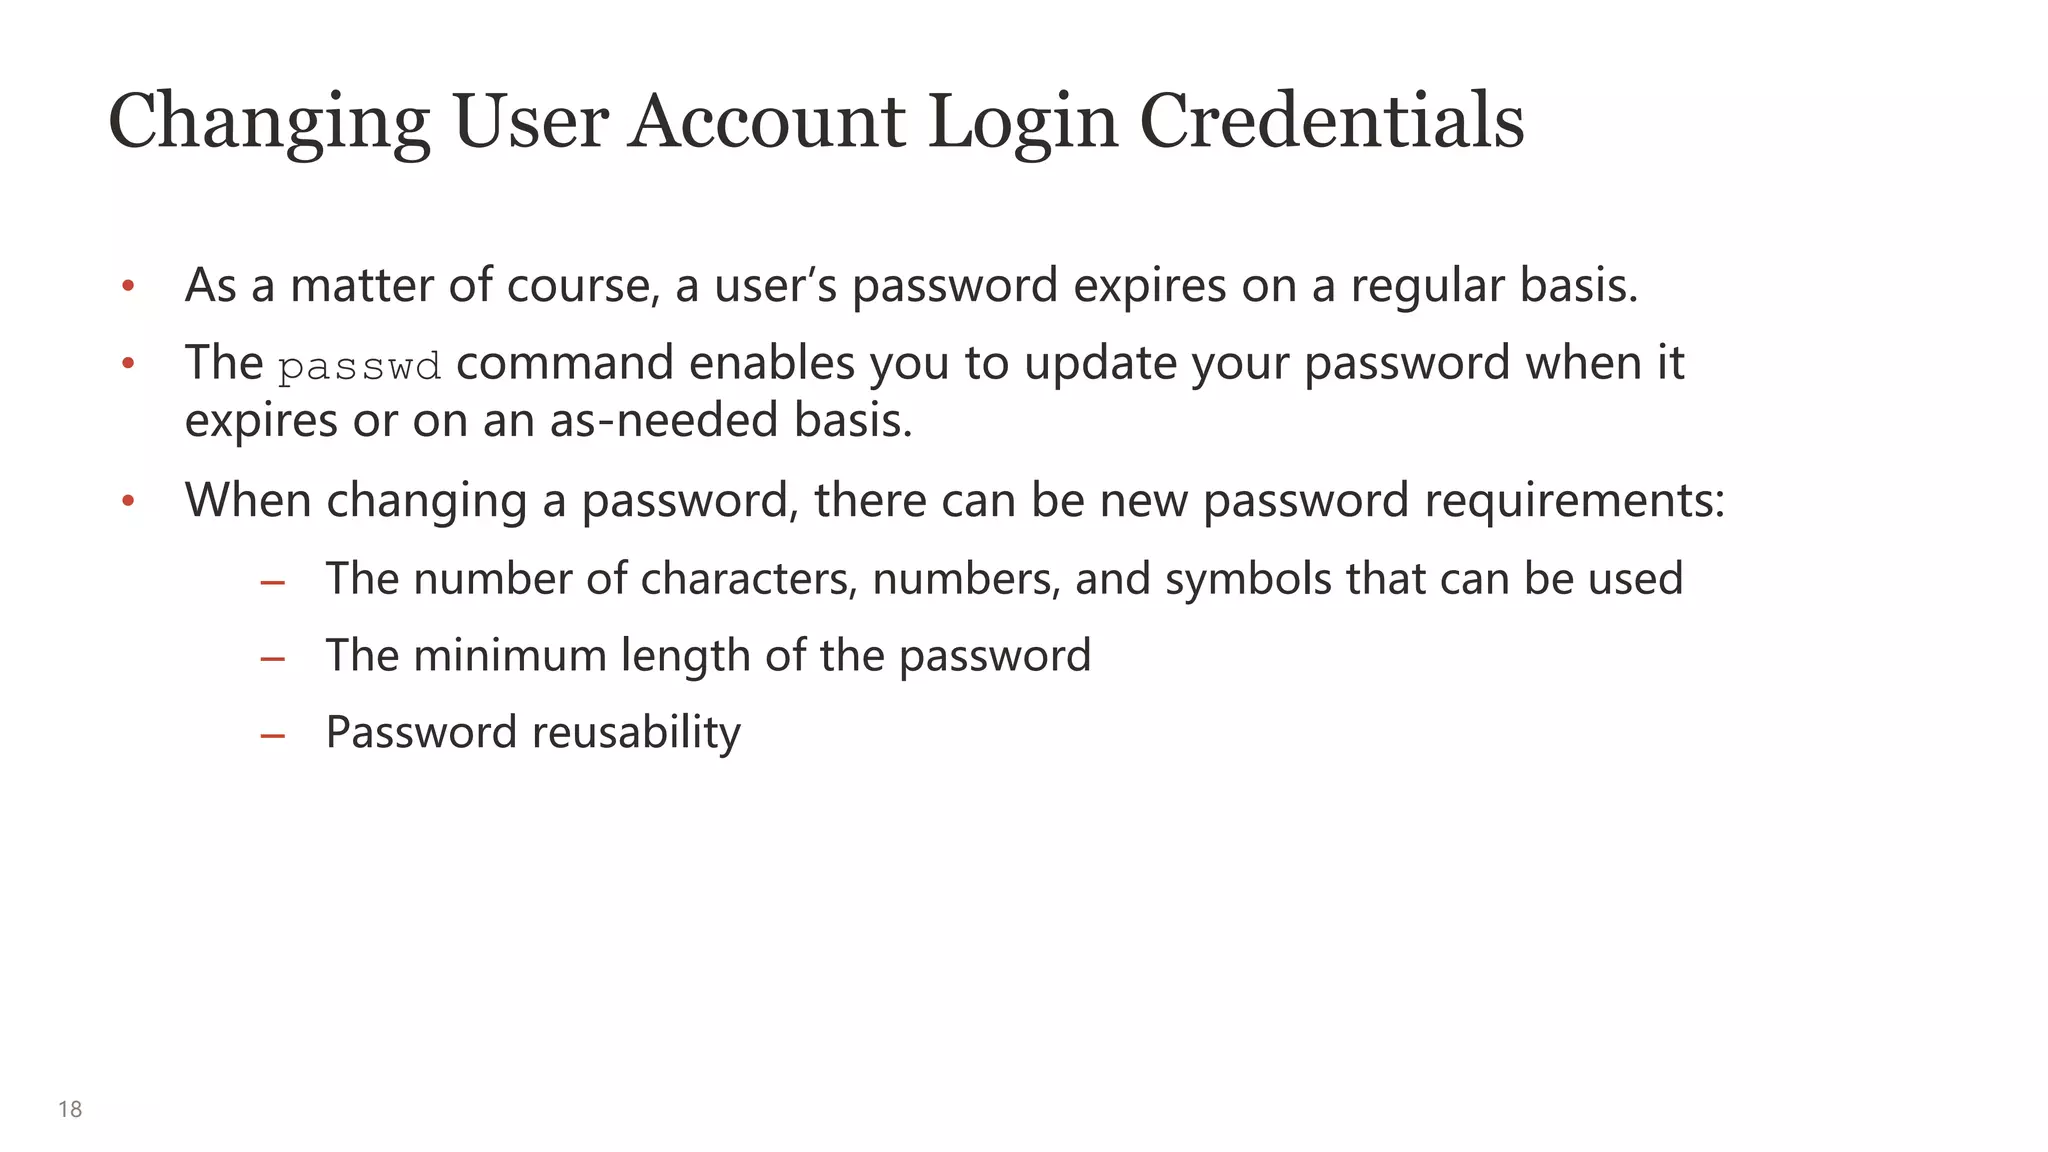
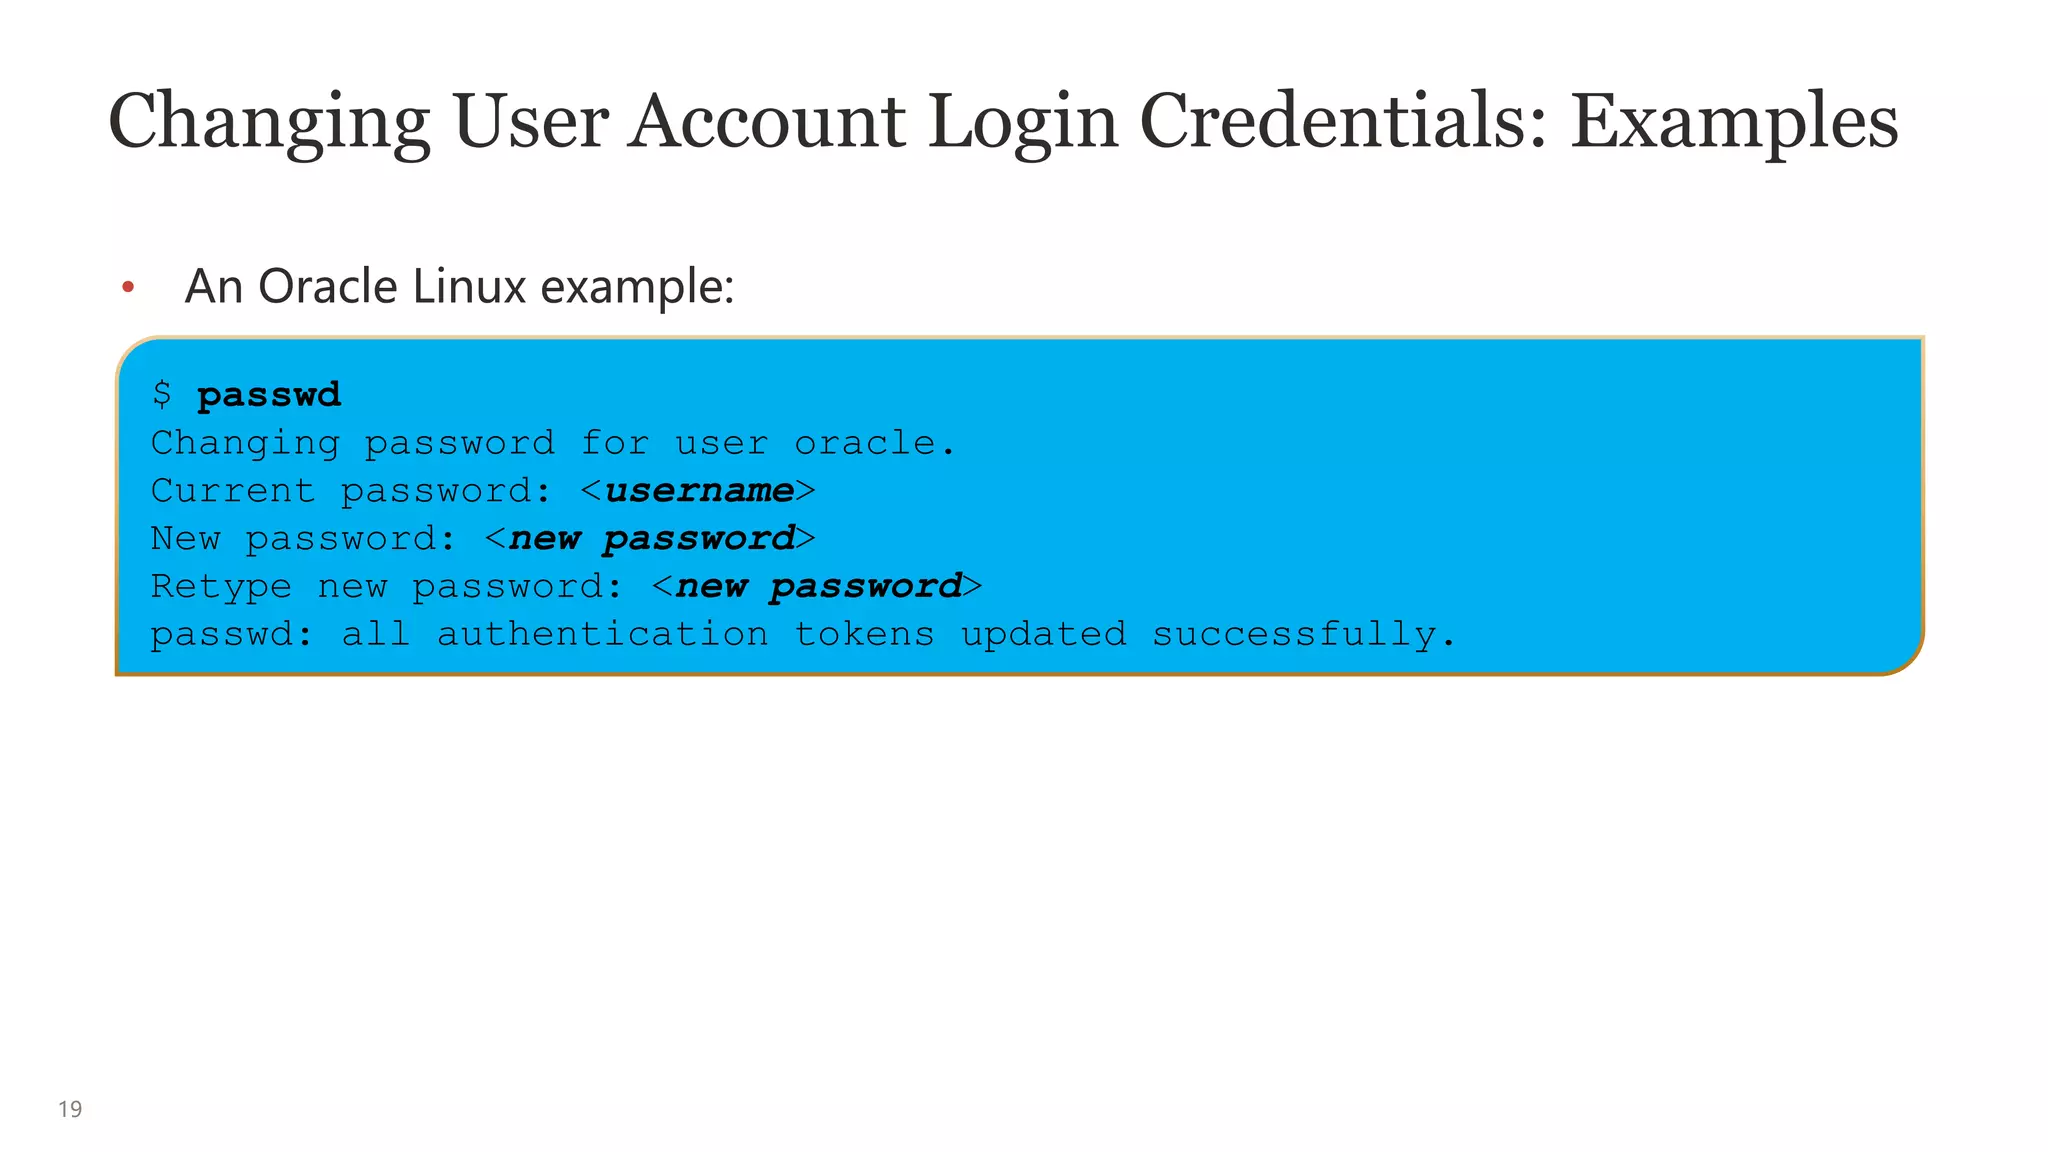
![20
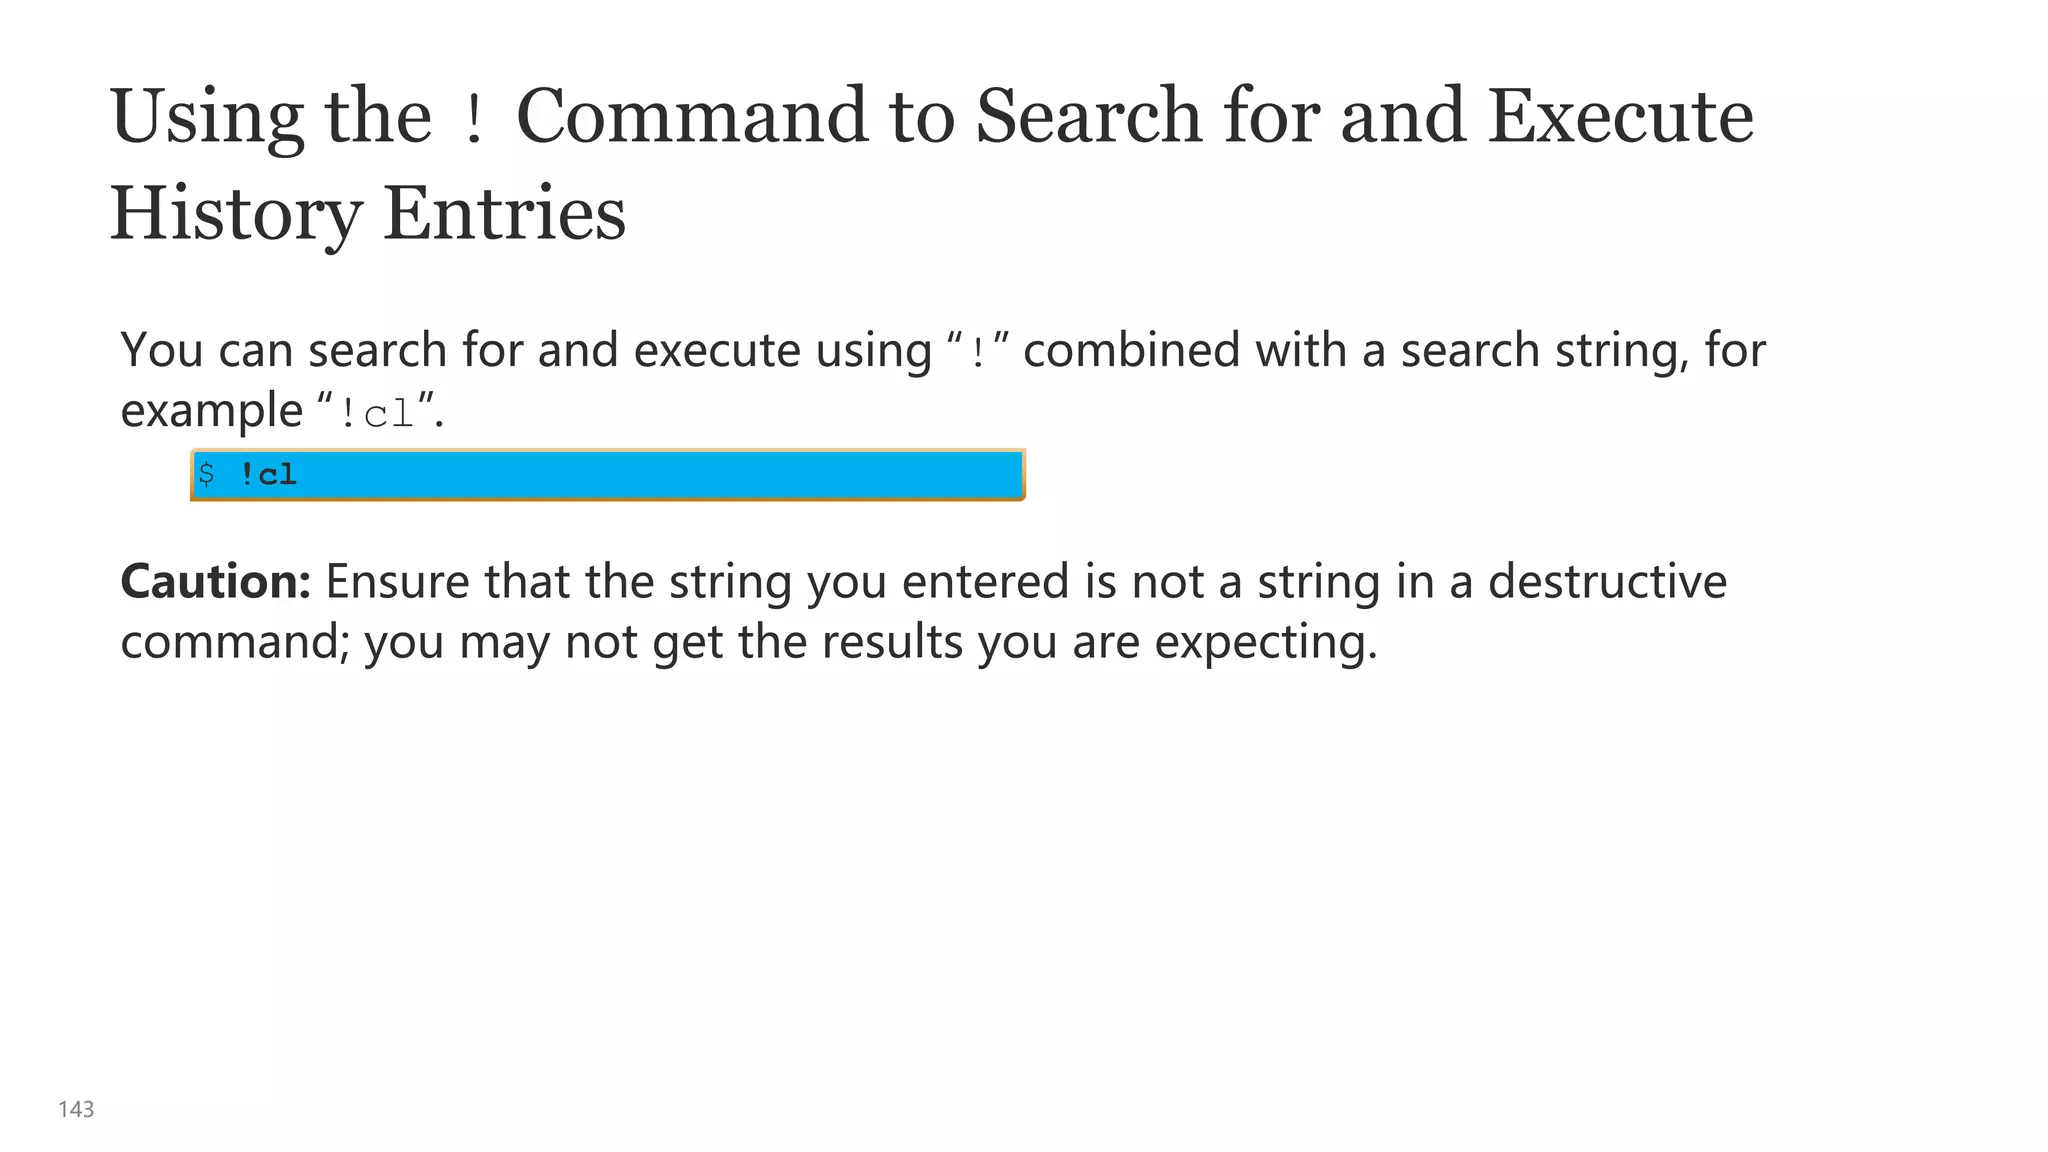
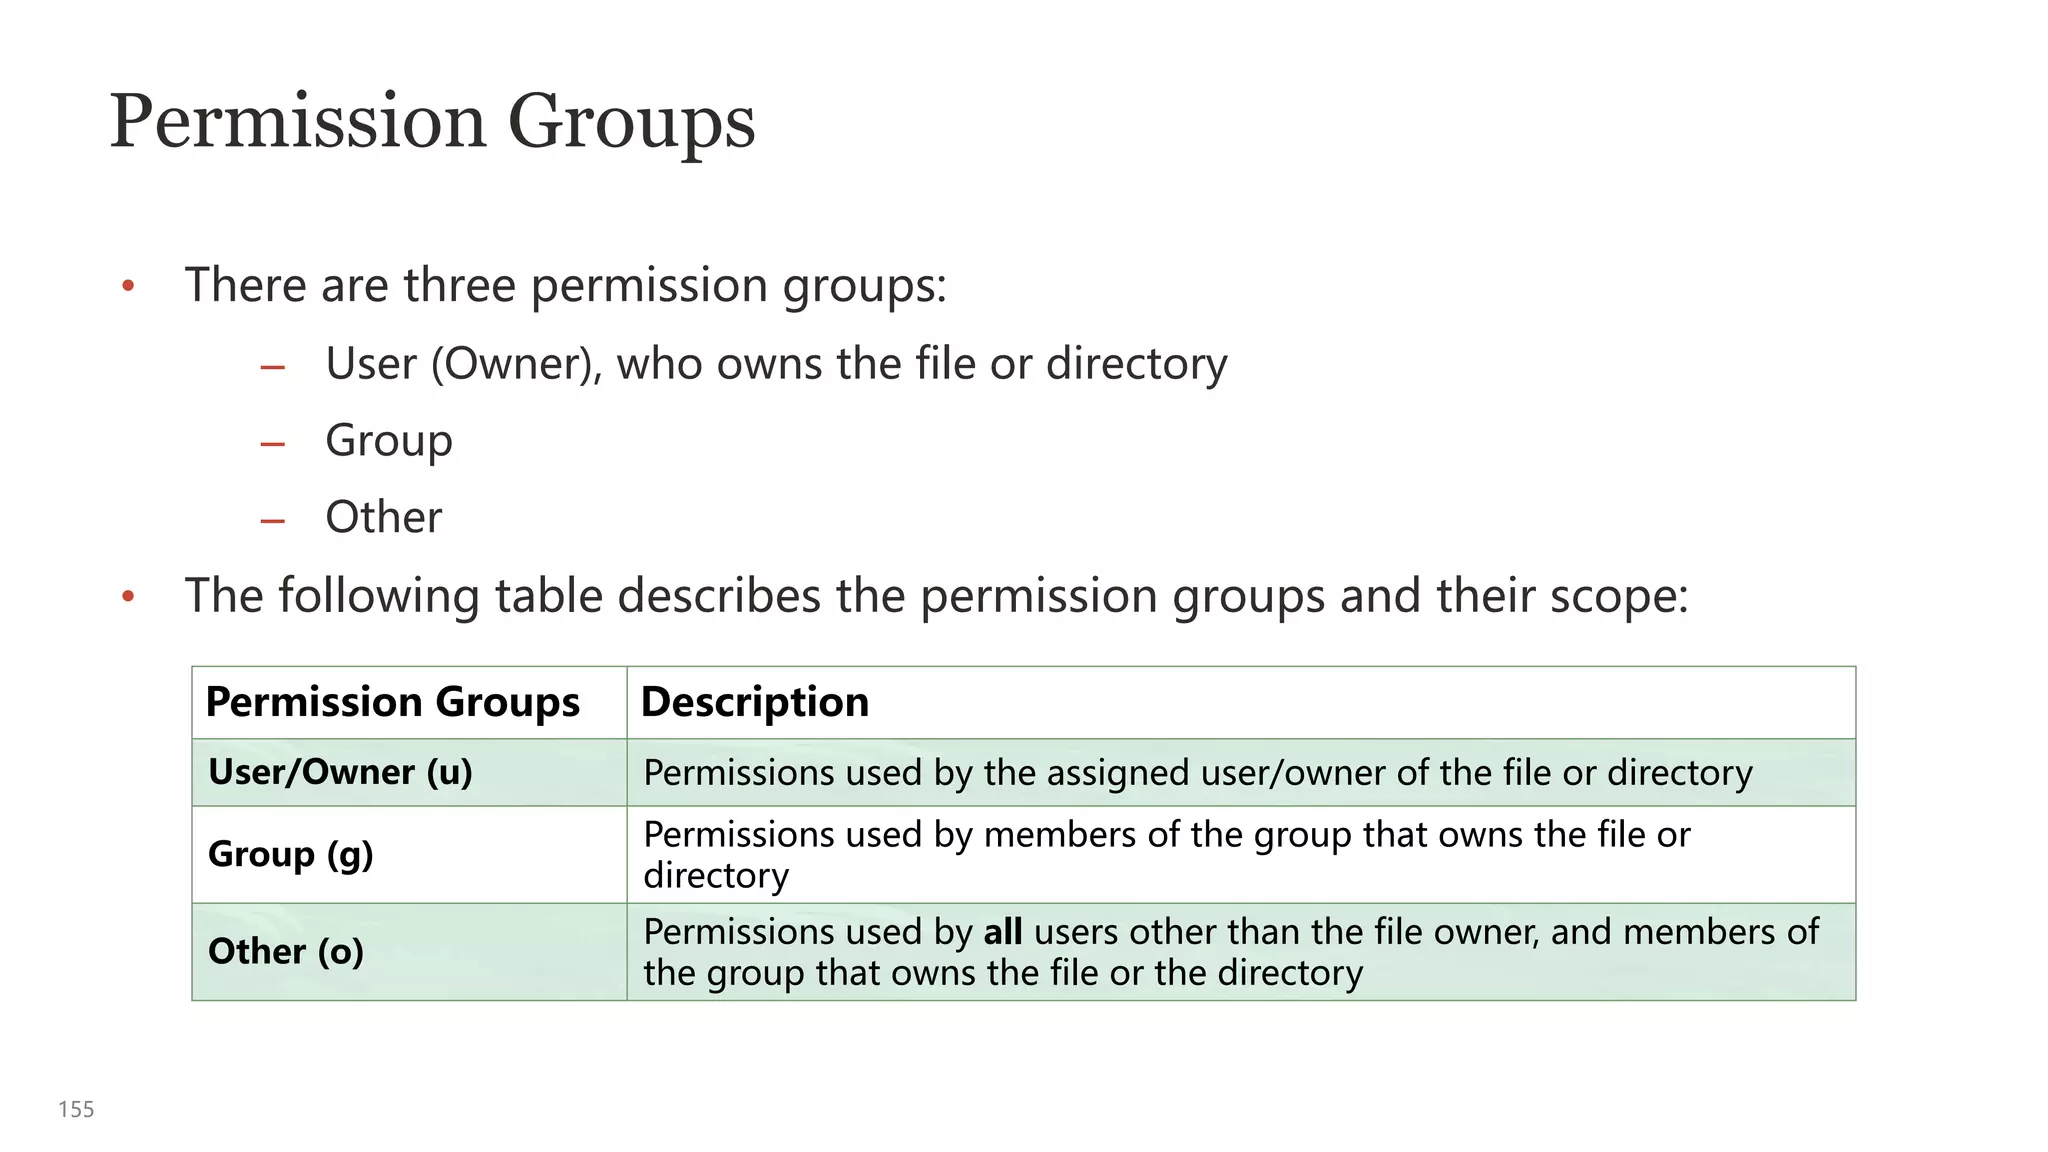
Changing Ownership of a Login Session to Another
User or Role
• You can use the su command to change the ownership of the current login
session to another user or role.
• The su command is commonly used to switch to the root user in Linux:
• The - (dash) is used to instantiate the home directory and environment
variables of the switched-to user.
• If the [username] attribute is omitted, then the root username is the default.
$ su [-] [username]
$ su -](https://image.slidesharecdn.com/kmsunixandlinux-230703111122-9797abd3/75/KMSUnix-and-Linux-pptx-20-2048.jpg)
![32
Using Multiple Commands on the Command Line
• You can enter multiple commands on a single command line by using a
semicolon (;) to separate each command.
• The shell recognizes the semicolon (;) as a command separator.
• The following example shows two commands separated by a semicolon:
• The shell executes each command from left to right when you press
Enter/Return.
$ command [options] [argument]; command [options] [argument]
$ date; uname
Tue Dec 22 20:24:47 UTC 2020
Linux](https://image.slidesharecdn.com/kmsunixandlinux-230703111122-9797abd3/75/KMSUnix-and-Linux-pptx-32-2048.jpg)
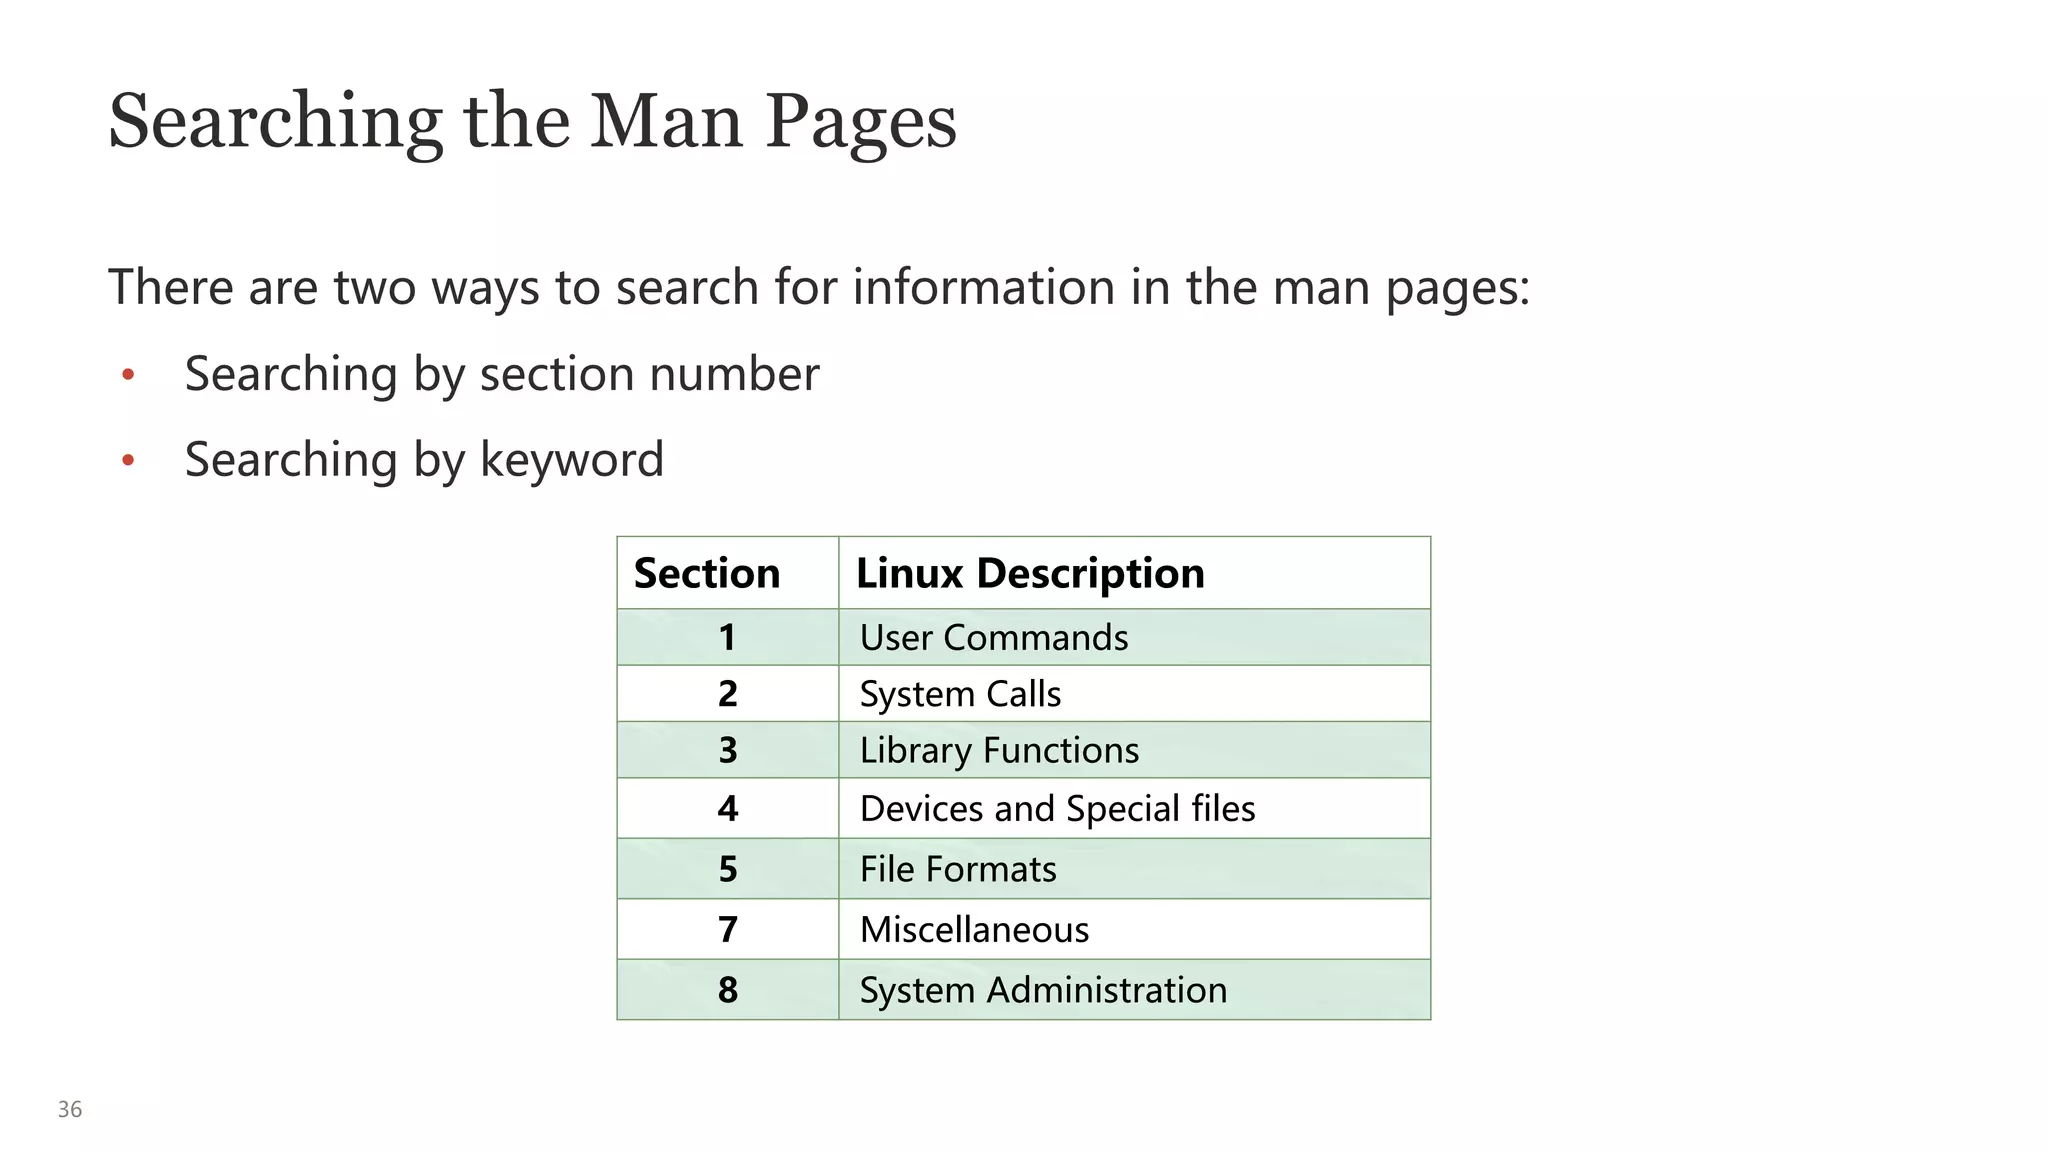
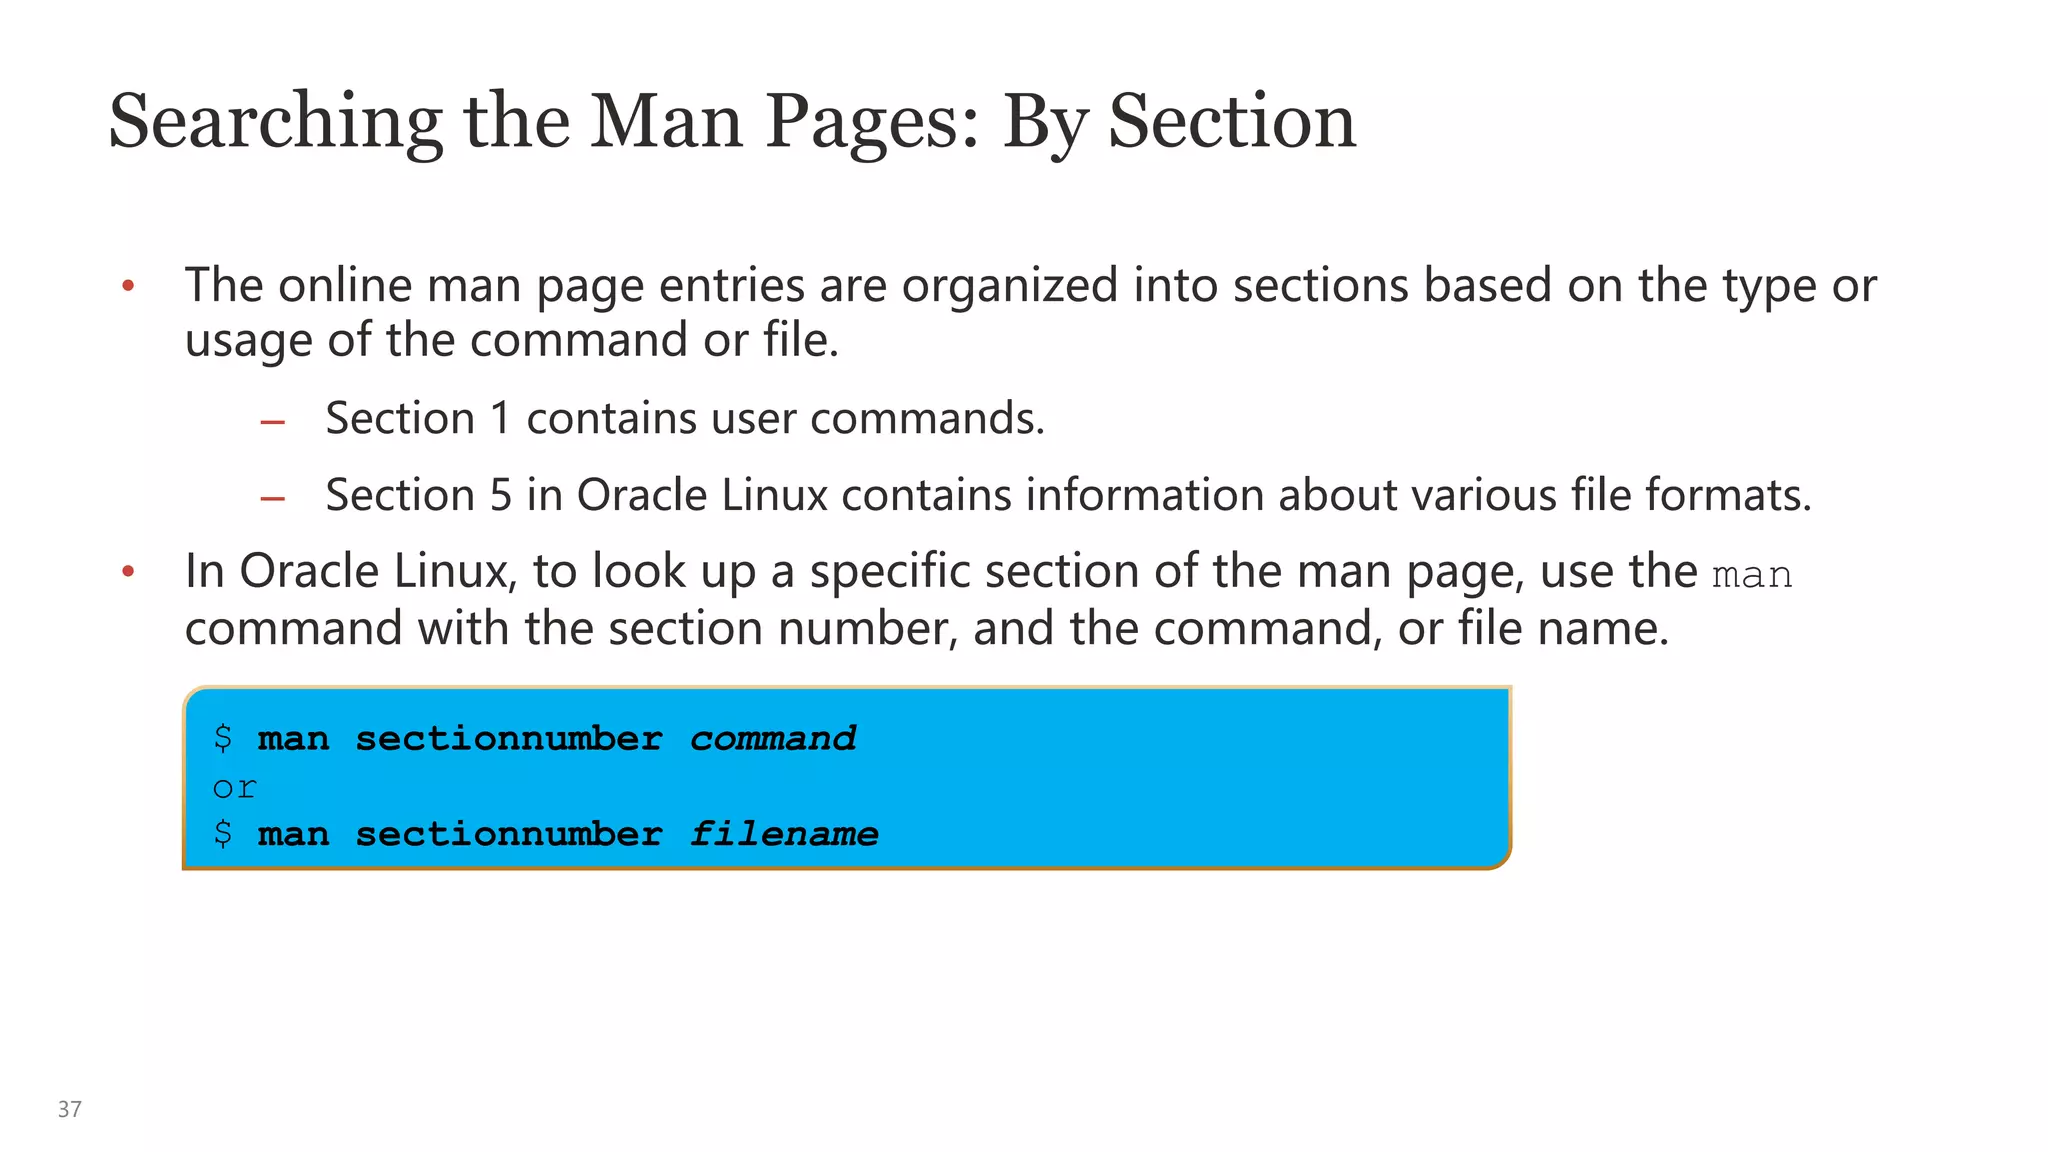
![33
Using the Man Pages
• The online technical reference manual (man) pages provide detailed syntax,
descriptions, and usage of the commands.
• You can use the man command to display the man page entry that explains a
given command.
• For more information about the man command options, see the man page.
$ man command
$ man [options] command
$ man [options] filename](https://image.slidesharecdn.com/kmsunixandlinux-230703111122-9797abd3/75/KMSUnix-and-Linux-pptx-33-2048.jpg)
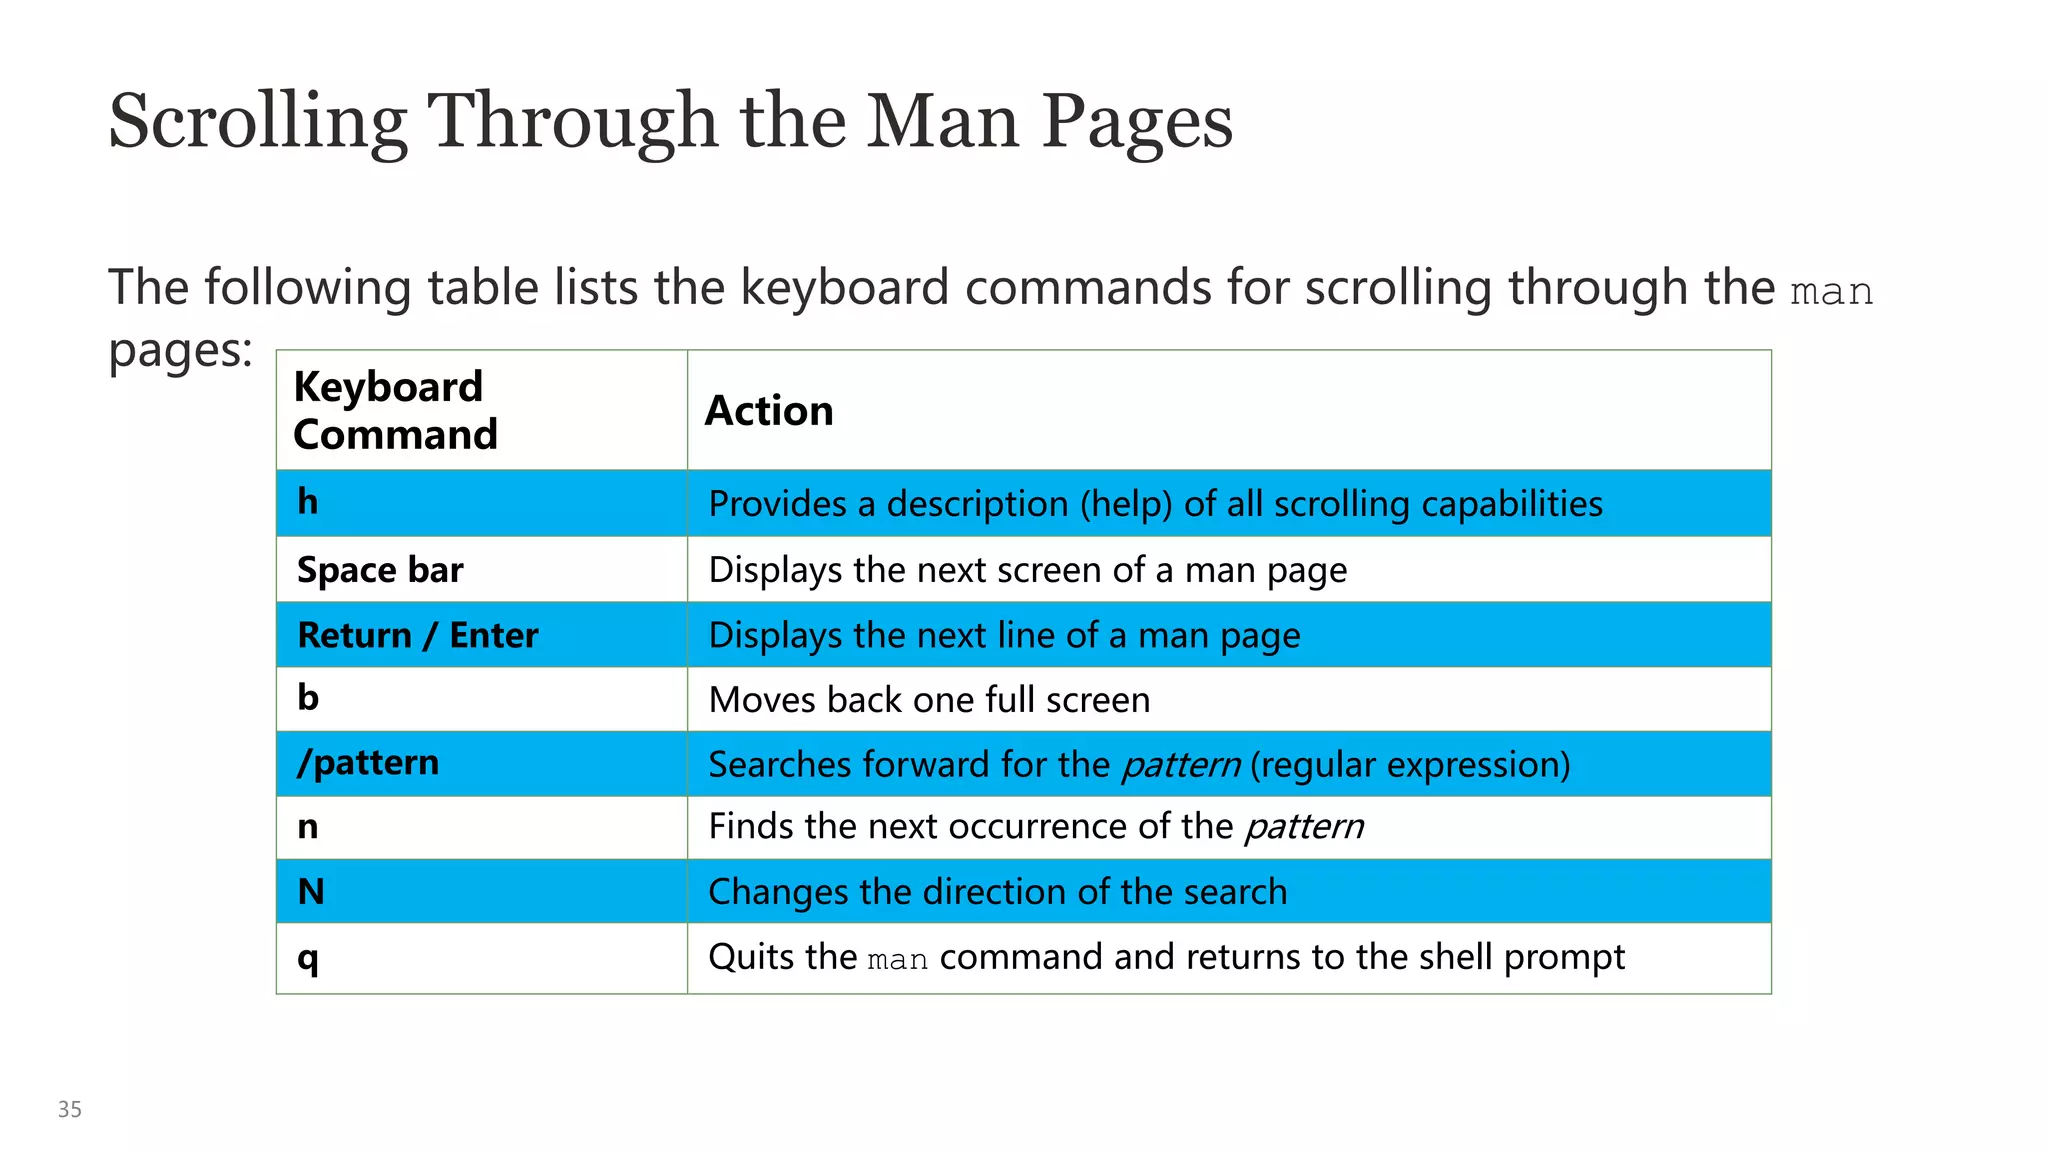
![34
Displaying the man Pages
To display the man pages for the uname command using the man command:
UNAME(1) User Commands
UNAME(1)
NAME
uname - print system information
SYNOPSIS
uname [OPTION]...
DESCRIPTION
Print certain system information. With no OPTION, same as -s.
...](https://image.slidesharecdn.com/kmsunixandlinux-230703111122-9797abd3/75/KMSUnix-and-Linux-pptx-34-2048.jpg)

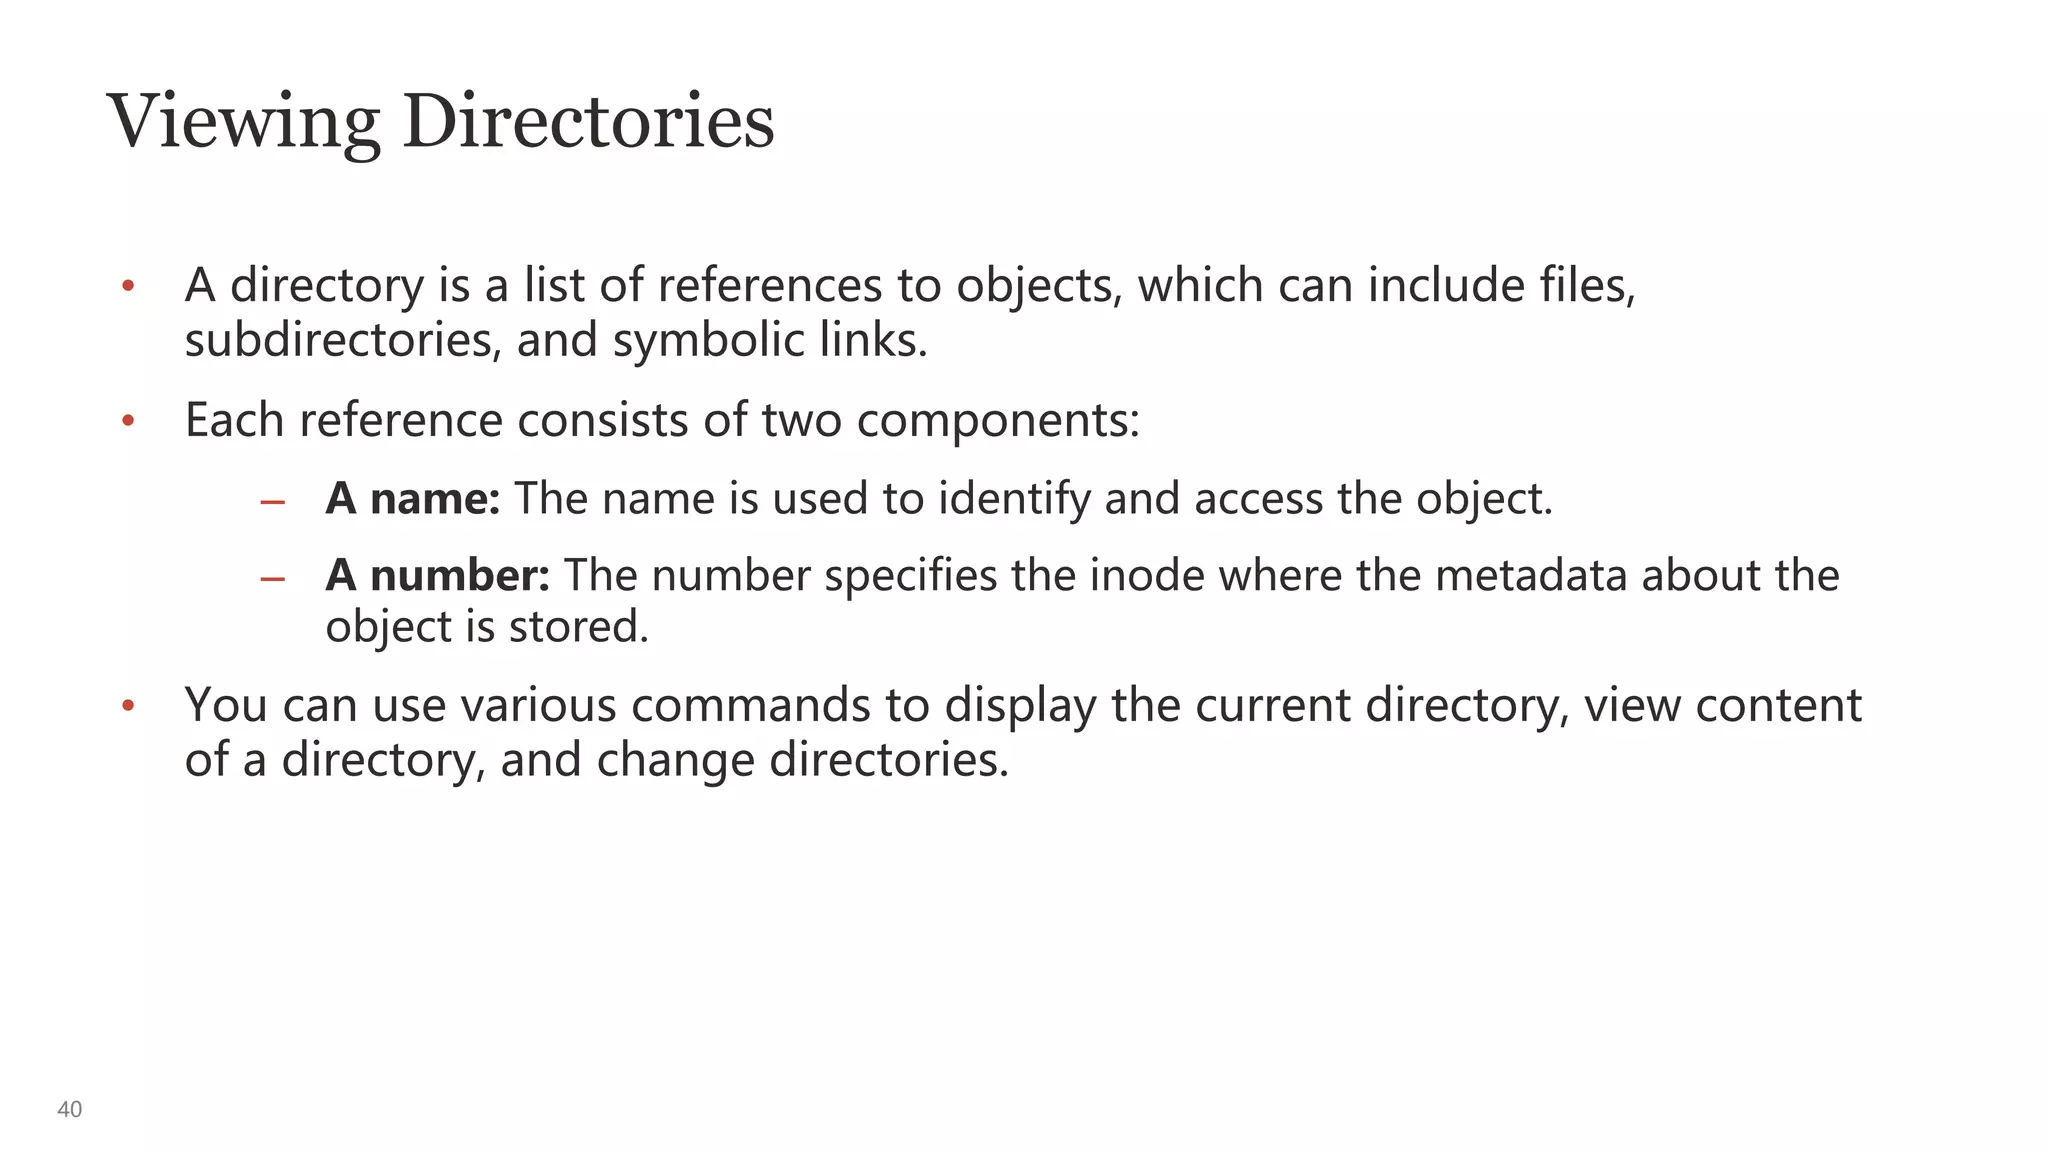
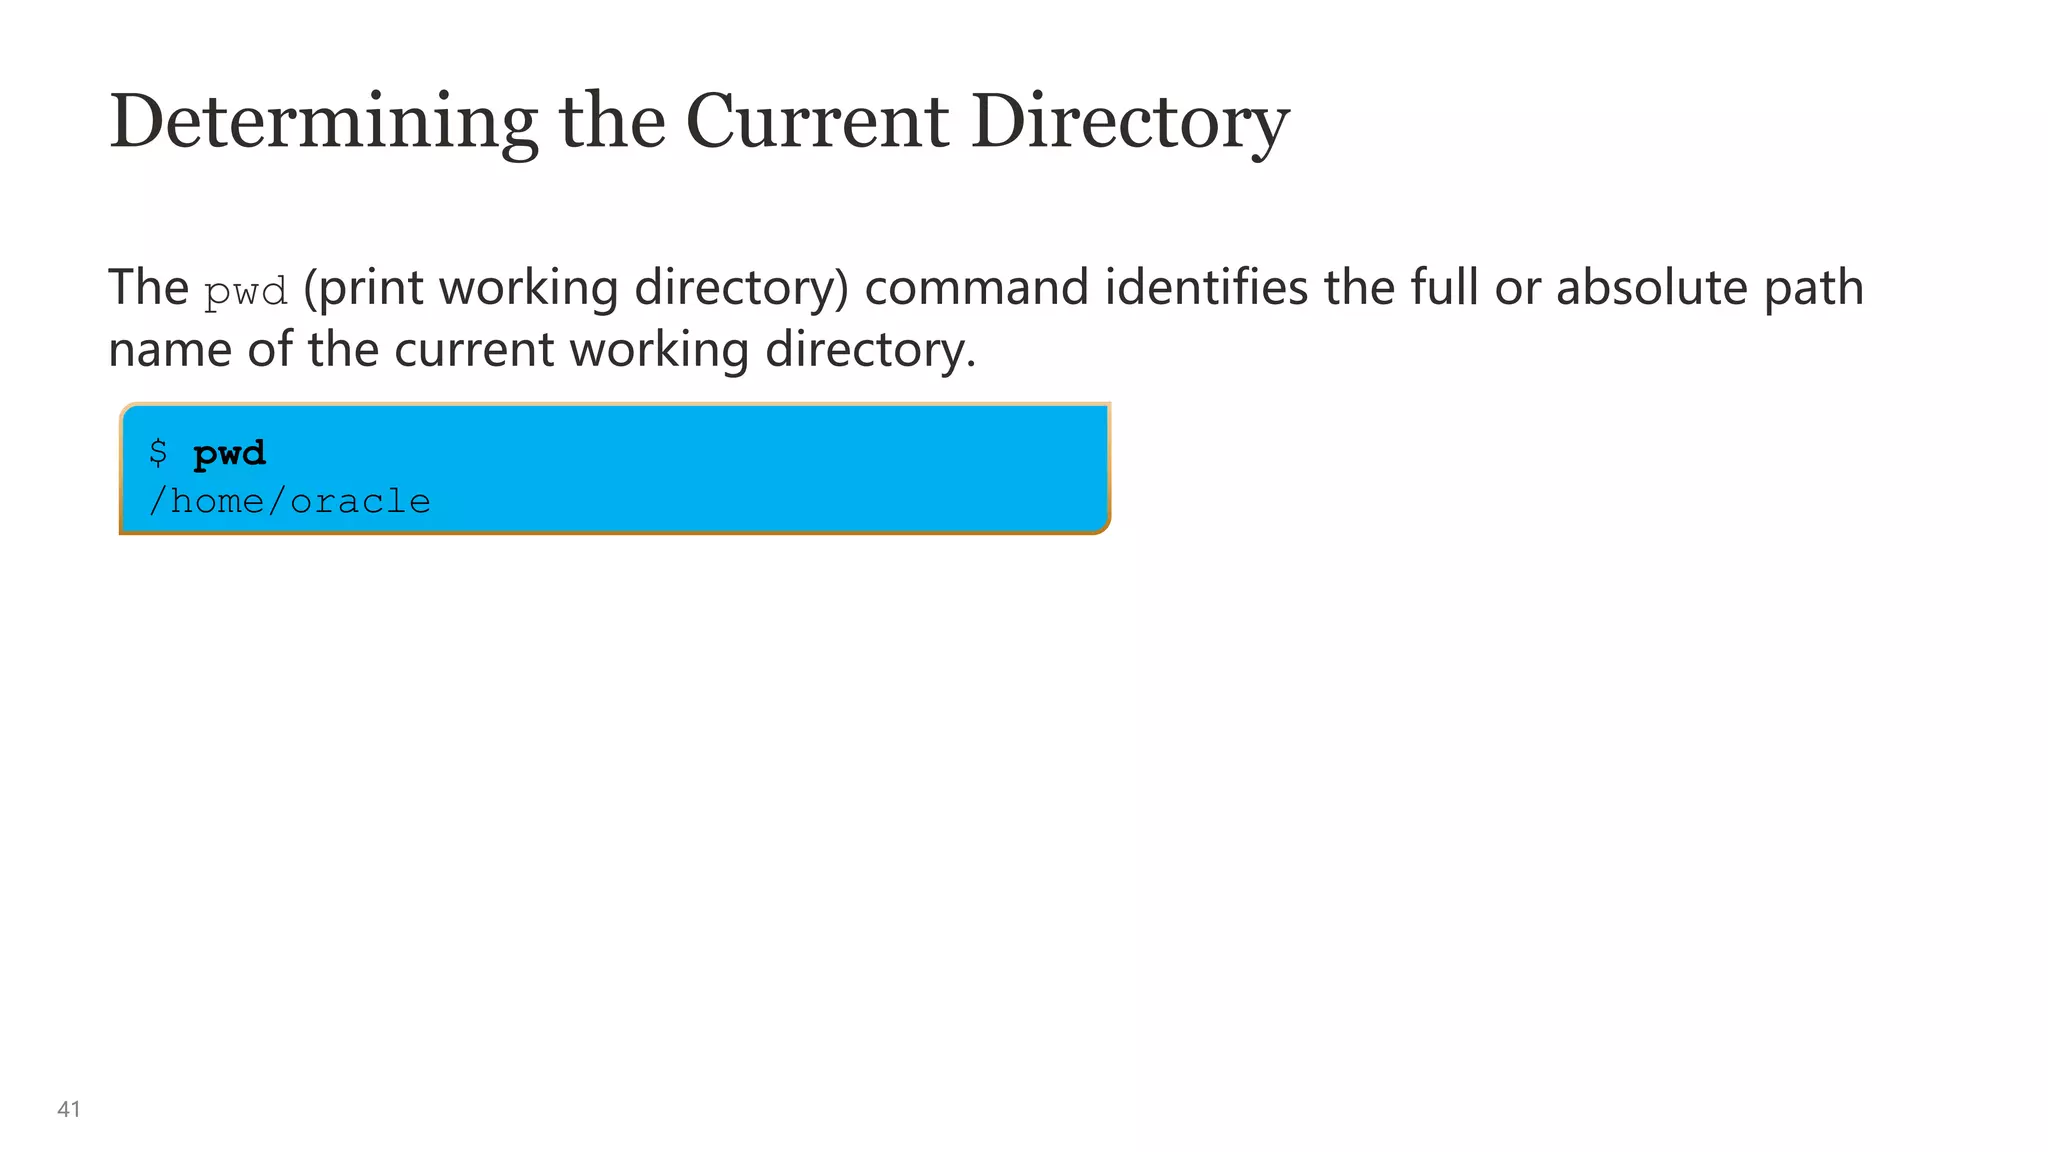
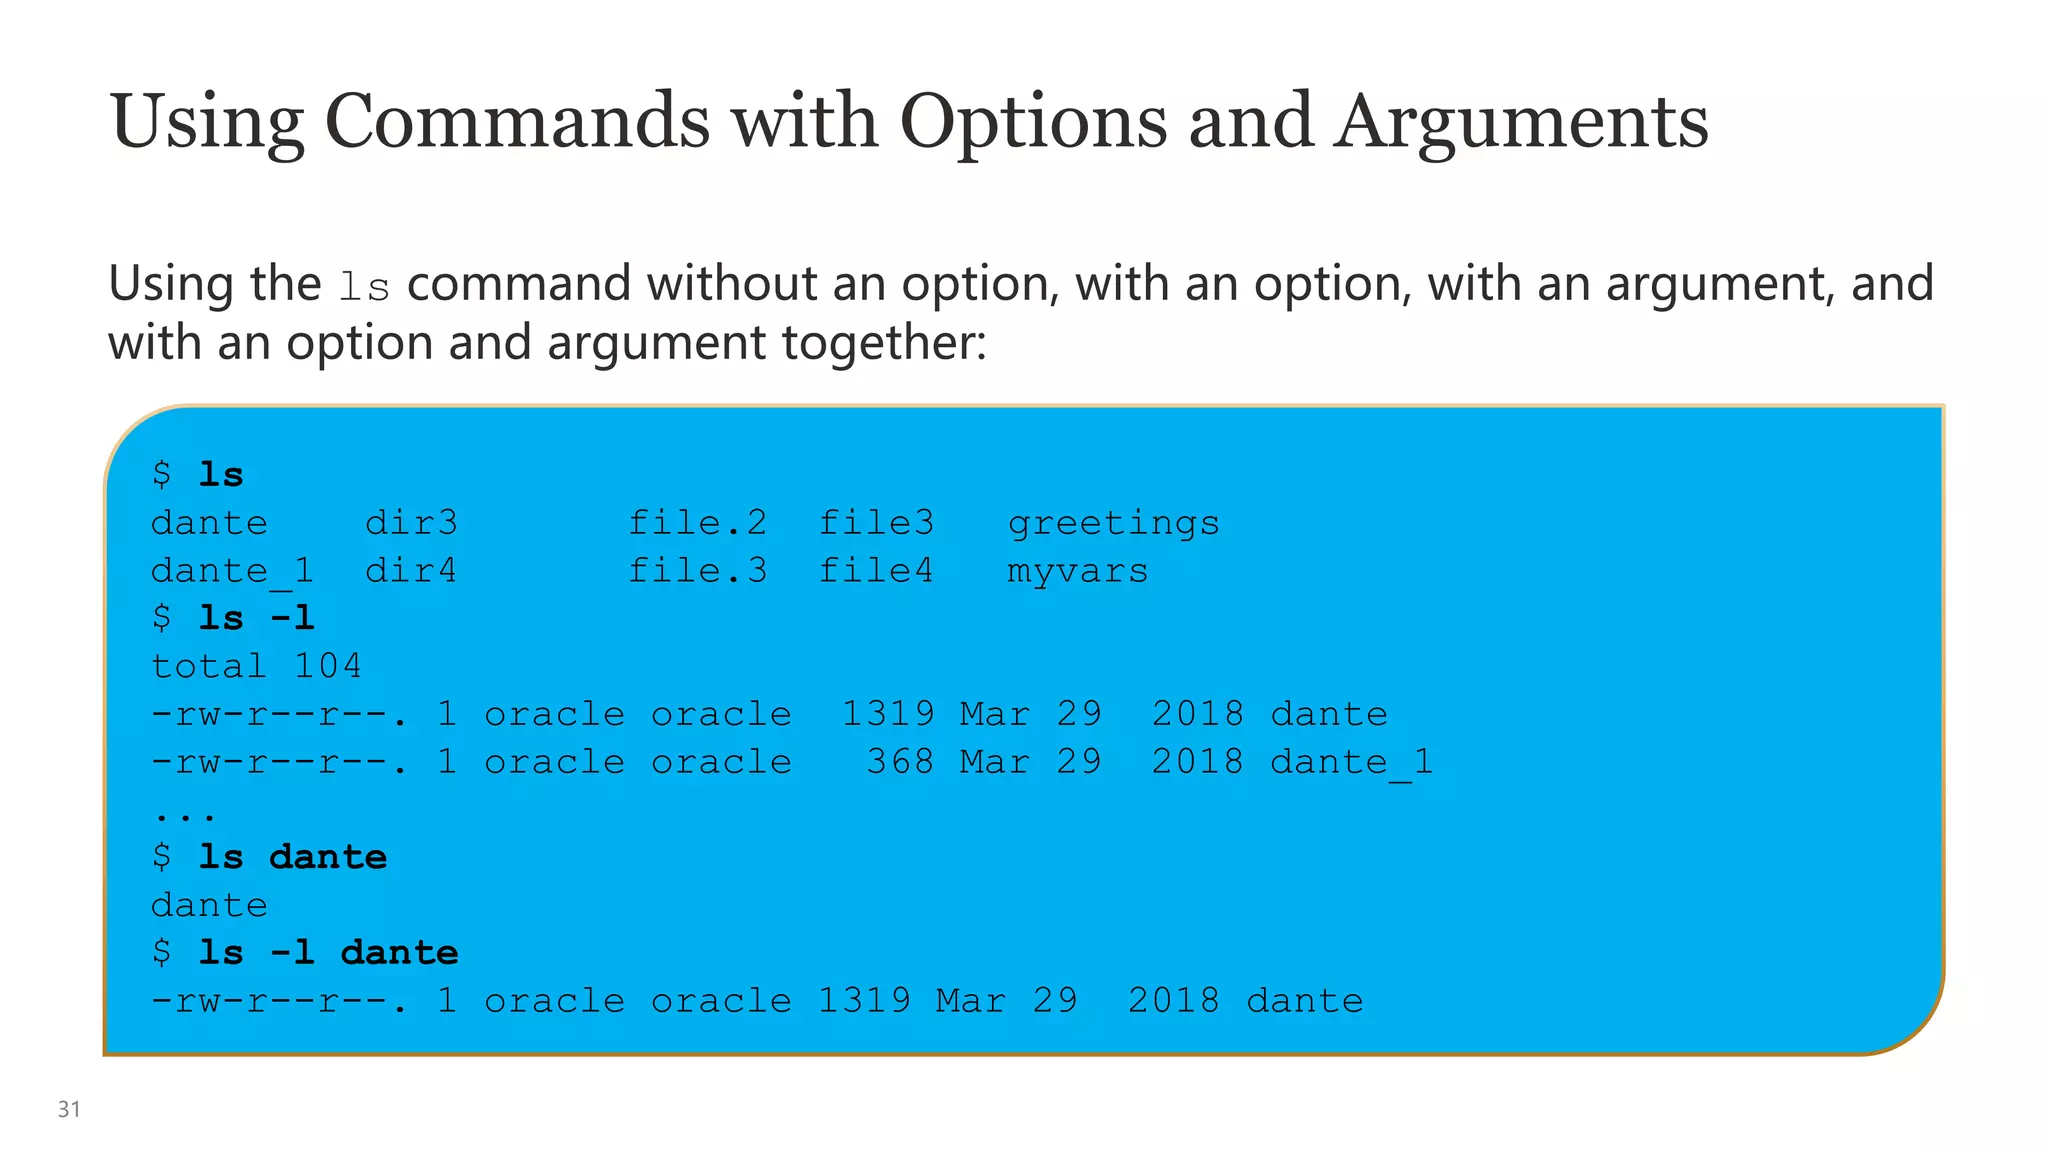
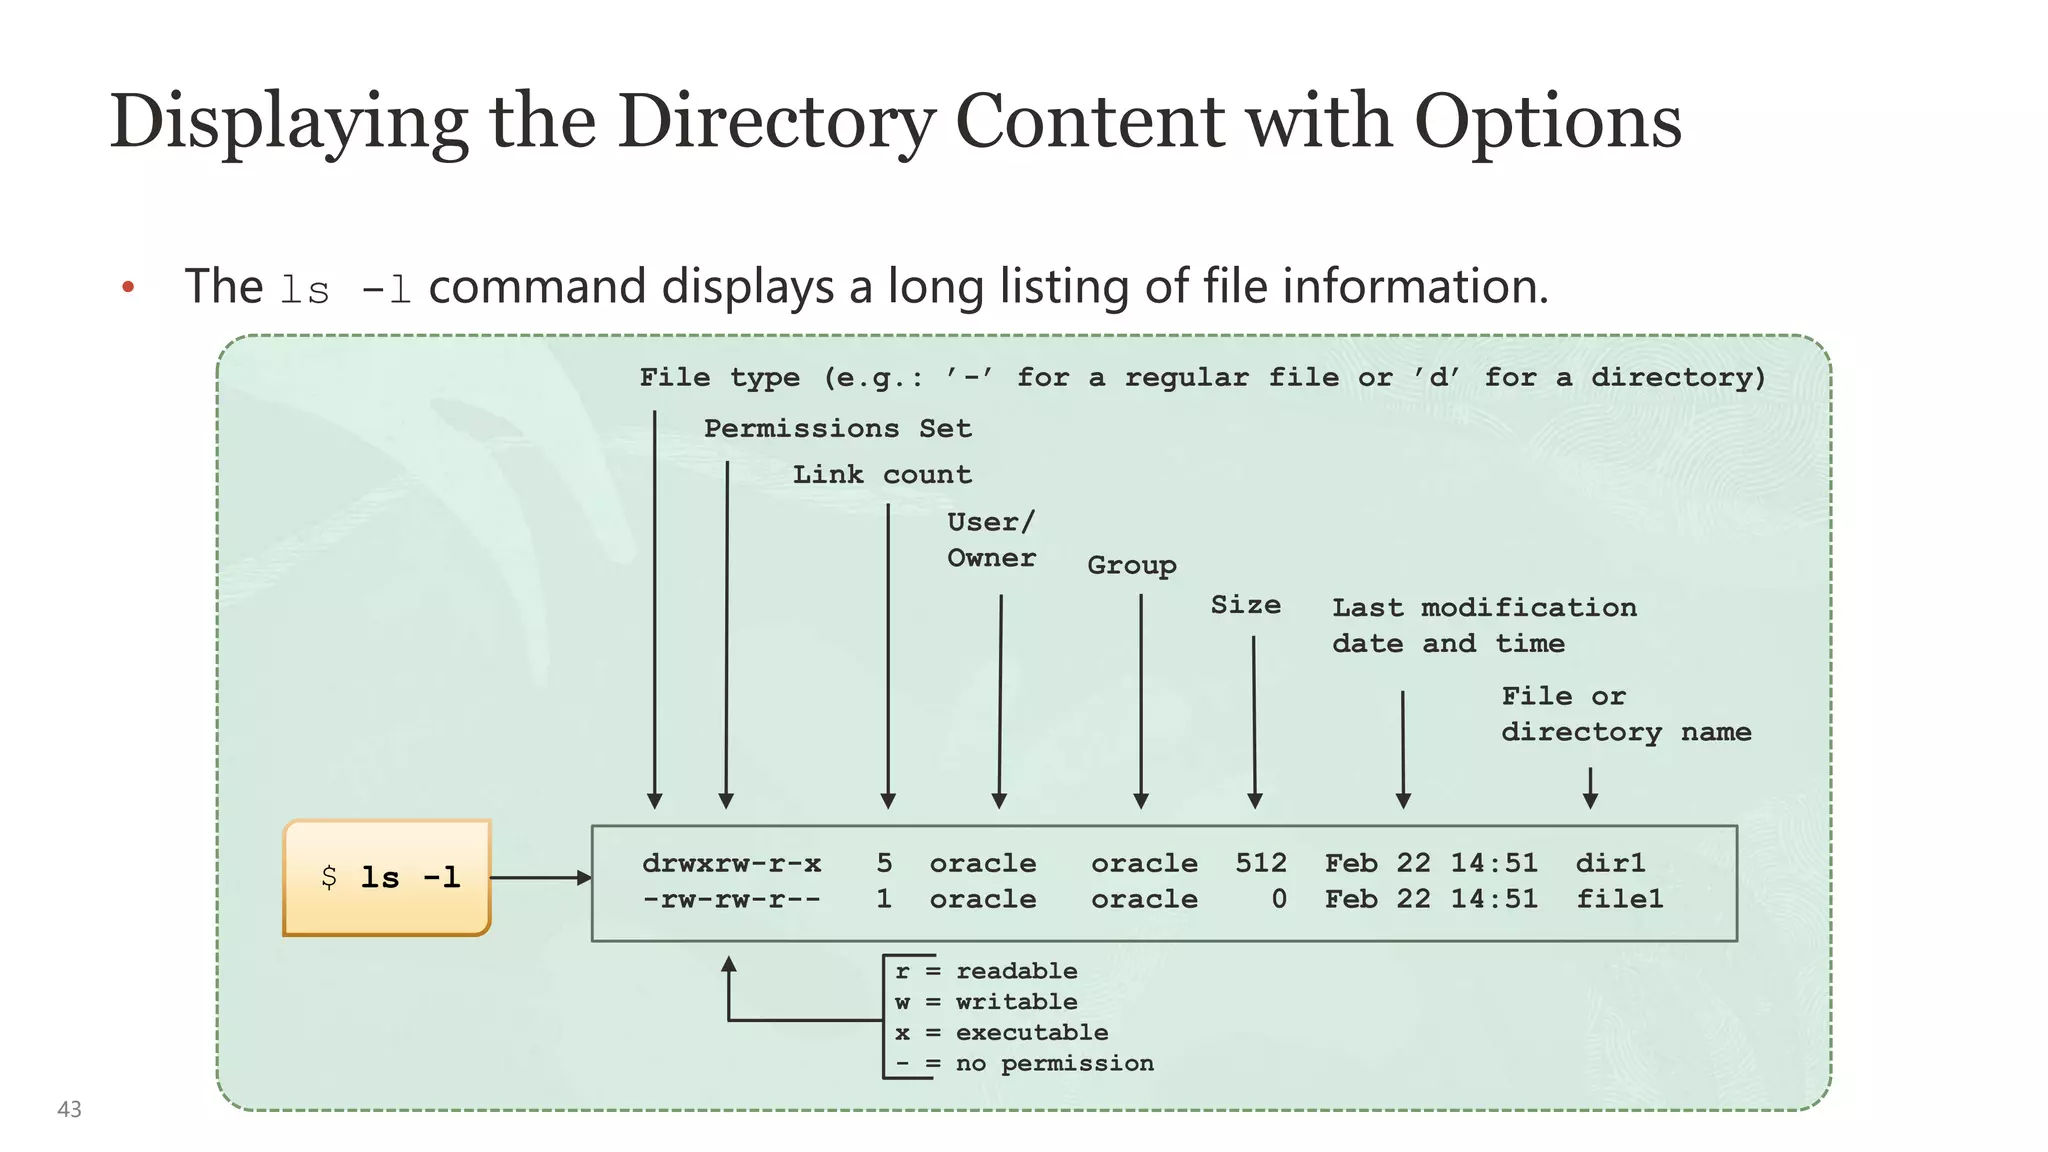
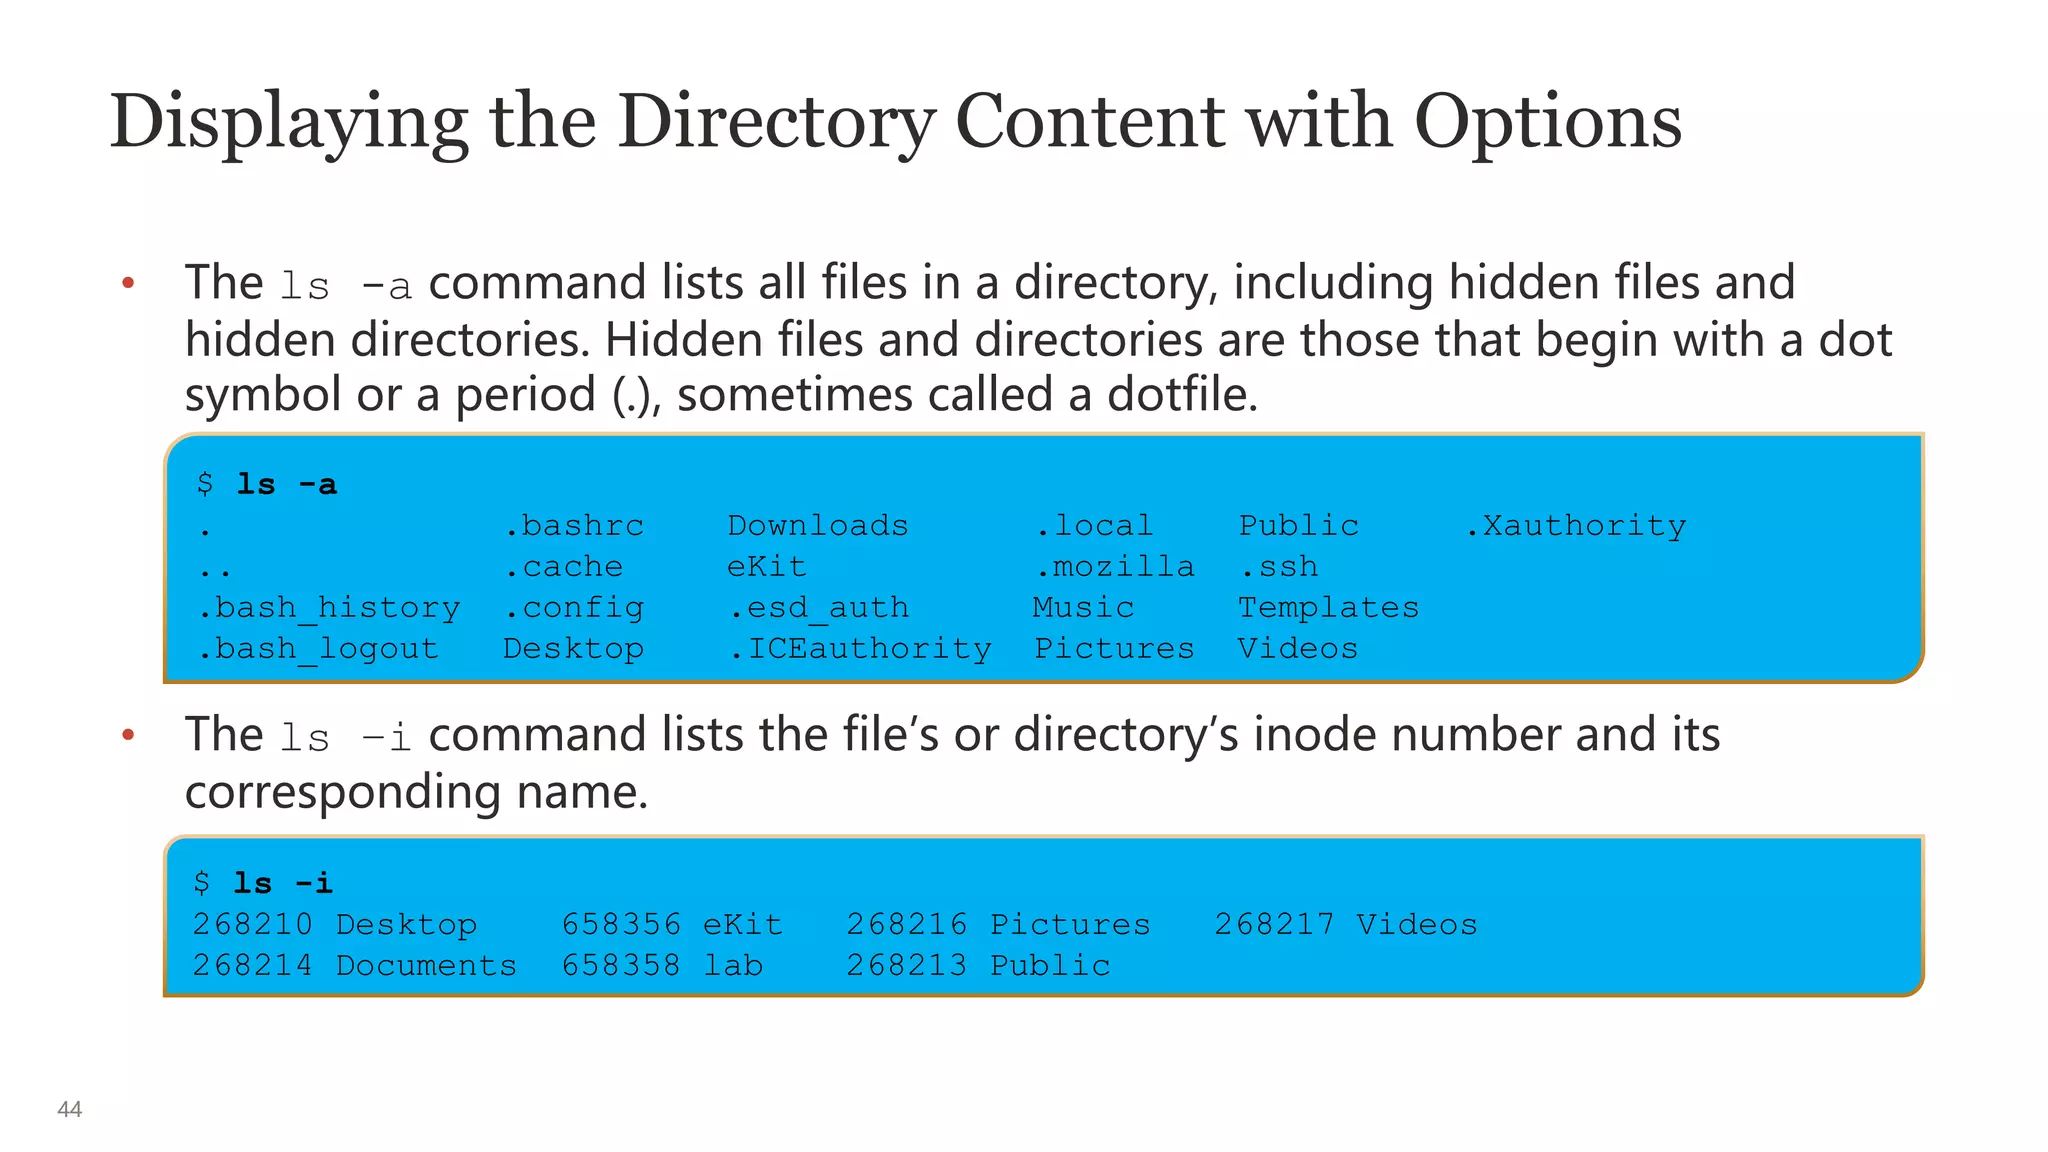
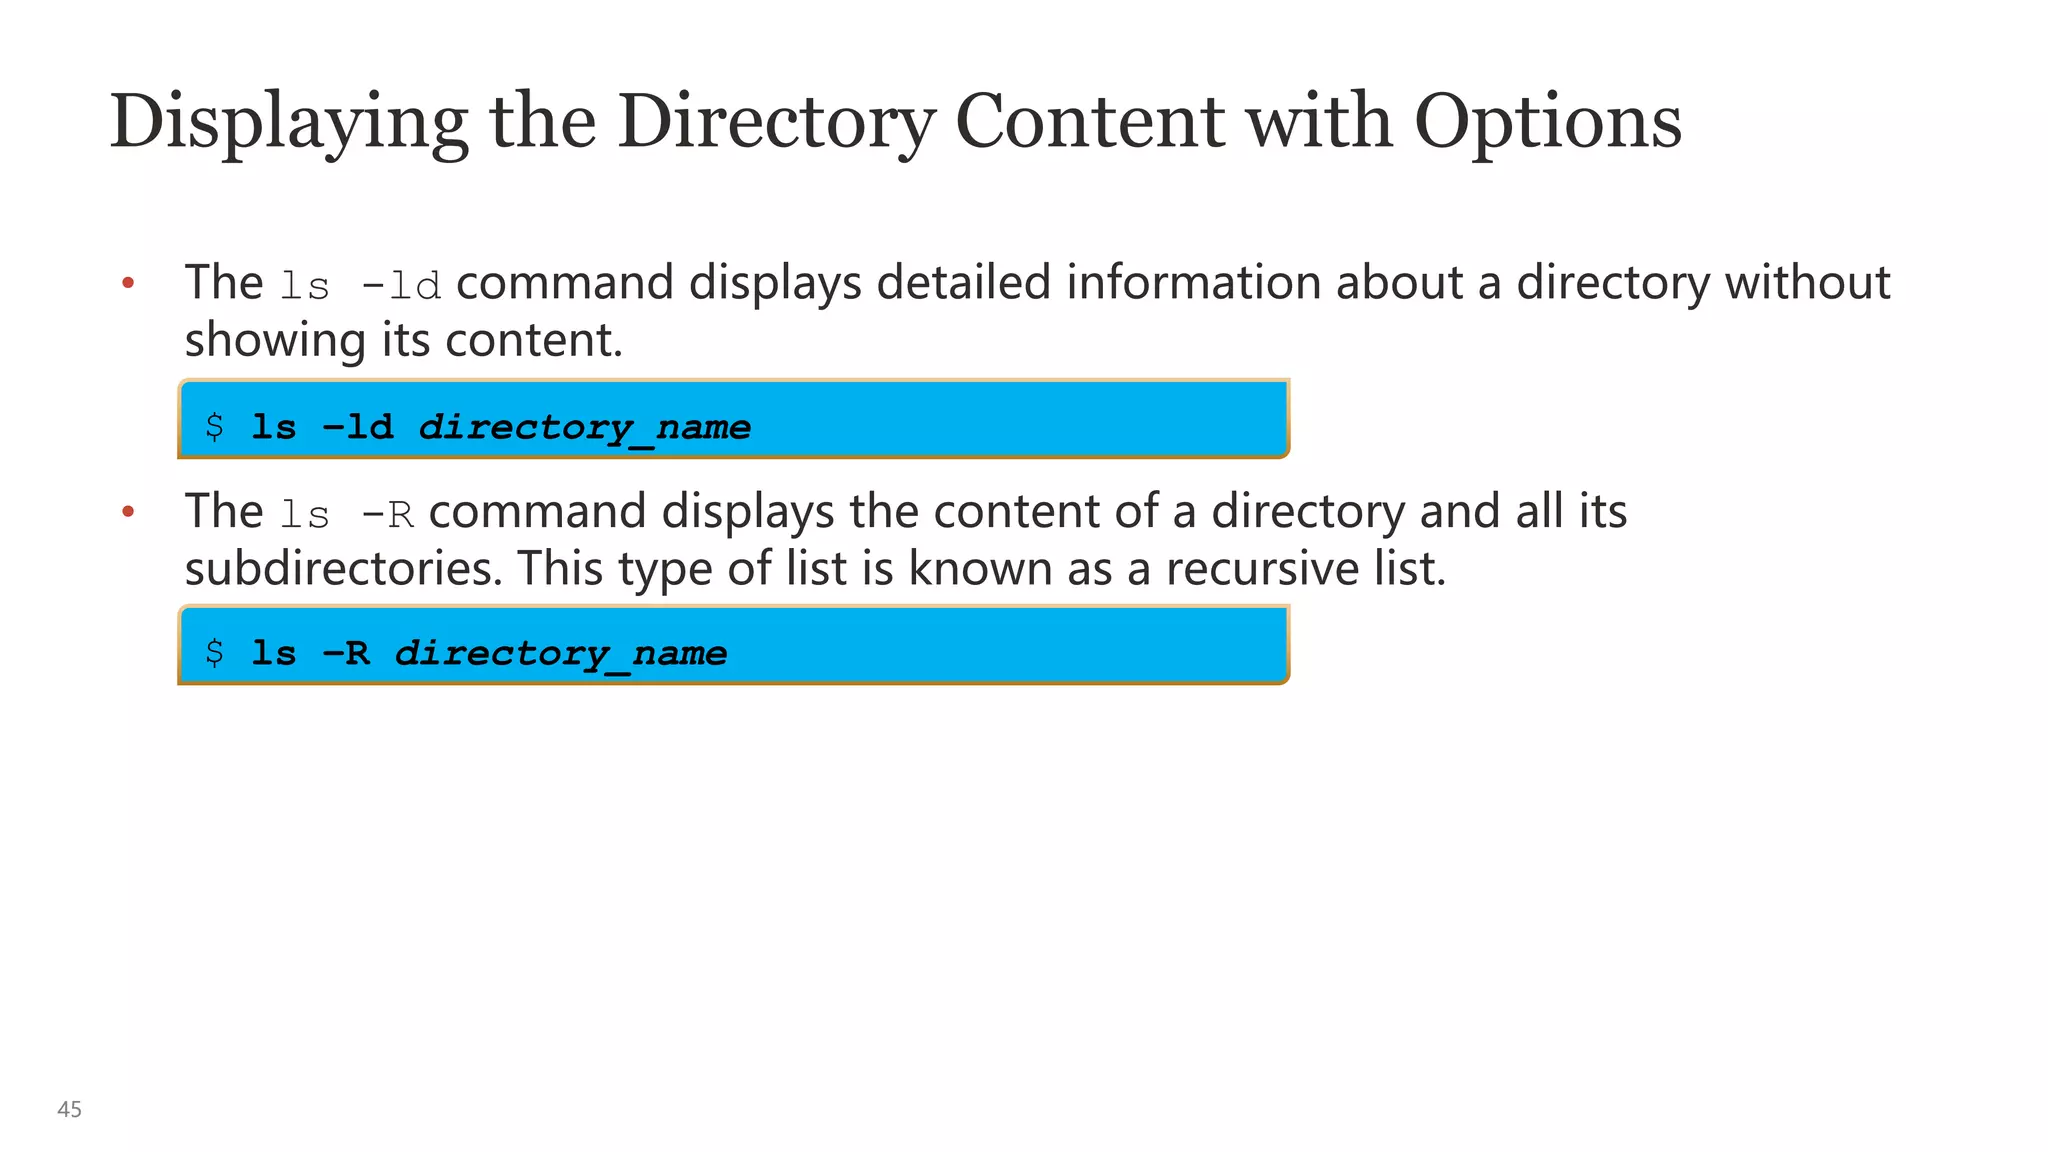
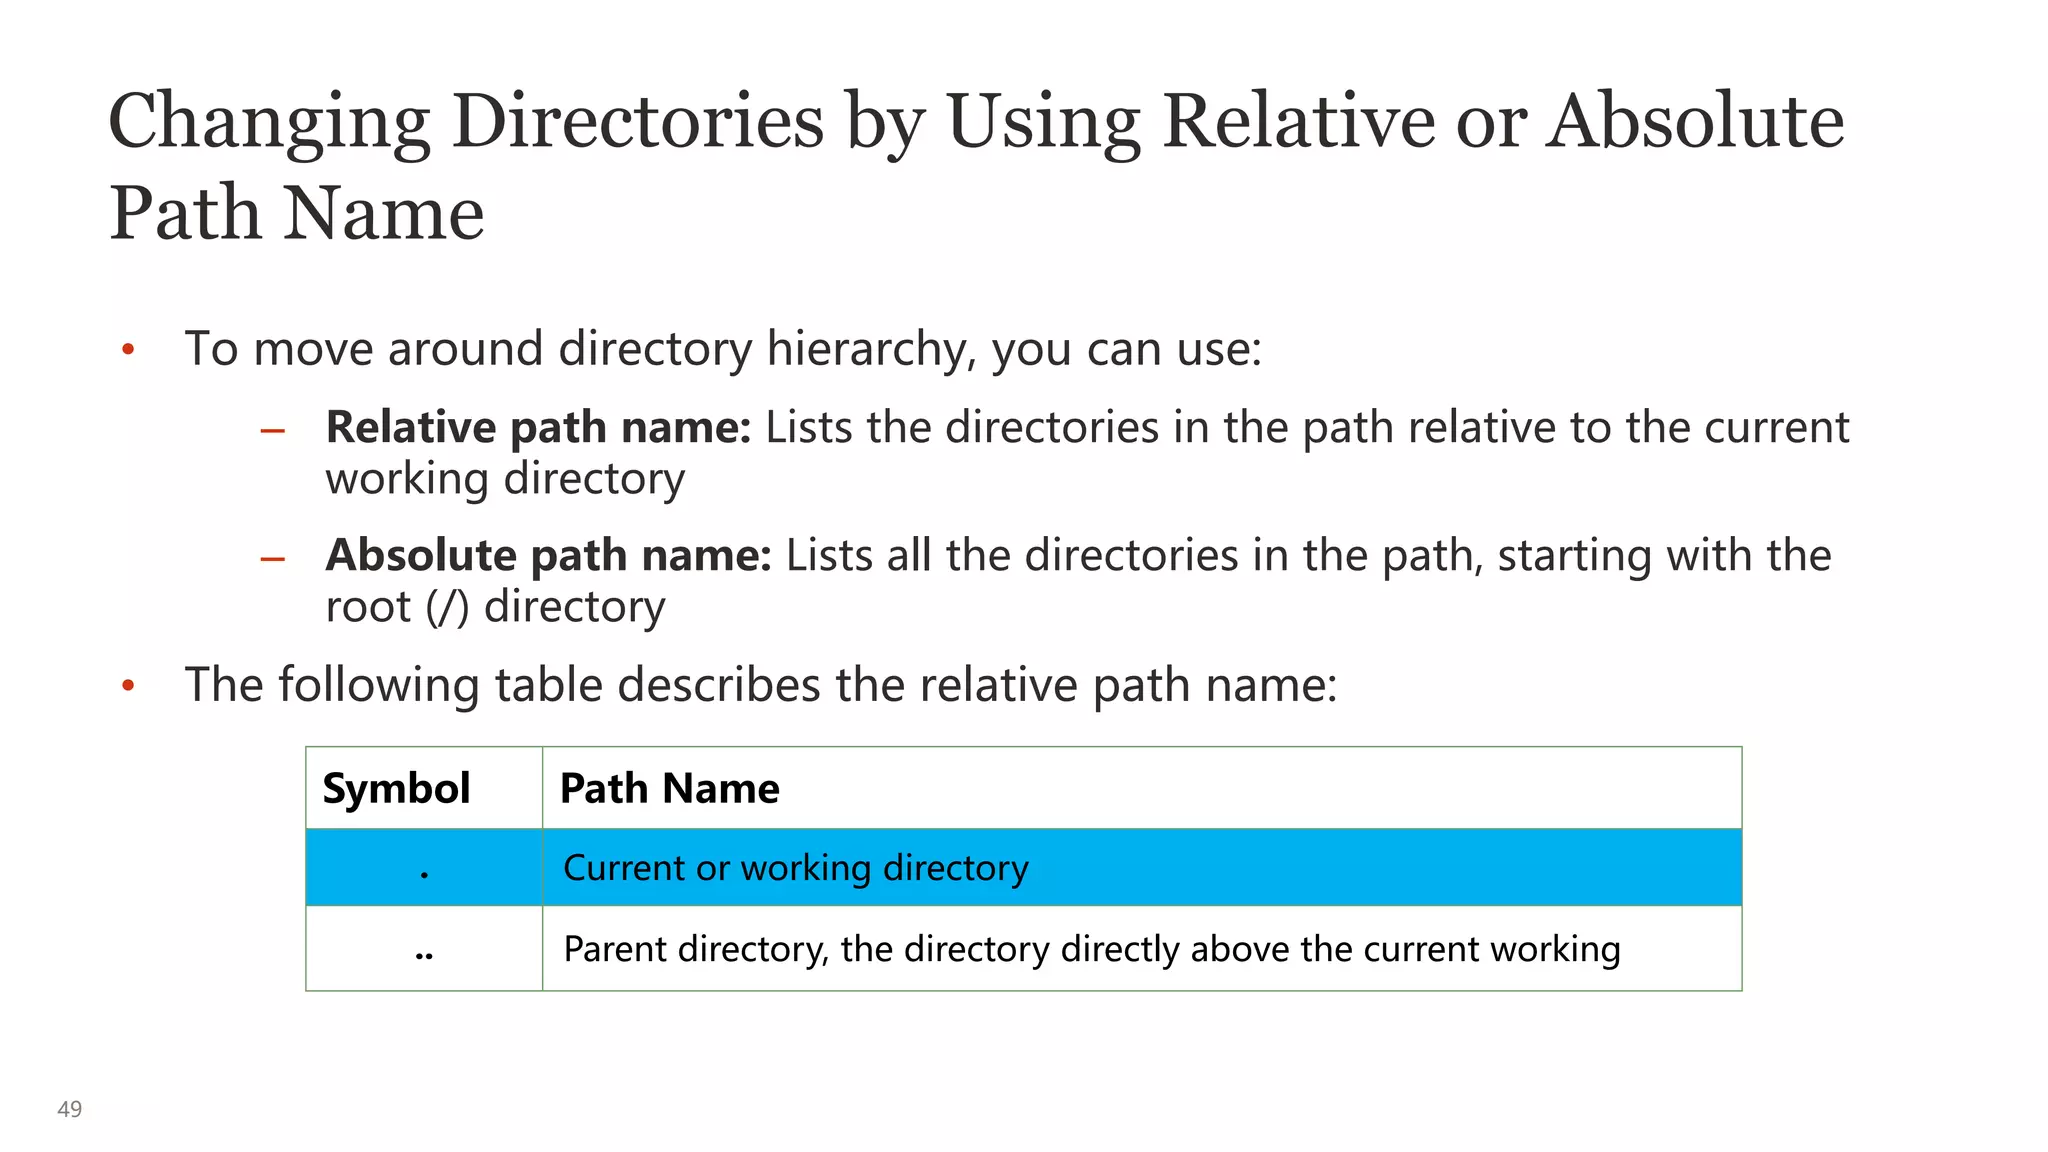
![42
Displaying the Directory Content
• The ls command displays the content of a directory.
• To display the contents of the /home/oracle/lab directory:
• To display the contents of the dir1 subdirectory:
• To display the contents of a directory by specifying its full path name:
$ ls [options] … [filename]
$ ls
dante dante_1 ... dir1 ... file1 ... fruit ... Practice
$ ls dir
coffees fruit trees
$ ls /home/oracle/lab/dir2
beans notes recipes](https://image.slidesharecdn.com/kmsunixandlinux-230703111122-9797abd3/75/KMSUnix-and-Linux-pptx-42-2048.jpg)
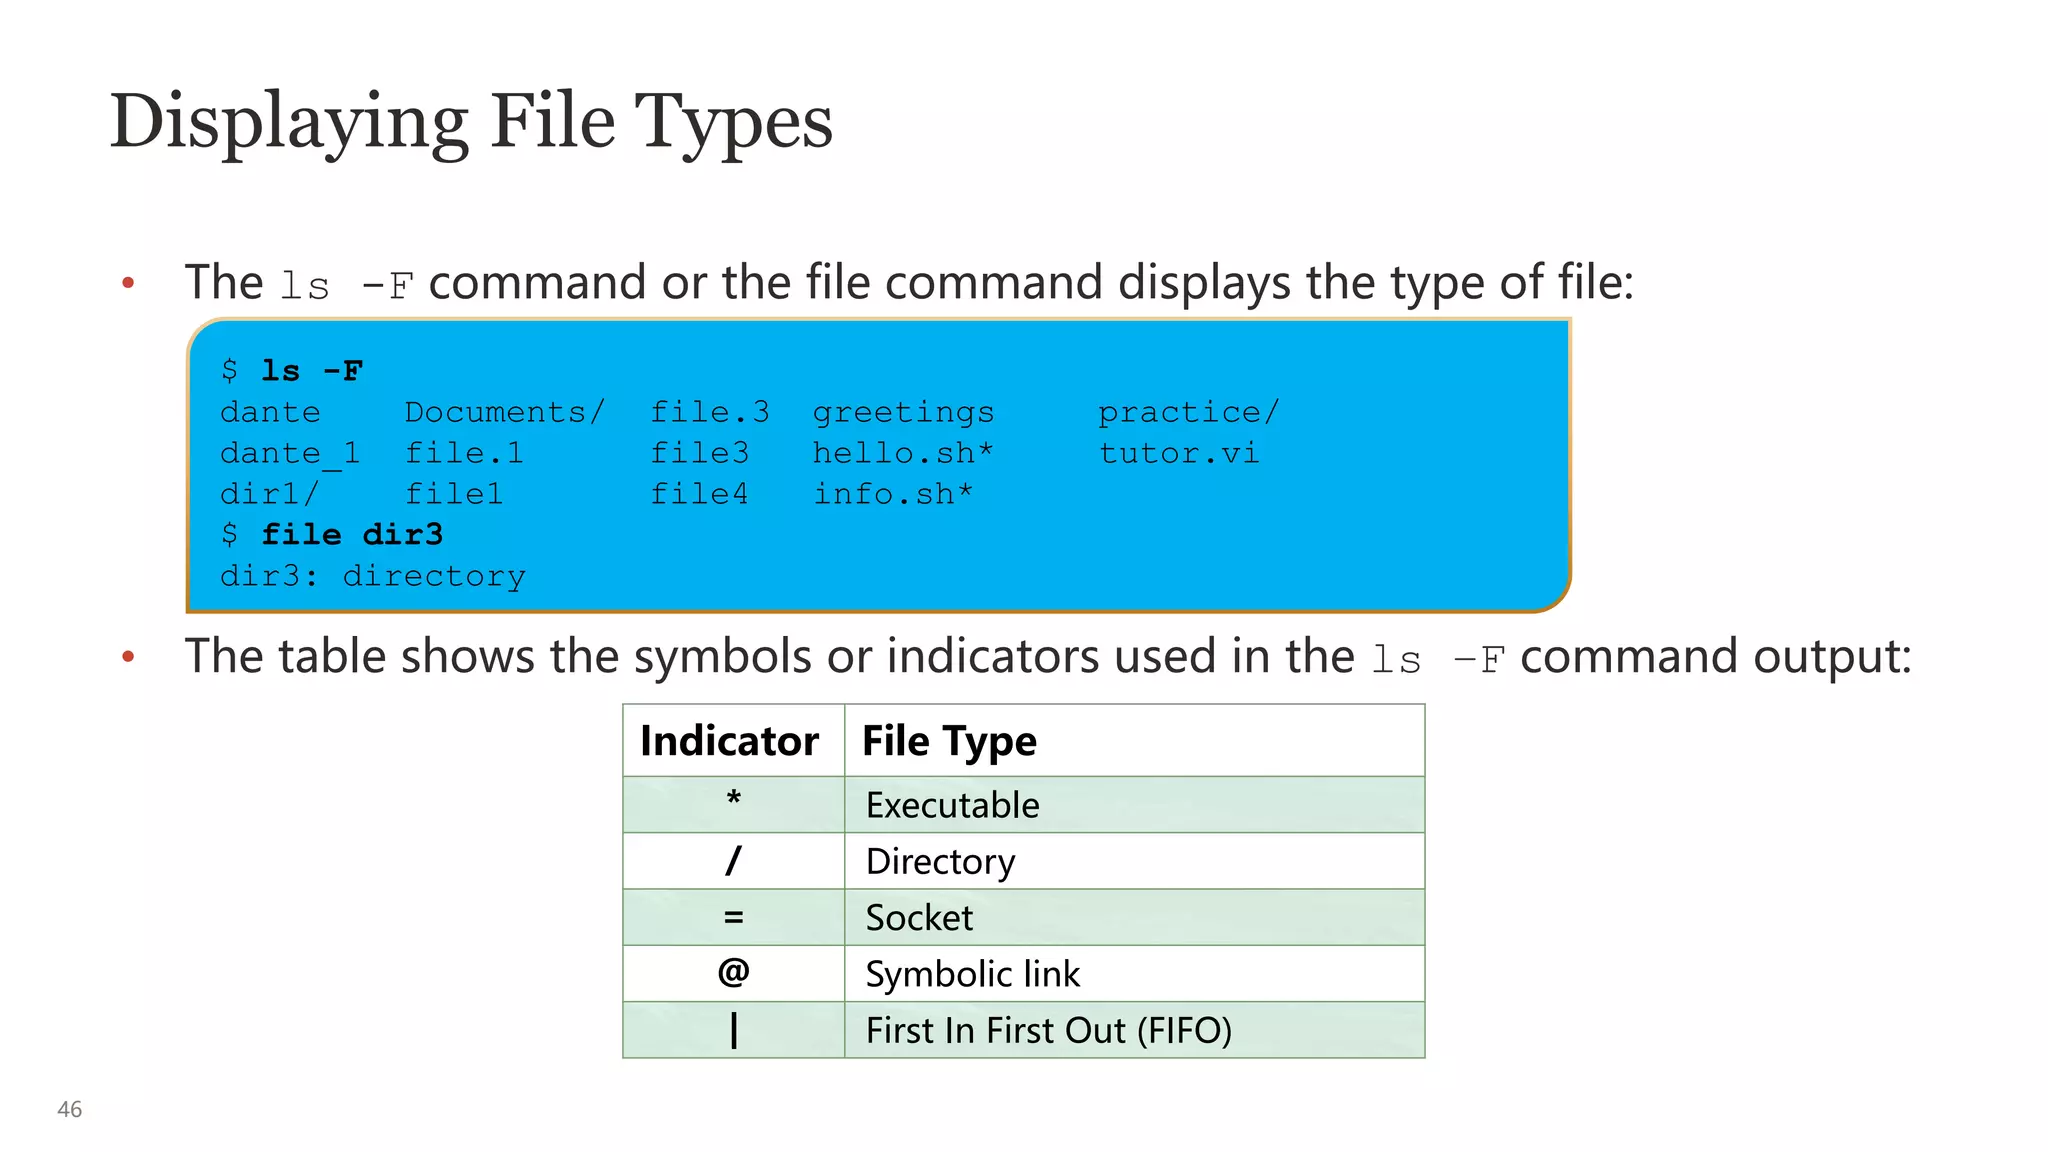
![47
Displaying File Types
• The file command also helps to determine certain file types.
• To view the file type for the dante file, enter the file command and specify the
name of the file.
• To view the file type for the /usr/bin/passwd executable, enter the file
command and specify the name of the file.
$ file [options] filename
$ file dante
dante: ASCII text
$ file /usr/bin/passwd
/usr/bin/passwd: setuid ELF 64-bit LSB shared object, x86-64, version 1 (SYSV),
dynamically linked, interpreter /lib64/ld-linux-x86-64.so.2, for GNU/Linux
3.2.0, BuildID[sha1]=bba2dbb97651c59c107478797c3cdfb9348357cd, stripped](https://image.slidesharecdn.com/kmsunixandlinux-230703111122-9797abd3/75/KMSUnix-and-Linux-pptx-47-2048.jpg)

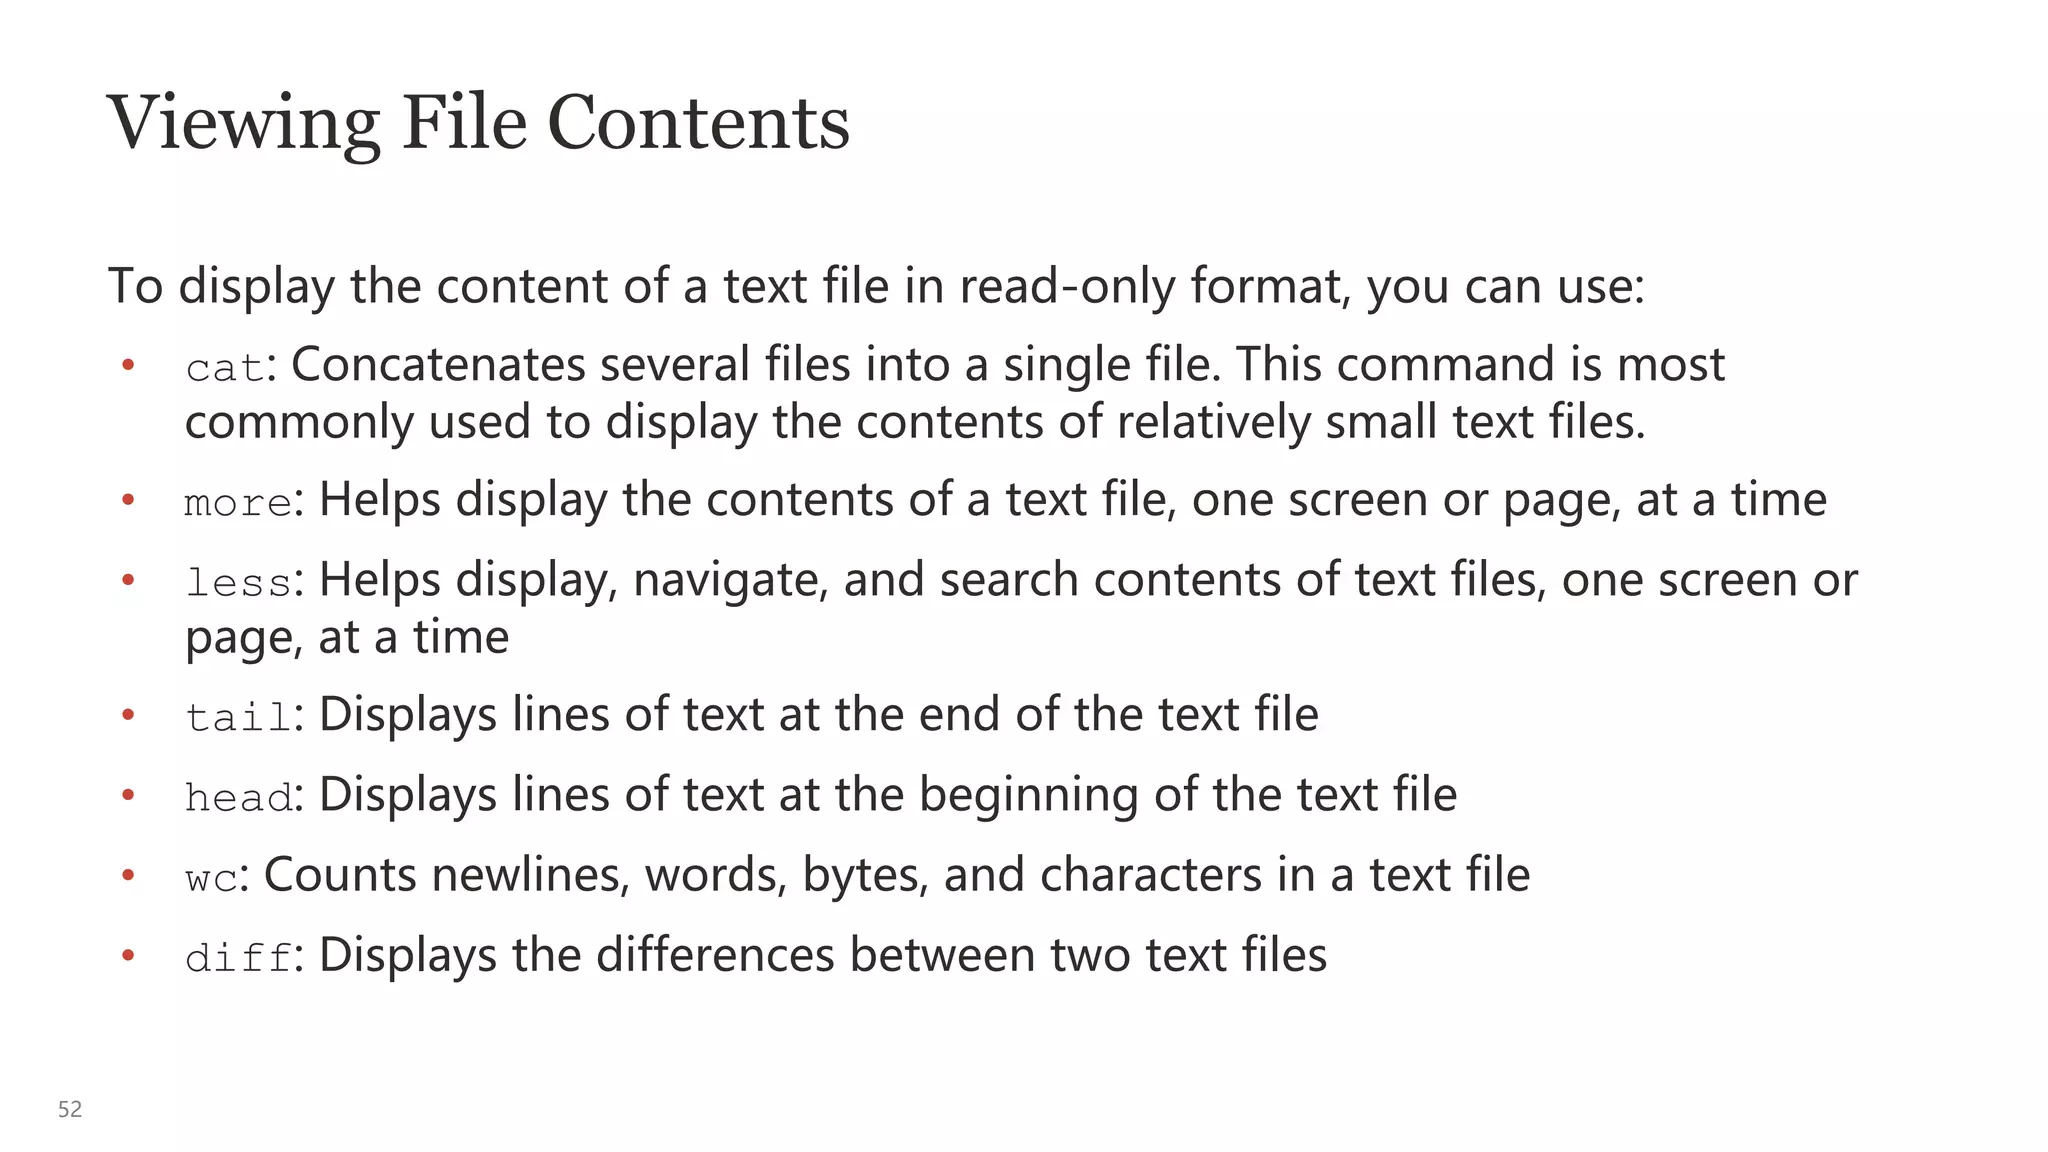
![53
Viewing File Content: cat Command
• The cat command is most commonly used to display the content of text files.
• Use the cat command to display the contents of the dante text file.
Note: Before you attempt to open a file by using the cat command, it is
recommended that you first run the file command to determine the file type.
$ cat [options] ... [filename]
$ cat dante
The Life and Times of Dante
by Dante Pocai
Mention "Alighieri" and few may know about whom you are talking. Say
"Dante," instead, and the whole world knows whom you mean. For
...](https://image.slidesharecdn.com/kmsunixandlinux-230703111122-9797abd3/75/KMSUnix-and-Linux-pptx-53-2048.jpg)
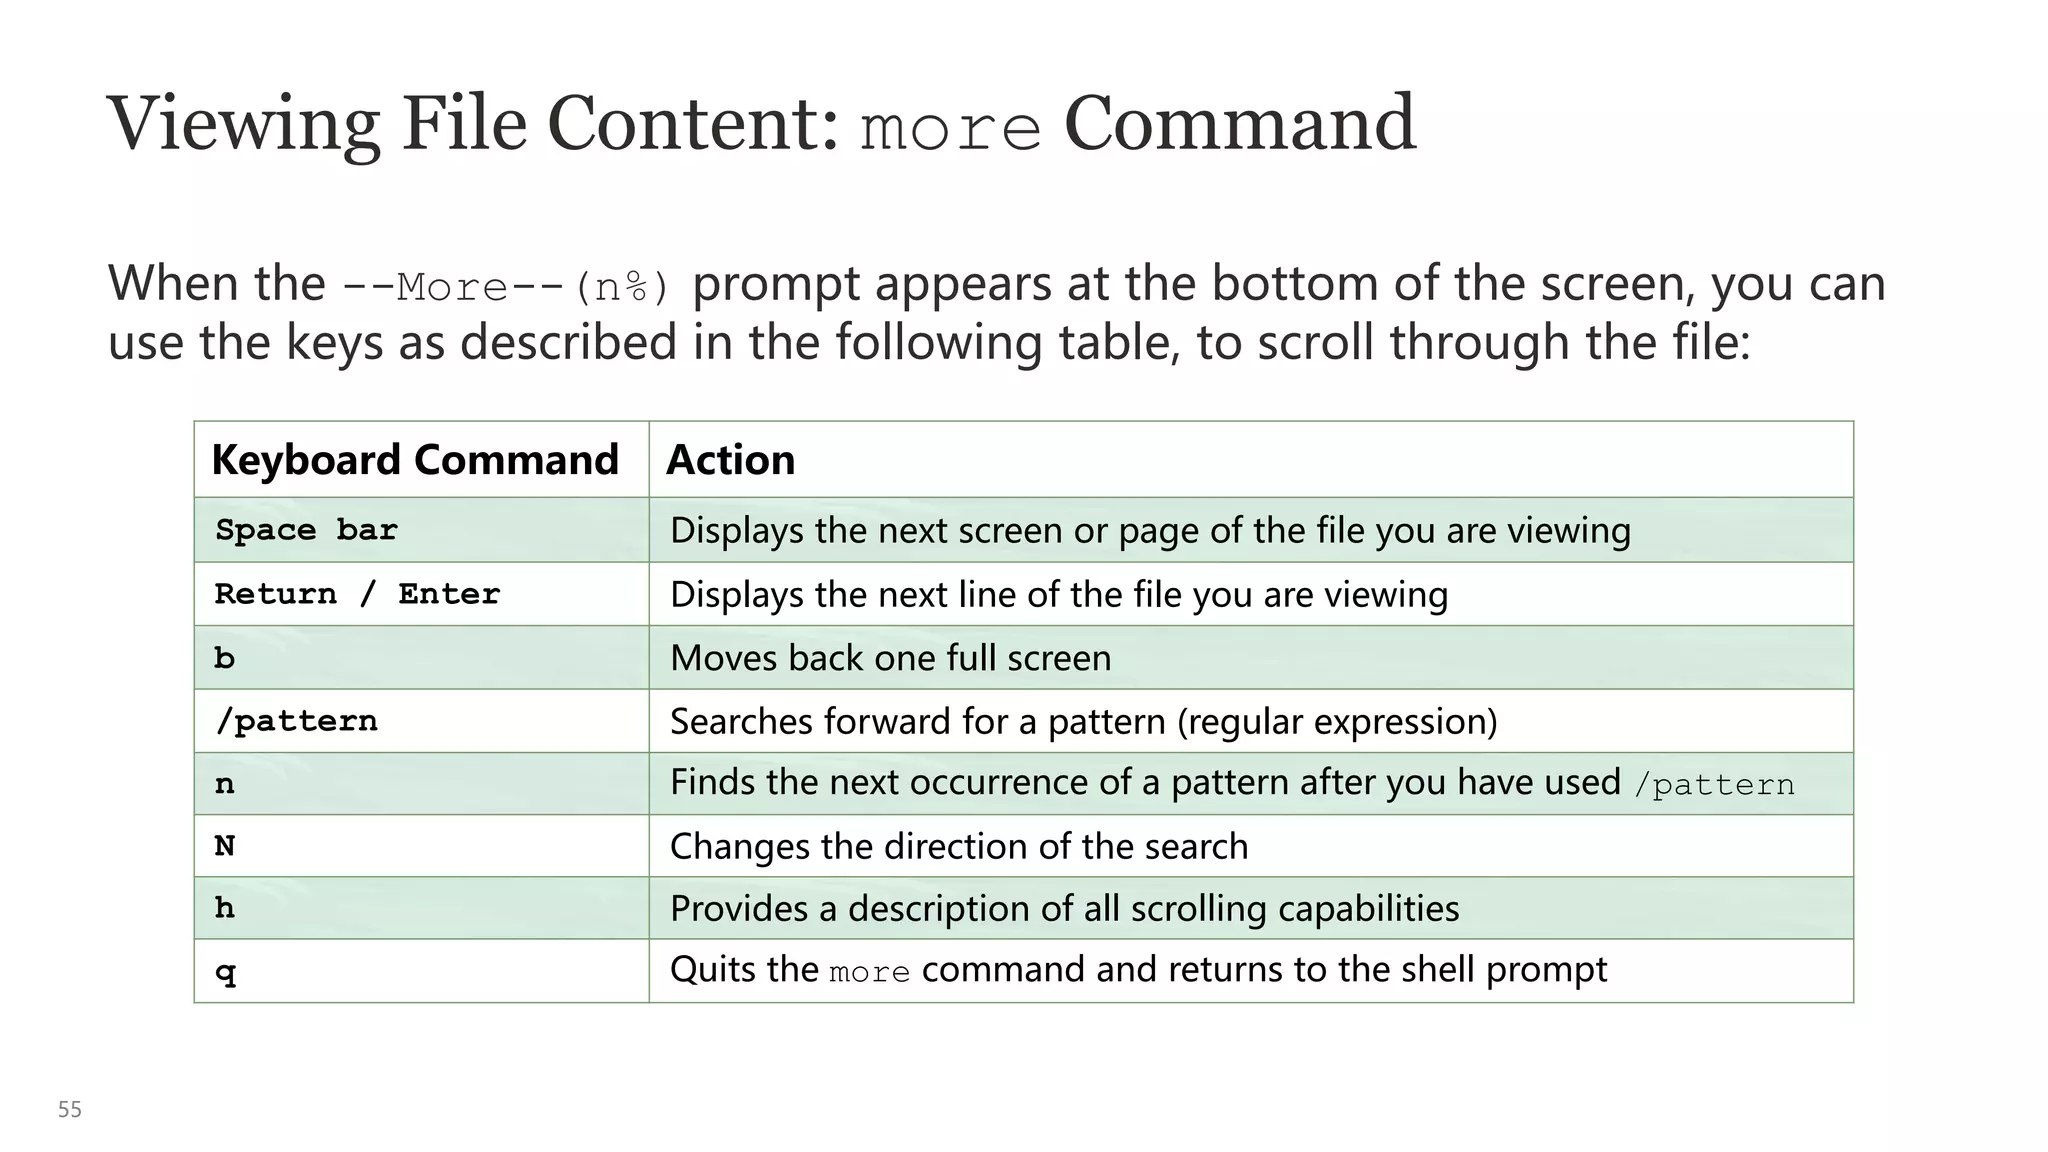
![54
Viewing File Content: more Command
• The more command displays the content of a text file one screen at a time.
• The --More--(n%) message appears at the bottom of each screen, where n% is
the percentage of the file that has been displayed.
• When the entire file has been displayed, the shell prompt appears.
$ more [options] filename](https://image.slidesharecdn.com/kmsunixandlinux-230703111122-9797abd3/75/KMSUnix-and-Linux-pptx-54-2048.jpg)
![56
Viewing File Content: less Command
The GNU Project created less as a response to more, but with more features and
actions. The table in the previous slide details not only more options but some of
the less options also. For a more thorough list of features, entering less -? will
yield greater details.
• The following is a snippet from the less man pages:
...
SYNOPSIS
less -?
less --help
less -V
less --version
less [-[+]aABcCdeEfFgGiIJKLmMnNqQrRsSuUVwWX~]
[-b space] [-h lines] [-j line] [-k keyfile]
...](https://image.slidesharecdn.com/kmsunixandlinux-230703111122-9797abd3/75/KMSUnix-and-Linux-pptx-56-2048.jpg)
![57
Viewing File Content: head Command
• The head command displays the first 10 lines of a file.
• You can change the number of lines displayed by using the -n option.
• To display the first five lines of the /usr/share/dict/words file in Linux, enter
the head command with the -n option set to 5.
$ head [–n] filename
$ head -5 /usr/share/dict/words
1080
10-point
10th
11-point
12-point](https://image.slidesharecdn.com/kmsunixandlinux-230703111122-9797abd3/75/KMSUnix-and-Linux-pptx-57-2048.jpg)
![58
Viewing File Content: tail Command
• The tail command displays the last 10 lines of a file.
• You can change the number of lines displayed by using the -n or +n option.
– The -n option displays n lines from the end of the file.
– The +n option displays the file from line n to the end of the file.
• Possibly one of the more popular options is -f, which allows you to follow the
data that is being appended to the file.
$ tail [options] filename](https://image.slidesharecdn.com/kmsunixandlinux-230703111122-9797abd3/75/KMSUnix-and-Linux-pptx-58-2048.jpg)
![59
Viewing File Content: wc Command
• The wc (word count) command displays the number of lines, words, and
characters contained in a file.
• You can use the following options with the wc command.
Option Description
-l Line count
-w Word count
-c Byte count
-m Character count
$ wc [options] filename](https://image.slidesharecdn.com/kmsunixandlinux-230703111122-9797abd3/75/KMSUnix-and-Linux-pptx-59-2048.jpg)
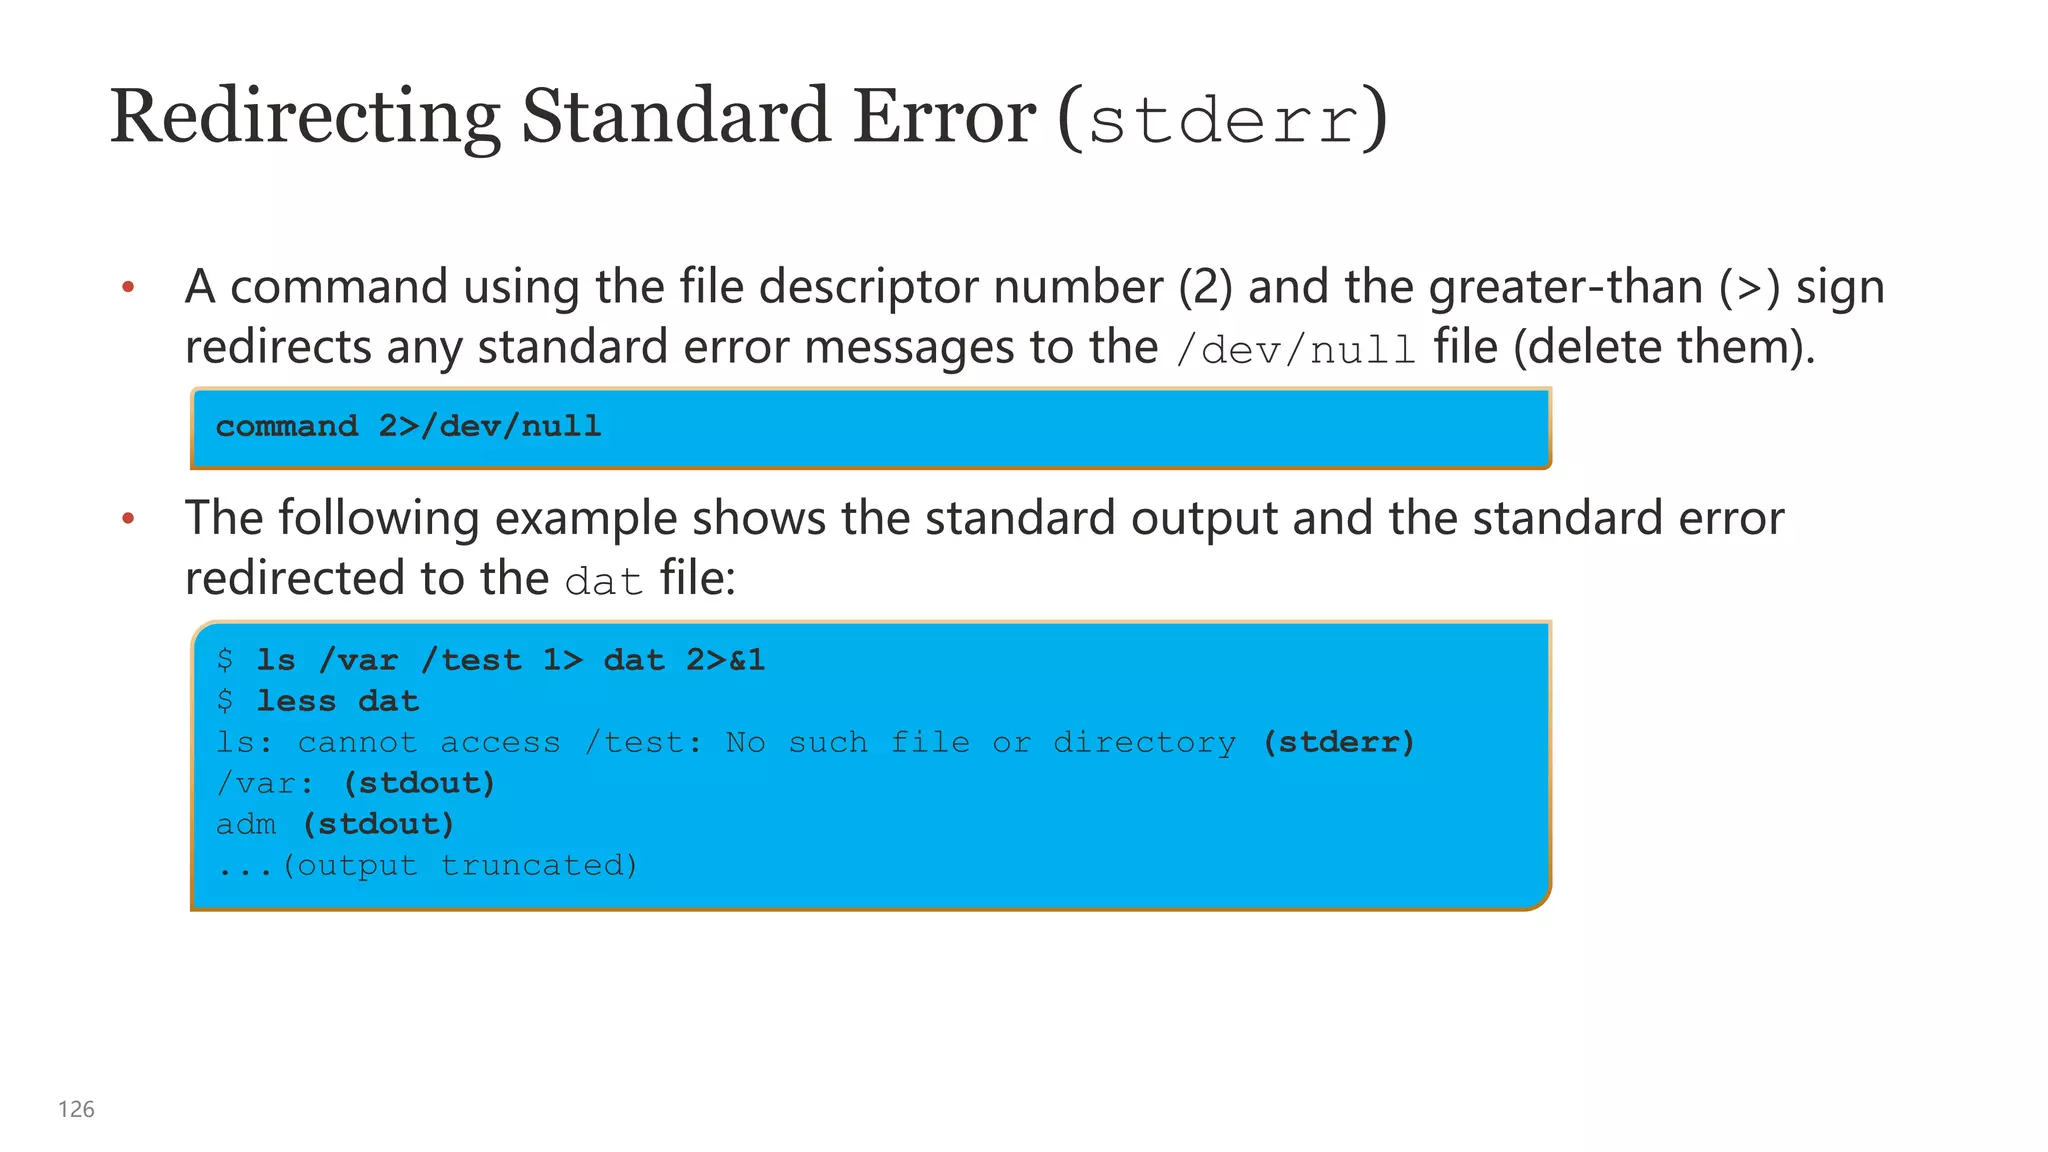
![60
Viewing File Content Differences: diff Command
• The diff command displays the differences between two ASCII text files.
• When the output of the diff command is displayed, the lines that are unique to
filename1 are identified by the < (less than) symbol, while lines that are unique
to filename2 are identified by the > (greater than) symbol. Lines that are
identical in both files are not displayed.
$ diff [options] filename1 filename2](https://image.slidesharecdn.com/kmsunixandlinux-230703111122-9797abd3/75/KMSUnix-and-Linux-pptx-60-2048.jpg)
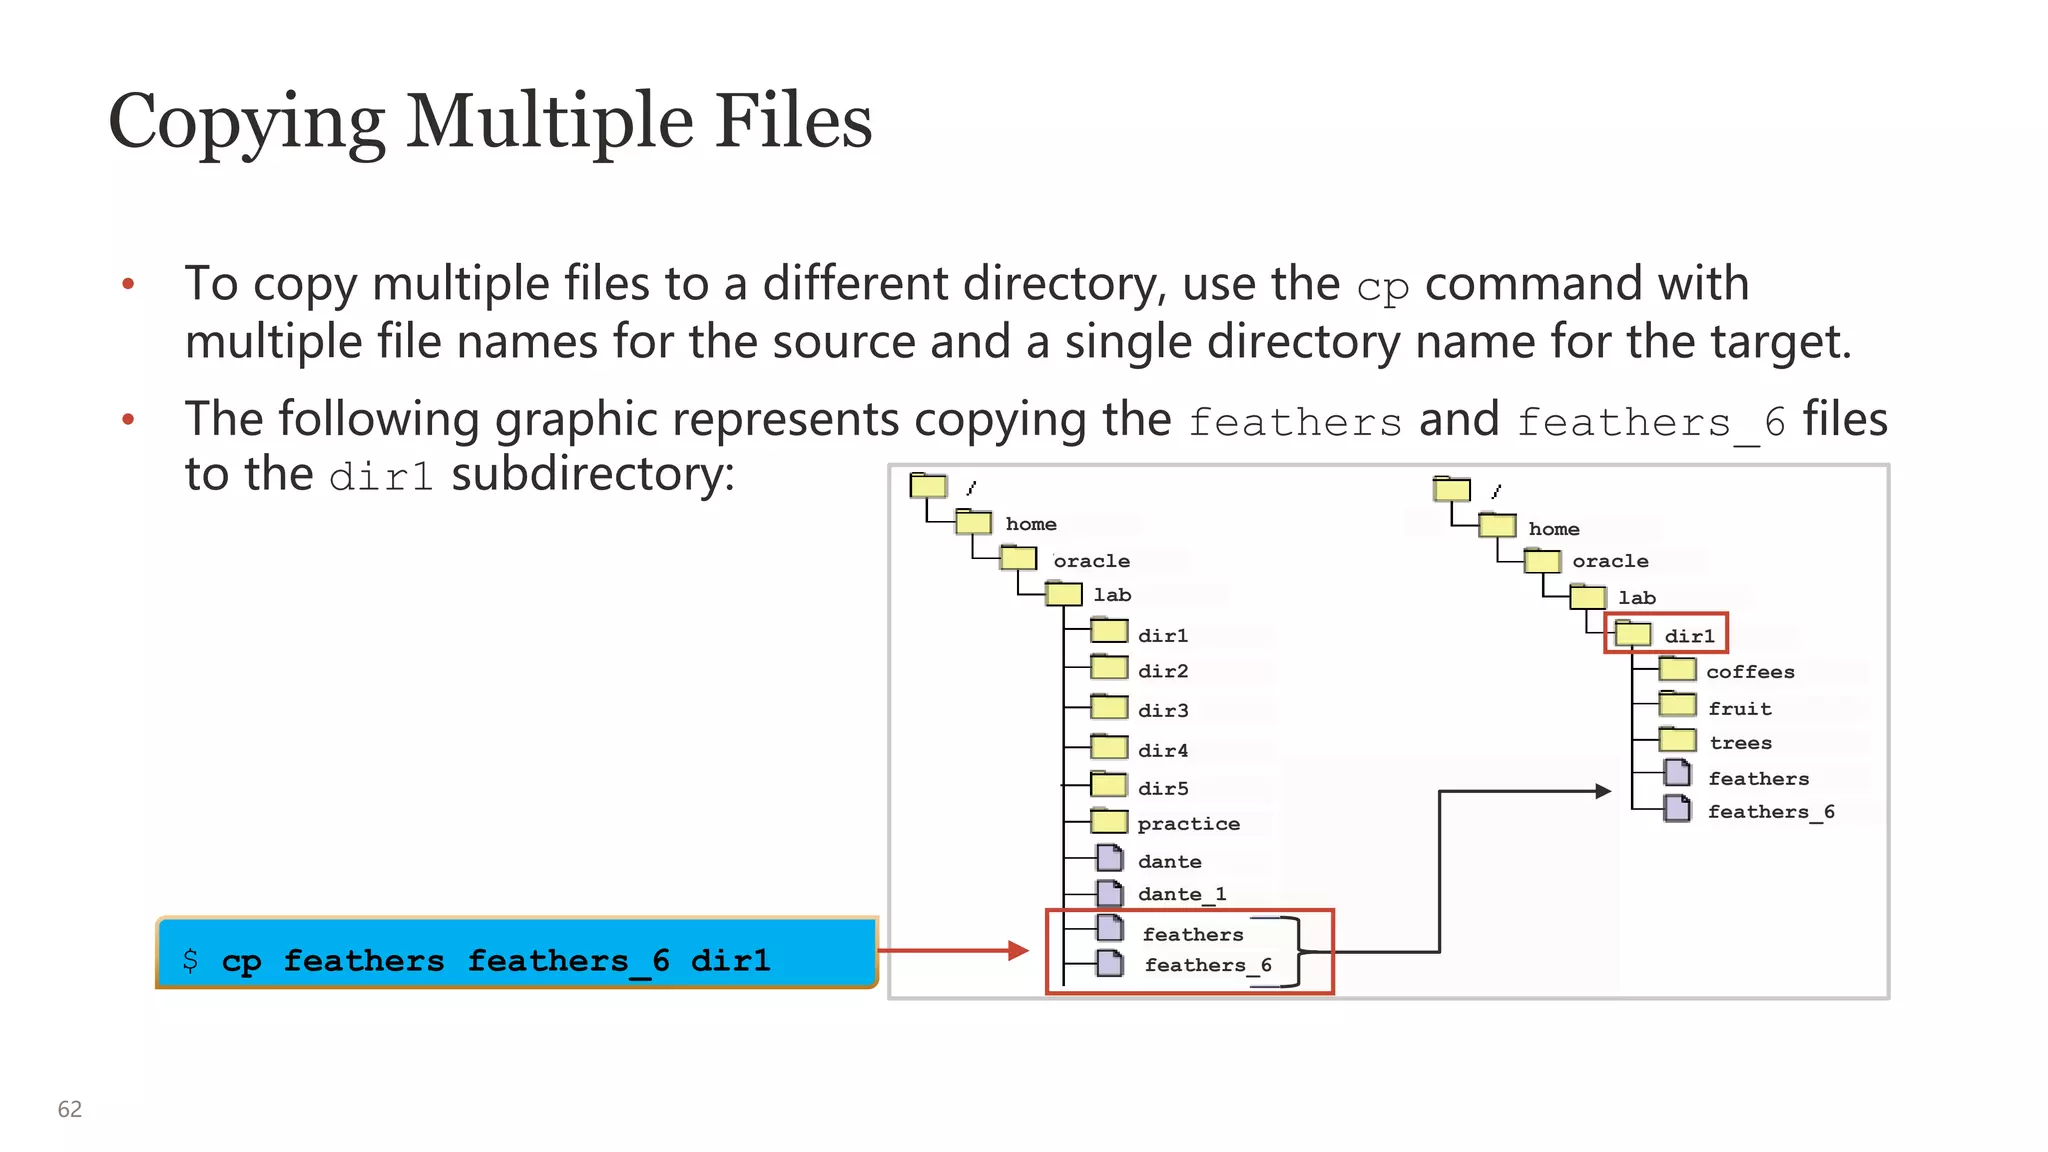
![61
Copying Files and Directories
The cp command copies single or multiple files and directories.
• To copy a file name to a new file name in the same directory, use the cp
command with the name of the source file and the target file.
$ cp [options] source(s) target/destination, where source(s) can be multiple
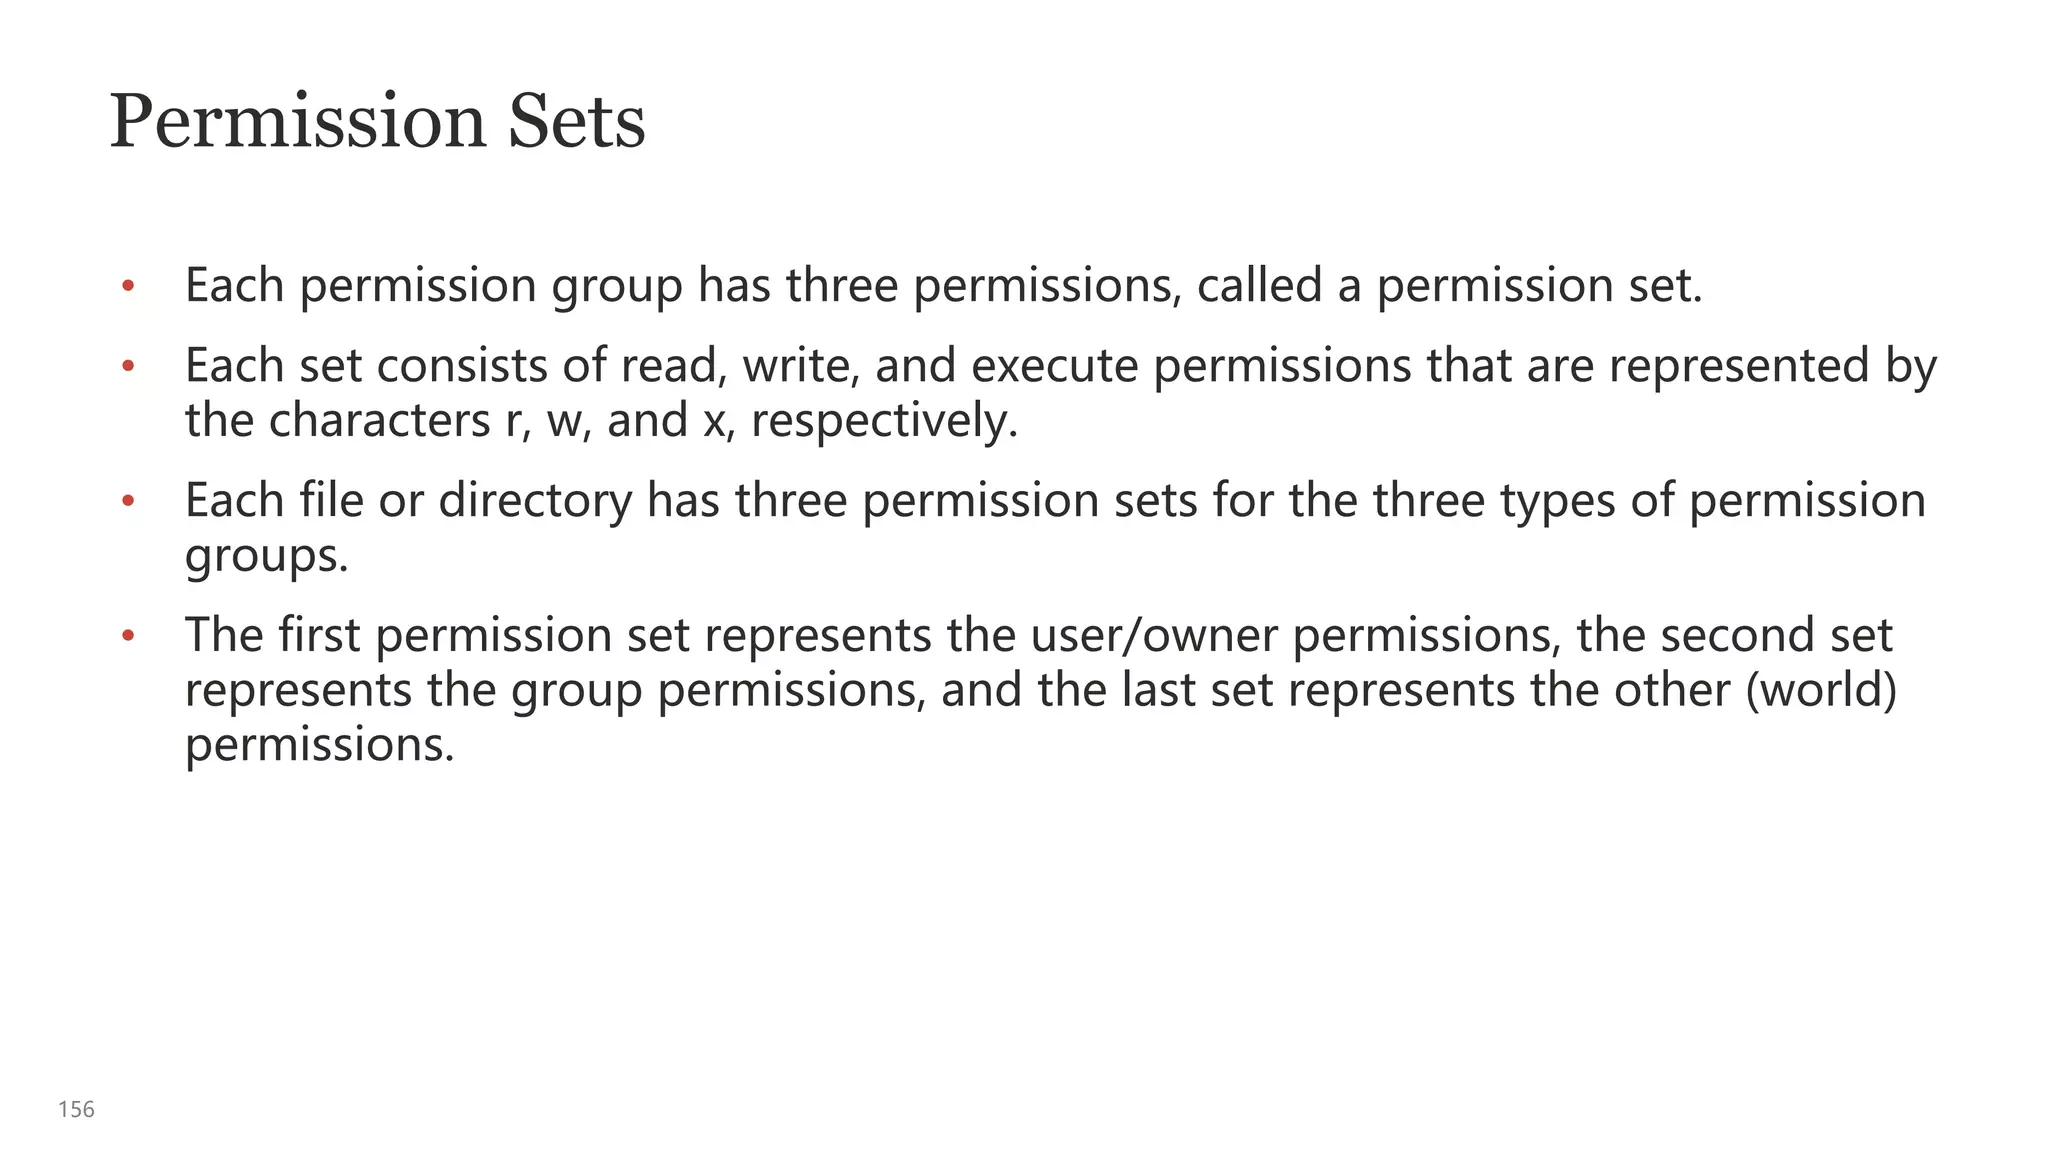
files(s) and target/destination can be a single file or directory
$ cp filename newfilename](https://image.slidesharecdn.com/kmsunixandlinux-230703111122-9797abd3/75/KMSUnix-and-Linux-pptx-61-2048.jpg)
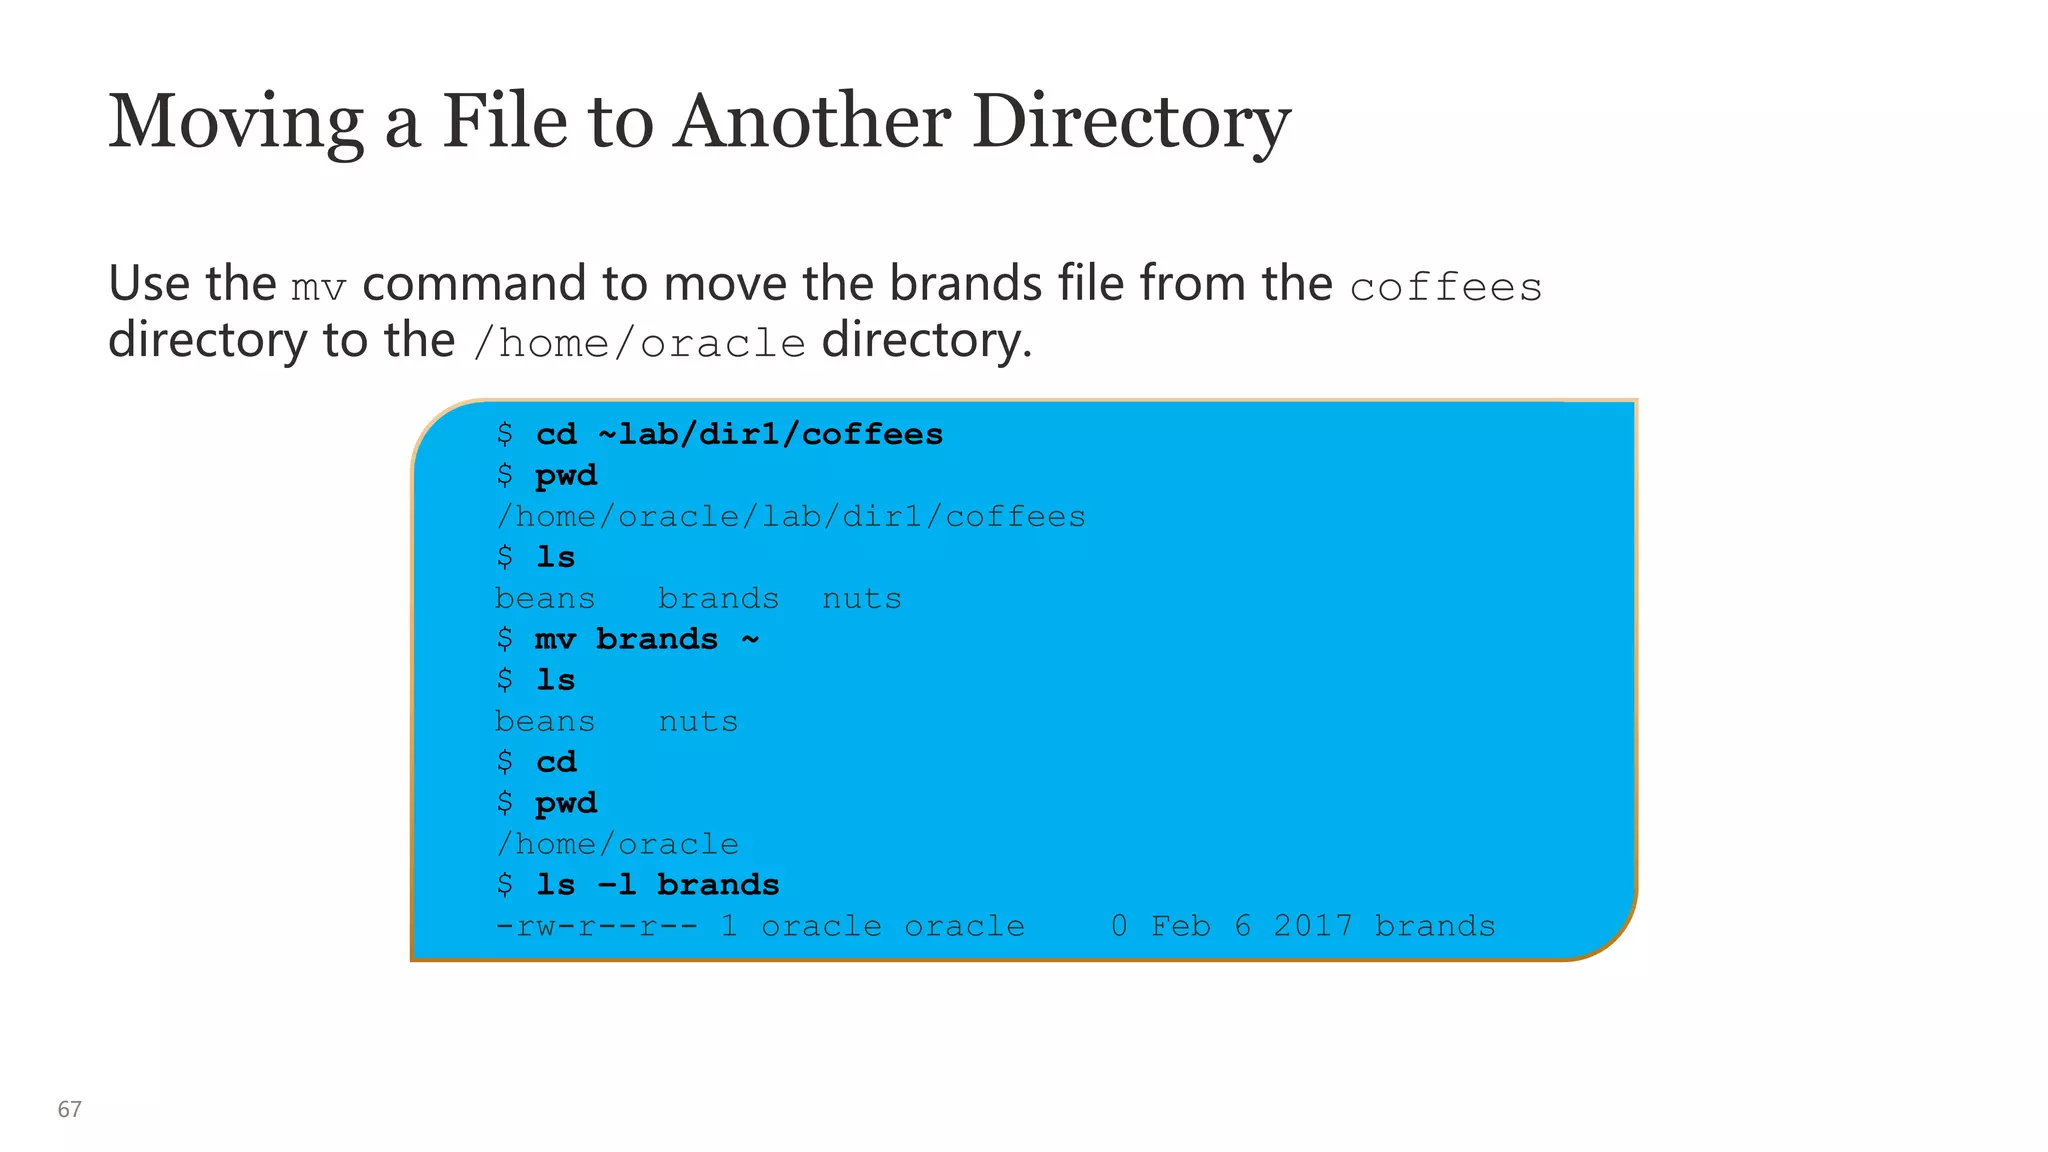
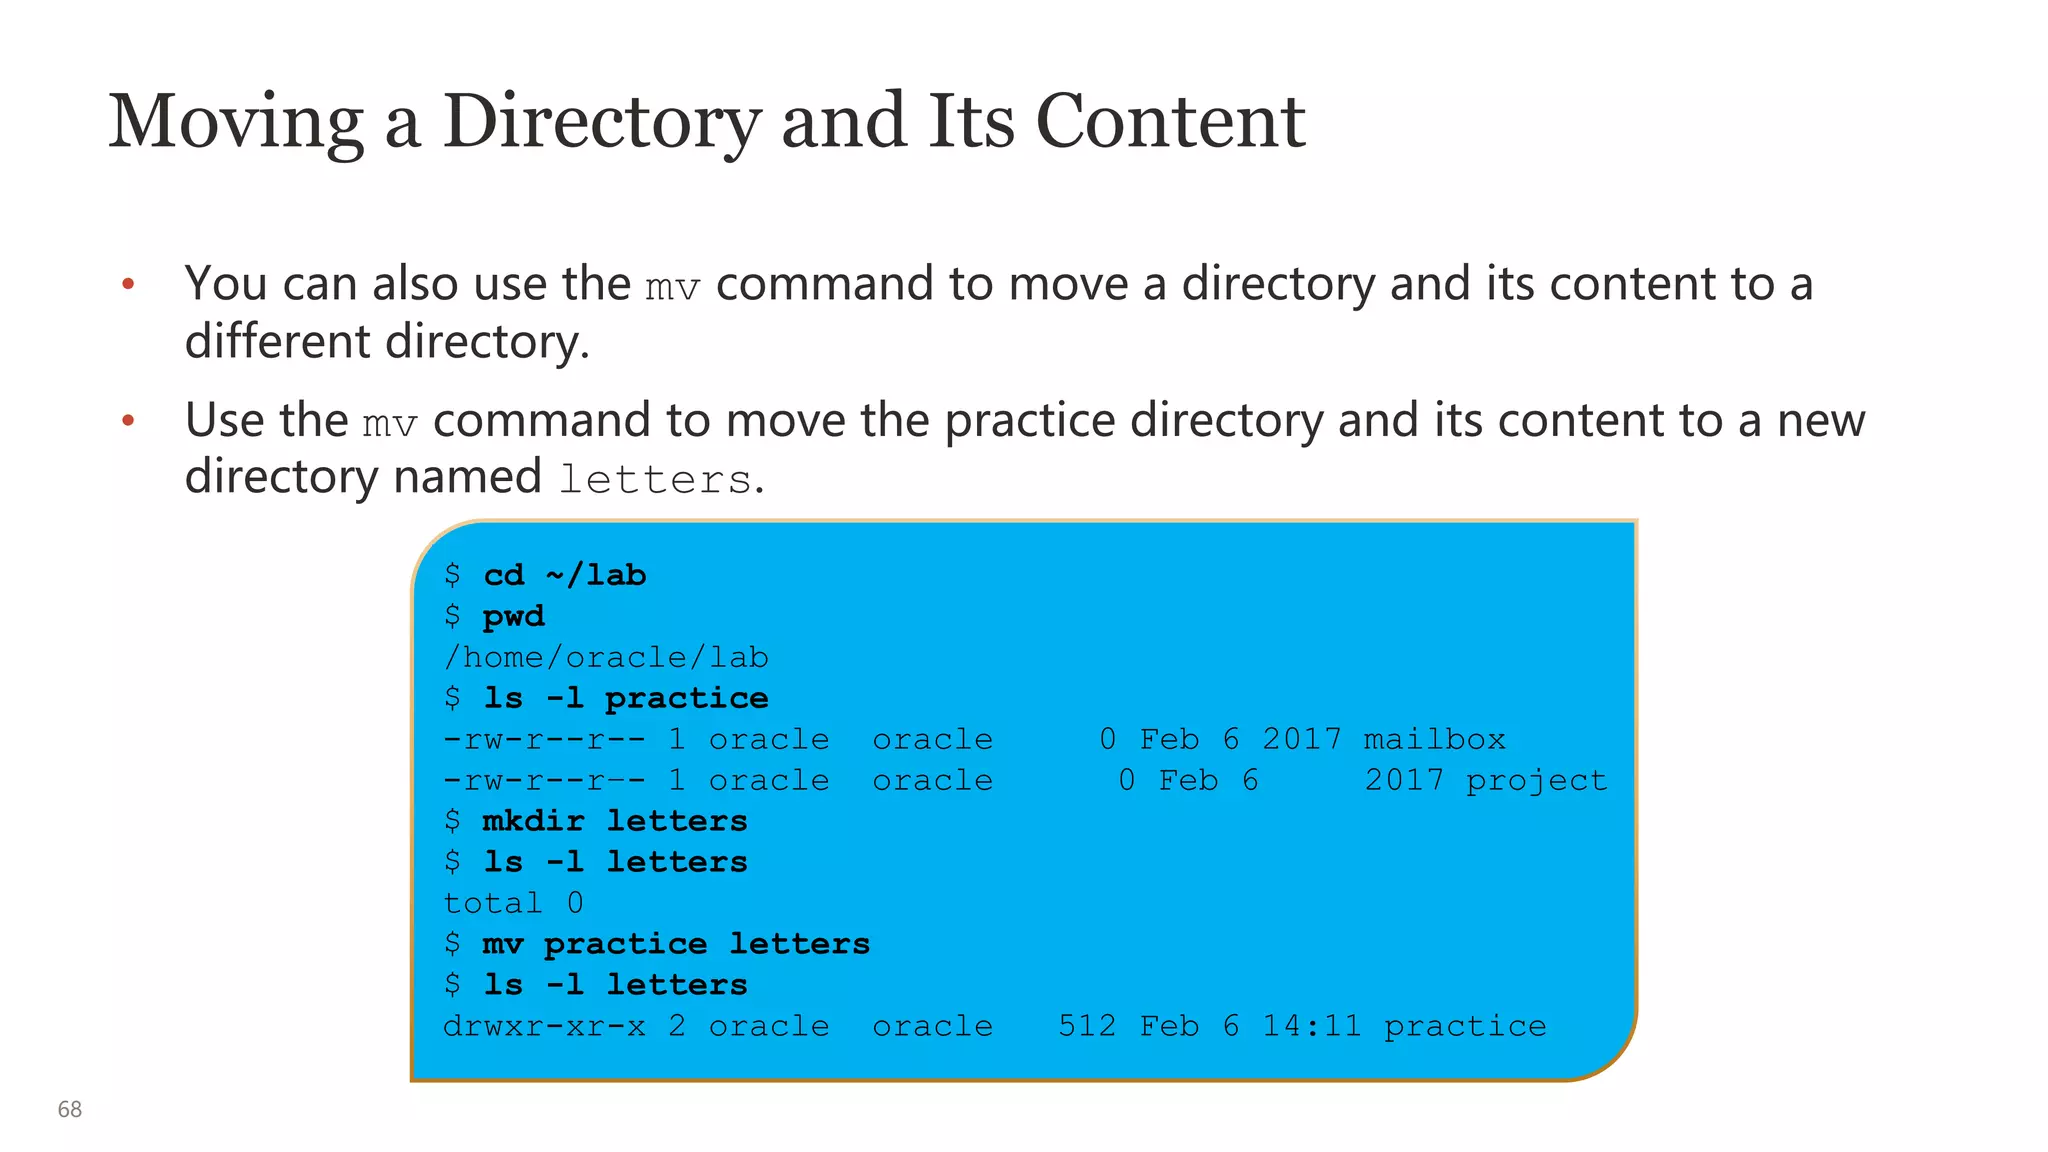
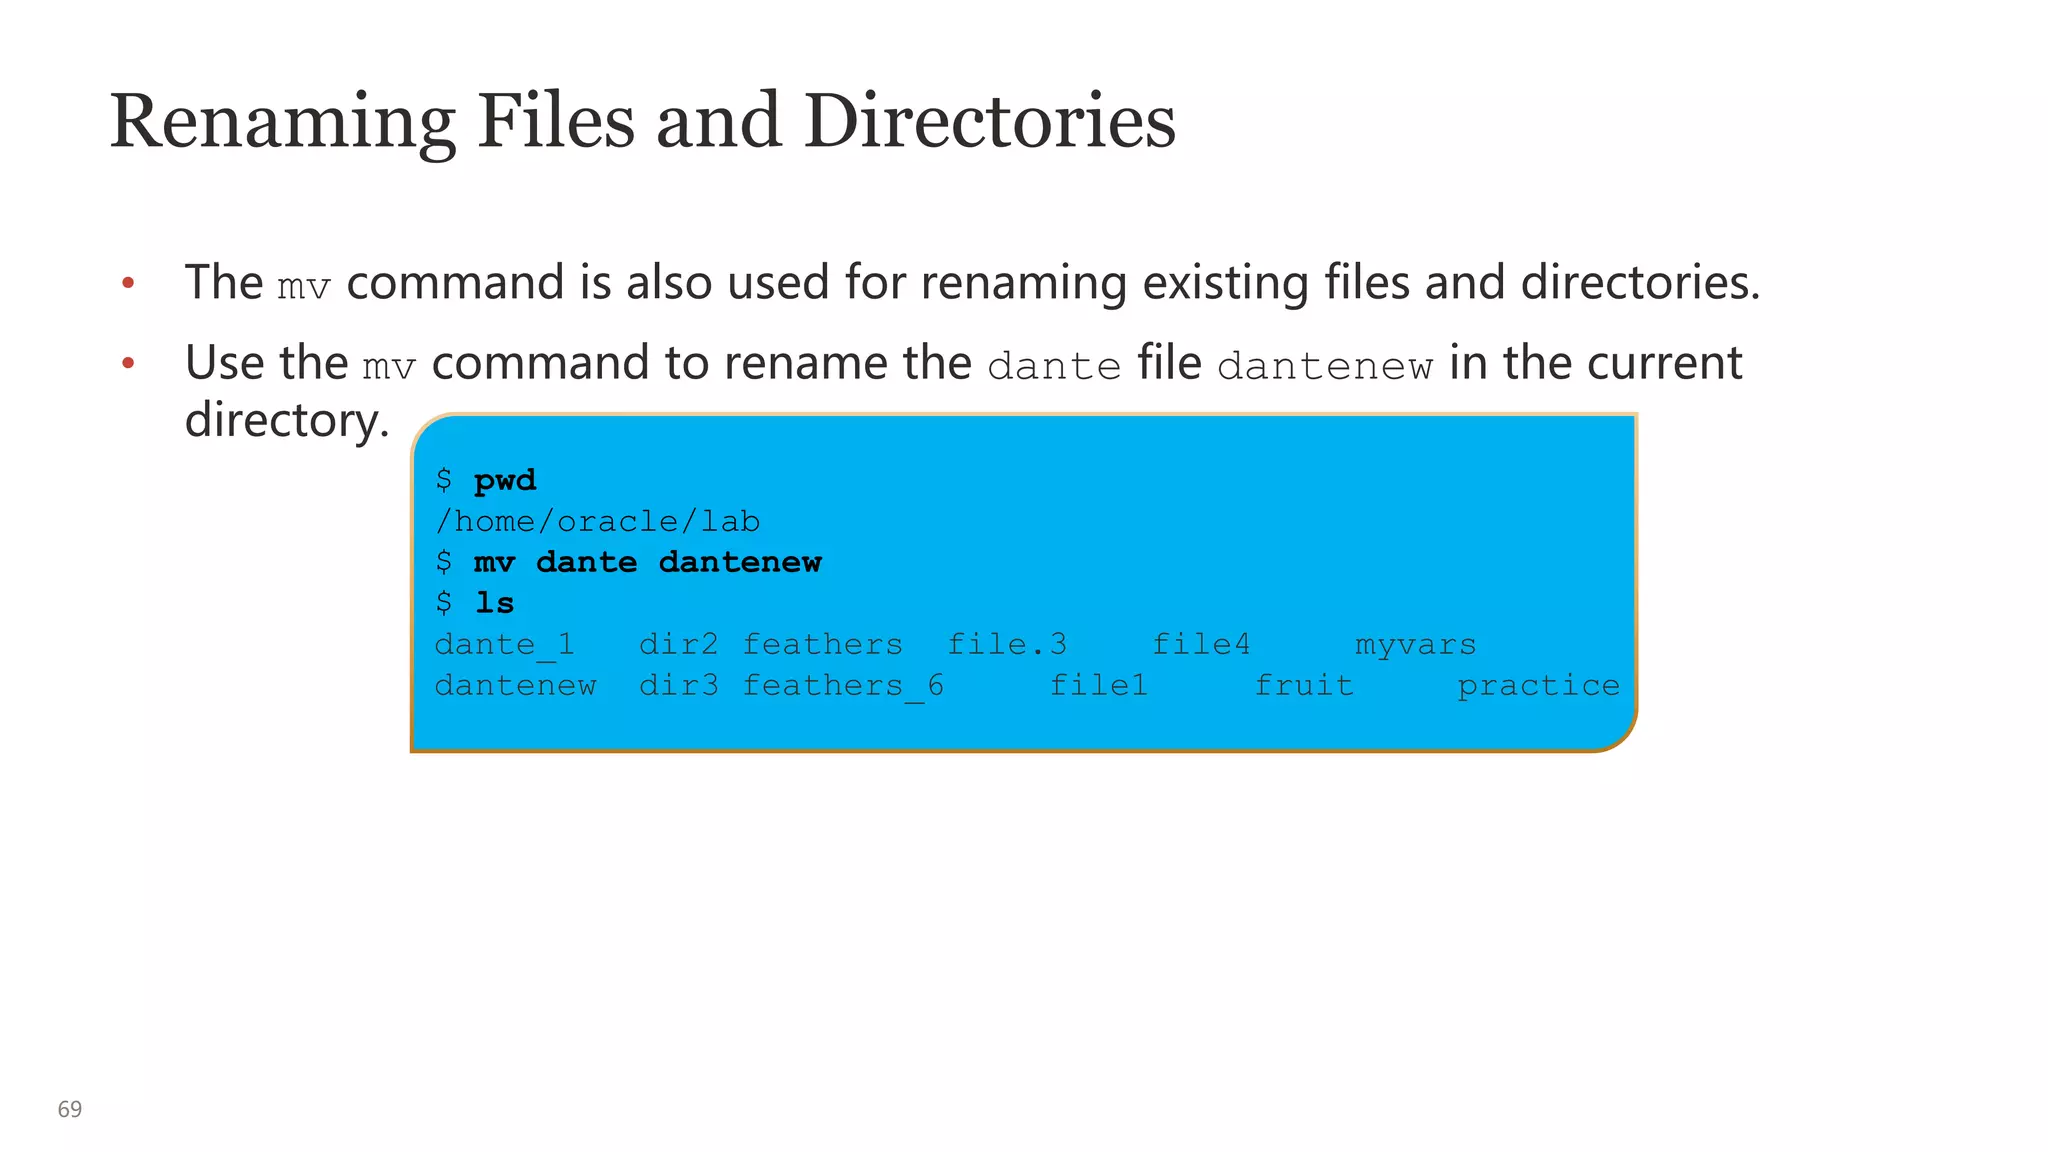
![66
Moving and Renaming Files and Directories
• The mv command helps to move and rename files and directories within the
directory hierarchy.
• The mv command does not affect the content of the files or directories being
moved or renamed.
• The moved/renamed file maintains its original inode number.
• For more information about mv command options, see the mv man page.
Caution: mv is a destructive command if not used with the correct options.
$ mv [options] source(s) target/destination, where source(s) is the current filename or directory and
target/destination is the new filename or directory.](https://image.slidesharecdn.com/kmsunixandlinux-230703111122-9797abd3/75/KMSUnix-and-Linux-pptx-66-2048.jpg)
![70
Creating Files
• The touch command creates a new empty file.
• You can create multiple files with the same command.
• You can also use the touch command to create .hiddenfilenames.
• If the file name or directory name already exists, the touch command updates
the modification time and access time to the current date and time.
• You can use absolute or relative path names on the command line when
creating new files.
• For more information about touch command options, see the touch man
page.
$ touch [options] filename](https://image.slidesharecdn.com/kmsunixandlinux-230703111122-9797abd3/75/KMSUnix-and-Linux-pptx-70-2048.jpg)
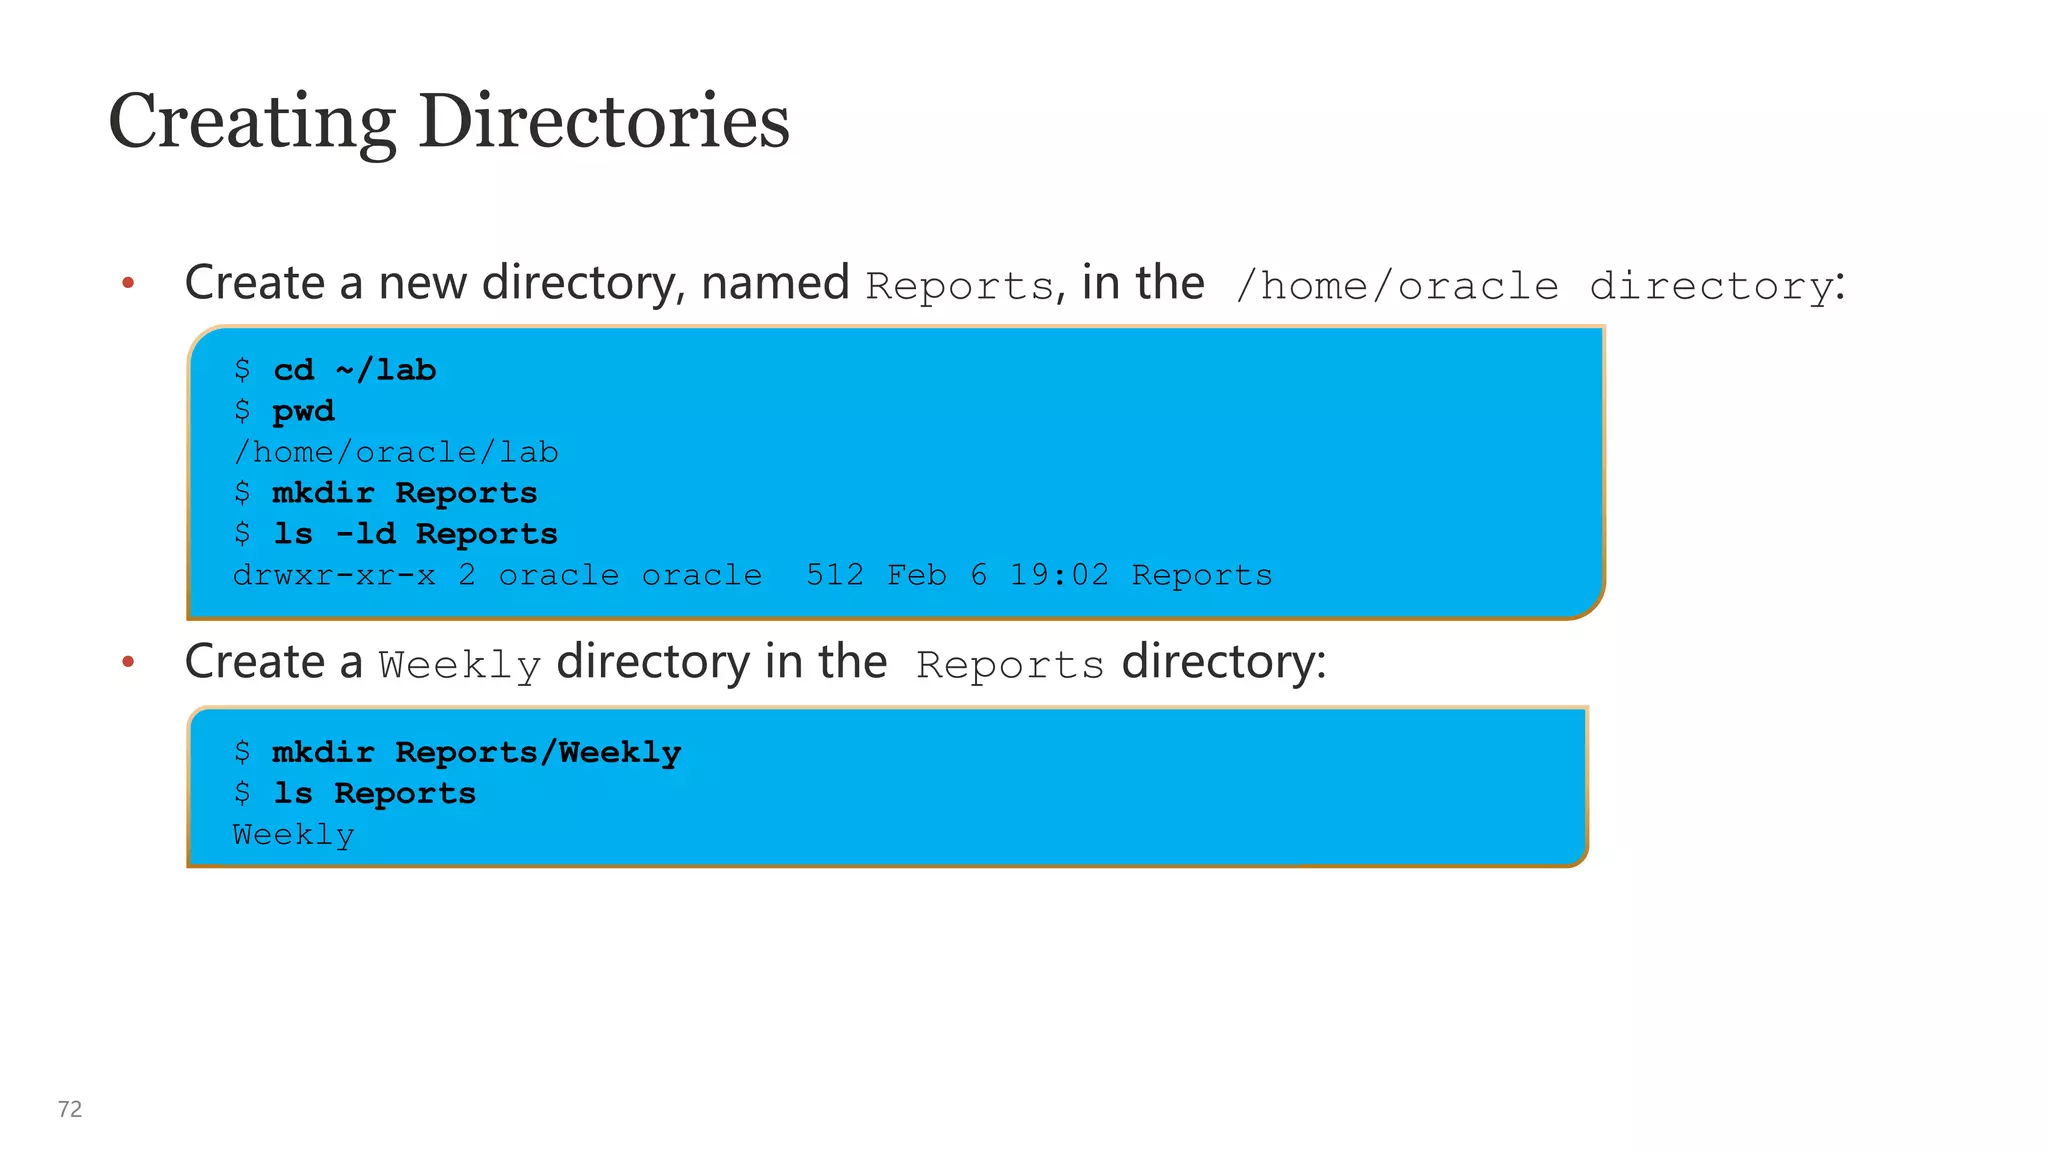
![71
Creating Directories
• The mkdir command creates new directories.
• Include the –p option if the directory name includes a path name, and the
intermediate directories will also be created.
• You can use absolute or relative path names on the command line when
creating new directories.
• For more information about mkdir command options, see the mkdir man page.
$ mkdir [options] directory_name
and
$ mkdir –p directory_name](https://image.slidesharecdn.com/kmsunixandlinux-230703111122-9797abd3/75/KMSUnix-and-Linux-pptx-71-2048.jpg)
![73
Removing Files
• You can permanently remove files from the directory hierarchy by using the rm
command.
• The rm command is a destructive command.
• The following table describes some of the options that you can use with the rm
command when removing files and directories.
• For more information about rm command options, see the rm man page.
Option Description
-r or –R Recursive, includes the contents of a directory and the contents of
subdirectories when you remove a directory
-i Prevents the accidental removal of existing files or directories by
prompting for a ‘yes’ or a ‘no’
-f, --force Forces the removal of existing files and directories (the opposite of
–i) without prompting
$ rm [options] filename](https://image.slidesharecdn.com/kmsunixandlinux-230703111122-9797abd3/75/KMSUnix-and-Linux-pptx-73-2048.jpg)

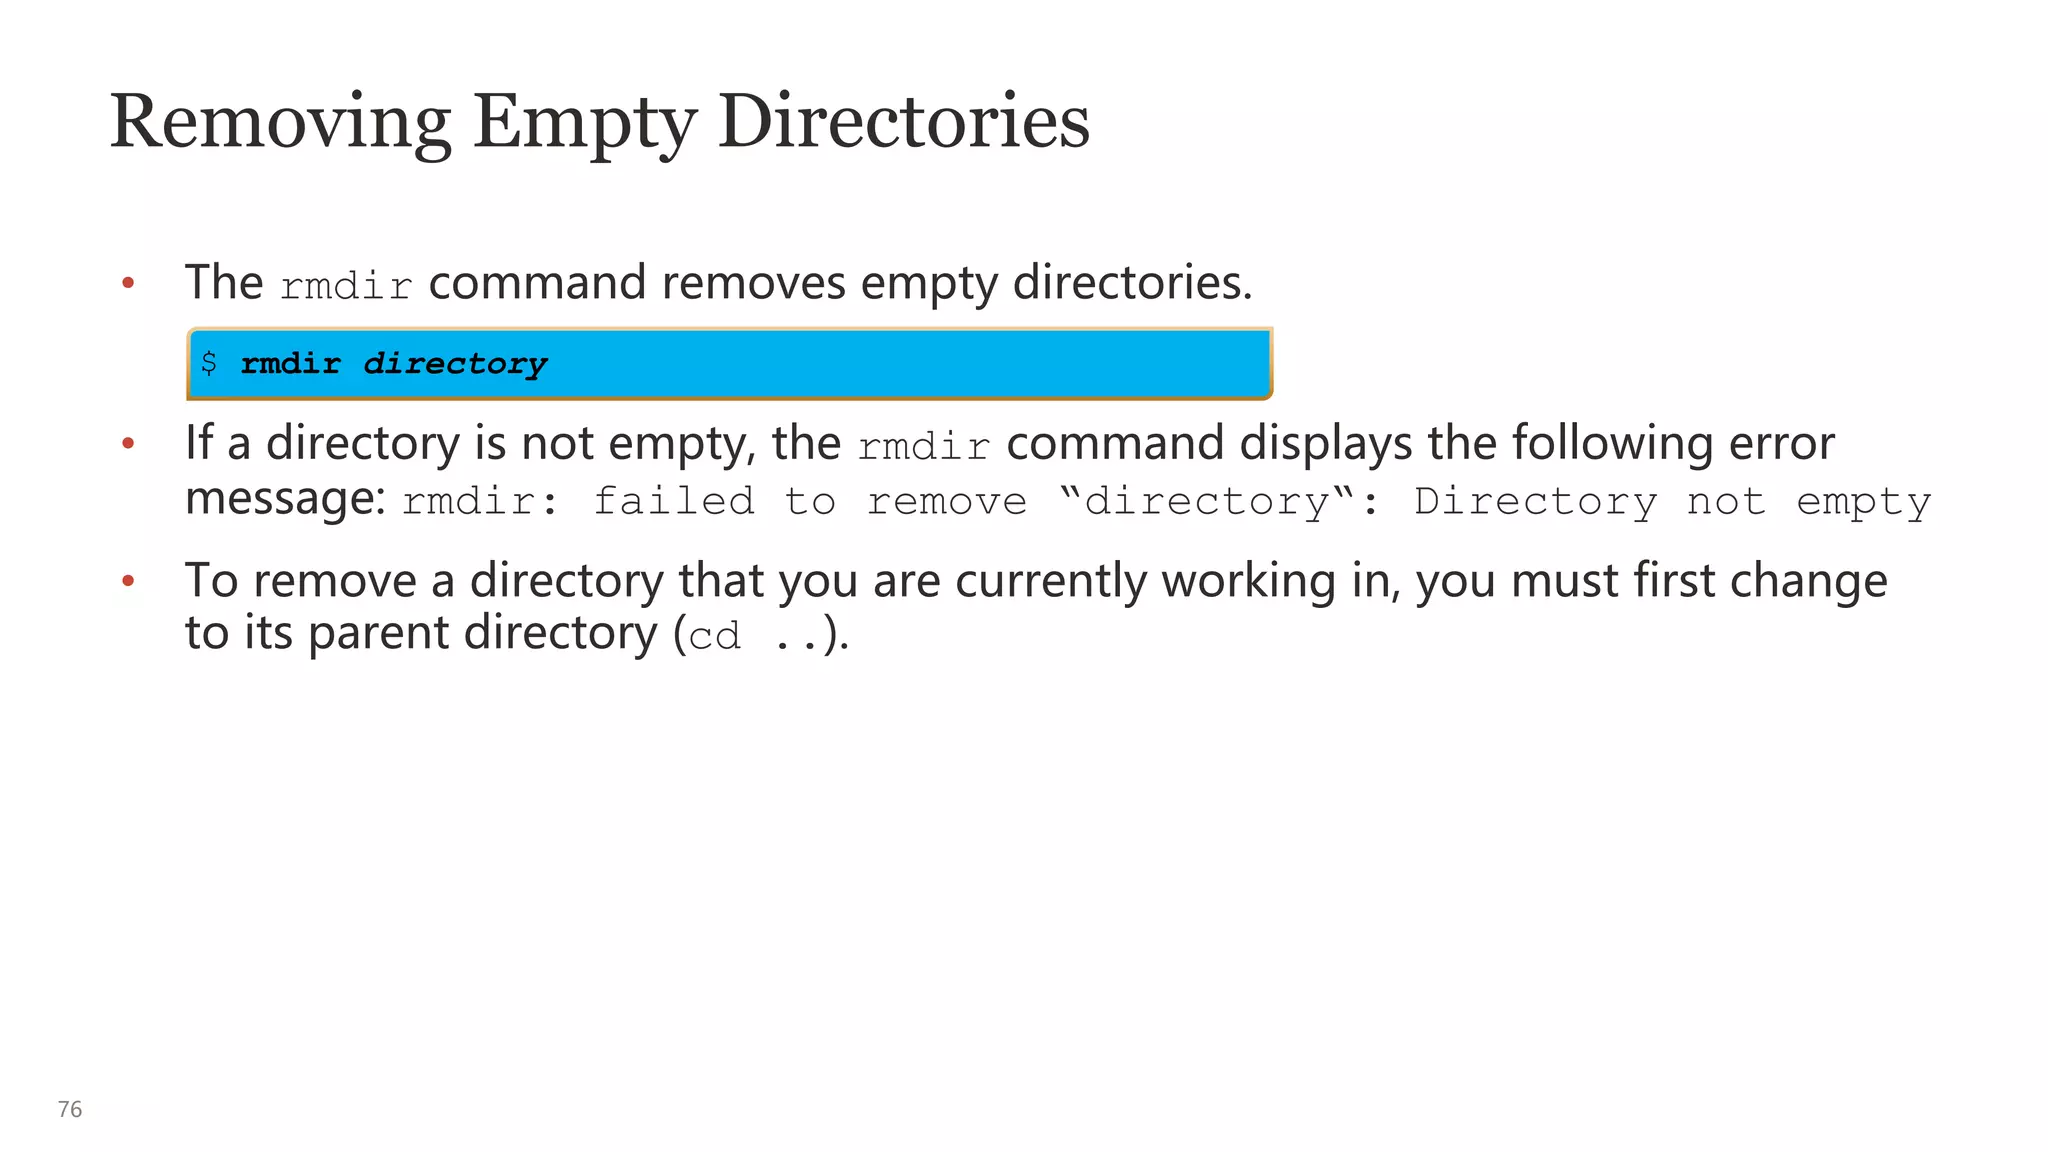
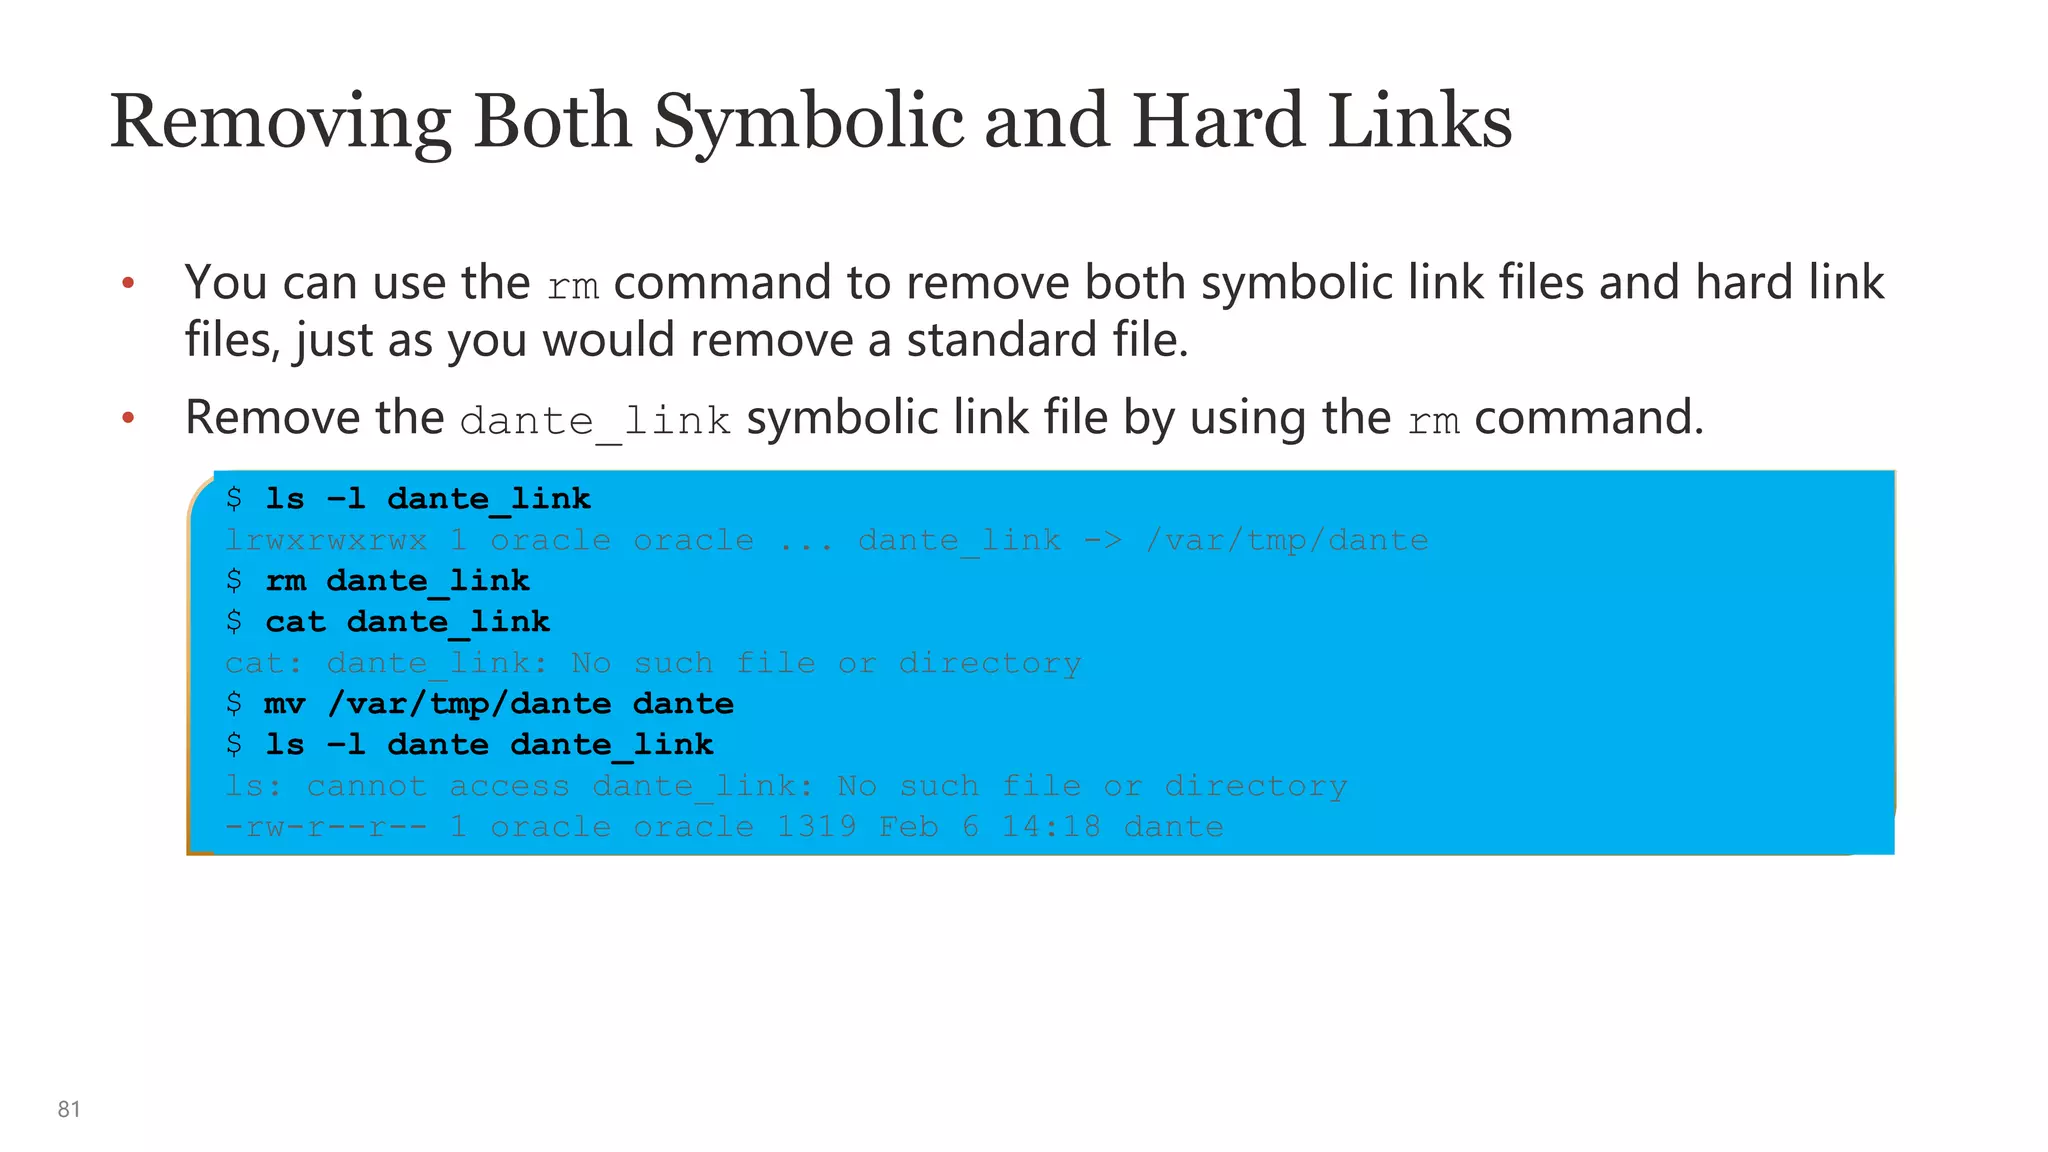
![75
Removing Directories
• You can use the rm command with the -r option to remove directories that
contain files and subdirectories.
• Remove the letters directory and its content by using the rm –r command.
$ rm [options] directory
$ cd ~/lab
$ pwd
/home/oracle/lab
$ ls letters
mailbox results
$ rm -r letters
$ ls letters
ls: cannot access letters: No such file or directory](https://image.slidesharecdn.com/kmsunixandlinux-230703111122-9797abd3/75/KMSUnix-and-Linux-pptx-75-2048.jpg)
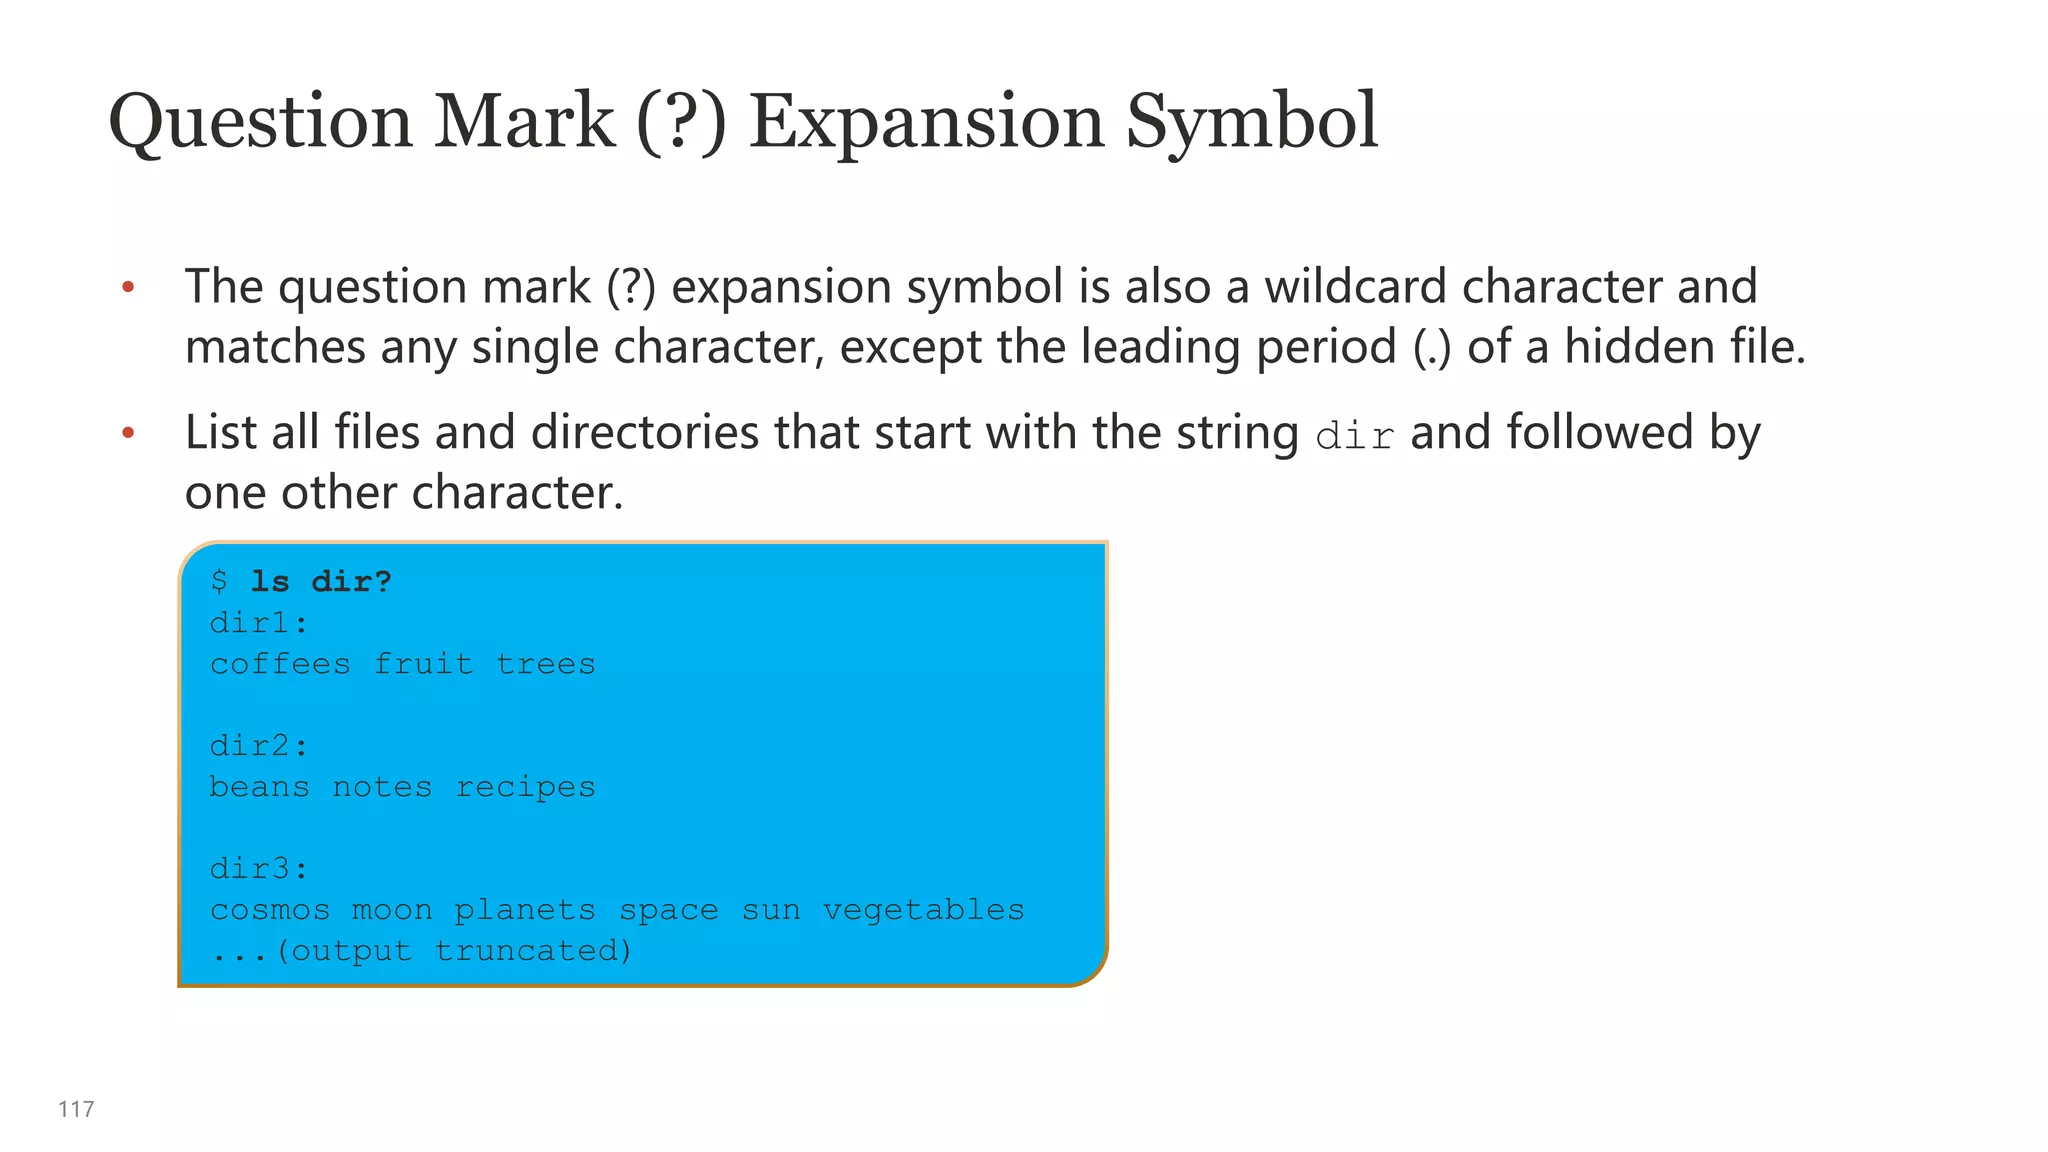
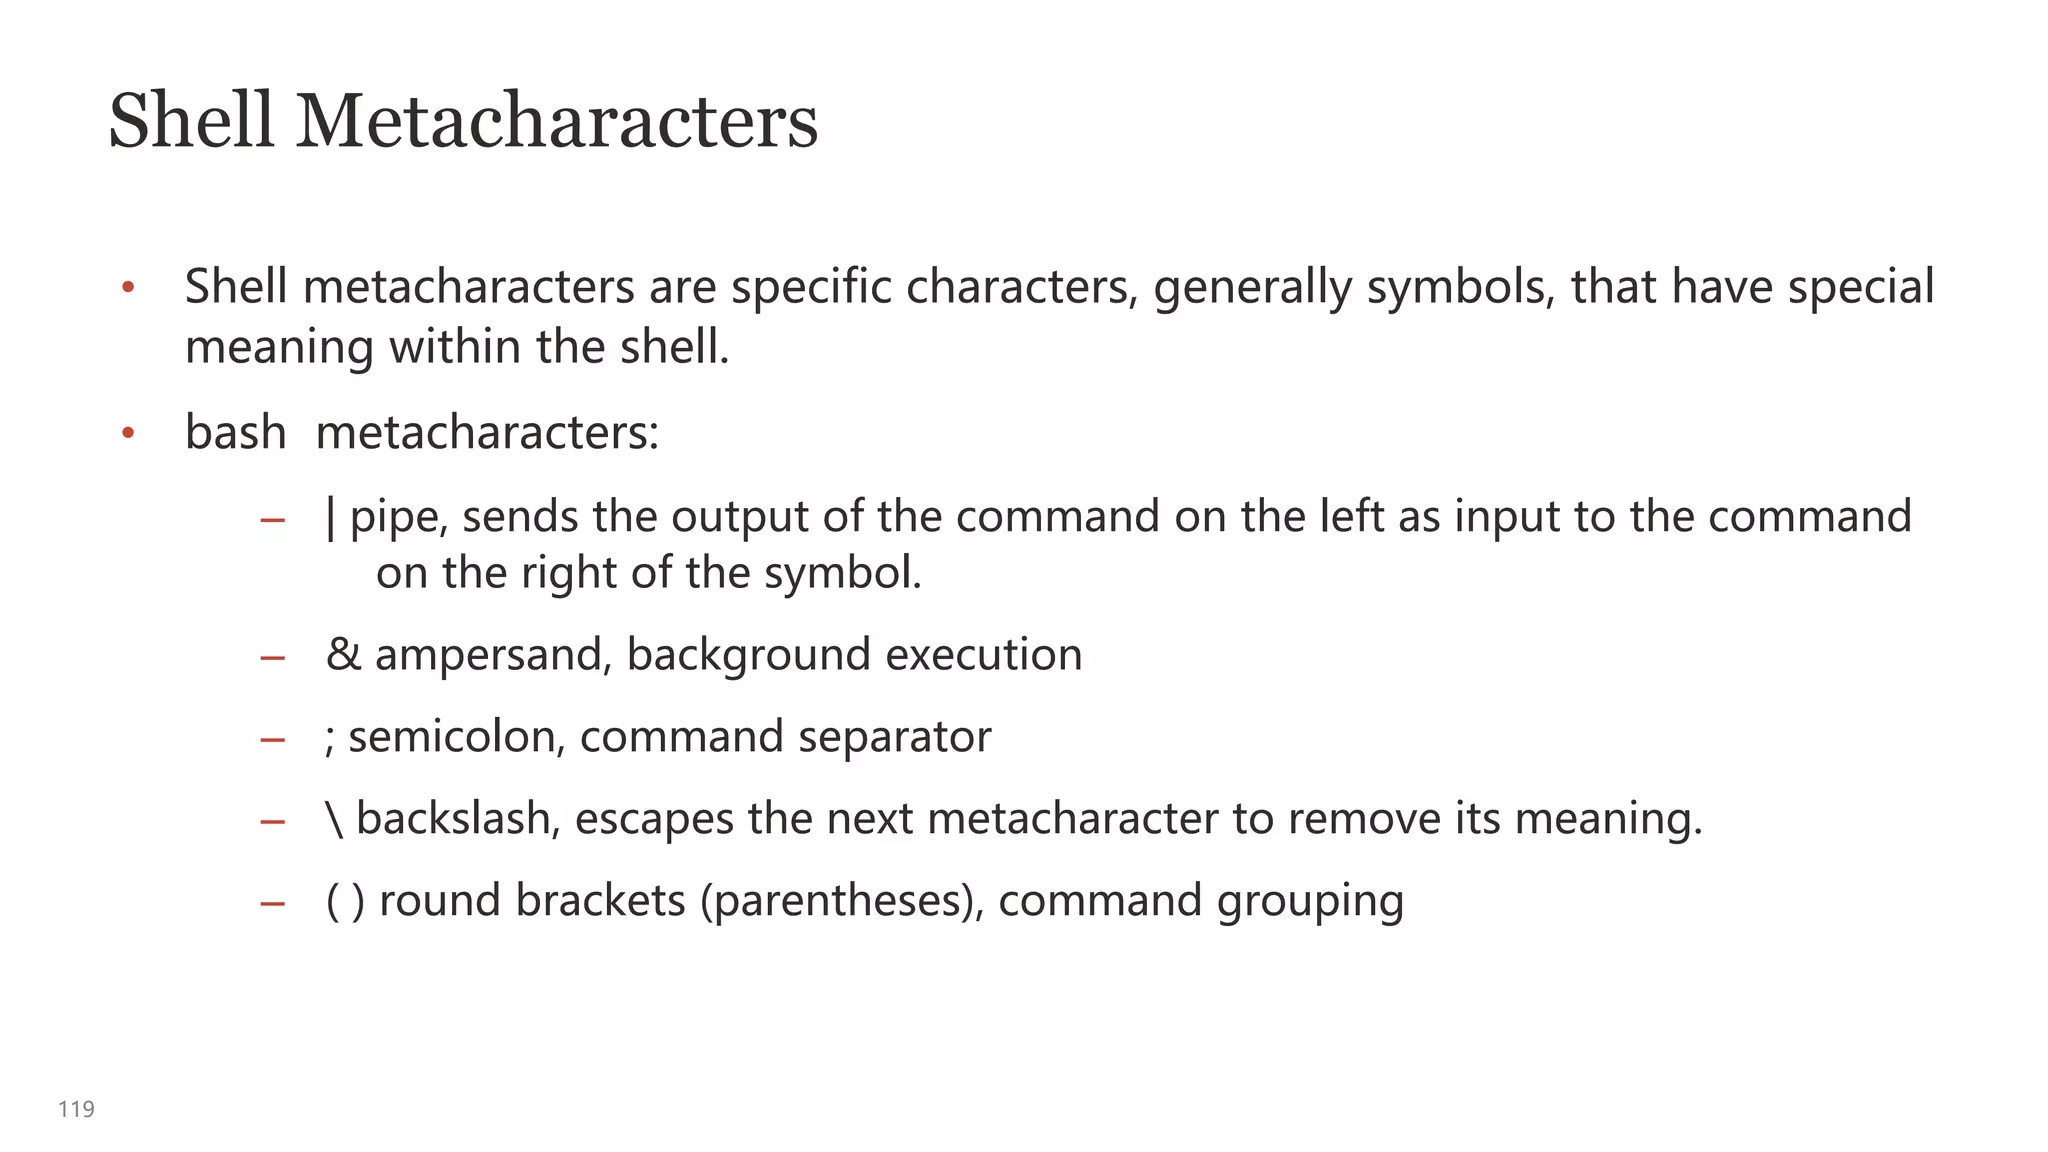
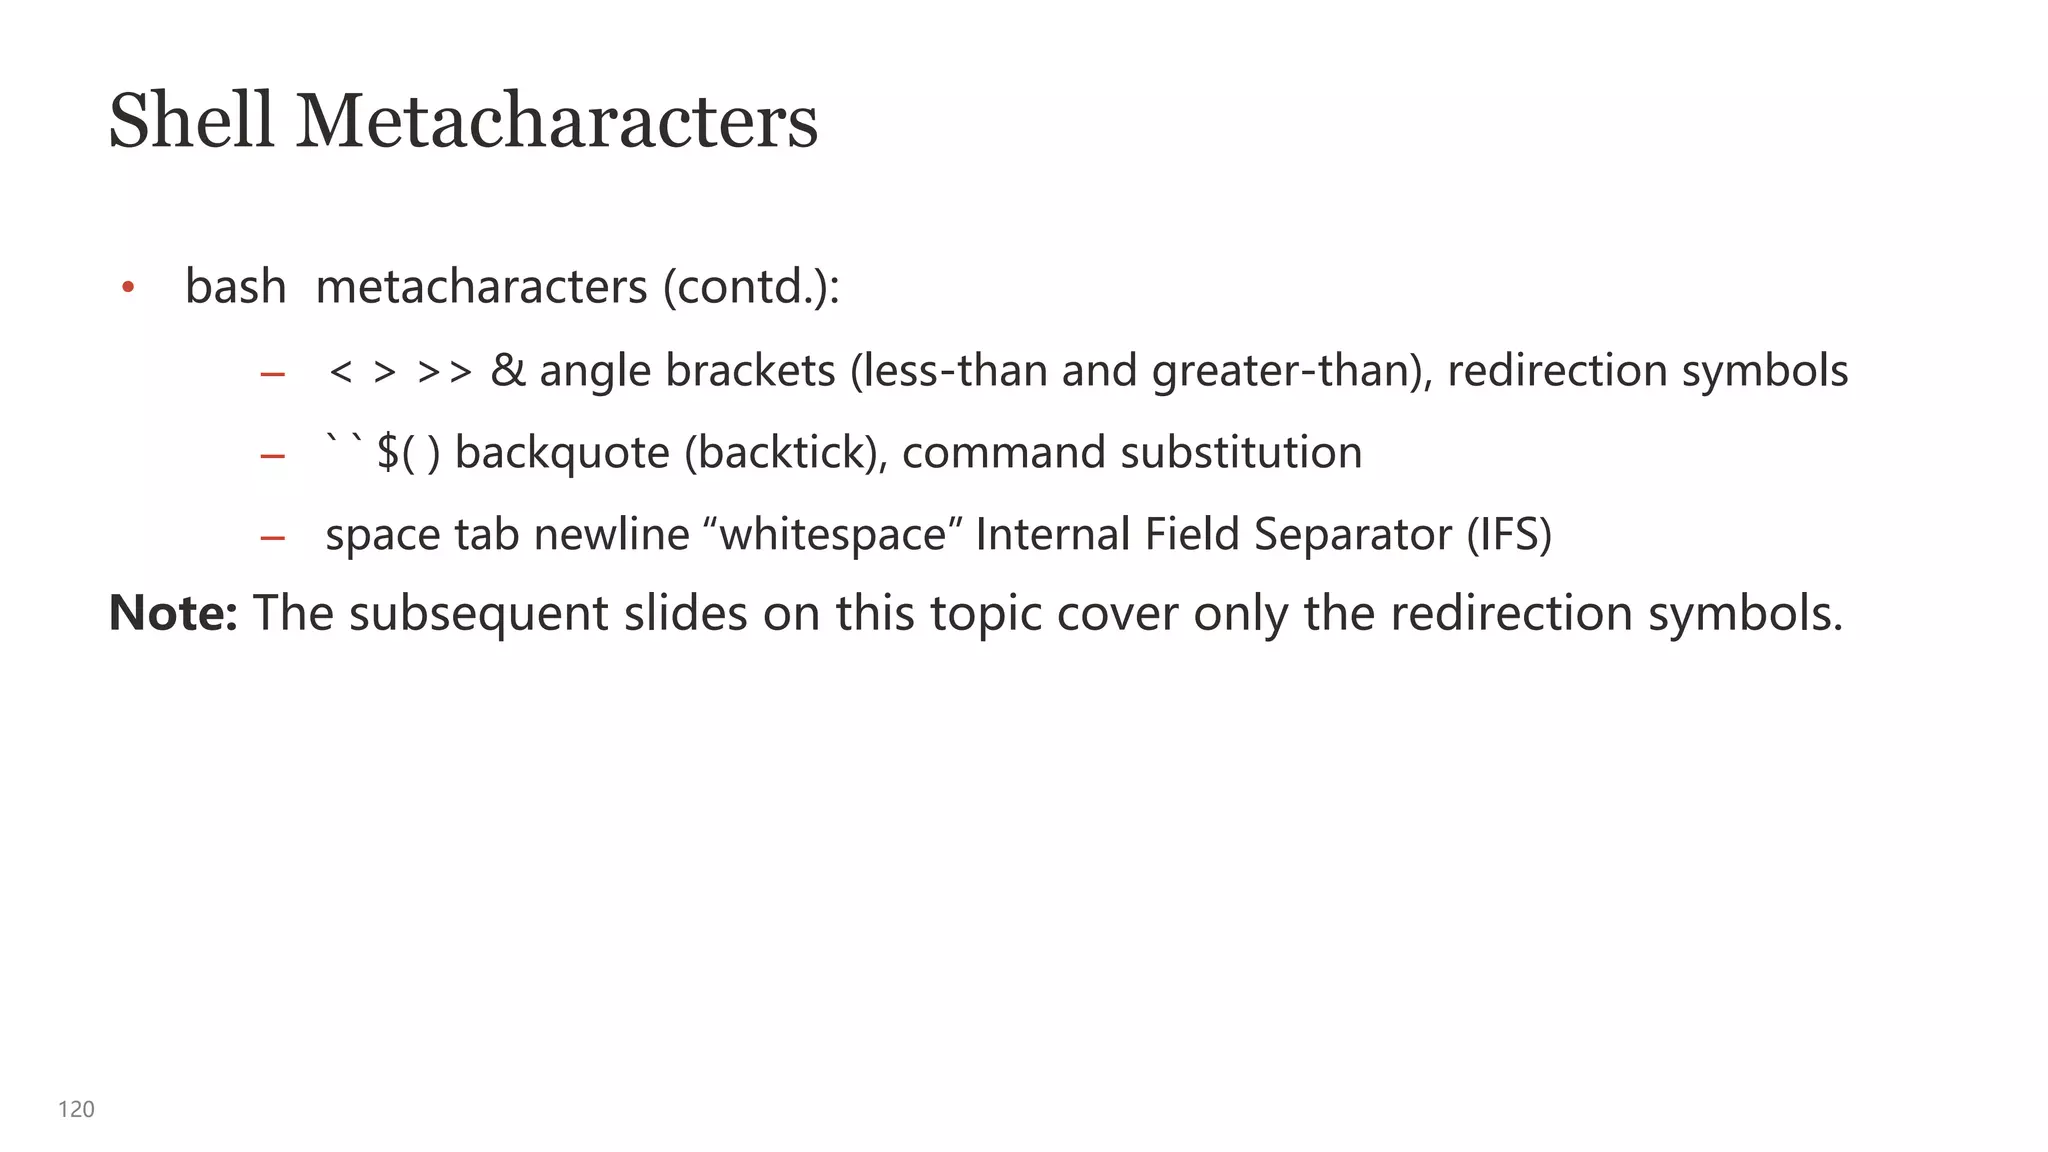
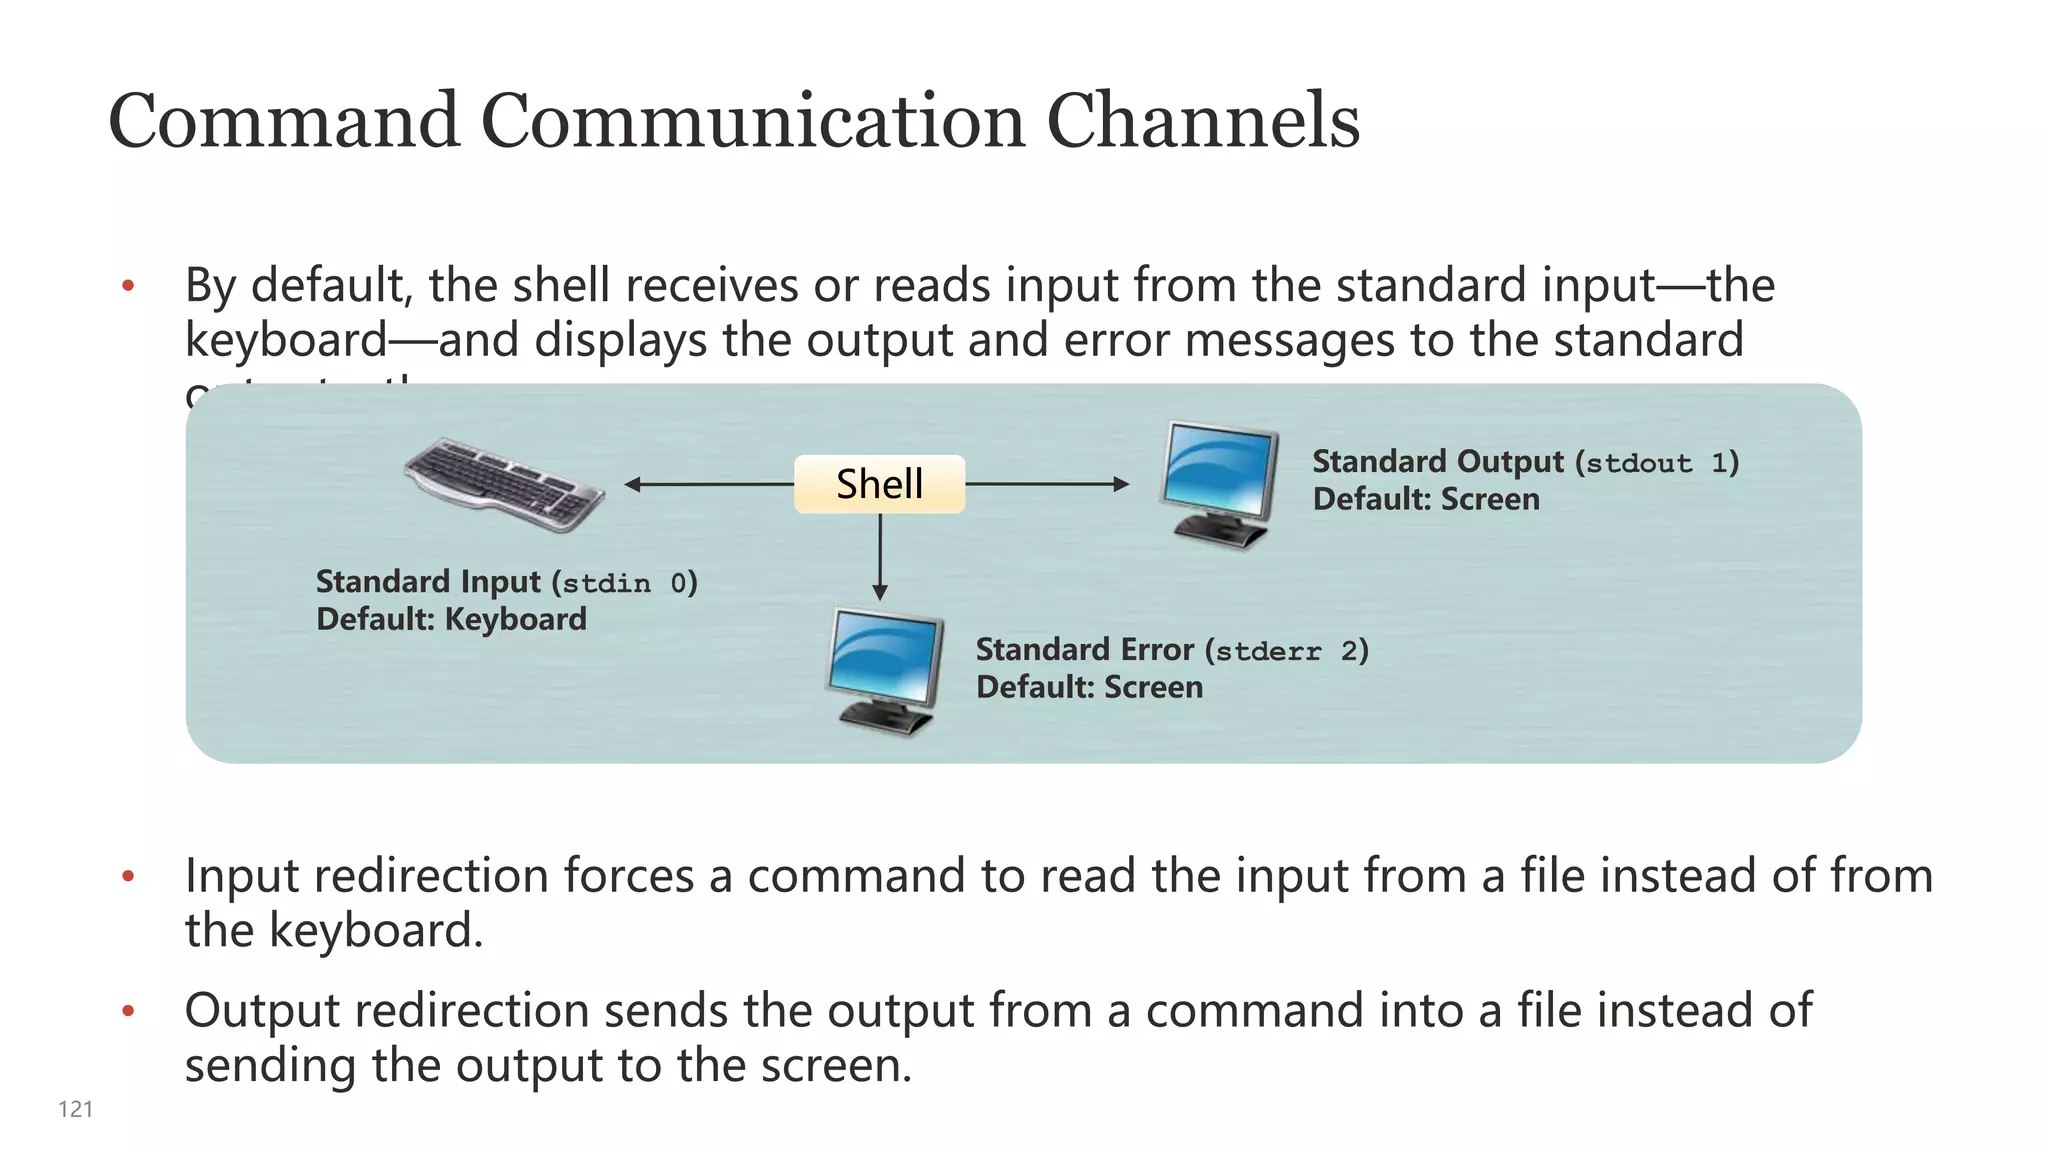
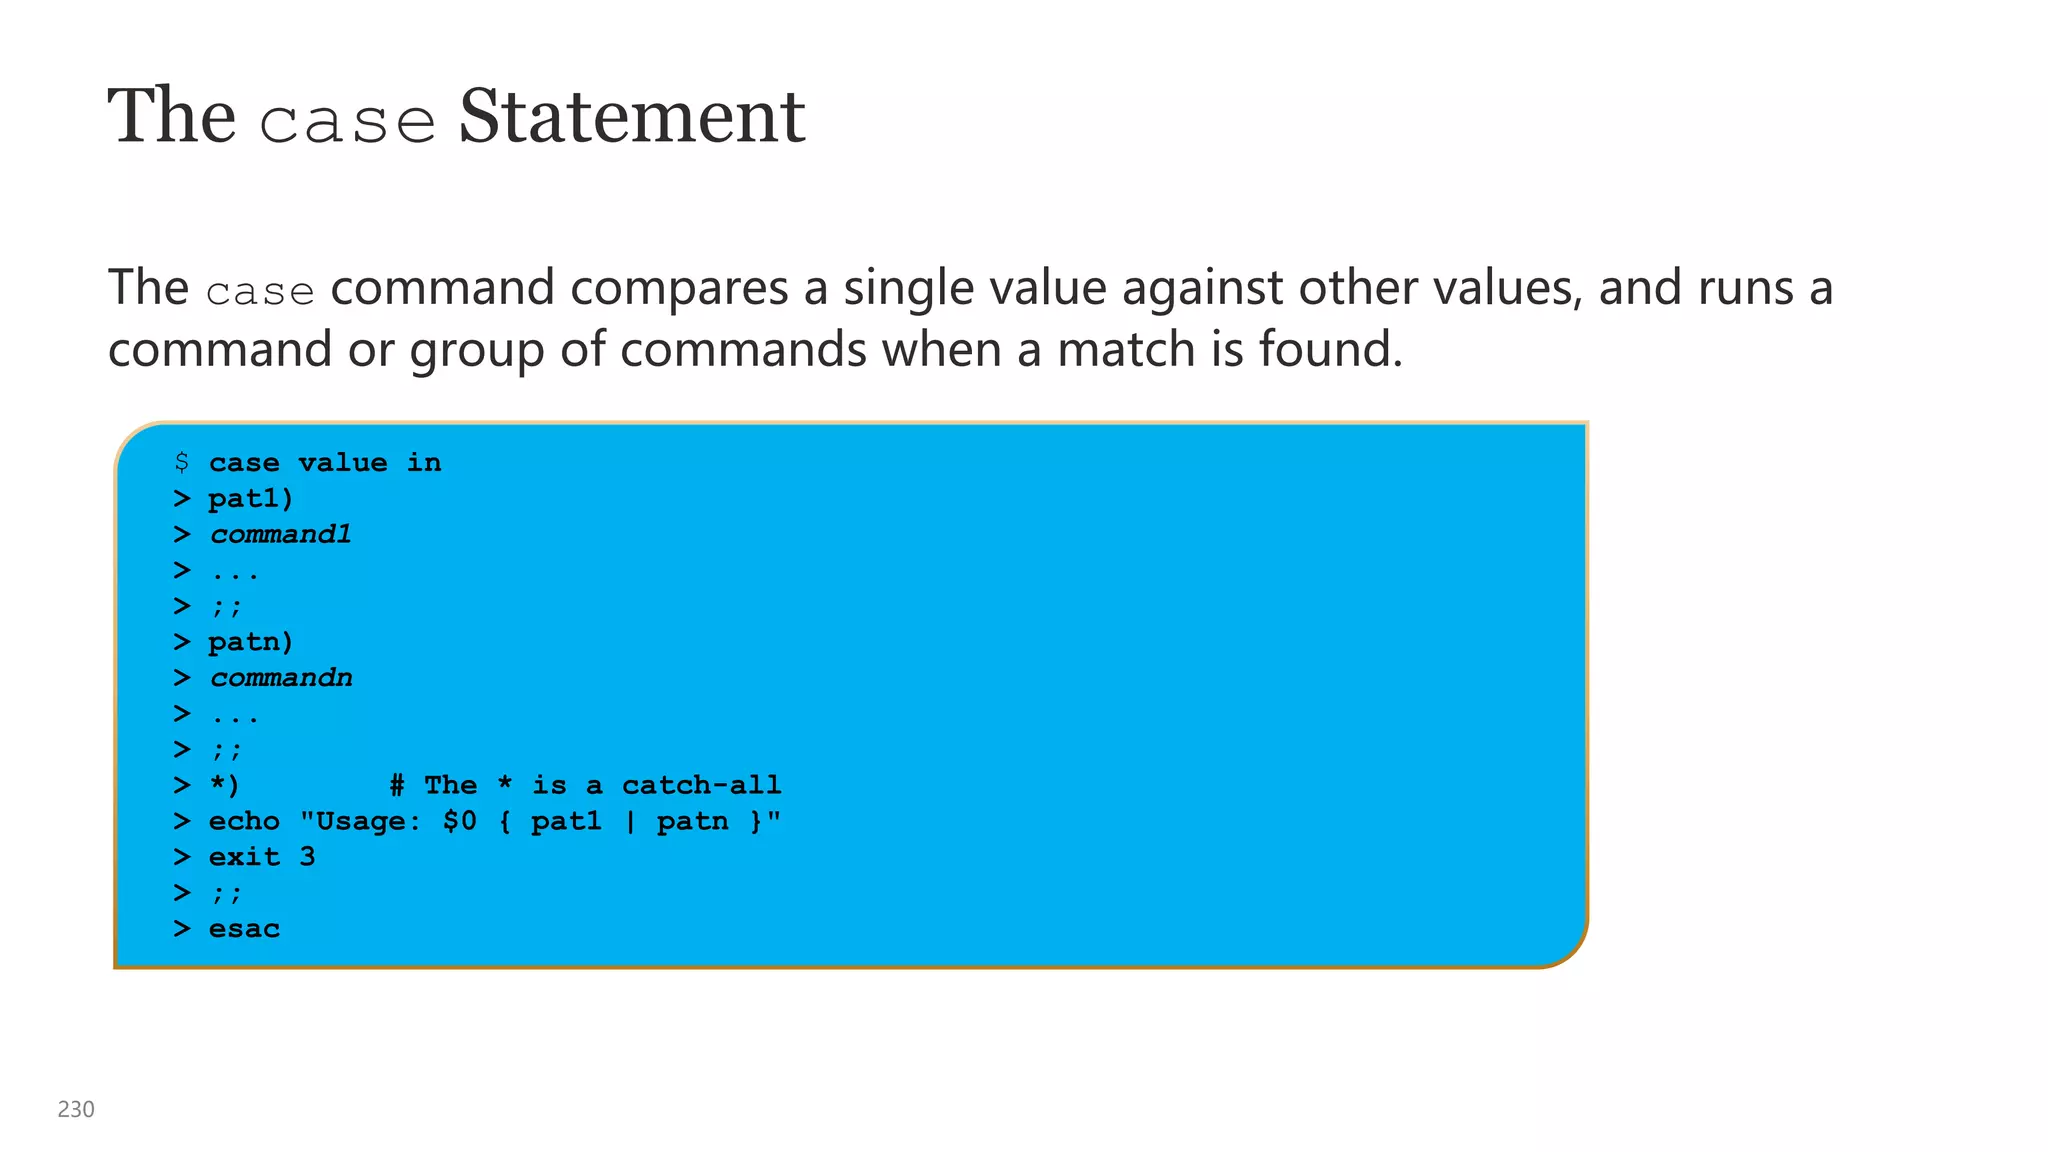
![83
Regular Expressions Wild Cards
Wild cards (metacharacters)
• * Asterisk (glob) matches zero or more characters.
• ? Question mark matches zero or a single character.
• . Period matches a single character.
• ^ Caret at the beginning of the line
• $ Dollar at the end of the line
• [ ] Brackets (a character class). The characters inside the brackets match
one character position.
• ‘ ‘ Single quotation marks (apostrophe) tell the shell to ignore any enclosed
metacharacters.
• “ “ Double quotation marks enclose a space.
• Backslash escapes the following metacharacter.](https://image.slidesharecdn.com/kmsunixandlinux-230703111122-9797abd3/75/KMSUnix-and-Linux-pptx-83-2048.jpg)
:
• Another example: If you want all files that end in 2 numerals, but the last
numeral has to be a 3; one pattern could be file[0-9][3]:
$ ls
file1 file11 file2 file23 file3 file32 file4 file45
$ ls file[24]
file2 file4
$ ls file[0-9][3]
file23](https://image.slidesharecdn.com/kmsunixandlinux-230703111122-9797abd3/75/KMSUnix-and-Linux-pptx-84-2048.jpg)
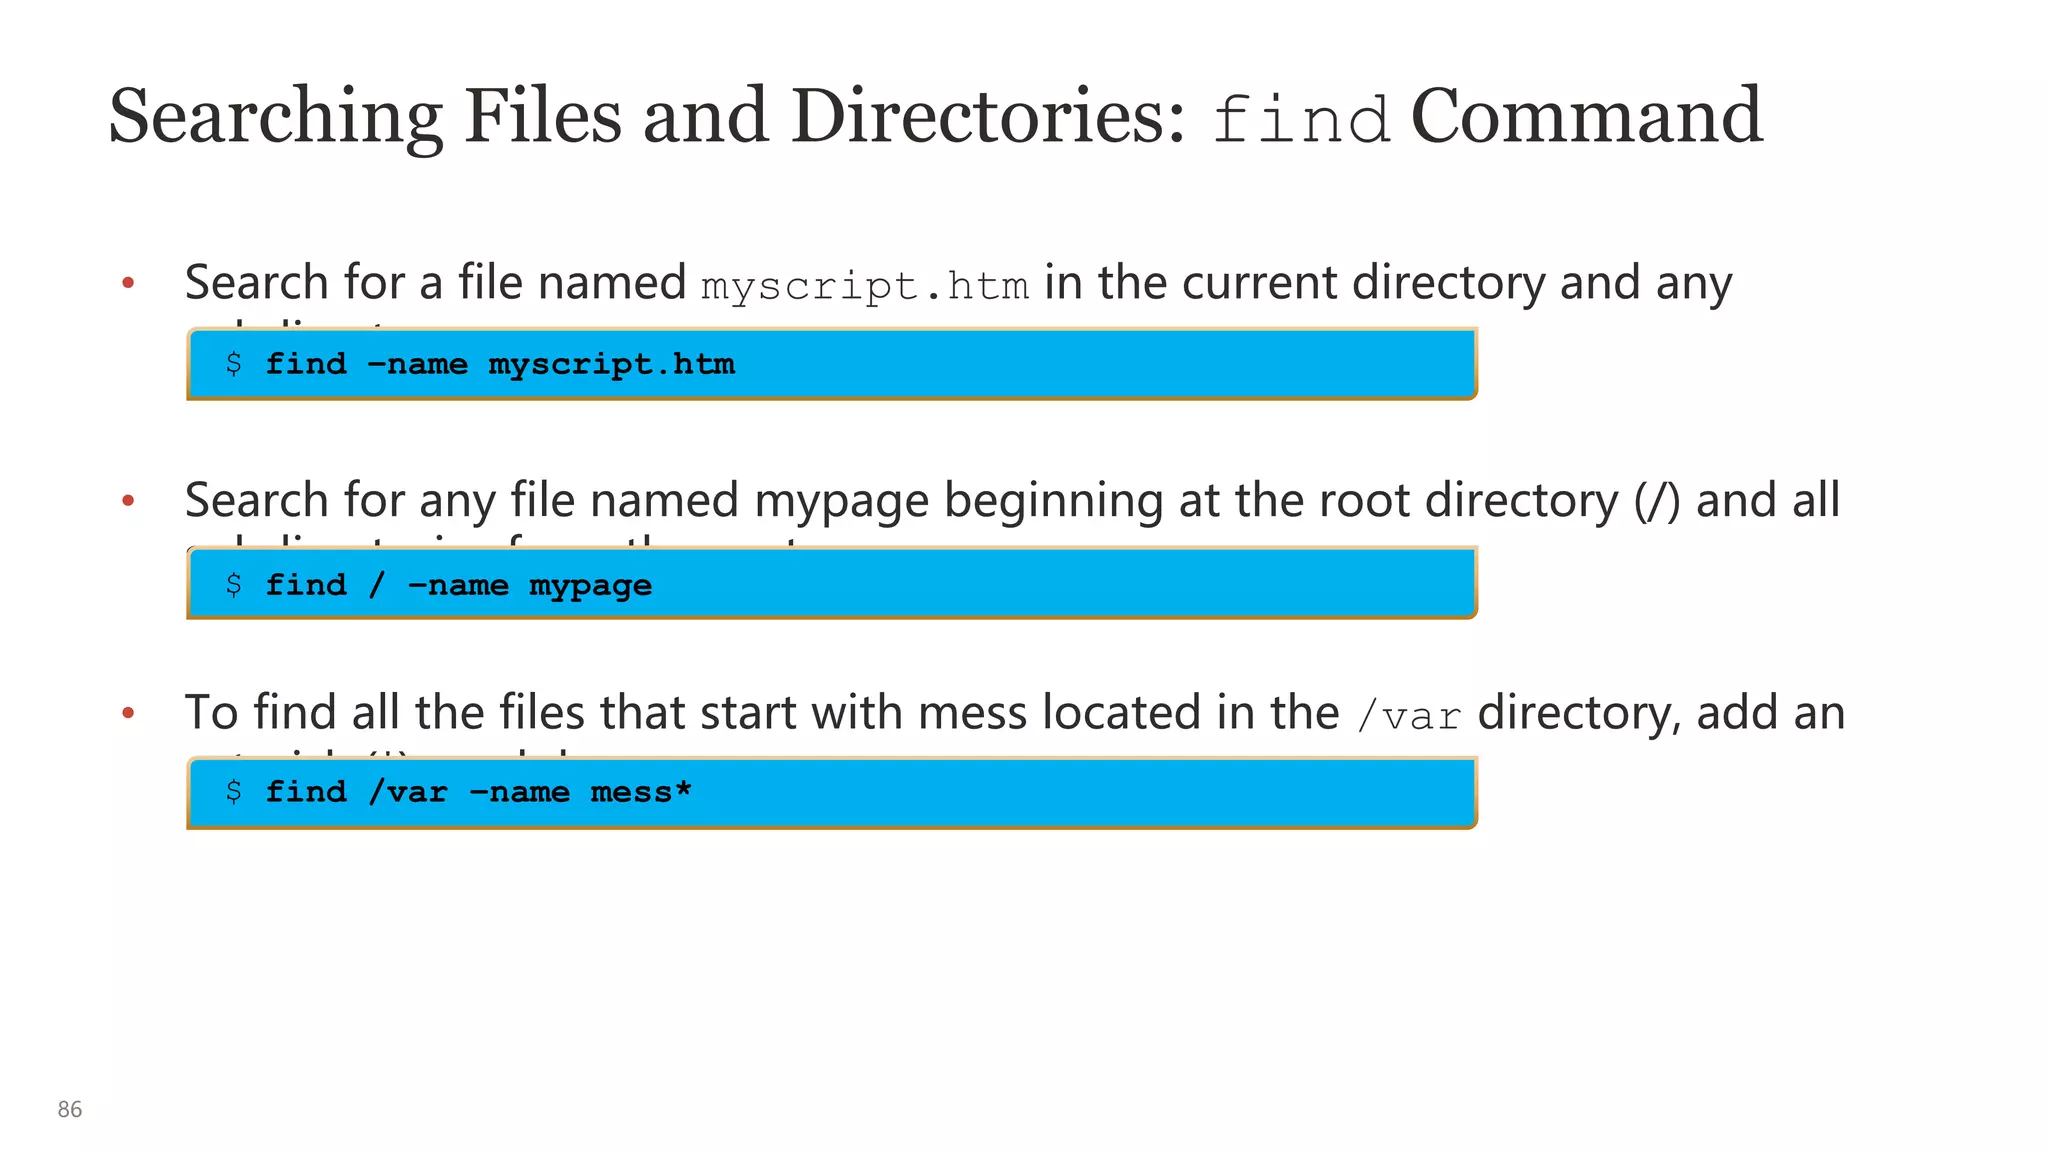
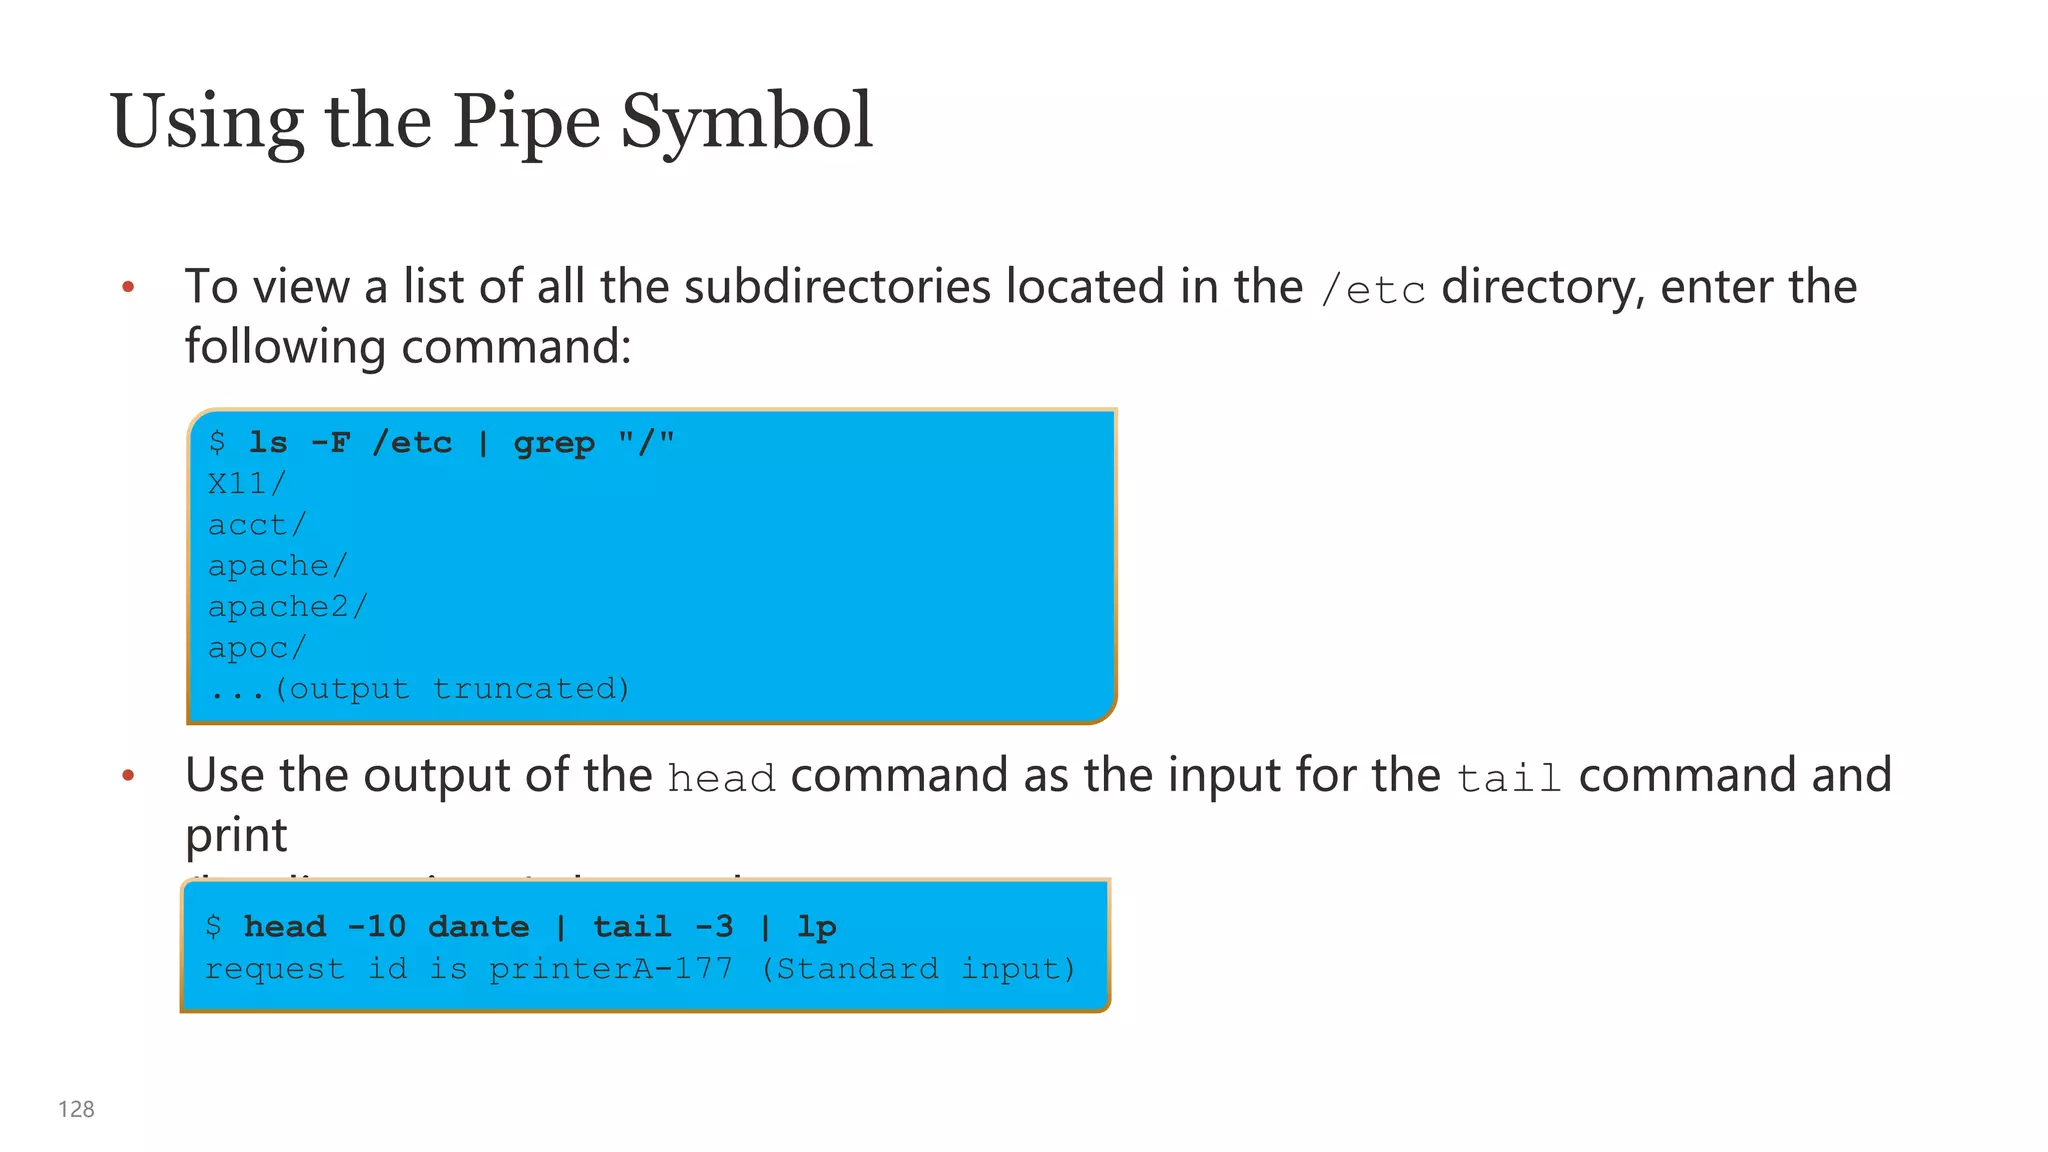
![85
Searching Files and Directories
• The find command searches for files that match the filename_pattern, (could be
a regex_pattern) starting in the location specified by path name.
• The find command also searches for subdirectories recursively.
• When a file matches the filename_pattern specified in the find command, its
full directory path is printed.
• You can search by –name, -type of file, -perm permissions, -empty or -size,
-group name, -user username, and many others.
• For more information about find command options, see the find man page.
$ find [pathname] –name filename_pattern](https://image.slidesharecdn.com/kmsunixandlinux-230703111122-9797abd3/75/KMSUnix-and-Linux-pptx-85-2048.jpg)
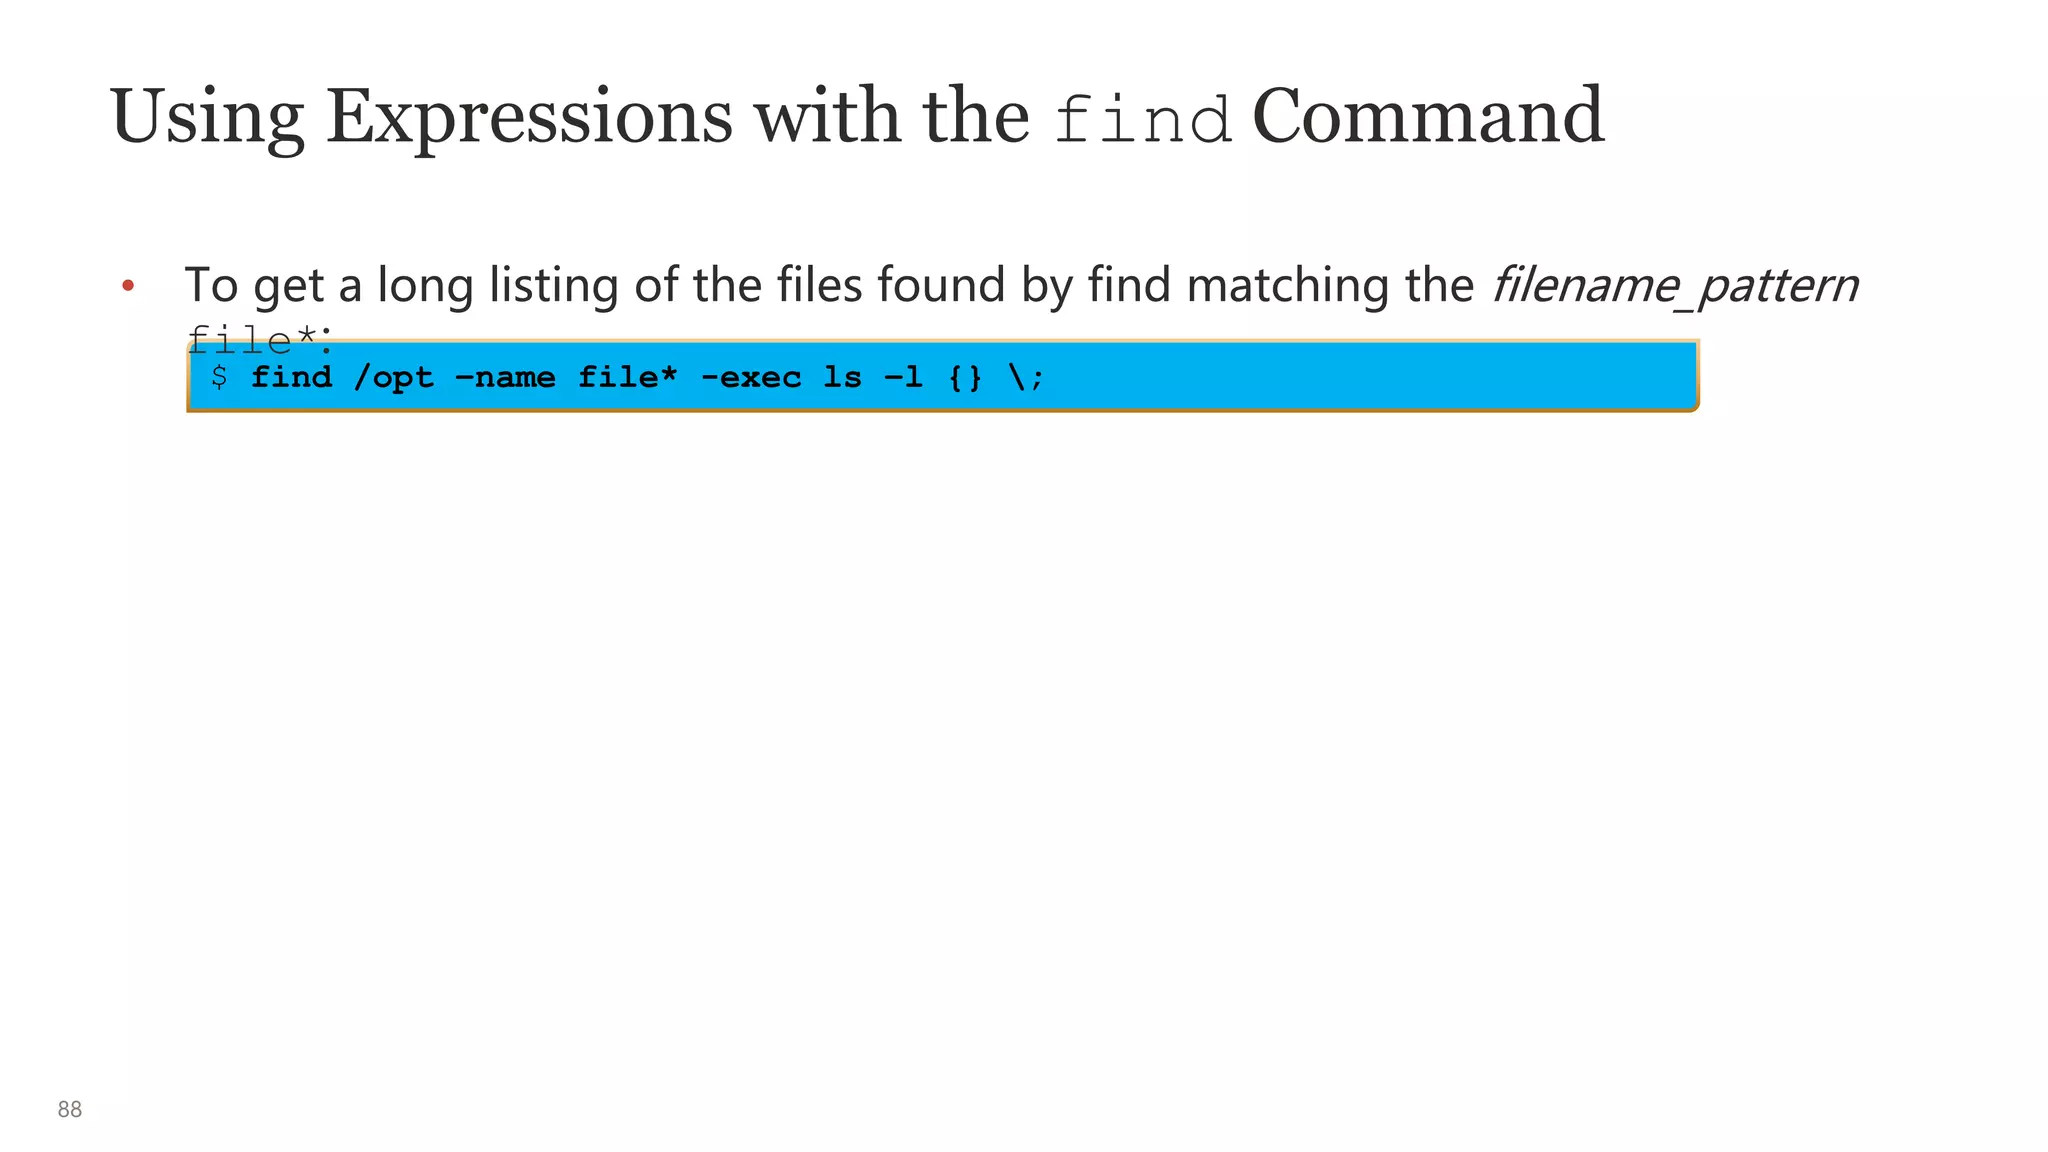
![87
Using Expressions with the find Command
• After the find command has found the files that you were searching for, often
you may want to do something with those files. That’s where expression comes
in.
• An expression could be the following:
– Instead of getting only the full directory path for the files which were found,
you may want to execute an ls –l to get a long listing of the found files.
– Alternatively, you want to cp or mv the files.
– The expression syntax can take many forms. You will explore two: the -exec
and
-ok that require y or Y acknowledgment.
$ find [pathname] <what you’re searching for> -exec <command> {} ;
$ find [pathname] [expression]
$ find /opt –name file* -exec ls -l {} ;](https://image.slidesharecdn.com/kmsunixandlinux-230703111122-9797abd3/75/KMSUnix-and-Linux-pptx-87-2048.jpg)
![89
Searching Files and Directories: Linux Also Has a
locate Command
• To search using locate:
• Search for any file named myscript.htm:
• The locate command works much like the grep command (covered in the
following slides), to locate any files that contain the pattern “mess*”.
• For more information about locate command options, see the locate man
page.
$ locate myscript.htm
$ locate [options] regex_pattern
$ locate mess*](https://image.slidesharecdn.com/kmsunixandlinux-230703111122-9797abd3/75/KMSUnix-and-Linux-pptx-89-2048.jpg)
![90
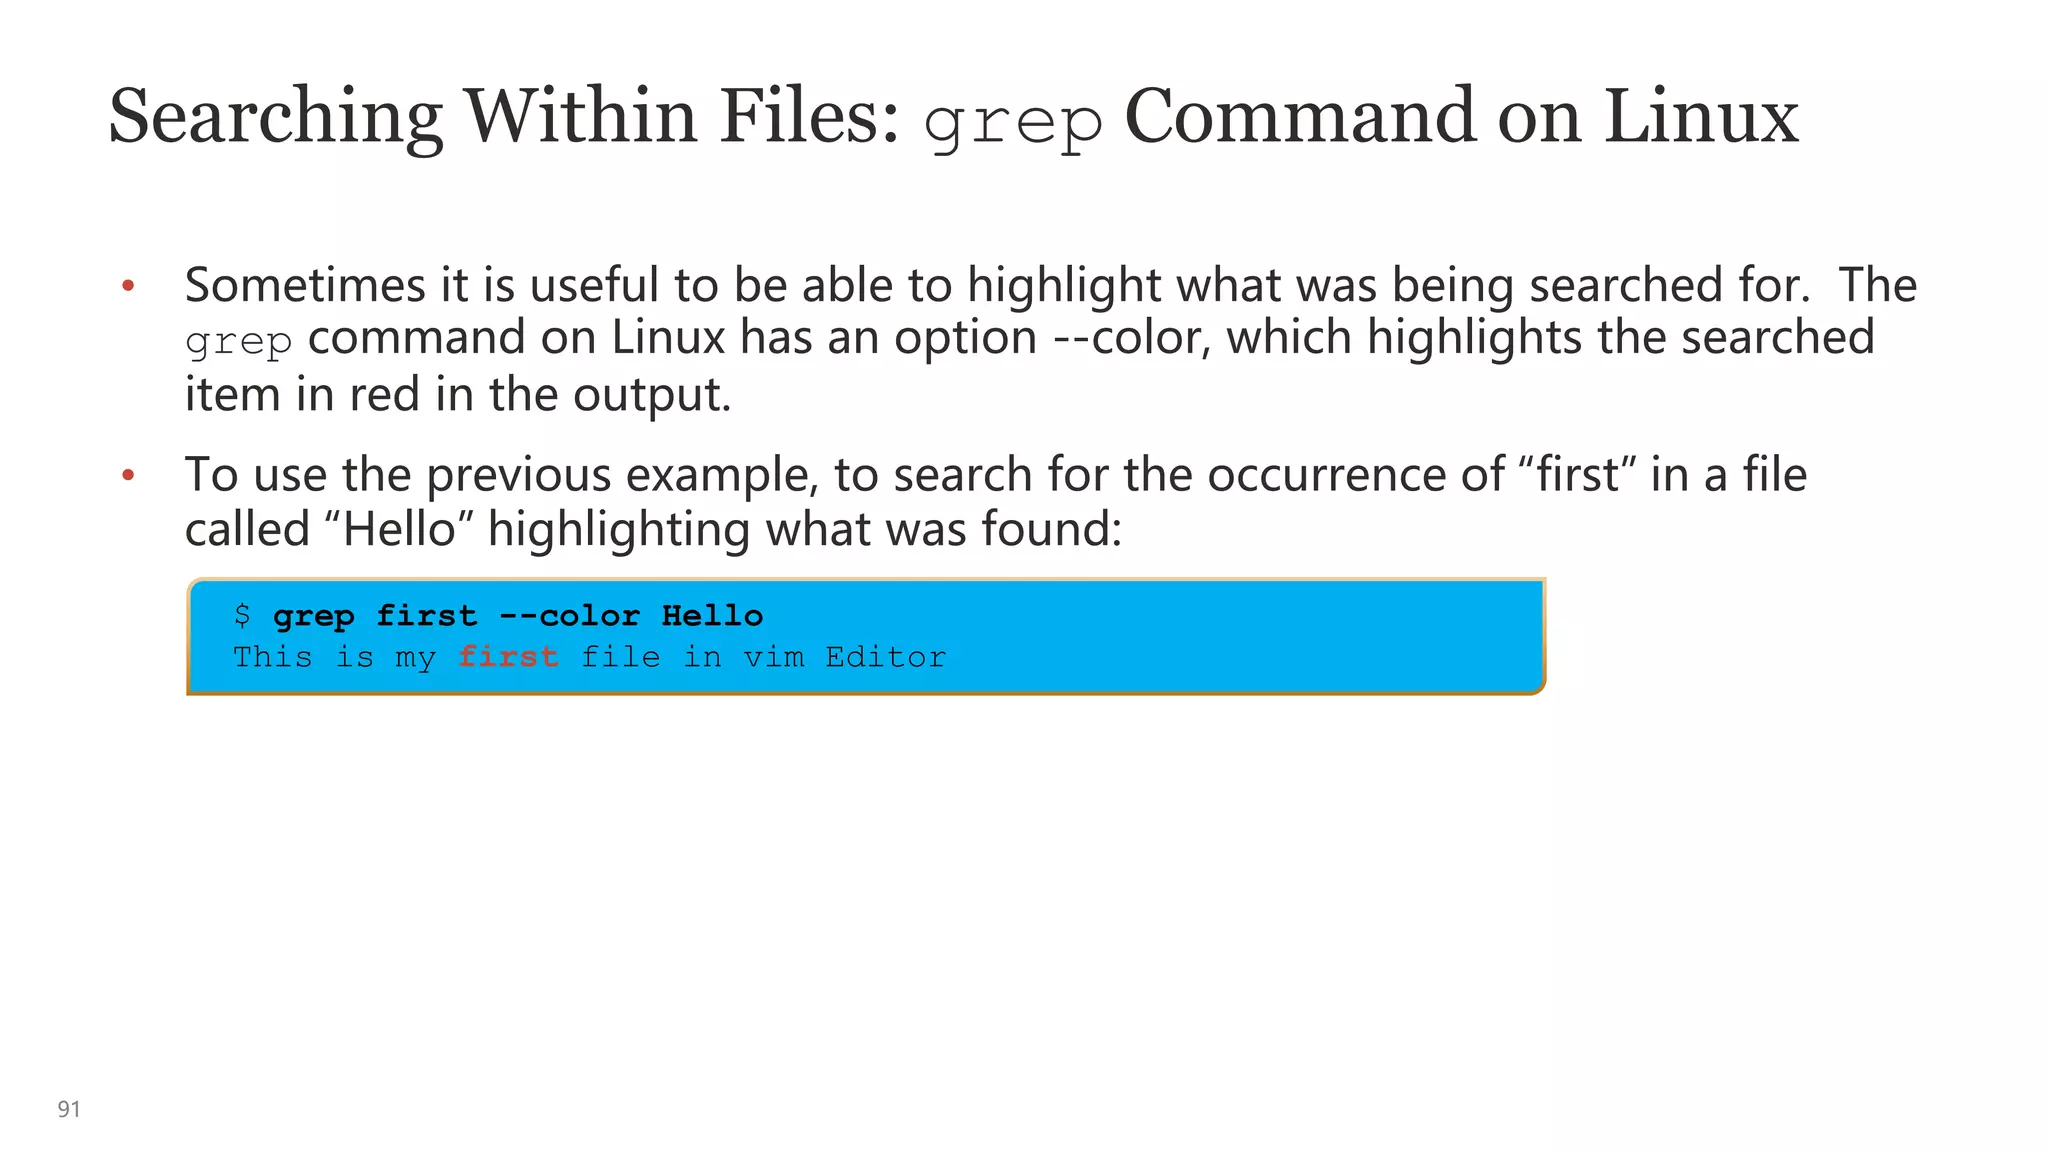
Searching Within Files: grep Command
• The grep (global regular expression print) command allows you to search
for a specified pattern in one or more files, printing any lines that contain
the specified pattern.
• To search for the occurrence of “first” in a file called “Hello,” enter the
following command:
• For more information about grep command options, see the grep man
page.
$ grep [options] regex_pattern [files(s)]
$ grep first Hello
This is my first file in vim Editor](https://image.slidesharecdn.com/kmsunixandlinux-230703111122-9797abd3/75/KMSUnix-and-Linux-pptx-90-2048.jpg)

![94
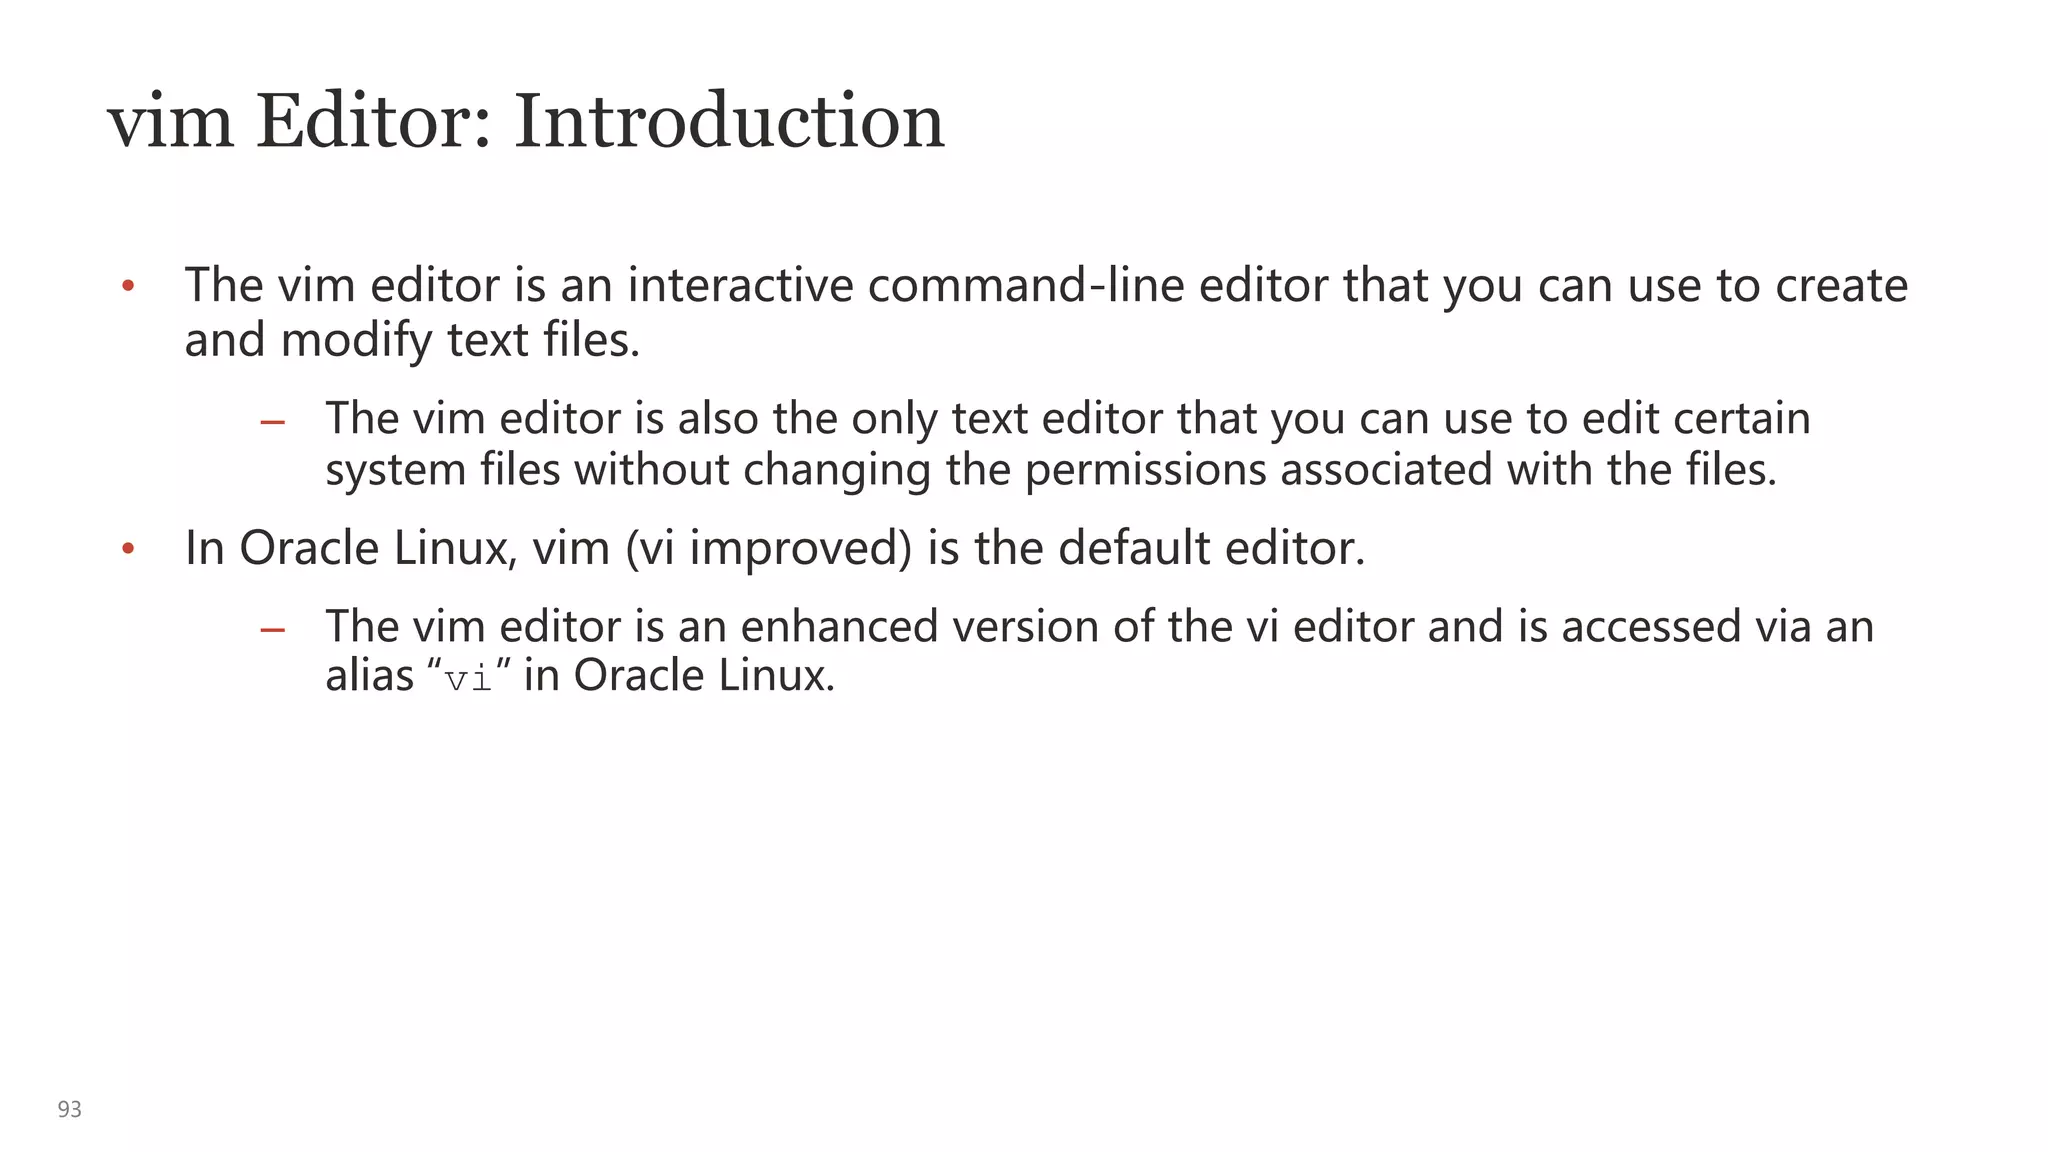
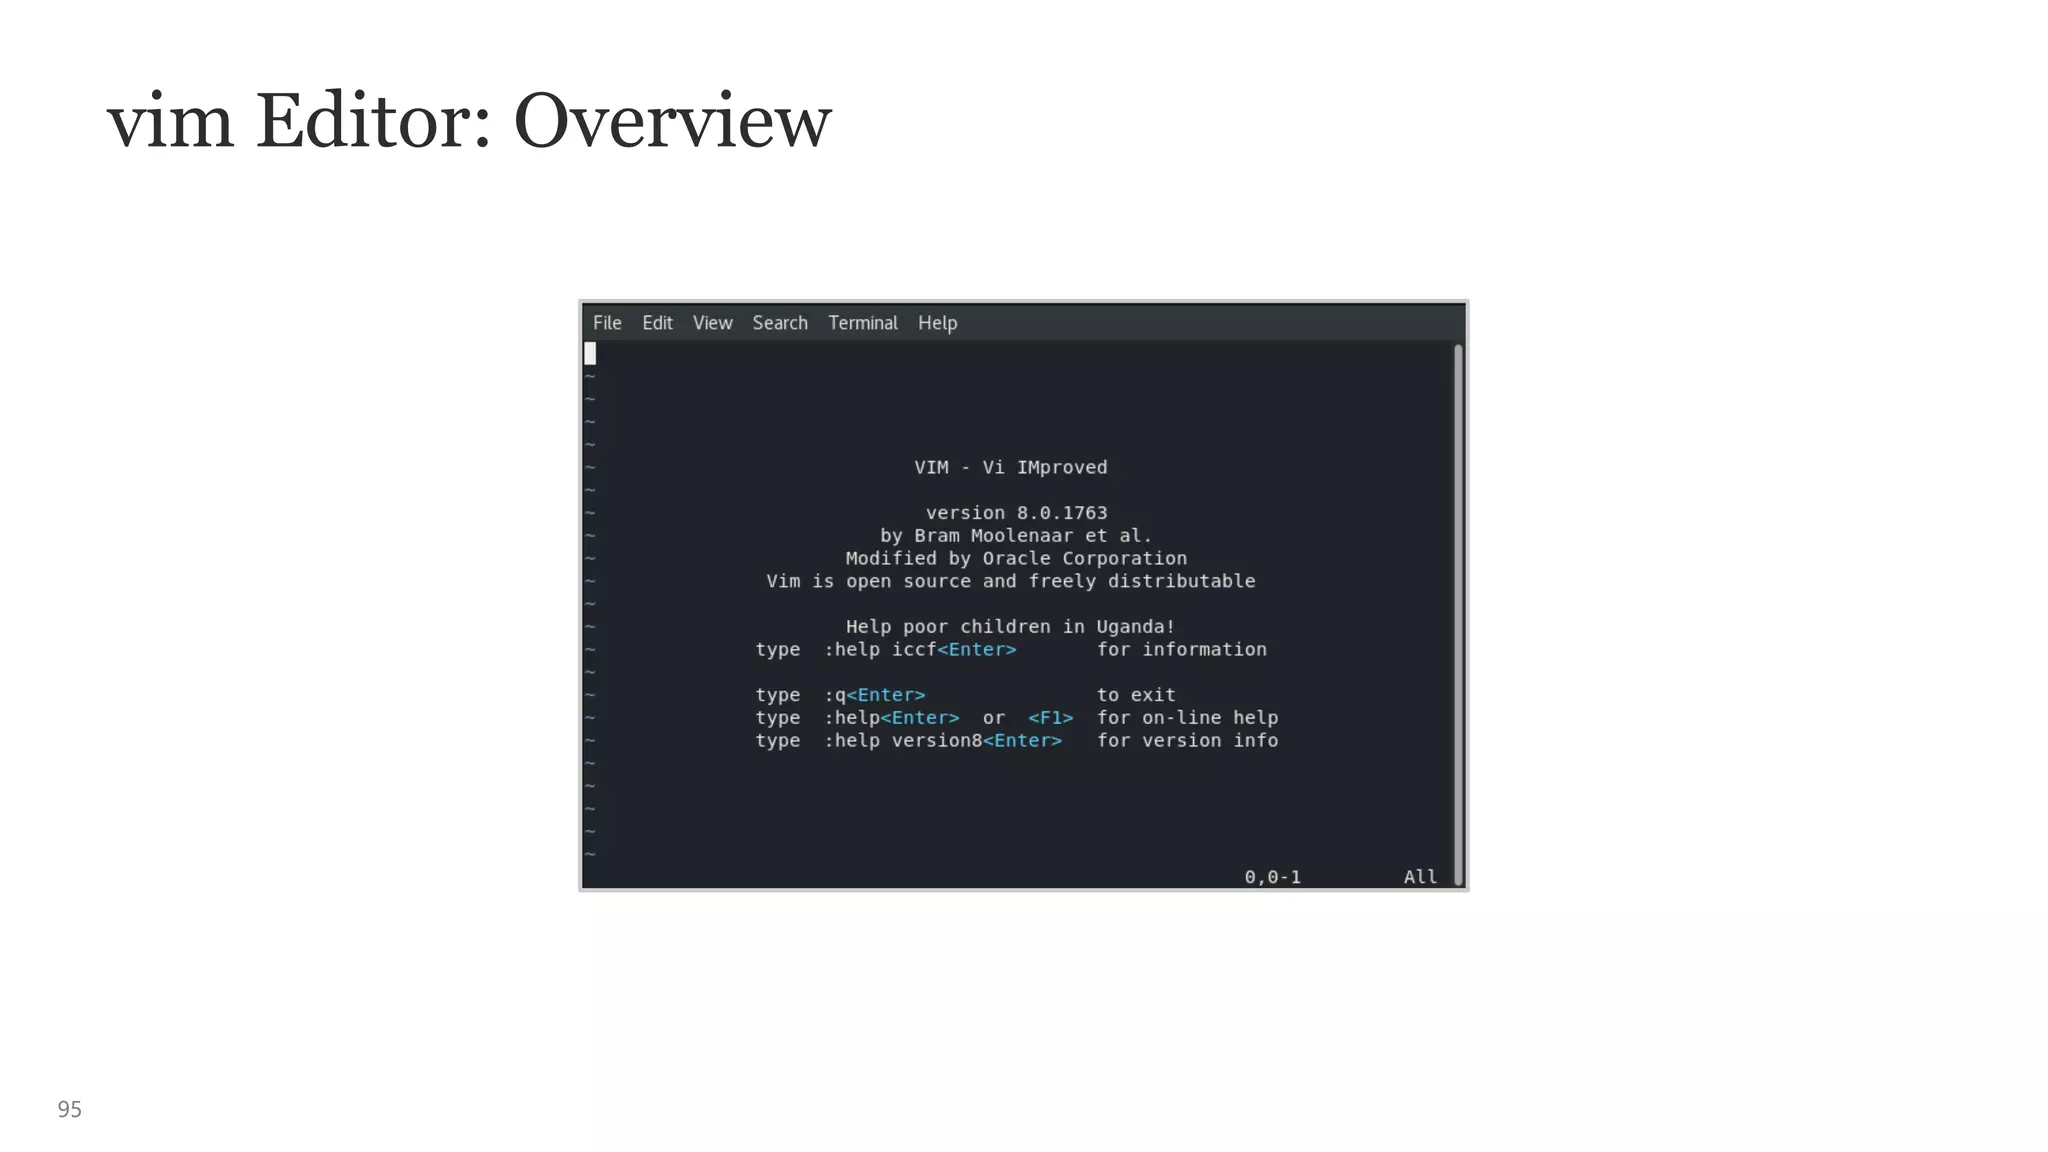
Accessing the vim Editor
• To create, edit, and view files in the vim editor, use the vi command.
• The vi command includes the following three syntaxes:
• For more information about vim command options, see the vim man page.
$ vi [options] filename
$ vi
$ vi filename](https://image.slidesharecdn.com/kmsunixandlinux-230703111122-9797abd3/75/KMSUnix-and-Linux-pptx-94-2048.jpg)

![104
Searching for and Substituting (Replacing) Text
Within a File
The table shows the commands that can search for and substitute (replace) text
using the vim editor.
Command Function
/pattern Searches forward for the pattern/string (regex_pattern)
?pattern Searches backward for the pattern/string
(regex_pattern)
n Searches for the next occurrence of the pattern. Use
this
command after searching for a pattern.
N Searches for the previous occurrence of the pattern.
Use
this command after searching for a pattern.
:[%]s/oldstring/newstring
/[g]
Searches for the old string and substitutes (replaces) it
with the new string globally. The “%” symbol searches
the whole file and the “g” replaces every occurrence of
the old string with new string globally.](https://image.slidesharecdn.com/kmsunixandlinux-230703111122-9797abd3/75/KMSUnix-and-Linux-pptx-104-2048.jpg)

![111
Brace Expansion
• The brace ({ }) expansion is a mechanism by which arbitrary strings can be
generated.
• Patterns to be brace-expanded take the form of an optional preamble, followed
by either a series of comma-separated strings or a sequence expression
between a pair of curly braces, followed by an optional postscript.
• In the following example, the preamble “a” is prefixed to each string contained
within the braces, and the postscript “e” is then appended to each resulting
string, expanding left to right.
Brace expansion syntax: optional preamble{string1[,string2][,stringn]}optional postscript
$ echo a{d,c,b}e
ade ace abe](https://image.slidesharecdn.com/kmsunixandlinux-230703111122-9797abd3/75/KMSUnix-and-Linux-pptx-111-2048.jpg)
![115
Path Name Expansion and File Name Generation
• The path name expansion simplifies location changes within the directory
hierarchy.
• The path name expansion or file name generation includes:
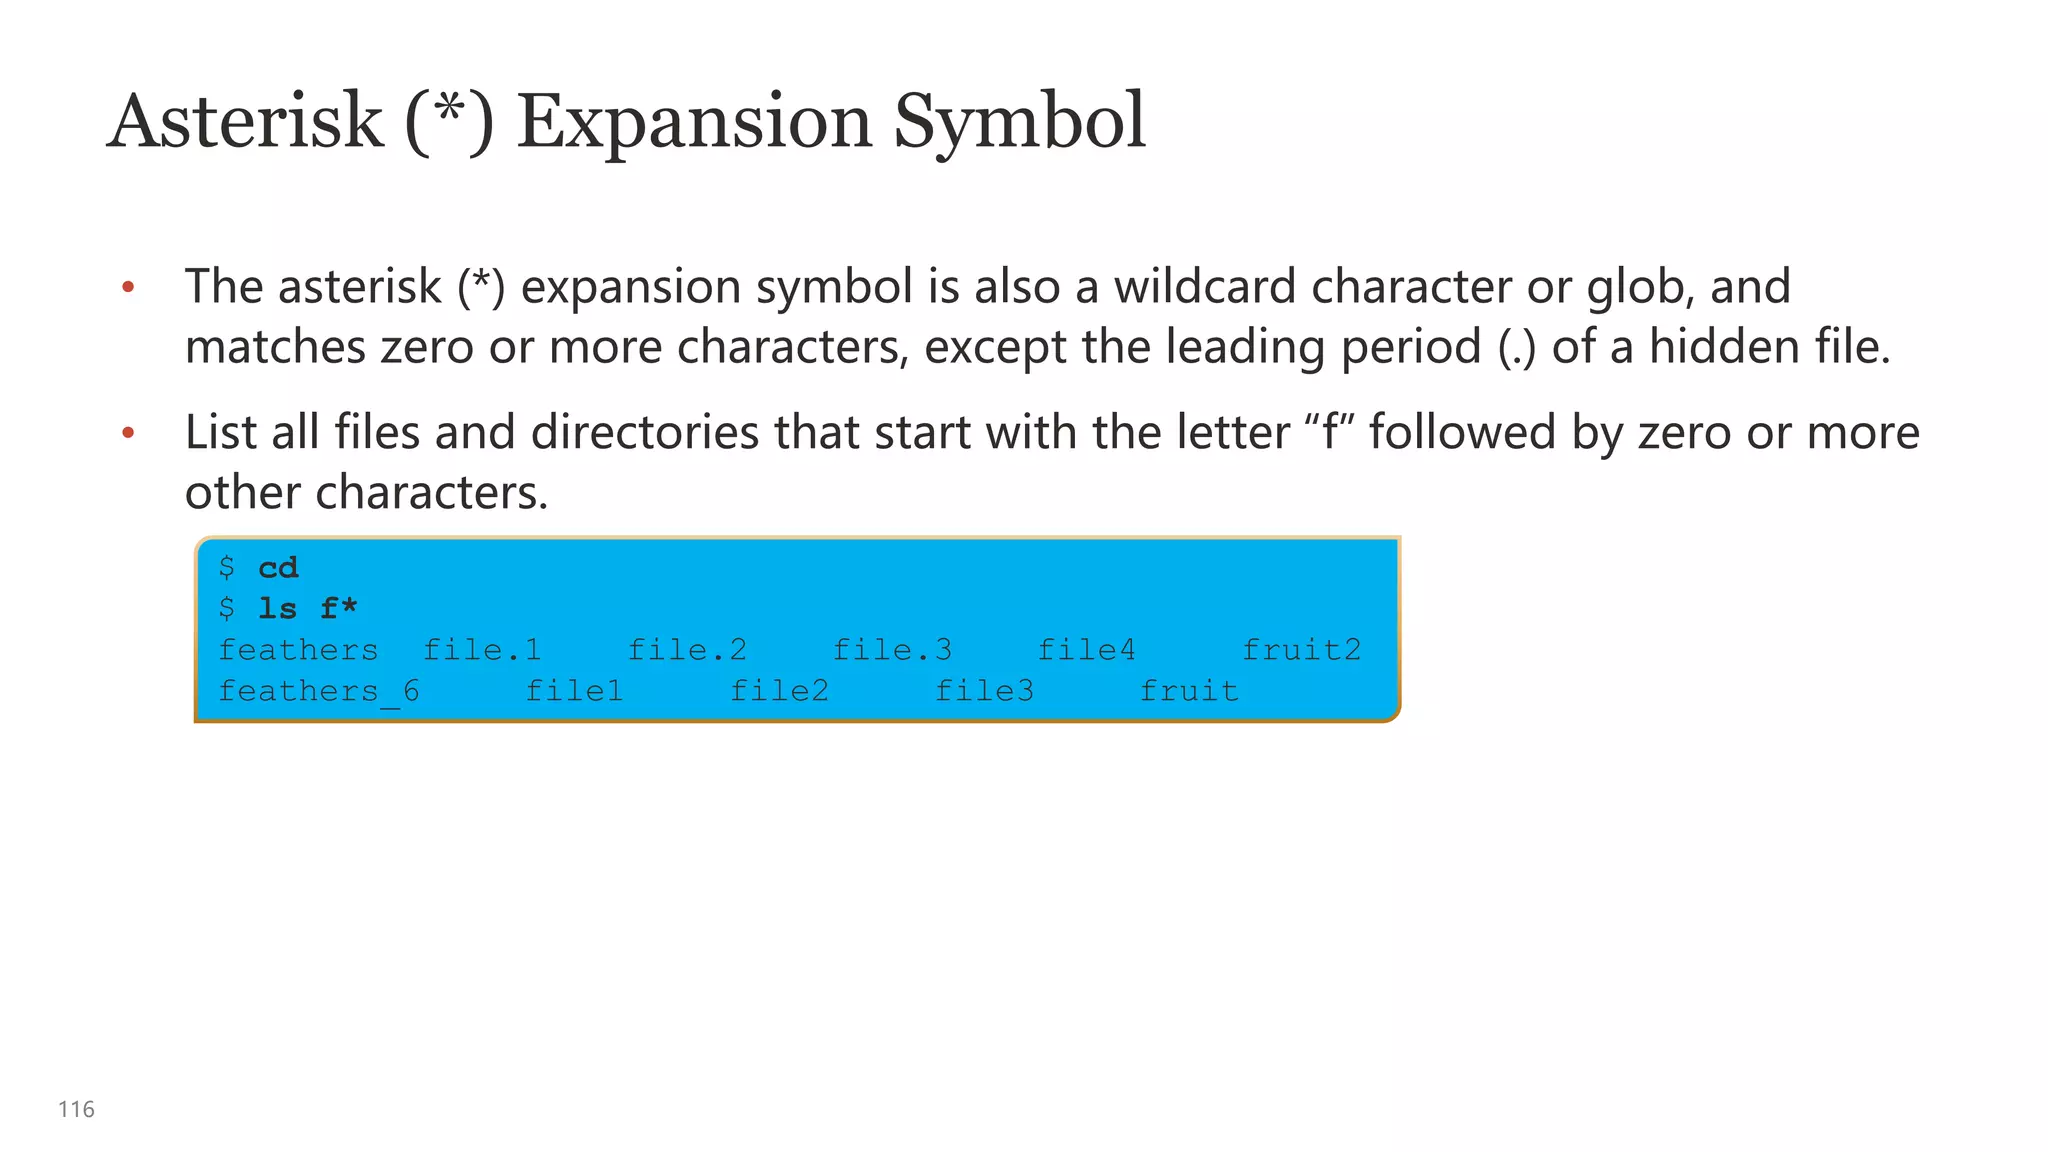
– The asterisk (*) symbol, which matches zero or more characters
(sometimes called “globbing”)
– The question mark (?) symbol, which matches zero or a single character
– A pair of square brackets ([ ]), which matches a single character
– The dash (-) symbol, which represents the previous working directory
Note: The asterisk, question mark, and square brackets are metacharacters
that are also used by regular expressions.](https://image.slidesharecdn.com/kmsunixandlinux-230703111122-9797abd3/75/KMSUnix-and-Linux-pptx-115-2048.jpg)
![118
Square Bracket ([]) Expansion Symbols
The square bracket ([]) expansion symbols are used to create a character class,
which represents a set or range of characters for a single character position.
• A set of characters is any number of specific characters, for example, [acb].
– The characters in a set do not necessarily have to be in any order, for
example, [abc] is the same as [cab].
• A range of characters is a series of ordered characters.
– A range lists the first character followed by a hyphen (-) and then the last
character, for example, [a–z] or [0–9].
– When specifying a range, arrange the characters in the order that you want
them to appear in the output, for example, use [A–Z] or [a–z] to search for
any uppercase or lowercase alphabetical character, respectively.](https://image.slidesharecdn.com/kmsunixandlinux-230703111122-9797abd3/75/KMSUnix-and-Linux-pptx-118-2048.jpg)


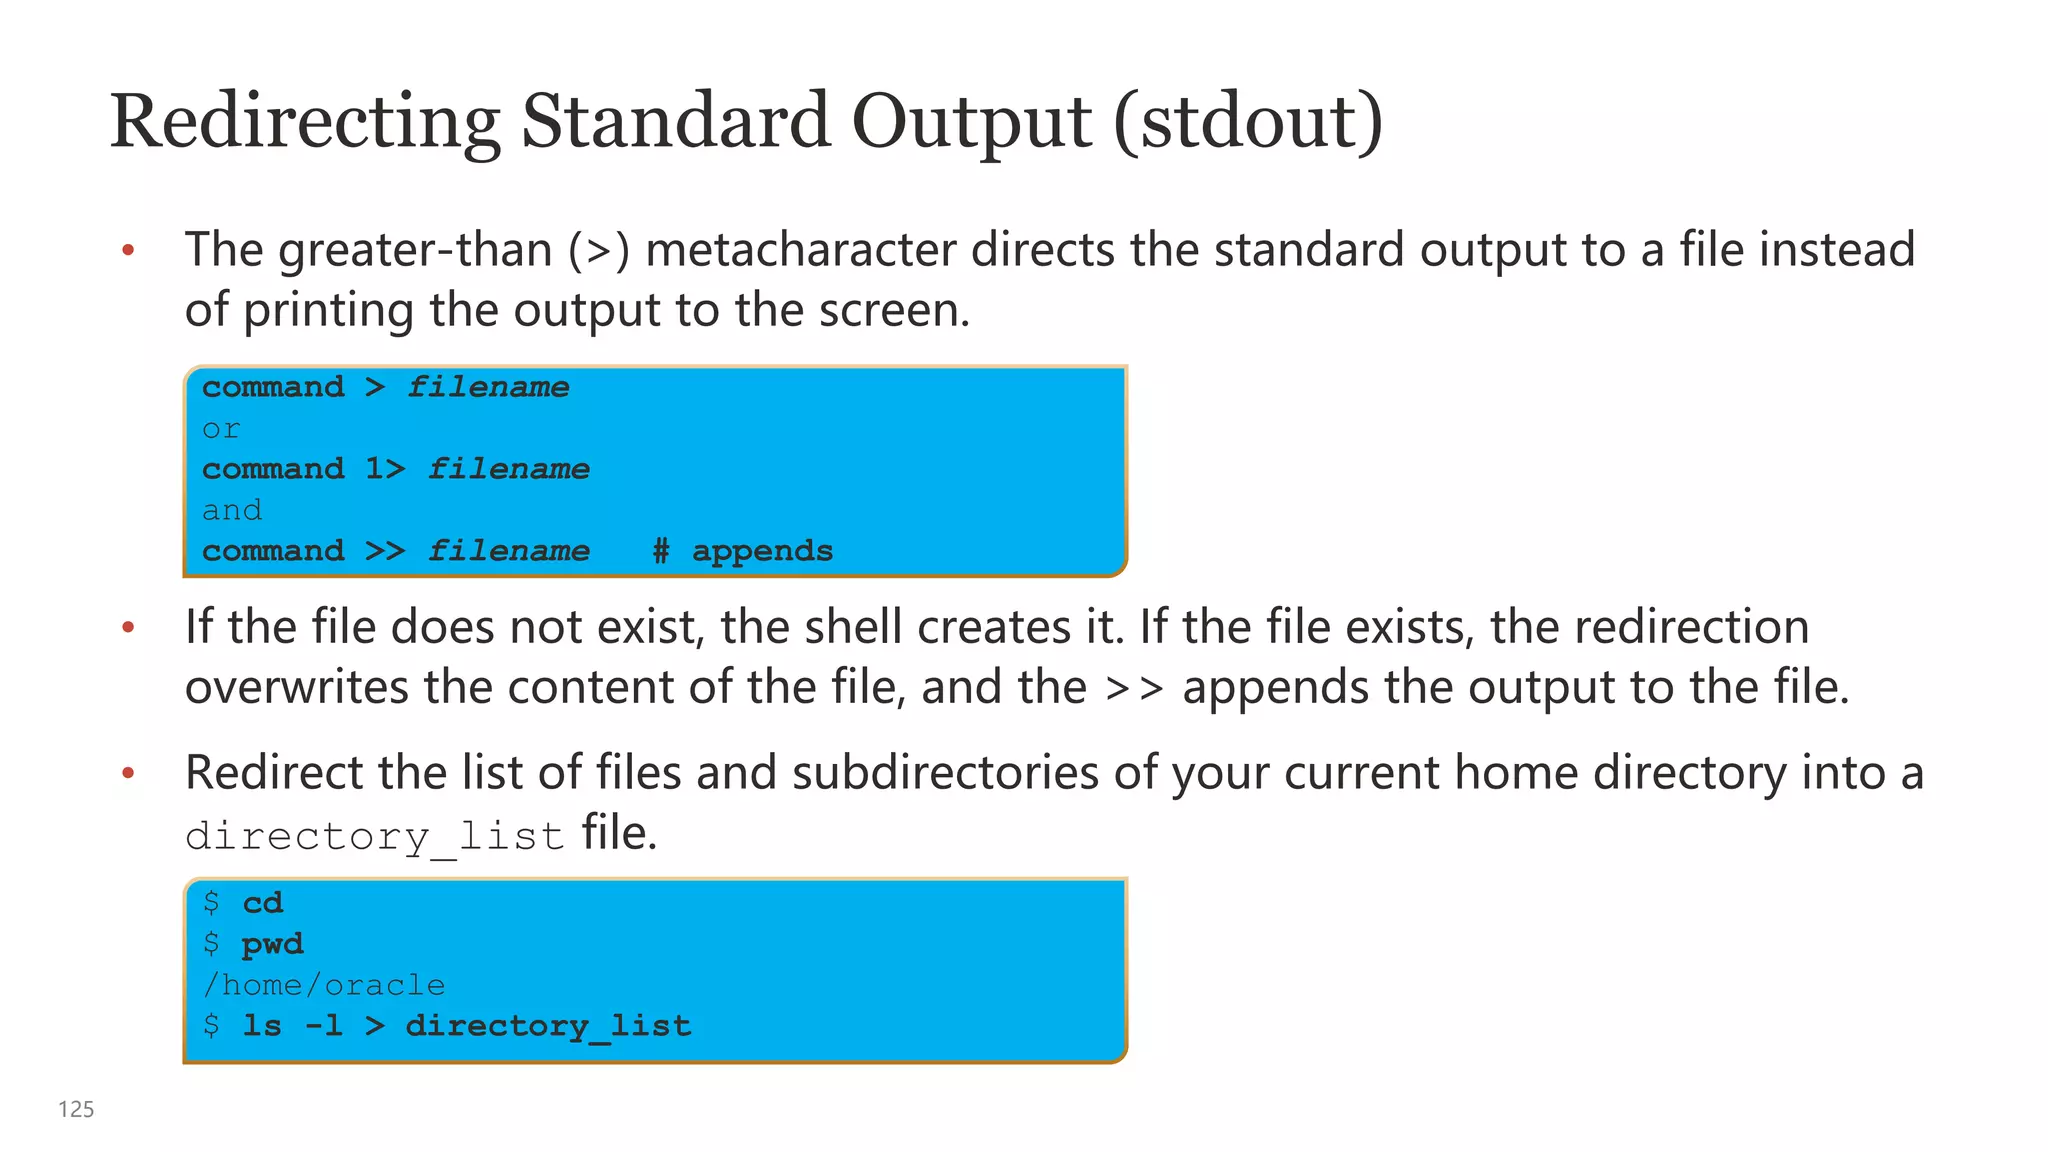

![129
Redirecting Standard Output (stdout) by Using the
tee Command
• As you saw earlier, the greater-than (>) metacharacter directs the standard
output to a file instead of printing the output to the screen.
• Hypothetically, if you wanted to see the output from command1 before it is
redirected to a file name, you would use the tee command.
• When using the tee command, if the file does not exist, the shell creates it.
If the file exists, the tee redirection overwrites the contents of the file, and
if the [-a] option (append) is used, the redirected output is appended to the
file.
command1 | tee [-a] filename
command > filename](https://image.slidesharecdn.com/kmsunixandlinux-230703111122-9797abd3/75/KMSUnix-and-Linux-pptx-129-2048.jpg)
![136
Customizing Bash Shell Variables: PS1
The shell prompt string is stored in the shell variable PS1, and you can customize
it according to your preference.
• In this Oracle Linux example, the prompt displays the user’s login name “u”, the
system’s host name “h” , and the current working directory “W”.
• This shell prompt displays the correct information even when the user logs in to
different hosts.
$ PS1=’[u@h W]$’
[oracle@ol7-server1 ~]$](https://image.slidesharecdn.com/kmsunixandlinux-230703111122-9797abd3/75/KMSUnix-and-Linux-pptx-136-2048.jpg)
![163
Changing Both Username and Group Ownership
• The syntax for the chown command is:
• You can change the ownership only for files and directories that you own.
However, the system administrator can change the ownership of any object.
• For more information about the chown command options, see the chown man
pages.
$ chown [options] [newusername][:newgroup] filename
$ ls -l dante
-rw-r--r-- 1 student class 1319 Mar 15 11:23 dante
$ chown oracle:oracle dante
$ ls -l dante
-rw-r--r-- 1 oracle oracle 1319 Mar 15 11:23 dante](https://image.slidesharecdn.com/kmsunixandlinux-230703111122-9797abd3/75/KMSUnix-and-Linux-pptx-163-2048.jpg)
![164
Changing Group Ownership
• The syntax for the chgrp command is:
• Note: If you still own a file or directory, you can always change the group
ownership.
$ chgrp [options] newgroup filename](https://image.slidesharecdn.com/kmsunixandlinux-230703111122-9797abd3/75/KMSUnix-and-Linux-pptx-164-2048.jpg)
![167
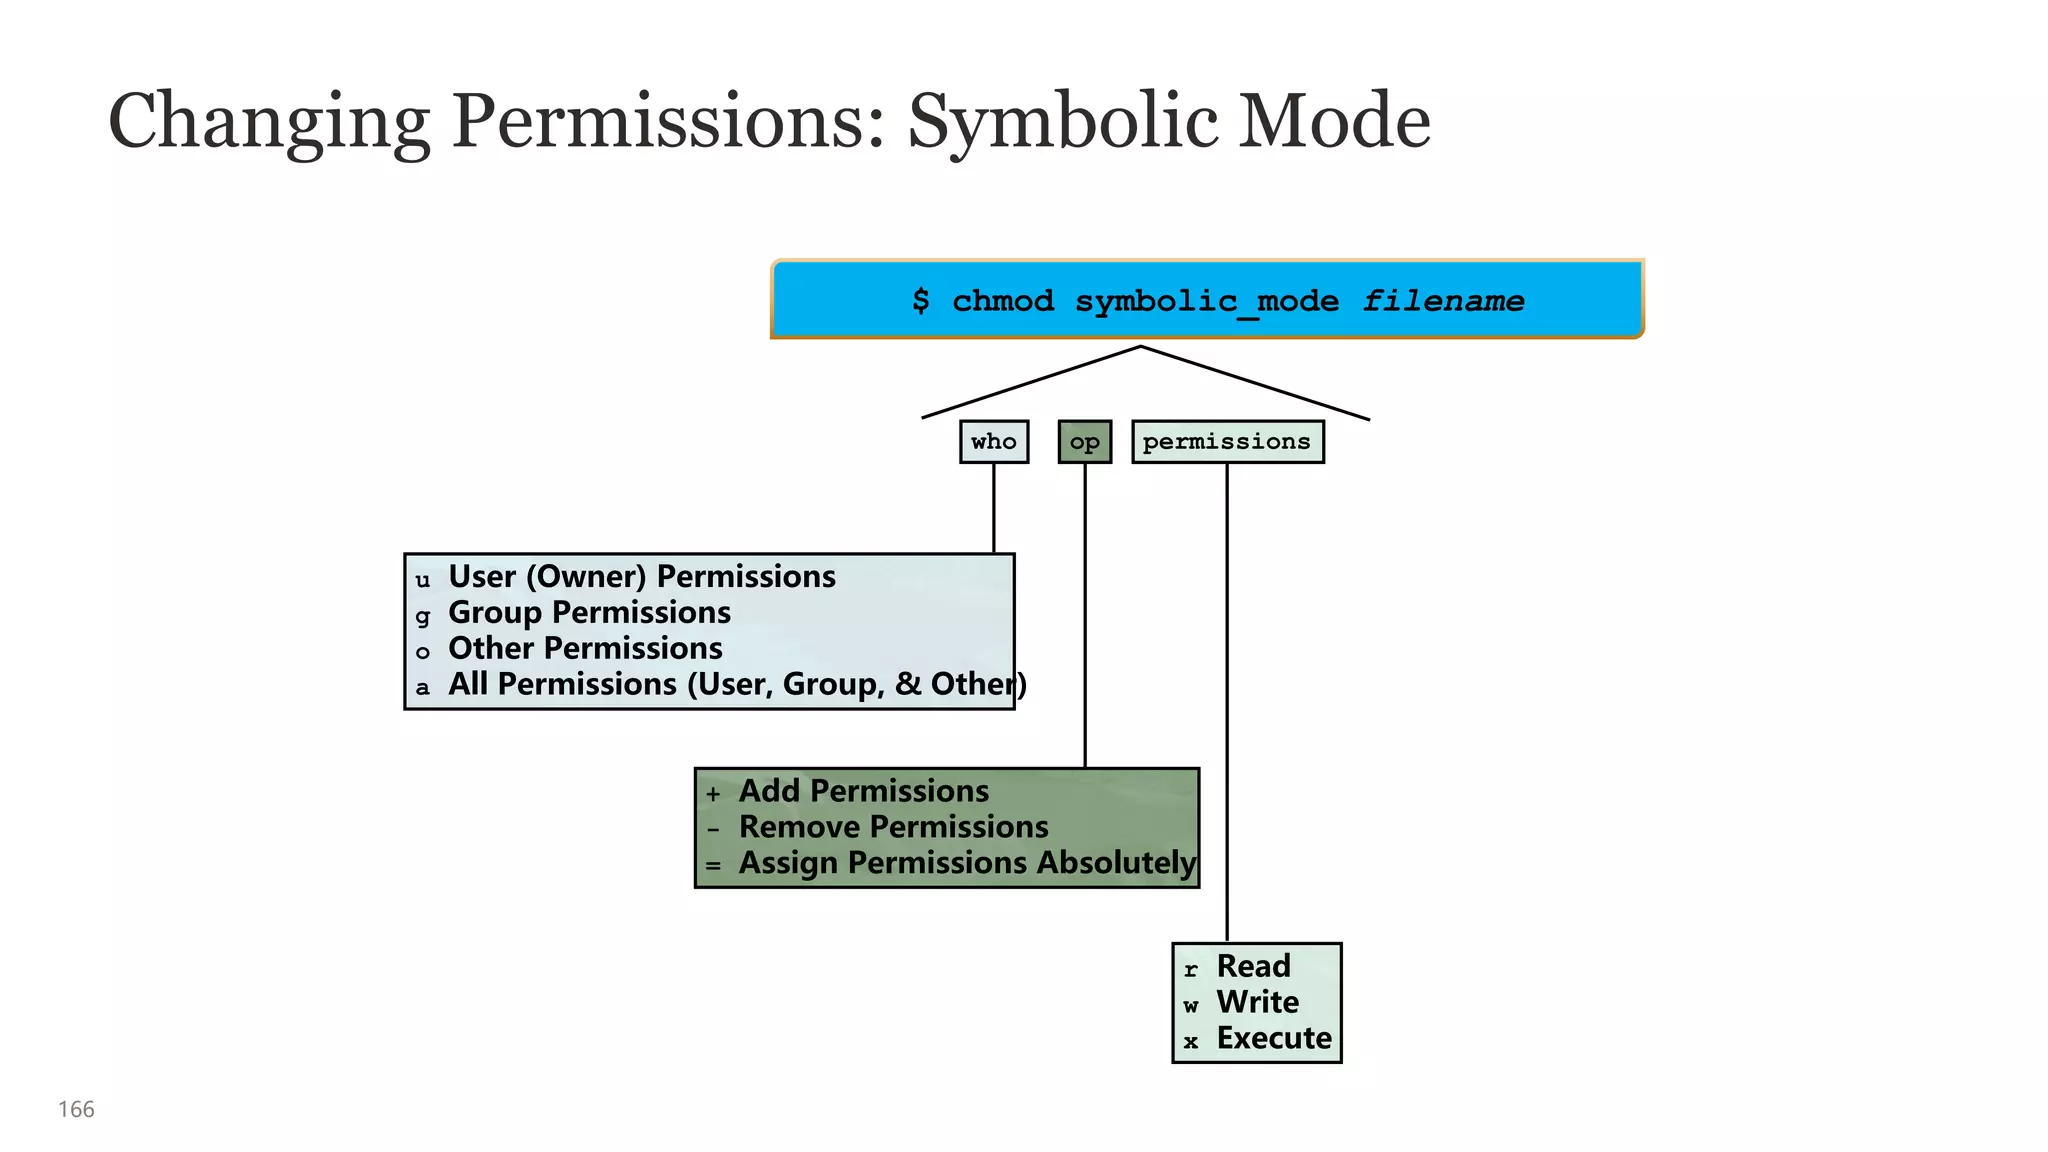
Changing Permissions: Symbolic Mode
• The syntax for the chmod command in symbolic mode is:
• The format of the symbolic_mode consists of three parts: [ugoa] [+-=] [rwx]
– The user category [ugoa]: User/owner, group, other, or all
– The function to be performed [+-=]: Add, remove, or set equal
– The permissions affected [rwx]: Read, write, and execute
Plus special file permissions and sticky bit [st] (described in the next slide)
• If the option is g+x, the executable permission is added to the group
permissions.
$ chmod [options] [symbolic_mode] filename](https://image.slidesharecdn.com/kmsunixandlinux-230703111122-9797abd3/75/KMSUnix-and-Linux-pptx-167-2048.jpg)
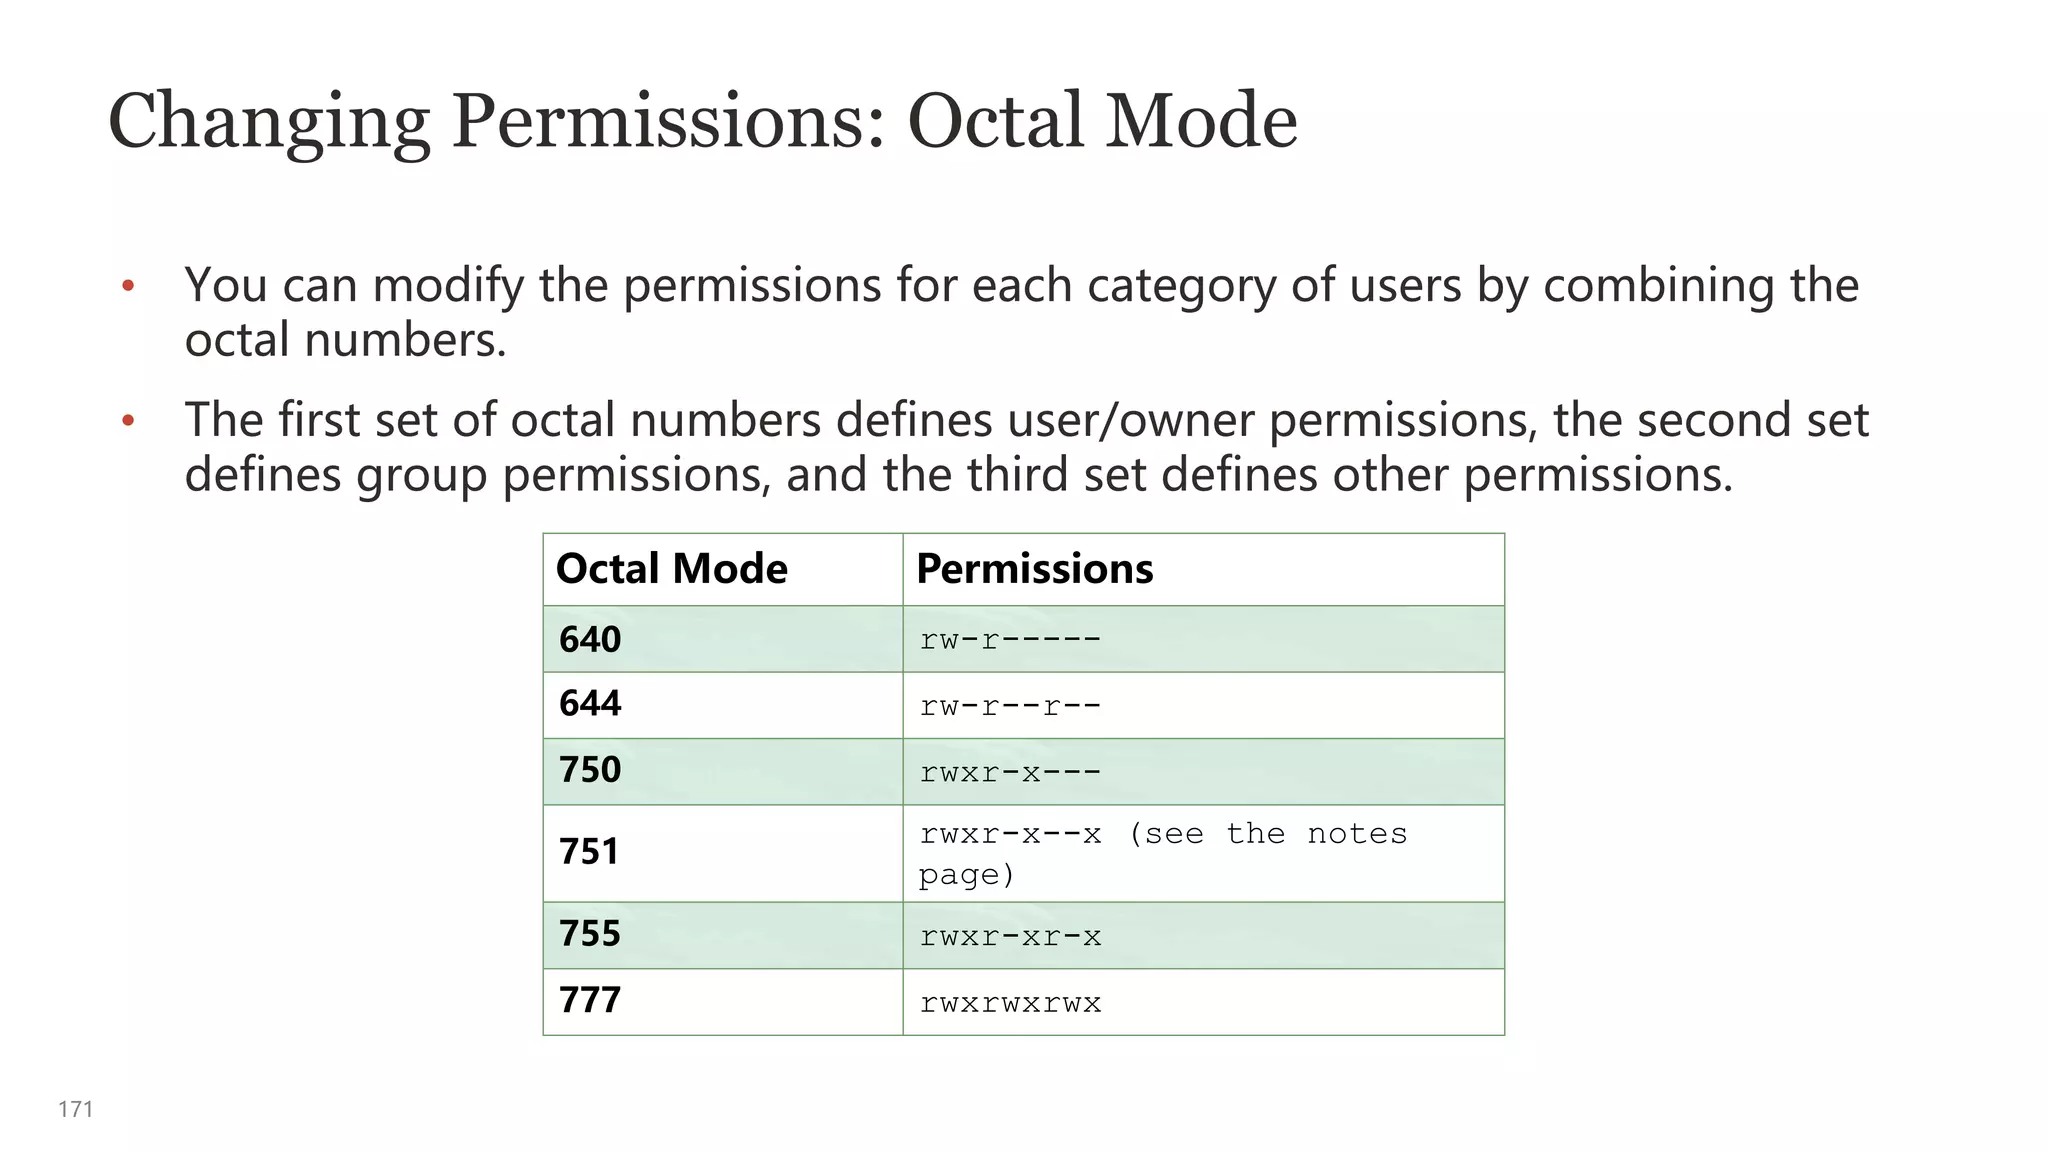
![169
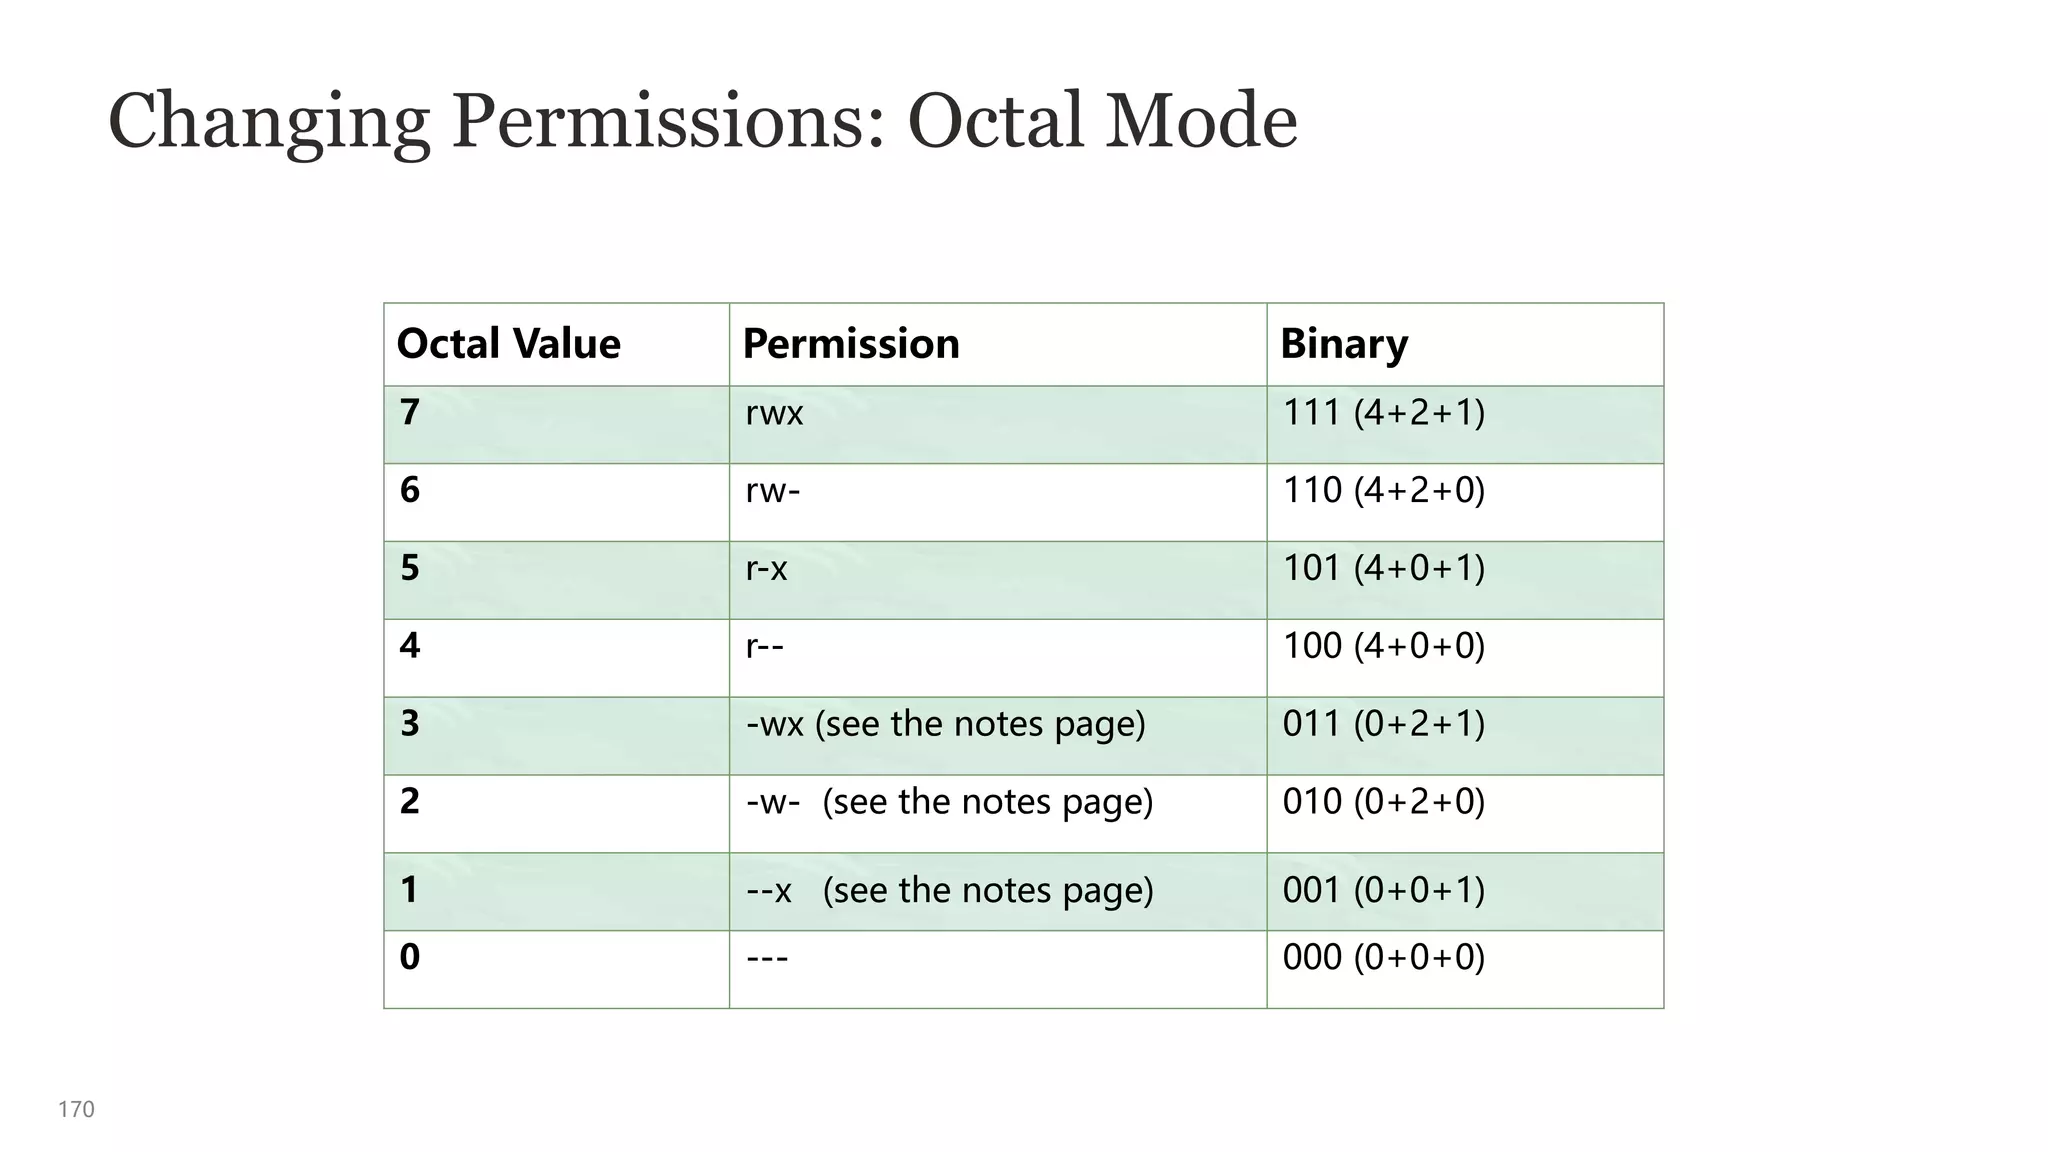
Changing Permissions: Octal Mode
• The syntax for the chmod command in octal mode is:
• The octal_mode option, sometimes called the absolute_mode, consists of three
octal numbers, 4, 2, and 1, which represent a combination (sum) of the
permissions, from 0–7, for the file or directory.
Octal Value Permission
4 Read
2 Write
1 Execute
$ chmod [octal_mode] filename](https://image.slidesharecdn.com/kmsunixandlinux-230703111122-9797abd3/75/KMSUnix-and-Linux-pptx-169-2048.jpg)


![183
Listing System Processes
• The process status (ps) command lists the processes that are associated with
your shell.
• For each process, the ps command displays the PID, the terminal identifier
(TTY), the cumulative execution time (TIME), and the command name (CMD).
• You can list the currently running processes on the system owned by the logged
on user by using the ps command.
$ ps [options]
$ ps
PID TTY TIME CMD
1001 pts/1 0:00 bash
1004 pts/1 0:00 ps](https://image.slidesharecdn.com/kmsunixandlinux-230703111122-9797abd3/75/KMSUnix-and-Linux-pptx-183-2048.jpg)
![186
Listing Process Trees in Oracle Linux
The process tree (pstree) command lists the running processes, rooted at either
systemd or PID.
$ pstree [-options] [PID | user ]
$ ps -f
UID PID PPID C STIME TTY TIME CMD
oracle 2274 2262 0 14:47 pts/0 00:00:00 /bin/bash
oracle 2308 2274 0 14:47 pts/0 00:00:00 ps -f
$ pstree 2262
gnome-terminal-─┬─bash───pstree
├─gnome-pty-helpe
└─3*[{gnome-terminal-}]](https://image.slidesharecdn.com/kmsunixandlinux-230703111122-9797abd3/75/KMSUnix-and-Linux-pptx-186-2048.jpg)
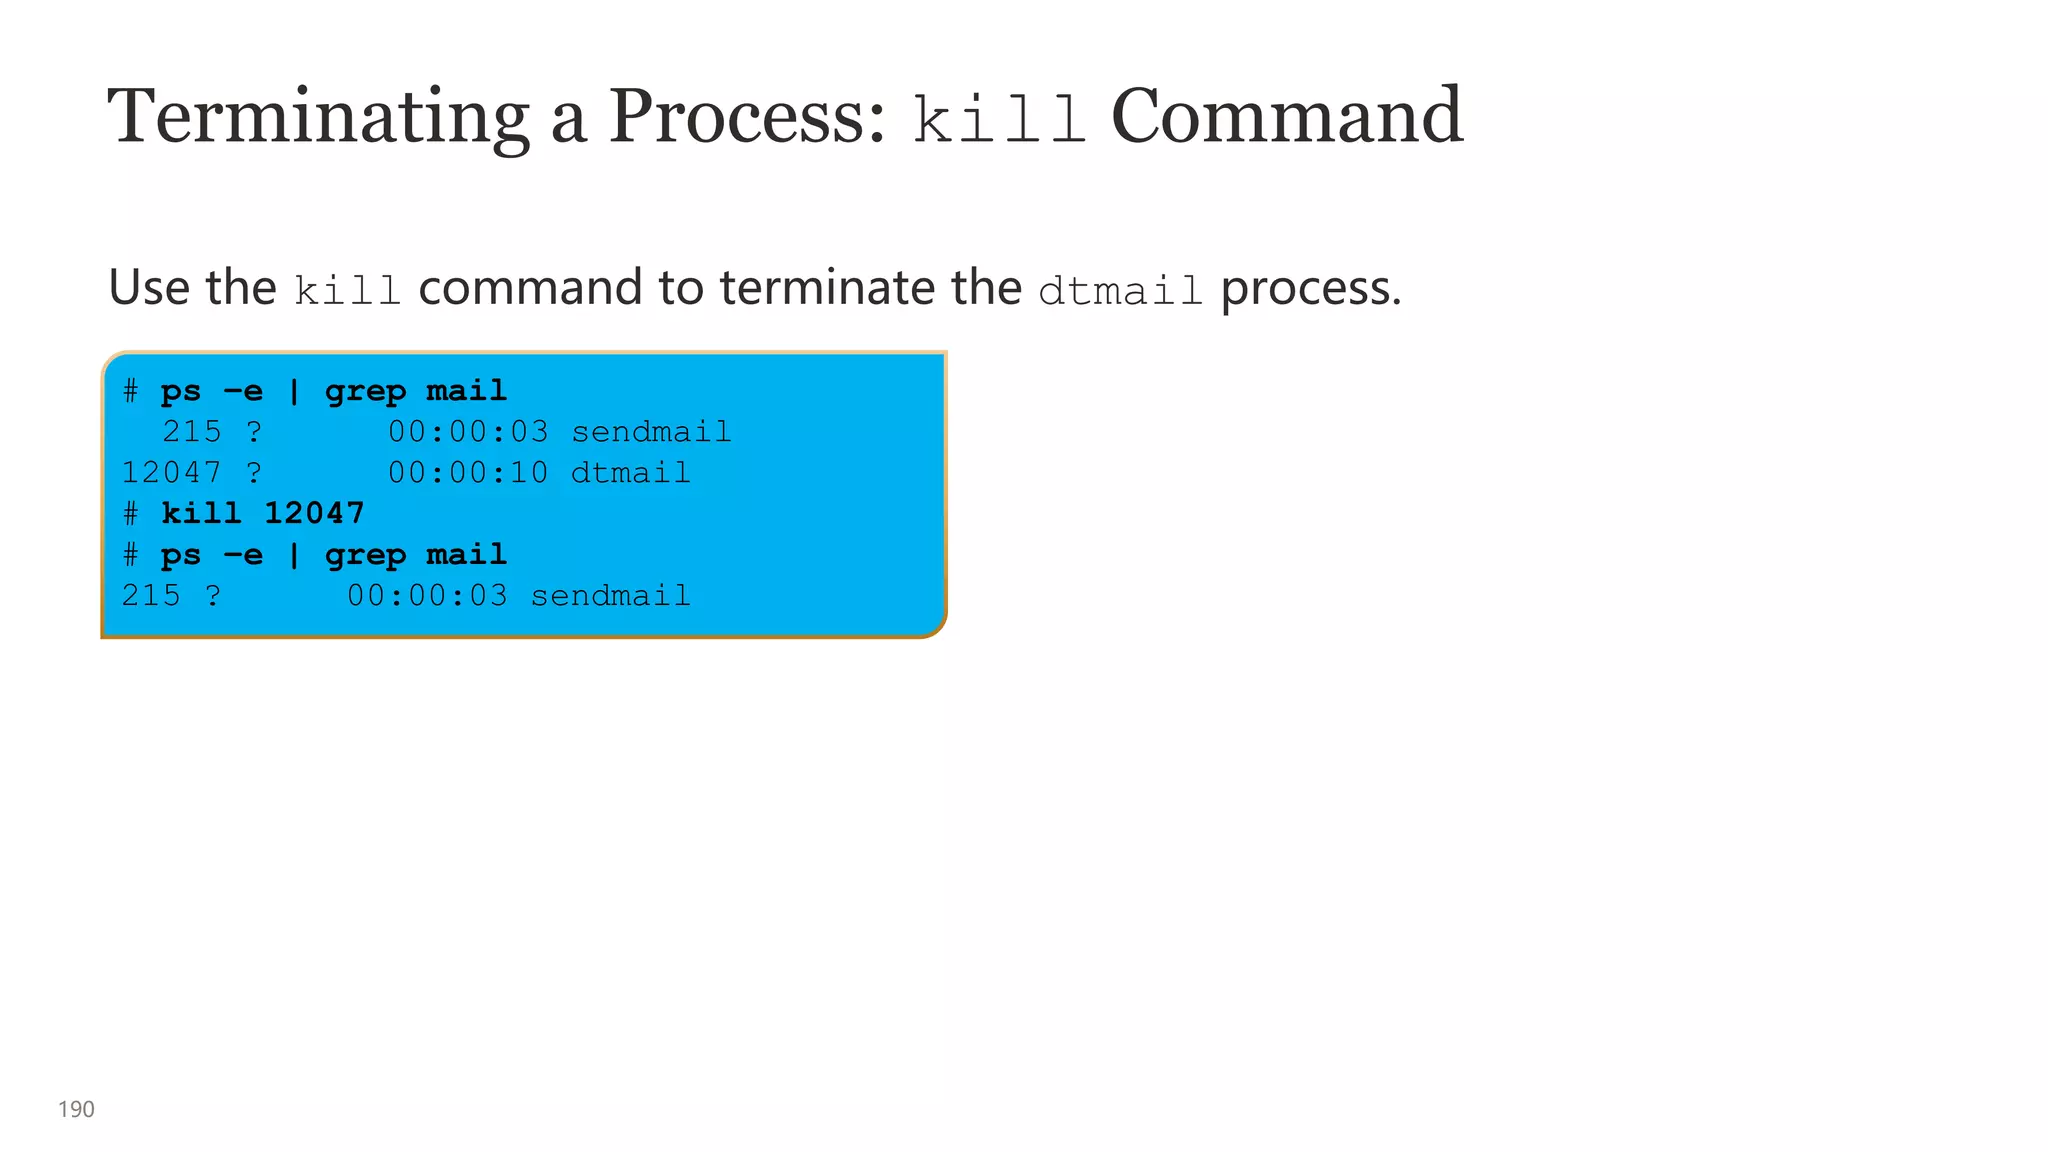
![187
Terminating a Process
• There might be times when you need to terminate an unwanted process.
• A process might have entered an endless loop, or it might be hung.
• You can kill or stop any process that you own.
• You can use the following two commands to terminate one or more processes:
– kill PID [PID ...]
– pkill -l [ processname | regex_pattern ]
• The kill and pkill commands send signals to processes directing them to
terminate.
• Each signal has a number/value, name, and an associated event.
• For more information about signal values, use the man 7 signal.](https://image.slidesharecdn.com/kmsunixandlinux-230703111122-9797abd3/75/KMSUnix-and-Linux-pptx-187-2048.jpg)
![188
Terminating a Process: kill Command
• You can terminate any process by sending the appropriate signal to the process.
• The kill command sends a Termination signal (SIGTERM signal 15), by default,
to one or more processes.
Note: The kill command terminates only those processes that you own.
$ kill [-signal] PID [PID ...]](https://image.slidesharecdn.com/kmsunixandlinux-230703111122-9797abd3/75/KMSUnix-and-Linux-pptx-188-2048.jpg)
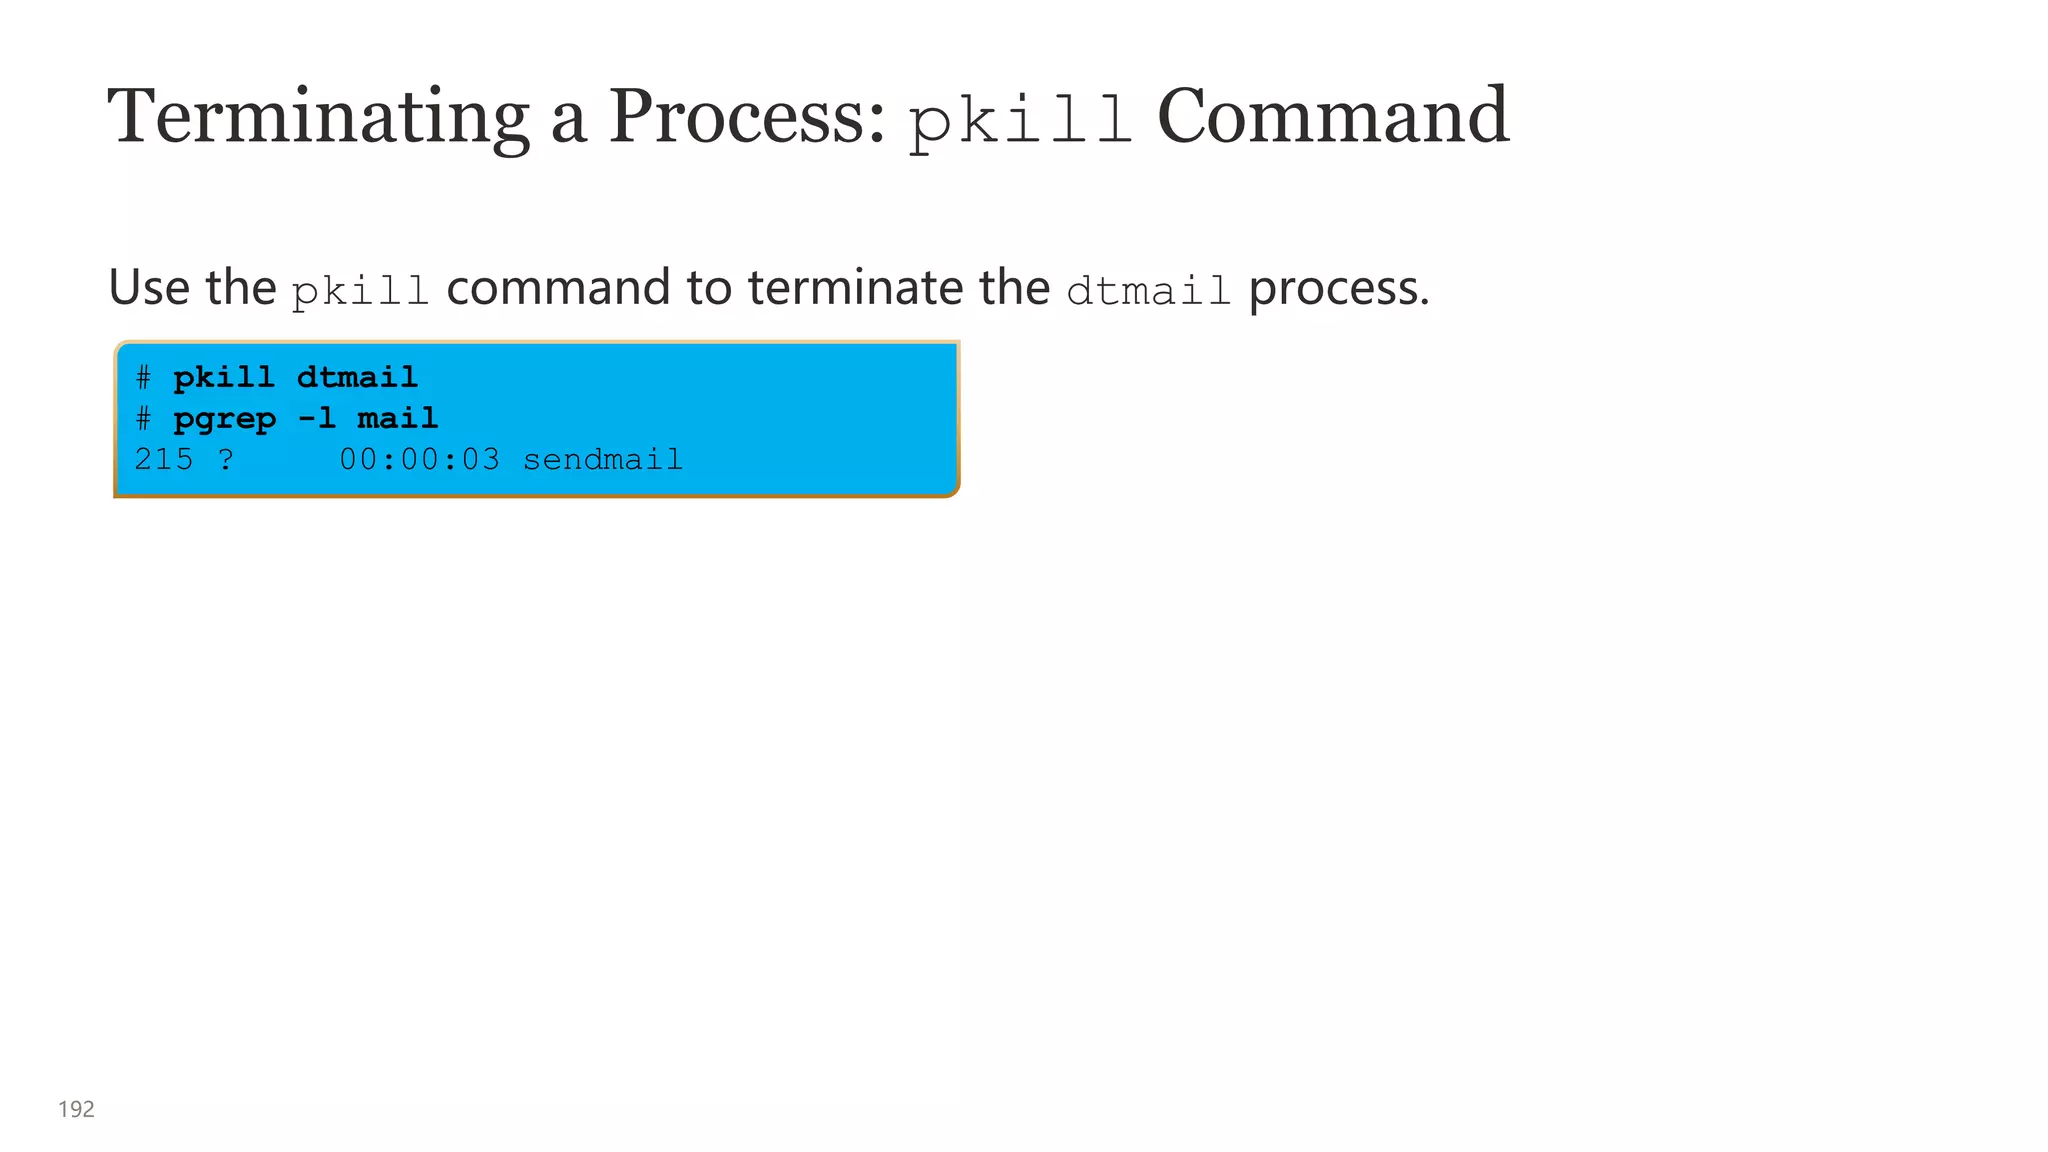
![191
Terminating a Process: pgrep and pkill Commands
• You can use the pgrep processname command to identify the ProcessName
or a regex_pattern to be killed, and then use the pkill command to kill it.
• The pkill command requires you to specify the ProcessName or a
regex_pattern instead of the PID of the process.
$ sleep 500 &
[1] 4378
$ pgrep sleep
4378
$ pgrep –l sleep
4378 sleep
$ pkill sleep
[1]+ Terminated sleep 500](https://image.slidesharecdn.com/kmsunixandlinux-230703111122-9797abd3/75/KMSUnix-and-Linux-pptx-191-2048.jpg)
![193
Forcefully Terminating a Process: Signal 9 (SIGKILL)
• Some processes ignore the default Termination signal (SIGTERM signal 15) that
the kill command sends.
• If a process does not respond to the Termination signal 15, you can force it to
terminate by sending the Kill signal (SIGKILL signal 9) with either the kill or the
pkill command.
Note: Sending the Termination signal 15 does not necessarily kill a process
gracefully. Only if the signal is caught by the process, it cleans itself up in an
orderly fashion and dies. If not, it just dies.
$ kill -9 PID
or
$ pkill -9 [ processname | regex_pattern ]](https://image.slidesharecdn.com/kmsunixandlinux-230703111122-9797abd3/75/KMSUnix-and-Linux-pptx-193-2048.jpg)
![196
Job Control Commands
Job control commands enable you to place jobs in the foreground or
background, and to start or stop jobs.
Option Description
Ctrl+Z
(SIGTSTP 19)
Stops the foreground job and places it in the background as a stopped job
jobs Lists all jobs and their job IDs
bg [%n] Places the current stopped job or the specified job ID in the background, where
job ID
fg [%n] Brings the current or specified job ID from the background to the foreground,
is the job ID
kill %n Deletes the job from the background, where n is the job ID
kill -19 %n Or, if signal 19 (SIGSTOP) is used, places the process associated with the job ID (n) in
a stopped state](https://image.slidesharecdn.com/kmsunixandlinux-230703111122-9797abd3/75/KMSUnix-and-Linux-pptx-196-2048.jpg)
![197
Running a Job in the Background
• To run a job in the background, you need to enter the command that you want
to run, followed by an ampersand (&), which is a shell metacharacter, at the end
of the command line.
– For example, to run the sleep command in the background:
– The shell returns the job ID, in brackets (which it assigns to the command), and
the associated PID.
Note: The sleep command suspends the execution of a program for n seconds.
$ sleep 500 &
[1] 3028](https://image.slidesharecdn.com/kmsunixandlinux-230703111122-9797abd3/75/KMSUnix-and-Linux-pptx-197-2048.jpg)
![198
Bringing a Background Job to the Foreground
• You can use the jobs command to list the jobs that are currently running or
stopped in the background.
• You can use the fg command to bring a background job to the foreground.
Note: The foreground job occupies the shell until the job is completed or
stopped and placed into the background.
$ jobs
[1] + Running sleep 500 &
$ fg %1
sleep 500](https://image.slidesharecdn.com/kmsunixandlinux-230703111122-9797abd3/75/KMSUnix-and-Linux-pptx-198-2048.jpg)
![201
Predefined Aliases
• In Oracle Linux, the GNU bash shell contains several predefined system aliases.
• You can display these predefined aliases by using the alias command.
Note: The alias command displays both system- and user-defined aliases.
[oracle@ol7-server1 ~]$ alias
alias egrep='egrep --color=auto'
alias fgrep='fgrep --color=auto'
alias grep='grep --color=auto'
alias l.='ls -d .* --color=auto'
alias ll='ls -l --color=auto'
alias ls='ls --color=auto'
alias vi='vim'
alias which='alias | /usr/bin/which --tty-only --read-alias --show-dot --show-tilde'](https://image.slidesharecdn.com/kmsunixandlinux-230703111122-9797abd3/75/KMSUnix-and-Linux-pptx-201-2048.jpg)

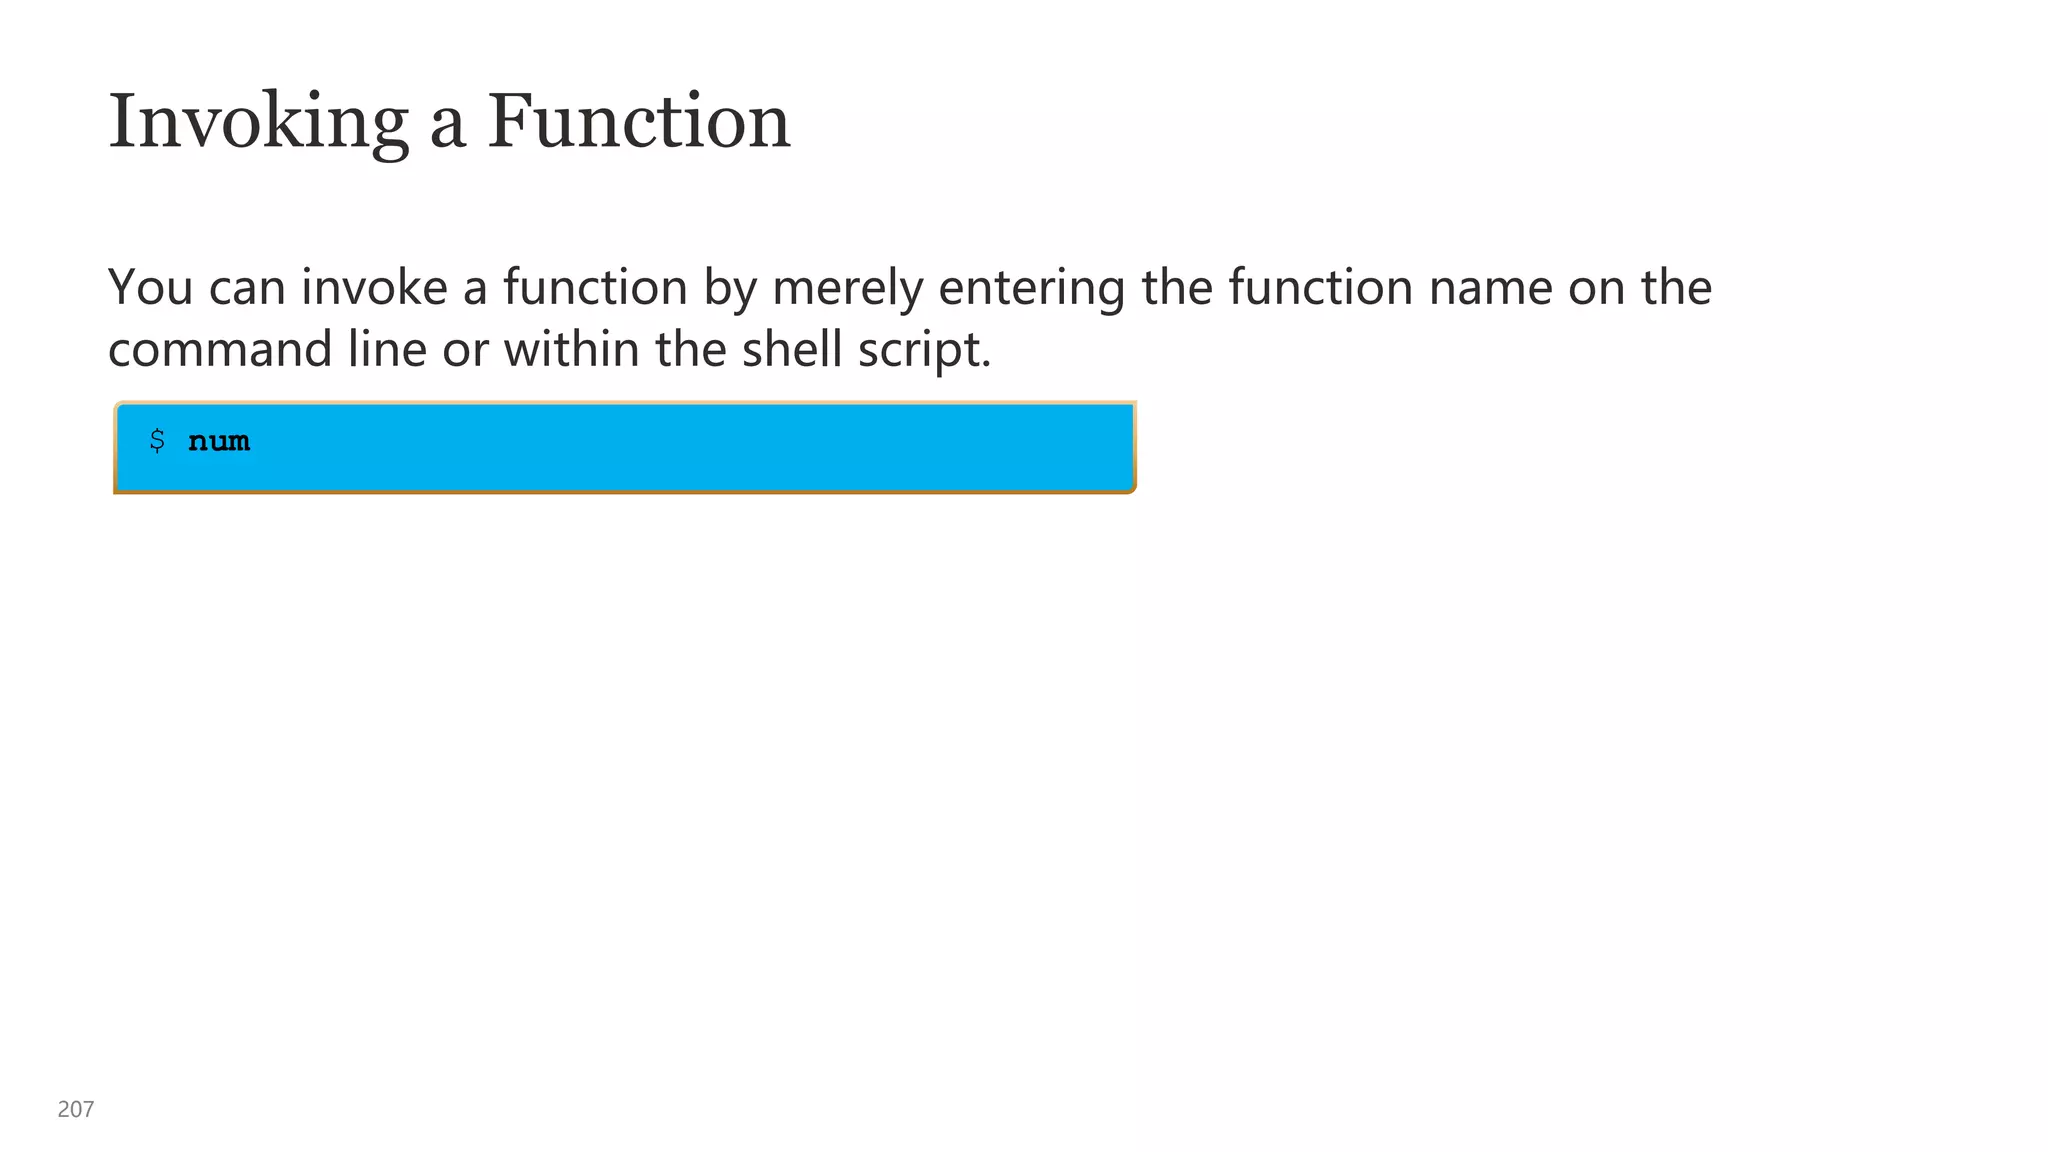
![206
Defining a Function
• A function is defined by using the following general syntax:
• To define a function called num that displays the total number of users currently
logged in to the system:
– The num function runs the who command, whose output is redirected to the wc
command.
• To remove a function, use the unset -f command:
function functionname [()] { compound-command [redirections]; }
$ function num { who | wc -l; }
$ unset -f num](https://image.slidesharecdn.com/kmsunixandlinux-230703111122-9797abd3/75/KMSUnix-and-Linux-pptx-206-2048.jpg)

![218
The test Command
• The shell built-in test command is used for testing conditions.
• The test command:
– Can be written as a test expression or written using the
[ expression ] special notation.
– Is also used for evaluating expressions, such as the following:
— Variable values
— File access permissions
— File types](https://image.slidesharecdn.com/kmsunixandlinux-230703111122-9797abd3/75/KMSUnix-and-Linux-pptx-218-2048.jpg)
![220
Integer/Arithmetic Test Comparison Operators
The Integer/Arithmetic test comparison operators use characters:
Operato Meaning Syntax
-eq Equal to [ "$var1" –eq "$var2" ]
Note1: ^ ^ ^ ^ required whitespace (IFS)
Note2: While not required, the double-quotes (" ") provide
excellent variable and value isolation and is
considered a Best Practice.
-ne Not equal to [ "$var1" –ne "$var2" ]
-le Less than or
equal to
[ "$var1" –le "$var2" ]
-ge Greater than
or equal to
[ "$var1" –ge "$var2" ]
-lt Less than [ "$var1" –lt "$var2" ]
-gt Greater than [ "$var1" –gt "$var2" ]](https://image.slidesharecdn.com/kmsunixandlinux-230703111122-9797abd3/75/KMSUnix-and-Linux-pptx-220-2048.jpg)
![221
String Test Comparison Operators
The String test comparison operators use symbols.
Operato Meaning Syntax
= or == Equal to [ "$str1" == "$str2" ]
Note: While both = and == are usable as string comparison
operators. The = is also used as an assignment
operator. The == is considered a Best Practice.
!= Not equal to [ "$str1" != "$str2" ]
-z String is null,
zero length
[ "$str1" –z "$str2" ]
-n String is not
null
[ "$str1" –n "$str2" ]
< Sorts before [ "$str1" < "$str2" ]
> Sorts after [ "$str1" > "$str2" ]](https://image.slidesharecdn.com/kmsunixandlinux-230703111122-9797abd3/75/KMSUnix-and-Linux-pptx-221-2048.jpg)
![222
File Test Comparison Operators
The File test comparison operators use characters. (Not a complete listing.)
Operator Meaning Syntax
-e (or -a) filename File exists [ -e filename ]
-f filename File is a regular file [ -f filename ]
-d filename File is directory [ -d filename ]
-c filename File is a character device [ -c filename ]
-b filename File is a block device [ -d filename ]
-h (or -L) filename File is a symbolic link [ -h filename ]
-r filename File is a readable [ -r filename ]
-w filename File is a writeable [ -w filename ]
-x filename File is a executable [ -x filename ]
-s filename File size is bigger than zero
bytes (not empty)
[ -s filename ]](https://image.slidesharecdn.com/kmsunixandlinux-230703111122-9797abd3/75/KMSUnix-and-Linux-pptx-222-2048.jpg)
![223
if test condition
then
command
...
fi
Using the test Command in an if Statement
• The test condition command or [ expression ] special notation often follows
the if statement.
• The test command evaluates a condition and, if the result of the test is true, it
returns an exit status of zero.
• If the result of the test is false, the test command returns a nonzero exit status.
if [ expression ]
then
command
...
fi](https://image.slidesharecdn.com/kmsunixandlinux-230703111122-9797abd3/75/KMSUnix-and-Linux-pptx-223-2048.jpg)
![228
The if Statement
• The if statement evaluates the exit status of a command and initiates
additional actions based on the return value.
• If the exit status is zero (true), any commands that follow the then statement
are run.
• If the exit status is nonzero (false), any commands that follow the else
statement are run.
$ if [ command | test ];
> then # on true execute
> command1
> ...
> else # on false execute
> commandn
> ...
> fi](https://image.slidesharecdn.com/kmsunixandlinux-230703111122-9797abd3/75/KMSUnix-and-Linux-pptx-228-2048.jpg)
![229
The if Statement Additional Syntax
Within the if statement, there can be multiple nested if test using the elif
syntax in place of an else.
$ if [ command1 | test1 ];
> then # on true execute
> commandn
> ...
> elif [ command2 | test2 ]; # on false run a second nested test
> then # on true from the second nested test execute
> commandn
> ...
> else # on false from the second nested test execute
> commandn
> ...
> fi](https://image.slidesharecdn.com/kmsunixandlinux-230703111122-9797abd3/75/KMSUnix-and-Linux-pptx-229-2048.jpg)
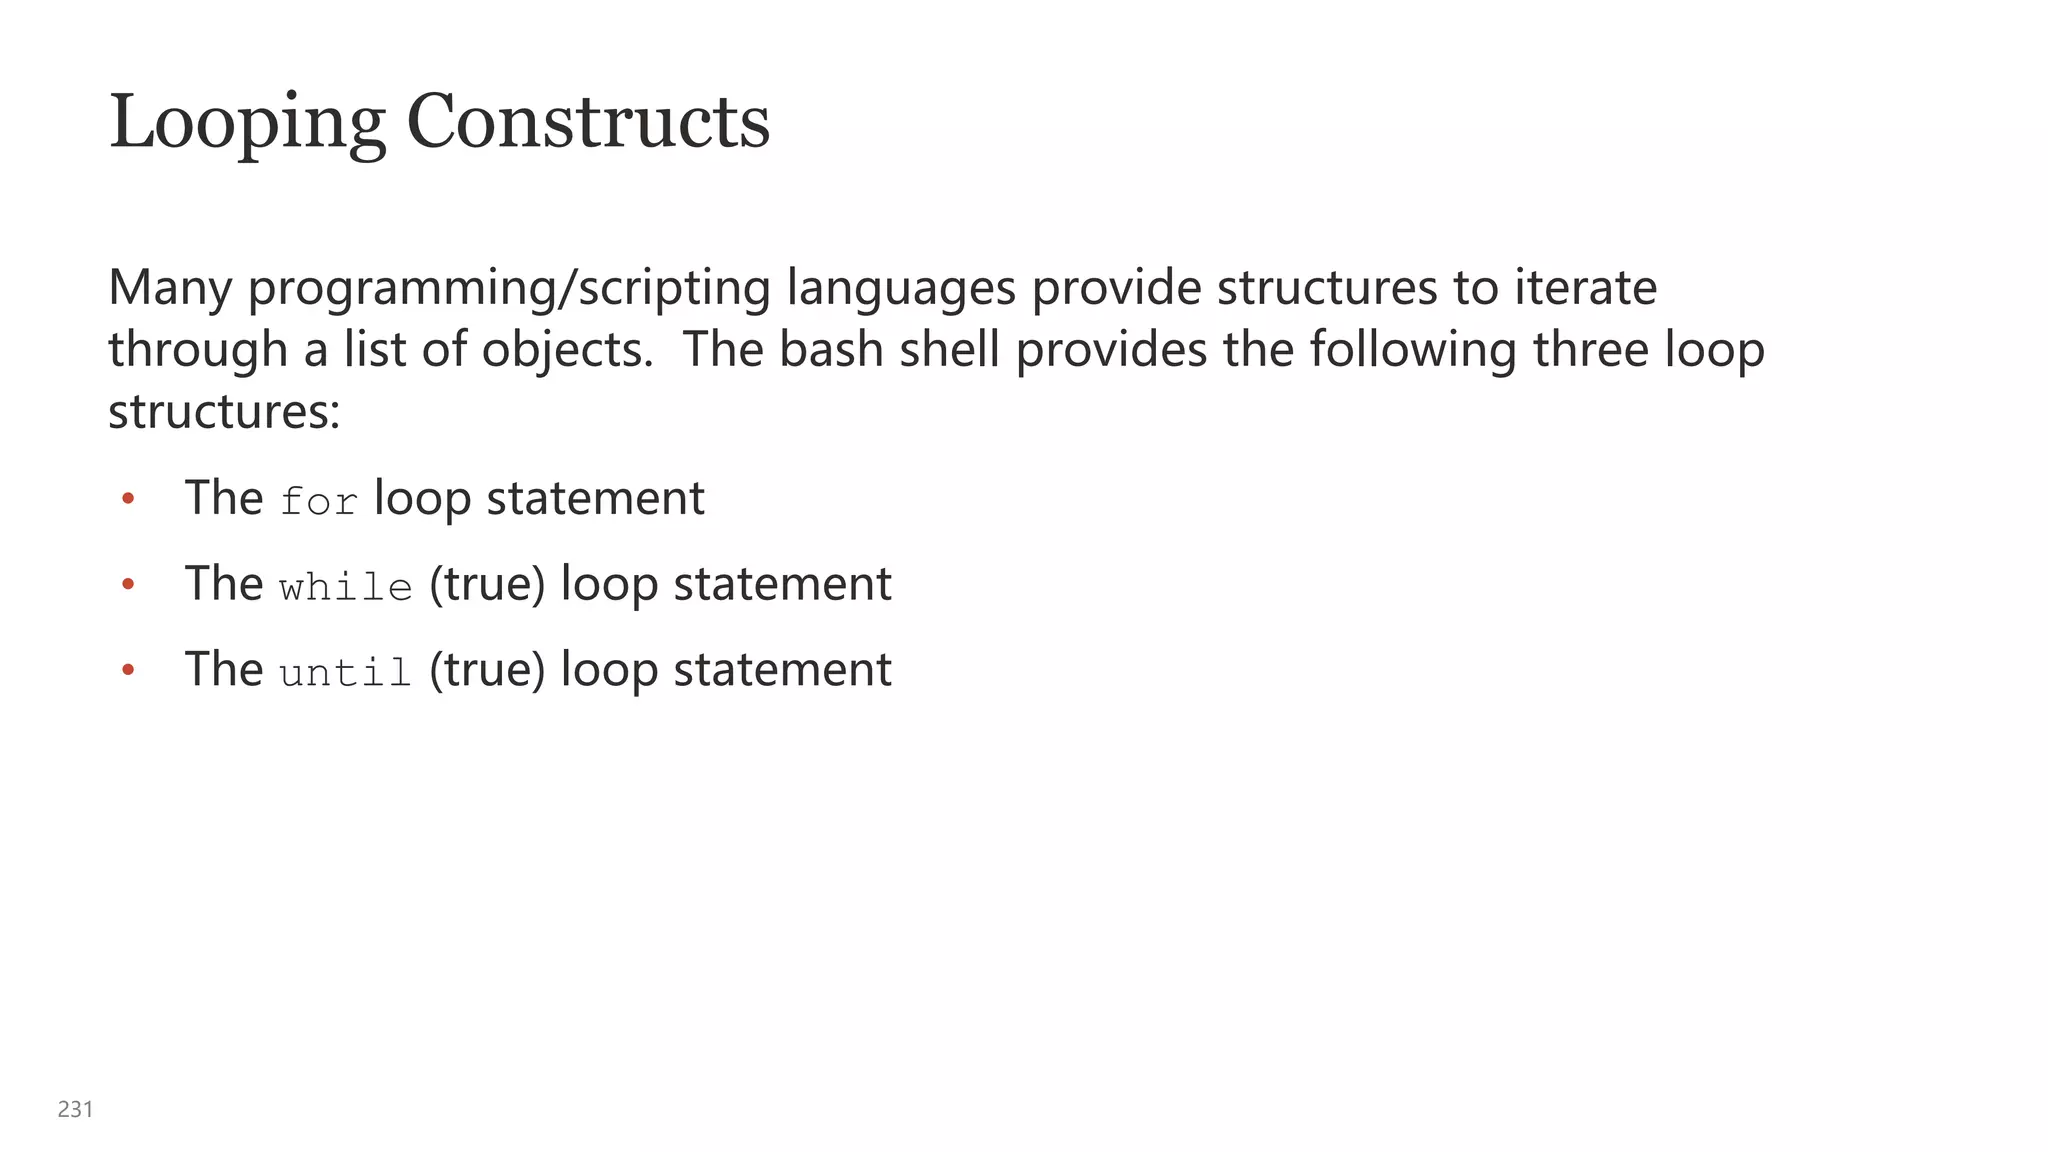
![232
The for Loop Statement
• The for command enables you to repeat a command or group of commands in
a loop.
• The for command evaluates the exit status of the in operation that follows it.
– If the exit status is zero, any instructions that follow the do statement are run,
command or test is rerun, and the exit status rechecked.
– If the exit status is nonzero, the loop terminates.
$ for arg in [ command | test ]
> do
> commandn
> ...
> done](https://image.slidesharecdn.com/kmsunixandlinux-230703111122-9797abd3/75/KMSUnix-and-Linux-pptx-232-2048.jpg)
![233
The while (True) Loop Statement
• The while command enables you to repeat a command or group of commands
in a loop.
• The while command evaluates the exit status of the command or the test
command that follows it.
– If the exit status is zero, any instructions that follow the do statement are run,
command or test is rerun, and the exit status rechecked.
– If the exit status is nonzero, the loop terminates.
$ while [ command | test ]
> do
> commandn
> ...
> done](https://image.slidesharecdn.com/kmsunixandlinux-230703111122-9797abd3/75/KMSUnix-and-Linux-pptx-233-2048.jpg)
![234
The until (True) Loop Statement
• The until command enables you to repeat a command or a group of
commands in a loop:
• The until command evaluates the exit status of the command or the test
command that follows it.
– If the exit status is nonzero, any instructions that follow the do statement are
run, command or test is rerun, and the exit status rechecked.
– If the exit status is zero, the loop terminates.
$ until [ command | test ]
> do
> commandn
> ...
> done](https://image.slidesharecdn.com/kmsunixandlinux-230703111122-9797abd3/75/KMSUnix-and-Linux-pptx-234-2048.jpg)

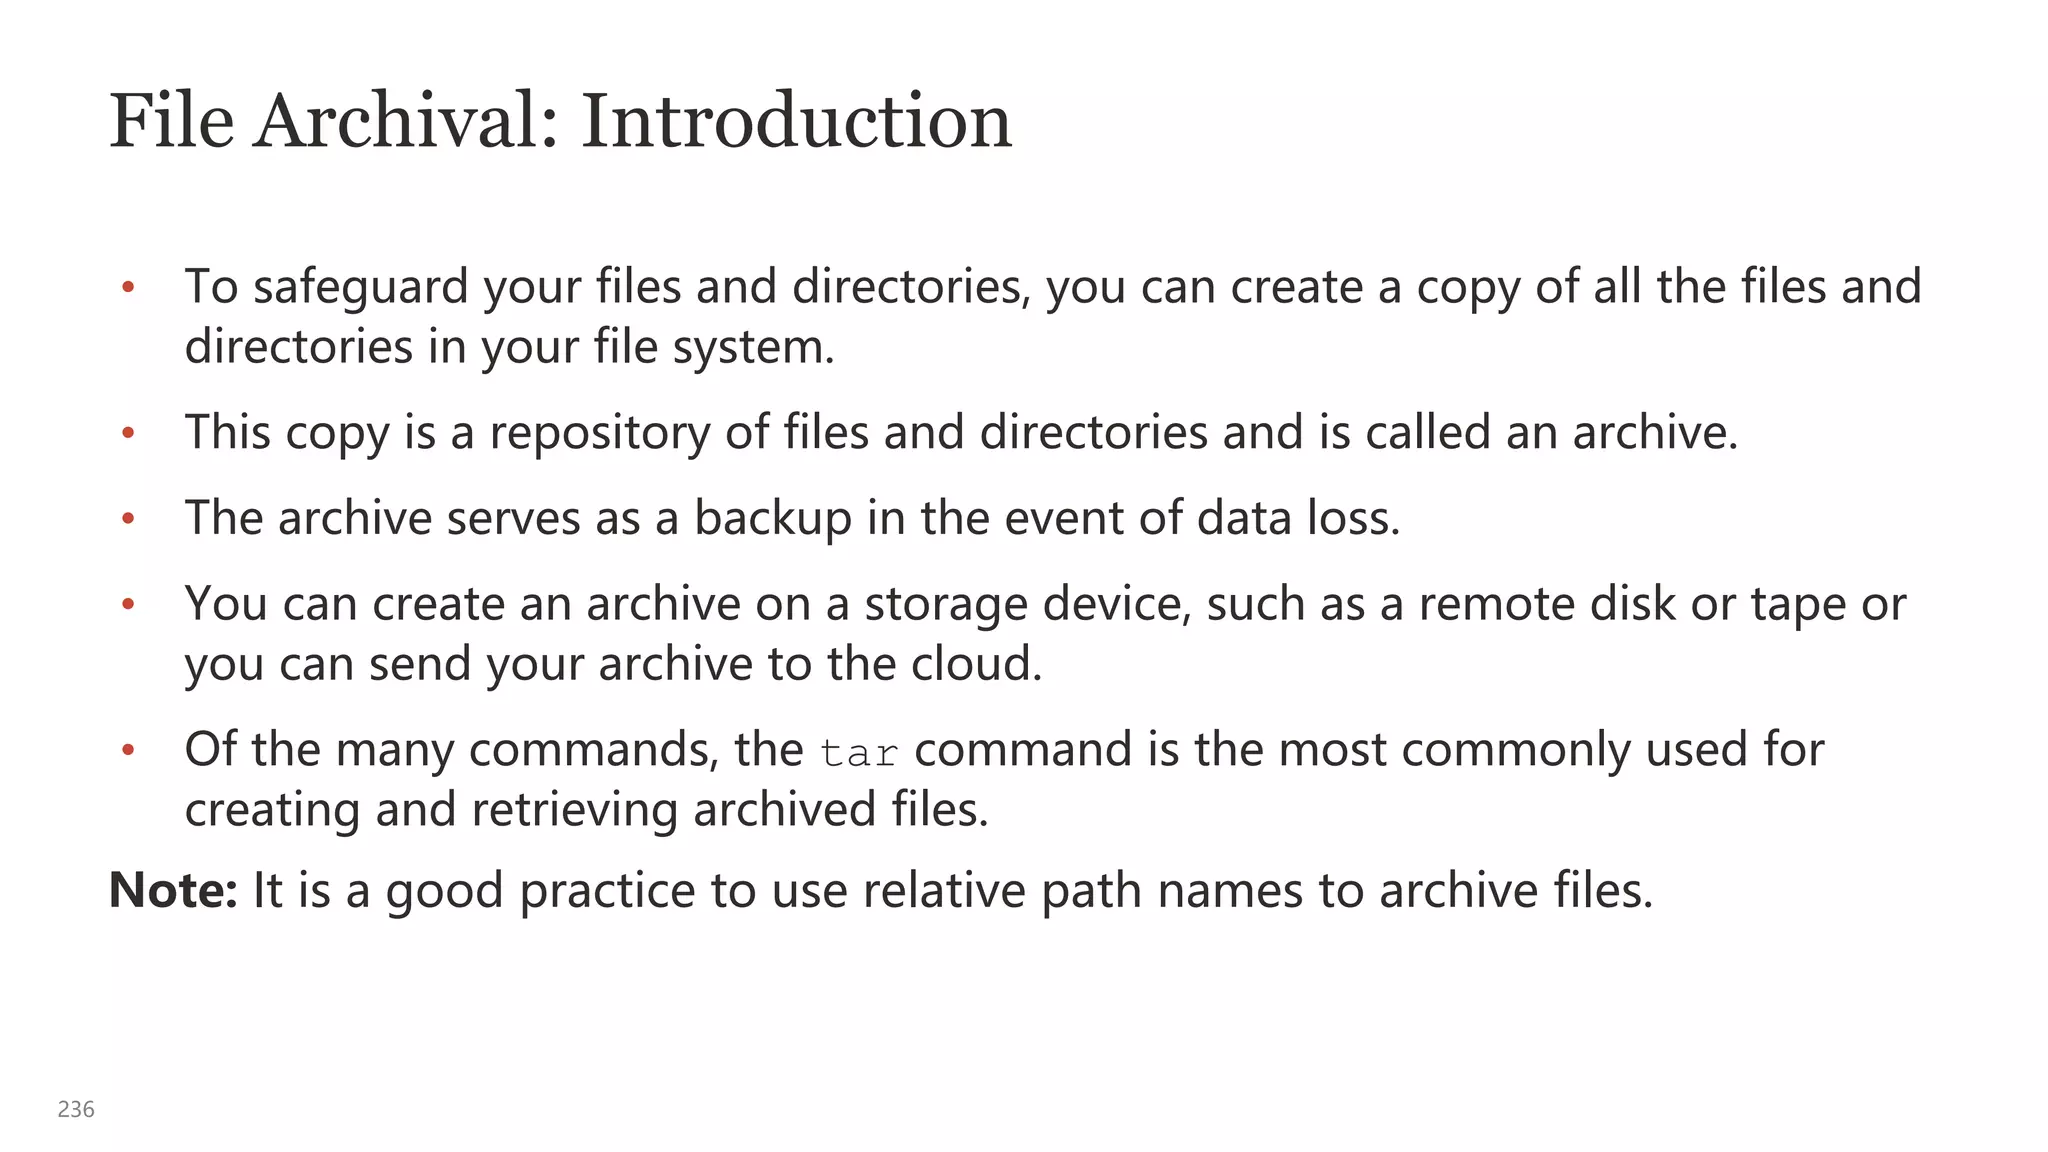
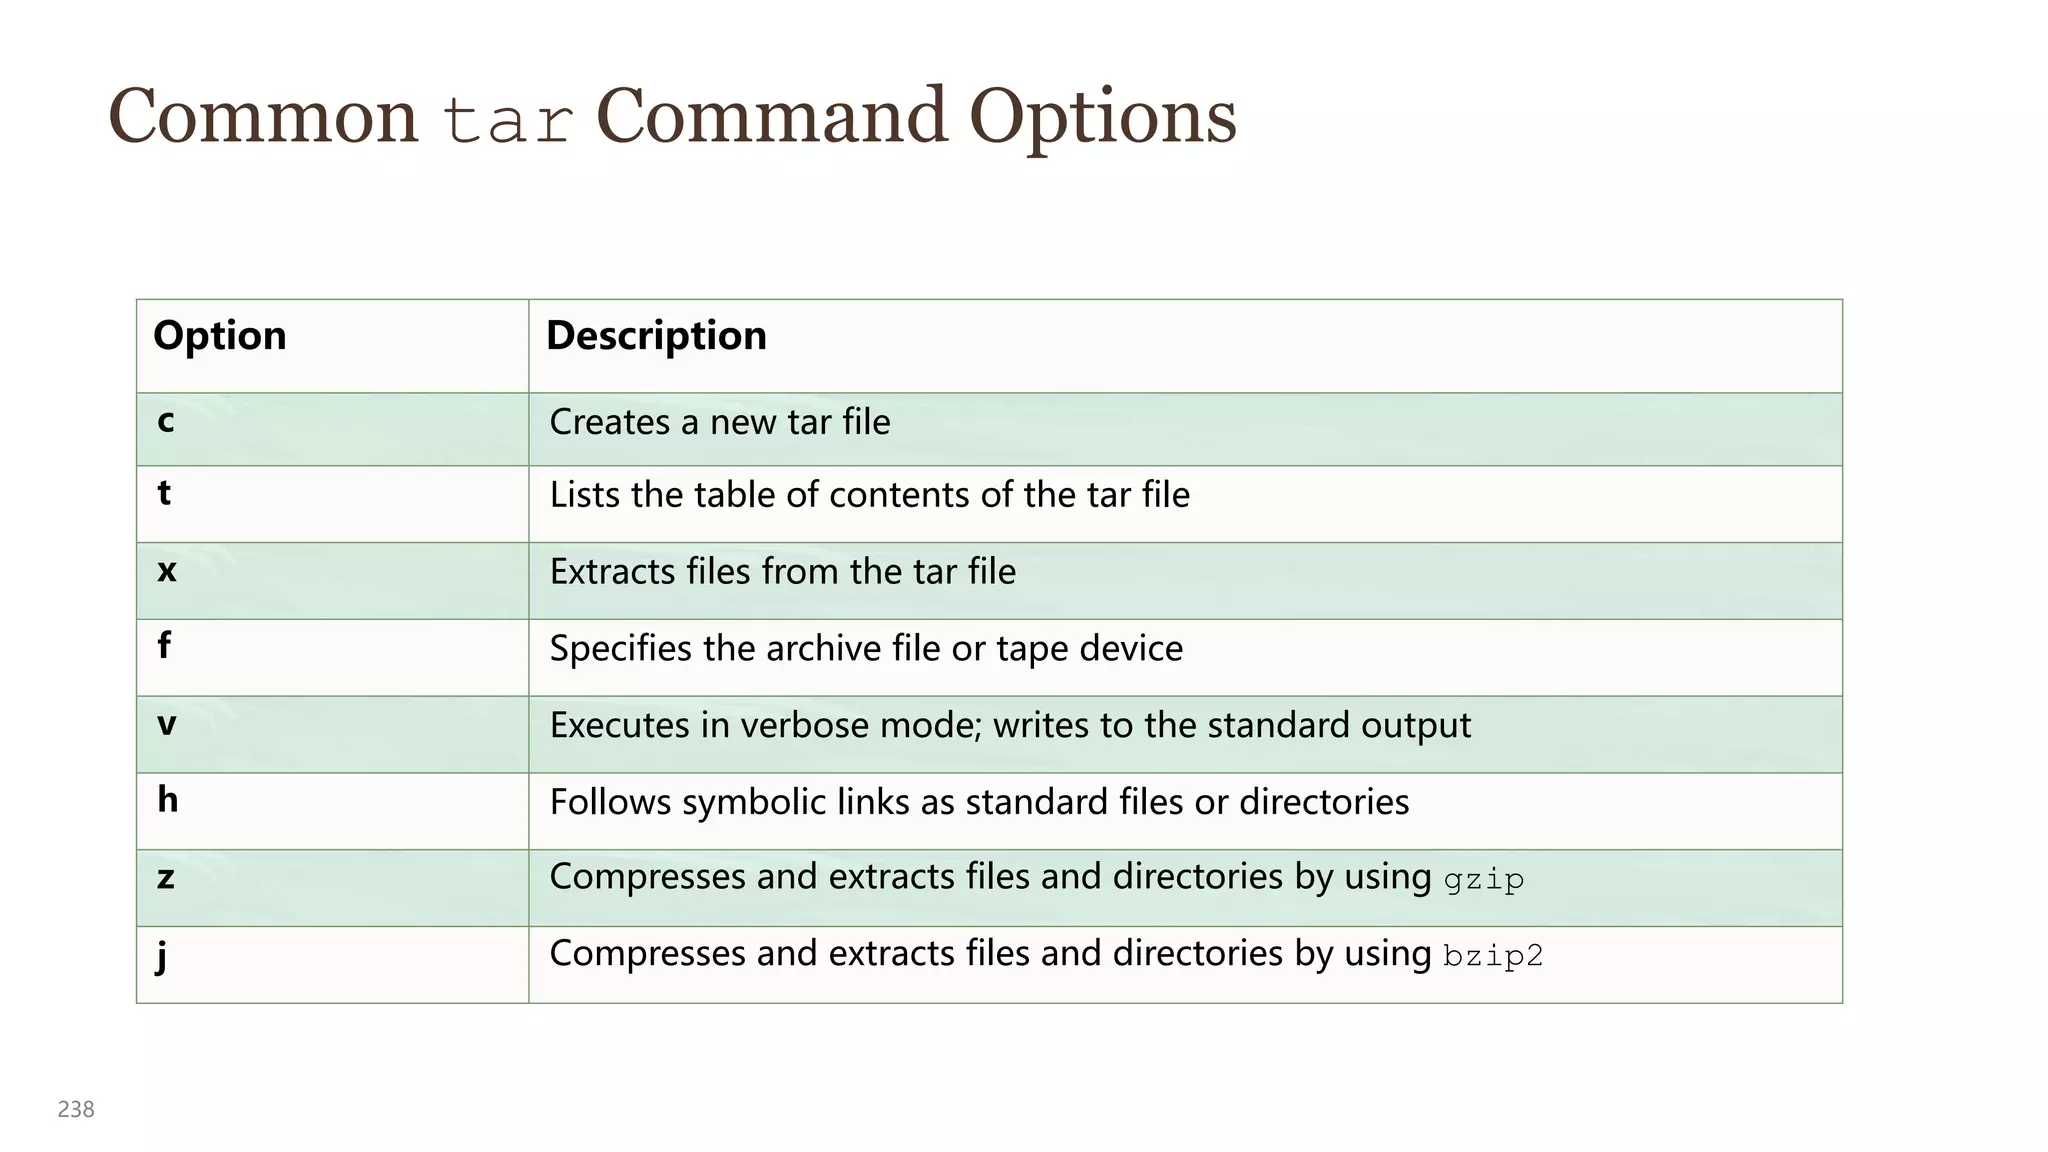
![237
The tar Command
• The tar command creates, adds, deletes, lists, or extracts files in a tape archive
file.
• The output of using a tar command is a tar file.
• The default output location for a tar file in UNIX and Linux is stdout.
$ tar [options] archivefile filenames](https://image.slidesharecdn.com/kmsunixandlinux-230703111122-9797abd3/75/KMSUnix-and-Linux-pptx-237-2048.jpg)
![239
Creating a tar Archive
• You can use the tar command to create an archive file containing multiple files
or directories on a disk or in a single file.
• The following example shows you how to archive your home directory on a disk:
• The following example shows you how to archive multiple files into an archive
file called files.tar:
$ tar [-]cvf /dev/rmt/0 .
a ./ 0 tape blocks
a ./.rhosts 1 tape blocks
...(output truncated)
$ tar [-]cvf files.tar file1 file2 file3
a file1 2K
a file2 1K
a file3 1K](https://image.slidesharecdn.com/kmsunixandlinux-230703111122-9797abd3/75/KMSUnix-and-Linux-pptx-239-2048.jpg)
![240
Viewing the Table of Contents of a tar Archive
• You can view the names of all the files that have been written directly to a disk
or an archive file.
• To view the table of contents of Oracle's home directory on the disk:
• To view the verbose content of the files.tar archive file:
$ tar [-]tf /dev/rmt/0
/.rhosts
./dante
./fruit
...(output truncated)
$ tar [-]tvf files.tar
-rw-rw-r–- oracle/oracle 1610 ... file1
-rw-rw-r-- oracle/oracle 105 ... file2
...(output truncated)](https://image.slidesharecdn.com/kmsunixandlinux-230703111122-9797abd3/75/KMSUnix-and-Linux-pptx-240-2048.jpg)
![241
Extracting a tar Archive
• You can retrieve or extract the entire contents of an archive or a single file that
was written directly to a disk device or to an archive file.
• To retrieve all the files from the disk archive, enter the following command:
• To extract or restore a single file from the files.tar archive file, enter the
following command:
$ tar [-]xvf /dev/rmt/0
x ., 0 bytes, 0 tape blocks
x ./.rhosts, 2 bytes, 1 tape blocks
...(output truncated)
$ tar [-]xvf files.tar file1
x file1, 1610 bytes, 4 tape blocks](https://image.slidesharecdn.com/kmsunixandlinux-230703111122-9797abd3/75/KMSUnix-and-Linux-pptx-241-2048.jpg)
![243
Compressing a File: gzip Command
• Use the gzip command to compress files:
• For example, to compress a set of files, file1, file2, file3, and file4, enter
the following command:
$ gzip file1 file2 file3 file4
$ ls *.gz
file1.gz file2.gz file3.gz file4.gz
$ gzip [options] filename(s)](https://image.slidesharecdn.com/kmsunixandlinux-230703111122-9797abd3/75/KMSUnix-and-Linux-pptx-243-2048.jpg)
![244
Uncompressing a File: gunzip Command
• The gunzip or gzip –d command uncompresses a file that has been
compressed by using the gzip command:
• To uncompress or decompress the file1.gz file, use the following command:
$ gunzip [options] filename
$ gunzip file1.gz
or
$ gzip –d file1.gz](https://image.slidesharecdn.com/kmsunixandlinux-230703111122-9797abd3/75/KMSUnix-and-Linux-pptx-244-2048.jpg)
![245
Viewing a Compressed File: zcat Command
• In Oracle Linux, the zcat command prints the uncompressed form of a
compressed file to stdout.
• To view the content of the dante.gz compressed file, enter the following
command:
Note: The zcat command interprets the compressed data and displays the
content
of the file as if it were not compressed.
$ zcat dante.gz | less
The Life and Times of Dante
by Dante Pocai
Mention "Alighieri" and few may know about whom you are talking. Say
"Dante," instead, and the whole world knows whom you mean. For
$ zcat [options] filename](https://image.slidesharecdn.com/kmsunixandlinux-230703111122-9797abd3/75/KMSUnix-and-Linux-pptx-245-2048.jpg)
![246
Archiving and Compressing Multiple Files: zip
Command
• The zip command archives and compresses multiple files into a single archive
file, and is compatible with files created by using pkzip.
• To compress file2 and file3 into the file.zip archive file:
$ zip file.zip file2 file3
adding: file2 (deflated 16%
adding: file3 (deflated 26%)
$ ls
file.zip
file2
file3
$ zip [options] archivefile filename(s)](https://image.slidesharecdn.com/kmsunixandlinux-230703111122-9797abd3/75/KMSUnix-and-Linux-pptx-246-2048.jpg)
![247
Viewing and Uncompressing Archive Files:
unzip Command
• The unzip command is used for listing the files and also for extracting the
content of a compressed .zip file.
• To uncompress the file.zip archive file, use the following command:
$ unzip [options] archivefile
$ unzip file.zip](https://image.slidesharecdn.com/kmsunixandlinux-230703111122-9797abd3/75/KMSUnix-and-Linux-pptx-247-2048.jpg)
![248
Compressing a File: bzip2 Command
• Use the bzip2 command to compress files.
• For example, to compress a set of files, file1, file2, file3, and file4, enter
the following command:
$ bzip2 file1 file2 file3 file4
$ ls *.bz2
file1.bz2 file2.bz2 file3.bz2 file4.bz2
$ bzip2 [options] filename(s)](https://image.slidesharecdn.com/kmsunixandlinux-230703111122-9797abd3/75/KMSUnix-and-Linux-pptx-248-2048.jpg)
![249
Uncompressing a File: bunzip2 Command
• The bunzip2 command uncompresses a file that has been compressed with the
bzip2 command.
• To uncompress the file1.bz2 file, use the following command:
$ bunzip2 [options] filename
$ bunzip2 file1.bz2](https://image.slidesharecdn.com/kmsunixandlinux-230703111122-9797abd3/75/KMSUnix-and-Linux-pptx-249-2048.jpg)
![250
Viewing a Compressed File: bzcat Command
• The bzcat command prints the uncompressed form of a compressed file to
stdout.
• To view the content of the dante.bz2 compressed file, enter the
following command:
Note: The bzcat command interprets the compressed data and displays the
content of the file as if it were not compressed.
$ bzcat dante.bz2 | less
The Life and Times of Dante
by Dante Pocai
Mention "Alighieri" and few may know about whom you are talking. Say
$ bzcat [options] filename](https://image.slidesharecdn.com/kmsunixandlinux-230703111122-9797abd3/75/KMSUnix-and-Linux-pptx-250-2048.jpg)

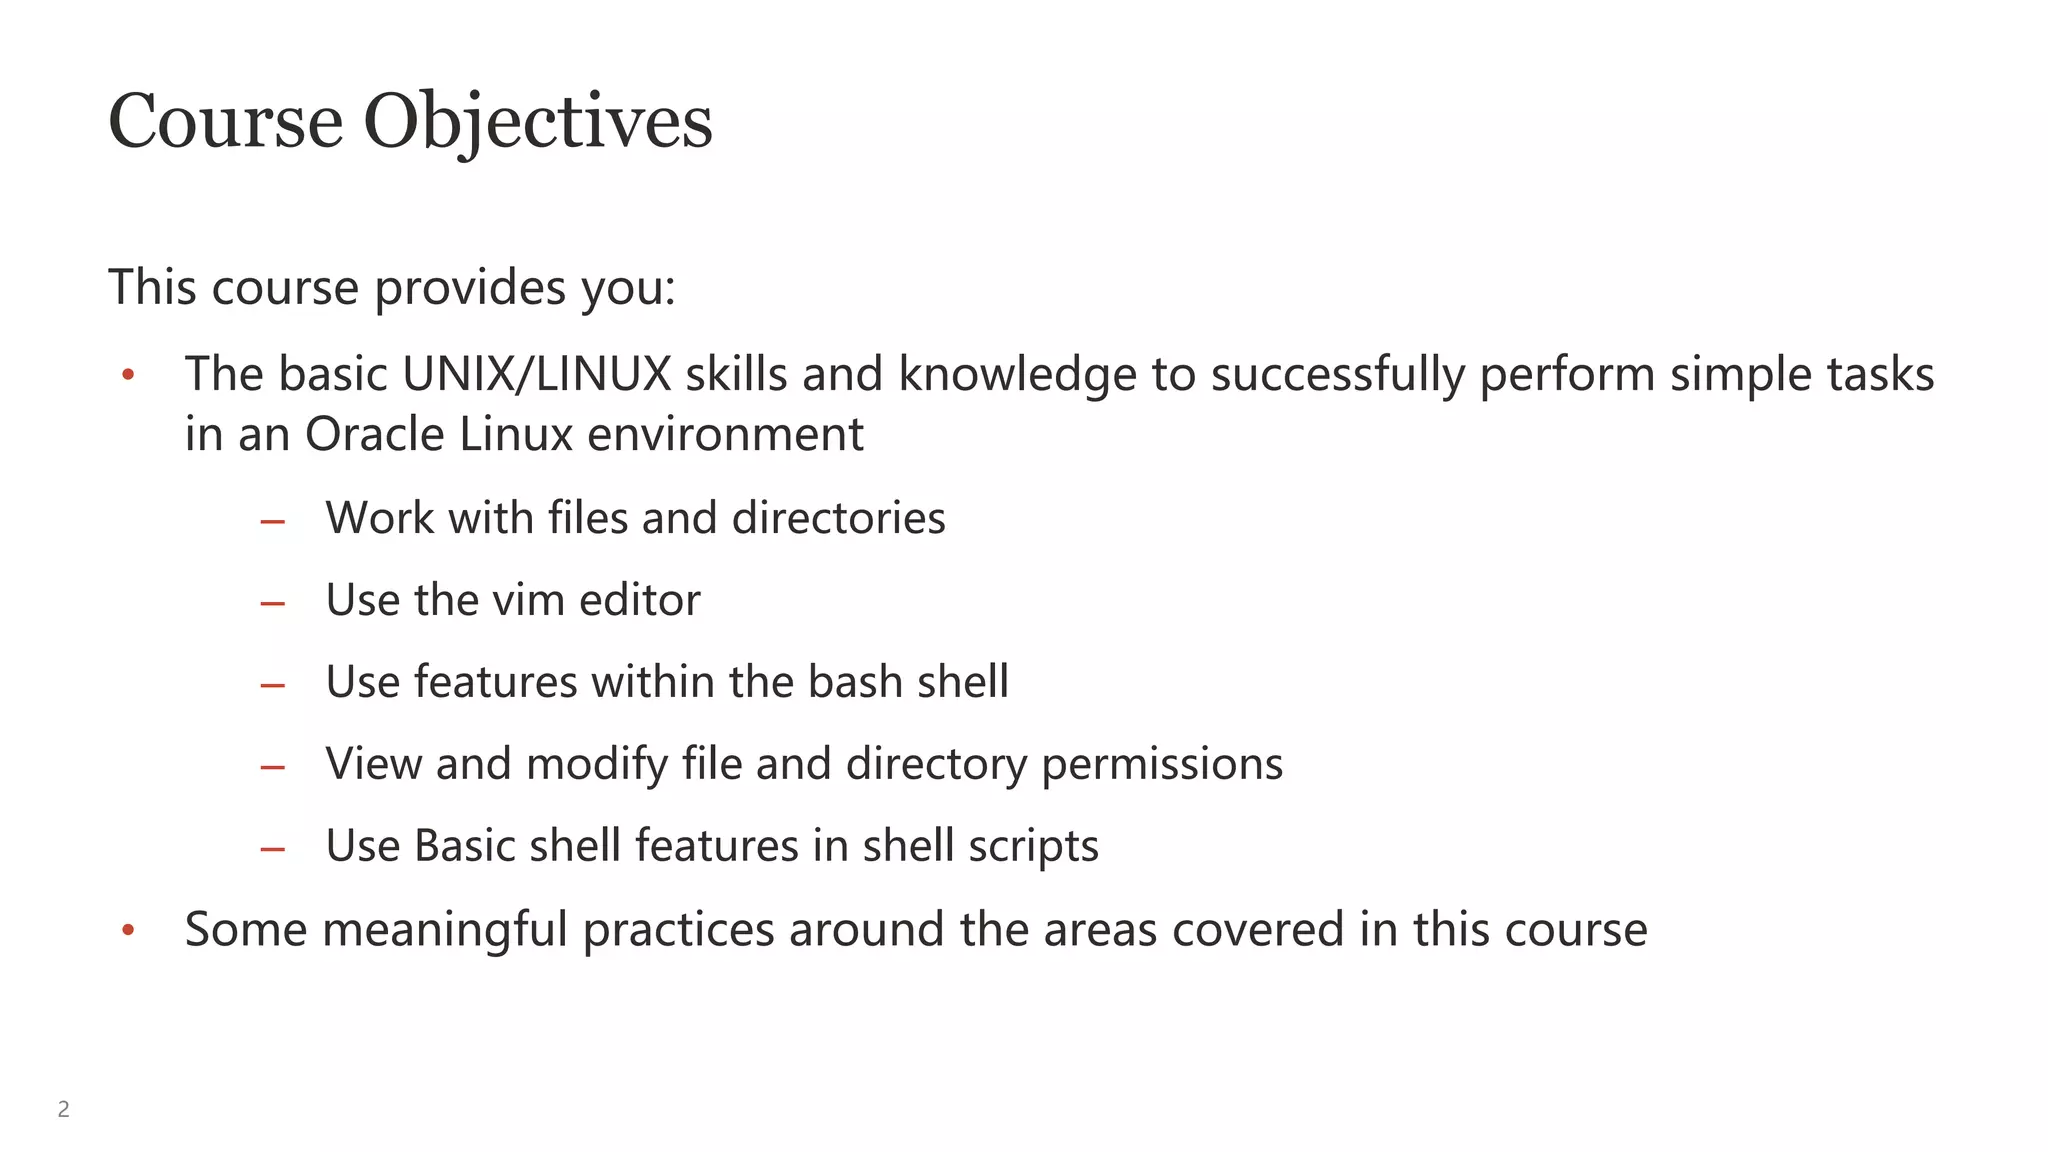
This document outlines a course on Unix/Linux essentials, covering basic skills such as using the bash shell, working with files and directories, and modifying permissions. It also provides historical context about the development of Unix and Linux, describes key components of the operating systems, and explains command-line usage and commands for managing files. Additionally, it touches on user accounts, changing passwords, and searching man pages for command references.