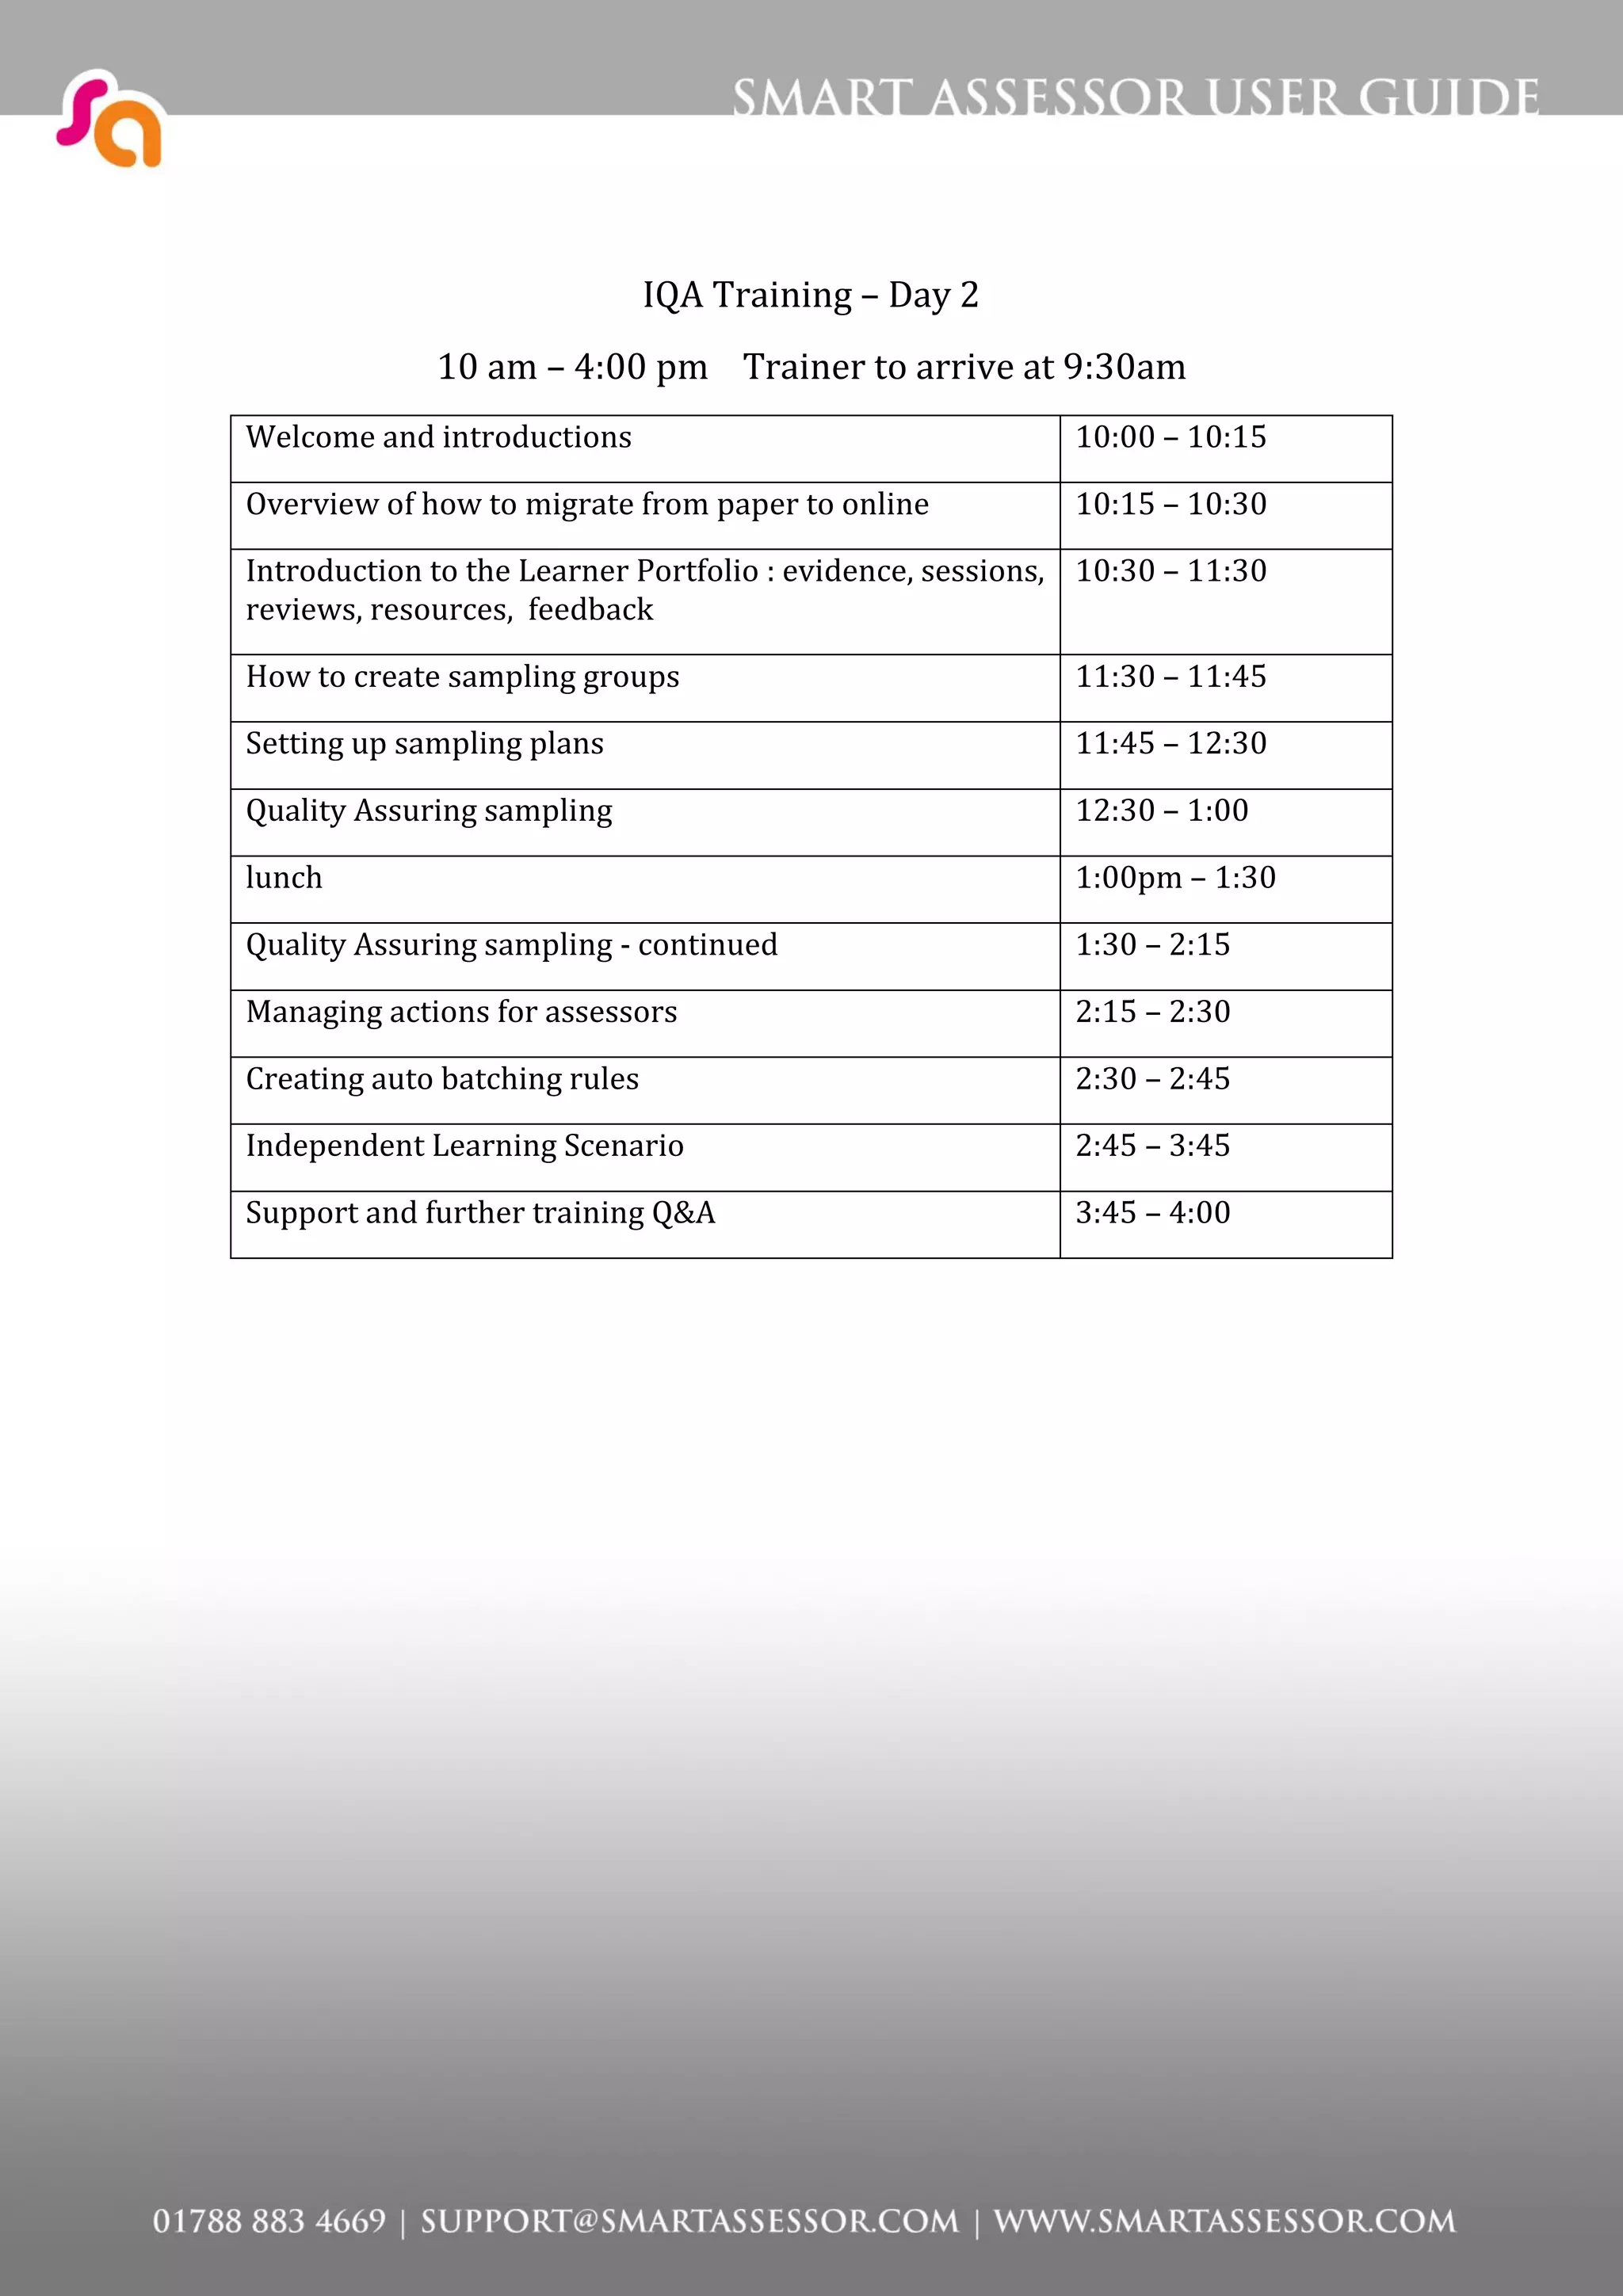
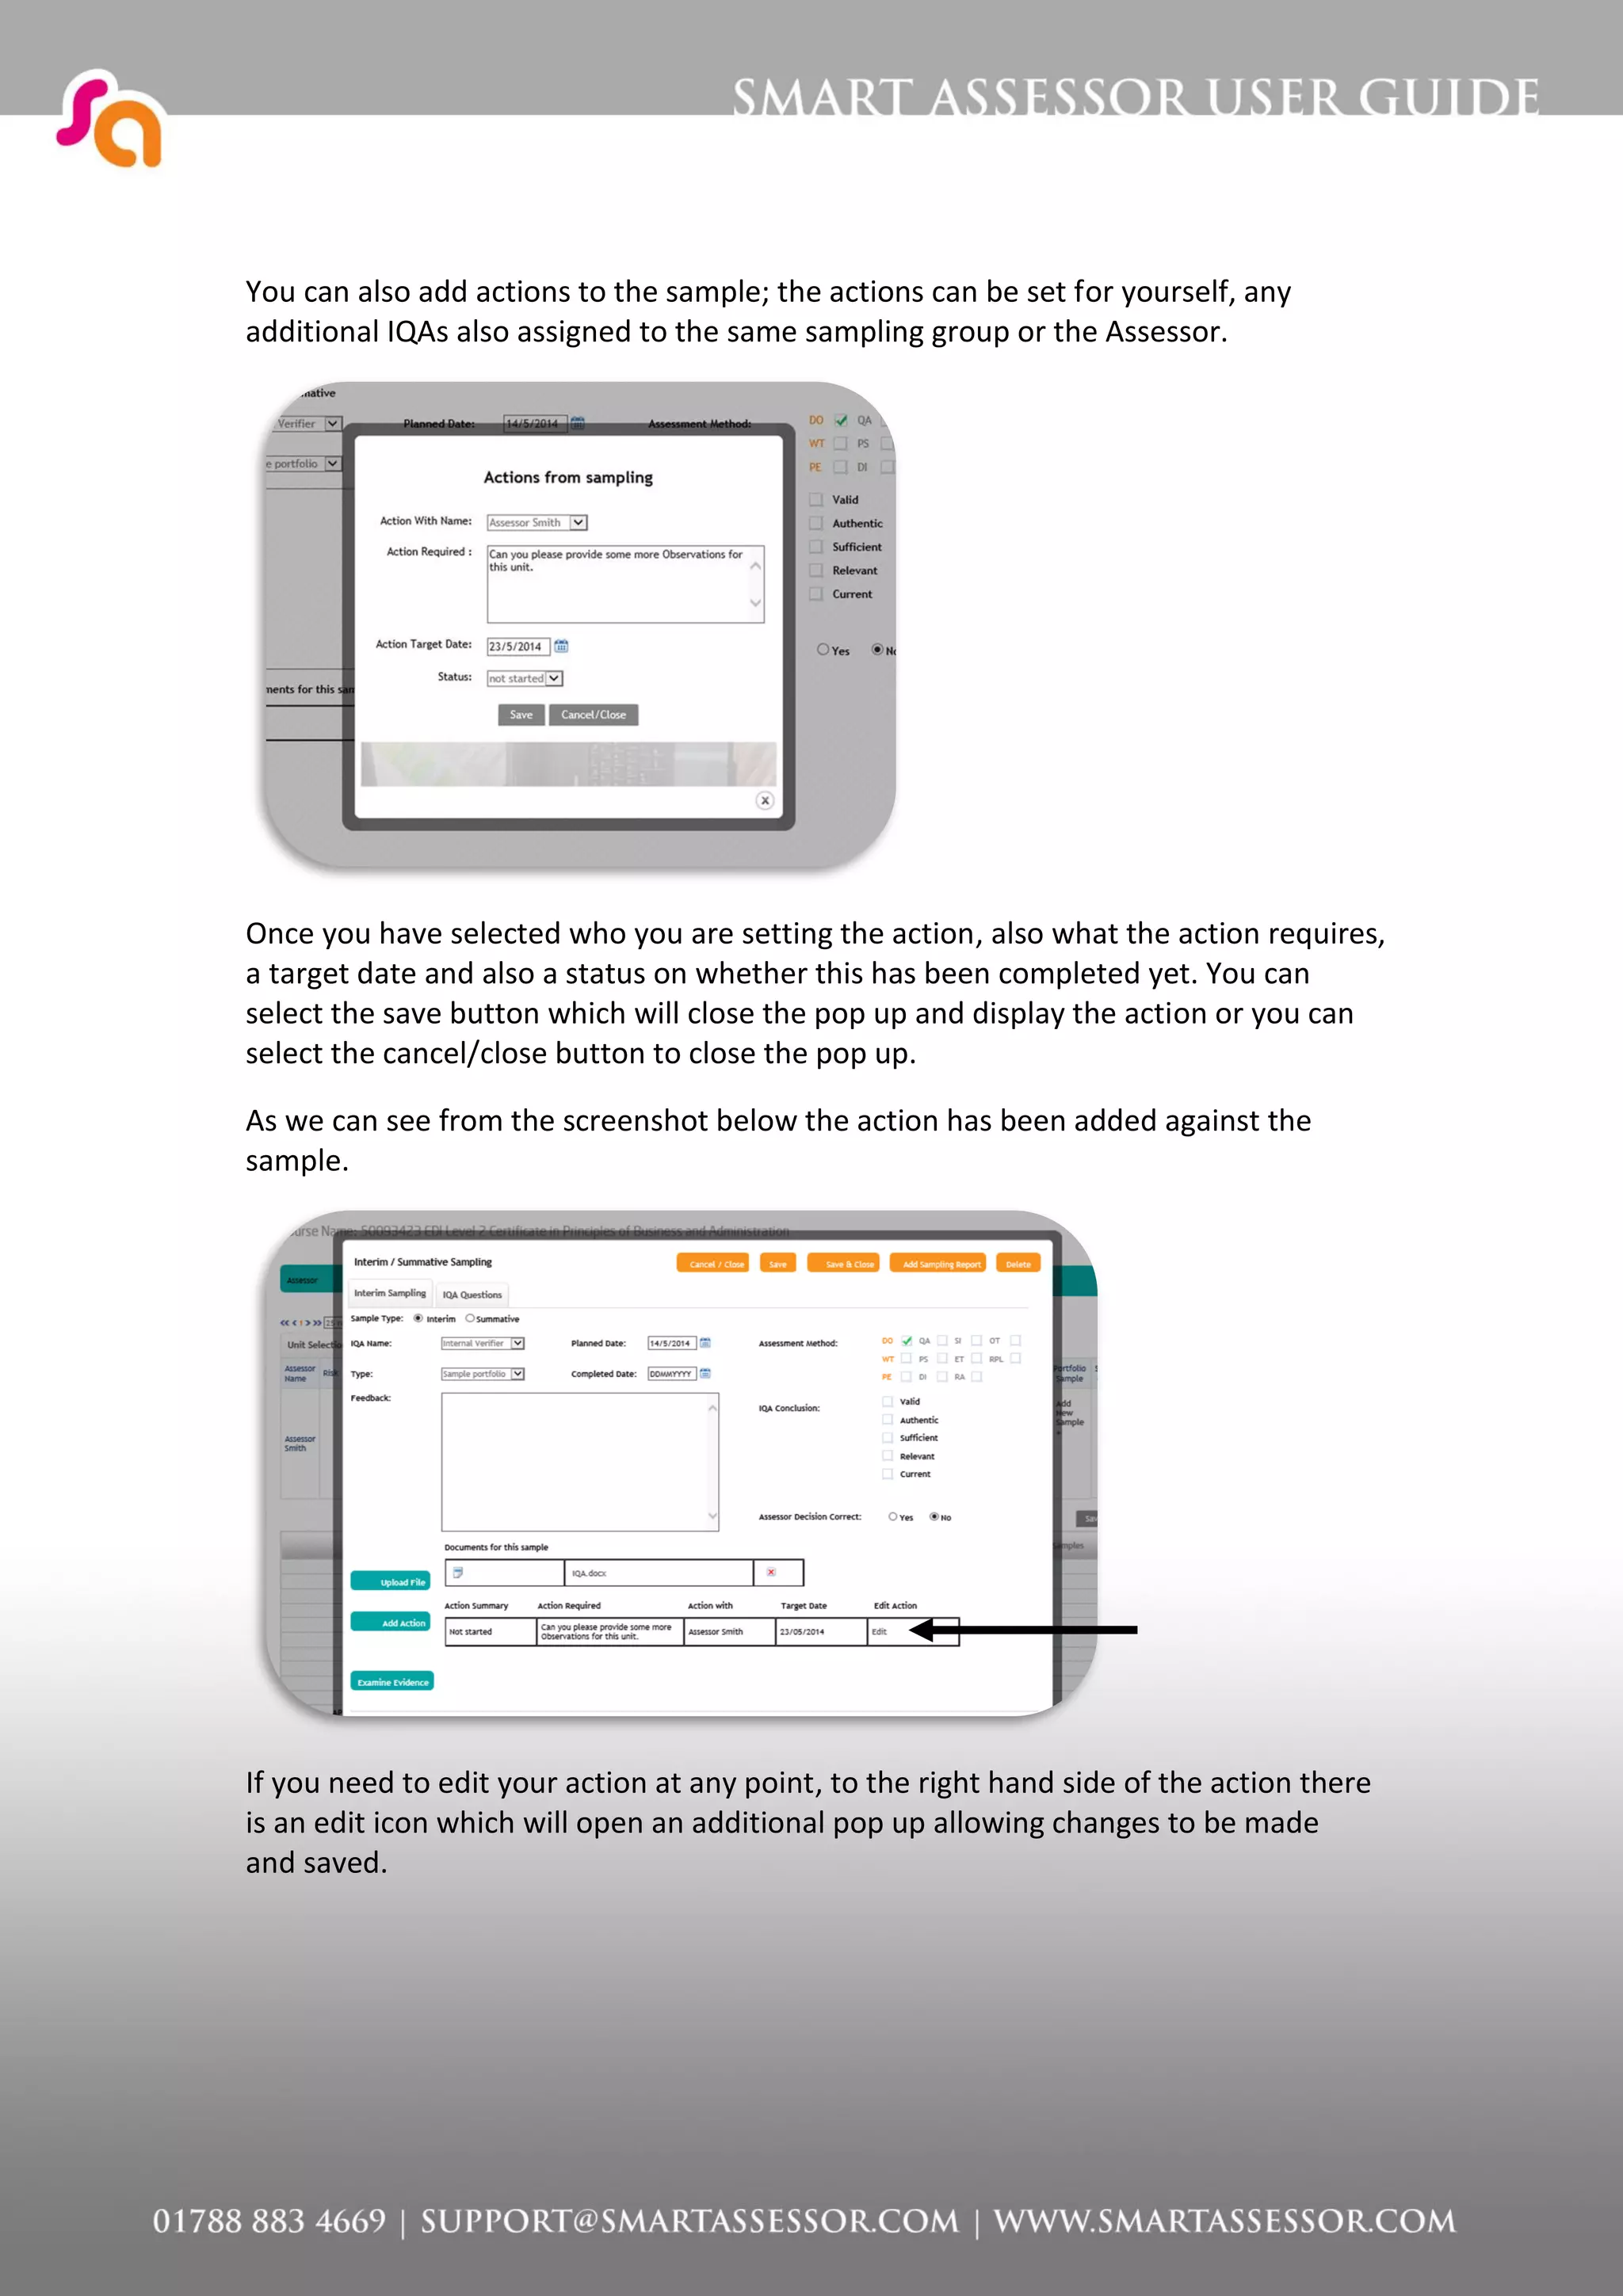
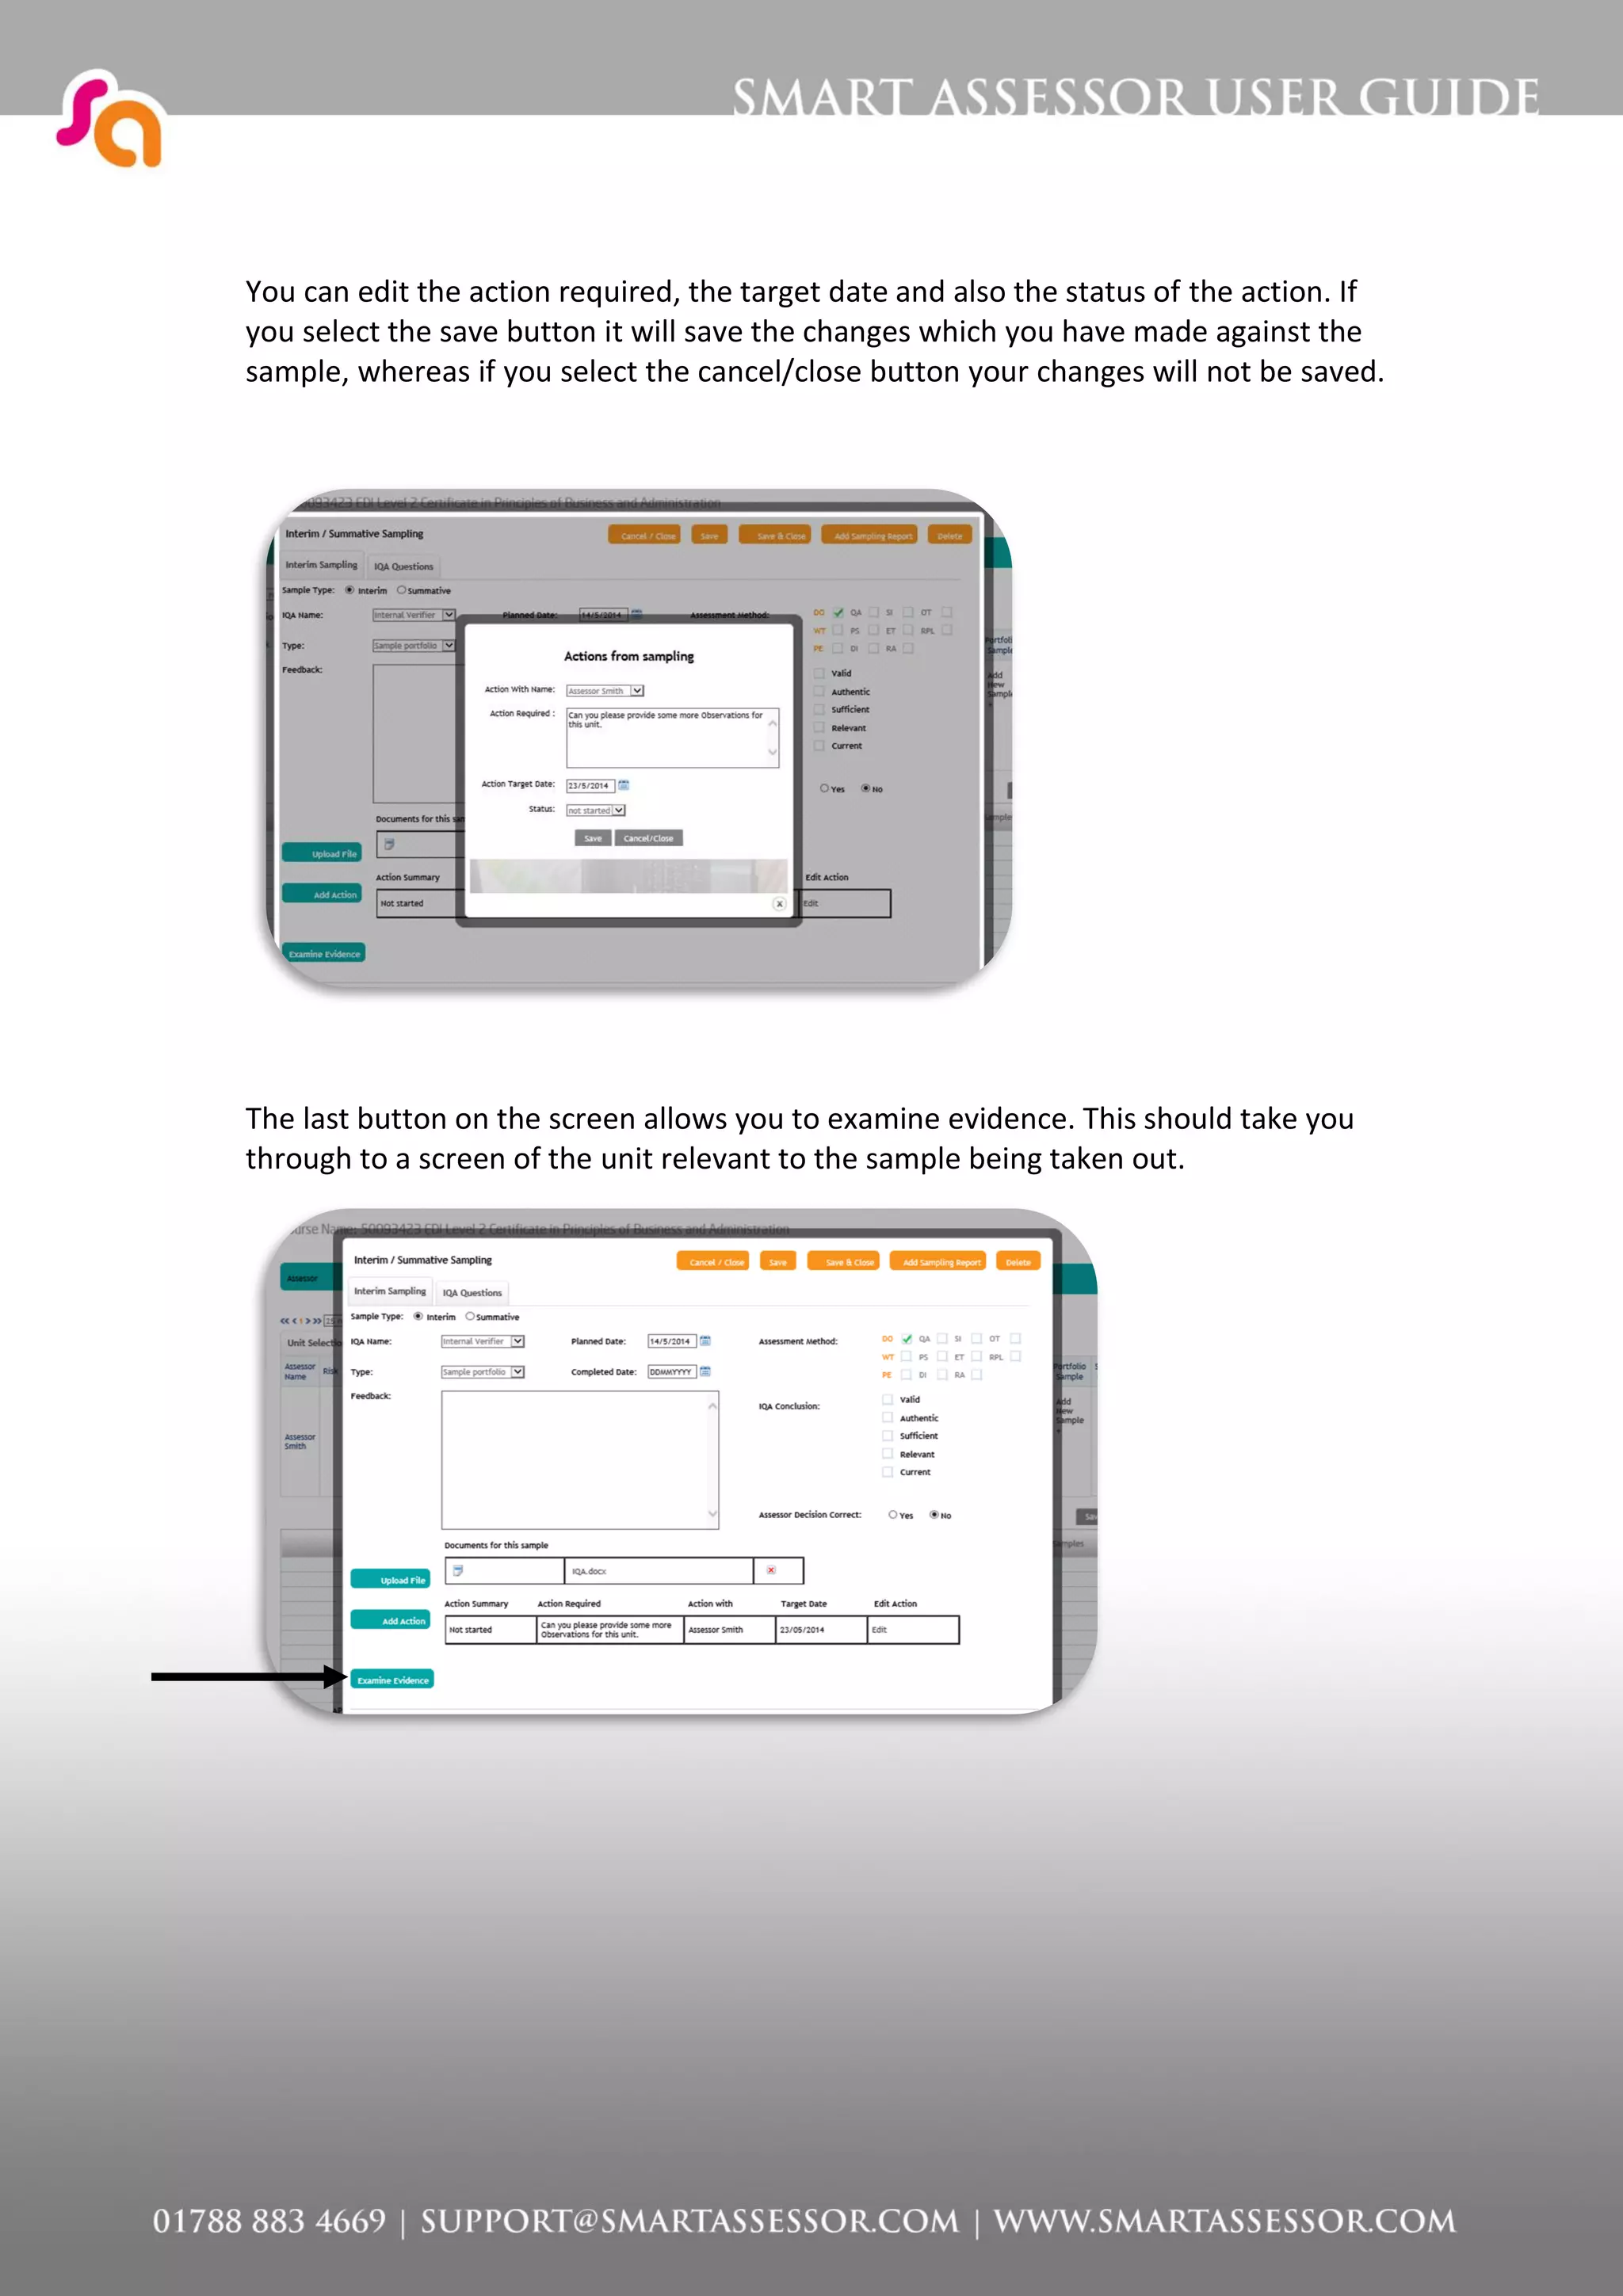
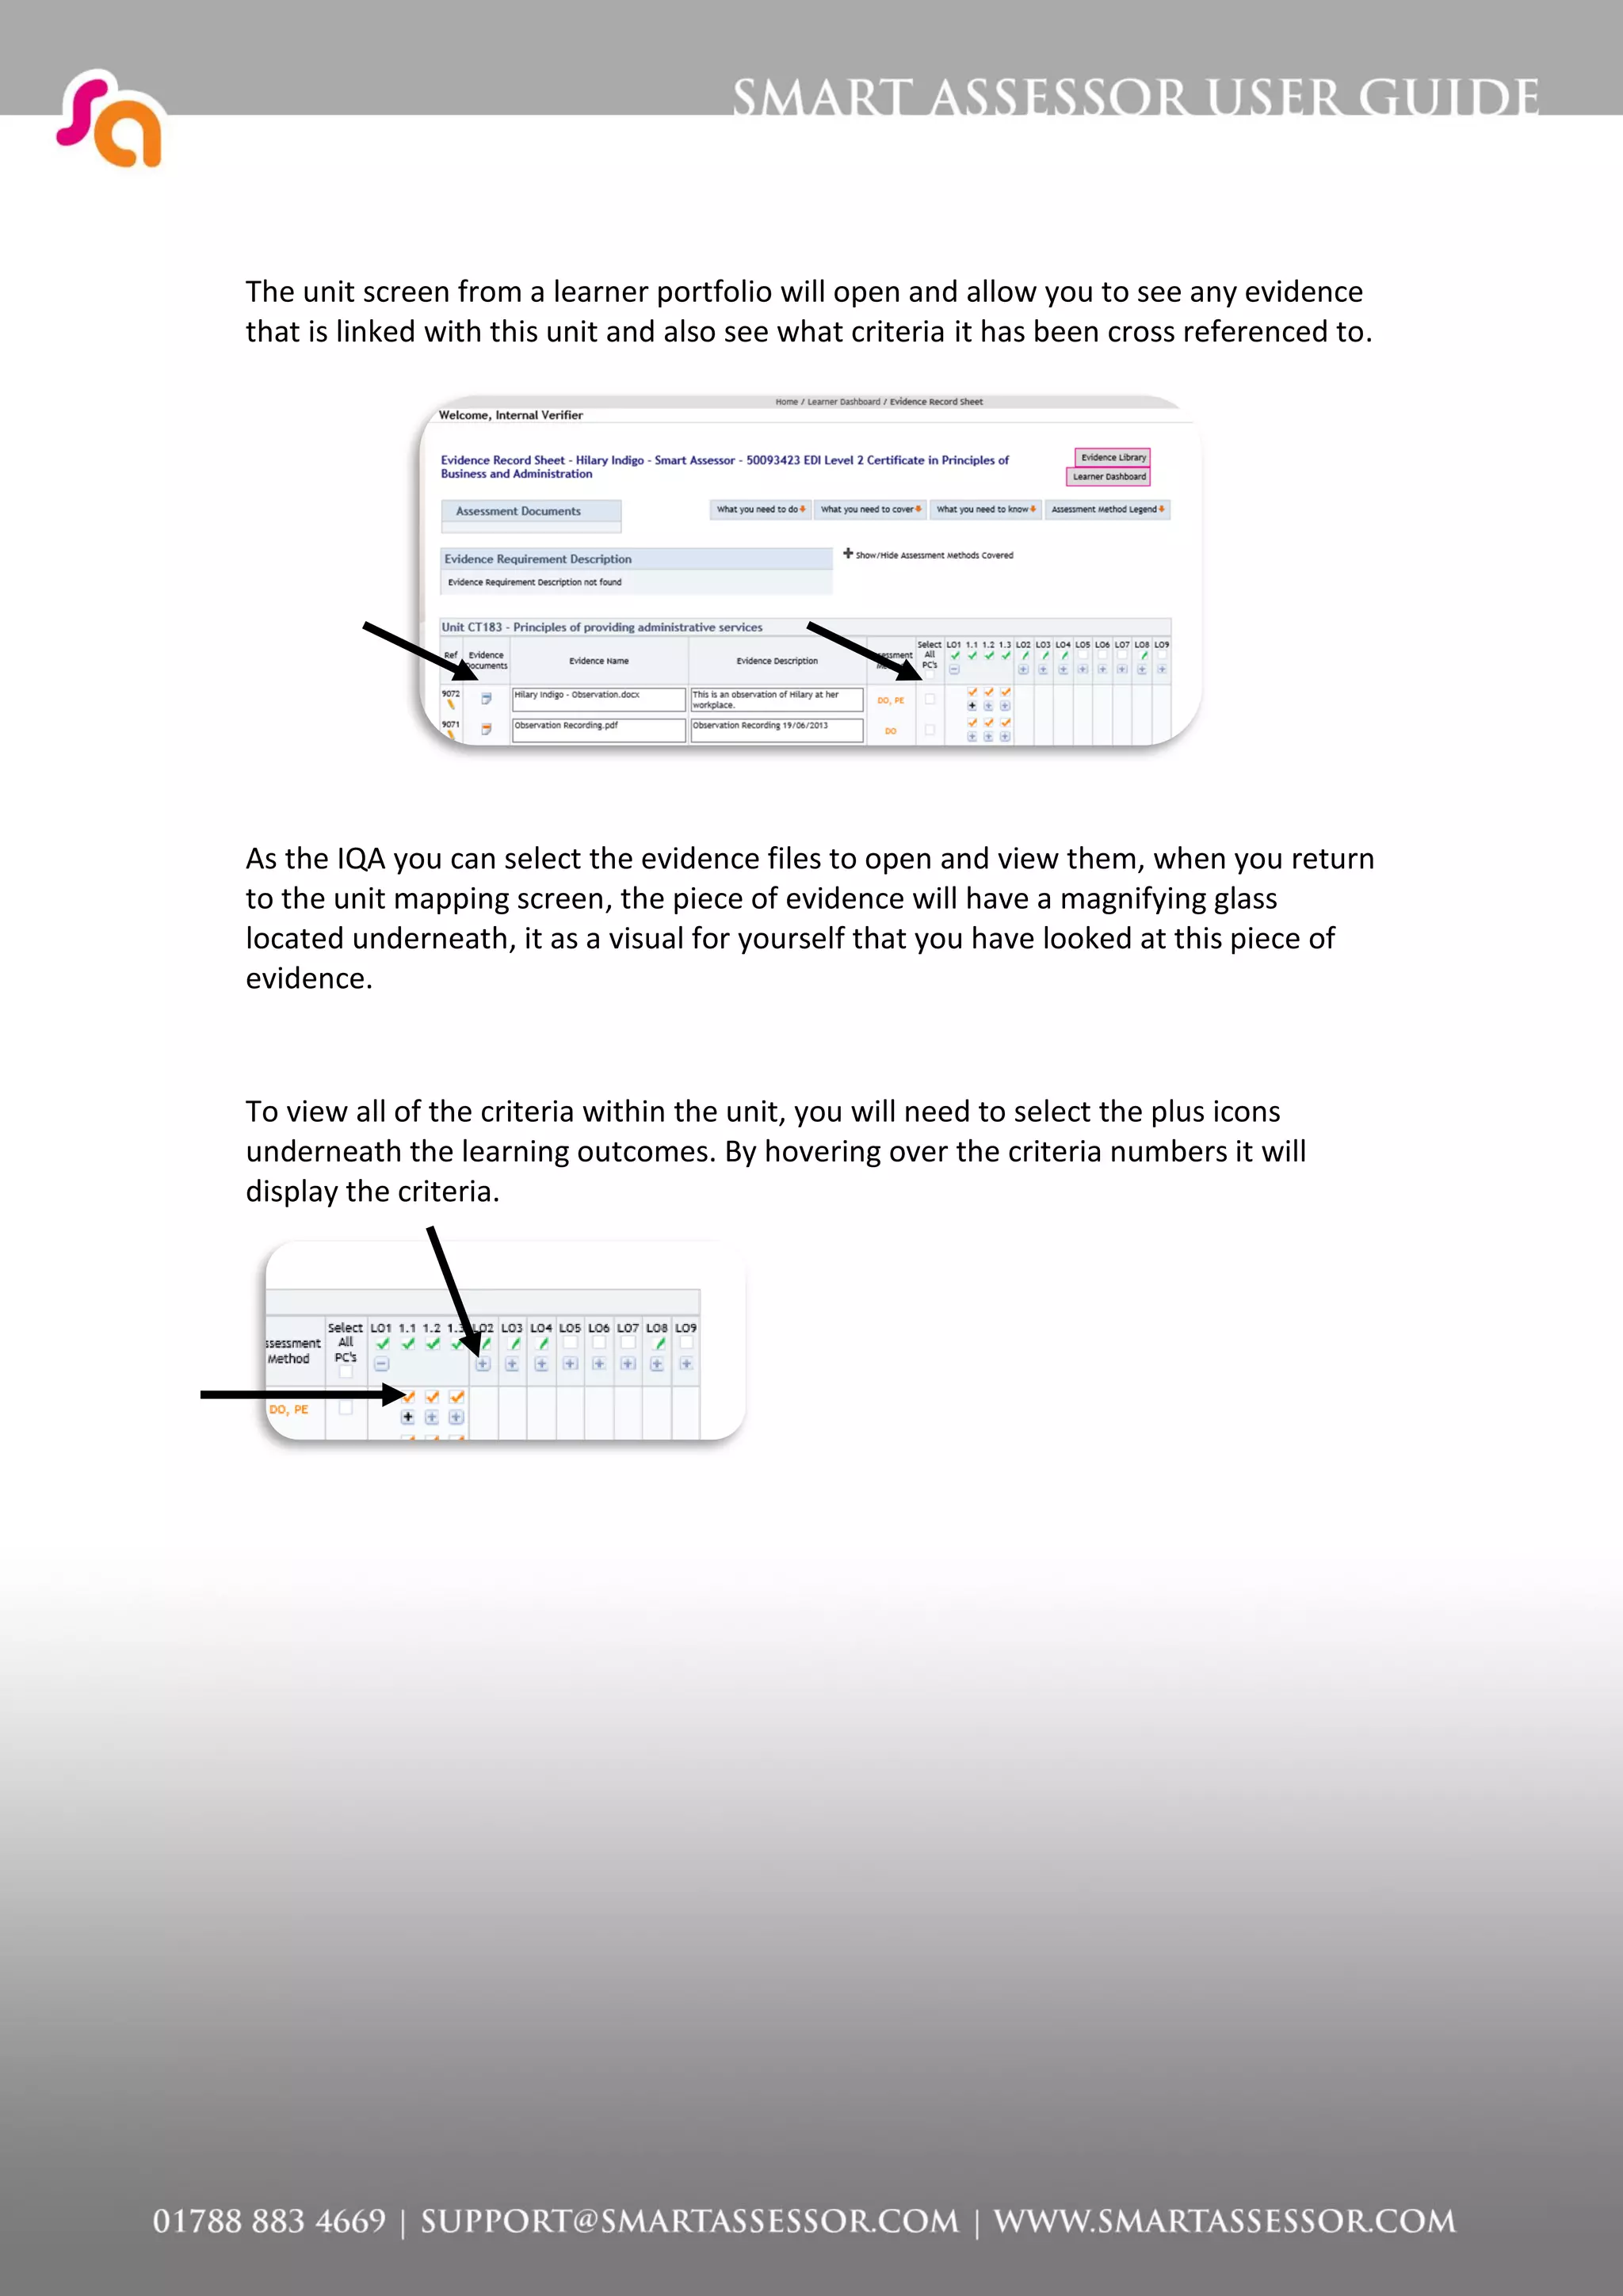
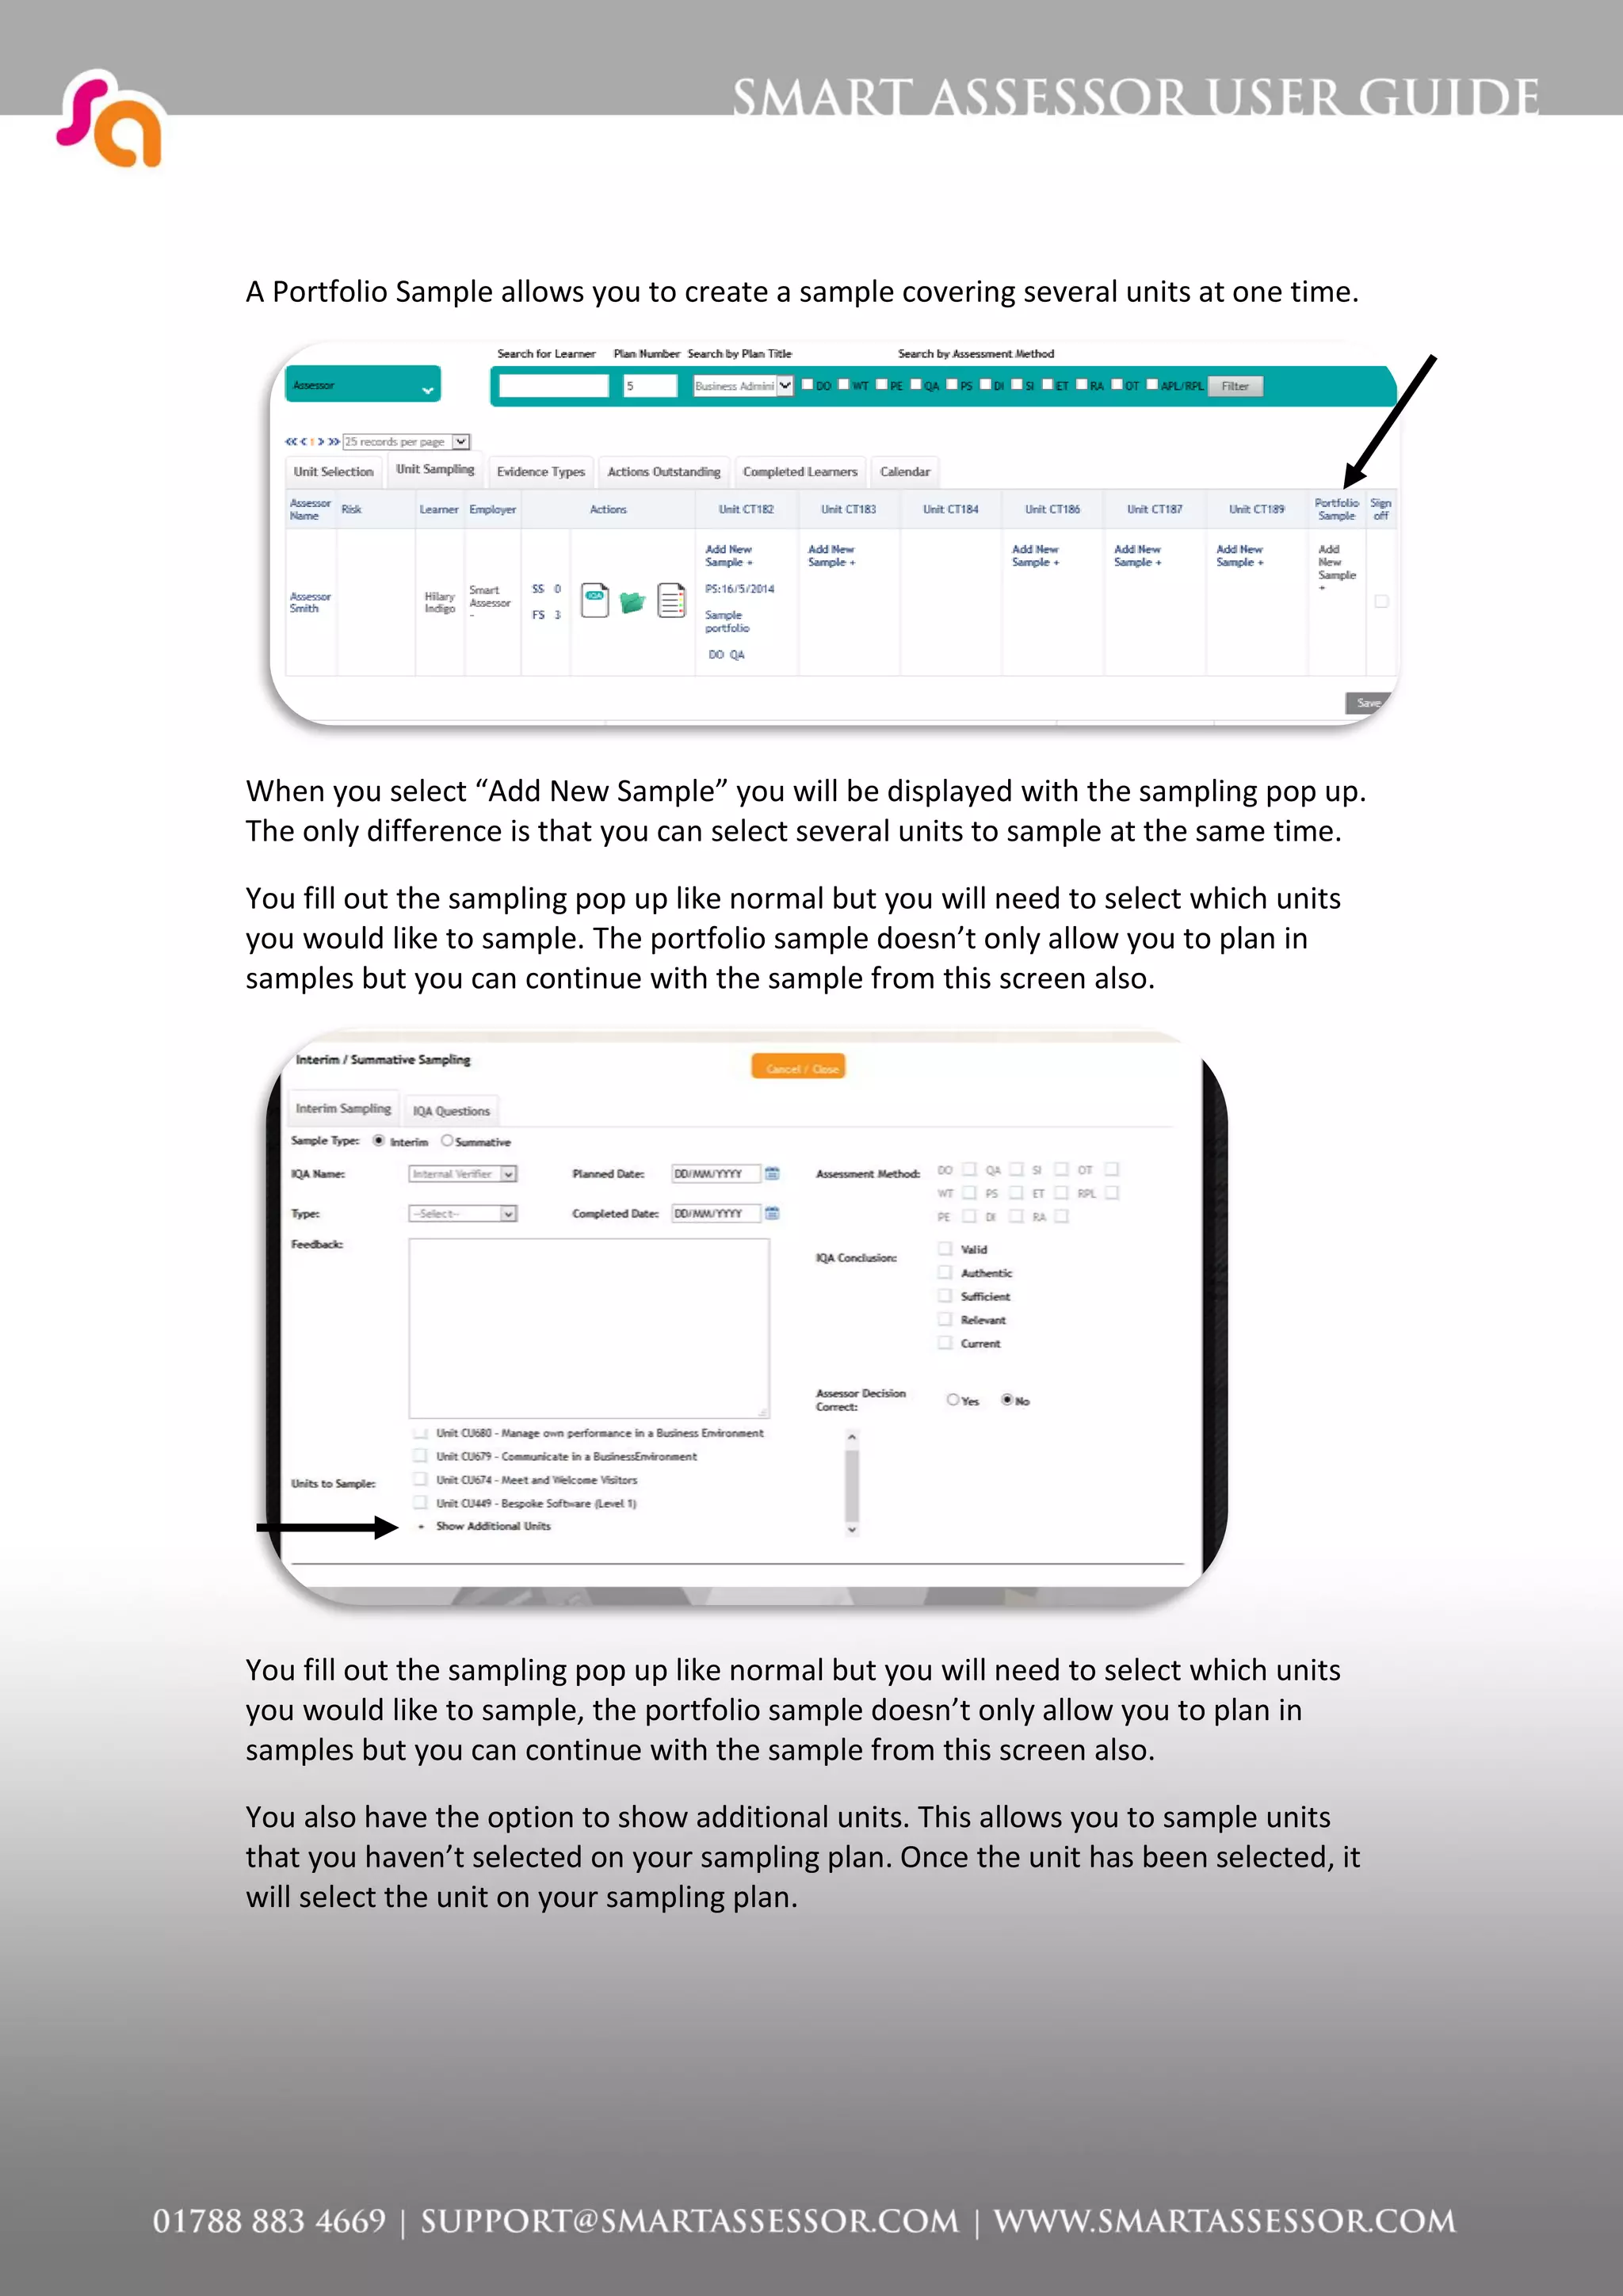
The document provides details of an IQA training agenda taking place from 10am to 4pm. It includes sessions on migrating from paper-based to online systems, introducing the learner portfolio, creating sampling groups, setting up sampling plans, quality assuring sampling, and managing assessor actions. The document also provides guidance on getting started with IQA, including creating sampling groups, setting up sampling plans, creating samples, and setting actions for assessors.
Blackboard allows instructors to create online assessments for students in the form of tests, surveys, and pools. Tests contain graded questions while surveys are ungraded. Pools allow instructors to store questions for reuse in different assessments. The document provides step-by-step instructions for creating tests, surveys, and pools as well as adding, editing, and reusing questions between assessments.
The document provides instructions for creating curriculum reports in Compass Learning that align Kentucky curriculum standards with available Compass Learning content. Users can generate reports that list specific learning activities, questions within activities, or questions within chapters that correlate to a selected subject, grade level, chapter, and lesson. The reports make it easy to find appropriate Compass Learning activities and questions to use for lessons, tests, or exit slips.
The document describes an automated class scheduling system developed by researchers at Bohol Island State University in the Philippines. The system uses MySQL and PHP to automate the process of creating class schedules, assigning instructors and rooms. It was tested by instructors and found to be more functional than the previous manual system by solving problems in creating schedules. The system allows administrators to manage courses, sections, instructors and rooms, as well as generate conflict-free class schedules, instructor schedules and room schedules through an online interface.
The document provides instructions for using an apprenticeship tool. It explains that users can select up to 10 apprenticeship frameworks that interest them, search for matching live apprenticeships, view locations on a map, see detailed information on shortlisted courses, save and email their shortlist, apply directly from the tool, and access saved shortlists from their dashboard.
1) Courseeplus is an online learning platform that connects teachers and students through online courses, forums, groups and other features.
2) Teachers can create courses by adding sections, units, content like videos and documents, assignments, and setting course details like duration and pricing.
3) The platform allows teachers to manage student enrollment, track their progress, and communicate with students through various features in their dashboard.
This document provides instructions for setting up Turning Point software to create presentations with slides, add graphics like countdown timers, insert response tables, copy slides to create templates, and save the template. It also explains how to create a participant list by entering student names and device IDs, select the participant list for a session, and pull different types of reports on student responses and scores from a session.
How to create a poll for live classroom meeting timesMatthew Otremba
To create a poll or survey in a course:
1. Add a content area and give it a title.
2. Within the content area, select "Survey" to begin creating questions.
3. Choose a question style like multiple choice, fill in the blank, or ordering and add options.
Once created, the poll will be available for students and teachers can view the results in the Grade Center.
Using ExamSoft Rubrics to Assess Student Medical Research ExamSoft
Presented by Shaheen Miller, Administrative Coordinator, UCF College of Medicine
At the UCF College of Medicine, we use ExamSoft Rubrics to assess first and second year medical students for our unique research program called FIRE (Focused Inquiry Research Experience). All students are required to complete a 2-year research project on a topic of their choice in the field of Medicine/Health. We use the ExamSoft Rubrics platform to assess students' papers in the first year and posters in the second year. Students receive formative (not graded) and summative (graded) feedback from peers, faculty, statistician, and librarian. This webinar will explore how to create and administer these assessments of student learning.
This document provides an overview and instructions for a DIY training on using Drafting Board, an online tool for teaching argumentative writing. It outlines the main sections of the training, including getting started, using the features of Drafting Board, classroom support materials, teacher reports, and a quiz. The training is designed to be interactive, with links to additional videos and tutorials throughout.
Career coach training module 3 career cruisingRachel Schwarz
This document provides instructions for using the Career Cruising software during a career planning workshop. It outlines how students can complete a career assessment, explore suggested careers and save education and career information to their personalized plan. Students are also instructed to set goals in their plan and upload a certificate of completion. The document serves as a guide for workshop facilitators to help students navigate Career Cruising and develop an initial career plan.
Schedule Builder is an app designed to make course planning and scheduling easy for students. It will provide all the resources students need in one place, including course details, descriptions, prerequisites, and professor ratings. A major feature is automatic schedule generation that allows students to generate all possible semester schedules based on selected courses. The app aims to improve upon the current outdated course planning system. It will have tabs for featured courses, all courses, schedules, and favorites. Revenue will come from embedding the cost in student tuition through a partnership with the university.
The document provides instructions for creating assessments in multiple steps:
1. Click "Create Assessment" and add skills by selecting from predefined options or adding individually. Sections and other customizations can be added.
2. Preview the assessment and click "Create Assessment" to access the scheduling page.
3. On the scheduling page, customize settings like instructions, activation period, proctoring options, and invited candidates.
4. Click "Done" to save and the new assessment will appear on the dashboard, ready to be taken.
How to prepare a Power Point Presentation.pptxssuser85c6c6
Introduction: Animations are the best suited to convey and create an impact of an idea or concept in media business. Animations are sequential frames of pictures shown across this fourth dimension, namely "time." Cartoons are the best examples of animations; needless to say, animations grab the attentions of every one. Animations can also be effectively used in medical education especially in teaching human embryology. It communicates of a concept of three-dimensional structures against one more dimension, namely time. However, to create a module of animation, knowledge, and operative skills of animation software like Flash® , Author ware® , Macromedia® or other high-ended software is necessary. Aim: To design simple, user-friendly and easy to make an effective animation using one of the office tools of Windows® , Power Point® . Materials and Methods: A personal computer with following configuration was used. Pentium III processor with 1.3 Gz speed, 40 GB HDD, 128 MB RAM, with multimedia kit, key pad, and scroll mouse was used. Programs used were Power Point® and MS Paint® . A screen play of sequences of diagrams was written. Frames consisting of diagrams of stages of development were drawn in MS Paint® , and were pasted in PowerPoint slides and animation tool was applied. Previewing was done at every stage. Results: Stages of development of storyboard have been shown as print screen images, 1-6. Conclusion: Emphasis is that such simple animations can be easily made. It is cheap and does not require any sophisticated software. However, it is time consuming but can be taken up as phased assignments or can be given as undergraduate student projects. This will certainly help to build teaching material in the department.
This document provides an overview of creating analyses, dashboards, and prompts in Oracle Business Intelligence Enterprise Edition (OBIEE) version 11g. It discusses how to write queries, create compound layouts with different views like pivot tables and charts, and add prompts to allow users to filter the data. Specifically, it demonstrates how to build a dashboard that displays degree recipient counts by academic year, college, department or gender using prompts, queries, and multiple interactive views.
1. The document provides instructions for instructors on using ATutor, an online learning platform, including creating an account, courses, content, groups, and managing students.
2. It describes how to create a course, add tools and content like files, packages, and tests. Instructors can also import student lists, enroll students manually, and designate assistants.
3. The document explains how to use the course management tools in ATutor to set up groups, add/remove tools, customize the course interface, and control access to course materials and tools. Context-sensitive help is available throughout the platform.
TurningPoint is a classroom response system that integrates with PowerPoint. It allows teachers to create polling and assessment slides to gather student responses using clickers. Teachers can view results in real-time or generate detailed reports on student performance. The software guides users through creating participant lists, questions slides with different answer types, and generating various session reports to analyze student data.
This document summarizes Forethought options, decorators, and checklists in Eduphoria. It discusses:
1. Activity options for publishing and displaying related activities.
2. Standard decorators that enable visual indicators for district-defined standard meanings using 5 colors.
3. Lesson checklists that allow districts to provide items for teachers to check when creating lessons, such as technology, strategies, or materials.
4. How to manage checklist groups and items and generate checklist usage reports.
This document provides instructions for instructors on creating virtual lab assignments, checking assignment scores and student performance reports, and creating post-lab assessments in Connect Virtual Labs. It outlines the steps to select a simulation to assign, name the assignment and set the due date. It describes the assignment results report that shows overall scores and allows accessing individual student performance reports. It also details how to create question bank assignments from corresponding lab content and view reporting data for these assessments.
The document provides instructions for setting up attendance tracking in PerfectMind. It lists the following items that need to be set up: software setup including styles, ranks, classes; student setup including birthdates, ranks, memberships; and PerfectScan setup including installation. It then provides details on how to configure styles and ranks, add a class, enter student information, and install and use PerfectScan for attendance tracking. Setup of key student information like style, rank, birthdate, and membership is emphasized for proper attendance tracking.
Lesson 1 Basic Tutorial Data Analysis Software for Flow CytometryUttam Belbase
This document introduces the FlowJo workspace and its main components. It describes how to add sample files to the workspace by dragging and dropping folders containing sample files. It explains how to organize samples into groups and how to drag and drop samples between groups. It provides details on the groups pane and samples pane, including how to view sample statistics and metadata by clicking on the sample badges displayed next to each sample name.
This document provides instructions for creating two types of rubrics in D2L: analytic rubrics and holistic rubrics. Analytic rubrics assess criteria in rows and achievement levels in columns, allowing for multiple criteria to be assessed. Holistic rubrics assess overall achievement based on a single predefined criterion using achievement levels. The document outlines the steps to create each rubric type, including adding criteria, levels, descriptions, feedback, and scoring methods.
- The document describes Pressmart Media Limited, an Indian company that provides horizontal media solutions, enterprise learning solutions, and enterprise cloud consulting.
- It offers cloud-based publishing, education, and AWS solutions to enterprises and K-12 schools.
- One of its products is MOCA, an enterprise learning solution that allows administrators to create courses and tests, register users, and view analytics, while learners can access courses, take tests, and view results.
The document provides instructions for setting up and using Classroom Performance System (CPS) software in the classroom. It describes how to install the CPS software, set up classes and students, create lessons and questions, engage lessons using the CPS receiver and response pads, and ask verbal questions. The summary also notes some online resources for downloading CPS software and accessing training materials.
This document provides guidance on using assessment data from AssessTrax to guide instruction. It outlines a 4-step process: 1) Decide which data to analyze, 2) Collect and organize the data, 3) Analyze it to identify strengths, weaknesses and trends, 4) Create an action plan. Key aspects covered include compiling answer frequency reports to identify concepts below 70% mastery, and using matrix reports to analyze student performance by question, objective or group. The overall message is that assessing, analyzing and acting on data helps ensure classroom instruction is effective.
This user guide provides instructions for using key features of Blackboard, including:
- Turning edit mode on/off to view or edit a course
- Using the Control Panel to access course tools, evaluation, users/groups, customization, and help
- Customizing the courses displayed on the My Blackboard page
- Adding, modifying, removing, and moving menu items
- Copying materials from a previous course
- Combining multiple course sections into a single Blackboard course using CLIPS
- Importing an archived course package
- Enrolling and modifying user roles
The document discusses an IELTS listening test that took place on April 7th, 2018. It provides the date of the test and specifies that it was for the listening portion of the IELTS exam. The brief statement conveys the core information about the test date and section without extraneous details.
The document provides information about various topics:
1) House rental information including available date, rent price, deposit, amenities, utilities, and landlord's name.
2) Information about a gym including what to do before joining, classes offered, tennis courses, benefits of exercise for children and members.
3) Details about a student group work research project including why they chose the topic and issues with the original questionnaire design.
4) Facts about London's underground houses including their low environmental impact, energy efficiency, conservation of land resources, lack of traffic noise, long lifespan, and health benefits.
5) A matching question pairing two new underground house types with key characteristics like energy saving, zero noise
This document provides information from 4 listening passages in an IELTS exam, including details about subletting an apartment, an introduction to a discovery walk event, preserving Pacific languages, and CO2 treatment in different countries. Key details include the rent amount and contact information for subletting, how new guides are trained for the discovery walk, challenges facing Pacific language preservation, and different industrial uses of CO2 in the Netherlands, US, and China.
This document provides summaries of past IELTS listening sections from multiple exam dates:
1. It lists the topics covered in listening sections from exams on April 21, 2018 (car insurance, park instructions, teaching methods, types of costs), July 7, 2018 (surf club, farm map, rock paintings, plants), May 24, 2018 (homeless, prices, toys, applications, reliable, confidence, clothing, coconut, mold, pressed, machinery, traders, Germany, balls, car tires, elastic) and August 18, 2018 in Canada (BBQs, oil exploration stages, volunteer briefing, food safety).
2. It also summarizes the listening sections from November 10, 2018 in Istanbul about collecting trash
Ielts reading ancient literate signals proto writing in americas 2014Ibrahim Khleifat
This document discusses the use of cosmetics and perfumes in biblical times based on archaeological evidence and writings. It notes that while cosmetics originally served religious and healing purposes, their use became widespread among both the wealthy and common classes over time. Ancient peoples devoted significant time to facial treatments and used scented creams, makeup, and hair styles to enhance beauty. Specific practices described include using eye paint for beautification and protection, applying beauty masks overnight, and styles for long and braided hair.
The document discusses 3 topics that will be covered in an upcoming IELTS exam in Canada on October 13, 2018 for an academic reading section. The topics include a baby mammoth named Lyuba, an unknown second topic, and how talents can develop in individuals such as Mozart.
The document discusses research into left and right-handedness in humans. It notes that about 90% of humans are right-handed, unlike other species. Research has found both genetic and non-genetic factors influence handedness. Studies show the left and right hemispheres of the human brain develop specialized functions, which may relate to the evolution of speech and preference for right-handedness. Later brain development in males compared to females may also influence higher rates of left-handedness in males. While attitudes toward left-handedness are improving, language and society have traditionally reinforced right-handedness as the norm.
Researchers have found that three main brain components are involved in processing humor and laughter through a complex pathway. These components include parts of the frontal lobe important for cognitive processing, the supplementary motor area important for movement, and the nucleus accumbens associated with pleasure. Brain imaging studies show these areas are activated when subjects read jokes, view cartoons, or listen to laughter. Damage to the frontal lobes can impair one's ability to understand humor, as patients with frontal lobe damage were less able to recognize joke punchlines or find cartoons funny. Tickling triggers laughter through a reflex, but this reflex requires an element of surprise from another person to trigger, as people do not laugh when tickling themselves.
The document provides a history of chocolate from its origins in Mesoamerica to its spread around the world. It discusses how:
1) Cocoa beans were first discovered by Columbus in America and brought to Europe, where the Aztecs used them to make a bitter drink called chocolatl.
2) The Spaniards did not initially like the bitter drink, but Cortez conceived of sweetening it with cane sugar to make it more palatable to Europeans.
3) Chocolate spread from Spain to other parts of Europe over the next few centuries and underwent various modifications, such as the invention of solid eating chocolate and milk chocolate, to make it smoother and more widely consumed.
This document provides guidance for internal verification procedures for several CIOB qualifications. It outlines the role of the internal verifier in developing quality assurance systems to ensure fair and accurate assessment of learners. Key responsibilities of the internal verifier include developing a verification plan, sampling student work, checking assessment quality, and advising assessors. Sampling should be conducted throughout the course via interim and summative procedures to continually monitor assessment quality and consistency. Outcomes must be documented in verification reports and discussed with assessors and the course team.
This document provides information on Pearson Edexcel qualifications in assuring the quality of assessment, including the objectives, structures, units and assessment requirements. It introduces the suite of qualifications for internal and external quality assurers that replaced previous V1 and V2 qualifications. The qualifications are designed to meet the needs of the developing qualification frameworks and changes in assessment practice. Individuals need to hold the appropriate IQA or EQA qualifications depending on their role and the assessment strategies set by sector skills councils. The units can be taken individually or in combinations leading to qualifications for lead/internal quality assurers, lead/external quality assurers or learning and development managers. Centres must guide learners to ensure they achieve the correct combination of units for
Certificate in assessing vocational acheivement textbook printIbrahim Khleifat
The document provides an overview of the Certificate in Assessing Vocational Achievement (CAVA). It discusses the purpose and types of assessment including initial, formative, and summative assessment. Initial assessment determines a learner's current knowledge and needs. Formative assessment provides continuous feedback throughout the course. Summative assessment measures performance against standards for certification. The key functions of assessment are to determine learner levels, needs, progress, and achievement against standards.
Quality assuring assessment guidelines for providers, revised 2013Ibrahim Khleifat
This document provides guidelines for quality assuring assessment processes for education providers. It outlines the key stages of the assessment process, including assessment, authentication of results, results approval, appeals processes, and requesting certification. The guidelines emphasize principles of validity, reliability, fairness, quality, transparency, and complementarity. Providers are responsible for establishing assessment policies and procedures, while QQI (Quality and Qualifications Ireland) monitors providers to ensure national standards are upheld consistently.
This document outlines the internal quality assurance strategy for The Learn2 Group and The LEC. It details the roles and responsibilities of internal quality assurers, assessors, and tutors. It also describes the processes for sampling student work, conducting standardization activities, maintaining records, and handling complaints and appeals to ensure the validity of awarded certifications.
This document contains examples of forms that can be used for internal verification of quality management systems and qualifications. It includes forms for sampling strategy, sampling plans, assessment records, observation of assessors, candidate feedback, and candidate interviews. The forms are provided as examples for centers to use to design their own internal verification procedures to ensure assessments are valid, reliable, and meet required standards.
This document provides an overview of motor control centers, including:
1. Motor control centers centralize control of multiple motors from a single location for convenience and efficiency.
2. Siemens TIASTAR motor control centers offer innovative features and advantages like easier installation and future modifications.
3. Power supplies provide three-phase voltage to motor control centers from large generators through complex distribution systems.
This document provides an overview of an engineering fundamentals handbook on engineering symbology, prints, and drawings. The handbook was developed to provide nuclear facility operators, maintenance personnel, and technical staff with the necessary fundamentals of engineering prints, their use, and function. The handbook covers various types of engineering drawings including piping and instrumentation drawings, electrical diagrams, electronic diagrams, logic diagrams, and fabrication/construction drawings. It also reviews the typical anatomy of an engineering drawing including title blocks, grids, revision blocks, notes, legends, and common views and perspectives. The handbook aims to provide personnel with a foundation for correctly reading, interpreting, and using the various engineering documents relevant to DOE nuclear facility operations and maintenance.
The e learning-guilds-handbook-on-synchronous-e-learningIbrahim Khleifat
This document provides an introduction to synchronous e-learning and discusses various synchronous technologies such as teleconferencing, webcasting, gaming/simulations, and web conferencing. It outlines the business case for synchronous e-learning and considerations for integrating synchronous technologies. The document is a handbook for designing, producing, leading and promoting successful synchronous e-learning events.
1. The document discusses earth/ground resistance measurement and why it is important for electrical safety. Regular measurements of the earth resistance can prove that an electrical installation is operating correctly.
2. An effective earth electrode alone is not enough to guarantee safety - it must be connected to a protective system like a residual current device (RCD). The acceptable maximum value of earth resistance depends on factors like the rated current of the RCD.
3. Soil resistivity measurements help determine the optimal locations and types of earth electrodes by measuring how well different types of soil conduct electricity. The Wenner and Schlumberger methods are commonly used to measure soil resistivity.
Hamon D'Hondt is a world leader in air-cooled heat exchangers and related products. It has over 50 years of experience designing and manufacturing air-cooled heat exchangers, finned tubes, and tube bundles for industries such as chemical, petrochemical, power, and heat recovery. Hamon D'Hondt has factories in France and Saudi Arabia and offers a full range of design, manufacturing, and after-sales services for air-cooled heat exchangers and components.
How to Manage Reception Report in Odoo 17Celine George
A business may deal with both sales and purchases occasionally. They buy things from vendors and then sell them to their customers. Such dealings can be confusing at times. Because multiple clients may inquire about the same product at the same time, after purchasing those products, customers must be assigned to them. Odoo has a tool called Reception Report that can be used to complete this assignment. By enabling this, a reception report comes automatically after confirming a receipt, from which we can assign products to orders.
Brand Guideline of Bashundhara A4 Paper - 2024khabri85
It outlines the basic identity elements such as symbol, logotype, colors, and typefaces. It provides examples of applying the identity to materials like letterhead, business cards, reports, folders, and websites.
Elevate Your Nonprofit's Online Presence_ A Guide to Effective SEO Strategies...TechSoup
Whether you're new to SEO or looking to refine your existing strategies, this webinar will provide you with actionable insights and practical tips to elevate your nonprofit's online presence.
CapTechTalks Webinar Slides June 2024 Donovan Wright.pptxCapitolTechU
Slides from a Capitol Technology University webinar held June 20, 2024. The webinar featured Dr. Donovan Wright, presenting on the Department of Defense Digital Transformation.
THE SACRIFICE HOW PRO-PALESTINE PROTESTS STUDENTS ARE SACRIFICING TO CHANGE T...indexPub
The recent surge in pro-Palestine student activism has prompted significant responses from universities, ranging from negotiations and divestment commitments to increased transparency about investments in companies supporting the war on Gaza. This activism has led to the cessation of student encampments but also highlighted the substantial sacrifices made by students, including academic disruptions and personal risks. The primary drivers of these protests are poor university administration, lack of transparency, and inadequate communication between officials and students. This study examines the profound emotional, psychological, and professional impacts on students engaged in pro-Palestine protests, focusing on Generation Z's (Gen-Z) activism dynamics. This paper explores the significant sacrifices made by these students and even the professors supporting the pro-Palestine movement, with a focus on recent global movements. Through an in-depth analysis of printed and electronic media, the study examines the impacts of these sacrifices on the academic and personal lives of those involved. The paper highlights examples from various universities, demonstrating student activism's long-term and short-term effects, including disciplinary actions, social backlash, and career implications. The researchers also explore the broader implications of student sacrifices. The findings reveal that these sacrifices are driven by a profound commitment to justice and human rights, and are influenced by the increasing availability of information, peer interactions, and personal convictions. The study also discusses the broader implications of this activism, comparing it to historical precedents and assessing its potential to influence policy and public opinion. The emotional and psychological toll on student activists is significant, but their sense of purpose and community support mitigates some of these challenges. However, the researchers call for acknowledging the broader Impact of these sacrifices on the future global movement of FreePalestine.
Information and Communication Technology in EducationMJDuyan
(𝐓𝐋𝐄 𝟏𝟎𝟎) (𝐋𝐞𝐬𝐬𝐨𝐧 2)-𝐏𝐫𝐞𝐥𝐢𝐦𝐬
𝐄𝐱𝐩𝐥𝐚𝐢𝐧 𝐭𝐡𝐞 𝐈𝐂𝐓 𝐢𝐧 𝐞𝐝𝐮𝐜𝐚𝐭𝐢𝐨𝐧:
Students will be able to explain the role and impact of Information and Communication Technology (ICT) in education. They will understand how ICT tools, such as computers, the internet, and educational software, enhance learning and teaching processes. By exploring various ICT applications, students will recognize how these technologies facilitate access to information, improve communication, support collaboration, and enable personalized learning experiences.
𝐃𝐢𝐬𝐜𝐮𝐬𝐬 𝐭𝐡𝐞 𝐫𝐞𝐥𝐢𝐚𝐛𝐥𝐞 𝐬𝐨𝐮𝐫𝐜𝐞𝐬 𝐨𝐧 𝐭𝐡𝐞 𝐢𝐧𝐭𝐞𝐫𝐧𝐞𝐭:
-Students will be able to discuss what constitutes reliable sources on the internet. They will learn to identify key characteristics of trustworthy information, such as credibility, accuracy, and authority. By examining different types of online sources, students will develop skills to evaluate the reliability of websites and content, ensuring they can distinguish between reputable information and misinformation.
2. IQA Training – Day 2
10 am – 4:00 pm Trainer to arrive at 9:30am
Welcome and introductions 10:00 – 10:15
Overview of how to migrate from paper to online 10:15 – 10:30
Introduction to the Learner Portfolio : evidence, sessions,
reviews, resources, feedback
10:30 – 11:30
How to create sampling groups 11:30 – 11:45
Setting up sampling plans 11:45 – 12:30
Quality Assuring sampling 12:30 – 1:00
lunch 1:00pm – 1:30
Quality Assuring sampling - continued 1:30 – 2:15
Managing actions for assessors 2:15 – 2:30
Creating auto batching rules 2:30 – 2:45
Independent Learning Scenario 2:45 – 3:45
Support and further training Q&A 3:45 – 4:00
3. Getting Started
A quick start guide on the different functionalities that are essential to your
introduction to Smart Assessor. There are many more different areas that are
available for you and your learners which will become clearer and easier as you
continue your Journey with Smart Assessor.
The areas that you will need to understand inside this Getting Started Guide are;
- Creating Sampling Groups
- Setting up Sampling Plan
- Creating a Sample
- Setting Actions for Assessors
If you would like to extend your knowledge further on the system and the
different areas available to yourself, when logged into Smart Assessor, inside the
top right hand side of the screen is the Support Dashboard. You will see a Book
Training Tab where you can have online training and also within the Support
Dashboard there are User Guides that are course notes taking you through the
different areas of the system.
4. Sampling Group
Sampling groups is the first stage that will be taken in order for you to set up your
sampling plan. When you first log into your IQA Dashboard you will have no learners
visible.
In order to set up your sampling groups so that learners appear on your homepage is
to select the “Learner Sampling” tab at the top of the screen on the grey taskbar.
5. You will be displayed with a new screen, “Learners not in a Sampling Plan” will
display all learners within your portfolio that status is “In Training” and also not
assigned to another Sampling Group.
The learners not assigned to a Sampling Group shows you the course name so you
can easily filter out and see the learners that you are supposed to be verifying, you
can also see how many learners are on that course that haven’t been grouped, the
learners names are listed and also their course start date ranges.
Once you are happy that the learners you want to group are listed on this screen,
you can select “Learner Sampling”
6. From the list on the left hand side of the screen you can select the “Sampling Group”
option, which will display you with a new screen.
The system will automatically select the “Add new Sampling plan and Learner”
option but you can also review existing plans from this screen and also delete them.
In the case of adding a new sampling group onto the system you will need to give
the sampling group a title. I would name your sampling groups something clear so
that you can identify which group you will are looking at for instances when you
have to go back and add and remove learners from that sampling group.
You will also need to allocate a course to the sampling plan so you have the option
to select a course from the dropdown, or you can use the course filter to single out
your course as the list may consist of lots of courses.
7. Once you have given your Sampling Group a title and also selected the relevant
course from the dropdown, you can then select the “Apply Choice” button which
opens up some more features on the screen.
The first option that has opened up for you to select from is selecting which Internal
Quality Assurers need allocating to the sampling group that you have just created.
You can assign as many “IQA”s to a sampling group that is needed but the “IQA” that
created the sampling group cannot be removed from the group.
As the “IQA” that has created the Sampling Group your name should appear in the
table to the right hand side which is labeled “IV’s managing this Sampling Plan” and
all other “IQAs” within your portfolio should appear in the table to the left hand side
in a table called “List of IVs”
If any of the “IQAs” in the table to the left hand side need adding to the Sampling
Group that you have just created you can select their name and then select the first
arrow to move them across into the relevant table, and if anyone needs moving
backwards you can just select their name again and then the reverse arrow. As you
can see from the screenshot below I have now added “Andrew James” onto the
Sampling Group just created.
8. Once this step has been completed you can then scroll further down the page where
you will see where you can allocate and remove learners from the Sampling Group.
As you can see from the screenshot above the first section highlights learners
already allocated to your Sampling Group and there are none present because we
have just created this Sampling Group, whereas the beneath section shows you all
learners on the course selected that aren’t assigned to a Sampling Group.
In order to allocate any of the learners to the sampling group you will need to place
a tick in the column “Add to Sampling Plan”
Once you are happy that you have selected all of the learners that you want to
allocate to the sampling group you need to select the “Add Selected Learners”
button which will refresh the page and add the learners into the “Learners assigned
to any Sampling Plan”
9. As you can see the learners have now been removed from the “Learners not
assigned to any Sampling plan” section and moved into the “Learners assigned to
this Sampling plan” area.
If you continue to scroll down on the page you will also see that you can set a
standardization unit for the sampling group that has been selected.
The system will pull through any units that both of the learners have allocated to
them. It shows you how many of the learners are doing this unit so that you can
ensure that all learners have the unit selected.
You can then select the unit in which you would like to select and within the “Auto
Interim and Auto Summative Sample” columns you will see that you can specify how
many weeks into the learner’s course you would like Smart Assessor to plan samples
in for you across the unit selected.
10. You don’t have to specify the number of weeks if you don’t want to, you can go in
and manually plan these in yourself.
You then have the option to save the learners that you have added to the sampling
group and also plan in your auto samples, or you can go straight through to your
sampling plan.
Once you select the save button, you can then select the house button in the top
right hand side of the screen, which will take you back to your IQA Dashboard and
you will be able to see the learners that you have allocated to the group.
11. Sampling Plans
In order to set up your sampling plans on Smart Assessor you will need to have
set up your Sampling Groups. There is a separate guide showing you how this
can be completed.
Once you are logged into Smart Assessor you should have learners on your
Dashboard.
To the left hand side of your learner’s portfolio picture there is a chevron arrow
which allows you to open up their grouped qualifications. The first column that is
displayed is “Plan” which is access to the sampling plan linked with the learner that
you have selected.
At the top of your sampling plan, depending on how many learners you have
assigned to the sampling group you may find the filters useful, allowing you to filter
down on Assessors and also Assessment methods.
12. Once you select the plan it will show the plan that the learner selected is allocated to.
If when you were creating the Sampling Groups you have selected an Auto Sample,
that unit will already be selected for you.
All of the units associated with the learners in the batch will appear. To select a unit,
all you need to do, is select the units which you want to sample, if you want to do
this manually, you can then select the save button when you have finished doing this
for your learners.
13. Random Selection
The system can automatically select the units in which you need taking the
information that you populate within “Assessor Risk Rating.” You can find the
Assessor Risk Rating button at the top of the screen on the grey taskbar
When you are within Assessor Risk Rating, you can firstly set what you rank as High,
Medium and Low risk.
Once you have set what you class as High,
Medium and Low risk you can then select
the save button so that you don’t have to
change this for every IQA in the system.
You can select the Assessors that you know you IQA, or Risk Rate all of the Assessors
within the list, this will show you all of the courses that they deliver.
14. As you can see from the above screenshot, you can choose to just risk rate the
courses in which the Assessor is allocated to learners within the system, or you can
risk rate all courses that are available within your portfolio. The system will always
default to “Courses Attached to User”
The system allows you to go and Risk Rate courses as High,
Medium or Low, so you can go through the courses rating them,
or you can use the buttons to the right hand side of the screen
which allows you to set all courses to one risk. This saves a lot of
time and you can then also go and change the odd course that
may be risked differently to the other courses.
You can also set a reminder date against an assessor’s risk rating, the
system will automatically send you an email when the date you have
selected arrives so that you can re-evaluate the risks that you have
set previously.
Once you have risk rated all of the courses for the assessor, you
will need to save your changes.
Within the last column, once you have saved your risk rating, you will notice that
there is a plus icon allowing you to leave a comment on why you have risked them
the way in which you have.
The system will then take into account your risk ratings if you decide to use the
Random Selection button. If you have selected Auto Samples, the Random Selection
button will not overwrite that unit, it will take it into consideration when it is
selecting units for you to sample.
15. Sampling Plan
When you are back onto your sampling plan you will need to change your view onto
Unit Sampling allowing you to take out your samples on units.
When you have selected the “Unit Sampling” tab this changes the screen slightly and
you will be able to see “Add New Sample” within the units which you said that you
would like to take a sample out on.
You can plan in Samples across different units using the Formative/Summative
sampling icon. This will allow you to plan in samples for the same date across several
units at one time.
16. The pop up that is created allows you to select what type of sample you are taking
out, the IQA this is being planned for, you can also select what type of sample it is
that you will be taking out. You can select a plan date, by selecting the calendar and
scrolling through or by entering a date using the format shown in the box.
You can also select the Assessment Method in which you are planning to sample on
the date which you specify, and you can also select at the bottom of the screen
which units you would like Smart Assessor to plan these in for.
Once you have filled out all of the relevant boxes, you can select the save and close
button, the system will plan in the samples that you have selected across the units.
17. As you can see from the screenshot below the pop up has closed and we can now
see the sample has been planned in across the units which we have selected,
providing that the units you select have been selected on the learner’s sampling plan.
The “PS” shows you the next upcoming planned sample, the type of sample in which
you are planning and also any assessment methods, if they have been selected.
If you want to take out samples on the day when you are logged in, you can simply
select the “Add New Sample” button which will allow you to take out samples now.
When you open up a new sampling report, you have the option to select if it is an
interim or summative sample, select the type of sample from the dropdown and also
complete the completed date if you are finalizing the sample today.
18. The Assessment method grid allows you to
see what pieces of evidence have been
uploaded to the learner’s portfolio in which
you are looking at.
Once you have filled in all of the relevant areas that you can before you take out a
sample you can select the save button, which will open up some buttons for you.
You now have the option to the bottom right, to upload any relevant files to the
sample, you can also add actions to the assessor and finally examine evidence that
has been uploaded against the unit for which you are taking out a sample.
19. If you select the upload a file option you will presented with an additional pop up.
You can select the browse button and then the upload button, where the pop up will
close and you will be able to see the file on the screen. If you have uploaded the
wrong file this can be deleted by selecting the red cross to the right hand side.
20. You can also add actions to the sample; the actions can be set for yourself, any
additional IQAs also assigned to the same sampling group or the Assessor.
Once you have selected who you are setting the action, also what the action requires,
a target date and also a status on whether this has been completed yet. You can
select the save button which will close the pop up and display the action or you can
select the cancel/close button to close the pop up.
As we can see from the screenshot below the action has been added against the
sample.
If you need to edit your action at any point, to the right hand side of the action there
is an edit icon which will open an additional pop up allowing changes to be made
and saved.
21. You can edit the action required, the target date and also the status of the action. If
you select the save button it will save the changes which you have made against the
sample, whereas if you select the cancel/close button your changes will not be saved.
The last button on the screen allows you to examine evidence. This should take you
through to a screen of the unit relevant to the sample being taken out.
22. The unit screen from a learner portfolio will open and allow you to see any evidence
that is linked with this unit and also see what criteria it has been cross referenced to.
As the IQA you can select the evidence files to open and view them, when you return
to the unit mapping screen, the piece of evidence will have a magnifying glass
located underneath, it as a visual for yourself that you have looked at this piece of
evidence.
To view all of the criteria within the unit, you will need to select the plus icons
underneath the learning outcomes. By hovering over the criteria numbers it will
display the criteria.
23. If you are happy with all of the evidence that you have sampled and would like to
sign off the unit, this can be done at the bottom of the screen within the
confirmation unit.
If you continue to scroll down it will show you the criteria listed, if you don’t like
using the hovering feature.
When you close down the unit mapping screen and go back to your sample, any
evidence which you have opened, will be shown underneath examine evidence and
be linked now within your sample.
Now that you are closing down your sample, you can select your IQA Conclusion and
also whether the Assessor’s decision was correct or not. The final step will be to put
in your completed date and select the save button which will close down the
sampling pop up.
24. A Portfolio Sample allows you to create a sample covering several units at one time.
When you select “Add New Sample” you will be displayed with the sampling pop up.
The only difference is that you can select several units to sample at the same time.
You fill out the sampling pop up like normal but you will need to select which units
you would like to sample. The portfolio sample doesn’t only allow you to plan in
samples but you can continue with the sample from this screen also.
You fill out the sampling pop up like normal but you will need to select which units
you would like to sample, the portfolio sample doesn’t only allow you to plan in
samples but you can continue with the sample from this screen also.
You also have the option to show additional units. This allows you to sample units
that you haven’t selected on your sampling plan. Once the unit has been selected, it
will select the unit on your sampling plan.
25. Once you have created your sample, by entering the planned date and also the type,
the save button will be available.
After you select the save button, the sampling buttons will appear to the bottom left
hand side of the screen, allowing you to upload documents, and also add actions.
The change with portofolio samples happen when you select the Examine Evidence
button.
When you have selected the examine evidence button it will take you through to the
learner dashboard, allowing you to go and select the units which you want to sample,
and link them to the portfolio sample which you are taking out.
From the learner dashboard, you will need to select the unit titles, which then follow
the same process as taking out unit samples.
Once you have finished sampling the learner’s portfolio, you can then select close
portfolio in the top right hand side of the screen to take you back to your sample,
allowing you to add your feedback and set any actions that are necessary.
26. IQA Actions
The IQA Report gives you a clear view of all the Actions that have been set and also
what actions are outstanding.
Assessors can only send you feedback on an action; this is sent to you via email,
prompting you to go into the learner’s portfolio to check and then change the status
to in progress or completed.
You can access the IQA Report from your dashboard by selecting the IQA Report icon,
the icon also appears inside the sampling plan underneath the actions column.
Once the IQA Report has opened, you will have the learner assessment for units,
scrolling down you will be able to see the plan of units you have selected on your
sampling plan.
Any Units that are clear, have not got a planned or completed sample on. If the unit
is pink it is showing that there has been a planned or completed sample taken place.
27. If you select the unit that has a sample, it will display the sample on the screen for
you to view. You will also be able to see any of the actions that are outstanding or
completed.
You can edit the sample by selecting edit and making any changes that are relevant
and then selecting save
If you scroll down on the IQA Report to the bottom there is an area that displays all
outstanding actions.
Actions can be edited from this view also. When the button has been selected, a pop
up will be displayed showing the action details. If the Assessor has left feedback, that
will also be displayed inside the Assessor Feedback box.
The Target Date and status can only be changed by you as an IQA, the Assessor can
only leave feedback which is emailed to you directly.
28. Finally at the bottom of the IQA Report you also have the option to Export List. This
is a feature allowing you to export your IQA Report into a PDF Document showing all
of your samples, completed and planned.
IQA Auto Batching Rules
IQA Auto Batching Rules are a quick way that enables you to manage your sampling
plan after they have been created. This option can be found inside Learning
Sampling and then into IQA Auto Batching Rules.
Once your sampling groups have been set up in the first instance, you should never
have to go back and add learners to your sampling plan as they will automatically be
added.
The steps to create your Batching Rules are straight forward, if you select your
course, which assessors need to be taken into account, the option is available to be
specific on learner creation date and also for which Sampling Plan they should be
assigned too.
29. Exercise
You have 45 minutes to complete the Exercise listed below. You should be confident
in how to do this following your training session.
Firstly we will need you to set up your Sampling Group, calling your Sampling Group
something Standardised such as “Business Administration Level 2” Once you have
your Sampling Group set up, you will need to allocate learners to the plan.
The second task will be for you to open the Sampling Plan, select units against the
learners which you would like to sample. Can you now plan a sample in the future
against one of the learners.
Opening your sample, can you now set an action for the Assessor regarding
something you believe is relevant.
Finally can you access the IQA Report and find the sample which you have booked
for the future, edit the sample and save.
30. Additional Information
There is a support dashboard available for you when you are logged into the
portfolio, this can be accessed from any part of the portfolio using the grey tab at
the top of the screen.
Once you are inside the Support Dashboard you have access
to raise ticket, which is available for any support and also any
system issues that you are having.
You have a small area that allows you to view your recent
tickets that are in progress and view who the ticket is awaiting
an answer from.
In the main frame of the screen you have the opportunity to see
further Training Materials such as Videos and User Guides. These
are broken down into topics to help you find guidance for areas
you may need more assistance with.
An area for FAQ is also available, this allows you to see
frequently asked questions and how we would deal with the
issue.
31. The update section, allows you to see any changes we are making to
the system, there will be a guide or video available for you to see what
the change is and also how to use the new feature.
Book Training is also an option that is available for you; this is
free online training courses that will be delivered through Smart
Rooms. The times and dates that we have available will be
listed, if none of these are suitable you can book bespoke
training with the trainers