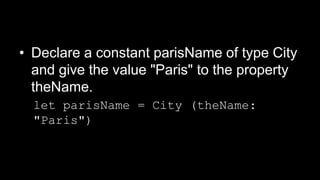
Downloaded 42 times


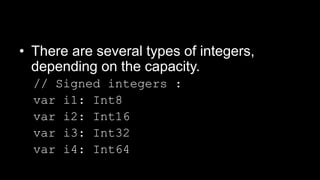

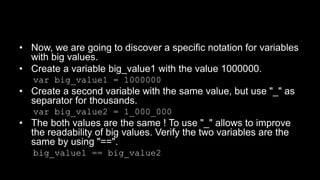


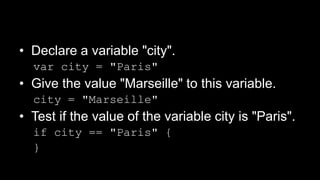

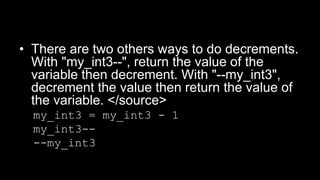


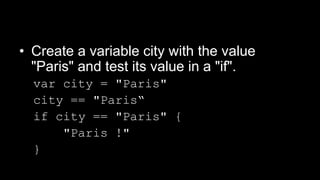


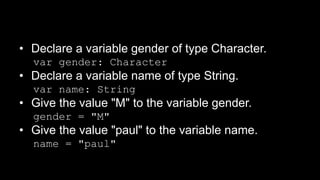


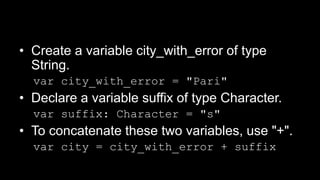

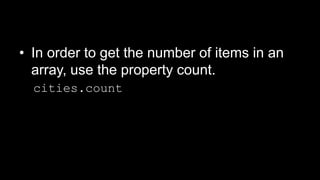
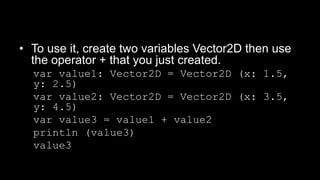
![• You have the choice between three
syntaxes to create an array.
var cities: Array<String>
var cities_1: String[]
var cities_2 = String[]()](https://image.slidesharecdn.com/swiftplayground-150307055112-conversion-gate01/85/Introduction-to-Swift-tutorial-67-320.jpg)
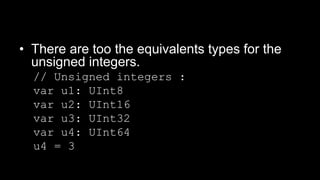
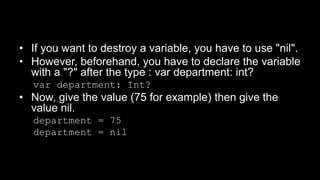
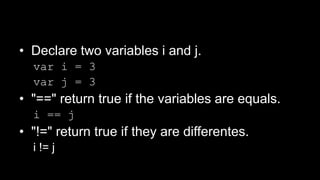
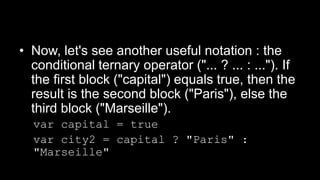
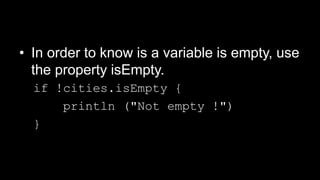
![• Create an array cities containing a list of
city names.
cities = ["Paris", "Lille", "Lyon"]
• Create a second array containing the
departments of these cities.
var department = [75, 59, 69]](https://image.slidesharecdn.com/swiftplayground-150307055112-conversion-gate01/85/Introduction-to-Swift-tutorial-68-320.jpg)
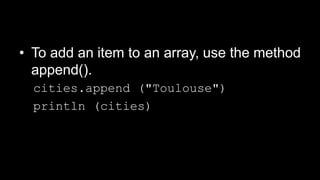
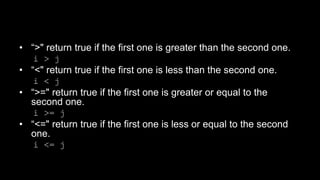
![• It's possible to add in one time several
items to an array. For this, use "+="
followed by an array containing the items
to add.
cities += ["Cannes", "Strasbourg"]
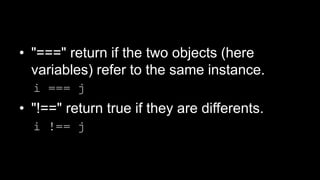
println (cities)](https://image.slidesharecdn.com/swiftplayground-150307055112-conversion-gate01/85/Introduction-to-Swift-tutorial-72-320.jpg)
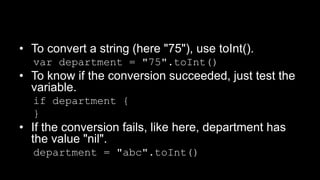
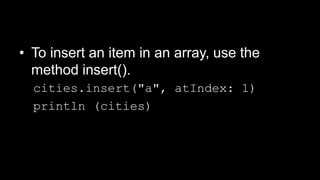
![• To display the value of an item of the array
(0 here, it's the first item of the array), use
[].
cities [0]](https://image.slidesharecdn.com/swiftplayground-150307055112-conversion-gate01/85/Introduction-to-Swift-tutorial-73-320.jpg)
![• To modify an item of the array, proceed as
below.
cities [0] = "Nantes“
println (cities)](https://image.slidesharecdn.com/swiftplayground-150307055112-conversion-gate01/85/Introduction-to-Swift-tutorial-74-320.jpg)
![• You can modify in one time several items.
Here, we modify the items of index 1 to 3.
cities [1...3] = ["x", "y", "z"]
println (cities)](https://image.slidesharecdn.com/swiftplayground-150307055112-conversion-gate01/85/Introduction-to-Swift-tutorial-75-320.jpg)
![• To get a sub-array, ie an array containing a
suitof items from another array, use : [ .. ].
cities [1..3]](https://image.slidesharecdn.com/swiftplayground-150307055112-conversion-gate01/85/Introduction-to-Swift-tutorial-76-320.jpg)
![• To get the index of the last item, use
endIndex. To extract the items from an
index (here 1) to the end of an array,
proceed as below. Attention, the result
doesn't include the last item indexed
(endIndex).
cities [1..cities.endIndex]](https://image.slidesharecdn.com/swiftplayground-150307055112-conversion-gate01/85/Introduction-to-Swift-tutorial-77-320.jpg)
![• You can create a new array from a set of
items from another array.
Array (cities [1..3])](https://image.slidesharecdn.com/swiftplayground-150307055112-conversion-gate01/85/Introduction-to-Swift-tutorial-78-320.jpg)

![• To merge two arrays, simply use the
concatenation with "+".
var cities1 = ["Paris",
"Marseille"]
var cities2 = ["Lyon", "Lille"]
cities = cities1 + cities2
println (cities)](https://image.slidesharecdn.com/swiftplayground-150307055112-conversion-gate01/85/Introduction-to-Swift-tutorial-85-320.jpg)

![• Declare a variable cities2 of type Dictionary,
with as key a String and as value an Int.
var cities2: Dictionary<String, Int>
• Declare a dictionnary with the syntax ["key":
value].
var cities = ["Paris": 75, "Lille":
59]
println (cities)](https://image.slidesharecdn.com/swiftplayground-150307055112-conversion-gate01/85/Introduction-to-Swift-tutorial-88-320.jpg)
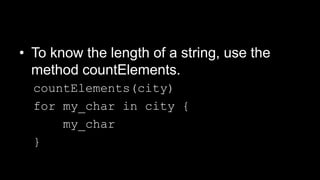
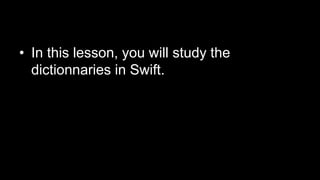
![• To change an item of the dictionnary,
specify the key between [] and attribute
the value.
cities ["Lyon"] = 69
println (cities)](https://image.slidesharecdn.com/swiftplayground-150307055112-conversion-gate01/85/Introduction-to-Swift-tutorial-89-320.jpg)
![• You can create an array from an entry of a
dictionnary.
var department = cities
["Marseille"]
println (department)](https://image.slidesharecdn.com/swiftplayground-150307055112-conversion-gate01/85/Introduction-to-Swift-tutorial-91-320.jpg)
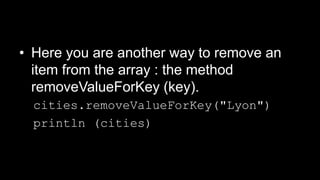
![• To remove an entry from a dictionnary, you
can attribute the value nil.
cities ["Marseille"] = nil
println (cities)](https://image.slidesharecdn.com/swiftplayground-150307055112-conversion-gate01/85/Introduction-to-Swift-tutorial-92-320.jpg)

![• To create an empty dictionnary, proceed like
this :
var cities = Dictionary<String, Int>
• To clean a dictionnary, you can attribute the
value [:].
cities = [:]
println (cities)](https://image.slidesharecdn.com/swiftplayground-150307055112-conversion-gate01/85/Introduction-to-Swift-tutorial-97-320.jpg)

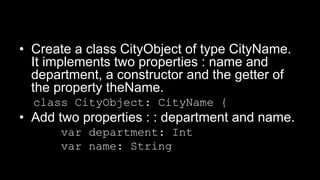


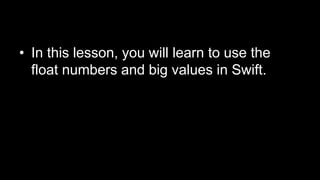
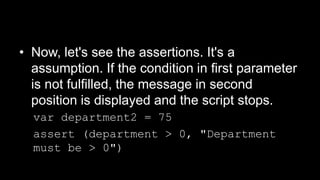
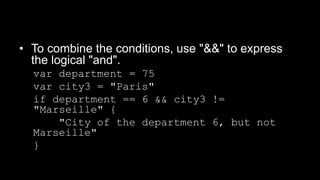
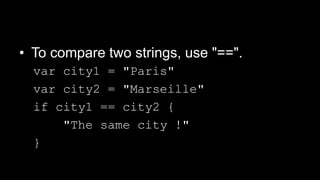
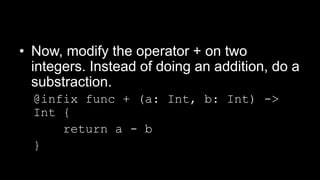
![• Create a generic type : Stack. It's a stack.
• Its shows that Stack will receive any type. <T> is the chosen type.
struct Stack<T> {
• This array will store the items.
var elements = T[]()
• The method push add a record to the array.
mutating func push(element: T) {
elements.append(element)
}
• The method pop returns the last value added to the stack and removes this item from the
array.
mutating func pop() -> T {
return elements.removeLast()
}
}](https://image.slidesharecdn.com/swiftplayground-150307055112-conversion-gate01/85/Introduction-to-Swift-tutorial-113-320.jpg)


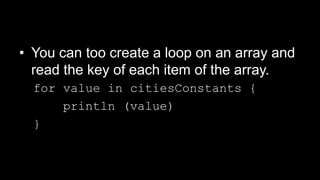
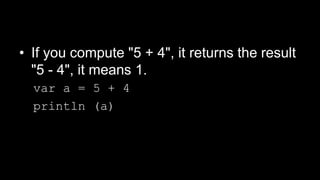
![• You can create a loop on an array and
read the value of each item.
• Create an array of Strings.
let citiesConstants = ["Paris": 75,
"Lille": 59]](https://image.slidesharecdn.com/swiftplayground-150307055112-conversion-gate01/85/Introduction-to-Swift-tutorial-117-320.jpg)
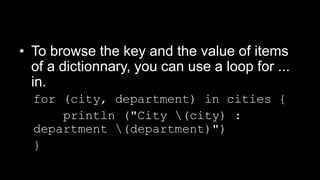
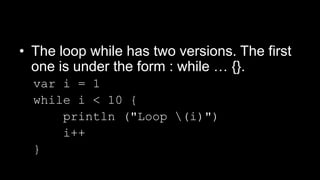
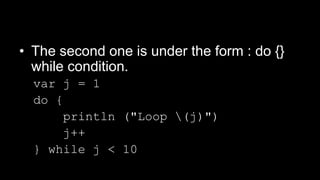
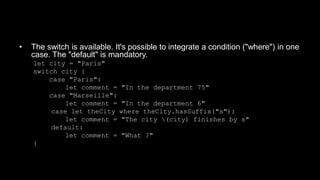
![• Or you can create a loop on an interval of values.
var cities = ["Paris": 75, "Lille": 59]
for (key, value) in cities {
println ("(key) = (value)")
}
for i in -1..1 {
println (i)
}](https://image.slidesharecdn.com/swiftplayground-150307055112-conversion-gate01/85/Introduction-to-Swift-tutorial-119-320.jpg)


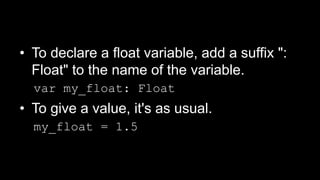
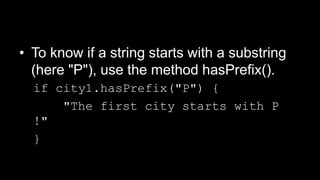
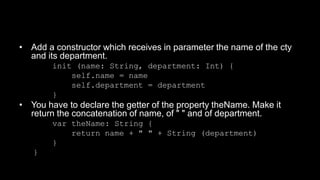
![• Extend the type Array by addig a method getFirst().
• Specify that we want to extend the type Array.
extension Array {
• Create a function getFirst() returning any type (Any).
func getFirst() -> Any? {
• Return the first item of the array.
return self [0]
}
}](https://image.slidesharecdn.com/swiftplayground-150307055112-conversion-gate01/85/Introduction-to-Swift-tutorial-146-320.jpg)
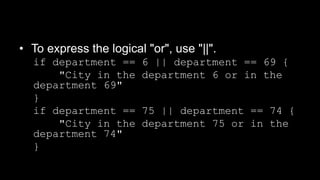
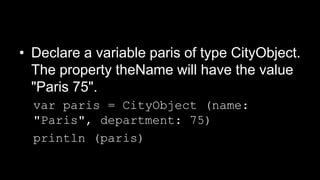
![• Create an array theCities and call the
method getFirst().
var theCities = ["Paris",
"Marseille"]
println (theCities.getFirst())
• The first item of the array is displayed in
the console.](https://image.slidesharecdn.com/swiftplayground-150307055112-conversion-gate01/85/Introduction-to-Swift-tutorial-147-320.jpg)


This document provides an introduction to the Swift programming language. It includes lessons on variables, constants, data types, operators, flow control, strings, arrays, dictionaries and other core concepts. Each concept is explained over multiple lines with examples provided for how to declare, assign values to, and manipulate various types of variables and objects in Swift code.